

Page 1

Installation Instructions
SYNCPRO II™
Publication 1902-IN001B-EN-E
Page 2
Important User Information
IMPORTANT
Solid-state equipment has operational characteristics differing from those of electromechanical equipment. Safety
Guidelines for the Application, Installation and Maintenance of Solid State Controls (publication SGI-1.1
your local Rockwell Automation sales office or online at http://www.rockwellautomation.com/literature/
important differences between solid-state equipment and hard-wired electromechanical devices. Because of this difference,
and also because of the wide variety of uses for solid-state equipment, all persons responsible for applying this equipment
must satisfy themselves that each intended application of this equipment is acceptable.
In no event will Rockwell Automation, Inc. be responsible or liable for indirect or consequential damages resulting from the
use or application of this equipment.
The examples and diagrams in this manual are included solely for illustrative purposes. Because of the many variables and
requirements associated with any particular installation, Rockwell Automation, Inc. cannot assume responsibility or
liability for actual use based on the examples and diagrams.
No patent liability is assumed by Rockwell Automation, Inc. with respect to use of information, circuits, equipment, or
software described in this manual.
Reproduction of the contents of this manual, in whole or in part, without written permission of Rockwell Automation,
Inc., is prohibited.
Throughout this manual, when necessary, we use notes to make you aware of safety considerations.
available from
) describes some
WARNING: Identifies information about practices or circumstances that can cause an explosion in a hazardous environment,
which may lead to personal injury or death, property damage, or economic loss.
ATTENTION: Identifies information about practices or circumstances that can lead to personal injury or death, property
damage, or economic loss. Attentions help you identify a hazard, avoid a hazard, and recognize the consequence.
SHOCK HAZARD: Labels may be on or inside the equipment, for example, a drive or motor, to alert people that dangerous
voltage may be present.
BURN HAZARD: Labels may be on or inside the equipment, for example, a drive or motor, to alert people that surfaces may
reach dangerous temperatures.
ARC FLASH HAZARD: Labels may be on or inside the equipment, for example, a motor control center, to alert people to
potential Arc Flash. Arc Flash will cause severe injury or death. Wear proper Personal Protective Equipment (PPE). Follow ALL
Regulatory requirements for safe work practices and for Personal Protective Equipment (PPE).
Identifies information that is critical for successful application and understanding of the product.
Allen-Bradley, Rockwell Software, Rockwell Automation, and TechConnect are trademarks of Rockwell Automation, Inc.
Trademarks not belonging to Rockwell Automation are property of their respective companies.
Page 3

Product Description
Table of Contents
Chapter 1
Introduction. . . . . . . . . . . . . . . . . . . . . . . . . . . . . . . . . . . . . . . . . . . . . . . . . . . . . . . 7
Related Documentation . . . . . . . . . . . . . . . . . . . . . . . . . . . . . . . . . . . . . . . . . . . . 7
Synchronous Motor Theory . . . . . . . . . . . . . . . . . . . . . . . . . . . . . . . . . . . . . . . . 8
Protection Theory . . . . . . . . . . . . . . . . . . . . . . . . . . . . . . . . . . . . . . . . . . . . . . . . . 9
Theory of Operation . . . . . . . . . . . . . . . . . . . . . . . . . . . . . . . . . . . . . . . . . . . 9
Optional Equipment . . . . . . . . . . . . . . . . . . . . . . . . . . . . . . . . . . . . . . . . . 10
Display/Metering Features. . . . . . . . . . . . . . . . . . . . . . . . . . . . . . . . . . . . . . . . 10
Typical Synchronous Starter Components . . . . . . . . . . . . . . . . . . . . . . . . . 11
Motor Contactor (M) . . . . . . . . . . . . . . . . . . . . . . . . . . . . . . . . . . . . . . . . 11
Motor Contactor Pilot Relay (CR1 or MR) . . . . . . . . . . . . . . . . . . . . 11
Field Voltage Relay (FVR) . . . . . . . . . . . . . . . . . . . . . . . . . . . . . . . . . . . . 11
Equipment Shutdown Relay (ESR) (Included with SyncPro II) . . 11
Phase Angle Transducer (Included with SyncPro II). . . . . . . . . . . . . 11
Discharge Resistor. . . . . . . . . . . . . . . . . . . . . . . . . . . . . . . . . . . . . . . . . . . . 12
Field Contactor (FC) . . . . . . . . . . . . . . . . . . . . . . . . . . . . . . . . . . . . . . . . . 12
Resistors Rf1 and Rf2 . . . . . . . . . . . . . . . . . . . . . . . . . . . . . . . . . . . . . . . . . 12
Analog/Digital Pulse Board . . . . . . . . . . . . . . . . . . . . . . . . . . . . . . . . . . . 13
Input/Output Descriptive Control . . . . . . . . . . . . . . . . . . . . . . . . . . . . . . . . 13
Listing. . . . . . . . . . . . . . . . . . . . . . . . . . . . . . . . . . . . . . . . . . . . . . . . . . . . . . . 13
Field Application. . . . . . . . . . . . . . . . . . . . . . . . . . . . . . . . . . . . . . . . . . . . . 14
Feedback . . . . . . . . . . . . . . . . . . . . . . . . . . . . . . . . . . . . . . . . . . . . . . . . . . . . 15
Fault Detection . . . . . . . . . . . . . . . . . . . . . . . . . . . . . . . . . . . . . . . . . . . . . . 15
Status . . . . . . . . . . . . . . . . . . . . . . . . . . . . . . . . . . . . . . . . . . . . . . . . . . . . . . . 16
Custom. . . . . . . . . . . . . . . . . . . . . . . . . . . . . . . . . . . . . . . . . . . . . . . . . . . . . . 16
Specifications . . . . . . . . . . . . . . . . . . . . . . . . . . . . . . . . . . . . . . . . . . . . . . . . . . . . 17
General. . . . . . . . . . . . . . . . . . . . . . . . . . . . . . . . . . . . . . . . . . . . . . . . . . . . . . 17
For Phase Angle Transducer. . . . . . . . . . . . . . . . . . . . . . . . . . . . . . . . . . . 17
PVc C400 Specifications. . . . . . . . . . . . . . . . . . . . . . . . . . . . . . . . . . . . . . . . . . 17
MicroLogix 1500 Specifications . . . . . . . . . . . . . . . . . . . . . . . . . . . . . . . . . . . 18
Receiving and Storage
Installation
Chapter 2
Receiving . . . . . . . . . . . . . . . . . . . . . . . . . . . . . . . . . . . . . . . . . . . . . . . . . . . . . . . . 21
Storage . . . . . . . . . . . . . . . . . . . . . . . . . . . . . . . . . . . . . . . . . . . . . . . . . . . . . . . . . . 21
Chapter 3
Arrangements. . . . . . . . . . . . . . . . . . . . . . . . . . . . . . . . . . . . . . . . . . . . . . . . . . . . 23
Component Level . . . . . . . . . . . . . . . . . . . . . . . . . . . . . . . . . . . . . . . . . . . . 23
Open Frame Configuration . . . . . . . . . . . . . . . . . . . . . . . . . . . . . . . . . . . 24
Grounding . . . . . . . . . . . . . . . . . . . . . . . . . . . . . . . . . . . . . . . . . . . . . . . . . . . . . . 25
Wiring Guidelines . . . . . . . . . . . . . . . . . . . . . . . . . . . . . . . . . . . . . . . . . . . . . . . 26
Summary . . . . . . . . . . . . . . . . . . . . . . . . . . . . . . . . . . . . . . . . . . . . . . . . . . . . . . . . 32
Rockwell Automation Publication 1902-IN001B-EN-E - April 2013 3
Page 4

Table of Contents
Chapter 4
Setup and Commissioning
Programming SyncPro II
Setup. . . . . . . . . . . . . . . . . . . . . . . . . . . . . . . . . . . . . . . . . . . . . . . . . . . . . . . . . . . . 33
RF1 & RF2 Resistor Setup . . . . . . . . . . . . . . . . . . . . . . . . . . . . . . . . . . . . 33
Procedure for Selection of Resistors . . . . . . . . . . . . . . . . . . . . . . . . . . . . . . . . 35
RF1 & RF2 Resistor . . . . . . . . . . . . . . . . . . . . . . . . . . . . . . . . . . . . . . . . . . . . . . 35
“RF” Resistor tap settings. . . . . . . . . . . . . . . . . . . . . . . . . . . . . . . . . . . . . . 35
Commissioning . . . . . . . . . . . . . . . . . . . . . . . . . . . . . . . . . . . . . . . . . . . . . . . . . . 36
Chapter 5
Overview . . . . . . . . . . . . . . . . . . . . . . . . . . . . . . . . . . . . . . . . . . . . . . . . . . . . . . . . 39
Main Menu . . . . . . . . . . . . . . . . . . . . . . . . . . . . . . . . . . . . . . . . . . . . . . . . . . . . . . 40
SyncPro II Status . . . . . . . . . . . . . . . . . . . . . . . . . . . . . . . . . . . . . . . . . . . . . . . . . 40
View Set Points . . . . . . . . . . . . . . . . . . . . . . . . . . . . . . . . . . . . . . . . . . . . . . . . . . 41
Set Point 1: Minimum Percent Synchronous Slip Frequency . . . . . 41
Set Point 2: Operating Frequency . . . . . . . . . . . . . . . . . . . . . . . . . . . . . . 42
Set Point 3: Function Number. . . . . . . . . . . . . . . . . . . . . . . . . . . . . . . . . 42
Set Point 4: Squirrel-Cage Protection Trip Time (at 95% speed). . 43
Set Point 5: Squirrel-Cage Protection Trip Time (at 50% speed). . 43
Set Point 6: Squirrel-Cage Protection Trip Time (at stall) . . . . . . . . 43
Set Point 7: Incomplete Sequence Trip Time Delay. . . . . . . . . . . . . . 44
Set Point 8: Power Factor Trip. . . . . . . . . . . . . . . . . . . . . . . . . . . . . . . . . 44
Set Point 9: Power Factor Trip Time Delay . . . . . . . . . . . . . . . . . . . . . 44
Set Point 10: Diagnostic Fault Mask. . . . . . . . . . . . . . . . . . . . . . . . . . . . 45
Edit Set Points . . . . . . . . . . . . . . . . . . . . . . . . . . . . . . . . . . . . . . . . . . . . . . . . . . . 45
Set Point 1: Minimum % Synchronous Slip Frequency. . . . . . . . . . . 45
Set Point 2: Operating Frequency . . . . . . . . . . . . . . . . . . . . . . . . . . . . . . 46
Set Point 3: Function Number. . . . . . . . . . . . . . . . . . . . . . . . . . . . . . . . . 46
Set Point 4: Squirrel-Cage Protection Trip Time (at 95% speed). . 47
Set Point 5: Squirrel-Cage Protection Trip Time (at 50% speed). . 47
Set Point 6: Squirrel-Cage Protection Trip Time (at stall) . . . . . . . . 47
Set Point 7: Incomplete Sequence Trip Time Delay. . . . . . . . . . . . . . 47
Set Point 8: Power Factor Trip. . . . . . . . . . . . . . . . . . . . . . . . . . . . . . . . . 47
Set Point 9: Power Factor Trip Time Delay . . . . . . . . . . . . . . . . . . . . . 48
Set Point 10: Diagnostic Fault Mask. . . . . . . . . . . . . . . . . . . . . . . . . . . . 48
Alarm History . . . . . . . . . . . . . . . . . . . . . . . . . . . . . . . . . . . . . . . . . . . . . . . . . . . 50
Access Code . . . . . . . . . . . . . . . . . . . . . . . . . . . . . . . . . . . . . . . . . . . . . . . . . . . . . 51
Settings. . . . . . . . . . . . . . . . . . . . . . . . . . . . . . . . . . . . . . . . . . . . . . . . . . . . . . . . . . 51
Chapter 6
Monitoring
4 Rockwell Automation Publication 1902-IN001B-EN-E - April 2013
Phase Angle/Power Factor . . . . . . . . . . . . . . . . . . . . . . . . . . . . . . . . . . . . . . . . 53
Faults . . . . . . . . . . . . . . . . . . . . . . . . . . . . . . . . . . . . . . . . . . . . . . . . . . . . . . . . . . . 54
Fault Detection and Diagnostics . . . . . . . . . . . . . . . . . . . . . . . . . . . . . . . 54
Power Factor Circuit Fault . . . . . . . . . . . . . . . . . . . . . . . . . . . . . . . . . . . . 54
Page 5

Chapter 7
Table of Contents
Troubleshooting
Spare Parts
Last Trip Table . . . . . . . . . . . . . . . . . . . . . . . . . . . . . . . . . . . . . . . . . . . . . . . . . . 55
Chapter 8
SyncPro II Spare Parts List . . . . . . . . . . . . . . . . . . . . . . . . . . . . . . . . . . . . . . . . 57
Rockwell Automation Publication 1902-IN001B-EN-E - April 2013 5
Page 6

Table of Contents
Notes:
6 Rockwell Automation Publication 1902-IN001B-EN-E - April 2013
Page 7

Product Description
IMPORTANT
Chapter 1
Introduction
The SyncPro II consists of a programmable small logic controller
(MicroLogix™ 1500) with the following additional peripheral items:
• PanelV iew™ Component Terminal C400
• Power Factor Transducer
• Analog/Digital Pulse Board
• Conditioning Resistors
• Interposing Relays FSR and ESR
The SyncPro II system is designed to provide supervisory protection and field
control to a brush-type synchronous motor controller, proper field application
timing, squirrel-cage protection against long acceleration and stall conditions as
well as running pullout protection by monitoring motor power factor. When
combined with a suitable induction motor protection relay, the SyncPro II
provides the necessary overload protection to the brush-type synchronous
motor.
Although the SyncPro II makes use of some standard MicroLogix 1500
programmable controller components, it is imperative that the controller is a
dedicated unit expressly for the control and protection of the field of a single
synchronous motor. The firmware and hardware configuration must only be
used for its designed purpose. Do not attempt to modify the controller in any
way for another use. No additional PLC control cards can be added nor should
the firmware/program be modified.
Related Documentation
The following publications contain information for components associated with
the SyncPro II.
Publicati on 2711C-IN001_-EN-P PanelView Component Terminal - Installation Instructions
Publicati on 1900-2.10
Publicati on 900-1.0
Publicati on SGI-1.1 Safety Guidelines for Application, Installation and Maintenance
Publicati on 1764-UM001_-EN-P
Rockwell Automation Publication 1902-IN001B-EN-E - April 2013 7
Measuring for Synchronous Motor Data
Synchronous Motor Control
MicroLogix 1500 Programmable Controller
Page 8

Chapter 1 Product Description
Synchronous Motor Theory
The synchronous motor is a commonly used industrial motor favored for its
higher efficiency, superior power factor, and low inrush currents. Typical
applications that benefit from the constant operating speed include refiners, head
box fan pumps, chippers, etc. Synchronous motors are particularly well suited to
low RPM applications. The synchronous brush-type motor is composed of a
three-phase stator winding, a DC rotor winding, and a squirrel-cage winding.
The stator winding is identical to that of an induction motor and, as such, the
direction of motor rotation depends on the rotation of the stator flux. The
direction can be changed by reversing two of the stator leads, just as it does with
induction motors.
The rotor contains laminated poles which carry the DC field coils that are
terminated at the slip rings. It also has a squirrel-cage winding composed of bars
embedded in the pole faces and shorted by end rings. The squirrel-cage winding
is also known as “damper” or “amortisseur” winding. This winding enables the
motor to accelerate to near synchronous speed so that the DC supply can be
applied to the field windings for synchronizing the motor to the line (typically
95%).
These field windings are connected through slip rings to a discharge resistor
during start up. The resistor is required to dissipate the high voltages that are
induced into the field windings from the stator, and it is removed from the circuit
when the DC field voltage is applied. The synchronous motor can be compared
to a transformer, with the three-phase stator resembling the primary and the field
winding acting like a secondary. Through this transformer action, an induced
voltage is generated in the motor field during starting. The induced signal can be
used to protect the squirrel-cage winding by monitoring the motor speed during
acceleration and to determine when the DC field can be excited for
synchronization. At zero speed, the frequency induced into the field is 60 Hz, at
95% speed the frequency induced is 3 Hz (for a 60 Hz system).
Once at 95% speed, the DC field is supplied with either 125 V DC or 250 V DC
and the discharge resistor is removed from the circuit. The excitation in the field
windings creates north and south poles in the rotor which lock into the rotating
magnetic field of the stator. The slip rings are used to connect the field windings
to the discharge resistor and static exciter. It is at these slip rings that the field
resistance of the motor can be measured to confirm the required field voltage and
current at rated power factor. If, for example, the field voltage is 125 V DC and
the current is 20 amps DC, then the resistance measured should be about 6 Ω,
based on Ohms Law.
8 Rockwell Automation Publication 1902-IN001B-EN-E - April 2013
Page 9

Product Description Chapter 1
Protection Theory
Theory of Operation
When the NOT STOP and START signals go high, an internal timer is started
(see Figure 4
start can be initiated. The timer is preset based on the slip frequency of the
motor. If the timer expires prior to achieving the maximum asynchronous speed,
the starting sequence will halt, the TRIP output will be dropped and the
PanelView will display a message indicating the faulted condition. The TRIP
signal is restored when there are no faults and the Fault/Reset PB input is
received.
NOTE: The NOT STOP and START can be tied together to indicate a RUN
condition to control the device without separate signals. The RUN output
follows the start input if the motor is permitted to start, (i.e. no faults and the
EQUIPMENT SHUTDOWN is high).
If the programmed percentage of synchronous speed is obtained within set time
limits, the FIELD RELAY is energized. The power factor is now monitored and
displayed on the PanelView. If the power factor drops below the programmed
values, the TRIP and FIELD RELAY outputs will be dropped and the
PanelView 300 will display a message indicating the faulted condition. Under
normal conditions the FIELD RELAY is maintained until the NOT STOP
signal is removed.
and Figure 5). The START signal must be dropped before another
The slip frequency is calculated from a square wave input representing the slip
frequency. Based on this frequency, the allowable starting time is calculated. This
calculation is based on three set points which are entered by the user, as well as a
‘function order’ used to shape the curve. The three required set points for
squirrel-cage protection trip time are:
• Set Point 4: at synchronizing = 95%
• Set Point 5: at 50% speed
• Set Point 6: at stalled
The time curve between stalled frequency and 50% speed is assumed to be linear.
The time between 50% speed and the synchronizing speed is to the nth order
such that unity makes it linear, 2-5 makes it exponential in nature. The higher the
order, the shorter the times near to 50% speed and the higher the times near the
synchronous speed set point (i.e. bottom of curve (time vs. frequency) is flatter
and then rises more steeply).
NOTE: If the time set point at the maximum programmed percentage of
synchronous speed is set below that of the extended stall (i.e. 50% speed curve),
the function between 50% speed and synchronous speed will also be treated as
linear. (For example, the slope between 50% speed and synchronizing speed is
flatter than the slope between stalled and 50% speed).
Rockwell Automation Publication 1902-IN001B-EN-E - April 2013 9
Page 10

Chapter 1 Product Description
When the maximum programmed percentage of synchronous speed (set point) is
obtained, the field coil is energized on the falling pulse of the negative square
wave (i.e. a rising sinusoid) from the slip frequency generator. A fixed time period
after synchronization, the autoload signal is raised. The field coil is energized
only if the TRANSITION COMPLETE has been received.
Display/Metering Features
Squirrel-Cage Winding Protection Protects the squirrel-cage winding from long acceleration and stall
conditions during starting.
Field Winding Application Control The signal that triggers application of the field excitation when the
programmed asynchronous speed is obtained.
Incomplete Sequence Timing Relay Trips the system if the overall starting time is exceeded.
Pull Out Protection Monitors the lagging power factor during running to detect a loss of
synchronism
Fiel d Voltage Failure Rel ay Input Monitors the condition of the static exciter output. This relay must be
supplied by the customer if the SyncPro II is not supplied as a configured
unit within an Allen-Bradley motor controller.
Optional Equipment
• Field Current Failure Relay
• Load and Unload Auxiliary Contacts – The outputs are energized 2 sec.
after the field is applied and is maintained until the field is removed.
The product in conjunction with the PanelView 300e Micro Terminal (PV) will
perform the following metering/display functions:
• display all detected fault conditions
• display the slip frequency and starting time during startup
• display the power factor during run mode.
• accept set points for the following:
– maximum % asynchronous speed [% of synchronous speed]
– power factor set point and trip delay
– maximum allowable time at stalled state (maximum slip
– maximum allowable time at 50% speed
– maximum allowable time at synchronizing speed (typically at 95%
speed)
– function order (allows adjustment of the slope of the acceleration/stall
time trip curve).
– incomplete sequence timer trip delay
– fault mask for PF transducer diagnostics
Refer to Chapter 5
10 Rockwell Automation Publication 1902-IN001B-EN-E - April 2013
for complete details.
Page 11

Product Description Chapter 1
Typical Synchronous Starter Components
Motor Contactor (M)
The following details outline some of the common components that which the
SyncPro II can be connected to, or are part of the SyncPro II protection package.
The motor contactor is used to provide and switch the power supplied to the
motor stator. It is controlled by the SyncPro II package and is necessary to remove
stator power in the event of a stop command or a trip condition. Two normally
open contactor auxiliaries may be required; one mandatory N.O. contact to give
contactor status information to the SyncPro II, and one may be needed as a holdin contact for the main control circuit.
Motor Contactor Pilot Relay (CR1 or MR)
This interposing relay allows the SyncPro II output to pick up the main contactor
coil. The power requirements of the pick-up coils used in most medium voltage
motor starters would exceed the switching capability of the 1764-24BWA output
contact.
Field Voltage Relay (FVR)
When energized, this DC relay indicates that the DC exciter supply is healthy
and producing an adequate level of DC excitation. The field voltage relay is
required to prevent starting the motor unless DC excitation is available. A field
voltage relay is recommended as the SyncPro II does not have the ability to
determine the level of the exciter output voltage. It is needed to prevent
unnecessary starts when synchronization cannot occur.
Equipment Shutdown Relay (ESR) (Included with SyncPro II)
The ESR relay combines the status of customer supplied protective and interlock
devices to a single contact input on the SyncPro II.
When ESR is energized, it is an indication that all external trip and interlock
contacts to the SyncPro II are in a "not tripped" condition. All external trips and
interlocks must be wired in series with the ESR coil in order to be properly
addressed by the SyncPro II.
Phase Angle Transducer (Included with SyncPro II)
The phase angle transducer provides a conditioned 4...20 mA signal to the analog
module of the SyncPro II system. The transducer is factory calibrated to provide a
specific output at zero (0) lagging power factor, at 1.0 or unity power factor, and
at zero (0) leading power factor. These factory settings must not be altered.
Rockwell Automation Publication 1902-IN001B-EN-E - April 2013 11
Page 12

Chapter 1 Product Description
The SyncPro II processor scales and interprets this signal to compare it to the
power factor trip set point and to cause a trip to occur if the power factor drops
below the programmed value for more than the specified power factor trip time
delay. If the DC excitation is lost, a low voltage condition exists, or the motor is
being overloaded to a point where the motor can no longer maintain
synchronous speed, the motor power factor will react by dropping to a very
lagging value. This indicates that the motor is slipping poles and the controller
should be shut down to protect the motor.
The phase angle transducer monitors voltage across lines 1 and 2, along with the
current in line 3 to obtain a power factor reading. When the reading is below the
set points programmed, the SyncPro II will shut down the starter.
Discharge Resistor
The discharge resistor is specified by the motor manufacturer for a specific
application to obtain correct starting and pull in torques and to provide a means
of discharging the motor induced field voltage when starting and stopping the
motor. The field winding has more turns than the stator winding and when
power is applied to the stator, the field acts like the secondary windings of a
current transformer. A field winding without a discharge path will produce a
voltage greater than its insulation rating, and as such, requires a means to
discharge or limit the voltage. If the discharge resistor is not connected during a
start, the induced voltage can build to a point where the field winding insulation
can be damaged. The resistor is also used to provide reference points to the
SyncPro II synchronous motor protector (see Chapter 4
).
Field Contactor (FC)
The field contactor provides two normally open and one normally closed power
poles. The normally open contacts apply DC power to the motor field windings
when the contactor is energized. Prior to energization and after de-energization,
the normally closed pole makes the path to the discharge resistor to allow the
dissipation of energy induced in the field during starting. It also provides a path
to discharge the stored energy in the large inductive motor field winding on
stopping of the motor.
Resistors RF1 and RF2
These resistors are used to attenuate the voltage which reaches the analog/digital
pulse board. Set up of these resistors is important because if the signal voltage to
the board is too low (too much resistance) then pulses will not be produced. If
too little resistance is used, the voltage may be too high which could damage the
analog/digital pulse board (see Figure 10 on page 33
).
12 Rockwell Automation Publication 1902-IN001B-EN-E - April 2013
Page 13

Product Description Chapter 1
IMPORTANT
Analog/Digital Pulse Board
This board converts the voltage sinusoidal waveform across the discharge resistor
and, by examining the zero crossings, creates a digital pulse train of an equal
frequency to the induced slip frequency occurring in the discharge resistor. At
start (zero speed), the frequency will be 60 Hz, at 95% speed, the frequency will
be 3 Hz (for a 60 Hz system). This feedback is used by the SyncPro II to
determine the speed of the motor at any time during acceleration and when the
motor has reached the desired speed set point to synchronize.
Input/Output Descriptive Control
Listing
NOT STOP INPUT (I:2/0)
This signal must be maintained high for the SyncPro II to operate. When the
signal is taken low, the software identifies this as a normal stop for the motor.
The SyncPro II does NOT have control over stopping the motor. The main
portion of the motor controller performs this control function.
The NOT STOP signal must be given in parallel to that of the hardware, i.e.
from the same PLC output or push button.
START INPUT (I:2/1)
The rising edge of this signal starts the operation of the SyncPro II. This signal is
maintained high for two-wire control or may be dropped after initial starting if
three-wire control is used. In both cases, this signal controls the START output.
After a fault has occurred, this input must be taken low before another start
command will be recognized (see Figure 4
RUN OUTPUT (O:0/1)
and Figure 5).
This output is used to control motor starting. It is the START input conditioned
by all permissives. That is to say that this output will follow the state of the input
as long as all permissives are met. Thus in two-wire control, this output is actually
a RUN command and will stay high until either a fault occurs or a stop is issued.
In three-wire control the output is maintained only as long as the input is
maintained, a fault occurs, or a stop is issued.
Rockwell Automation Publication 1902-IN001B-EN-E - April 2013 13
Page 14

Chapter 1 Product Description
EQUIPMENT SHUTDOWN RELAY (ESR) INPUT (I:2/7)
This fault input is used to group all external faults. It notifies the SyncPro II that
the system has stopped for an external reason. The SyncPro II will send a message
indicating the reason for the stoppage. In the normal state this signal is held high,
going low on a fault condition. While this signal is low, a start signal will not be
accepted. Typically, all emergency stops or external faults (i.e. overloads, motor
protection relays) will be wired to an ESR relay. This relay is then fed into the
SyncPro II for logging and control and also tied into the hardware to stop the
motor.
TRIP OUTPUT (O:0/0)
This output is high during normal conditions. When the SyncPro II detects a
fault, the output goes low and the SyncPro II stops the motor
typically wired into the ESR circuit. It will be set high when there are no faults
and the FAULT RESET PB is momentarily raised high.
. The trip output is
Field Application
TRANSITION COMPLETE CONTACT INPUT (I:2/6) (OPTIONAL)
The field relay output will not be energized until this input permissive is given. Once
the field relay is picked up, this permissive is no longer required. If the permissive
is not given prior to the squirrel-cage protection timing out or the incomplete
sequence timing out, the SyncPro II will fault and stop the motor.
If unused, it must be tied high. This input is intended for an external input such as
the RUN contact of an autotransformer starter. It prevents synchronization until
the autotransformer starter has first transitioned to full voltage RUN mode.
FIELD RELAY OUTPUT (O:0/2)
This output controls the field contactor relay which applies the field to the
motor. This output is energized when the transition complete permissive is given
and the synchronous setpoint has been reached. The field is then applied either on
the rising waveform or after a fixed time period of one second if the motor
synchronizes on reluctance torque. The output is dropped whenever the NOT
STOP is removed, the EQUIPMENT SHUTDOWN RELAY is removed, or a
fault is detected.
14 Rockwell Automation Publication 1902-IN001B-EN-E - April 2013
Page 15

Product Description Chapter 1
Feedback
MOTOR CONTACTOR FEEDBACK CONTACT INPUT (I:2/8)
This input indicates to the SyncPro II that the motor contactor is closed,
confirming that the motor is running. It also allows the SyncPro II to detect a
fault in the contactor circuit.
FIELD CONTACTOR FEEDBACK CONTACT INPUT (I:2/5)
This input indicates to the SyncPro II that the field contactor has picked up,
confirming that the field has been applied. (The signal must come from the
auxiliary of the coil which ultimately applies the field, i.e. contactor.) If missing,
the SyncPro II detects a fault in the field circuit.
TRIP/RESET PB INPUT (I:2/2)
This input from the push button on the panel will reset any fault condition in the
SyncPro II. Once no fault exists, the fault condition will be removed from the
PanelView and the TRIP output will be set.
Fault Detection
FIELD VOLTAGE RELAY INPUT (I:2/3)
When the signal is low, it indicates a lack of field voltage. This input is monitored
for a fault condition only while starting, prior to applying the field. Tie this input
high if it is not used. When this contact is high, it verifies that the static exciter is
providing an appropriate DC voltage.
FIELD CURRENT RELAY INPUT (I:2/4) (OPTIONAL)
When the signal is low, it indicates a lack of field current. This input is monitored
for a fault condition after the field has been applied. Tie this input high if it is not
used. This optional input verifies there is DC current flowing from the static
exciter to the motor field. It is redundant since the power factor trip feature will
trip if the field current is lost.
POWER FACTOR INPUT (I:1/0)
The signal supplied to the SyncPro II is from the Phase Angle Transducer,
representing a power factor of zero (0) lagging to zero (0) leading respectively.
Note that the SyncPro II firmware has been tailored to this specific transducer.
No substitution is allowed.
Rockwell Automation Publication 1902-IN001B-EN-E - April 2013 15
Page 16

Chapter 1 Product Description
SLIP GENERATOR POWER INPUT (I:0/1)
This fault input is monitored during idle and starting periods. It is normally held
high by the power supply to the Slip Pulse Generator.
SLIP GENERATOR NEGATIVE INPUT (-) (I:0/0)
Connect to the negative terminal (N) of the Slip Pulse Generator.
SLIP GENERATOR POSITIVE INPUT (+) (I:0/2)
Connect to the positive terminal (P) of the Slip Pulse Generator.
Status
AUTO LOAD OUTPUT (O:0/3)
Output is energized two seconds after the field is applied and remains closed
until the field is removed from the motor by a stop or a fault.
SCP TRIP OUTPUT (O:0/8)
Output is set high when a Squirrel-Cage Protection Fault occurs. It is reset when
the TRIP output goes high after pushing the reset button. This signal can be used
for indication, via a pilot light, or it can be used as an optional trip output.
MOTOR PULLOUT TRIP OUTPUT (O:0/9)
Output is set high when the power factor lags for longer than the programmed
trip time delay indicating that the motor has pulled out. It is reset when the TRIP
output goes high after pushing the reset button. This signal can be used for
indication, via a pilot light, or it can be used as an optional trip output.
INCOMPLETE SEQUENCE TRIP OUTPUT (O:0/10)
Output is set high when an Incomplete Start Sequence Fault occurs. It is reset
when the TRIP output goes high. This signal can be used for indication, via a
pilot light, or it can be used as an optional trip output.
Custom
I:2/10 to I:2/15 are custom fault inputs. If any are true, they trip the unit off.
16 Rockwell Automation Publication 1902-IN001B-EN-E - April 2013
Page 17

Product Description Chapter 1
Specifications
General
Operating Power
Input Line Voltage 120V AC, 50/60 Hz
Input Current 0...5 A
Temperature and Humidity
Temperature
(Maximum Ambient)
Humidity 5...95% (non-condensing)
Operating: 0...40ºC (32...104ºF)
Storage: -20...65ºC (-4...149ºF)
Maximum temperature: 40 ºC (104 ºF)
For Phase Angle Transducer
General
Accuracy 3% span
Housing Flame retardant plastic case
Weight 2.4 kg maximum
Climate
Storage -20...70 ºC (-4...158 ºF)
Temperature range Operational at 0...60 ºC (32...140 ºF)
Calibrated at 23 ºC (73 ºF)
Humidity Up to 95% relative humidity, non-condensing
Input
Frequency 50/60 Hz
Current 0.2...10 A
Range (A) 20...120%
Burden 5 VA maximum
Voltage 115...230V, ±10%
Range (V) ±20% (20...120% with separate auxiliary)
Overload Capacity
Six times rated current for 30 s
1.25 rated voltage for 10 s
Electrical Tests
Dielectric Test 2 kV RMS per BS 5458
Impulse Test 5 kV transient as BEAMA 219 and BS 923
Surge Withstand ANSI C37-90A
Certification CSA Approved
Burden 1 VA maximum
PVc C400 Specifications
MicroLogix 1500 Specifications
See Publication 2711C-IN001_-EN-P, pages 30...31.
See Publication 1764-UM001_-EN-P, Appendix A.
Rockwell Automation Publication 1902-IN001B-EN-E - April 2013 17
Page 18

Chapter 1 Product Description
Notes:
18 Rockwell Automation Publication 1902-IN001B-EN-E - April 2013
Page 19

Receiving and Storage
IMPORTANT
Chapter 2
Receiving
Storage
Upon receiving the controller, remove the packing and check for damage that
may have occurred during shipping. Report any damage immediately to the
claims office of the carrier.
If the SyncPro II is an integral component of a brush-type synchronous starter,
special receiving and handling instructions will apply. For details, refer to the
service manual provided with the equipment.
It is important to consider the following storage requirements if you are not
installing your controller immediately after receiving it.
• Store the controller in a clean, dry, dust-free environment.
• Storage temperature must be maintained between -20...65 °C (-4...149 °F).
• Relative humidity must not exceed 95%, non-condensing.
Rockwell Automation Publication 1902-IN001B-EN-E - April 2013 21
Page 20

Chapter 2 Receiving and Storage
Notes:
22 Rockwell Automation Publication 1902-IN001B-EN-E - April 2013
Page 21

Installation
Chapter 3
Arrangements
The SyncPro II is offered in three arrangements.
Component Level
The SyncPro II may be ordered as individual components for maximum
flexibility when installing the controller. The user may then mount the
components in a configuration most suitable to his main motor controller
equipment layout. Care must be exercised to ensure the SyncPro II processor has
adequate ventilation provided around it. Refer to Figure 6
the components.
Figure 1 - SyncPro II Component Configuration
for typical wiring of
Rockwell Automation Publication 1902-IN001B-EN-E - April 2013 23
Page 22

Chapter 3 Installation
IMPORTANT
18.02 [458]
16.75 [425]
13.29
[338]
18.95
[481]
20.00
[508]
0.38[10]
13.75[349]0.63 [16]
0.36 [9] dia.
(4) Mounting Holes
5.1
[113]
Front View
Side View
Open Frame Configuration
The SyncPro II components are mounted on a panel, except the PanelView
display module and the illuminated push button for trip indication and reset
function. See Figure 2
installation within the main controller is possible with this arrangement.
Figure 2 - Mounting Dimensions
for mounting dimensions of the main unit panel. Quick
The PanelView is supplied with a two-meter cord for connection with the
SyncPro II processor. Mount the PanelView in a suitable location to make this
connection.
24 Rockwell Automation Publication 1902-IN001B-EN-E - April 2013
Page 23

Figure 3 - Component Layout
Bul. 1606 DC Power Supply
FSR, ESR Relays
SyncPro II
Phase Angle Transducer
Terminal Blocks
Analog/Digital Pulse
Conver ter Board
Conditioning Resistors,
RF1 and RF2
Installation Chapter 3
Grounding
Integral to a completed low voltage or medium voltage controller
The SyncPro II is also available as a component of a Rockwell Automation/AllenBradley synchronous motor controller, incorporating the components shown in
Figure 3
remain the same.
The grounding required by the SyncPro II panel has been brought to a common
grounding bar mounted on the panel. It is important that once the unit is installed,
that this grounding bar is wired to the starter ground bus. It is important that a proper
ground is made as the SyncPro II has a number of low voltage signals which, if not
properly grounded, may be vulnerable to noise causing erratic operation.
. Although the layout in the starter is different, control and functionality
Rockwell Automation Publication 1902-IN001B-EN-E - April 2013 25
Page 24

Chapter 3 Installation
Wiring Guidelines
The SyncPro II can accept either two- or three-wire control. The control chosen
will determine the configuration of the control hardware. Consider the following
two inputs and single output when selecting the type of control:
I:2/0 NOT STOP input
I:2/1 START input
O:0/1 RUN output
If using two-wire control, the two inputs (I:2/0 and I:2/1) are tied together.
They are both low in order to stop the SyncPro II (see Summary
on page 32) and
both high in order to run the device. To start the device after a fault, the START
input (I:2/1) must be taken low and then closed again. In this configuration, the
RUN output acts as a run command (see Figure 4
).
If using three-wire control, the NOT STOP input must be maintained high in
order to run the device. Momentarily opening this input will cause the SyncPro II
to stop (see Summary
on page 32). Momentarily closing the START input will
start the SyncPro II (given that all permissives are satisfied). In this configuration,
the RUN output acts as a start command (see Figure 5
Figure 4 - Two-wire Control
).
In both cases, the RUN output will follow the state of the START input,
provided that all starting conditions are met. Note that in all cases, stopping the
motor is done via the hardwired control circuit logic, and notification only is
given to the SyncPro II.
Figure 4
shows a typical two-wire control circuit. The selector switch is used to
control the NOT STOP and the START as a pair. It is also used to ensure the
motor is stopped via the hardwired control circuit logic, (even though in this case
the RUN output will be removed when the selector switch is turned off ).
26 Rockwell Automation Publication 1902-IN001B-EN-E - April 2013
Page 25

Installation Chapter 3
The ESR circuit ensures the motor is stopped for any fault condition occurring
either externally or when detected by the SyncPro II. Once the ESR has dropped
out (detected by the loss of I:2/7), the selector switch must be switched off and
on to initiate a start. This prevents a premature start if the fault condition is
cleared and the selector switch is still in the run position.
Figure 5
shows a typical three-wire control circuit. The STOP PB must be
maintained high in order to initiate a start and to run the system. The button also
ensures that the motor is stopped via the hardware circuit. The momentary
START PB is used to create a RUN (START) output signal of the same duration
as the input signal as long as there are no faults detected by the SyncPro II.
Figure 5 - Three-wire Control
Rockwell Automation Publication 1902-IN001B-EN-E - April 2013 27
Page 26

Chapter 3 Installation
L1
____V AC, 3Ø, __Hz
ISOLATING SWITCH
DOOR INTERLOCK
CURRENT LIMITING
GRDL2 L3
POWER FUSES
R1
R2
(-)
(+)
F1
F2
G
NPC
V
(+)
PULSE CONVERTER
ANALOG/DIGITAL
R
W
BLK
(-)
DANGER
AUTOMATICALLY.
SEVERE INJURY OR DEATH.
OF LOAD CAN RESULT IN
UNEXPECTED ENERGIZATION
RESETTING ANY DEVICE.
CONTROL SIGNAL BEFORE
REMOVE MAIN CONTACTOR
CONTROLLER
MAY AUTOMATICALLY
RESET OR RESETS
START/RE-START AFTER
A PROTECTIVE DEVICE IS
!
REFER TO DIMENSION DRAWING FOR COMPONENT SIZING NOT SHOWN ON THIS DRAWING.
REMOTE EQUIPMENT
LOW VOLTAGE DOOR MOUNTED DEVICE
"IEEE" NUMBER FOR PROTECTIVE DEVICE
CUSTOMER
WIRING
NOTESNOTESNOTES
D
LEGENDLEGENDLEGEND
SYNCHRONOUS
MOTOR
MPS
COM
INPUT 1
INPUT 2
Y1-
Y12
Y14
RX
BUL. 825P MODULAR PROTECTIVE SYSTEM
AUX 2
CBCT
PTC
(THERMISTOR)
INPUT
ALARM
AUX 1
TO MCM
COMCOM
INPUT 3INPUT 3
INPUT 5INPUT 5
INPUT 4INPUT 4
OUTPUTOUTPUT
ANALOGANALOG
5454
4343
4444
5353
3333
3434
I-I-
I+I+
6363
6464
Y26Y26
Y22Y22
Y24Y24
Y2-Y2-
120 V PIO OPTION CARD
AUX
AUX
AUX
AUX
TRIP
24
S1
S2
13
23
14
A2-
98
95
96
A1+
T1
T2
3
4
5
6
FRONT PANEL
LOCAL PROGRAMMING
PORT
POWER
FAILSAFE
FAILSAFE
NON
RS232
POWER APPLIED. THE FOLLOWING FACTORY INSTALLED
OUTPUT RELAY CONTACTS SHOWN WITHOUT CONTROL
BUL.825P TO BE PROGRAMMED BY THE CUSTOMER
AUX.1/ALARM - NON FAIL SAFE
CONTACT POWER-UP STATES ARE IN EFFECT:
BEFORE START-UP.
AUX.2 - NON FAIL SAFE
TRIP - FAIL SAFE
BUL.825P NOTES:
D
2
1
46
35
CONVERTER MODULE
BLK
W
PRIMARY FUSES
CURRENT LIMITING
FROM RECTIFIER ASSEMBLY
SHT.2, LINE K-238
FROM SHT.4
LINE H-415
FROM RECTIFIER ASSEMBLY
SHT.2, H-238
LINE C-301
BLK
B
R
W
DEVICENET
OPTION CARD
TO DEVICENET NETWORK
RTD 1 - RTD 12
BUL.825P RTD MODULE
MPSRTD
+
23
+
24
N
240VAC
120VAC
N
25
26
NOT USED
19
20
21
22
FIBRE OPTIC
CONNECTOR
SHOWN ON SHT.3
500M MAX.
L3
L2
L1
N
PHASE
VOLTAGE
INPUT
MIO OPTION CARD
(OPTIONAL)
AND/OR PROTECTION RELAYS.
WILL OVERRIDE METERING DEVICES
USE OF SHORTING TERMINAL BLOCK
CAUTION:
SHORTING
TERMINAL
BLOCK
BLK
W
PHASE ANGLE TRANSDUCER
BLK
W
V
VA
V
DANGER
INDUCED FIELD VOLTAGES
HIGH VOLTAGE
CONTACT WITH
SYNCHRONOUS MOTOR
EXCEED 1000 VOLTS.
STARTING AND MAY
IN SEVERE INJURY.
FIELD CONNECTED
COMPONENTS CAN RESULT
OR DEATH
ARE PRESENT DURING
!
LIVE CIRCUIT
MORE THAN ONE
DANGER
!
LINE B-202
3 PHASE
H3
X3
H1
H2
X1
X2
VV
VV
TO SHT.3
TO SHT.2
TO SHT.3
LINE D-331
FROM SHT.3
LINE E-337
LINE N-302
TO SHT.3
LINE C-318
TO SHT.3
LINE D-330
90
91
VB
PT
____ ____
120 120
FFF__E __E __E
VCVBVA
____
120
500
CPT
VAA
VCA
F5
1.0AF51.0A
47A
46B
44A
42A
STB
PAT
1
12
52
1
12
51
__EF2
6
__EF2
5
ISa
7
46A
47
46
44
42
CM
GFCT
100:1
113
1L2A
1L1A
104
103
M
101
RF
102
RF
105
A/DPC
F1
F2
CT1
CT3
CT2
T3
T2
T1
RD
304
F1
F1
F1
IS
Figure 6 - Typical Wiring A
28 Rockwell Automation Publication 1902-IN001B-EN-E - April 2013
Page 27

Figure 7 - Typical Wiring B
DOOR MOUNTED POTENTIOMETER IS USED TO ADJUST THE MOTOR FIELD
CURRENT UP TO THE MAXIMUM VALUE.
FIELD CURRENT SETTINGS:
HIGH TEMPERATURE WIRE
NOTES
LEGEND
(-)
RECTIFIER TRANSFORMER
LIMITING FUSES
PRIMARY CURRENT
BOARD
SWITCH
FIELD
SNUBBER
SECONDARY FUSES
TB2
SW1
PSRB
115 230
FU
4
POT
AMMETER
DC
COMMAND
DOOR
2+1
-
687
3
FIELD CURRENT
MAX. LIMIT POT.
COMMAND
REMOTE
FIRING
9
5
10
TB3
4
5
TB1
132
ENABLE
REMOTE
R56
(0.5V)
(0-10V)
(0-10mA)
COM
SIG
+10V@10mA
COM
SIG
+10V@10mA
CONTROL
VOLTAGE
SELECTOR
SWITCH
(+)
BOARD
SCR FIRING
SINGLE PHASE
FCRO4100
DISCHARGE RESISTOR
SWITCH
HEATSINK
THERMOSTAT
RECTIFIER ASSEMBLY
RECTIFIER
STACK
+
DC AMMETER
FROM SHT.3
LINE D-319
FOR 125VDC EXCITER OUTPUT JUMPER X1-X3, X2-X4 FOR 160V AC.
FOR 250V DC EXCITER OUTPUT JUMPER X2-X3 FOR 320V AC
SCR+X2
SCR-X1
BLK
W
BR
BR
R
-
(7)
(4)
R
W
(5)
(2)
(6)
(3)
BLK
(NOT USED)
THERMOSTAT
24 VAC
THERMOSTAT
687
534
687
534
1
2
1
2
J9
MOV
THERMOSTAT
NEG-K
2
21
J7
1
- BUS
34
3
4
656
5
NEG-G
R2-K
R2-G
MOV
(3)
6
4
5
3
12
7
THERMOSTAT
+ BUS
(NOT USED)
(NOT USED)
(NOT USED)
MOV
L1
L2
2
P8
J8
1
3
4
657
8
RST
L3
8
(3)
R
R
R2
(1)
+
G
K
(7)
(6)
(1)
X2
(5)
(4)
G
K
SCR-X2
(2)
K
G
(7)
(6)
(1)
X1
(5)K(4)
G
SCR+X1
(2)
-X2
+X2
G44
125
125
GKK
J2 J2
-X1
+X1
215
6
J1
G
56K1
2
J1
G
K
L2
L1
J3
545
4
2
3
1
2
3
1
77
+5
COM 11
12
COM
SIG HI
9108
12
11910
8
+12
I
6541231
65423
1
J6
J4
3
4
P7
P9
WRW
R
R
W
R
W
SFSB
DRS
HST
SCRFB
TO SHT.1
LINE Q-111
TO SHT.1
LINE Q-103
FROM SHT.1
LINE G-111
LEM
POWER
SUPPLY/
REGULATOR
BOARD
D
D
LOW VOLTAGE DOOR MOUNTED DEVICED
FROM SHT.3
LINE D-333
12
1
12
1
3
3
A
118
117
RTR
X1
X3
X2
X4
H1
H2
____kVA
160V/320V
113
114
112
111
FSR
116
115
108
109
110
(3)
(2)
(1)
FIELD CURRENT ADJUST
115
5
DCCT
105
116
106
107
113
114
53
52
103104
5
Installation Chapter 3
Rockwell Automation Publication 1902-IN001B-EN-E - April 2013 29
Page 28

Chapter 3 Installation
SNUBBER FIELD SWITCH BOARD
P9 J9
I:2/08
I:2/02
SYNCPRO II
RECTIFIER
7
J9 P9
8
O:0/00
SS
VHz
TEST SUPPLY POINT
O:0/02
O:0/01
SS
AC COMMON
I:2/01
I:2/00
REMOVE JUMPER WHEN CONNECTING REMOTE EQUIPMENT
REFER TO DIMENSION DRAWING F OR COMPONENT SIZING NOT SHOWN ON THIS DRAWING.
REMOTE EQUIPMENT
CUSTOMER WIRING
METAL OXIDE VARISTOR
NOTES
MOV
LEGEND
CTB
CUSTOMER TERMINAL BLOCKS
SFSB
FIELD SWITCH
EQUIPMENT SHUTDOWN
RELAY (ESR)
RELAY (FSR)
BACK INTO NORMAL OPERATION.
ENSURE JUMPERS ARE REMOVED BEFORE PUTTING STARTER
IF THESE SYNCPRO CONTACTS HAVE BEEN JUMPERED OUT.
THE STARTER CONTRO L CAN BE OPERATED IN TEST MODE, ONLY
D D
D
D
RTD 4
32
44
434142
40393837363435
33
RTD 11RTD 12 RTD 10 RTD 9
3130292827
18141716151213
11
RTD 6RTD 7RTD 8 RTD 5
03
100908
070506
04
02
01
RTD 3 RTD 2 RTD 1
RTN
-
+
RTN
-
+
RTN
-
+
RTN
-
+
RTN
-
+
RTN
-
+
RTN
-
+
RTN
-
+
RTN
-
+
RTN
-
+
RTN
-
+
RTN
-
+
(825P)
L1
(825P)
(825P)
MAIN CONTACTOR (M)
MOV
32
1
EC
-
+
4
TCO
12
11
AUX CCO
5
6
L1
G
+-
V
V
V
AUXILIARY RELAY (MX)
SS
D
DRUN
OFF
L2J3
LOW VOLTAGE DOOR MOUNTED DEVICED
FROM SHT.1, LINE C-117
CUSTOMER BEFORE START-UP.
INTELLIVAC NOTES:
ARE IN EFFECT:
CONTACTOR STATUS - FAIL SAFE
MODULE STATUS - FAIL SAFE
OUTPUT RELAY CONTACTS SHOWN WITHOUT
CONTROL POWER APPLIED. THE FOLLOWING FACTORY
INSTALLED CONFIGURATION/POWER-UP STATES
INTELLIVAC TO BE PROGRAMMED/CONFIGURED BY THE
V
- INTELLIVAC MODULE VACUUM CONTACTOR AUXILIARY INPUTAUX
- INTELLIVAC MODULE EXTERNAL CAPACITOR INPUTEC
- I
NTELLIVAC MODULE CLOSING COIL OUTPUTCCO
- MAIN CONTACTOR INT ELLIVAC MODULEM-IV
- INTELLIVAC MODULE TRIP COIL OUTPUTTCO
TO SYNCPRO II
SHT.4, LINE C-422
DC POWER SUPPLY
TO SHT.1
LINE Q-108
TO SHT.4
LINE H-413
PANELVIEW
TO SYNCPRO II
D
D
SHT.4, LINE C-422
ETB
EXCITER
TERMINAL BLOCKS
RECTIFIER
ASSEMBLY FAN
52
52
7473727170
2
2
91
90
91
90
91
90
14A
VC
14
VA
VB
(1) (2)
(3) (4)
NORMAL
OFF
TEST
X
X
14
MX
67
MX
MX
MX
66
6061626364
65
1
14
F5
F5
VAA
VCA
F7
1A
251
51
111
12
3
4
4A
134
4A
123152
G
M
H
M
K
L
36
37
12313034333532
53
54
541253
14
14
1
58
14A
59
12
1
G
R
317316 319318MX
313 322307
321311
M-
IV
15 16
CONTACTOR
STATUS
M-IV
910
CLOSE
M-IV
F7
2.0A
C
M
M
17
20
13
M
15
AB N
MPSRTD
INPUT POWER
MPS
INPUT POWER
MPSRTD
SCRFB
INPUT POWER
MPS
95 96
98
TRIP
1
35
M
34
IJ
23
START
1A
STOP
2
SYNCPRO II
TRIP OUTPUT
SYNCPRO II
FSR OUTPUT
SYNCPRO II
RUN OUTPUT
SYNCPRO II
NOT STOP/START INPUT
SYNCPRO II
TRIP/RESET
SYNCPRO II
MAIN CONTACTOR INPUT
PAT
INPUT POWER
219 428
325
313 429
THERMOSTAT
6
11
12
4A
FSR
ESR
2
4
50
7
10
8
9
ISb
(7) (8)
X
(5)(6)
X
F3 4.0A
60120
TS
12
ESR
54
2
53
R
TRIP/RESET
31
MF
51
30
1
E
ESR
Figure 8 - Typical Wiring C
30 Rockwell Automation Publication 1902-IN001B-EN-E - April 2013
Page 29

Figure 9 - Typical Wiring D
1764-24BWA
DC
COM 1
+24V
POWER
OUT
DC
COM 0
DC
COM 2
VAC
NEUT
VAC/
VDC 0
VAC/
VDC 1
VAC/
VDC 2
VAC/
VDC 3
VAC/
VDC 4
120/240
VAC
EARTH
GND
VAC/
VDC 5
MicroLogix 1500
SLOT: BASE
1764-24BWA
MicroLogix 1500
SLOT: BASE
AC
COM 2
1769-IF4X0F2
MicroLogix 1500
SLOT: #1
1769-IA16
MicroLogix 1500
SLOT: #2
INPUT MODULE
R
W
BLK
(C)
(N)
(P)
#14 AWG
G
PANELVIEW
START
TRIP RESET
FLR INPUT
(NOT USED)
TRANSITION COMPLETE
(NOT USED)
MAIN CONTACTOR
FEEDBACK
FROM SHT.3
LINE G-325
FROM SHT.3
LINE G-321
NOT STOP
FROM SHT.3
LINE G-311
AUTOLOAD CONTROL
TO SHT.3, LINE F-318
TO SHT.1
LINE Q-106
TO SHT.3, LINE F-314
TO SHT.3, LINE F-316
TO CHASSIS GROUND
SQUIRREL CAGE MOTOR
PROTECTION TRIP
INCOMPLETE SEQUENCE TRIP
MOTOR PULLOUT
TRIP
AUTOLOAD CONTROL
TO SHT.3, LINE F-318
TO SHT.3, LINE F-314
TO SHT.3, LINE F-316
FROM SHT.3
LINE E-337
FROM SHT.3
LINE 339
D
(4-20mADC)
+-
FVR INPUT (NOT USED)
AC
COM 1
12
98
98
99
PA TRANSDUCER
91
71
14
2
53
73
74
72
50
4
54
70
FSR
ESR
31
1
69
68
1
58
3
3
12
1
12
1
12
1
MOV
NOTES
LEGEND
LOW VOLTAGE DOOR MOUNTED DEVICED
REFER TO DIMENSION DRAWING FOR COMPONENT
SIZING NOT SHOWN ON THIS DRAWING.
1764-LPR PROCESSOR
ANALOG INPUT MODULE
Installation Chapter 3
Rockwell Automation Publication 1902-IN001B-EN-E - April 2013 31
Page 30

Chapter 3 Installation
In this case (three-wire) since the START signal is only momentary, the hardware
must perform the sealing function using the control relay, CR. The START
output is really an extension of the START input, except that the output is
conditioned by any fault conditions.
The ESR circuit ensures the motor is stopped for any fault condition occurring
either externally or when detected by the SyncPro II. Once the ESR has dropped
out, a start will not be permitted until the fault condition is reset.
It should be noted that in all cases, the TRIP output is removed when a fault is
detected. This fault includes both external hardware faults (as recognized by the
EQUIPMENT SHUTDOWN signal) and faults which are generated by the
SyncPro II such as a power factor trip.
Summary
1. The RUN output will follow the state of the START input, given there are
no faults detected by the SyncPro II.
2. Once a fault is detected, the START input must be taken low before the
RUN output will be allowed to operate.
3. All motor stopping must be controlled by hardwired control circuit logic.
The SyncPro II is only notified of the stoppage to determine what is
happening. Any time the motor stops without first removing NOT STOP
input, an error condition will be detected.
4. When using three-wire control, a contact from the CR relay must be used
to seal in around the RUN output.
32 Rockwell Automation Publication 1902-IN001B-EN-E - April 2013
Page 31

Setup and Commissioning
Chapter 4
Setup
Check the following components of the SyncPro II once it has been installed.
RF1 & RF2 Resistor Setup
The synchronous motor field discharge resistor feedback resistors (RF1, RF2) are
necessary to attenuate the induced voltage waveform which appears across the
field discharge resistor during starting (Figure 11
reduce the voltage which is seen at the terminals of the analog/digital pulse
converter to a level which is acceptable to the optoisolators on the board.
Guidelines for resistor settings are contained in Tab le 1 on pa ge 3 6
The resistance value shown is the amount of resistance which is required on each
lead which is connected to the A/D pulse board (F1, F2). For example, if the
induced voltage on the discharge resistor is 1000V at zero speed and 600V at 95%
speed (across the entire discharge resistor), then it is necessary to select taps on
the RF1 and RF2 to provide 20 k
Figure 10 - Discharge Resistor Installation
Ω at RF1 and 20 kΩ at RF2.
). The resistors (RF1, RF2)
.
These settings must be made prior to any start attempt.
Rockwell Automation Publication 1902-IN001B-EN-E - April 2013 33
Page 32

Chapter 4 Setup and Commissioning
EXAMPLE
EXAMPLE
0 speed rms voltage across 1 Ω 56 / 2.828 = 20V rms
95% speed rms voltage across 1
Ω 34 / 2.828 = 12V rms
0 speed rms current across 1
Ω 20V / 1Ω = 20A rms
95% speed rms current across 1
Ω 12V / 1Ω = 12A rms
Determining the induced voltage which will appear across the discharge resistor
during starting can be done two ways.
1. If motor data is available the voltage can be determined by multiplying the
discharge resistance by the induced currents at zero and 95% speed as given
by the motor manufacturer.
Induced current @ 0% speed: 20 A
Induced current @ 95% speed:12 A
Discharge resistance: 50
Ω
Therefore:
Induced voltage @ 0% speed: 20A x 50
Induced voltage @ 95% speed: 12A x 50
Ω = 1000V
Ω = 600V
2. A measurement can be taken using a storage oscilloscope or a strip chart
recorder, see publication 1900-2.10
for correct set point values. The
waveform obtained will have a peak value which must be converted to an
rms value. This is done by dividing the peak-to-peak value by 2
√2 or 2.828.
When doing this, a portion of the discharge resistor only should be used, 1 Ω can
then be used to determine the value which will be on the entire resistor.
A strip char t recording is taken across a 1 Ω portion of a 50 Ω discharge
resistor. The following peak to peak values are obtained:
0 speed: 56V p-p
95% speed: 34V p-p
Therefore:
Once the induced voltage has been determined, make the appropriate selection
from Tab le 1 on pa ge 36
then be determined to the appropriate taps on the R
. Wires from each end of the discharge resistor should
F1 and RF2 resistors. Both
the 0 and 95% speed induced voltages must fall between the upper and lower
limits defined on the chart.
34 Rockwell Automation Publication 1902-IN001B-EN-E - April 2013
Page 33

Setup and Commissioning Chapter 4
Procedure for Selection of Resistors
RF1 & RF2 Resistor
RD = Discharge resistance __________ Ω
RSD = Sample resistance __________ Ω
Vpp0 = 0% speed peak to peak voltage __________ V (Vpeak@0)
Vpp95 = 95% speed peak to peak voltage __________ V (Vpeak@95)
Vrms 0 = Induced voltage (0% speed) __________ V (Vrms@0) Vp0/2.828
Vrms 95 = Induced voltage (95% speed) __________ V (Vrms@95) Vp95/2.828
Io = Induced current (0% speed) __________ A (Arms@0)Vrms0/Rs
I95 = Induced current (95% speed) __________ A (Arms@95)Vrms95/Rs
V0 = Induced voltage (0% speed) __________ V I0 x Rd
V95 = Induced voltage (95% speed) __________ V I95 x Rd
0 speed induced voltage across the entire discharge resistor 50 Ω * 20 A= 1000V
95% speed induced voltage across the entire di scharge resistor 50 Ω * 12 A = 600V
R
F1/RF2 Resistance Required __________ Ω
“RF” Resistor tap settings
Figure 11 - Discharge Resistor Setup
Rockwell Automation Publication 1902-IN001B-EN-E - April 2013 35
Page 34

Chapter 4 Setup and Commissioning
IMPORTANT
Table 1 - Feedback Resistor Values • Synchronous Field Feedback Board
RF1/RF2 Resistance (KΩ)
2.5 80 160
5160320
7.5 230 480
10 320 640
12.5 400 800
15 490 950
17.5 560 1100
20 640 1300
(1) Resistance value is per resistor (two required).
(1)
Lower Limit Upper Limit
Usable Voltage Range
Motor induced currents will cause a voltage to be produced across the
synchronous motor starter field discharge resistor. This voltage is connected to
the feedback resistors and the tap to be selected on these resistors is dependent on
this voltage level. For example, if the discharge resistor value is 20 Ω and the
induced currents are 30 A at 0 speed and 18 A at 95% speed, then the induced
voltage seen by the feedback resistors will range from 600V (0 speed) to 360V
(95% speed). The selection would then be 10 k
Ω on each of the two resistors.
Commissioning
In the event that the induced voltage proves to be higher than allowed by the
chart, it will be necessary to tap the field discharge resistor at a point which will
allow the value to fall within the chart. Contact Rockwell Automation for
assistance at 1-519-740-4790.
1. Complete and verify that the setup procedures (see page 33) have been
completed. This should include verifying that the parameters programmed
into the SyncPro II are appropriate for the motor. See Chapter 5
for
further details on programming.
2. Verify that the SyncPro II has been wired into the motor starter circuit as
indicated by the wiring diagram.
3. Remove the wire from the Field Contactor Relay (FCR) coil either at the
I/O point (0:0/2) or at the FCR coil itself. Tie back and insulate the wire
so that it cannot accidentally short out to ground or another electrical
point. This will disable the field contactor so that the starter will not
attempt to synchronize.
The contactor must be disabled in this manner rather than removing
the field cables from the contactor. The discharge path through the
discharge resistor must be maintained; otherwise, a voltage high
enough to damage the field insulation will occur at the open field
windings. This is similar to the effect which occurs if a current
transformer secondary winding is left open circuited.
36 Rockwell Automation Publication 1902-IN001B-EN-E - April 2013
Page 35

Setup and Commissioning Chapter 4
4. If during the previous setup procedure for the discharge resistors RF1 and
F2, the induced currents were not known, then the next step would be to
R
bump the motor with the R
method detailed in publication 1900-2.10
F1 and RF2 resistors disconnected. The
for determining the motor data
by measurement using a strip chart recorder should be done at this time.
The R
F1 and RF2 resistors should then be set up as shown in Figure 11
with the data obtained. It is necessary to use jumpers at the SyncPro II trip
output, and the run output, for the motor bump.
ATTENTION: During the jogging procedure, the SyncPro II does not
protect the motor. Monitor the procedure closely to avoid damage to
the motor.
ATTENTION: Do not use jumpers at the ESR contact as this will also
eliminate any external protective trips such as line overcurrent, fault
protection, etc. which are still necessary for the bump. See Figure 8
for
the jumper placement, and the points at which to disconnect the wires.
ATTENTION: During synchronization, voltages that may exceed 1000
volts are present at the Rf1 and Rf2 resistors. To avoid shock hazard, do
not touch the resistors.
The phase angle transducer, as wired from the factory, is set up for the customer
to run his wiring with an ABC line orientation. If this was not observed, the user
has two options. First, the line cables can be moved (switching any two incoming
lines will do) so that ABC now exists (BCA or CAB are also acceptable), OR the
current transformer leads to the transducer can be swapped at the transducer.
5. If the RF1/RF2 connections were removed for step 4, they should now be
reconnected at this point and set to the appropriate tap. The motor may
now be bumped for rotation. Allow the motor to accelerate to rated
subsynchronous speed and monitor the following items at this time.
• The time to accelerate to rated subsynchronous speed
• The point at which the I/O point 0:0/2 picks up (which normally
would energize the field contactor) occurs to see if it appears to be
occurring at 95% speed
• Monitor Power Factor during acceleration. It should be lagging.
• This will also prove that the power factor transducer connection is in
the correct orientation with the incoming current and voltages. If the
polarity is incorrect, switching the C3A and C3B connections should
correct the situation.
The phase angle transducer connections are correct provided that the transducer
power and voltage reference inputs are connected to Line 1 and 2 and the current
reference is Line 3. If the incoming connections into the starter have been made
B-A-C, rather than A-B-C, the polarity will also be incorrect even though the
correct starter lines have been brought to the transducer. In either event, the
correction is the same, reverse the C3A and the C3B current transformer
connections.
Rockwell Automation Publication 1902-IN001B-EN-E - April 2013 37
Page 36

Chapter 4 Setup and Commissioning
ATT EN TI ON : To avoid damage to the motor, do not allow the motor to run
without synchronizing (at 95% speed) for longer than required to perform this
test. Most motors are only capable of running for about 60 seconds at 95%
speed without synchronizing.
6. After completing the actions in Step 5, if the equipment appears to be
operating in the correct manner, then the leads can be reconnected to the
FCR coil which was removed in Step 3.
7. The motor can now be normally started. Once the motor has
synchronized, a good check is to vary the DC excitation. Verify that when
the DC current to the field is reduced, the motor power factor becomes
more lagging and if increased, the motor power factor becomes more
leading. Verify that the MicroLogix is getting all the inputs according to
the circuit diagram.
38 Rockwell Automation Publication 1902-IN001B-EN-E - April 2013
Page 37

Programming SyncPro II
Chapter 5
Overview
The SyncPro II programming is performed via the PV300 display unit provided.
The SyncPro II menu structure has been designed to optimize workflow. Please
refer to Menu Map below.
Figure 12 - Programming Menu Map
Rockwell Automation Publication 1902-IN001B-EN-E - April 2013 39
Page 38

Chapter 5 Programming SyncPro II
Main Menu
SyncPro II Status
The main menu provides access to the following screens.
SyncPro II Status Provides idle, starting, running status information
View Set Points Allows viewing of SyncPro II operation and protection set points.
Edit Set Points Allows viewing of SyncPro II operation and protection set points
Alarm History Lists alarm/fault history recorded with relative time stamping
Access Code Allows users to log in or log out to provide access control to operation and protection set points.
Settings Allow editing of general HMI configuration such as language, relative time/date stamp
These screens are displayed when the motor is idle, starting, or running. The
PVc C400 automatically switches to one of the following screens after a period of
inactivity.
Figure 13 - Ready Mode
Ready mode (Figure 13) indicates the SyncPro II has not detected any software or
hardware faults and is ready to start.
Figure 14 - Starting Mode
During the Starting mode (Figure 14), the motor slip frequency in Hz power factor in %,
and time to a squirrel cage protection in seconds are displayed. The power factor value is
accompanied by either a < or >
symbol to indicate lagging or leading power factor. Typical
power factor readings during staring are lagging. If leading power factor is displayed, please
confirm voltage and current input connections for proper sequencing (e.g. V
, Ic).
ab
40 Rockwell Automation Publication 1902-IN001B-EN-E - April 2013
Page 39

Programming SyncPro II Chapter 5
operating
slipMinimum
f
f
SP
_
1
=
Figure 15 - Running Mode
In the Running mode, the slip frequency and power factory is displayed. During
normal operation, the slip frequency is 0 Hz, and power factor is approximately
100% for unity.
View Set Points
Figure 16 - Minimum Slip Frequency
Set Point 1: Minimum Percent Synchronous Slip Frequency
This set point determines the percentage of synchronous speed at which the DC
voltage is to be applied by the field switch/contactor. The SyncPro II monitors
the frequency of the induced voltage across the discharge resistor during starting.
When this frequency indicates that the motor has achieved the desired sub
synchronous speed at which it is allowable to synchronize, the SyncPro II
energizes the coil of the field switch/contactor. The SyncPro II ensures that the
application of the field contactor coincides with the rising edge of the induced
voltage waveform which makes for a smooth transition. If the motor pulls into
synchronism due to reluctance torque, the SyncPro II will detect no pulses and
then will apply DC voltage to the field after a one second delay.
Rockwell Automation Publication 1902-IN001B-EN-E - April 2013 41
Page 40

Chapter 5 Programming SyncPro II
operating
fSP =
2
bab
a
x
b
spsp
x
sp
a
spsp
sp
spsp
spa
b
ba
kttBMfta
k
ff
k
BMft
ff
k
MftB
ff
tt
M
fffiftSP
ffiftSP
ttfFSP
+=+=
−
=
−−
−
=
−=
−
−
=
<≤=
<=
=
,
)(
,
)(
,
,
,
),,(
%50
14
1%50
26
6%50
65
2%503
%503
3
Set Point 2: Operating Frequency
This set point determines the operating system frequency. This allows the
SyncPro II to properly determine the appropriate minimum percent slip
frequency.
Figure 17 - Function Number
Set Point 3: Function Number
The function number entry determines the slope of the curve between the 50%
speed trip time and the 95% speed trip time – set point 4 and 5. Although the trip
time is set as 50% and 95% speed, the intermediate points between these values
can be shaped to cause the trips for 51% and 94% to occur more or less quickly
depending on which function number is selected. According to Figure 17
time is allowed when function 1 is selected, and less time is allowed when
function 5 is selected.
, more
42 Rockwell Automation Publication 1902-IN001B-EN-E - April 2013
Page 41

Programming SyncPro II Chapter 5
44 sp
tSP =
55 sp
tSP =
66 sp
tSP =
Table 2 - Function Numbers
Variable Function Number
t
sp4
t
sp5
t
sp6
f Detected slip frequency
f
sp1
f
50%
f
sp2
Squirrel-Cage Protection Trip Time (at 95% speed)
Squirrel-Cage Protection Trip Time (at 50% speed)
Squirrel-Cage Protection Trip Time (at stall)
Minimum Percent Synchronous Slip Frequency
Squirrel-Cage Protection Trip Frequency
Operating Frequency
Set Point 4: Squirrel-Cage Protection Trip Time (at 95% speed)
This time setting determines the maximum length of time the synchronous
motor may run at 95% speed before it is shut down. The squirrel-cage winding of
the synchronous motor is not rated to run the motor continuously even at no
load and therefore must be shut down if synchronism does not occur. Time
should be set to motor manufacturer’s specifications.
Set Point 5: Squirrel-Cage Protection Trip Time (at 50% speed)
It is possible that a synchronous motor can accelerate only to an intermediate
speed and either not accelerate further or take too long to accelerate further due
to overloading. This would cause the squirrel-cage windings to overheat if
allowed to continue unchecked. This setting limits the time that the motor can
operate at 50% speed to the safe maximum recommended by the manufacturer.
Set Point 6: Squirrel-Cage Protection Trip Time (at stall)
In the event that a synchronous motor fails to accelerate at start up it will go into
a stall condition at zero speed. This can occur if the motor is overloaded at start.
The time entered at this set point should be the maximum allowable stall time on
the Squirrel-Cage Winding as defined by the motor manufacturer.
Rockwell Automation Publication 1902-IN001B-EN-E - April 2013 43
Page 42

Chapter 5 Programming SyncPro II
IMPORTANT
IST
tSP =
7
trip
PFSP =
8
DelayPF
tSP
_9
=
The squirrel-cage winding of a synchronous motor has a very limited
capability. Generally, the stall time allowed by the squirrel-cage winding is less
than the time that the stator winding is capable of. It is possible that a motor
with a stator capable of a 20 second stall would have a rotor which can only
endure a stall condition of 5 seconds.
Set Point 7: Incomplete Sequence Trip Time Delay
Once a synchronous starter has been commissioned, the acceleration and
synchronization times should remain fairly consistent provided that the starting
load does not vary significantly. The incomplete sequence timer can be set to a
time delay that is slightly higher than the slowest acceleration time. The
aforementioned squirrel-cage protection features protect the motor, but they also
let it go to its thermal limitations. The Incomplete Sequence Timing Relay
(ISTR) set point can be adjusted to take the starter off-line earlier than the
squirrel-cage protection trip time (set point 5) in the event of a field contactor
failure or some other mechanical problem that prevents synchronization. This
action minimizes motor heating during an equipment failure.
Set Point 8: Power Factor Trip
As discussed earlier, power factor can be sued to determine if a motor has pulled
out of synchronism due to loss of excitation, overloading or a severe undervoltage.
At this time, the motor should be taken off line to protect the stator and field.
Set Point 9: Power Factor Trip Time Delay
Once it is determined that the motor has a lagging power factor due to a pullout
condition, the trip condition can be time delayed to allow the motor a brief
opportunity to pull back into synchronism.
44 Rockwell Automation Publication 1902-IN001B-EN-E - April 2013
Page 43

Programming SyncPro II Chapter 5
Set Point 10: Diagnostic Fault Mask
This parameter/screens are used to define a fault mask code that will disable
individual diagnostic faults. The value is based on the 16 bit Fault Mask Word.
Please refer to Edit Set Points section for additional information.
Table 3 - Mask Description
Code Mask Description
0 Enable All Faults
272 Mask Commissioning Faults
2000 Mask All Power Factor Faults
1984 Mask Power Factor Transducer Circuit Faults
64 Mask Power Factor Transducer No Input Fault
128 Mask Power Factor Transducer CT Open/Shorted Fault
256 Mask Power Factor Transducer CT Input Reversed Fault
512 Mask Power Factor Transducer No Signal at PLC Fault
1024 Mask Power Factor Transducer Abnormal Operation Fault
16 Mask PLC Reversed Power Factor Fault
Edit Set Points
Figure 18 - Minimum Slip Frequency
Set Point 1: Minimum % Synchronous Slip Frequency
Allowable Range: 2...10% (slip at which synchronization will occur as a
percentage of synchronous speed)
Factory Default setting: 5% (95% speed)
Typically set at: 5%
Rockwell Automation Publication 1902-IN001B-EN-E - April 2013 45
Page 44

Chapter 5 Programming SyncPro II
Set Point 2: Operating Frequency
Allowable Range: 50 or 60 Hz
Factor Default: 60 Hz
Figure 19 - Function Number
Set Point 3: Function Number
Allowable Range: 1...5
Factory Default Setting: 3 (Function curve 3)
In the example below the 50% speed has been set to 5 seconds, and the 95% speed
is set to 20 seconds for a 60 Hz system.
Figure 20 - Trip Time
46 Rockwell Automation Publication 1902-IN001B-EN-E - April 2013
Page 45

Programming SyncPro II Chapter 5
Set Point 4: Squirrel-Cage Protection Trip Time (at 95% speed)
Allowable Range: 5...80 seconds
Factory Default Setting: 5 s (5 seconds)
Set Point 5: Squirrel-Cage Protection Trip Time (at 50% speed)
Allowable Range: 2 s to Value in Set Point 4
Factory Default Setting: 2 s (2 seconds)
Set Point 6: Squirrel-Cage Protection Trip Time (at stall)
Allowable Range: 1 s to Value in Set Point 5
Factory Default Setting: 1 s (1 second)
Figure 21 - Incomplete Sequence Trip Time
Set Point 7: Incomplete Sequence Trip Time Delay
Allowable Range: 1...80 seconds
Factory Default Setting: 3 seconds
Set Point 8: Power Factor Trip
Allowable Range: 60...100 (% of unity)\
Factory Default Setting: 80 (0.8 lagging power factor)
Rockwell Automation Publication 1902-IN001B-EN-E - April 2013 47
Page 46
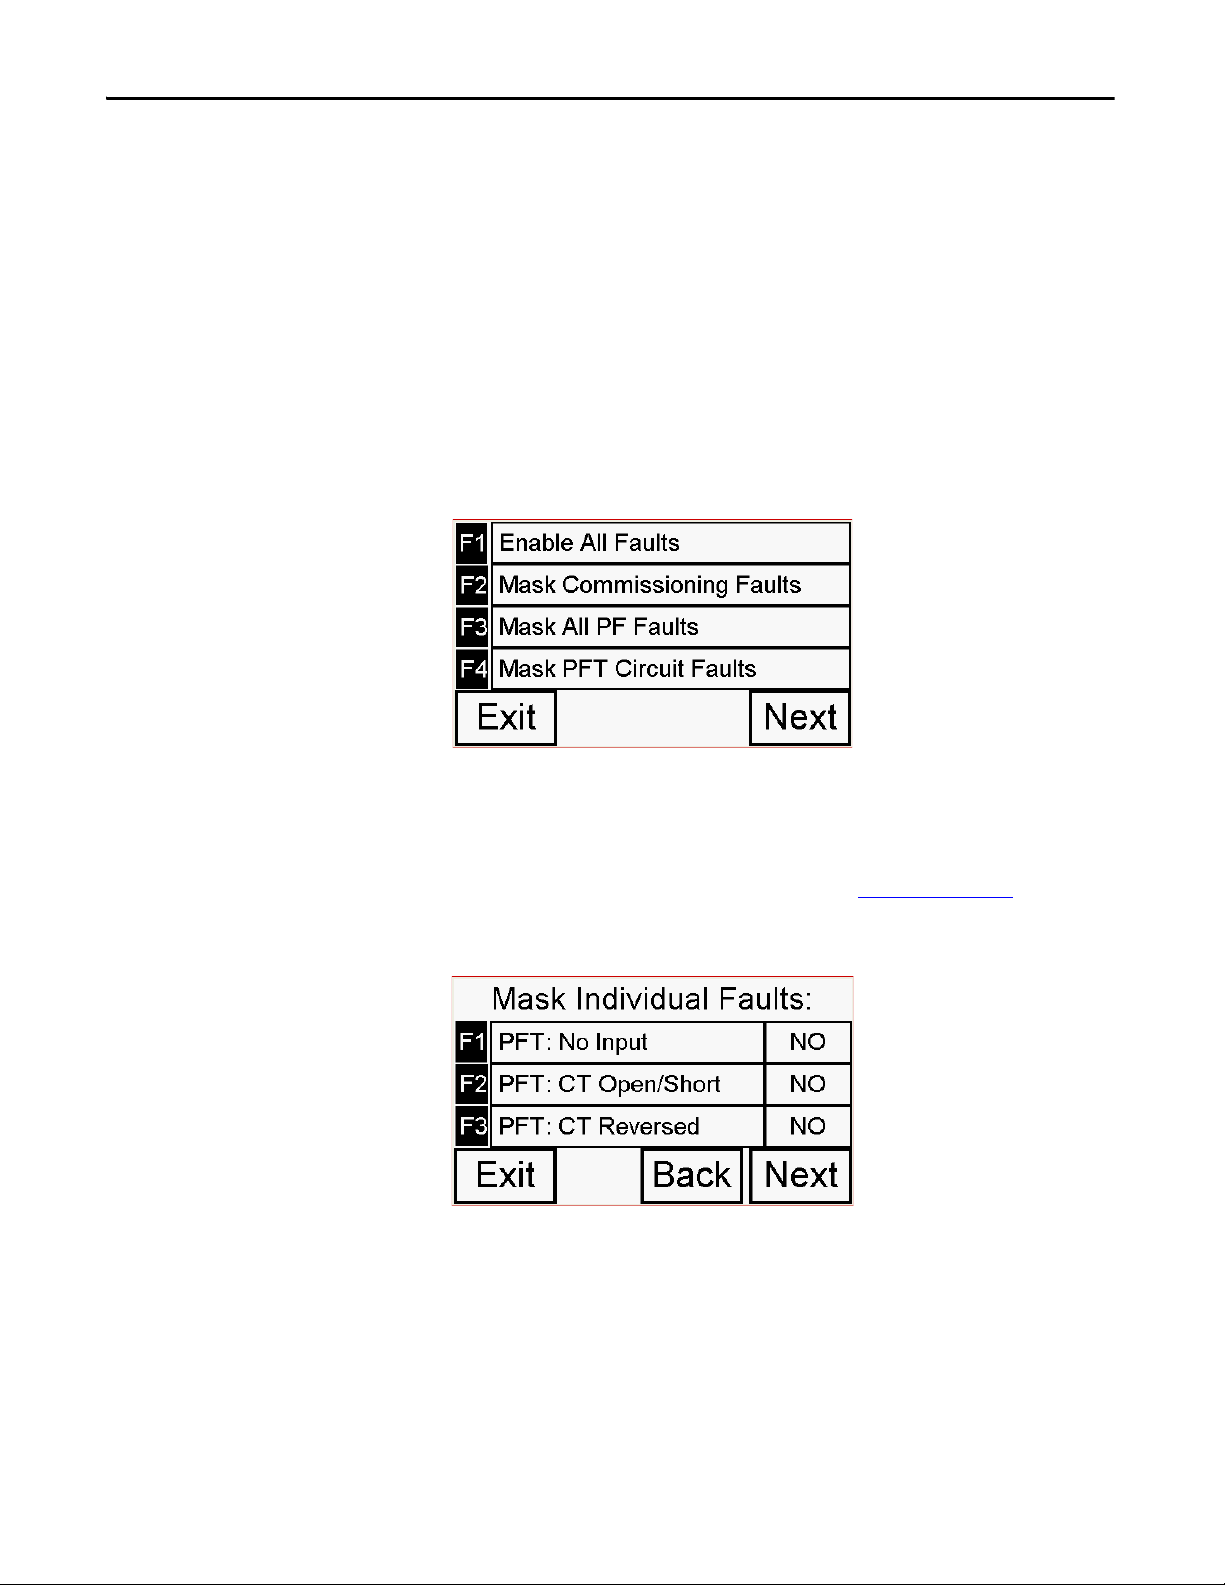
Chapter 5 Programming SyncPro II
Set Point 9: Power Factor Trip Time Delay
Allowable Range: 0...100 s (0.01 second units)
Factory Default Setting: 50 s (0.5 second delay)
Set Point 10: Diagnostic Fault Mask
The Fault Mask value can be calculated by selecting either a Fault Mask groups or
individual faults. When switching between mask groups it is recommended that
the fault code be cleared/reset by selecting “Enable All Faults”.
Figure 22 - Diagnostic Fault Mask
Either group or individual mask can be used at one time. The resultant fault mask
code will be function of the 16 bit fault mask word use. It is possible to selectively
mask individual faults by adding up the fault values and entering the result. For
example, to disable the Reversed PF at Syncpro II and No Signal at Syncpro II,
the mask value would be 528 (16 +512). Refer to Ta ble 4 on pa ge 4 9
additional information.
Figure 23 - Mask Individual Faults
for
48 Rockwell Automation Publication 1902-IN001B-EN-E - April 2013
Page 47

Figure 24 - Individual Faults
Figure 25 - Individual Faults (cont’d)
Programming SyncPro II Chapter 5
The value entered during prompting may not be the same value displayed if the
value can be represented more clearly by some other combination of faults, i.e.
The value of 272 (16 + 256) corresponds to 1.
Table 4 - Fault M ask Wo rd
Mask
Code
1514131211109876543210
0 0 00 0 00 0000000000Enable All Faults
272 0000000
2000000001 1 1 1 1010000Mask All PF Faults
1984000001 1 1 1 1000000Mask PFT Circuit Faults
64 000000000
128 00000000
256 0000000
512 0000001000000000PFT: No Signal @ PLC
102400000
16 00 000000000
Fault Mask Word (16bit) Mask Description
100010000Mask Comm. Faults
1000000PFT: No Input
10000000PFT: CT Open/Short
100000000PFT: CT Reversed
1 0000000000PFT: Abnormal Operation
10000PLC: Reversed PF
Rockwell Automation Publication 1902-IN001B-EN-E - April 2013 49
Page 48

Chapter 5 Programming SyncPro II
Alarm History
The Alarm Banner screen will appear if any alarm condition exists in the system.
The screen provides three user options:
• Clear Alarm
• Acknowledge Alarm
• Acknowledge All Alarms
The clear Alarm option will remove the currently displayed fault and not record
the fault in the Alarm History.
The Acknowledge Alarm option will remove the currently displayed fault and
record the fault in the Alarm History with the relative time stamp. After a single
alarm has been acknowledged, the next unacknowledged on if any will appear on
the screen. If none unacknowledged alarms are left and all faults have been
cleared the Main Menu Screen will be displayed.
The Acknowledge All Alarm option will remove the currently displayed fault
along with all additional faults in the fault stack/buffer and record all the fault(s)
in the Alarm History with the relative time stamp.
Figure 26 - Acknowledge All Alarm Screen
The Alarm History Screen displays all the acknowledged alarms with date and
time. Using the arrow keys you can scroll through up to 50 previous alarm
conditions. The Alarm History may be cleared with the Clear key.
Figure 27 - Alarm History
50 Rockwell Automation Publication 1902-IN001B-EN-E - April 2013
Page 49

Programming SyncPro II Chapter 5
Access Code
The Access Code Screen allows authorized users to log in to secured screens and
modify their own password. To log in, press the F1 key and enter your user ID
and password using the alphanumeric keypad that opens during a login request.
Login is successful if the “Logged in as:” indicator displays the correct username.
To change your password, press F3 and enter the current and new password to
make the change. If both passwords match, then it successfully changes. Press F2
key to log out in the end of the session. The “Logged in as:” indicator username
will disappear.
Figure 28 - Log In/Log Out
Prior to programming the unit a user must log in with full access writes. The
default administrator (admin) Access Code is “12345”. It is recommended this be
changed during product commissioning.
Settings
The Settings Screen provides access to PVc C400 built-in HMI configuration
screen and offers capability to set up SyncPro II relative time stamp. Please not
that the time stamp is reset when power is removed.
Figure 29 - Settings
Rockwell Automation Publication 1902-IN001B-EN-E - April 2013 51
Page 50

Chapter 5 Programming SyncPro II
Notes:
52 Rockwell Automation Publication 1902-IN001B-EN-E - April 2013
Page 51

Monitoring
)(θCosPF =
Va
Vb
Ic
Vab
Chapter 6
Phase Angle/Power Factor
A key protection component of the SyncPro II is to monitor Power Factor.
Monitoring Power Factor is one of the most reliable methods to determine if a
motor is running properly. The SyncPro II system utilizes a Phase Angle
Transducer which provided a proportional signal to the measured phase angle
(angle difference between motor voltage and current).
The phase angle transducer board provides a 4...20mA output proportional to
-90...90º. The SyncPro II utilizes this input to calculated Power Factor.
To provide an accurate measurement the voltage and current inputs must be in
the proper relationship, V
Figure 30 - Voltage and Current Inputs Relationship
and Ic.
ab
Rockwell Automation Publication 1902-IN001B-EN-E - April 2013 53
Page 52

Chapter 6 Monitoring
Faults
Fault Detection and Diagnostics
The product incorporates numerous fault detections in addition to the starting
squirrel-cage protection and running pullout protection previously mentioned.
Prior to starting the motor, diagnostics are performed that detect the:
a. Lack of 24V supply to the slip frequency generator.
b. Reversed Power Factor Leads between the SyncPro II and tansducer.
c. Lack of the EQUIPMENT SHUTDOWN (external fault) signal.
d. Loss of Setpoint Data.
Upon starting the motor, additional diagnostics are performed. Any of these
conditions will abort the start. Diagnostics performed are:
a. Lack of either pulse signal from the slip frequency generator.
b. Lack of field voltage or field current (if applicable).
c. Power Factor Transducer Circuit Fault.
Power Factor Circuit Fault
This fault covers a number of possibilities such as reversed leads at the CT,
shorted CT input, loss of control power to transducer or a faulted transducer.
An incomplete start sequence timer (setpoint 7) is utilized to abort the starting if
abnormal long periods are encountered. This time is set independent of the
squirrel-cage protection times.
While the motor is running, the motor is protected by monitoring fault
conditions for:
a. Loss of synchronization. Minimum power factor lag is selectable, as is
the duration of running.
b. Loss of feedback from the field contactor.
c. Loss of the EQUIPMENT SHUTDOWN caused by an external fault.
In all cases, faults are displayed on the PanelView 300 and can be reset via the
RESET push button.
54 Rockwell Automation Publication 1902-IN001B-EN-E - April 2013
Page 53

Troubleshooting
Chapter 7
Last Trip Table
To aid in troubleshooting, the unit stores the last 50 recorded faults. These can be
accessed by viewing the contents of the alarm history.
Table 5 - Troubleshooting Guide
Problem or Trip
Indicated
Pullout trip (power factor)
[PULL OUT TRIP
(POWER FACTOR)]
Squirrel-cage
Protection Trip
[SQUIRREL-CAGE
PROTECTION TRIP]
Incomplete Star t Sequence
Time Exceeded
[INCOMPLETE START
SEQUENCE TRIP]
No Transducer Input
[POWER FACTOR XDCR –
NO INPUTS]
CT Open/Shorted
[POWER FACTOR XDCR –
CT OPEN/SHORT]
CT Reversed
[POWER FACTOR XDCR–
CT REVERSED]
No Signal @ SLC
[POWER FACTOR XDCR–
NO SIGNAL AT PLC]
Transducer Problem
[POWER FACTOR XDCR
CIRCUIT FAULT]
Indication of the following conditions Possible Solutions
• Motor overloaded
• Loss of DC excitation
• Static exciter DC current level set
too low
• Motor overloaded at start • Remove or lessen load for start
• Motor overloaded at start
• Field contactor or FC pilot relay coil
failure
• The transducer is putting out less than
12 mA when the motor is off (should
be 12 mA)
• The CT is either open or shorted. • Check the wiring between the CT and
• The CT is incorrectly wired to the
transducer board.
• There is no signal at the PLC analog
card from the PF transducer board.
• The transducer is behaving
un
predictably.
• Lessen the motor loading and/or
overload
• Repair static exciter
• Increase current setting on static
exciter if lagging
• Decrease current setting on static
exciter if leading
• Mask leading power factor trip if
application/ motor is designed for it
• Remove or lessen load for start
• Replace coil(s)
• Check the wiring for the voltage
sensing on the transducer board.
• Replace phase angle transducer board
if necessary.
• Replace analog card in SyncPro II
chassis
the transducer board.
• Replace the CT if necessary.
• Reverse the leads of the CT at the
transducer board.
• Check the wiring between the
transducer board and the PLC
analog card.
• Ensure that there is power to the
transducer board.
• Replace the PLC analog card or
transducer board as required.
• This is an all-encompassing fault and
coul d include anything from the CT, the
transducer board, or the PLC analog card
Rockwell Automation Publication 1902-IN001B-EN-E - April 2013 55
Page 54

Chapter 7 Troubleshooting
Table 5 - Troubleshooting Guide (Continued)
Problem or Trip
Indicated
Pulse Board 24 V Failure
[PULSE BOARD 24 VDC
FAI LUR E]
Field Voltage Loss
[FIELD VOLTAGE LOSS]
Field Curren t Loss
[FIELD CURRENT LOSS]
No Field Coil Feedback
[NO FIELD COIL FEEDBACK]
Reversed PF @ SyncPro II
[REVERSED PF AT PLC]
Extern al Hardware Fault
[EXTERNAL HARDWARE
FAU LT]
Pulse Board Positive and
Negative Pulse Missing
[PULSE BOARD POSITIVE
MISSING]
[PULSE BOARD NEGATIVE
MISSING]
Contac tor Feedba ck Lost
[NO MOTOR CONTACTOR
FEEDBACK]
Halt Synch Relay • The program/remote/run switch on the
Indication of the following conditions Possible Solutions
• Connection has not been made
between the analog/digital pulse
board and the SyncPro II DC input card
or from the discharge resistor to the
same A/D pulse board.
• 24VDC power supply has had a failure
• The static exciter is not actively
producing DC or the FVR relay coil has
failed.
• Wrong polarity on FVR coil.
• Incorrect voltage rating of FVR coil.
• Exciter Enable (EE) relay did not pick up.
• The current relay which monitors the
motor field current is not providing an
energized contact to verify that the
static is functional.
• The SyncPro II has requested the field
contactor to energize but the feedback
contact from this contactor is not
showing as closed.
• The connections from the PF transducer
to the analog card have been
accidentally reversed.
• An external device to the SyncPro II is
not functioning as expected.
• The SyncPro II is not seeing a pulse
train being supplied from the A/D
board at the time of starting.
• The R
F1/RF2 resistor selection is not
correct. The signal is too weak to
provide the necessary pulse train
• The SyncPro II monitors the status of
the synchronous motor stator contactor
while running.
• The male/female connector of the
vacuum contactor is not matched
properly.
• The PLC I/O card slot 2 input 8 is faulty.
PLC processor may be in program
mode.
• Check the connections at the A/D
pulse board.
• Check fuse in power supply. Check for
24 V at power supply. Replace power
supply if necessary.
• Replace A/D pulse board.
• Service the static exciter or repair the
FVR relay.
• AC Voltage to the bridge absent
• 10 VDC on Op Amp Board Absent
• Check polarity on FVR coil.
• Check voltage rating of FVR coil.
• Verify the control circuit.
• Check both the field current relay and
the static exciter for possible failures.
• The field contactor coil has failed. Replace
the coil. The connection to the FC
auxiliary has not been made. Check
the wiring.
• The FC auxiliary contact has failed.
Replace the contact.
• Switch the positive and negative
transducer output leads at the analog
card.
• Check external devices.
• Pulse train would be lost if either the A/D
card fai led, the RF/RF2 selection is
incorrect, or if the connection is n ot ma de
from the A/D board to the SyncPro II.
• Review the RF1/RF2 setup parameter
and verify the procedure performed
(see ‘Commissioning’, item 4, on page
4-7).
• The main contactor coil has failed.
Replace the coil. The connection of the
M auxiliary contact h as not been made.
Check the wiring.
• The contact has failed. Replace.
• Ensure the connec tor is matched
properly.
• Replace the I/O board.
• Check the fuse.
• Turn the key switch to the «RUN» mode
position.
The phase angle transducer, as wired from the factory, is set up for the customer
to run his wiring with and ABC line orientation. If this was not observed, the
user has two options. First, the line cables can be moved (switching any two
incoming lines will do) so that ABC now exists (BCA or CAB are also
acceptable), OR the current transformer leads to the transducer can be swapped
at the transducer.
56 Rockwell Automation Publication 1902-IN001B-EN-E - April 2013
Page 55

Spare Parts
Chapter 8
SyncPro II Spare Parts List
Table 6 - Spare Parts List
Part Number Designation Description Quantity
800H-PRTH1GR
800T-N65 Lamp for Red Push Button 1
800T-N318R Lens for Red Push Button 1
700-CF220D FCR, ESR Relay 1
X-251089 F3 Fuse 4 amp. 1
80165-778-51-R — Analog/Digital Board 1
80025-817-01-R 20 kΩ tapped Power Resistor 20 kΩ tapped 2
700DC-P200Z1
700DC-P200Z2 Field Voltage Relay – 250 V DC exciter 1
80190-020-01-R 120 V
80190-020-02-R 240 V 1
2711C-T4T PanelView Component C400 Terminal 1
1761-CBL-PM02 RS-232 (DF1) cable 1
1606-XLP50E DC Power Supply 1
1769-IF4XOF2 Analog I/O Module 1
1764-24BWA MicroLogix 1500 Base Unit 1
1764-LRP
1769-IA16 Digital Input Module 1
Tri p/ Re se t
FVR
Red Illuminated Push Button 1
Field Voltage Relay – 125 V DC exciter 1
Phase Angle Transducer Board
MicroLogix 1500 Processor
(unprogrammed)
1
1
Rockwell Automation Publication 1902-IN001B-EN-E - April 2013 57
Page 56

Chapter 8 Spare Parts
Notes:
58 Rockwell Automation Publication 1902-IN001B-EN-E - April 2013
Page 57

Page 58

Rockwell Automation Support
Rockwell Automation provides technical information on the Web to assist you in using its products.
At http://www.rockwellautomation.com/support
code and links to software service packs, and a MySupport feature that you can customize to make the best use of these
tools. You can also visit our Knowledgebase at http://www.rockwellautomation.com/knowledgebase
information, support chat and forums, software updates, and to sign up for product notification updates.
, you can find technical manuals, technical and application notes, sample
for FAQs, technical
For an additional level of technical phone support for installation, configuration, and troubleshooting, we offer
SM
Te c h C o nne c t
representative, or visit http://www.rockwellautomation.com/support/
support programs. For more information, contact your local distributor or Rockwell Automation
.
Installation Assistance
If you experience a problem within the first 24 hours of installation, review the information that is contained in this
manual. You can contact Customer Support for initial help in getting your product up and running.
United States or Canada 1.440.646.3434
Outside United States or Canada Use the Wor ldwi de Lo cato r at http://www.rockwellautomation.com/rockwellautomation/support/overview.page, or contact your local
Rockwell Automation representative.
New Product Satisfaction Return
Rockwell Automation tests all of its products to help ensure that they are fully operational when shipped from the
manufacturing facility. However, if your product is not functioning and needs to be returned, follow these procedures.
United States Contact your distributor. You must provide a Customer Support case number (call the phone number above to obtain one) to your
Outside United States Please contact your local Rockwell Automation representative for the return procedure.
distributor to complete the return process.
Documentation Feedback
Your comments will help us serve your documentation needs better. If you have any suggestions on how to improve this
document, complete this form, publication RA-DU002
Medium Voltage Products, 135 Dundas Street, Cambridge, ON, N1R 5X1 Canada, Tel: (1) 519.740.4100, Fax: (1) 519.623.8930
Online: www.ab.com/mvb
Allen-Bradley, Rockwell Software, Rockwell Automation, and TechConnect are trademarks of Rockwell Automation, Inc.
Trademarks not belonging to Rockwell Automation are property of their respec tive companies.
Publication 1902-IN001B-EN-E - April 2013
Supercedes Publication 1902-IN001A-EN-E - March 2009 Copyright © 2013 Rockwell Automation, Inc . All rights reserved. Printed in Canada.
, available at http://www.rockwellautomation.com/literature/.
 Loading...