


1. Introduction
Congratulations on your purchase of the Rocktron Prophesy™!
Effectively comprising three complete processors in a single package, the Prophesy is the single most powerful and sophisticated guitar system available today. With dual 24-bit, 66MHz DSP processors providing 130mips of processing power, the Prophesy is over 12 times as powerful as the original Rocktron Intellifex!
The pre-effects section features wah, compression, EQ, and numerous other effects that can be assigned prior to the preamp section. The highly-configurable post-effects section provides ultra-transparent, high quality effects which completely preserve the tone of the preamp—thick reverbs and lush choruses can be used without coloring the sound of the preamp's tone.
The preamp section features four channels (Clean American, Texas Blues, Vintage British and Mega Drive), each with their own distinct voicings to provide a vast array of amp sounds to the player — especially when combined with the pre and post parametric EQ.
The ADSR (Attack/Decay/Sustain/Release) function features Rocktron's patent-pending pluck detection, and allows you to configure specific Prophesy parameters to be controlled dynamically by each pluck of a guitar string.
Getting Started
Often the large number of display pages and preset parameters in a product such as the Prophesy can seem a little overwhelming to a new user. Once you have become familiar with the basic operating interface of the Prophesy, we encourage you to study the Performance Notes section in the Appendix of this manual. The Performance Notes section describes how many of the factory presets were created, and discusses how to get a particular distortion sound, which effects are used, etc. You can use the information from these notes to help you in creating your own unique presets.
Key Prophesy Features
———————————————————————————————————————————————————˝
þComplete Pre-effects section
þHighly-configurable Post-effects section
þMost advanced Tube/DSP preamp section available
þAssignable stereo effect loop
þAdvanced ADSR (Attack/Decay/Sustain/Release)
þAdvanced speaker simulation
þFixed Pre-effects:
Pre EQ, Wah, Compressor
þAssignable effects (can be used Pre or Post effect):
Phaser, Flanger, Pitch Shift, Chorus, Rotary Speaker,
Delay/Ducker, Effect Loop
þFixed Post Effects:
Post EQ, Global EQ, Speaker Simulation, Tremolo,
Reverb
þBuilt-in Tuner
þGlitch-free preset switching with no signal drop out
———————————————————————————————————————————————————˝
For a thorough explanation of the Prophesy and its many features, please read this manual carefully and keep it for future reference.
1

Safety Precautions
——————————————————————————————————————————
NOTE: IT IS VERY IMPORTANT THAT YOU READ THIS SECTION TO PROVIDE YEARS OF TROUBLE FREE USE. THIS UNIT REQUIRES CAREFUL HANDLING.
——————————————————————————————————————————
•All warnings on this equipment and in the operating instructions should be adhered to and all operating instructions should be followed.
•Do not use this equipment near water. Care should be taken so that objects do not fall and liquids are not spilled into the unit through any openings.
•All safety and operating instructions must be read before operating this equipment. Instructions should be retained for future use.
•All warnings on the equipment and in the operating instructions should be adhered to, and all operating instructions should be followed.
•Care should be taken so that objects do not fall and liquids are not spilled into the enclosure through any openings.
•The power cord should be unplugged from the outlet when left unused for a long period of time.
•This equipment should not be used near water - for example, near a bathtub, laundry tub, in a wet basement, near a swimming pool, etc.
•The power cord to this equipment should be routed so that it is not likely to be walked on or pinched by items placed upon or against it. Care should be taken as to not overload any one AC power outlet with too may appliances. The power cord should be unplugged from the outlet when the equipment is left unused for a long period of time.
•This unit should be connected to a power supply only of the type recommended by the manufacturer as described in the operating instructions.
•This equipment should be situated so that its location or position does not interfere with proper ventilation. This equipment should be kept away from heat sources.
——————————————————————————————
•This unit should be serviced by qualified service personnel when:
-The power supply cord or the plug has been damaged, or
-Objects have fallen, or liquids have been spilled into the unit, or
-The unit has been exposed to rain or water, or
-The unit does not appear to operate normally or exhibits a marked change in performance, or
-The unit has been dropped, or the enclosure damaged.
——————————————————————————————
DO NOT ATTEMPT TO SERVICE THE EQUIPMENT. THIS EQUIPMENT SHOULD BE SERVICED BY QUALIFIED SERVICE PERSONNEL ONLY. DO NOT REMOVE THE COVER FROM THIS EQUIPMENT AT ANY TIME. DO NOT
MAKE ANY INTERNAL ADJUSTMENTS OR ADDITIONS TO THIS EQUIPMENT AT ANY TIME. DO NOT TAMPER WITH THE INTERNAL ELECTRONIC COMPONENTS AT ANY TIME. FAILURE TO FOLLOW THESE INSTRUCTIONS
MAY VOID WARRANTY SERVICE TO THIS EQUIPMENT, AS WELL AS CAUSING SHOCK HAZARD.
Power Requirements
This unit accepts power from the 9VAC/3.4A adaptor supplied with the unit. This 9 volt RMS AC voltage is internally processed by a voltage doubler which generates a bipolar ±15 volts to maintain the headroom and sound quality of professional, studio quality equipment. Using an external power source such as this minimizes excessive noise and hum problems often associated with internal transformers, providing optimal performance for the user.
Operating Temperature
Do not expose this unit to excessive heat. This unit is designed to operate between 32° F and 104° F (0° C and 40° C). This unit may not function properly under extreme temperatures.
2
2. Front Panel
|
122 |
HOT LEAD |
<- MEGA DRIVE |
|
|
|
|
|
|
|
|
|
|
|
|
|
|
|
|
||||||||||||||||||||||||
|
CHORUS->PITCH-> |
>----- - |
|
|
----- |
|
|
|
|
|
|
|
|
|
|
|
|
|
|
|
|
|
|
|
|
|
|
|
|
||||||||||||||
|
|
|
|
|
|
|
|
|
|
|
|
|
|
|
|
|
|
|
|
|
|
|
|
|
|
|
|
|
|
|
|
|
|
|
|
|
|
|
|
|
|
|
|
|
|
|
|
|
|
|
|
|
|
|
|
|
|
|
|
|
|
|
|
|
|
|
|
|
|
|
|
|
|
|
|
|
|
|
|
|
|
|
|
|
|
|
|
|
|
|
|
|
|
|
|
|
|
|
|
|
|
|
|
|
|
|
|
|
|
|
|
|
|
|
|
|
|
|
|
|
|
|
|
|
|
|
|
|
|
|
|
|
|
|
|
|
|
|
|
|
|
|
|
|
|
|
|
|
|
|
|
|
|
|
|
|
|
|
|
|
|
|
|
|
|
|
|
|
|
|
|
|
|
|
|
|
|
|
|
|
|
|
|
|
|
|
|
|
|
|
|
|
|
|
|
|
|
|
|
|
|
|
|
|
|
|
|
|
|
|
|
|
|
|
|
|
|
|
|
|
|
|
|
|
|
|
|
|
|
|
|
|
|
|
|
|
|
|
|
|
|
|
|
|
|
|
|
|
|
|
|
|
|
|
|
|
|
|
|
|
|
|
|
|
|
|
|
|
|
|
|
|
|
|
|
|
|
|
|
|
|
|
|
|
|
|
|
|
|
|
|
|
|
|
|
|
|
|
|
|
|
|
|
|
|
|
|
|
|
|
|
|
|
|
|
|
|
|
|
|
|
|
|
|
|
|
|
|
|
|
|
|
|
|
|
|
|
|
|
|
|
|
|
|
|
|
|
|
|
|
|
|
|
|
|
|
|
|
|
|
|
|
|
|
|
|
|
|
|
|
|
|
|
|
|
|
|
|
|
|
|
|
|
|
|
|
|
|
|
|
|
|
|
|
|
|
|
|
|
|
|
|
|
|
|
|
|
|
|
|
|
|
|
|
|
|
|
|
|
|
|
|
|
|
|
|
|
|
|
|
|
|
|
|
|
|
|
|
|
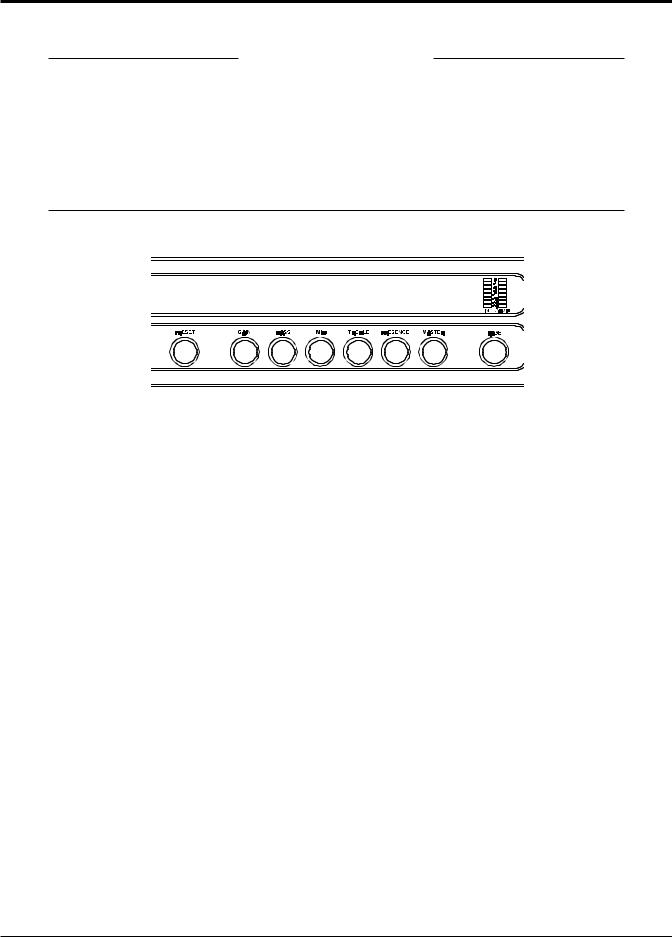
1POWER switch
¯¯ ¯ ¯ ¯ ¯ ¯ ¯ ¯ ¯ ¯ ¯ ¯ ¯ ¯ ¯ ¯ ¯ ¯ ¯ ¯ ¯ ¯ ¯ ¯ ¯ ¯ ¯ ¯ ¯ ¯ ¯ ¯ ¯ ¯ ¯ ¯ ¯ ¯ ¯ ¯ ¯ ¯ ¯ ¯ ¯
2PRESET control
¯¯ ¯ ¯ ¯ ¯ ¯ ¯ ¯ ¯ ¯ ¯ ¯ ¯ ¯ ¯ ¯ ¯ ¯ ¯ ¯ ¯ ¯ ¯ ¯ ¯ ¯ ¯ ¯ ¯ ¯ ¯ ¯ ¯ ¯ ¯ ¯ ¯ ¯ ¯ ¯ ¯ ¯ ¯ ¯ ¯
The PRESET control is used to scroll through the Prophesy's 127 presets. Each preset is activated automatically when it is displayed.
3DISPLAY panel
¯¯ ¯ ¯ ¯ ¯ ¯ ¯ ¯ ¯ ¯ ¯ ¯ ¯ ¯ ¯ ¯ ¯ ¯ ¯ ¯ ¯ ¯ ¯ ¯ ¯ ¯ ¯ ¯ ¯ ¯ ¯ ¯ ¯ ¯ ¯ ¯ ¯ ¯ ¯ ¯ ¯ ¯ ¯ ¯ ¯
4GAIN control
¯¯ ¯ ¯ ¯ ¯ ¯ ¯ ¯ ¯ ¯ ¯ ¯ ¯ ¯ ¯ ¯ ¯ ¯ ¯ ¯ ¯ ¯ ¯ ¯ ¯ ¯ ¯ ¯ ¯ ¯ ¯ ¯ ¯ ¯ ¯ ¯ ¯ ¯ ¯ ¯ ¯ ¯ ¯ ¯ ¯
The function of the GAIN control is dependent upon the current status of the display:
•When the title for the current preset is displayed, this control can be used to instantly display the first Preamp page. This control then provides instant access to the Gain parameter of that page.
•When any parameter page is displayed, this control is used to edit the parameter that is displayed directly above it. (Note that this control is not used when no parameters are displayed above it.)
3

5BASS control
¯¯ ¯ ¯ ¯ ¯ ¯ ¯ ¯ ¯ ¯ ¯ ¯ ¯ ¯ ¯ ¯ ¯ ¯ ¯ ¯ ¯ ¯ ¯ ¯ ¯ ¯ ¯ ¯ ¯ ¯ ¯ ¯ ¯ ¯ ¯ ¯ ¯ ¯ ¯ ¯ ¯ ¯ ¯ ¯ ¯ ¯
The function of the BASS control is dependent upon the current status of the display:
•When the title for the current preset is displayed, this control can be used to instantly display the first Preamp page. This control then provides instant access to the Bass parameter of that page.
•When any parameter page is displayed, this control is used to edit the parameter that is displayed directly above it. (Note that this control is not used when no parameters are displayed above it.)
6MID control
¯¯ ¯ ¯ ¯ ¯ ¯ ¯ ¯ ¯ ¯ ¯ ¯ ¯ ¯ ¯ ¯ ¯ ¯ ¯ ¯ ¯ ¯ ¯ ¯ ¯ ¯ ¯ ¯ ¯ ¯ ¯ ¯ ¯ ¯ ¯ ¯ ¯ ¯ ¯ ¯ ¯ ¯ ¯ ¯ ¯ ¯
The function of the MID control is dependent upon the current status of the display:
•When the title for the current preset is displayed, this control can be used to instantly display the first Preamp page. This control then provides instant access to the Mid parameter of that page.
•When any parameter page is displayed, this control is used to edit the parameter that is displayed directly above it. (Note that this control is not used when no parameters are displayed above it.)
7TREBLE control
¯¯ ¯ ¯ ¯ ¯ ¯ ¯ ¯ ¯ ¯ ¯ ¯ ¯ ¯ ¯ ¯ ¯ ¯ ¯ ¯ ¯ ¯ ¯ ¯ ¯ ¯ ¯ ¯ ¯ ¯ ¯ ¯ ¯ ¯ ¯ ¯ ¯ ¯ ¯ ¯ ¯ ¯ ¯ ¯ ¯ ¯
The function of the TREBLE control is dependent upon the current status of the display:
•When the title for the current preset is displayed, this control can be used to instantly display the first Preamp page. This control then provides instant access to the Treble parameter of that page.
•When any parameter page is displayed, this control is used to edit the parameter that is displayed directly above it. (Note that this control is not used when no parameters are displayed above it.)
8PRESENCE control
¯¯ ¯ ¯ ¯ ¯ ¯ ¯ ¯ ¯ ¯ ¯ ¯ ¯ ¯ ¯ ¯ ¯ ¯ ¯ ¯ ¯ ¯ ¯ ¯ ¯ ¯ ¯ ¯ ¯ ¯ ¯ ¯ ¯ ¯ ¯ ¯ ¯ ¯ ¯ ¯ ¯ ¯ ¯ ¯ ¯ ¯
The function of the PRESENCE control is dependent upon the current status of the display:
•When the title for the current preset is displayed, this control can be used to instantly display the first Preamp page. This control then provides instant access to the Presence parameter of that page.
•When any parameter page is displayed, this control is used to edit the parameter that is displayed directly above it. (Note that this control is not used when no parameters are displayed above it.)
4

9MASTER control
¯¯ ¯ ¯ ¯ ¯ ¯ ¯ ¯ ¯ ¯ ¯ ¯ ¯ ¯ ¯ ¯ ¯ ¯ ¯ ¯ ¯ ¯ ¯ ¯ ¯ ¯ ¯ ¯ ¯ ¯ ¯ ¯ ¯ ¯ ¯ ¯ ¯ ¯ ¯ ¯ ¯ ¯ ¯ ¯ ¯ ¯
The function of the MASTER control is dependent upon the current status of the display:
•When the title for the current preset is displayed, this control can be used to instantly display the first Preamp page. This control then provides instant access to the Master parameter of that page.
•When any parameter page is displayed, this control is used to edit the parameter that is displayed directly above it. (Note that this control is not used when no parameters are displayed above it.)
10PAGE control
¯¯ ¯ ¯ ¯ ¯ ¯ ¯ ¯ ¯ ¯ ¯ ¯ ¯ ¯ ¯ ¯ ¯ ¯ ¯ ¯ ¯ ¯ ¯ ¯ ¯ ¯ ¯ ¯ ¯ ¯ ¯ ¯ ¯ ¯ ¯ ¯ ¯ ¯ ¯ ¯ ¯ ¯ ¯ ¯ ¯ ¯
The PAGE control is used to scroll through the display pages of the current preset, where each page displays adjustable parameters for the active effects and Prophesy functions.
11INput and COMPression meters
¯¯ ¯ ¯ ¯ ¯ ¯ ¯ ¯ ¯ ¯ ¯ ¯ ¯ ¯ ¯ ¯ ¯ ¯ ¯ ¯ ¯ ¯ ¯ ¯ ¯ ¯ ¯ ¯ ¯ ¯ ¯ ¯ ¯ ¯ ¯ ¯ ¯ ¯ ¯ ¯ ¯ ¯ ¯ ¯ ¯ ¯
The input meter provides a visual indication of the peak level of the input signal. For the optimal signal-to-noise ratio, it is best to adjust the input level so that the top-most LED (0dB) is rarely lit. This will guard against overdriving the unit.
The compression meter provides a visual indication of the level of compression currently applied to the signal.
These meters are also used to indicate the stereo output levels when mixer function pages are displayed.
12 Button group
¯ ¯ ¯ ¯ ¯ ¯ ¯ ¯ ¯ ¯ ¯ ¯ ¯ ¯ ¯ ¯ ¯ ¯ ¯ ¯ ¯ ¯ ¯ ¯ ¯ ¯ ¯ ¯ ¯ ¯ ¯ ¯ ¯ ¯ ¯ ¯ ¯ ¯ ¯ ¯ ¯ ¯ ¯ ¯ ¯ ¯ ¯
The group of buttons to the right of the display perform various tasks, and light up to provide a visual indication of active effects and functions. These buttons each operate as described below.
————————————————————————————————————————————————
Allows you to compare a preset that has been modified to the original, stored preset. This button is lit when listening to the stored version of the preset.
————————————————————————————————————————————————
Permanently saves any changes made to a preset to Prophesy memory. This button lights when a preset page is displayed which has one or more parameters that have been altered from their stored values, or the preset title page of an altered preset is displayed.
This button also lights when the Preset Utility page is displayed, indicating that a MIDI dump or factory restore may be initiated.
5

————————————————————————————————————————————————
When pressed, switches all Prophesy effects out of the signal path. This button is lit when the effects are bypassed.
————————————————————————————————————————————————
Fully attenuates the Prophesy outputs and activates the Prophesy built-in tuner. This button lights when the Prophesy output is muted.
————————————————————————————————————————————————
Instantly accesses the Compressor page for the current preset. Once the
Compressor page has been displayed, this button can then be used to switch the compressor in and out of the signal path. This button is lit when the compressor is active.
————————————————————————————————————————————————
Instantly accesses the Wah page for the current preset. Once the Wah page has been displayed, this button can then be used to switch the wah in and out of the signal path. This button is lit when the wah is active.
————————————————————————————————————————————————
Instantly accesses the Phaser page for the current preset if it has been assigned. When the Phaser page is displayed, this button can then be used to switch the phaser in and out of the signal path. This button is lit when the phaser effect is active.
————————————————————————————————————————————————
Instantly accesses the first Preamp page for the current preset. Once the Preamp page is displayed, this button can then be used to switch the preamp in and out of the signal path. When lit, the preamp is active. When not lit, the preamp is bypassed and the signal only passes through any active effects.
————————————————————————————————————————————————
Instantly accesses the Tremolo page for the current preset. When the Tremolo page is displayed, this button can then be used to switch the tremolo in and out of the signal path. This button is lit when the tremolo effect is active.
————————————————————————————————————————————————
Switches the Loop in or out if it has been assigned.
————————————————————————————————————————————————
When pressed, looks to see if one of the three modulation effects is assigned (flange, chorus or rotary). If the particular effect it is searching for is assigned to the preset, the Prophesy displays the first page for that effect. If not, displays a message indicating that the effect is not currently assigned.
Additional presses of the MODU button perform the same search for the remaining two modulation effects.
————————————————————————————————————————————————
Instantly accesses the first Pitch Shift page for the current preset if it has been assigned. When the first Pitch Shift page is displayed, this button can then be used to switch the pitch shift effect in and out of the signal path. This button is lit when the pitch shift effect is active.
————————————————————————————————————————————————
When viewing any page other than a delay or tremolo page, this button allows you to tap the current delay time, tremolo rate, or both (depending on the current setting of the TAPBTN parameter on the Tap button page).
6

When viewing the delay time parameter, this button allows you to tap the current delay time.
When viewing the tremolo rate parameter, this button allows you to tap the current tremolo rate.
————————————————————————————————————————————————
Instantly accesses the first Delay page for the current preset if it has been assigned. When the first Delay page is displayed, this button can then be used to switch the delay effect in and out of the signal path. This button is lit when the delay effect is active.
————————————————————————————————————————————————
Instantly accesses the first Reverb page for the current preset. When the first Reverb page is displayed, this button can then be used to switch the reverb effect in and out of the signal path. This button is lit when the reverb effect is active.
————————————————————————————————————————————————
Instantly accesses the first Mixer page for the current preset.
————————————————————————————————————————————————
13 OUTPUT LEVEL control
¯ ¯ ¯ ¯ ¯ ¯ ¯ ¯ ¯ ¯ ¯ ¯ ¯ ¯ ¯ ¯ ¯ ¯ ¯ ¯ ¯ ¯ ¯ ¯ ¯ ¯ ¯ ¯ ¯ ¯ ¯ ¯ ¯ ¯ ¯ ¯ ¯ ¯ ¯ ¯ ¯ ¯ ¯ ¯ ¯ ¯ ¯
The OUPUT LEVEL control determines the overall output level of the Prophesy at the MAINOUT jacks only.
14 INPUT LEVEL control
¯ ¯ ¯ ¯ ¯ ¯ ¯ ¯ ¯ ¯ ¯ ¯ ¯ ¯ ¯ ¯ ¯ ¯ ¯ ¯ ¯ ¯ ¯ ¯ ¯ ¯ ¯ ¯ ¯ ¯ ¯ ¯ ¯ ¯ ¯ ¯ ¯ ¯ ¯ ¯ ¯ ¯ ¯ ¯ ¯ ¯ ¯
The INPUT LEVEL control adjusts the Prophesy's gain to match the signal level at its input. Use the input meter (11) to determine the optimal setting of this control.
15 INPUT jack
¯ ¯ ¯ ¯ ¯ ¯ ¯ ¯ ¯ ¯ ¯ ¯ ¯ ¯ ¯ ¯ ¯ ¯ ¯ ¯ ¯ ¯ ¯ ¯ ¯ ¯ ¯ ¯ ¯ ¯ ¯ ¯ ¯ ¯ ¯ ¯ ¯ ¯ ¯ ¯ ¯ ¯ ¯ ¯ ¯ ¯ ¯
This standard unbalanced ¼” jack provides an input to the Prophesy. This jack has the same function as the rear panel INPUT jack.
Note that the front and rear INPUT jacks should never be used simultaneously.
This jack should be used when plugging a guitar in and out on a regular basis. The rear INPUT jack should be used for a permanent input connection, such as in a rack with a wireless receiver.
7
3. Rear Panel
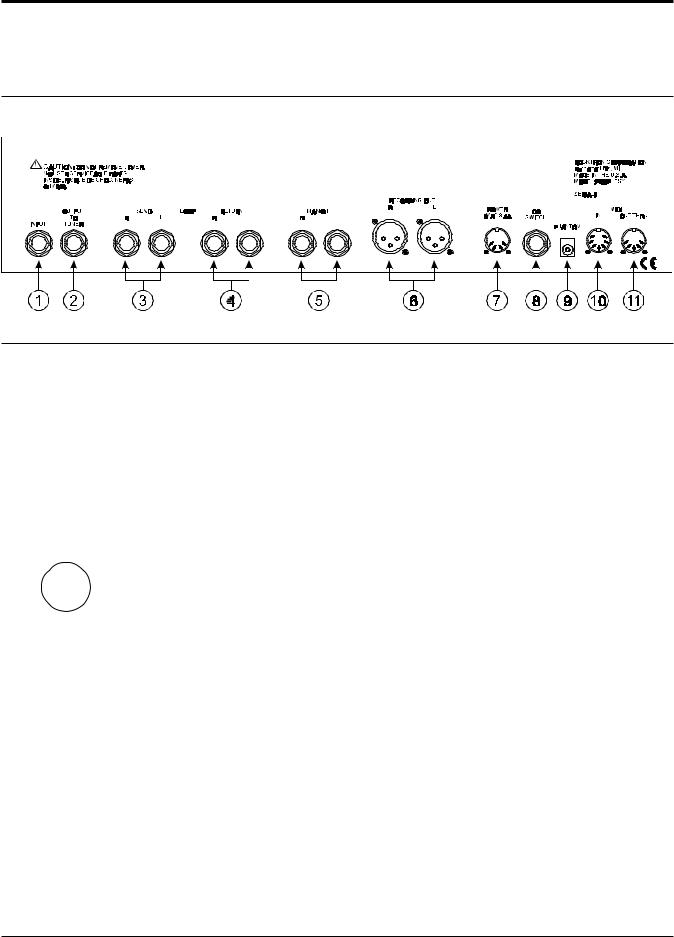
1 INPUT jack
¯ ¯ ¯ ¯ ¯ ¯ ¯ ¯ ¯ ¯ ¯ ¯ ¯ ¯ ¯ ¯ ¯ ¯ ¯ ¯ ¯ ¯ ¯ ¯ ¯ ¯ ¯ ¯ ¯ ¯ ¯ ¯ ¯ ¯ ¯ ¯ ¯ ¯ ¯ ¯ ¯ ¯ ¯ ¯ ¯ ¯
G
About the Effects
Loop
The Prophesy effects loop allows you to patch a series of one or more other effect units into the Prophesy's signal path at a location determined by the user.
An example of an effects loop configuration is shown in Section 4: Connections.
This standard, unbalanced ¼" mono jack provides the same function as the front panel INPUT jack (i.e. provides an input to the Prophesy). Please note that the front and rear input jacks should not be used simultaneously.
2 OUTPUT TO TUNER jack
¯ ¯ ¯ ¯ ¯ ¯ ¯ ¯ ¯ ¯ ¯ ¯ ¯ ¯ ¯ ¯ ¯ ¯ ¯ ¯ ¯ ¯ ¯ ¯ ¯ ¯ ¯ ¯ ¯ ¯ ¯ ¯ ¯ ¯ ¯ ¯ ¯ ¯ ¯ ¯ ¯ ¯ ¯ ¯ ¯ ¯
This standard, unbalanced ¼" mono jack provides the same signal that is applied to the INPUT jack (1) for use with an external electronic tuner.
3 LOOP SEND jacks
¯ ¯ ¯ ¯ ¯ ¯ ¯ ¯ ¯ ¯ ¯ ¯ ¯ ¯ ¯ ¯ ¯ ¯ ¯ ¯ ¯ ¯ ¯ ¯ ¯ ¯ ¯ ¯ ¯ ¯ ¯ ¯ ¯ ¯ ¯ ¯ ¯ ¯ ¯ ¯ ¯ ¯ ¯ ¯ ¯ ¯
The Left and Right LOOP SEND jacks provide left and right output signals to be fed to the left and right inputs of the first outboard effects device in the effects loop.
4 LOOP RETURN jacks
¯ ¯ ¯ ¯ ¯ ¯ ¯ ¯ ¯ ¯ ¯ ¯ ¯ ¯ ¯ ¯ ¯ ¯ ¯ ¯ ¯ ¯ ¯ ¯ ¯ ¯ ¯ ¯ ¯ ¯ ¯ ¯ ¯ ¯ ¯ ¯ ¯ ¯ ¯ ¯ ¯ ¯ ¯ ¯ ¯ ¯
The Left and Right LOOP RETURN jacks receive the left and right output signals from the outputs of the last outboard effects device in the effects loop.
5 MAINOUT jacks
¯ ¯ ¯ ¯ ¯ ¯ ¯ ¯ ¯ ¯ ¯ ¯ ¯ ¯ ¯ ¯ ¯ ¯ ¯ ¯ ¯ ¯ ¯ ¯ ¯ ¯ ¯ ¯ ¯ ¯ ¯ ¯ ¯ ¯ ¯ ¯ ¯ ¯ ¯ ¯ ¯ ¯ ¯ ¯ ¯ ¯
These ¼” mono jacks are used to connect the Prophesy to the inputs of a stereo power amplifier. The output level of these jacks is controlled by the OUTPUT LEVEL control on the front panel.
8

G
About MIDI chains
Inherently in MIDI there is a limit to the number of devices which can be chained together (series connected). With more than three devices, a slight distortion of the MIDI signal can occur (due to signal degradation) which can cause an error in MIDI signal transmission.
Should this occur, a MIDI box can be used which connects directly to the device transmitting MIDI information. A MIDI box has multiple connectors for the multiple devices receiving
MIDI.
Note that MIDI cables should not exceed 50 feet (15 meters) in length.
6 RECORDING OUT jacks
¯ ¯ ¯ ¯ ¯ ¯ ¯ ¯ ¯ ¯ ¯ ¯ ¯ ¯ ¯ ¯ ¯ ¯ ¯ ¯ ¯ ¯ ¯ ¯ ¯ ¯ ¯ ¯ ¯ ¯ ¯ ¯ ¯ ¯ ¯ ¯ ¯ ¯ ¯ ¯ ¯ ¯ ¯ ¯ ¯ ¯
These XLR connectors provide left and right output signals that are suitable to be fed directly into a mixing console or recording device. Note that the Prophesy's Speaker Simulation function operates only on the RECORDING OUT outputs.
The output level of these jacks is independent of the OUTPUT LEVEL control on the front panel and is only effected by internal parameter settings. This would allow you to adjust your stage volume through the MAINOUT jacks without changing the level to the mixing board.
7 POWER jack
¯ ¯ ¯ ¯ ¯ ¯ ¯ ¯ ¯ ¯ ¯ ¯ ¯ ¯ ¯ ¯ ¯ ¯ ¯ ¯ ¯ ¯ ¯ ¯ ¯ ¯ ¯ ¯ ¯ ¯ ¯ ¯ ¯ ¯ ¯ ¯ ¯ ¯ ¯ ¯ ¯ ¯ ¯ ¯ ¯ ¯
This 4-pin DIN connector accepts power from the 9VAC adapter supplied with the unit.
8 FOOT SWITCH jack
¯ ¯ ¯ ¯ ¯ ¯ ¯ ¯ ¯ ¯ ¯ ¯ ¯ ¯ ¯ ¯ ¯ ¯ ¯ ¯ ¯ ¯ ¯ ¯ ¯ ¯ ¯ ¯ ¯ ¯ ¯ ¯ ¯ ¯ ¯ ¯ ¯ ¯ ¯ ¯ ¯ ¯ ¯ ¯ ¯ ¯
This ¼” TRS jack allows for the connection of a dual function, latching-type footswitch. One function provides the Mute function, while the other provides the Tap Delay function.
9 PHANTOM jack
¯ ¯ ¯ ¯ ¯ ¯ ¯ ¯ ¯ ¯ ¯ ¯ ¯ ¯ ¯ ¯ ¯ ¯ ¯ ¯ ¯ ¯ ¯ ¯ ¯ ¯ ¯ ¯ ¯ ¯ ¯ ¯ ¯ ¯ ¯ ¯ ¯ ¯ ¯ ¯ ¯ ¯ ¯ ¯ ¯ ¯
This jack provides the ability to power a Rocktron MIDI Mate™ foot controller from a seven pin MIDI cable which connects from the MIDI Mate to the MIDI IN jack on the rear panel of the Prophesy—thus eliminating the need to find an AC outlet near where the footpedal would be placed during a performance, or the need to run an extension cord out to the MIDI Mate.
Instead of inserting the adaptor into the MIDI Mate POWER jack, plug it into the PHANTOM POWER jack on the Prophesy. This will power the MIDI Mate through pins 6 and 7 of the MIDI cable connecting the two units. A 7-pin MIDI cable must be used for this feature and is available through your Rocktron dealer.
10 MIDI IN jack
¯ ¯ ¯ ¯ ¯ ¯ ¯ ¯ ¯ ¯ ¯ ¯ ¯ ¯ ¯ ¯ ¯ ¯ ¯ ¯ ¯ ¯ ¯ ¯ ¯ ¯ ¯ ¯ ¯ ¯ ¯ ¯ ¯ ¯ ¯ ¯ ¯ ¯ ¯ ¯ ¯ ¯ ¯ ¯ ¯ ¯
This 7-pin DIN connector receives MIDI information from the device which is transmitting the MIDI commands for the Prophesy to execute.
11 MIDI OUT/THRU jack
¯ ¯ ¯ ¯ ¯ ¯ ¯ ¯ ¯ ¯ ¯ ¯ ¯ ¯ ¯ ¯ ¯ ¯ ¯ ¯ ¯ ¯ ¯ ¯ ¯ ¯ ¯ ¯ ¯ ¯ ¯ ¯ ¯ ¯ ¯ ¯ ¯ ¯ ¯ ¯ ¯ ¯ ¯ ¯ ¯ ¯
This standard 5-pin DIN connector passes on the MIDI information that is received at the MIDI IN jack to other MlDI-compatible devices via a MIDI cable. It also outputs MIDI data when performing a memory dump.
9
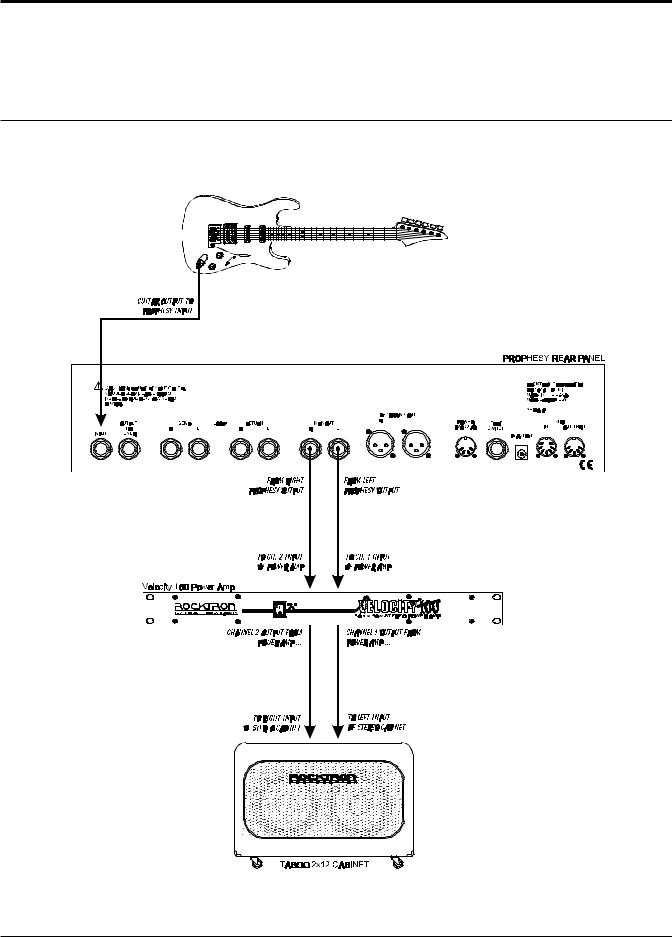
4. Connections
Used with a stereo power amp and stereo cabinet
10
Using direct into a mixing console
11
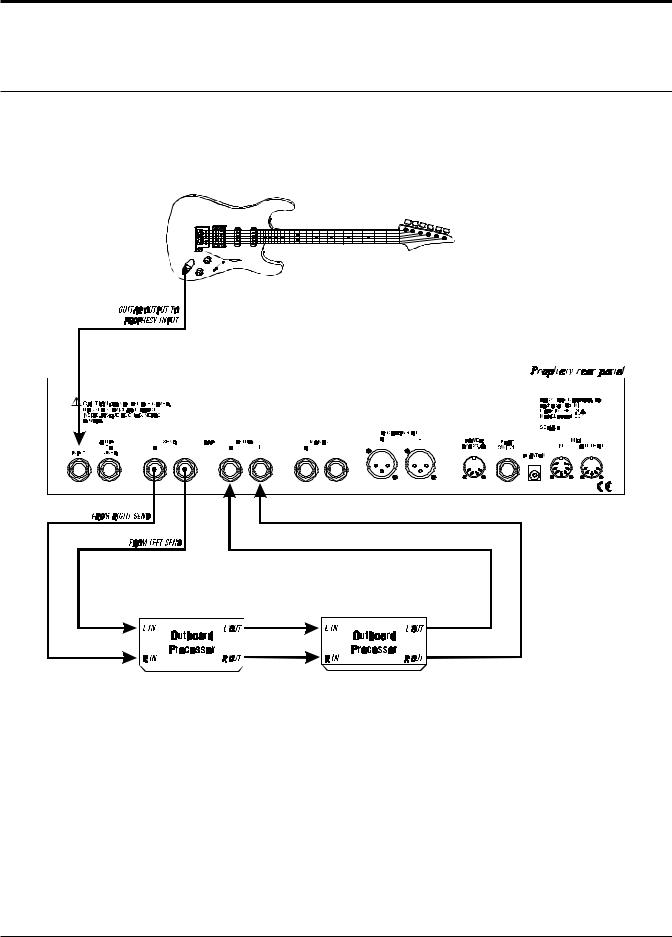
Using the Prophesy Effects Loop
12

5. Basic Operation
G
Note
The first preset page displays any effects that are user-assigned to the current preset (that aren't automatically included).
Effects that are active in the signal path are indicated by the corresponding lit buttons to the right of the display.
Preset Basics
The Prophesy provides 127 unique, stored sounds called presets. Each Prophesy preset remembers effect settings, mixer settings and MIDI information which can be recalled at any time.
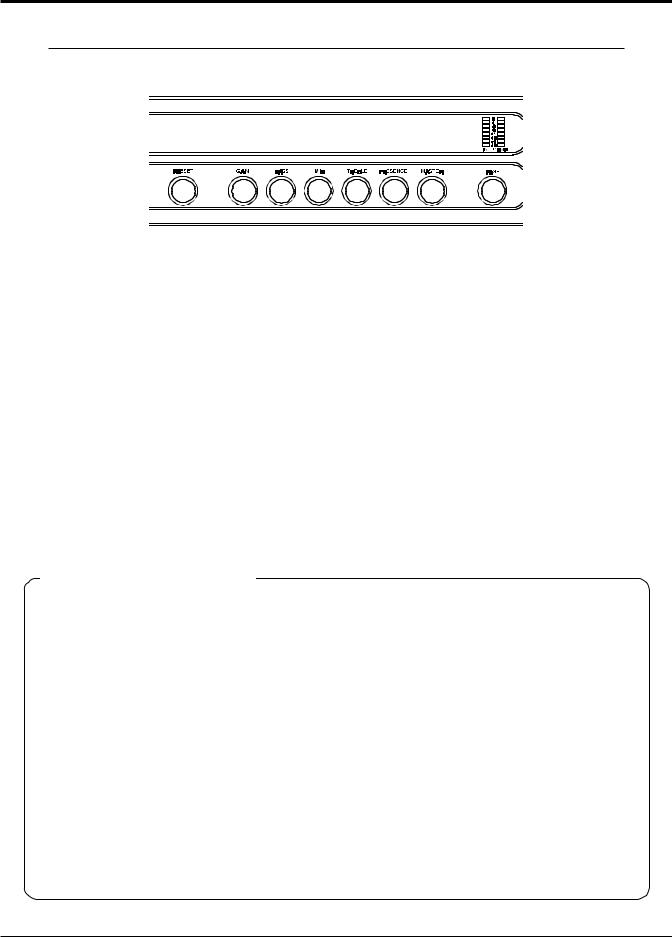
Presets are instantly recalled when accessed via the front panel PRESET control or a MIDI footswitch. When a preset is selected, the Prophesy will display the preset number, channel, title, and any additional effects that have been assigned to the preset which aren't automatically included with every preset (HUSH, compression, wah, tremolo and reverb are automatically included with every preset). Active effects are indicated via illuminated buttons at the right of the display, as shown below:
122 |
HOT LEAD |
<- MEGA DRIVE |
CHORUS->PITCH-> |
----- -> ----- |
Figure 5-1: Display shows preset number (122), preamp channel ("Mega Drive"), preset title ("Hot Lead") and assigned effects (Chorus, Pitch Shift).
The sound of a particular preset is dependent upon the preamp channel that is selected, which effects are selected, and how each of those effects is configured. Each effect provides numerous parameters that can be edited to change its characteristics, and therefore change the sound of the preset.
1 3

Preset Pages
The initial information that is displayed when a preset is recalled represents the first page for the preset. All remaining parameters for the preset (i.e. mixer parameters, effect parameters, etc.) are located on subsequent pages which are accessible via the front panel PAGE control. Many pages can also be instantly accessed by the corresponding buttons to the right of the display.
Each preset page displays up to six parameters for a particular effect or function, each of which can be edited to change the sound of the preset. Note that some effects and functions (such as reverb and the mixer) have many editable parameters, and therefore occupy numerous successive pages.
Turning the PAGE control will scroll through the successive pages of the current preset. The pages for each preset are organized as shown in Figure 5-2.
1 4

Figure 5-2: Basic layout of Prophesy preset pages
1 5
Adjusting parameters
The six controls grouped directly below the display are used to edit the displayed parameter values for each page. All display pages are configured so that each parameter can be adjusted by the control that is located directly beneath it.
122 |
CHORUS |
LVL1 |
PAN1 |
DLY1 |
DEPTH1 |
RATE1 |
ON |
- 2 . 0 |
LEFT |
88 |
50 |
25 |
Figure 5-3: Each displayed parameter can be adjusted by the control located directly below it.
Instant access controls
When a preset is recalled and the preset title page is displayed, the six controls below the display can be used to instantly access the gain, basic EQ and master volume parameters for the current preset (Figure 5-4). Turning any of these controls when viewing the preset title page will immediately display the first preamp page — providing instant access to some of the most commonly-edited parameters.
GAIN |
BASS |
MID |
TREB |
PRES |
MASTER |
8 . 0 |
5 . 5 |
3 . 6 |
7 . 5 |
6 . 0 |
6 . 0 |
Figure 5-4: Turning any of the six controls above when viewing a preset title will instantly recall the first preamp page, allowing for instant editing of these common parameters.
Prophesy effects
Each Prophesy preset can have up to eight effects assigned to it. Of these eight, there are four that are always automatically assigned to every preset — these are compression, wah, tremolo and reverb. The table on the following page lists all of the effects that can be assigned to a Prophesy preset.
1 6

G
Note!
Although some effects are automatically assigned to each preset, they do not necessarily have to be active in the signal path (i.e., they can be switched in or out at any time).
PROPHESY EFFECTS
|
Effect |
Pre/Post Preamp |
Assignment |
|
|
|
|
|
Compressor |
Pre |
Automatic |
|
Wah |
Pre |
Automatic |
|
Tremolo |
Post |
Automatic |
|
Reverb |
Post |
Automatic |
|
Phaser |
User Defined |
User Assignable |
|
4-voice Chorus |
User Defined |
User Assignable |
|
Ducker Delay |
User Defined |
User Assignable |
|
Pitch Shift |
User Defined |
User Assignable |
|
Flanger |
User Defined |
User Assignable |
|
Rotary |
User Defined |
User Assignable |
|
Effect Loop |
User Defined |
User Assignable |
|
|
|
|
Effect Configuration
Of the eight possible effects per preset, three are configured as pre-effects (located before the gain section in the signal path) while the remaining five are post-effects (located after the gain section), as shown in Figure 5-5 below.
Figure 5-5: Simplified Prophesy effect configuration
You can think of the pre-effects like the stomp-boxes that you would normally connect between the guitar and the input of an amplifier (before any gain is applied to the signal)— effects like phasers, wah pedals and compressors. Post-effects are those that you would run through the effects loop of the amp (after gain has been applied to the signal)—these include the higher-end processing units which provide effects such as reverb, delay and chorus. However, you are free to assign any available effects to any of the user-assignable locations designated in Figure 5-5.
1 7
Assigning Effects to a Preset
The user-assignable Pre Effect and Post Effect pages each begin with a simple page which displays the effect currently assigned to the respective location, as shown in Figure 5-6. The unit will display "EMPTY" if no effect has been assigned to the location, as shown in Figure 5-7.
POST EFFECT 1 122 CHORUS
Figure 5-6: Post Effect 1 status/assign page with the Chorus effect assigned
POST EFFECT 1 122 EMPTY
Figure 5-7: Post Effect 1 status/assign page with no effect assigned
—————————————————————————————————————————————
1 To assign an effect to a preset, first select the location where the effect is to be executed in the signal path (Pre effect, Post Effect 1, Post Effect 2 or Post Effect 3) using the PAGE control.
POST EFFECT 2
EMPTY
Continued ð
1 8

G
Note!
It is not necessary to store changes made to a particular page before accessing another page of the same preset, as all changes remain in memory until another preset is recalled.
However, it is important to note that any changes made to a preset will be lost if another preset is recalled before those changes are stored.
—————————————————————————————————————————————
2The display should look like Figure 5-6 if an effect has already been assigned to the selected location, or like Figure 5-7 if one has not. The control labeled "GAIN" can be used to scroll through all of the available effects that can be assigned.
POST EFFECT 2
CHORUS
—————————————————————————————————————————————
3Once an effect has been selected, use the PAGE control to access the next page, which will be the first page of the selected effect. The effect can be switched in or out of the signal path via the its button located to right of the display. If an effect does not have its own button (such as Chorus), it can be switched in or out via the first parameter of the first page for the effect.
CHORUS LVL1 PAN1 DLY1 DEPTH1 RATE1
ON |
0.0 100 88 |
50 |
25 |
|
|
|
|
|
|
|
|
|
|
|
|
Note that the modified preset must be stored in order for the changes that have been made to be activated the next time the preset is recalled. This is described in the following section.
—————————————————————————————————————————————
Saving your changes
A modified preset must be stored in order for the changes that have been made to be activated the next time the preset is recalled.
—————————————————————————————————————————————
1 To save a modified preset, press the STORE button once to initiate the storing procedure. The Prophesy will display "SELECT DESTINATION PRESET". This allows you to store the modified preset into a new location, while saving the original preset at the present location.
SELECT DESTINATION PRESET
1 9
G
Cancelling the store process
Turning the PAGE control at any time prior to pressing the STORE button a second time (Step 3) will cancel the storing process.
—————————————————————————————————————————————
2If you wish to save the new preset to a new preset number, use the PRESET control to select the new preset number. Note that the preset at the currently selected location will be written over when the storing process is completed.
If you do not wish to store the new preset at a different preset number, skip this step. Note that the original preset stored at this location will be written over once the storing process is complete.
—————————————————————————————————————————————
3Once the desired preset number has been selected, press the STORE button a second time. The Prophesy will display "STORING PRESET NOW" as it is storing the information, and "PRESET HAS BEEN STORED" when it is finished.
****** PRESET HAS BEEN STORED *****
Now the modified preset has been stored to the selected preset number and can be recalled at any time.
—————————————————————————————————————————————
Assignable Effects Loop
In addition to assigning Prophesy effects to the locations noted as "User-assignable" in Figure 5-5, the rear panel effects loop can also be assigned to any of these locations instead of an internal Prophesy effect. This effectively inserts any outboard effect(s) into the Prophesy signal path wherever you define!
2 0
Block Diagram
2 1

6. Pages and Parameters
This section details all of the pages displayed by the Prophesy and their respective parameters. Note that the pages that are accessible from any given preset is dependent upon which effects are assigned to it, therefore not all pages discussed in this section are accessible from every preset.
2 2
PRESET TITLE Page
The preset title page is the first page that is displayed when a preset is recalled. The preset title and current channel are displayed on the top line, while the bottom line indicates the effects that are currently assigned to the preset.
Preset Title Page
|
122 |
HOTLEAD |
4 <--MEGA DRIVE |
|
|
PHASER --> CHORUS -- |
> DELAY --> ----- |
|
|
|
|
|
|
|
|
|
|
|
|
2 3

HUSH® Page
HUSH® is Rocktron's patented single-ended noise reduction system, and is available in all presets. The HUSH system provided in the Prophesy is a fully digital implementation, modeled after the latest analog HUSH design, achieved through Digital Signal Processing (DSP).
How HUSH® works
The low level expander of the HUSH system operates like an electronic volume control. The analog version of the HUSH system utilizes a voltage-controlled amplifier (VCA) circuit which can control the gain between the input and the output from unity gain to 30, 40 or even 50dB of gain reduction. When the input signal is above the user-set threshold point, the VCA circuit remains at unity gain. (This means that the amplitude of the output signal will be equal to that of the input signal.) As the input signal level drops below the user preset threshold point, downward expansion will begin. It is at this point that the expander acts like an electronic volume control, gradually decreasing the output signal level relative to the input signal level. As the input signal drops further below the threshold point, downward expansion increases (see figure below). A drop in the input level by 20dB would cause the output level to drop approximately 40dB (i.e., 20dB of gain reduction). In the absence of any input signal, the expander will reduce the gain so that the noise floor becomes inaudible.
The HUSH circuit is located after the A/D converter in the signal chain to reduce any noise generated from the guitar and the A/D converter. This ensures a quiet input signal to the preamp section. Because the preamp section of the Prophesy is digital, it is virtually noise-free (even in the high-gain mode). Therefore, a quiet input signal to the preamp will result in a quiet output signal.
2 4
HUSH Page
122
HUSH |
H-THRES |
GLBOFFSET |
ON |
-44dB |
-3dB |
|
HUSH page parameters |
|
|
PARAMETER |
DESCRIPTION |
|
|
HUSH |
The HUSH parameter determines whether the HUSH® circuit is active for the |
|
current preset. (Off, On) |
HUSH THRESH |
The HUSH THRESHOLD parameter determines the level at which downward |
|
expansion begins. For example, if the HUSH THRESHOLD was set at -20dB and |
|
the input signal dropped below -20dB, downward expansion would begin. (-90dB |
|
to -27dB) |
GLB OFFSET |
The GLOBAL OFFSET parameter allows you to globally (all presets) adjust the |
|
HUSH® expander threshold. This means that if this parameter is altered from 0dB |
|
to +3dB, the expander threshold will become 3dB higher for all presets. This |
|
feature is useful when switching from a quiet guitar with passive electronics to a |
|
noisier guitar with active electronics, as the guitar with active electronics would |
|
require a higher threshold level in all presets. (-10dB to +30dB) |
|
|
Application Notes: HUSH
You may find that the HUSH is not even needed for tones created with the Clean American voicing or the Texas Blues voicing when using a low gain setting. As you move into a higher gain Texas Blues setting or the Vintage British and Mega Drive voicings, the gain rises and so does the noise floor. The higher the Gain parameter of these voicings is set, the more noise you'll hear. Before turning on the HUSH and adjusting the HUSH threshold, make sure you have the preamp gain and EQ settings the way you want them for that preset, then engage the HUSH.
To properly set the HUSH THRESHOLD:
Set the Threshold level so that your signal remains open during the quietest notes or decay's that you'll be playing, yet shuts down tight when you mute your strings.
Using different guitars:
It is also important to note that if you switch guitars during a performance and those guitars have a different output level, you should quickly use the INPUT LEVEL control on the face of the unit to set a proper input level for each guitar. This will allow your preset HUSH Threshold settings to work the same for all guitars. You may also use the GLOBAL OFFSET to fine tune the HUSH Threshold settings for all presets.
2 5

COMPRESSOR Page
The compressor allows you to compress the signal prior to the distortion stage. Compression is often used to maintain an even volume level when using clean tones, and is also used to increase sustain when using distorted tones.
Compressor Page
122 |
C-THRESH |
C-ATTACK |
C-RELEASE |
-22dB |
16ms |
.75sec |
|
|
Compressor page parameters |
|
|
|
|
|
|
PARAMETER |
DESCRIPTION |
|
|
|
|
|
|
C-THRESH |
The COMPRESSOR THRESHOLD parameter determines the input level (in dB) |
|
|
|
at which compression will begin. Lower settings of this parameter will result in |
|
|
|
more compression. (-30dB to -6dB) |
|
|
C-ATTACK |
The COMPRESSOR ATTACK parameter determines the speed (in milliseconds) |
|
|
|
in which the compressor will reach its maximum compression level after the input |
|
|
|
signal has exceeded the threshold level (set by the Compressor THRESHold |
|
|
|
parameter). (0 to 75ms) |
|
|
C-RELEASE |
The COMPRESSOR RELEASE parameter determines the speed in which |
|
|
|
compression will cease after the input signal has dropped below the threshold |
|
|
|
level. (.05sec to 2.05sec) |
|
|
|
|
|
|
|
|
|
2 6

Application Notes: Compression
Compression is most often used when playing with a very clean tone, like in the Clean American or Texas Blues voicings. Since there is very little or no clipping (distortion), the guitar signal will remain very dynamic, which means that there is a lot of variance in volume levels. For example, when you strum a chord or pick a note, it sounds very loud at first and then dies out quickly. What compression will do is narrow the dynamic range of the signal, meaning that your strum or pluck will not be as loud and the decay of the chord or note will be louder. The result is greater sustain and a more even volume level.
Since the Vintage British and Mega Drive voicings have more gain, there is more clipping of the guitar signal (distortion). This clipping of the guitar signal is actually a natural form of compression — this is the reason your chords and notes will sustain much longer using high gain than when using a clean channel. Compression is not usually used with high gain settings, although you can use it if you really need to get even more sustain and/or for a less dynamic effect and sound.
Using different guitars:
It is also important to note that if you switch guitars during a performance and those guitars have a different output level, you should quickly use the INPUT LEVEL control on the face of the unit to set a proper input level for each guitar. This will allow your preset Compression threshold settings to work the same for all guitars.
2 7

WAH Page
The Prophesy includes an internal wah-wah which can either be used as a fixed wah or can be controlled by an expression pedal through continuous control changes. Use of this feature eliminates the need to run long audio cables out to a conventional wah-wah pedal.
To set up an expression pedal as a wah-wah pedal, the Prophesy must be configured so that the expression pedal controls the "WAH FREQ" parameter described below. (See "Controller Assignments" in Section 7 for more information.)
Wah Page
122 |
WAHFREQ |
805HZ |
|
|
Wah page parameters |
|
|
|
|
|
|
PARAMETER |
DESCRIPTION |
|
|
|
|
|
|
WAH FREQ |
The WAH FREQUENCY parameter allows you to manually sweep the fre- |
|
|
|
quency range of the wah-wah. Selecting a frequency for this parameter allows |
|
|
|
you to use the wah-wah as a fixed wah. (310Hz to 2600Hz) |
|
|
|
|
|
|
|
|
|
2 8
PREAMP Pages
The preamp pages are available in all presets. They are all accessible via the front panel PAGE control, however the PREAMP button provides immediate access to the first preamp page. In addition, turning any of the front panel instant access controls when the preset title is displayed will also instantly access the first preamp page.
Preamp Page 1: Gain/Basic EQ Levels
122 |
GAIN |
BASS |
MID |
TREB |
PRES |
MASTER |
8 . 6 |
6 . 5 |
4 . 0 |
7 . 0 |
5 . 0 |
8 . 3 |
|
Preamp Page 1 parameters |
|
|
PARAMETER |
DESCRIPTION |
|
|
GAIN |
The GAIN parameter determines the amount of gain in the distortion stage. |
|
(0.0 to 10.0) |
BASS |
The BASS parameter adjusts the amount of low frequency information at the |
|
output of the current preset. (0.0 to 10.0) |
MID |
The MID parameter adjusts the amount of mid frequency information at the |
|
output of the current preset. (0.0 to 10.0) |
TREB |
The TREBLE parameter adjusts the amount of high frequency information at |
|
the output of the current preset. (0.0 to 10.0) |
PRES |
The PRESENCE parameter also adjusts the amount of high frequency |
|
information at the output of the current preset. (0.0 to 10.0) |
MASTER |
The MASTER parameter determines the overall signal level of the current |
|
preset. (0.0 to 10.0) |
|
|
2 9
 Loading...