


TV SOUNDBAR MOUNT
RF-SBM101
USER GUIDE
Before using your new product, please read these instructions to prevent any damage.

Safety information and specifications
Maximum soundbar weight: 15 lbs.
(6.8 kg)
Overall dimensions (W × D × H):
1.75 x 1.0 x 11.9 in. (4.4 x 2.5 x 30.2 cm)
Soundbar mount weight: 1.74 lbs.
(0.79 kg)
We’re here for you
www.rocketfishproducts.com
For customer service, call:
800-620-2790 (U.S./Canada
markets)
IMPORTANT
SAFETY
INSTRUCTIONS SAVE THESE
INSTRUCTIONS
CAUTION: Do not use
this product for any
purpose not explicitly
specified by Rocketfish.
Improper installation
may cause property
damage or personal
injury. If you do not
understand these
directions, or have
doubts about the safety of the installation, contact Customer Service
or call a qualified contractor. Rocketfish is not responsible for damage
or injury caused by incorrect installation or use.
The weight of your soundbar must not exceed 15 lbs. (6.8 kg). Also, the
weight of the soundbar plus the weight of your TV cannot exceed the
total rated weight of the TV wall mount. Refer to your TV wall mount
assembly guide for specific weight limits.
This product contains small items that could be a choking hazard if
swallowed. Keep these items away from young children!
WARNIN G: This product is only designed to be used with Rocketfish,
Dynex, Insignia, and SANUS television mounts mounted below the
television.
This soundbar mount was designed to be installed and utilized ONLY
as specified in this manual. The manufacturer is not responsible for
improper assembly, use, or handling of this product.
2
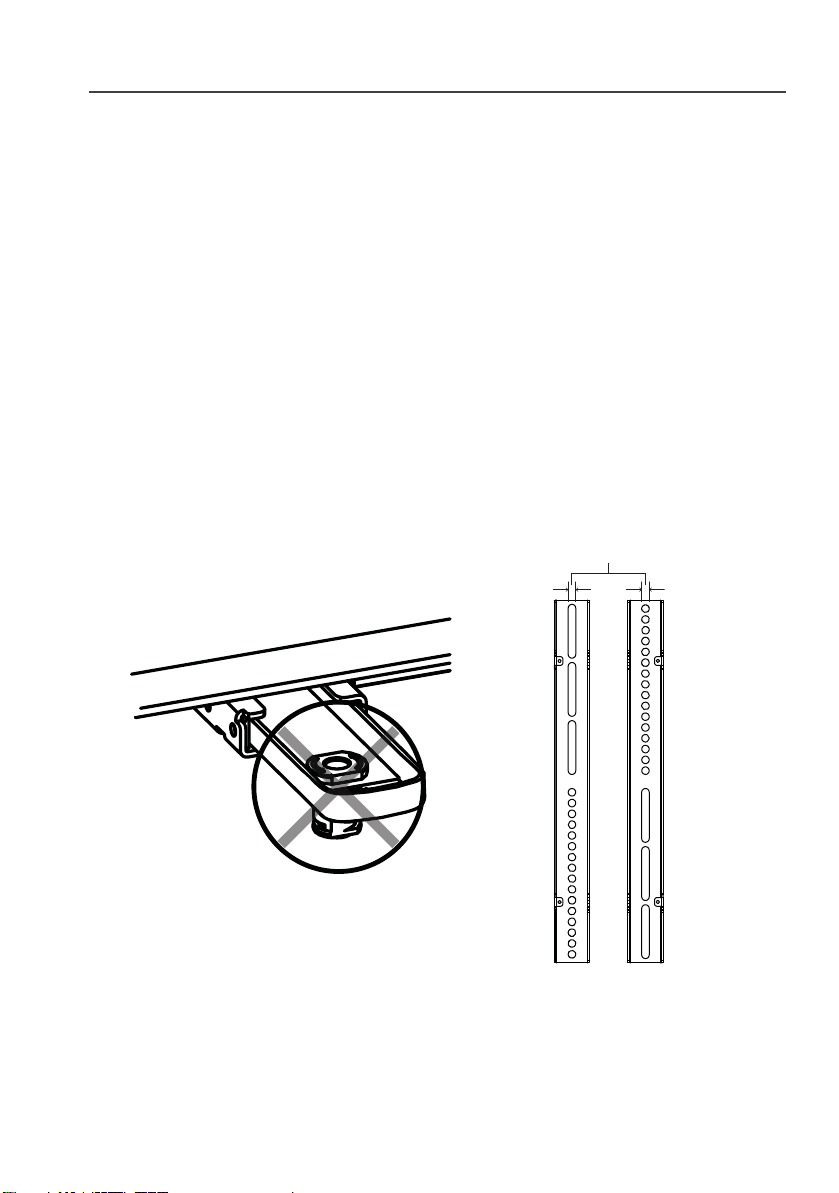
Before You Begin
<.43 in. (11mm)
Figure 1
Figure 2
Please check the following items:
• Your TV and any accessories you plan to use do not exceed
the specified weight limit of your TV mount.
• You read and understand these directions.
• You refer to the documentation that came with your TV for
additional guidance.
• You have the tools needed for installation.
• If your TV bracket has built-in or integrated spacers (see
Figure 1), or mounting holes or slots that are wider than
11mm [.43 in.] (see Figure 2), you cannot use this product.
Call Customer Service for assistance.
RF-SBM101
3
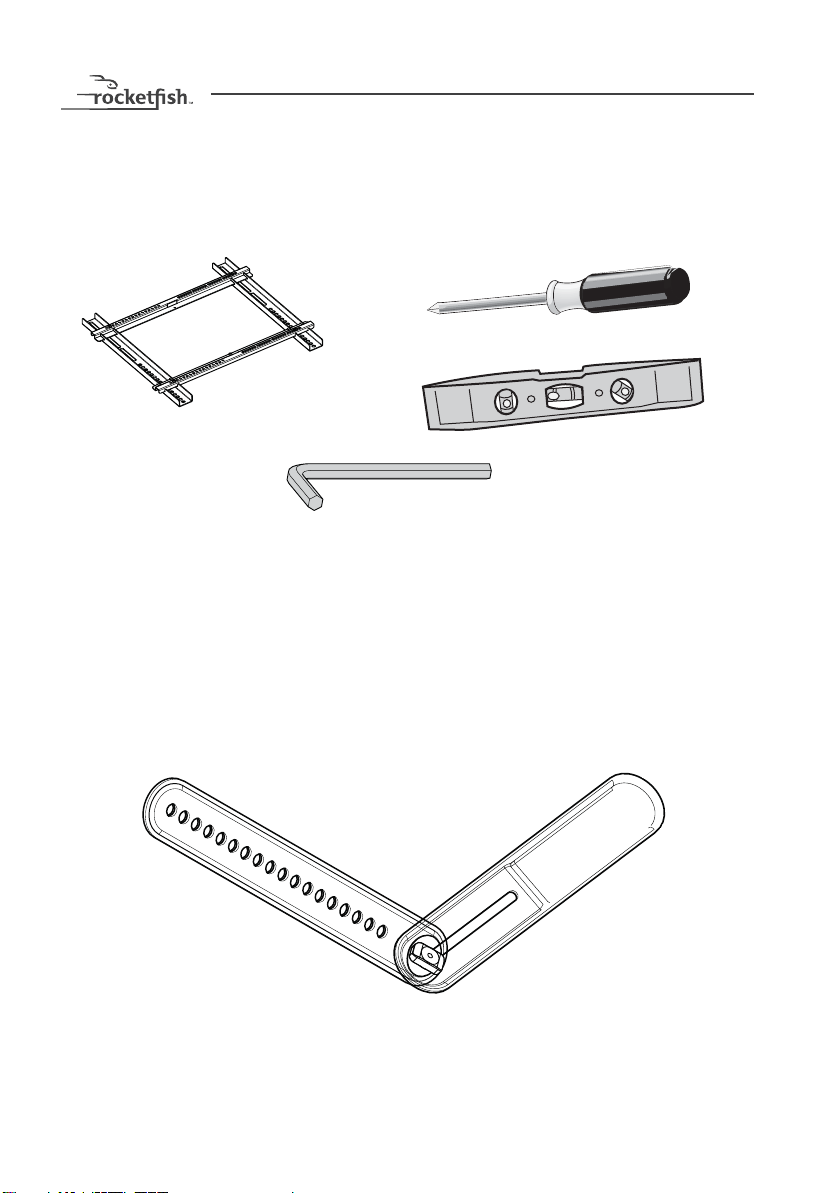
What you need
TV Wall Mount Bracket
Level
Phillips screwdriver
3/16 in. Hex key
(Included in this kit)
Soundbar bracket assembly - A (2)
You will need the following to assemble your new sound bar mount:
Package contents: parts
Make sure that you have all the parts necessary to assemble your new
sound bar mount.
4

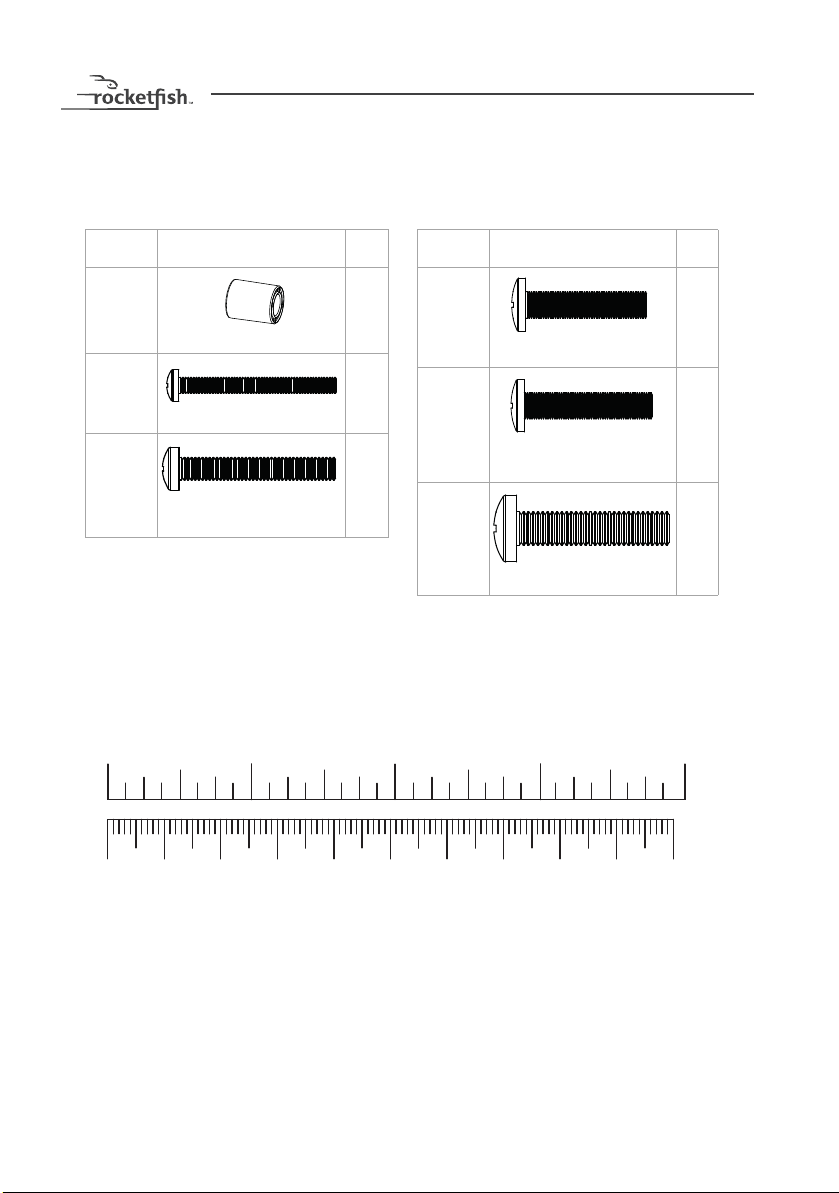
Package contents: hardware
GG
Label Hardware Qty
C2
D2
E2
F2
G4
GG 4
Fender washer
Keyhole screw
Knob
Mount spacer
M4/M5 washer
M4/M5 washer
Label Hardware Qty
H4
HH 4
I4
J4
K4
L4
M4
M6/M8 washers
M6/M8 washers
M4 × 16 mm
screw
M5 × 16 mm screw
M6 × 16 mm screw
M6 × 25 mm screw
M8 × 20 mm screw
Make sure that you have all the hardware necessary to assemble your
new soundbar mount. Not all hardware included will be used:
Hardware bag
RF-SBM101
5
Hardware bag (continued)
Label Hardware Qty
N4
P4
Q4
Spacers
M4 × 40 mm screw
M5 × 40 mm screw
Label Hardware Qty
R4
S4
T4
M6 × 40 mm screw
M6 × 50 mm screw
M8 × 40mm screw
10 20 30 40 50 60 70 80 90 1 00mm
1234in
6
Installation instructions
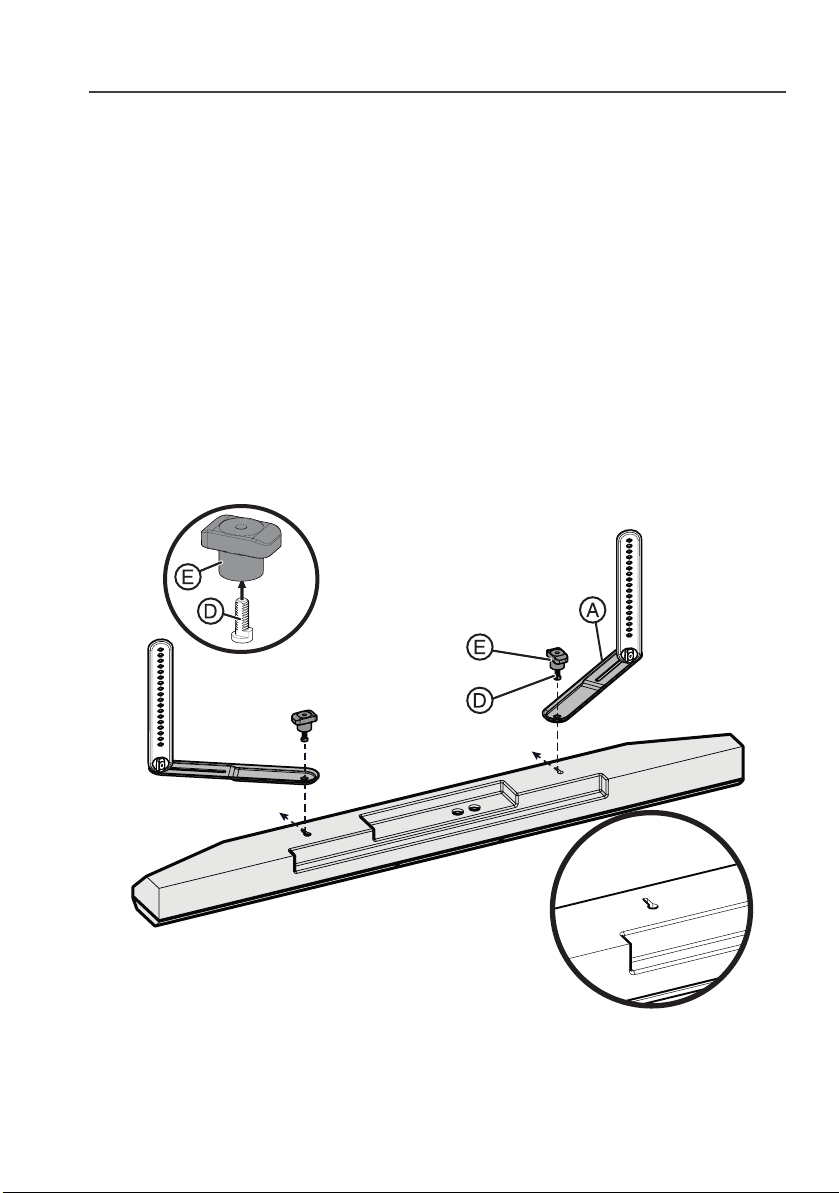
Soundbar
STEP 1: Option 1 - Mount the bracket arms to the
soundbar
1 Check the compatibility of the soundbar bracket with your
soundbar.
2 Insert the keyhole screws (D) into the knobs (E).
3 Attach the soundbar bracket assembly (A) to your soundbar
with the assembled knob/keyhole screws.
NOTE: When planning on the position of the soundbar, make
sure you will be able to properly access control buttons, if
necessary.
RF-SBM101
7

4 [OPTIONAL] If there are gaps or recesses under the soundbar
arms, slip a “Fender” washer (C) onto the keyhole screws (D)
and under the soundbar bracket assembly (A) make sure
that it lays flat on the soundbar.
5 Loosely tighten the knobs (E).
8

RF-SBM101
Soundbar
manufacturer
supplied hanger
STEP 1: Option 2 - Mount the bracket arms to a hanger
Some soundbars come with a manufacturer supplied hanger (for
example Samsung).
1 Attach the soundbar bracket assembly (A) to the soundbar
hanger with the assembled knob/keyhole screws. Do not
fully tighten knobs.
9

STEP 2 - Preparing your TV (go to Step 3 if your TV is not
1
already mounted on the wall).
CAUTION: Refer to your TV wall mount assembly instructions for
how to properly remove your TV from the brackets.
1 Remove all cables attached to your TV.
2 Remove your TV from the wall.
3 Remove the existing wall mount bracket from the back of
your TV.
• Save the existing screws and washers in case you want to
use the TV without the soundbar in the future.
• You MUST use the screws and washers provided with the
soundbar mount instead of the screws and washers that
came with your existing wall mount.
10

2
3
CAUTION: Heavy. You may
need assistance with this
step.
Phillips screwdriver
RF-SBM101
You’ll need
11

STEP 3 - Determine whether your TV has a flat back or an
TV wall mount bracket
irregular or obstructed back
1 Carefully place your TV screen face-down on a cushioned,
clean surface to protect the screen from damages and
scratches.
2 If your TV has a table-top stand attached, remove the stand.
See the documentation that came with your TV for
instructions.
3 Temporarily lay your existing TV wall mount brackets (not
included) on the back of your TV.
4 Align the screw holes in your existing TV wall mount
brackets with the mounting screw holes on your TV.
5 Identify which type of back your TV may have:
• Flat back: The brackets lay flush against the back of your TV
and do not block any jacks. You do not need spacers when
assembling the wall mount.
12
You’ll need

RF-SBM101
TV wall mount bracket
• Obstructed back: A bracket blocks any of the jacks on the
back of your TV. You will need spacers when assembling the
wall mount.
• Irregularly-shaped back: There is a gap between a bracket
and some part of the back of your TV. You will need spacers
when assembling the wall mount.
6 Remove the TV brackets.
You’ll need
13

STEP 4 - Select screws, washers, and spacers
1 Select the hardware necessary for your TV (screws, washers,
and spacers). A limited number of TVs come with mounting
hardware included. (If there are screws that came with the
TV, they are almost always in the holes on the back of the
TV.)
If you don't know the correct length and diameter of the
mounting screws your TV requires, test various sizes by hand
threading the screws.
Select one of the following types of screws:
M4 × 16 mm screws (I)M6×25mm screws (L)
M4 × 40 mm screws (P)M6×40mm screws (R)
M5 × 16 mm screws (J)M6×50mm screws (S)
M5 × 40 mm screws (Q)M8×40mm screws (T)
M6 × 16 mm screws (K)
Select one of the following types of washers:
M4/M5 washers (G) M6/M8 washers (H)
M4/M5 washers large (GG) M6/M8 washers large (HH)
14
For an irregular or obstructed TV back, use the spacers (N)
provided.
CAUTION:
make sure that there are adequate threads to secure the brackets to
your TV. If you encounter resistance, stop immediately and contact
customer service. Use the shortest screw and spacer combination to
accommodate your TV. Using hardware that is too long may damage
your TV. However, using a screw that is too short may cause your TV
to fall from the mount.
To avoid potential personal injuries and property damage,

RF-SBM101
Screw is
too long
Screw fits
correctly
Screw is
too short
2 Remove the screws.
3 For a flat back TV, go to “STEP 5 - Option 1: Attaching the
mounting hardware to TVs with a flat back” on page 16.
-ORFor an irregular or obstructed back, go to “STEP 5 - Option 2:
Attaching the mounting hardware to TVs with irregular or
obstructed backs” on page 18.
15

STEP 5 - Option 1: Attaching the mounting hardware to
TVs with a flat back
1 Place the mount spacers (F) over the top two screw holes on
the back of the TV.
2 Place the soundbar bracket assembly (A) over the bottom
two screw holes on the back of the TV. To make sure the
arms are not visible when on the wall, align the arms so they
reach the bottom or corners of the TV, but do not over hang
the edges.
3 Align your existing TV wall mount brackets with the screw
holes on the back of the TV.
4 Install screws (I, J, K, L, or M) and washers (G, GG, H, or HH)
through the top two holes in the wall mount bracket. The TV
brackets should be level on the back of the TV. Do not
tighten.
5 Install screws (I, J, K, L or M) and washers (G, GG, H, or HH)
through the bottom two holes in the wall mount bracket.
Continued on next page.
16

6 Tighten all screws, but do not over-tighten.
HHGG
NOTE: Your existing TV wall mount may vary from the one shown below. Refer to the
instructions that came with your existing TV wall mount for attaching brackets to the back
of the TV. However, you MUST use the screws and washers provided with the soundbar
mount instead of the screws and washers that came with your existing wall mount.
NOTE: The soundbar or
hanger must be mounted
below your TV. Soundbar
hanger shown here.
or
or
WAR NI NG: You must use the larger
washers (GG or HH) unless they do
not fit your TV bracket.
G (4)
H (4)
I
(4)
J (4)
K (4)
Phillips screwdriver
or
or
or
L (4)
Level
or
M (4)
F Mount
spacer (2)
or
or
GG (4)
or
HH (4)
RF-SBM101
You’ll need
17

STEP 5 - Option 2: Attaching the mounting hardware to
TVs with irregular or obstructed backs
1 Place the spacers (N) and mount spacers (F) over the top two
screw holes on the back of the TV.
2 Place the spacers (N) and the soundbar bracket assembly (A)
over the bottom two screw holes on the back of the TV. To
make sure the arms are not visible when on the wall, align
the arms so they reach the bottom or corners of the TV, but
do not over hang the edges.
3 Align your existing TV wall mount bracket with the screw
holes on the back of the TV.
4 Install screws (P, Q, R, S, or T) and washers (G, GG, H, or HH)
through the top two holes in the wall mount bracket.
brackets should be level on the back of the TV.
5 Install screws (P, Q, R, S, or T) and washers (G, GG, H, or HH)
through the bottom two holes in the wall mount bracket.
Continued on next page.
Do not tighten.
The TV
18

6 Tighten all screws, but do not over-tighten.
HH
GG
or
NOTE: Your existing TV wall mount may vary from the one shown below. Refer to the
instructions that came with your existing TV wall mount for attaching brackets to the back of
the TV. However, you MUST use the screws and washers provided with the soundbar mount
instead of the screws and washers that came with your existing wall mount.
NOTE: The soundbar or
hanger must be mounted
below your TV. Soundbar
hanger shown here.
or
WAR NING: You must use the larger
washers (GG or HH) unless they do
not fit your TV bracket.
G (4)
H (4)
P
(4)
Q (4)
R (4)
Phillips screwdriver
or
or
or
S (4)
Level
or
T (4)
F Mount
spacer (2)
N Spacers (4)
or
or
GG (4)
or
HH (4)
RF-SBM101
You’ll need
19

STEP 6 - Final adjustments, tightening, and hanging the
2 in. (5.1 cm)
CAUTION: Heavy. You may
need assistance with this
step.
Attaching the soundbar
using the manufacturers
supplied bracket.
TV
1 Adjust the soundbar bracket assembly (A) until the
soundbar is in the position you want.
NOTE: The soundbar must be positioned within 2 inches
(5.1 cm) of the TV.
20

RF-SBM101
NOTE: The TV/bracket arms should be positioned as vertically
as possible.
2 When the soundbar is in the correct position, tighten all
fasteners. Do not overtighten the screws.
NOTE: Tighten the upper four connectors with the screwdriver
and the bracket connectors with the 3/16 in. hex key. The
soundbar knobs should be hand tightened.
21

3 Hang the TV/soundbar assembly on the wall, following the
Phillips screwdriver
H 3/16 in. Hex key
instructions that came with your existing TV wall mount,
then reconnect the cables and power cord.
You’ll need
For customer service, call: 800-620-2790 (U.S./Canada markets) or
01-800-926-3010 (Mexico).
22

Part Number: 6907-002115 00
www.rocketfishproducts.com
(800) 620-2790
ROCKETFISH is a trademark of Best Buy and its affiliated companies.
Registered in some countries. Distributed by Best Buy Purchasing, LLC
7601 Penn Avenue South, Richfield, MN 55423-3645 USA
© 2016 Best Buy. All rights reserved.
Made in China
V2 ENGLISH
16-0204
 Loading...