

Page 1

www.roadstar.com
HIF-5988
User manual
Bedienungsanleitung
Manuel d’instructions
Manuale d’istruzioni
Manual de instrucciones
Manual de instruções
Gebruiksaanwijzing
Návod k použití
Návod na použitie
Page 2

INDEX
English Page 1
Deutsch Seite 3
Français Page 5
Italiano Pagina 7
Español Página 9
Português Página 11
Nederlands Pagina 13
Čeština Strana 15
Slovenský Strana 17
Your new unit was manufactured and assem-
bled under strict ROADSTAR quality control.
Thank-you for purchasing our product for your
music enjoyment. Before operating the unit,
please read this instruction manual carefully.
Keep it also handy for further future references.
Votre nouvel appareil a été fabriqué et monté
en étant soumis aux nombreaux tests ROADSTAR. Nous espérons que cet appareil vous
donnera entière satisfaction. Avant de vous
adonner à ces activités, veuillez lire attentivement ce manuel d’instructions. Conservez-le à
portée de main à fin de référence ultérieure.
Vuestro nuevo sistema ha sido construido se-
gún las normas estrictas de control de calidad
ROADSTAR. Le felicitamos y le damos las
gracias por su elección de este aparado. Por
favor leer el manual antes de poner en funcionamiento el equipo y guardar esta documen-
tación en case de que se necesite nuevamen-
te.
Ihr neues Gerät wurde unter Beachtung der
strengen ROADSTAR Qualitätsvorschriften gefertigt. Wir danken Ihnen für den Kauf unseres
Produktes und wünschen Ihnen optimalen Hör-
genuss. Bitte lesen Sie diese Bedienungsanleitung durch, und heben Sie sie auf, um jederzeit
darin nachschlagen zu können.
Il vostro nuovo apparecchio é stato prodotto ed
assemblato sotto lo stretto controllo di qualità
ROADSTAR. Vi ringraziamo di aver acquistato
un nostro prodotto per il vostro piacere
d’ascolto. Prima di procedere all'utilizzo dell'ap-
parecchio, leggete attentamente il manuale
d’istruzioni e tenetelo sempre a portata di mano
per futuri riferimenti.
Seu novo aparelho foi construido e montado sob
o estrito controle de qualidade da ROADSTAR.
Agradecemos por ter comprado nosso produto
para a sua diversão. Antes de usar esta unidade
é necessário ler com atençâo este manual de
instruções pare que possa ser usada apropria-
damente; mantenha o manual ao seu alcance
para outras informações.
Page 3
7
8
9
1
2
3
4
5
6
10
11
12
13
14
15 16
Page 4

1 English
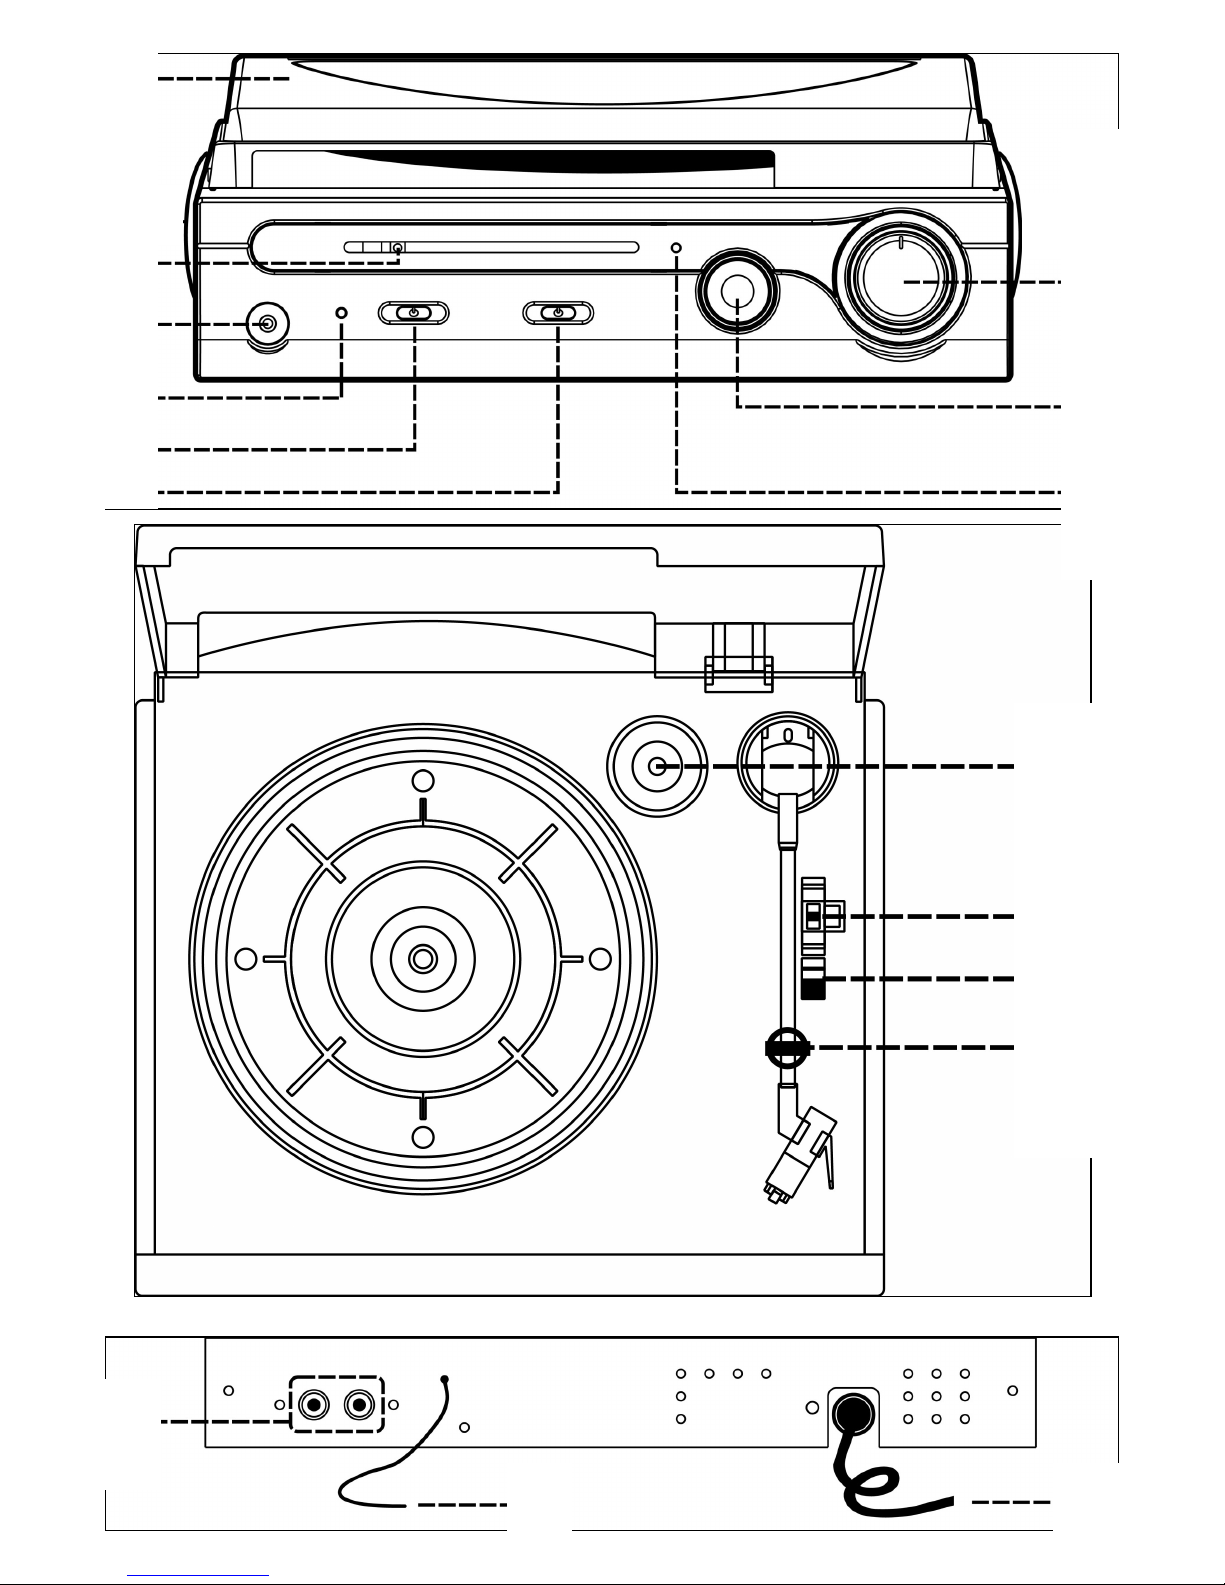
LOCATION OF CONTROLS
1. DUST COVER
2. DIAL SCALE
3. EARPHONE OUTPUT
4. POWER INDICATOR
5. FUNCTION SELECTOR
6. MUTE BUTTON
7. VOLUME KNOB
8. TUNING KNOB
9. FM STEREO INDICATOR
10. SPINDLE ADAPTOR
11. 33/45 RPM SPEED SELECTOR
12. AUTOSTOP SWITCH
13. TONE ARM
14. LINE OUT SOCKET
15. FM ANTENNA
16. AC CORD
POWER SUPPLY
Connect the unit to the power supply. Switch FUNCTION SELECTOR (5) to
OFF position to switch the unit OFF.
FM RADIO OPERATIONS
1. Select TUNER mode using FUNCTION SELECTOR (5).
2. Turn TUNING KNOB (8) to select your favourite radio station.
3. Turn the VOLUME KNOB (7) to the desired volume level.
LISTENING TO RECORDS
1. Select PHONO mode using FUNCTION SELECTOR (5).
2. Open the Record Player Cover. Release the Tonearm Clamp, and remove
the stylus protector. Place a record on the turntable, over the central spindle.
Place the EP adapter over the central spindle when playing 17cm EP records.
3. Set 33/45 RPM SPEED SELECTOR (11) to 33 / 45 rpm according to the record.
4. Lift the Tonearm with the Tonearm Lift Lever. Move the tonearm to the beginning of the record, or to the start of a particular track. Gently lower the tone
arm onto the record with the Tonearm Lift lever to start playing.
5. To select autostop mode, move AUTOSTOP SWITCH (12) to ON position.
When the record is finished the tonearm will automatically stop. To stop manually, lift the tonearm from the record and return it to the rest.
Page 5
2 English
6. Moving or jarring the turntable without securing the Tonearm clamp could result in damage to the Tonearm. Replace the protective cap on the stylus
when not in use.
EARPHONE
Headphones should have a 3.5 mm diameter stereo plug and an impedance of
8-32 ohms, and should be connected to HEADPHONE OUTPUT (3). When headphones are connected, the speaker is automatically disconnected.
LINE-OUT
You can connect the unit to an external audio device (speakers or amplifier)
through LINE OUT SOCKET (14) using an RCA audio cable.
SPECIFICATIONS
AC: 230 V ~ 50 Hz
FM: 88 - 108 MHz
This marking shown on the product or its literature, indicates that it should not be disposed with other household wastes at the end of its working life. To prevent possible harm to the environment or
human health from uncontrolled waste disposal, please separate this from other types of wastes
and recycle it responsibly to promote the sustainable reuse of material resources. Household users
should contact the retailer where they purchased this product, or their local government office, for
details of where and how they can take this item for environmentally safe recycling. Business users
should contact their supplier and check the terms and conditions of the purchase contract. This product should not be mixed with other commercial wastes for disposal.
CORRECT DISPOSAL OF THIS PRODUCT
(Waste Electrical & Electronic Equipment)
WARNINGS
The exclamation point within the triangle is a warning sign alerting the user of important instructions accompanying the product.
The lightening flash with arrowhead symbol within the triangle is a warning sign alerting the user
of “dangerous voltage” inside the unit.
To reduce the risk of electric shock, do not remove the cover. No user serviceable parts inside
the unit. Refer all servicing to qualified personnel.
This unit operates on 230V ~ 50Hz. If the unit is not used for a long period of time, remove the
plug from the AC mains.
Ensure all connections are properly made before operating the unit.
This unit must not be exposed to moisture or rain.
This unit should be positioned so that it is properly ventilated. Avoid placing it, for example, close
to curtains, on the carpet or in a built-in installation such as a bookcase.
Do not expose this unit to direct sunlight or heat radiating sources.
Page 6

3 Deutsch
LAGE DER BEDIENELEMENTE
1. STAUBSCHUTZ
2. SKALENSCHEIBE
3. KOPFHÖRERAUSGANG
4. STROMANZEIGE
5. FUNKTIONSAUSWAHL-SCHALTER
6. STUMM-TASTE
7. LAUTSTÄRKEREGLER
8. TUNING-KNOP
9. FM-STEREO-ANZEIGE
10. ACHSADAPTER
11. 33/45 RPM DREHZAHLWÄHLER
12. AUTOSTOP-SCHALTER
13. TONE ARM
14. AUSGANGSBUCHSE
15. FM-ANTENNE
16. NETZKABEL
ENERGIEVERSORGUNG
Schließen Sie das Gerät an die Stromversorgung. Schalter FUNKTIONSAUSWAHLSCHALTER (5) auf OFF das Gerät auszuschalten.
UKW RADIO-BETRIEB
1. Wählen TUNER-Modus durch die FUNKTIONSAUSWAHL-SCHALTER (5) verwenden.
2. Drehen Sie am TUNING-KNOP (8), um Ihren gewünschten Radiosender auszuwä-
hlen.
3. Drehen Sie LAUTSTÄRKEREGLER (7) die Lautstärke einzustellen.
SCHALLPLATTEN ANHÖREN
1. Wählen PHONO-Modus durch die FUNKTIONSAUSWAHL-SCHALTER (5) verwenden.
2. Öffnen Sie den Deckel des Plattenspielers. Lösen Sie die Sperre des Tonarms und
entfernen Sie die Schutzkappe von der Nadel. Legen Sie eine Platte auf den Plattenteller über die Spindel in der Mitte. Platzieren Sie den EP-Adapter über die Spindel,
wenn Sie EPs mit 17 cm Durchmesser abspielen.
3. Stellen Sie den 33/45 RPM DREHZAHLWÄHLER (11) je nach Art der Platte auf
33/45 rpm ein.
4. Heben Sie den Tonarm mit dem Heber für dem Tonarm an. Bewegen Sie den To-
narm zum Anfang der Platte oder zum Anfang eines bestimmten Titels. Senken Sie
den Tonarm mit Hilfe des Tonarm-Hebers langsam auf die Platte, um mit der Wiedergabe zu beginnen.
5. So wählen Sie Auto-Stop-Modus, um AUTOSTOP-SCHALTER (12)-Bewegung in die
Position ON. Wenn die Platte das Ende erreicht haben, wird der Datensatz automatisch gestoppt. Um das Abspielen manuell zu stoppen, heben Sie den Tonarm von
Page 7
4 Deutsch
der Platte und legen Sie ihn wieder in seine Halterung.
6. Wenn Sie den Plattenteller verschieben oder erschüttern den Plattenspieler, ohne
daß der Tonarm gesichert ist, kann das Schäden am Tonarm zur Folge haben. Setzen Sie die Schutzkappe auf die Nadel, wenn Sie den Plattenspieler nicht benützen.
KOPFHÖRER
Kopfhörer sollte einen Durchmesser von 3,5 mm Stereo-Stecker haben und eine Impedanz von 8-32 Ohm und sollte KOPFHÖRERAUSGANG (3) angeschlossen werden.
Wenn Kopfhörer angeschlossen sind, wird der Lautsprecher automatisch abgeschaltet.
LINE-OUT
Sie können das Gerät an ein externes Audiogerät (Lautsprecher oder Verstärker) durch
AUSGANGSBUCHSE (14) mit einem Cinch-Audiokabel anschließen.
TECHNISCHE DATEN
AC: 230 V ~ 50 Hz
UKW: 88 - 108 MHz
Das Typenschild befindet sich an der Gehäuseunterseite des Gerätes.
Die Kennzeichnung auf dem Produkt bzw. auf der dazugehörigen Literatur gibt an, dass es nach seiner Lebensdauer nicht zusammen mit dem normalen HaushaltsmüIl entsorgt werden darf. Entsorgen Sie dieses Gerat
bitte getrennt von anderen Abfallen, um der Umwelt bzw. der menschl i chen Gesundhei t ni cht durch unkontrol
l i erte Mül l besei ti gung zu schaden. Recycel n Si e das Gerät, um di e nachhaltige Wiederverwertung von
stofflichen Ressourcen zu fördern. Private Nutzer sollten den Händler, bei dem das Produkt gekauft wurde, oder
die zuständigen Behörden kontaktieren, um in Erfahrung zu bringen, wie sie das Gerät auf umweltfreundliche
Weise recyceln können. Gewerbliche Nutzer sollten sich an Ihren Lieferanten wenden und die Bedingungen des
Verkaufsvertrags konsultieren. Dieses Produkt darf nicht zusammen mit anderem Gewerbemüll entsorgt wer-
den.
KORREKTE ENTSORGUNG DIESES PRODUKTS
(Elektromüll)
SICHERHEITSHINWEISE
Das Ausrufszeichen im Dreieck weist den Benutzer auf wichtige Bedienungs- und Wartungsanweisungen (Service) in diesem Handbuch hin, die unbedingt zu befolgen sind.
Um die Gefahr elektrischer Schläge auszuschliessen, Gehäuse auf keinen Fall abnehmen.
Im Innem befinden sich keine vom Benutzer selbst instandsetz-baren Teile. Reparaturen dürfen
nur von einer autorisierten Fachwerkstatt durchgeführt werden.
Dieses Gerät ist für 230V ~ 50Hz Netzspannung ausgelegt. Bei längerer Nichtbenutzung des Geräts ziehen Sie den Stecker aus der Steckdose.
Setzen Sie das Gerät weder Feuchtigkeit noch Regen aus.
Schalten Sie das System erst dann ein, wenn Sie alle Verbindungen genau geprüft haben.
Stellen Sie das Gerät so auf, dass immer eine ungestörte Frischluftzufuhr sichergestellt ist. Es ist
zum beispiel keinesfalls auf Teppiche und in der Nähe von Gardinen zu stellen oder in Bücherre-
gale einzubauen.
Setzen Sie das Gerät weder direkter Sonneneinstrahlung noch Wärmequellen aus.
Page 8

5 Français
CONTRÔLE DE POSITION
1. ANTI-POUSSIERE
2. FREQUENCE
3. CASQUE DE SORTIE
4. INDICATEUR ON / OFF
5. FONCTION DIAL
6. MUTE
7. VOLUME KNOB
8. FRÉQUENCE REGULATEUR
9. FM STEREO INDICATEUR
10. ADAPTER DISC
11. SPEED SELECTOR 33/45 RPM
12. DE AUTOSTOP INTERRUPTEUR
13. ARM PLATINE
14. SORTIE AUDIO
15. ANTENNE FM
16. CORDON
PUISSANCE
Branchez l'appareil au pouvoir. Placez FONCTION DIAL (5) dans la position OFF
pour éteindre l'appareil.
FONCTION RADIO FM
1. Sélectionnez le mode TUNER utilisant FONCTION DIAL (5).
2. Tournez FRÉQUENCE REGULATEUR (8) pour sélectionner la station de radio
souhaitée.
3. Tourner VOLUME KNOB (7) au volume désiré.
FONCTION RECORD
1. Sélectionnez le mode PHONOen utilisant FONCTION DIAL (5).
2. Ouvrez le couvercle de la platine. Retirez la clé de bras et le protecteur de
stylet. Placez un disque sur la platine. Placez l'adaptateur dans le cas d'utilisation d'un disque de 17cm.
3. Réglez SPEED SELECTOR 33/45 RPM (11) sur 33/45 rpm en fonction du di-
sque à jouer.
4. Levez le bras à l'aide du levier. Déplacer le début du bras de disque, ou le dé-
but d'une piste particulière. Abaissez lentement l'aiguille sur le disque en utili-
sant le levier.
5. Pour sélectionner la fonction auto-stop, déplacer AUTOSTOP INTERRUP-
TEUR (12) ON. Lorsque le disque se termine, la lecture s'arrêtera automatiquement. Pour arrêter la lecture manuellement, soulever le bras du dossier et de le
ramener à la position de départ.
Page 9

6 Français
6. Déplacer ou secouer l'appareil sans bloquer le bras pourrait endommager le
mécanisme. Mettez le cap sur le stylet lorsqu'il ne sert pas.
CASQUE
Le casque doit avoir une fiche de 3,5 mm, une impédance de 8-32 ohms et sont
connectés all'PRISE CASQUE (3). Lorsque le casque est branché, les hautparleurs sont automatiquement déconnectés.
LINE-OUT
Vous pouvez connecter l'appareil à un périphérique externe (haut-parleurs ou un
amplificateur) à travers SORTIE AUDIO (14) en utilisant un câble RCA.
CARACTERISTIQUES TECHNIQUES
AC: 230 V ~ 50 Hz
FM: 88 - 108 MHz
Les spécifications peuvent êtres modifiées sans avis préalable.
Ce symbole sur le produit ou sa documentation indique qu'il ne doit pas être éliminé en fin de vie avec
les autres déchets ménagers. L' élimination incontrôlée des déchetspouvant porter préjudice a l'environnement ou a la santé humaine, veuillez le séparer des autres types de déchets et le recycler defaçon
responsable. Vous favoriserez ainsi la réutilisation durable desressources matérielles. Les particuliers
sont invites a contacter le distributeur leur ayant vendu le produit ou a se renseigner auprès de leur mairie pour savoir ou et comment ils peuvent se débarrasser de ce produit afin qu'il soit recycle en respectant l'environnement. Les entreprises sont invitées a contacter leurs fournisseurs et aconsulter les conditions de leur contrat de vente. Ce produit ne doit pas être éliminé avec les autres déchets commerciaux.
COMMENT ÉLIMINER CE PRODUIT
(déchets d'équipements électriques et électroniques)
ATTENTION
Le symbole “point d’exclamation” à l’intérieur d’un triangle avertit l’utilisateur que d’importantes instructions d’utilisation et de maintenance sont contenues dans le mode d’emploi.
Le symbole “éclair” à l’intérieur d’un triangle sert à avertir l’utilisateur de la présence du courant à
l’intérieur du l’appareil qui pourrait constituer un risque.
Afin de minimiser les risques, ne pas ouvrir le boîtier ni ôter le dos de l’appareil. En case de panne, faites
appel aux techniciens qualifiés pour les réparations. L’appareil ne renferme aucune pièce reparable par
l’utilisateur.
Cet appareil a été conçu pour une tension d’alimentation de 230V ~ 50Hz. Débranchez la prise de courant quand on prévoit de ne pas utiliser l’appareil pendant un certain temps.
Mettez l’appareil sous tension seulement après avoir vérifié que tous les raccordements soient corrects.
L’unité ne doit pas être exposée à l’humidité ou à la pluie.
L’appareil doit être gardé dans un endroit suffisamment ventilé. Ne le gardez jamais par exemple près
des rideaux, sur un tapis ou dans des meubles, tels qu’une bibliothèque.
L’unité ne doit pas être exposée à la lumière directe du soleil ou à des sources de chaleur.
Page 10

7 Italiano
POSIZIONE DEI COMANDI
1. COPERCHIO ANTI-POLVERE
2. SCALA DI FREQUENZE
3. USCITA CUFFIE
4. INDICATORE ON/OFF
5. SELETTORE DI FUNZIONE
6. MUTO
7. MANOPOLA VOLUME
8. REGOLATORE DI FREQUENZA
9. INDICATORE FM STEREO
10. ADATTATORE DISCO
11. SELETTORE DI VELOCITÀ 33/45 RPM
12. INTERRUTTORE DI AUTOSTOP
13. BRACCIO GIRADISCHI
14. USCITA AUDIO
15. ANTENNA FM
16. CAVO DI ALIMENTAZIONE
ALIMENTAZIONE
Connettere l'unità all'alimentazione. Posizionare SELETTORE DI FUNZIONE
(5) in posizione OFF per spegnere l'unità.
FUNZIONE RADIO FM
1. Selezionare la modalità TUNER usando SELETTORE DI FUNZIONE (5).
2. Ruotare REGOLATORE DI FREQUENZA (8) per selezionare la stazione radio desiderata.
3. Ruotare MANOPOLA VOLUME (7) fino al volume desiderato.
FUNZIONE GIRADISCHI
1. Selezionare la modalità PHONO usando SELETTORE DI FUNZIONE (5).
2. Aprire il coperchio del giradischi. Rimuovere il blocco del braccio e la protezione della puntina. Posizionare un disco sul giradischi. Posizionare l'adattatore nel caso di utilizzo di un disco da 17cm.
3. Impostare SELETTORE DI VELOCITÀ 33/45 RPM (11) su 33/45 giri a se-
conda del disco da riprodurre.
4. Sollevare il braccio utilizzando l'apposita leva. Spostare il braccio all'inizio
del disco, o all'inizio di una traccia particolare. Abbassare lentamente la puntina sul disco utilizzando l'apposita leva.
5. Per selezionare la funzione autostop, spostare INTERRUTTORE DI AUTO-
STOP (12) in posizione ON. Quando il disco terminerà, la riproduzione si fermerà automaticamente. Per fermare la riproduzione manualmente, sollevare
Page 11

8 Italiano
il braccio dal disco e riportarlo alla posizione di partenza.
6. Spostare o scuotere il dispositivo senza bloccare il braccio potrebbe danneggiare il meccanismo. Rimettere la protezione sulla puntina quando non viene
utilizzata.
USCITA CUFFIE
Le cuffie devono avere una spina da 3,5 mm, un'impedenza di 8-32 ohm e vanno connesse all'USCITA CUFFIE (3). Quando le cuffie vengono connesse, gli
altoparlanti vengono automaticamente disconnessi.
LINE-OUT
È possibile connettere l'unità a un dispositivo esterno (altoparlanti o amplificato-
re) attraverso USCITA AUDIO (14) utilizzando un cavo RCA.
SPECIFICHE TECNICHE
AC: 230 V ~ 50 Hz
II marchio riportato sul prodotto e sulla sua documentazione indica che il prodotto non deve essere smaltito
can altri rifiuti domestici al termine del ciclo di vita. Per evitare eventuali danni all'ambiente o alla salute
causati dall'inopportuno smaltimento dei rifiuti, si invita l'utente a separare questo prodotto da altri tipi di
rifiuti e di riciclarlo in maniera responsabile per favorire il riutilizzo sostenibile delle risorse materiali. Gli utenti domestici sono invitati a contattare il rivenditore presso il quale e stato acquistato il prodotto a l'ufficio
locale preposto per tutte le informazioni relative alla raccolta differenziata e al riciclaggio per questo tipo di
prodotto. Gli utenti aziendali sono invitati a contattare il proprio fornitore e verificare i termini e le condizioni
del contratto di acquisto. Questo prodotto non deve essere smaltito unitamente ad altri rifiuti commerciali.
CORRETTO SMALTIMENTO DEL PRODOTTO
(rifiuti elettrici ed elettronici)
ATTENZIONE
Il punto esclamativo all’interno di un triangolo avverte l’utente che il libretto d’istruzioni contiene delle
importanti istruzioni per l’uso e la manutenzione.
Il simbolo del fulmine all’interno di un triangolo avverte l’utente della presenza di una pericolosa tensione all’interno dell’apparecchio.
Per ridurre i rischi di scosse elettriche, non aprire l’apparecchio. L’apparecchio non contiene parti riparabili dall’utente. In caso di guasto fare appello a tecnici qualificati per le riparazioni.
Questo apparecchio è stato progettato per funzionare a 230V ~ 50Hz. Se non si intende utilizzare
l’apparecchio per un lungo periodo di tempo, rimuovere la spina dalla presa di corrente.
Utilizzare l’apparecchio solo dopo aver verificato che tutte le connessioni siano state eseguite corretta-
mente.
Non esporre l’apparecchio alla pioggia o all’umidità.
Posizionare l’apparecchio in un luogo sufficientemente ventilato. Evitare di sistemarlo vicino a tende,
sul tappeto o all’interno di un mobile quale, ad esempio, una libreria.
Non esporre l’apparecchio alla luce diretta del sole o a fonti di calore.
Page 12

9 Español
CONTROL DE POSICIÓN
1. ANTI-DUST COVER
2. GAMA DE FRECUENCIAS
3. SALIDA DE AURICULARES
4. INDICADOR ON / OFF
5. FUNCIÓN DIAL
6. MUTE
7. BOTÓN DE VOLUMEN
8. REGULADOR DE FRECUENCIA
9. INDICADOR DE ESTÉREO FM
10. ADAPTADOR DE DISCO
11. SELECTOR DE VELOCIDAD 33/45 RPM
12. DE CONMUTADOR AUTOSTOP
13. ARM TOCADISCO
14. SALIDA DE AUDIO
15. ANTENA FM
16. CABLE DE ALIMENTACIÓN
POTENCIA
Conecte la unidad a la corriente. Coloque FUNCIÓN DIAL (5) en la posición OFF
para apagar la unidad.
FUNCIÓN DE RADIO FM
1. Seleccione el modo de sintonizador usando FUNCIÓN DIAL (5).
2. Gire REGULADOR DE FRECUENCIA (8) para seleccionar la emisora de radio
deseada.
3. Gire BOTÓN DE VOLUMEN (7) hasta el volumen deseado.
FUNCIÓN TOCADISCOS
1. Seleccione el modo PHONO usando FUNCIÓN DIAL (5).
2. Abra la cubierta de la torreta. Retire la llave de brazo y el protector de la aguja.
Coloque un disco en el plato. Coloque el adaptador en el caso de utilizar un disco de 17 cm.
3. Establecer SELECTOR DE VELOCIDAD 33/45 RPM (11) el 33/45 rpm dependiendo del disco para jugar.
4. Levantar el brazo con la palanca. Mueva el principio del brazo del disco, o el
comienzo de una pista particular. Lentamente baje la aguja en el disco mediante el uso de la palanca.
5. Para seleccionar la función de auto-stop, mover CONMUTADOR AUTOSTOP
(12) ON. Cuando termina el disco, la reproducción se detendrá automáticamente. Para detener la reproducción manualmente, levante el brazo del registro y traerlo de vuelta a la posición inicial.
Page 13

10 Español
6. Mover o agitar el dispositivo sin bloquear el brazo podría dañar el mecanismo.
Ponga la tapa en el lápiz cuando no esté en uso.
SALIDA DE AURICULARES
Los auriculares deben tener un conector de 3,5 mm, una impedancia de 8-32 o-
hmios y están conectadas all'SALIDA DE AURICULARES (3). Cuando se conectan los auriculares, los altavoces se desconectan automáticamente.
LINE-OUT
Puede conectar la unidad a un dispositivo externo (altavoces o amplificador) a través SALIDA DE AUDIO (14) mediante un cable RCA.
ESPECIFICACIONES TÉCNICAS
AC: 230 V ~ 50 Hz
FM: 88 - 108 MHz
Las características tecnicas estan sujetas a cambios sin aviso previo.
La presencia de esta marca en el producto o en el materiál informativo que lo acompaña, indica que al finalizar su vida útil no deberá eliminarse junto con otros residuos domésticos. Para evitar los posi bl es daños al
medi o ambi ente o a l a sal ud humane que representa la eliminación incontrolada de residuos, separe este
producto de otros tipos de residuos y reciclelo correctamente para promover la reutilización sostenible de re-
cursos materiales. Los usuarios particulares pueden contactar con el establecimiento donde adqui ri eron el
producto, o con l as autori dades l ocal es pertinentes, para informarse sobre cómo y dónde pueden lIevario
para que sea sometido a un reciclaje ecológico y seguro. Los usuarios comerciales pueden contactar con su
proveedor y consultar las condiciones del contrato de compra. Este produco no debe eliminarse mezclado con
otros residuos comerciales.
ELIMINACIÓN CORRECTA DE ESTE PRODUCTO
(material electrico y electrónico de descarte)
ATTENTIÓN
El símbolo de exclamación dentro un triángulo tiene el objeto de advertir al usuario de la presencia de
instrucciones importantes de funcionamiento y mantenimiento en la documentación adjunta con el equipo.
El símbolo del rayo con punta de flecha dentro de un triángulo adverte al usuario de la presencia de ten-
siones peligrosas en el equipo.
Para reducir los riesgos de descargas eléctricas, no retire la cubierta. La unidad no hay en su enterior
componentes que pueda manipular el usuario. Encargue su reparación a personal cualificado.
Esta unidad funciona con 230V ~ 50Hz. Cuando el equipo vaya a estar un tiempo prolongado sin utilizarse, desenchufar el cable de alimentación.
No conecte la unidad hasta que no se hayan efectuado todas las otras conexiones.
La unidad no debería ser expuesta a lluvia o humedad.
La unidad se debe instalar de forma que su posición no le impida tener ventilación adecuada. Por ejemplo, el equipo no se debe colocar cerca de cortinas o sobre el tapete, ni en una instalación como puede
ser un armario.
La unidad no debería ser expuesta a la luz solar directa ni a fuentes emisora de calor.
Page 14

11 Português
CONTROLE DE POSIÇÃO
1. ANTI-DUST COVER
2. FAIXA DE FREQÜÊNCIA
3. AUSCULTADORES OUTPUT
4. INDICADOR DE ON / OFF
5. CONTROLO DE FUNÇÃO
6. MUTE
7. BOTÃO DE VOLUME
8. REGULADOR DE FREQUÊNCIA
9. INDICADOR STEREO FM
10. DISC ADAPTER
11. VELOCIDADE SELECTOR 33/45 RPM
12. DE AUTOSTOP CHAVE
13. ARM PRATO
14. SAÍDA DE ÁUDIO
15. ANTENA FM
16. CABO DE ALIMENTAÇÃO
PODER
Ligue a unidade ao poder. Troque de lugar FUNÇÃO (5) para a posição OFF para
desligar o aparelho.
FUNÇÃO DE RÁDIO FM
1. Selecione o modo TUNER usando o interruptor de FUNÇÃO (5).
2. Desativar o controle da frequência (8) para seleccionar a estação de rádio de-
sejada.
3. Gire o botão VOLUME (7) para o volume desejado.
FUNÇÃO DE GRAVAÇÃO PLAYER
1. Selecione o modo PHONO, usando interruptor FUNÇÃO (5).
2. Abra a tampa da base giratória. Remova a chave de braço eo protetor caneta.
Coloque um disco no prato. Coloque o adaptador no caso de se utilizar um disco de 17 centímetros.
3. Definir 33/45 RPM selector de velocidade (11) de 33/45 rpm, dependendo do
disco para jogar.
4. Levante o braço com a alavanca. Mover o início do braço do disco, ou o início
de uma faixa em particular. Lentamente, abaixe a agulha no disco usando a alavanca.
5. Para selecionar a função de carona, mova AUTOSTOP do interruptor (12) para
ON. Quando o disco termina, a reprodução irá parar automaticamente. Para
parar a reprodução manualmente, levante o braço a partir do registro e trazê-lo
de volta para a posição inicial.
Page 15

12 Português
6. Mover ou sacudir o dispositivo sem bloquear o braço pode danificar o mecanismo. Coloque a tampa na caneta quando não estiver em uso.
AUSCULTADORES OUTPUT
Os fones de ouvido deve ter um plug 3,5 mm, uma impedância de 8-32 ohms e e-
stão ligados aos telefones de saída (3). Quando os auscultadores estão ligados,
os alto-falantes são automaticamente desligados.
LINE-OUT
Você pode conectar o aparelho a um dispositivo externo (alto-falantes ou amplifi-
cador) através da saída AUDIO (14) usando um cabo RCA.
ESPECIFICAÇÕES TÉCNICAS
CA: 230 V ~ 50 Hz
FM: 88 - 108 MHz
As características e o projeto estão sujeitos a modificações sem prévio aviso.
Esta marca, apresentada no produto ou na sua literatura indica que ele não deverá ser eliminado juntamente
com os residuos domésticos indiferenciados no final do seu periodo de vida útil. Para impedir danos ao ambiente e á saúde humana causados pela eliminação incontrolada de resíduos deverá separar este equipamento de
outros tipos de residuos e reciclá-lo de forma responsável, para promover uma reutilização sustentável dos
recursos materiais. Os utilizadores domesticos deverão contactar ou o estabelecimento onde adquiriram este
produto ou as entidades oficiais locais para obterem informaçães sobre onde e de que forma podem levar este
produto para permitir efectuar uma reciclagem segura em termos ambientais. Os utilizadores profissionais de-
verão contactar o seu fornecedor e consultar os termos e condições do contrato de compra. Este produto não
devera ser misturado com outros residuos comerciais para eliminação.
ELIMINAÇAO CORRECTA DESTE PRODUTO
(Resíduo de Equipamentas Eléctricos e Electrónicos)
ATENÇÃO
O ponto de exclamação dentro de um triângulo avisa o utilizador que no livrete de instruções
há importantes informações para a utilização e a manutenção.
O símbolo com o raio dentro de um triângulo avisa o utilizador que há tensão perigosa no
interior do aparelho.
Para reduzir o risco de choque eléctrico, não abra o aparelho. O aparelho não contém peças
que podem ser reparadas pelo utilizador. Em caso de defeitos, para a reparação, contacte
um técnico qualificado.
Este aparelho foi projectado para funcionar com 230 V. ~ 50 Hz. Se o aparelho não for utilizado durante muito tempo, tire a ficha eléctrica da tomada de corrente.
Não exponha o aparelho à chuva nem à humidade.
Coloque o aparelho num local suficientemente ventilado. Evite colocá-lo perto de cortinas,
em cima de alcatifas ou dentro de quaisquer móveis como por exemplo uma estante.
Não exponha o aparelho directamente à luz do sol nem a fontes de calor.
Page 16

13 Nederlands
PLAATS VAN DE CONTROLES
1. STOFKAP
2. KIESSCHAAL
3. HOOFDTELEFOONUITGANG
4. HUIDIGE STATUS
5. FUNCTIEKEUZE
6. GELUID UIT KNOP
7. VOLUMEKNOP
8. AFSTELKNOP
9. FM STEREO INDICATOR
10. AS ADAPTOR
11. 33/45 TOEREN KIEZER
12. AUTO STOP SWITCH
13. TONE ARM
14. OUTPUT JACK
15. FM ANTENNE
16. AC SNOER
STROOMVOORZIENING
Sluit het apparaat aan op de voeding. Schakel FUNCTIEKEUZE (5) op OFF om het toestel uit te schakelen.
FM-RADIO WERKZAAMHEDEN
1. Kies TUNER mode door FUNCTIEKEUZE (5) te gebruiken.
2. Draai AFSTELKNOP (8) om je favoriete radiostation te kiezen.
3. Draai VOLUMEKNOP (7) om het volume bij te stellen.
LUISTER VERSLAGEN
1. Kies PHONO mode door FUNCTIEKEUZE (5) te gebruiken.
2. Open de kap van de platenspeler. Draai de veiligheid-overbrengingsschroef, die zich
bovenop de platenspeler bevindt, los. Plaats een plaat op de centrale as van de platenspeler. Plaats de EP-adapter op de centrale as bij het beluisteren van EP’s van
17 cm (45 toeren).
3. Stel de 33/45 TOEREN KIEZER (11) af op 33/45 toeren, in overeenkomst met de
plaat die wordt afgespeeld.
4. Hef de afspeelarm op met de hendel van de arm. Plaats de afspeelarm aan het begin van de plaat of aan het begin van een bepaalde track. Laat de arm uiterst voorzichtig op de plaat zakken met de hendel van de arm om te beginnen met het afspelen.
5. Om de automatische stop-modus te selecteren, te verplaatsen naar ON zal de positie van AUTO STOP SWITCH (12). Als de plaat het einde heeft bereikt, zal de platenspeler automatisch stoppen. Om de plaat te stoppen tijdens het afspelen, hef de
afspeelarm op en plaats deze op de steun.
6. Het verplaatsen of schudden van de platenspeler zonder de beschermkap van de
punt en de sluiting van de afspeelarm, kan leiden tot schade aan het apparaat. Pla-
Page 17

14 Nederlands
ats de beschermkap op de punt, wanneer deze niet in gebruik is.
KOPTELEFOON
Hoofdtelefoon moet een 3,5 mm stereo plug en een impedantie van 8-32 Ohm hebben,
en moet worden aangesloten op KOPTELEFOON OUT (3). Wanneer een hoofdtelefoon
is aangesloten, wordt de luidspreker automatisch verbroken.
LINE-OUT
U kunt het apparaat aansluiten op een extern audio-apparaat (luidsprekers of versterker) door middel van OUTPUT JACK (14) met behulp van een RCA-kabel.
TECHNISCHE SPECIFICATIES
AC: 230 V ~ 50 Hz
FM: 88 - 108 MHz
Kenmerken zijn zonder voorafgaande kennisgeving onderhevig aan veranderingen.
Dit symbool dat staat weergegeven op het product en in de documentatie ervan, duidt erop dat het product niet
kan worden weggegooid met het gewone huisvuil aan het einde van de levensduur. Om schade aan het milieu
of aan de gezondheid door ongepaste afvalverwijdering te voorkomen, dient de gebruiker dit product te schei-
den van andere soorten afval op verantwoorde wijze ter bevordering van duurzaam hergebruik van de materië-
le hulpbronnen. De thuisgebruiker dient contact op te nemen met de verkoper van het apparaat of met de lokale gemeente voor informatie met betrekking tot het scheiden en recyclen van dit type product. Zakelijke gebruikers dienen contact op te nemen met hun leverancier en de algemene voorwaarden van de verkoopovereenkomst te raadplegen. Dit product dient niet te worden gemengd met ander bedrijfsafval voor de verwijdering.
CORRECTE AFVALVERWERKING VAN HET PRODUCT
(elektrisch en elektronisch afval)
WAARSCHUWING
Het uitroepteken in een gelijkzijdige driehoek is bedoeld om de gebruiker erop attent te maken dat de
gebruikershandleiding belangrijke instructies bevat voor het gebruik en het onderhoud.
De bliksemschicht in een gelijkzijdige driehoek is bedoeld om de gebruiker te waarschuwen voor de aanwezigheid van gevaarlijke spanning binnen in het apparaat.
Om het risico op elektrische schokken te reduceren, dient het apparaat niet te worden geopend. Het
apparaat bevat geen onderdelen die gerepareerd kunnen worden door de gebruiker. In het geval van
een defect dient contact opgenomen te worden met een gekwalificeerde technicus voor de reparatie.
Dit apparaat is ontworpen om te werken op 230v~ 50Hz. Als het apparaat voor een langere tijd niet gebruikt gaat worden, dient de stekker uit het stopcontact te worden gehaald.
Stel het apparaat niet bloot aan regen of vocht.
Gebruik het apparaat uitsluitend nadat is gecontroleerd dat alle aansluitingen correct zijn uitgevoerd.
Plaats het apparaat op een voldoende geventileerde plek. Plaats het apparaat niet in de buurt van gordijnen, op het tapijt of in in een stuk meubilair, zoals bijvoorbeeld een boekenkast.
Stel het apparaat niet bloot aan direct zonlicht of aan warmtebronnen.
Page 18

15 Čeština
UMÍSTĚNÍ OVLÁDACÍCH
1. DUST
2. DIAL
3. KONEKTOR PRO SLUCHÁTKA
4. SOUČASNÝ STAV
5. FUNKCE PŘEPÍNAČ
6. MUTE BUTTON
7. VOLUME CONTROL
8. TUNING KNOP
9. FM STEREO INDICATOR
10. UNAŠEČ
11. 33/45 RPM SPEED VÝBĚR
12. AUTO STOP SWITCH
13. RAMÉNKO
14. OUTPUT JACK
15. FM ANTENNA
16. POWER CORD
NAPÁJENÍ
Připojte zařízení k napájecímu zdroji. Přepínač FUNCTION SELECT přepínač
(5) vypněte zařízení.
FM RÁDIO OPERACE
1. Použít zvolte režim tuner Volba funkce spínač (5).
2. Otáčet (8) na TUNING Knop vyberte požadovanou rozhlasovou stanici.
3. Otáčením VOLUME CONTROL (7), nastavit hlasitost.
RECORDS POSLOUCHEJTE
1. Použití Select PHONO režim podle funkcí Volič (5).
2. Otevřít víko přehrávače disků. Uvolněte zámek raménko a odstraňte ochran-
ný kryt z jehly. Umístěte desku na talíři na vřeteno ve středu. Umístěte adaptér EP přes stonek, když hrajete EP o průměru 17 cm.
3. Nastavit 33/45 RPM SPEED volič (11) v závislosti na typu desky do 33/45
otáček za minutu.
4. Zvedněte raménko na vleku pro raménko. Posuňte raménko na začátku disku nebo začátek určitou skladbu. Snižte raménko s pomocí přenosku zvedákem pomalu na panelu pro spuštění přehrávání.
5. Chcete-li zvolit režim automatické zastavení na AUTO vypínač (12) pohybu v
poloze ON. Když je disk dohraje do konce, záznam se automaticky zastaví.
Chcete-li zastavit přehrávání ručně, zvedněte raménko z jednotky a vložte jej
zpět do držáku.
Page 19

16 Čeština
6. Pokud přesunete talíř nebo třást gramofonu bez tonearm je zajištěno, škoda
na raménko může mít za následek. Nasaďte uzávěr na jehle, pokud nepoužíváte gramofonu.
SLUCHÁTKA
Sluchátka by měla mít průměr 3,5 mm stereo konektor a impedanci 8-32 ohmů
a měly by sluchátkový výstup (3), které mají být spojeny.
Jsou-li připojena sluchátka, reproduktor je vypnutý.
LINE-OUT
Můžete připojit zařízení k externímu audio zařízení (reproduktory nebo zesilovač) přes OUT (14) s audio kabelu RCA.
TECHNICKÉ ÚDAJE
AC: 230V ~ 50 Hz
FM: 88 - 108 MHz
Tento symbol na výrobku, jeho příslušenství nebo obalu označuje, že při pozdější likvidaci výrobku (z jakýchkoliv důvodů) nesmí být s výrobkem zacházeno jako s domovním odpadem. Výrobek zlikvidujte jeho
předáním na sběrné místo pro likvidaci použitých elektrických a elektronických zařízení šetrnou
k životnímu prostředí. Zajištěním jejich správné likvidace zabráníte vzniku potenciálních rizik pro životní
prostředí a lidské zdraví, která by mohla vzniknout nesprávným zacházením s odpady. Kromě toho recyklace odpadových materiálů napomáhá udržení přírodních zdrojů surovin pro příští generace. Podrobné
informace k likvidaci tohoto výrobku šetrné k životnímu prostředí získáte u pracovníka ochrany životního
prostředí místního (městského nebo obvodního) úřadu nebo v prodejně, ve které jste výrobek zakoupili.
POKYNY PRO SPRÁVNOU LIKVIDACI VÝROBKU
(likvidaci použitých elektrických a elektronických zařízení)
UPOZORNĚNÍ
Vykřičník uvnitř trojúhelníka na zadní straně skříňky přístroje upozorňuje uživatele na důležité pokyny pro obsluhu a
ošetřování přístroje, uvedené v jeho doprovodné dokumentaci. čeština
Symbol blesku uvnitř trojúhelníka na zadní straně skříňky přístroje upozorňuje uživatele na existenci životu nebezpečného napětí na některých dílech uvnitř skříňky přístroje.
Nevyjímejte přístroj ze skříňky – riziko úrazu elektrickým proudem. Uvnitř skříňky nejsou díly, které by mohl opravit
nebo seřídit jeho uživatel bez odpovídajícího vybavení a kvalifikace. Bude-li přístroj vyžadovat seřízení nebo opravu
kontaktujte odborný servis. Zásahem do přístroje v době platnosti záruky se vystavujete riziku ztráty event. záručních
plnění.
Přístroj je konstruován pro napájení střídavým napětím 230 V / 50 Hz z elektrické sítě. Pokud nebudete přístroj delší
dobu používat odpojte jej od elektrické sítě vyjmutím vidlice síťového kabelu přístroje ze síťové zásuvky.
Chraňte přístroj před zmoknutím, postříkáním nebo politím jakoukoliv kapalinou.
Vypnutím přístroje není přístroj odpojen od elektrické sítě. Pro odpojení přístroje od elektrické sítě vyjměte vidlici síťového kabelu přístroje ze síťové zásuvky. Před zapnutím přístroje překontrolujte všechna připojení k přístroji.
Okolo přístroje ponechejte na všech stranách dostatečný volný prostor, nutný pro cirkulaci vzduchu okolo přístroje. Je
tak odváděno teplo vznikající během jeho provozu.
Neumísťujte přístroj na přímém slunci nebo v blízkosti zdrojů tepla. Vysokými teplotami je významně zkracována životnost elektronických dílů přístroje.
Page 20

17 Slovenský
UMIESTNENIE OVLÁDACÍCH
1. DUST
2. DIAL
3. KONEKTOR PRE SLÚCHADLÁ
4. SÚČASNÝ STAV
5. FUNKCIE PREPÍNAČ
6. MUTE BUTTON
7. VOLUME CONTROL
8. TUNING KNOP
9. FM STEREO INDICATOR
10. UNÁŠAČ
11. 33/45 RPM SPEED VÝBER
12. AUTO STOP SWITCH
13. RAMIENKO
14. OUTPUT JACK
15. FM ANTENNA
16. POWER CORD
NAPÁJANIE
Pripojte zariadenie k zdroju napájania. Prepínač FUNCTION SELECT prepínač
(5) vypnite zariadenie.
FM RÁDIO OPERÁCIE
1. Použiť zvoľte režim tuner Voľba funkcie spínač (5).
2. Otáčať (8) na TUNING Knop vyberte požadovanú rozhlasovú stanicu.
3. Otáčaním VOLUME CONTROL (7), nastaviť hlasitosť.
RECORDS POČÚVAJTE
1. Použitie Select PHONO režim podľa funkcií Volič (5).
2. Otvoriť veko prehrávača diskov. Uvoľnite zámok ramienko a odstráňte o-
chranný kryt z ihly. Umiestnite dosku na tanieri na vreteno v stredu. Umiestnite adaptér EP cez stonku, keď hráte EP o priemere 17 cm.
3. Nastaviť 33/45 RPM SPEED volič (11) v závislosti od typu dosky do 33/45
otáčok za minútu.
4. Zdvihnite ramienko na vleku pre ramienko. Posuňte ramienko na začiatku disku alebo začiatok určitú skladbu. Znížte ramienko s pomocou prenosku
zdvihákom pomaly na paneli pre spustenie prehrávania.
5. Ak chcete zvoliť režim automatické zastavenie na AUTO vypínač (12) pohybu v polohe ON. Keď je disk dohrá do konca, záznam sa automaticky zastaví. Ak chcete zastaviť prehrávanie ručne, zdvihnite ramienko z jednotky a
vložte ho späť do držiaka.
Page 21

18 Slovenský
6. Ak premiestnite tanier alebo triasť gramofónu bez tonearm je zaistené, škoda na ramienko môže mať za následok. Nasaďte uzáver na ihle, ak nepoužívate gramofónu.
SLÚCHADLÁ
Slúchadlá by mala mať priemer 3,5 mm stereo konektor a impedanciu 8-32 ohmov a mali by slúchadlový výstup (3), ktoré majú byť spojené.
Keď sú pripojené slúchadlá, reproduktor je vypnutý.
LINE-OUT
Môžete pripojiť zariadenie k externému audio zariadenia (reproduktory alebo zosilňovač) cez OUT (14) s audio kábla RCA.
TECHNICKÉ ÚDAJE
AC: 230V ~ 50 Hz
FM: 88 - 108 MHz
Tento symbol na výrobku, jeho príslušenstve alebo obale označuje, že pri naskoršej likvidácii výrobku (z akýchkoľvek dôvodov) nesmie byť s výrobkom zachádzané ako s domácim odpadom. Výrobok zlikvidujte jeho
odovzdaním na zberné miesto pre likvidáciu použitých elektrických a elektronických zariadení šetrnú
k životnému prostrediu. Zaistením ich správnej likvidácie zabránite vzniku potenciálnych rizík pre životné prostredie a ľudské zdravie, ktorá by mohla vzniknúť nesprávnym zachádzaním s odpadmi. Okrem toho recyklácia odpadových materiálov napomáha udržaniu prírodných zdrojov surovín pre budúce generácie. Podrobné
informácie k likvidácii tohto výrobku šetrné k životnému prostrediu získate u pracovníka ochrany životného
prostredia miestneho (mestského alebo obvodného) úradu alebo v predajni, v ktorej ste výrobok zakúpili.
POKYNY PRE SPRÁVNU LIKVIDÁCIU VÝROBKU
(likvidácii použitých elektrických a elektronických zariadení)
OPOZORILO
Výkričník vo vnútri trojuholníka na skrinke prístroja upozorňuje užívateľa na existenciu dôležitých pokynov pre jeho obsluhu uvedených v návode.
Symbol blesku vo vnútri trojuholníka upozorňuje užívateľa na nebezpečné napätie na niektorých dieloch
vo vnútri skrinky prístroja.
Nevyberajte prístroj zo skrinky - riziko úrazu elektrickým prúdom. Vo vnútri skrinky prístroja nie sú diely
ktoré by mohol opraviť alebo nastaviť jeho užívateľ bez zodpovedajúceho vybavenia a kvalifikácie. Ak
bude prístroj vyžadovať nastavenie alebo opravu kontaktujte odborný servis. Zásahom do prístroja v
dobe platnosti záruky sa vystavujete riziku straty príp. záručných plnení.
Chráňte prístroj pred zmoknutím, postriekaním alebo poliatím akoukoľvek kvapalinou - riziko úrazu lektrickým prúdom. Nepoužívajte prístroj mimo miestnosti.
Pre odpojenie prístroja od elektrickej siete vyberte vidlicu sieťového kábla prístroja zo sieťovej zásuvky.
Prístroj umiestenie na dobre vetranom mieste. Nezakrývajte vetracie otvory skrinky prístroja - riziko jeho
prehriatia a poškodenia.
Chráňte prístroj pred priamym slnkom, neumiestňujte prístroj v blízkosti zdrojov tepla. Vysokými teplotami je výrazne skracovaná životnosť elektronických komponentov prístroja.
Page 22

Page 23

Page 24

is a registered Trademark of Roadstar S.A. - Switzerland. All rights reserved.
Roadstar Management SA, via Passeggiata 7 CH 6883 Novazzano (Switzerland)
VER.1
 Loading...