

Page 1

is a registered Trademark of Roadstar S.A. - Switzerland All rights reserved
www.roadstar.com
Roadstar management SA, via Passeggiata 7 CH 6883 Novazzano (Switzerland)
HIF-3650UMP
Instruction manual
Bedienungsanleitung
HOME MICRO HI-FI SYSTEM WITH
MW/FM-STEREO RADIO, CD/CD-R/CD-RW
USB MP3 PLAYER AND ALARM CLOCK.
Page 2
EnglishEnglish
1 2
HIF-3650UMP
Micro Hifi System with Compact Disc / MP3 Player, USB, MW/FM-stereo
radio and Remote Control.
INSTRUCTION MANUAL
Please read this instruction manual carefully and familiarize yourself with your new HiFi
system before using it for the first time. Please retain this manual for future reference.
WARNINGS
The exclamation point within the triangle is a warning sign alerting
the user of important instructions accompanying the
product.
The lightening flash with arrowhead symbol within the triangle is a
warning sign alerting the user of “dangerous voltage” inside the unit.
To reduce the risk of electric shock, do not remove the cover. No
user serviceable parts inside the unit. Refer all servicing to
qualified personnel.
This unit employs a laser. Only a qualified service person should
remove the cover or attempt to service this device, due to
possible eye injury.
Invisible laser radiation when the unit is opened or interlocks defeated. Avoid exposure to laser beam. Use of controls,
adjustments or procedures other than those specified herein may
result in hazardous radiation exposure.
This unit operates on 230V ~ 50Hz. If the unit is not used for a long
period of time, remove the plug from the AC mains.
This unit must not be exposed to moisture or rain.
The power switch in this unit is mounted on the secondary
circuit and does not disconnect the whole unit from the mains in
OFF position.
Ensure all connections are properly made before operating the unit.
This unit should be positioned so that it is properly ventilated. Avoid
placing it, for example, close to curtains, on the carpet or in a builtin installation such as a bookcase.
Do not expose this unit to direct sunlight or heat radiating sources.
1
2
3
4
5
6
7
89
10
11
12
13 14
16
17
18
19
20
Correct Disposal of This Product
(Waste Electrical & Electronic Equipment)
This marking shown on the product or its literature, indicates that it should not be
disposed with other household wastes at the end of its working life. To prevent possible
harm to the environment or human health from uncontrolled waste disposal, please
separate this from other types of wastes and recycle it responsibly to promote the
sustainable reuse of material resources.
Household users should contact either the retailer where they purchased this product,
or their local government office, for details of where and how they can take this item
for environmentally safe recycling.
Business users should contact their supplier and check the terms and conditions
of the purchase contract. This product should not be mixed with other commercial
wastes for disposal.
15
Page 3

EnglishEnglish
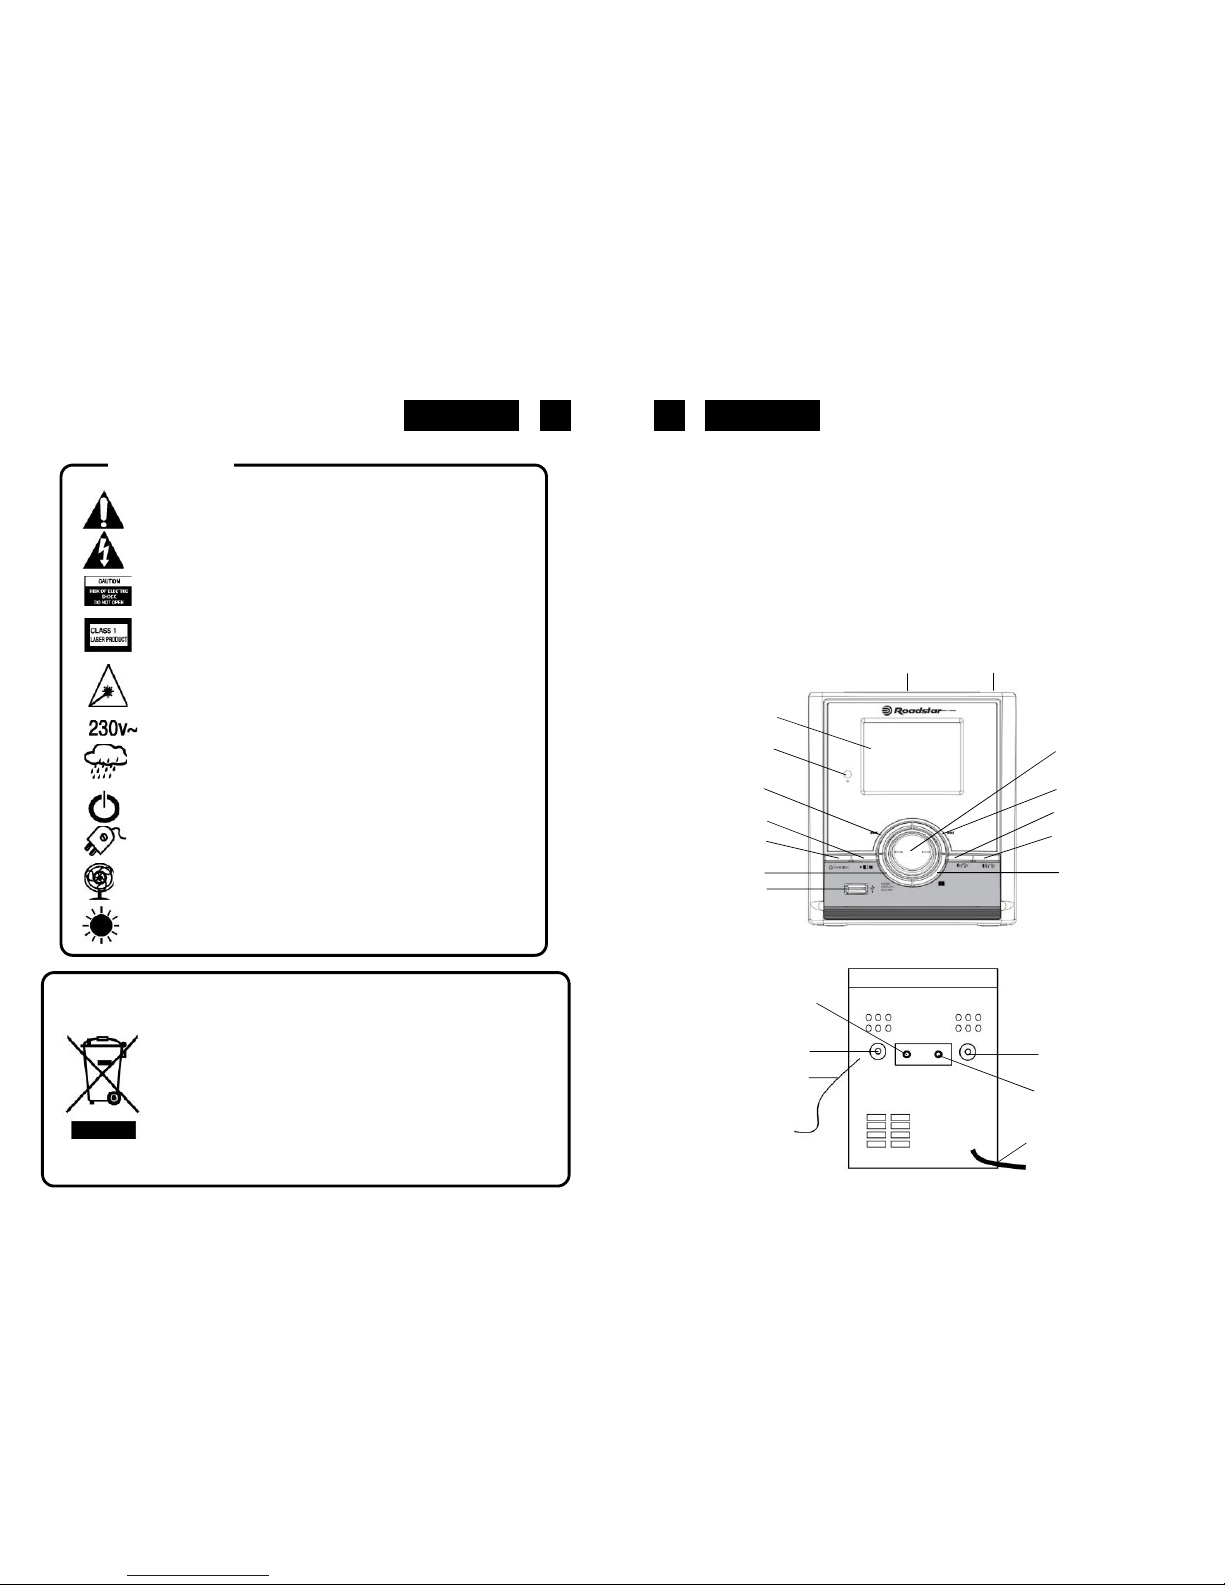
LOCATION OF CONTROLS
1. Power cord
2. Antenna
CONNECTING TO POWER
Before switching on make sure that the voltage of your electricity supply is the same as that indicated
on the rating plate.
For your own safety read the following instructions carefully before attempting to connect this unit to
the mains.
MAINS (AC) OPERATION
This unit is designed to operate on AC 230V 50Hz current only. Connecting it to other power sources
may damage the unit.
CAUTION
To prevent electric shock disconnect from the mains before removing cover. No user serviceable parts
inside. Refer servicing to qualified service personnel.
SAFETY PRECAUTION
Do not allow this unit to be exposed to rain or moisture.
Mains Supply: 230V 50Hz - AC only
This symbol means that this unit is double insulated. An earth connection is not required.
POWER SUPPLY
Remove the stereo carefully from the box, retaining the packaging for future use.
AC POWER OPERATION
Connect the plug to a mains power inlet 230V AC ~ 50 Hz.
CONNECTIONS
SPEAKER CONNECTION
Connect each speaker to the corresponding speaker terminals (16 / 17) on the back of the system.
Ensure that the left speaker is connected to the leftterminals, and the right speaker to the right terminals.
MW/FM TUNER
OPERATION
• Press the Function Selector sequentially (11) until the RADIO AM or FM compare in the
display.
• Tune to the desired radio station by turning the Tuning control (10).
• To POWER OFF press the Function Selector (11) three seconds.
ANTENNA
• For FM reception there is a built-in FM antenna wire at the rear of the unit (2). Move the wire
around to obtain the best reception.
• For MW reception the signals are picked up through a built-in ferrite antenna. Your may have
to orient the unit to obtain the best reception.
in the display.
CLOCK SETTING
1. Make surethe unit isin standbymode.
2. Pressand hold “CLOCK SET”(13) button until the unit entered the yearsetting.
3. Press “SKIP +” (8) or “SKIP -” (9) to select the desired year.
4. Press “Clock Set” (13) button once to confirm
3 4
skip button
10. Tuning Control
11. Function Selector (RADIO/USB/CD/AUX)
12. Remote sensor
13. Mode Display / Clock / Repeat / Program Button
14. Album button
15. CD Open corner
16. Left Speaker (L)
17. Right Speaker (R)
18. AUX-IN
19. Eadphone output
20. Snooze button
FM-STEREO RECEPTION
• Stereo reception is possible when the tuned FM station is broadcasting in stereo.
• When in FM mode and the station is broadscasting in Stereo, the STEREO indicator compare
7. CD/USB Play/Pause-Button (II)
FM
3. LCD Display
4. USB Port input
5. volume up /Alarm 1
6. volume down / Alarm 2
8. CD/USB Forward
Skip/Search Button
9. CD/USB
Page 4

EnglishEnglish
5. Repeat step 3 & 4 for setting Month, Date, 12/24Hr, Hour and Minute
ALARMSETTING
ALARM setting must beaftercompletedclocksetting.Unit must bein “STANDBY“
mode.
Belowis using “AL 1” alarmsetting forexample:
1. Pressand hold the “AL 1” button for2 secondsto entryalarm setmode.
2. Adjust hour by pressing the “SKIP+” (8) or“SKIP-” (9) button, press the “AL 1” button to
confirm.
3. Adjustminutebypressingthe “SKIP+”or“SKIP-”button,pressthe “AL 1”button to confirm.
4. Pressthe “SKIP+”(8) or“SKIP-”(9) button to selectbelow1,2 .3or 4 forwake-up function:
1 - FM
2 - MP3 (DISC)
3 - USB
4- BUZZ
5. Press the “AL1” button to confirm. The display will show “AL1”, ALARM set is complete.
6. Press the “AL1” button to activate alarm ON/OFF function.
7. When “AL1” is OFF, “AL1” will disappear from the display.
SNOOZE FUNCTION
SNOOZE must be after completed ALARM setting. When the timer is triggered. You may
press the “SNOOZE” button to delay the alarm fr another 10 minute
AUX-IN FUNCTION
1. Usea 3.5mmMale-to-Male Stereocableto connectanyexternalaudio devicewith a3.5mm
Headphone or Line-Out jackto theAUX INjack onthe front panelof thestereo.
2. Startplaybackon the externalaudiodevice. Adjustthe volume ontheaudiodevice (donot
setthevolumetoo hightoavoiddistortion).Youmayalso adjustthevolume on theappliance.
3. To control playback function, usethe controls provided bythe externalaudio device.
HANDLING COMPACT DISC
• To remove a disc from its storage case, press down on the centre of the case and lift the
disc out, holding it carefully by the edges.
Fingerprints and dust should be carefully wiped off the disc’s recorded surface with a soft
5 6
cloth. Unlike conventional records, compact discs have no grooves to collect dust and
microscopic debris so gently wiping with a soft cloth should remove most particles. Wipe in
a straight line from the inside to the outside of the disc. Small dust particles and light stains
will have absolutely no effect on reproduction quality.
• Never use chemicals such as record sprays, antistatic sprays, benzine, or thinners to clean
compact discs. These chemicals can irreparably damage the disc’s surface.
• Discs should be returned to their cases after use. This avoids serious scratches that could
cause the Laser pickup to skip.
• Do not expose discs to direct sunlight, high humidity, or high temperatures for extended
periods. Long exposure to high temperatures can warp the disc.
• Do not stick paper or write anything with a ballpoint pen on the label side of the disc.
COMPACT DISC / USB OPERATION
LOADINGAND UNLOADING COMPACT DISCS
• Set the Function Selector (11) to the CD /USB/SD Position.
• Open the disc compartment by pressing on the CD OPEN right corner.
• When the disc compartment has opened, remove a disc from its case and place it carefully
in the compartment with the label side facing up. Locate smaller, 3” discs, in the centre
depression of the compartment.
• Close the disc compartment.
When the compartment is fully closed, the disc will start turning automatically. The total
number of tracks of the CD will appear on the LCD display (3).
CAUTION
• Do not put anything except a compact disc into the compartment. Foreign objects can
damage the mechanism.
• Keep the disc compartment closed when not in use to prevent dirt and dust from entering
the mechanism.
• Never place more than one disc into the disc compartment at any time.
• If the disc is correctly loaded , the following information will be displayed:
Total number of tracks on the disc
Notes: After the disc compartment is fully closed, the disc information may not appear on the
display, This means that the disc is improperly loaded (most likely it is upside down). To
check, open the disc compartment again and reload the disc.
ATTENTION!
THIS PRODUCT IS ALSO ABLE TO REPRODUCE CD-RW DISCS, HOWEVER IT COULD
HAPPEN THAT DURING PLAYBACK SOME TYPE OF DISCS CANNOT BE PLAYED
PROPERLY. THEREFORE, FULL PLAYABILITY WITH ALL CD-RW DISCS IS NOT
GUARANTEED.
Page 5

EnglishEnglish
NORMAL DISC PLAY
• Open the disc compartment by lift on the CD OPEN right corner and load a CD.
• Close the disc compartment.
• Press the PLAY / PAUSE button (7). The disc play will begin from the start of the first
track of the disc.
• A particular track can be selected using either the CD Skip buttons (8,24). If this is done
before pressing the PLAY / PAUSE (7) button, disc play will start with the selected track
when the PLAY / PAUSE button is pressed.
• At the end of the disc, the unit will switch to stop mode.
Notes: If the disc is deeply scratched, or too dirty, disc play may not start.
If on improperly centred disc is played, noise can be heard in the mechanism. The
use of such discs should be avoided.
IMPORTANT INFORMATION
This compact disc player has built-in error compensation circuits to correct for minor defects
in a disc.
There are limits, however, to the amount of correction available.
In some cases, the CD / MP3 player may skip some tracks on a disc during disc play. This
problem may be cause by defects (such as scratches) in the disc being played, which are
too large for the error compensation circuits to handle. If you encounter this problem, check
the CD player’s operation as follows, before having the unit serviced:
Play a new disc. If the CD player operates normally, the skipping problem is probably due to
a defective disc.
TO STOP A CD PART WAY THROUGH
• Press the Stop button (7). Disc play will stop and the display will show the total number of
tracks for the CD.
• To temporarily stop disc play (pause mode), press the Play / Pause button. Disc play will
pause at the current play position. The Play/Pause indicator will flash.
• To resume disc play, press the Play/Pause (7) button again.
TRACK SKIP (CD / USB)
STARTING DISC PLAY FROM THE BEGINNING OFA PARTICULAR TRACK
• Press the Forward or Reverse Skip / Search Track button (8,9) to select the desired track.
The number of the selected track will be shown on the display. Press the Play/Pause button
to start play.
TO SKIP TO THE NEXT TRACK
• Press the Forward Skip / Search Track button (8) once. Play will resume at the beginning
of the next track.
7 8
The player will skip ahead to the next track each time the Forward Skip / Search Track
button is pressed. Continuously pressing the Forward Skip / Search Track button makes
the player skip ahead through the track by track. Once the beginning of the last track is
reached the player will not advance any further.
TO SKIP BACK TO THE PREVIOUS TRACK (CD / USB)
• Press the Reverse Skip / Search Track button (8/9). If this button is pressed in the middle of
a track, the player will skip back to the beginning of that track. To make it skip back to the
previous track press the Reverse Skip / Search Track button (9) twice.
Continuously pressing the Reverse Skip / Search Track button makes the player skip
back through the disc track by track. Once the beginning of the first track is reached, the
player will not go back any further.
Notes: Tracks can be selected even when the Compact Disc compartment is open. However
if a track number is selected that is not present on the CD, disc play will start from
the beginning of the last track.
PROGRAMMED PLAYBACK (CD / USB)
It is not possible to enter programs during CD/USB play. Press the Stop button (7) first, then follow
the instructions below.
Press the PROGRAM button (13). “P01” and the PROGRAM indicator will light up.
Press the Forward and Reverse Skip Track buttons (8/9) to select the track to be stored in
position1.
Press the PROGRAM button (13). The first program selection is now stored in the program
memory 1.
Select the next track to be programmed using the Forward and Reverse Skip Track (8/9)
buttons.
Press the PROGRAM button (13) to store this track.
Continue entering tracks in this way until all the desired tracks are stored (up to a limit of20).
When the PROGRAM button (13) is pressed to store the 20th track, the display will return to
the 1st program location. Press the PROGRAM button (13) to step through the program
locations.
Listening to Programmed Tracks (CD / USB)
Press the Play Pause button (7). Disc play will start at the beginning of the first programmed track.
To Clear The Program Memory (CD / USB)
If the disc is playing, press the Stop button (25) to stop the disc.
Switch the Function (11) selector to a different position (RADIO/AUX) to clear the Program.
Page 6

EnglishEnglish
REPEAT PLAY (CD / USB)
Use the MODE button (13) to listen to an entire disc, Album or one track repetitively.
For repeat play of one track
Press the Play/Pause button (7), then press the MODE button once.
The REPEAT indicator will light up.
Select the desired track by pressing the Forward or Reverse Skip Track buttons (8,9). The
selected track will be shown on the CD display.
The selected track will then begin playing through to its end. At which point it will automatically
return to the beginning of that track. This will continue until the Stop button (25) is pressed.
If the MODE button (13) is pressed three times more, the Repeat indicator will gooff, Repeat play
will end, and normal disc play will resume from that point.
When the selected track has finished playing, the CD play will Stop.
For repeat play of Album or allthe tracks on the CD / USB
Press the Play/Pause button (7), then press the MODE button (13) twice.
The REPEAT ALBUM indicator will light up .
The player will then begin playing through to the end of the last track. At which point it will
automatically return to the beginning of the first track. This will continue until the Stop button (7)
is pressed.
If the MODE button (13) is pressed twice more, the Repeat indicator will be cancelled, repeat play
will end, and normal disc play will resume from that point.
When the last track has finished playing, the CD player will then Stop.
Random Function
Press the “MODE” button 4 times to select the RANDOM function.
EQUALIZER
Pressand hold the “ALBUM”button (14), each pressswitchthe EQ function as follows:
1. C = CLASSIC
2. r = ROCK
3. P = POP
4. J = JAZZ
5. F = FLAT (NORMAL)
IMPORTANT
Since movement of the CD mechanism and the sensitive circuitry may cause interference to a radio tuner
nearby switch this unit off while operating other radio devices.This product utilizes a laser
Danger - Invisible laser radiation when opened and interlock failed or defeated. Avoid direct
exposure to the beam.
Caution - Use of controls, adjustments, or procedures not listed in this manual may result in
hazardous radiation exposure.
9 10
Concerning Compact Discs
Only compact discs identified with this mark can be used with this player.
REMOTE CONTROL UNIT
1. Remove the battery film from the battery compartment of the remote.
REMOTE CONTROL:
1. POWER ON/OFF BUTTON
2. STOP BUTTON
3. SKIP I<<
4. ALARM 1
5. ALBUM -
6. MODE BUTTON
7. FUNCTION BUTTON
8. PLAY / PAUSE BUTTON
9. SKIP >>I
10. ALARM 2
11. ALBUM +
12. PROGRAM BUTTON
BATTERY REPLACEMENT
When the remote control operation becomes unstable or
the distance from which remote control is possible
becomes shorter, replace the batteries with new ones.
SPECIFICATIONS
Power Supply
AC: 230V ~ 50Hz, 11W
CD Player
Pick Up: 3-Beam. Semiconductor Laser
Encoding: 16-Bit Linear, 2 x oversampling
Design and specifications are subject to change without notice.
1
2
3
4
5
6
7
8
9
10
11
12
Radio Frequency Coverage
FM: 87.5 - 108MHz
MW: 520 - 1620 kHz
Page 7

DeutschDeutsch
11 12
SICHERHEITSHINWEISE
Das Ausrufszeichen im Dreieck weist den Benutzer auf wichtige
Bedienungs- und Wartungsanweisungen (Service) in diesem
Handbuch hin, die unbedingt zu befolgen sind.
Das Blitzsymbol im Dreieck weist den Benutzer auf “gefährliche
Spannungen” an einigen freiliegenden Bauteilen im Innem des
Gerätes hin.
Um die Gefahr elektrischer Schläge auszuschliessen, Gehäuse auf
keinen Fall abnehmen. Im Innem befinden sich keine vom Benutzer
selbst instandsetz-baren Teile. Reparaturen dürfen nur von einer
autorisierten Fachwerkstatt durchgeführt werden.
Diese Apparat benützt einen Laserstrahl. da Gefahr Augenschädern
besteht, darf nur qualifiziertes Personal den Deckel des Gerätes
aufheben, entfernen oder reparieren.
Dunkelstrahlung bei geöffneten Geräten und defektem Verschluss.
Bedienung oder Regulierung der technischen Eigenshaften oder
sonstige nicht spezifierte Prozeduren auf dieser manuellen Betriebsart
können zur Ausetzung gefährlicher Laserstrahlen führen.
Dieses Gerät ist für 230V ~ 50Hz Netzspannung ausgelegt. Bei
längerer Nichtbenutzung des Geräts ziehen Sie den Stecker aus der
Steckdose.
Setzen Sie das Gerät weder Feuchtigkeit noch Regen aus.
Der EIN-Schalter dieses Geräts ist an den Sekundärschaltkreis ange-
schlossen. Seine Abschaltung unterbricht die Hauptstromzufuhr des
Geräts nichts.
Schalten Sie das System erst dann ein, wenn Sie alle Verbindungen
genau geprüft haben.
Stellen Sie das Gerät so auf, dass immer eine ungestörte
Frischluftzufuhr sichergestellt ist. Es ist zum beispiel keinesfalls auf
Teppiche und in der Nähe von Gardinen zu stellen oder in Bücherregale
einzubauen.
Setzen Sie das Gerät weder direkter Sonneneinstrahlung noch
Wärmequellen aus.
HIF-3650UMP
MIKRO-HIFI-SYSTEM MIT CD-USB/MP3 SPIELER, MW/STEREO-UKW RADIO
UND FERNBEDIENUNG.
BEDIENUNGSANLEITUNG
Bitte lesen Sie aufmerksam diese Bedienungsanleitung, um sich mit Ihrem neuen HiFi-System
vertraut zu machen, bevor Sie es zum ersten Mal in Betrieb nehmen. Bitte bewahren Sie diese
Anleitung auf, um später jederzeit nachschlagen zu können.
1
2
3
4
5
6
7
89
10
11
12
13 14
16
17
18
19
20
Korrekte Entsorgung dieses Produkts (Elektromüll)
Die Kennzeichnung auf dem Produkt bzw. auf der dazugehörigen Literatur
gibt an, dass es nach seiner Lebensdauer nicht zusammen mit dem normalen
HaushaltsmüIl entsorgt werden darf. Entsorgen Sie dieses Gerat bitte getrennt
von anderen Abfallen, um der Umwelt bzw. der menschlichen Gesundheit
nicht durch unkontrollierte Müllbeseitigung zu schaden. Recyceln Sie das
Gerät, um die nachhaltige Wiederverwertung von stofflichen Ressourcen
zu fördern.
Private Nutzer sollten den Händler, bei dem das Produkt gekauft wurde, oder
die zuständigen Behörden kontaktieren, um in Erfahrung zu bringen, wie
sie das Gerät auf umweltfreundliche Weise recyceln können.
Gewerbliche Nutzer sollten sich an Ihren Lieferanten wenden und die
Bedingungen des Verkaufsvertrags konsultieren. Dieses Produkt darf nicht
zusammen mit anderem Gewerbemüll entsorgt werden.
15
Page 8

DeutschDeutsch
LAGE DER BEDIENUNGSELEMENTE
1. Netz-Kable
2. UKW-Antenne
3. LCD-Anzeige
4. USB Port
5. Lautstärke-Regler oben / Alarm 1
6. Lautstärke-Regler unten / Alarm 2
(R)
18. AUX-IN Aingang
19. Kopfhörerausgang
20. Snooze-Taste
NETZANSCHLUSS
Bevor Sie das Gerät einschalten, vergewissern Sie sich, daß Ihre örtliche Netzspannung mit der
auf dem Typenschild angegebenen Spannung übereinstimmt.
Zu Ihrer eigenen Sicherheit lesen Sie sorgfältig die folgende Bedienungsanleitung, bevor Sie das
Gerät ans Netz anschließen.
NETZBETRIEB (AC)
Dieses Gerät funktioniert nur mit einer Spannung von AC 230V 50Hz. Wird das Gerät an andere
Stromquellen angeschlossen, könnte es Schaden nehmen.
Vorsicht
Um elektrischen Schlägen vorzubeugen, trennen Sie das Gerät vom Netz ab, bevor Sie den
Deckel entfernen. Verwenden sie keine nutzbaren inneren Teile. Für die Wartung wenden Sie sich
an qualifiziertes Kundendienstpersonal.
Sicherheitsmaßnahmen
Setzen Sie das Gerät weder Regen noch Feuchtigkeit aus.
Stromversorgung: AC 230Volt / 50Hz - nur Wechselstrom (AC)
Dieses Zeichen bedeutet, daß dieses Gerät doppelt isoliert ist. Eine Erdung ist nicht
notwendig.
STROMVERSORGUNG
Nehmen Sie das Gerät vorsichtig aus der Verpackung und heben Sie diese für eine spätere
Verwendung auf.
WECHSELSTROM-BETRIEB (AC)
Schließen Sie das Netzkabel an eine AC-Steckdose an. Überprüfen Sie, daß Ihre Stromversorgung
230V, 50Hz beträgt.
ANSCHLÜSSE
LAUTSPRECHER
Schließen Sie die Lautsprecher an die Lautsprecherbuchsen (16/17) auf der Rückseite des
Gerätes an. Schließen Sie den rechten Lautsprecher an die rechte Buchse und den linken
Lautsprecher an die linke Buchse an.
MW-/UKW-TUNER
BETRIEB
• Stellen sequentiell Sie den Funktion-taste (11) auf RADIO (FM oder MW).
• Stimmen Sie die gewünschte Sendestation ab, indem Sie den Abstimm-Regler
drehen (10).
• Um das Radio auszuschalten, drücken Sie die POWER-Taste Aus (11) 3 Sekunden.
ANTENNE
• Für den UKW-Empfang befindet sich auf der Rückseite des Gerätes ein eingebauter UKW-
Antennendraht. Bewegen Sie den Draht hin und her, bis der beste Empfang erreicht wird.
• Für den MW-Empfang werden die Signale über die eingebaute Ferrit-Antenne empfangen.
Sie brauchen das Gerät nur auszurichten, bis Sie den besten Empfang erreichen.
UKW UND UKW-STEREO-EMPFANG
Stereo Ton ist möglich wenn die eingestellte UKW-Station in Stereo sendet.
13 14
7. CD/USB-Wiedergabe-/Pause-Taste(II)
8. CD/USB-Sprungtaste vorwärts ()
9. CD/USB-Rückspul-Taste()
10. Abstimm-Regler
11. Funktions-Wahlschalter (RADIO/AUX/CD/USB)
12. Remote Sensor
13. Mode-Taste Display / Uhr / Repeat / Program
14. Album-Taste
15. CD offenen Tür Ecke
16. Lautsprecher-Ausgänge (L)
17. Lautsprecher-Ausgänge
Page 9

DeutschDeutsch
15 16
Wenn ein UKW-Signal abgestimmt wird und Sie den Band-Schalter auf UKW stellen, können Sie
das Programm in Stereo empfangen. Die UKW-Stereo-Anzeige auf die Display.
UHREINSTELLUNG
1. Stellen Sie sicher, das Gerät im Standby-Modus.
2. Drücken und halten Sie die "CLOCK SET" (13), bis das Gerät die Jahreseinstellung eingetragen.
3. Drücken Sie die "SKIP +" (8) oder "SKIP -" (9) das gewünschte Jahr auswählen.
4. Drücken Sie die "Clock Set" (13)-Taste einmal, um zu bestätigen.
5. Wiederholen Sie Schritt 3 und 4 für die Einstellung Monat, Datum, 12/24Hr, Stunde und Minute
ALARM-EINSTELLUNG
ALARM Einstellung muss nach Einstellung der Uhr abgeschlossen sein. Das Gerät muss in
"STANDBY" sein Modus.
Im Folgenden wird mit "AL 1" Alarmeinstellung zum Beispiel:
1. Drücken und halten Sie die Taste "AL 1" für 2 Sekunden, um Alarm Eintrag eingestellten
Modus.
2. Stunde einstellen, indem Sie die "SKIP +" (8) oder "SKIP-" (9)-Taste, und drücken Sie die
Taste "AL 1" zu bestätigen.
3. Stellen Minute durch Drücken der "Skip-Taste" "SKIP +" oder drücken Sie die Taste "AL 1" zu
bestätigen.
4 Drücken Sie die "SKIP +" (8) oder "SKIP -" (9), um unter 1 wählen, 2 0,3 oder 4 für Wake-upFunktion.:
1 - FM
2 - MP3 (DISC)
3 - USB
4 - BUZZ
5. Drücken Sie die Taste "AL1" bestätigen. Das Display zeigt "AL1" zeigen, ist ALARM Set komplett.
6. Drücken Sie die Taste "AL1", um den Alarm ON / OFF-Funktion zu aktivieren.
7. Wenn "AL1" ausgeschaltet ist, "AL1" aus dem Display verschwinden.
WECKWIEDERHOLUNG
SNOOZE muss nach abgeschlossen sein ALARM-Einstellung. Wenn der Zeitgeber ausgelöst
wird. Sie können die "Snooze"-Taste drücken, um den Alarm fr weitere 10 Minuten Verspätung
ZUM UMGANG MIT DEN COMPACT DISCS
Um eine Disc aus ihrer Schutzhülle zu nehmen, drücken Sie auf die mittlere Halterung und heben
Sie die Disc hoch, wobei Sie vorsichtig an den Rändern halten sollten.
Fingerabdrücke und Staub sollten von der bespielten Oberfläche der Disc vorsichtig mit einem
weichen Tuch entfernt werden. Im Unterschied zu den herkömmlichen Platten, haben Compact
Discs keine Rillen, in denen sich Staub und feinste Schmutzteilchen ansammeln können. Somit
werden durch das Abwischen mit einem weichen Tuch die meisten Teilchen entfernt. Wischen
Sie in geraden Bewegungen von der Mitte der Disc zum Außenrand. Kleine Staubteilchen oder
leichte Streifen beeinflussen keinesfalls die Wiedergabequalität.
Verwenden sie niemals chemische Produkte, wie Plattensprays, Antistatik-Sprays, Benzin oder
Verdünner, um Compact Discs zu reinigen. Diese Produkte könnten die Oberfläche der CD
ernsthaft beschädigen.
Nach der Verwendung sollten die CDs wieder in ihre Schutzhülle zurückgelegt werden. Damit
werden ernsthafte Kratzer vermieden, die das Springen des Laser-Tonabnehmers hervorrufen
könnten.
Setzen Sie die Discs nicht längere Zeit dem direkten Sonnenlicht, hoher Feuchtigkeit oder hohen
Temperaturen aus. Werden die CDs längere Zeit hohen Temperaturen ausgesetzt, könnten sie
sich verformen.
Vermeiden Sie es, auf die beschriftete Seite der CD Aufkleber anzubringen oder mit einem
Kugelschreiber darauf zu schreiben.
WIEDERGABE DER COMPACT DISCS / USB
EINLEGEN UND HERAUSNEHMEN DER COMPACT DISCS
• Drücken Sie den Funktionswahlschalter (11) auf CD/USB.
• Drücken Sie dieCD-Öffnungstaste des CD-Fachdeckels an, umes zu öffnen,
nehmen Sie eine Disc aus ihrer Schutzhülle und legen sie vorsichtig,mit der
beschrifteten Seite nach oben, ins Fach ein.
Wenn die Disc kleiner als 3 Zoll ist, legen Sie diese auf die mittlere Spindel im Fach.
• Schließen Sie den Deckel. Ist das CD-Fach richtig geschlossen, beginnt sich
die Disc automatisch zu drehen. Die Gesamttitelanzahl der CD erscheint auf
dem CD-Display.
• Das CD-Fach kann jederzeit durch das Drücken der Stopp-Taste und das
Anheben der Ecke des CD-Fachdeckels geöffnet werden. Entnehmen Sie die
CD nur, wenn der Deckel vollständig geöffnet ist.
Page 10

DeutschDeutsch
17 18
VORSICHT
• Legen Sie nichts anderes, als eine CD ins CD-Fach. Fremdkörper könnten den
Mechanismus beschädigen.
• Wenn Sie das Gerät nicht benutzen, lassen Sie das CD-Fach geschlossen,
damit weder Schmutz noch Staub in den Mechanismus eindringen können.
• Legen Sie niemals mehrere CDs gleichzeitig ins CD-Fach.
• Wenn die Disc richtig eingelegt worden ist, erscheinen die folgenden
Informationen auf dem Display:
Gesamtanzahl der Titel auf der Disc
Hinweise:Nachdem der Deckel vollständig geschlossen worden ist, könnte die CD-Information
nicht auf dem Display erscheinen. Das bedeutet, daß die Disc nicht richtig eingelegt worden ist
(meist falsch herum). Überprüfen Sie, indem Sie erneut das CD-Fach öffnen und die Disc richtig
einlegen.
CD/USB-WIEDERGABE
• Drücken Sie dieCD/USB-Öffnungstaste des CD/USB-Fachdeckels an, um
das CD-Fach zu öffnen, und legen Sie eine CD/USB ein.
• Schließen Sie das CD/USB-Fach.
• Drücken Sie die Wiedergabe/Pause-Taste (7). Die Wiedergabe der player beginnt
vom ersten Titel an.
Ein bestimmter Titel kann mit beiden CD/USB-Sprungtasten (8,9) gewählt
werden. Geschieht dies, bevor die Wiedergabe/Pause-Taste gedrückt wurde,
beginnt die Wiedergabe mit diesem Titel, wenn die Wiedergabe/Pause-Taste
gedrückt wird.
• Am Ende der tritt das Gerät in den Stopp-Modus und die Wiedergabeanzeige wird
ausgeschaltet.
Hinweise: Wenn die player schwer zerkratzt oder zu schmutzig ist, könnte die Wiedergabe
nicht starten.
Wird eine nicht richtig zentrierte abgespielt, könnten Geräusche im Mechanismus gehört
werden. Sie sollten die Verwendung solcher vermeiden.
WICHTIGE INFORMATION (CD)
Dieser CD-Spieler hat einen eingebauten Fehlerkompensationskreislauf, der geringfügige
Fehler einer Disc korrigiert. Jedoch sind dieser Funktion Grenzen gesetzt.
In einigen Fällen könnte der CD-Spieler während der Wiedergabe einige Titel oder Titelstellen
überspringen. Dieses Problem könnte durch Fehler (wie Kratzer) auf der gerade
wiedergegebenen Disc hervorgerufen werden, die die Fehlerausgleichfunktion nicht beseitigen
kann. Wenn Sie auf dieses Problem stoßen, überprüfen Sie die Funktionstüchtigkeit des CDSpielers wie folgt, bevor Sie das Gerät in Betrieb nehmen.
Spielen Sie eine neue Disc ab. Wenn der CD-Spieler normal funktioniert, ist das Springen
voraussichtlich auf eine fehlerhafte CD zurückzuführen.
ZEITWEILIGES STOPPEN EINER CD/USB
• Drücken Sie die Stop-Taste (25). Die CD/USB-Wiedergabe wird gestoppt, und
das Display zeigt die Gesamttitelanzahl der CD/USB/SD an.
• Um zeitweilig die CD/USB-Wiedergabe zu stoppen (Pause-Modus), drücken
Sie dieWiedergabe/Pause-Taste (7). Die CD/USB-Wiedergabe stoppt an der
gerade wieder-gegebenen Stelle. Die Wiedergabe/Pause-Anzeige (7) blinkt.
• Um die Wiedergabe der Disc fortzusetzen, drücken Sie erneut die Wiedergabe/
Pause-Taste.
TITELSPRUNG (CD/USB)
STARTEN DER DISC-WIEDERGABE VOM ANFANG EINES BESTIMMTEN TITELS
Drücken Sie eine der Titelsprungtasten Vorwärts oder Rückwärts (8,9), um den gewünschten
Titel zu wählen. Die Nummer des gewünschten Titels erscheint auf dem LCD Display. Drücken
Sie die Wiedergabe/Pause-Taste (7), um die Wiedergabe zu starten.
ZUM NÄCHSTEN TITEL SPRINGEN
Drücken Sie einmal die Titelsprungtaste Vorwärts (8). Die Player wird vom Anfang des nächsten
Titels.
Der Spieler springt jedesmal voraus zum nächsten Titel, wenn Sie die Titelsprungtaste Vorwärts
(8) drücken. Wenn Sie die Titelsprungtaste Vorwärts (8) wiederholt drücken, durchspringt der
Spieler die Disc vorwärts, Titel für Titel. Wenn der Anfang des letzten Titels erreicht ist, kehrt der
Spieler zu Titel 1 zurück.
ZURÜCKSPRINGEN ZUM VORHERIGEN TITEL AUF EINER TITRL
Drücken Sie die Titelsprungtaste Rückwärts (9) zweimal. Die Disc-Wiedergabe wird vom Anfang
des vorherigen Titels.
Page 11

DeutschDeutsch
19 20
Der Spieler springt jedesmal einen Titel zurück, wenn die Titelsprungtaste Rückwärts (9)
gedrückt wird. Wenn diese Taste in der Mitte eines Titels gedrückt wird, springt der Spieler zurück
an den Anfang dieses Titels. Um an den Anfang des vorherigen Titels zurückzuspringen, drücken
Sie die Titelsprungtaste Rückwärts (9) zweimal.
Wenn Sie die Titelsprungtaste Rückwärts wiederholt drücken, durchspringt der Spieler die Disc
rückwärts, Titel für Titel. Wenn der Anfang des ersten Titels erreicht ist, kehrt der Spieler zum
letzten Titel zurück.
Hinweise: Die Titelsprungtasten Vorwärts und Rückwärts (8,9) können verwendet werden, um
einen gewünschten Titel zu wählen, bevor die Player gestartet wird. In diesem Fall
erscheint die Nummer des gewählten Titels auf dem Display, bis die Wiedergabe/
Pause-Taste gedrückt wird.
PROGRAMMIERTE CD/USB-WIEDERGABE
Es ist nicht möglich, Programme während der Player einzugeben. Drücken Sie zuerst die StopTaste (7) und befolgen Sie dann die untenstehenden Anweisungen.
Drücken Sie diePROGRAM -Taste (13). Die “P-01”- und Program-Anzeigen blinken.
Drücken Sie die Titelsprungtaste Vorwärts und Rückwärts (8,9), um den Titel zu wählen, der auf
Speicherplatz 1 gespeichert werden soll.
Drücken Sie die PROGRAM-Taste (13). Die erste Programmwahl befindet sich nun im
Programmspeicher.
Wählen Sie mit den Titelsprungtasten Vorwärts und Rückwärts (8,9) den nächsten Titel, der
programmiert werden soll.
Drücken Sie diePROGRAM-Taste (13), um diesen Titel zu speichern.
Auf diese Weise können Sie alle gewünschten Titel (bis zu20) speichern. Wenn Sie diePROGRAM
-Taste (13) drücken, um den20.Titel zu speichern, kehrt das Display zum ersten Speicherplatz
zurück. Drücken Sie die PROGRAM -Taste (13), um die Speicherplätze einzusehen.
WIEDERGABE DER PROGRAMMIERTEN TITEL (CD/USB)
Drücken Sie die Wiedergabe/Pause-Taste (7). Die Disc-Wiedergabe startet vom ersten
programmierten Titel.
LÖSCHEN DES PROGRAMMSPEICHERS (CD/USB)
Wenn die Disc gerade wiedergegeben wird, drücken Sie die Stop-Taste (7), um die Wiedergabe
zu stoppen.
Drücken Sie den Funktionswahlschalter (11) auf eine andere Position (RADIO oder AUX), um das
Programm zu löschen.
WIEDERHOLTE CD/USB-WIEDERGABE
Verwenden Sie dieMODE-Taste (13), um die ganze Disc oder einen Titel wiederholt zu hören.
WIEDERHOLTE WIEDERGABE EINES TITELS
Drücken Sie die CD/UDB-Wiedergabe/Pause-Taste (7) und dann drücken Sie die MODE-Taste
(13) einmal. Die REPEAT-Anzeige blinkt.
Wählen Sie den gewünschten Titel, indem Sie die Titelsprungtaste Vorwärts oder Rückwärts
(8,9) drücken. Der gewählte Titel wird auf dem Display angezeigt.
Der gewählte Titel wird dann bis zum Ende wiedergegeben. An dieser Stelle beginnt erneut die
Wiedergabe des Titels vom Anfang an. Das wird fortgesetzt, bis Sie die Stop-Taste (7) drücken.
Wenn Sie die MODEl-Taste (13) noch einmal drücken, werden die Wiederhol-Anzeigen gelöscht,
die wiederholte Wiedergabe wird beendet und die normale Disc-Wiedergabe wird von dieser
Stelle an wieder aufgenommen.
Wenn der gewählte Titel wiedergegeben worden ist, stoppt die CD/USB-Wiedergabe.
WIEDERHOLTE WIEDERGABE ALLER TITEL DER CD/USB
Drücken Sie die Wiedergabe/Pause-Taste (7) und dann die Wiederhol-Taste (13) zweimal. Die
REPEAT-Anzeige leuchtet auf.
Die Disc wird dann bis zum Ende des letzten Titels wiedergegeben. An dieser Stelle beginnt
automatisch die Wiedergabe des ersten Titels der Disc. Das wird fortgesetzt, bis die Stop-Taste
(7) gedrückt wird.
Wenn Sie die MODE-Taste (13) noch einmal drücken, wird die Wiederhol-Anzeige gelöscht, die
wiederholte Wiedergabe wird beendet und die normale Wiedergabe der Disc wird von dieser
Stelle an wieder aufgenommen.
Wenn der letzte Titel wiedergegeben worden ist, stoppt der Spieler.
Hinweis : Der "REPEAT ALL"-Modus wirkt auf normalen und programmierten Wiedergaben.
WIEDERGABE STOPPEN
1. Drücken Sie die Stop-Taste (7). Die CD/USB-Wiedergabe wird gestoppt, und das
Display zeigt die Gesamttitelanzahl der CD/USB an.
2. Drücken Sie die CD/USB-Fach-Öffnungstaste, um die Disc herauszunehmen.
ACHTUNG!
DIESES PRODUKT IST IN DER LAGE CD-RW ABZULESEN. DENNOCH KANN ES PASSIEREN, DASS BEI DER WIEDERGABE EINIGE CD-ARTEN NICHT KORREKT WIEDERGEGEBEN WERDEN. DAHER KANN DIE WIEDERGABE ALLER-CD-RW NICHT GARANTIERT WERDEN.
Page 12

DeutschDeutsch
21 22
FERNBEDIENUNG
12. PROGRAMM-TASTE
ERSETZEN DER BATTERIEN
Wenn die Batterien zu schwach werden, wird die
Reichweite der Fernbedienung bedeutend verringert
und Sie müssen die Batterie ersetzen.
Hinweise: Um die Genauigkeit und eine lange
Betriebsdauer der Fernbedienung beizubehalten,
drücken Sie niemals zwei oder mehr Tasten gleichzeitig. Wenn Sie die Fernbedienung längere
Zeit nicht benutzen, entfernen Sie die Batterie.
EQUALIZER
Drücken und halten Sie die "ALBUM"-Taste (14), die jeweils wechseln, drücken Sie die EQ
Funktion wie folgt:
1. C = CLASSIC
2. R = ROCK
3. P = POP
4. J = JAZZ
5. F = FLAT (NORMAL)
WICHTIG
Die Bewegung des CD-Mechanismus und der empfindliche Stromkreis können Störungen bei
einem nahestehenden Radio oder Tuner hervorrufen. Schalten Sie dieses Gerät aus, wenn Sie
andere Radios verwenden.
Dieses Gerät verwendet einen Laser
1
2
3
4
5
6
7
8
9
10
11
12
Gefahr - Unsichtbare Laserstrahlung beim Öffnen und wenn das Schließsystem versagt oder
beschädigt ist. Vermeiden Sie es, sich der direkten Strahlung auszusetzen.
Vorsicht -Die Benutzung von Bedienelementen, das Vornehmen von Regulierungen oder
Einstellungen, die nicht in dieser Bedienungsanleitung aufgeführt sind, könnten Sie einer gefährlichen
Strahlung aussetzen.
BEZÜGLICH DER COMPACT DISCs
Nur Compact Discs mit der Marke CD können mit diesem CD-Spieler wiedergegeben werden.
TECHNISCHE DATEN
Stromversorgung
AC: 230V – 50Hz, 11W
CD-Spieler
Tonabnehmer: 3-Beam, Halbleiter-Laser
Encoding: 16-Bit, linear, 2 x Oversampling
Hinweis: Auf Grund ständiger Verbesserungen bleibt die Änderung der technischen Daten und
des Designs ohne Vorankündigung vorbehalten.
Radio-Frequenzbereich
UKW: 87.5 – 108 MHz
MW: 520 – 1620 kHz
FERNBEDIENUNG:
1. EIN / AUS-Taste
2. STOP-Taste
3. SKIP I <<
4. ALARM 1
5. ALBUM -
6. MODE-Taste
7. FUNKTION-TASTEN
8. PLAY / PAUSE
9. SKIP >> I
10. ALARM 2
11. ALBUM +
 Loading...