


Operation 8082C
|
|
T |
|
E |
|
S |
|
|
RE |
|
|
1 2 3
|
|
AM |
|
GR |
|
NU |
PRO |
|
|
|
|
ME |
|
|
RESET 
ENGLISH
|
|
RAM |
|
OG |
|
NU |
PR |
|
|
|
|
ME |
|
|
RESET 
|
|
T |
|
E |
|
S |
|
|
E |
|
|
R |
|
|
1 2 3
Customer Support: 888-515-2585 or Visit our webiste www.ritetemp-thermostats.com |
1-402-012 |
Printed in China |
PG 1
Operation 8082C
|
|
|
|
Touch Screen |
|
|
|
Time |
Time |
|
|
Back light |
|
|
Slot |
|
|
button |
|
|
|
of day |
|
|
Current Room |
||
Day |
|
|
|
|||
|
|
|
|
Temperature |
||
|
|
|
|
|
||
|
|
|
|
|
Target |
|
|
|
|
|
|
Temperature |
|
|
|
|
|
|
|
Program |
|
|
|
|
PROG |
|
button |
|
|
|
|
RAM |
|
|
|
|
|
|
MENU |
|
|
|
|
|
|
RESET |
|
Menu |
|
|
|
|
|
|
|
|
|
|
|
|
|
button |
|
|
|
|
|
Reset |
|
Indoor |
|
|
|
|
button |
|
|
|
|
Thermostat |
|
||
Humidity |
|
|
Mode |
|
||
|
|
Mode |
|
|
||
|
|
|
|
|
||
|
|
Fan |
Switch |
|
|
|
|
|
|
|
|
||
Switch
Statement of use: The 8082C can be used with most 24 volt gas, oil or electric heating and air conditioning systems, heat pumps, gas millivolt and zoned heating systems. It cannot be used with 120 volt heating systems.
Using a TOUCH SCREEN
Please take a moment to try out your touch screen itself.
To select a function, place your finger on the main temp display and give a short firm touch. Try a "tap" of the finger or stylus. Your input must last long enough for the system to determine it is not an accidental 'bump".
Using the stylus is more comfortable for some users, and work well in dry climates. Again allow the system enough time to recognize your inputs. When you are comfortable with touch inputs, proceed.
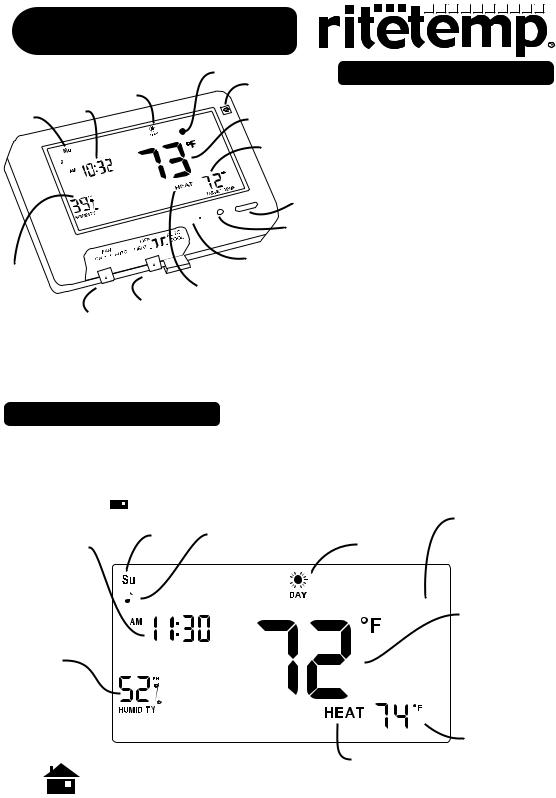
Basic Screens
The MODE SWITCH of the 8082C must be in the HEAT or the COOL position to access all control functions. The 8082C Thermostat has 3 basic screens. The HOME screen is displayed when unit is operating your system.
Touching the  will always return you to this screen.
|
Day |
Chirp |
Time |
Remote Control |
|
Time of day |
Channel Indicator |
||||
|
indicator |
Slot |
|
||
Touch here |
|
|
|
||
|
|
|
|
||
to change |
|
|
|
|
|
from 12 to 24hr |
|
|
CH1 |
Current Room |
|
clock display. |
|
|
|
Temperature |
|
Humidity |
|
|
|
|
|
shows current |
|
|
|
|
|
indoor humidity. |
|
|
|
|
|
Flashes when |
|
|
|
Target |
|
humidiy control |
|
|
TARGET TEMP |
||
|
|
Temperature |
|||
is "on". |
|
|
Thermostat |
||
|
|
|
|||
HOME screen |
PG 2 |
||||
Mode |
|||||
|
|
|
|
||
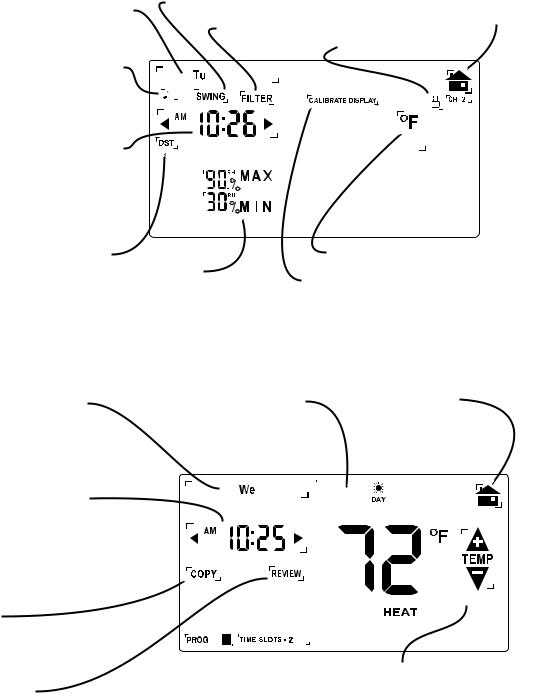
MENU screen
PG 3
Displayed when the MENU button is pressed from the HOME screen.
Set Day
Touch this area to set the day of the week.
Chirp set
Touch this to turn the audible chirp on or off.
Set Time
Touch this area to set the time of day.
Left arrow goes back, right arrow goes forward.
DST set
Touch this for Daylight Savings Time
Temperature Swing set |
Lock Program |
Return |
|
HOME |
|||
Filter Timer set |
Touch for 5 sec |
||
|
|||
|
to lock or unlock |
|
Humidity
Touch MIN and Max to set desired humidity
Remote Control
Channel select
Calibrate Display
Touch here to match display to another thermometer
PROGRAM screen
Displayed when the PROGRAM button is pressed from the HOME screen.
Set Program Day
Touch this area to set the day of the week you want to program Target Temps for.
Set Program Time
Touch this area to set the time of day you want each time period to start.
Left arrow goes back, right arrow goes forward.
Copy
Touch this area to copy current program to the next day
Set Time Slot
Touch this area to set the Time Slot you want to program.
B
Review |
Select A or B |
Select 2-6 |
|
touch to auto cycle |
Time Slots |
||
Program |
|||
through your program |
per day |
Return HOME
When programming is complete touch this to run your program.
Temp Up / Temp Down arrows. Touch these to raise and lower
each Target Temp. PG 4
 Loading...