

Page 1

OPERATING INSTRUCTIONS
SCANNER & FAX REFERENCE
Type 450e
Read this manual carefully before you use this product and keep it handy for future
reference.
For safety, please follow the instructions in this manual.
Page 2

ScanRouter Professional OPERATING INSTRUCTIONS
Printed in Japan
UE USA B365-8504
Page 3

Introduction
To get maximum versa tility from this machin e all opera tors shoul d carefull y read and f ollow th e instructions in this manual. Please keep this manual in a handy place near the machine.
Please read the Safety Informat ion in the “Operating Instructions” before usi ng this mac hine. It c ontains
important information related to USER SAFETY and PREVENTING EQUIPMENT PROBLEMS.
Page 4

Copyright © 2000
Page 5

TABLE OF CONTENTS
Introduction................................................................................................ 1
Delivery Operations from the machine.......................................................... 1
Required Options.......................................................................................... 2
1.User Tools
Delivery Scanner Setup............................................................................ 3
Enabling Delivery Option................................ ..................................... .......... 3
Adjusting Delivery Settings ........................................................................... 5
Scanner Setup ........................................... ............................ .... ..... ..... .... 10
Items for Scanner Setup ............................................................................. 10
Resolutions and Original Sizes................................................................... 11
Registering Items for Scanner Setup.......................................................... 12
Delivery Fax Setup.................................................................................. 15
2.Delivering Originals
Delivery Settings..................................................................................... 17
Setting Originals...................................................................................... 21
Scanning 1-sided Originals......................................................................... 22
Scanning 2-sided Originals......................................................................... 23
Setting Originals on the Exposure Glass (Platen Glass)............................. 24
Setting Originals in the Document Feeder (ADF)........................................ 25
Setting the Direction of the Originals .................................................... 26
Changing the Scanner Settings Temporarily........................................ 27
3.Appendix
Troubleshooting...................................................................................... 29
Error Messages.......................................... .... ..... ..... ............................ .... 30
INDEX........................................................................................................ 33
i
Page 6

ii
Page 7
Introduction
This manual describes how to use the machine as a network delivery scanner
and as a delivery fax machine. To deliver documents sent from the machine with
ScanRouter Professional, ScanRouter Professional Station settings must be configured in addition to the machine settings. For the setup, see “Setup & Administrator Reference”.
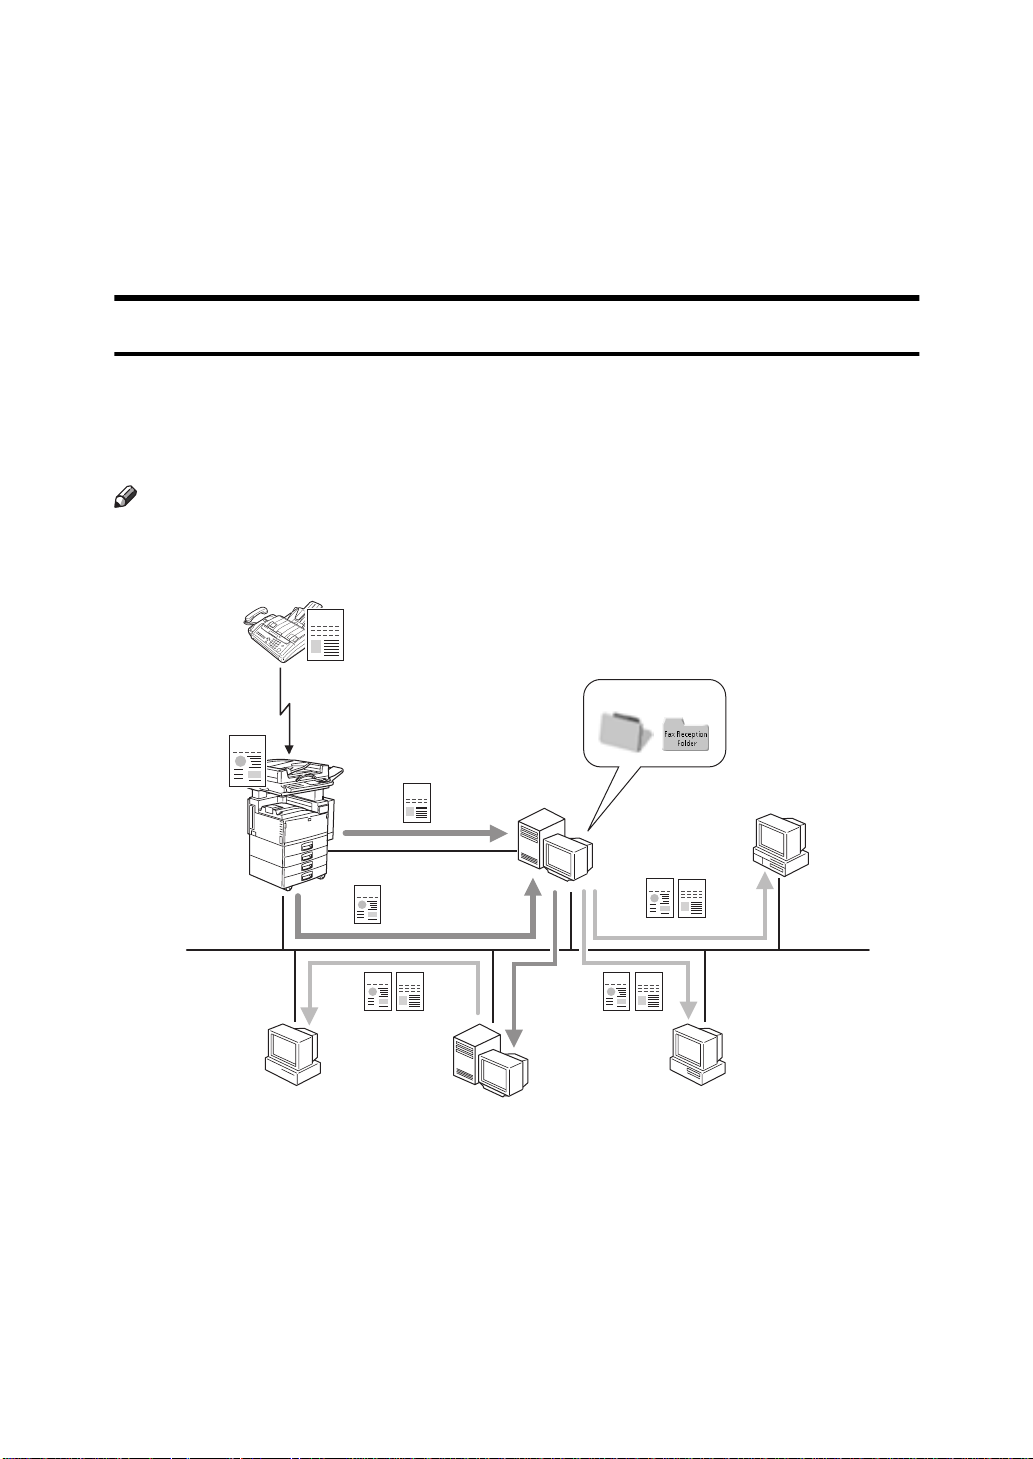
Delivery Operations from the machine
The illustration below describes examples of document delivery with the machine. After being delivered to ScanRouter Professional Station, the documents
are processed in various ways depending on the settings of ScanRouter Professional Station.
Note
❒ The term "machine" as described in this manual refers to the diverse delivery
device for which this application was designed.
FAX
SCN
FAX
SCN
SCN
FAX
F
C
A. ScanRouter Professional Station
B. Mail Server
C. Client
D
A
E
SCN
FAX
SCN
FAX
G
B
C
C
TNSX011E
D. Saved in Folders
E. Received using Client Software
F. Delivered by mail
G. Viewed/downloaded using the WWW browser
1
Page 8

Note
❒ The fax documents received by the machine are forwarded to ScanRouter
Professional Station automatically.
Required Options
To use the machine with ScanRouter Professional, the following options are required.
Required
❖
• Scanner unit
Required for fax document delivery
❖
•Fax unit
Note
❒ If required, install the appropriate options such as Expansion Memory
(optional). For more information about the Fax unit options, see “Facsimile Reference(option)”.
• PC-FAX Expander
Limitation
❒ If delivering a fax document with ScanRouter Professional, the func-
tions used from the computer as described in the PC-FAX Expander
manual cannot be used.
2
Page 9
1. User Tools
To use the machine as a network delivery scanner, it must be configured for use
as both a network scanner and a delivery scanner.
First, see the “Operating Instructions” that comes with Scanner Option for instructions on setting up the network scanner, and then configure the delivery
scanner settings.
Delivery Scanner Setup
The following settings are required to
use the machine as a network delivery scanner.
Note
❒ When using the machine as a de-
livery scanner, initial network settings are required in addition to
the settings described below. If the
setup has not been completed yet,
see the “Operating Instructions”
that comes with Scanner Option
for information on how to do this.
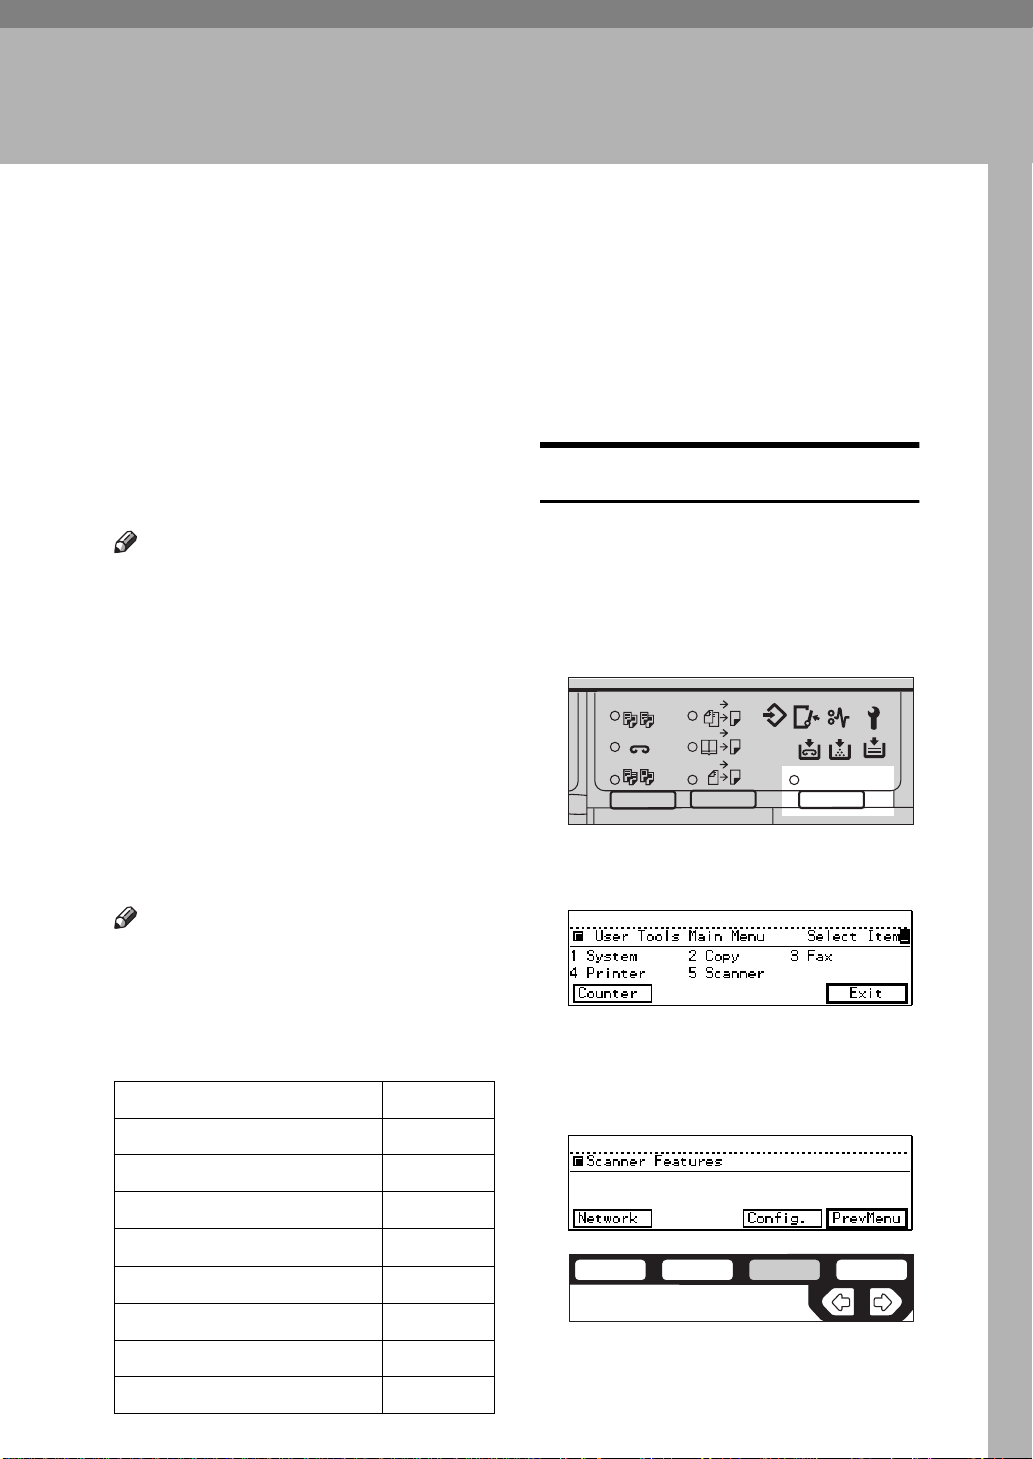
Enabling Delivery Option
First, select
[
Installed
Option. If you don’t do this, you
won’t be able to change any delivery
settings.
A Press {
User Tools/Counter
Sort
Staple
Stac
1-Sided 2-Sided
2-Sided 2-Sided
for the Delivery
]
2
1
1
Book 2-Sided
2
2
2
}.
User T ools / Counter
To use the machine as a network delivery scanner, the following items
should be configured:
Note
❒ Settings of the items marked with
“'” are necessary for delivery and
must be configured. Settings of
other items can be changed if required.
Setting Item Required
Delivery option '
Delivery Server Address '
Function Priority
TWAIN connection time out.
Scanner Auto Clear Time
Date
Auto Address Update
Measurement Unit
B Press {
The
[
pears.
C Press
} on the Number keys.
5
Scanner Features
[
Config.
.
]
menu ap-
]
PEN0200TN
ND2C0103
3
Page 10
User Tools
1
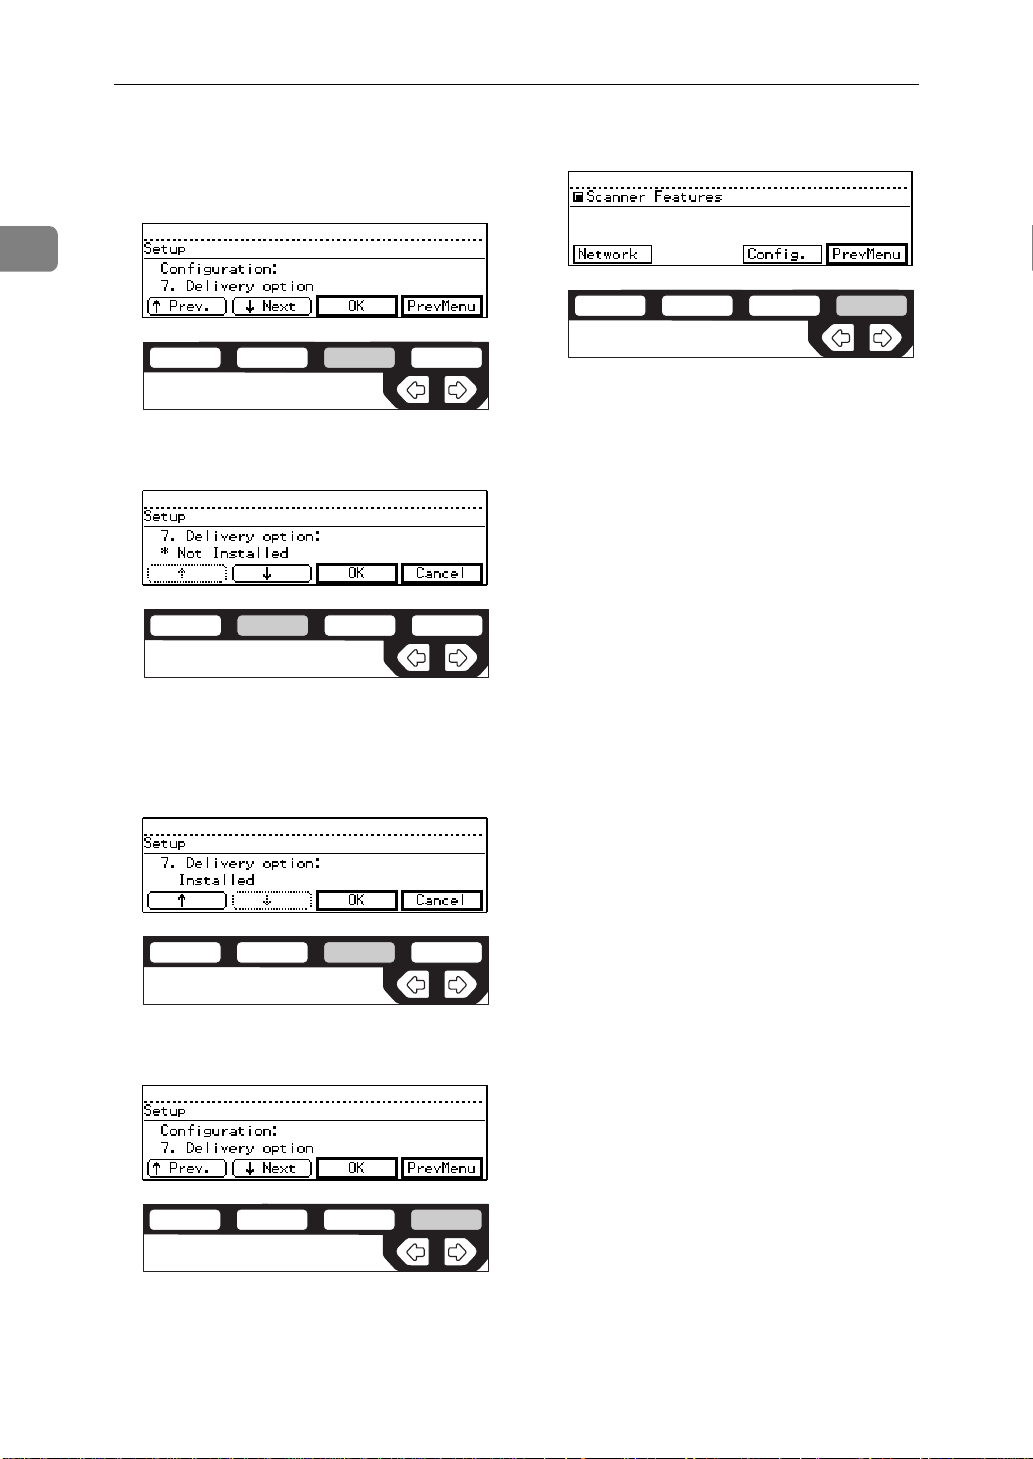
D Press
play
press
E Press
The current setting is displayed
with “*”.
↓
[
[
7.Delivery option
OK
[
[↓]
several times to dis-
Next
]
.
]
, and select
, and then
]
[
Installed
]
ND2C0103
.
ND2C0102
H Press
[
PrevMenu
and press
]
[
Exit
.
]
ND2C0104
I Turn off the machine’s main switch
and then turn it on.
Now the delivery settings can be
configured.
F Press
G Press
.
[
OK
]
[
PrevMenu
ND2C0103
.
]
ND2C0104
4
Page 11
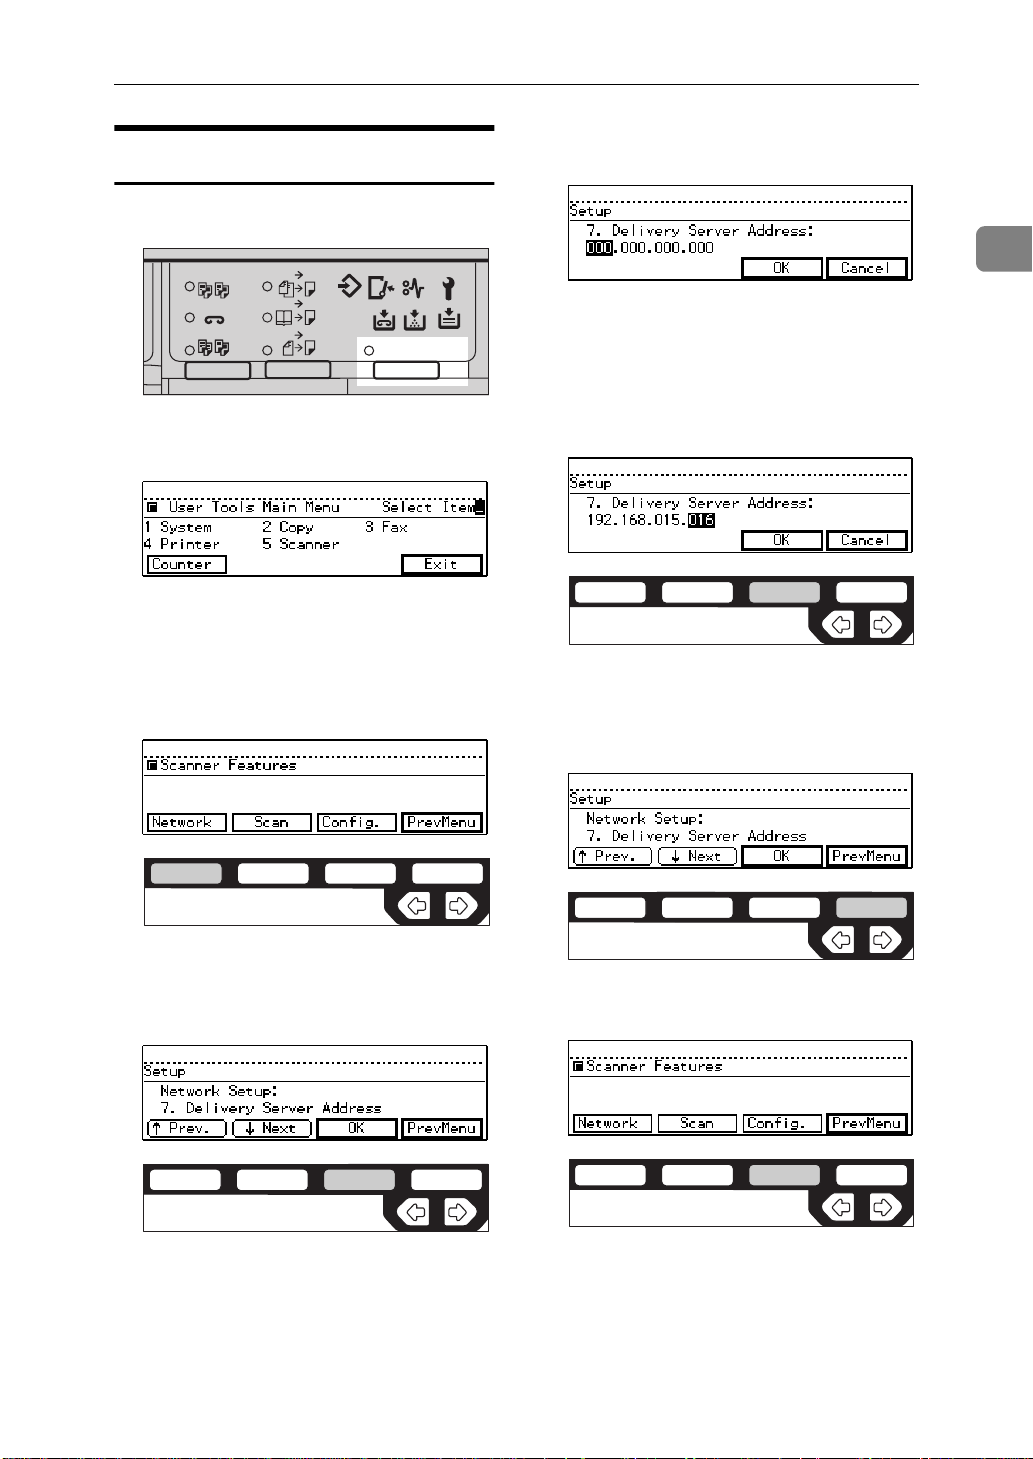
Adjusting Delivery Settings
Delivery Scanner Setup
C Enter the IP address of Scan-
Router Professional Station.
A Press {
B Press {
The
Scanner Features
[
User Tools/Counter
Sort
Staple
Stac
1-Sided 2-Sided
2
1
1
Book 2-Sided
2
2-Sided 2-Sided
2
2
} on the Number keys.
5
}.
User T ools / Counter
PEN0200TN
menu appears.
]
C First, set the IP address of Scan-
Router Professional Station.
A Press
Network
[
.
]
To move between each field,
press < or >.
If you make a mistake, press
{
Clear/Stop
D Press
} and try again.
.
[
OK
]
The IP address of ScanRouter
Professional Station has been set.
E Press
[
PrevMenu
.
]
1
ND2C0103
B Press
display
dress
↓
[
, and then press
]
several times to
Next
]
[
7. Delivery Server Ad[OK]
ND2C0101
.
ND2C0103
D Press
[
Config.
.
]
Next, adjust the settings for the
scanner-side operations.
ND2C0104
ND2C0103
5
Page 12
User Tools
1
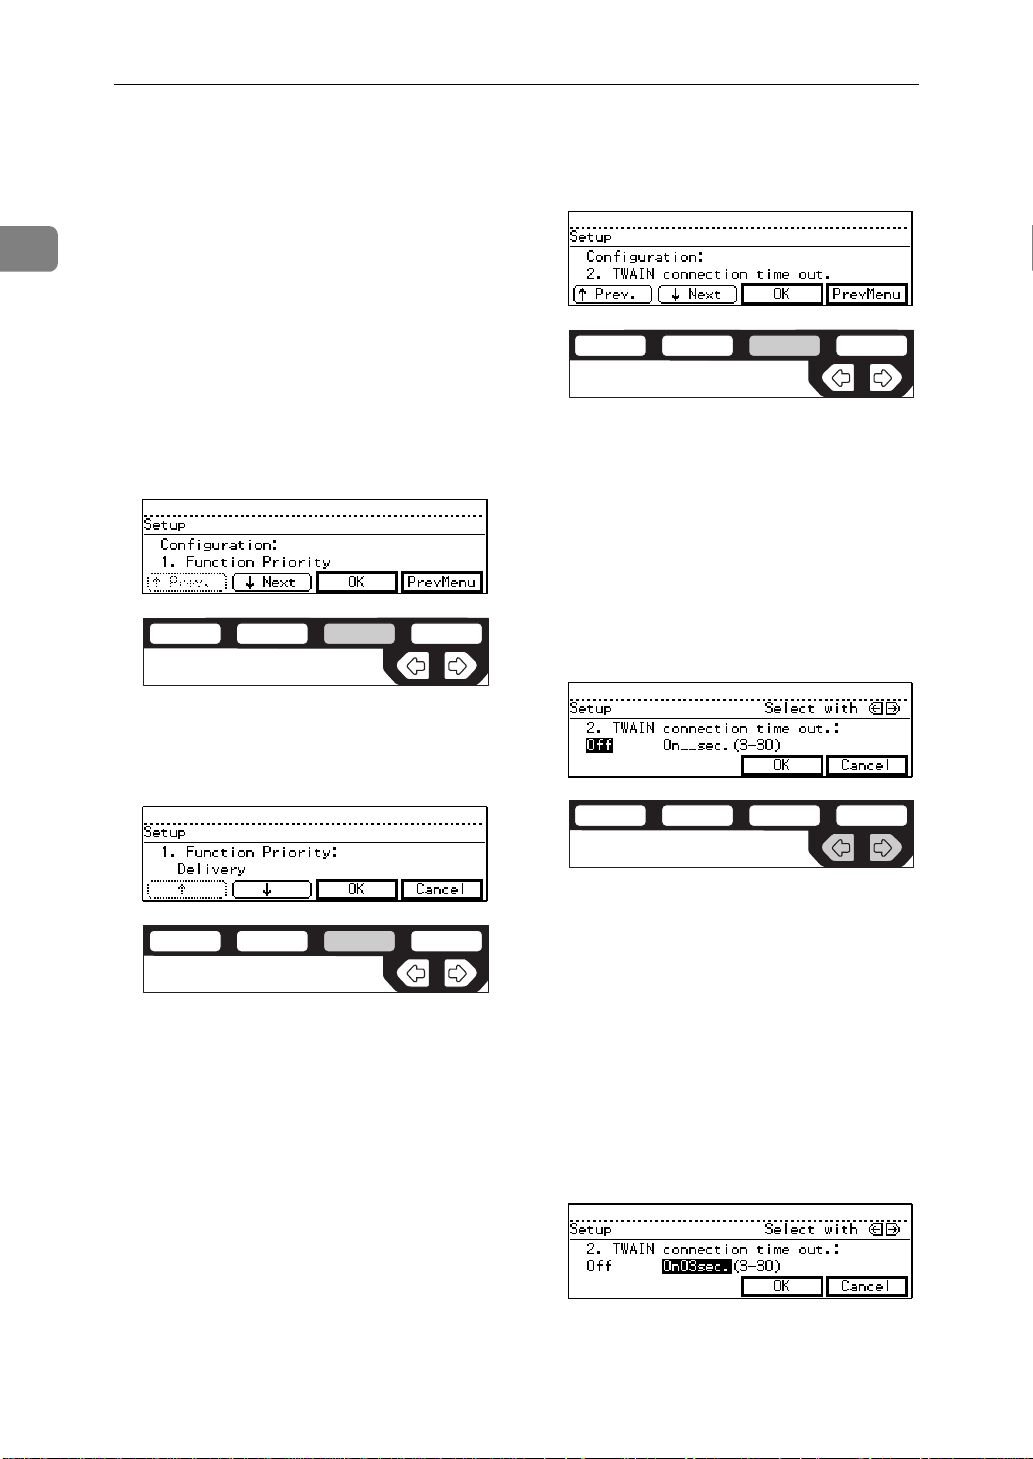
E Select a priority setting from De-
livery/TWAIN functions.
Select the display mode when
switching the machine to a scanner. If you want to use the machine
only as a delivery scanner, select
[
Delivery
used as a TWAIN scanner and
scans are made from the machine,
select
A Make sure that
ity
[
. If the machine is to be
]
[
TWAIN
is displayed, and then press
]
.
OK
]
.
]
[
1.Function Prior-
ND2C0103
A Press
display
out
↓
[
, and then press
]
several times to
Next
]
[
2.TWAIN connection time
[OK]
.
ND2C0103
B Press < or >, and select “Off”
or “On”.
If you want to switch immediately, select “Off”, or if you
want to switch only after the
specified timeout period has
passed since the last operation
was made with the scanner, select “On”.
B Press
or
ery
]
.
OK
]
[
F Set the time for the
tion time out
There are two options to comply
with the scan request to the
TWAIN scanner while the machine is being used as a delivery
scanner.
• switching to a TWAIN scanner
immediately.
• switching only after the specified timeout period has passed
since the last operation was
made with the scanner.
6
or
[↑]
[
TWAIN
.
]
to display
[↓]
, and then press
]
[
TWAIN connec-
[
Deliv-
ND2C0103
ND2C0105
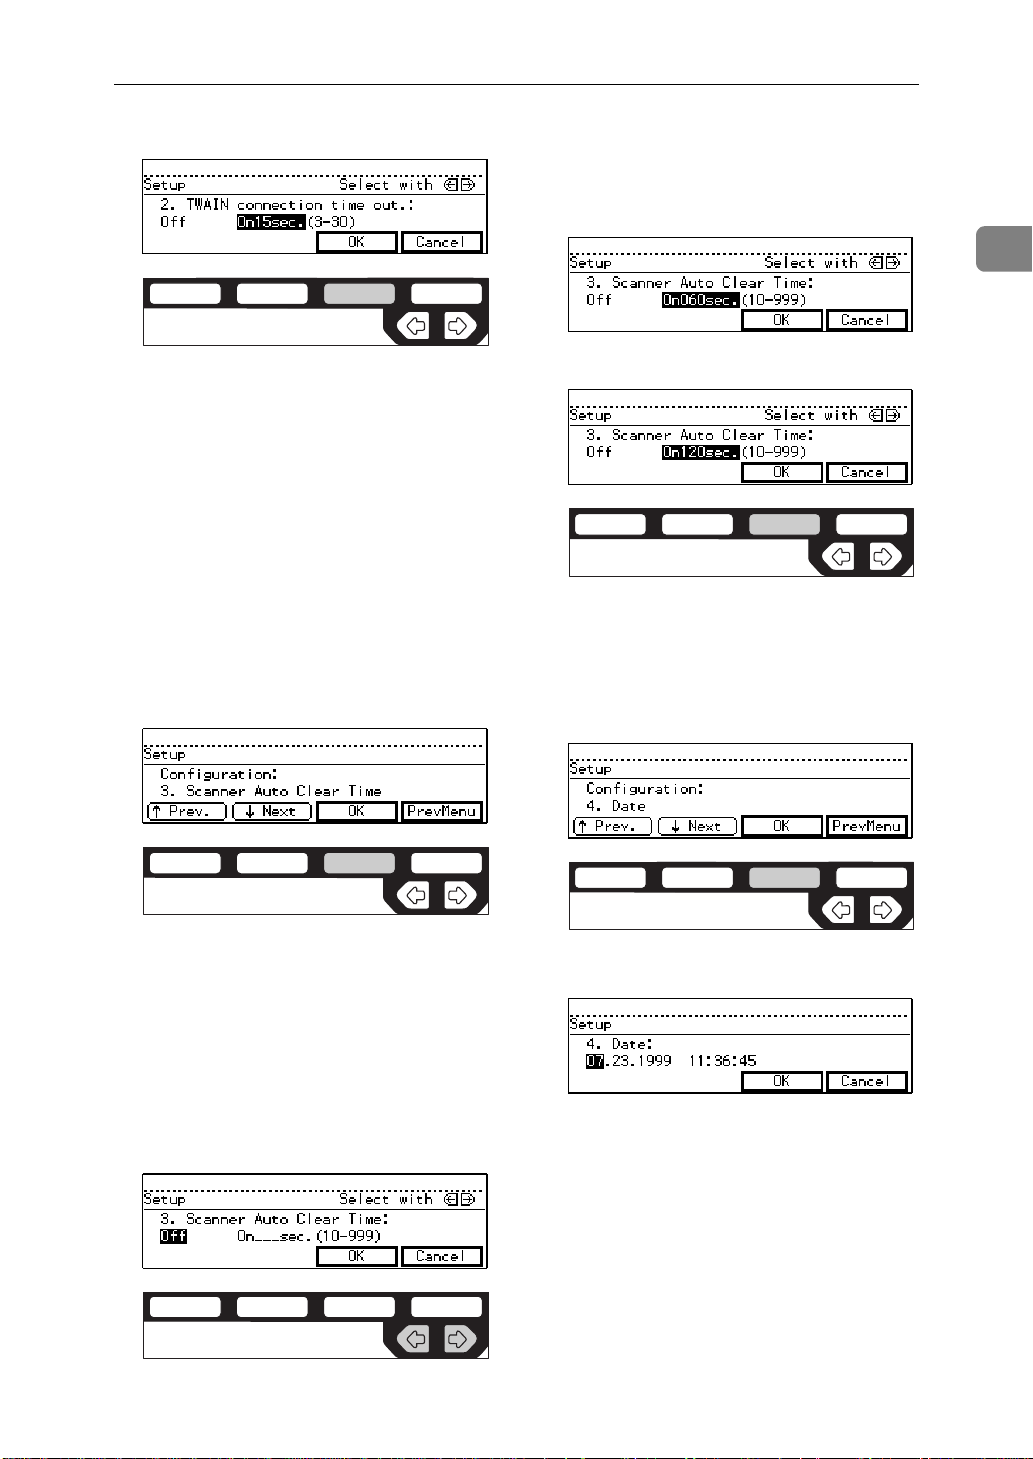
C If “On” is selected, set the tim-
eout period (3-30 seconds) to
switch to the TWAIN scanner
with the Number keys.
If the scan request to a TWAIN
scanner is made, the scanner
will be switched to the TWAIN
scanner only after the timeout
period has passed since the last
operation was made with the
scanner.
Page 13
Delivery Scanner Setup
D Press
G Set the time for the
Clear Time
.
[
OK
]
option.
]
[
Scanner Auto
You can automatically cancel the
settings and return to the main
menu after a specified amount of
time has passed since the last operation was made with the scanner.
If you want to clear the settings,
the length of time should be set.
A Press
display
Time
↓
[
, and then press
]
several times to
Next
]
[
3. Scanner Auto Clear
[OK]
.
ND2C0103
C If “On” is selected, enter the
length of time (10-999 seconds)
until returning to the main
menu.
D Press
[
OK
.
]
H Set the current date and time.
A Press
display
OK
[
↓
[
.
]
several times to
Next
]
[
4.Date
, and then press
]
1
ND2C0103
ND2C0103
B Press < or >, and select “Off”
or “On”.
If you want to keep the current
settings, select “Off”, or if you
want to cancel the current settings and return to the main
menu after the specified time
has passed, select “On”.
ND2C0105
ND2C0103
B Set the current date and time.
To move between each field,
press < or >.
If you make a mistake, press
{
Clear/Stop
} and try again.
7
Page 14

User Tools
1
C Press
[
OK
.
]
ND2C0103
I Select the automatic update op-
tion for the address book.
With this option, you can update
the address book information automatically when selecting a destination and a sender from the
address book.
If
[
Auto Address Update
the address book information is
updated only when the machine’s
operation switch is turned on.
is disabled,
]
A Press
play
↓
[
Next
[
8. Auto Address Update
and then press
B Press
or
[↑]
, and then press
[
Off
]
four times to dis-
]
.
OK
]
[
or
to display
[↓]
[OK]
ND2C0103
[On]
.
ND2C0103
,
]
Note
❒ If updating the address book
automatically, you can use the
latest address book. If the address book is changed frequently, select
[
Auto Address Update
.
]
❒ If the address book is not
changed frequently, disable
so that you
to Address Update
]
Au-
[
don’t have to wait for the address book to be updated unnecessarily.
❒ If
Auto Address Update
[
is dis-
]
abled, be sure to turn the machine’s operation switch off
then on to update the machine’s
address book after the station’s
address book has been changed.
If the station’s address book has
been updated, none of the relevant documents will be delivered and they will be saved in
the non-forwarding folder until
the machine’s address book is
updated.
J Select the measurement unit.
In this option, you can select “mm”
or “inch” as the measurement unit
for scanning custom-sized originals.
A Press
surement Unit
OK
[
↓
[
.
]
to display
Next
]
, and then press
]
[
9. Mea-
ND2C0103
8
Page 15

Delivery Scanner Setup
B Press
or
K Press
L Press
Exit
]
[
[↑]
[
inch
]
[
PrevMenu
[
PrevMenu
.
or
to display
[↓]
, and then press
.
]
, and then press
]
[
[OK]
mm
.
ND2C0103
ND2C0104
]
1
ND2C0104
The machine is now ready to be
used as a network delivery scanner.
9
Page 16

User Tools
Scanner Setup
1
You can register scanner settings
(density, original type, resolution,
and original size), which are selected
when scanning. If registering the settings in advance for the frequently
scanned types of originals, you can
select these settings easily when delivering a document.
Note
❒ Up to three custom settings can be
registered as “User1”, “User2”,
and “User3”.
❒ The setting registered as “Default”
becomes the default scanning setting. If no setting has been selected
when delivering a document, the
original is scanned with the setting
registered as “Default”.
Items for Scanner Setup
There are four scanner settings items
as follows:
Density
❖
The density for scanning originals.
Select from seven levels, from
“Lighter (1)” to “Darker (7)”. The
default setting is the middle density.
• Text/Photo
For originals containing both a
high-contrast black-and-white
image such as text, and a halftone image such as a photograph or a drawing.
• Photo
For originals containing a halftone image such as a photograph or a drawing (Black &
White).
• Gray Scale
For originals containing a halftone image such as a photograph or a picture (Grayscale).
Note
❒ If “Photo” is selected, the image
is scanned in a Black & White
mode, and if “Gray Scale” is selected, the image is scanned in a
Grayscale mode. In general,
Black & White is suitable for
printing and Grayscale is for
displaying on the computer
screen.
Resolution
❖
Select from 100dpi, 200dpi, 300dpi,
400dpi, and 600dpi. The default
setting is “100dpi”.
10
Original Type
❖
Originals are scanned using the
settings appropriate for that type.
The default setting is “Text”.
•Text
For originals containing a highcontrast black-and-white image
such as text.
Note
❒ If scanning at a high resolution,
the scanned image quality is
high but the size of the data is
large. When processing a large
amount of data, ScanRouter
Professional Station and the entire system may take a long
time. Be sure to select the appropriate resolution for that image.
Page 17

Original Size
❖
Select a scanning area. The default
setting is “Auto Paper Select”.
• Auto Paper Select
Scans the original size using the
machine's Auto Paper Select
function.
For more information, see the
“Copy Reference”.
•A3S, A4S, A4R, A5S, A5R,
1
8
/2x14S, 81/2x13S, 81/2x11S,
1
/2x11R, 51/2x81/2S, 51/2x
8
1
8
/2R, JIS B4S, JIS B5S, JIS
B5R, Custom Size
If the paper size is selected from
above, the original is scanned at
the selected size regardless of
the original size.
Note
❒ If
Custom Size
[
is selected,
]
you can use either “mm” or
“inch” as the measurement
unit to specify the scanned
area.
❒ The measurement unit set-
ting can be adjusted in
in the
figuration
Features
menu.
]
]
[
Scanner
[
Con-
Scanner Setup
Resolutions an d Original Sizes
In some cases, a large-sized original
cannot be scanned at high resolution.
If the following message appears after the scan fails, adjust the scanner
settings and then scan the original
again.
The relationships between resolutions and original sizes are as follows:
When “Text”, “Text/Photo”, or “Pho-
❖
to” is selected as an Original Type:
Scanning is possible with all combinations up to A3, or 600dpi.
When “Gray Scale” is selected as an
❖
Original Type:
Scanning is possible in combinations marked with “'” in the following table.
100
200
300
400
600
dpi
dpi
dpi
dpi
dpi
A3 ''
1
JIS B4 ''
A4 '''
JIS B5 '''
A5 ''''
1
8
/2x14
1
8
/2x13
1
8
/2x11
51/2x81/
''
''
'''
''''
2
11
Page 18

User Tools
1
Registering Items for Scanner
Setup
A Press {
Sort
Staple
Stac
B Press {
The
[
pears.
C Press
User Tools/Counter
1-Sided 2-Sided
2
1
1
Book 2-Sided
2
2-Sided 2-Sided
2
2
} on the Number keys.
5
Scanner Features
Scan
.
]
[
}.
User T ools / Counter
menu ap-
]
PEN0200TN
E To display the item you want to
set up, press
and then press
F Press <> or
value, and then press
The following is an example of the
density setting.
↑
[
Prev.
OK
]
[
[↑][↓]
or
]
[↓Next
.
ND2C0103
to select the
.
[
OK
]
,
]
ND2C0102
D Use the Number keys to enter the
number of the scanner settings to
be configured.
The density option is displayed as
the first item of the scanner settings.
ND2C0103
The following is an example of the
resolution setting.
G Repeat steps E and F, and set up
other items as well.
Reference
For more information about the
operation when
[
Custom Size
selected as the original size, see
P.13 “Selecting
[Custom Size]
the Original Size”.
]
is
as
12
Page 19

Scanner Setup
H Press
complete.
[
PrevMenu
if all settings are
]
ND2C0104
I If registering other user numbers
as well, repeat steps D-H.
J Press
is complete.
[
PrevMenu
if the registration
]
Selecting [Custom Size] as the Original
Size
If
[
Custom Size
inal size, you can use either “mm” or
“inch” as the measurement unit to
specify the scanned area.
Note
❒ The measurement unit setting can
be adjusted in
Scanner Features
[
A Display
nal size selection display, and
then press
is selected for an orig-
]
Configuration
[
menu.
]
[
Custom Size
.
[
OK
]
on the origi-
]
in the
]
1
K Press
Exit
]
[
[
PrevMenu
.
ND2C0104
, and then press
]
ND2C0104
ND2C0103
B Enter the length from the refer-
ence position to the starting point,
and the length of the scanned area, with the Number keys and
then press {
The following is an example with
“mm” selected as the measurement unit.
After pressing {
moved to the next field. Or, you
can press < or > to move the cursor.
A reference position is defined as
the place where the original is set,
as illustrated below:
}.
#
}, the cursor is
#
13
Page 20

User Tools
1
A On the exposure glass (platen
glass)
A
D
E
BC
F
TNSY090E
A. Reference position
B. Horizontal starting position
C. Horizontal scanning positionl
D. Vertical starting position
E. Vertical scanning position
F. Scanned area
B In the Document Feeder (ADF)
C
B
A
C Press
values.
after you enter all the
[
OK
]
ND2C0103
G
F
D
E
TNSY120E
A. Reference position
B. Horizontal starting position
C. Horizontal scanning position
D. Vertical starting position
E. Vertical scanning position
F. Scanned area
G. Direction to set original
The maximum scanned area is
297mm (W) x 432mm (L) (423mm
for Grayscale). Make sure that the
scanned area is no larger than this.
14
Page 21

Delivery Fax Setup
Delivery Fax Setup
To use the machine as a delivery fax,
you need to configure the settings for
transmitting the received documents
to ScanRouter Professional Station.
A Make sure that the ready screen
appears on the panel display.
Note
❒ If this screen doesn’t appear,
press the {
B Press the {
C Press {
The
D Press {
and then press {
onds.
} on the Number keys.
3
[
Fax Features
} on the Number keys,
6
} key.
Fax
User Tools/Counter
menu appears.
]
} within 3 sec-
#
} key.
G Use {
ber keys to change the digits in
Current
[
its from the right (bits 0, 1, and 2).
When pressing the Number keys,
the digit changes from left to right.
A Using a combination of bits 0
}, {1}, and {2} on the Num-
0
to set the first to third dig-
]
and 1, configure the settings of
document transmission to ScanRouter Professional Station and
the settings of the document
type to be transmitted.
The combinations of the bit values
and the conditions for transmission to ScanRouter Professional
Station are as follows:
Bit 1, 0 Conditions for transmission
0, 0 No transmission to Scan-
Router Professional Station will be made after
receiving the fax documents. The documents
will be printed with the
machine.
1
E Press
User Parameters
[
that number with the Number
keys.
F Press
31
↑
[
↑
[
.
]
Prev.
Switch
or
]
[↓Next
, and then enter
]
to display
]
to display
]
[
Switch
0, 1 Only the documents
which have the Forwarding ID selected from the
sender’s fax will be transmitted to ScanRouter
Professional Station. Other documents will be
printed with the machine.
1, 0 All the received docu-
ments will be transmitted
to ScanRouter Professional Station.
15
Page 22

User Tools
1
Note
❒ If you set the values to “0,1”
or “1,0”, the machine’s Forwarding function is not available. For more information
about the Fax unit options,
see “Facsimile Reference(option)”.
• If you set the values to
“0,1”, the received documents will be printed as
normal fax documents.
• If you set the values to
“1,0”, all of the documents
will be transmitted to
ScanRouter Professional
Station.
❒ In the case of setting to “0,1”
or “1,0”, the setting from
Digit 0 to Digit 2 on Switch 21
of User Parameter Settings of
the machine becomes invalid. For details about
Switch 21 of User Parameter
Settings, see the manual of
PC-FAX Expander.
❒ Documents received by Poll-
ing Reception will not be
transmitted to ScanRouter
Professional Station.
B Using the bit 2 value, define
whether or not to print the
transmitted document with the
machine when transmission is
made to ScanRouter Professional Station.
The combinations of the bit 2
values and the conditions for
printing are as follows:
H Press
I Press
J Press
Now the machine is ready to be
used as a delivery fax.
.
[
OK
]
[
PrevMenu
[
, and then press
Menu
]
.
]
[
Exit
ND2C0104
ND2C0104
ND2C0104
.
]
16
Bit 2 Conditions for printing
0 No printing will occur.
1 Document will be printed
with the machine.
Page 23

2. Delivering Originals
Delivery Settings
You can deliver the scanned image of
the originals to users registered in
ScanRouter Professional Station.
Note
❒ Scanned originals are forwarded
from the machine to ScanRouter
Professional Station, and then delivered to the selected users.
❒ The delivery type from ScanRouter
Professional Station to the users
varies depending on the station
settings.
A Set originals.
Reference
“Setting Originals” ⇒ P.21
B Press {
The display that appears when
pressing the {
differs depending on System Settings and Scanner Features settings. Display the delivery scanner
mode display by the following
procedures depending on the display that appears.
Printer/Scanner
Printer/Scanner
}.
} key
B If the printer display appears,
press {
C If the TWAIN scanner mode
display appears, press
❒ The TWAIN scanner mode
After switching to delivery
mode, the following display appears.
Printer/Scanner
Note
display appears if the TWAIN
mode is selected in
Priority
tures
in the
]
menu.
]
} again.
[
Cancel
ND2C0104
Function
[
[
Scanner Fea-
]
.
A If the printer and scanner se-
lection display appears, press
[
Scanner
.
]
ND2C0101
17
Page 24

Delivering Originals
2
C Select scanner settings (density,
original type, resolution, and
original size).
The currently selected settings are
listed on the display. If these settings are correct, go to step
lect a delivery destination. Follow
the steps below if you want to
change the settings.
Note
❒ If you want to cancel the opera-
tion and start again, press {
Modes
A Press
}.
[
Menu
.
]
to se-
D
Clear
ND2C0101
❒ To change the scanner set-
tings temporarily, select
[
Manual Setup
Settings
[
and then press
]
. When the scanner
]
setup mode display appears,
adjust the scanner settings.⇒
P.27 “Changing the Scanner
Settings Temporarily”
D Select a delivery destination.
A Press
[
The Short ID and the name of
each user/group registered in
ScanRouter Professional Station
are displayed.
Dest.
.
]
ND2C0102
18
B Press < or >, and select a
scanner setting from “User1”,
“User2”, or “User3”, and then
Press
Note
[
OK
.
]
ND2C0103
❒ Up to three custom settings
can be registered as “User1”,
“User2”, or “User3” in Scanner Setup mode. If registering the appropriate settings
for the frequently scanned
originals in advance, you can
select these settings easily.⇒
P.10 “Scanner Setup”
Note
❒ If
Auto Address Update
[
is en-
]
abled, the address book is replaced with the latest one.
B Select the user/group for the
delivery destination with < or
>.
ND2C0105
If you know the Short ID of the
user/group (001-200) you want
to select, input the number with
the Number keys. If you don’t
know the Short ID, display the
user/group by pressing
or
↓
[
, and then select the
Next
]
↑
[
Prev.
user/group with < or >.
]
Page 25

Delivery Settings
Note
❒ The order of users/groups on
the display can be changed
with ScanRouter Professional
Station.
C Press
[
Select
.
]
The selected user/group is
specified as a delivery destination, with a ' mark in the check
box. Press
[
Select
to cancel the
]
selection.
ND2C0103
E Select a sender (where the origi-
nal is delivered from).
Note
❒ After selecting a sender, the
sender’s name can be found
when receiving or viewing documents from the delivery destination.
❒ The sender’s column will be
blank if no sender is specified.
❒ Select a single sender from the
users/groups registered in ScanRouter Professional Station.
A Press
Sender
[
.
]
2
D When delivering multiple us-
ers/groups, repeat step B-C.
E When all the delivery destina-
tions are set, press
[
Exit
.
]
ND2C0104
The selected destination appears on the display. If multiple
delivery destinations have been
selected, you can view them
with < or >.
ND2C0103
The Short ID and the name of
each user/group registered in
ScanRouter Professional Station
are displayed.
B Select a user/group for the
sender with < or >.
If you know the Short ID of the
user/group (001-200) you want
to select, input the number with
the Number keys. If you don’t
know the Short ID, display the
user/group by pressing
or
↓
[
, and then select the
Next
]
↑
[
Prev.
user/group with < or >.
]
19
Page 26

Delivering Originals
2
C Press
[
Select
.
]
The selected user/group is
specified as a sender, with a “'”
mark in the check box. Press
to cancel the selection.
lect
]
D Press
[
Exit
.
]
ND2C0103
[
Se-
Reference
For more information about
the direction of the original,
see P.26 “Setting the Direction
of the Originals”.
G Press {
Start
}.
The scan begins.
To cancel the scan, press {
}. After the scan is canceled, all
Stop
the scanned data is deleted and no
delivery is made.
When placing the originals on the
exposure glass (platen glass), the
following display appears every
time after a single page is scanned.
Clear/
ND2C0104
F When originals are set in posi-
tion or when scanning 2-sided
originals, select the correct direction of the original from the machine as follows:
A Press [R
B Select the direction of the orig-
inal, and then press
↔R
1
.
]
2
ND2C0104
.
[
OK
]
If there is another page to scan,
place the original and press {
Start
}.
If there is no page to scan, press
[
Finish
.
]
After the scan is complete, the display returns to the scanner settings
menu and the scanned data is delivered to ScanRouter Professional
Station.
Note
❒ If you do not press {
Finish
[
within one minute after
]
Start
} or
scanning, the scan is regarded as
finished, and only the scanned
pages are delivered to ScanRouter Professional Station.
20
ND2C0103
Page 27

Setting Originals
Setting Originals
The originals can be placed in either portrait or landscape position for scanning.
However, if you want the original to appear in a certain direction on the computer display, be sure to place the original correctly on the scanner.
The direction of the original to be set depends on the width of the original as follows:
• A4 size (297mm) or narrower width:
A4 A4
2
R
R
• Wider than A4 size (297mm):
A4
R
Note
❒ Depending on the direction of the original to be set on the scanner, you need
to select the correct direction from the machine for delivery⇒ P.26 “Setting the
Direction of the Originals”. After changing the direction setting, the scanned
image can be rotated by the machine so that the original appears correctly on
the computer display.
Limitation
❒ The document feeder (ADF) is required to scan 2-sided originals.
❒ If the document feeder (ADF) is not installed, “2 Side Bind” and “2 Top Bind”
on the panel display appear dimmed and cannot be selected.
21
Page 28

Delivering Originals
Scanning 1-sided Originals
Direction setting depends on the width of the originals as follows:
2
Width of the Origi-
nals
Setting originals on
the Exposure Glass
(Platen Glass)
P.24 “Setting Origi-
⇒
nals on the Exposure
Glass (Platen Glass)”
Setting originals in the
Document Feeder
(ADF)
P.25 “Setting Origi-
⇒
nals in the Document
Feeder (ADF)”
A4 (297mm) or narrower Wider than A4 (297mm)
Place the original face down
and align its upper side with
the left side of the exposure
glass (platen glass).
Set the originals face up with
the bottom edge of the document in the document feeder
(ADF).
Select [
R
] in .
1
Place the original face down
and align its upper side with
the rear side of the exposure
glass (platen glass).
Set the originals face up and
align the top edge of the originals with the rear side of the
document feeder (ADF).
Select [
R
] in .
1
22
Setting the Direction
of the Originals
P.26 “Setting the Di-
⇒
rection of the Originals”
Note
This setting is set as the de-
❒
fault.
Page 29

Scanning 2-sided Originals
Direction setting depends on the width of the originals as follows:
Setting Originals
Width of the Origi-
nals
Setting originals in the
Document Feeder
(ADF)
P.25 “Setting Origi-
⇒
nals in the Document
Feeder (ADF)”
Setting the Direction
of the Originals
P.26 “Setting the Di-
⇒
rection of the Originals”
A4 (297mm) or narrower Wider than A4 (297mm)
Set the originals face up with
the bottom edge of the document in the document feeder
(ADF).
Side-bound Originals
Side Bind
R
2
R
S
RS
] in .
RS
Select [
Top-bound Originals
R
S
Set the originals face up and
align the top edge of the originals with the rear side of the
document feeder (ADF).
Side-bound Originals
RS
Select [
Top-bound Originals
Side Bind
R
2
] in .
R
S
2
Select [
Top Bind
R
2
] in .
Select [
Top Bind
R
2
] in .
23
Page 30

Delivering Originals
Setting Originals on the
Exposure Glass (Platen Glass)
A Lift the platen cover/document
feeder (ADF).
B Width of the original is wider
than A4 (297mm)
2
Note
❒ Be sure to open the platen cov-
er/document feeder (ADF) by
more than 30 degrees, otherwise the original size will not be
detected.
B Place the original face down and
align its upper left corner with the
reference mark in the upper left
corner of the exposure glass (platen glass).
For more information about the direction of the original to be set, see
P.21 “Setting Originals”.
A Width of the original is A4 (297mm)
or narrower
TNSY023E
With this setting, you need to
select the correct direction from
the machine for delivery. ⇒
P.26 “Setting the Direction of the
Originals”
C Close the platen cover/document
feeder (ADF).
24
TNSY021E
Page 31

Setting Originals in the
Document Feeder (ADF)
A Adjust the guide to the original
size.
B Set the aligned originals face up
(if 2-sided originals, first-page up)
in the document feeder (ADF).
For more information about the direction of the original to be set, see
P.21 “Setting Originals”.
Note
❒ You can set the originals with
different horizontal sizes if their
vertical sizes are the same.
❒ The stacked originals set in the
document feeder (ADF) are
scanned from the top page.
A Width of the original is A4 (297mm)
or narrower
Setting Originals
With this setting, you need to
select the correct direction from
the machine for delivery.⇒ P.26
“Setting the Direction of the Originals”
Note
❒ If scanning 2-sided originals,
you need to select the correct direction from the machine for delivery, regardless of the direction
to be set on the scanner.⇒ P.26
“Setting the Direction of the Originals”
2
TNSY031J
B Width of the original is wider
than A4 (297mm)
TNSY033J
25
Page 32

Delivering Originals
RS
RS
Setting the Direction of the Originals
2
When originals are set in direction
or when scanning 2-sided originals,
select the correct direction of the original from the machine as follows:
A Press
[
R
↔R
1
.
]
2
ND2C0104
B Select the appropriate combina-
tion from the
with < or >.
[
Duplex/Dir
menu
]
• Side-bound originals:
R
Side Bind
[
2
• Top-bound originals:
R
Top Bind
[
2
R
R
S
S
C Press
[
OK
.
]
]
]
Setting the Direction of the origi-
❖
nals
If the originals are set in the
direction, select from the upper
line options, and if set in the
direction, select from the lower
line options.
1-sided/2-sided originals
❖
If scanning 1-sided originals, select [R
If scanning 2-sided originals, select [R
Bind
position of the originals.
.
]
1
Side Bind
2
depending on the binding
]
or [R
]
ND2C0105
Top
2
ND2C0103
26
Page 33

Changing the Scanner Settings Temporarily
Changing the Scanner Settings
Temporarily
Scanner settings can be selected from
“User1”, “User2”, or “User3” which
were registered in advance, however,
you can change these settings temporarily when scanning.
A Press
ner mode display.
[
on the delivery scan-
Menu
]
ND2C0101
B To change the scanner settings
temporarily, select
and then press
[
Manual Setup
[
Settings
.
]
Reference
For more information about
each of the items, see P.10 “Items
for Scanner Setup”.
D Press < or > to select the option,
and then press
The display returns to the scanner
setup mode.
]
OK
[
.
]
E If changing another item’s setting
as well, repeat steps C-D.
F Press
are complete.
when all the settings
[
Exit
]
2
ND2C0103
ND2C0101
When the scanner setup mode display appears, adjust the scanner
settings.
C Select the item you want to
change with < or >, and then
press
[
OK
.
]
ND2C0103
G To change the scanner settings
temporarily, select
and then press
[
Manual Setup
.
[
OK
]
ND2C0103
]
27
Page 34

2
Delivering Originals
28
Page 35

Troubleshooting
Problem Cause / Action
3. Appendix
The delivery scanner mode
doesn’t appear on the panel display.
If the TWAIN scanner mode appears when switching the machine to a scanner, see P.17 “Delivery
Settings” to switch to a delivery scanner.
If the scanner mode cannot be switched from
“TWAIN” to “Deliver”, the delivery scanner setting is not correct. See P.3 “Delivery Scanner Setup”
to adjust the setting.
29
Page 36

Appendix
Error Messages
If the error message appears on the panel display, follow the instructions described below:
Note
❒ These messages are related to the delivery scanner operations. If any message
which is not listed here is displayed, see the “Operating Instructions” that
comes with Scanner Option.
3
Message Cause / Action / Reference
Updating the address book.
Please wait.
Address update failed.
Try again?
[
Yes][No
]
Auto Address Update
If [
settings and when you press [
the address book is updated by the user/
group information from ScanRouter Professional Station. Therefore, you can always use
the latest information. Updating may take
longer, depending on the number of users/
groups and the network condition.
Unable to get the user/group information
from ScanRouter Professional Station. Press
Yes
] and then try again.
[
If this message appears repeatedly, one of the
following may cause this trouble:
• ScanRouter Professional Station is not started.
• ScanRouter Professional Station is temporarily stopped due to a shortage of free disk
space or other resources.
] is enabled in scanner
Dest.
] or [
Sender
],
30
Page 37

Error Messages
Message Cause / Action / Reference
Cannot communicate with the server.
Check the operating status and server connection.
OK
]
[
No response from ScanRouter Professional
Station. One of the following may cause this
trouble:
• The power of the computer running ScanRouter Professional Station Software is off.
Or, ScanRouter Professional Station is not
started.
Delivery Server Address
• [
] is incorrect.
• The Machine may not be connected to the
network properly. Check the LED on the
Network Interface Board.
A
B
C
3
Invalid data size.
Check the scanning resolution.
[
OK
]
D
TACH032E
A. The red light is on when the Machine
network scanner is working normally.
B. The orange light is on when the Network
Interface Board is working normally.
C. The green light is on when 100BASE-TX
is being used and is off when 10BASE-T is
being used.
D. The green light is on when the network
connection is normal.
In some cases, a large-sized original cannot be
scanned at high resolution. For more information, see P.11 “Resolutions and Original Sizes”.
31
Page 38

Appendix
Message Cause / Action / Reference
3
Cannot detect original size.
Check whether original is placed,
and select the proper size.
OK
]
[
Page limit exceeded, to scan remaining pages, press Exit then Start ( to
run as a new Job).
OK
]
[
Memory full. Cannot scan.
Scanning has stopped, the scanned
data has been deleted.
Memory full. Cannot continue, send
the existing scanned data or delete,
reset and repeat the process.
No original is placed on the exposure glass (platen glass). Or, cannot detect the original size.
• Place the original on the exposure glass
(platen glass).
• Open the platen cover/document feeder
(ADF) more than 30 degrees to detect the
original size correctly.
• Some paper sizes will not be automatically
detected (e.g. small-sized paper or foreignsized paper). For more information, see the
“Copy Reference”.
Achieved the maximum pages (100 pages )
which can be scanned continuously. Press
OK
]. The scanned originals will be sent. Since
[
the selected destination and other scanner set-
OK
tings remain after pressing [
the originals and press {
Due to the memory shortage in the Machine,
scanning has been stopped in the middle.
The first message appears when the first page
of the originals cannot be scanned. In this case,
OK
press [
The next message appears when the second or
later pages of the originals cannot be scanned.
If you want to send the scanned pages (up to
the previous page) only, press [
cedure must be completed within about 15
minutes after the error occurs.
If pressing [
ed and no data is sent.
Scan the remaining pages after the memory capacity is back to normal.
].
Delete
], all the stored data is delet-
], set the rest of
Start
}.
Send
]. This pro-
32
Error in sending image.
Scan with the same settings and resend.
You have exceeded data capacity,
please wait until the current data has
been sent.
Scanner is in use.
Cannot scan due to another application currently in use.
Failed to send a scanned image to ScanRouter
Professional Station due to a network error.
Scan the originals again because the scanned
data has been deleted.
If the same message appears again, the amount
of network traffic could be the reason, therefore, contact the network administrator.
Five documents are waiting to be sent to ScanRouter Professional Station. Wait until the current document data is sent.
The document feeder (ADF) is currently being
used to copy or to send a fax. Set the originals
in the document feeder (ADF) again.
Page 39

INDEX
A
Auto Address Update
C
Custom Size
,
13
D
,
Date
Delivery Fax
Delivery Option
Delivery Scanner
Delivery server address
Delivery Settings
Density
7
,
10
,
15
,
,
,
3
3
17
E
Error Messages
,
30
F
Function Priority
,
6
,
,
U
8
5
User Tools
,
3
M
Measurement Unit
,
8
O
Original Size
Original Type
,
,
11
10
R
Resolution
,
10
S
21
,
10
,
,
27
7
Scanner Auto Clear Time
Scanner Settings
Registering Items
Temporary Changes
Setting Originals
Setting the Direction of the originals
,
T
Troubleshooting
TWAIN connection time out
,
29
,
6
,
26
33
Page 40

34 UE USA B365
Page 41

@Cover4-1.fm Page 1 Friday, August 25, 2000 10:52 AM
ScanRouter Professional OPERATING INSTRUCTIONS
OPERATING INSTRUCTIONS
SCANNER & FAX REFERENCE
Type 450e
Printed in Japan
UE USA B365-8504
Read this manual carefully before you use this product and keep it handy for future
reference.
For safety, please follow the instructions in this manual.
 Loading...