

Page 1

OPERATING INSTRUCTIONS
PC-FAX REFERENCE
Read this manual carefully before you use this product and keep it handy for future
reference.
For safety, please follow the instructions in this manual.
Page 2

Introduction
To get maximum versa tility from this machin e all opera tors shoul d carefull y read and f ollow th e instructions in this manual. Please keep this manual in a handy place near the machine.
Please read the Safety Informat ion in the “Operating Instructions” before usi ng this mac hine. It c ontains
important information related to USER SAFETY and PREVENTING EQUIPMENT PROBLEMS.
Trademarks
Microsoft, Windows, Windows NT are registered trademarks of Microsoft Corporation in the United
States and/or other countries.
Other product names us ed herei n are for iden tifica tion purp oses on ly and migh t be tradem arks of th eir
respective companies. We disclaim any and all rights in those marks.
Note
The proper names of Windows operating system are as follows:
®
•Microsoft
Windows® 95 operating system
•Microsoft® Windows® 98 operating system
®
•Microsoft
Windows NT® Server network operating system Version 4.0
•Microsoft® Windows NT® Workstation operating system Version 4.0
Page 3

TABLE OF CONTENTS
Introduction................................................................................................ 1
Overview................................... .................................................................... 1
Required Options.......................................................................................... 2
1.Administrator Operations
ScanRouter Professional Station Preparation Procedure..................... 3
Machine Preparation Procedure.............................................................. 4
Processing Transmission Errors............................................................. 5
Error Log List................................................................................................. 5
Non-forwarding Folder List............................................................................ 6
2.Client Operations
NIC FAX Com Redirector Setup............................................................... 7
System Requirements................................................................................... 7
Installing NIC FAX Com Redirector............................................................... 8
Initial Settings................................................................................................ 9
Transmitting a Document Using a PC-FAX Application...................... 10
Recommended PC-FAX Applications ......................................................... 10
PC-FAX Application Settings ............... .................................. ..................... 10
Transmitting a Document............................................................................ 11
Checking Transmission Results............................................................ 12
i
Page 4

ii
Page 5

Introduction
Overview
With NIC FAX Com Redirector which comes with this product, you can send a
fax from the client computer using a PC-FAX application through ScanRouter
Professional Station without a modem connection.
❖
NIC FAX Com Redirector
NIC FAX Com Redirector is an application offered by our company for use
with a PC-FAX application when sending a fax to ScanRouter Professional
Station.
With NIC FAX Com Redirector, data which is usually sent from the COM
port on the computer is delivered to ScanRouter Professional Station through
the network. After that, the data is sent to the destination by fax using the modem of the machine which is connected to ScanRouter Professional Station.
With NIC FAX Com Redirector, you can send a fax from the client computer
without a modem connection.
Limitation
❒
Fax reception is not available with a PC-FAX application when using NIC
FAX Com Redirector.
❒
The following functions described in the PC-FAX Expander manual cannot be used.
• Fax transmission from the computer, using Quick Dials, Speed Dials, or
Group Dials which are registered in the machine.
• CFM TWAIN scanning
• Scanning from the fax machine using PC-FAX application
• Printing from the fax machine using PC-FAX application
1
Page 6
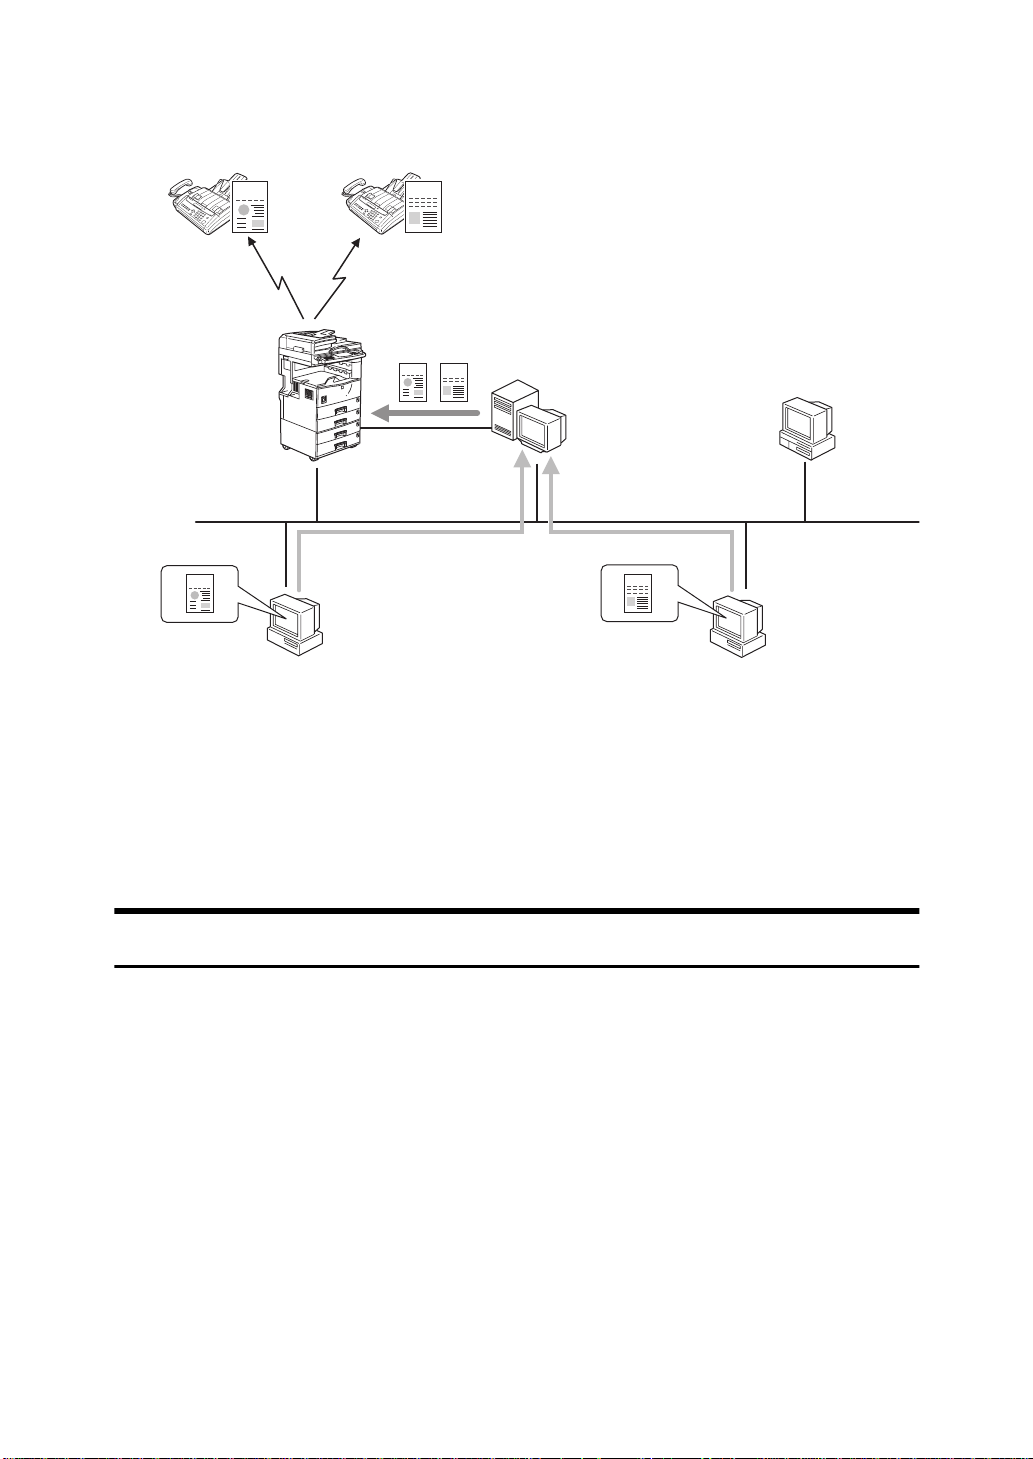
❖
Document Transmission Flow
A fax document sent from the client computer is transmitted to the destination as illustrated below.
FAX
FAX
FAX
A
FAX
B
FAX
FAX
B
A. ScanRouter Professional Station
B. Client
A Sent by the client computer to ScanRouter Professional Station.
B
TNSX151E
B Sent by ScanRouter Professional Station to the machine.
C Sent by the machine to the destination.
Required Options
To use this function, the same options which are required when using the machine as a network delivery fax machine, must be installed on the machine. For
more information about the required options for a network delivery fax machine, see “Scanner & Fax Reference”.
2
Page 7

1. Administrator Operations
ScanRouter Professional Station Preparation Procedure
If fax document delivery with ScanRouter Professional Station can already be
done, this procedure is not required. Go to P.4 “Machine Preparation Procedure”.
If fax document delivery cannot be done, you must install a fax delivery application on ScanRouter Professional Station and configure the settings. For more
information about installing and configuring a fax delivery application, see “Setup & Administrator Reference”.
Note
❒
The procedure of installation and configuration are the same as in the case of
fax document delivery.
3
Page 8

Administrator Operations
Machine Preparation Procedure
1
First, configure the machine settings
which are the same as those used for
a network delivery fax machine. For
more information about the network
delivery fax machine settings, see
“Scanner & Fax Reference”.
If fax document delivery with ScanRouter Professional Station can already be done, the procedure above is
not required.
After the settings are complete, follow the steps below.
A Make sure that the ready screen
appears on the panel display.
Note
❒
If this screen does not appear,
press the {
Fax
} key.
E Press
User Parameters
[
that number with the Number
keys.
F Press
20
G Press {
change the value of bit 0 displayed
in
[
[
.
]
[
Current
↑
↑
0
or
Prev.
]
[↓Next
, and then enter
]
to ”1”.
]
to display
]
Switch
} on the Number keys to
to display
]
[
Switch
B Press the {
C Press {
D Press {
4
User Tools/Counter
} on the Number keys.
3
The
[
Fax Features
} on the Number keys,
6
and then press {
seconds.
} key.
menu appears.
]
} within three
#
H Press
I Press
J Press
The settings are now complete.
.
[
OK
]
[
PrevMenu
[
, and then press
Menu
]
.
]
[
Exit
.
]
Page 9

Processing Transmission Errors
Processing Transmission Errors
When an error occurs while sending a document from ScanRouter Professional
Station to the machine, the document is saved in the “non-forwarding folder” located on the ScanRouter Professional and the error details are recorded in the
“error log list” of ScanRouter for Admin.
In this case, the error notification message is not sent to the sender. The administrator should check the document saved in the "non-forwarding folder" and
the "error log list" periodically to take the appropriate action for that document,
for example, requesting the sender to send the document again.
Note
❒
If
[
Mail to Administrator
Environment Settings
[
receive the error notification messages by mail or by printout.
Error Log List
If fax document delivery from ScanRouter Professional Station to the machine
fails, the following items are displayed in the error log list.
or
]
[
Output to Printer
page of ScanRouter for Admin, the administrator will
]
is selected in
]
[
Error Settings
in the
]
1
Item Description
Record Date and Time The date and time when an error occurred.
Classification “FaxProxy” is displayed.
Contents The contents of the error. If the Personal Code is registered
in NIC FAX Com Redirector running on the client computer, that Personal Code follows the contents of the error.
Processing The way the error is processed.
Destination The fax number of the destination where the document was
supposed to be delivered.
Document The file name of the document which was saved in the non-
forwarding folder. To view the first-page image of the document, click the icon.
Note
❒
Personal Code (up to 20 digits) can be registered in NIC FAX Com Redirector
running on the client computer. If different Personal Codes are set to each client, you can find the sender of a document undelivered due to an error. We
recommend using the Personal Codes for each client.
5
Page 10

Administrator Operations
The common errors are as follows:
Contents Cause and Action
1
The modem is not responding. Please turn
off the modem and try
the operation again.
Call was unsuccessful. An error has occurred while the machine was transmitting.
There is no response from the machine.
• Make sure that ScanRouter Professional Station is connected properly to the machine with a RS232 cable.
• Make sure that the machine’s main power switch is
turned on. If not, turn it on.
• Turn off the machine’s main power switch and then turn
it on again.
When sending a large document, or a document with a
large amount of data such as a photograph, the transmission may not be successful, because the memory of the machine becomes full.
Divide the document and send it with two or more transmissions.
Note
If installing Fax Function Upgrade Unit or Expansion
❒
Memory on the machine, the amount of data which can
be sent out at a time will be increased. For more information, see “Fax & Scanner Reference”.
Non-forwarding Folder List
The following items are displayed in the non-forwarding folder list.
Item Description
Document Name The file name of the document.
Creation Date The date and time when the client sent the document.
Sender The Personal Code set on the client computer from which a
document was sent. If no Personal Code is set on the client
computer, no Personal Code is displayed.
Receiver The fax number of the document destination.
Page Total Total pages of the document.
Station Save Interval The number of days for the saved document to remain in
the non-forwarding folder.
6
Page 11

2. Client Operations
To send a document by fax from the client computer, NIC FAX Com Redirector
and a PC-FAX application are required.
Note
❒
NIC FAX Com Redirector is included in the CD-ROM which comes with this
product.
❒
You must have a PC-FAX application before beginning the setup, because this
application is not included in the CD-ROM which comes with this product.⇒
P.10 “Recommended PC-FAX Applications”
First, set up NIC FAX Com Redirector, and then configure the settings of the PCFAX application.
NIC FAX Com Redirector Setup
System Requirements
To use NIC FAX Com Redirector, the client computer must meet the following
system requirements.
❖
CPU
Pentium 133MHz or faster
❖
Operating Systems
• Microsoft Windows 95
• Microsoft Windows 98
• Microsoft Windows NT Server 4.0 (with Service Pack 4 or later)
• Microsoft Windows NT Workstation 4.0 (with Service Pack 4 or later)
Limitation
❒
Under Windows NT, this application does not support RISC based processor (MIPS R Series, Alpha AXP, Power PC).
❖
RAM
24MB minimum (64MB recommended)
❖
Hard Disk Space
30MB minimum
❖
Protocols
TCP/IP
7
Page 12

2
Client Operations
Installing NIC FAX Com Redir ector
Follow the steps below to install NIC FAX Com Redirector.
Note
❒
Quit all open applications before beginning the installation.
❒
When installing in a computer running Windows NT 4.0, log on as a member
of the Administrators group.
A Start Windows on the computer where you want to install this application,
and then insert the CD-ROM into the computer.
The language selection dialog box appears.
Note
❒
If the window does not appear, double-click on “Setup.exe” located on the
root directory of the CD-ROM to start the installer.
B Select the language of the application to be installed, and click
C Click
D Click
[
ScanRouter Software for Client PCs
[
Com Redirector
.
]
.
]
E When the installation confirmation message appears, click
F When the
[
Welcome
dialog box appears, click
]
[
Next
.
]
[
Yes
[
.
]
OK
]
G Follow the instructions to be displayed.
H Restart the computer and then log on to Windows again.
After logging on to Windows, the NIC FAX Com Redirector settings dialog
box appears. Continue the procedure as described in P.9 “Initial Settings”.
.
8
Page 13

NIC FAX Com Redirector Setup
Initial Settings
Preparation
The host name or IP address of ScanRouter Professional Station is required.
For more information, ask the ScanRouter Professional administrator.
A Enter the host name or IP address of ScanRouter Professional Station in the
Connect to
[
B Click
After the connection completion message appears, click
If the connection fails, check if the host name or IP address being entered is
correct.
Note
❒
Connection is not possible if ScanRouter Professional Station is not started,
or the machine’s power switch is turned off. If the connection fails even
though the host name or IP address is correct, ask the ScanRouter Professional administrator.
C Enter the Personal Code in the
Personal Code (up to 20 digits) is an optional code used to identify the client
computer which sent a document. Ask the ScanRouter Professional administrator to assign the Personal Code because this code must be unique.
D Click
The NIC FAX Com Redirector settings are now complete.
Note
❒
To display the NIC FAX Com Redirector settings dialog box again, rightclick the NIC FAX Com Redirector icon and click
up menu.
box.
]
[
Test Connection
.
[
OK
]
.
]
.
[
OK
]
[
Personal Code
box.
]
[
Settings
from the pop-
]
2
❒
For more instructions on NIC FAX Com Redirector, see NIC FAX Com Redirector Help. To display Help, right-click the icon and then click
from the pop-up menu.
[
Help
]
9
Page 14

Client Operations
Transmitting a Document Using a PC-FAX Application
Recommended PC-FAX Applications
2
When using NIC FAX Com Redirector, recommended PC-FAX applications and
languages supported by them are as follows:
Application Supported Languages
WinFAX Pro 9.0
(Symantec Corporation. )
Bitware 3.30
(Cheyenne Software, Inc.)
Sopwith 1.1
(Wordcraft International Limited )
WinPhone 2.0
(BVRP Software)
English (U.S.), English (U.K.), German,
French, Italian, Spanish
English (U.S.)
English (U.S.), English (U.K.), German,
French, Italian, Spanish
French
PC-FAX Application Settings
To make a fax transmission with NIC FAX Com Redirector, configure the settings of the PC-FAX application being used as follows:
• Select “Facsimile Modem Type A05” as the modem to be used. Facsimile Modem Type A05 is installed automatically when installing NIC FAX Com Redirector.
• Select the option to use Class 2 as the modem command. If both Class 2 and
Class 2.0 exist, select Class 2. Facsimile Modem Type A05 supports the Class
2 AT command only.
• Select the option to disable the auto fax reception function.
Note
❒
For more information about the PC-FAX application settings, see the manual
of the PC-FAX application being used.
❒
If the PC-FAX application settings are not available unless the modem is
turned on, start NIC FAX Com Redirector and then confirm the connection
with the
[
Test Connection
button.
]
10
Page 15

Transmitting a Document Using a PC-FAX Application
Transmitting a Document
A Make sure that ScanRouter Professional Station is running and the ma-
chine’s power switch is turned on.
B Make sure that NIC FAX Com Redirector is running.
If running, the icon of NIC FAX Com Redirector is displayed on the right side
of the taskbar.
If not running, click
to start.
Start
[
, point to
]
[
Program
, and then click
]
[
Com Redirector
C Transmit a fax using the PC-FAX application.
PC FAX application transmission procedures are the same as those of a modem.
Note
❒
For more information about using the PC-FAX application, see the manual
of the PC-FAX application being used.
2
]
11
Page 16

2
Client Operations
Checking Transmission Results
A fax document sent from the client computer is transmitted to its destination
after the following steps are completed.
A Sent by the client computer to ScanRouter Professional Station.
B Sent by ScanRouter Professional Station to the machine.
C Sent by the machine to the destination.
Even if the transmission seems successful from the client computer, the document is not delivered to the destination correctly when an error occurs during
steps B or C.
Confirm the transmission results using the following methods.
❖
Using ScanRouter for Client
If an error occurs during step B, the error details are recorded in the “error
log list” of ScanRouter for Client.
The following items are displayed in the error log list.
Item Description
Record Date and Time The date and time when an error occurred.
Classification “FaxProxy” is displayed.
Contents The contents of the error. If Personal Code is set regis-
tered in NIC FAX Com Redirector running on the client
computer, that Personal Code follows the contents of the
error.
Processing This information is for the administrator only.
Destination The fax number of the document destination.
Document The file name of the document which is saved in the non-
forwarding folder.
12
Page 17

The common errors are as follows:
Contents Cause and Action
Checking Transmission Results
The modem is not responding. Please turn
off the modem and try
the operation again.
Call was unsuccessful. An error has occurred while the machine was transmit-
❖
Using the Transmission Result Report
There is no response from the machine.
• Make sure that ScanRouter Professional Station is connected properly to the machine with a RS232 cable.
• Make sure that the machine’s power switch is turned
on. If not, turn it on.
• Turn off the machine’s power switch and then turn it
on again.
ting.
When sending a large document, or a document with a
large amount of data such as a photograph, the transmission may not be successful, because the memory of the
machine becomes full. Divide the document and send it
with two or more transmissions.
Note
If installing Fax Function Upgrade Unit or Expansion
❒
Memory on the machine, the amount of data which
can be sent at a time will be increased. For more information, see “Fax & Scanner Reference”.
Be sure to complete steps A and B. After that, check the transmission result
report printed by the machine to confirm the transmission result in step C.
2
13
Page 18

2
Client Operations
14 EE GB UE USA B365
Page 19

Copyright © 1999
Page 20

ScanRouter Professional OPERATING INSTRUCTIONS
Printed in Japan
UE USA B365-8503
 Loading...