

Page 1
OPERATING INSTRUCTIONS
CLIENT REFERENCE
Read this manual carefully before you use this product and keep it handy for future
reference.
For safety, please follow the instructions in this manual.
Page 2

Introduction
To get maximum versa tility from this machin e all opera tors shoul d carefull y read and f ollow th e instructions in this manual. Please keep this manual in a handy place near the machine.
Please read the Safety Informat ion in the “Operating Instructions” before usi ng this mac hine. It c ontains
important information related to USER SAFETY and PREVENTING EQUIPMENT PROBLEMS.
Trademarks
Adobe, Acrobat are registered trademarks of Adobe Systems Incorporated.
Microsoft, Windows, Windows NT are registered trademarks of Microsoft Corporation in the United
States and/or other countries.
Netscape, Netsca pe Navigat or are re gistered tra demarks of Netscap e Communi cations Corporati on in
the United States and/or other countries.
Other product names us ed herei n are for iden tifica tion purp oses on ly and migh t be tradem arks of th eir
respective companies. We disclaim any and all rights in those marks.
Note
The proper names of Windows operating system are as follows:
®
•Microsoft
Windows® 95 operating system
•Microsoft® Windows® 98 operating system
®
•Microsoft
Windows NT® Server network operating system Version 4.0
•Microsoft® Windows NT® Workstation operating system Version 4.0
Page 3

TABLE OF CONTENTS
Introduction................................................................................................ 1
Overview................................... .................................................................... 1
System Requirements................................................................................... 3
1.Receiving Documents with Client Software
Setting up the Reception Environment for Client Software.................. 5
Installing Client Software............................................................................... 5
Setting up the Reception Environment.......................................................... 6
Exiting from Client Software.......................................................................... 7
Receiving Documents............................................................................... 8
Receiving Documents Automatically............................................................. 8
Receiving Documents Manually.................................................................... 9
Opening a Received Document.................................................................... 9
Client Software Properties...................................................................... 11
[
Log in
]
Tab .................................................................................................. 11
Reception
[
Application
[
Save
[
]
Tab ............................................................................................ 12
]
Tab........................................................................................... 13
]
Tab.......................... .......................................................................... 14
2.WWW Browser Operations
ScanRouter for Client Operations.......................................................... 15
Viewing the User List Page (Top Page)...................................................... 15
Quitting ScanRouter for Client .................................................................... 17
Viewing Documents Saved in the Folder.............................................. 18
Opening a Folder to View............................................................................ 18
Weekly Calendar............... .......................................................................... 19
Monthly Calendar........................................................................................ 21
Daily Calendar............................................................................................. 22
Image List........................ ............................................................................ 23
Icon List............................................................................ ........................... 25
Document View........................................................................................... 26
Page View................................................................................................... 27
Downloading a Document Saved in the Folder.................................... 28
Downloading a Document........................................................................... 28
Viewing the Downloaded Document ........................................................... 29
Target
[
Changing the User Folder Settings ....................................................... 32
[
]
Dialog Box ...................................................................................... 31
Register/Edit User
]
Page............................................................................... 33
3.Opening a Document Delivered by Mail
Opening a Document Delivered by Mail................................................ 35
i
Page 4

4.Appendix
Troubleshooting...................................................................................... 37
File Formats............................................................................................. 40
INDEX........................................................................................................ 41
ii
Page 5
Introduction
Overview
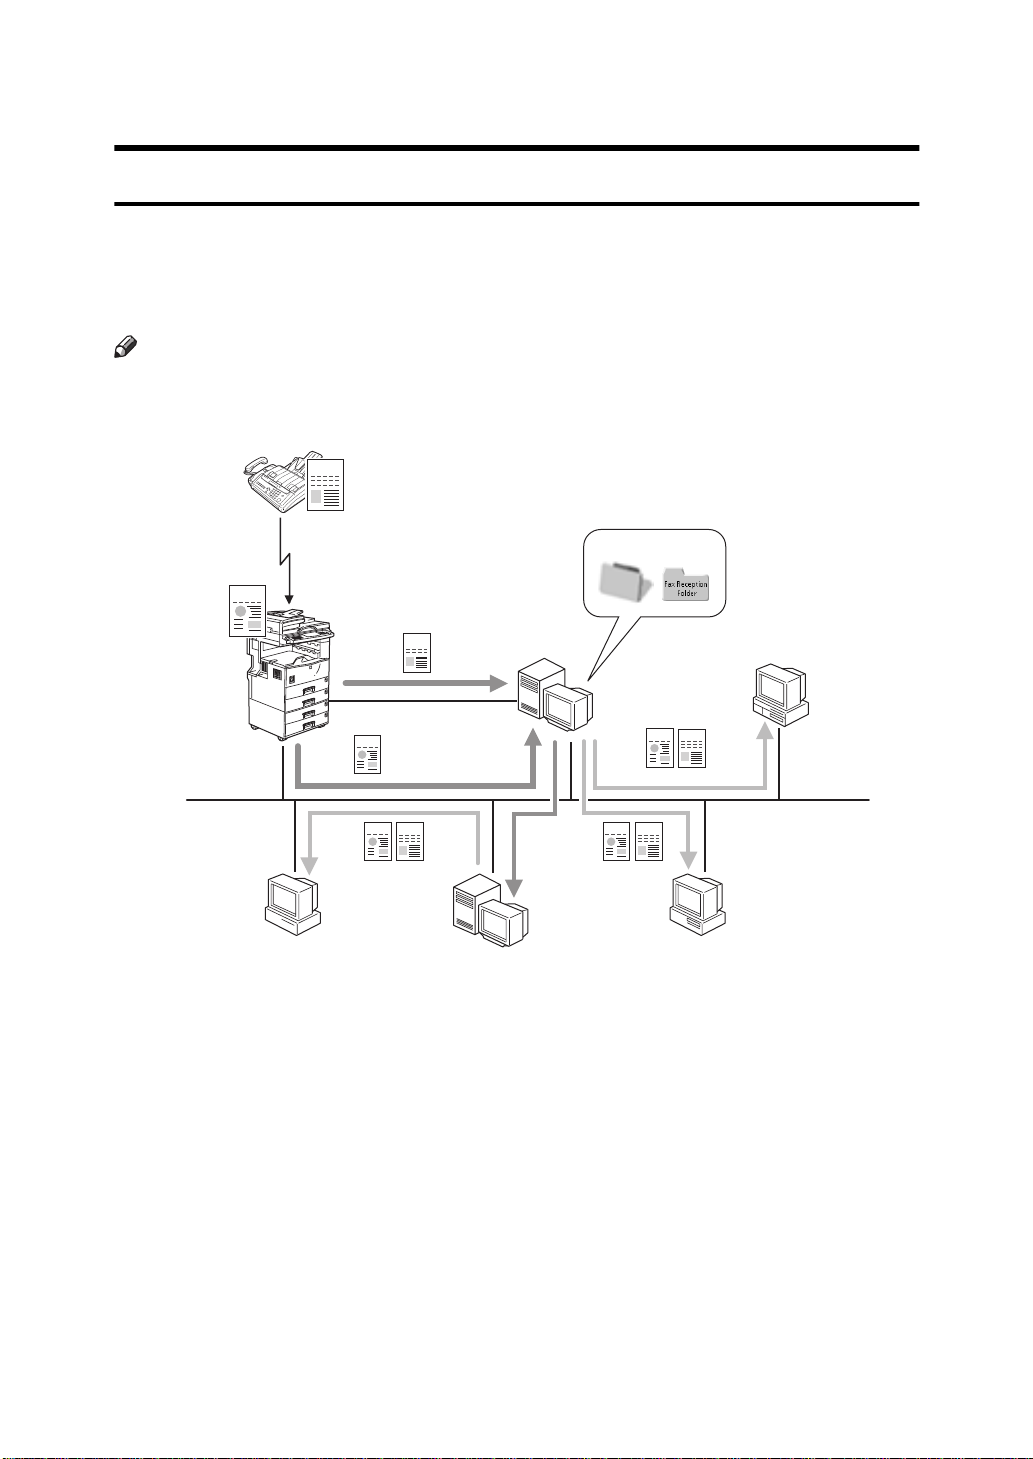
With ScanRouter Professional, you can deliver scanned documents from the machine and fax documents to selected folders. The delivery method is set by the
administrator in advance, so the way clients receive documents depends on
these settings.
Note
❒ The term "machine" as described in this manual refers to the diverse delivery
device for which this application was designed.
FAX
D
SCN
FAX
SCN
SCN
FAX
F
C
A. ScanRouter Professional Station
B. Mail Server
C. Client
D. Saved in Folders
E. Received using Client Software
F. Delivered by mail
A
E
SCN
FAX
SCN
FAX
G
B
C
C
TNSX011E
G. Viewed/downloaded using the WWW browser
1
Page 6

Documents sent from the machine to ScanRouter Professional are delivered and
saved to the folders as follows, depending on the ScanRouter Professional settings.
A Delivered by mail
B Saved in the user folder located on ScanRouter Professional Station.
C Saved in the fax reception folder located on ScanRouter Professional Station.
With the client computer, documents can be received and viewed by using the
appropriate applications for that type of file. The following are examples of client computer operations.
When documents are delivered by mail
❖
If “Mail Delivery” has been set in the folder settings of the user selected as a
destination, the documents are mailed to the selected address as attachments.
With the client computer, you can check the contents of attached documents
by using the appropriate application for that type of file.
When documents are saved in the user folder or in the fax reception folder
❖
If “Save in Folder” has been set in the folder settings of the user selected as a
destination, the documents are saved in the folder located on ScanRouter Professional Station. Fax documents with no delivery destinations are saved in
the “fax reception folder”.
The two methods for viewing these documents from the client computer are
as follows:
• Saved documents can be received using ScanRouter Client Software and
can be displayed with the appropriate application.
Reference
“Receiving Documents with Client Software” ⇒ P.5
• Saved documents can be viewed using the WWW browser. The documents
can be also downloaded.
Reference
“WWW Browser Operations” ⇒ P.15
2
Page 7

System Requirements
To use a computer as a client computer of ScanRouter Professional, the computer must meet the following system requirements.
Computer
CPU
❖
Pentium 133MHz or faster
Operating Systems
❖
• Microsoft Windows 95
• Microsoft Windows 98
• Microsoft Windows NT Server 4.0 (with Service Pack 4 or later)
• Microsoft Windows NT Workstation 4.0 (with Service Pack 4 or later)
Limitation
❒ Under Windows NT, this application does not support RISC based proces-
sor (MIPS R Series, Alpha AXP, Power PC).
RAM
❖
24MB minimum (64MB recommended)
Hard Disk Space
❖
At least 2.6MB of disk space is required for installation.
50MB or more free disk space is required to run Client Software.
Protocols
❖
TCP/IP protocol
Note
❒ The TCP/IP protocol is required to use ScanRouter Client Software or
ScanRouter for Client.
❒ To receive a document by mail, the protocols appropriate for that mail type
are also required.
3
Page 8

Mail Software (receiving mail from ScanRouter Professional Station)
To receive mail delivered from ScanRouter Professional Station, install the necessary mail software which is appropriate for the mail server being used.
Reference
For more information, ask the administrator.
WWW Browser (accessing ScanRouter Professional Station with the WWW browser)
To use ScanRouter for Client, one of the following browsers is required.
• Microsoft Internet Explorer 3.02 or later
• Netscape Navigator 4.05 or later
Note
❒ We recommend that you display this application at 800 x 600 pixels or more.
4
Page 9

1. Receiving Documents with
Client Software
With ScanRouter Client Software installed in a client computer, you can receive
documents saved in a user folder in ScanRouter Professional Station.
Important
❒ After receiving documents with the client computer, the documents saved in
ScanRouter Professional Station will be deleted.
Setting up the Reception Environment for Client Software
Installing Client Software
Follow the steps below to install ScanRouter Client Software.
Note
❒ Quit all open applications before beginning the installation.
❒ When installing in a computer running Windows NT 4.0, log on as a member
of the Administrators group.
A Start Windows on the computer where you want to install this application,
and then insert the CD-ROM into the computer.
The language selection dialog box appears.
Note
❒ If the window doesn’t appear, double-click on “Setup.exe” located on the
root directory of the CD-ROM, to start the installer.
B Select the language of the application to be installed, and click
C Click
D Click
[
ScanRouter Software for Client PCs
[
ScanRouter Client Software
E When the
[
Welcome
.
]
dialog box appears, click
]
.
]
.
[
Next
]
[
OK
.
]
F Follow the instructions to be displayed.
5
Page 10
1
Receiving Documents with Client Software
Setting up the Reception Environment
After installation, you need to set up ScanRouter Professional Station, select the
user folder, and configure the reception environment.
A Click
click
[
, point to
[
Start
]
ScanRouter Client Software
[
Programs
, point to the
]
.
]
[
ScanRouter Client
folder, and
]
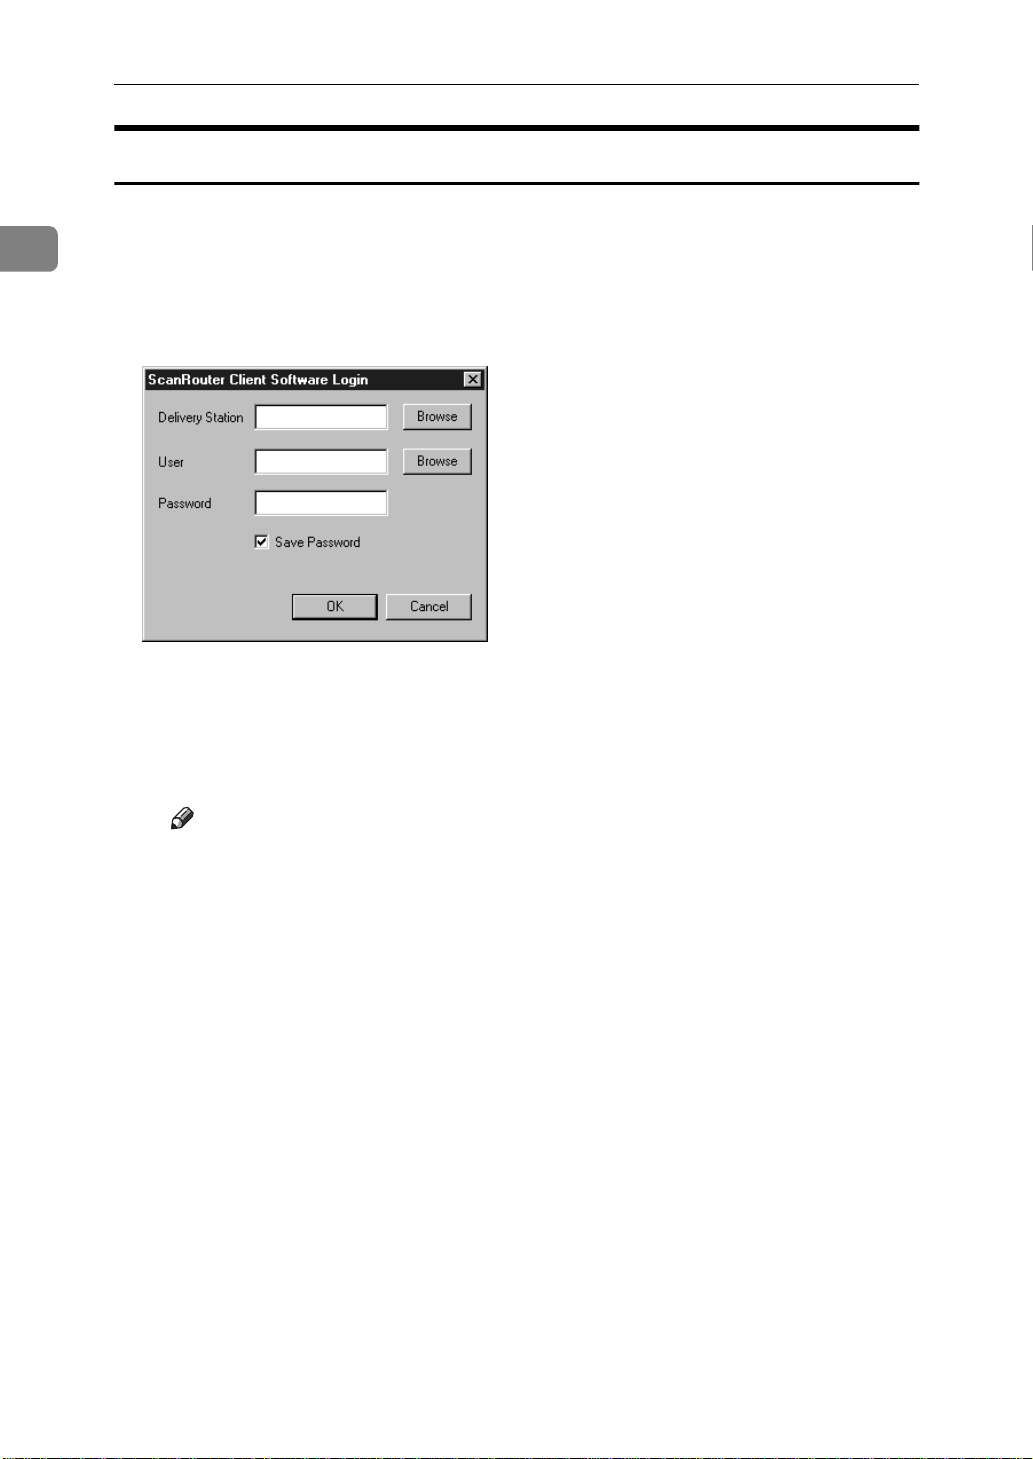
The
[
ScanRouter Client Log in
dialog box appears.
]
B Configure each of the options.
Enter the IP address or the host name of ScanRouter Professional Station
A
in the
Ask ScanRouter Professional administrator for details.
❒ If a DNS server or WINS server is not used, Client Software may take a
❒ ScanRouter Professional Station can be selected from the network tree
[
Deliver y Station
Note
long time to start if an IP address is not entered.
which is displayed by clicking
computer names. If the computer name set in ScanRouter Professional
Station and the host name are different, directly enter the IP address or
the host name.
box.
]
Browse
[
. However, the list displays only
]
Click
B
A list of user folders created in ScanRouter Professional Station is displayed.
Click to select the user folder where documents are to be saved, and then
C
click
Enter the password for the folder, which was entered in the
D
the
For information about the password to be entered, ask the ScanRouter Professional administrator.
Click to select the
E
If this check box is selected, you don't have to enter the password every
time Client Software starts.
[
Browse
[
OK
[
Password
located on the right of the
]
.
]
box.
]
[
Save Password
box.
[
User
]
check box if required.
]
[
User
box, in
]
6
Page 11

Setting up the Reception Environment for Client Software
Click
F
The settings for the folder are now complete. The icon for Client Software
is displayed on the taskbar.
Next, configure the settings for document reception.
[
OK
.
]
C Right-click Client Software icon on the taskbar, and then click
from the pop-up menu.
The properties of Client Software are displayed.
D Set the time interval to check and receive documents in the
Select the
A
If you select
reception status of the selected folders in ScanRouter Professional Station,
and receives new documents automatically. When you select this option,
Automatic Reception Interval
[
If you want to receive documents manually, select
Configure other settings.
B
For more information about these items, see P.12 “
Help.
[
Reception Mode
[
Automatic Reception
E Configure settings in the
option.
]
, Client Software periodically checks the
]
must be configured as well.
]
[
Application
tab and the
]
[
No Automatic Recept ion
[Reception]
[
Save
tab.
]
[
Reception
[
Properties
tab.
]
Tab”, or see
]
1
.
]
For more information about each of the items, see P.13 “
P.14 “
[Save]
Note
❒ The saving location for received documents can be selected by
Path
F When all of the settings are complete, click
Now Client Software is ready to receive documents.
Tab”, or see Help.
in the
]
[
Save
tab.
]
[
OK
.
]
[Application]
File Save
[
Exiting from Client Software
With the following procedure, you can exit from Client Software.
A Right-click the Client Software icon on the taskbar, and then click
from the pop-up menu.
Tab”,
[
Exit
]
7
Page 12

1
Receiving Documents with Client Software
Receiving Documents
With ScanRouter Client Software, you can receive documents saved in the user
folder located on ScanRouter Professional Station. The documents can be received automatically or manually.
Note
❒ When receiving documents with Client Software, make sure that the Scan-
Router Professional Station setting is configured to save documents in the
user folder.
❒ After the client computer receives the documents, the documents saved in
ScanRouter Professional Station will be deleted.
Important
❒ The received documents are saved in the hard disk of the client computer.
There is a possibility the available free disk space will become full if documents aren’t removed from the hard disk regularly.
Note
❒ The received documents are saved to the location set in the
ScanRouter Client Properties
[
window.⇒ P.14 “
]
[Save]
Tab”
Save
[
tab in the
]
Receiving Documents Automat ically
Select
Router Client Properties
tion from ScanRouter Professional Station at the specified interval, set in
[
automatically.
[
Automatic Reception
Automatic Reception Interval
in
]
[
Reception Mode
window in advance. Client Software acquires informa-
]
in the
]
[
Reception
in the
]
tab, and receives new documents
]
[
Reception
tab in the
]
[
Scan-
A Make sure that Client Software icon is displayed on the taskbar.
If no icon is displayed, follow the steps below to start Client Software.
A Click
click
[
The icon appears on the taskbar.
Client Software acquires information from ScanRouter Professional Station at
the specified interval, set in
and receives new documents automatically. After receiving documents, a reception notification, whose style is defined in the
Router Client Properties
, point to
[
Start
]
ScanRouter Client Software
[
Programs
window, will be delivered.
]
]
.
]
[
Automatic Recept i on Interval
, point to the
[
ScanRouter Client
in the
]
[
Reception
[
tab in the
]
folder, and
]
Reception
tab,
]
[
Scan-
8
Page 13

Receiving Documents Manually
Receiving Documents
Documents are received manually if
tion Mode
vance. Select this if you want to check for and receive documents immediately.
in the
]
[
Reception
tab in the
]
[
No Automatic Rece ption
[
ScanRouter Client Properties
is selected in
]
window in ad-
]
[
Recep-
A Make sure that Client Software icon is displayed on the taskbar.
If not, follow the steps below to start Client Software.
A Click
click
[
The icon appears on the taskbar.
B Double-click the icon, or right-click the icon and click
pop-up menu.
After a moment a notification will be displayed.
When receiving new documents
❖
You will receive a notification whose style is defined in the
in the
When there are no documents
❖
The pop-up dialog box notifies you that there are no received documents.
, point to
[
Start
]
ScanRouter Client Software
[
ScanRouter Client Properties
[
Programs
]
.
]
, point to the
window.
]
[
ScanRouter Client
[
Reception
folder, and
]
from the
]
[
Reception
tab
]
1
Note
❒ If the document file size is large, station-side processing and document de-
livery may take a long time.
Opening a Received Document
When receiving a document from ScanRouter Professional Station, you will receive a notification message whose style is defined in the
ScanRouter Client Properties
[
tents.
If selecting
Follow the instructions below depending on the settings in the
• If Launch application has been selected
After clicking
ing multiple documents at once, all of the documents are opened.
• If no application has been selected
Only a notification is delivered. To open the document, use an application
which is suitable for the file format of the document.
[
Popup
in
]
, the application starts to open the document. When receiv-
OK
]
[
window. Open a new document to check the con-
]
[
Notify on Reception
, the notification message will appear.
]
Reception
[
[
tab in the
]
Application
tab.
]
9
Page 14

Receiving Documents with Client Software
Document File Name
-
1
Received documents are saved in the folder selected in
tab. A document file name reflects the setting in
Save
]
[
as follows:
A document scanned with the machine
❖
SCNyyyymmddhhmmssttt_n.xxx
A document received by fax
❖
FAXyyyymmddhhmmss_n.xxx
• yyyymmddhhmmss
The date (yyyy/mm/dd) and the time (hh/mm/ss) when the document was
saved in ScanRouter Professional Station.
•ttt
A unit of 1/1000 second.
•n
If received as a single page file format, this represents a page number. If received as a multi-page file format, this represents a page total. The file format
for delivery is defined in the user folder settings.
•xxx
The file format (tif, dcx, pcx, bmp, pdf, jpg).
For example, if a 2-page scanned document in single page TIFF format was received on August 1 1999, at 12:34:56:123, the document is saved in two files as
below:
• SCN19990801123456123_1.TIF
[
File Save Path
[
Format
in the
]
in the
]
[
Save
tab
]
• SCN19990801123456123_2.TIF
If the same document was received in Multipage DCX format, the document is
saved in the following file.
• SCN19990801123456123_2.DCX
10
Page 15
Client Software Properties
5
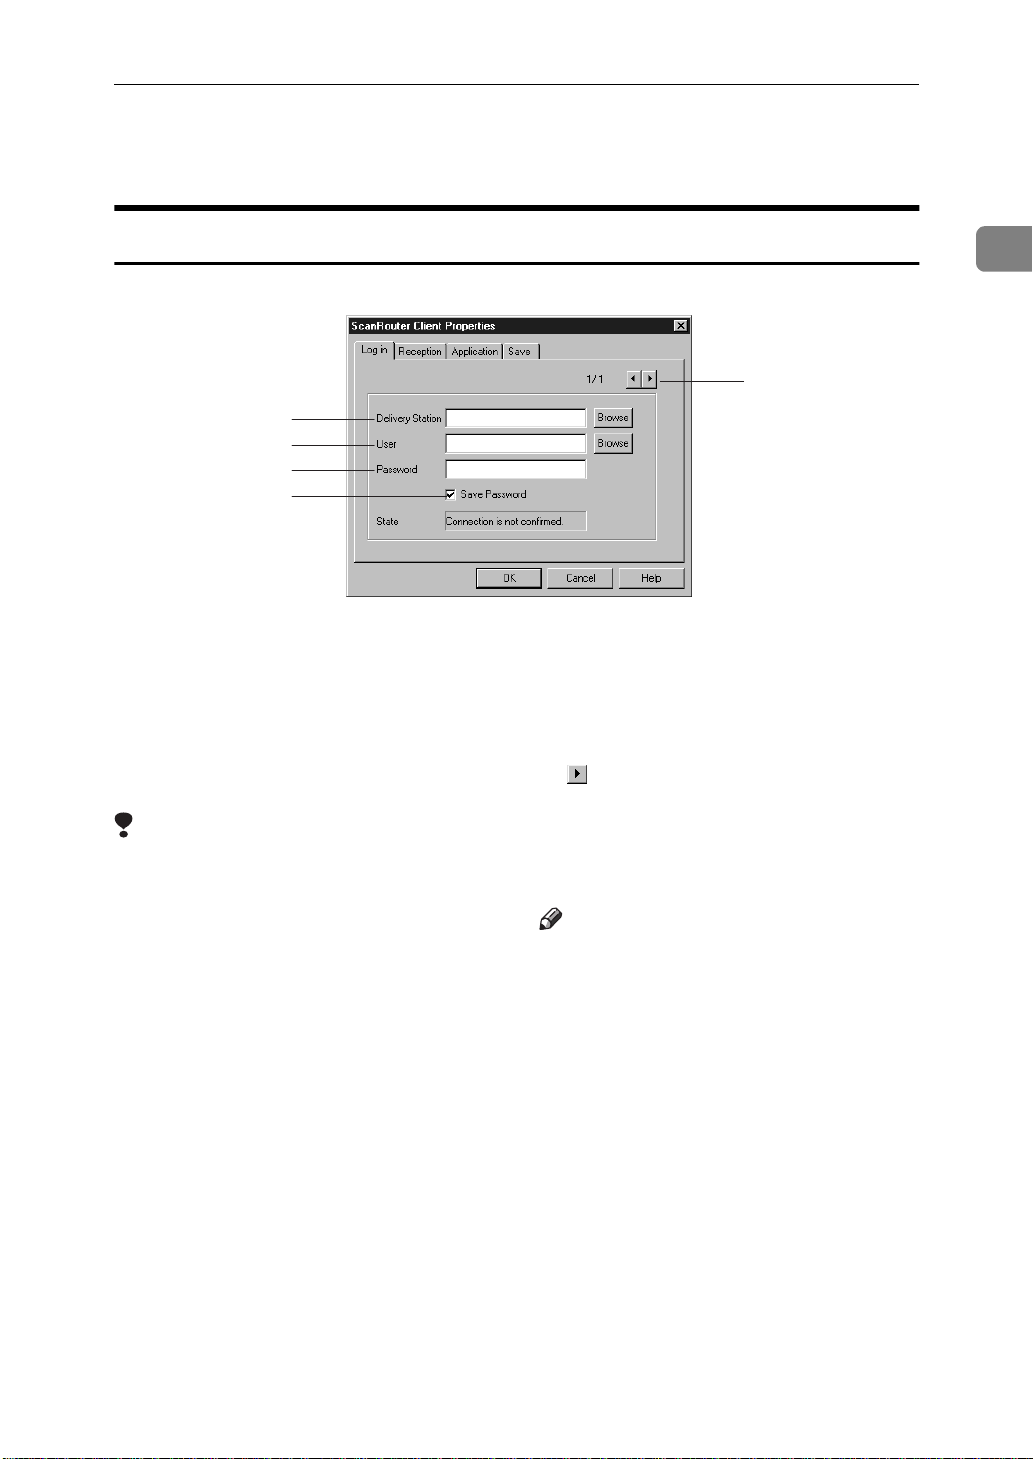
[
Log in] Tab
1
2
3
4
Client Software Properties
1
Delivery Station
1.
Enter the IP address or the host name of
ScanRouter Professional Station. If a station and a client computer exist in the
same network segment, you can select
the station from the displayed network
tree by clicking [
Limitation
Browse
].
❒ Some network environments may
not support the
Browse
[
function.
]
In this case, enter the IP address or
the host name of ScanRouter Professional Station.
❒ If a computer name and the host
name are different, enter the IP address or the host name of ScanRouter Professional Station.
User
2.
Enter the name of the user folder where
received documents are saved. By click-
Browse
ing [
from the list of user folders located on
ScanRouter Professional Station.
], you can select the folder
Save Password
4.
Select this check box to save the password. If not selected, the password request dialog box appears every time
Client Software starts.
5.
If receiving documents from two or more
ScanRouter Professional Stations or from
two or more user folders, click this button
to add another station or user folder.
Note
Up to ten stations and user folders can
❒
be selected.
Password
3.
Enter the password which is set for the
user folder.
11
Page 16

1
Receiving Documents with Client Software
[
Reception] Tab
1
2
3
Reception Mode
1.
Configures the way that documents are
received by Client Software.
• Automatic Reception
Client Software periodically acquires
information about the reception status
of the selected folder in ScanRouter
Professional Station, and receives new
documents automatically. When you
select this option, [
Interval
• No Automatic Reception
If you want to receive documents
manually, select this option.
Automatic Reception Interval
2.
Configures the interval setting (1-60 minutes) for acquiring information from
ScanRouter Professional Station when
Automatic Reception
[
] must be configured as well.
Automatic Reception
] is selected.
Notify on Reception
3.
Select the type of document reception notification. Multiple options can be selected.
• Popup
Displays the pop-up dialog box. If the
Launch application has been selected
in the [
the application from this dialog box to
open the document.
• Sound
Causes the computer to beep when a
document is received.
• Flashing Icon
Causes the icon on the taskbar to flash
when a document is received. To stop
flashing, click the icon.
Application
] tab, you can start
12
Page 17

[
Application] Tab
1
2
Launch Application
1.
Sets the application to open received documents.
• Choose Application
When selecting [
from the pop-up menu of the icon on
the taskbar, the application selected in
Application Name
[
selected in [
[
Reception
cation from the notification dialog box
to open the received document.
• Do Not Launch
No application is configured to open received documents. [
in the pop-up menu appears dimmed.
Notify on Reception
] tab, you can start the appli-
Launch Application
] starts. If [
Launch Application
Popup
] in the
] is
Client Software Properties
1
]
]
Application Name
2.
Enter the path of the application you
want to start. Or after clicking [
you can select the path from the list in the
[
Launch Application Selection
If the application is not displayed, click
[
Browse
tion
] in the [
] dialog box to find the application.
Limitation
Launch Application Selec-
Browse
] dialog box.
❒ Some applications, such as Paint,
may not support this function.
],
13
Page 18

1
Receiving Documents with Client Software
[
Save] Tab
1
2
File Save Path
1.
Enter the full path for saving received
documents. Or after clicking [
you can select the path from the list in the
[
Browse Folder
] dialog box.
Browse
],
Format
2.
Select the image data format for saving
received documents.
Two image data formats are used; Black
& White and Grayscale. If you select
“Text”, “Text/Photo”, or “Photo” when
scanning a document from the machine;,
the document will be saved in Black &
White image data format. If you select
“Gray Scale” when scanning a document
from the machine;, the document will be
saved in Grayscale image data format.
Note
If “Do Not Change Received Data For-
❒
mat” is selected, the document will be
received as a TIFF or JPEG file, depending on the machine’s setting.
Reference
For more information about image
data formats, see P.40 “File For-
mats”.
14
Page 19

2. WWW Browser Operations
With the WWW browser, you can view or download documents saved in folders. You can also change the settings of the folders located on ScanRouter Professional Station, or check the delivery results by viewing log information.
Reference
In this section, basic operations of the client computer are described. For a description of other features or for more information, see ScanRouter for Client
Help.
ScanRouter for Client Operations
Viewing the User List Page (To p Page)
The user list page (Top Page) can be viewed by accessing ScanRouter Professional Station with the WWW browser.
A Start the WWW browser.
B Enter the URL as follows:
http://ScanRouter Professional Station name/scanrouter/
The following can be used as ScanRouter Professional Station name.
• IP address (for example, http://192.168.15.16/scanrouter/)
• Domain name (if the domain name is “server.sc-r.com”, the URL is http:/
/server.sc-r.com/scanrouter/)
• Host name (if the host name is “server”, the URL is http://server/scan-
router/)
Note
❒ Use the host name set in ScanRouter Professional Station in Windows NT.
❒ For more information about names which can be used, ask the network ad-
ministrator.
15
Page 20

2
WWW Browser Operations
The ScanRouter Professional title page appears.
Note
❒ There is a link to the ScanRouter for Client notes on the lower left side of
this page. Each browser’s limitation and required settings are described in
these notes, therefore, click here to read them when using this application
for the first time.
❒ This page can be registered into the browser’s bookmark folder. Even if
you register other pages while using ScanRouter for Client, those pages
cannot be viewed.
C Click
The user list page (Top Page) of ScanRouter for Client appears.
On the user list page, all user folders located on ScanRouter Professional Station which can be accessed from client computers are displayed.
❒ For information about the browser operations, see the manual of the
❒ Do not use the browser’s menu or buttons while operating ScanRouter for
[
for Client
Note
browser which is being used.
Important
Client. This may cause errors to occur.
.
]
16
❒ Do not bookmark this page. Also, do not bookmark the pages concerning
ScanRouter for Client operation following this page. They will not be directly accessed even if you bookmark them.
Page 21

Quitting ScanRouter for Client
Important
❒ Do not quit ScanRouter for Client with the browser’s
cated on the upper-right corner of the page.
ScanRouter for Client Operations
button, which is lo-
X
]
[
A Click
Note
❒ The
can click on this button on any page to quit ScanRouter for Client
B After the confirmation message appears, click
The title page of ScanRouter Professional appears.
on the upper right side of the page.
[
Quit
]
button exists on other pages in addition to the user list page. You
Quit
]
[
[
OK
.
]
C Close the WWW browser.
2
17
Page 22

2
WWW Browser Operations
Viewing Documents Saved in the Folder
When viewing documents saved in the folder, you can select from three viewing
types; Calendar (monthly/weekly/daily), Image List, and Icon List.
Opening a Folder to View
A Display the user list page (Top Page) of ScanRouter for Client.
Reference
“ScanRouter for Client Operations” ⇒ P.15.
B Click the icon linked to the user folder you want to open, or click
ception Folder
If you click on the icon of a user folder, a password request dialog box appears.
C Enter the password required for the folder, and then click
For the password to enter, ask the ScanRouter Professional administrator.
If the browser displays a security warning dialog box, select the option to con-
tinue the process.
After the password has been confirmed, the documents saved in the folder
are displayed in the weekly calendar.
.
]
[
OK
[
.
]
Fax Re-
18
Page 23

Viewing Documents Saved in the Folder
4
Weekly Calendar
The documents saved in the folder are sorted chronologically by the week.
Title Area, Left Frame
6
7
8
[
User Settings
1.
Click to configure the user folder settings.
[
Quit
2.
Click to quit ScanRouter for Client. We
recommend that you quit this application
before closing the browser.
3.
Returns to the user list page (Top Page).
]
[
User List
]
]
152 3
[
Refresh List
6.
Updates the page to the latest information.
Display Mode Button
7.
Click to change the display mode.
]
8.
Click to display Help for this page.
2
[
Help
4.
Displays Help for ScanRouter for Client.
5.
Click to select a mode to display or not
display documents. is for fax documents, and is for scanned documents
from the machine. Documents are displayed when the button is blue, and if the
button is white, documents are not displayed.
]
Document Button
19
Page 24

2
4
5
WWW Browser Operations
Right Frame
2
1
3
6
[
Previous Week
1.
Click to display the previous/next week.
Date
2.
The currently displayed week. To change
the week, select the date of the week from
Year
], [
the [
then click [
Monthly Calendar Button
3.
Click to display a monthly calendar.
Daily Calendar Button
4.
Click to display a daily calendar.
[
Delete All
5.
Deletes all of the documents saved in the
folder.
Month
Go To Date
]
] [
Next Week
], and [
].
Week
] menus, and
]
1
Thumbnail
6.
The first page image of the document is
displayed as a thumbnail on the date that
the document was saved.
The documents are sorted chronologically by their save dates, and the newest
document is displayed on the top. You
can click the thumbnail to switch the display mode to the [
mode.⇒ P.26 “Document View”
Document View
20
]
Page 25

Monthly Calendar
3
8
7
1
2
5
6
Viewing Documents Saved in the Folder
43
2
Title Area
1.
The links in this area are the same in each
type of list. For more information, see
P.19 “Title Area, Left Frame”.
Left Frame
2.
The links in this area are the same in each
type of list. For more information, see
P.19 “Title Area, Left Frame”.
[
Previous Month
3.
Click to display the previous/next
month.
Date
4.
The currently displayed month. To
change the month, select the month from
Year
the [
click [
5.
Click to display a weekly calendar.
6.
Click to display a daily calendar.
7.
Deletes all of the documents saved in the
folder.
] and [
Go To Date
Weekly Calendar Button
Daily Calendar Button
[
Delete All
]
] [
Next Month
Month
] menus, and then
].
]
Thumbnail
8.
The first page image of the document is
displayed as a thumbnail on the date that
the document was saved.
The documents are sorted chronologically by their save dates, and the newest
document is displayed on the top. You
can click the thumbnail to switch the display mode to the [
mode.⇒ P.26 “Document View”
Note
Up to four thumbnails can be dis-
❒
played on the page per day. If five or
more documents are saved, the
button is displayed. Click on this button to display a weekly calendar.
Document View
]
21
Page 26

2
3
5
6
8
7
WWW Browser Operations
Daily Calendar
43
1
2
Title Area
1.
The links in this area are the same in each
type of list. For more information, see
P.19 “Title Area, Left Frame”.
Left Frame
2.
The links in this area are the same in each
type of list. For more information, see
P.19 “Title Area, Left Frame”.
[
Previous Day
3.
Click to display the previous/next date.
Date
4.
The currently displayed date. To change
the date, select the date from the [
[
Month
], and [
[
Go To Date
Weekly Calendar Button
5.
Click to display a weekly calendar.
Monthly Calendar Button
6.
Click to display a monthly calendar.
[
Delete All
7.
Deletes all of the documents saved in the
folder.
] [
Next Day
Day
] menus, and then click
].
]
]
Year
Thumbnail
8.
The first page image of the document is
displayed as a thumbnail on the hour that
the document was saved.
Documents are sorted chronologically by
their save time, and the oldest document
is displayed on the left. You can click the
thumbnail to switch the display mode to
],
Document View
the [
ment View”
Note
By default, the displayed time range is
❒
from 9:00AM to 6:00PM. If there is a
document which was saved outside of
this time range, the displayed time
range will be extended.
] mode.⇒ P.26 “Docu-
22
Page 27

Viewing Documents Saved in the Folder
Image List
All of the documents saved in the folder can be viewed in groups of 20 documents, from the newest to the oldest.
Note
❒ You can view documents which were saved on and prior to the selected date.
For example, a document saved on the 10th is not displayed if you set the date
to the 9th, however, if the 10th is selected, you can view a document saved on
the 9th.
53
4
1
2
2
Title Area
1.
The functions in this area are the same in
each type of list. For more information,
see P.19 “Title Area, Left Frame”.
Left Frame
2.
The functions in this area are the same in
each type of list. For more information,
see P.19 “Title Area, Left Frame”.
[
Previous 20
3.
If you have more than 20 documents,
click to view the other documents.
Date
4.
The date set as the default. All documents saved on and prior to that date can
be viewed. To change the date, select the
date from the [
menus, and then click [
] [
Next 20
Year
]
], [
Month
Go To Date
], and [
].
Day
3
6
7
Document Properties
5.
The information about the document is
displayed as follows:
• Thumbnail displaying the first page
image of the document
• Document Name
• Creation Date
• Sender
•Page Total
• Save Interval
The thumbnails on this page are document images reduced proportionally to a
maximum size of 128 x 128 pixels. Click
the thumbnail to switch the display mode
to the [
ument View”
]
6.
Deletes all of the documents saved in the
folder.
Document View
[
Delete All
]
] mode.⇒ P.26 “Doc-
23
Page 28

2
WWW Browser Operations
[
Delete
] [
Move
] [
7.
Deletes a document saved in the folder;
moves a document to another user folder;
downloads a document to the client computer. For more information about the
download, see P.28 “Downloading a Docu-
ment Saved in the Folder”.
Download
]
24
Page 29

Viewing Documents Saved in the Folder
Icon List
All of the documents saved in the folder can be viewed in groups of 40 icons,
from the newest to the oldest.
Note
❒ You can view the documents which were saved on and prior to the selected
date, from the newest to the oldest. For example, a document saved on the
10th is not displayed if you set the date to the 9th, however, if the 10th is selected, you can view a document saved on the 9th.
53
4
1
2
2
Title Area
1.
The functions in this area are the same in
each type of list. For more information,
see P.19 “Title Area, Left Frame”.
Left Frame
2.
The functions in this area are the same in
each type of list. For more information,
see P.19 “Title Area, Left Frame”.
[
Previous 40
3.
If you have more than 40 documents,
click to view the other documents.
Date
4.
The date set as the default. All documents saved on and prior to that date can
be viewed. To change the date, select the
date from the [
menus, and then click [
] [
Next 40
Year
]
], [
Month
Go To Date
], and [
].
Day
3
6
7
Document Properties
5.
The information about the document is
displayed as follows:
• Document Icon
• Document Name
• Creation Date
Click the icon to switch the display mode
to the [
⇒
6.
Deletes all of the documents saved in the
folder.
7.
Deletes a document saved in the folder;
moves a document to another user folder;
]
downloads a document to the client computer. For more information about the
download, see P.28 “Downloading a Docu-
ment Saved in the Folder”.
Document View
P.26 “Document View”
[
Delete All
[
Delete
] [
]
Move
] mode.
] [
Download
]
25
Page 30

2
4
6
WWW Browser Operations
Document View
On this page, a thumbnail for each page of the document is displayed. Click the
thumbnail to switch the display mode to the
Note
❒ If
[
Do Not Create
has been selected in the
]
[
Page View
[
Thumbnail
when saving the document, the thumbnail will be displayed as an image.
54
1
mode.
]
setting for the user folder
]
2
3
Title Area
1.
The functions in this area are the same in
each type of list. For more information,
see P.19 “Title Area, Left Frame”.
[
Refresh List
2.
Returns to the document list page and
updates the page.
[
Return to List
3.
Returns to the previously displayed
page.
[
Previous Document
4.
Click to sort the documents by their save
time.
]
]
] [
Next Document
26
Document Properties
5.
Information about the document is displayed as follows:
• Thumbnail of each page
• Document Name
• Creation Date
• Sender
•Page Total
• Save Interval
Click the thumbnail to switch the display
mode to the [
]
[
Delete Document
6.
[
Download
Deletes a document saved in the folder;
moves a document to another user folder;
downloads a document to the client computer. For more information about the
download, see P.28 “Downloading a Docu-
ment Saved in the Folder”.
Page View
]
] mode.
] [
Move Document
]
Page 31

Page View
4
7
The image of the page is displayed.
1
2
3
Viewing Documents Saved in the Folder
5 64
2
Title Area
1.
The functions in this area are the same in
each type of list. For more information,
see P.19 “Title Area, Left Frame”.
[
Refresh List
2.
Returns to the document list page and
updates the page.
[
Back
3.
Switches to the [
4.
Use these buttons to view a multiplepage document.
]
[
Previous Page
]
Document View
] [
Next Page
] mode.
]
[
Zoom In
5.
Click to change the reduce/enlarge ratios
to view the image; 50%, 75%, 100%, 150%,
and 200% are available.
[
Rotate Left
6.
Click to rotate the image in 90-degree increments to the left or to the right.
Page
7.
(current page number) / (total number of
pages) is displayed.
] [
Zoom Out
] [
Rotate Right
]
]
27
Page 32

WWW Browser Operations
Downloading a Document Saved in the Folder
You can download a document from a folder located on ScanRouter Professional
Station. The document is downloaded in a self-extracting file format.
2
Important
❒ The downloaded document will not be deleted from the folder located on
ScanRouter Professional Station. There is a possibility that available free disk
space will become full if documents aren’t removed from the hard disk regularly.
Downloading a Document
A Display the user list page (Top Page) of ScanRouter for Client.
B Click the folder containing the document to be downloaded.
Note
❒ With ScanRouter for Client, you can download a document from the user
folder or from the fax reception folder.
C After clicking on the user folder, enter the password and then click
[
OK
.
]
D Follow the steps below, depending on the display type.
When displaying the Calendar
28
Click the thumbnail of the document to be downloaded.
A
The display mode switches to the
Click
B
After the confirmation message appears, click
C
When displaying the Image List or the Icon List
Click
A
ed.
❒ If you want to view the document, click the thumbnail or the icon to
After the confirmation message appears, click
B
[
Download
[
Download
Note
switch the display mode to the
Download
[
.
]
, which is located next to the document to be download-
]
.
]
[
Document View
Document View
[
mode.
]
.
[
OK
]
mode, and then click
]
.
[
OK
]
Page 33

Downloading a Document Saved in the Folder
E The following steps vary depending on the browser being used. In this sec-
tion, instructions for Internet Explorer 4.0 are used as examples.
F Click
[
Save this program to disk
, and then click
]
[OK]
.
G When a message asks you to select the location to save the document, select
the folder to save the document and then click
The download starts.
Note
❒ The name given to the downloaded file is different for each browser. With
Internet Explorer 3.02, the file name is “doc*.exe” (* represents additional
characters), and with other browsers, the file name is saved as “document.exe”. If you want to continue downloading another document,
change the file name or select another folder.
❒ Do not change the extension of the file (.EXE) because the file is download-
ed in a self-extracting file format.
Viewing the Downloaded Document
The document is downloaded in a self-extracting file format. You can extract this
file and view the image using the appropriate application.
[
Save
.
]
A Double-click the downloaded file.
The
[
Target
dialog box appears.
]
2
B In the
tracted file will be saved.
The folder where the downloaded document was saved appears as the default, thus change the folder name if required.
[
Folder
C Enter the name of the extracted file (without the extension) in the
box.
The date and time this dialog box was opened appears in the
as the default, thus change the name if required. The file name consists of the
name entered in the
box, enter the folder name with the full path where the ex-
]
[
File Name
[
File Name
[
File Name
box, the page information, and the extension.
]
box
]
]
29
Page 34

WWW Browser Operations
2
D Select a file format for the extracted file from the
If the document is a Black-and-White image, the file format can be selected
from the Black & White File Format list or the TIFF Compression Format list.
If the document is a Grayscale image, the file format can be selected from the
Grayscale File Format list.
Reference
For more information about output file formats, see P.40 “File Formats”.
E Click
The file is extracted.
[
Extract
Reference
For more information about the file name for the created file, see P.31
[Target]
“
.
]
Dialog Box”.
[
Output File
group.
]
F Double-click the created file.
The image of the file is displayed after the application starts.
If the application does not start, an application which supports that file for-
mat has not been installed. Extract the file with a different file format, or install an application which supports the extracted file format.
Reasons for downloading files that are in a self-extracting file format
-
By compressing multiple pages into a single file, you can download the file in a
single step. Also, some browsers may only display a file that is in a non-compressed file format without saving it.
30
Page 35

Downloading a Document Saved in the Folder
[
Target] Dialog Box
In this dialog box, you can configure settings for the downloaded files such as
the folder where the extracted file will be saved, the file name, and the file format
to be used.
After being extracted, the downloaded file is saved with the following names,
depending on the file format set here:
• When single-page format is selected for the extracted file format:
The name entered in the
[
File Name
box followed by “_page number.exten-
]
sion”. One file will be created for each page.
• When multi-page format is selected for the extracted file format:
The name entered in the
File Name
[
box followed by “_1-total number of pag-
]
es.extension”. One file will be created for all of the pages.
1
2
2
3
4
Folder
1.
Enter the folder name where the extracted file will be saved. If the folder name is
not entered, the extracted file will be
saved in the same folder where the
downloaded document was saved.
Black & White File Format
2.
Enabled when the downloaded document is a Black & White image. Select the
file format for the extracted file.
Reference
For more information about the
file formats, see P.40 “File For-
mats”.
TIFF Compression Format
3.
Enabled when “TIFF” or “TIFF-F” is selected in the [
Note
If you select "TIFF-F" in the [
❒
White File Format
ally be saved in MH format irrespective of selecting any format.
Grayscale File Format
4.
Enabled when the downloaded document is a Grayscale image. Select the file
format for the extracted file.
Reference
Black & White File Format
] list, the file will actu-
] list.
Black &
For more information about file
formats, see P.40 “File Formats”.
31
Page 36

2
WWW Browser Operations
Changing the User Folder Settings
The user folder settings are configured when ScanRouter Professional administrator created the folder, however, you can change the document delivery settings of the folder with ScanRouter for Client.
A Display the user list page (Top page) of ScanRouter for Client.
B Click the user folder of which you want to change the settings.
C Enter the password for the folder , and then click
The calendar page appears.
D Click
[
User Settings
.
]
[
OK
.
]
E Adjust the settings appropriately.
For more information about the items on this page, see P.33 “
User]
Page”.
F When the settings are complete, click
The settings have been changed.
[
OK
.
]
[Register/Edit
32
Page 37

[
Register/Edi t User] Page
1
2
3
4
5
6
Changing the User Folder Settings
2
Delivery Type
1.
Select a document delivery type used
when the user is selected as a destination.
If you want to save the document in the
folder without delivering it, select [
In Folder
Select [
with an attachment, and [
[
Mail Address
The delivered document will not be
saved in the user folder.
2.
Select the mail type and the mail address
if [
Type
the mail address.
ScanRouter Professional supports the fol-
lowing mail types:
• Internet Mail (SMTP)
• Microsoft Mail
• Microsoft Exchange
• Lotus Notes
3.
Enter the Fax Forwarding ID (4 digits).
If a sender selects the receiver’s ID num-
ber when sending a fax, the fax is forwarded to the receiver automatically.
].
Mail Delivery
] when delivering mail
Mail Type
] settings are also required.
Mail Type, Mail Address
Mail Delivery
] list. Click [
] is selected in the [
Address Book
FAX Forwarding ID
Save
] and
Delivery
] to select
Reference
For more information about document delivery by fax, see “Setup &
Administrator Reference”.
Delivery Format
4.
Select a file format of the document from
the drop-down menu when sending an email with a document as an attachment.
Reference
For more information about file
formats, see P.40 “File Formats”.
Station Save
5.
Set the number of days for saved documents to remain in the folder. If [
ically Delete
be deleted automatically at midnight after the number of days set here have
passed.
Thumbnail
6.
Select whether or not to create a thumbnail when the document is saved. If [
Not Create
to save the document is reduced.
] is selected, the document will
] is selected, the time required
Automat-
Do
33
Page 38

2
WWW Browser Operations
34
Page 39

3. Opening a Document
Delivered by Mail
Opening a Document Delivered by Mail
If
[
Mail Delivery
the ScanRouter Professional is attached to an e-mail and is delivered to the destination address.
From the client computer, you can open the attached document using the appropriate application.
Note
❒ For information about receiving an e-mail with a file attachment, see the man-
ual of the mail software which is being used.
❒ The destination address and the image file format are set by the ScanRouter
Professional administrator when the user file is created, however, you can
change the settings using a browser on the client computer.⇒ P.32 “Changing
the User Folder Settings”
Mail Header Information
-
An E-mail is delivered with the following header information.
Subject
❖
The subject is defined for that type of document.
• A document scanned with the machine
is selected in the user folder settings, a document received with
]
Message From
A user name or a group name can be selected as the sender when scanning
a document with the machine. If no sender is selected,
blank.
• A document received by fax
Fax From
represents the TSI received from the sender’s fax. If the Fax Forward-
[
TSI
]
ing ID is selected for transmission, “++ Fax Forwarding ID” is added to the
TSI.
Note
❒ If the combination of TSI and a sender’s name is registered to the TSI ta-
ble in ScanRouter Professional, the registered name will be used for the
subject in “Fax From
From
❖
The client name registered in ScanRouter Professional.
[
TSI
Sender
[
]
]
Sender (TSI)
[
[
Sender
”.
]
remains
]
35
Page 40

3
Opening a Document Delivered by Mail
File Name of the Attached Document
-
Documents are attached to an e-mail with the following file names.
A document scanned with the machine.
❖
SCNyyyymmddhhmmssttt_n.xxx
A document received by fax
❖
FAXyyyymmddhhmmss_n.xxx
• yyyymmddhhmmss
The date (yyyy/mm/dd) and the time (hh/mm/ss) when the document was
saved in ScanRouter Professional Station.
•ttt
A unit of 1/1000 second.
•n
If received as a single page file format, this represents a page number. If received as a multi-page file format, this represents a page total. The file format
for delivery is defined in the user folder settings.
•xxx
The file format (tif, dcx, pdf, jpg).
For example, if a 2-page scanned document in single page TIFF format was received on August 1 1999, at 12:34:56:123, the document is saved in two files as
below:
• SCN19990801123456123_1.TIF
• SCN19990801123456123_2.TIF
If the same document was received in Multipage DCX format, the document is
saved in the following file.
• SCN19990801123456123_2.DCX
36
Page 41

Troubleshooting
Problem Cause / Action
4. Appendix
A connection to ScanRouter Professional Station cannot be made
when starting ScanRouter Client
Software.
Client Software takes a long time
to start.
Cannot receive documents even
though ScanRouter Client Software is running.
Make sure that ScanRouter Professional Station
and ScanRouter Client Manager are running.
If a DNS server or WINS server is not used, Client
Software may take a long time to start. Enter the IP
address of ScanRouter Professional Station in [
livery Station
Client Properties
ScanRouter Client Software is not working properly due to some causes. Exit from ScanRouter Client
Software and then restart this application.
] in the [
] window.
Log in
] tab in the [
ScanRouter
De-
37
Page 42

Appendix
Problem Cause / Action
4
The top page of ScanRouter Professional is not displayed after
entering the URL with the WWW
browser.
Check if the WWW browser is set to use a proxy
server. If not required, cancel the setting. If you
need to use a proxy server, be sure to configure the
browser so that it doesn't use the proxy server to
access the ScanRouter Professional Station.
The following is an example of a setting used with
Internet Explorer 4.0:
• If not using a proxy server, click to clear the [
cess the Internet using a proxy server
] check box.
Ac-
38
• If using a proxy server, click to select the [
pass proxy server for local (Intranet) ad dress
box. Or, click [
of ScanRouter Professional Station in the [
ceptions
] box.
Advanced
] and enter the address
] check
By-
Ex-
Page 43

Problem Cause / Action
Troubleshooting
When using the WWW browser
to open a page of ScanRouter for
Client, or when operating ScanRouter for Client, a message is
displayed stating that you cannot
make a connection due to exceeding the maximum allowed number of connections.
The maximum allowed number of simultaneous
connections to ScanRouter Professional Station is
exceeded.
Wait for a brief period, and then reperform the operation.
4
39
Page 44

Appendix
File Formats
The following file format types are available for ScanRouter Professional Station
Software and ScanRouter Client Software:
4
ScanRouter Professional Station Software
Available File
Format
Note
❒ In ScanRouter Professional Station Software, if “Text”, “Text/Photo”, or
“Photo” is selected when scanning a document from the machine, the document will be saved in Black & White image data format, and if “Gray Scale”
is selected, the document will be saved in Grayscale image data format.
❒ In case of multiple-page documents, one file will be created for each page be-
cause Multipage option is not available for Grayscale image.
TIFF, TIFF-F
❖
File formats used to save bitmap images. These formats are used for Black &
White, Grayscale, and Color images.
One file is created for single-page images in TIFF, and one file for multiplepage image in Multipage TIFF and TIFF-F.
You can select the TIFF Compression Format as MH, MR, or MMR. In general,
the order is MH, MR, MMR from high to low compression ratios (depending
on the image). The TIFF-compressed image can be restored to the original image.
TIFF-F stands for “Tiff Class F Specification” and is one of the fax image data
formats. The TIFF-F format created by ScanRouter Professional Station Software is 200dpi and the Compression Format is MH only.
TIFF, TIFF-F, DCX, PDF, JPEG TIFF, TIFF-F, PCX, BMP, DCX,
ScanRouter Client Software
PDF, JPEG
40
PCX, BMP
❖
File formats used to save bitmap images. These formats are not available for
the Multipage option.
DCX
❖
A file format to save bitmap images. This format is available for the Multipage option.
PDF
❖
This file format can be opened with the Adobe Acrobat application. Multipage images can be saved in one file with this file format.
JPEG
❖
This method can compress image data from 1/10 to 1/100 of the original size.
The compressed image cannot be restored. This method is suitable for landscape images or photo data because the compression effect tends to be less obvious with these kinds of images.
Page 45

INDEX
B
,
BMP
40
D
,
DCX
Downloading
40
,
28
E
Exit
,
Client Software
extract
,
29
7
F
File Format
File Name
, 14, 31,
Attached Document
Documents received with Client Soft-
,
10
ware
40
,
36
I
Install
,
Client Software
5
S
Settings
,
User Folder
Set up
Reception Environment of Client Soft-
,
ware
32
6
T
,
40
,
40
,
,
26
23
,
37
thumbnail
thumbnails
TIFF
TIFF-F
Troubleshooting
V
Viewing Documents
,
18
W
WWW Browser
,
15
J
,
JPEG
40
O
Opening a Document Delivered by Mail
35
P
,
PCX
PDF
,
40
40
Q
Quitting
,
ScanRouter for Client
17
R
Receiving Documents
,
8
,
41
Page 46

42 EE GB UE USA B365
Page 47

Copyright © 1999
Page 48

ScanRouter Professional OPERATING INSTRUCTIONS
Printed in Japan
UE USA B365-8501
 Loading...