

Page 1
Setup Guide
Page 2

Preface
ScanRouter V2 Professional is a delivery server that can deliver the documents read by a scanner, received by fax, or delivered from DeskTopBinder V2 to the specified destination using a network. You
can use the attached ScanRouter V2 Administration Utility to set how to process documents for each
destination and set up the delivery server.
This manual explains how to set up ScanRouter V2 Professional. For how to use ScanRouter V2 Professional, see the ScanRouter V2 Professional Management Guide and Help after installing ScanRouter V2 Professional.
Trademarks
Microsoft, Windows, Windows NT, Outlook, PowerPoint are registered trademarks of Microsoft Corporation in the United States and other countries.
Lotus is a registered trademark of Lotus Development Corporation.
Pentium is a registered trademark of Intel Corporation.
Other company names and product names are trademarks or registered trademarks of their respective
companies. They are used for explanations in this manual and the rights of their owners. Use of these
marks does not infringe on the rights of the owners.
®
• The proper name of Windows
• The proper name of Windows
95 is Microsoft® Windows® 95
®
98 is Microsoft® Windows® 98
• The proper name of Windows® Me is Microsoft® Windows® Millennium Edition
• The proper names of Windows NT® 4.0 are as follows:
Microsoft
Microsoft
• The proper names of Windows® 2000 are as follows:
Microsoft
Microsoft
®
Windows NT® Server 4.0
®
Windows NT® Workstation 4.0
®
Windows® 2000 Professional
®
Windows® 2000 Server
Page 3

TABLE OF CONTENTS
1.System Requirements
System Requirements of the Delivery Server......................................... 1
Computer ...................................................................................................... 1
Device ........................................................................................................... 2
Before Installation ......................................................................................... 2
Mailing Environment ................................................................................. 4
Mail Server .................................................................................................... 4
Mail Software (SMTP Mail) ........................................................................... 4
Mail Software (MAPI Mail)............................................................................. 5
Fax Environment ....................................................................................... 6
2.Server Setup
Account Settings....................................................................................... 8
When a Member of a Domain ....................................................................... 8
When Not a Member of a Domain................................................................. 9
Mailing Environment Setup .................................................................... 11
Installing the Mail Software (SMTP Mail) .................................................... 11
Installing the Mail Software (MAPI Mail) ..................................................... 11
Installing Service Pack and Restarting Windows........................................ 12
Setting Up Mail Client Software and Confirming Transmission................... 13
3.Fax Delivery Setup
For a Device for Fax Delivery using RS232........................................... 15
For Windows NT ......................................................................................... 15
For Windows 2000 ...................................................................................... 16
Microsoft Outlook 2000 Setup..................................................................... 16
4.ScanRouter V2 Professional Setup
Installing ScanRouter V2 Professional.................................................. 20
Initialization After Installation ................................................................ 22
Profile Settings............................................................................................ 22
Setting up the Information Service When Not Using E-mail........................ 28
Installing ScanRouter V2 Administration Utility in a Client Computer
System Requirements................................................................................. 29
Installing ScanRouter V2 Administration Utility ........................................... 29
Uninstalling ScanRouter V2 Professional............................................. 31
Uninstalling ScanRouter V2 Administration Utility.............................. 32
... 29
i
Page 4

5.After Installation
Device Setup............................................................................................ 33
Start Menu................................................................................................ 34
Basic Settings.......................................................................................... 35
Server Printer Setup................................................................................ 37
Setting up MAPI Mail/Fax Delivery Later............................................... 38
6.Appendix
Related Application Setup...................................................................... 39
Microsoft Office 2000/Office 97................................................................... 39
Troubleshooting ...................................................................................... 40
INDEX........................................................................................................ 41
ii
Page 5

1. System Requirements
To use ScanRouter V2 Professional, the computer must meet the following system requirements:
Limitation
❒ Do not install ScanRouter V2 Professional in a computer used as a database
or a mail server.
❒ You cannot connect to ScanRouter V2 Professional from the following:
•DeskTopBinder
• ScanRouter Client Software
• ScanRouter Browser
System Requirements of the Delivery Server
Computer
❖❖❖❖ Main unit
PC/AT compatible
❖❖❖❖ CPU
Pentium MMX 233 MHz or faster (Pentium III 450 MHz or faster recommended)
❖❖❖❖ Operating Systems
• Microsoft Windows NT Server 4.0 + Service Pack 5 or later
• Microsoft Windows 2000 Server + Service Pack 1 or later
Note
❒ Install ScanRouter V2 Professional in the stand-alone server. Do not install
it in the primary domain controller or backup domain controller.
❖❖❖❖ RAM
64 MB or more (for Windows NT, 128 MB or more recommended, for Windows 2000, 256 MB or more recommended)
❖❖❖❖ Hark Disk Space
At least 200 MB of disk space is required for installation.
Note
❒ In addition to the disk space for installation, reserve 500 MB or more to
save documents.
1
Page 6

1
System Requirements
❖❖❖❖ Protocols
TCP/IP protocol
Limitation
❒ Do not use ScanRouter V2 Professional in a WAN environment. Depending
on the network time-outs may occur while connected, and documents may
not be delivered normally.
❒ Do not install ScanRouter V2 Professional in a dial-up connection computer.
❒ A total of 1000 documents can be managed by ScanRouter V2 Professional.
One in-tray can receive 100 documents. If this limitation is exceeded, performance may deteriorate.
❒
The processing of some images sent to ScanRouter V2 Professional may take time.
These include grayscale images, color images, large images, and images with a
resolution of 600 dpi. If you normally use such images, we recommend that you
increase the capacity of the CPU, memory, and hard disk of your computer.
Device
A device for ScanRouter V2 Professional is necessary to deliver documents. For
information about devices, see the Readme file.
Before Installation
If you upgrade to ScanRouter V2 Professional, follow the appropriate procedure
below to install ScanRouter V2 Professional.
❖❖❖❖ Upgrade from ScanRouter V2 Lite to ScanRouter V2 Professional
Document data and destinations can be inherited. Be sure to back them up using ScanRouter V2 Lite before starting work.
See the ScanRouter V2 Lite Setup Guide for uninstallation information.
Uninstall ScanRouter V2 Lite. If you want ScanRouter V2 Professional to
A
inherit the ScanRouter V2 Lite document data and destinations, do not delete the settings data/content data during uninstallation.
Install ScanRouter V2 Professional. Make settings to inherit the data from
B
ScanRouter V2 Lite.
❖❖❖❖ Upgrade from ScanRouter to ScanRouter V2 Professional
Only the Address Book can be inherited. Document data cannot be inherited
and used.
Download all ScanRouter documents in advance using client software.
A
Back up the documents with ScanRouter.
B
Install ScanRouter V2 Professional.
C
At this time, set a new data path for use in ScanRouter V2 Professional.
Convert the Address Book, and then uninstall ScanRouter automatically.
D
Delete the data for ScanRouter if necessary.
E
2
See the manual for ScanRouter for how to delete the data.
Page 7

System Requirements of the Delivery Server
❖❖❖❖ Upgrade from ScanRouter Professional to ScanRouter V2 Professional
The Address Book and document data can be inherited.
Back up the data with ScanRouter Professional.
A
Install ScanRouter V2 Professional.
B
At this time, set a new data path for use in ScanRouter V2 Professional.
Convert the Address Book and document data, and then uninstall Scan-
C
Router automatically.
Delete the data for ScanRouter Professional if necessary.
D
See the manual for ScanRouter Professional for how to delete the data.
1
3
Page 8

System Requirements
Mailing Environment
1
SMTP or MAPI mail is used to deliver
documents or send various notifications. By e-mail, you can:
• Deliver documents read by a scanner or received by fax.
• Notify the administrator of an error or a shortage of disk capacity.
• Notify the sender that documents
were saved in the undelivered data
tray.
• Notify clients that documents were
saved in the fax in-tray.
Set up the mail server in a computer
different from the delivery server in
advance. The software required for
the delivery server depends on the
mail server. See the table below.
❖❖❖❖ When the OS of the delivery server is
Windows NT
Type of
mail server
SMTP - -
Microsoft
Exchange
Server 5.0
Microsoft
Exchange
Server 5.5
Lotus Notes
Server
Software
required for
MAPI mail
environment
Windows
Messaging
Windows
Messaging
Windows
Messaging
Mail client
software
Microsoft
Exchange
Client 5.0 or
Microsoft
Outlook
97/98/2000
Microsoft
Outlook
2000
Lotus Notes
Client
❖❖❖❖ When the OS of the delivery server is
Windows 2000
Type of
mail server
SMTP - -
Microsoft
Exchange
Server 5.0
Microsoft
Exchange
Server 5.5
Lotus Notes
Server
Note
Software
required for
MAPI mail
environment
Microsoft
Outlook
2000
Microsoft
Outlook
2000
Microsoft
Outlook
2000
Mail client
software
Microsoft
Outlook
2000
Microsoft
Outlook
2000
Lotus Notes
Client
❒ Windows Messaging can be in-
stalled from the Windows NT
CD-ROM. Other software must
be obtained separately.
Mail Server
When you want to deliver documents
by e-mail, one of the following mail
servers is required:
• POP/SMTP Server
• Microsoft Mail Server 3.51 or later
• Microsoft Exchange Server 5.0 or
later
• Lotus Notes Server 4.5 or later (except for 4.56 and 4.57)
Mail Software (SMTP Mail)
No software is particularly required.
4
Page 9

Mailing Environment
Mail Software (MAPI Mail)
The appropriate mail software for the
mail server must be installed to use
MAPI mail.
Note
❒ Setup an e-mail account for Scan-
Router V2 Professional in each
mail server.
❒ Use SMTP mail for Internet mail.
For Windows NT
❖❖❖❖ Required mail software
Windows Messaging
Note
❒ Windows Messaging can be in-
stalled from the Windows NT
CD-ROM.
For Windows 2000
❖❖❖❖ Required mail software
Microsoft Outlook 2000
1
Note
❒ Even if documents are not de-
livered by e-mail, software is
necessary for receiving faxes.
❒ Since Microsoft Outlook 2000 is
not included in this product, obtain it separately.
❖❖❖❖ Mail software required to use Lotus
Notes Server
To use the Lotus Notes Server as a
mail server, Lotus Notes Client
(Release 5.03 or later) is required in
addition to Microsoft Outlook
2000.
❖❖❖❖ Required mail software depending on
the mail server
If you want to use one of the following mail servers, the appropriate mail software for that server is
required in addition to Windows
Messaging:
Microsoft Exchange Server 5.0
A
One of the following clients is
required:
• Microsoft Exchange Client
5.0
• Microsoft Outlook 97/98/
2000
Microsoft Exchange Server 5.5
B
• Microsoft Outlook 2000
Lotus Notes Server
C
• Lotus Notes Client (Release
4.52 or later)
Note
❒ You cannot use Outlook Ex-
press.
5
Page 10

System Requirements
Fax Environment
The required fax environment depends on the device.
1
❖❖❖❖ When you use a device for delivering fax documents using a network
No environment is particularly required.
❖❖❖❖ When you use a device for delivering fax documents using RS232
The MAPI mail environment is required. The following software must be installed:
Note
❒ Set up the computer to use RS232.
❒ Install the necessary software for each OS.
• For Windows NT
Windows Messaging (the Windows NT CD-ROM)
• For Windows 2000
Microsoft Outlook 2000 (obtained separately)
Delivery of fax
documents
using a network
Software
required to
receive faxes
--
Software
required for
the MAPI mail
environment
Delivery of fax
documents
using RS232
Fax Delivery
Software
(installed from
ScanRouter V2
Professional's
CD-ROM)
For Windows
NT:Windows
Messaging
For Windows
2000:Microsoft
Outlook 2000
6
Page 11
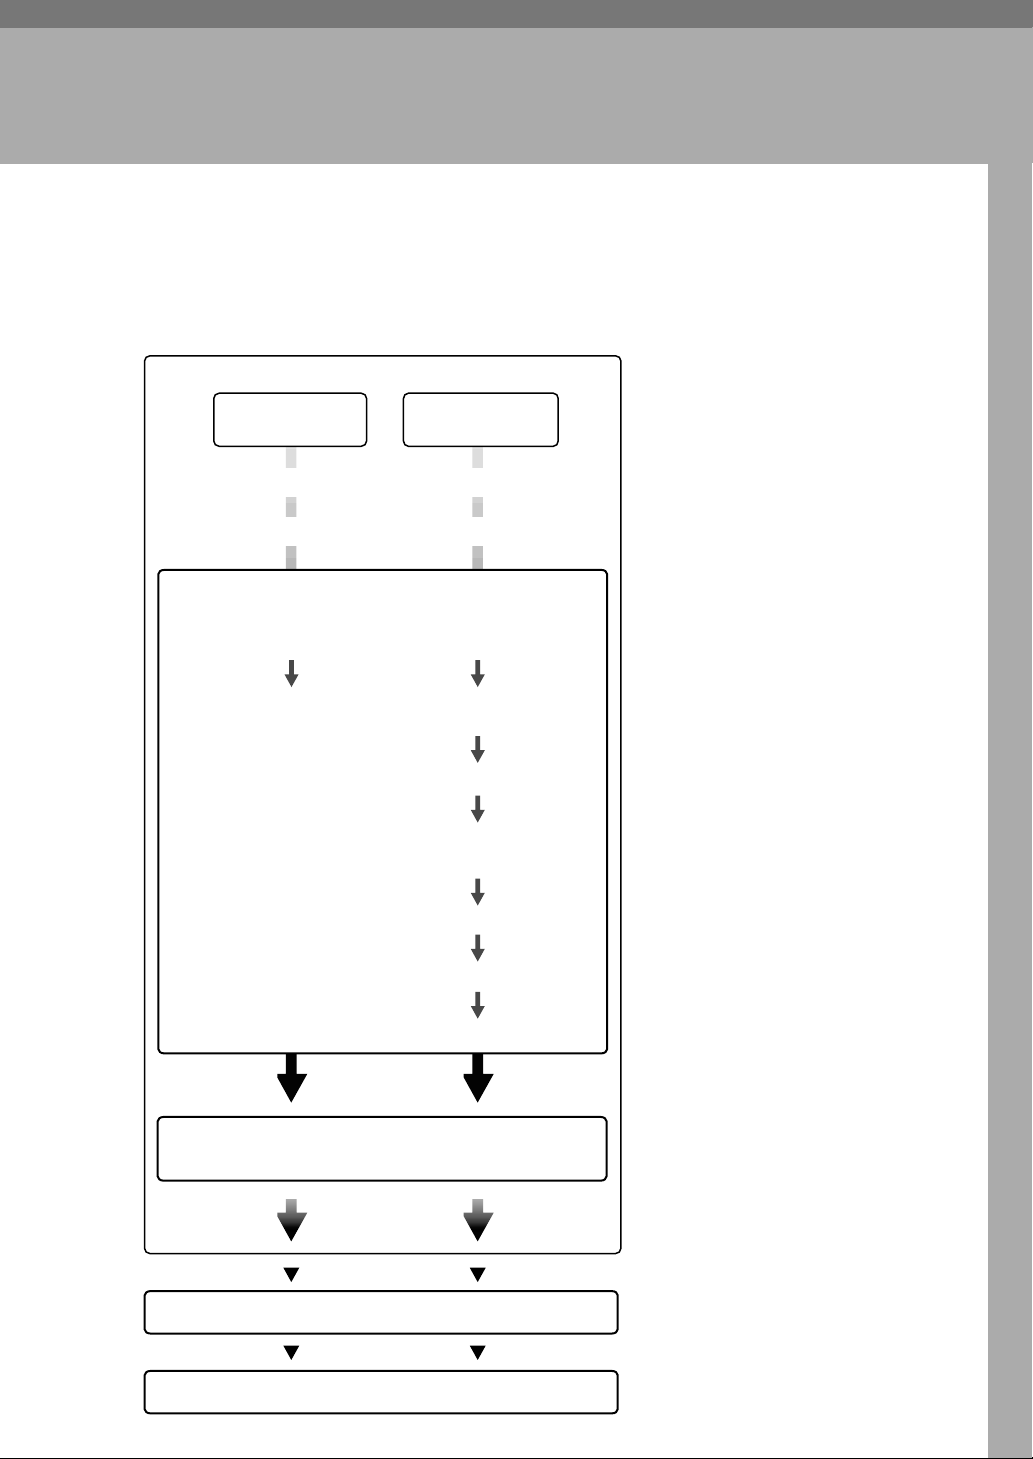
2. Server Setup
First, set up the TCP/IP environment. For information about setting up TCP/IP,
ask the network administrator.
Next, set up the computer as the delivery server, then install ScanRouter V2 Professional.
Setup flow
Server setup
Windows NT
Set up the TCP/IP network environment
Account settings
Mailing environment setup
(When you use e-mail delivery or e-mail notification)
SMTP
None
Windows 2000
MAPI
Install software for
MAPI mailing environment
Install MAPI Mail Client
Install Windows
Service Pack
Restart
Set up mail client software
Confirm transmission
Fax delivery setup
(for a device for fax delivery using RS232)
Install ScanRouter V2 Professional
Initialization after installation
7
Page 12

Server Setup
Account Settings
2
Create an account for launching ScanRouter V2 Professional in Windows
and give the Administrator permission. You can use the existing account; however, we recommend that
you create an account for ScanRouter
V2 Professional.
The procedure for setting an account
differs when a server is a member of a
domain and when it is not.
Note
❒ The account for launching Scan-
Router V2 Professional is also used
when ScanRouter V2 Professional
is installed.
When a Member of a Domain
Preparation
If you want to create a new account, ask the network administrator to add an account in the
domain server exclusively for
ScanRouter V2 Professional.
Add the account added in the domain
server to the Administrators group of
the computer in which ScanRouter V2
Professional will be installed.
Select [Administrators] from the
C
groups list, and then select [Prop-
erties] from the [User] menu.
The local group properties are displayed.
Click [Add].
D
A list of the users and groups
which belong to the domain is displayed in the [Add Users and Groups]
dialog box.
Select an launching account from
E
the [Names] box, and then click
[Add].
If the account is not displayed,
check if the correct domain server
is selected from the [List Names
From] drop-down menu.
After the launching name is add-
F
ed to the [Add Names] box, click
[OK].
Make sure that the launching ac-
G
count has been added to the [Mem-
bers] box, and click [OK].
Close User Manager.
H
For Windows 2000
For Windows NT
A
B
8
Log on as a member of the Administrators group.
Click [Start], point to [Programs],
and then select [User Manager] or
[User Manager for Domains] in the
[Administrative Tools (Common)]
folder.
Log on as a member of the Ad-
A
ministrators group.
Right-click [My Computer], and
B
then select [Manage].
Select the [Groups] folder of [Local
C
Users and Groups] from the console
tree. Select [Administrators], and
then select [Properties] from the
[Action] menu.
Page 13

Account Settings
Click [Add].
D
The [Select Users or Groups] dialog
box is displayed, and a list of the
users and groups which belong to
the domain is displayed.
From the upper box, select the
E
launching account, and then select [Add].
If the account is not displayed,
check if the correct domain server
is selected from the [Look in] dropdown menu.
After the launching account is
F
added to the lower box, click [OK].
Make sure that the launching ac-
G
count has been added to [Mem-
bers], and click [OK].
Close Computer Management.
H
Click to clear the check box for
D
[User Must Change Password at Next
Logon], and then enter the other
items.
Select [Groups].
E
Select [Administrators] from the
F
[Not member of] box, and then click
[Add].
[Administrators] is added to [Member
of].
Click [OK].
G
Click [Add] .
H
Click [Close] to close "New User".
I
Close User Manager.
J
For Windows 2000
2
When Not a Member of a Domain
Add a new account to the computer
in which ScanRouter V2 Professional
will be installed.
For Windows NT
Log on as a member of the Ad-
A
ministrators group.
Click [Start], point to [Programs],
B
and then select [User Manager]
from the [Administrative Tools (Com-
mon)] folder.
Select [New User] from the [User]
C
menu.
The [New User] dialog box is displayed.
Log on as a member of the Ad-
A
ministrators group.
Right-click [My Computer], and
B
then select [Manage].
Select the [Users] folder of [Local
C
Users and Groups] from the console
tree, and then select [New User]
from the [Action] menu.
The [New User] dialog box is displayed.
Click to clear the check box for
D
[User Must Change Password at Next
Logon], and then enter the other
items.
Select [Create], and then click
E
[Close].
Select [Groups] of [Local Users and
F
Groups] from the console tree.
9
Page 14

2
Server Setup
Click [Administrators] from the
G
window area in detailed information, and then select [Properties]
from the [Action] menu.
Click [Add].
H
The [Select Users or Groups] dialog
box is displayed, and a list of the
users and groups are displayed.
Select to highlight the launching
I
account from the upper box, and
then click [Add].
After the launching account is
J
added to the lower box, click [OK].
Make sure that the launching ac-
K
count has been added to "Members", and then click [OK].
Close Computer Management.
L
----
The WWW service must be installed
in the delivery server to access the delivery server from the client computer
using Web Document Viewer. You
can also install the WWW service after ScanRouter V2 Professional is set
up. In this case, suspend the WWW
service and delivery server in advance.
For more information, see Web Document Viewer Setup Guide.
10
Page 15

Mailing Environment Setup
SMTP or MAPI mail is used to deliver
documents or send various notifications.
Important
❒ For delivery by e-mail, obtain the
e-mail account in each mail server
exclusively for ScanRouter V2 Professional from the network administrator .
❒ Be sure to log on with a launching
account for ScanRouter V2 Professional. Documents cannot be delivered properly by e-mail with other
accounts.
Installing the Mail Software (SMTP Mail)
Separate software need not be installed. Create an e-mail account for
SMTP/POP in advance.
Installing the Mail Software (MAPI Mail)
When you want to deliver documents
by MAPI mail, the following software
must be installed.
• Software for the MAPI Mailing Environment
• MAPI Mail Client
Installing software for the MAPI mailing environment
❖❖❖❖ For Windows NT
Log on with a launching ac-
A
count.
If you log on with another account, log off and then log on
again with the launching account.
Double-click [Inbox] on the
B
desktop.
After the confirmation message
C
appears, select [Yes] and follow
the messages.
Windows Messaging is installed.
Next, install MAPI Mail Client
software.
Mailing Environment Setup
2
❖❖❖❖ For Windows 2000
Log on with a launching ac-
A
count.
If you log on with another account, log off and then log on
again with the launching account.
Install Microsoft Outlook 2000.
B
Install the required mail soft-
C
ware for the mail server to be
used.
Next, install MAPI Mail Client.
11
Page 16

2
Server Setup
Installing MAPI Mail Client software
❖❖❖❖ For Windows NT
If you want to use one of the following mail servers, the appropriate mail software for that server is
required in addition to Windows
Messaging:
Microsoft Exchange Server 5.0
A
One of the following is required:
• Microsoft Exchange Client
5.0
• Microsoft Outlook 97/98/
2000
Microsoft Exchange Server 5.5
B
• Microsoft Outlook 2000
Lotus Notes Server
C
Lotus Notes Server
C
• Lotus Notes Client (Release
5.03 or later)
Note
❒ To deliver documents using
Lotus Notes, you must install
Notes Client after the mail
software is installed. If Notes
Client is already installed,
uninstall it before installing
the mail software. In this
case, since the user ID file,
desktop.dsk, desktop5.dsk,
and names.nsf are used after
reinstallation, back them up.
Installing Service Pack and Restarting Windows
• Lotus Notes Client (Release
4.52 or later)
Note
❒ To deliver documents using
Lotus Notes, you must install
Notes Client after the mail
software is installed. If Notes
Client is already installed,
uninstall it before installing
the mail software. In this
case, since the user ID file,
desktop.dsk, desktop5.dsk,
and names.nsf are used after
reinstallation, back them up.
❖❖❖❖ For Windows 2000
Microsoft Exchange Server 5.0
A
• Microsoft Outlook 2000 (already installed in “Installing
software for the MAPI mailing
environment”
Microsoft Exchange Server 5.5
B
⇒
P.11)
Install the required Service Pack according to the OS of the delivery server, and then restart Windows.
❖❖❖❖ For Windows NT
Service Pack 5 or later
❖❖❖❖ For Windows 2000
Service Pack 1 or later
12
• Microsoft Outlook 2000 (already installed in “Installing
software for the MAPI mailing
environment”
⇒
P.11)
Page 17

Setting Up Mail Client Software and Confirming Transmission
Use the account for launching set in
⇒
“Account Settings”
Windows, and then set up the mail
software and confirm transmission.
Important
❒ When you first launch Microsoft
Outlook 2000 after it is installed,
the Outlook 2000 start-up wizard
starts. Be sure to select [Corporate or
Workgroup] in the dialog box of the
wizard where the “E-mail Service
Options” is selected.
❒ If the dialog box to check if Out-
look is set up as a default manager
is displayed, select "Yes".
P.8 to log on
Mailing Environment Setup
❖❖❖❖ When Lotus Notes is used
Install Notes Client to deliver documents by MAPI mail using Lotus
Notes, and then set up using the
following procedure.
Launch Notes Client.
A
Point to [Utility] from the [File]
B
menu, and then select [User ID].
Select [Menu].
C
Enter a password.
D
Check "Do Not Display Pass-
E
word Prompt from Other
Notes-based Program".
Check the transmission of e-mail for
each client computer.
2
Note
❒ Be sure to log on with a launching
account.
❒ When using e-mail for delivery,
specify each e-mail account that
was obtained for ScanRouter V2
Professional.
❒ The settings depend on the e-mail
program to be used. Ask the mail
administrator before making settings.
❖❖❖❖ When Internet Explorer and Outlook
2000 are used
Select [Programs] tab in [Internet
A
Options] on the control panel.
Select "Microsoft Outlook" from
B
the "E-mail" drop-down menu.
13
Page 18

2
Server Setup
14
Page 19

3. Fax Delivery Setup
For a Device for Fax Delivery using RS232
The preparations below are necessary
to deliver faxes from a device using
RS232.
The MAPI mailing environment must
be installed for fax delivery. Even if
you do not use MAPI mail, install the
MAPI mailing environment. If the
MAPI mailing environment is already installed, skip Steps 12, 14 and
after for Windows NT, and skip Steps
11, 13 and after for Windows 2000.
Note
❒ Before beginning the installation,
connect the computer to be used as
the delivery server to the device
with an RS232 cable.
For Windows NT
Turn on the main power switch of
A
the device.
Double-click [Modems] in [Control
B
Panel].
The [Install New Modem] dialog box
appears.
If the [Modems Properties] dialog
box appears, click [Add].
Click [Next].
C
The search for the modems starts.
Click [Next].
F
After the message informing you
G
that the setup of the modem has
been completed appears, click
[Finish].
The [Modems Properties] dialog box
appears.
Click [Dialing Properties].
H
When the [Location Information] dia-
I
log box appears, make the necessary settings.
If you have set up the location in
advance, the [Dialing Properties] dia-
log box appears. Change the settings if necessary.
Click [OK].
J
Click [Close] to close the [Modem
K
Properties] dialog box.
The modem installation is now
complete.
Install the MAPI mailing envi-
L
ronment.⇒⇒⇒⇒ P.11 “Installing soft-
ware for the MAPI mailing
environment”
Insert the CD-ROM into the CD-
M
ROM drive, and then install Fax
Delivery Software.
After “Standard Modem” is dis-
D
played as being detected, click
[Change].
Click ”(Standard Modem Types)”
E
in the [Manufacturers] list, click to
select “Standard 14400 bps Modem“ in the [Models] list, and then
click [OK].
Install Fax Delivery Software from
the [ScanRouter V2 Professional Set-
up] dialog box.
Install Windows NT Service Pack
N
5 or later.
Restart the computer used as the
O
delivery server.
15
Page 20

3
Fax Delivery Setup
For Windows 2000
Turn on the main power switch of
A
the device.
Double-click [Phone and Modem Op-
B
tions] in [Control Panel].
When configuring the modem for
the first time, the [Location Informa-
tion] dialog box appears. Make any
necessary settings, and then click
[OK].
Click the [Modems] tab, and then
C
click [Add].
Add/Remove Hardware Wizard
appears.
Click [Next].
D
The search for the modems starts.
Install the MAPI mailing envi-
K
ronment.⇒⇒⇒⇒ P.11 “Installing soft-
ware for the MAPI mailing
environment”
Insert the CD-ROM for this prod-
L
uct into the CD-ROM drive, and
then install Fax Delivery Software.
Install Fax Delivery Software from
the [ScanRouter V2 Professional Set-
up] dialog box.
Setup Microsoft Outlook 2000.⇒⇒⇒⇒
M
P.16 “Microsoft Outlook 2000 Set-
up”
Install Windows 2000 Service
N
Pack 1 or later.
Restart the computer used as the
O
delivery server.
After “Unknown Modem” is dis-
E
played as being detected, click
[Change].
The [Install New Modem] dialog box
appears.
Click ”(Standard Modem Types)”
F
in the [Manufacturers] list, click to
select “Standard 14400 bps Modem“ in the [Models] list, and then
click [OK].
Click [Next].
G
After the message informing you
H
that the setup of the modem is
completed appears, click [Finish].
Click the [Dialing Rules] tab, and
I
then make the necessary settings.
Click [OK].
J
The modem installation is now
complete.
Microsoft Outlook 2000 Setup
Double-click Microsoft Outlook
A
on the desktop.
After the dialog box for Outlook
B
2000 start-up wizard is displayed,
click [Next].
After the dialog box for selecting
C
“E-mail Service Options” is displayed, click [Corporate or Work-
group], and then click [Next].
Click [Manually configure information
D
services] in the Microsoft Outlook
setup wizard, and then click
[Next].
Click [Next].
E
Click [OK].
F
After the setup completion mes-
G
sage appears, click [Finish].
16
Page 21

After the message indicating that
H
default e-mail folders could not
be opened, click [OK].
After the dialog box asking
I
whether the to open the default
file system folder is displayed,
click [Yes].
After the message Outlook could
J
not start appears, click [OK].
After the dialog box asking
K
whether to use Outlook as the default manager appears, click [Yes].
After the dialog box asking
L
whether to register as an official
user appears, click [No].
Add yourself as an official user later if necessary.
For a Device for Fax Delivery using RS232
3
Close Outlook 2000.
M
17
Page 22

3
Fax Delivery Setup
18
Page 23

4. ScanRouter V2 Professional
Setup
Use the flowchart below to set up ScanRouter V2 Professional.
Server setup
Install ScanRouter V2 Professional
Windows NT
Software License Agreement
Select an installation destination
Select a folder as the installation destination
Select a data path
Select a setup type
Restart
Initialization after installation
Authorization for service access
Select a delivery type
Windows 2000
Set POP and SMTP
Set up MAPI mail
19
Page 24

ScanRouter V2 Professional Setup
Installing ScanRouter V2 Professional
4
Install ScanRouter V2 Professional according to the procedure below.
Make sure that you have finished preparing the server to be installed.
Important
❒ After installation is complete, be
sure to restart the computer. If
ScanRouter V2 Professional is
launched before restarting the
computer, it does not work normally. In this case, reinstall ScanRouter V2 Professional.
❒ If you need the document data or
Address Book when ScanRouter
V2 Lite, ScanRouter or ScanRouter
Professional is installed, back them
up.
Note
❒ To install ScanRouter V2 Profes-
sional, be sure to log on Windows
with the launching account which
was set in “Account Settings”
P.8.
❒ You cannot install ScanRouter V2
Professional in a computer in
which ScanRouter V2 Administration Utility is installed.
Insert the CD-ROM for this prod-
A
uct into the CD-ROM drive.
The [ScanRouter V2 Professional Set-
up] dialog box is displayed.
⇒
If ScanRouter is installed or Scan-
C
Router V2 Lite data can be inherited, select whether the data is
used.
When "Yes" is selected, conversion
is performed. For ScanRouter Professional, Address Book and document data will become available
for use. For ScanRouter V2 Lite
and ScanRouter, only Address
Book will become available for
ScanRouter V2 Professional.
The installation start confirmation
dialog box is displayed.
Click [Yes].
D
Click [Next] in the displayed dia-
E
log box.
Confirm the Software License
F
Agreement, and then click [Yes].
[Customer Information] appears.
Enter user information, and then
G
click [Next].
Confirm the displayed informa-
H
tion, and then click [Yes].
[Choose Destination Location] ap-
pears.
Specify the installation destina-
I
tion.
20
Click [ScanRouter V2 Professional].
B
Note
❒ If DeskTopBinder V2 or Scan-
Router V2 Link is already installed, you cannot specify the
installation destination. The
destination will be a folder common to them.
Page 25

Installing ScanRouter V2 Professional
A Enter a folder as the installa-
tion destination, and then click
[Next].
Note
❒ You cannot specify the fol-
lowing locations:
• Within Windows folder
• Root directory
• Within removal media
such as the MO disk
B Enter a data path, and then
click [Next].
You can specify a location for
saving data used in the DeskTopBinder V2 or ScanRouter V2
Link.
Note
❒ You cannot specify the fol-
lowing locations:
• Within Windows folder
• Root directory
• Within removal media
such as the MO disk
• Within a Program Files
folder
Select a setup type.
J
You can select the method of
launching the delivery server.
• Launch from Program Folder
After you log on Windows with
an account for launching the delivery server, select [Start]. Then,
select [ScanRouter V2 Administra-
tion Utility] in [ScanRouter V2 Professional](depending on the
settings during installation)
from the [Programs] folder to
launch the delivery server.
• Launch at Startup
After you log on Windows with
an account for launching the delivery server, the delivery server launches automatically.
• Run in service mode
The delivery server launches in
the background regardless of the
account used during log-on. In
this case, documents cannot be
delivered to the network drive
or delivered by MAPI mail.
Setup
type
Delivery
to the
network
drive
MAPI
mail
delivery
Fax
delivery
using
RS232
Confirm the settings.
K
Launch
from
Program
Folder
Avail-
able
Avail-
able
Avail-
able
Launch
at Startup
Avail-
able
Avail-
able
Avail-
able
Run in
service
mode
After clicking [Next], ScanRouter
V2 Professional is installed and
"ScanRouter V2 Professional installation is complete." appears.
Note
❒ If ScanRouter is installed, a mes-
sage to uninstall it appears before
"ScanRouter V2 Professional installation is complete." appears.
Click [Finish].
L
The [ScanRouter V2 Professional Set-
up] dialog box appears.
After the computer restarted, log
on as a launching account, the “En-
ter final settings for ScanRouter V2
Professional” dialog box is displayed. Proceed to the next page.
Note
❒ Before restarting the computer,
ScanRouter V2 Professional
does not work normally.
Un-
avail-
able
4
Un-
avail-
able
Un-
avail-
able
21
Page 26

ScanRouter V2 Professional Setup
Initialization After Installation
4
Click [OK] on the “Enter final set-
A
tings for ScanRouter V2 Professional” dialog box.
The ”Authentication to Access
Server Options” dialog box is dis-
played.
Enter the administrator's pass-
B
word in the [Password] and [Con-
firm Password] boxes, and click
[OK].
The [Set Delivery Type] dialog box is
displayed.
Select the delivery type of mail to
C
be used, and then click [OK].
Important
❒ If fax documents are delivered
using a device for fax delivery
using RS232 without mail, select MAPI.
When the completion message is
F
displayed, click [Finish].
The Windows setup required to
operate ScanRouter V2 Professional is changed automatically. When
the "Delivery server setup is all
complete." message appears, setup
is finished.
Profile Settings
When the [Mail] dialog box is displayed after Scan Router V2 Professional is installed, perform the
operation below to set a profile.
This is done when MAPI mail is used.
For Windows NT
Click [Add] in the [Mail] dialog box.
A
When select SMTP mail, set up
D
mail delivery. Follow the instructions of the dialog box and set
POP and SMTP.
Set the following:
• Host name of the SMTP and
POP servers
• Prepared mail account and
password for ScanRouter V2
Professional
When select MAPI mail, the [Mail]
E
dialog box is displayed. Set a profile.⇒⇒⇒⇒ P.22 “Profile Settings”
Note
❒ If another profile has already
been created, the profile setting
dialog box is displayed. In this
case, select [Show Profiles].
The setup wizard is displayed. If
the [MS Exchange setting property],
[Microsoft Outlook 2000] or [Windows
Messaging] dialog box is displayed,
click [Show Properties]. The [Mail] di-
alog box appears.
Select the e-mail and fax services
B
to be used with ScanRouter V2
Professional.
Select all services to be used.
Important
❒ Be sure to perform the above in
the [Use the following information
services] box. Do not select the
[Manually configure information
services] check box.
22
Page 27

Initialization After Installation
Note
❒ If documents received by fax
are then delivered, select [Scan-
Router FAX].
❒ The e-mail programs usable in
ScanRouter V2 Professional are
displayed as follows:
• Microsoft Exchange Server…
Microsoft Exchange Server
• Lotus Notes Server…Lotus
Notes Mail
❒ For devices for fax delivery via
RS232 without mail, ⇒ P.28
“Setting up the Information Service When Not Using E-mail”. Af-
ter setting, proceed to
Click [Next].
C
Note
❒ If another profile has already
been created, instructions to enter a new profile name appear. In
this case, enter "ScanRouterV2
Profile" in the [Profile Name] box,
and then click [Next]. You can use
uppercase and lowercase letters
to enter "ScanRouterV2 Profile",
but a space is necessary between
“ScanRouterV2” and “Profile”.
The setting dialog box is displayed.
D
Make the necessary settings.
Specify the account obtained for
ScanRouter V2 Professional for email accounts. Follow the displayed instructions to set up the
mail server and password.
The settings depend on the mailing
environment. Ask the mail administrator before making settings.
After setup, a profile is saved automatically. The profile name is usually [
Windows Messaging Settings
may be [
depending on the environment.
Microsoft Exchange Settings
.
K
], but
Note
❒ If "ScanRouterV2 Profile" is en-
tered in Step
"ScanRouterV2 Profile" is
saved. In this case, proceed to
Step
Click [Copy].
E
Enter "ScanRouterV2 Profile" in
F
the [New Profile Name] box, and
click [OK].
You can use uppercase and lowercase letters to enter "ScanRouterV2
Profile", but a space is necessary
between “ScanRouterV2” and
“Profile”.
"ScanRouterV2 Profile" is newly
created.
Add "Personal Address Book" ser-
G
vice to "ScanRouterV2 Profile".
A
Click to highlight "ScanRouterV2
Profile", and then click [
If “Personal Address Book” is
already added, proceed to
Step
B Click [Add].
C Click to highlight "Personal
Address Book" in [Available in-
formation services], and then
click [OK].
D After the "Personal Address
Book" dialog box is displayed,
click [OK].
E Confirm that "Personal Ad-
dress Book" has been added to
[The following information services
are set up in this profile] in the
[Services] tab.
Add “Personal Folders” service to
H
“ScanRouterV2 Profile”.
A
]
Click to highlight "ScanRouterV2
Profile", and click [
If “Personal Folders” is already
added, proceed to Step
.
G
.
H
, a profile named
B
Properties
Properties
].
.
I
4
].
23
Page 28

ScanRouter V2 Professional Setup
4
B Click [Add].
C Click to highlight [Personal
Folders] in [Available information
services], and then click [OK].
D Specify the location and name
of the Personal Folders, and
then click [Open].
For example, set "Rds.pst" as the
file name when the location is
being displayed.
E After the [Personal Folders] dia-
log box is displayed, click [OK].
F Confirm that "Personal Fold-
ers" has been added to [The fol-
lowing information services are set
up in this profile] in the [Services]
tab.
Click the [Delivery] tab.
I
Click [Personal Folders] on the
J
drop-down menu in the [Deliver
new mail to the following location] box.
If [ScanRouter FAX] is selected in
K
Step
low.
A Click the [Services] tab.
B Click to highlight [ScanRouter
C Click the [Modem] tab.
, perform the procedure be-
B
FAX] in the [The following information services are set up in this profile] box, and then click
[Properties].
G Click [Advanced].
H Click to select [Use Class2 if avail-
able].
I Click [OK] to close the [Ad-
vanced] dialog box.
J After the message to inform
you that the mail software
must be restarted to apply the
changes appears, click [OK].
K Click [OK] to close the Proper-
ties of the modem.
L Click [OK] to close the Proper-
ties of ScanRouter FAX.
M Click the [Delivery] tab.
N Click to highlight [ScanRouter
FAX Transport] in the [Recipient
addresses are processed by these
information services in the following
order] box. Then, use [↑↑↑↑] to
move it to the top of the box.
Set the order for the names in the
L
address list on the [Addressing]
tab.
The list is used to confirm a name
for delivery.
Click [OK] to close the Properties
M
of ScanRouterV2 Profile.
Select [ScanRouterV2 Profile] on the
N
drop-down menu of the [When
starting Windows Messaging, use this
profile] box.
24
D Confirm that the [Let other peo-
ple on the network use my modem to
send faxes] check box is not se-
lected.
If it is selected, click to clear the
check box.
E Click [Properties].
F Click [Answer after] in the [An-
swer mode]dialog box.
You may set the number of calls
to any number, but about three
times is standard.
Note
❒ [When starting Microsoft Exchange,
use this profile] dialog box or
[When starting Microsoft Outlook,
use this profile] dialog box may
appear depending on the state
of the computer.
Page 29

Initialization After Installation
Click [Close] to close the [Mail] dia-
O
log box.
The settings for after installation
are finished. Now you can use
ScanRouter V2 Professional.
Note
❒ To confirm that the profile has
been set properly, before operating ScanRouter V2 Professional, use Windows Messaging
to send test mail to each mail client.
For Windows 2000
Click [Add] in the [Mail] dialog box.
A
The setup wizard is displayed. If
the [MS Exchange setting property],
[Microsoft Outlook 2000] or [Windows
Messaging] dialog box is displayed,
click [Show Properties]. The [Mail] di-
alog box appears.
Select the e-mail and fax services
B
to be used with ScanRouter V2
Professional.
Select all services to be used.
Important
❒ Be sure to perform the above in
the [Use the following information
services] box. Do not select the
[Manually configure information
services] check box.
Note
❒ If documents received by fax
are then delivered, select [Scan-
Router FAX].
• Microsoft Exchange Server…
Microsoft Exchange Server
• Lotus Notes Server…Lotus
Notes Mail
❒ [Microsoft Mail] is not displayed.
It will be set in Step
❒ For devices for fax delivery via
RS232 without mail, ⇒ P.28
“Setting up the Information Service When Not Using E-mail”. Af-
ter setting, proceed to
Click [Next].
C
Note
❒ If another profile has already
been created, instructions to enter a new profile name appear. In
this case, enter "ScanRouterV2
Profile" in the [Profile Name] box,
and then click [Next]. You can use
uppercase and lowercase letters
to enter "ScanRouterV2 Profile",
but a space is necessary between
“ScanRouterV2” and “Profile”.
The setting dialog box is dis-
D
played. Make the necessary settings.
Specify the account obtained for
ScanRouter V2 Professional for email accounts. Follow the displayed instructions to set up the
mail server and password.
The settings depend on the mailing
environment. Ask the mail administrator before making settings.
After setup, a profile is saved automatically. The profile name is usually [MS Exchange Settings].
.
I
.
L
4
❒ For mail delivery or notifica-
tion, select a service according
to the mail server to be used.
The e-mail usable in ScanRouter
V2 Professional is displayed as
follows:
Note
❒ If "ScanRouterV2 Profile" is en-
tered in
"ScanRouterV2 Profile" is
saved. In this case, proceed to
Step
G
, a profile named
B
.
25
Page 30

ScanRouter V2 Professional Setup
4
Click [Copy].
E
Enter "ScanRouterV2 Profile" in
F
the [New Profile Name] box, and
click [OK].
You can use uppercase and lowercase letters to enter "ScanRouterV2
Profile", but a space is necessary
between “ScanRouterV2” and
“Profile”.
"ScanRouterV2 Profile" is newly
created.
Add "Personal Address Book"
G
service to "ScanRouterV2 Profile".
A
Click to highlight "ScanRouterV2
Profile", and then click [
If “Personal Address Book” is
already added, proceed to
Step
.
H
B Click [Add].
C Click to highlight "Personal
Address Book", and then click
[OK].
D After the "Personal Address
Book" dialog box is displayed,
click [OK].
E Confirm that "Personal Ad-
dress Book" has been added to
[The following information services
are set up in this profile] in the
[Services] tab.
Add “Personal Folders” service to
H
“ScanRouterV2 Profile”.
A
Click to highlight "ScanRouterV2
Profile", and then click [
If “Personal Folders” is already
added, proceed to Step
B Click [Add].
Properties
Properties
.
I
C Click to highlight [Personal
Folders] in [Available information
services]dialog box, and then
click[OK].
D Specify the location and name
of the Personal Folders, and
then click [Open].
For example, set "Rds.pst" as the
file name when the location is
being displayed.
E After the [Personal Folders] dia-
log box is displayed, click [OK].
F Confirm that "Personal Fold-
ers" has been added to [The fol-
lowing information services are set
up in this profile] in the [Services]
].
].
tab.
If documents are delivered by
I
"Microsoft Mail", add "Microsoft
Mail" service.
Note
❒ If "Microsoft Mail" is not used,
proceed to Step
A Click [Add] in the [Services] tab.
B Click to highlight [Microsoft
Mail] in [Available information services], and then click [OK].
C Follow the displayed instruc-
tions.
After the "Microsoft Mail" setup
dialog box is displayed, make
the necessary settings.
After making settings, the Properties of ScanRouterV2 Profile
will return.
D Confirm that "Microsoft Mail"
has been added to [The following
information services are set up in
this profile] in the [Services] tab.
Click the [Delivery] tab.
J
.
J
26
Page 31

Initialization After Installation
Click [Personal Folders] on the
K
drop-down menu in the [Deliver
new mail to the following location] box.
If there is no [Personal Folders] on
the drop-down menu, add [Person-
al Folders] in the [Services] tab.
If [ScanRouter FAX] is selected in
L
Step
low.
❒ If [ScanRouter FAX] is not select-
A Click the [Services] tab.
B Click to highlight [ScanRouter
C Click the [Modem] tab.
D Confirm that the [Let other peo-
E Click [Properties].
F Click [Answer after] in [Answer
G Click [Advanced].
H Click to select [Use Class2 if avail-
, perform the procedure be-
B
Note
ed, proceed to Step
FAX] in the [The following information services are set up in this profile] box, and then click
[Properties].
ple on the network use my modem to
send faxes] check box is not se-
lected. If it is selected, click to
clear the check box.
mode]dialog box.
You may set the number of calls
to any number, but about three
times is standard.
able].
.
O
L Click [OK] to close the Proper-
ties of ScanRouter FAX.
M Click the [Delivery] tab.
N Click to highlight [ScanRouter
FAX Transport] in the [Recipient
addresses are processed by these
information services in the following
order] box. Then, use [↑↑↑↑] to
move it to the top of the box.
Set the order for the names in the
M
address list on the [Addressing]
tab.
The list is used to confirm a name
for delivery.
Click [OK] to close the Properties
N
of ScanRouterV2 Profile.
Click [ScanRouterV2 Profile] on the
O
drop-down menu in the [When
starting Microsoft Outlook, use this
profile] box.
Click [Close] to close the [Mail] dia-
P
log box.
The settings for after installation
are finished. Now you can use
ScanRouter V2 Professional.
Note
❒ To confirm that the profile has
been set properly, before operating ScanRouter V2 Professional, use Microsoft Outlook
2000 to send test mail to each
mail client.
4
I Click [OK] to close the [Ad-
vanced] dialog box.
J After the message to inform
you that the mail software
must be restarted to apply the
changes appears, click [OK].
K Click [OK] to close the Proper-
ties of the modem.
27
Page 32

4
ScanRouter V2 Professional Setup
Setting up the Information Service When Not Using E-mail
If e-mail will not be used in ScanRouter V2 Professional, use the following
procedure and add only [Personal Ad-
dress Book] and [Personal Folders].
Click [Manually configure information
A
services] in the Windows Messag-
ing setup wizard(for Windows
NT)or Microsoft Outlook setup
wizard(for Windows 2000), and
then click [Next].
Enter "ScanRouterV2 Profile" in
B
the [Profile Name] box, and then
click [Next].
You can use uppercase and lowercase letters for "ScanRouterV2 Profile", but a space is necessary
between “ScanRouterV2” and
“Profile”.
Click [Add].
C
Click to highlight [Personal Address
D
Book] in [Available information services], and then click [OK].
After the [Personal Address Book]
E
dialog box is displayed, and then
click [OK].
Click [Add]. Click to highlight [Per-
F
sonal Folders] in [Available information services], and then click [OK].
Specify the location and name of
G
the Personal Folders, and click
[Open].
For example, set "Rds.pst" as the
file name when the location is being displayed.
After the [Personal Folders] dialog
H
box or [Create Microsoft Personal
Folders] dialog box is displayed,
and then click [OK].
Click [OK].
I
28
Click [Finish].
J
Page 33

Installing ScanRouter V2 Administration Utility in a Client Computer
Installing ScanRouter V2 Administration
Utility in a Client Computer
You can install the ScanRouter V2
Administration Utility in a client
computer to remotely manage the delivery server.
Installing ScanRouter V2 Administration Utility
Limitation
❒ If the MAPI mailing environment
is setup, you cannot suspend and
resume service remotely with the
ScanRouter V2 Administration
Utility. Suspend and resume service from the ScanRouter V2 Administration Utility installed in the
delivery server.
System Requirements
❖❖❖❖ Operating Systems
• Microsoft Windows 95 (OSR2 or
later)
• Microsoft Windows 98
• Microsoft Windows 98 Second
Edition
• Microsoft Windows Me
• Microsoft Windows NT Work-
station 4.0 + Service Pack 5 or
later
• Microsoft Windows NT Server
4.0 + Service Pack 5 or later
• Microsoft Windows 2000 Professional
• Microsoft Windows 2000 Server
Note
❒ Do not install the ScanRouter V2
Administration Utility in the dialup connection computer if possible.
❒ You cannot separately install the
ScanRouter V2 Administration
Utility in a delivery server in
which ScanRouter V2 Professional
is already installed.
Insert the CD-ROM for this prod-
A
uct into the CD-ROM drive. Display the [ScanRouter V2 Professional
Setup] dialog box of ScanRouter
V2 Professional.
Click [Administration Utility] of
B
ScanRouter V2 Professional.
A confirmation message about
starting installation appears.
Click [Yes].
C
Click [Next] in the displayed dia-
D
log box.
Confirm the Software License
E
Agreement, and then click [Yes].
The [Choose Destination Location] di-
alog box appears.
4
29
Page 34

ScanRouter V2 Professional Setup
Enter a folder as the installation
F
destination, and then click [Next].
Installation will start.
Note
❒ If DeskTopBinder V2 or Scan-
Router V2 Link is already installed, you cannot specify the
installation destination. The
destination will be a folder common to them. The [Select Installa-
tion Destination] dialog box does
not appear.
4
❒ You cannot specify the follow-
ing destinations:
• Within a Windows folder
• Root directory
• Within removal media such
as the MO disk
Click [Finish].
G
The [ScanRouter V2 Professional Set-
up] dialog box appears.
Click [Exit Setup].
H
30
Page 35

Uninstalling ScanRouter V2 Professional
Uninstalling ScanRouter V2 Professional
This section explains how to uninstall
ScanRouter V2 Professional.
Important
❒ Before uninstallation, be sure to
back up the system and other information.
Note
❒ ScanRouter V2 Professional cannot
be uninstalled when devices are
configured in [Set I/O Device]. To
uninstall ScanRouter V2 Professional, delete all the devices set in
[Set I/O Device] first.
Suspend the delivery server us-
A
ing the ScanRouter V2 Administration Utility.
Close the ScanRouter V2 Admin-
B
istration Utility.
Select ScanRouter V2 Profession-
C
al in [Add/Remove Application] on
the control panel, and then click
[Add/Remove] or [Change/Remove].
The [InstallShield Wizard] dialog box
appears.
Click [Remove], and then click
D
[Next].
A confirmation dialog box appears.
Click [OK].
E
Note
❒ If you are asked to delete a file
that may be shared with other
programs, click [No].
❒ If a locked file is displayed, click
[Remove after Restart].
Click [Finish].
G
Important
❒ If the setting information is not
kept, document data and destination setting are all deleted
and cannot be used with the
next installation.
Note
❒ If only ScanRouter V2 Profes-
sional is installed in the computer, you can delete the
"RDCab" folder (or the folder
specified as the data path)⇒
P.20 “Installing ScanRouter V2
Professional”. If the data path is
shared with DeskTopBinder V2
or ScanRouter V2 Link, do not
delete the "RDCab" folder(or
the folder specified as the data
path). If you want to delete the
ScanRouter V2 Professional data, delete only the "DR" and
"DRTmp" folders in the "RDCab" folder(or the folder specified as the data path).
4
Select whether the setting infor-
F
mation is kept.
ScanRouter V2 Professional is uninstalled and the [Exit of Mainte-
nance] dialog box appears.
31
Page 36

4
ScanRouter V2 Professional Setup
Uninstalling ScanRouter V2 Administration Utility
This section explains how to uninstall
the ScanRouter V2 Administration
Utility when it is installed in the client
computer.
Close the ScanRouter V2 Admin-
A
istration Utility.
Select [Add/Remove Application] on
B
the control panel. The [Add/Re-
move Application] dialog box ap-
pears. Select ScanRouter V2
Administration Utility, and then
click [Add/Remove] or [Change/Re-
move].
The [InstallShield Wizard] dialog box
appears.
Click [Remove], and then click
C
[Next].
The confirmation dialog box appears.
Click [OK].
D
ScanRouter V2 Administration
Utility is uninstalled and the [Exit
of Maintenance] dialog box appears.
Note
❒ If you are asked to delete a file
that may be shared with other
programs, click [No].
❒ If a locked file is displayed, se-
lect [Remove after Restart].
Select [Finish].
E
32
Page 37

5. After Installation
Device Setup
Make the delivery server settings on
the operation panel of a device. For
more information, see the operating
instructions for the device to be used.
33
Page 38

5
After Installation
Start Menu
Click [Start], point to [Programs], and
then point to the [ScanRouter V2 Profes-
sional] folder. The items below ap-
pear.
• ScanRouter V2 Administration Utility
Launches the ScanRouter V2 Administration Utility.
• Delivery server(only for a server)
This is only displayed on the start
menu when [Launch From Program
Folder] is selected as the launch
method during installation. Even if
you don't launch the ScanRouter
V2 Administration Utility, you can
start the service of the delivery
server.
• Readme.
Displays product information.
• Management Guide
Displays the Management Guide.
This manual explains the operation of the delivery server.
Note
❒ To close the delivery server, select
[Suspend Services] from the [Server]
menu of the ScanRouter V2 Administration Utility.
34
Page 39

Basic Settings
Basic Settings
To operate the delivery server, the
“Administrator's password”, “destination”, “and “device” must at least
be set. Turn on the power of the device in advance. Some devices do not
require settings. For more information, see the [Management Guide], [Re-
adme], or Help. To display Help,
select [Help] in the operation dialog
box.
Launch the ScanRouter V2 Ad-
A
ministration Utility.
A Click [Start], point to [Programs],
and then select [ScanRouter V2
Administration Utility] from the
[ScanRouter V2] folder.
The ScanRouter V2 Administration Utility launches and a dialog box for entering a password
appears.
B Since the password is not set
immediately after installation,
click [OK] without entering
anything.
The [ScanRouter V2 Administration
Utility] dialog box appears.
Set the administrator's password.
B
Set the administrator's password
in the ScanRouter V2 Administration Utility so that the settings are
not changed by mistake.
A Select [Set Administrator] from
the [Server] menu.
The [Set Administrator] dialog
box appears.
B Enter a new password(using
up to eight alphanumeric characters) in the [Password] and the
[Confirm Password] boxes.
Since the lower [Password] box is
used for confirmation, enter the
same password as the upper
password.
C Click [OK].
The password has been set.
Set up a device if necessary.
C
A Select [Set I/O Device] from the
[Server] menu.
The [Set I/O Device] dialog box
appears.
B Select [Add].
The [Add I/O Device] dialog box
appears.
C Enter the host name or IP ad-
dress of the device to be used
for delivery, and select [OK].
Note
❒ You can select [Browse] to se-
lect the device.
The selected device is displayed
in the [I/O Device List].
D Select [OK].
Add a user as a destination.
D
Documents are delivered and
saved for each in-tray. After the
user is added in the ScanRouter V2
Administration Utility, an in-tray
for the user is created, and you can
use it to specify the destination of
documents.
5
Note
❒ If the same document is deliv-
ered to multiple users, you
should create a group.
35
Page 40

After Installation
5
Limitation
❒ The combined number of users
and groups is limited to 200.
A Open the [Delivery Server]tree on
the left side of the window,
and then select [Destination] in
[Delivery Table].
The [Operations] menu appears
on the menu bar.
B Select [Add New Destination]-[Us-
er] on the [Operations] menu.
The [Add New Destination-User]
dialog box appears.
C Enter an in-tray name in the
[Name] box.
D Set a delivery type.
Select the delivery type from
A
the [Delivery type selection:]
drop-down menu, and then
click [Add].
• In-Tray save
Received documents are
saved in the in-tray. The client computer can automatically receive them using
ScanRouter V2 Link.
• Save as Windows file
Delivered documents are
saved in the specified location as a file. Multiple locations can be specified.
• Send by SMTP mail
Documents are delivered by
SMTP mail. You can attach
documents and document
links to e-mail for delivery
and notify client of documents sent to the in-tray.
E Set a password if necessary.
Select [Set/Change Password].
A
Enter a password(using up
B
to eight alphanumeric characters) in the [Password:] and
the [Confirm password:]boxes.
Click [OK].
C
F Click [OK].
G The user is added to [Destination
List].
H Repeat the operation from Step
B to add another user.
Launch the delivery server.
E
Perform the operation below only
if you launch the delivery server
manually when the type of launching the delivery service is set to
such as when [Program Folder] is set
as the type of launch during installation.
A Select [Resume Services] from
the [Server] menu.
The delivery server starts.
36
Note
❒ Only a folder, which can
be confirmed by the delivery server can be specified
as the save destination.
• Send by MAPI mail
Documents are delivered by
MAPI mail. You can attach
documents and document
links to e-mail for delivery
and notify client of documents sent to the in-tray.
Page 41

Server Printer Setup
From the client computer(using
DeskTopBinder V2 or Web Document Viewer and so on), you can
print data in the delivery server using
a printer connected to the delivery
server.
Note
❒ If the application that the print
data was created with is not installed in the delivery server, server printing may not be possible.
Install a printer driver that sup-
A
ports RPCS in the delivery server.
Note
❒ For information about printer
connection and printer driver
setup, see the operating instructions that come with the printer.
Server Printer Setup
5
❒ For information about that sup-
port connectable printers for
RPCS, see the Readme file or the
Compatible Device List.
37
Page 42

5
After Installation
Setting up MAPI Mail/Fax Delivery Later
Follow the procedure below to set up
MAPI mail delivery or fax delivery
using RS232 after ScanRouter V2 Professional is set up.
Set up MAPI mail.
A
Reference
⇒ P.11 “Mailing Environment
Setup”
Launch the ScanRouter V2 Ad-
B
ministration Utility, and then select [Set Delivery Types] on the
[Server] menu to reset the delivery
type.
For fax delivery using RS232, set
C
Fax Received.
Reference
⇒ P.15 “Fax Delivery Setup”
38
Page 43

6. Appendix
Related Application Setup
Install and set up the application used
for server printing.
Important
❒ When installing the applications
below under Windows NT or Windows 2000, be sure to log on Windows with an account for
launching ScanRouter V2 Professional .
❒ Before using ScanRouter V2 Pro-
fessional, be sure to launch each installed application to confirm that
the print function works normally.
Note
❒ If the application that the print
data was created with is not installed in the delivery server, server printing may not be possible.
Microsoft Office 2000/Office 97
Install the application from the
A
CD-ROMs for Microsoft Office
2000/Office 97.
For these applications, make the
settings as below in each dialog
box.
After a dialog box prompting to
B
restart appears, click [Yes].
The computer restarts.
After restart, log on with an ac-
C
count for launching ScanRouter
V2 Professional.
Launch the installed application.
D
Set as below for PowerPoint 2000.
A Launch PowerPoint 2000.
B Click [Option] from the [Tool]
menu.
C Click to clear the [dialog box at
Launching] check box and [New
Slide] dialog box check box in
[Set View] of the [View] tag, and
click [OK].
Important
❒ Be sure to launch the in-
stalled application(Excel/
PowerPoint/Word) once before using ScanRouter V2
Professional.
• Select [Microsoft Internet Explorer
5.0 - Standard] in the [Microsoft In-
ternet Explorer 5.0 Upgrade] dialog
box.
• Select [Execute All from My Com-
puter] from [Microsoft Office] in
the [Select Function] dialog box.
• Select [Standard] in the [Change
Option] dialog box.
39
Page 44

Appendix
Troubleshooting
Problem Cause/Action
6
When the following
message appears:
"The specified computer name or IP address is not valid.
Please specify another name or address".
When the password
is entered in the [Authorization for Server
Access] dialog box,
"The password may
be wrong. If the password is correct, press
[Cancel] in the [Enter
Password] dialog box
and close." appears.
MAPI mail is unavailable when making a destination
setting with ScanRouter V2 Administration Utility.
The "Profile is invalid." message appears when
launching.
Check if the power of the server is turned on, the network cable is connected properly, and the IP address is specified correctly.
The password for the Windows logon account for launching the delivery server may be wrong or the account rights may have changed.
Make sure that the password and account rights are correct, and then
reenter the password. After the password is entered, restart the computer.
The MAPI mailing environment may not be set up properly. If [Run in
service mode] is set as the setup type, documents cannot be delivered
by MAPI mail.
The profile name created for sending by MAPI mail may not be
[ScanRouterV2 Profile]. Follow the procedure below to create a profile.
1. Open [Control Panel], and then click [Mail].
2.Click [Show Profiles], and then create a profile with a name of
[ScanRouterV2 Profile].
40
Page 45

INDEX
A
Account for launching
D
,
,
20
8
Data path
Domain
F
Fax delivery
,
38
I
Installation
Installation destination
,
20
L
Launch mode
,
21
,
8
, 20,
30
M
MAPI mail
,
38
S
ScanRouter V2 Administration Utility
,
Setup
Setup type
Start menu
System Requirements
20
,
,
21
33
,
1
T
Troubleshooting
,
40
U
,
2
, 31,
32
Uninstallation
Upgrade
,
33
41
Page 46

42
UE USA B426
Page 47

Part of illustrations or explanations in this guide may differ from your product due to improvement or
change in the product.
Notes:
1. The contents of this documents are subject to change without notice.
2. No part of this document may be duplicated, replicated, reproduced in any form, modified or quoted
without prior consent of the supplier.
3. THE SUPPLIER SHALL NOT BE LIABLE FOR THE RESULT OF THE OPERATION OF THIS
SOFTWARE OR THE USE OF THIS DOCUMENT.
Important
❒ It is possible that any document or data stored in the PC will be damaged or lost by user
error during operation or software error. Be sure to back up of all important data beforehand.
❒ Do not remove or insert any disk while operating this software.
❒ THE SUPPLIER SHALL NOT BE LIABLE TO YOU FOR DAMAGES OR LOSS OF ANY
DOCUMENT OR DATA PRODUCED BY USING THIS SOFTWARE.
❒ THE SUPPLIER SHALL NOT BE LIABLE TO YOU FOR ANY CONSEQUENTIAL, INCI-
DENTAL OR INDIRECT DAMAGES (INCLUDING, BUT NOT LIMITED TO, DAMAGES
FOR LOSS OF PROFITS, BUSINESS INTERRUPTION OR LOSS OF BUSINESS INFORMATION, AND THE LIKE) CAUSED BY FAILURE OF THIS SOFTWARE OR LOSS OF DOCUMENTS OR DATA, NOR FOR ANY OTHER DAMAGES ARISING OUT OF THE USE OF
THIS SOFTWARE, IF THE SUPPLIER HAS BEEN ADVISED OF THE POSSIBILITY OF
SUCH DAMAGES.
Copyright © 2001
Page 48

ScanRouter V2 Professional Setup Guide
UE USA B426-8521
 Loading...