

Page 1
Management Guide
Page 2

Preface
This guide explains how to use ScanRouter V2 Lite. For information about setting up ScanRouter V2
Lite, see the ScanRouter V2 Lite Setup Guide. For information about using ScanRouter V2 Lite, see
ScanRouter V2 Administration Utility Help.
Network devices used in the illustrations of this guide are examples. They may differ from actual network devices.
Trademarks
Microsoft, Windows, WindowsNT are registered trademarks of Microsoft Corporation, in the United
States and other countries.
Other company names and product names are trademarks or registered trademarks of their respective
companies. They are used for explanations in this guide and the right of their owner only. This use does
not infringe on the right of the owner.
®
• The proper name of Windows
98 is Microsoft® Windows® 98
• The proper name of Windows® 95 is Microsoft® Windows® 95
®
• The proper name of Windows NT
Microsoft
Microsoft
®
Windows NT® Server 4.0
®
Windows NT® Workstation 4.0
4.0 are as follows:
Page 3

TABLE OF CONTENTS
1.Overview of ScanRouter V2 Lite
ScanRouter V2 Lite Delivery System....................................................... 1
Delivery System Layout ................................................................................ 1
Features of the Delivery System ................................................................... 2
2.Using the Delivery System
Network Administrator Duties.................................................................. 5
Before You Start............................................................................................ 5
Launching/Quitting the Delivery Server......................................................... 6
Daily Operations............................................................................................ 7
Other Operations........................................................................................... 8
3.Using ScanRouter V2 Administration Utility
ScanRouter V2 Administration Utility.................................................... 11
ScanRouter V2 Administration Utility Features ........................................... 11
Launching ScanRouter V2 Administration Utility......................................... 11
Using Help................................................................................................... 12
Screen Layout ............................................................................................. 13
Suspending and Resuming Service ...................................................... 14
Server Settings ........................................................................................ 15
Select Server............................................................................................... 15
Set Administrator......................................................................................... 15
Set Preferences .......................................................................................... 15
Set I/O Device ............................................................................................. 16
Set Delivery Feature Defaults ..................................................................... 16
Delivery Table Settings........................................................................... 17
Destinations ................................................................................................ 17
Senders....................................................................................................... 19
Undelivered Data Tray ................................................................................ 20
Log Administration.................................................................................. 22
Scan Delivery Log Administration ............................................................... 22
Error Log Administration ............................................................................. 23
Maintenance............................................................................................. 24
Backing Up and Restoring .......................................................................... 24
System Recovery ........................................................................................ 25
Returnnig to Installation Defaults ................................................................ 25
i
Page 4

4.Appendix
Troubleshooting ...................................................................................... 27
Error Log .................................................................................................. 29
Uninstalling ScanRouter V2 Lite............................................................ 30
Dial-up Connection.................................................................................. 31
Using Dial-up Router with ScanRouter V2 Lite ........................................... 31
Using a Dial-up Network Computer............................................................. 31
INDEX........................................................................................................ 32
ii
Page 5

1. Overview of ScanRouter V2
Lite
ScanRouter V2 Lite Delivery System
ScanRouter V2 Lite allows you to save scanned documents in remote folders or
to deliver documents to multiple destinations.
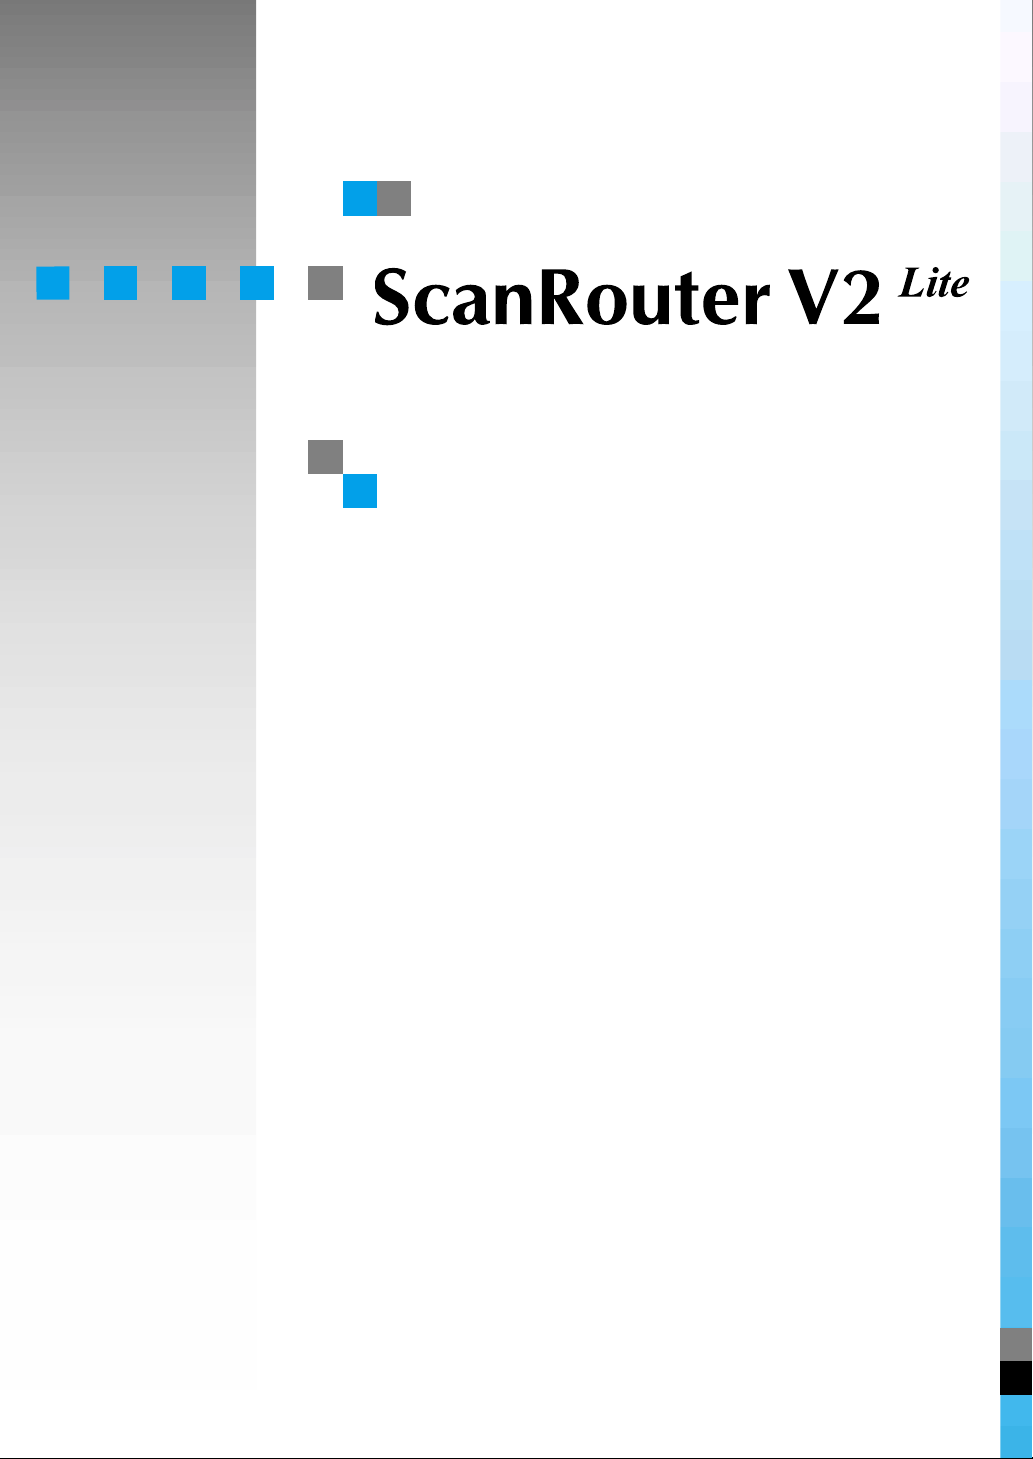
Delivery System Layout
The diagram below shows the layout of the ScanRouter V2 Lite delivery system.
Scanned documents are delivered to the destination with the selected delivery
method.
1
SCN
3
2
SCN
5
1. Network Devices
Select a destination, and then scan.
2. Delivery Server
The server works with other devices on
the network to ensure document delivery. The system administrator uses the
delivery table to configure delivery settings for each user.
Available delivery methods:
•In-Tray save
• Save as Windows file
Reference
⇒ P.2 “Available delivery methods”
4
GRFMLT0J
3. In-Tray
The ScanRouter V2 Administration Utility configures an in-tray for each user.
When [In-Tray save] is selected, documents are saved in the in-tray.
4. Client Computer
Install DeskTopBinder V2 and/or ScanRouter V2 Link on the client computers.
• DeskTopBinder V2 can read, copy
and/or delete documents in the intray.
• ScanRouter V2 Link can automatically
retrieve documents or notify users
that new documents have arrived.
1
Page 6

Overview of ScanRouter V2 Lite
1
5. Shared Folder on the File Server
When [Save as Windows file] is selected,
you can send and save documents to a
shared folder of the file server.
Note
❒ For information about available net-
work devices, see the ScanRouter V2
Readme or Compatible Device List.
❒ Scanned documents are delivered to
the delivery server over the network.
❒ The scanner can display the preset
destinations on the operation panel,
but this requires appropriate operation on the scanner.
❒ Undeliverable documents are saved
in the undelivered data tray.
❒ Do not use ScanRouter V2 Link or
ScanRouter V2 Administration Utility
installed on a client computer connected to WAN, as this may result in
system timeouts and incomplete delivery.
❒ Be sure to correctly configure any
computers that use dial-up access.
Reference
⇒ P.31 “Dial-up Connection”
Features of the Delivery System
ScanRouter V2 Lite has the following functions to ensure that the right document reaches the right person efficiently.
Deliverable Documents
The following type of document is deliverable:
• Scanned documents
Available delivery methods
The following delivery methods are available for each user.
• In-Tray save
• Save as Windows file
2
Page 7
ScanRouter V2 Lite Delivery System
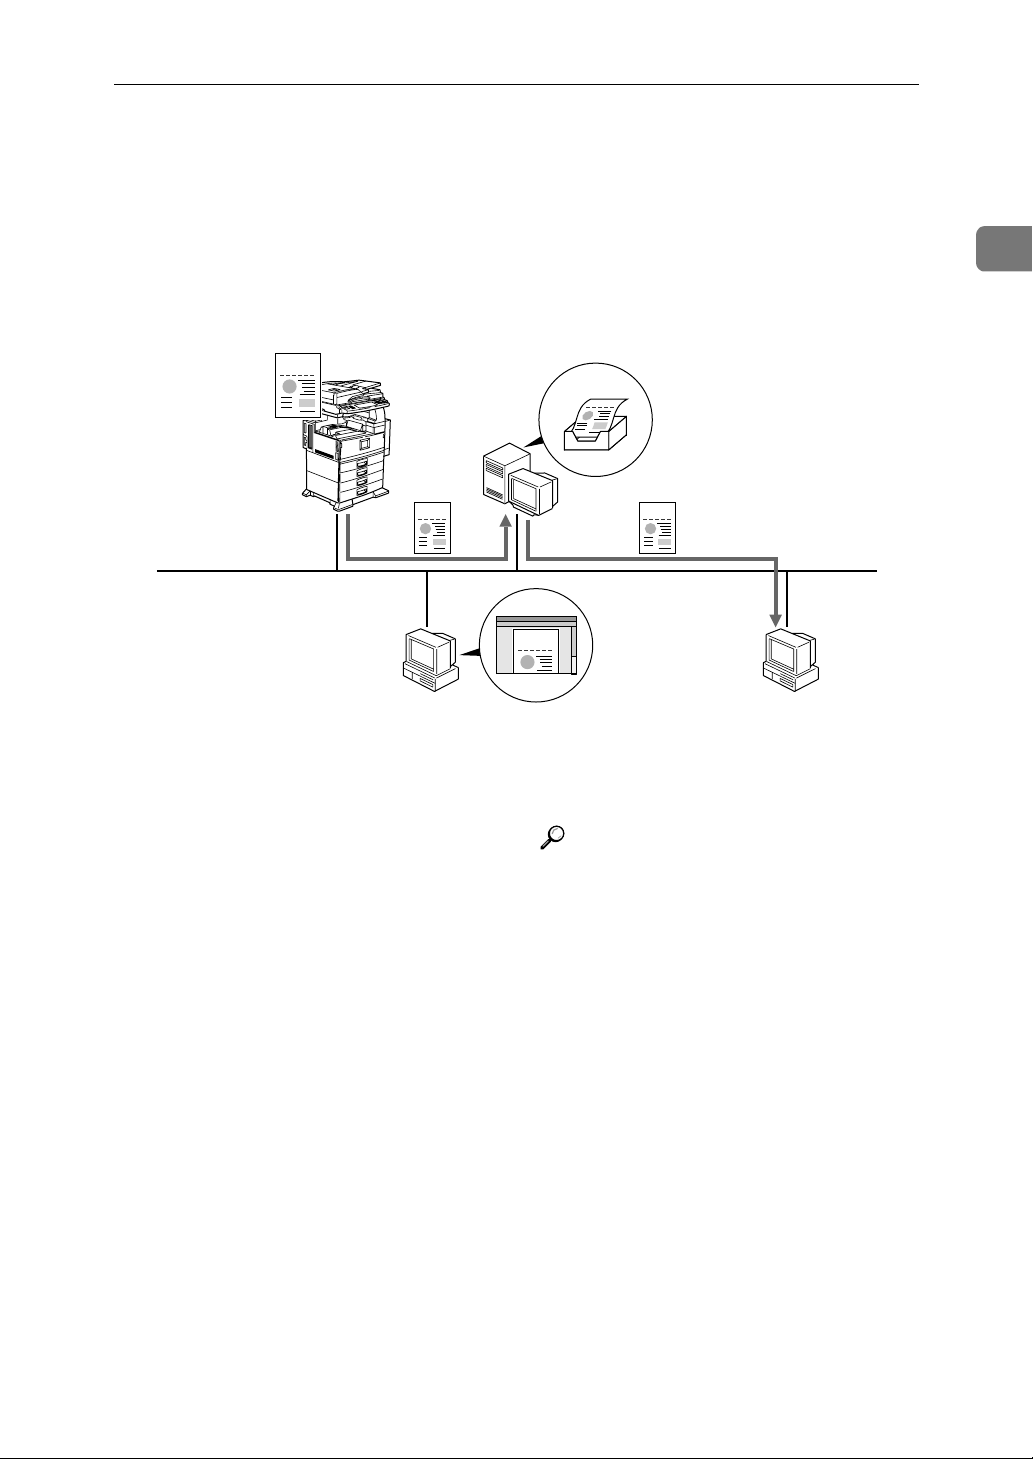
❖❖❖❖ In-Tray save
Documents can be saved in the in-tray on the delivery server. The in-tray
properties are set for individual users.
• You can read documents saved in the in-tray by DeskTopBinder V2.
• ScanRouter V2 Link can retrieve documents from the in-tray.
SCN
2
SCN
SCN SCN
13
SCN
1
1. The scanner sends scanned docu-
ments to the delivery server.
2. The delivery server saves scanned
documents in the in-tray.
3. A client computer installed with
ScanRouter V2 Link can retrieve
documents or notify users of document arrival. Retrieved documents
are deleted from the in-tray.
4
GRFMLT1J
4. A client computer installed with
DeskTopBinder V2 can read documents saved in the in-tray.
Reference
⇒ P.17 “Delivery Table Settings”
3
Page 8
Overview of ScanRouter V2 Lite
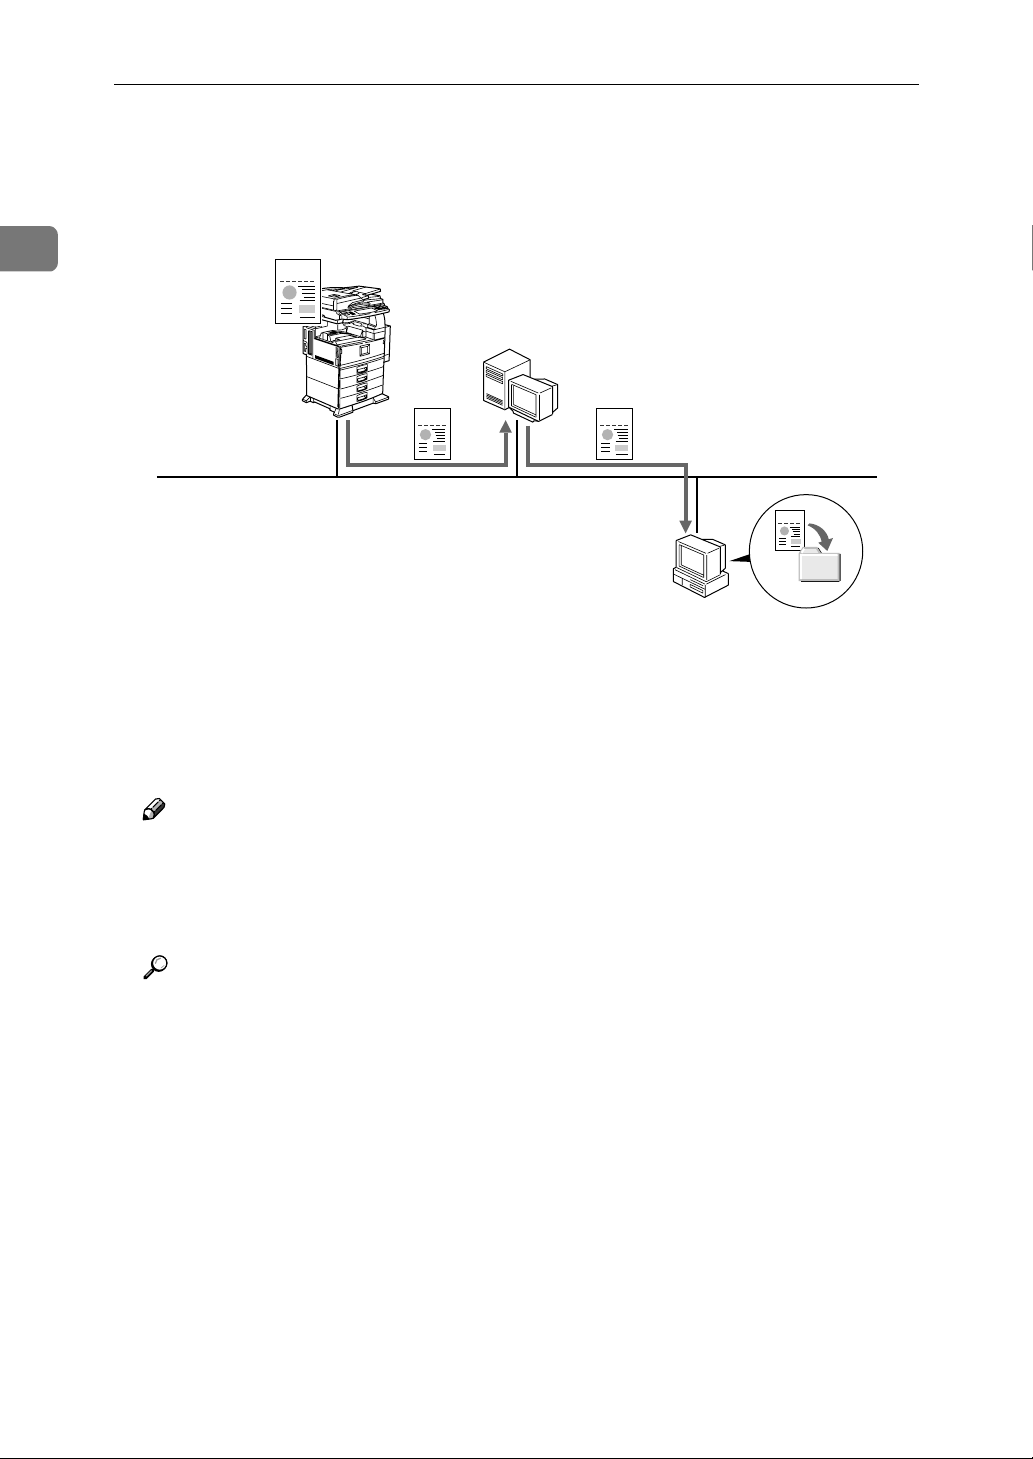
❖❖❖❖ Save as Windows file
You can save documents in the shared folder of a client computer.
1
SCN
SCN SCN
12
SCN
3
1. The scanner sends scanned docu-
ments to the delivery server.
3. You can use documents on a client
computer on the network.
2. The delivery server saves the doc-
ument in a shared folder on the selected target computer.
Note
❒ Before setting up ScanRouter V2 Lite, create a shared folder in the client
computer.
GRFMLT2J
❒ You can also save documents to the delivery server Windows folder in this
way.
Reference
⇒ P.17 “Delivery Table Settings”
4
Page 9

2. Using the Delivery System
Network Administrator Duties
There are several things that the network administrator must do before
bringing the delivery server in operation. Daily maintenance is required
after the server is brought in operation. The network administrator must
also be ready to deal with any problems that arise.
Constant maintenance of the network
is required to ensure that all clients
have convenient access to the delivery service.
Note
❒ Use the ScanRouter V2 Adminis-
tration Utility to manage the network and maintain optimal
performance settings.
Before You Start
Before the system is usable, the environment and other settings must be
configured.
Reference
For assistance with the installation,
see Help.
❖❖❖❖ Setting Administrator's Password
The administrator's password is
used to control access to the ScanRouter V2 Administration Utility.
Note
❒ The administrator's password is
requested only when the ScanRouter V2 Administration Utility is launched.
❒ If you have a system with more
than one delivery server, you
will need to set passwords individually for each server.
Reference
⇒ P.15 “Set Administrator”
❖❖❖❖ Environment Settings
Environment settings are broken
down into the following subsections.
• Default Image Format
This controls the default save
format for delivered scanned
images.
• Error/Disk Space
Controls error notification and
monitors remaining disk space.
Global settings
Before opening the system for use,
global settings for the environment,
network devices and delivery functions must be configured.
• Schedule
Controls scheduling of routine
maintenance tasks.
• Maintenance
Deletes expired documents
and old error log entries.
Also optimizes the database.
Reference
⇒ P.15 “Set Preferences”
5
Page 10

Using the Delivery System
2
❖❖❖❖ Adding Network Devices
Select and add a network device.
Not all devices need to be added.
Reference
⇒ P.16 “Set I/O Device”
❖❖❖❖ Setting Delivery Features
Delivery system options:
• Undelivered Data
This setting controls how undelivered documents are handled.
• User Index
Controls display of [Destination]
and [Sender] on network devices, once having set [Set I/O De-
vice] from the [Server] menu.
Reference
⇒ P.16 “Set Delivery Feature De-
faults”
Preparation for delivery operation
Several settings are required before
delivery can begin.
❖❖❖❖ Adding Destinations
Set destinations for users first.
Registered users can be selected
into groups. Appropriate delivery
settings must be made for each
destination.
Reference
⇒ P.17 “Destinations”
❖❖❖❖ Adding Senders
This function adds the senders.
You can set them while adding
destinations. Some network devices use the destination as for sender
information, so it is not necessary
to add senders.
❖❖❖❖ Limiting the Log Entry
Set the maximum log entry for the
delivery and error logs.
Reference
⇒ P.22 “Log Administration”
Launching/Quitting the Delivery Server
Launching and quitting
❖❖❖❖ Launching the Delivery Server
Turn on the power to the delivery
server and start Windows. Server
start-up varies with your installation options.
❖❖❖❖ Quitting the Delivery Server
When turning off or restarting the
delivery server, suspend delivery
service first, then shut down Windows and turn off the computer.
Starting delivery service
Delivery service can be started from
the [Server] menu of ScanRouter V2
Administration Utility or when the
delivery server starts up, delivery service is to be started as set during installation.
❖❖❖❖ Launch at Startup
When you log into Windows using
the ScanRouter V2 Lite starting account, delivery service will automatically begin.
Reference
⇒ P.19 “Senders”
6
Page 11

Network Administrator Duties
❖❖❖❖ Launch from Program Folder
To start delivery service manually,
select [Resume Services] from the
[Server] menu.
Note
❒ To suspend delivery service, se-
lect [Suspend Services] from the
[Server] menu.
Reference
⇒ P.14 “Suspending and Resum-
ing Service”
❖❖❖❖ Run in service mode
Delivery service is started in the
background. If [Run in service mode]
is selected as the setup type, this
will happen automatically.
Daily Operations
To properly maintain the system, the
administrator should perform the following tasks on a regular basis.
Monitoring disk space
Because undelivered documents are
stored on the server, a lack of disk
space may impair system function. To
ensure that there is sufficient disk
space, check the undelivered data
tray periodically and delete or export
any documents stored there. It is recommended to maintain free space
more than 250 MB. From the [Server]
menu, select [Server Information] to
check free disk space. To receive notification of low free disk space, or to
set free disk space for halting delivery, select [Set Preferences] from the
[Server] menu, and make necessary
settings on the [Error/Disk Space] tab.
Note
❒ If the remaining free space became
lower than the value specified by
[Suspend at:], delivery service is
suspended. (Default minimum
value: 200MB)
2
Checking the undelivered data tray
Undelivered documents are saved in
a undelivered data tray. Check the
undelivered data tray periodically
and delete or forward any documents
found there. Also note that there may
be a problem when two or more documents for the same destination are
saved in this tray. In this case, make
sure that the destination and/or communication settings are correct.
Reference
⇒ P.20 “Undelivered Data Tray”
• If delivery service is suspended,
delete any unnecessary documents from the in-tray and the
undelivered data tray to raise
free space, and resume the service.
• To help maintain free space, set
a save-for period so that documents are automatically deleted
after remaining in the tray longer.
❒ You can set the system to warn that
disk space is running low before it
suspends delivery service. Make
the necessary settings on the [Error/
Disk Space] tab.
Reference
⇒ P.15 “Error/Disk Space”
⇒ P.17 “Destinations”
⇒ P.16 “Undelivered Data”
7
Page 12

Using the Delivery System
2
Checking system operating conditions
You can monitor the condition of the
system with the log. The log contains
destination and sender information,
as well as file sizes, logged time, page
counts and file histories. The log can
also tell you when and how often different devices are used and when and
how often different errors occur.
When an error occurs, check the error
log to find the directory, and then delete the unnecessary data.
The following types of logs are kept:
❖❖❖❖ Delivery Log
Scan: Log of scanner deliveries
❖❖❖❖ Errors Log
Log of Errors
Note
❒ Logs can also be saved as files.
❒ Even if you are not logged in to
ScanRouter V2 Administration
Utility as the system administrator, you may view the logs. (Administrator functions are still
prohibited.)
Reference
⇒ P.22 “Log Administration”
Backing up
Regular backups should be made to
ensure system reliability. You can
save backup information to any directory on the server.
Note
❒ Make sure there is enough free
space on the server before backing
up.
Reference
⇒ P.24 “Backing Up and Restoring”
Other Operations
The following settings are for dealing
with specific problems.
System notices
If there is an error or if disk space is
low, the system will send a message
to the administrator. You can manage
error notification. From the [Server]
menu, point to [Set Preferences], and
make necessary settings on the [Error/
Disk Space] tab. If [Ignore] is selected,
no message arrives.
The following system notices are
available:
Restarting the server
The server should be restarted regularly to maintain stability.
Important
❒ Suspend delivery services before
restarting the server.
8
❖❖❖❖ Nondelivery Message
If the destination settings are
wrong or the destination has been
updated and the server has not, a
nondelivery message will appear.
The undelivered document will go
to the undelivered data tray. Documents in the undelivered data tray
can be delivered again.
Page 13

Network Administrator Duties
❖❖❖❖ Error Message
A message will appear anytime
there is an error. See "Troubleshooting" for handling a specific error.
❖❖❖❖ Disk Space Low Warning
If free disk space falls below the value set in [Issue alert at:], you will receive a low disk space message.
Upon receiving this message, you
should delete any unnecessary data
to maintain enough disk space.
Reference
⇒ P.16 “Undelivered Data”
⇒ P.27 “Troubleshooting”
⇒ P.15 “Error/Disk Space”
Change in user settings
When there are changes in the layout/configuration of the network,
take the following actions.
❖❖❖❖ Adding a User
To add a user to the system, follow
the steps below.
• Install and configure DeskTopBinder V2 or ScanRouter V2
Link on the user's computer.
• Set the destination on the server. Assign the new user to a
group if necessary. ⇒ P.17 “Des-
tinations”
❖❖❖❖ Removing a User
To remove user from the system,
take the following actions.
❖❖❖❖ Changing User's Information
If a user's information changes,
take the following steps.
• Edit the user's information as
appropriate.
• If the user's group association
has changed, change the group
information. If necessary, update the destination information. ⇒ P.17 “Destinations”
❖❖❖❖ Changing the Group Address
If the user's group association has
changed, follow the procedures
given below.
• If the users group name has
changed, change the group destination information. ⇒ P.17
“Destinations”
Changes in the environment
If network devices or the system layout is changed, take the following actions. Not all network devices require
configuration in [Set I/O Device].
❖❖❖❖ Adding a Network Device
When adding a network device,
take the following steps.
• Register the network device. ⇒
P.16 “Set I/O Device”
• Make the delivery settings on
the network device. For detail
settings, see the operating instructions that come with the
device.
2
• Delete the user's destination information from the server. If the
user was a member of a group,
the user will be automatically
deleted from the group. ⇒ P.17
“Destinations”
• Delete the user from the sender
list. ⇒ P.19 “Senders”
❖❖❖❖ Changing Network Device Settings
When changing network device
settings or exchanging in new network devices, perform the following:
• Change the settings for the net-
work device. ⇒ P.16 “Set I/O
Device”
9
Page 14

Using the Delivery System
2
❖❖❖❖ Changing an IP Address
When the IP address of the delivery server or network device is
changed, perform the following:
• When the IP address of a network device is changed, delete
the device, and then add the device with its new IP address
again. ⇒ P.16 “Set I/O Device”
Note
❒ If the network device is not listed
in [Set I/O Device], confirm that the
device has the correct IP address
for the delivery server.
❒ If the network environment chang-
es, make the necessary changes on
clients and network devices with
connected ScanRouter V2 Administration Utility, ScanRouter V2
Link or DeskTopBinder V2, to correct server information. Correct information of connecting devices on
[Set I/O Device] from ScanRouter V2
Administration Utility.
Troubleshooting
If a problem arises, see "Troubleshooting", and take the appropriate
measures.
If data is corrupted, the system is unstable or does not operate correctly
for some reason, load the backup data. If this is impossible, select [Return
to Installation Defaults] from the [Mainte-
nance] menu for initialization, and
then restore the backup data.
Reference
⇒ P.27 “Troubleshooting”
⇒ P.24 “Maintenance”
Reference
⇒ P.31 “Dial-up Connection”
Miscellaneous
❖❖❖❖ Changing the Schedule
To change the starting time for
maintenance. ⇒ P.15 “Set Prefer-
ences”
❖❖❖❖ Changing the Administrator
To change the administrator password. ⇒ P.15 “Set Administrator”
10
Page 15

3. Using ScanRouter V2
Administration Utility
ScanRouter V2 Administration Utility
ScanRouter V2 Administration Utility Features
The ScanRouter V2 Administration
Utility enables you to manage settings, delivery tables and maintenance.
❖❖❖❖ Administrator and User Modes
The ScanRouter V2 Administration Utility can be accessed in either administrator or user mode.
• Administrator mode
Administrator access allows use
of all functions and requires the
administrator password.
• User mode
User access is restricted to viewing the log files but does not require a password.
Note
❒ The ScanRouter V2 Adminis-
tration Utility is installed
when ScanRouter V2 Lite is
set up. You can also set up
the ScanRouter V2 Administration Utility on a client
computer and use it to access
the delivery server.
❒ For information about set-
ting up on a client computer,
see the ScanRouter V2 Lite
Setup Guide.
Launching ScanRouter V2 Administration Utility
Launching from the delivery server
This section details how to launch the
ScanRouter V2 Administration Utility directly from the delivery server.
Note
❒ After launch, you can select anoth-
er delivery server. ⇒ P.15 “Select
Server”
Click [Start], point to [Programs],
A
point to [ScanRouter V2] and then
click [ScanRouter V2 Administration
Utility].
The [Enter Password] dialog box ap-
pears.
Enter the password in [Password:].
B
Click [OK] to open the ScanRouter
C
V2 Administration Utility in administrator mode.
Click [Cancel] to open in user
mode.
Launching from a client computer
This section details how to launch the
ScanRouter V2 Administration Utility from a client computer.
Follow the procedure below to launch
the ScanRouter V2 Administration
Utility for the first time on a client computer. For any launches after the first
time, the last selected server is used.
11
Page 16

Using ScanRouter V2 Administration Utility
3
Note
❒ After launch, you can select anoth-
er delivery server. ⇒ P.15 “Select
Server”
Click [Start], point to [Programs],
A
point to [ScanRouter V2] and then
click [ScanRouter V2 Administration
Utility].
The [Select Server] dialog box appears.
Click [Browse].
B
The [Browse for Server] dialog box
appears.
Select the desired server and click
C
[OK].
The [Select Server] dialog box reap-
pears.
Click [OK].
D
The [Enter Password] dialog box appears.
Note
❒ Click [Cancel] to close the Scan-
Router V2 Administration Utility.
Using Help
There is a help file provided for the
ScanRouter V2 Administration Utility. The help file provides information
about settings, operations and dialog
screens.
Help with operation
Select [Contents and Index] from the
[Help] menu. Help topic areas will be
displayed.
Help with dialog boxes
Click [Help] in the dialog box you
wish to know more about.
Searching Help by a function name or keyword
From the [Help] menu, select [Contents
and Index] and click the [Index] tab. En-
ter the function name or keyword you
wish to search for, or select from the
list in the box. Click [Display] to see the
relevant information.
12
Enter the password in [Password:].
E
Click [OK] to open the ScanRouter
F
V2 Administration Utility in administrator mode.
Click [ Cancel] to open in user
mode.
Quitting
Select [Exit] from the [Server]
A
menu.
Seeing version information
Select [About ...] from the [Help] menu
to display version information for
ScanRouter V2 Administration Utility.
Page 17

Screen Layout
This section explains the layout of the screen.
Screen components
ScanRouter V2 Administration Utility
3
GRFMLT4N
1. List of items under administra-
tion displayed as a tree.
2. Contents of the item selected in 1.
Selecting items
Select an item to administer from the tree. The contents of the display pane and
the make-up of the menus will change according to what is selected on the tree.
Displaying/Hiding the status bar
From the [View] menu, select [Status Bar], and then select hide status bar or dis-
play status bar.
Updating Information
To update the information on your display, select [Refresh] from the [View] menu.
3. ScanRouter V2 Administration
Utility menu.
4. Shows status of the delivery serv-
er and information about the item
selected in 1.
13
Page 18

3
Using ScanRouter V2 Administration Utility
Suspending and Resuming Service
Delivery service can be suspended by
selecting [Suspend Services] from the
[Server] menu.
Make sure that service is suspended
when performing any of the following actions.
• Any functions from the [Mainte-
nance] menu
• Turning off or restarting the server
Be sure to resume delivery service
once these operations are completed.
Important
❒ When turning off or restarting the
delivery server, be sure to suspend
delivery.
Note
❒ It is possible that service will not
resume immediately after [Resume
Services] is selected from the [Server] menu. Wait until the [Services
temporarily suspended.] message
disappears so that the server can
finish maintenance.
14
Page 19

Server Settings
The following options and settings
are available with administrator
mode on the server.
Note
❒ Information such as available disk
space and server condition can be
found under [Server Information] in
the [Server] menu.
Select Server
When the ScanRouter V2 Administration Utility is started without a delivery service selected or when you are
administrating another delivery server, select a management server by
clicking [Select Server] from the [Serv-
er] menu.
Server Settings
Set Preferences
The delivery system environment can
be modified by [Set Preferences] in the
[Server] menu.
Default Image Format
3
This setting controls the default format for saved images.
Note
❒ Choose from the following default
image save formats:
• Save as Windows file
❒ If the delivery type is [In-Tray save],
images will be saved in the default
format configured on the network
device.
Set Administrator
If the administrator or the administrator password changes, change the administrator settings in [ Set
Administrator] in the [Server] menu.
The following sections can be
changed:
• Password
Error/Disk Space
This controls methods of notification
for errors and for low disk space.
❖❖❖❖ Error Notification
Controls methods for notification
of errors.
• From the [Output printer] drop-
down list, select a printer from
those displayed for use with the
[Output to printer] setting. Only
one printer can be selected.
❖❖❖❖ Server disk space
These settings control how the server
handles a lack of server disk space.
• [Issue alert at:] allows you to set
when the server will notify you
of low disk space. The default is
250 MB.
• [Suspend at:] allows you to set
when the server will suspend
delivery.
15
Page 20

Using ScanRouter V2 Administration Utility
3
Schedule
This function allows you to schedule
maintenance tasks. The following
tasks are automatically performed.
❖❖❖❖ Maintenance
This allows you to set a regular
time for the server to carry out its
maintenance routines. The default
time is 1:00 am.
Maintenance consists of the following tasks:
• Deletion of Expired documents
• Deletion of old error log entries
• Database optimization
Note
❒ Users can access the server
while maintenance is under
way, but it is recommended that
this be avoided as it may cause
problems.
Set I/O Device
This controls configuration of network devices. This can be found in
[Set I/O Device] under the [Server]
menu . Not all devices need to be configured.
Network devices can be installed in
the following ways:
• Setting their IP addresses
• By setting their host names
Note
❒ For information about available
network devices which require settings in [Set I/O Device], see the
ScanRouter V2 Readme or Compatible Device List.
❒ [I/O Device List] displays a list of the
network devices on the network.
❒ You can add multiple network de-
vices.
❒ Click [Properties] to see remaining
disk space and change settings.
Set Delivery Feature Defaults
This controls default delivery options
and is found in [Set Delivery Feature De-
faults] under the [Server] menu.
Undelivered Data
This controls how undelivered documents are handled.
• Set a save-for period date to have
documents deleted after they are
no longer needed.
User Index
This controls the [Destination] and
[Sender] information displayed on the
operation panel of the network devices, which were configured in [Set I/O
Device] under the [Server] menu.
There are two display formats, Title 1
and Title 2.
• Title 1: 10 titles for frequent use
and 10 more
• Title 2: 10 titles for frequent use
and 5 more
Note
❒ To apply the setting, operation on
the network device is required. For
information, see the operating instructions that come with the device.
❒ The [User Index] tab appears only
when a network device is added in
[Set I/O Device] under the [Server]
menu.
16
Page 21

Delivery Table Settings
Delivery Table Settings
The delivery table consists of the following:
• Destination
• Sender
• Undelivered Data Tray
Destinations
The [Destination] field contains destination information and management
tools. Select [Destination] in [Delivery
Type] to view a list of destinations.
The following actions are available:
• Adding new destinations
• Editing destinations
• Delete destinations
• Changing the display order
• Exporting/Importing destinations
Note
❒ The [Destination List] displays the
following information:
• Name
• Short ID
• Delivery Type
• Index Title
Adding new destinations
New destinations can be added for individual users or for groups.
❖❖❖❖ Adding Users
From the [Operations] menu, point
to [Add New Destination], and then
select [User] to set a destination for
an individual user. The following
information is displayed in the
[Destination List] :
• Name
• Short ID
• Delivery type settings
• Index settings (The settings in
[Set I/O Device] are required.)
The following delivery types are
possible:
• In-Tray save
Data can be saved in the server's
in-tray. In-tray options allow
you to set passwords and document expiration dates. You can
view the in-tray through DeskTopBinder V2 or ScanRouter V2
Link.
• Save as Windows file
This option saves data in a folder. Specified folders on the file
server must be set to share beforehand.
The following folders may be
selected as a destination:
• A shared folder on the file
server in the network
• A folder on the delivery server
Note
❒ To deliver documents to
the file server, a network
drive must be mapped to
the selected folder in the
file server.
Note
❒ You can set more than one de-
livery type to a single destination or set one delivery type
multiple times (on the same
destination or multiple destinations). However, the in-tray can
only have one delivery type set
at a time.
3
17
Page 22

Using ScanRouter V2 Administration Utility
3
❒ Click [Properties] to display the
dialog box that corresponds to
the selected delivery type,
which allows detailed setting of
that delivery type.
❒ An unused number is automati-
cally assigned to [Short ID:]. The
number can be changed to another one not used.
❒ Select the [Add also as sender]
check box to set the new destination as a sender on the delivery table.
❖❖❖❖ Adding a Group as a Destination
From the [Operations] menu, point
to [Add New Destination], and then
select [Group] to add a group as a
destination. Set the following
items:
• Name
• Short ID
• Group member
• Index settings (The settings in
[Set I/O Device] are required.)
Note
❒ A group cannot have another
group as a member.
❒ The [Group member] list shows
all of the destinations in that
group.
Editing destinations
Select the destination you wish to edit
from the [Destination List], and then
edit the desired items in [Edit Destina-
tion] from the [Operations] menu.
Deleting destinations
Select the destination you wish to delete from the [Destination List], then select [Delete Destination] from the
[Operations] menu.
Changing the display order
You can change the order in which
destinations are viewed in the [Desti-
nation List] :
• Select the sender you wish to move
from the [Destination List], then select [Up] or [Down] from the [Opera-
tions] menu.
• Select [Down] to move the desti-
nation one place down on the
list.
• Select [Up] to move the destina-
tion one step up on the list.
• Select the destination you wish to
move and drag it to the location
you wish to move it to.
18
❒ An unused number is automati-
cally assigned to [Short ID]. The
number can be changed to another number that is not used.
❒ Select the [Add also as sender]
check box to set the new destination as a sender on the delivery table.
Exporting/Importing destinations
The destination list can be backed up
by exporting.
• To export the destination list, select [Export Destinations] from the
[Operations] menu, and then select
an export destination.
• To import the destination list to the
system again, select [Import Destina-
tions] from the [Operations] menu,
and then select a file to import.
Page 23

Delivery Table Settings
Note
❒ Because password information
cannot be imported or exported,
reset passwords after importing
destination information.
Senders
The [Sender] can manage senders. Select [Sender] in [Delivery Type] to view a
list of senders.
The following actions are available:
• Adding new senders
• Editing senders
• Deleting senders
• Changing the display order
• Exporting/Importing senders
Note
❒ Some network devices will use the
destination's settings as sender information automatically, so a
sender does not need to be set with
this case.
❒ The following information is dis-
played on the [Sender List] :
• Sender Name
• Click [Add New Sender] from the
[Operations] menu and input the
required information:
• Sender Name
• Short ID
• Index settings (The settings
in [ Set I/O Device] are re-
quired.)
• Add senders while setting user
destinations. ⇒ P.17 “Adding
new destinations”
Note
❒ An unused number is automati-
cally assigned to [Short ID]. The
number can be changed to another number that is not used.
❖❖❖❖ Adding Groups
Add senders while setting group
destinations. ⇒ P.17 “Adding new
destinations”
Note
❒ Unless a user/group is added
as a destination, the user/group
cannot be added as a sender.
Editing senders
3
• Short ID
❒ The senders shown in the sender
list can be specified from the network devices. When a scanned
document is delivered, sender information is kept in the log.
Adding new senders
Like destinations, senders can be set
as individual users or as groups.
❖❖❖❖ Setting the User Type
There are several ways to add a
sender.
Select the sender you wish to edit
from the [Sender List], then edit the desired items in [Edit Sender] from the
[Operations] menu.
Deleting senders
Select the sender you wish to delete
from the [Sender List], then select [De-
lete Sender] from the [Operations]
menu.
19
Page 24

Using ScanRouter V2 Administration Utility
3
Changing the display order
You can change the order in which
senders are viewed in the [Sender
List].
• Select the sender you wish to move
from the [Sender List], and then select [Up] or [Down] from the [Opera-
tions] menu.
• Select [Up] to move the sender
one step up on the list.
• Select [Down] to move the send-
er one place down on the list.
• Select the sender you wish to move
and drag it to the location you
wish to move it to.
Exporting/Importing senders
Sender list can be backed up by exporting.
• To export the sender list, select [Ex-
port Senders] from the [Operations]
menu, and then select an export
destination.
• To import the sender list to the system again, select [Import Senders]
from the [Operations] menu, then
select the exported file to import.
Undelivered Data Tray
Undelivered documents are stored in
the undelivered data tray. To view a
list of undelivered documents, select
[Undelivered Data Tray] from the [Delivery Type]. See the error log to deter-
mine why the document was not
delivered and take the necessary action.
There are several operations for undelivered documents:
• Deleting selected undelivered data
• Forwarding undelivered data
• Viewing undelivered data
Note
❒ The [Undelivered Data List] displays
the following information:
• Item Name
• Creator
• Added Data
Reference
⇒ P.23 “Error Log Administration”
Deleting selected undelivered data
Documents in the undelivered data
tray can be deleted either individually or all at once.
20
• To delete a single document, select
it from the [Undelivered Data List],
and then select [Delete Selected Un-
delivered Data] from the [Operations]
menu.
• To delete all documents in the tray
at once, select [Delete All Undelivered
Data] from the [Operations] menu.
Page 25

Note
❒ To prevent documents from accu-
mulating in the undelivered data
tray, set a save-in period to delete
undelivery document automatically.
Reference
⇒ P.16 “Undelivered Data”
Delivery Table Settings
Forwarding undelivered data
To forward an undelivered document, select the document you wish
to forward from the [Undelivered Data
List], and then select [Forward Undelivered Data] from the [Operations] menu.
Viewing undelivered data
To view an undelivered document,
select the document you wish to display from the [Undelivered Data List],
and then select [View Undelivered Data]
from the [Operations] menu. The first
page of the document will be shown
by the appropriate application if
available.
3
21
Page 26

Using ScanRouter V2 Administration Utility
Log Administration
3
The delivery server keeps the following logs:
• Scan : log of scanner deliveries
• Error Log : log of errors
Scan Delivery Log Administration
The [Scan] saves information about
scanned data.
Select [Scan] to view the logged data.
The following operations can be performed from the scan delivery log.
• Deleting all log entries
• Exporting log entries
• Limiting maximum log entries
Note
❒ An entry in the scan delivery log is
created for each delivery. When
there are multiple types, an entry
will be made for each type.
❒ The [Scan Delivery Log] displays the
following information:
• Logged
Deleting all log entries
The entire scan delivery log can be
deleted by selecting [Delete All Log En-
tries] from the [Operations] menu.
Note
❒ Log entries cannot be deleted indi-
vidually.
Exporting log entries
To export the scan delivery log to a
file, select [Export Log Entries] from the
[Operations] menu, and then select a
location to save in.
Limiting log entries
To set the maximum size of the scan
delivery log, select [Max Log Entries
Limit] from the [Operations] menu, and
then enter the desired maximum size.
Note
❒ The maximum log entries must be
between 100 and 1000 entries.
22
• Device
• Delivered
• Delivery Type
• Sender
• Destination
• Subject
• Item Name
• Data Size
• Pages
• Original Size
• Resolution
• Results
Page 27

Log Administration
Error Log Administration
The error log records errors on the
system.
The following operations are available for the error log:
• Delete all error log entries
• View delivery/forwarding error
data
• Forward delivery/forwarding error data
• Export error log entries
• Max error log entries limit
Note
❒ An entry in the error log is created
for each delivery. When there are
multiple delivery types, an entry
will be made for each type.
❒ The [Error Log] displays the follow-
ing information:
• Logged
• I/O Device
• Delivery Type
Viewing error data
To display an undelivery document
in error log, select an entry from the
[Error Log], and then select [View Delivery/Forwarding Error Data] from the [Op-
erations] menu.
Reference
⇒ P.29 “Error Log”
Forwarding error data
To forward an undelivered document
in error log, select an entry from the
[Error Log], and then select [Forward Delivery/Forwarding Error Data] from the
[Operations] menu, and then select a
destination to forward to.
Exporting the error log
To export the error log as a file, select
[Export Error Log Entries] from the [Operations] menu, and then select a loca-
tion to save in.
3
• Error Details
• Handling
• Sender
• Destination
• Application
• Item Name
Deleting all error log entries
The error log can be deleted by selecting [Delete All Error Log Entries] from
the [Operations] menu.
Note
❒ Log entries cannot be deleted indi-
vidually.
Limiting error log entries
To set the maximum size of the error
log, select [Max Error Log Entries Limit]
from the [Operations] menu, and then
enter the desired maximum size.
Note
❒ The maximum log entries must be
between 100 and 10000 entries.
23
Page 28

Using ScanRouter V2 Administration Utility
Maintenance
3
The ScanRouter V2 Administration
Utility has the following maintenance
functions. Make sure that delivery
service is suspended before beginning maintenance.
• Back Up
• Restore
• Recover
• Return to Installation Defaults
Backing Up and Restoring
All system information can be backed
up in any directory on the delivery
server. It is recommended that backups be made regularly.
To restore backup data, use the Restore function. Unneeded backup
data may be deleted with the Delete
Backup Data function.
Note
❒ To make backups, use the Scan-
Router V2 Administration Utility
configured on the delivery server.
❖❖❖❖ Restoring Backup Data
Select [Restore] from the [Mainte-
nance] menu, and then select the
backup data to use.
Important
❒ The Restore function should
only be used when there is no
alternative.
❒ The Restore function returns the
system to the state it was in
when the backup was made. All
data or changes saved since the
backup will be lost.
❖❖❖❖ Deleting Backup Data
Select [Delete Backup Data] from the
[Maintenance] menu, and then select
the data to delete.
Note
❒ When backing up or restoring
the system, do not perform any
other operations.
❖❖❖❖ Backing Up
24
Select [Back Up] from the [Mainte-
nance] menu to save to the backup
directory. If there is an error
caused by insufficient disk space
during backup, change the backup
location or delete unnecessary
files, and then back up again.
Page 29

System Recovery
If the delivery server loses power for
any reason other than a regular shutdown, data may be corrupted. If this
happens, the system may become unstable and cause frequent errors. To
resolve the situation, select [Recover]
from the [Maintenance] menu.
Maintenance
Important
❒ Do not use the Recover function
unless absolutely necessary.
Returnnig to Installation Defaults
This function deletes all data and settings and returns the system to its initial state. To start initialization, select
[Return to Installation Defaults] from the
[Maintenance] menu.
Important
❒ Do not use this function unless ab-
solutely necessary.
3
25
Page 30

3
Using ScanRouter V2 Administration Utility
26
Page 31

Troubleshooting
Problem Possible Causes and Solutions
4. Appendix
When launching the ScanRouter V2
Administration Utility from the delivery server, the following message
appears: " Delivery server authorization settings may be incorrect. The
[Authorization for Server Access] dialog box will be displayed. Set authorization properly. "
When launching the ScanRouter V2
Administration Utility from a client
computer, the following message appears: " Delivery server authorization settings may be incorrect.
Restart management tools on the delivery server and set authorization
properly. "
The ScanRouter V2 Lite starting account password may
have been changed. Take the following steps, and then
restart the delivery server.
Click [OK] in the dialog box.
When the [Authorization for Server Access] dialog box appears, enter the new password, and click [OK]. Restart
the delivery server.
The ScanRouter V2 Lite starting account password may
have been changed. Take the following steps, and then
restart the server.
From the [Start] menu on the server, point to [ScanRouter
V2], and then select [ScanRouter V2 Administration Utility] .
The following message will appear: " Delivery server
authorization settings may be incorrect. The [Authorization for Server Access] dialog box will be displayed.
Set authorization properly. " Click [OK] in the message
box.
When the [Authorization for Server Access] dialog box appears, enter the new password, and click [OK].
Restart the server.
Note
❒ If the starting mode for the delivery server is set to
[Run in service mode], you must log into Windows.
The operation panel of a network device displays " Cannot communicate
with server. "
The operation panel of a network device displays "Address update failed.
Try again?"
The operation panel of a network device displays " Destination and sender list update has been failed. Try
again? "
• Make sure that the server is operating properly.
• Make sure that the network device has the correct IP
addresses for itself and for the server or other network settings.
Delivery service may not have started. Restart delivery
service from the [Server] menu of the ScanRouter V2 Administration Utility.
• Make sure that the server is operating properly.
• Make sure that the network device has the correct IP
addresses for itself and for the server or other network settings.
• Make sure that the network device settings are cor-
rect in [Set I/O Device] menu on the ScanRouter V2
Administration Utility.
27
Page 32

Appendix
Problem Possible Causes and Solutions
4
When selecting a server, the following message appears: " The specified
computer name or IP address is not
valid. Please specify another name or
address. "
There is no response when [Browse] is
clicked in [Set I/O Device].
After entering an IP address in [Set I/
O Device], the following message ap-
pears: " The selected I/O device is
not switched on, or is not available
on this network. "
When adding or deleting a destination and updating the index, those on
the network device are not updated.
• Mak e s ure that the server s ett in g is correct and the IP
address and name are correct in network settings.
• You may be logged onto Windows under an account
that does not have administrator access. Log in under an account that has the access right.
• Make sure that network devices are plugged in and
switched on.
• Make sure that connection can be made by selecting
a device by host name and/or IP address.
• Some I/O devices do not require any configuration.
If the devices are of this type, clicking [Browse] may
not display anything. If this is the case, make sure
that the device has the correct IP address for the delivery server.
• Make sure that the device is plugged in and
switched on.
• Some I/O devices do not require any configuration.
If this is the case, make sure that the device has the
correct IP address for the delivery server.
Some I/O devices do not automatically update destination lists. Press [Update Address] on the device to update
the delivery list. For more information, see the operating instructions that come with the network device.
When entering the password on the
[Authorization for Server Access] dialog
box, the following message is displayed " Your password may be invalid.If you are sure about password
you entered, press [Cancel] and close
the [Set Authorization for Server Access] dialog box. "
The password for the starting Windows account may be
incorrect, or account authorization may have changed.
Make sure that the password and the authorizations are
correct and re-enter the password, then, restart the computer.
28
Page 33

Error Log
Error Log
The following table explains the meanings of common error log entries.
Entry Possible Causes and Solutions
Drive is not ready. • Windows is not started on the destination computer.
• The specified drive does not exist.
• No network drive has been mapped to the network
folder which is selected as a destination folder. Map
the network drive to the network folder again.
Note
❒ Use the setting for re-connection at login if you
want document delivery to the destination folders in the computers on the network.
No access rights to the specified folder.
The sender does not have export access privileges to the
specified folder. Make sure the user is logged in under
the correct name. If the user name is correct, change the
access privileges of the folder.
4
No destination user has been registered.
Destination file versions do not match.
Disk space insufficient. Free disk space has fallen below the [Issue alert at:] value
Delivery processing interrupted due
to insufficient disk space.
Unable to process as disk is full. This message is displayed when attempting to send to
The destination group does not have the specified destination as a member and therefore the document could
not be delivered. The document is saved in the undelivered data tray.
The delivery server and network device have different
versions. Could not deliver to specified destination.
This error occurs when the network device does not automatically update its address book. If the delivery server has updated its address book, restart the network
device so that it updates its address book.
set in [Server disk space] on the [Error/Disk Space] tab. Create more disk space.
Free disk space has fallen below the [Suspend at:] value
set in [Server disk space] on the [Error/Disk Space] tab. Create more disk space.
an unverifiable disk or when attempting to save a document larger than the available disk space.
29
Page 34

Appendix
Uninstalling ScanRouter V2 Lite
4
This section explains how to uninstall
ScanRouter V2 Lite.
The contents of the RDCab folder remain after ScanRouter V2 Lite is uninstalled.
Important
❒ Before uninstallation, be sure to
back up the system and various
data. Stop the delivery server from
the ScanRouter V2 Administration
Utility.
Note
❒ ScanRouter V2 Lite cannot be un-
installed when netwok devices are
configured in [Set I/O Device]. To
uninstall ScanRouter V2 Lite, delete all the network devices set in
[Set I/O Device] first.
Exit the ScanRouter V2 Adminis-
A
tration Utility.
Select ScanRouter V2 Lite in [Add
B
and Delete Application] on the con-
trol panel, and then select [Add and
Delete] or [Change/Delete].
The "InstallShield Wizard" dialog
box appears.
Select if setting information such
E
as a Destination is deleted.
ScanRouter V2 Lite has been uninstalled and "Exit of Maintenance"
appears.
Note
❒ If you are asked to delete a file
which may be shared with other
programs, select [No].
Select [Complete].
F
Note
❒
If only ScanRouter V2 Lite is installed in a computer, you can
delete the RDCab folder (or a
folder specified as a data path). If
DeskTopBinder V2 or ScanRouter V2 Link is installed in the same
computer, however, do not delete the RDCab folder (or a folder
specified as a data path). If you
want to delete the data in ScanRouter V2 Lite, delete the DR
folder and the DRTmp folder in
the RDCab folder (or a folder
specified as a data path)
30
Select "Delete" and then select
C
[Next].
The Confirmation dialog box appears.
Select [OK].
D
Page 35

Dial-up Connection
Take the following precautions when
using a dial-up connection capable
devices:
Dial-up Connection
Using a Dial-up Network Computer
Using Dial-up Router with ScanRouter V2 Lite
Set the delivery server to the correct
settings with connected ScanRouter
V2 Administration Utility, ScanRouter V2 Link or DeskTopBinder V2. Set
network devices to appropriate settings from [Set I/O Device] in ScanRouter V2 Administration Utility.
If the network environment changes,
make the necessary changes on clients and/or network devices to correct server information with
connected ScanRouter V2 Administration Utility, ScanRouter V2 Link or
DeskTopBinder V2, and set correct information of connecting devices on
[Set I/O Device] from ScanRouter V2
Administration Utility.
Important
❒ If set for connection to the server
via dialup-Router, a connection
may be charged.
If you are using the ScanRouter V2
Administration Utility, DeskTopBinder V2 and/or ScanRouter V2
Link on a computer with dial-up feature, a connection to the server may
be charged with a certain settings.
Important
❒ If a computer is set as automatic in-
ternet connection with the dial-up
feature, a connection to internet is
charged without notifying display.
Set the computer to confirm connection in display before dialing
up. Sometimes check if automatic
dial-up is not taking place during
using these applications.
4
31
Page 36

INDEX
A
Administrator Modes
Available delivery methods
,
B
Back Up
,
24
D
,
,
,
,
17
7
17
18
,
,
,
17
7
,
,
24
1
,
,
18
Daily Operation
Default Image Format
Delete Backup Data
Delivery System
Delivery Table
Desk space
Destination
Add New Destination
Delete Destination
Edit Destination
Export Destinations
Group
Import Destinations
User
Disk Space Low Warning
E
,
Error
Error Log
Error Message
Error Notification
8
,
23
Delete All Error Log Entries
Export Error Log Entries
Forward Delivery/Forwarding Error Data
Max Error Log Entries Limit
View Delivery/Forwarding Error Data
,
9
,
15
11
,
,
15
18
,
,
18
18
,
17
9
,
2
23
,
,
23
23
,
,
23
23
H
,
Help
12
I
In-Tray
In-Tray save
Issue alert at:
,
17
, 3,
,
17
7
L
Launching/Quitting the Delivery Server
, 8,
Log
Low free disk space
22
,
7
M
Maintenance
, 16,
24
N
Nondelivery Message
,
8
P
Password
Preparation
,
15
,
5
,
Global settings
Preparation for Delivery Operation
5
R
,
,
25
24
Recover
Restore
,
,
6
6
32
Page 37

S
15
,
,
,
,
15
,
,
,
16
15
8
19
,
,
15
, 4,
,
19
20
20
15
,
19
,
,
22
13
17
,
22
22
,
16
,
Save as Windows file
,
Scan
ScanRouter V2 Administration Utility
Schedule
Select Server
Sender
Server disk space
[Server] menu
Set Administrator
Set Delivery Feature Defaults
Set I/O Device
Set Preferences
Status Bar
Suspending and Resuming Service
System Notices
22
Delete All Log Entries
Export Log Entries
Max Log Entries Limit
,
,
,
11
12
16
Launch
Quit
Screen Components
,
,
19
Add New Sender
Delete Sender
Edit Sender
Export Senders
Import Senders
,
,
13
,
14
11
U
Undelivered Data Tray
Delete Selected Undelivered Data
Forward Undelivered Data
Undelivered Data
View Undelivered Data
,
,
,
30
16
11
Uninstalling
Updating Information
User Index
User Modes
,
,
, 7,
16
13
,
20
21
,
21
,
20
33
Page 38

34
UE USA B427
Page 39

Part of illustrations or explanations in this guide may differ from your product due to improvement or
change in the product.
Notes:
1. The contents of this documents are subject to change without notice.
2. No part of this document may be duplicated, replicated, reproduced in any form, modified or quoted
without prior consent of the supplier.
3. THE SUPPLIER SHALL NOT BE LIABLE FOR THE RESULT OF THE OPERATION OF THIS
SOFTWARE OR THE USE OF THIS DOCUMENT.
Important
❒ It is possible that any document or data stored in the PC will be damaged or lost by user
error during operation or software error. Be sure to back up of all important data beforehand.
❒ Do not remove or insert any disk while operating this software.
❒ THE SUPPLIER SHALL NOT BE LIABLE TO YOU FOR DAMAGES OR LOSS OF ANY
DOCUMENT OR DATA PRODUCED BY USING THIS SOFTWARE.
❒ THE SUPPLIER SHALL NOT BE LIABLE TO YOU FOR ANY CONSEQUENTIAL, INCI-
DENTAL OR INDIRECT DAMAGES (INCLUDING, BUT NOT LIMITED TO, DAMAGES
FOR LOSS OF PROFITS, BUSINESS INTERRUPTION OR LOSS OF BUSINESS INFORMATION, AND THE LIKE) CAUSED BY FAILURE OF THIS SOFTWARE OR LOSS OF DOCUMENTS OR DATA, NOR FOR ANY OTHER DAMAGES ARISING OUT OF THE USE OF
THIS SOFTWARE, IF THE SUPPLIER HAS BEEN ADVISED OF THE POSSIBILITY OF
SUCH DAMAGES.
Copyright © 2001
Page 40

ScanRouter V2 Lite Management Guide
UE USA B427ENY0-02A
 Loading...