

Page 1
Guide
Page 2

Preface
ScanRouter V2 Link can monitor in-tray in the delivery server (ScanRouter V2 Professional/ScanRouter V2 Lite) in the network and notify of documents received from a network device in a client computer.
Also, ScanRouter V2 Link can automatically receive the received documents by the client computer
and delete them from the delivery server.
This manual explains how to use ScanRouter V2 Link. For information about how to use ScanRouter
V2, see the ScanRouter V2 Management Guide or Help of ScanRouter V2.
Network devices used in the illustrations of this guide is an example. It may differ from actual network
devices.
Trademark
Adobe, Acrobat, and PostScript are trademarks of Adobe Systems Incorporated.
Other company names and product names are trademarks or registered trademarks of their respective
companies. They are used for explanations in this manual and the rights of owners. Use of these
marks does not infringe on the rights of owners.
Page 3

TABLE OF CONTENTS
Introduction................................................................................................ 1
1.Launch and Exit
Launch........................................................................................................ 3
Exit.............................................................................................................. 4
2.Various settings
Setting in-trays .......................................................................................... 5
Dial-up-related Device................................................................................... 6
Setting Monitoring and Notification method: ......................................... 8
3.Confirmation and Receipt of Documents
Manual Confirmation and Automatic Receiving..................................... 9
Save as Windows file .................................................................................... 9
Add as DeskTopBinder V2 document ........................................................... 9
Notification Only ............................................................................................ 9
Automatic Confirmation and Automatic Receiving.............................. 10
Save as Windows file .................................................................................. 10
Add as DeskTopBinder V2 document ......................................................... 10
Notification Only .......................................................................................... 10
4.Appendix
Troubleshooting ...................................................................................... 11
File Formats ............................................................................................. 12
File Name of Documents......................................................................... 13
INDEX........................................................................................................ 14
i
Page 4

ii
Page 5
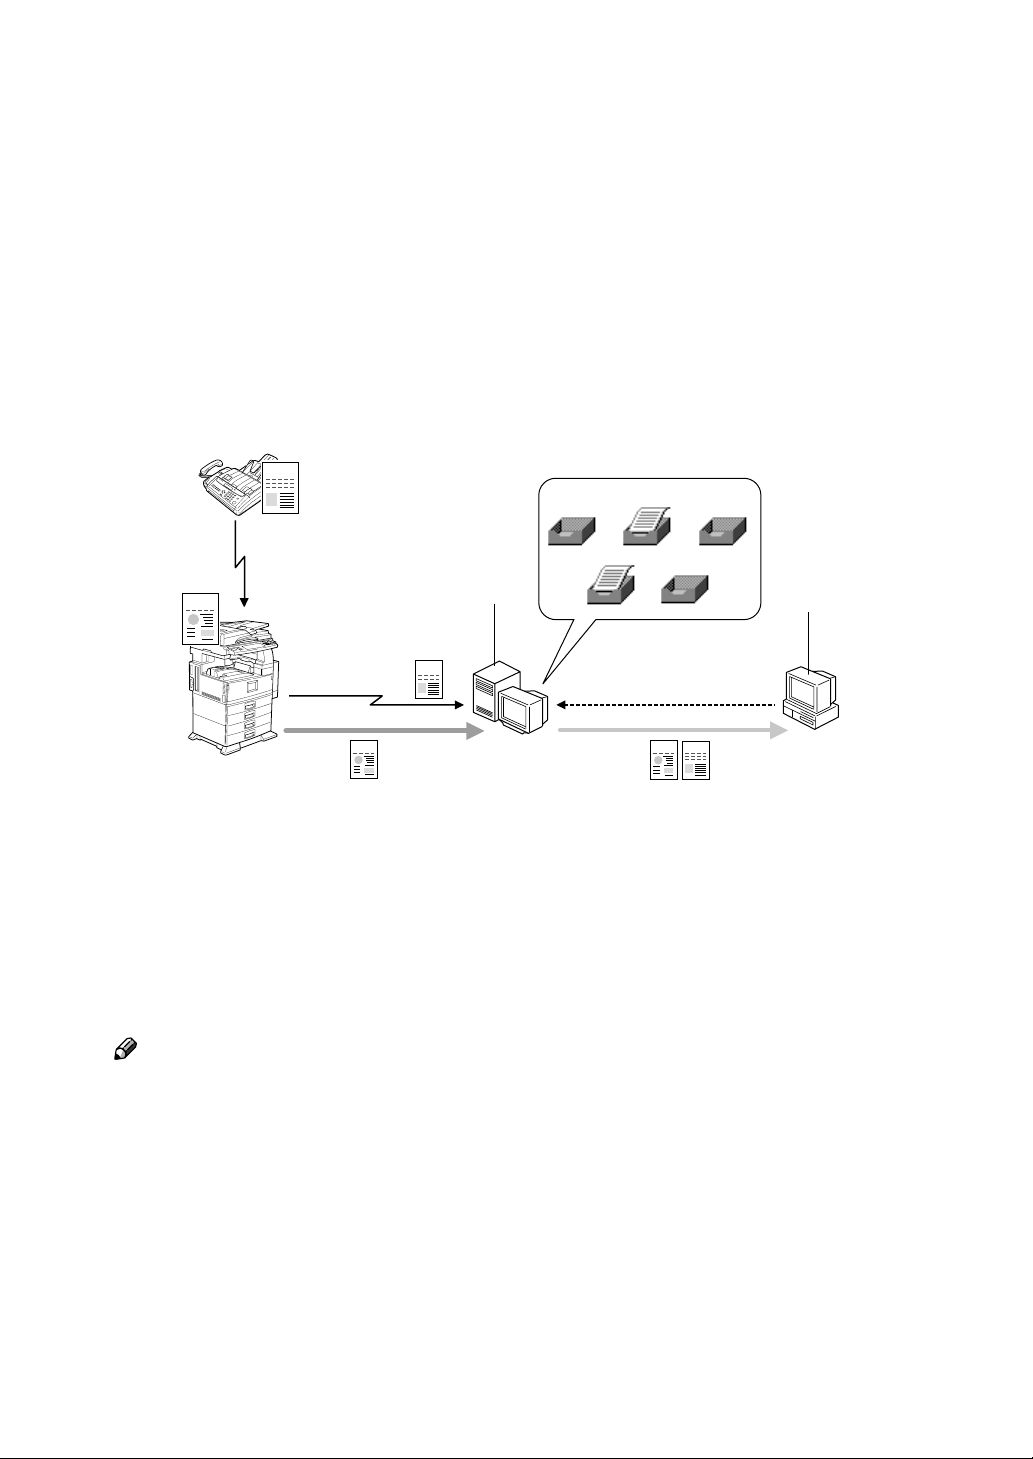
Introduction
ScanRouter V2 Link can monitor in-trays in the delivery server (ScanRouter V2 Professional/ScanRouter V2 Lite) in the network and notify of documents received from
a network device in a client computer. Also, ScanRouter V2 Link can automatically
receive the received documents sent by the client computer and delete them from the
delivery server. You can set to save the automatically received documents as below.
• The documents are saved in the specified location. The documents can be displayed by launching a specified application.
• If ScanRouter V2 Link and DeskTopBinder V2 are installed in the same machine, the documents are added in the [My Work Folder] of DeskTopBinder V2.
The documents can be displayed by DeskTopBinder V2.
FAX
3
SCN
1
FAX
2
4
SCN
SCN
FAX
5
GGFMICOJ
1. delivery server
2. Client Computer
3. Received in in-tray
Note
❒ In the WAN environment, do not use ScanRouter V2 Link installed in a client
computer. Depending on the network, timeout may occur and documents
cannot be delivered normally during connection.
❒ Set up an environment correctly when the ScanRouter V2 Administration
Utility, DeskTopBinder V2, or ScanRouter V2 Link is used in the dial-up connection computer. ⇒ P.6 “Dial-up-related Device”
4. Monitoring
5. Auto-Receiving/Notification
❒ Fax documents received from a facsimile can be used for ScanRouter V2 Pro-
fessional only.
❒ When Scan Type is set to GrayScale or Color, resolution is set to 600 dpi, or a
large image is read in the connecting device, processing after documents are
received automatically may take time depending on documents received. In
this case, we recommend that you increase the CPU processing capability,
memory size, or hard disk capacity of the client computer.
1
Page 6

2
Page 7

1. Launch and Exit
Launch
Click [Start] and point to [Programs] and [DeskTopBinder V2] to select [Scan-
A
Router V2 Link].
The "ScanRouter V2 Link Properties" dialog box appears.
Select [OK].
B
"ScanRouter V2 Link Properties" dialog box is closed, and the icon for
ScanRouter V2 Link is displayed on the task tray.
3
Page 8

1
Launch and Exit
Exit
Right-click the icon for ScanRouter V2 Link on the task tray, and click
A
[Exit].
ScanRouter V2 Link exits.
4
Page 9

2. Various settings
Setting in-trays
After installation, set in-trays to control. You can monitor multiple in-trays.
Click [Start] and point to [Programs] and [DeskTopBinder V2] to select [Scan-
A
Router V2 Link].
The "ScanRouter V2 Link Properties" dialog box appears.
Note
❒ To display the "ScanRouter V2 Link Properties" dialog box from already
launched ScanRouter V2 Link, right-click the icon of ScanRouter V2
Link on the task tray to select [Properties].
Select [Add] beside the [In-Trays to control:].
B
The "In-Tray Settings" dialog box appears.
Specify the in-trays to control.
C
A Enter the IP address of the delivery server in [Delivery Server].
Note
❒ You can select the delivery server from the displayed "Select Delivery
Server" dialog box by clicking [Browse]. When the delivery server name
is selected on the "Select Delivery Server" dialog box, an IP address is
displayed on the "In-Tray Settings" dialog box.
B Select [Browse] on the right of [In-Tray].
The "Add In-Tray to Control" dialog box appears.
C Click to select the in-tray name of the in-tray name from the in-tray list
which is displayed on the "Add In-Tray to Control," and select [OK].
D Enter the password for the in-tray, which was entered in [In-Tray], in
[Password].
Note
❒ Ask the delivery server administrator about the password to be entered.
Set how to process the document on the in-tray.
D
A Check [Monitor In-Tray] to monitor the in-tray periodically.
Check [Auto-receive from In-Tray] to automatically receive the document on
the in-tray.
B To save the automatically received document in the specified location,
select [Save as Windows file], and enter the location in [Save in:].
By selecting [Add as DeskTopBinder V2 document], you can add the automat-
ically received document in [My Work Folder] of DeskTopBinder V2.
5
Page 10

2
Various settings
Note
❒ By clicking [Browse], you can select the save location from the tree dis-
play.
❒ You can select [Add as DeskTopBinder V2 document] only when DeskTop-
Binder V2 was already installed in the same computer as for ScanRouter
V2 Link.
Set the format of saving documents.
E
Select the format from the pull-down menus for [Black & White:] and [Grayscale/
Color:].
Reference
For more information about formats, see P.12 “File Formats”.
Select [OK].
F
You have finished setting the in-tray to be monitored.
If multiple in-trays are monitored, repeat Steps B to F to add the in-tray.
G
Dial-up-related Device
When the dial-up router is connected in an environment in which ScanRouter V2 is used
Appropriately perform the settings below. If the network environment is
changed, perform the settings again.
The delivery server must be set up.
• network device
• ScanRouter V2 Administration Utility
• ScanRouter V2 Link
• DeskTopBinder V2
A network device must be set up.
• Delivery server (set up in the setting of I/O devices of ScanRouter V2 Administration Utility)
Note
❒ Some network devices do not require the setting of I/O devices.
Important
❒ If the delivery server is connected when a connection to the delivery server
via the dial-up router is set, the line may be connected and telephone charges
may be collected.
6
Page 11

Setting in-trays
When you use a dial-up connection computer
When the ScanRouter V2 Administration Utility, DeskTopBinder V2, or ScanRouter V2 Link is used in the dial-up connection computer, a dial-up connection
may be made due to the connection to the delivery server, depending on the setting.
Important
❒ When you set that your computer is automatically connected to the Internet,
without displaying the dialog box for confirming the connection, the line is
connected and telephone charges occur. To avoid the unnecessary dial-up
connection, be sure to set to display connection confirmation during operation. Also, check if the unnecessary dial-up connection is made when these
software products are used.
2
7
Page 12

Various settings
Setting Monitoring and Notification method:
Set how to notify of the monitoring interval of the in-tray and how to notify the
result of monitoring.
2
Note
❒ This setting is applied to all in-trays to be monitored.
Select the [Monitoring] tab on the "ScanRouter V2 Link Properties" dialog
A
box.
Set [Monitoring interval:] and [Notification method:].
B
If [Monitor Tray] on the "In-Tray Settings" dialog box is not selected, setting
[Monitoring interval:] will be invalid.
Select [OK].
C
You have finished setting monitoring and the notification method.
8
Page 13

3. Confirmation and Receipt
of Documents
Manual Confirmation and Automatic Receiving
Double-click the icon for ScanRouter V2 Link on the task tray.
A
Or, right-click the icon for ScanRouter V2 Link on the task tray to select [Re-
ceive]. If there are no documents on the in-tray, the "No corresponding data
after %s. (the date when you previously double-clicked the icon for ScanRouter V2 Link)" message appears. When there is a document on the in-tray, the
following are displayed depending on the setting on the "ScanRouter V2 Link
Properties" dialog box.
Save as Windows file
Received documents are saved in the specified location and deleted from the intray. After the documents are saved in the specified location, the "Data Received" dialog box appears. You can display the documents by specifying an application.
Add as DeskTopBinder V2 document
Received documents are added as ScanRouter V2 documents and deleted from
the in-tray. After the documents are added in [My Work Folder] for DeskTopBinder V2, the "Data Delivered" dialog box appears. You can launch DeskTopBinder
V2 by clicking [Launch DeskTopBinder V2].
Notification Only
After reception is confirmed, the "Data Delivered" dialog box appears. No received documents are deleted from the in-tray. You can launch DeskTopBinder
V2 to display the documents by clicking [Launch DeskTopBinder V2].
Note
❒ To confirm the contents of the in-tray, you must add the delivery server for
ScanRouter V2 to the connection destination in advance when the functionality of DeskTopBinder V2 is extended.
9
Page 14

Confirmation and Receipt of Documents
Automatic Confirmation and Automatic Receiving
When you set to monitor the in-tray, ScanRouter V2 Link automatically monitors the in-tray at each set time. When there is a document on the in-tray, the
following are displayed depending on the setting on the "ScanRouter V2 Link
Properties" dialog box.
3
Save as Windows file
Received documents are saved in the specified location and deleted from the intray. When a notification with pop-up is set, the "Data Received" dialog box appears. You can display the documents by specifying an application.
Add as DeskTopBinder V2 document
Received documents are added in [My Work Folder] for DeskTopBinder V2 and
deleted from the in-tray. When a notification with pop-up is set, the "Data Delivered" dialog box appears. You can launch DeskTopBinder V2 by clicking
[Launch DeskTopBinder V2].
Notification Only
After reception is confirmed, the "Data Delivered" dialog box appears. No received documents are deleted from the in-tray. You can launch DeskTopBinder
V2 to display the documents by clicking [Launch DeskTopBinder V2].
Note
❒ To confirm the contents of the in-tray, you must add the delivery server for
ScanRouter V2 to the connection destination in advance when the functionality of DeskTopBinder V2 is extended.
10
Page 15

4. Appendix
Troubleshooting
Problem Cause/Action
Cannot receive documents. Check if the service of the delivery server stops using
the ScanRouter V2 Administration Utility. Also, check
if the same in-tray is monitored by multiple client computers.
It takes time to receive data with a
network device.
Check the value of "Monitoring interval:" in the monitoring tab on the Properties dialog box in ScanRouter V2
Link. Do not make the size of data large by reducing the
resolution of documents for scanning.
Note
❒ It may take time to receive data depending on the
processing capability of the computer (e.g., the
memory of computer is small).
11
Page 16

4
Appendix
File Formats
Documents are received by either of the file formats below depending on the setting.
Note
❒ When originals are read by the network device, ScanRouter V2 Link handles
documents in which "Text, " "Text/Photo," or "Photo" is specified as the type
of originals and documents received by fax as a Black & White image.
❒ When documents handled as a Grayscale/Color image are read by the net-
work device, "Grayscale" is specified as the type of manuscripts.
❒ In case of multiple-page documents, one file is created for each page because
Multi-page option is not available for Grayscale/Color image.
❖❖❖❖ TIFF/TIFF-F
File formats used to save bitmap images. These formats are used for Black &
White, Grayscale, and Color images.
One file is created for single-page image in TIFF, and one file for multiplepage image in Multi-page TIFF and TIFF-F.
You can select the TIFF Compression Format as MH, MR, or MMR. In general, the order is MH, MR, MMR from low to high compression ratios (depending on the image).
❖❖❖❖ PDF
This file format can be opened with Adobe Acrobat Reader. Multi-page images can be saved in one file with this file format.
❖❖❖❖ JPEG
This method can compress image data with constant quality.
12
Page 17

File Name of Documents
File Name of Documents
When you select "Save as Windows file" in "Save as/Add as:" on the "In-Tray
Settings" dialog box, the following name is used for the received documents:
Document name_nnn.xxx
• nnn
Page number for documents when they are received as a file in the singlepage format. The page number is fixed to 001 when documents are received
as a file in the multiple-page format.
• xxx
Extension of each file format
Note
❒ If the same documents are received in the multiple-page format, the first
name in the page group is used.
4
13
Page 18

INDEX
C
Confirmation of reception
,
F
,
,
13
12
File Formats
File Name
J
,
JPEG
12
M
Monitor
, 5,
8
P
,
PDF
12
R
Reception
,
9
S
ScanRouter V2 Link Properties
9
,
5
T
,
TIFF
Troubleshooting
12
,
11
14
UE USA B428
Page 19

Part of illustrations or explanations in this guide may differ from your product due to improvement or
change in the product.
Notes:
1. The contents of this documents are subject to change without notice.
2. No part of this document may be duplicated, replicated, reproduced in any form, modified or quoted
without prior consent of the supplier.
3. THE SUPPLIER SHALL NOT BE LIABLE FOR THE RESULT OF THE OPERATION OF THIS
SOFTWARE OR THE USE OF THIS DOCUMENT.
Important
❒ It is possible that any document or data stored in the PC will be damaged or lost by user
error during operation or software error. Be sure to back up of all important data beforehand.
❒ Do not remove or insert any disk while operating this software.
❒ THE SUPPLIER SHALL NOT BE LIABLE TO YOU FOR DAMAGES OR LOSS OF ANY
DOCUMENT OR DATA PRODUCED BY USING THIS SOFTWARE.
❒ THE SUPPLIER SHALL NOT BE LIABLE TO YOU FOR ANY CONSEQUENTIAL, INCI-
DENTAL OR INDIRECT DAMAGES (INCLUDING, BUT NOT LIMITED TO, DAMAGES
FOR LOSS OF PROFITS, BUSINESS INTERRUPTION OR LOSS OF BUSINESS INFORMATION, AND THE LIKE) CAUSED BY FAILURE OF THIS SOFTWARE OR LOSS OF DOCUMENTS OR DATA, NOR FOR ANY OTHER DAMAGES ARISING OUT OF THE USE OF
THIS SOFTWARE, IF THE SUPPLIER HAS BEEN ADVISED OF THE POSSIBILITY OF
SUCH DAMAGES.
Copyright © 2001
Page 20

DeskTopBinder V2 ScanRouter V2 Link Guide
UE USA B428-8600
 Loading...