

Page 1
1 Overview............................................................................................................... 2
1.1 DeskTopBinder V2...........................................................................................................................2
1.2 Starting and Exiting DeskTopBinder V2 Lite........................................................................2
1.3 Adding Features ...............................................................................................................................2
2 Document Management.................................................................................. 3
2.1 Cabinets and Folders......................................................................................................................3
2.2 Documents and Sections..............................................................................................................3
2.3 Document Properties and Document Type ..........................................................................3
3 Using DeskTopBinder V2 Lite ..................................................................... 5
3.1 Structure of DeskTopBinder V2 Lite ......................................................................................5
4 Desk Features.................................................................................................... 6
4.1 Viewing the Desk Display .............................................................................................................6
4.2 Displaying Contents of a Document........................................................................................9
4.3 Controlling Documents...............................................................................................................10
4.4 Maintenance....................................................................................................................................11
5 Viewer Features.............................................................................................. 12
5.1 Viewing the Viewer Display.......................................................................................................12
5.2 Managing Sections........................................................................................................................12
This guide provides information about the features of DeskTopBinder V2 Lite and viewing its display. For
detailed operational procedures, see DeskTopBinder V2 Lite Help.
Page 2

DeskTopBinder V2 Lite Introduction Guide
1Overview
1.1 DeskTopBinder V2
DeskTopBinder V2 can integrate various kinds of data, such as
files made with different applications, scanned image data, and
existing image files for total document management. In addition to
the file name, each document can have specific document
properties. Networking with input/output (I/O) devices also
enables you to add document I/O functions. Depending on the
network devices, saved documents in the Document Server can be
captured by DeskTopBinder V2.
Incorporated with the DeskTopBinder delivery server, ScanRouter
V2 enables you to view documents in in-trays and deliver them.
DeskTopBinder delivery server must be installed in advance to
operate ScanRouter V2. ScanRouter V2 has two versions:
ScanRouter V2 professional and ScanRouter V2 Lite.
1.2 Starting and Exiting DeskTopBinder V2
Lite
Starting
)
Click [Start], and then point to [Programs].
*
Point to [DeskTopBinder V2], and then click [DeskTopBinder
V2].
DeskTopBinder V2 Lite starts.
≪ Note ≫
・ If the [Display list of expired documents on exit] check box on the My
Cabinet Properties dialog box is selected, the documents are searched
and the Expired Document list appears when you exit DeskTopBinder
V2 Lite. From the Expired Document list, you can delete unnecessary
documents.
1.3 Adding Features
New network devices can be added by selecting Extended
Features. These devices are displayed under the DeskTopBinder
V2 Lite tree and can be used in cooperation with DeskTopBinder
V2 Lite.
Using the network devices, the following operations are possible:
■ Control files in a client computer with DeskTopBinder V2 Lite
■ In cooperation with ScanRouter V2, view documents in the in-
trays
■ Control documents in the Document Server
≪ Note ≫
・ For more information about network devices, see Help. ("Extended
Features" in "Overview")
・ The Document Server function can be selected only when network
devices support the same function.
1
Exiting
)
From the [File] menu, select [Exit].
DeskTopBinder V2 Lite exits.
2
Page 3
DeskTopBinder V2 Lite Introduction Guide
2 Document Management
2.1 Cabinets and Folders
Added documents are stored in a cabinet called My Cabinet. In this
cabinet, you can create folders and use them to sort documents.
This cabinet has a trash can where deleted files and documents
are placed.
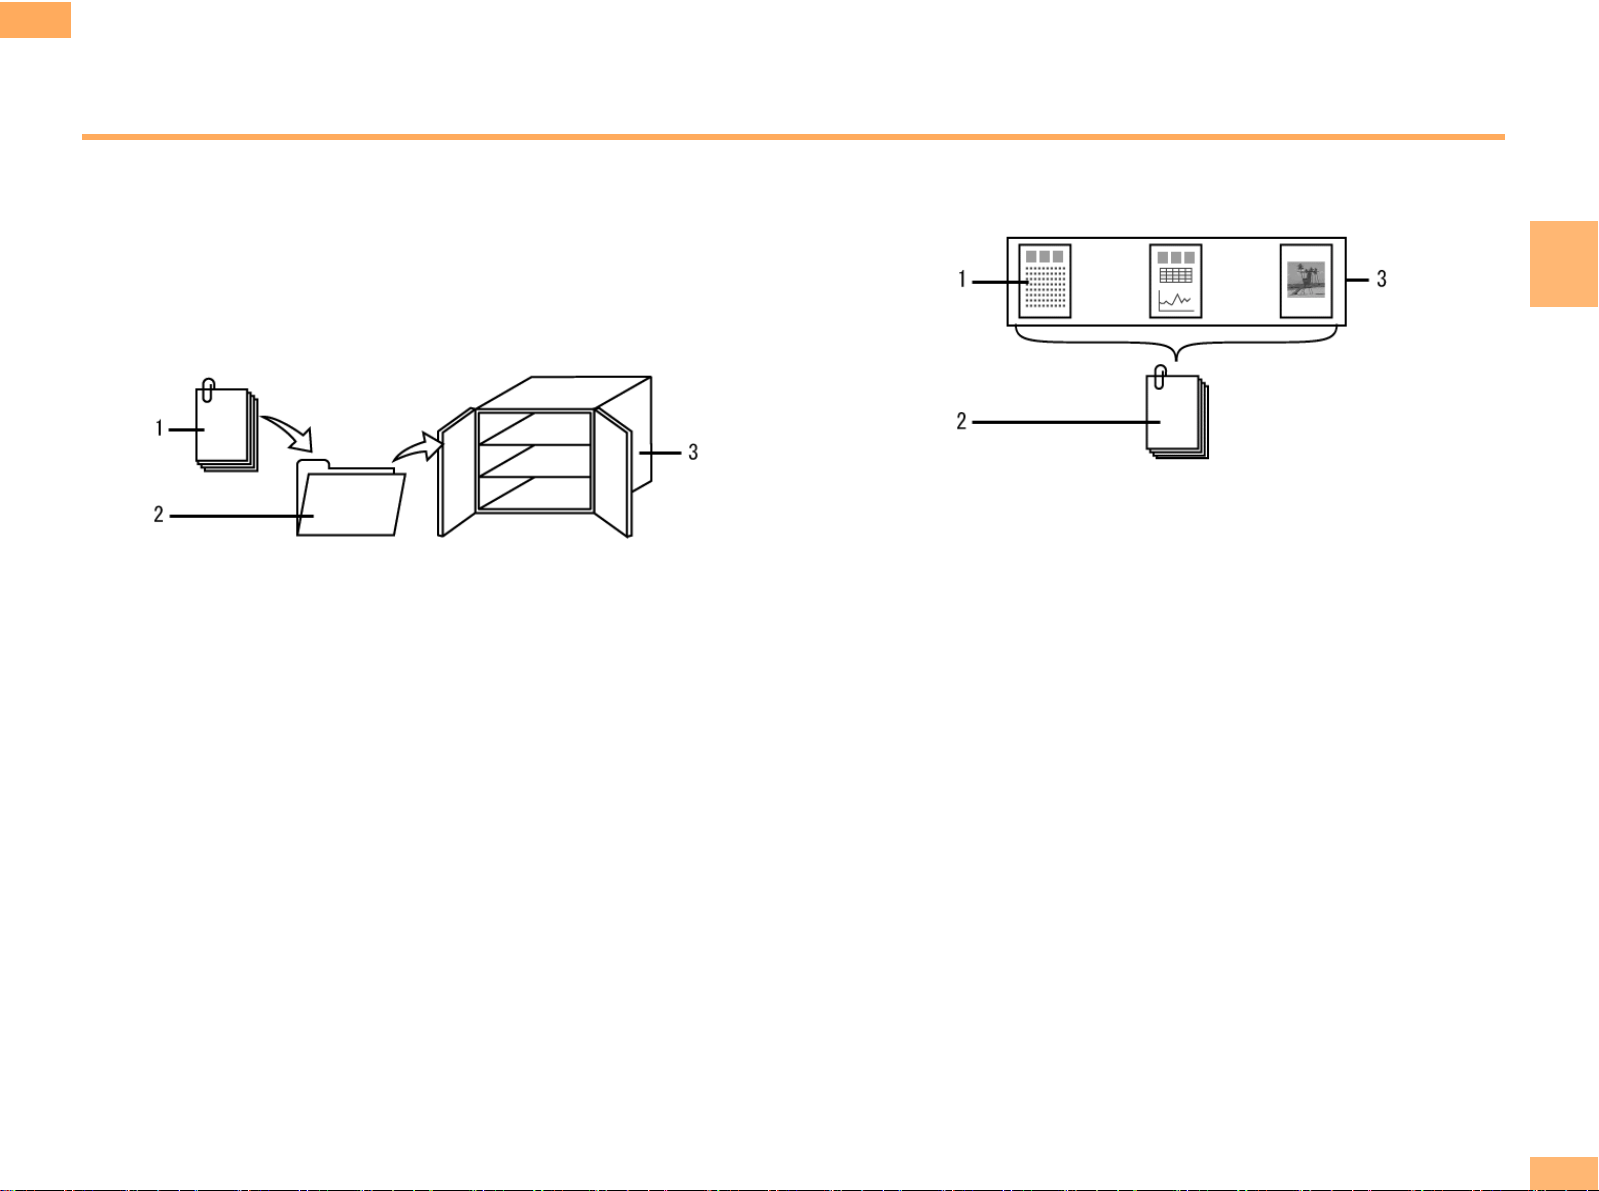
2
1. Section
2. Document
3. Data made with applications and scanned image data
1. Document
2. Folder
3. Cabinet
≪ Note ≫
・ When DeskTopBinder V2 Lite is installed, one My Cabinet is created.
You cannot add any new cabinets.
2.2 Documents and Sections
You can add multiple files made with various applications as one
document. In this case, one file becomes one section, and one
document can be composed of multiple sections.
2.3 Document Properties and Document Type
Document properties, including information such as the creator,
document status, and expiration date, make document
management easier.
The document properties displayed may differ depending on the
document type. Each document can only be configured as one
document type.
In addition to the basic document type, the ScanRouter V2
specific document types are available. Documents added from
input devices by way of ScanRouter V2 Lite/Professional can be
configured as a ScanRouter V2 specific document.
3
Page 4

DeskTopBinder V2 Lite Introduction Guide
Document Properties of DeskTopBinder V2 Lite
Using DeskTopBinder V2 Lite, you can configure document
properties for each document and confirm them using Properties.
You can confirm the document name, date added/modified,
creator, work status, and expiration date.
Document Properties and Document Type of In-Tray
Documents
The document properties displayed may differ depending on the
document type.
Each document delivered in the in-tray of ScanRouter V2 Lite/
Professional has a specific document type depending on the
capture method.
2
4
Page 5

DeskTopBinder V2 Lite Introduction Guide
3 Using DeskTopBinder V2 Lite
3.1 Structure of DeskTopBinder V2 Lite
DeskTopBinder V2 Lite has Desk and Viewer displays.
■ Desk Display
Shows a document list. This display is used to operate
DeskTopBinder V2 Lite.
3
■ Viewer Display
Shows the contents of a document. This display is mainly
used to edit a document.
5
Page 6

DeskTopBinder V2 Lite Introduction Guide
4 Desk Features
4.1 Viewing the Desk Display
1 : Menu Bar
Use this to perform operations on the display.
2 : Standard Toolbar
Use this to perform standard function operations such as
searching, displaying properties, and switching views.
3 : Input Toolbar
Use this to add existing files and scanned documents.
4 : Tree Pane
Displays My Cabinet from DeskTopBinder V2 Lite and
network devices added using the Extended Features
function. Just after installation, only My Workroom is
displayed.
5 : Document List Pane
Displays folders and documents in a cabinet or a folder
selected from the tree.
6 : Output Toolbar
Use this for printing and fax transmission. Except and
, functions configured using Extended Features are
displayed.
7 : Conversion Toolbar
Use this to convert documents or sections into images.
Convert to Image setting must be configured using
Extended Features of DeskTopBinder V2 Lite.
4
6
Page 7

DeskTopBinder V2 Lite Introduction Guide
Document View Varieties
The following views are available:
■ Thumbnails View
6 : [Previous Section][Next Section] Buttons
These buttons appear when a document is composed of
multiple sections. Use them to move through the sections
of a document.
7 : Note
Click this to show the marked section. Double-click to
display the Note Contents dialog box.
8 : Note Leaf
When six or more notes are attached to one document,
only five notes are displayed, and the Note Leaf button
appears. Use this button to move through the marked
sections of a document.
9 : Current Section Number/Total Section Number
Shows the current section number and the total number of
sections.
■ Icons View
4
1 : Folder Icon
2 : Folder or Document Name
3 : Clip
When a document is composed of multiple sections, a clip
is displayed.
4 : Section Thumbnail
The section thumbnail is displayed. According to the data,
sometimes the thumbnail is not created.
5 : Section Icon
The application icon corresponding to the section file
extension is displayed.
1 : Folder Icon
2 : Document Icon
The document icon is displayed. When a document is
composed of multiple sections, the icon is displayed with a
clip attached.
3 : Folder or Document Name
4 : Total Section Number
Shows the total number of sections in the document.
7
Page 8

DeskTopBinder V2 Lite Introduction Guide
■ Details View
1 : Displayed Items
Click each item to sort documents. In addition, the
documents stored in the in-tray can be displayed by
document type.
■ Calendar View
・ Monthly View
・ Weekly View
4
1 : Monthly/Weekly Button
Use this to switch between the weekly and monthly
calendar.
2 : [Specify Date] Button
Shows the month or week including the specified date.
3 : [Today] Button
Shows the month or week including today.
4 : Calender Settings Button
Select Monday or Sunday as the first day of the week in
the calendar.
5 : Added/Modified Date
Select to display by the added date or modified date of the
document.
≪ Note ≫
・ You can directly edit a folder or document name by clicking it.
・ To show unread status of documents, the unread mark is
displayed in the Thumbnails view and is shown in red in the Details
view.
・ The view type and view contents may differ depending on the network
devices.
8
Page 9

DeskTopBinder V2 Lite Introduction Guide
4.2 Displaying Contents of a Document
The following methods are available to display the contents of a
document:
■ Using Easy Viewer
Select [Easy Viewer] from the [View] menu or click the Easy
Viewer button on the toolbar. Then select a document from
the document list pane.
■ Using Viewer
From the [Document] menu, select [Open in Viewer].
■ Using an Application
Three methods are available:
・ Double-click a document composed of one section created
with an application file.
・ In the Thumbnails view, select a section, and then select
[Open in Application] from the [Document] menu.
・ In the Icon view, Details view, or Calendar view, select a
document containing only one section, and then select
[Open in Application] from the [Document] menu.
Displaying a Document Using Easy Viewer
You can easily display the contents of a document section by
section.
Click , and then select a document on the document list pane.
The size of the Easy Viewer window is changeable.
4
1 : [Previous Section][Next Section] Buttons
Use these buttons to move through the sections of a
document.
2 : [Open Viewer] Button
Use this to start Viewer. Easy Viewer is canceled.
3 : Current Section Number/Total Section Number
Shows the current section number and the total number of
sections.
4 : [Launch] Button
Launches an application. Easy Viewer is canceled.
5 : [Previous Document][Next Document] Buttons
Use these buttons to move from document to document.
6 : [90 ゚ Left] [90 ゚ Right] [180 ゚ ] Buttons
Use these buttons to rotate a displayed section image.
The rotated image cannot be saved.
7 : Section Name
≪ Note ≫
・ Easy Viewer can display image sections only.
9
Page 10

DeskTopBinder V2 Lite Introduction Guide
4.3 Controlling Documents
≪ Reference ≫
・ For details, see Help.
Adding Documents
To add a document, start from the [File] menu or Input toolbar.
The following methods are available:
■ Create a new file using an application
A new file created with an application is added as a document.
■ Add a document from a file
An existing file is added as a document. You can use the dragand-drop operation.
■ Add a document using a scanner
A scanned image is added as a document.
■ Add a document using easy scanning
Configure the scan-input conditions in advance. The image
scanned with the easy scanning compliant scanner is added as
a document.
≪ Note ≫
・ Scan or easy scanning settings must be configured using Extended
Features.
Searching Documents
To search for documents, start from the [File] menu or General
toolbar.
The following methods are available:
■ Specific Search
Searches with detail conditions.
■ Broad Search
Searches only with words or date.
Arranging Documents
The following methods are available:
■ Display properties
You can check the document properties and document type.
■ Create thumbnails
When section thumbnails are created, you can find and view
documents in the Thumbnails view.
■ Combine/Separete documents
Use to combine multiple documents or to separete multiple
DeskTopBinder V2 Lite documents into one-section
documents.
■ Add/delete a note and change note contents
Adding/deleting a note on a section makes document
arrangement easier.
You can change the color of a note and enter the comment.
Printing/Outputting/Converting Documents
To print, output or convert documents, start from the [File] menu,
or Output or Conversion toolbar.
The following methods are available:
■ Export as files
■ Print using Easy Print
■ Fax transmission (Send by Fax)
■ Print
■ Convert to an image file (Convert to Image)
≪ Note ≫
・ Easy Print, fax transmission must be configured using Extended
Features.
・ Convert to Image is available only for image data.
・ To use fax transmission, a fax driver is required. For information about
supported fax drivers, see the DeskTopBinder V2 Readme file.
4
≪ Note ≫
・ This version does not support Specific Search.
10
Page 11

DeskTopBinder V2 Lite Introduction Guide
4.4 Maintenance
Arranging Folders
You can create, delete, move, and change the name of folders.
Adding Features
To add features, start from the [Tools] menu.
The following features are available:
■ Input functions
Scan, easy scanning
■ Output functions
Easy Print, Send by Fax, Deliver
■ Convert function
Convert to Image
■ Network functions
My Computer, Document Server
Backing Up DeskTopBinder V2 Lite Cabinets and
Folders
≪ Note ≫
・ For more information about backups, see DeskTopBinder V2 Help.
("Backup" in "DeskTopBinder V2 operation")
4
For backups, start from the [File] menu. Periodic backup and
extracting backup data are possible.
■ Manual Backup
Select the folder to be backed up. From the [File] menu,
select [Backup]. In the [Backup] dialog box, select the objects
to be backed up. In the [Save As] dialog box, specify the name
for the backup file and where the file is to be saved.
■ Automatic Backup
Click the My Cabinet icon. The My Cabinet Properties dialog
box appears. Click the [Backup] tab and make the necessary
settings.
■ Extract Backup Data
Use Windows Explorer and uncompress the file.
In the [Extract To] dialog box, click [Browse DeskTopBinder
Tree]. Specify the location for the file and uncompress.
11
Page 12

DeskTopBinder V2 Lite Introduction Guide
5 Viewer Features
5.1 Viewing the Viewer Display
When a DeskTopBinder V2 Lite document Is Displayed
The menu and toolbars look different depending on whether an
image section or non-image section is displayed.
To edit an image, click [Edit Image] from the Section menu or
Image View toolbar.
5 : Note
Use this to attach or delete a note, or to change the note
contents.
6 : Section Name
Use this to change the section name.
7 : Section List Pane
The section thumbnail list in a document is displayed.
8 : Output Toolbar
Use this for printing and fax transmission. Except and
, functions configured using Extended Features are
displayed.
9 : Drawing Toolbar
Use this to draw lines, polygons and circles on an image.
10 : Conversion Toolbar
Use this to convert documents or sections to images. Convert
to Image setting must be configured using Extended Features
of DeskTopBinder V2.
11 : Section Pane
The contents of the currently selected section are displayed.
Only image sections can be displayed.
≪ Note ≫
・ The Image View toolbar appears only when an image section is
displayed.
5
1 : Menu Bar
Use this to perform operations on the display.
2 : Standard Toolbar
Use this to perform standard function operations such as
switching sections and adding notes.
3 : Input Toolbar
Use to add existing files and scanned documents.
4 : Image Viewing Toolbar
Use to zoom in, zoom out, or rotate an image.
5.2 Managing Sections
≪ Reference ≫
・ For more information, see Help.
Changing the Section Order
To change the section order, start from the menu, or move a
section thumbnails in the thumbnail pane using a drag-and-drop
operation.
12
Page 13

DeskTopBinder V2 Lite Introduction Guide
Inserting/Replacing a Section
To insert/replace a section, start from the [File] menu. The types
of data you can insert/replace are:
■ Data imported from a file
■ Image data scanned with a scanner
■ Clipboard images
■ Data captured from added documents
■ Image data scanned using easy scanning
≪ Note ≫
・To use a Scan or easy scanning to insert or replace a section, you must
first configure them using Extended Features.
Printing/Outputting/Converting a Section
To print, output or convert a section, start from the [File] menu,
the Output toolbar or Conversion toolbar.
The following methods are available:
■ Export as files
■ Print with Easy Print
■ Fax transmission (Send by Fax)
■ Print
■ Convert to an image file (Convert to Image)
■ Insert Text
■ Stamp
■ Insert Illustration
■ Straight Lines
■ Horizontal/Vertical Lines
■ Squares/Rectangles
■ Rounded Rectangles
■ Ovals
■ Polygons
■ Freehand
5
≪ Note ≫
・ To use Easy Print or fax transmission, you must first configure them
with Extended Features.
・ Convert to Image is available only for image data.
Editing an Image Section
To edit an image, click [Edit Image] from the Section menu or the
Image Viewing toolbar.
To draw a figure, start from the [Graphics] menu or Drawing
toolbar.
The followings are available for editing an image.
Copyright
©
2001
B428ENY0-02
13
 Loading...