

Ricoh InfoPrint 1612 User Manual

InfoPrint 1612
MT(4546)
User’s Guid e
S510-6708-00

2
Edition: June 2006
The following paragraph does not apply to any country where
such provisions are inconsistent with local law: LEXMARK
INTERNATIONAL, INC., PROVIDES THIS PUBLICATION “AS IS”
WITHOUT WARRANTY OF ANY KIND, EITHER EXPRESS OR
IMPLIED, INCLUDING, BUT NOT LIMITED TO, THE IMPLIED
WARRANTIES OF MERCHANTABILITY OR FITNESS FOR A
PARTICULAR PURPOSE. Some states do not allow disclaimer of
express or implied warranties in certain transactions; therefore, this
statement may not apply to you.
This publication could include technical inaccuracies or
typographical errors. Changes are periodically made to the
information herein; these changes will be incorporated in later
editions. Improvements or changes in the products or the programs
described may be made at any time.
References in this publication to products, programs , or services do
not imply that the manufacturer intends to make these available in
all countries in which it operates. Any reference to a product,
program, or service is not intended to state or imply that only that
product, program, or service may be used. Any functionally
equivalent product, program, or service that does not infringe any
existing intellectual property right may be used instead. Evaluation
and verification of operation in conjunction with other products,
programs, or services, except those expressly designated by the
manufacturer, are the user’s responsibility.
Trademarks
Lexmark and Lexmark with diamond design are trademarks of
Lexmark International, Inc. Other trademarks are the property of
their respective owners.
© 2006 Lexmark International, Inc.
All rights reserved.
UNITED STATES GOVERNMENT RIGHTS
This software and any accompanying documentation provided
under this agreement are commercial computer software and
documentation developed exclusively at private expense.
Safety information
Additional caution statements throughout this document:
• Connect the power cord to a properly grounded
electrical outlet that is near the product and
easily accessible.
•CAUTION: Do not set up this product or make
any electrical or cabling connections, such as
the power cord or telephone, during a lightning
storm.
•CAUTION: This product uses a laser. Use of
controls or adjustments or performance of
procedures other than those specified herein
may result in hazardous radiation exposure.
• This product uses a printing process that heats
the print media, and the heat may cause the
print media to release emissions. You must
understand the section in your operating
instructions that discusses the guidelines for
selecting print media to avoid the possibility of
harmful emissions. (See Selecting print media
on page 12.)
• Refer service or repairs, other than those
described in the operating instructions, to a
professional service person.
• This product is designed, tested, and approved
to meet strict global safety standards with the
use of specific manufacturers components. The
safety features of some parts may not alwa ys be
obvious. The manufacturer is not responsib le for
the use of other replacement parts.
CAUTION: The fuser or fuser area may be hot.
CAUTION: Turn the printer off, and unplug the power
cord from the wall outlet before continuing.
CAUTION: To install memory, you must access the
printer system board. Turn the printer off, and unplug
the power cord from the wall outlet before continuing.

3
CAUTION: If you are installing a memory card after
setting up the printer, turn the printer off, and unplug
the power cord from the wall outlet before continuing.
CAUTION: If you are installing a flash memory card
after setting up the printer, turn the printer off, and
unplug the power cord from the wall outlet before
continuing.

4
Contents
Chapter 1: Learning about the printer .............................................................................. 6
Printer overview ...............................................................................................................................................6
Understanding the control panel ......................................................................................................................9
Chapter 2: Understanding print media guidelines ......................................................... 11
What types of print media can be loaded? ....................................................................................................11
Selecting print media ..................................................................................................................................... 12
Storing print media .........................................................................................................................................17
Avoiding jams ................................................................................................................................................18
Chapter 3: Printing ............................................................................................................ 19
Loading the 250-sheet tray .................. ........................................................ .................................................. 19
Loading the manual feeder ..................... ........................................................ ...............................................24
Linking trays ...................................................................................................................................................25
Sending a job to print .....................................................................................................................................25
Canceling a print job .............. ... ... ..................................................... ... ... .......................................................26
Printing the menu settings page ....................................................................................................................27
Printing a network setup page ............................................................................................ .. .........................28
Printing a font sample list ............................................................... ................................................................28
Chapter 4: Installing options ........................................................................................... 29
Accessing the system board ..........................................................................................................................29
Adding a memory card ...................................................................................................................................32
Adding a flash memory card ..........................................................................................................................33
Installing an optional 550-sheet drawer .........................................................................................................34
Recognizing installed options ........................................................................................................................35
Chapter 5: Maintaining the printer .................................................................................. 36
Storing supplies .............................................................................................................................................36
Conserving supplies ......................................................................................................................................36
Ordering supplies ..................................................... ..................................................... ... ..............................36
Photoconductor kit end-of-life ........................................................................................................................39
Maintenance kit ..............................................................................................................................................42
Chapter 6: Clearing jams .................................................................................................. 43
Identifying jams ............................................. ..................................................... ... .........................................43
Understanding jam messages .......................................................................................................................43
Clearing a jam .......................................................... ..................................................... .................................44
Chapter 7: Troubleshooting ............................................................................................. 50

5
Contents
Calling for service .............................................. ... ... ......................................................................................50
Checking an unresponsive printer .................................................................................................................50
Printing multiple-language PDFs ...................................................................................................................51
Solving printing problems ..............................................................................................................................51
Turning on Reduced Curl mode ........................................................... ... .. .....................................................52
Solving option problems ................................................................................................................................53
Solving service message issues ....................................................................................................................54
Solving paper feed problems .......................................................................... ... ............................................54
Solving print quality problems ........................................................................................................................55
Cleaning the printhead lens ...........................................................................................................................59
Chapter 8: Administrative support .................................................................................. 61
Disabling control panel menus .......................................................................................................................61
Enabling control panel menus .......................................................................................................................61
Restoring factory default settings ..................................................................................................................62
Selecting printer operating mode ...................................................................................................................62
Setting security using the Embedded Web Server (EWS) .............................................................................62
Notices ................................................................................................................................ 66
Conventions ...................................................................................................................................................66
Electronic emission notices ...........................................................................................................................66
Noise emission levels ................................... .. ... ..................................................... ... ....................................68
Product energy consumption .........................................................................................................................68
Waste from Electrical and Electronic Equipment (WEEE) directive ...............................................................69
Laser notice ...................................................................................................................................................69
Index .................................................................................................................................... 70
Learning about the printer
6
1
Learning about the printer
Printer overview
CAUTION: Do not set up this product or make any electrical or cabling connections, such
as the power cord or telephone, during a lightning storm.
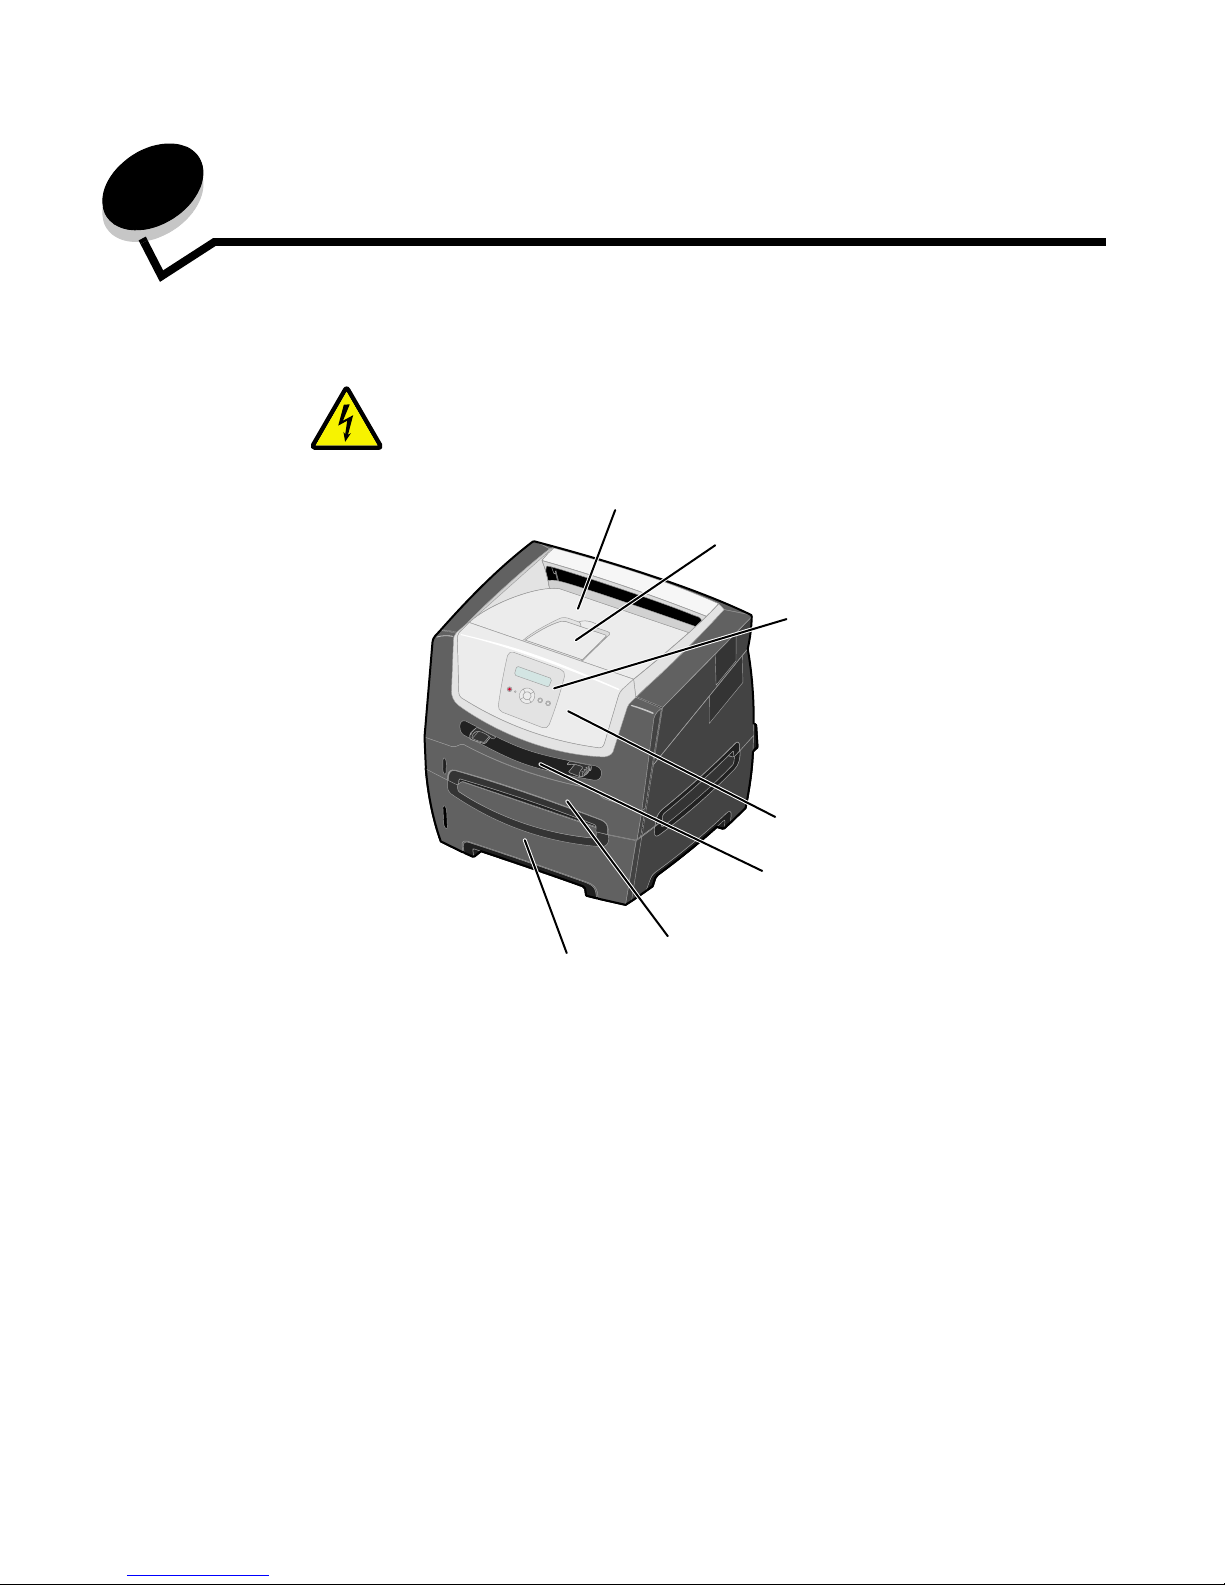
The following illustration shows a front view of the printer with its features labeled.
1
2
3
4
5
6
7
1 150-sheet output bin 5 Manual feeder
2 Paper support 6 250-sheet tray
3 Control panel and Menu buttons 7 550-sheet drawer (optional)
4 Front door
Printer overview
7
Learning about the printer
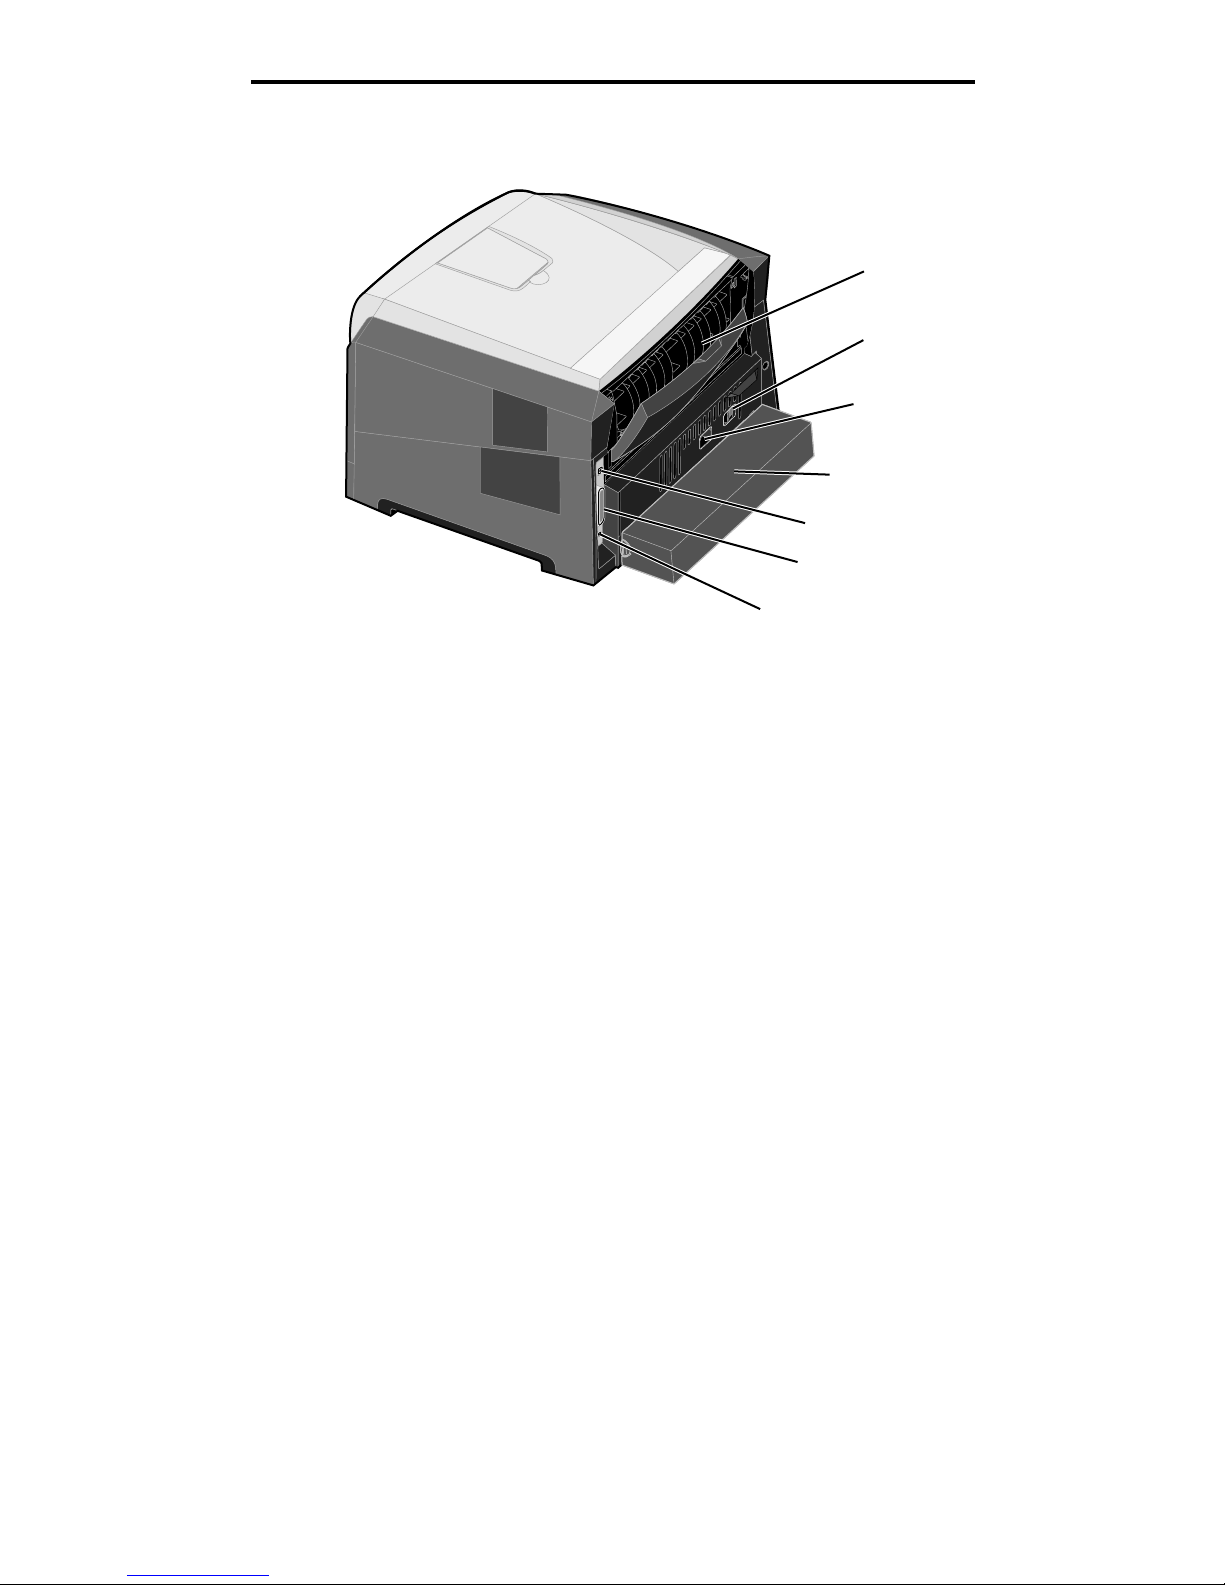
The following illustration shows a rear view of the printer with its features labeled.
1
2
3
6
7
5
4
1 Rear exit 5 USB connect
2 Power button 6 Parallel connect
3 Power connect 7 Ethernet connect
4 Dust cover (not available for some models)
Printer overview
8
Learning about the printer
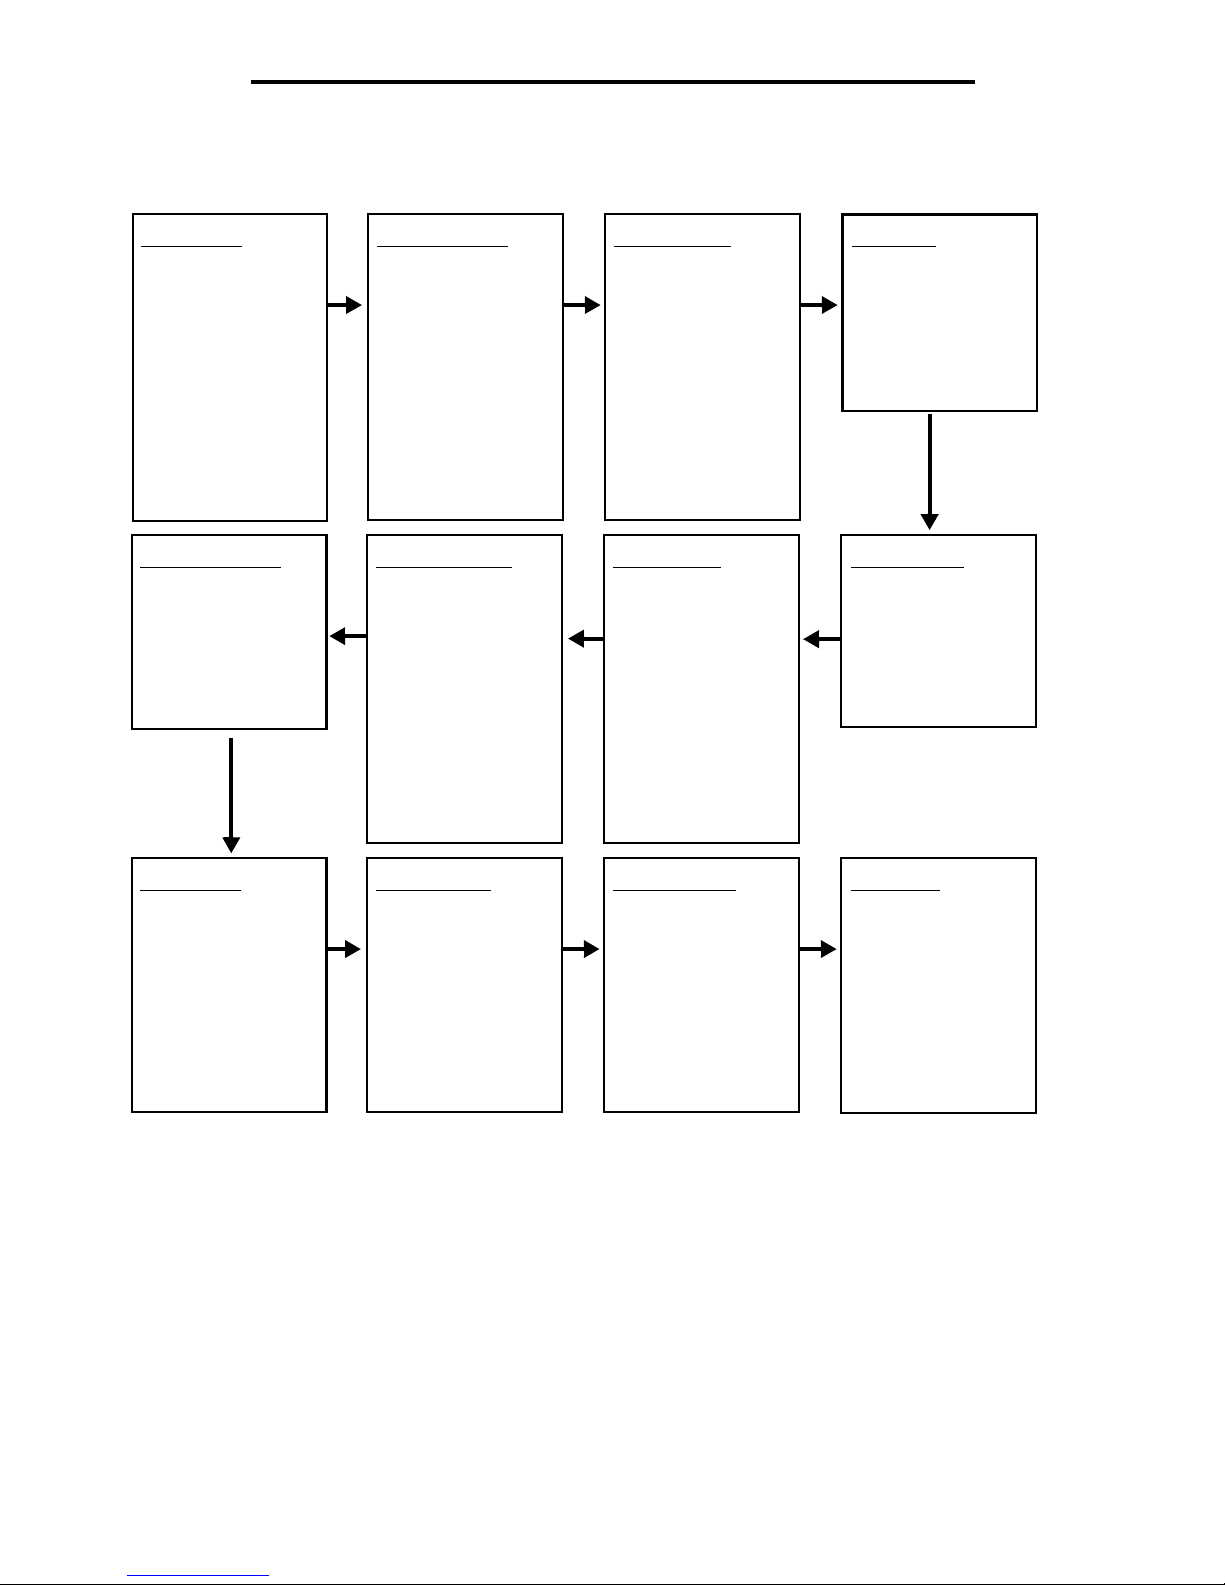
A number of menus are available to make it easy for you to change printer settings. The diagram shows the menu index on
the control panel and the menus and items available under each menu. For more inf ormation about menus and menu items,
see the Menus and Messages guide on the Software and Documentation CD.
Quality Menu
Print Resolution
Toner Darkness
Small Font Enh.
Job Menu
Reset Printer
PCL Emul Menu
Font Source
Font Name
Point Size
Pitch
Symbol Set
Orientation
Lines per Page
A4 Width
Tray Renumber
Auto CR after LF
Auto LF after CR
Set-up Menu
Eco-mode
Quiet Mode
Printer Language
Power Sav er
Resource Save
Print Timeout
Wait Timeout
Auto Continue
Jam Recovery
Page Protect
Display Language
Toner Alarm
PostScript Menu
Print PS Error
Font Priority
USB Menu
Standard USB
Parallel Menu
Std Parallel
Network Menu
Standard Network
PPDS Menu
Orientation
Lines per Page
Lines per Inch
Page Format
Character Set
Best Fit
Tray 1 Renumber
Auto CR after LF
Auto LF after CR
Finishing Menu
Duplex
Duplex Bind
Copies
Blank Pages
Collation
Separator Sheets
Separator Source
Multipage Print
Multipage Order
Multipage View
Multipage Border
Utilities Menu
Print Menus
Print Stats
Print Net Setup
Print Fonts
Print Directory
Factory Defaults
Format Flash
Defragment Flash
Hex Trace
Paper Menu
Paper Source
Paper Size
Paper Type
Custom Types
Universal Setup
Substitute Size
Paper Texture
Paper Weight
Paper Loading
Understanding the control panel
9
Learning about the printer
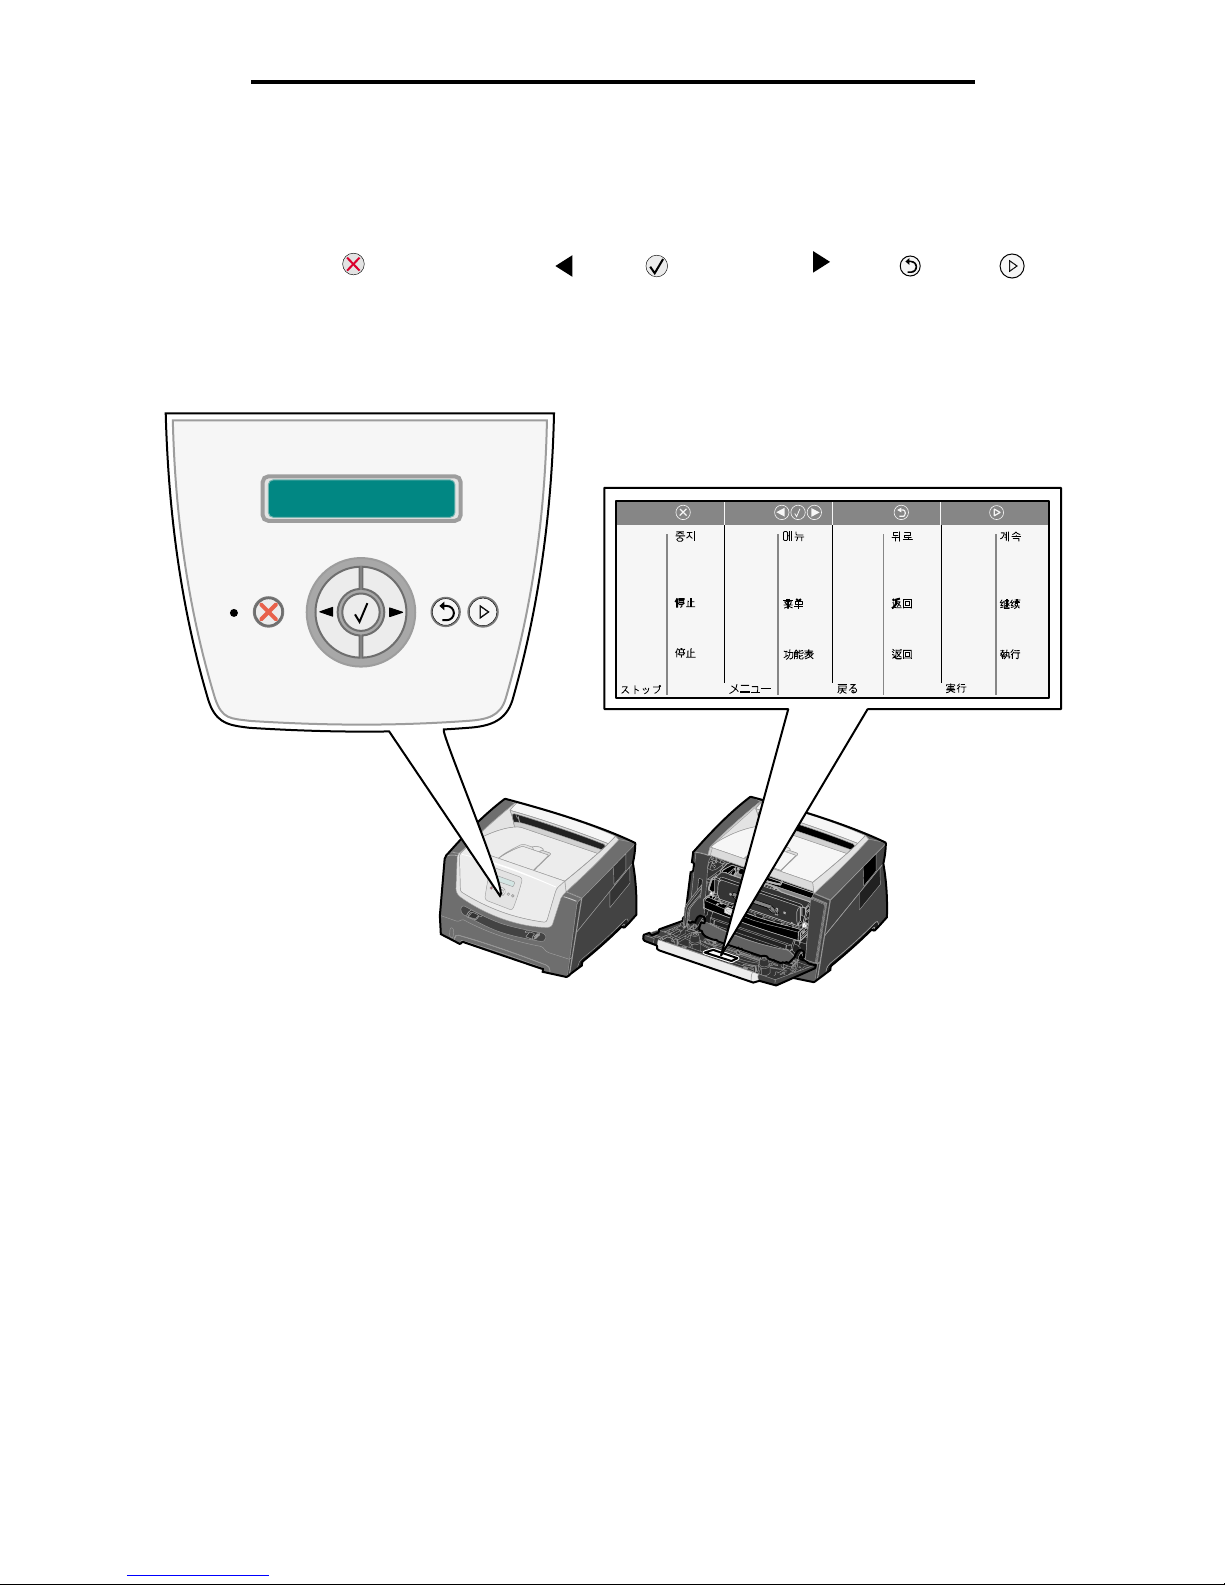
Understanding the control panel
The control panel consists of these items:
• A 2-line liquid crystal display (LCD) that shows text
• Six buttons: Stop , Menu (with Left Menu , Select , and Right Menu ), Back , and Go
• An indicator light
Note: A label located on the inside front door shows the control panel buttons in your language. An
additional translated label is included in the printer box.
Stopp
Stop
Parar
Stopp
Durdur
Стоп
Voltar
Zp t
Tilbage
Terug
Takaisin
Retour
Zurück
Vissza
Indietro
ě
Tilbake
Wró
aa
Atrás
Bakåt
Geri
ć
Hзд
Menu
Nabídka
Menu
Menu
Valikko
Menu
Menü
Menü
Menu
Meny
Menu
Menú
Meny
Menü
Меню
Parar
Stop
Stop
Stop
Seis
Stop
Stopp
Leállítás
Stop
BackStop
Continuar
Start
Start
Start
Jatka
Reprise
Fortfahren
Tovább
Ok
Fortsett
Dalej
Continuar
Starta
Git
Пуск
Go
Menu
Understanding the control panel
10
Learning about the printer
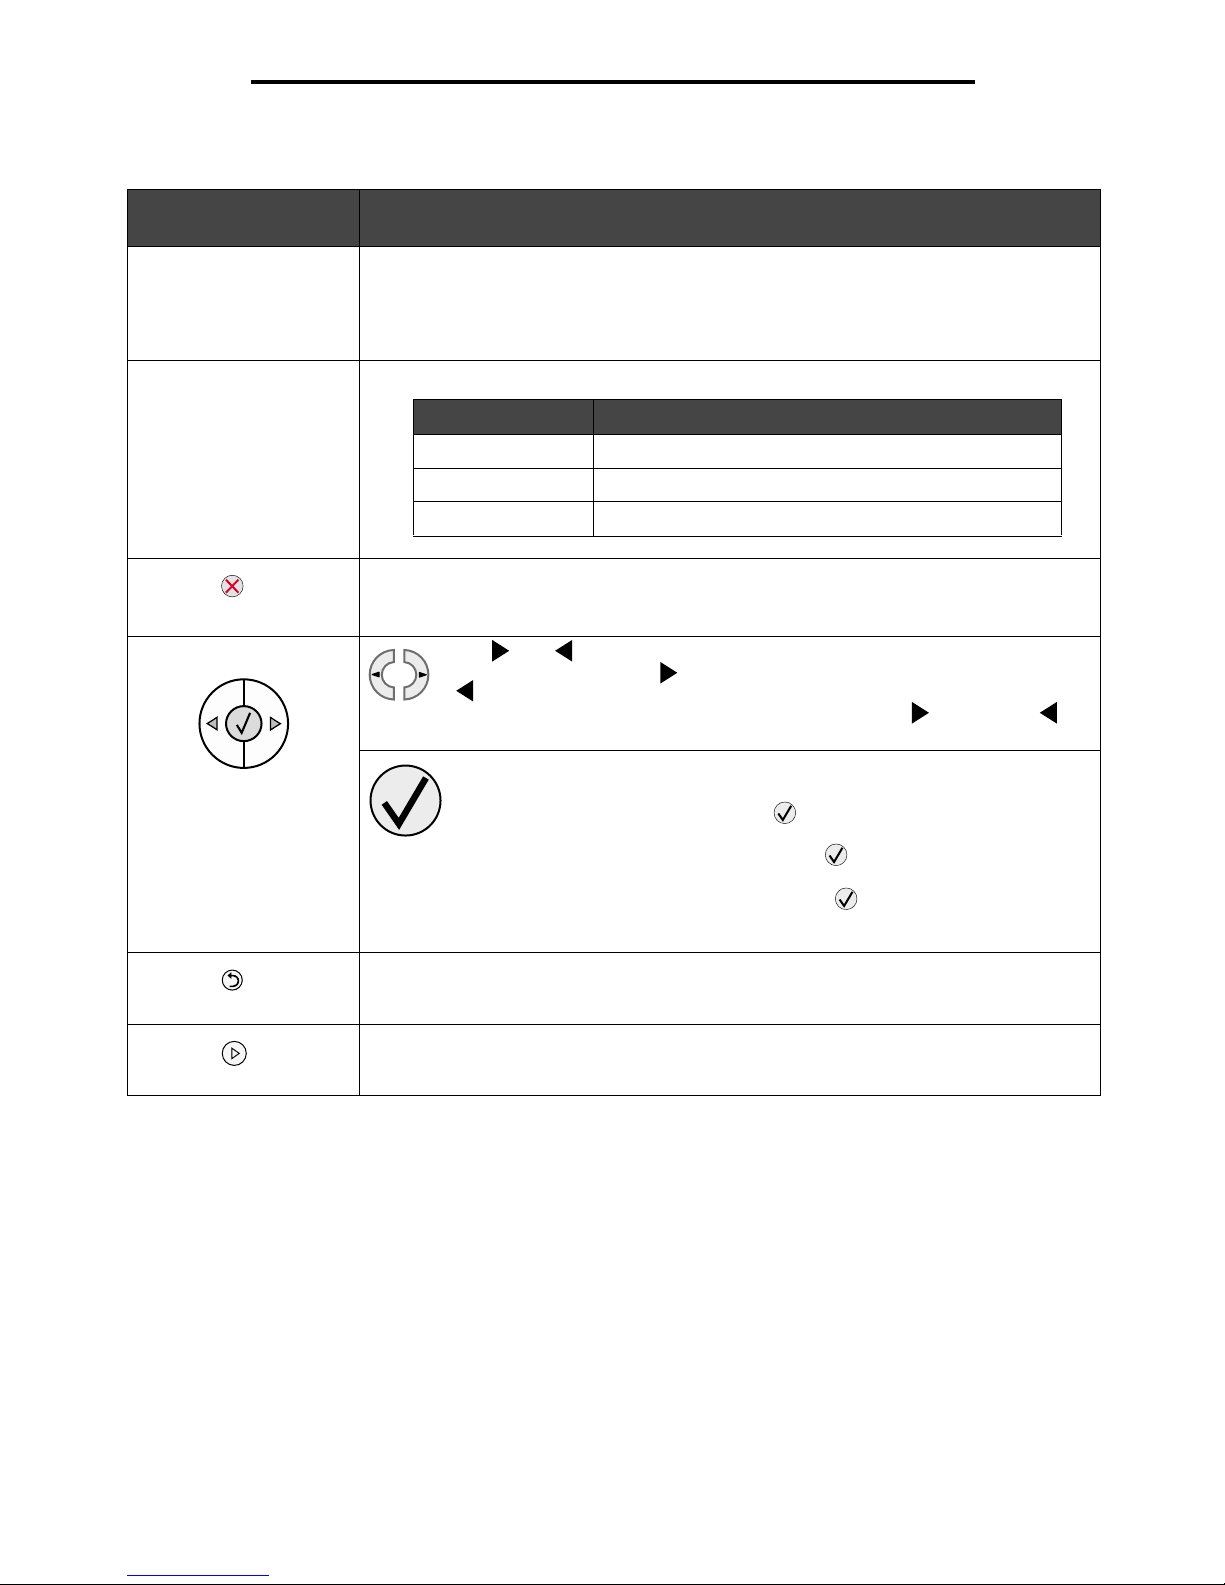
The use of the buttons and the layout of the display are described in the following table.
Button or control panel
item Function
Display The display shows messages describing the current state of the printer and indicating
possible printer problems you must resolve.
The top line of the display is the header line. It will display the current status and the
Supplies (Warnings) status. This is where you view printer status, supplies messages, and
show-me screens.
Indicator light A green LED is used on the display, indicating the printer status.
Stop Press and release the Stop button to stop the mechanical operation of the printer.
The Not Ready message will appear. Operation will resume when the Go button is
pressed.
Menu buttons The and buttons are used to enter a menu group. Once a menu group is
active, press and release to step to the next selection, or press and release
to step to the previous selection.
You can also use these buttons to automatically increase or decrease the
desired number of copies.
Press and release the Select button to initiate action on a selection.
Selects the menu selection displayed on the second line of the display. If a menu
is displayed such as Paper Menu, then opens the menu and displays the
first printer setting contained in the menu.
If a menu item such as Paper Source is displayed, then opens the item and displays
the default setting.
If a menu item such as Manual Feeder is displayed, then saves the selection as the
new default setting for Paper Source. The printer will display the Saved message
monentarily and then return to the menu item level.
Back Press and release the Back button to return to the previous menu group. If at the top of the
menu group, the button functions as a Go button.
Go Press and release the Go button to place the printer in the Ready state after an off line
situation (to exit menus, to clear most messages).
Status Indicates
Off Pow e r is off.
On Printer is on, but idle.
Flashing green Printer is on, and busy.
Understanding print media guidelines
11
2
Understanding print media guidelines
Print media is paper, card stock, transparencies, labels, and envelopes . The last four are sometimes referred to as specialty
media. The printer provides high-quality printing on a variety of media. A number of things must be considered concer ning
print media before printing. This chapter provides information on making print media selections and caring for print media.
• What types of print media can be loaded?
• Selecting print media
• Storing print media
• Avoiding jams
Selecting the right paper or other print media reduces printing problems. For best print quality, try a sample of the paper or
other print media you are considering before buying large quantities.
What types of print media can be loaded?
Get the most from your printer by properly loading the trays. Never mix media types within a tray.
Source Sizes Types Weight Capacity* (sheets)
250-sheet tray A4, A5, A6 (grain long
only), JIS B5, letter,
legal, executive , folio,
statement
Plain paper, bond,
letterhead,
transparencies,
paper labels (singlesided only)
60–90 g/m
2
(16–24 lb)
• 250 paper
• 50 labels**
• 50 transparencies
550-sheet drawer A4, A5, JIS B5, letter,
legal, executive , folio,
statement
Plain paper, bond,
letterhead,
transparencies,
paper labels (singlesided only)
60–90 g/m
2
(16–24 lb)
• 550 paper
• 50 labels**
• 50 transparencies
Manual feeder A4, A5, A6 (grain long
only), JIS B5, letter,
legal, executive , folio,
statement, Universal
‡
Plain paper,
transparencies,
paper labels (singlesided only)
60–163 g/m
2
(16–43 lb)
1
Card stock
†
• 120–163 g/m
2
(66–90 lb) Index Bristol
• 75–163 g/m
2
(46–100 lb) Tag
7¾, 9, 10, DL, C5, B5 Envelopes 75 g/m
2
(20 lb)
* Capacity for 20 lb print media, unless otherwise noted.
**Use for occasional printing only.
†
Grain short is recommended. Use rear exit for best results.
‡
Universal size ranges:
– Manual feeder: 76–216 x 127–356 mm (3.0–8.5 x 5.0–14.0 in.) (includes 3 x 5 in. cards)

Selecting print media
12
Understanding print media guidelines
Selecting print media
Selecting the appropriate print media for the printer helps you avoid printing problems. The following sections contain
guidelines for choosing the correct print media for the printer:
•Paper
• T ransparencies
• Envelopes
•Labels
• Card stock
Paper
To ensure the best print quality and feed reliability, use 75 g/m2 (20 lb) xerographic, grain long paper. Business papers
designed for general business use may also provide acceptable print quality.
Note: Certain paper types will not print at maximum speed.
Always print several samples before buying large quantities of any type of print media. When choosing print media,
consider the weight, fiber content, and color.
The laser printing process heats paper to high temperatures of 210°C (410°F) for non-MICR applications. Use only paper
able to withstand these temperatures without discoloring, bleeding, or releasing hazardous emissions. Check with the
manufacturer or vendor to determine whether the paper chosen is acceptable for laser printers.
When loading paper, note the recommended print side on the paper package, and load paper accordingly . F or detailed tra y
loading instructions, see the following:
• Loading the 250-sheet tray on page 19
• Loading the manual feeder on page 24
Paper characteristics
The following paper characteristics affect print quality and reliability. It is recommended that these guidelines are followed
when evaluating new paper stock.
Weight
The printer can automatically feed paper weights from 60 to 90 g/m2 (16 to 24 lb bond) grain long in the integrated and
optional trays and paper weights from 60 to 163 g/m
2
(16 to 43 lb bond) grain long in the manual feeder. Paper lighter than
60 g/m
2
(16 lb) might not be stiff enough to feed properly, causing jams. For best performance, use 75 g/m2 (20 lb bond)
grain long paper. To use paper narrower than 182 x 257 mm (7.2 x 10.1 in.), it is recommended that the weight be equal to
90 g/m
2
(24 lb bond).
Curl
Curl is the tendency of media to curve at its edges. Excessive curl can cause paper feeding problems. Curl can occur after
the paper passes through the printer, where it is exposed to high temperatures. Storing paper unwrapped in hot, humid,
cold, and dry conditions, even in the trays, can contribute to paper curling prior to printing and can cause feeding problems.
For more information about curl, see Turning on Reduced Curl mode on page 52.

Selecting print media
13
Understanding print media guidelines
Smoothness
The degree of smoothness of paper directly affects print quality. If the paper is too rough, the toner does not fuse to the
paper properly, resulting in poor print quality. If the paper is too smooth, it can cause paper feeding or print quality issues.
Smoothness needs to be between 100 and 300 Sheffield points; however, smoothness between 150 and 250 Sheffield
points produces the best print quality. If you are using paper with a Sheffield point greater than 350 points, change Paper
Type to Rough Cotton. For more information, see “Paper Menu” in the Menus and Messages guide on the Software and
Documentation CD.
Moisture content
The amount of moisture in the paper affects both print quality and the ability of the printer to feed the paper properly. Leav e
the paper in its original wrapper until it is time to use it. This limits the exposure of the paper to moisture changes that can
degrade its performance.
Condition paper while it is still in the original wrapper. To condition it, store it in the same environment as the printer for 24
to 48 hours before printing to let the paper stabilize in the new conditions. Extend the time several days if the storage or
transportation environment is very different from the printer environment. Thick paper may also require a longer
conditioning period because of the mass of material.
Grain direction
Grain refers to the alignment of the paper fibers in a sheet of paper. Grain is either grain long, running the length of the
paper, or grain short, running the width of the paper.
For 60 to 90 g/m2 (16 to 24 lb bond) paper, grain long fibers are recommended.
Fiber content
Most high-quality xerographic paper is made from 100% chemically pulped wood. This content provides the paper with a
high degree of stability resulting in fewer paper feeding problems and better print quality. Paper containing fibers such as
cotton possesses characteristics that can result in degraded paper handling.
Recycled paper
US executive order 13101 strongly encourages the use of recycled papers in government agencies. Ask for warranty
information and performance claims from your paper supplier, and/or test small quantities before buying large amounts. A
list of suppliers and approved papers used by the US Government Printing Office can be found at http://www.gpo.gov/
qualitycontrol/cpypaper.htm.
Unacceptable paper
The following papers are not recommended for use with the printer:
• Chemically treated papers used to make copies without carbon paper, also known as carbonless papers,
carbonless copy paper (CCP), or no carbon required (NCR) paper
• Preprinted papers with chemicals that may contaminate the printer
• Preprinted papers that can be affected by the temperature in the printer fuser
• Preprinted papers that require a registration (the precise print location on the page) greater than ±0.09 in., such as
optical character recognition (OCR) forms
In some cases, you can adjust registration with your program to successfully print on these forms.
• Coated papers (erasable bond), synthetic papers, thermal papers
• Rough-edged, rough or heavily textured surface papers or curled papers
• Recycled paper having a weight less than 60 g/m
2
(16 lb)
• Multiple-part forms or documents
Selecting print media
14
Understanding print media guidelines
Selecting paper
Proper paper loading helps prevent jams and ensures trouble-free printing.
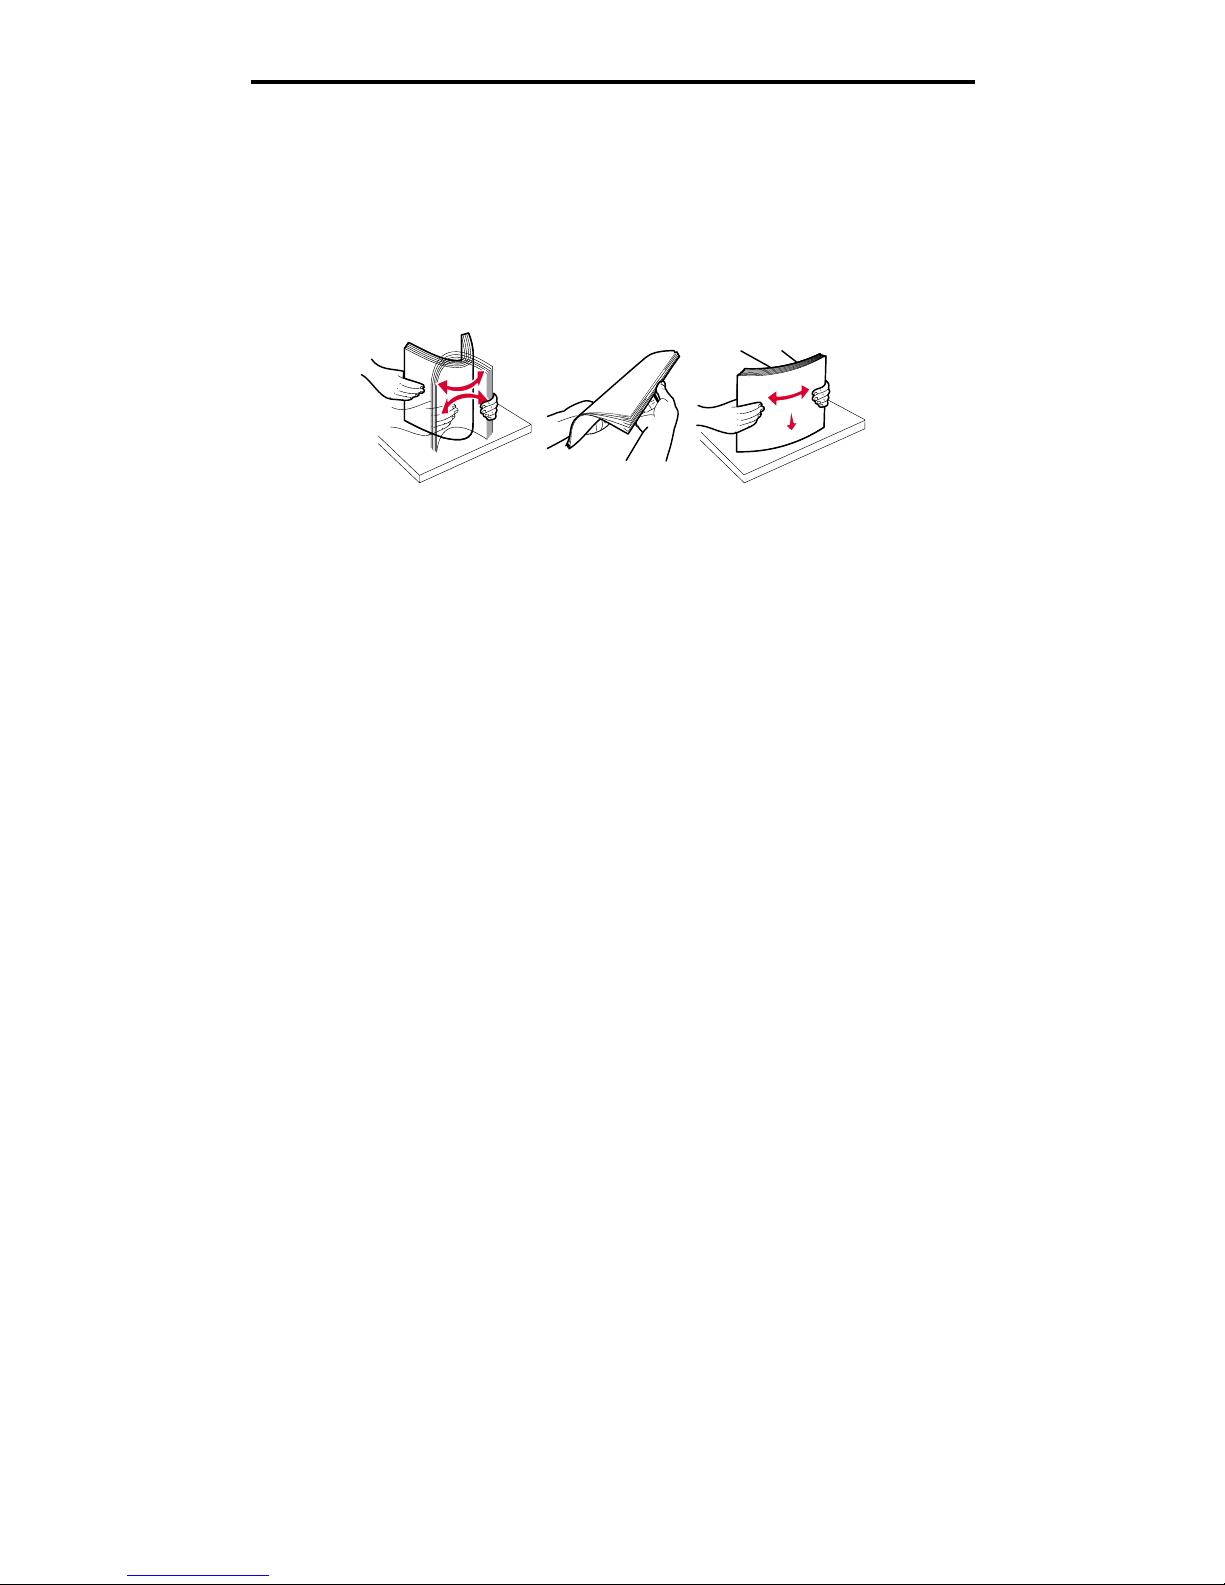
To help avoid jams or poor print quality:
• Always use new, undamaged paper.
• Flex the paper stack back and for th. Do not fold or crease the paper. Straighten the edges on a level surface.
• Before loading paper, know the recommended print side of the paper. This informati on is usually indicated on the
paper package.
• Make sure the paper stack is laying flat in the tray and is not above the maximum paper fill indicators. Improper
loading may cause jams.
• Do not use paper that has been cut or trimmed by hand.
• Do not mix media sizes, weights, or types in the same source; mixing results in jams.
• Do not use coated papers unless they are specifically designed for electrophotographic printing.
• Do not remove trays while a job is printing or Busy appears on the display.
• Make sure the Paper Type, Paper Texture, and Paper Weight settings are correct. (For more information about
these settings, see “Paper Menu” in the Menus and Messages Guide located on the Software and Documentation
CD.)
• Make sure the paper is properly loaded in the source.
Selecting preprinted forms and letterhead
Use the following guidelines when selecting preprinted forms and letterhead paper for the printer:
• Use grain long papers for best results for 60 to 90 g/m2 weights.
• Use only forms and letterhead printed using an offset lithographic or engraved printing process.
• Avoid papers with rough or heavily textured surfaces.
Use papers printed with heat-resistant inks designed for use in xerographic copiers. The ink must withstand temperatures
of 210°C (410°F) without melting or releasing hazardous emissions. Use inks that are not affected by the resin in toner. Inks
that are oxidation-set or oil-based should meet these requirements; latex inks might not. When in doubt, contact the paper
supplier.
Preprinted papers such as letterhead must be able to withstand temperatures up to 210°C (410°F) without melting or
releasing hazardous emissions.
Selecting print media
15
Understanding print media guidelines
Printing on letterhead
Check with the manufacturer or vendor to deter m ine whether the chosen preprinted letterhead is acceptable for laser
printers.
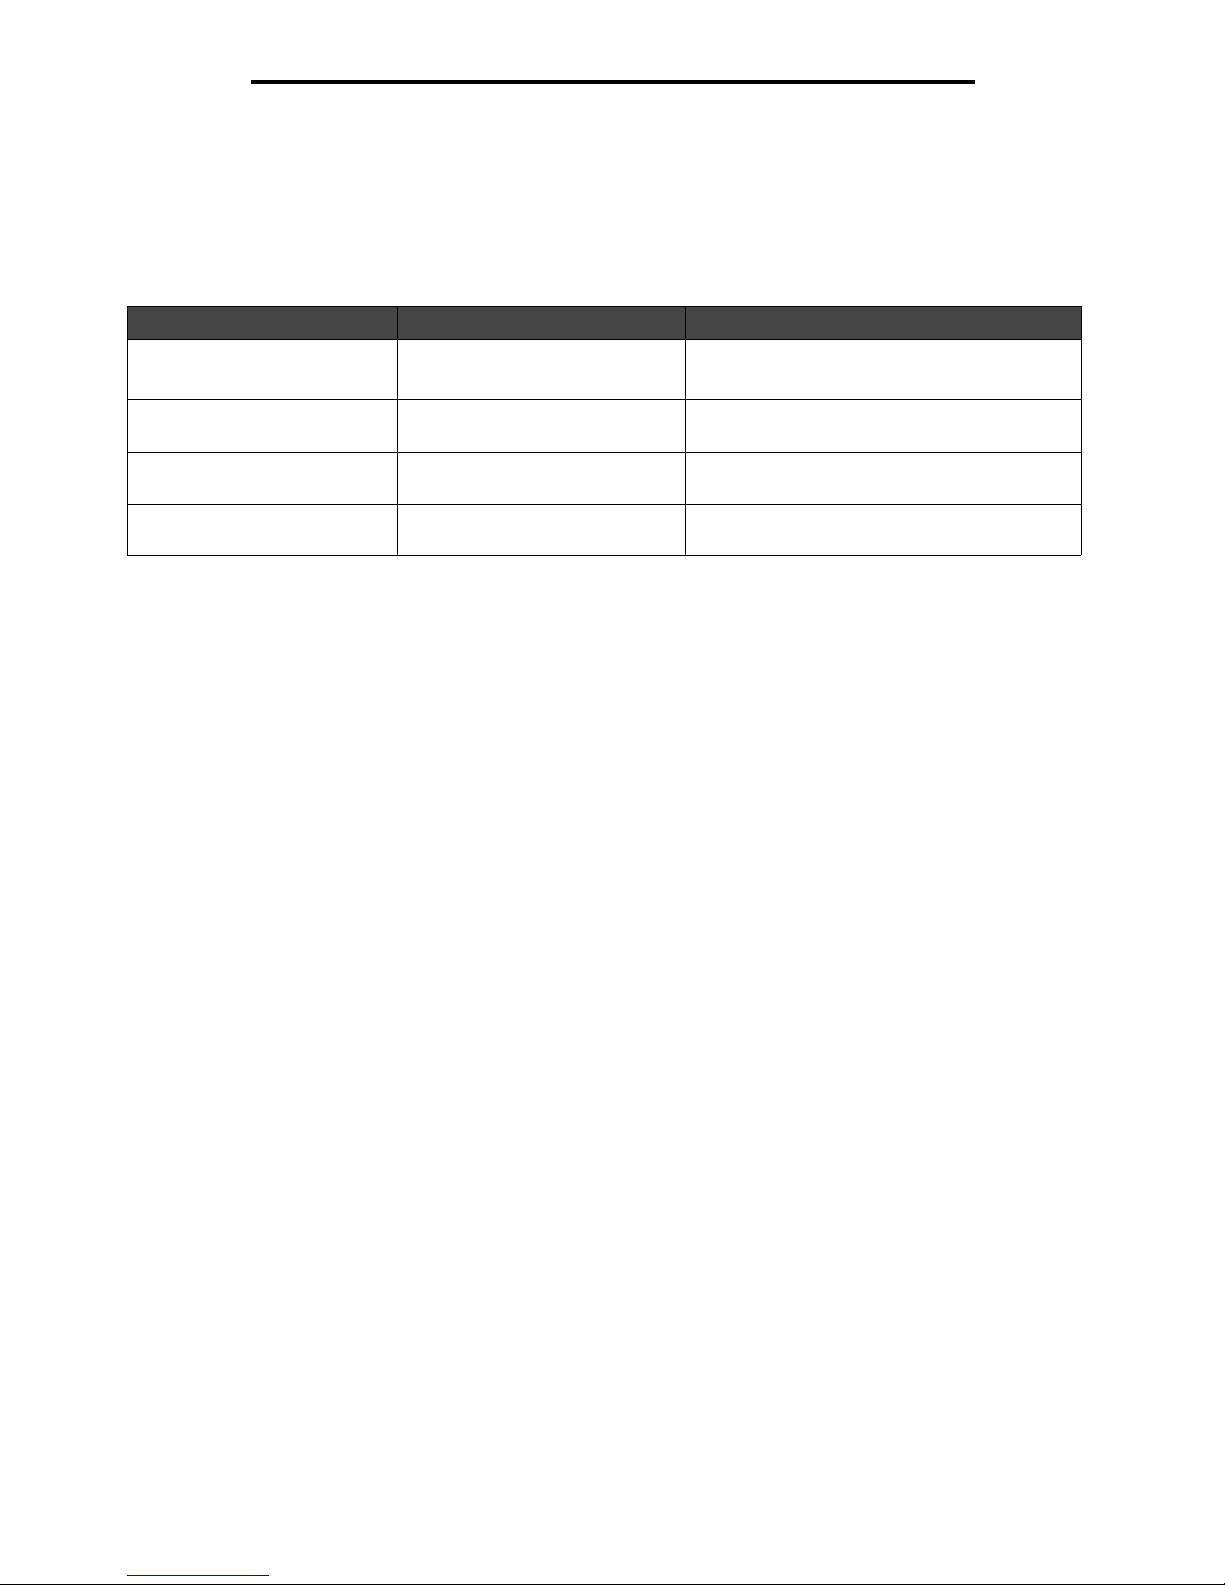
Page orientation is important when printing on letterhead. Use the following table for help when loading letterhead in the
media sources.
Transparencies
Feed transparencies from the 250-sheet tray or the manual f eeder. T ry a sample of any transparencies being considered f or
use with the printer before buying large quantities.
When printing on transparencies:
• Be sure to set the Paper Type to Transparency to avoid damaging the printer.
• Use transparencies designed specifically for laser printers. Transparencies must be able to withstand
temperatures of 175°C (350°F) without melting, discoloring, offsetting, or releasing hazardous emissions.
• To prevent print quality problems, avoid getting fingerprints on the transparencies.
• Before loading transparencies, fan the stack to prevent sheets from sticking together.
Selecting transparencies
The printer can print directly on transparencies designed for use in laser printers. Print quality and durability depend on the
transparency used. Always print samples on the transparencies being considered for use before buying large quantities.
The Paper Type setting should be set to Transparency to help prevent jams. (For detailed information about this setting, see
“Paper Type” on the Software and Documentation CD.) Check with the manufacturer or vendor to determine whether the
transparencies are compatible with laser printers that heat transparencies to 175°C (350°F). Use only transparencies that
are able to withstand these temperatures without melting, discoloring, offsetting, or releasing hazardous emissions.
Transparencies can be fed automatically from the paper trays or manually from the manual feeder. For information ab out
transparency compatibility with input bins, see What types of print media can be loaded? on page 11.
Be careful when you handle transparencies. Fingerprints on the surface of the transparency cause poor print quality.
Media source or process Print side Top of page
250-sheet tray and
550-sheet draw er
Printed letterhead facedown The top edge of the sheet with the logo is
placed at the front of the tray.
Duplex (two-sided) printing from
trays
Printed letterhead faceup The top edge of the sheet with the logo is
placed at the front of the tray
Manual feeder Printed letterhead faceup The top edge of the sheet with the logo enters
the printer first.
Duplex (two-sided) printing from
Manual feeder
Printed letterhead facedown The top edge of the sheet with the logo enters
the printer first.

Selecting print media
16
Understanding print media guidelines
Envelopes
Try a sample of any envelope you are considering using with the printer before buying large quantities. For instructions on
loading envelopes, see Loading the manual feeder on page 24.
When printing on envelopes:
• To achieve the best possible print quality, use only high-quality envelopes that are designed for use in laser
printers.
• Set the Paper Source in the Paper menu based on the source in use, set the Paper Type to Envelope, and select
the correct envelope size from the control panel, the printer driver, or from MarkVision Professional.
• For best performance, use envelopes made from 75 g/m
2
(20 lb) paper. Use up to 105 g/m2 (28 lb bond) weight for
the manual feeder as long as the cotton content is 25% or less. Envelopes with 100% cotton content must not
exceed 75 g/m
2
(20 lb) weight.
• Use only new, undamaged env elopes .
• For best performance and to minimize jams, do not use envelopes that:
– Have excessive curl or twist.
– Are stuck together or damaged in any way.
– Contain windows, holes, perforations, cutouts or embossing.
– Use metal clasps, string ties, or metal folding bars.
– Have an interlocking design.
– Have postage stamps attached.
– Have any exposed adhesive when the flap is in the sealed or closed position.
– Have nicked edges or bent corners.
– Have rough, cockle, or laid finishes.
• Use envelopes that can withstand temperatures of 175°C (350°F) without sealing, excessive curling, wrinkling, or
releasing hazardous emissions. If you have any doubts about the env elopes y ou are considering using, check with
the envelope supplier.
• Adjust the width guide to fit the width of the envelope.
• Load only one envelope at a time.
• A combination of high humidity (over 60%) and the high printing temperatures may seal the envelopes.
Labels
The printer can be used for occasional printing of paper labels designed for laser printers. These labels are supplied in
letter-size, A4-size, and legal-size sheets. Label adhesives, face sheet (printable stock), and topcoats must be able to
withstand temperatures of 210°C (410°F) and pressure of 25 pounds per square inch (psi).
Try a sample of any label you are considering using with the printer before purchasing a large quantity.
Note: Labels are one of the most difficult print medi a for laser printers. The printer has been designed for
occasional paper label printing. Printing large amounts of labels can degrade print quality and may
damage the printer.
When printing on labels:
• Set the Paper Type menu item to Labels in the Paper menu. Set the P aper Type from the printer control panel, the
printer driver, or from MarkVision Professional.
• Do not load labels together with paper or transparencies in the same source; mixing media can cause feeding
problems.
• Do not use label sheets with a slick backing material.
• Use full label sheets. Partial sheets may cause labels to peel off during printing, resulting in a jam. Partial sheets
also contaminate the printer and the cartridge with adhesive, and could void the printer and cartridge warranties.
• Use labels that can withstand temperatures of 210°C (410°F) without sealing, excessive curling, wrinkling, or
releasing hazardous emissions.

Storing print media
17
Understanding print media guidelines
• Do not print within 1 mm (0.04 in.) of the edge of the label, of the perforations, or between die-cuts of the label.
• Do not use label sheets that have adhesive to the edge of the sheet. Zone coating of the adhesive at least 1 mm
(0.04 in.) away from edges is recommended. Adhesive material contaminates the printer and could void the
warranty.
• If zone coating of the adhesive is not possible, remove a 3 mm (0.125 in.) strip on the leading and driver edge, and
use a non-oozing adhesive.
• Remove a 3 mm (0.125 in.) strip from the leading edge to prevent labels from peeling inside the printer.
• Portrait orientation is preferred, especially when printing bar codes.
• Do not use labels that have exposed adhesive.
• Do not use vinyl labels.
Card stock
Card stock is single ply, and has a large array of properties, such as the moisture content, thickness, and texture, that can
significantly affect print quality. For information on the preferred weight and for grain direction of print media, see What
types of print media can be loaded? on page 11.
Try a sample of any card stock you are considering using with the printer before purchasing a large quantity.
When printing on card stock:
• Cardstock can only be printed from the Manual Feeder.
• Set the Paper Type menu item in the Paper Menu to Card Stock from the control panel, from the printer driver, or
from MarkVision Professional. Set the Paper Weight to CardStock Weight, and select the CardStock Weight as
Normal or Heavy for the value. Set this from the control panel, the printer driver, or from MarkVision Professional.
Use Heavy for card stock weighing more than or heavier than 163 g/m2 (90 lb).
• Be aware that preprinting, perforation, and creasing can significantly affect the print quality and cause print media
handling or jamming problems.
• Avoid using card stock that may release hazardous emissions when heated.
• Do not use preprinted card stock manufactured with chemicals that may contaminate the printer. Preprinting
introduces semi-liquid and volatile components into the printer.
• The use of grain short card stock is recommended.
Storing print media
Use the following guidelines to avoid paper feeding problems and uneven print quality:
• For best results, store media in an environment where the temperature is approximately 21°C (70°F) and the
relative humidity is 40%.
Most label manufacturers recommend printing in a temperature range of 18 to 24°C (65 to 75°F) with a relative
humidity of 40 to 60%.
• Store cartons of media on a pallet or shelf, rather than directly on the floor.
• When storing individual packages of media out of the original carton, make sure they rest on a flat surface so the
edges do not buckle or curl.
• Do not place anything on top of the media packages.
• Store paper in its original wrapper until you load it into the printer.

Avoiding jams
18
Understanding print media guidelines
Avoiding jams
Use appropriate print media (paper, transparencies, labels, and card stock) to help ensure trouble-free printing. For more
information, see What types of print media can be loaded? on page 11.
Note: Try a limited sample of any print media you are considering using with the printer before purchasing
large quantities.
By selecting the appropriate print media and loading it properly, you can avoid most jams. For detailed tray loading
instructions, see the following:
• Loading the 250-sheet tray on page 19
• Loading the manual feeder on page 24
The following hints can help you avoid jams:
• Use only recommended print media.
• Do not overload the print media sources. Make sure the stack height does not exceed the maximum height
indicated by the stack line on the labels in the sources.
• Do not load wrinkled, creased, damp, or curled print media.
• Flex, fan, and straighten print media before you load it. If jams do occur with print media, try feeding one sheet at
a time through the manual feeder.
• Do not use print media that you have cut or trimmed yourself.
• Do not mix print media sizes, weights, or types in the same print media source.
• Make sure the recommended print side is loaded in the source according to your simplex or duplex needs.
• Keep print media stored in an acceptable environment. For more information, see Storing print media on
page 17.
• Do not remove trays during a print job.
• Push all trays in firmly after loading them.
• Make sure the guides in the trays are properly positioned for the size of print media you have loaded. Make sure
the guides are not placed too tightly against the stack of print media.
Printing
19
3
Printing
This chapter covers information about loading print media, sending a job to print, printing confidential jobs, canceling a print
job, printing a menu settings page, and printing a font list. For tips on paper jam prevention and print media storage, see
Avoiding jams on page 18 or Storing print media on page 17.
Loading the 250-sheet tray
Your printer has a 250-sheet tray. You may have also purchased an optional 550-sheet drawer . Print media is loaded into
both components in the same way.
To load print media:
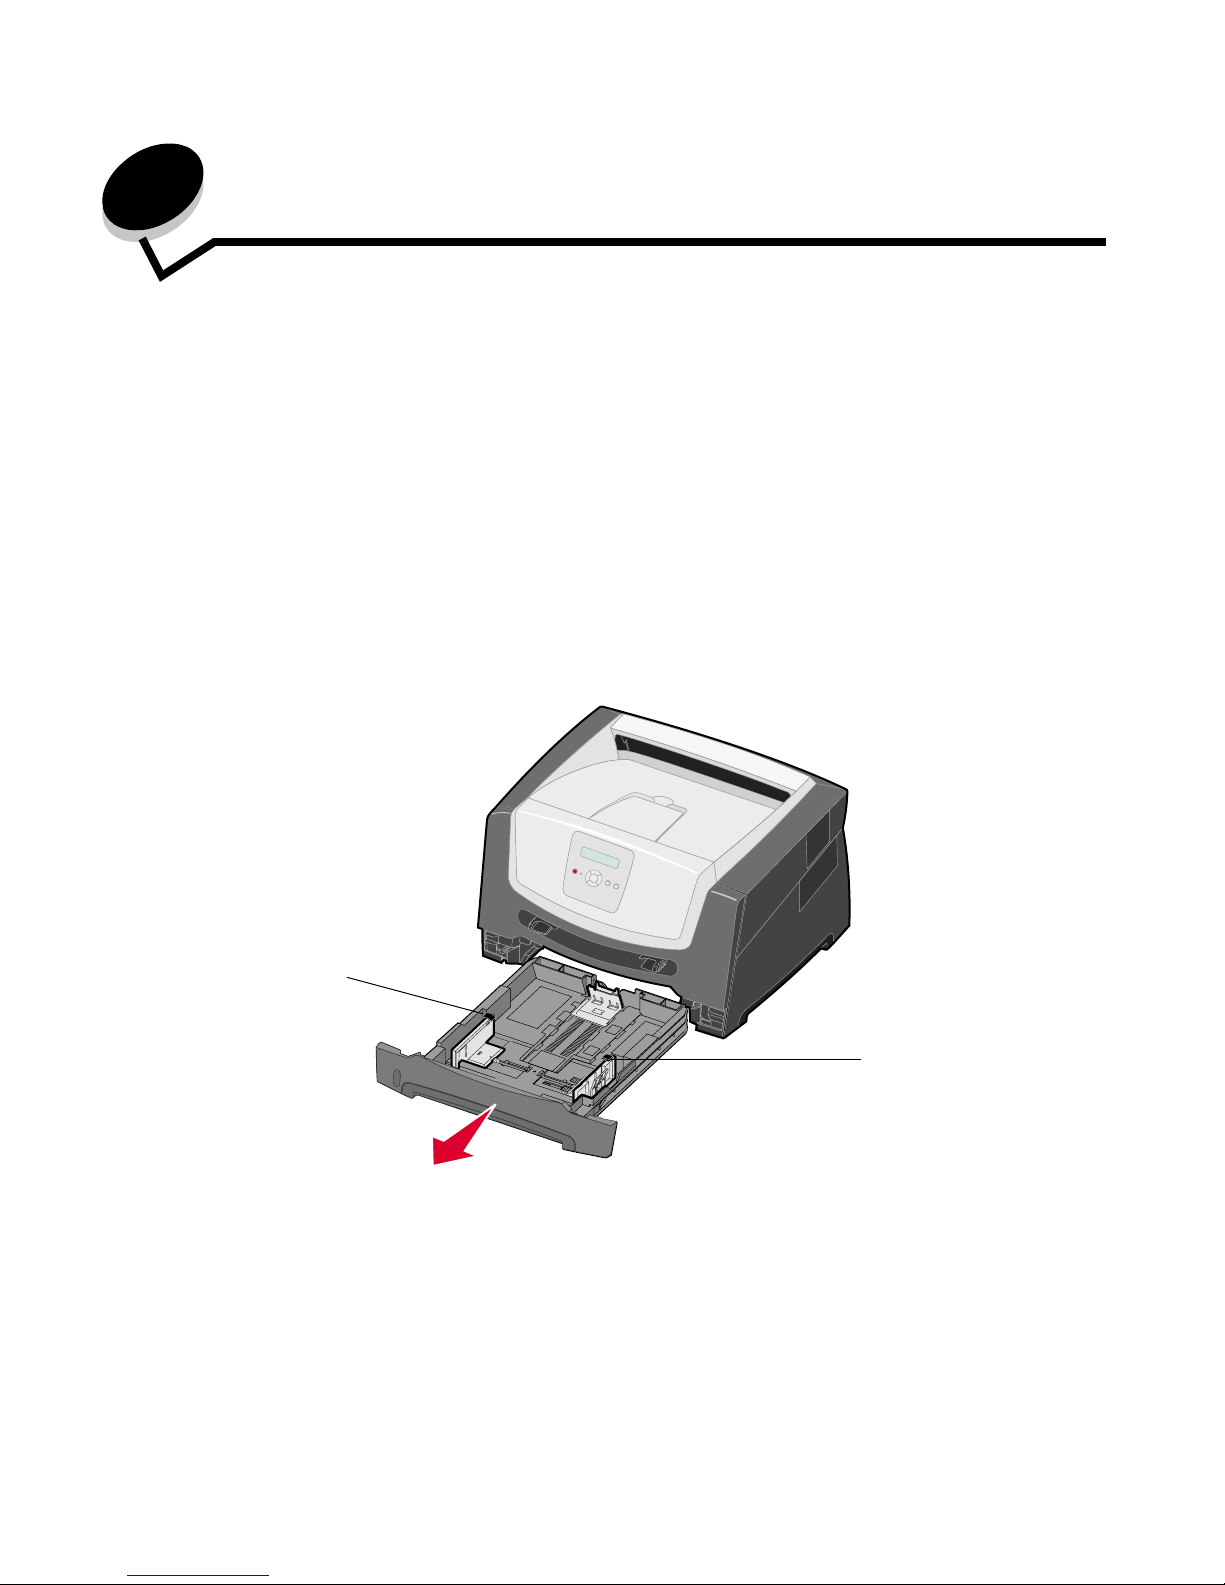
Note: Do not remove a tray when a job is printing or when the control panel indicator light is blinking. Doing
so may cause a jam.
1 Remove the 250-sheet tray.
Note: To load legal-size or folio-size paper, extend the length of the 250-sheet paper tray. For instructions,
see Extending the tray for legal-size or folio-size paper on page 22.
maximum paper fill
indicator
maximum paper fill
indicator
Loading the 250-sheet tray
20
Printing
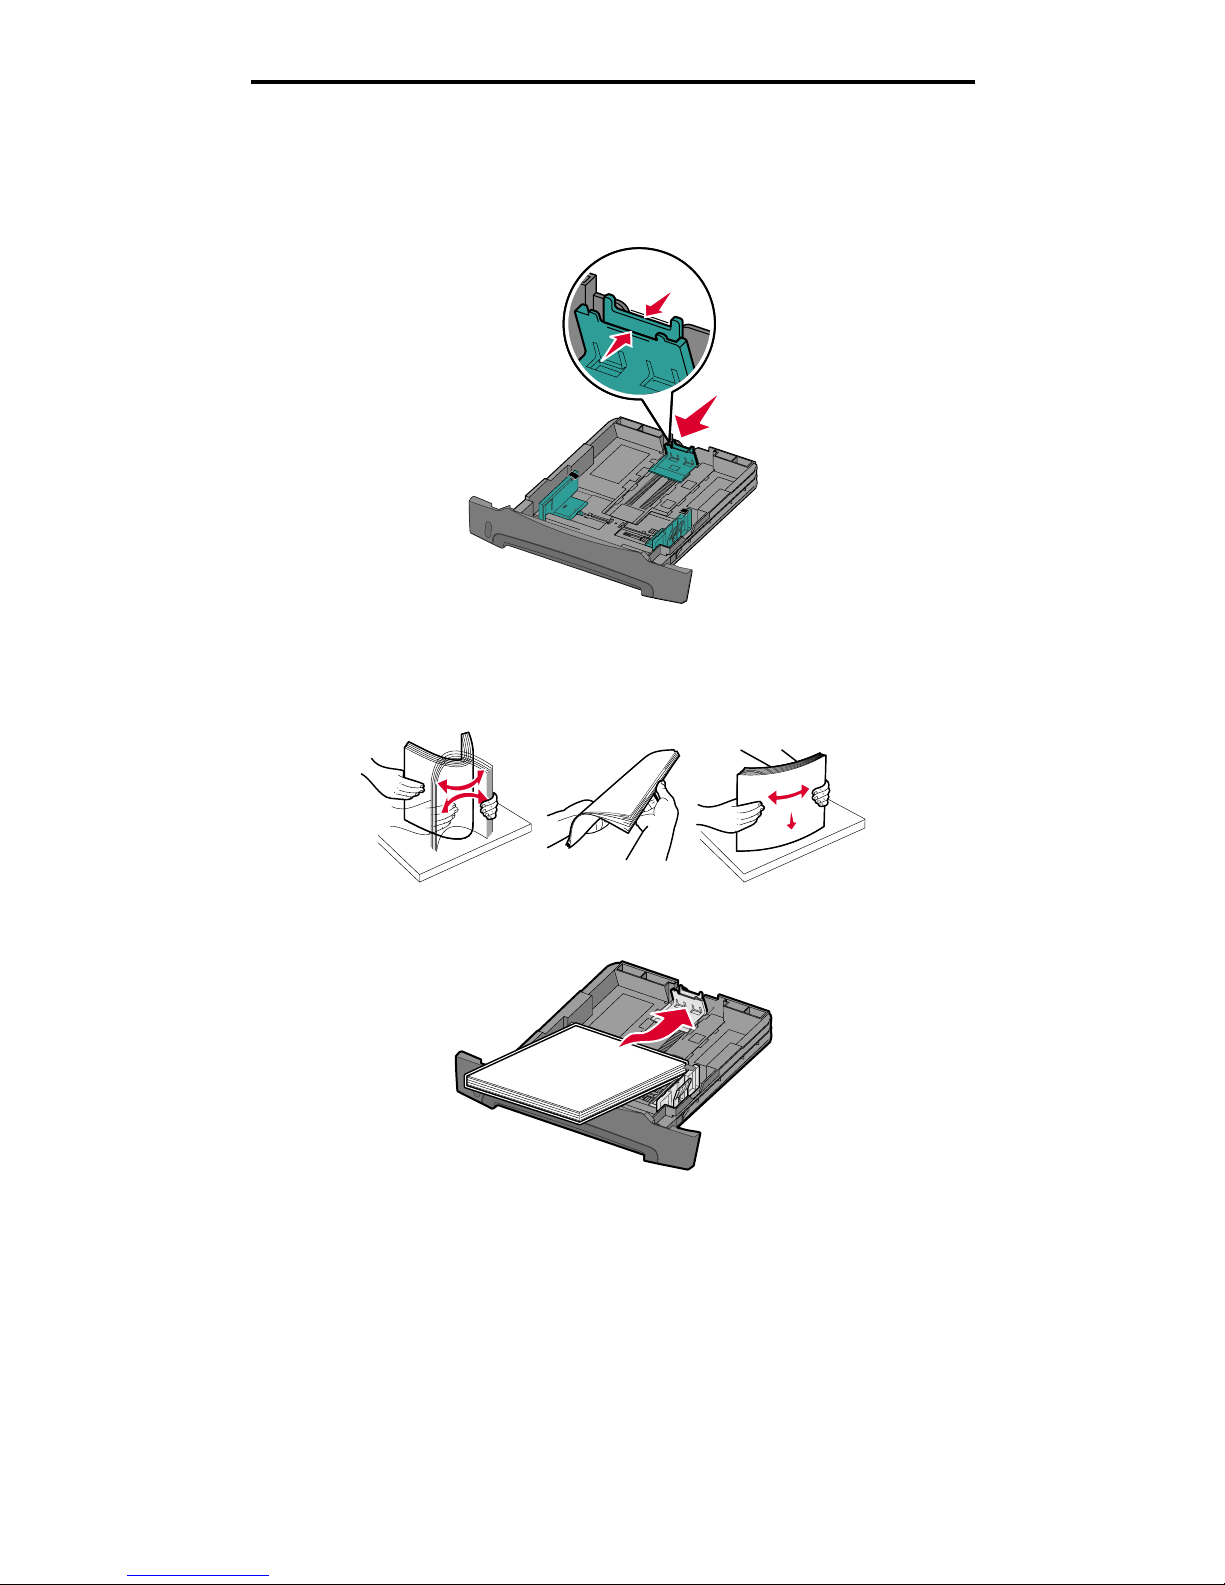
2 Adjust the rear paper guide, to the correct position for the size print media you are loading.
Note: There should be a slight gap between the rear paper guide and the paper stack.
3 Flex the sheets back and f orth to loosen them, then fan them. Do not fold or crease the print media. Straighten the
edges of the paper stack on a level surface.
4 Insert the paper stack.
Note: Make sure the paper stack is laying flat in the tray and is not above the maximum paper fill indicators.
Improper loading may cause jams.
Note: For simplex printing load letterhead paper with the design side facing down. The top edge of the sheet
with the logo should be placed at the front of the tray. For duplex printing load letterhead paper with
the design side facing up.
Loading the 250-sheet tray
21
Printing
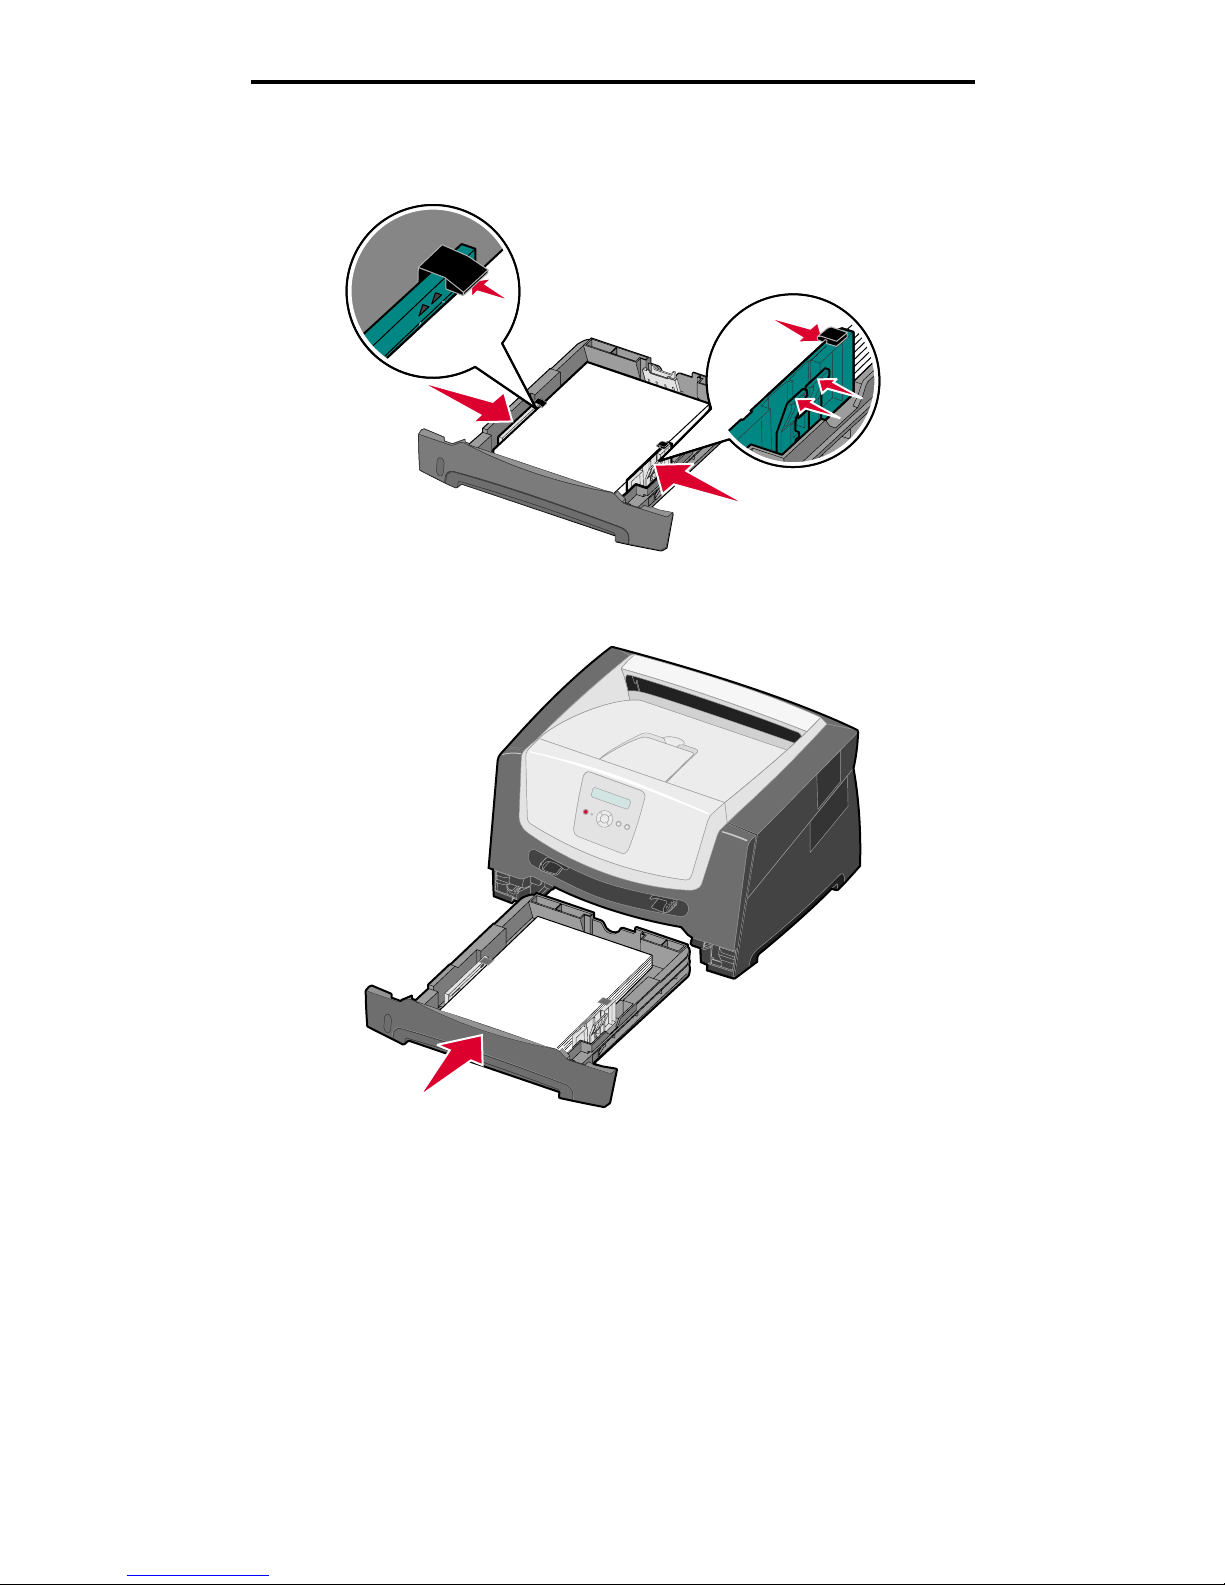
5 Adjust the two side paper guides to touch lightly against the sides of the paper stack.
6 Insert the 250-sheet tray.
Loading the 250-sheet tray
22
Printing
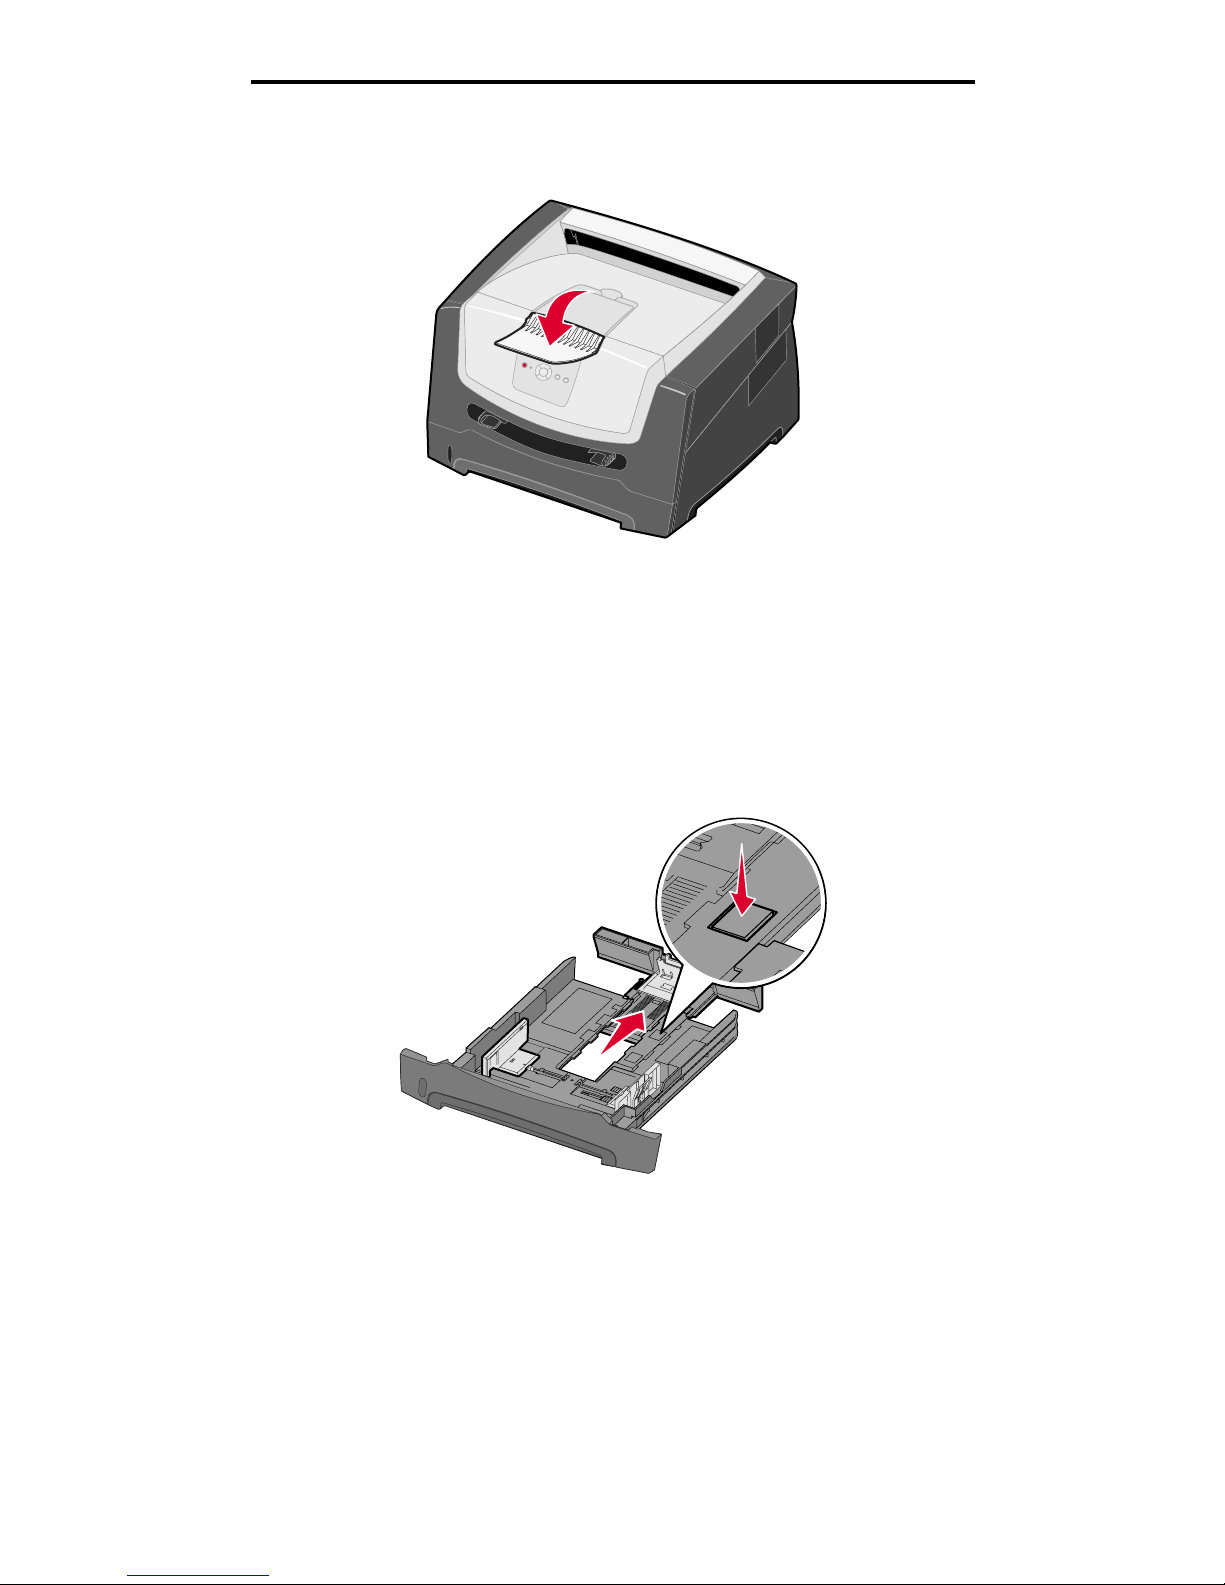
7 Extend the paper support on the output bin.
Extending the tray for legal-size or folio-size paper
To load legal-size or folio-size paper, e xtend the paper tray. You ma y also attach a dust cover (if availab le) on the back of the
printer to protect the tray while it is extended.
1 Press down on the latch at the back of the tray.
2 Expand the tray until the extender locks into place.
 Loading...