

Page 1
Page 2
has chosen ELF
For all engines
ELF EXCELLIUM LDX 5W-40 ACEA A3 / B3 / B4
Optimum performance and maximum protection in the most severe conditions
All types of driving
ELF EVOLUTION SXR 5W-40 ACEA A3 / B3 / B4
Optimum performance
All types of driving
All types of petrol
and LPG engines
ELF EVOLUTION SXR 5W-30 ACEA A5 / B5
Fuel economy, engine protection and respect for the environment
All types of driving
For all engines
ELF COMPETITION ST 10W-40 ACEA A3 / B3 / B4
ELF TURBO DIESEL 10W-40 ACEA B3 / B4
Other RENAULT approved lubricants for normal use
Manual gearbox
Automatic gearbox
Kangoo 4×4 final drive
RENAULT recommends approved ELF lubricants.
When topping up or changing the oil, we recommend you use only the original lubricants.
Consult your RENAULT Dealer or visit the site www.lubricants.elf.com
TRANSELF TRJ 75W-80 API GL5
RENAULTMATIC D3 Syn DEXRON III
TRANSELF UNIVERSAL 80W-90 API GL5
Page 3
Quick overview
- Tyre pressures .............................................................................................................................. 0.04
0.02
- Adjusting the seats and driver’s position
- Child restraint devices
- Warning lights
............................................................................................................. 1.52 ➟ 1.77
- De-icing/Demisting
............................................................................................. 1.34 ➟ 1.45
.................................................................................................................... 1.80
- Visible and audible warning signals
.......................................................... 1.22 ➟ 1.25
................................................................................... 1.81
- Running in, driving ................................................................................................... 2.02 ➟ 2.21
- Heating/air conditioning
- Opening the bonnet
- Levels (engine oil, windscreen washer, etc.)
- Emergency spare wheel
......................................................................................... 3.04 ➟ 3.10
................................................................................................................... 4.02
................................................... 4.03 ➟ 4.11
........................................................................................... 5.02 ➟ 5.04
- Practical advice (changing the bulbs, fuses, repairs,
operating faults)
.......................................................................................................... 5.02 ➟ 5.40
Page 4

CONTENTS
Sections
Getting to know your vehicle ................................................................ 1
Driving ................................................................................................................ 2
Your comfort .................................................................................................. 3
Maintenance ................................................................................................... 4
Practical advice ............................................................................................ 5
Technical specifications .......................................................................... 6
Alphabetical index ...................................................................................... 7
0.03
Page 5
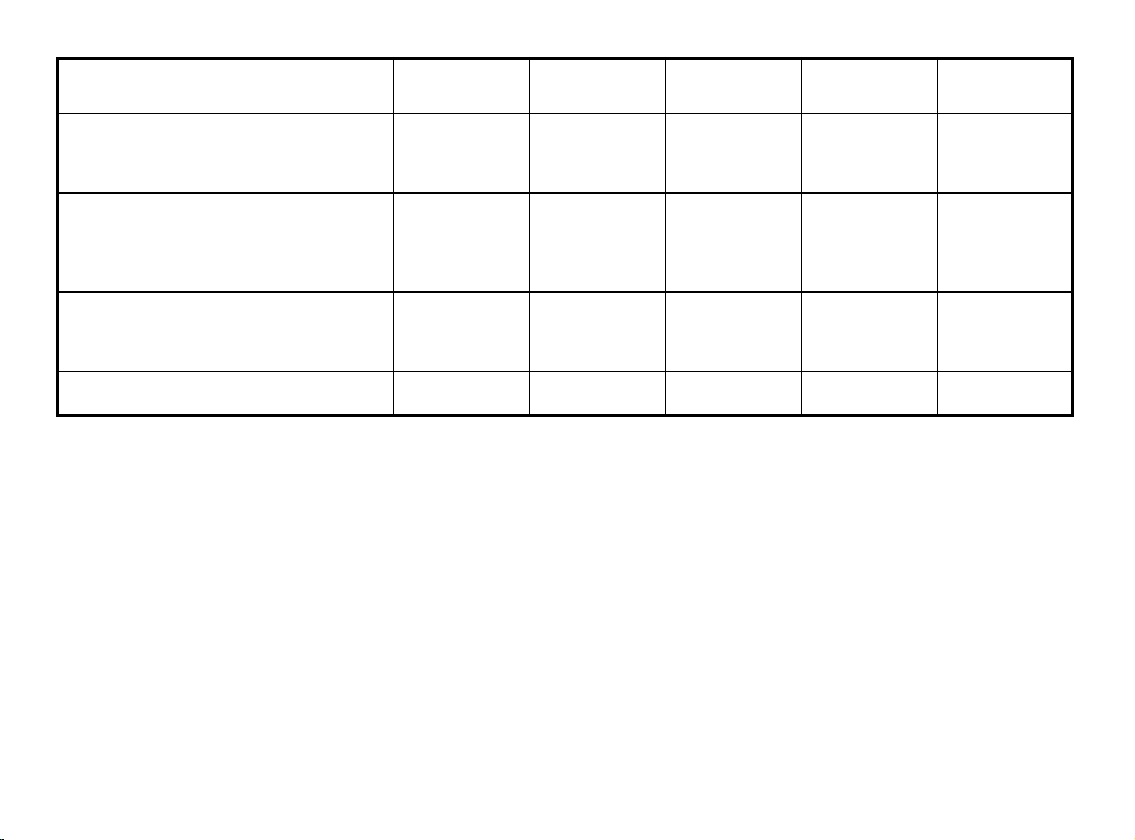
Tyre pressures when cold (in bar)
Tyre sizes 165/70 R 14 C
Normal use
- Front 2.6 2.4 2.5 2.2 2.3
- Rear 3.4 3.0 3.2 2.2 2.3
Full load use and/or motorway
driving (1)
- Front 2.6 2.4 2.5 2.4 2.4
- Rear 3.4 3.0 3.2 2.6 2.6
Emergency spare wheel
- identical to other 4 wheels 3.4 – 3.2 2.6 2.6
- for temporary use – 2.9 (13") – – –
Wheel sizes 5.5 J 14 5.5 J 14 5.5 J 14 5.5 J 14 5.5 J 14
Tyre safety and use of chains
Refer to the information on tyres in section 5 for advice on tyre maintenance and, depending on the version, the use of
chains.
165/70 R 14 165/70 R 14
reinforced reinforced reinforced
165/70 R 14
165/70 R 14
(1) Special note concerning vehicles used at full load (maximum permissible all-up weight) and towing a trailer
The maximum speed must be limited to 60 mph (100 km/h) and the tyre pressure increased by 0.2 bar.
Refer to the information on weights in section 6 for more details.
0.04
Page 6
Section 1: Getting to know your vehicle
Keys ........................................................................................................................................................................... 1.02
Radio frequency remote control unit
Doors
.......................................................................................................................................................... 1.07 ➟ 1.13
Renault Anti-Intruder Device (RAID)
Engine immobiliser
Headrests
Roof flap
Partition
Front seats
..................................................................................................................................................... 1.17 - 1.18
....................................................................................................................................................... 1.19 - 1.20
....................................................................................................................................................................
................................................................................................................................................................ 1.22
Rear view mirrors
Seat belts
.................................................................................................................................................... 1.24 ➟ 1.27
................................................................................................................................... 1.15 - 1.16
................................................................................................................................................... 1.23
Restraint systems in addition to front seat belts
Side protection devices ......................................................................................................................................... 1.32
Child safety
Driver’s position
Instrument panel
Clock
............................................................................................................................................... 1.34 ➟ 1.45
....................................................................................................................................... 1.46 ➟ 1.51
...................................................................................................................................... 1.52 ➟ 1.77
............................................................................................................................................................. 1.78 - 1.79
Rear screen and windscreen de-icing and demisting
Audible and visual warnings
Headlight beam adjustment
External lighting and signals
Screen wash/wipe
Fuel tank
...................................................................................................................................................... 1.87 - 1.88
...................................................................................................................................... 1.85 - 1.86
............................................................................................................................... 1.81
................................................................................................................................. 1.82
................................................................................................................... 1.83 - 1.84
.................................................................................................. 1.03 ➟ 1.06
................................................................................................................. 1.14
1.21
............................................................................... 1.28 ➟ 1.33
..................................................................................... 1.80
1.01
Page 7
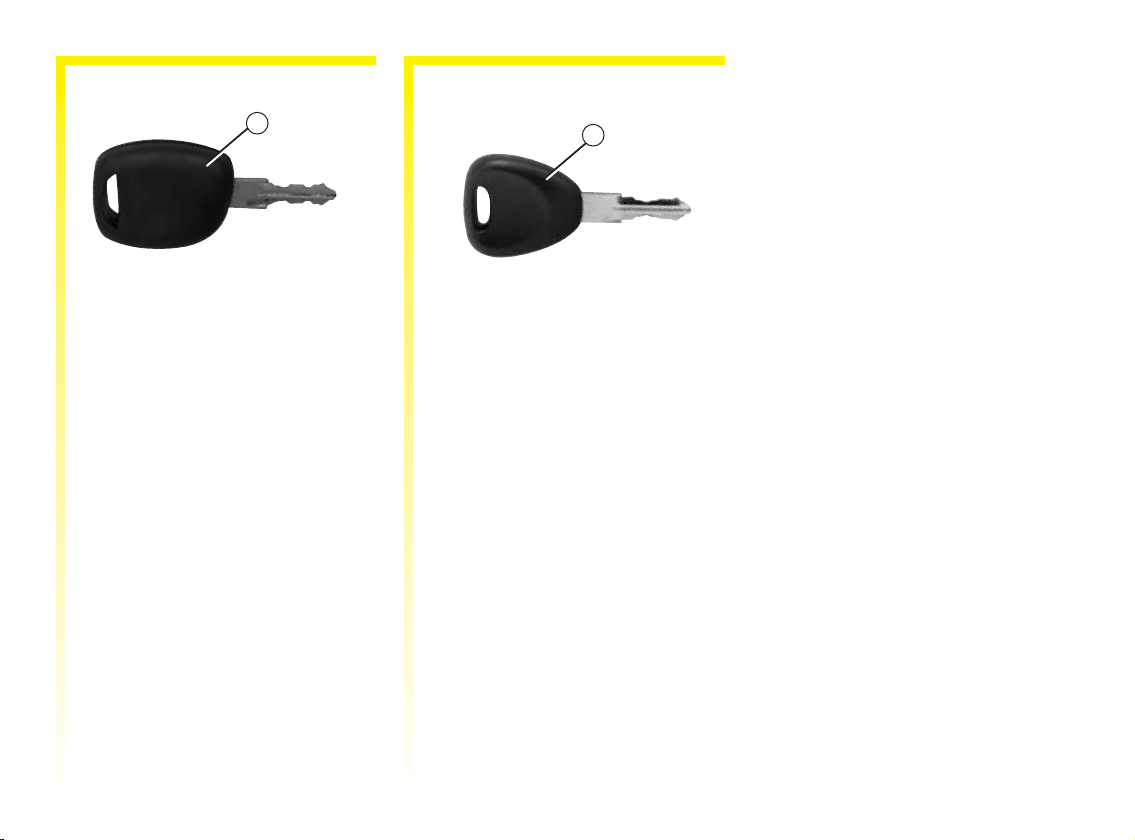
KEYS
1
1 Coded key for ignition switch,
doors and fuel filler cap.
2
2 Key for ignition switch, doors and
fuel filler cap.
1.02
Page 8
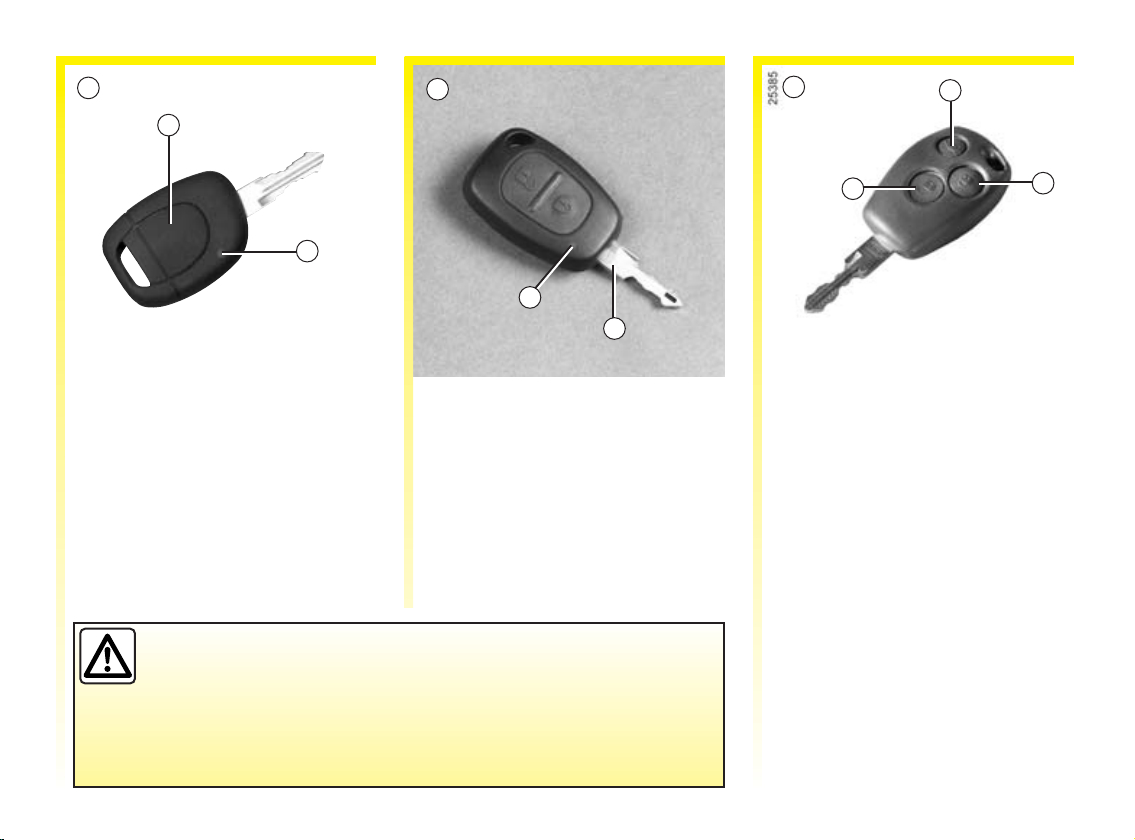
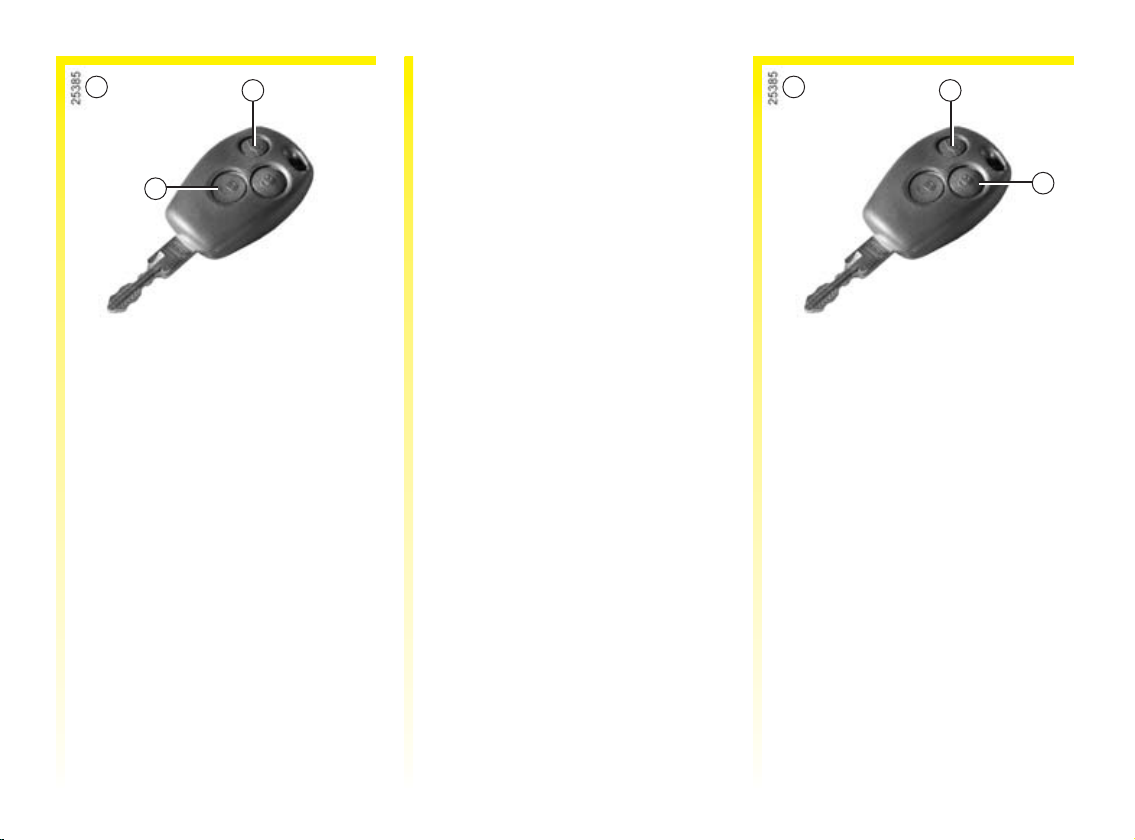
RADIO FREQUENCY REMOTE CONTROL: general information
A
B
1
2
4
3
Radio frequency remote control A
1 Key for ignition switch, doors and
fuel filler cap.
2 Battery warning light.
Driver’s responsibility
Never leave the vehicle unattended with the key in the ignition if
there is a child (or animal) in the vehicle. With the key in the
ignition, he or she could start the engine or operate electrical
equipment such as the electric windows and there is a risk that the child
may be injured by trapping his or her neck, arm, hand, etc. Risk of serious
injury.
Radio frequency remote control B
3 Key for ignition switch, doors and
fuel filler cap.
4 Battery warning light.
C
5
7
6
Radio frequency remote control C
5 Unlocking the front doors and,
depending on the vehicle, sliding
side doors.
Unlocking the doors and luggage
compartment.
6 Locking the doors and luggage
compartment.
7 Locking/Unlocking the luggage
compartment and, depending on
the vehicle, sliding side doors.
1.03
Page 9

RADIO FREQUENCY REMOTE CONTROL UNIT: general information (continued)
Remote control unit operating
range
This varies according to the
environment: therefore take care
when handling the remote control
that you do not inadvertently lock or
unlock the doors.
Note: on certain vehicles, if a door is
not opened within approximately 30
seconds of the door being unlocked
by remote control, the doors will
lock again automatically.
Interference
Interference may be caused to the
operation of the remote control by
factors in the immediate vicinity
(external installations or the use of
equipment operating on the same
frequency as the remote control).
If you lose your keys or remote
control unit, or need another set,
contact your RENAULT Dealer.
- If a remote control unit is
replaced, it will be necessary to
take the vehicle to your
RENAULT Dealer because both
the vehicle and the remote
control are needed to initialise
the system.
- Depending on the vehicle, you
have the option of using up to
four remote control units.
Contact your RENAULT Dealer.
If the remote control unit will not
operate:
- Make sure that the batteries are
always in good condition; they
have a service life of
approximately two years.
See Radio frequency remote
control: batteries in Section 5 for
the battery replacement procedure.
1.04
Page 10
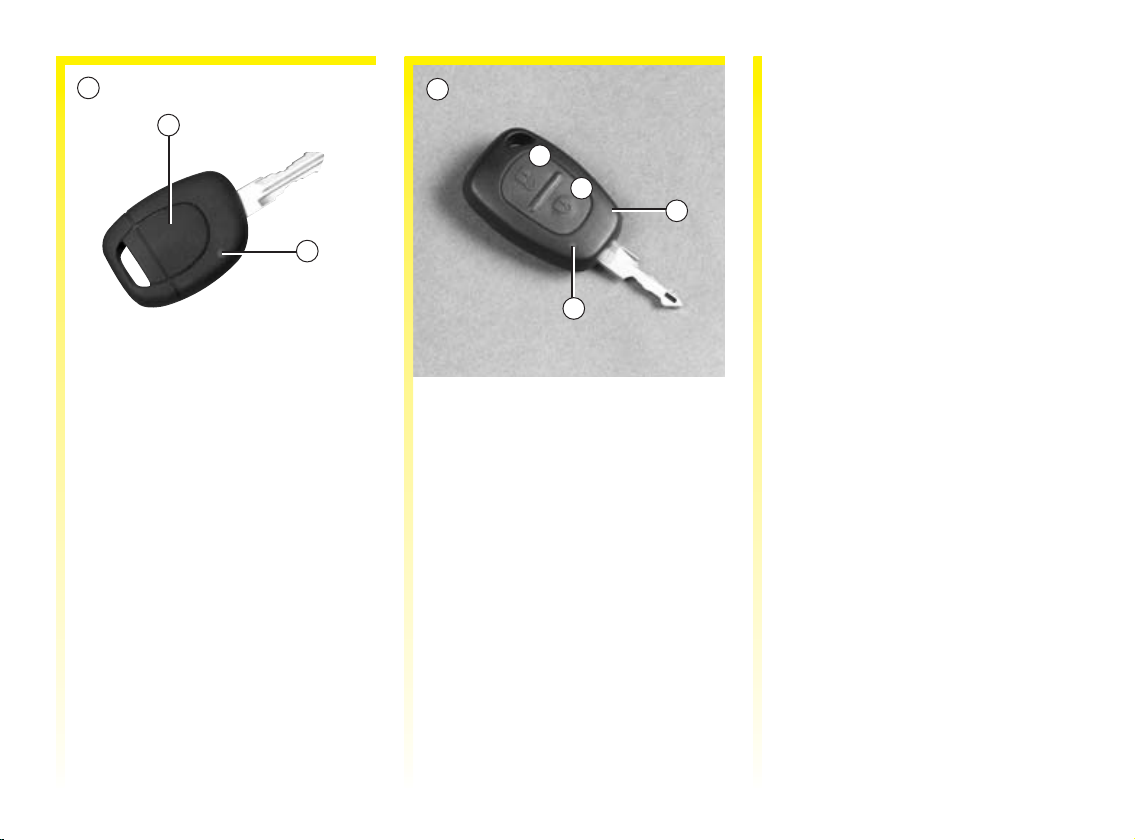
RADIO FREQUENCY REMOTE CONTROL: use
A
1
2
B
E
The side mounted indicators and
hazard warning lights flash twice to
indicate that the doors have been
locked.
Note: depending on the vehicle, if
D
3
4
either a door or the luggage
compartment is open or not
properly closed, the hazard warning
lights will not flash.
The hazard warning lights and side
mounted indicators flash once to
indicate unlocking.
Remote control units A and B are
used to lock and unlock the doors.
They are supplied by a battery
which must be replaced when the
battery warning light 2 or 4 no
longer lights up (see Remote control
locking: batteries).
Locking/unlocking the doors
Remote control unit A
Press the remote control for
approximately one second to lock or
unlock the doors. (indicator light 2
will come on.)
Remote control unit B
Press the remote control unit for
approximately one second
(indicator light 4 comes on) to lock
(side D) or to unlock (side E).
1.05
Page 11
RADIO FREQUENCY REMOTE CONTROL UNIT: use (continued)
Unlocking the doors
C
6
5
Remote control unit C locks and
unlocks the doors.
It is powered by a battery which
must be replaced (see Radio
frequency remote control: battery in
Section 5).
A short press on button 5 unlocks
the front doors and, depending on
the vehicle, the sliding side doors.
Pressing and holding button 5
unlocks all the doors and luggage
compartment.
A short press on button 6 unlocks
the luggage compartment and,
depending on the vehicle, the
sliding side doors.
The hazard warning lights and side
mounted indicators flash once to
indicate unlocking.
Special notes (for some countries):
- pressing button 5 unlocks the
driver’s door only.
- pressing and holding button 5
unlocks all the doors and the
luggage compartment.
C
6
7
Locking the doors
Pressing button 7 locks all the doors
and luggage compartment.
Pressing button 6 locks/unlocks the
luggage compartment and,
depending on the vehicle, the
sliding side doors.
The side indicators and hazard
warning lights flash twice to
indicate that the doors have been
locked.
1.06
Page 12
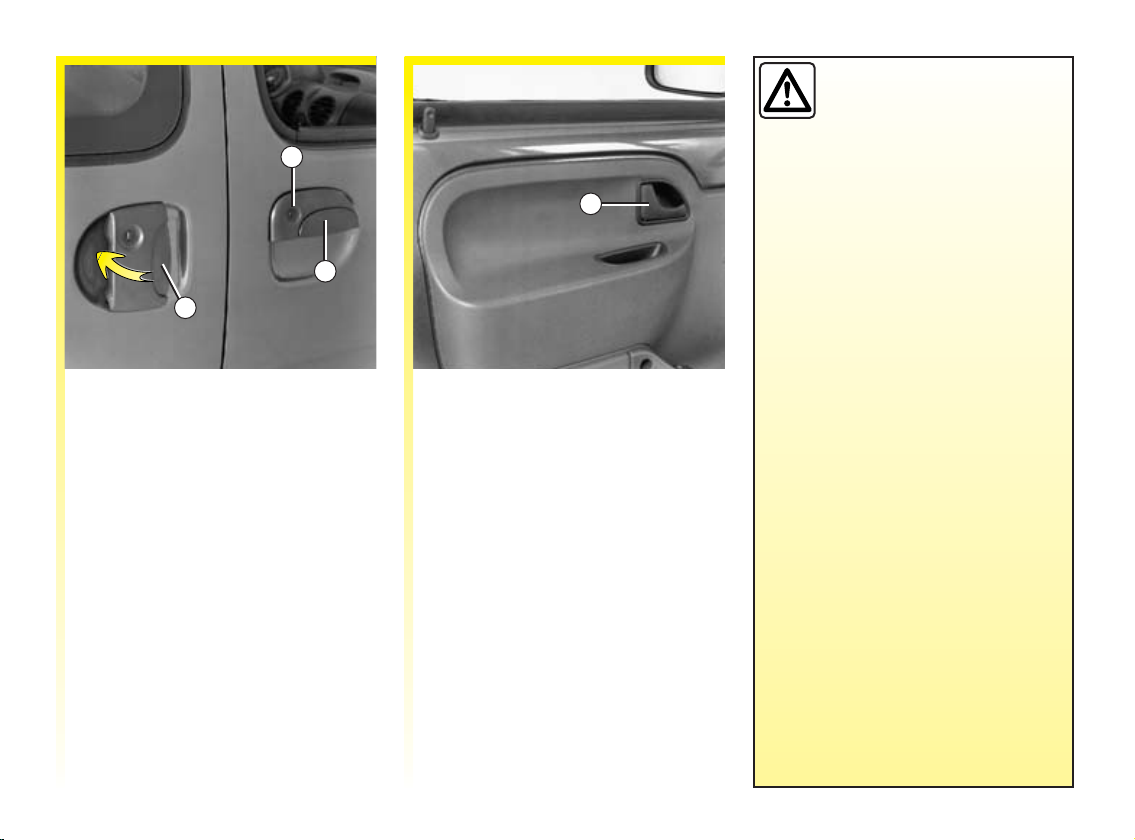
DOORS
1
2
3
Front door
Opening manually from the outside
Unlock using the key after inserting
it fully into one of the front door
locks 1. Place your hand behind
handle 2 and pull it towards you.
Opening from the inside
Move handle 4 or 6.
4
Sliding side door
Opening manually from the outside
Unlock the door using a key in the
same way as a front door, place your
hand behind handle 3 and slide the
door towards the rear of the vehicle
until it locks in position.
Closing from the inside
Use handle 5 to close the door
completely.
Check that it is correctly locked.
Recommendations for the
sliding side door (left or
right-hand side)
Appropriate precautions
must be taken when opening or
closing the sliding door, as is the
case for any of the vehicle’s doors.
- Check that the door will not come
into contact with any person, part
of your body, animal or object.
- Only use the handles on the
inside and outside of the door to
operate it.
- Take care when opening and
closing the door.
- Take particular care when the
vehicle is parked on a slope: open
the door with care until it is fully
open and latches into its locking
position.
- Before moving off, always ensure
that the door is properly closed.
- Do not use the lower support as a
step.
1.07
Page 13

DOORS (continued)
5
6
7
Lights-on reminder buzzer
If you have left the lights switched
on after turning off the ignition, a
warning buzzer will sound when a
door is opened (to prevent discharge
of the battery, etc.).
This warning light
o
shut properly.
1.08
indicates that a door is not
Childproof locks
To prevent the side door from being
opened from the inside, move lever
7 and check from inside the vehicle
that it is locked correctly.
Page 14
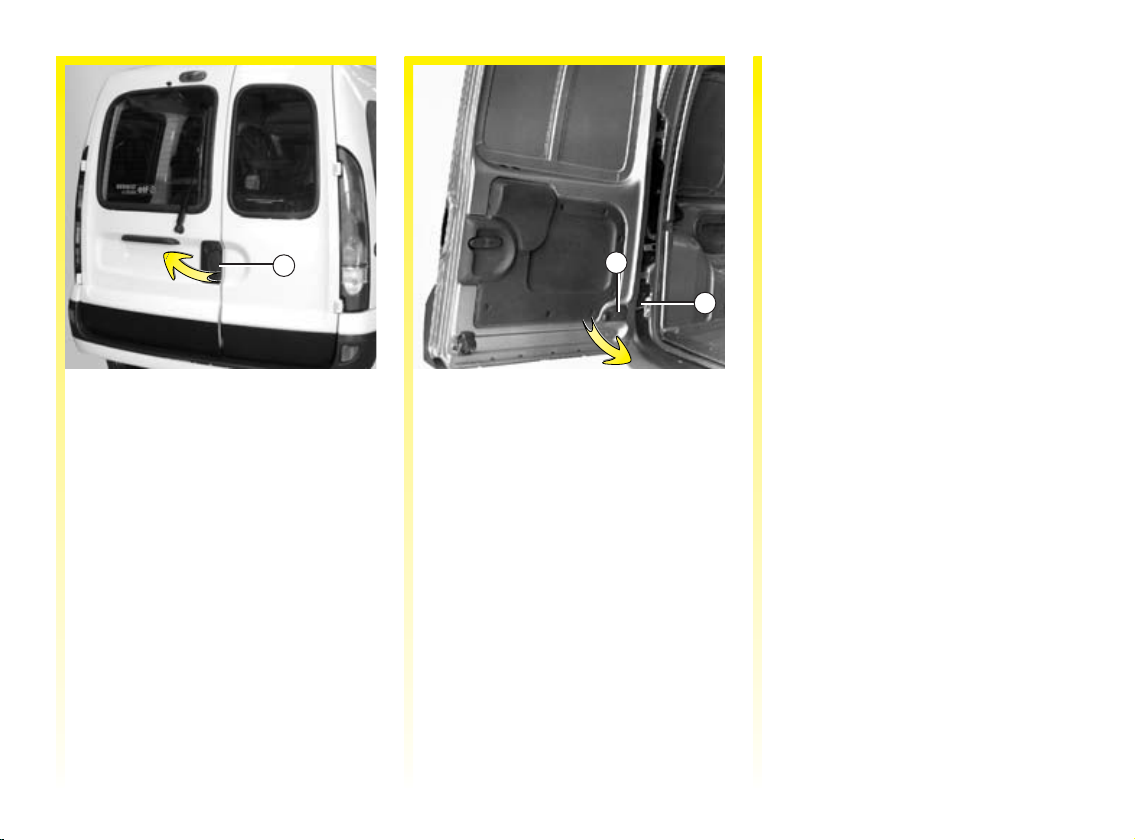
DOORS (continued)
Locking manually from the outside
First close the small door and then
close the large door.
Door stays 3 will lock into their
locations automatically.
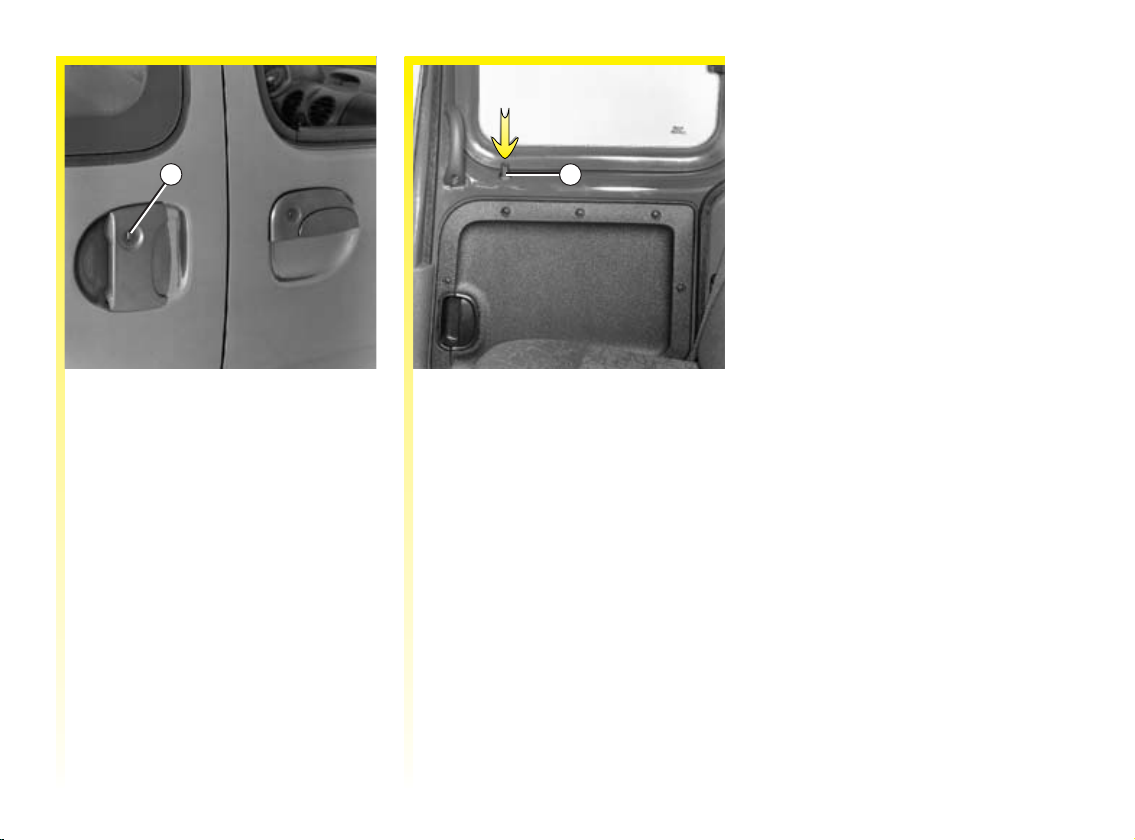
1
Rear hinged doors
Opening manually from the outside
Unlock using the same key as for the
front doors.
Place your hand behind handle 1
and pull it towards you.
2
3
To open the rear doors completely
To open the doors fully, move catch
2, open the door fully so that stay 3
is released.
Proceed in the same way for the
other door.
1.09
Page 15
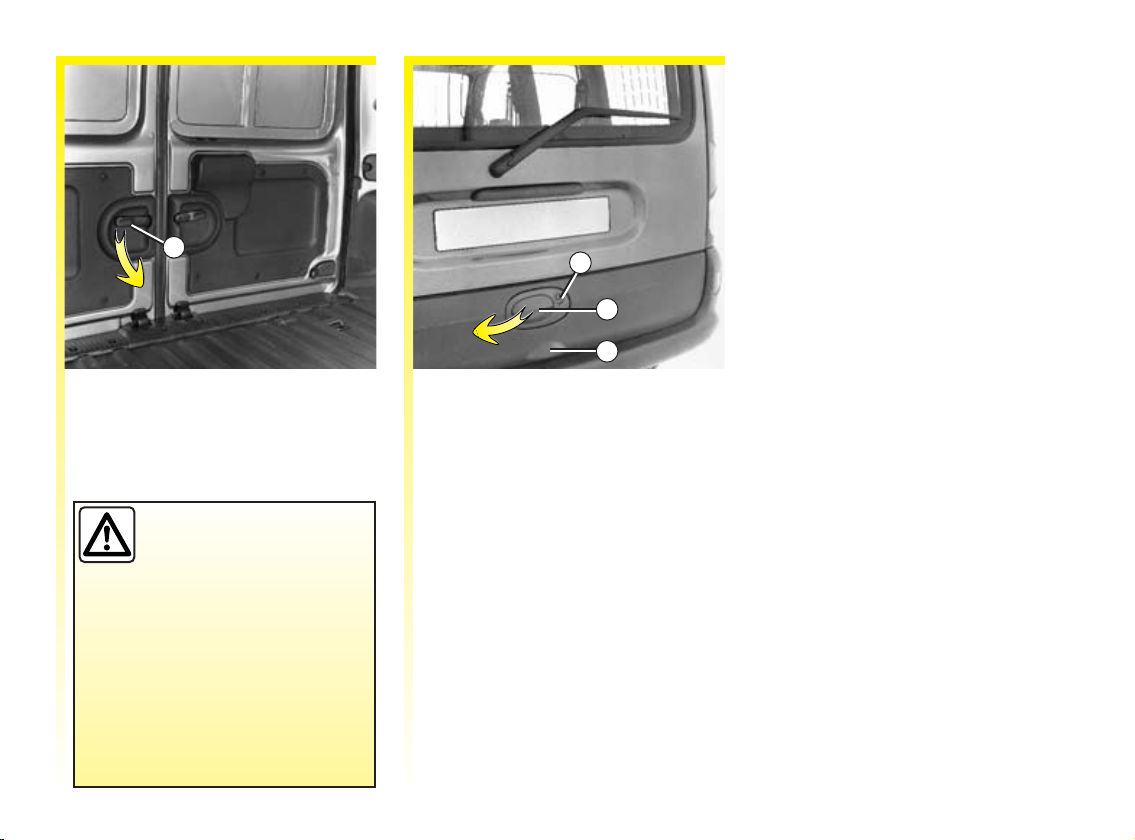
DOORS (continued)
4
Rear hinged doors
Opening from the inside
The small door can be opened from
inside the vehicle by turning handle
4 downwards.
If the vehicle is parked on
the hard shoulder with
luggage compartment
door open, the rear lights
may be obscured. You should
make other road users aware of
the presence of your vehicle by
using a warning triangle or other
equipment specified by the road
traffic regulations of the country
concerned.
1.10
(continued)
5
6
7
Tailgate
Opening manually from the outside
To unlock, insert the ignition key
into lock 5.
Place your hand behind handle 6
and lift to open.
Close the luggage compartment door
by shutting it firmly but carefully.
Do not pull on the hydraulic struts
to do this.
Make sure it is correctly locked in
position by trying to lift it at 7.
Page 16
LOCKING THE DOORS
1
2
1
Electric central locking
This enables all the doors to be
locked simultaneously.
Lock by pressing the opposite side
to the figurine on switch 1.
Check that buttons 2 are pressed
down fully.
Manual locking
Front door
Use the key if outside or, if inside
the vehicle, press down button 2
fully when the door is closed.
If you decide to keep the
doors locked when you
are driving, remember
that it may be more
difficult for those assisting you to
gain access to the passenger
compartment in the event of an
emergency.
1.11
Page 17
LOCKING THE DOORS (continued)
3
Sliding side door (right-hand
side)
From outside, insert the key fully
into lock 3 and lock the door.
4
From inside, fully depress button 4,
with the door closed.
1.12
Page 18

LOCKING THE DOORS (continued)
Second sliding side door (located on
the fuel filler cap side).
This door does not have a lock on
the outside. It is locked or unlocked
from outside the vehicle using the
remote control (at the same time as
the other doors) or from the inside
by moving the locking button (same
for the other side door).
Opening and closing operations are
the same as for the other sliding side
door.
Special information when filling
with fuel:
Depending on the vehicle, when the
fuel filler cap is removed during
refuelling:
- the doors lock then unlock
immediately, except for the side
door which remains locked,
- only the side door locks.
This is to prevent the door from
striking against the filler nozzle
during refuelling.
When the fuel tank has been filled,
refit the cap. The locking button is
operational again.
For vehicles without remote control
locking, the door is always locked
and it is therefore possible to unlock
it from the inside.
Note: if the door was open before the
fuel filler cap was removed, it will
not lock.
To ensure that it does not collide
with the fuel pump filler nozzle
while the fuel tank is being filled,
close the door, taking precautions to
ensure that no one is injured. It will
then lock automatically.
1.13
Page 19
RENAULT ANTI-INTRUDER DEVICE (RAID)
You must first decide if you want to
activate this function.
To activate
With the ignition on, press button 1
on the locking side (opposite the
symbol) for approximately 5
seconds, until you hear the beep.
To deactivate
With the ignition on, press button 1
on the locking side (opposite the
symbol) for approximately 5
seconds, until you hear the beep.
Operating principle
When the vehicle moves off, the
system automatically locks the
doors as soon as a speed of 5 mph (8
km/h) is reached.
If you decide to keep the
doors locked when you
are driving, remember
that it may be more
difficult for those assisting you to
gain access to your vehicle in the
event of an emergency.
Depending on the vehicle, pressing
unlocking button 1 or opening a
front door unlocks:
- all the doors and the luggage
compartment;
- the front doors and the sliding side
doors;
- the front doors.
Note: if a rear door is opened, it
will automatically lock again when
the vehicle reaches a speed of
approximately 5 mph (8 km/h).
1
1
Operating faults
If you note that the system is not
operating correctly (automatic
locking does not take place), first
check that all the doors have been
properly closed. If they are closed
correctly, consult your RENAULT
Dealer.
Also make sure that locking has not
accidentally been deactivated.
If this is the case, switch the ignition
off and on again and reactivate the
system as described above.
1.14
Page 20
ENGINE IMMOBILISER
Immobiliser warning light
This prevents the vehicle
being driven by anyone not in
possession of the vehicle’s coded
ignition key.
ê
Operating principle
The vehicle is automatically
protected for a few seconds after the
key is removed from the ignition.
If the vehicle does not recognise the
ignition key code, warning light 1
will flash continuously and the
engine cannot be started.
- System operational indicator light
When the ignition is switched on,
warning light 1 comes on for
approximately three seconds and
then goes out. You can then start
the engine. The vehicle has
recognised the code and the engine
can be started.
1
- Vehicle protection warning light
A few seconds after the ignition
has been switched off, indicator
light 1 will flash constantly.
The vehicle will not be protected
until the key has been taken out of
the ignition.
1
1
Any unauthorised work carried out on the engine immobiliser
(computers, wiring, etc.) could be dangerous.
It must be carried out by a qualified RENAULT Technician.
1.15
Page 21
ENGINE IMMOBILISER SYSTEM (continued)
- Operating fault warning light
Petrol version
After the ignition has been
switched on, if warning light 1
continues to flash or remains
continuously lit, this indicates a
system operating fault.
Any unauthorised work
carried out on the engine
immobiliser (computers,
wiring, etc.) could be
dangerous.
It must be carried out by a
qualified RENAULT Technician.
Diesel version
If indicator light 1 comes on or
remains lit after the ignition has
been switched on, this indicates that
the system is not operating correctly.
In all cases, it is essential to contact
a RENAULT Dealer. Only RENAULT
Dealers are qualified to repair the
engine immobiliser.
If the coded ignition key is faulty,
use the second key (supplied with
the vehicle), when warning light 1
begins to flash quickly after the
ignition has been switched on. If
you do not have access to this, it is
essential to contact a RENAULT
Dealer. Only RENAULT Dealers are
authorised to repair the engine
immobiliser system.
1.16
Page 22
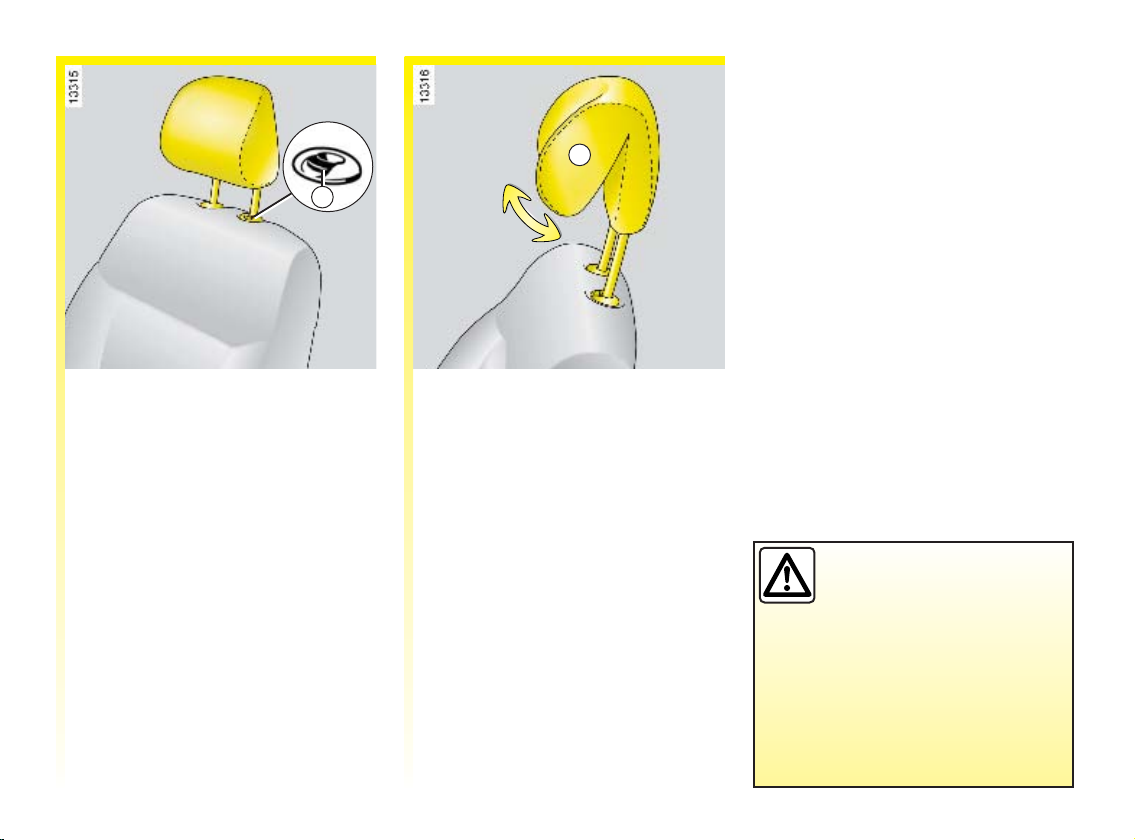
FRONT HEADRESTS
A
1
To raise or lower the headrest
Pull the headrest towards you (i.e.
towards the front of the vehicle) and
slide it up or down at the same time.
To remove the headrest
First incline the seatback towards
the rear.
Raise the headrest until it is at the
highest possible setting. Lift up tab 1
and then pull the headrest upwards
until it is released.
To refit the headrest
Insert the rods into the sleeves, with
the notches facing the front.
Lower the headrest until it locks in
position.
To adjust the angle of the headrest
On certain vehicles the angle of the
headrest can be adjusted. To do this,
move the front section A of the
headrest forwards or backwards
until it feels comfortable.
The headrest is important
for safety. Ensure that it is in
place and in the correct
position. The distance
between your head and the
headrest should be as small as
possible. The top of your head
should be in line with the top of the
headrest.
1.17
Page 23
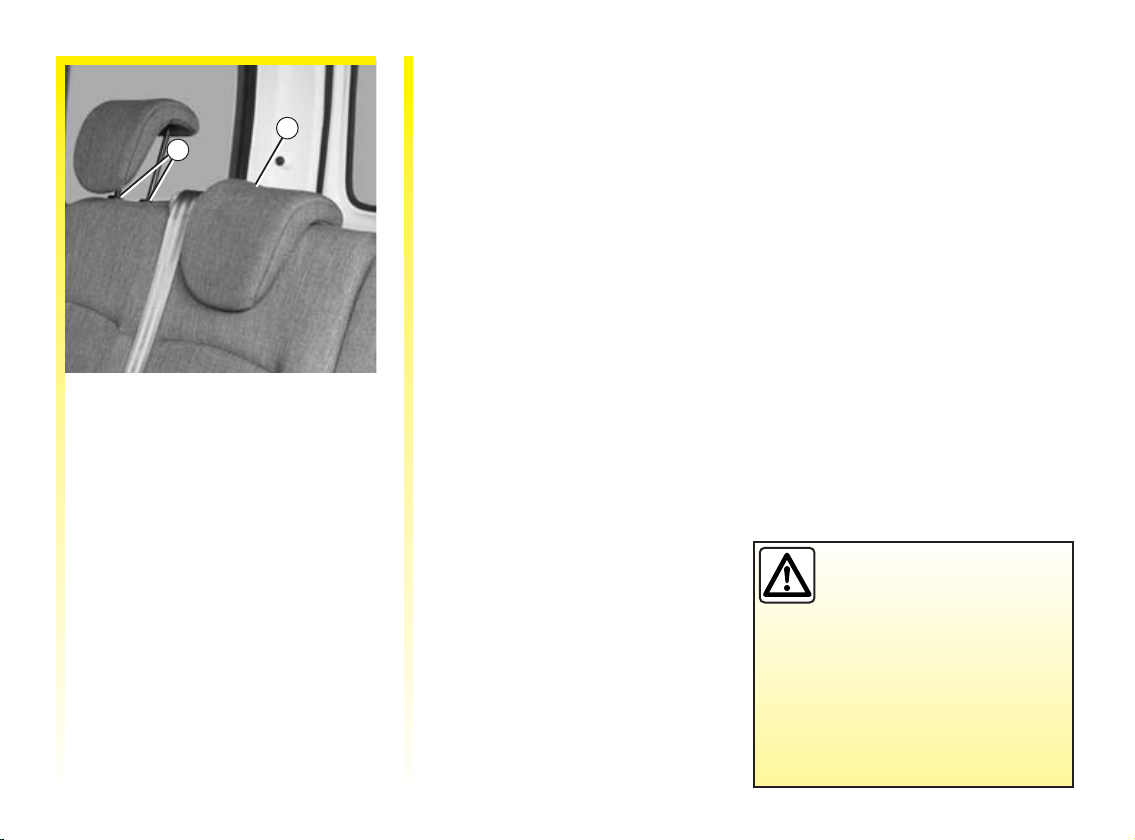
REAR HEADREST
2
1
To raise it
Simply slide it up.
To lower it
Press tabs 1 (on the headrest guide)
while pushing it down at the same
time.
To refit the headrest
Insert the rods into the sleeves, with
the notches to the front, and lower
the headrest to the desired height by
pressing tab A.
Storage position 2
Press the headrest guide tabs 1 and
lower the headrest completely.
When the headrest is fully lowered,
it is in the storage position; do not
use this position when someone is
sitting in the rear seats.
To remove it
Fit the headrest and then press
tabs 1 to release it.
1.18
The headrest is important
for safety. Ensure that it is in
place and in the correct
position. The distance
between your head and the
headrest should be as small as
possible. The top of your head
should be in line with the top of the
headrest.
Page 24
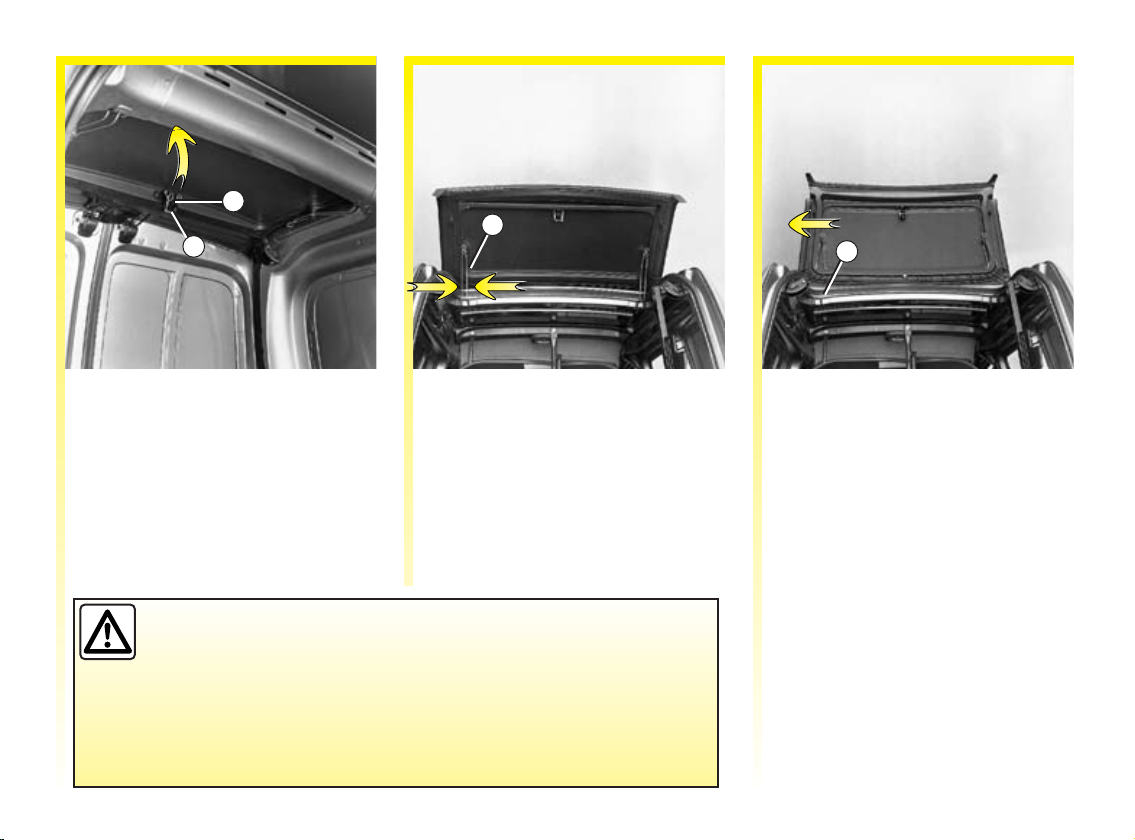
ROOF FLAP
1
3
2
4
To open
- Unfasten clip 2 by moving catch 1
upwards.
- Lift the flap until it is locked in
position.
Closing
Close the roof flap before you close
the rear doors.
Driving with the roof flap open may be unpleasant for passengers
because exhaust gas may enter the passenger compartment. This use
is solely for short distances whilst transporting bulky objects
without having to open the rear doors. In this case, close the
windows and operate the ventilation system at the half or fully open setting
as this will help to prevent exhaust gas from entering the passenger
compartment.
To remove
- Press the two rods 3 towards each
other on each side.
- Unhook them from their mounting.
- Hold the flap with both hands.
- Tilt it as far as possible to the rear
and release it from hinges 4 in the
direction of the arrow.
1.19
Page 25
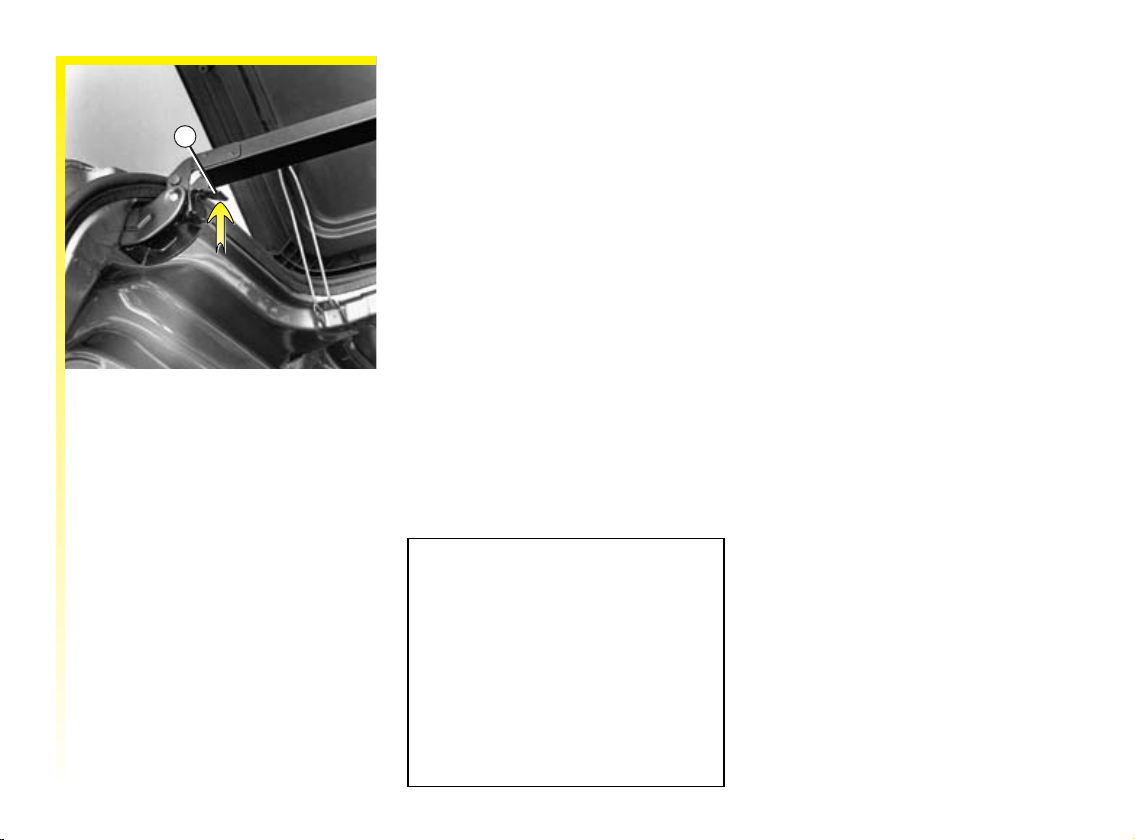
ROOF FLAP (continued)
5
Transverse bar
When loading bulky objects, the
transverse bar may be moved:
- Press handle 5 upwards.
- Lift the bar all the way to the door
pillar.
- Reposition the bar after loading.
Before starting off, always
reposition the transverse bar.
The rear doors can only be closed
with the bar locked.
Remember that the overall vehicle
dimensions may change when you
are transporting bulky objects.
1.20
Page 26
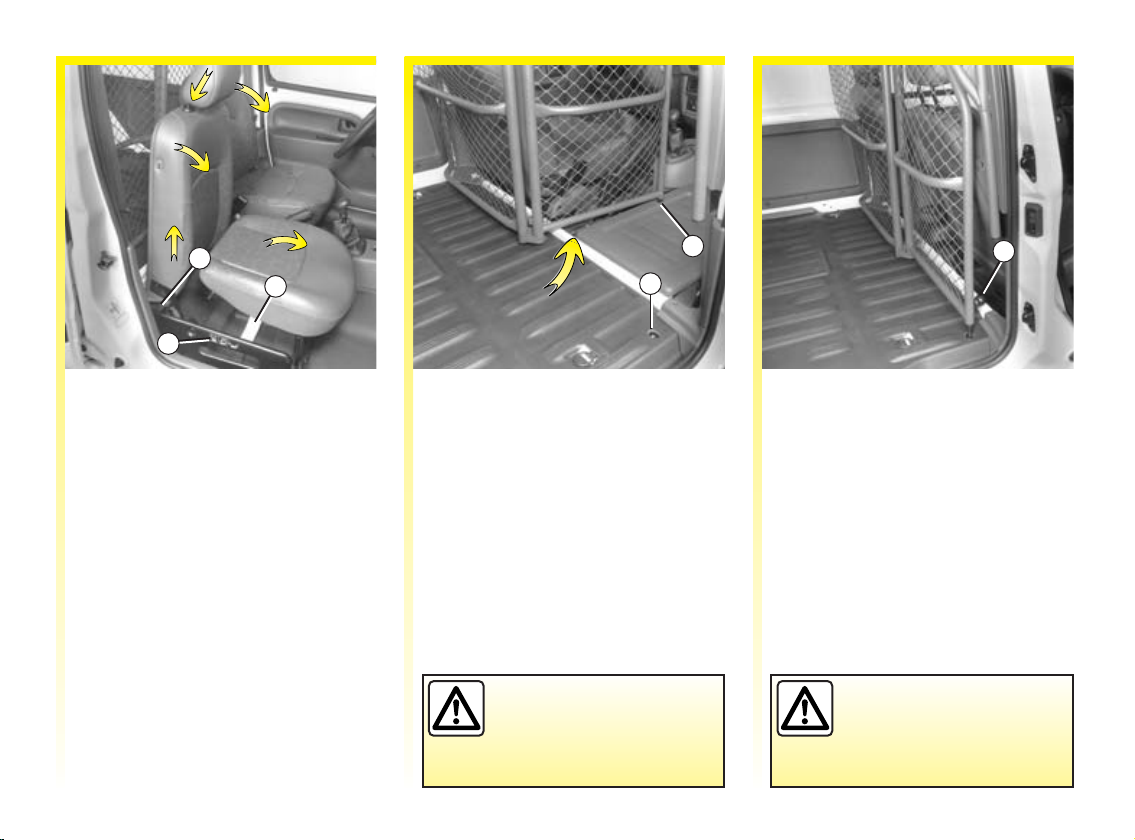
PARTITION
1
3
2
Using the swivelling bulkhead
- Bring the front passenger seat base
into a vertical position by pulling it
past the point of resistance (arrow).
- Unlock the seatback by raising the
handle 1 and push it into a
horizontal position after lowering
the headrest. Press the top of the
headrest to make the operation
easier. It is hinged.
Label 2 reminds you of these
instructions.
4
5
- Release the swivelling section by
lifting catch 6 until it locks in
position.
- Pivot the moving section until it is
at right angles and lock it at point 4
by lowering catch 6.
Follow the safety
instructions on label 3.
6
Note: before returning the
swivelling section to its original
position, make sure that locking
point 5 is not obstructed.
The swivelling bulkhead
section must always be
locked when the vehicle
is driven.
1.21
Page 27
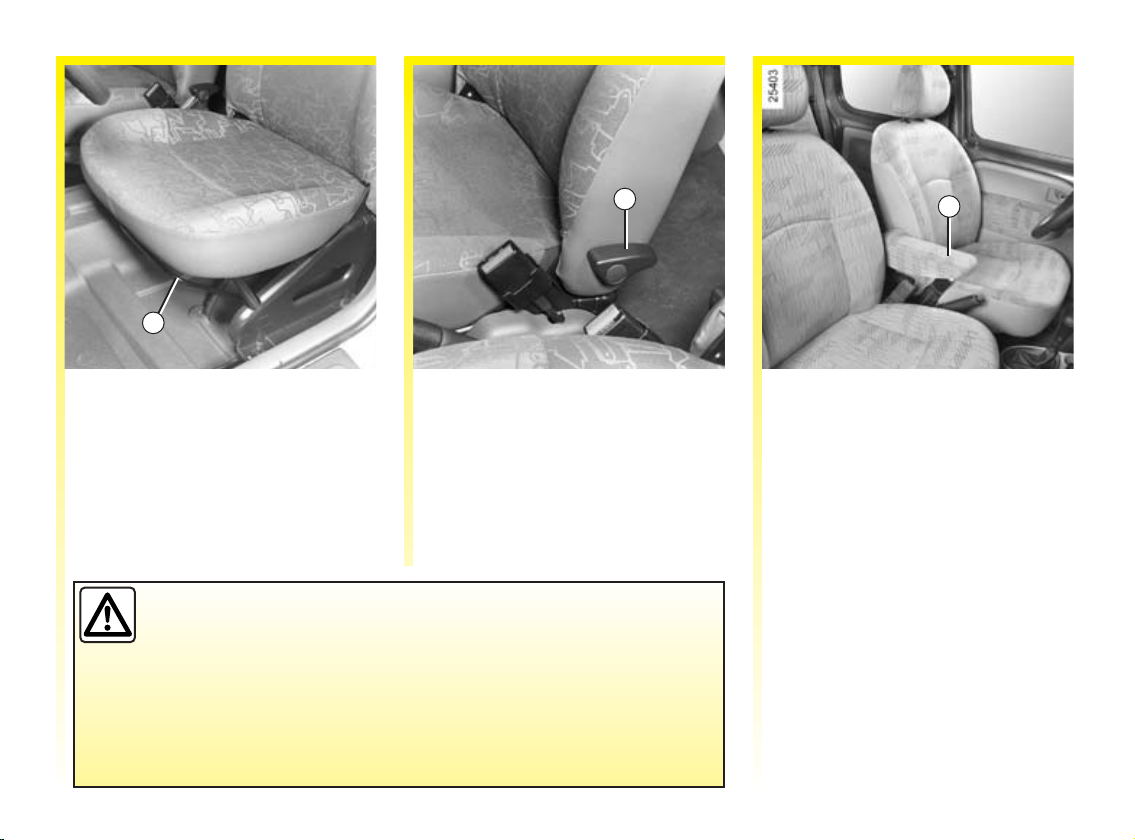
FRONT SEATS
2
1
To move a seat forwards or
backwards
Stay in your seat and raise bar 1 to
unlock the mechanism.
We would advise you not to recline the seatbacks too far back to
ensure that the effectiveness of the seat belts is not reduced.
Make sure that the seatback is locked in place correctly.
No objects should be placed on the floor (area in front of driver) as these
objects could slide under the pedals during braking manoeuvres, thus
obstructing its use.
To tilt the seatback
Move lever 2 until the seatback is at
the desired angle.
3
Heated seats
ð
With the ignition on, press
the switch located on the side of the
seat base. An indicator light will
come on. The system has a
thermostat and determines whether
or not heating is necessary.
Front armrest 3
1.22
Page 28
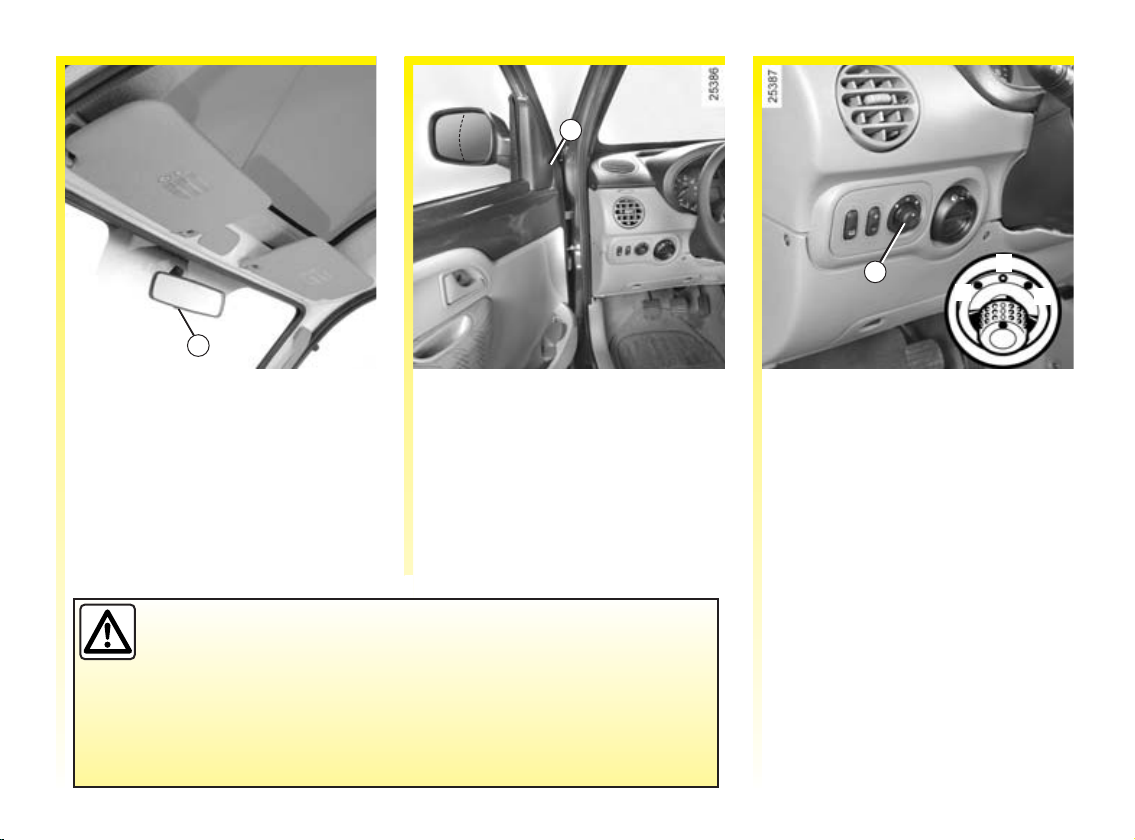
REAR-VIEW MIRRORS
1
Interior rear-view mirror
The interior rear-view mirror is
adjustable. When driving at night,
tilt small lever 1 to avoid being
dazzled by the headlights of the
vehicle behind.
On some models, the door mirror has two clearly defined zones.
Zone B is what can normally be seen in a conventional door mirror.
For your safety, zone A increases rear side visibility.
The objects in zone A look much further away than they really are.
A
B
2
Door mirror
To adjust the mirror, move lever 2.
3
A
B
C
Electrically-adjustable door
mirrors
With the ignition on, turn knob 3:
- position B to adjust the left-hand
door mirror;
- position C to adjust the right-hand
door mirror;
A is the neutral central position.
Heated door mirrors
The door mirrors are also de-iced
when rear screen demisting is
switched on.
1.23
Page 29
SEAT BELTS
Always wear your seat belt when
travelling in your vehicle. You must
also comply with the legislation of
the particular country you are in.
Before starting:
- first ensure that your driving
position is correct,
- then adjust your seat belt to
provide maximum protection.
Incorrectly adjusted seat
belts may cause injuries
in the event of an
accident.
Even pregnant women should
wear a seat belt. In this case,
ensure that the lap belt is not
exerting too much pressure on
the abdomen but do not allow
any slack.
Adjusting your driving position
- Sit with your back firmly against
the seatback. (after having
removed your coat or jacket).
This is essential to ensure that
your back is in the correct position.
- Adjust the distance between the
seat and the pedals.
Your seat should be as far back as
possible while still allowing you to
fully depress the clutch pedal. The
seatback should be adjusted so that
your arms are slightly bent when
you hold the steering wheel.
- Adjust the position of your
headrest.
For safety reasons, the top of the
headrest must be level with the top
of the head.
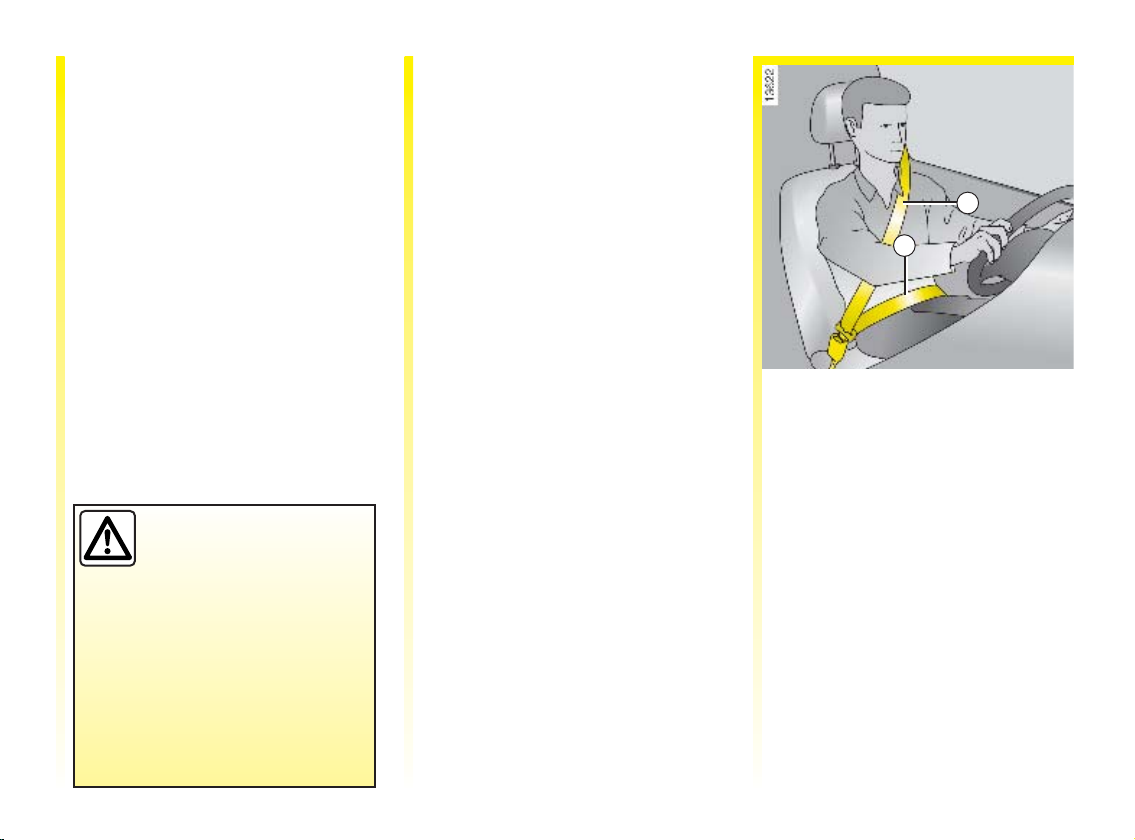
1
2
Adjusting the seat belts
Sit with your back firmly against the
seatback.
The shoulder strap 1 should be as
close to the base of your neck as
possible but not on it.
The lap strap 2 should be worn flat
over your thighs and against your
pelvis.
The belt should be worn so that it is
as close to your body as possible, i.e.
avoid wearing heavy clothing,
having bulky objects under the belts
or reclining the seatback
excessively, etc.
1.24
Page 30
SEAT BELTS (continued)
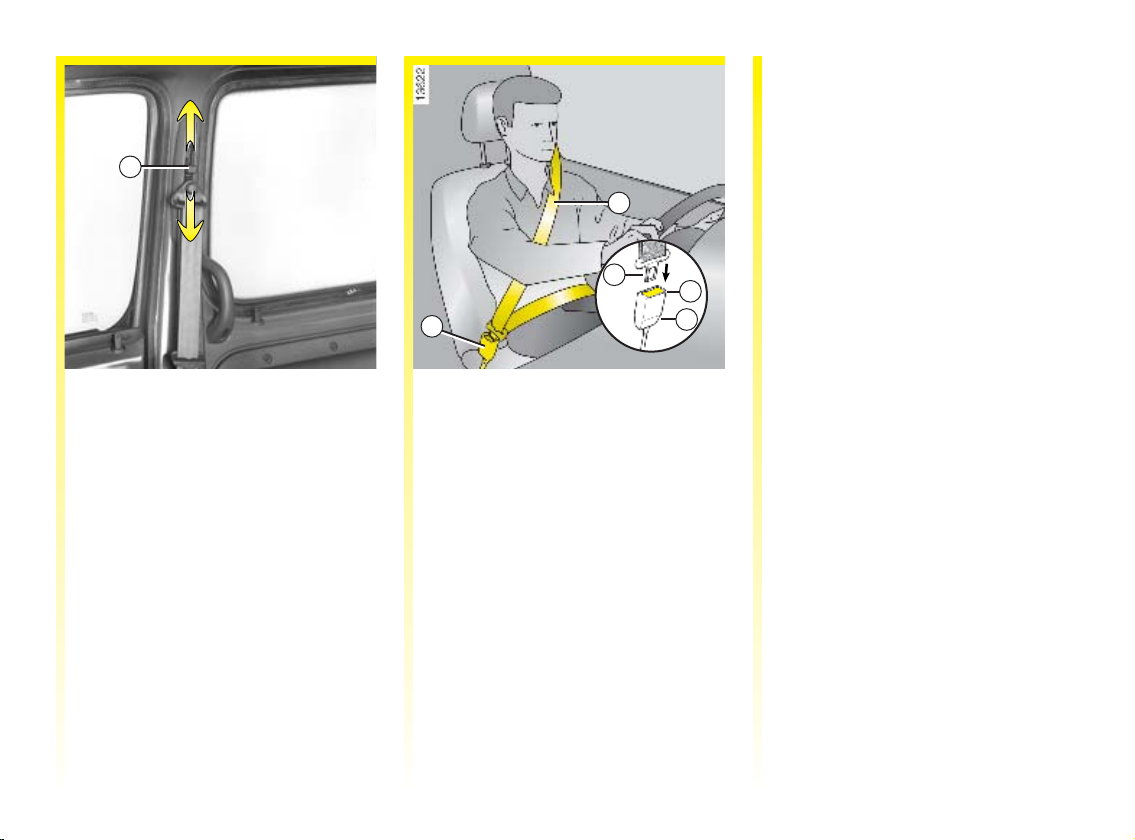
3
Adjusting the front seat belt
height
Press button 1 to select the
adjustment position you require so
that shoulder strap 3 is worn as
described above.
Make sure that the seat belt is locked
in position correctly after you have
adjusted it.
1
5
6
4
4
Locking
Unwind the belt slowly and
smoothly and ensure that buckle 5
locks into housing 4 (check that it is
locked by pulling buckle 5). If the
belt jams, allow it to run back before
attempting to unwind it again.
To fasten (continued)
If your belt becomes completely
jammed:
- pull the belt slowly but firmly so
that just over an inch (3 cm)
unwinds;
- then allow the belt to rewind
automatically,
- unwind it again,
- if there is still a problem, contact
your RENAULT Dealer.
ç
This lights up constantly, and, when
the vehicle reaches a speed of
approximately 6 mph (10 km/h),
depending on the vehicle, it will
flash and a beep will sound for
approximately 90 seconds before the
light returns to being constantly lit.
Driver’s seat belt reminder
warning light
Unlocking
Press button 6 on buckle 4 and the
seat belt will be rewound by the
inertia reel.
Guide the buckle to help the
operation.
1.25
Page 31

REAR SEAT BELTS
Rear side seat belts
The belts are locked, unlocked and
adjusted in the same way as the
front belts.
1
2
3
Rear centre belt
Slowly unwind belt 1 until the black
buckle 2 locks into housing 3.
Make sure that the rear bench
seat is locked in position
correctly so that the seat belts
will operate efficiently.
Refer to the information on the
rear bench seat in section 3.
4
5
6
6
4
5
Rear lap belt with manual
adjustment
The belts are fastened and
unfastened in the same way as the
inertia reel type belts.
Adjusting the lap belt
- To tighten, pull on the free end 6 of
the belt.
- To loosen, tilt adjusting buckle 4
perpendicular to the seat belt,
press the buckle while pulling lap
belt 5.
The central seat of the rear
bench seat cannot be used
when it is configured as a
two-seater, as there is no
seat belt.
1.26
Page 32

SEAT BELTS
The following information applies to both the vehicle’s front and rear seat belts.
- No modification may be made to the component parts of the restraint system (belts and seats and their
mountings) fitted originally.
Contact your RENAULT Dealer for special operations (e.g. fitting child seats).
- Do not use devices which give any slack in the belts (e.g. clothes pegs, clips, etc.), as a seat belt which is worn too
loosely risks causing injury in the event of an accident.
- Never wear the shoulder strap under your arm or behind your back.
- Never use the same belt for more than one person and never hold a baby or child on your lap with your seat belt around
them.
- The belt should never be twisted.
- Following a serious accident the seat belts in use at the time must be replaced. Always replace your seat belts as soon
as they show any signs of wear.
- When putting back the rear bench seat, take care that the seat belts are correctly positioned so that they can be used
properly.
- If necessary, readjust the position and tension of the belt.
1.27
Page 33

RESTRAINT SYSTEMS IN ADDITION TO FRONT SEAT BELTS
These are:
- pretensioners (described below),
- force limiter,
- driver’s and passenger airbags
(described on the following pages).
These systems are designed to act
independently or together when the
vehicle is subjected to a frontal
impact.
There are three possibilities,
depending on the force of the
impact:
- protection is provided by the belt
only;
- the pretensioner is triggered to
rectify belt position and take up
slack in the belt;
- the airbag and the force limiter are
also triggered when there are
severe impacts.
Pretensioners
With the ignition on, if the vehicle is
subjected to a severe frontal impact,
piston 1 immediately retracts the
seat belt buckle, pulling the seat belt
against the body and thereby
increasing its efficiency.
1
- Have the entire restraint
system checked following
an accident.
- No operation whatsoever is
permitted on any part of the
pretensioner system (computer,
wiring) and the system components
must not be reused on any other
vehicle, even if identical.
- Only qualified RENAULT
personnel may work on the
pretensioner system; otherwise
the system may trigger
accidentally and cause injury.
- The electric trigger system may
only be tested by a specially
trained technician using special
equipment.
- When scrapping your vehicle,
contact your RENAULT Dealer for
disposal of the gas generator.
1.28
Page 34

METHODS OF RESTRAINT IN ADDITION TO THE FRONT SEAT BELTS (continued)
Force limiter
Above a certain level of impact, this
mechanism is used to limit the force
of the belt against the body so that it
is at an acceptable level.
Driver and passenger airbags
The airbag system uses the
principles of pyrotechnics. This
explains why, when the airbag
inflates, it will generate heat,
produce smoke (this does not
mean that a fire is about to start)
and make a noise upon
detonation. In a situation where
an airbag is required, it will
inflate immediately and this may
cause some minor, superficial
grazing to the skin or other
discomfort.
An airbag may be provided for both
the driver and the front passenger.
Airbag markings on the steering
wheel, the dashboard and the lower
section of the windscreen inform
you of the presence of this
equipment.
Each airbag system consists of:
- an airbag and gas generator fitted
on the steering wheel for the driver
and in the dashboard for the front
passenger;
- a computer for both systems,
which includes the impact sensor
and a monitor controlling the
electrical trigger system for the gas
generator;
- a single
on the instrument panel.
å
indicator light
1.29
Page 35

METHODS OF RESTRAINT IN ADDITION TO THE FRONT SEAT BELTS (continued)
1
1
Driver and passenger airbags
(continued)
Operation
This system is only operational
when the ignition is switched on.
If a severe frontal impact occurs, the
airbag(s) inflate(s) rapidly,
cushioning the impact of the driver’s
head and chest against the steering
wheel and the front passenger’s
head against the dashboard. The
airbag(s) then deflate(s) immediately
so that the passengers are not
impeded in any way when leaving
the vehicle.
1
Depending on the vehicle, the
passenger airbag system is linked to
a front passenger airbag deactivation
warning light 2 on the instrument
panel. This warning light is linked
to the passenger airbag deactivation
system through the ignition key.
It lights up to indicate that the
passenger airbag will not be inflated
in the event of an impact (refer to
the section on Deactivating the front
passenger airbag).
2
Operating faults
Warning light 1 will light up on the
instrument panel when the ignition
is switched on and then will go out
after a few seconds.
If it does not light up when the
ignition is switched on or if it
flashes, there is a fault in the system.
Consult your RENAULT Dealer as
soon as possible. Your protection
will be reduced until this fault is
rectified.
1.30
Page 36

METHODS OF RESTRAINT IN ADDITION TO THE FRONT SEAT BELTS (continued)
A
All of the warnings below are given
so that the airbag is not obstructed
in any way when it is inflated and
also to prevent the risk of serious
injuries caused by items which may
be dislodged when the airbag
inflates.
Warnings concerning the driver’s airbag
- Do not modify the steering wheel or the steering wheel boss.
- Do not cover the steering wheel boss under any circumstances.
- Do not attach any objects (badge, logo, clock, telephone holder, etc.) to the
steering wheel boss.
- The steering wheel must not be removed (except by qualified personnel from
the RENAULT network).
- When driving, do not sit too close to the steering wheel. Sit with your arms
slightly bent (see Adjusting your driving position in Section 1). This will
allow sufficient space for the airbag to deploy correctly and be fully effective.
Warnings for passenger airbag: location A
- Do not attach or glue any objects (badge, logo, clock, telephone holder, etc.) to
the dashboard in the proximity of the airbag housing.
- Do not place anything between the dashboard and the passenger (pet,
umbrella, walking stick, parcels, etc.).
- The passenger must not put his or her feet on the dashboard or seat as there is
a risk that serious injuries may be sustained. In general, parts of the body
should be kept away from the dashboard (knees, hands, head etc.)
- You should reactivate the airbag as soon as you remove the child seat from
the front passenger seat to ensure the protection of the front passenger in the
event of an impact.
FITTING A REAR FACING CHILD SEAT TO THE PASSENGER SEAT
IS PROHIBITED UNLESS THE METHODS OF RESTRAINT IN ADDITION
TO THE FRONT PASSENGER SEAT BELT HAVE BEEN DEACTIVATED
(Refer to the information on Deactivating passenger airbags in Section 1).
1.31
Page 37

LATERAL PROTECTION EQUIPMENT
Side airbags
This airbag may be fitted to each of
the front seats and is activated at the
sides of the seats (door side) to
protect the occupants in the event of
a severe side impact.
accessory outlets. The use of any covers other than those designed for your
vehicle (and including those designed for another vehicle) may affect the
operation of these airbags and reduce your protection.
- Do not place any accessories, objects or animals between the seatback and the
door. Do not cover the seatback with any items such as clothes or accessories.
This may prevent the airbag from operating correctly or cause injury when
the airbag is deployed.
- Only qualified RENAULT Network personnel may remove or modify a seat.
- These airbags operate through slits in the front seatbacks (door side): never
insert any objects in these slits.
A marking on the windscreen
informs you of the presence of
additional means of restraint
(airbags, pretensioners, etc.) in
the passenger compartment.
Warnings concerning the lateral airbag
- Fitting seat covers: seats equipped with an airbag require covers
specifically designed for your vehicle. Contact your RENAULT Dealer
to find out if these covers may be purchased from RENAULT
1.32
Page 38

ADDITIONAL METHODS OF RESTRAINT
All of the warnings below are given so that the airbag is not obstructed in any way when it is inflated and also to
prevent the risk of serious injuries caused by items which may be dislodged when the airbag inflates.
The airbag is designed to complement the action of the seat belt. Both the airbags and seat belts are integral parts
of the same protection system. It is therefore essential to wear seat belts at all times. If seat belts are not worn, the
occupants are exposed to the risk of serious injury in the event of an accident. It may also increase the risk of
possible with airbags.
If the vehicle should overturn or in the event of a rear impact, however severe, the pretensioners and airbags are not
always triggered. Shocks to the underbody of the vehicle, from pavements, potholes, stones etc. can all trigger these
systems.
- No work or modification whatsoever may be carried out on any part of the driver or passenger airbag system (computer,
- To ensure that the system is in good working order and to avoid accidental triggering of the system which may cause
- As a safety precaution, have the airbag system checked if your vehicle has been involved in an accident, or is stolen or
- If the vehicle is lent or resold, inform the new driver of these conditions and pass on the current driver’s handbook.
- When scrapping your vehicle, contact your RENAULT Dealer for disposal of the gas generator(s).
minor superficial injuries occurring when the airbag is deployed, although such minor injuries are always
wiring harness, etc.), except by qualified RENAULT Network personnel.
injury, only qualified RENAULT Network personnel may work on the airbag system.
broken into.
1.33
Page 39

CHILD SAFETY
In all countries there are regulations
governing the use of restraints for
children and babies.
In Europe, children under 10 years
(1)
of age
approved safety device which is
suitable for the weight and size of
the child.
The driver is responsible for
ensuring that this equipment is used
correctly.
Child restraints for which type
approval was obtained after January
1992 offer a level of safety much
greater than for restraints with type
approval before that date.
It is therefore advisable to select a
child restraint that complies with
European regulation ECE 44.
Restraints that comply with this
legislation must be marked with an
orange label bearing the letter E
followed by a number (which
represents the country where it is
type approved) and the year in
which the type approval was
granted.
Refer to the Child safety equipment
booklet available from the
RENAULT Network to choose the
seat suited to your child and
recommended for your vehicle.
must be seated in an
Remember that a collision at 30
mph (50 km/h) is the same as
falling a distance of 10 metres.
Expressed in other terms,
transporting a child without a
restraint is the equivalent of
allowing him or her to play on a
fourth-floor balcony without
railings.
Under no circumstances
should babies or children be
allowed to travel sitting on
the knees of another
passenger in the vehicle.
If a frontal impact occurs at 30 mph
(50 km/h) a child weighing 30 kg
(66 lbs) will be transformed into a
missile equivalent to one ton: you
will find it impossible to hold the
child, even if you yourself are
wearing a belt.
It is particularly dangerous to put
the belt round your child when he
or she is sitting on your lap. Never
use the belt for more than one
person at the same time.
There are some passenger seats on
which the installation of child
seats is forbidden. To find out the
authorised seats and types of child
seats that can be installed in each
of the authorised seats, refer to the
tables on the following pages.
Before installing a child seat in the
front seat (if installation is permitted)
If fitted to the passenger seat, carry
out the following adjustments:
- move the passenger seat as far back
as possible,
- set the seatback to its fully upright
position,
- raise the seat base as far as
possible,
- lower the headrest to its lowest
setting,
- move the seat belt height control to
the low position.
1.34
(1) You must always comply with the
laws of the country in which you are
travelling. They may be different to
the guidelines in this handbook.
Page 40

CHILD SAFETY (continued)
Seats suitable for installing a child seat
Type of seat group
(weight of child) WITH PASSENGER AIRBAG WITHOUT PASSENGER AIRBAG
Front passenger seat (2) Front passenger seat (2)
Standard seat Tiltable folding
(3) (4) seat (3) (4) seat
Group 0 and 0+
(weight below 13 kg (29 lbs))
Group I
(weight from 9 kg (20 lbs ) XXXU
to 18 kg (40 lbs))
Group II and III (1)
(weight from 15 kg (33 lbs) to
36 kg (79 lbs))
X : Seat not suitable for fitting a child seat for this age range.
U : Seat suitable for fitting a belt-fitted child seat classed as universal for this age range, check that it can be fitted.
L : Seat only suitable for fitting a belt-fitted rear facing RENAULT child seat, available from the RENAULT network.
(1) A child taller than 1.36 m or weighing more than 36 kg (79 lbs) can be strapped in like an adult, without a special seat.
(2) Before fitting a child seat: position the vehicle seat as far back as possible.
(3) Only a rear facing child seat may be installed in this seat.
LLXU
XXXU
Van version
Standard seat
Tiltable folding
(4) DANGER RISK OF DEATH OR SERIOUS INJURY: BEFORE INSTALLING A REAR FACING CHILD SEAT
IN THIS SEAT, CHECK THAT THE PASSENGER AIRBAG HAS BEEN DEACTIVATED (refer to the
information on Deactivating the front passenger airbags in Section 1).
1.35
Page 41

CHILD SAFETY (continued)
Seats suitable for installing a child seat
Type of seat group
(weight of the child) WITHOUT
Group 0 and 0+
(weight below 13 kg (29 lbs))
Group I
(weight from 9 kg (20 lbs )
to 18 kg (40 lbs))
Group II and III (1)
(weight from 15 kg (33 lbs) X X U (2) X
to 36 kg (79 lbs))
X : Seat not suitable for fitting a child seat for this age range.
U : Seat suitable for fitting a belt-fitted child seat classed as universal for this age range, check that it can be fitted.
L : Seat only suitable for fitting a belt-fitted rear facing RENAULT child seat, available from the RENAULT network.
(1) A child taller than 1.36 m or weighing more than 36 kg (79 lbs) can be strapped in like an adult, without a special seat.
(2) Place the back of the child seat against the seatback of the vehicle; adjust the height of the headrest or remove it if
necessary.
(3) Only a rear facing child seat may be installed in this seat. Before fitting a child seat: position the vehicle seat as far back
as possible.
WITH PASSENGER
AIRBAG
Front passenger Front passenger
seat (3) (4) seat
LXUX
X X U (2) X
5-seat version with one-part rear bench seat (1/1)
PASSENGER
AIRBAG
Rear side Rear centre
seats seat
1.36
(4) DANGER RISK OF DEATH OR SERIOUS INJURY: BEFORE INSTALLING A REAR FACING CHILD SEAT
IN THIS SEAT, CHECK THAT THE PASSENGER AIRBAG HAS BEEN DEACTIVATED (refer to the
information on Deactivating the front passenger airbags in Section 1).
Page 42

CHILD SAFETY (continued)
Seats suitable for installing a child seat
Type of seat group
(weight of the child) WITHOUT
Group 0 and 0+
(weight below 13 kg (29 lbs))
Group I
(weight from 9 kg (20 lbs ) X X U (2)
to 18 kg (40 lbs))
Group II and III (1)
(weight from 15 kg (33 lbs) X X U (2)
to 36 kg (79 lbs))
X : Seat not suitable for fitting a child seat for this age range.
U : Seat suitable for fitting a belt-fitted child seat classed as universal for this age range, check that it can be fitted.
L : Seat only suitable for fitting a belt-fitted rear facing RENAULT child seat, available from the RENAULT network.
(1) A child taller than 1.36 m or weighing more than 36 kg (79 lbs) can be strapped in like an adult, without a special seat.
(2) Place the back of the child seat against the seatback of the vehicle; adjust the height of the headrest or remove it if
necessary.
(3) Only a rear facing child seat may be installed in this seat. Before fitting a child seat: position the vehicle seat as far back
as possible.
WITH PASSENGER
AIRBAG
Front passenger Front passenger
seat (3) (4) seat
4-seat version with one-part rear bench seat (1/1)
PASSENGER
AIRBAG
LX U
Rear side
seats
(4) DANGER RISK OF DEATH OR SERIOUS INJURY: BEFORE INSTALLING A REAR FACING CHILD SEAT
IN THIS SEAT, CHECK THAT THE PASSENGER AIRBAG HAS BEEN DEACTIVATED (refer to the
information on Deactivating the front passenger airbags in Section 1).
1.37
Page 43

CHILD SAFETY (continued)
Seats suitable for installing a child seat
Type of seat group
(weight of the child) WITHOUT
WITH PASSENGER PASSENGER
AIRBAG AIRBAG
Front passenger Front passenger
seat (3) (4) seat
Group 0 and 0+
(weight below 13 kg (29 lbs))
Group I
(weight from 9 kg (20 lbs ) X X U (2) U - I (2)
to 18 kg (40 lbs))
Group II and III (1)
(weight from 15 kg (33 lbs) X X U (2) U (2)
to 36 kg (79 lbs))
X : Seat not suitable for fitting a child seat for this age range.
U : Seat suitable for fitting a belt-fitted child seat classed as universal for this age range, check that it can be fitted.
I : Seat equipped with anchorage points for mounting a seat for this age range using ISOFIX locks; only RENAULT seats are
approved.
L : Seat only suitable for fitting a belt-fitted rear facing RENAULT child seat, available from the RENAULT network.
(1) A child taller than 1.36 m or weighing more than 36 kg (79 lbs) can be strapped in like an adult, without a special seat.
(2) Place the back of the child seat against the seatback of the vehicle; adjust the height of the headrest or remove it if
necessary.
(3) Only a rear facing child seat may be installed in this seat. Before fitting a child seat: position the vehicle seat as far back
as possible.
Version with two-part rear bench seat (1/3 / 2/3)
Rear side Rear centre
seats seat
L X U U - I
1.38
(4) DANGER RISK OF DEATH OR SERIOUS INJURY: BEFORE INSTALLING A REAR FACING CHILD SEAT
IN THIS SEAT, CHECK THAT THE PASSENGER AIRBAG HAS BEEN DEACTIVATED (refer to the information
on Deactivating the front passenger airbags in Section 1).
Page 44

CHILD SAFETY (continued)
The right choice
The safety of your children is also
your responsibility.
To ensure that your child has the
maximum possible protection, we
recommend that you use seats
approved by the RENAULT
Network.
Restraint systems for all the
categories are available. These
systems have been developed in
consultation with the manufacturers
and have been tested in RENAULT
vehicles.
Contact your RENAULT Dealer and
ask him to help you install it.
Categories 0 and 0+ (0 to 13 kg
(0 to 29 lbs))
A child’s neck is very susceptible to
injury up to the age of two. It is
preferable to put your child into a
rear facing enclosing shell seat. This
position enhances safety.
To avoid any risk to your safety, we recommend that you use
RENAULT approved accessories because they are designed for your
vehicle and are the only accessories for which RENAULT will
provide a warranty.
Category 1 (9 to 18 kg (20 to 40
lbs))
Between the ages of 2 and 4, a
child’s pelvis is not fully developed.
Restraints using the vehicle’s threepoint belts are not adequate and
there is also a risk that the child will
sustain abdominal injuries in the
event of a frontal impact. It is
therefore advisable to use a bucket
type seat that restrains the child by
means of a harness or shock
absorbing pad.
1.39
Page 45

CHILD SAFETY (continued)
Category 2 (15 kg (33 lbs) to 25
kg (55 lbs)) and category 3 (22
kg (48 lbs) to 36 kg (79 lbs))
To correctly restrain the pelvis of a
child under 10 years, less than 1.36
m tall and weighing less than 36 kg
(79 lbs), preferably use a raised seat
with belt guides that ensure that the
three-point belt lies flat over the
child’s thighs.
A booster seat with a heightadjustable seatback and a belt guide
are recommended as this will allow
the belt to be worn as close to the
base of the neck as possible but not
on it.
Place the back of the child seat
firmly against the vehicle seatback.
Adjust the height of the headrest or
remove it if necessary.
If a booster seat without a seatback
is used, the vehicle’s headrest will
have to be adjusted to suit the
child’s stature; the upper edge of the
headrest must be at the same height
as the top of the child’s head and
should never be lower than in line
with the child’s eyes.
The standard classifies the child
restraints in five categories:
Category 0 : 0 to 10 kg
(0 to 22 lbs)
Category 0+ : 0 to 13 kg
(0 to 29 lbs)
Category 1 : 9 to 18 kg
(20 to 40 lbs)
Category 2 : 15 kg to 25 kg
(33 to 55 lbs)
Category 3 : 22 kg to 36 kg
(48 to 79 lbs)
DANGER
It is forbidden to install a
rear facing child seat on the
front passenger seat if the
vehicle is fitted with a front
passenger airbag. The child may
suffer very serious injuries if the
airbag inflates.
The label (on the dashboard) and
marking (on the front passenger sun
visor) remind you of these
instructions.
1.40
Page 46
CHILD SAFETY (continued)
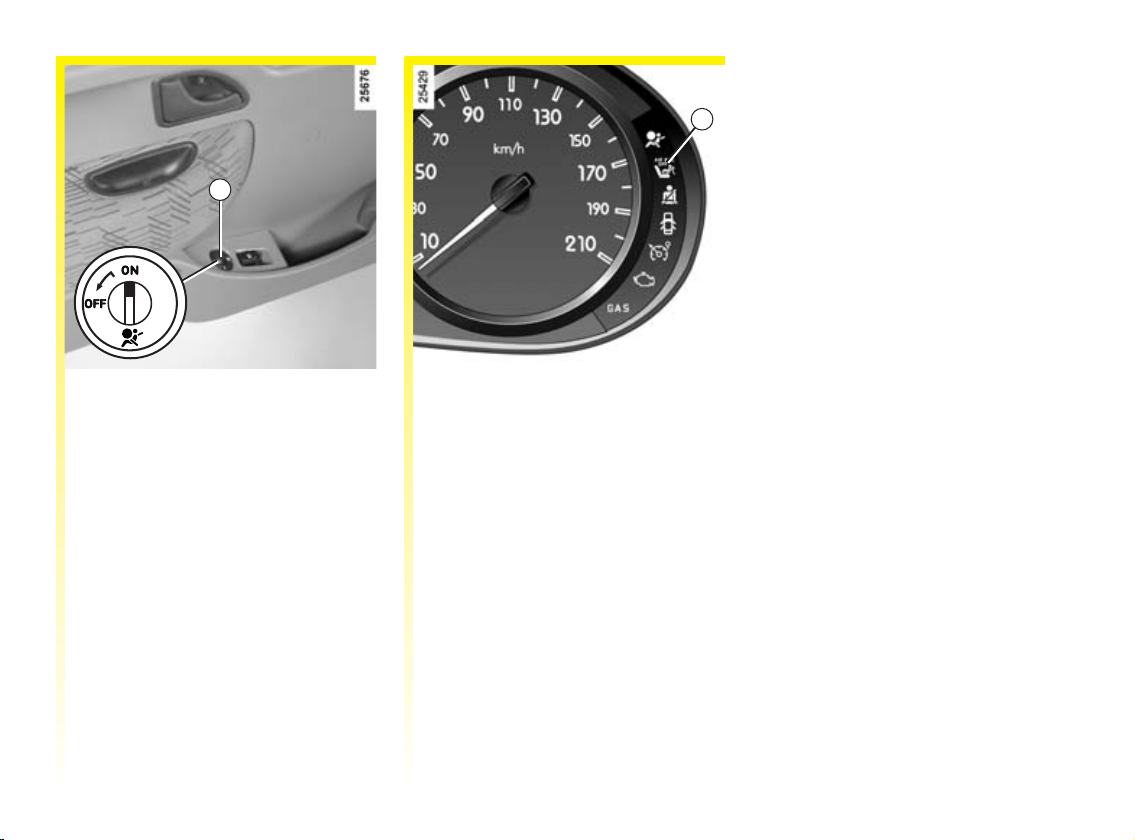
1
Deactivating the front passenger
airbags
(if fitted)
To fit a rear facing child seat on the
front passenger seat, you must
deactivate the restraint systems
additional to the front passenger
seat belt (frontal and side airbag).
2
To deactivate the airbags: switch off
the ignition, press and turn lock 1 to
the OFF position.
With the ignition switched on, you
must check that warning light 2,
AIRBAG OFF on the dashboard is lit
up.
This warning light remains
continuously lit to let you know that
you can fit a child seat.
1.41
Page 47

CHILD SAFETY (continued)
1
Activating the front passenger
airbags
You should reactivate the airbag as
soon as you remove the child seat
from the front passenger seat, to
ensure the protection of the front
passenger in the event of an impact.
To reactivate the airbags: switch off
the ignition, press and turn lock 1 to
the ON position.
Switch the ignition back on, then
check that the AIRBAG OFF
warning light is not lit. The front
passenger seat belt additional
restraint systems are activated.
The passenger airbag
must be activated or
deactivated with the
ignition off.
If work is carried out on the
airbag system with the ignition
switched on, the
indicator lights come on: the
passenger airbag is deactivated.
Switch the ignition off then on
again to reset the airbag in
accordance with the lock.
å
and
Operating faults
It is forbidden to fit a rear facing
child seat to the front passenger seat
if the airbag activation/deactivation
system is faulty.
Allowing any other passenger to sit
in that seat is not recommended.
Consult your RENAULT Dealer as
soon as possible.
1.42
Page 48

CHILD SAFETY (continued)
Isofix child seat mounting system
There is a procedure for installing a
child seat.
To find out which seats are fitted
with this system, refer to the tables
entitled Seats suitable for fitting
child seats at the beginning of the
information on Child safety.
The system comprises:
- two anchoring rings located
between the seat base and the
seatback to attach the base of the
child seat,
- one ring located under the seat
base to secure the child seat
seatback in the rear facing position;
- a special RENAULT child seat
fitted with two locks that hook
onto the two rings and a belt to
attach the child seat seatback.
- Make sure that there is
nothing obstructing the
seat mounting mechanism
at the anchorage points
(gravel, rags, toys, etc.).
- Always remember to fasten the
seat belts on child seats for all
journeys.
Only the RENAULT seat is typeapproved for this vehicle. Please
contact your RENAULT Dealer to
purchase this seat.
1.43
Page 49

CHILD SAFETY (continued)
1
2
3
Fitting a child seat
- For information on fitting and
using the seat, read the
instructions provided carefully.
- The front seats must not be moved
back beyond the halfway point on
the seat runners and the seatback
must be in an upright position.
- Position the guides 2 (supplied
with the seat) in the openings
provided in the seat base.
- Offer up seat catches 3 opposite the
two rings 1 which are fitted to the
vehicle rear centre seats.
- Latch the hooks onto the rings and
make sure they are securely locked
(by moving them forwards and
backwards and from left to right).
- Push on the base of the seat firmly
to bring the child seat into contact
with the seatback and make sure it
is securely in position.
4
5
6
When the seat is in the rear facing
position, use strap 4 supplied with
the seat. Insert hook 5 into hole 6.
1.44
Page 50

CHILD SAFETY (continued)
CHILD SAFETY
- No modifications may be made to the component parts of the restraint system (belts, seats and their mountings)
originally fitted.
- Carefully follow the instructions for fitting provided by the manufacturer of the restraint system.
- Always avoid dressing the child in bulky garments and do not place any objects between the child and the restraint
system.
- The seat belt in the vehicle must be tight enough that the child seat is held in position securely. Check the tension
regularly.
- Never pass the belt under the arm or behind the back.
- The harness or belt should be taut and fitted to suit the child’s size.
- Never allow your child to stand up or kneel on the seats while the vehicle is moving.
- Check that the child is in the correct position for the entire journey, especially if asleep.
- Use the seat belts to hold the seat in position, even if it is not occupied. Otherwise, if an accident were to occur, it may
become dislodged and pose a risk to other vehicle occupants.
- Following a serious accident, have the seat belts and restraint systems in use at the time checked.
- You should never leave a child unattended in a vehicle, even in the restraint device.
- Activate the rear door locks (if your vehicle is equipped with these).
- Make sure that the child does not get out of the vehicle at the side of the traffic.
- Set your children a good example; always wear your seat belt.
1.45
Page 51

DRIVER’S POSITION, LEFT-HAND DRIVE
123 45 678910 11 12 13
31 30 29 28 27 26 25 24 23 22 21 20 19 18 17 16 15 14
1.46
Page 52

DRIVER’S POSITION, LEFT-HAND DRIVE (continued)
The equipment fitted, described below, depends on the version, option and country.
1 Side air vent.
2 Location for speaker.
3 Stalk for:
- direction indicator lights,
- exterior lights,
- front fog lights,
- rear fog lights.
4 Instrument panel.
5 - Horn.
- Location for driver’s airbag.
6 Radio remote control.
7 Windscreen and rear screen
wash/wipe stalk.
8 Windscreen demister outlets.
10 - Radio display.
- Navigation system display.
- Clock.
11 - Location of passenger
airbag.
12 Location for speaker.
13 Side air vent.
14 Glove compartment.
15 Location for:
- radio,
- storage compartment,
- navigation system control.
16 Controls for ventilation,
heating and de-icing.
17 Central door
locking/unlocking, storage
compartment or blanking
cover switch.
19 Cup holder.
20 Handbrake.
21 Ashtray and cigarette lighter.
22 Cruise control/speed limiter
switch.
23 Location for sunroof switch.
24 Hazard warning lights
switch.
25 Ignition switch.
26 Fuse box.
27 Control for headlight beam
adjustment.
28 Bonnet release.
29 Control for adjusting electric
door mirrors.
30 Cruise control/speed limiter
adjustment switch.
9 Central air vents.
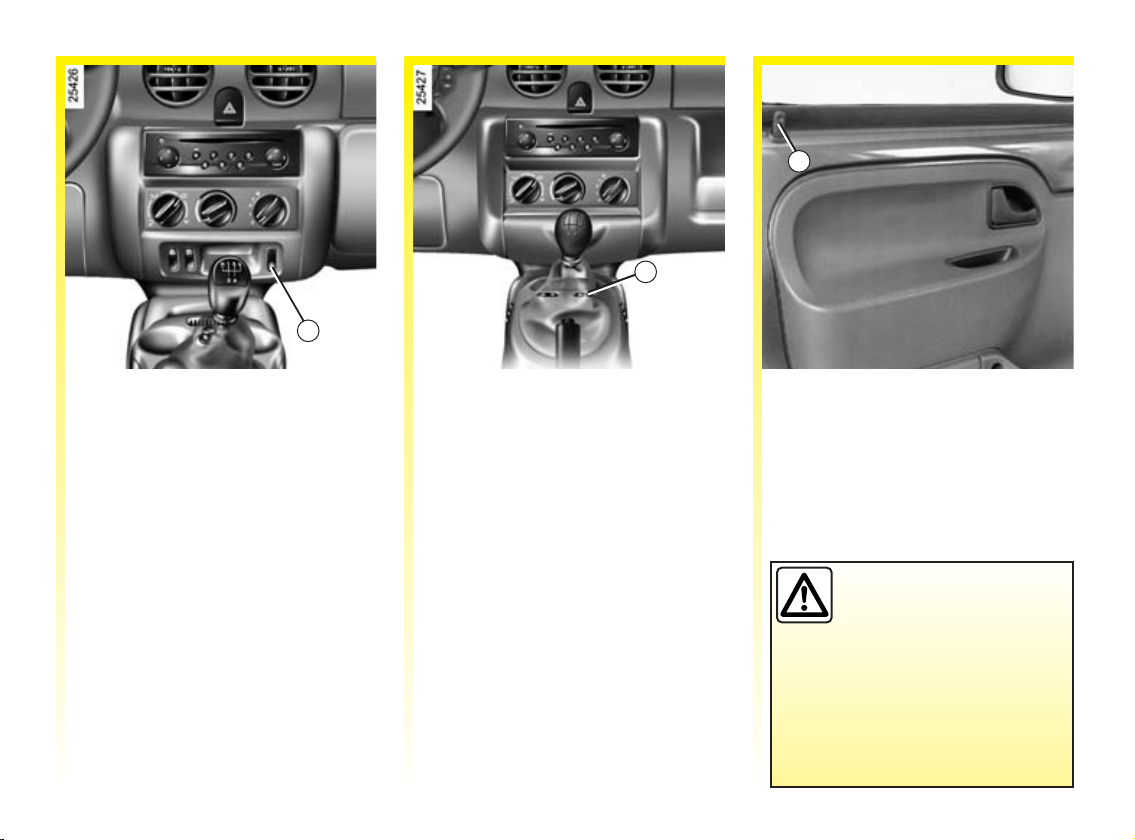
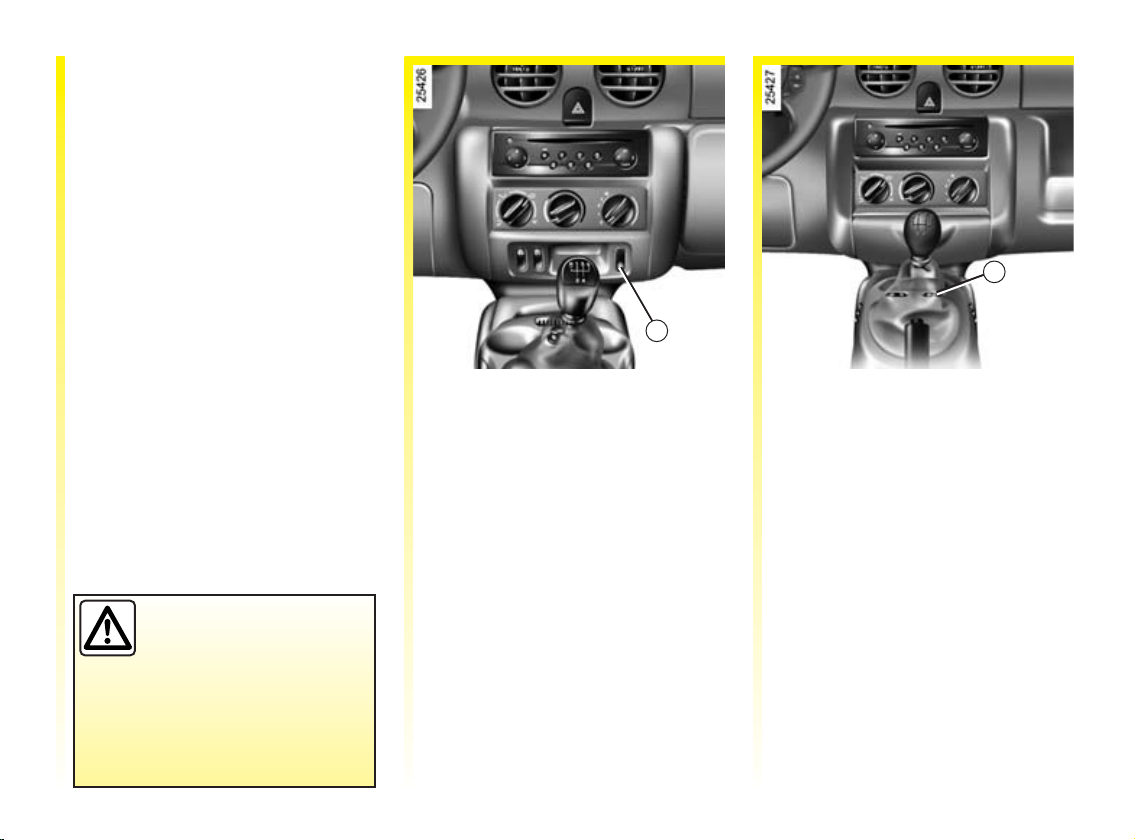
18 Gear lever.
31 Rear screen demisting switch.
1.47
Page 53

DRIVER’S POSITION, LEFT-HAND DRIVE (continued)
12 3 4 5 678910 11 12 13
30 29 28 27 26 25 24 23 22 21 20 19 18 17 16 15 14
1.48
Page 54

DRIVER’S POSITION, LEFT-HAND DRIVE (continued)
The equipment fitted, described below, depends on the version, option and country.
1 Side air vent.
2 Location for speaker.
3 Stalk for:
- direction indicator lights,
- exterior lights,
- front fog lights,
- rear fog lights.
4 Instrument panel.
5 - Horn.
- Location for driver’s airbag.
6 Radio remote control.
7 Windscreen and rear screen
wash/wipe stalk.
8 Windscreen demister outlets.
10 - Radio display.
- Driver’s seat belt reminder
light.
- Door status warning light.
- Navigation system display.
- Clock.
11 - Glove compartment.
- Location for passenger
airbag.
12 Location for speaker.
13 Side air vent.
14 Storage compartment.
15 Location for:
- radio,
- storage compartment,
- navigation system control.
16 Controls for ventilation,
heating and de-icing.
17 Central door
locking/unlocking or
blanking cover switch.
19 Ashtray and cigarette lighter.
20 Handbrake.
21 Cup holder.
22 Cruise control/speed limiter
switch.
23 Hazard warning lights
switch.
24 Ignition switch.
25 Fuse box.
26 Control for headlight beam
adjustment.
27 Bonnet release.
28 Control for adjusting electric
door mirrors.
29 Cruise control/speed limiter
adjustment switch.
9 Central air vents.
18 Gear lever.
30 Rear screen demisting switch.
1.49
Page 55

DRIVER’S POSITION, RIGHT-HAND DRIVE
12 3 45678 9 10111213
1.50
29 28 27 26 25 24 23 22 21 20 19 18 17 16 15 14
Page 56

DRIVER’S POSITION, RIGHT-HAND DRIVE (continued)
The equipment fitted, described below, depends on the version, option and country.
1 Side air vent.
2 Location for speaker.
3 - Glove compartment.
- Location of passenger airbag.
4 - Radio display.
- Driver’s seat belt reminder
light.
- Door status warning light.
- Clock.
5 Central air vents.
6 Windscreen demister outlets.
7 Stalk for:
- direction indicator lights,
- exterior lights,
- front fog lights,
- rear fog lights.
8 Instrument panel.
10 Radio remote control.
11 Steering column stalk for
windscreen and rear screen
wash/wipe.
12 Location for speaker.
13 Side air vent.
14 Control for adjusting electric
door mirrors.
15 Cruise control/speed limiter
adjustment switch.
16 Rear screen demisting switch.
17 Control for headlight beam
adjustment.
18 Ignition switch.
20 Central door locking/
unlocking or blanking cover
switch.
21 Handbrake.
22 Cruise control/speed limiter
switch.
23 Gear lever.
24 Ashtray and cigarette lighter.
25 Controls for ventilation,
heating and de-icing.
26 Radio location or storage
compartment.
27 Storage compartment.
28 Fuse box.
9 - Horn.
- Location for driver’s airbag.
19 Hazard warning lights
switch.
29 Bonnet release.
1.51
Page 57

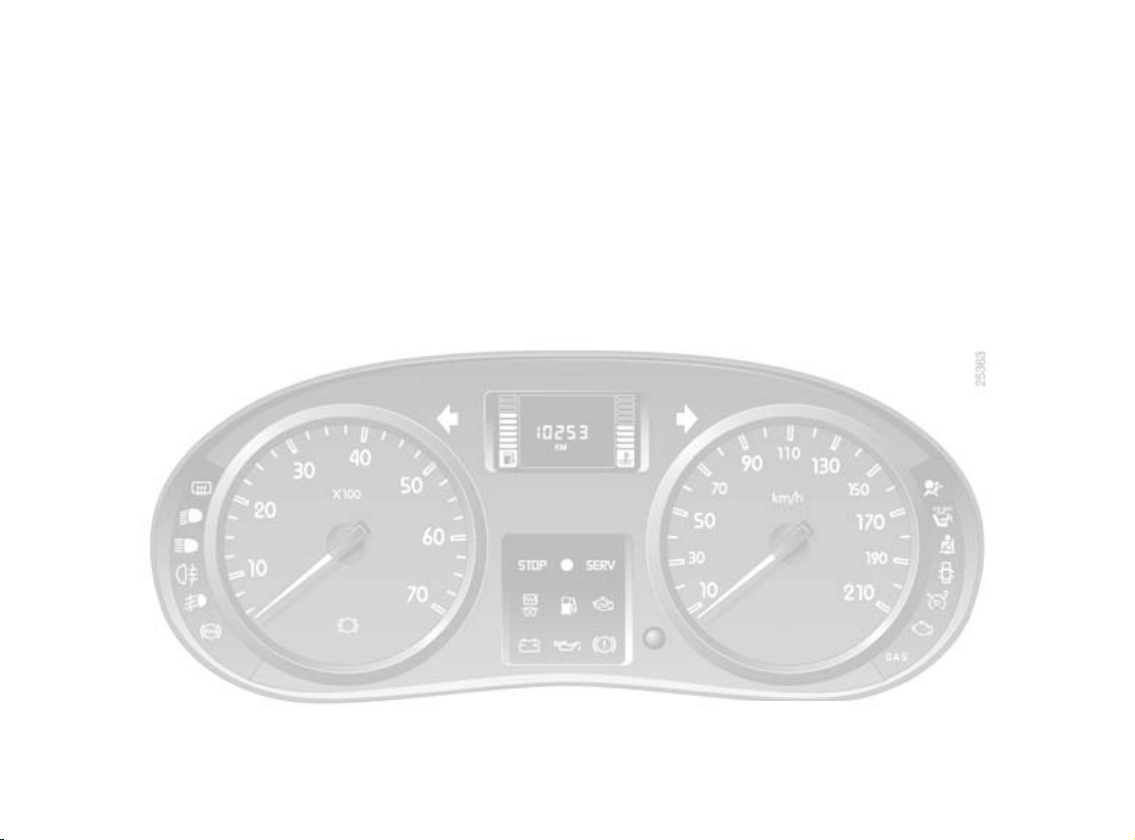
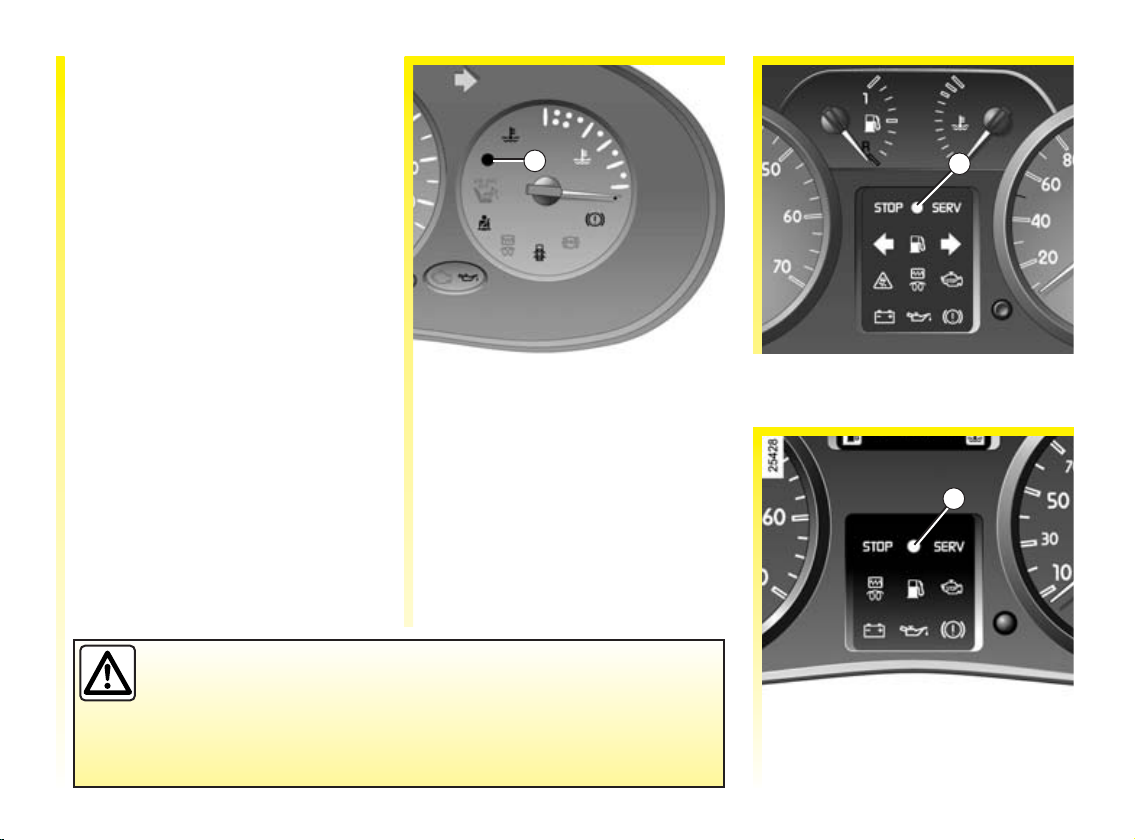
INSTRUMENT PANEL
The presence and operation of the warning lights described below depend on the vehicle equipment and country.
123 4 56 7
11 10 9 8
1.52
If these warning lights come on, you must stop
as soon as traffic conditions allow.
úàôd+x
If no information appears on the instrument panel,
it is essential to stop as soon as traffic conditions allow.
Page 58

INSTRUMENT PANEL (continued)
The presence and operation of the warning lights described below depend on the vehicle equipment and country.
1 Fuel gauge
2
l
the engine starts.
If it lights up or remains lit, fill
up with fuel as soon as possible.
y
c
g
f
Low fuel level warning
light
It goes out as soon as
Not used
Heated rear screen
indicator light
Front fog light
indicator light
Rear fog light indicator
light
2
å
and goes out after a few seconds.
If it does not light up when the
ignition is switched on or if it
flashes, there is a fault in the
system. Consult your RENAULT
Dealer as soon as possible.
o
m
3
c
4 Speedometer (mph or km/h)
Overspeed buzzer
Depending on the vehicle, a
buzzer sounds for approximately
10 seconds every 40 seconds, as
long as the vehicle is travelling
in excess of 72 mph (120 km/h).
Airbag warning light
This lights up when the
ignition is switched on
Main beam headlights
indicator light
Dipped beam
headlights indicator
light
Indicator light for lefthand direction
indicators
5
b
6
ô
are driving, stop and let the
engine idle for a minute or two.
The temperature should drop. If
not, stop the engine. Let the
engine cool down, then check
the coolant level. Contact a
RENAULT Dealer if necessary.
ê
functions. Refer to the
information on the engine
immobiliser in section 1.
Right-hand direction
indicator light
Coolant temperature
warning light
If it comes on while you
Engine immobiliser
system warning light
This light has several
1.53
Page 59

INSTRUMENT PANEL (continued)
The presence and operation of the warning lights described below depend on the vehicle equipment and country.
123 4 56 7
11 10 9 8
1.54
If these warning lights come on, you must stop
as soon as traffic conditions allow.
úàôd+x
If no information appears on the instrument panel,
it is essential to stop as soon as traffic conditions allow.
Page 60

INSTRUMENT PANEL (continued)
The presence and operation of the warning lights described below depend on the vehicle equipment and country.
6
Electronic fault and
water present in fuel
o
warning light (on petrol
and diesel versions) and
preheating indicator light (on
diesel version)
- Electronic fault warning light
(on petrol and diesel versions).
If it comes on while driving, it
indicates an electrical or
electronic fault or that water is
present in the fuel. Consult
your RENAULT Dealer as soon
as possible.
- Preheating and water present
in fuel warning light (on diesel
version).
This light should come on
when the ignition key is in
position M; it indicates that
the heater plugs are in
operation. It goes out after
preheating is sufficient and the
engine can be started.
6
ã
ç
o
ignition is switched on, it
indicates that a door is not
properly closed.
x
This light comes on when the
ignition is switched on and goes
out within 3 seconds. If it comes
on when you are driving, it
indicates a fault in the anti-lock
braking system. Braking will
then occur normally, without
the anti-lock system. Contact
your RENAULT Dealer as soon
as possible.
Not used
Seat belt reminder
warning light
Door status warning
light
If it lights up when the
Anti-lock braking
system (ABS) indicator
light
6
d
If it comes on during braking, it
indicates that the fluid level in
the circuit is low; it may be
dangerous to continue driving.
Contact a RENAULT Dealer.
7 Coolant temperature indicator
In normal operation, the needle
should be below the hatched
area. Under severe conditions
the needle may enter this area.
This is not serious unless the
Ö
Handbrake on and
brake circuit fault
warning light
warning light comes on.
1.55
Page 61

INSTRUMENT PANEL (continued)
The presence and operation of the warning lights described below depend on the vehicle equipment and country.
123 4 56 7
11 10 9 8
1.56
If these warning lights come on, you must stop
as soon as traffic conditions allow.
úàôd+x
If no information appears on the instrument panel,
it is essential to stop as soon as traffic conditions allow.
Page 62

INSTRUMENT PANEL (continued)
The presence and operation of the warning lights described below depend on the vehicle equipment and country.
8
à
as the engine starts; if it comes
on when you are driving, stop at
once and switch off the ignition.
Check the oil level. If the level is
correct, the light has come on
for another reason; contact a
RENAULT dealer.
ä
with this option, the light comes
on when the ignition is
switched on then goes out.
- If it lights up continuously,
- If it flashes, reduce the engine
Refer to the information on
special operating conditions in
section 2.
Oil pressure warning
light
It should go out as soon
Exhaust gas monitor
warning light
For vehicles equipped
contact your RENAULT Dealer
as soon as possible,
speed until the light stops
flashing. Consult your
RENAULT Dealer as soon as
possible.
9 Multifunction key
Depending on the vehicle,
successive presses on this
button allow information to be
brought up on the display, the
trip mileage recorder to be reset
(the trip mileage recorder must
be selected on the display for
this operation) or the clock to be
set.
10 Multifunction display
Engine oil level low warning
The display informs the driver
that the engine oil level is low
when the engine is started. This
warning lasts for 30 seconds.
Refer to the information on
Engine oil level in Section 4.
10 Multifunction display (continued)
Total mileage recorder, trip
mileage recorder and clock
Can be read for approximately
30 seconds after the ignition has
been switched on.
11
l
ú
soon as the engine starts. If it
lights up while you are driving,
it indicates that the electrical
circuit is overcharging or
discharged. Stop and have the
circuit checked.
Not used
Battery charge warning
light
This should go out as
1.57
Page 63

INSTRUMENT PANEL (continued)
The presence and operation of the warning lights described below depend on the vehicle equipment and country.
2345
1.58
1
6
11 10 9 8 7
If these warning lights come on, you must stop
as soon as traffic conditions allow.
úàôd+x
If no information appears on the instrument panel,
it is essential to stop as soon as traffic conditions allow.
Page 64

INSTRUMENT PANEL (continued)
The presence and operation of the warning lights described below depend on the vehicle equipment and country.
1
e
z
å
and goes out after a few seconds.
If it does not light up when the
ignition is switched on or if it
flashes, there is a fault in the
system. Consult your RENAULT
Dealer as soon as possible.
f
g
c
Not used
Not used
Airbag warning light
This lights up when the
ignition is switched on
Rear fog light indicator
light
Front fog light
indicator light
Heated rear screen
indicator light
2 Rev counter (×100 scale)
Up to 3,000 rpm (or 2,500 rpm
on diesel versions), engine
speed not to be exceeded in the
intermediate gears for
economical driving.
3 Fuel gauge
4 Coolant temperature indicator
In normal operation, the needle
should be below zone 4a. Under
severe conditions the needle
may enter this area. This is not
serious unless the
light comes on.
5 Speedometer (km or miles per
hour)
Overspeed buzzer
Depending on the vehicle, a
buzzer sounds for
approximately 10 seconds every
40 seconds, as long as the
vehicle is travelling in excess of
72 mph (120 km/h).
Ö
warning
6
ü
l
ã
á
k
d
Not used
Not used
Not used
Main beam headlight
indicator light
Dipped beam headlight
indicator light
Not used
1.59
Page 65

INSTRUMENT PANEL (continued)
The presence and operation of the warning lights described below depend on the vehicle equipment and country.
2345
1.60
1
6
11 10 9 8 7
If these warning lights come on, you must stop
as soon as traffic conditions allow.
úàôd+x
If no information appears on the instrument panel,
it is essential to stop as soon as traffic conditions allow.
Page 66

INSTRUMENT PANEL (continued)
The presence and operation of the warning lights described below depend on the vehicle equipment and country.
7 Multifunction display
Low engine oil level warning
The display informs the driver
that the engine oil level is low
when the engine is started. This
warning lasts for 30 seconds.
Refer to the information on
Engine oil level in Section 4.
Total mileage recorder, trip
mileage recorder and clock
Can be read for approximately
30 seconds after the ignition has
been switched on.
8 Multifunction key
- Display selection
Press briefly to move from the
total mileage to the trip
mileage and vice versa.
- Resetting the trip mileage
recorder
Once the display of the trip
mileage recorder is selected,
press and hold the button.
9
û
It lights up in conjunction with
one of the warning lights:
STOP light
It goes out as soon as
the engine starts.
àôdú
9
ê
several functions. Refer to
section 1 on the engine
immobiliser.
ø
and goes out after 3 seconds. If it
lights up when the vehicle is
being driven, it is advisable to
see a RENAULT Dealer soon.
It lights up together with one of
the warning lights:
Engine immobiliser
warning light
This light performs
SERVICE warning light
This lights up when the
ignition is switched on
x å d l
c
Left-hand direction
indicator light
1.61
Page 67

INSTRUMENT PANEL (continued)
The presence and operation of the warning lights described below depend on the vehicle equipment and country.
2345
1.62
1
6
11 10 9 8 7
If these warning lights come on, you must stop
as soon as traffic conditions allow.
úàôd+x
If no information appears on the instrument panel,
it is essential to stop as soon as traffic conditions allow.
Page 68

INSTRUMENT PANEL (continued)
The presence and operation of the warning lights described below depend on the vehicle equipment and country.
9
M
the engine starts.
If it lights up or remains lit, fill
up with fuel as soon as possible.
b
à
as the engine starts; if it comes
on when you are driving, stop at
once and switch off the ignition.
Check the oil level. If the level is
correct, the light has come on
for another reason; contact a
RENAULT dealer.
Low fuel level warning
light
It goes out as soon as
Right-hand direction
indicator light
Oil pressure warning
light
It should go out as soon
9
o
fault (on petrol and diesel
versions).
- Electronic fault or water
- Preheating warning light (on
Preheating and water
present in diesel
warning light (on diesel
versions) and electronic
present in diesel fuel warning
light (on petrol and diesel
versions)
If it comes on while driving, it
indicates an electrical or
electronic fault or that water is
present in the fuel. Consult
your RENAULT Dealer as soon
as possible.
diesel version)
This light should come on
when the ignition key is in
position M; it indicates that
the heater plugs are in
operation. It goes out as soon
as preheating is sufficient and
the engine may be started.
9
Ö
the engine starts. If it comes on
while you are driving, stop and
let the engine idle for a minute
or two. The temperature should
drop. If not, stop the engine. Let
the engine cool down, then
check the coolant level. Contact
a RENAULT Dealer if necessary.
ú
as the engine starts.
If it lights up when you are
driving, it indicates that the
electrical circuit is overloaded
or is discharging. Stop and have
the circuit checked.
Coolant temperature
warning light
It goes out as soon as
Battery charge warning
light
It should go out as soon
1.63
Page 69

INSTRUMENT PANEL (continued)
The presence and operation of the warning lights described below depend on the vehicle equipment and country.
2345
1.64
1
6
11 10 9 8 7
If these warning lights come on, you must stop
as soon as traffic conditions allow.
úàôd+x
If no information appears on the instrument panel,
it is essential to stop as soon as traffic conditions allow.
Page 70

INSTRUMENT PANEL (continued)
The presence and operation of the warning lights described below depend on the vehicle equipment and country.
9
y
d
light/Brake pads wear indicator
If it lights up when the brakes
are applied, it indicates that the
fluid level in the circuit is low.
It may be dangerous to continue
driving; contact a RENAULT
Dealer.
If it lights up at the same time as
the
indicates that the brake pads
need replacing.
10 Warning lights for the
operation of and/or faults on
the automatic gearbox.
Refer to the information in
Section 2 on the proactive
automatic gearbox.
Not used
Handbrake on warning
light/Braking system
fault warning
ø warning light it
11
ä
with this option, the light comes
on when the ignition is
switched on then goes out.
- If it lights up constantly,
- If it flashes, reduce the engine
Refer to the advice on emission
control, fuel economy and
driving in Section 2.
Warning light for
monitoring exhaust gas
For vehicles equipped
contact your RENAULT Dealer
as soon as possible,
speed until the light stops
flashing.
Consult your RENAULT Dealer
as soon as possible.
11
x
when the ignition is switched
on and goes out within 3
seconds. If it comes on when
you are driving, it indicates a
fault in the anti-lock braking
system (ABS).
Braking will then be as normal,
without the ABS system.
Contact your RENAULT Dealer
as soon as possible.
Anti-lock braking
system warning light
This light comes on
1.65
Page 71

INSTRUMENT PANEL (continued)
The presence and operation of the warning lights described below depend on the vehicle equipment and country.
234a44b356
1
1.66
98
If the ø warning light comes on, you should visit a RENAULT Dealer in the near future.
If the
û warning light comes on, you must stop as soon as traffic conditions allow.
If no information appears on the instrument panel,
it is essential to stop as soon as traffic conditions allow.
7
Page 72

INSTRUMENT PANEL (continued)
The presence and operation of the warning lights described below depend on the vehicle equipment and country.
1
c
k
á
f
g
x
when the ignition is switched
on and goes out within 3
seconds. If it comes on when
you are driving, it indicates a
fault in the anti-lock braking
system (ABS).
Braking will then be as normal,
without the ABS system.
Contact your RENAULT Dealer
as soon as possible.
Heated rear screen
indicator light
Dipped beam headlight
indicator light
Main beam headlight
indicator light
Rear fog light indicator
light
Front fog light
indicator light
Anti-lock braking
system (ABS) indicator
light
This light comes on
2 Rev counter (×100 scale)
3
c
b
4 Multifunction display
Low engine oil level warning
The display informs the driver
that the engine oil level is low
when the engine is started. This
warning lasts for 30 seconds.
Refer to the information on
Engine oil level in Section 4.
Left-hand direction
indicator light
Right-hand direction
indicator light
4 Multifunction display (continued)
Total mileage recorder, (except
on vehicle with
chronotachograph) trip mileage
recorder, clock.
Can be read for approximately
30 seconds after the ignition has
been switched on.
OR
Trip computer
Refer to the information in
section 1 on the trip computer.
4a Fuel level gauge
The number of squares lit shows
the fuel level. When it is at
minimum, the squares
disappear and the low fuel level
warning light comes on.
1.67
Page 73

INSTRUMENT PANEL (continued)
The presence and operation of the warning lights described below depend on the vehicle equipment and country.
234a44b356
1
1.68
98
If the ø warning light comes on, you should visit a RENAULT Dealer in the near future.
If the
û warning light comes on, you must stop as soon as traffic conditions allow.
If no information appears on the instrument panel,
it is essential to stop as soon as traffic conditions allow.
7
Page 74

INSTRUMENT PANEL (continued)
The presence and operation of the warning lights described below depend on the vehicle equipment and country.
4 Multifunction display (continued)
4b Coolant temperature indicator
Under normal use, four squares
are lit. The number of squares lit
depends on the engine coolant
temperature. There is no
warning unless the last three
squares light up.
5 Multifunction key
Pressing the key repeatedly lets
you select information on the
display, reset the trip mileage
recorder or set the time on the
clock in the instrument panel.
6 Speedometer (km or miles per
hour)
Overspeed buzzer
Depending on the vehicle, a
buzzer sounds for
approximately 10 seconds every
40 seconds, as long as the
vehicle is travelling in excess of
72 mph (120 km/h).
7
å
and goes out after a few seconds.
If it does not light up when the
ignition is switched on or if it
flashes, there is a fault in the
system. Consult your RENAULT
Dealer as soon as possible.
ã
Refer to the information on
child safety in section 1.
ç
not fastened the light remains lit
when the vehicle is started, then
when the car reaches a speed of
approximately 6 mph (10 km/h),
it flashes and a beep sounds for
about 90 seconds.
Airbag warning light
This lights up when the
ignition is switched on
Front passenger airbag
deactivated warning
light
Seat belt not fastened
warning light
If the driver’s seat belt is
7
q
î
To understand how this
operates, see Cruise Control and
Speed Limiter in Section 2.
ä
with this option, the light comes
on when the ignition is
switched on then goes out.
- If it lights up constantly,
- If it flashes, reduce the engine
Consult your RENAULT Dealer
as soon as possible.
Refer to the advice on emission
control, fuel economy and
driving in Section 2.
î
Door status warning
light
Speed limiter and
cruise control indicator
light
Warning light for
monitoring exhaust gas
For vehicles equipped
contact your RENAULT Dealer
as soon as possible,
speed until the light stops
flashing.
Not used
1.69
Page 75

INSTRUMENT PANEL (continued)
The presence and operation of the warning lights described below depend on the vehicle equipment and country.
234a44b356
1
1.70
98
If the ø warning light comes on, you should visit a RENAULT Dealer in the near future.
If the
û warning light comes on, you must stop as soon as traffic conditions allow.
If no information appears on the instrument panel,
it is essential to stop as soon as traffic conditions allow.
7
Page 76

INSTRUMENT PANEL (continued)
The presence and operation of the warning lights described below depend on the vehicle equipment and country.
7
û
It lights up in conjunction with
one of the warning lights:
STOP light
It goes out as soon as
the engine starts.
àædú
ê
This light performs several
functions.
Refer to the information on the
engine immobiliser in section 1.
ø
and goes out after 3 seconds.
It may light up alone or together
with other warning lights.
If it lights up when the vehicle
is being driven, it is advisable to
see a RENAULT Dealer soon.
Engine immobiliser
system warning light
SERVICE warning light
This lights up when the
ignition is switched on
8
o
Preheating warning light
This light should come on when
the ignition key is in position M;
it indicates that the heater plugs
are in operation. It goes out after
preheating is sufficient and the
engine can be started.
Electronic fault or water in the
diesel filter warning light
If the warning light remains on
or comes on while the engine is
running, this indicates that
there is an electrical or
electronic fault or that there is
still water in the diesel filter.
Consult your RENAULT Dealer
as soon as possible.
Preheating indicator
light/water in the diesel
filter or electronic fault
warning light
8
Warning light for serious
æ
injection fault/coolant
temperature warning
light
Warning light for serious
injection system fault
If this light flashes when you are
driving, it indicates a fault in
the injection system. Stop
immediately, switch off the
ignition and contact a
RENAULT Dealer.
Coolant temperature warning
light
If this light is continuously lit
when you are driving, it
indicates engine overheating.
Stop and allow the engine to run
at idle speed for a minute or
two. The temperature should
drop. If not, stop the engine. Let
the engine cool down, then
check the coolant level. Contact
a RENAULT Dealer if necessary.
1.71
Page 77

INSTRUMENT PANEL (continued)
The presence and operation of the warning lights described below depend on the vehicle equipment and country.
234a44b356
1
1.72
98
If the ø warning light comes on, you should visit a RENAULT Dealer in the near future.
If the
û warning light comes on, you must stop as soon as traffic conditions allow.
If no information appears on the instrument panel,
it is essential to stop as soon as traffic conditions allow.
7
Page 78

INSTRUMENT PANEL (continued)
The presence and operation of the warning lights described below depend on the vehicle equipment and country.
8
ú
as the engine starts.
If it lights up when you are
driving, it indicates that the
electrical circuit is overloaded
or is discharging. Stop and have
the circuit checked.
à
ignition is switched on and goes
out within 3 seconds. If it lights
up while you are driving, stop at
once and switch off the ignition.
Check the oil level. If the level is
correct, the light has come on
for another reason; contact a
RENAULT dealer.
d
If it lights up when the brakes
are applied, it indicates that the
fluid level in the circuit is low.
It may be dangerous to continue
driving; contact a RENAULT
Dealer.
Battery charge warning
light
It should go out as soon
Oil pressure warning
light
This lights up when the
Handbrake on and
brake circuit fault
warning light.
8
l
the engine starts.
If it lights up or remains lit, fill
up with fuel as soon as possible.
9
y
If the warning light comes on
when you brake, have your
brake pads checked as soon as
possible.
Low fuel level warning
light
It goes out as soon as
Brake pad wear
warning light
(depending on the
vehicle).
1.73
Page 79

TRIP COMPUTER AND WARNING SYSTEM
1
2
3
Display 1
General reset and trip mileage
recorder reset key 2
The display must be showing the
trip mileometer function before it
can be reset.
Display selection key 3
Keep pressing key 3 briefly to scroll
through the following information
in sequence:
a) total mileage recorder,
b) trip mileage recorder,
c) fuel used,
d) average fuel consumption,
e) current fuel consumption
(depending on vehicle),
f) estimated range,
g) distance covered,
h) average speed,
i) programmed speed (speed
limiter/cruise control).
Refer to the table on the following
page for display examples.
Interpreting values displayed
after resetting:
The values showing average fuel
consumption, range and average
speed will become more stable and
reliable the further you travel since
the last time the reset key was
pressed.
For the first few miles after pressing
the reset key you will notice:
- that the range increases as you
travel. This is normal; average fuel
consumption may decrease when:
- the vehicle stops accelerating,
- the engine reaches its operating
temperature (engine cold when
reset button pressed),
- when driving from a built-up
area onto the open road.
Therefore, if the average fuel
consumption decreases, the range
will increase.
- You may also notice that the
average fuel consumption
increases when the vehicle is
stationary and the engine idling.
This is normal since the computer
takes account of fuel used during
idling.
Note: resetting is automatic when
the maximum capacity of any of the
memories is exceeded.
1.74
Page 80

24320
24321
24322
24323
TRIP COMPUTER AND WARNING SYSTEM (continued)
Examples of display
selections by repeatedly Interpreting the display
pressing 3
a) Total mileage recorder (except on vehicles with chronotachograph).
b) Trip mileage recorder.
c) Fuel used (in litres or gallons) since the last reset.
d) Average fuel consumption (in mpg and l/100 km) since the last reset.
This value is displayed after driving 400 metres and takes into account the
distance travelled and the fuel used since the last time the reset button was
pressed.
1.75
Page 81

24324
24325
24326
24327
24349
TRIP COMPUTER AND WARNING SYSTEM (continued)
Examples of display
selections by repeatedly Interpreting the display
pressing 3
e) Current fuel consumption (depending on the vehicle) (in l/100 km)
This value is displayed after a speed of approximately 18 mph (30 km/h) is
reached.
f) Estimated range with remaining fuel (in miles or km)
This range takes into account the average fuel consumption since the last
time the reset button was pressed.
The value is displayed after driving 400 metres.
g) Distance covered (in miles or km) since the last reset.
h) Average speed (in mph and km/h) since the last reset.
The value is displayed after driving 400 metres.
1.76
i) Cruise control or speed limiter programmed speed (depending on
vehicle).
See Speed limiter and Cruise control in Section 2.
Page 82

25371
TRIP COMPUTER AND WARNING SYSTEM (continued)
Examples of display
selections by repeatedly Interpreting the display
pressing 3
h) Mileage before service/maintenance
This displays the distance left before the next service.
There are several scenarios:
- distance less than 1,200 miles (2,000 km) or next service date.
Êsymbol flashes (for 30 seconds if the display is not set to Mileage
The
before oil change, otherwise Mileage before oil change is displayed
continuously)
- distance is 0 miles or servicing date reached
Ê symbol flashes constantly whatever the information selected on
The
the display.
Resetting the display after service in accordance with the maintenance
schedule
The mileage before oil change/service must only be reset after a service in
conformance with the recommendations in the Warranty and Services
booklet.
If you decide to change the oil more frequently, do not reset this data each
time the oil is changed. This prevents the replacement interval from being
exceeded for other parts included in the maintenance schedule.
With the ignition switched on, select the mileage before oil change
information on the display.
Press button 3 for more than 10 seconds. The value on the display flashes
after 5 seconds and then is replaced by the reset mileage before service
value. This flashes for 2 seconds then stays continuously lit and is stored.
1.77
Page 83

CLOCK
- Turn button 1 to the right again
briefly.
The minute display flashes.
To adjust the minutes, press
button 1 briefly or hold the button
down.
- Finally, turn button 1 to the right
again to confirm that the altered
time is correct.
4
1
Clock 1
The time is displayed when the
ignition is switched on.
Setting the clock
- Turn button 2 briefly to the right.
The hours display will flash.
Press button 2 briefly or hold it
down to change the hours display.
- Turn button 2 to the right again
briefly.
The tens flash on the minute
display.
To alter the minutes, press button
2 briefly or hold the button down.
1.78
2
3
Clock 4
Setting the clock
With the ignition switched on and
display 4 set to total mileage
recorder and clock function, press
and hold button 3, to access Time
setting mode (clock flashing) then
release the button.
- Pressing and holding down button
If the electrical supply is cut
(battery disconnected, broken
supply wire, etc.), the clock will
lose its time setting.
The clock must be reset.
For your safety, we recommend
that you do not adjust the clock
while driving.
3 allows you to scroll through the
hours and minutes quickly;
- pressing button 3 briefly allows
you to set the time minute by
minute.
Page 84

CLOCK (continued)
5
6
Clock 5
Setting the clock
With the ignition switched on and
display 5 set to total mileage
recorder and clock function, press
and hold button 6, to access Time
setting mode (clock flashing) then
release the button.
- Pressing and holding button 6
allows you to scroll through the
hours and minutes quickly;
- short presses on button 6 allow you
to set the time minute by minute.
H
Clock 7
Setting the clock
Press button:
H for hours
M for minutes
7
M
If the electrical supply is cut
(battery disconnected, broken
supply wire, etc.), the clock will
lose its time setting.
You should reset the time on the
clock.
For your safety, we recommend
that you do not adjust the clock
while driving.
1.79
Page 85

DE-ICING/DEMISTING
1
4
2
Heated rear screen
With the engine running,
press button 1 (indicator light 2 or 3
on the button or on the instrument
panel comes on depending on the
vehicle).
This function demists the rear
screen and the electric door mirrors
(if these are fitted to the vehicle).
Press button 1 again to switch off the
demister (the indicator light goes
out).
1.80
c
Demisting the windscreen and
side windows
Move control 4: set it at position
.
d
Close the dashboard centre air
vents for greater efficiency.
3
This directs the entire flow of air to
the demisting outlets for the
windscreen and front side windows.
Position the air outlets so that they
direct the air towards the
windscreen and side windows.
Page 86

THE HORN AND HAZARD LIGHTS
1
2
Horn
Press one of points 2.
Headlight flasher
Pull stalk 1 towards you to flash the
headlights, even if the lights are not
in use.
3
é
This switch lights up all four
indicators simultaneously.
Only use this function to warn other
road users if:
- you have to stop in an area where
- you are obliged to drive under
Hazard warning lights
Press switch 3.
stopping is prohibited or
unexpected.
special conditions.
0
1
Direction indicators
Shift stalk 1 parallel to the steering
wheel and in the direction you are
going to turn.
When driving on the motorway, the
steering wheel manoeuvres are
generally inadequate for
automatically bringing the stalk
back to 0. There is an intermediate
position in which you must keep the
stalk during the manoeuvre.
When the stalk is released, it
automatically returns to 0.
1.81
Page 87

ELECTRIC BEAM HEIGHT ADJUSTMENT
Load status
Driver only or with passenger 0
All seats occupied 1
Position of tumblewheel A
1.6 CNG Other versions
A
Tumblewheel A allows the height of
the beams to be adjusted in relation
to the load.
Turn tumblewheel A to the left to
lower the headlights and to the right
to raise them.
1.82
Intermediate position.
According to driver’s judgement
Driver only with luggage
compartment laden
All seats occupied with the
luggage compartment laden
(1) Load status at maximum permitted weight.
(1)
2
3
2 Increased
payload
version: 4
4
Page 88

EXTERNAL LIGHTING AND SIGNALS
o
beam position, pull the stalk
2
1
towards you.
When the main beam headlights are
lit, an indicator light lights up on
the instrument panel.
To return to the dipped headlight
position, pull the stalk towards you.
Main beam headlights
With stalk 1 in the dipped
Lights-on reminder buzzer
When a door is opened a buzzer will
sound to warn you that the lights are
still switched on after the ignition
has been switched off (to prevent
discharge of the battery, etc.).
u
the symbol is opposite mark 2.
m
the symbol is opposite mark 2.
An indicator light on the instrument
panel comes on.
Side lights
Turn the end of stalk 1 until
Dipped beam headlights
Turn the end of stalk 1 until
e
to its original position.
Switching off the lights
Turn the end of stalk 1 back
Before driving at night, check that the electrical equipment is
operating correctly and adjust the headlight beams (if your vehicle
is not carrying its normal load). In general, check that the lights are
not obscured (by dirt, mud, snow or objects which could cover
them).
1.83
Page 89

EXTERNAL LIGHTING AND SIGNALS (continued)
Rear fog lights
Turn the centre ring of stalk 1
3
1
g
until the symbol is aligned opposite
mark 3.
Operation of the fog lights depends
on the exterior lighting selected, and
an indicator light will light up on
the instrument panel.
Front fog lights
Turn the centre ring of stalk 1
f
until the symbol is aligned opposite
mark 3.
Operation of the fog lights depends
on the exterior lighting selected, and
an indicator light will light up on
the instrument panel.
To avoid inconveniencing other
road users, remember to switch off
the rear fog light when it is no longer
needed.
Note: when the exterior lights are
switched off, the rear fog light is
switched off or the control returns to
the front fog lights position (if these
are fitted on the vehicle).
See me home lighting function
This function (useful, for example,
when opening a gate, a garage, etc.),
enables you to momentarily turn on
dipped beam headlights.
With the ignition switched off and
the headlights off, pull stalk 1
towards you: the dipped beam
headlights come on for
approximately thirty seconds.
This action may be carried out no
more than four times for a maximum
lighting period of two minutes.
To switch off the lights before they
go out automatically, turn the end of
stalk 1, then return it to position 0.
1.84
Page 90

WINDSCREEN WASH/WIPE
1
A
B
C
D
Windscreen washer
With the ignition on, pull
stalk E towards you.
A short press triggers one sweep
cycle of the wiper.
A longer press triggers four sweeps
followed by a final sweep after
several seconds.
m
Special note
When driving, the wiping speed is
reduced every time the vehicle
stops. The speed will change from
fast wipe speed to normal wipe
speed.
As soon as the vehicle moves off,
wiping will return to the speed
originally selected.
Any action on stalk 1 overrides and
cancels automatic operation.
Windscreen wiper
With the ignition on, move
stalk 1 parallel to the steering wheel:
- A Off
- B Intermittent wiping.
The wipers will pause for
several seconds between sweeps.
- C Normal wiping speed.
- D Fast wiping speed.
f
In frosty weather, make sure that
the wiper blades are not stuck by
ice (to avoid the risk of the motor
overheating).
Keep an eye on the condition of
the blades. Replace the wiper
blades as soon as they begin to
lose efficiency (approximately
once a year).
Clean your windscreen regularly.
If you switch off the ignition
before switching off the
windscreen wiper (position A)
the blades will stop at random on
the windscreen.
Switch on the ignition again and
just move stalk 1 to position A to
return the wipers to the park
position.
1.85
Page 91

REAR SCREEN WASHER/WIPER
1
2
k
end of stalk 1 to align mark 2
opposite the symbol.
When the stalk is released, it returns
to the rear wipe position.
Rear screen wash/wipe
With the ignition on, turn the
e
end of stalk 1 to align mark 2
opposite the symbol.
1.86
Rear screen wiper with
timer
With the ignition on, turn the
Before using the rear wiper, check
that no transported object can
obstruct the travel of the blade.
In frosty weather, make sure that
the wiper blades are not stuck by
ice (to avoid the risk of the motor
overheating).
Keep an eye on the condition of the
blades. Replace the wiper blades as
soon as they begin to lose
efficiency (approximately once a
year).
Regularly clean your rear screen.
Page 92

FUEL TANK
Capacity of the fuel tank: 50 litres
approximately.
Fuel filler cap: this is a
special type. If you have to
replace it, make sure the
new cap is of the same type.
Contact your RENAULT Dealer.
Never place the cap near a source of
heat or flame.
Fuel cut-off system in the event of a
severe impact
Refer to the information in section
5 on the Fuel cut-off system in the
event of a severe impact.
Fuel grade
Use a high grade fuel that complies
with the standards currently in force
in each country.
Petrol versions
It is essential to use unleaded petrol.
The octane rating (RON) must
conform with the information given
on the label beside the fuel filler
neck.
Refer to Section 6 for information on
engine specifications.
Diesel versions
It is essential to use diesel fuel that
conforms with the information
given on the label beside the filler
neck.
Make sure that no water
accidentally enters the fuel tank
during filling. The shut-off system
and its surrounding area must be
dust-free.
Do not mix even small
volumes of petrol with
diesel.
1.87
Page 93

FUEL TANK (continued)
Filling up with fuel
Petrol versions
Use unleaded petrol only.
Using leaded petrol will damage the
anti-pollution devices and may lead
to a loss of warranty.
To ensure the fuel tank is not filled
with leaded petrol, the fuel tank
filler neck contains a restrictor fitted
with a valve which only allows the
nozzle for unleaded petrol to be
used (at the pump).
- Insert the nozzle as far as it will go
to open the valve.
- Keep the nozzle in this position
throughout the entire filling
operation.
Filling up with fuel (continued)
Petrol and diesel versions
No more than two filling operations
may be made after the fuel feed has
switched off automatically for the
first time because there must be
sufficient space in the fuel tank to
allow for expansion.
Diesel version
Use diesel engine fuel only. Make
sure that no water accidentally
enters the fuel tank during filling.
The fuel filler cap and neck must be
clean and dust-free. The diesel fuel
must be of a high grade.
No modifications whatsoever are permitted on any
part of the fuel supply
system (computers,
wiring, fuel circuit, injector,
protection covers, etc.) as this
may be dangerous (such work
must be undertaken by qualified
RENAULT Network personnel).
Persistent fuel odour
If you notice a persistent fuel
odour you should:
- stop the vehicle when traffic
conditions allow and switch off the
ignition,
- switch on the hazard warning
lights and ask your passengers to
leave the vehicle and to keep away
from the traffic;
- refrain from working on or
restarting the vehicle before it has
been inspected by qualified staff
from the RENAULT Network.
1.88
Page 94

Section 2: Driving
(Advice on use relating to fuel economy and the environment)
Running in/Ignition switch .......................................................................................................................................... 2.02
Starting the engine/Stopping the engine
Special features of petrol versions
Special features of diesel versions
Advice on emission control, fuel economy and driving
Environment
Gear lever/Handbrake/Power steering
Anti-lock braking system
Emergency brake assist
Cruise control/Speed limiter
Using the automatic gearbox
.................................................................................................................................................................... 2.09
.............................................................................................................................................. 2.11
................................................................................................................................................. 2.12
........................................................................................................................... 2.13 ➟ 2.18
........................................................................................................................... 2.19 ➟ 2.21
................................................................................................................... 2.03
.............................................................................................................................. 2.04
.............................................................................................................................. 2.05
........................................................................... 2.06 ➟ 2.08
....................................................................................................................... 2.10
2.01
Page 95

RUNNING IN IGNITION SWITCH
Petrol version
For the first 600 miles (1,000 km) do
not exceed 54 mph (90 km/h) in the
highest gear.
On completion of 600 miles (1,000
km) you may use your vehicle
normally. However, it is only after
1,800 miles (3,000 km) have been
covered that you may reasonably
expect full performance.
Service intervals: refer to the
vehicle’s warranty and servicing
booklet.
Diesel version
For the first 900 miles (1,500 km),
do not exceed 54 mph (90 km/h).
After completing this mileage you
may drive faster, although you may
only expect top performance after
approximately 3,600 miles (6,000
km).
During the running in period, do not
accelerate hard while the engine is
still cold and do not let the engine
overrev.
Service intervals: refer to the
vehicle’s warranty and servicing
booklet.
Stop and steering lock position St
To lock: remove the key and turn the
steering wheel until the steering
column locks.
To unlock: turn the key and the
steering wheel slightly.
Accessories position A
When the ignition is switched off,
any accessories (radio, etc.) will
continue to function.
Ignition on position M
The ignition is switched on:
- petrol version: the engine may be
started.
- diesel version: the engine is
preheating.
Start position D
If the engine fails to start at the first
attempt, the key must be turned
back before the starter can be
activated again. Release the key as
soon as the engine starts.
2.02
Page 96

STARTING/STOPPING THE ENGINE
Starting the engine
■ Petrol injection
Engine warm or cold
- Turn the key to the start position
without depressing the
accelerator.
- Release the key as soon as the
engine starts.
Never leave the vehicle unattended with the key in the ignition if
there is a child (or animal) in the vehicle. With the key in the
ignition, he or she could start the engine or operate electrical
equipment such as the electric windows and there is a risk that the
child may be injured by trapping his or her neck, arm, hand, etc. Risk of
serious injury.
Never switch off the ignition before the vehicle has stopped completely.
Once the engine has stopped, the brake servo, power assisted steering, etc.
and the passive safety devices such as airbags and pretensioners will no
longer operate.
The steering is locked when the key is removed.
■ Diesel injection
Turn the ignition key to the
ignition on position, M, and hold
this position until the preheating
warning light goes out.
Turn the key to the start position D
without pressing the accelerator.
Release the key as soon as the
engine starts.
é
Stopping the engine
With the engine idling, turn the key
back to the Stop position.
2.03
Page 97

SPECIAL NOTES ON PETROL VERSIONS
The following operating conditions
should be avoided:
- driving for long periods when the
low fuel level warning light is lit
up,
- using leaded petrol,
- using oil or fuel supplements
which are not approved by
RENAULT,
or operating faults such as:
- faulty ignition, running out of fuel
or spark plug disconnected
resulting in engine misfire and
snatching when driving,
- loss of power,
as they may cause the catalytic
converter to overheat and thus
reduce its efficiency, or destroy it
and cause heat damage to the
vehicle.
If you notice any of the above faults,
have the necessary repairs carried
out as soon as possible by your
RENAULT Dealer.
These faults may be avoided by
regularly taking your vehicle to your
RENAULT Dealer at the intervals
specified in your Warranty and
Servicing booklet.
Starting faults
To avoid damaging the catalytic
converter, do not keep trying to start
the engine (using the start button, or
by pushing or towing the vehicle)
without having identified and
corrected the starting fault.
If the fault cannot be identified, do
not continue to try to start the
engine, contact a RENAULT Dealer.
2.04
Do not park the vehicle or run the engine in locations where combustible substances or materials such as grass
or leaves can come into contact with the hot exhaust system.
Page 98

SPECIAL FEATURES OF DIESEL VERSIONS
Diesel engine speed
Diesel engines are fitted with
injection equipment incorporating a
mechanical regulator which
prevents overrevving of the engine
irrespective of the gear engaged.
Running out of fuel
If the fuel tank has been drained
completely, you may start the
engine normally after refilling the
fuel tank provided that the battery is
well charged.
However, if after a few seconds and
several attempts the engine fails to
start, contact a RENAULT Dealer.
Precautions to be taken in
winter
To avoid any faults in icy weather:
- ensure that the battery is always
fully charged.
- always keep the diesel tank
relatively full to avoid water
vapour condensing in it and
accumulating at the bottom of the
tank.
Do not park the vehicle or run the engine in locations where combustible substances or materials such as grass
or leaves can come into contact with the hot exhaust system.
2.05
Page 99

ADVICE ON FUEL ECONOMY AND DRIVING
RENAULT is actively striving to
reduce pollutant exhaust gas
emissions and to save energy.
By virtue of its design, moderate fuel
consumption and initial settings,
your RENAULT conforms to current
anti-pollution regulations. Technical
design, however, cannot achieve all.
The fuel consumption of your
vehicle and the level of pollutant
exhaust gas emissions are very much
within your control. Make sure that
your vehicle is maintained correctly,
and is driven carefully.
Maintenance
It should be noted that failure to
respect anti-pollution regulations
may lead to legal action being taken
against the vehicle owner. In
addition, replacing engine, fuel
supply system and exhaust
components with parts other than
those originally recommended by
the manufacturer may alter your
vehicle so that it no longer complies
with anti-pollution regulations.
Have your vehicle checked and
adjusted by your RENAULT Dealer
in accordance with the instructions
in the vehicle’s Warranty and
Servicing booklet.
Your RENAULT Dealer has all the
equipment necessary for ensuring
that your vehicle is maintained to its
original standard.
Engine adjustments
- ignition: this does not require
adjustment.
- spark plugs: for optimum fuel
economy, efficiency and
performance the specifications laid
down by our Design Department
must be strictly applied.
If the spark plugs have to be
changed, use the make, type and
gap specified for your vehicle’s
engine. Contact your RENAULT
Dealer for this information.
- idling speed: this does not require
adjustment.
- air filter, diesel filter: a clogged
element hinders performance and
must be replaced.
2.06
Page 100

ADVICE ON EMISSION CONTROL, FUEL ECONOMY AND DRIVING (continued)
Exhaust gas monitoring system
The exhaust gas monitoring system
will detect any malfunctioning of
the vehicle’s exhaust gas antipollution system.
If this system malfunctions, toxic
substances may be released into the
atmosphere or damage may occur.
ä
This comes on when the ignition is
switched on and goes out after three
seconds.
- If it comes on continuously,
- If it flashes, reduce the engine
This instrument panel
warning light shows any
system faults:
contact your RENAULT Dealer as
soon as possible.
speed until the light stops flashing.
Consult your RENAULT Dealer as
soon as possible.
Driving
- Drive carefully for the first few
miles until the engine reaches its
normal operating temperature,
rather than let it warm up while
the vehicle is stationary.
- Speed is expensive.
- Sporty driving uses a lot of fuel:
drive with a light right foot.
- Brake as little as possible. If you
anticipate obstacles or bends ahead
of you it will be sufficient just to
lift your foot off the accelerator.
- Avoid sharp acceleration.
- Do not overrev the engine in the
intermediate gears. Always use the
highest gear possible without
labouring the engine.
- Do not try to maintain the same
speed up a hill, accelerate no more
than you would on the level. Keep
your foot in the same position on
the accelerator pedal.
- Double declutching and accelerating
before switching off are unnecessary
in modern vehicles.
- Bad weather, flooded roads
Do not drive through
floods if the depth of
water is above the lower
edge of the wheel rims.
2.07
 Loading...