

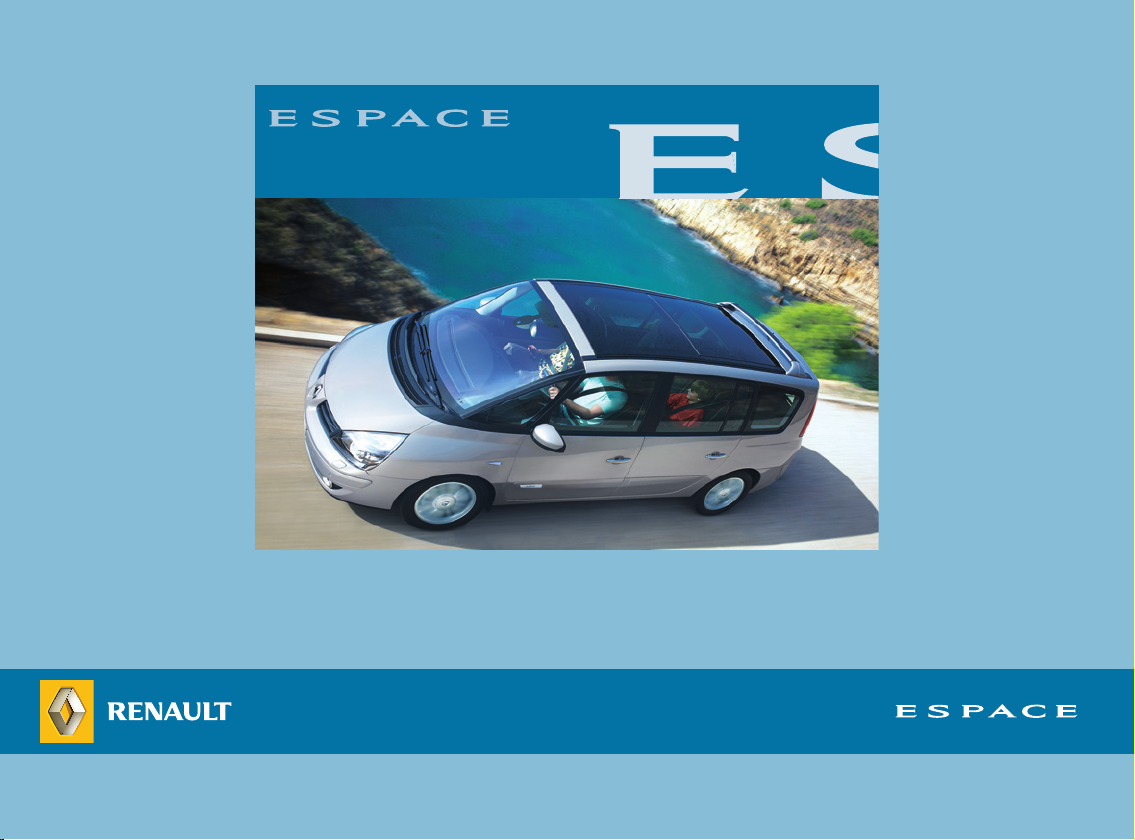
Renault ESPACE 2007 Owner Manual
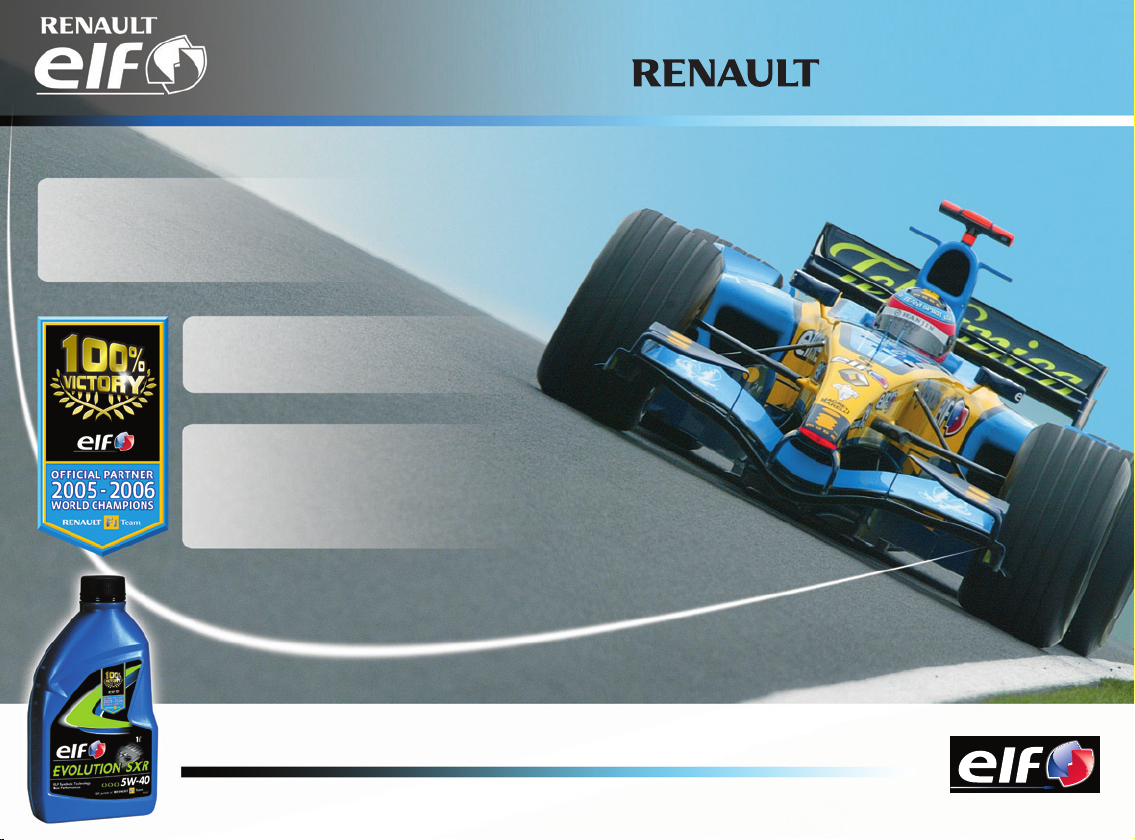
ELF is developing a complete range of
lubricants for RENAULT: engine oils, manual
and automatic transmission oils.
These are very high-technology
lubricants stimulated by applied
research in Formula One.
This range is updated with RENAULT’s
engineering teams to perfectly meet the
specific needs of RENAULT vehicles.
Ź ELF lubricants are a major factor in your
vehicle’s performance.
recommends ELF
Important: to optimize engine operation the use of a lubricant
may be restricted to certain vehicles. See your owner’s
manual.
RENAULT recommends the approved ELF lubricants for your oil changes and top-ups.
Contact your RENAULT representative or visit the site: www.lubricants.elf.com
The oil born in Formula One
Quick overview
– Tyre pressure . . . . . . . . . . . . . . . . . . . . . . . . . . . . . . . . . . . . . . . . . . . . . . 0.4 → 0.7
– RENAULT card: use . . . . . . . . . . . . . . . . . . . . . . . . . . . . . . . . . . . . . . . . . 1.2 → 1.7
– Child restraint/seat . . . . . . . . . . . . . . . . . . . . . . . . . . . . . . . . . . . . . . . . 1.31 → 1.40
– Warning lights (instrument panel) . . . . . . . . . . . . . . . . . . . . . . . . . . . . . 1.46 → 1.64
– Starting/stopping the engine . . . . . . . . . . . . . . . . . . . . . . . . . . . . . . . . . . . 2.3 → 2.6
– Driving . . . . . . . . . . . . . . . . . . . . . . . . . . . . . . . . . . . . . . . . . . . . . . . . . . 2.2 → 2.42
Electronic parking brake . . . . . . . . . . . . . . . . . . . . . . . . . . . . . . . . . . . . . 2.10 – 2.12
Tyre pressure monitor . . . . . . . . . . . . . . . . . . . . . . . . . . . . . . . . . . . . . . 2.18 → 2.21
Electronic Stability Program: ESP . . . . . . . . . . . . . . . . . . . . . . . . . . . . . . . . . . 2.22
Traction control . . . . . . . . . . . . . . . . . . . . . . . . . . . . . . . . . . . . . . . . . . . . 2.23 – 2.24
Emergency brake assist . . . . . . . . . . . . . . . . . . . . . . . . . . . . . . . . . . . . . . . . . . 2.22
Cruise control-speed limiter . . . . . . . . . . . . . . . . . . . . . . . . . . . . . . . . . 2.28 → 2.34
Parking distance control . . . . . . . . . . . . . . . . . . . . . . . . . . . . . . . . . . . . . 2.35 – 2.38
– Heating/air conditioning . . . . . . . . . . . . . . . . . . . . . . . . . . . . . . . . . . . . . 3.3 → 3.25
– Bonnet/maintenance . . . . . . . . . . . . . . . . . . . . . . . . . . . . . . . . . . . . . . . 4.2 → 4.16
0.2
– Practical advice (changing bulbs, fuses, breakdown, operating faults) . 5.2 → 5.42
C O N T E N T S
Sections
Getting to know your vehicle ...............................
Driving ...................................................................
Your comfort .........................................................
Maintenance .........................................................
Practical advice ....................................................
Technical specifications ......................................
Alphabetical index ...............................................
1
2
3
4
5
6
7
0.3
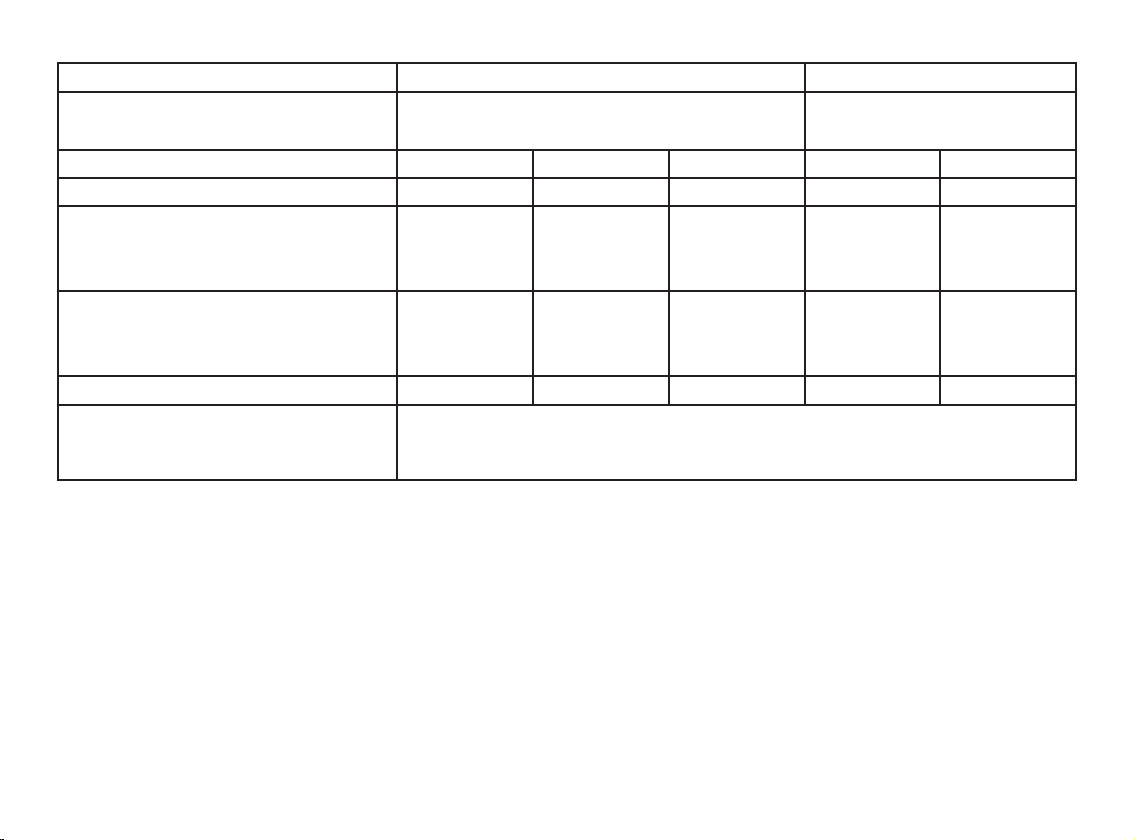
TYRE PRESSURES (in bar or kg/cm² when cold)
Versions
Vehicle type
See vehicle identification plate
Tyre dimensions
Wheel sizes
Non-motorway use
– Front
– Rear
Motorway use (1)
– Front
– Rear
Emergency spare wheel
Intermediate emergency spare wheel
(wheel smaller than the four other
wheels)
Tyre pressure monitor
Refer to the pages on the “Tyre pressure monitor” in Section 2 for information on this function.
Tyre safety and use of snow chains
Refer to the information on “Tyres” in Section 5 for the servicing conditions and, depending on the version, the use of chains.
(1) Special note concerning vehicles used fully laden (Maximum Permissible All-up Weight) and towing a trailer.
The maximum speed must be limited to 60 mph (100 km/h) and the tyre pressure increased by 0.2 bar.
Refer to the information on “Weights” in Section 6.
225/60 R 16 225/55 R 17 245/45 R 18 225/55 R 17 245/45 R 18
6,5 J 16 7 J 17 7,5 J 18 7 J 17 7,5 J 18
2.4 2.4 2.5 2.5 2.6
2.2 2.2 2.3 2.2 2.3
2.4 2.4 2.5 2.5 2.6
2.2 2.2 2.3 2.2 2.3
2.4 2.4 2.5 2.5 2.6
2.0 dCi 2.0 dCi – 2.2 dCi – 3.0 dCi
JK01 – JK02 – JK04
3.7
JK03 – JK07 – JK0E – JK0H
JK0J – JK0V – JK0Y – JK1A
0.4

TYRE PRESSURES (in bar or kg/cm² when cold) (continued)
Versions
Vehicle type
See vehicle identification plate
Tyre dimensions
Wheel sizes
Non-motorway use
– Front
– Rear
Motorway use (1)
– Front
– Rear
Emergency spare wheel
Intermediate emergency spare wheel
(wheel smaller than the four other
wheels)
Tyre pressure monitor
Refer to the pages on the “Tyre pressure monitor” in Section 2 for information on this function.
Tyre safety and use of snow chains
Refer to the information on “Tyres” in Section 5 for the servicing conditions and, depending on the version, the use of chains.
(1) Special note concerning vehicles used fully laden (Maximum Permissible All-up Weight) and towing a trailer.
The maximum speed must be limited to 60 mph (100 km/h) and the tyre pressure increased by 0.2 bar.
Refer to the information on “Weights” in Section 6.
JK09 – JK0A – JK0B – JK0D – JK0G – JK0K
JK0L – JK0N – JK0U – JK1B – JK1D – JK1C
225/60 R 16 225/55 R 17 245/45 R 18 225/55 R 17 245/45 R 18
6,5 J 16 7 J 17 7,5 J 18 7 J 17 7,5 J 18
2.0 16V – 2.0T – 1.9 dCi 3.5 V6
JK00 – JK0F – JK0P – JK0S
2.2 2.3 2.4 2.4 2.5
2.1 2.2 2.3 2.2 2.3
2.3 2.3 2.4 2.7 2.8
2.2 2.2 2.3 2.4 2.5
2.3 2.3 2.4 2.7 2.8
3.7
0.5

TYRE PRESSURES (in PSI when cold)
Versions
Vehicle type
See vehicle identification plate
Tyre dimensions
Wheel sizes
Non-motorway use
– Front
– Rear
Motorway use (1)
– Front
– Rear
Emergency spare wheel
Intermediate emergency spare wheel
(wheel smaller than the four other
wheels)
Tyre pressure monitor
Refer to the pages on the “Tyre pressure monitor” in Section 2 for information on this function.
Tyre safety and use of snow chains
Refer to the information on “Tyres” in Section 5 for the servicing conditions and, depending on the version, the use of chains.
(1) Special note concerning vehicles used fully laden (Maximum Permissible All-up Weight) and towing a trailer.
The maximum speed must be limited to 60 mph (100 km/h) and the tyre pressure increased by 3 PSI.
Refer to the information on “Weights” in Section 6.
225/60 R 16 225/55 R 17 245/45 R 18 225/55 R 17 245/45 R 18
6.5 J 16 7 J 17 7.5 J 18 7 J 17 7.5 J 18
35 35 36 36 38
32 32 33 32 33
35 35 36 36 38
32 32 33 32 33
35 35 36 36 38
2.0 dCi 2.0 dCi – 2.2 dCi – 3.0 dCi
JK01 – JK02 – JK04
47
JK03 – JK07 – JK0E – JK0H
JK0J – JK0V – JK0Y – JK1A
0.6

TYRE PRESSURES (in PSI when cold) (continued)
Versions
Vehicle type
See vehicle identification plate
Tyre dimensions
Wheel sizes
Non-motorway use
– Front
– Rear
Motorway use (1)
– Front
– Rear
Emergency spare wheel
Intermediate emergency spare wheel
(wheel smaller than the four other
wheels)
Tyre pressure monitor
Refer to the pages on the “Tyre pressure monitor” in Section 2 for information on this function.
Tyre safety and use of snow chains
Refer to the information on “Tyres” in Section 5 for the servicing conditions and, depending on the version, the use of chains.
(1) Special note concerning vehicles used fully laden (Maximum Permissible All-up Weight) and towing a trailer.
The maximum speed must be limited to 60 mph (100 km/h) and the tyre pressure increased by 3 PSI.
Refer to the information on “Weights” in Section 6.
JK09 – JK0A – JK0B – JK0D – JK0G – JK0K
JK0L – JK0N – JK0U – JK1B – JK1D – JK1C
225/60 R 16 225/55 R 17 245/45 R 18 225/55 R 17 245/45 R 18
6.5 J 16 7 J 17 7.5 J 18 7 J 17 7.5 J 18
2.0 16V – 2.0T – 1.9 dCi 3.5 V6
JK00 – JK0F – JK0P – JK0S
32 33 35 35 36
32 32 33 32 33
33 33 35 39 41
32 32 33 35 36
33 33 35 39 41
47
0.7

0.8
Section 1: Getting to know your vehicle
RENAULT card: general information, use, deadlocking . . . . . . . . . . . . . . . . . . . . . . . . . . . . . . . . . . 1.2
Doors . . . . . . . . . . . . . . . . . . . . . . . . . . . . . . . . . . . . . . . . . . . . . . . . . . . . . . . . . . . . . . . . . . . . . . . . . 1.8
Engine immobiliser . . . . . . . . . . . . . . . . . . . . . . . . . . . . . . . . . . . . . . . . . . . . . . . . . . . . . . . . . . . . . . 1.14
Headrests - Seats . . . . . . . . . . . . . . . . . . . . . . . . . . . . . . . . . . . . . . . . . . . . . . . . . . . . . . . . . . . . . . . 1.16
Seat belts . . . . . . . . . . . . . . . . . . . . . . . . . . . . . . . . . . . . . . . . . . . . . . . . . . . . . . . . . . . . . . . . . . . . . 1.21
Additional methods of restraint . . . . . . . . . . . . . . . . . . . . . . . . . . . . . . . . . . . . . . . . . . . . . . . . . . . . . 1.25
to the seat belt . . . . . . . . . . . . . . . . . . . . . . . . . . . . . . . . . . . . . . . . . . . . . . . . . . . . . . . . . . . . 1.25
side protection devices . . . . . . . . . . . . . . . . . . . . . . . . . . . . . . . . . . . . . . . . . . . . . . . . . . . . . . 1.29
Child safety . . . . . . . . . . . . . . . . . . . . . . . . . . . . . . . . . . . . . . . . . . . . . . . . . . . . . . . . . . . . . . . . . . . . 1.31
Deactivating the front passenger air bags . . . . . . . . . . . . . . . . . . . . . . . . . . . . . . . . . . . . . . . . . . . . . 1.36
Time and external temperature . . . . . . . . . . . . . . . . . . . . . . . . . . . . . . . . . . . . . . . . . . . . . . . . . . . . . 1.41
Driving position . . . . . . . . . . . . . . . . . . . . . . . . . . . . . . . . . . . . . . . . . . . . . . . . . . . . . . . . . . . . . . . . . 1.42
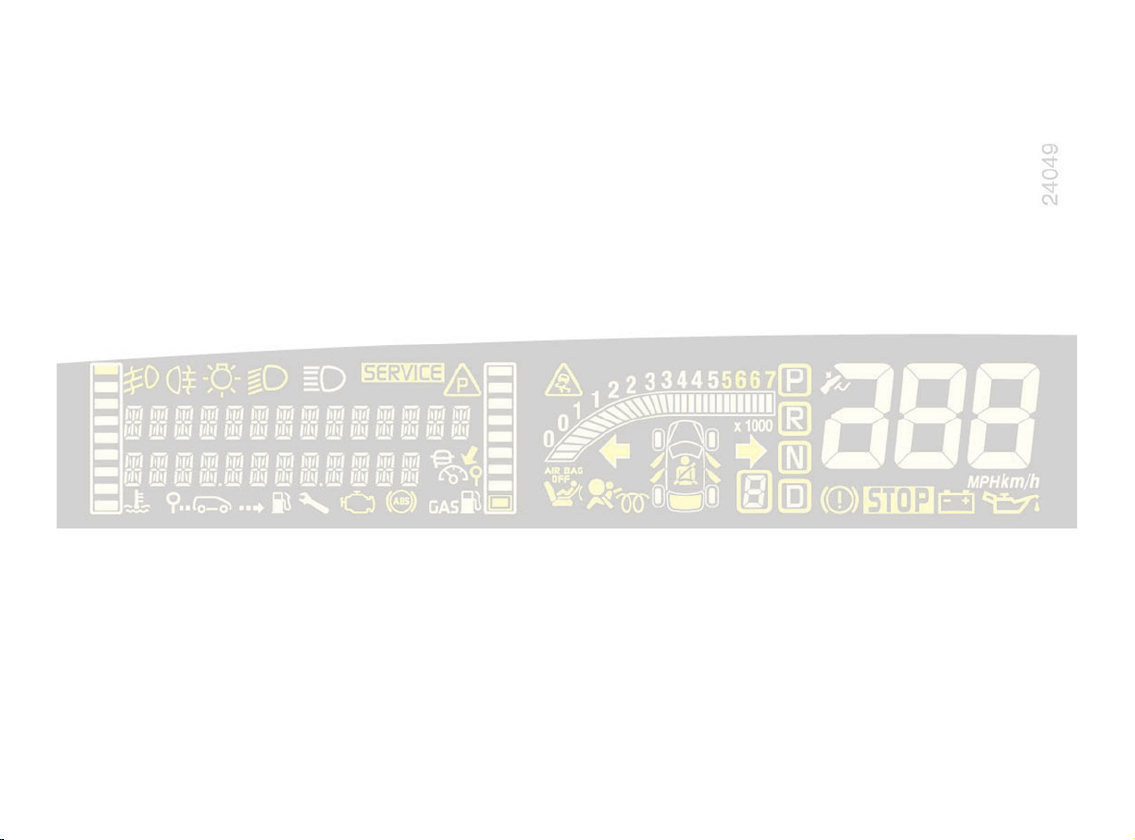
Instrument panel . . . . . . . . . . . . . . . . . . . . . . . . . . . . . . . . . . . . . . . . . . . . . . . . . . . . . . . . . . . . . . . . 1.46
Trip computer and warning system . . . . . . . . . . . . . . . . . . . . . . . . . . . . . . . . . . . . . . . . . . . . 1.52
Steering wheel . . . . . . . . . . . . . . . . . . . . . . . . . . . . . . . . . . . . . . . . . . . . . . . . . . . . . . . . . . . . . . . . . . 1.63
Rear view mirrors . . . . . . . . . . . . . . . . . . . . . . . . . . . . . . . . . . . . . . . . . . . . . . . . . . . . . . . . . . . . . . . 1.64
Audible and visual signals . . . . . . . . . . . . . . . . . . . . . . . . . . . . . . . . . . . . . . . . . . . . . . . . . . . . . . . . . 1.66
Lighting and exterior signals . . . . . . . . . . . . . . . . . . . . . . . . . . . . . . . . . . . . . . . . . . . . . . . . . . . . . . . 1.67
Headlight beam adjustment . . . . . . . . . . . . . . . . . . . . . . . . . . . . . . . . . . . . . . . . . . . . . . . . . . . . . . . . 1.71
Wash/Wipe . . . . . . . . . . . . . . . . . . . . . . . . . . . . . . . . . . . . . . . . . . . . . . . . . . . . . . . . . . . . . . . . . . . . 1.72
Fuel tank (filling with fuel) . . . . . . . . . . . . . . . . . . . . . . . . . . . . . . . . . . . . . . . . . . . . . . . . . . . . . . . . . 1.75
1.1
RENAULT CARD: general information
1
Remote control RENAULT
card A
The card has two buttons, 1 and 2.
It enables:
– the doors, tailgate and the fuel filler
flap to be locked or unlocked (see
the following pages).
2
A
RENAULT card in hands-free
mode B
The card has three buttons: 1, 2 and 3.
It enables:
– automatic unlocking and locking of
the doors, tailgate and fuel filler flap,
if desired.
General information:
1
3
2
B
– depending on the vehicle, automatic
closing of windows and sunroof
(refer to the information on the “Onetouch electric windows: remote con
trol closing” and “Electric sunroof:
remote c o n t r o l closing” in
Section 3);
– operation of certain devices (e.g.:
radio, electrically controlled seats,
etc.);
– starting the engine (see the infor
mation on “Starting the engine” in
Section 2);
– switching off the “See-me-home
lighting” function (refer to the infor
mation on “Exterior lighting and sig
nals” in Section 1).
-
-
-
-
1.2
RENAULT CARD: general information (continued)
Remote control range
This varies according to the environment: therefore take care when hand
ling the RENAULT Card, so that you
do not inadvertently lock or unlock the
doors!
-
4
RENAULT cards A and B are powered
by a battery which must be replaced
when battery tell-tale light
lights up (refer to the information on the
“RENAULT card: battery” in Section 5).
A
4 no longer
4
Special note: for some vehicles, the
RENAULT Card records the settings
selected by the Card user: the choice of
settings for the automatic climate con
trol, some radios, electric seats (if this
is stored), the rear view mirror position
ing, etc. It is therefore advisable always
to keep the same RENAULT Card so
that you can recall your personal set
tings.
B
-
-
-
inserted in the reader or left inside
the passenger compartment. With
the card in the reader, it would be
possible to start the engine or op
erate electrical equipment such as
the electric windows, and there is a
risk that a child may trap part of their
body (neck, arms, hands, etc.). Risk
of serious injury.
Driver’s responsibility
Never leave a child (or a
pet) alone in the vehicle
with the RENAULT card
1.3
-
RENAULT CARD: general information (continued)
5
Integrated 5 or separate 6
emergency key
(depending on vehicle)
It is only for use in exceptional circum
stances, it is used to lock and unlock
the left-hand door when the RENAULT
Card is not functioning correctly:
– if the vehicle is located in a zone of
high electromagnetic radiation;
– use of devices using the same fre
quency as the card;
– when the RENAULT card battery is
drained, flat battery, etc.
6
For instructions on how to use the
emergency key, refer to the information
on “Locking and unlocking the doors”.
-
Once you have accessed the vehicle
with the emergency key, insert the
RENAULT card into the card reader
in order to start the vehicle.
-
Replacement: need for an
additional RENAULT Card
If you lose your RENAULT card or
require another, you can obtain one
from your RENAULT Dealer.
If a RENAULT card is replaced, it
will be necessary to take the vehicle
and all its RENAULT cards to your
RENAULT Dealer to initialise the
system.
You can use up to four RENAULT
cards per vehicle.
Faulty RENAULT card
Make sure that the batteries are
always in good condition: they have
a service life of approximately two
years.
Refer to the information on the
“RENAULT card: Batteries” in
Section 5.
1.4
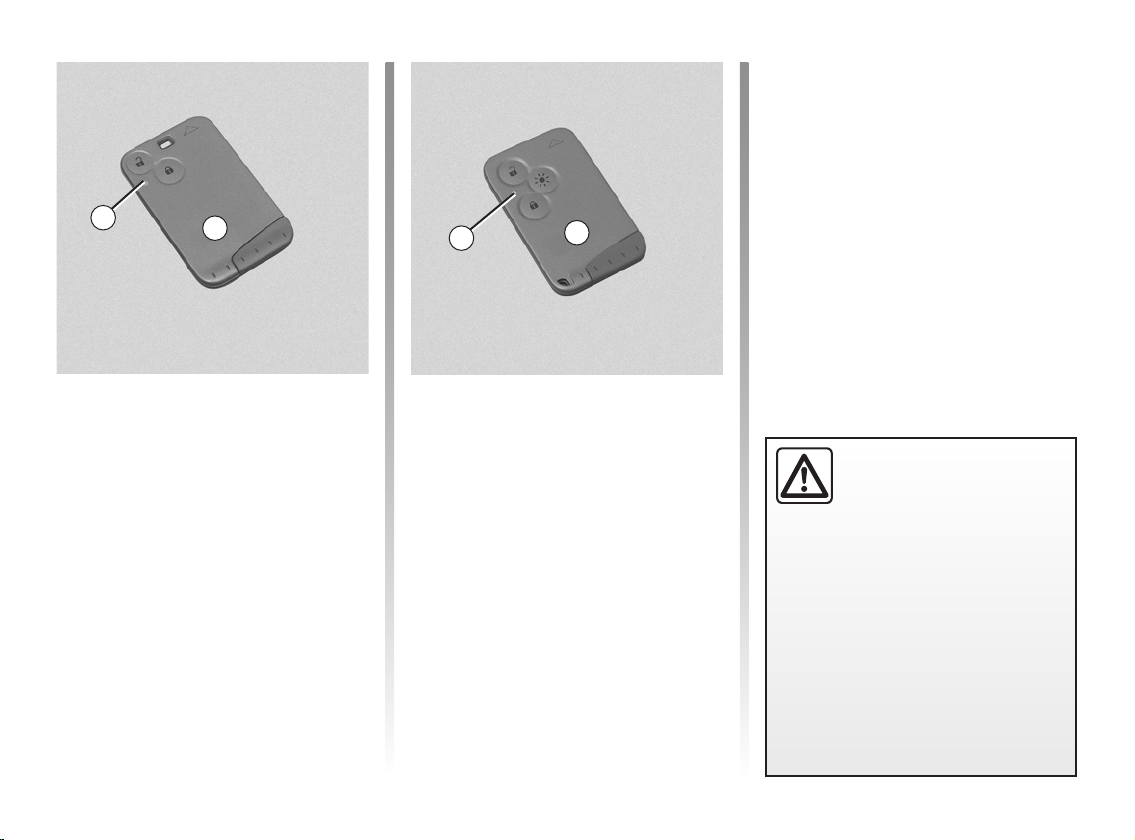
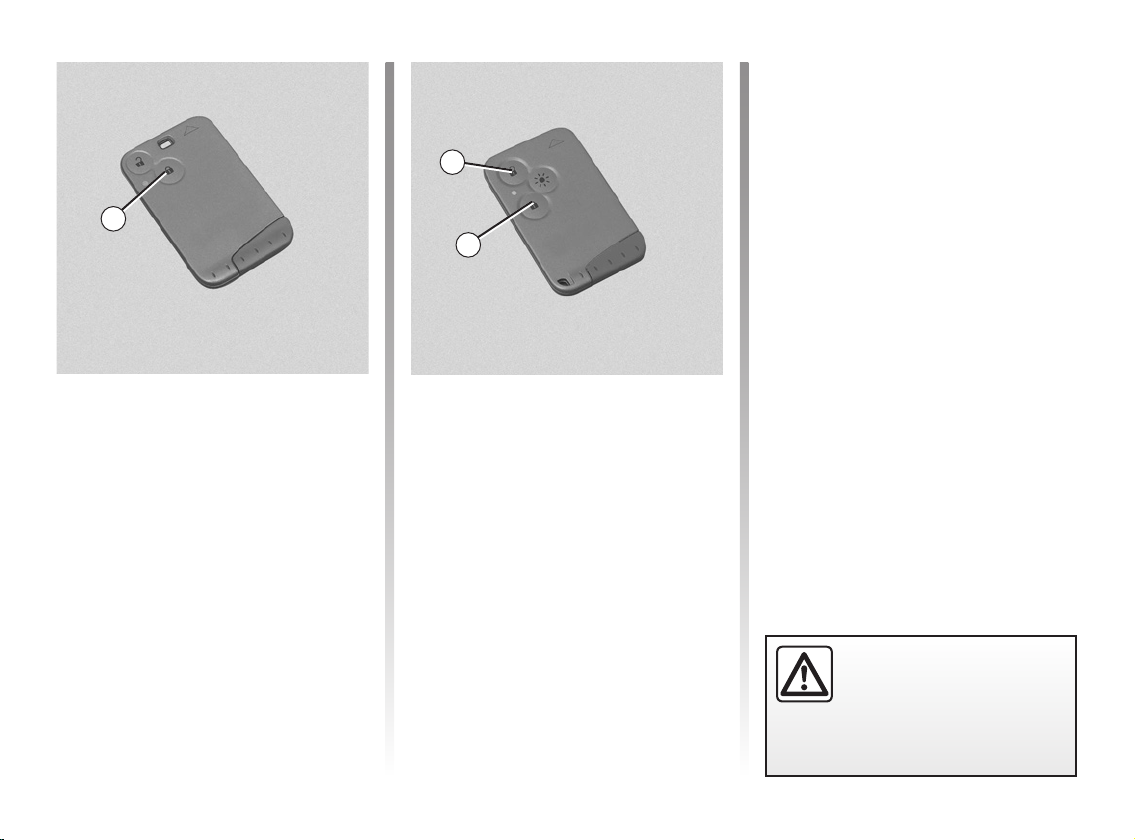
REMOTE CONTROL RENAULT CARD: use
Locking the doors
1
2
Unlocking the doors
Press unlocking button 1.
The hazard warning lights flash
indicate that the doors have been un
locked.
Special notes (for some countries):
– pressing button
er’s door only to be unlocked,
– pressing button
the doors and the tailgate.
1 enables the driv-
1 twice unlocks all
once to
Press the locking button 2.
The hazard warning lights flash twice
to indicate that the doors are locked:
– if a front door is open or not closed
properly, the doors and tailgate will
not lock and the hazard warning
lights will not flash;
– if one of the other doors or tailgate
is open or not closed properly, the
hazard warning lights will not flash.
-
1.5
RENAULT CARD IN HANDS-FREE MODE: use
1
3
2
Hands-Free mode
Unlocking the doors
Walk up to your vehicle carrying your
RENAULT card.
As soon as you grip one of the handles
(doors or tailgate), the locks will open
automatically.
The hazard warning lights flash once
to indicate that the doors have been un
locked.
Locking the doors
With the doors closed, walk away from
the vehicle carrying your RENAULT
card: the doors will lock automatically.
Note: the distance at which the vehicle
locks depends on the surroundings.
The hazard warning lights flash twice
and the side indicator lights light up
(for approximately 10 seconds) to indi
cate that the doors have been locked. A
beep also sounds.
This beep can be chosen from a list of
several options or turned off. Consult
your RENAULT Dealer.
-
Operation in manual mode
If you wish, you can exit the hands-free
mode by pressing button
then switch to manual mode and opera
tion of the RENAULT card is the same
as that described in the section entitled
“Remote control RENAULT card: use”.
Returning to hands-free
-
mode
Hands-Free mode returns automatically each time the vehicle ignition is
switched on.
1 or 2; you will
Distance lighting function
This can, for example, identify the vehicle from a distance when parked in a
car park.
The side lights, dipped lights, indicators
and interior lights light up for about
30 seconds when button 3 is pressed.
Note: pressing button
the 30 seconds turns the lights off.
3 again during
-
1.6
Never leave your vehicle
without first removing the
RENAULT card.
DEADLOCKING
2
Special notes for the HandsFree mode
Activating the deadlocking function
1
2
exits hands-free mode.
To unlock the doors, you must press
button 1 (refer to the information on the
“RENAULT Card in hands-free mode:
use”).
Hands-Free mode returns automati
cally each time the vehicle ignition is
switched on.
-
Deadlocking of the doors/tailgate
(for some countries)
This allows you to lock the doors and
tailgate and to prevent the doors from
being unlocked with the interior handles
(for example, by breaking the window
and then trying to open the door from
the inside).
To activate deadlocking
– press button
– press and hold button
The hazard warning lights flash four
times to indicate that the vehicle is
locked.
Note: deadlocking is not possible if the
hazard warning lights or the side lights
are lit.
2 twice, briefly;
:
2.
Never use deadlocking if
someone is still inside the
vehicle.
1.7
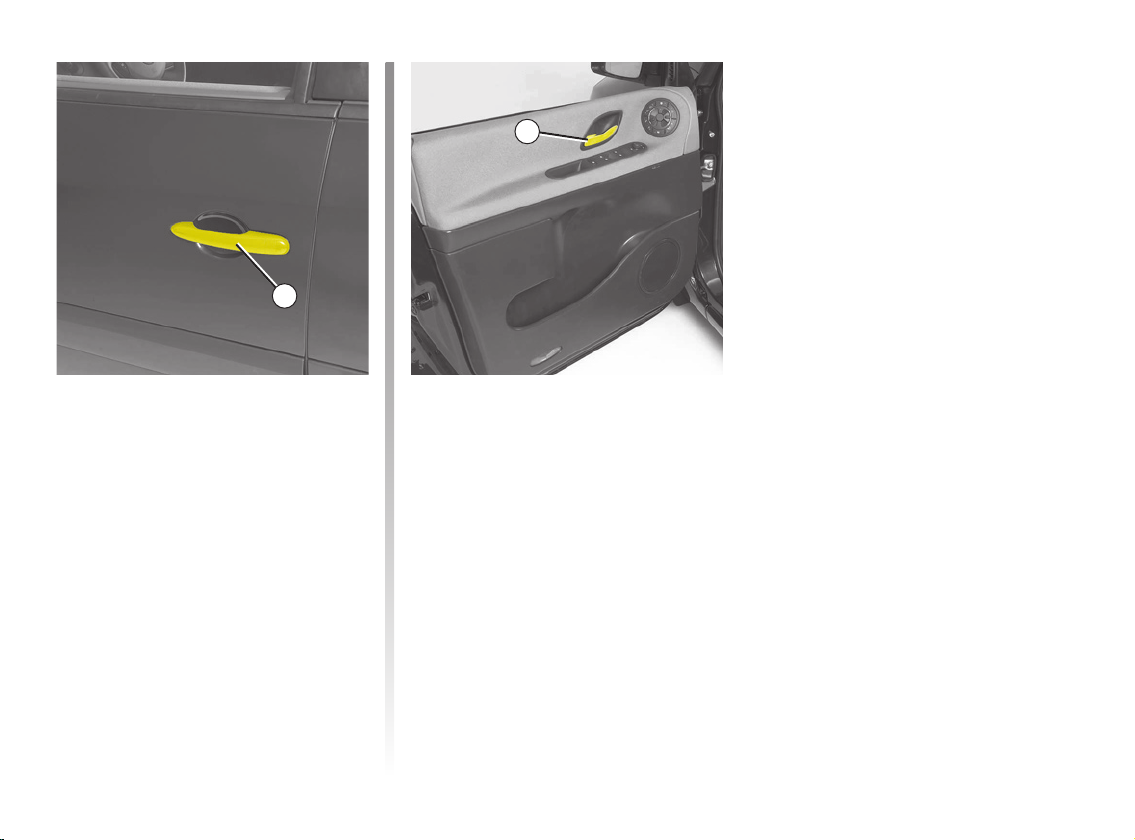
OPENING AND CLOSING THE DOORS
1
2
Opening from the outside
Once the doors have been unlocked
using the RENAULT Card, hold han
dle
1 and pull it towards you to open
the door.
1.8
Opening from the inside
Pull handle 2.
-
Lights-on warning buzzer
If you have left the lights on after switching off the ignition, a reminder buzzer
will sound when a door is opened (to
prevent discharge of the battery, etc.).
OPENING AND CLOSING THE DOORS (continued)
Depending on the vehicle,
in the event of a fault:
– a beep sounds;
– a message is displayed
on the instrument panel;
3
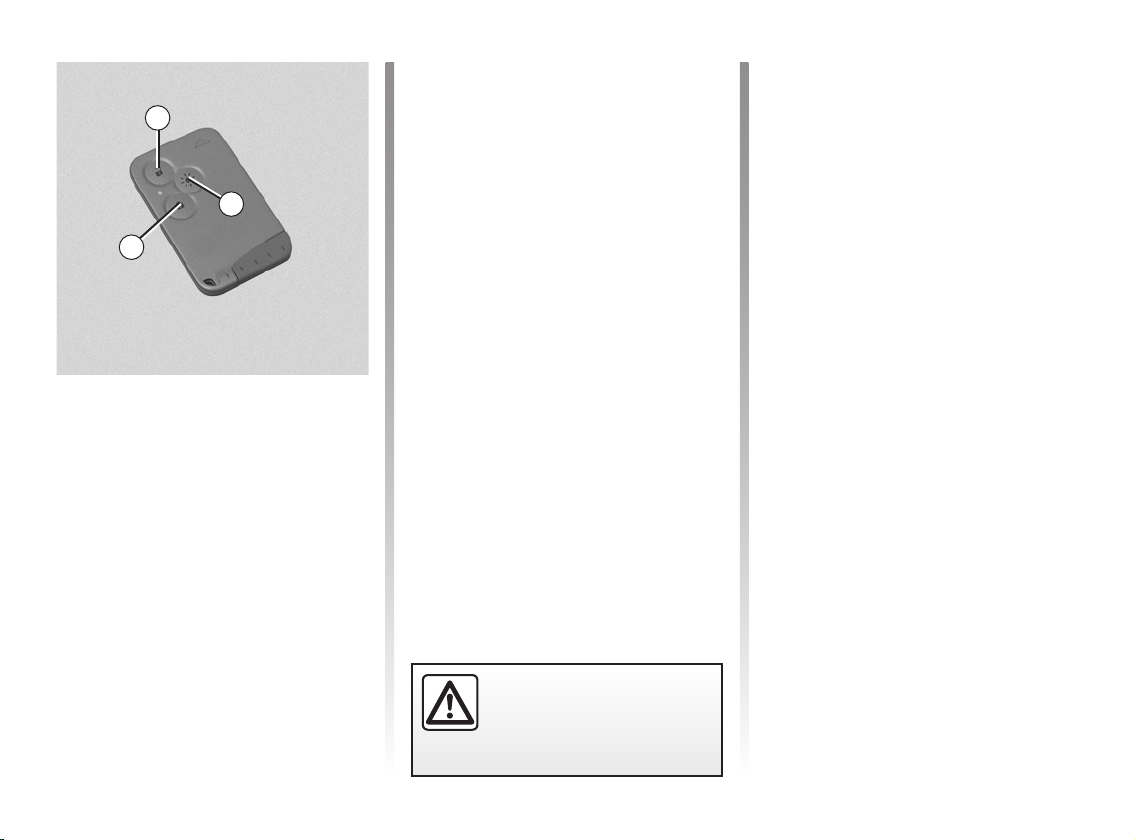
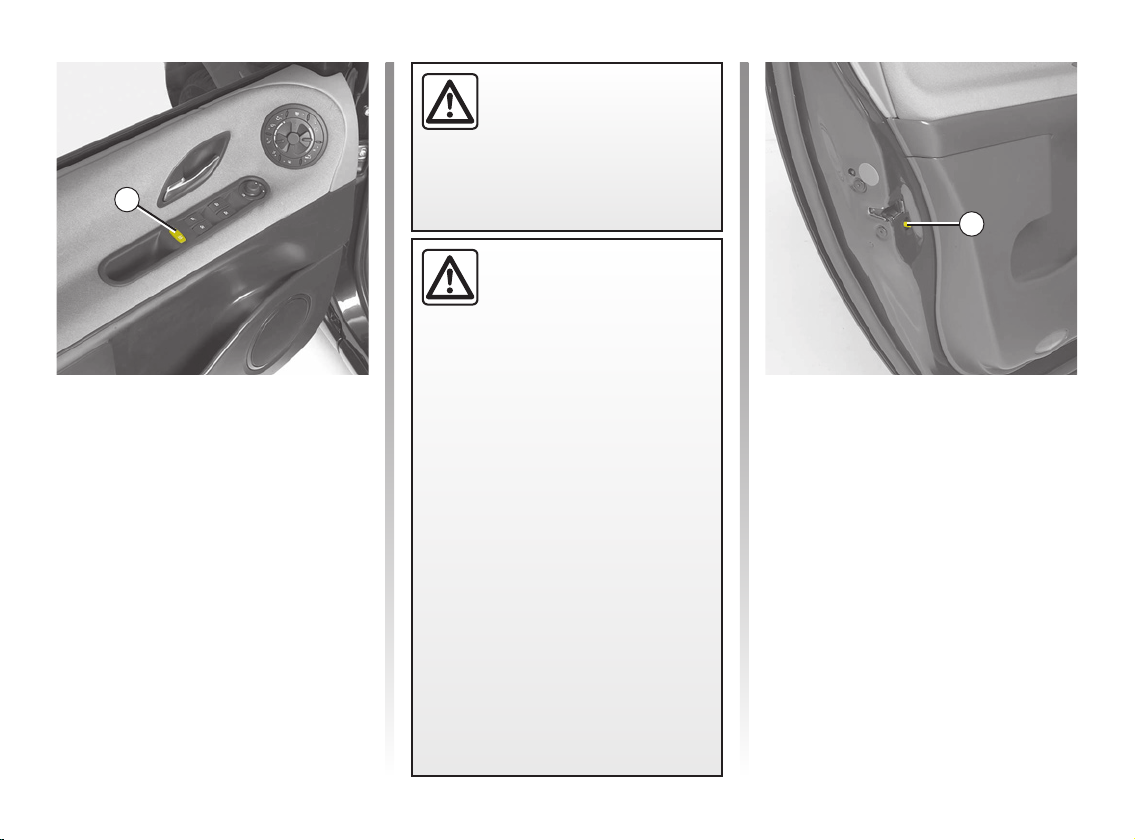
Child safety
Vehicles fitted with switch 3 with
integrated indicator light
Press switch
and prevent operation of the rear elec
tric windows.
The indicator light in the switch lights
up to confirm that the doors have been
locked.
Special note
This function also deactivates the rear
heating and ventilation controls (refer
to the information on “automatic climate
control” in Section 3).
3 to lock the rear doors
-
– the integrated indicator does not
light up.
Safety of rear occupants
The driver can inhibit opera
tion of the rear electric win
dows and doors by pressing
switch 3 on the side with the illustration.
Driver’s responsibility
Never leave your vehicle without
removing the RENAULT card from
inside and never leave a child (or a
pet) inside. With the key in the igni
tion it would be possible to operate
the electric windows and there is a
risk that a child or animal may be
seriously injured (by trapping his or
her neck, arm, hand, etc.). If some
thing gets trapped, reverse the di
rection of travel as soon as possible
by pressing the relevant switch.
4
-
-
Other cases
To make it impossible for the rear doors
to be opened from the inside, move
lever
-
-
-
4 on each door and check from
the inside that the doors are securely
locked.
1.9
LOCKING/UNLOCKING THE DOORS
Locking/unlocking the doors
from the outside
This is done using the RENAULT
card; refer to the information on the
“RENAULT card” in Section 1.
In certain cases, the RENAULT card
may not work:
– if the vehicle is located in a zone of
high electromagnetic radiation;
– use of appliances operating on the
same frequency as the card (mobile
phone, etc.);
– when the RENAULT card battery is
drained, flat battery, etc.
It is then possible:
– use the emergency key (integrated
into the card or, depending on the
vehicle, separate) for the front left-
hand door;
– to lock each of the doors manually;
– to use the door locking/unlocking
control inside the vehicle (refer to the
information on “Locking and unlock
ing from the inside” in Section 1).
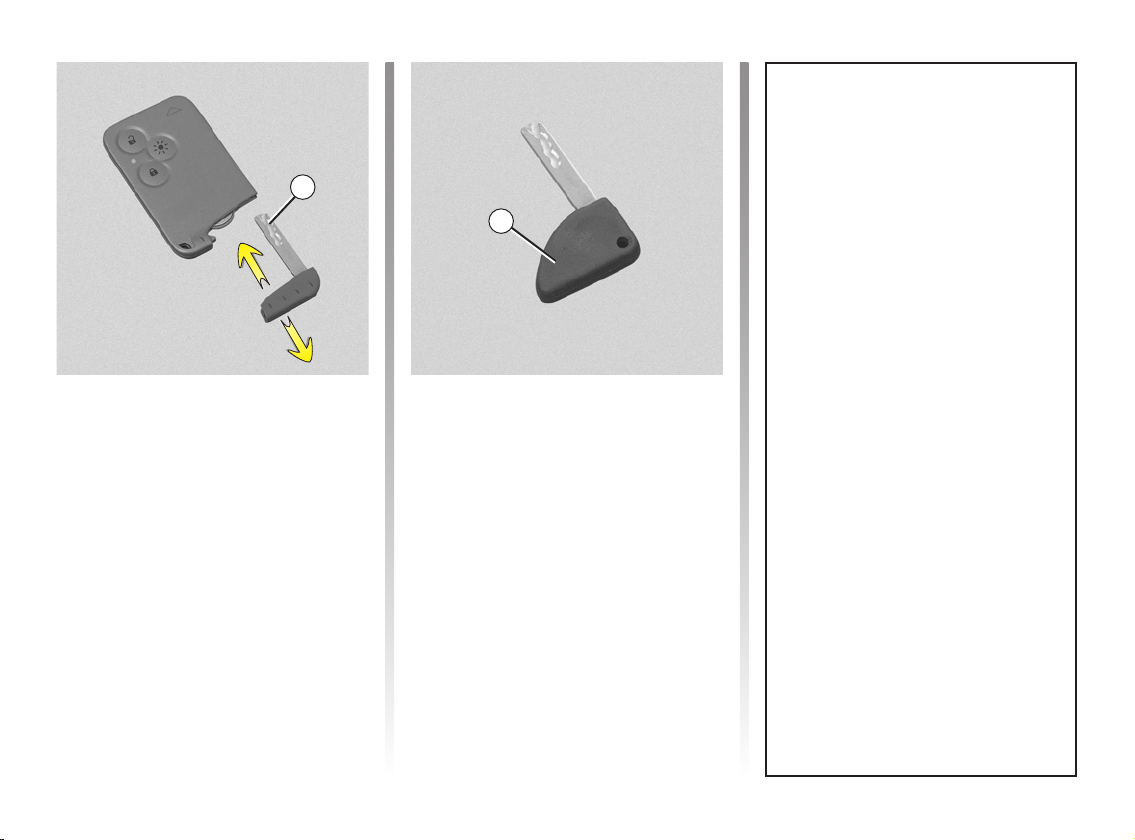
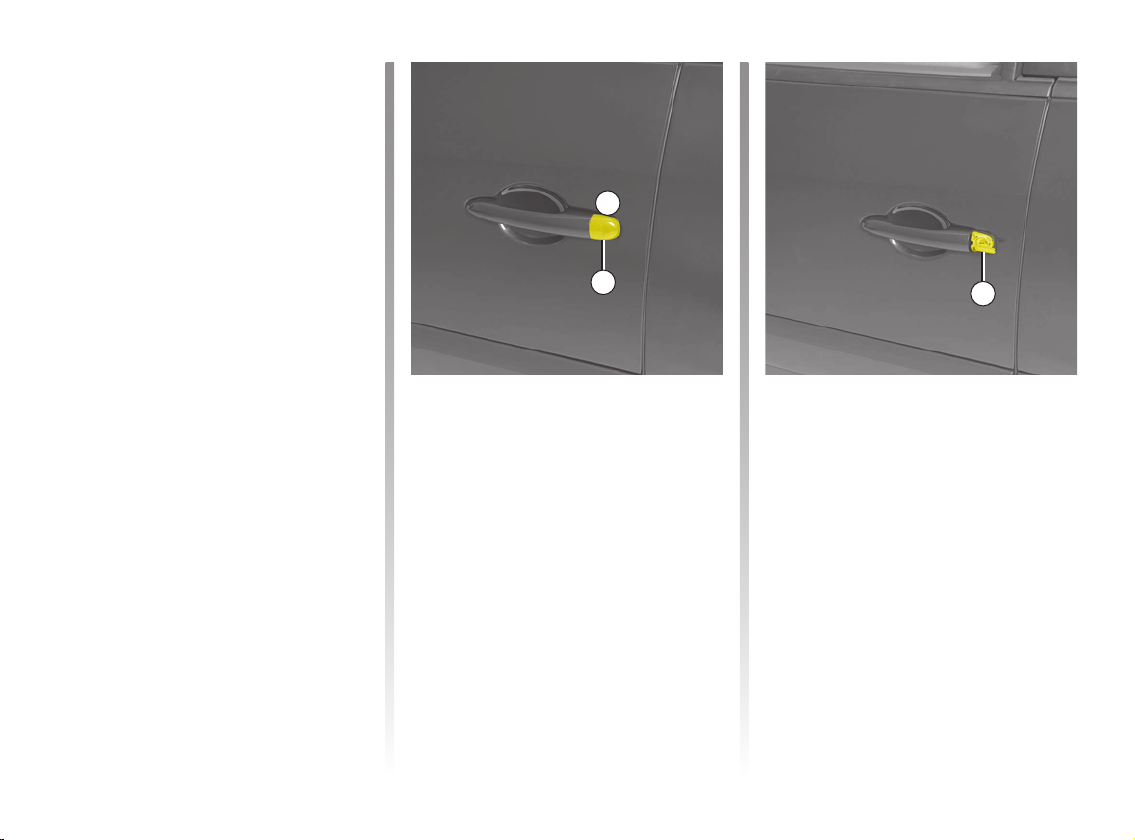
Use of the integrated
emergency key 2
Remove cover A from the front lefthand door (using the end of the emer
gency key) in notch 1.
Move it upwards to remove cover A.
-
A
1
Insert the key 2 into the lock and lock or
unlock the door.
-
2
1.10
LOCKING/UNLOCKING THE DOORS (continued)
4
3
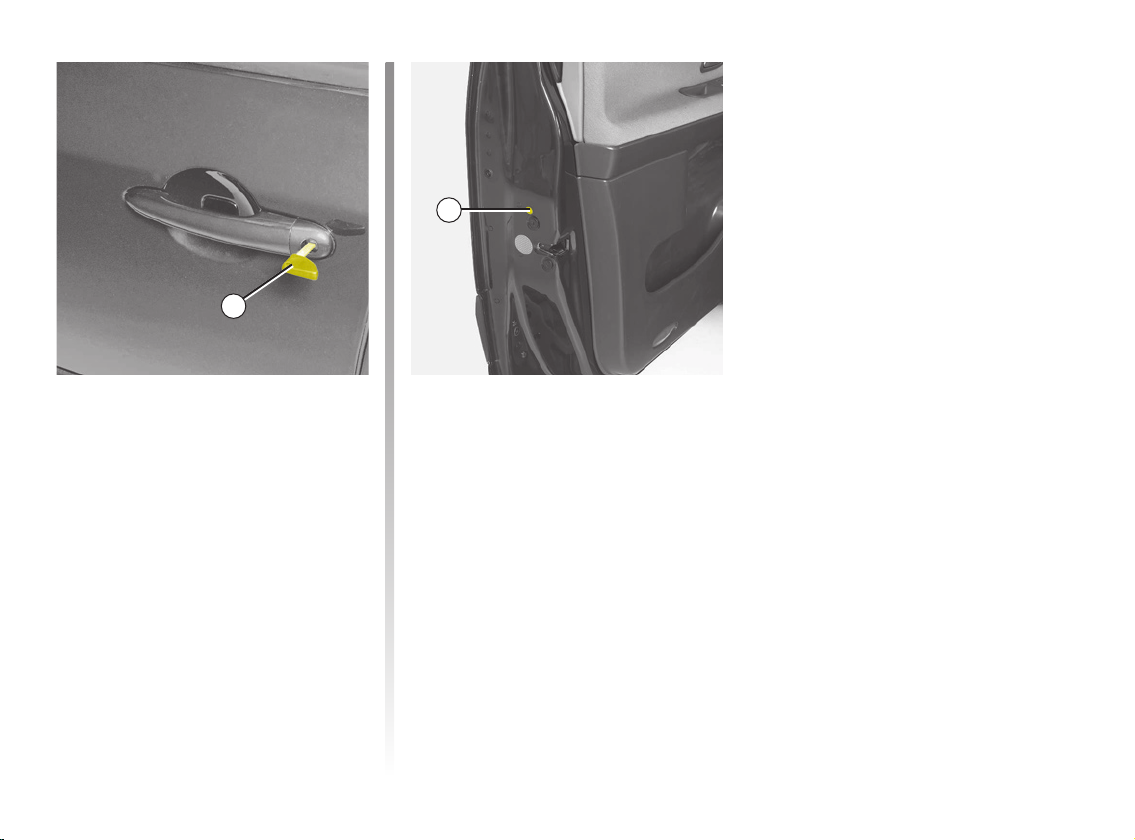
Use of the separate
emergency key 3
(depending on vehicle)
Insert key
and lock or unlock the door.
3 in the left-hand side door
Locking the doors manually
Turn the screw 4 with the door open
(using a tool such as a flat blade screw
driver) and close the door.
This means that the doors are then
locked from the outside.
The door can only be opened from the
inside of the vehicle.
-
1.11
LOCKING/UNLOCKING THE DOORS (continued)
5
Interior locking/unlocking
door control
Switch 5 controls the doors, the tailgate
and the fuel filler flap simultaneously.
If a door or the tailgate is open or not
closed properly, the doors and tailgate
lock/unlock quickly.
Locking the doors and
tailgate without the RENAULT
card
With the ignition switched off and
a front door open, press switch
more than five seconds.
When the door is closed, all the doors
and the tailgate will be locked.
Unlocking the vehicle from the outside
will only be possible with the RENAULT
card.
Never leave your vehicle
with the RENAULT card
inside.
5 for
Doors and tailgate status
indicator light
When the ignition is switched on, the
indicator light integrated in the switch
informs you of the status of the doors
and luggage compartment lid:
– light on, the doors and tailgate are
locked,
– light off, the doors and tailgate are
unlocked.
When you lock the doors, the indicator
light remains lit for approximately one
minute then goes out.
If you decide to keep the
doors locked when you
are driving, remember that
it may be more difficult for
those assisting you to gain access
to the passenger compartment in
the event of an emergency.
1.12
RENAULT ANTI-INTRUDER DEVICE (RAID)
You must first decide if you want to
activate this function.
To activate
With the ignition on, press central lock
ing button
lock side) for approximately 5 seconds,
until you hear the beep.
To deactivate
With the ignition on, press central lock
ing button
posite padlock side) for approximately
5 seconds, until you hear the beep.
those assisting you to gain access
to the passenger compartment in
the event of an emergency.
1 on the locking side (pad-
1 on the unlocking side (op-
If you decide to keep the
doors locked when you
are driving, remember that
it may be more difficult for
-
-
1
Operating principle
When the vehicle is started, the system
automatically locks the doors when you
are driving at approximately 6 mph
(10 km/h) and over.
The door can be unlocked:
– by opening a front door (vehicle sta
tionary).
Note: if a door is opened, it will auto-
matically be locked again when the
vehicle reaches a speed of approxi
mately 6 mph (10 km/h);
– by pressing door unlocking button
Operating faults
If you experience an operating fault (no
automatic locking, the indicator light in
corporated in button
when trying to lock the doors and tail
gate, etc.), firstly check that the doors
and tailgate are properly closed. If
they are properly closed, contact your
RENAULT Dealer.
-
-
1.
1 does not light up
-
-
1.13

ENGINE IMMOBILISER
This prevents the vehicle being
driven by anyone not in possession
of the vehicle’s RENAULT card.
The vehicle is automatically protected
a few seconds after the engine is
switched off.
1
2
Any repair or modification
to the engine immobiliser
(computer, wiring, etc.) may
be dangerous. It must be
carried out by a qualified RENAULT
technician.
1.14
Operating principle
As soon as the system detects the card,
indicator light
for a few seconds then goes out.
The vehicle has recognised the code
and the engine can be started.
1 comes on continuously
If the vehicle does not recognise the
code, indicator light
er
2 will flash (rapid flashing), and the
vehicle cannot be started.
1 and card read-
ENGINE IMMOBILISER (continued)
Operating fault warning light
If warning light
remains continuously lit, then the card
is present but it is not recognised; this
1
indicates that there is an operating fault
in the system.
If there is interference and/or the handsfree RENAULT card is not recognised,
insert it in card reader 2.
1 continues to flash or
2
Indicator lights
Vehicle protection tell-tale light
A few seconds after the ignition has
been switched off, warning light
flash continuously.
1 will
If the RENAULT Card is faulty (rapid
flashing of indicator light
reader), use the second RENAULT
Card (supplied with the vehicle) if pos
sible.
Call your RENAULT Dealer who is the
only person capable of repairing the
engine immobiliser system.
1 and the card
-
1.15
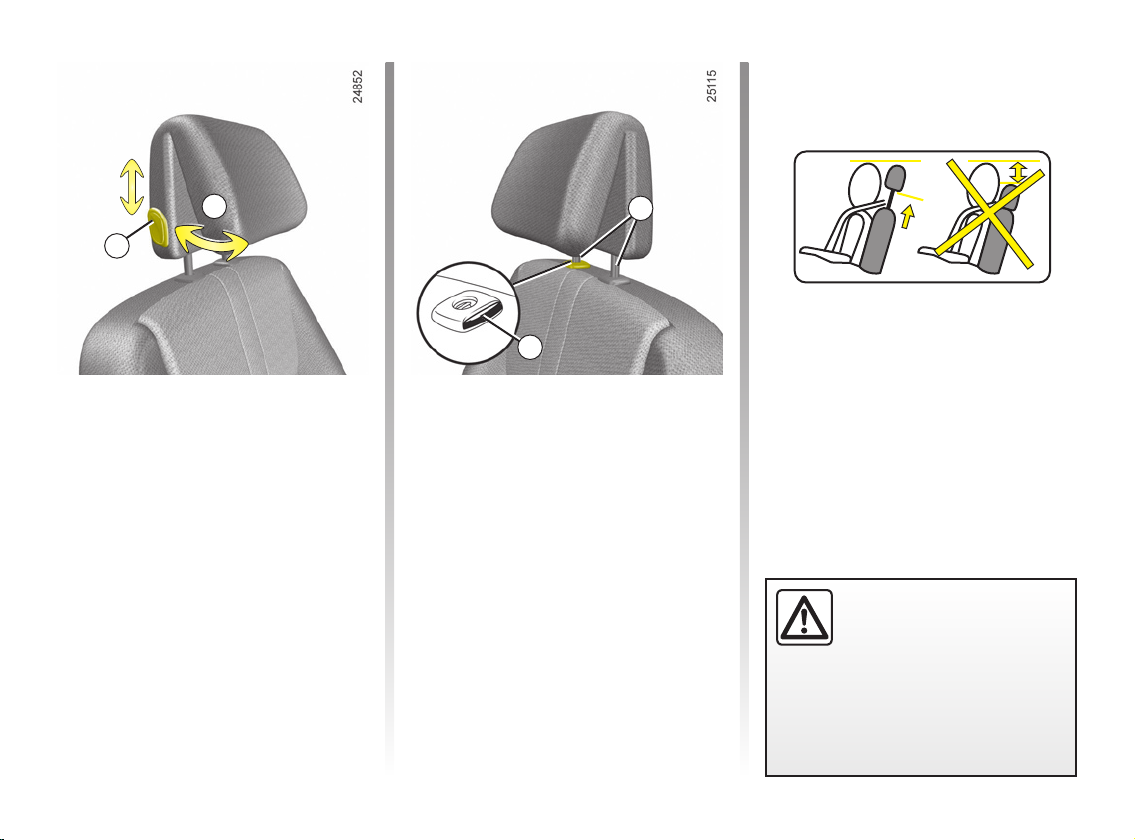
FRONT HEADRESTS
A
1
To raise the headrest
Pull the headrest upwards to the desired height.
To lower the headrest
Press button 1 and guide the headrest
down to the desired height.
To adjust the angle of the
headrest
Depending on the vehicle, tilt section A
towards or away from you to the re
quired position.
2
To remove the headrest
Lift the headrest to its highest position.
Press button
release it.
Note: when the headrest is removed,
take care not to change the positions
of rods 3.
2 and lift the headrest to
To refit the headrest
If the setting of rods 3 has been altered,
pull them fully upwards. Take care to
ensure they are clean and correctly
aligned and, if there are any problems,
-
check that the notches are facing for
wards.
3
Insert the headrest rods into the holes
(tilt the seatback backwards if neces
sary).
Lower the headrest until it locks, press
button 1 and lower the headrest as far
as possible.
-
should be in line with the top of the
headrest.
The headrest is a safety
component. Ensure that it is
fitted and in the correct po
sition: the top of your head
-
-
1.16
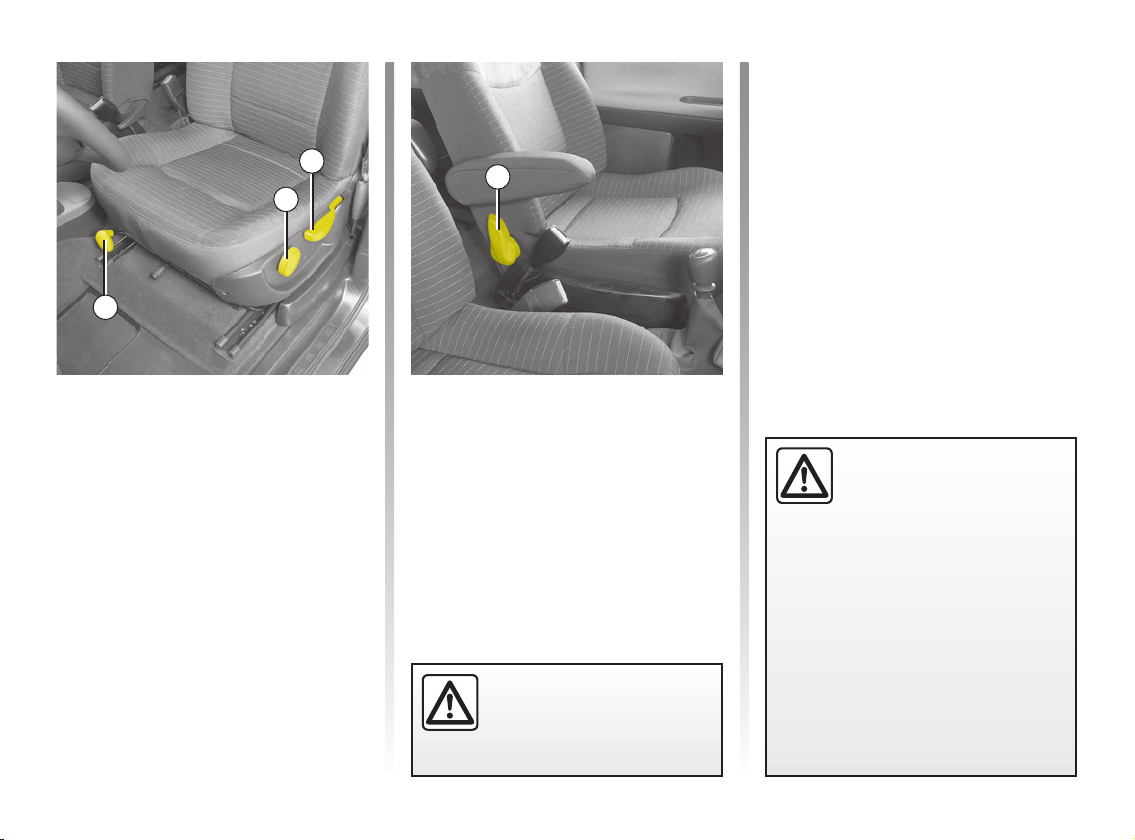
FRONT SEATS WITH MANUAL CONTROL
3
2
1
To move forwards or backwards
Lift lever
seat is in the required position, release
the lever and ensure that the seat is
locked in place.
To tilt the seatback
Lift lever
desired position.
To adjust the lumbar support on the
driver’s seat:
Pull handle 2.
1 to unlock the seat. When the
4 and tilt the seatback to the
4
To adjust the driver’s seat height:
Move lever
sary:
– upwards to raise the seat,
– downwards to lower the seat.
3 as many times as neces-
For safety reasons, carry
out any adjustments when
the vehicle is not being
driven.
We would advise you not
to recline the seatbacks too
far to ensure that the effec
tiveness of the seat belts is
not reduced.
Make sure that the seatbacks are
locked in place correctly.
Nothing should be placed on the
floor (area in front of driver) as such
objects may slide under the pedal
during braking manoeuvres, thus
obstructing its use.
-
1.17
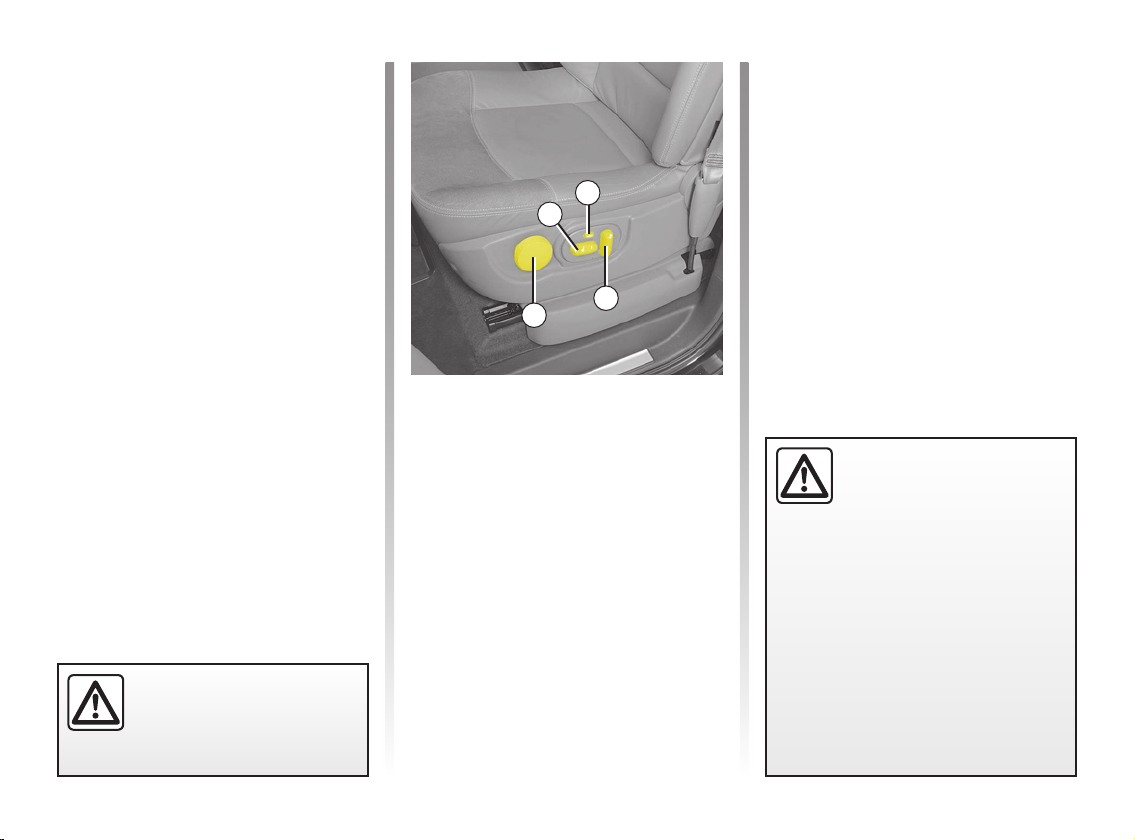
FRONT SEATS WITH ELECTRIC CONTROL
Switches 1 and 3 are the same shape
as the seat squab and seatback:
switch
1 is used for adjusting the seat
squab and switch
ing the seatback.
On equipped vehicles, button
to store the chosen driving position. It
is possible to store a driving position
using the RENAULT Card.
The system operates:
– hands-free RENAULT card de
tected or, depending on the vehicle,
RENAULT remote control in ‘acces
sories’ position in the card reader;
– for vehicles with button
operates for about 40 minutes when
the driver’s door is opened and the
ignition is switched off.
For safety reasons, carry
out any adjustments when
the vehicle is not being
driven.
3 is used for adjust-
2 is used
2, this also
-
-
Adjusting the seat squab:
switch 1
– To move forwards
Move it forwards.
– To move backwards
Move it backwards.
– To raise
Lift the rear of the switch.
– To lower
Lower the rear of the switch.
1
4
Adjusting the seatback:
switch 3
To tilt the seatback
Move the switch forward or backwards.
2
Adjusting the lumbar support on the
driver’s seat
Pull handle 4.
3
We would advise you not
to recline the seatbacks too
far to ensure that the effec
tiveness of the seat belts is
not reduced.
Make sure that the seatbacks are
locked in place correctly.
Nothing should be placed on the
floor (area in front of driver) as such
objects may slide under the pedal
during braking manoeuvres, thus
obstructing its use.
-
1.18

STORING THE DRIVER’S SEAT POSITION
It is possible to store a driving position
using the RENAULT Card.
A driving position includes the driver’s
seat position and door mirror settings.
When a driving position is stored, the
seat and door mirror settings linked to
the RENAULT Card used are automati
cally recalled when the doors are un
locked and opened using the RENAULT
Card.
The system operates:
– hands-free RENAULT card de
tected or, depending on the vehicle,
RENAULT remote control in ‘acces
sories’ position in the card reader;
– when the driver’s door is opened,
with the ignition off, for about 40 min
utes.
-
-
-
-
2
1
Driver’s seat memory
procedure
With the ignition on, adjust the seat
using switches
tion on “Front seats with electric con
trol” in Section 1).
Press button
the driving position is stored.
Repeat this procedure for each of the
RENAULT Cards.
1 and 3 (see informa-
2 until you hear a beep:
Recalling a stored position
With the vehicle stationary, briefly
press button 2.
Note: recall of the stored position is in-
terrupted if one of the seat adjustment
buttons is pressed during recall.
3
When driving, it is possible to adjust
the driving position, but it is not possible
to recall a driving position.
Special case
Several hands-free cards in the vehicle.
In this case:
– there is no automatic recall;
– it is possible to recall the driving po
sition by inserting the RENAULT
-
card in the card reader and pressing
button 2.
-
1.19
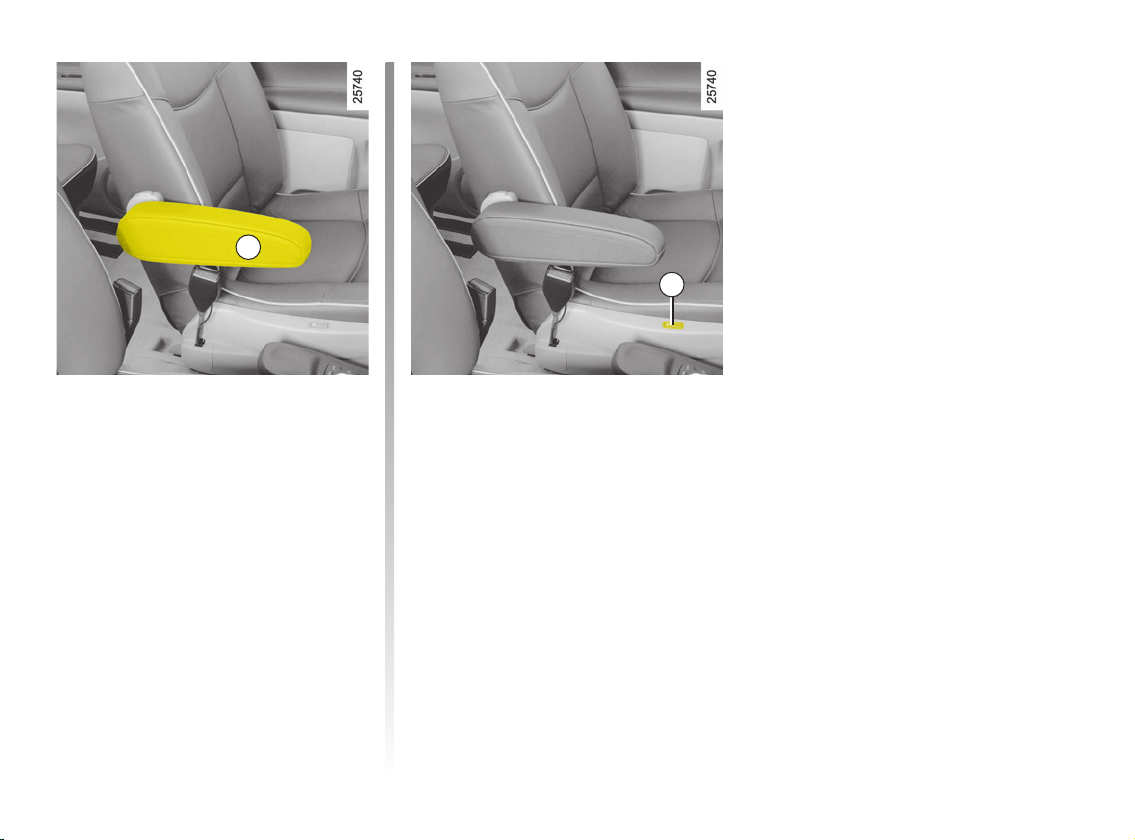
FRONT ARMRESTS
1
HEATED SEATS
2
Armrest adjustments
If the vehicle is fitted with this, lift armrest 1 fully. Lower it fully then raise it to
the desired height.
1.20
With the engine running, press
switch
2. The indicator light in the
switch lights up.
The system, which has a thermostat,
decides whether or not the heating is
needed.
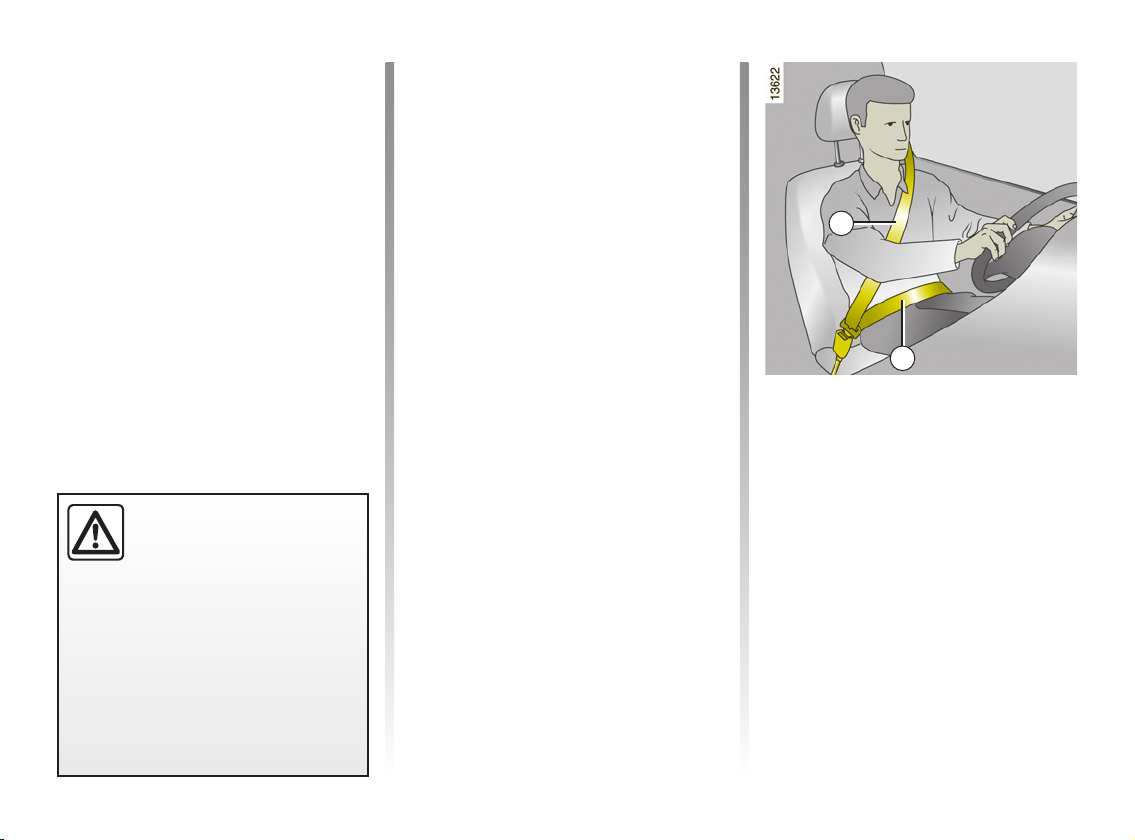
SEAT BELTS
Always wear your seat belt when travelling in your vehicle. You must also
comply with the legislation of the par
ticular country you are in.
Before starting the vehicle:
– first ensure that your driving posi
tion is correct;
– then adjust your seat belt to pro
vide maximum protection.
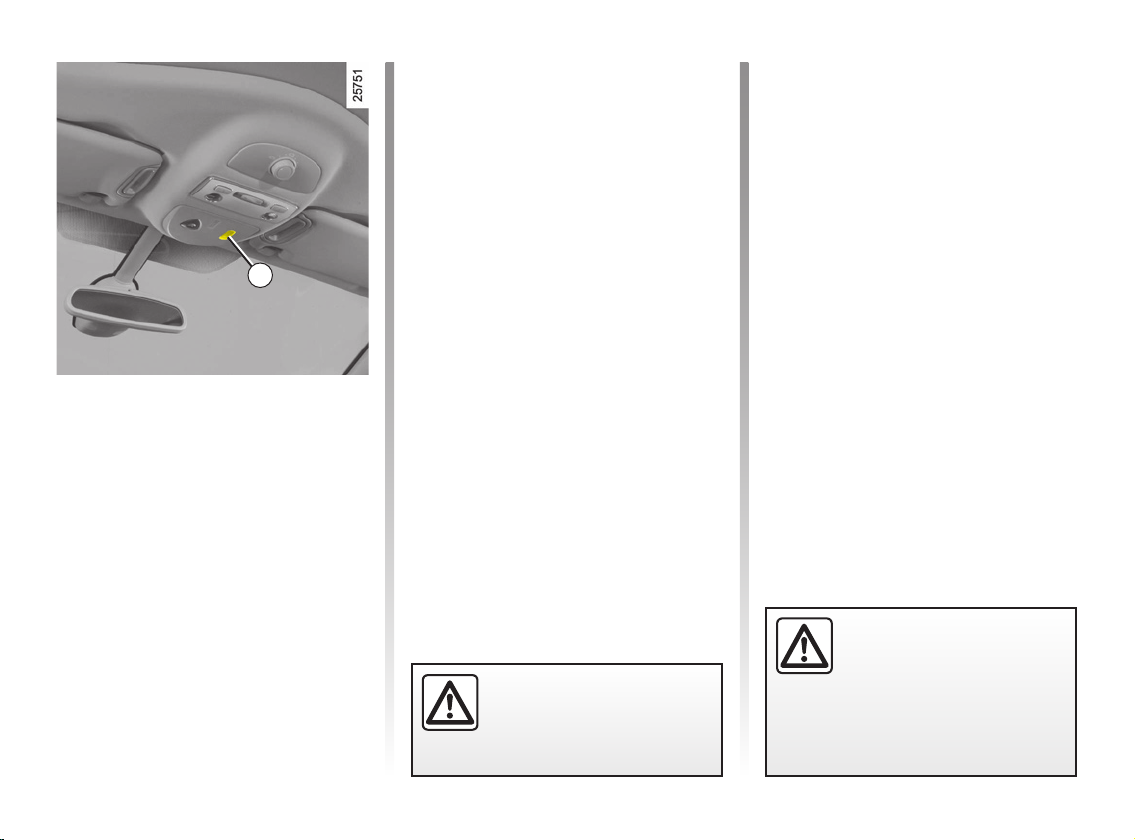
Incorrectly adjusted seat
belts may cause injuries in
the event of an accident.
Even pregnant women
should wear a seat belt. In this case,
ensure that the lap belt is not exert
ing too much pressure on the abdo
men but do not allow any slack.
-
-
Adjusting your driving
position
– Sit well back in your seat (having
removed your coat or jacket etc.).
This is essential to ensure your back
-
-
is positioned correctly.
– Adjust the distance between the
seat and the pedals. Your seat
should be as far back as possible
while still allowing you to depress
the clutch pedal fully. The seatback
should be adjusted so that your arms
are slightly bent when you hold the
steering wheel.
– Adjust the position of your head
rest. For the maximum safety, your
head must be as close as possible to
the headrest.
The top of your head should be in
line with the top of the headrest.
– Adjust the height of the seat. This
adjustment allows you to select the
seat position which offers you the
best possible view.
– Adjust the position of the steering
wheel.
1
2
-
Adjusting the seat belts
Sit with your back firmly against the
seatback.
Shoulder strap
possible to the base of the neck but not
on it.
Lap belt
thighs and against the pelvis.
The belt should be worn so that it is
as close as possible to your body, i.e.:
avoid wearing heavy clothing or allow
ing bulky objects under the belts.
1 should be as close as
2 should be worn flat over the
-
1.21
 Loading...