

MKT 350/2
Portable Air Conditioner
Operation
Technology
Spare Parts
Edition GB – T05

Operating Instructions
Read these instructions carefully before setting up/operating the unit!!
Our guarantee becomes null and void if the unit is used, set up
or maintained improperly, or if modifications are made to the
supplied unit without our prior consent.
Subject to alterations!
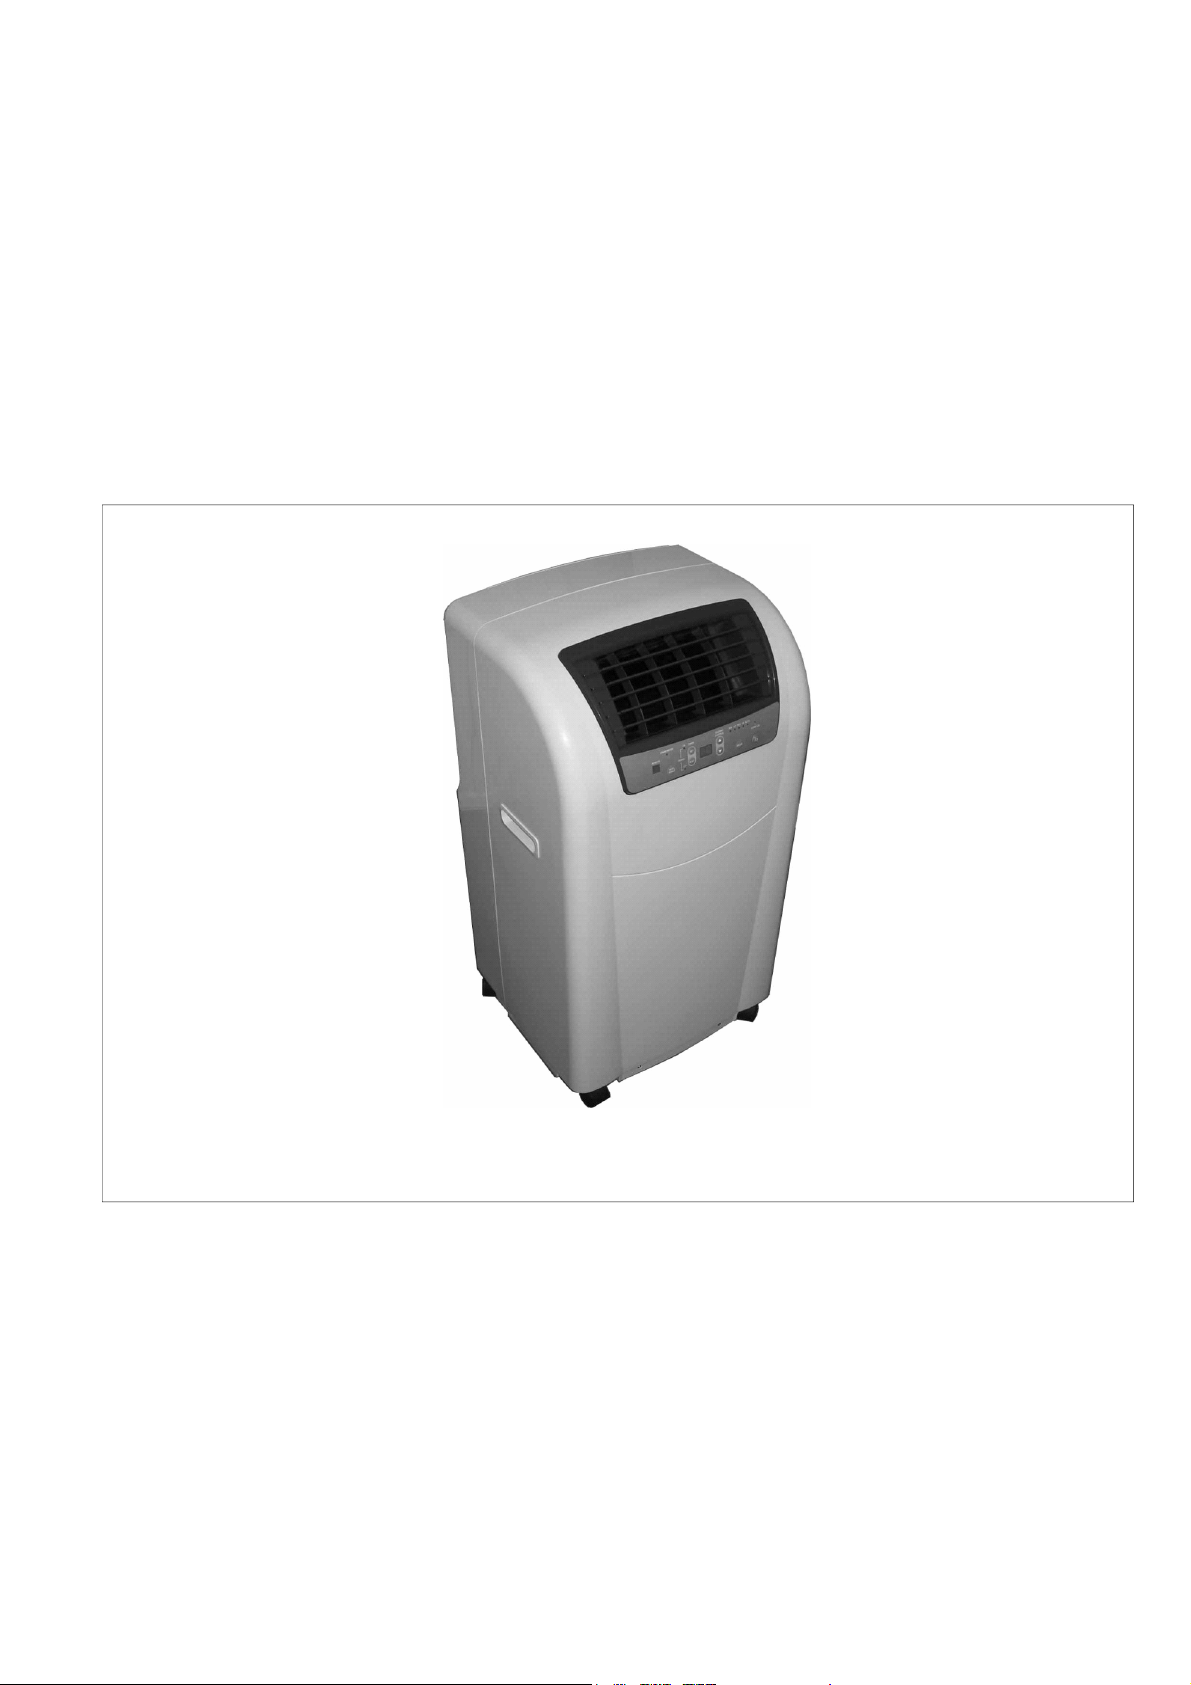
Portable Air Conditioner
MKT 350/2
Contents
Safety Instructions 4
Transport and Packaging 4
Description of Device 5
Operation 5
Prior to Initial Operation 8
Initial Operation 9
Shutting Down the Unit 9
Maintenance and Service 10
Cleaning the Filter 10
Always keep these operating instructions near or on the
Page
Contents
Wiring Diagram 10
Troubleshooting 11
Technical Data 12
Customer Service and Guarantee 12
Environment and Recycling 14
Exploded View 12
Spare Part List 13
Installation of the Wall Lead-through 15
unit.
Page
Safety Instructions
Extensive tests have been conducted on the material,
functionality and quality of the portable air conditioner
to ensure that it is a high-performance unit with a long
service life.
Hazards may nevertheless arise if the unit is used by
persons not familiar with its operation or if the unit is
not used for its intended purpose.
Please make sure to follow these instructions:
The unit is not suitable for outdoor operation.
Do not set up or operate the unit in rooms suscepti-
ble to explosions.
Ensure that the unit is set up at a safe distance
from flammable materials.
Do not set up or operate the unit if the atmosphere
is contaminated by oil, sulphur or salt.
Do not set the unit up near curtains or drapes.
Minimum distance of 50 cm.
Ensure that the air intake and outlet openings are
always clear of foreign objects.
Ensure that the air conditioner is securely placed
on a level surface.
Do not transport the unit during operation.
Do not place the unit on its side.
Protect all electrical cables from being damaged, for
example, by animals.
Make sure that all extension cables are suitable in
terms of capacity, length and intended use.
Do not lay any lines under carpets.
Never operate the unit without the air filter!
Never aim the air current directly at people!
Never open the unit housing!
This may cause an electrical shock.
Work on the cooling system and on the electrical
equipment may only be performed by an authorised
service centre.
Operation/handling which does not comply with
these instructions is prohibited!
In cases of non-compliance, we assume no liability
and the guarantee becomes null and void.
The unit may only be operated in an upright posi-
tion.
Do not insert any foreign objects into the air intake
or outlet openings.
Do not place any heavy or warm objects on top of
the unit.
Do not expose the unit to direct streams of water.
Operate the unit only within its permissible operat-
ing ranges.
Pay attention to the surrounding temperatures.
This unit may only be connected to a correctly in-
stalled, grounded and fused plug socket.
230V / 50Hz, fuse 10A.
When unplugging the unit, do not pull the power
cable too forcefully or bend it too much.
This may result in damage to the cable!
Do not move the unit while in operation. Wait at
least 5 minutes before starting the unit after it has
been moved.
This protects the unit from damage.
Switch the unit off by pressing the “Power” button.
Do not switch the unit off by unplugging the power
cord.
Transport and Packaging
All units are subject to continuous quality control and are
carefully packaged before being sent.
The device is shipped in a stable transport box made of
cardboard. Please examine the unit when it is delivered.
Make note of any damage or missing parts on the shipping bill and inform the shipping company and your
contract partner. No liability is assumed for subsequent
claims.
Please observe the following for transport:
Before transporting the unit, switch it off on the control
panel and unplug the power cable.
The unit may only be transported in an upright posi-
tion.
The unit is equipped with wheels and two handles to
makes transport easier.
Excess condensation is collected in the internal tank
of the unit. We recommend removing this water prior
to transport via the drain at the back of the unit.
4
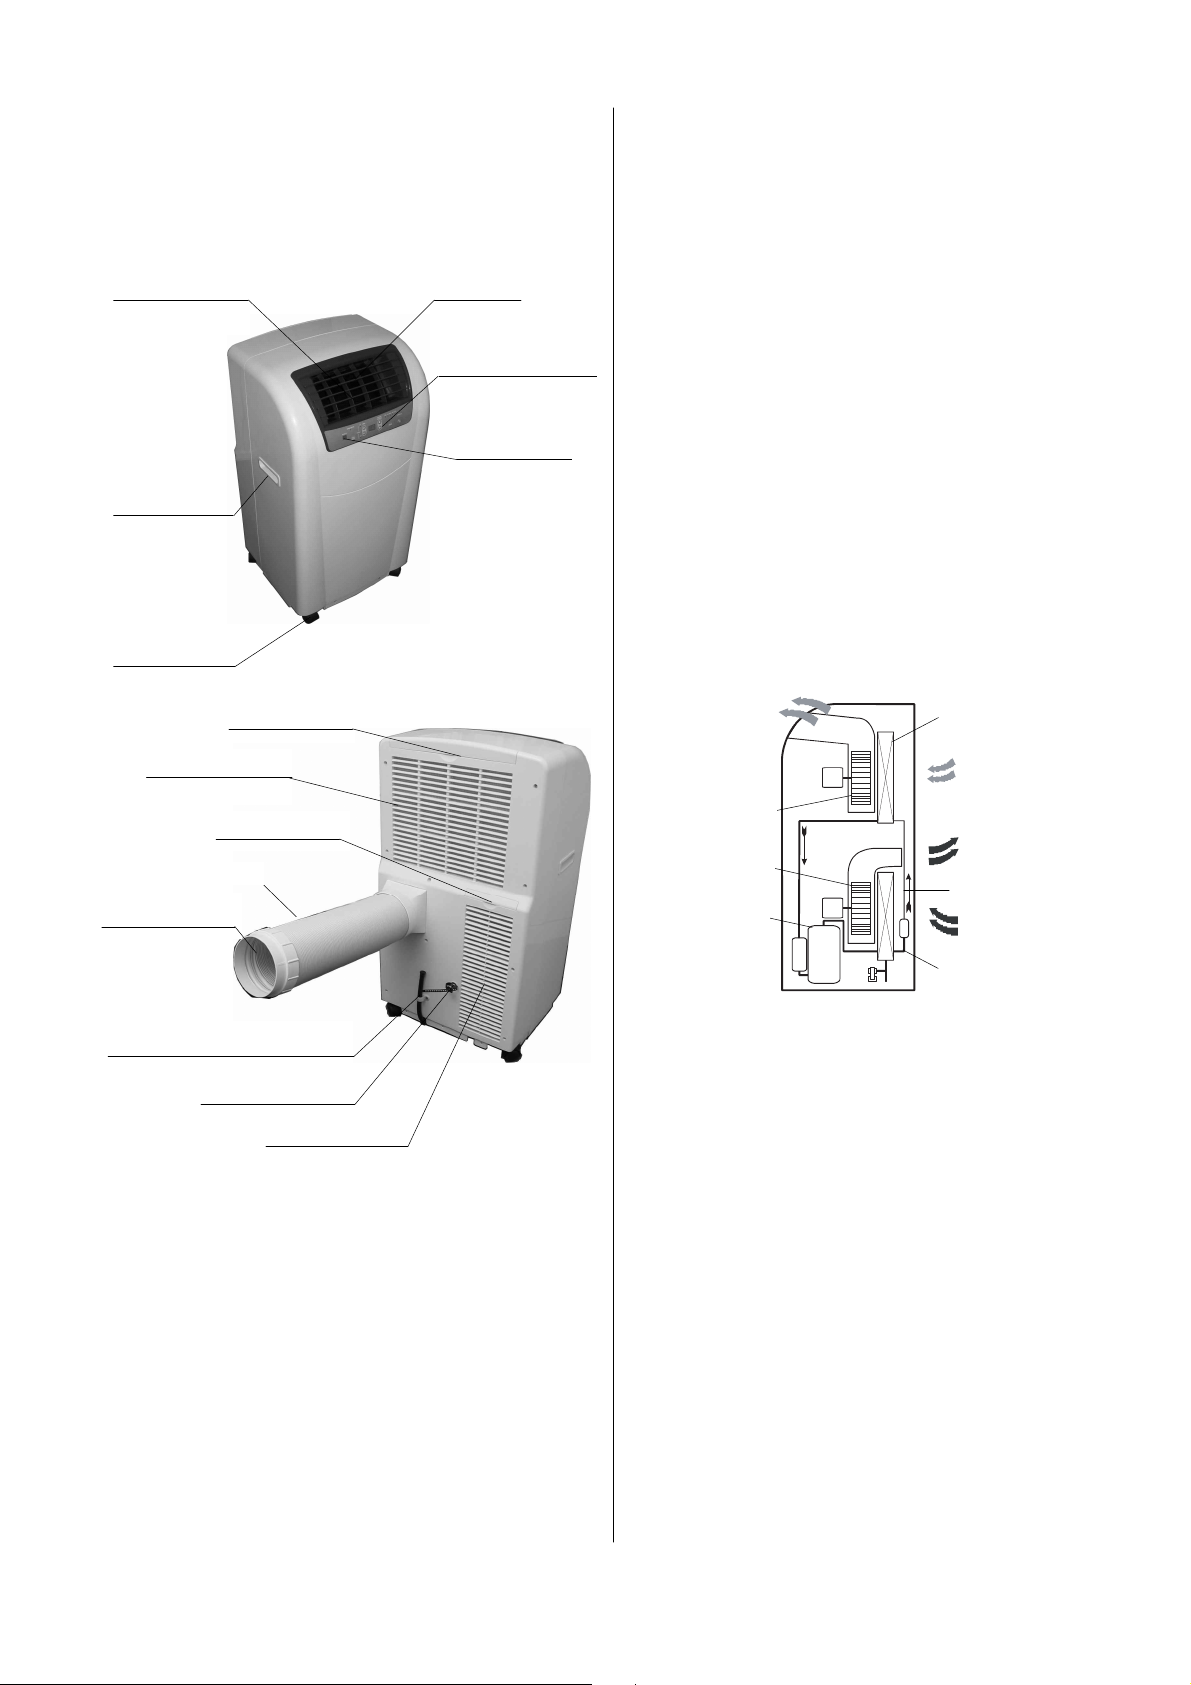
Description of Device
The MKT 350/2 air conditioner comes with an infrared
remote control and an air outlet hose with a flat
nozzle.
Air directing
plate fins
Air outlet
The unit has been designed for automatic, universal,
smooth air dehumidification. Its compact dimensions
make it easy to transport and set up in all rooms.
The unit meets the basic safety and health requirements found in the relevant EU regulations. It is safe
and easy to operate.
Recessed
grip
Transport
wheels
Air intake
circulation
Air filter exhaust
Air outlet hose
Air outlet exhaust
Air filter
circulation
Control panel
IR receiver
Functional principle
The portable air conditioner cools the air in the room by
extracting the heat from it. The heat absorbed is expelled to the outside via the exhaust hose and the
cooled air is resupplied to the room where the unit is in
operation via a fan.
Condensation that accumulates drips from the evaporator onto the hot condenser where it condenses and is
then transported via the air outlet hose to the outside.
Excess condensation drips from the condenser into a
collection tray and is resupplied to the condenser by
means of a rotating wheel with blades, where it evaporates and is then expelled with the outgoing air current.
Cool circulating air in
the room
Fan for circulation
Fan for outgoing air
Compressor
Evaporator
Circulation intake
from the room
Warm air expelled to the outside
Condenser
Expelled air intake
from the room
Refrigerant
cycle
Condensation drain with
plug
Cable holder
Air intake exhaust
The unit’s primary function is to air-condition rooms. It
also filters and dehumidifies the air, thus creating a
comfortable climate in the room.
In “Fan” mode, the unit can also be used to circulate air
with no cooling effect.
The units operates fully-automatically and offers a
range of other options thanks to its microprocessor control. For example, it can be automatically switched off
and on at a preset time via the timer function.
The unit is comfortably operated via the control panel
on the indoor unit or via the infrared remote control that
comes with it.
The environmentally-friendly refrigerant, R 407C, transports the absorbed heat within the closed-loop refrigerant cycle.
Operation
Prior to putting the unit into operation, ensure that all
safety instructions have been observed.
Please note that the unit operates most efficiently and
most comfortably when put into operation before the
hottest part of the day, e.g. the morning.
The selected target temperature should be 4 to 7°C below the outside temperature. It should never be lower
because the room temperature would feel too cold
when coming from a non-air-conditioned room and people may catch cold.
The selected target temperature does not affect the
performance of the unit! This means that when temperatures in the room are high, it is not practical to adjust the unit to the lowest possible target temperature.
5

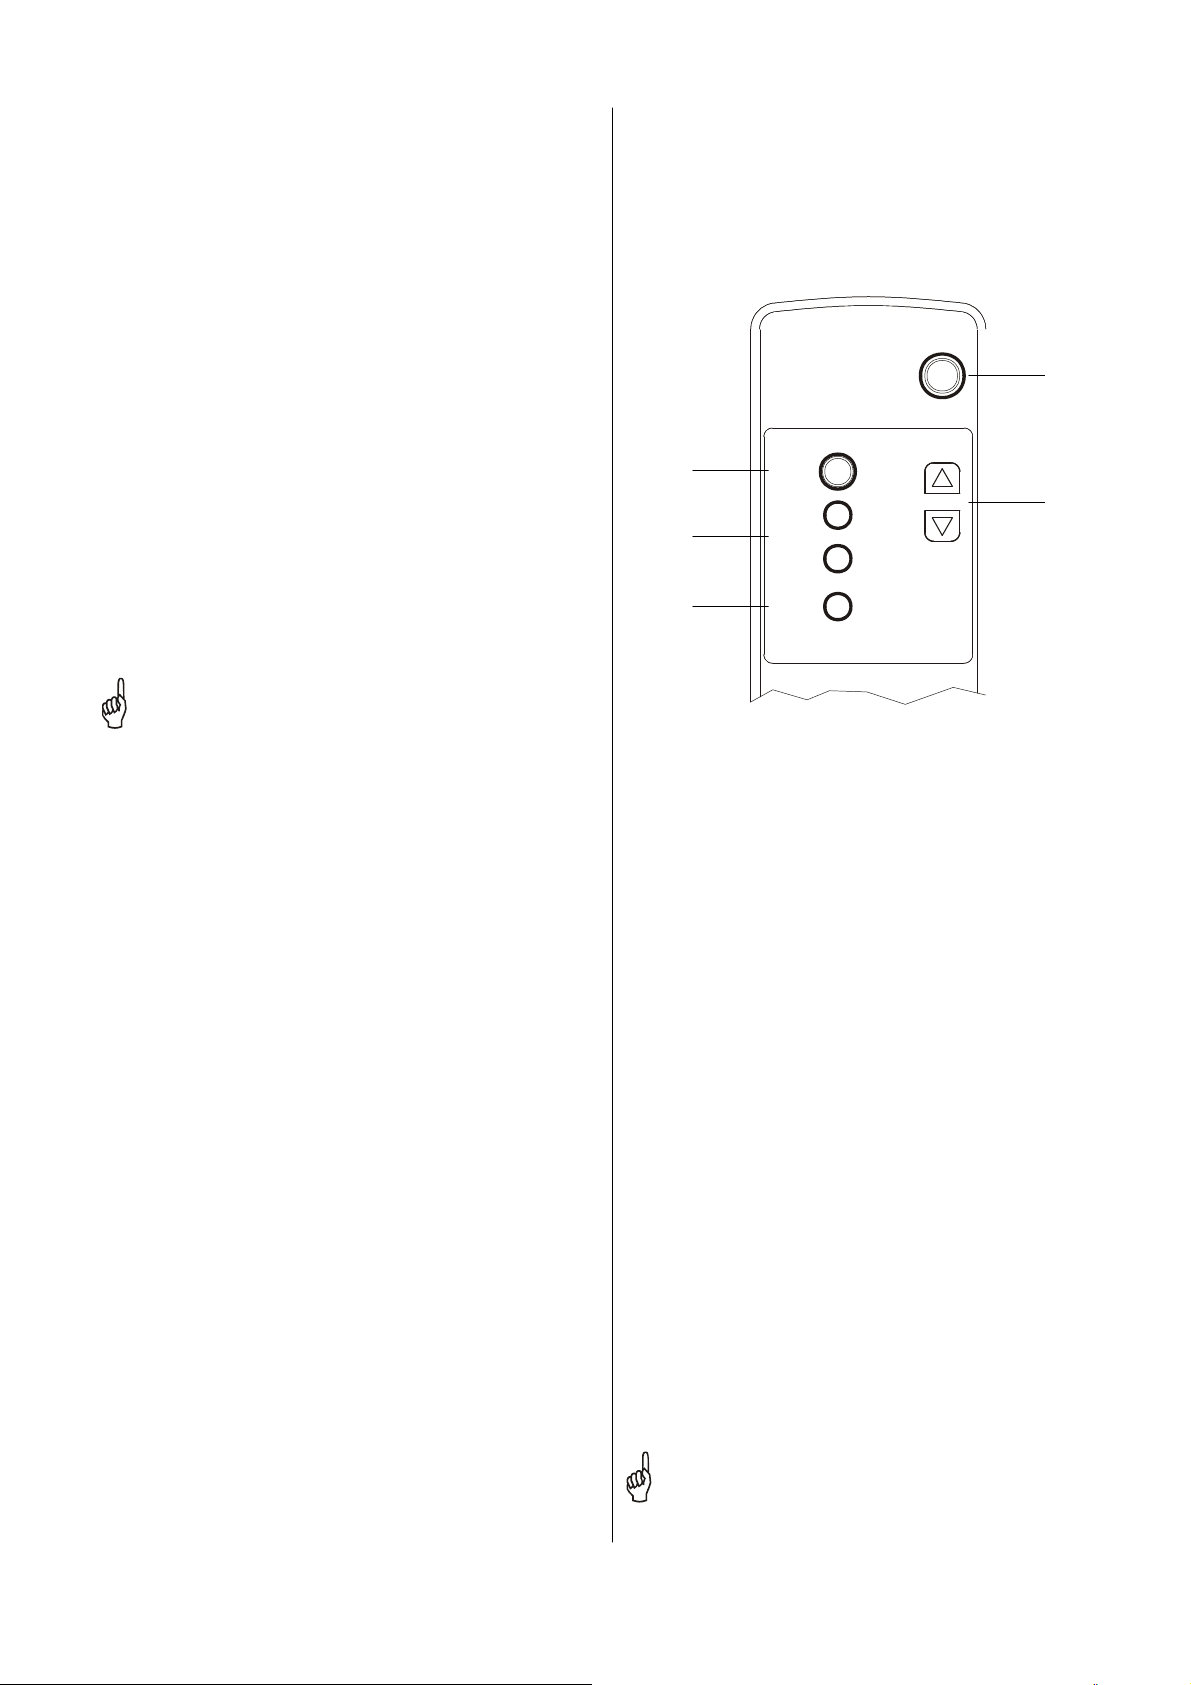
Control Panel
10
6 11
14
12
3
1 “I / 0” button
The unit is switched on or off with button 1.
2 “MODE” button
Button 2 is used to switch between “Cooling” mode
and “Ventilation” mode. Each time the button is
pressed, the speed of the fan changes. The LEDs of
display 8 indicate the selected speed.
In “Cooling” mode, the unit cools the room to a
set value as long as the LED 7 “COMP ON” is lit
up. The temperature can be set in a range between 18 and 30°C. The fan speed can be freely
selected as follows.
Adjusted fan sped: LED “AUTO”
Highest fan speed: LED “HI”
Medium fan speed : LED “MED”
Lowest fan speed: LED “LO”
The “AUTO” setting is used to automatically ad-
just the fan speed to the desired
cooling capacity. The greater the difference b e
tween the set and current room temperature,
the higher the fan speed.
3 “AUTO SWING” button
This button is used to set how the air that is discharged from the unit is distributed.
Press button once =continuous swing function
Press button twice =locked swing function
Press button third =continuous swing function
4 ▲ / ▼ “THERMO CONTROL” button
This button is used to set the desired target temperature in “Cooling” mode. If the Up/Down button 4
is pressed, the adjusted target temperature is shown
on the display. The target temperature can be set in
1°C increments between 18 and 30°C.
Upper button = higher target temperature.
Lower button = lower target temperature.
9 8 7 4 5 13
2
1
5 “TIMER” button
This button is used to automatically activate the unit
to switch on and off. When the unit is off, the Timer
On function is programmed in one hour increments
up to 24 hours via the “SET” button. The LED 10 displays that this function has been activated. When the
unit is on, the Timer Off function is programmed in
one hour increments up to 24 hours via the “SET”
button. The LED 11 displays that this function has
been activated.
6 “RESET” button
The programmed timer can be deactivated by pressing the button 6 “RESET”.
7 “COMP. ON” button
In cooling mode, the unit operates according to the
programmed target temperature. If the target temperature has been reached, the compressor that creates the cooling capacity switches off. However, the
circulation fan continues to operate. The LED 7
lights up while the compressor is in operation.
8 Cooling mode: “AUTO, HI, MED, LO” LED
See also point 2.
9 Ventilation mode: “FAN” LED
In ventilation mode, the air in the room is circu-
lated. The unit does not cool. The fan speed cannot be selected and is automatically set to
“MED”. The temperature can be changed, however, this does not change the operating mode.
10 “TIMING ON” LED
This LED indicates whether the timer has been activated to switch the unit on.
11 “TIMING OFF” LED
This LED indicates whether the timer has been activated to switch the unit off.
6
12 “DRAIN WATER” display
This light indicates that the floating switch of the
internal tank has switched off unit operation. The
internal tank does not become full during normal
operation because the exhaust fan transports the
accumulated and evaporated condensation to the
outside via the exhaust hose. In conditions with
very highs levels of humidity, the moisture cannot
be completely expelled and the unit switches off.
To resume unit operation after it has automatically
been switched off due to a malfunction, proceed as
follows:
1. Switch the unit off by pressing the “On/Off” button and unplug it from the power supply.
2. Place a suitable container under the condensation drain of the internal tank.
The condensation drain is located at the bottom
middle at the back of the unit.
3. Pull the plug from the condensation drain and
collect the water that drains out.
4. Then replace the plug.
Keep in mind that if there is no plug or it is inserted
incorrectly, water may leak out after the unit has resumed operation.
13 Display
The programmed room temperature is shown on
the display.
The current temperature value is increased or decreased by pressing the Up/Down buttons 3 and 4.
If the timer button 5 is pressed, the display switches
to show the remaining hours until the unit is
switched on or off.
If after 5 seconds, no buttons are pushed, the target temperate appears on the display again.
14 Infrared remote control receiver
If the unit is operated using the infrared remote
control, the impulses are received via the receiver.
Infrared Remote Control
Inserting the batteries into the remote control
Prior to initial operation, the batteries supplied with the
unit (2 type AAA batteries) must be inserted into the remote control.
1. Slide off the cover of the battery slot on the back
of the remote control.
2. Place the batteries in the slot making sure that
the polarity is correct.
Use the labelling in the slot.
3. Close the cover.
Infrared Remote Control Functions
All settings can also be made using an infrared remote
control. A description of the button functions can be
found in the “Control Panel” section. The remote control’s range is approx. 5 meters.
Two 1.5 V AAA batteries (included in the scope of the
remote control delivery) power the remote control.
2
3
4
MODE
set
TIMER
reset
AUTO
SWING
POWER
on / off
THERMO
CONTROL
1
5
1 “ON/OFF” button
2 “MODE” button
3 “TIMER” button
4 “AUTO SWING” button
5 ▲ / ▼ “THERMO CONTROL” buttons
General Information
The infrared remote control must be protected from
moisture.
When the unit is switched on, each change in the
settings is automatically transferred to the air conditioner. A beep indicates that the data has been properly received.
The transmitter of the infrared remote control must
generally transfer changes to settings in the direction of the air conditioner.
It is only possible for data to be properly transmitted
if there are no objects located between the transmitter and the receiver unit such as doors, drapes,
blinds, etc.
Never use new and old batteries at the same time!
We recommend removing the batteries from the re-
mote control if the unit is taken out of operation for a
longer period of time.
Remove dead batteries and immediately replace
them with new batteries that meet quality standards because otherwise they may leak.
7
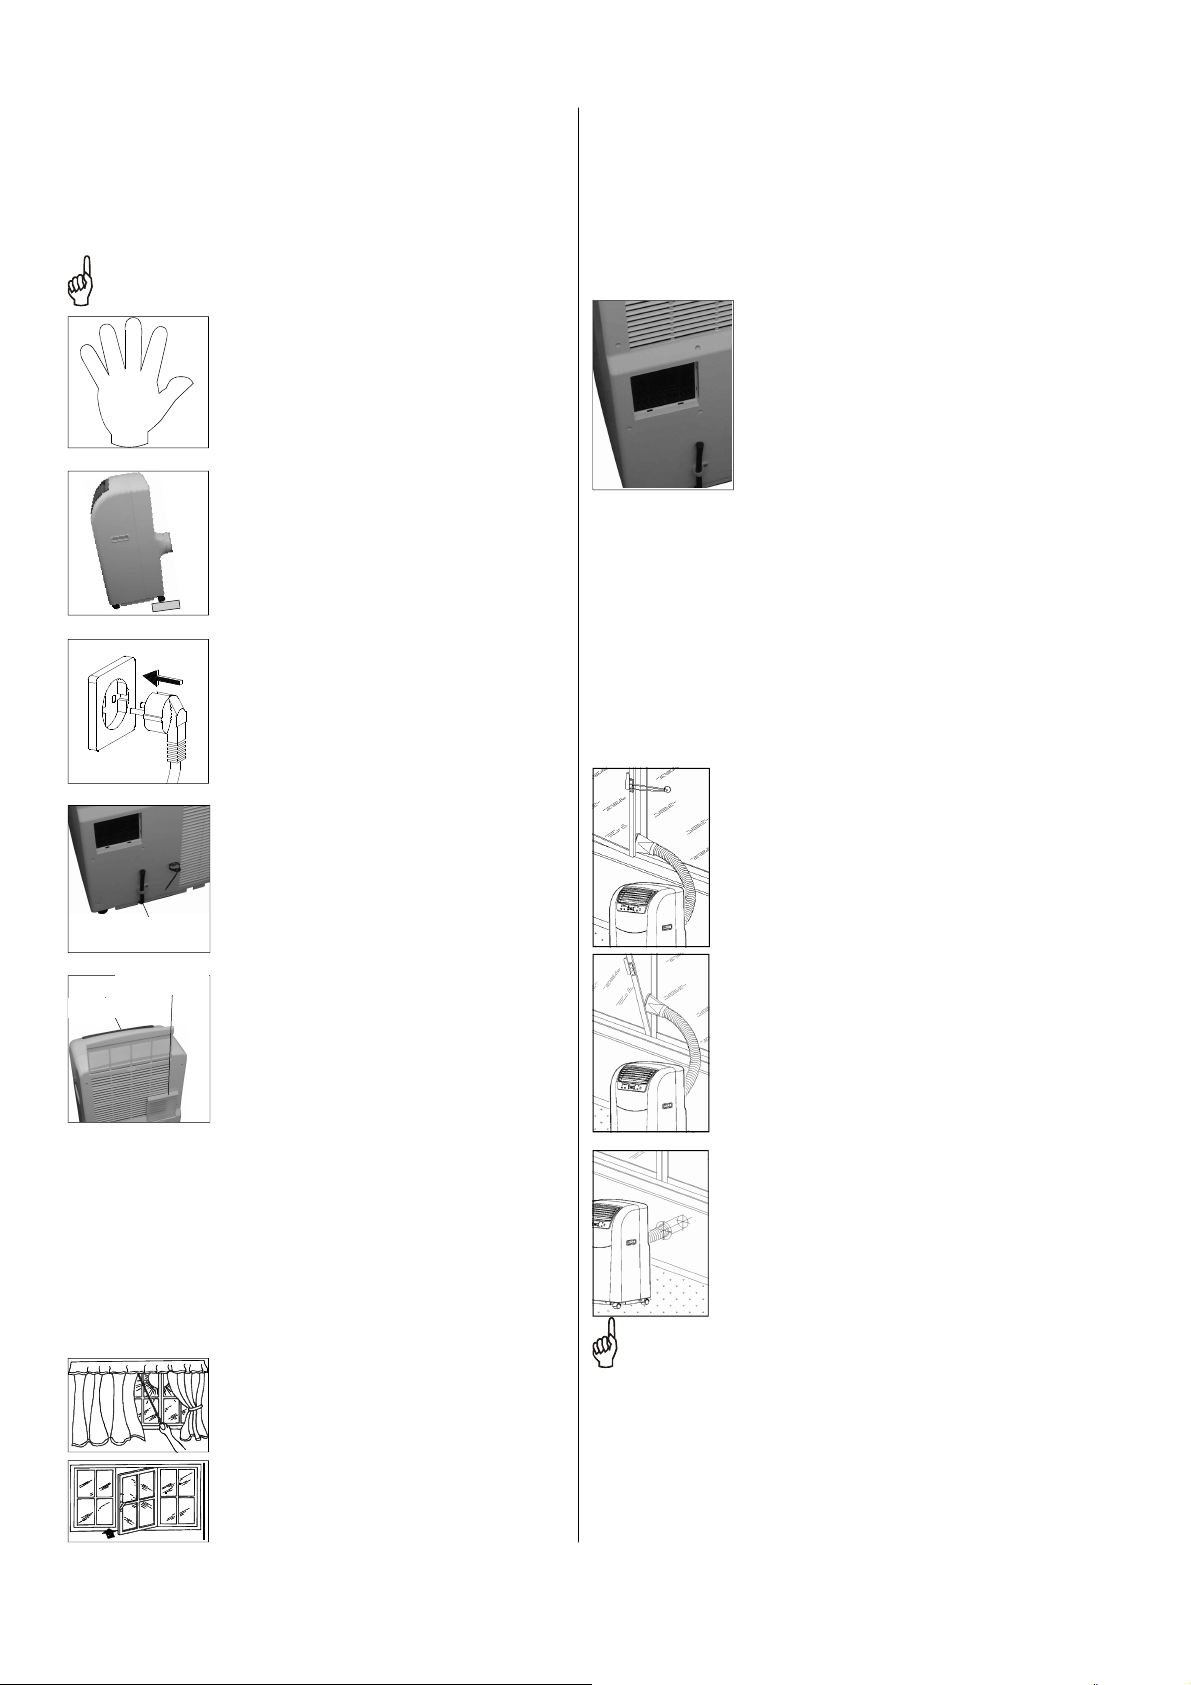
Prior to Initial Operation
The unit is set up in the desired location with the air outlet side facing the room. Follow the safety instructions
when setting up the unit.
There must be a minimum of 20 cm between the
back of the unit and the wall.
After unpacking the unit, place it on
its transport wheels and let it stand
for a minimum of 5 min. before
5 MIN.
Condensation
drain with plug
Exhaust filter
Circulation filter
switching it on.
Place the unit securely on a level
and firm surface.
An uneven surface can cause vibrations and disruptive noises.
Before plugging in the power cord,
make sure that the required current is
available!
230V / 1~, N, PE / 50 Hz.
If extension cords are necessary,
make absolutely sure that they are
sufficiently thick.
All extensions of the power cords
must be sufficiently thick and may
only be used if they are completely
extended.
Make sure that there is a plug for the
condensation drain and that it has
been securely placed.
Water may leak out after the unit becomes operational.
Never operate the unit without the
intake filter.
Without an air intake filter, the plate
fins of the evaporators become dirty
and the unit’s performance is adversely affected.
Make sure that people and objects,
such as plants in the room, are not
directly in the path of the expelled air.
Expelling the warm air
During cooling mode, the unit generates warm air. This
air must be expelled from the room to retain the cooling
effect.
It is therefore necessary to insert the supplied exhaust
hose into the air outlet opening at the back of the unit.
Make sure that the deflector piece
from the top slides down into the
notches on the side until it clicks into
place.
To ensure that the unit operates effectively, do not place the flexible exhaust hose supplied at sharp angles
and make sure there are no kinks.
You may not extend the exhaust hose.
The air expelled from the unit contains a certain
amount of moisture. We therefore recommend expelling the air to the surroundings or the outside.
Different ways of expelling air
You can expel air from the building as follows:
1. With a flat nozzle.
The flat nozzle supplied can be
used in different ways.
It is possible to guide the flat nozzle
through the open window and secure it firmly using straps and suction devices.
The flat nozzle can also be hung
through the partially opened window.
2. With a fixed connection to the exhaust hose (wall lead-through).
The hose supplied is firmly connected to a wall lead-through.
Lead-through kits can be purchased as accessories.
Recommendations for optimum unit operation.
In case of direct sunlight, make sure
to close all curtains and blinds.
Keep doors and windows closed
during operation.
8
The exhaust hose must always be placed at an incline in the direction the air is flowing!
In some circumstances, low pressure can occur in the
setup room when air is being expelled via a permanently attached exhaust hose, e.g. as a result of closed
windows or doors. If the performance of the unit is adversely affected as a result, make sure that the pressure is
corrected.

Initial Operation
Prior to initial operation, the air intake and outlet openings must be inspected for foreign bodies and the air intake filter for dirt. Blocked or dirty grilles and filters must
be cleaned immediately. See the chapter “Maintenance
and Service“.
Cooling mode
1. Switch the unit on with the “I/O” button.
2. Select cooling mode with the “Mode” button.
The “AUTO” LED must be lit up.
3. Set the target temperature you want with the
“THERMO CONTROL” buttons.
The selected target temperature appears on the
display.
4. If the set fan speed is too high or too low, the desired fan speed can be set by pressing the “MODE”
button.
Fan mode (circulation)
1. Switch the unit on with the “I/O” button
2. Select fan mode with the “MODE” button. The “FAN”
LED must be lit up.
Timer Operation
The timer can be preset to switch the unit on or off for a
maximum of 12 hours. Pressing the “SET” button increases the time until the unit is switched on or off by
one hour.
The number of hours is shown on the display.
Timer switches unit off automatically:
1. When the unit is on, press the
“SET” button; the “OFF” LED lights up.
2. Set the desired amount of time until the unit is
switched off with “SET” button.
Keep in mind that after the setting has been made,
the display changes to show the target temperature.
3. After the set amount of time has elapsed, the unit
switches off automatically.
Timer switches unit on automatically:
The unit switches on with the most recently made set-
tings. If you want different settings, you must switch the
unit on, make the changes and then switch the unit off
again.
1. When the unit is switched off, press the “SET” button ; the “ON” LED lights up.
2. Set the desired amount of time until the unit is
switched on with the “SET” button.
Keep in mind that after the setting is made, the display changes to show the target temperature.
3. After the set amount of time has elapsed, the unit
switches on automatically.
Information about timer mode (timer clock)
The timer function is reset by pressing the “I/O” but-
ton.
If the “SET” button is pressed while the timer is acti-
vated, the remaining time is shown on the display
and can be changed using the same “SET” button.
If the timer is programmed, this setting may be lost if
the unit is disconnected from the power supply.
Shutting Down the Unit
To shut down the unit, always switch it off with the
“Power” button on the control panel or via the remote
control. Only now can you unplug it from the power supply. Never shut the running unit off by pulling the power
plug.
Storage
If the unit is to be taken out of operation for a longer period of time, for example, over the winter, proceed as
follows:
1. Let the device run for approximately 2 hours in circulation mode (FAN) to dry the surface of the evaporator plate fins.
This removes the remaining moisture from the unit
and prevents unpleasant odours when the device is
put back into operation.
2. Switch off the unit by pressing the “I/O” button, unplug the unit from the power supply and roll up the
power cord.
3. Make sure that the cable is not bent and there are
no kinks.
The cable can be attached to the back of the unit.
4. Place a suitable container under the condensation
drain of the internal tank.
The condensation drain is located at the bottom at
the back of the unit.
5. Pull the plug from the condensation drain and collect
the water that drains out.
6. Then replace the plug.
Keep in mind that if there is no plug or it is inserted
incorrectly, water may leak out after the unit has resumed operation.
7. Store the unit in an upright position in a dry location
that is protected from direct sunlight and dust.
8. To prevent dust from getting inside the unit, protect it
with, for example, a plastic cover.
9

Maintenance and Service
Regular maintenance and observance of some basic
principles are required to ensure a long service life and
to keep the unit functioning properly.
However, the unit should be inspected at least once a
year and thoroughly cleaned after long periods of use.
The entire cooling system is a low-maintenance, closedloop system and may only be serviced by authorised
service centres.
Before performing any work on the unit, make
sure to switch the unit off and unplug the power
cord.
Cleaning the Filter
The unit is equipped with two air intake filters. These
can be removed from the back of the unit. The filters
must be cleaned at regular intervals. Clean the air filters
after no more than 100 hours of operation. If the air is
heavily contaminated, reduce this time period accordingly.
Never operate the unit without the air filter. The air
filter prevents the condenser from becoming dirty
and the performance of the unit from being adversely affected.
Cleaning the plastic housing:
For cleaning, use only a clean, soft and slightly moist
towel to carefully wipe the housing.
Please observe the following:
Never use chemical cleaners or polish to clean the
unit.
They can damage the surface.
Only use lukewarm water.
Maximum 40°C .
Make sure that no moisture gets into the unit.
This can damage the internal components.
Never clean the unit under a stream of water.
Thoroughly clean the air intake and outlet openings
on a regular basis.
This is where the most dirt accumulates in the shortest period of time.
Wiring Diagram
Filter
1. Switch the unit off with the On/
Off button on the control panel
or the infrared remote control.
2. Unplug the unit.
3. Remove the filter from the unit.
4. Clean the dust that has accumulated from the filter.
You can use a vacuum cleaner.
5. If the dust filter is very dirty,
wash it with a lukewarm soap
solution.
6. Let the filter air dry.
7. Replace the filter in the unit.
8. Make sure that the filter is dry
and undamaged.
Legend
PCB1 = Control panel
PCB2 = Control board
SM = Swing motor
M1 = Circulation fan motor
M2 = Exhaust fan motor
KM = Water pump
CM = Compressor motor
OLP = Overload protection
CX1 = Capacitor motor (M1)
CX2 = Capacitor motor (M2)
CX3 = Capacitor (compressor motor)
TH = Thermostat sensor
MS1 = Microswitch (water tank full)
Colour code
Y = Yellow
W = White
R = Red
BU = Blue
BR = Brown
BK = Black
GR = Grey
10

Troubleshooting
This unit has been designed using state-of-the-art manufacturing processes and it has been tested repeatedly to
ensure that it is working properly. However, should problems occur, refer to the following list.
Problem Possible cause Check Remedy
The unit does not start or
switches itself off automatically.
The unit is either not cooling
at all or only cooling a little
bit.
Power failure.
Defective power fuse /
main switch is off.
Power supply line damaged.
Temperature range is either
too high or too low.
Water tank is full.
The surrounding temperature is
outside of the operating range
(16 to 35 °C).
The exhaust hose is bent, extended, facing downwards or
blocked.
Dirty filter
Input and/or output opening
blocked by foreign matter.
Are all other electrical components working?
Are all currents for lighting
functional?
Are all other electrical components working?
Is the fan still working?
Is the “Tank Full” signal light lit
up?
Does “E1“ appear on the dis-
play?
Does the cooling performance
improve when the device is
operated without an exhaust
hose and without a filter?
Are the filters dirty?
Does the cooling performance
improve when the device is
operated without a filter?
Check current and wait for the
device to start again.
Replace power fuse.
Switch on main switch.
Maintenance by authorised
personnel.
Keep the unit within operating
temperature range 20 to 35°C.
Empty tank. See page 7.
Do not operate the unit outside of the operating range.
Make sure that the exhaust
channel is not blocked.
Clean filter and reinsert it into
the unit.
The unit does not to respond
to the infrared remote control.
Condensation water leaks
out of the device.
Minimum clearance is insufficient.
Windows and doors open /
thermal load increased.
Low pressure in the setup
room when operating the unit.
“Cooling” operating mode not
set.
Device is switched on with the
timer function.
Temperature setting too high.
Excess voltage due to lightning.
Remote-control batteries are
dead or the transmission distance is too far.
Polarity of the batteries is incorrect after replacement.
The device is not standing upright.
The plug for the condensation
drain is not inserted correctly
or is damaged.
Has the minimum distance of
50 cm been maintained?
Has something been changed
in the design or application?
Does the cooling performance
improve when a door or window is opened?
Is the “AUTO, HI, MED or LO“
LED lit up in the display?
Is the “AUTO, HI, MED, LO or
FAN“ LED lit up?
Is the temperature setting
higher than the temperature of
the room?
Was there lightning recently in
the region?
Does the button function work
at a distance of approx. 1 m?
Is the polarity correct?
Is the device upright?
Is water dripping out of the
condensation drain?
Maintain minimum distance.
Close windows and doors /
reduce thermal load.
Correct pressure in the setup
room.
Set operation mode to “AUTO,
HI, MED or LO“.
Press the I / 0 button again.
Lower temperature.
Unplug the unit from power
supply with switch 5 and restart.
Replace batteries /
reduce distance or change location.
Insert the batteries correctly.
Pay attention to the labels.
Place upright and make sure it
is firmly in place.
Insert the plug correctly or replace if necessary.
Should the unit still not be working despite these checks, please contact an authorised service centre.
Unplug the unit from the power supply before performing any work on it!
11

Technical Data
Type designation
Nominal cooling capacity 1)
Energy efficiency class cooling
Energy efficiency ratio EER
Dehumidification capacity max. l/h
Operational area (size of room), approx. m³
Operating range indoor unit °C / % r.F.
Refrigerant
Operating pressure max., refrigeration cycle kPa
Refrigerant, basic quantity kg
Circulating air volume per speed m³/h
Sound pressure level per speed) dB(A)
Power supply V/Ph/Hz
Protection type IP
Nominal power consumption1)
Nominal current consumption1)
LRA
Operating medium
Exhaust air hose, length / diameter mm/mm
Dimensions height mm
width mm
depth mm
Weight kg
Serial number
Ref. No.
1) Room temperature WB 35°C/DB 24°C 2) Distance 1m
kW
kW
A
A
MKT350/2
3.45
A
2.63
2.0
100
18 to 35 / 35 to 85
R 407 C
1900 / 2800
0.75
380 / 430 / 450
49 / 51 / 52
230 / 1~ / 50
IP 20
1.31
5.98
25
Fresh air, max. 80% relative hu-
midity
1250 / 125
825
450
380
35.0
631... 569...
1615350 1615351
Customer Service and
Guarantee
For the guarantee to be valid, the purchaser or his customer must completely fill out the “guarantee certificate”
enclosed with all units and send it back.
The units are repeatedly tested at the production site to
ensure that they are working properly. If a malfunction
occurs that cannot be eliminated by the operating personnel, please contact your dealer or contact person.
Operation/handling which does not comply with
these instructions is prohibited!
In cases of non-compliance, we assume no liability
and the guarantee becomes null and void.
Environment and Recycling
Important information about recycling!
Only authorised personnel may come into contact with
the cold cycle. This ensures that refrigerant does not
escape into the environment when the unit is being repaired.
Both the refrigerant and the system parts are subject to
special requirements for disposal. The refrigerant in use
is a safety refrigerant. This means that, should damage
occur, the quantities released will not cause injury to the
respiratory systems of people and animals.
Do not touch the liquid refrigerant as it can freeze the
skin!
Proper use
The manufacturer assumes no liability for damage resulting from non-compliance with manufacturer specifications and legal requirements, or if modifications are
made to the units.
12

Exploded View
30
8
7
27
25
33
28
34
20
18
31
24
19
17
26
29
6
14
16
5
15
4
11
13
12
3
2
21
Spare Part List
No. Description
1 Cover, front
2 Recessed grip
3 Control panel cover
4 Air outlet grille
5 Plate fins
Adjustable lever
6
(plate fins)
7 Cover, rear
8 Air filter (circulation)
9 Unit bottom
10 Transport wheel
11 Fan housing (circulation)
12 Fan wheel (exhaust)
13 Fan motor (exhaust)
14 Collection tray
15 Condenser
16 Water pump cpl.
17 Floater (reservoir)
18 Microswitch 1 (tank)
Ref. No.
10
MKT350
1107000
1107001
1107002
1107003
1107004
1107005
1107006
1107007
1107008
1107009
1107010
1107011
1107013
1107014
1107015
1107016
1107017
1107018
9
23
22
No. Description
19 Microswitch 2 (tank)
20 Evaporator
21 Compressor cpl.
22 Control panel foil
23 Control panel circuit board
24 Control board
25 Fan motor (circulation)
26 Evaporator housing
27 Fan housing (circulation)
28 Fan wheel (circulation)
29 Fin motor
30 Filter (exhaust)
31 Power supply with plug
32 Capacitor compressor
33
Capacitor fan motor
(circulation)
34
Capacitor fan motor
(exhaust)
Infrared remote control
Exhaust air hose cpl.
1
Ref. No.
MKT 350
1107019
1107020
1107022
1107023
1107024
1107025
1107026
1107028
1107029
1107030
1107031
1107032
1107033
1107036
1107038
1107040
1613135
1107042
When orderig parts please indicate ref. no and machine no. (see type plate).
We reserve the right to make changes to dimensions and design in the interest
of technical progress.
Accessoires
variable wall lead-through
1613118 1613118 1613118 1613118
13

Installation Diagram of the Wall-Lead Through
Back pressure flap
Safety guard
Sealing cap
Telescope
pipe
Installation instructions
1. Create a core hole in the outer wall (maximum wall
thickness 480 mm) with a diameter of at least 135
mm.
Keep an eye out for possible supply lines in this
area!
2. Insert the telescope pipe in the wall lead-through
that you created so that the outer pipe (100 mm diameter) is on the inner side of the wall.
To prevent cold bridges, insulate the telescope pipe
with a suitable insulation material.
3. Place bricks around the telescope pipe in the core
hole so that it is aligned with both sides of the wall.
min. 400 mm
4. Attach the safety guard to the outer side of the wall
with 4 screws.
Mount the safety guard paying attention to the position of the rain drainage.
5. Insert the back pressure flap inside and attach it with
4 screws as well.
The “oben” label on the back pressure flap must be
visible from inside!
6. Close the opening on the back pressure flap with the
sealing cap when taking the device out of operation,
e.g. before winter, to prevent air circulation.
14


 Loading...