

Page 1
Seite 2 mm kürzer
All technical modifi cations reserved. 02/08. TSC 08.0162
Rem ing ton
®
Re gis tere d Trade M ark of sp ect rum Br and s, Inc ., or one of
its su bsi dia rie s
VARTA Cons ume r B att eri es Gmb H & Co. K GaA
Alf red- Kru pp- Str. 9
734 79 Ellw ang en
Ger many
Model No. HC365
3.
6.
4.
Hair Clipper
HC365
Hair Clipper
HC365
2.
1.
5.
5.
5.
11/UK/HC365 Version 08/11 Part No. T22-33279
080162_REM_IFU_HC365_UK.indd 1-3 28.02.2008 13:59:54
Page 2
Seite 2 mm kürzer
REMINGTON® SERVICE HOTLINES
1. 2.
3.
United Kingdom
+44 0800 212 438 (free call)
Spectrum Brands (UK) Limited,
Fir Street, Failsworth,
Manchester,
M35 0HS, UNITED KINGDOM
5.4.
6
www.remington.co.uk
080162_REM_IFU_HC365_UK.indd 4-6 28.02.2008 13:59:56
Page 3
1
ENGLISH
Thank you for ch oosi ng Remi ngto n®. Our pro duct s are de signed to mee t the
highe st sta ndar d of qua lity, funct ionality a nd des ign. We ho pe you en joy usi ng
your new R eming ton
®
produ ct.
Pleas e read t he ins truction s for us e care fully and kee p in a saf e plac e for fut ure
refer ence .
CAUTION
Use thi s appliance o nly for i ts int ended u se as de scrib ed in th is manu al. Do n ot use
atta chments not r ecomm ended by Remin gton
®
.
Do not us e this pr oduct if it is no t worki ng corr ectl y, if it has b een dropped o r dama ged,
or dropped int o wate r.
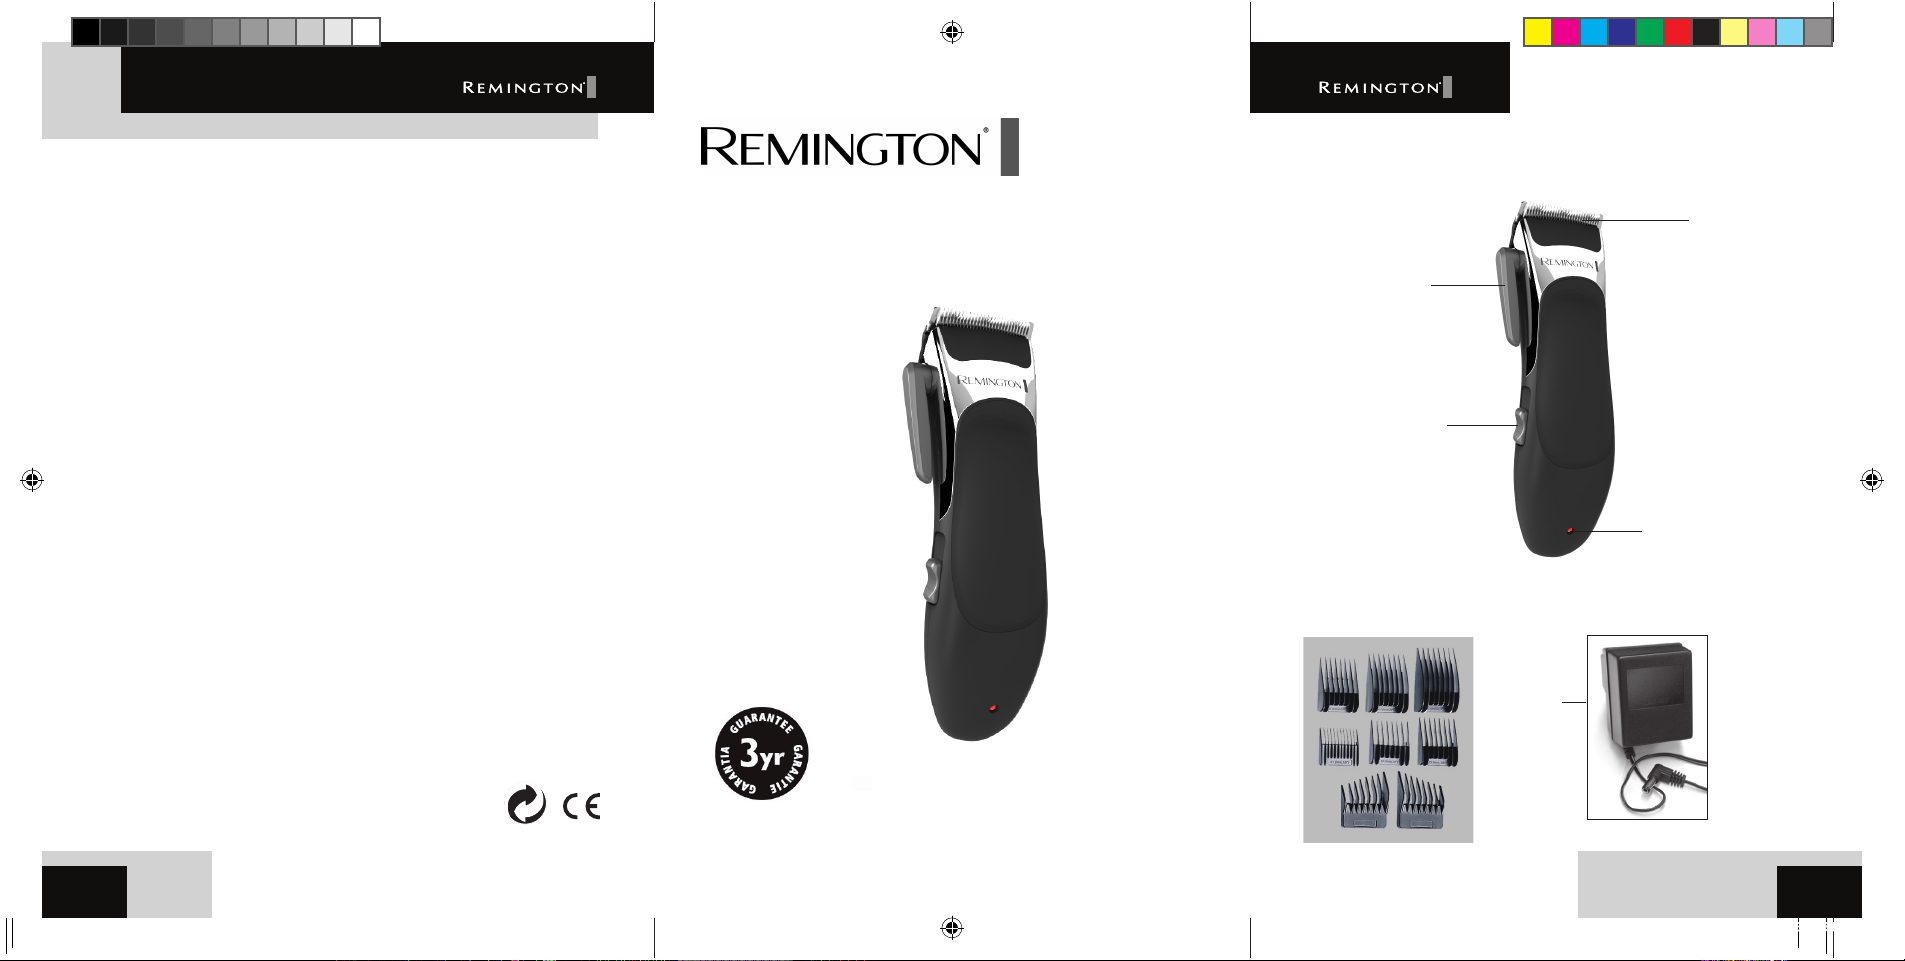
DESC RIPTION
1. On/Of f swit ch
2. Blade set
3. Taper l ever
4. 8 attachme nt guid e combs
5. Charge indic ator light
6. Charging adaptor
GB
080162_REM_IFU_HC365_UK.indd 1 28.02.2008 14:00:36
Page 4

2
GETTING STARTED
CHARGIN G YOUR HA IRCLIPPE R
Before using your hai r clipper for t he fi rst time, charg e for 14-16 hou rs.
Ensur e the pro duct i s switched of f.
Conne ct the c harging adaptor to t he prod uct and then to the mai ns.
The cha rging i ndic ator wi ll ligh t up.
Your clipp er can not be ove rchar ged. H owever, if th e product is not g oing to b e used fo r an
exte nded pe riod time (2- 3 mont hs), unplu g it from t he mains and st ore.
Fully rechar ge your haircli pper w hen you wo uld like t o use it a gain .
To preser ve the life of your b atte ries , let th em run out ever y six mon ths then rec harge f or
14-16 hours .
CORDED US E
Conne ct the c harging adaptor to t he prod uct and then to the mai ns.
CAUTI ON : Ext ended m ains o nly use w ill res ult in the reduction o f the ba tter y life .
HOW TO USE
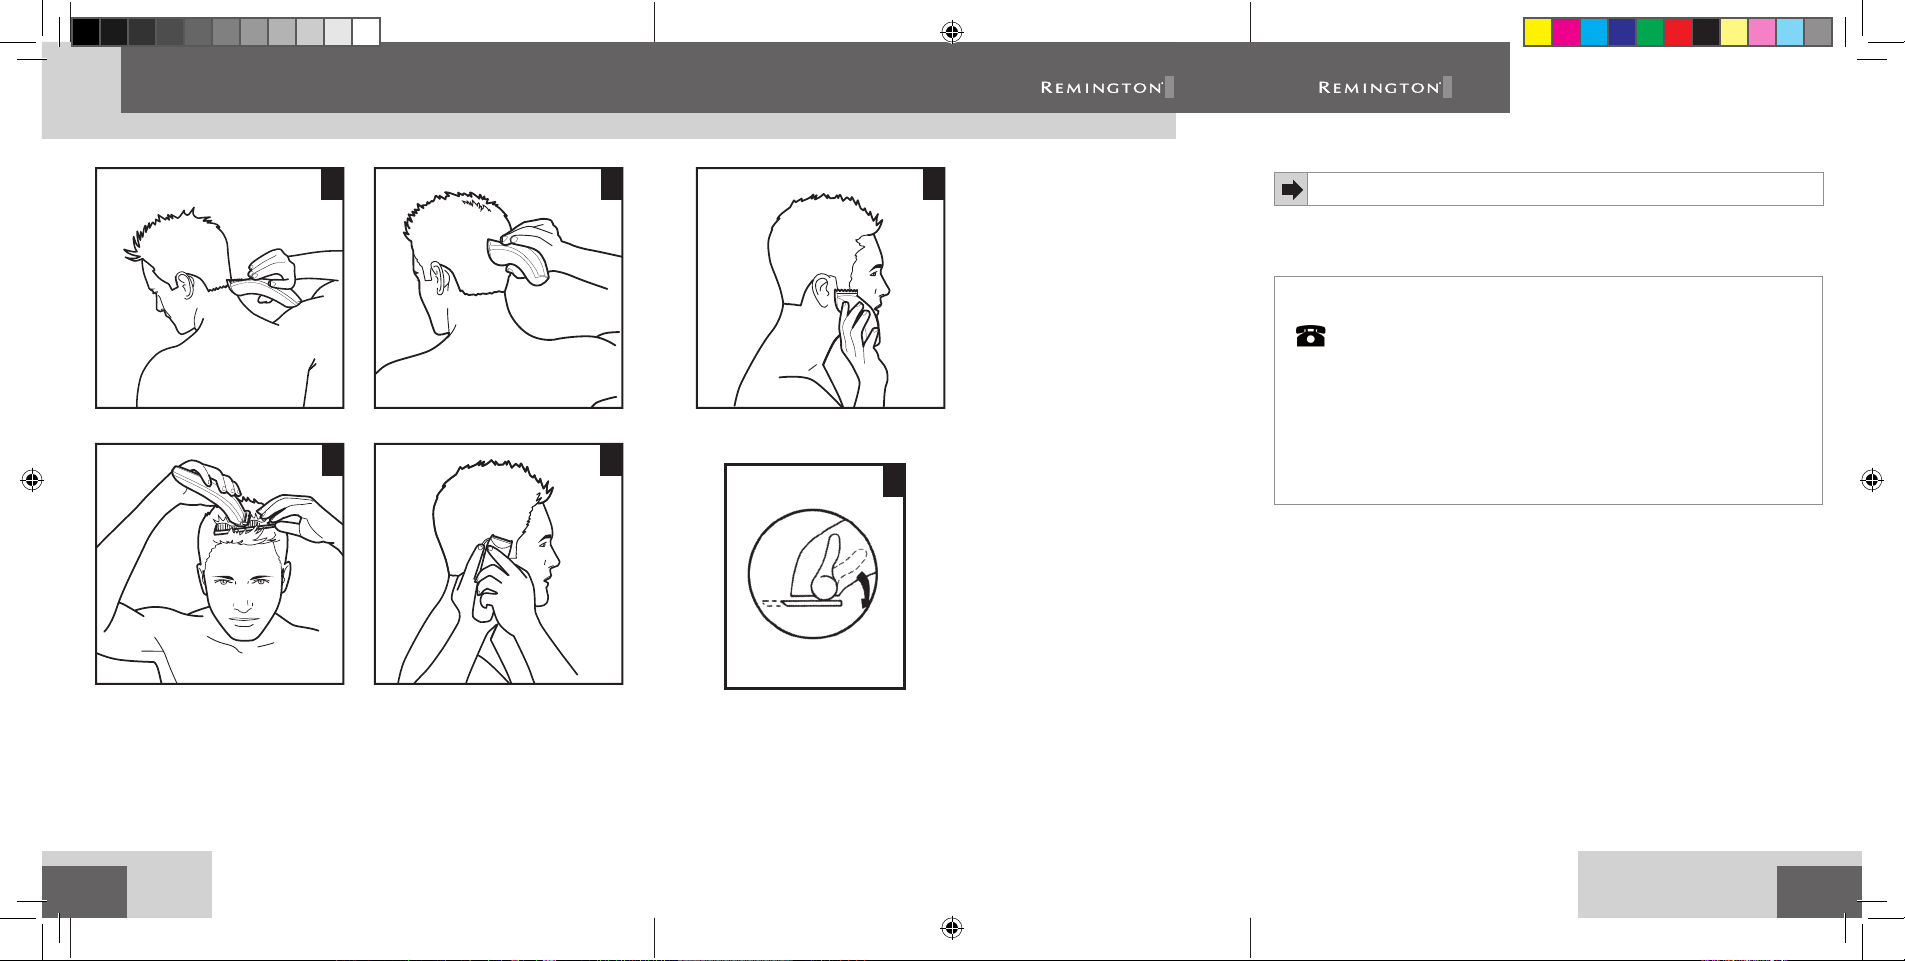
Befor e startin g the cut
Inspe ct the clipp er mak ing sure that it i s free fr om hair a nd dir t.
Seat t he person so th at thei r head is a pprox imate ly at you r eye level .
Before cutting, a lways comb the h air so it is tang le free a nd dry.
To attach a c omb
Hold the comb with it s teet h upward
Slide i t onto and along the cli pper b lade un til the front of t he comb fi rmly s its ag ains t the
clipp er blade.
To remove the c omb
Holdi ng the clippe r with t he blad es fac ing away f rom you, fi rmly p ush th e comb upward
and away from the b lades .
ENGLISH
080162_REM_IFU_HC365_UK.indd 2 28.02.2008 14:00:36
Page 5

3
Each co mb att achm ent is m arked ac cordingly on i ts out side mi ddle surfac e. (3mm, 7mm,
9mm, 12mm, 18mm, 25mm, left a nd righ t ear gu ide)
Repla cemen t combs availa ble. M odel : SP 254
INSTRUCTION S FOR HA IR CUT TIN G
Note : For eve n cutting, a llow th e comb at tachment /blade to cu t its way throu gh the hair.
Do not force it through quickl y. If you are c utt ing for t he fi rst time, star t wit h the ma ximum com b attachme nt.
STEP 1 – N ape of t he neck – PICTU RE 1
Use 3mm o r 7mm guide comb.
Hold the clip per wit h the bl ade teeth pointin g upwards. Be gin st arting at th e centr e of the
head at t he base of the ne ck.
Slowl y lift the cli pper, work ing upw ards and outwards t hroug h the ha ir, trimmi ng just a
litt le at a tim e.
STEP 2 – Back of t he head – PICTU RE 2
With t he 12mm or 18m m guide c omb at tach ed, cut the hai r at the back of th e head.
STEP 3 – S ide of the head – P ICTU RE 3
With t he 3mm gu ide com b attached , trim sideburns. Then change to t he longer 9mm gu ide
comb and conti nue to cu t to the t op of th e head.
STEP 4 – Top of the head – P ICTU RE 4
With t he 18mm or 2 5mm guide comb atta ched, cut hai r on top of the hea d against the
direc tion in which t he hair n orma lly grow s.
For lon ger hai r on top, u se wit hout a guide com b. Lif t the hair on to p of the he ad wit h a
small h and com b. Cut ove r the ha nd comb w ith th e hair li fte d or hold t he hair b etwe en the
fi nger s to lif t it and c ut it to t he desi red length .
Alway s work fro m the ba ck of the h ead.
GB
080162_REM_IFU_HC365_UK.indd 3 28.02.2008 14:00:36
Page 6

4
STEP 5 – The fi nis hing to uche s – PICTU RE 5
Use the c lipper without an a ttac hmen t comb fo r close t rimmi ng arou nd the base and sides
of the ne ck. Use the ea r comb guides t o get a cle an line around e ach ea r. For the re quired
ear com b guide , angl e the clipper a nd ligh tly st roke aro und eac h ear to t he back of the
neck .
To produce a cl ean st raig ht line a t the sid eburns, reve rse th e hair cl ipper. Place the
revers ed clip per at right an gles to t he hea d, tips of the bl ades lightl y touc hing th e skin a nd
then wo rk downwards .
SHORT TAPERED ST YLES – “ FL AT TOPS” & SH ORT CU TS
Star ting w ith the longe st gui de comb attac hed (25mm), cut f rom the b ack of t he neck t o
the crow n. Hol d the guide comb fl at ag ainst t he head and slow ly move the clip per through
the hai r, as shown . (PI CTURE 1)
Use the s ame pro cedur e from th e lower si de to th e upper side of the head , as illu str ated.
Then cu t the ha ir against the direc tion i n which i t grows a nd level w ith th e sides .
(PI CTURE 3)
To give a “fl at t op” loo k, the h air on top of the h ead mus t be cut ov er the top of a fl at
comb.
Use a clo ser gui de comb t o tape r the ha ir down t o the necklin e as des ired.
TAPER LEVE R
This product h as a ta per leve r located a the l eft side of th e clipp er nea r the bl ades. A djust
the leve r to cha nge the c loseness of t he cut gradua lly and a lso to improve the eff ecti venes s of
the com b att achme nts. T he tap er lever also ex tends the lif e of the blades b ecau se a dif feren t
cutt ing edg e is used i n each setti ng.
CARE FOR YOUR HAIRCLIPPER
Your clipp er is fi t ted wi th hig h quali ty ceramic b lades that ar e prema nent ly lubricat ed. To
ensur e long la stin g performa nce of you r clipper, clean the blades and unit regular ly. Always
keep th e prote ctive cap on the trim mer bl ade.
AFTER EACH U SE
Ensur e the clipper i s swit ched of f and di sconn ecte d from th e mains.
Brus h the acc umula ted hair from the blades. Do not submerge th e clipper in water.
To clean the unit , wipe w ith a da mp clot h and dr y imme diately.
Note : Ensure tha t the clipper i s turne d off w hen cle anin g.
EVERY SIX M ONTH S
At regular int erv als the Blade S et sho uld be re moved an d cleaned.
Remove t he 2 screw s reta ining t he fi xed b lade with a screwdriver.
Do not re move bla de set .
ENGLISH
080162_REM_IFU_HC365_UK.indd 4 28.02.2008 14:00:37
Page 7

5
Brus h out hairs from betwe en the b lades with so ft cleanin g brus h. Do not r emove the
lubri cating grea se from t he blad es. It i s not necessa ry to re move the small m oving blade
from th e unit .
If the moving bl ade ha s been removed t his ca n be re- fi tted by slot ting the lon g grooved
edge of t he blad e onto t he two white pl asti c guide r idges a nd the n seating the b lade ove r
the plastic a ctua tor bar. The fi xed bl ade is fi tted with the raise d profi le pointing ou twards
and fi xed with the 2 screw s.
Before fully tight ening t he 2 scre ws, adj ust th e tape r lever to the lowe r posit ion and align
the blades so t hat the ir cut ting e dges ar e para llel to o ne anot her. Tigh ten th e 2 screws.
Note t hat if the blades are not correc tly aligned then cu tti ng effi cien cy will be impa ired.
Place a f ew drops o f cutt er or sew ing machine oil onto t he blad es. Wi pe off e xcess o il.
CAUTI ON : Do not use liqui d clea ners on the blades or harsh or corrosi ve chem ical s on
the blade cas ing. Al ways us e a soft b rush t o remove t he accu mulat ed hair s.
Unplu g the ch arge ad aptor from the power ou tlet w hen fi t ting o r removing att achm ents ,
or whil e cleaning th e product.
Alway s store t his ap plian ce and cord in a mois ture -free area.
Do not wr ap the c ord of th e charg ing adaptor around t he appl iance .
TROUBLESHOOTING
If blades do no t seem to cut hai r easi ly, the ta per lever (P ICTU RE 6) c an be used to rem ove
any hair c augh t between the comb and blade . Switch the cl ippe r on and move the ta per leve r
up and down a few times but d o not for ce the lever in ei ther direct ion. This should remove
hairs a nd restore th e cutt ing ef fi cie ncy. If no t, co ntac t your ne arest Reming ton Servi ce
Centr e.
IMPORTANT SAFETY INSTRUCTIONS
WARNI NG – TO RE DUCE THE RI SK OF B URN S, EL ECTRO CUTI ON, F IRE , OR
INJURY TO PER SON S:
An appliance should never be l eft unattended w hen plugge d into a power out let .
Keep the power pl ug and cord away fro m heated surfaces .
Make sure the power plug a nd cord do not get we t.
Do not pl ug or unp lug the shaver w ith wet h ands .
Do not us e the pro duct with a da maged c ord. A re place ment c an be ob tained via ou r
Remington® serv ice cen ter.
Charg e, use and store the product at a t empe rature between 15°C and 35°C.
Alway s unplu g from the main s when cleani ng.
Only use the pa rts suppli ed wit h the applian ce.
Kee p this p roduc t out of re ach of childre n. The u se of thi s appliance by p erso ns wit h
reduced physi cal, sensor y or men tal capabi litie s or lac k of experien ce and kn owled ge can
give cause to ha zard s. Per sons re spons ible for thei r safety should give e xplic it ins truc tions
or supe rvis e the use o f the ap pliance.
GB
080162_REM_IFU_HC365_UK.indd 5 28.02.2008 14:00:37
Page 8

6
PROTECT THE ENVIRONMENT
The product co ntai ns a Nickel Met al Hydr ide cel l unit . Do not dispose the trimmer i n
house hold waste at t he end of its use ful li fe. Disposa l can take place at our service c entres
or appropria te coll ecti on site s.
CAUTI ON : Do not put in fi re or mutil ate your batt ery packs as they may b urst or relea se
toxic m ateri als.
For fur the r infor mation on rec ycling see ww w.rem ingt on- europ e.com
WARRANTY
ENGLISH
This product h as bee n checked and is f ree of de fect s. We warr ant th is prod uct ag ainst a ny
defec ts th at are due t o faul ty mat erial or work manship for the warr ant y perio d from th e
original dat e of cons umer purchase. If t he produ ct sho uld bec ome def ecti ve with in the
warr anty p eriod , we will repair a ny such defect o r elec t to replace th e produc t or any part
of it wit hout c harge p rovide d there i s proof of purchase. Th is does not mea n an ext ensio n
of the warran ty per iod.
In the c ase of a wa rran ty sim ply ca ll the Reming ton
This wa rran ty is of fere d over and above your n ormal statu tor y right s.
The war rant y shall appl y in all countri es in whi ch our pr oduct w as sol d via an au thorised
dealer.
This wa rran ty doe s not inc lude d amage t o the product by accide nt or mis use, abuse,
alter atio n to the pr oduct or use inc onsis tent w ith th e technical a nd/ or safe ty instruc tion s
required. Th is warr ant y shall n ot apply if the p roduc t has be en dis mantled or repaired by a
perso n not aut horised by us.
®
Serv ice Cen ter in your regio n.
080162_REM_IFU_HC365_UK.indd 6 28.02.2008 14:00:38
Page 9

080162_REM_IFU_HC365_UK.indd 7 28.02.2008 14:00:35
Page 10

GB7GB
080162_REM_IFU_HC365_UK.indd 7 28.02.2008 14:00:38
 Loading...