

Page 1

Seite 2 mm kürzer
Hair Clipper
HC365
Hair Clipper
HC365
2.
All technical modifi cations reserved. 02/08. TSC 08.0162
3.
1.
6.
5.
Model No. HC365
08/UK/HC365 Version 02/08 Part No. T22 -25969
Remington
its subsidiaries
VARTA Consumer Batteries GmbH & Co. KGaA
Alfred-Krupp-Str. 9
73479 Ellwangen
Germany
www.remington-products.com
© 2008 SBI
080162_REM_IFU_HC365_UK.indd 1-3 28.02.2008 13:59:54
®
Registered Trade Mark of spectrum Brands, Inc., or one of
4.
Page 2
Seite 2 mm kürzer
1. 2.
3.
REMINGTON® SERVICE HOTLINES
United Kingdom
+44 0800 212 438 (free call)
Rayovac Europe Ltd,
Watermans House, Kingsbury Crescent,
The Causeway, Staines, Middlesex,
TW18 3BA, UNITED KINGDOM
5.4.
www.remington.co.uk
6
080162_REM_IFU_HC365_UK.indd 4-6 28.02.2008 13:59:56
Page 3
ENGLISH
Thank you for ch oosi ng Remi ngton®. Our pro duct s are de signed to mee t the
highe st sta ndar d of qua lity, functional ity a nd design. We hop e you enj oy usin g
your new Remington
Pleas e read t he ins truc tion s for use carefully a nd kee p in a safe place f or fut ure
reference.
®
product.
CAUTION
Use thi s appliance only for i ts intended u se as describ ed in thi s manu al. Do no t use
attachments not recommended by Remington
Do not us e this pr oduct if it is no t worki ng correctl y, if it has b een dro pped or d amag ed,
or dropped int o water.
®
.
DESCRIPTION
1. On/Off s witch
2. Bl ade s e t
3. Taper l ever
4. 8 attachme nt guid e combs
5. Charge indic ator light
6. Charging a daptor
GB
080162_REM_IFU_HC365_UK.indd 1 28.02.2008 14:00:36
1
Page 4

ENGLISH
GETTING STARTED
CHARGING YOUR HAIRCLIPPER
Before using your hai r clipp er for the fi rst t ime, c harge for 14-16 hour s.
Ensur e the pro duct is switc hed of f.
Conne ct the c hargi ng adap tor to t he prod uct and t hen to t he mains.
The cha rging i ndicator will light up.
Your clipp er can not be ove rchar ged. However, if the produc t is not going to be used for an
exte nded pe riod ti me (2- 3 months), u nplug it from t he main s and store.
Fully rechar ge your haircli pper w hen you wo uld like t o use it again.
To preser ve the life of your b atte ries , let them run ou t every six mon ths th en rech arge fo r
14-16 hours.
CORDED U SE
Conne ct the c hargi ng adap tor to t he prod uct and t hen to t he mains.
CAUTI ON : Extended m ains only use w ill result in th e reduc tion of the bat ter y life .
HOW TO USE
Befor e starting the cut
Inspe ct the clipp er mak ing sure t hat it i s free from hair a nd dir t.
Seat t he person so th at thei r head is a pproximate ly at your eye level .
Before cutting, a lways comb the h air so it i s tang le free a nd dry.
To attach a c omb
Hold the comb with it s teet h upward
Slide i t onto and along the cli pper blade until the f ront of t he comb fi rmly s its ag ains t the
clipper blade.
To remove the c omb
Holdi ng the clippe r with t he blad es fac ing away from you, fi rmly p ush the comb upw ard
and away from the blades .
2
080162_REM_IFU_HC365_UK.indd 2 28.02.2008 14:00:36
Page 5

Each co mb att achm ent is marked accordin gly on its out side middle sur face. (3m m, 7mm,
9mm, 12mm, 18mm, 25mm, left a nd righ t ear guide)
Replacement combs available. Model: SP254
INSTRUCTIONS FOR HAIR CUTTING
Note : For eve n cutting, a llow the comb at tach ment /blade to cu t its way t hroug h the ha ir.
Do not force it through quickl y. If you are c utting for the fi rst t ime, s tar t with t he maximum com b attachment.
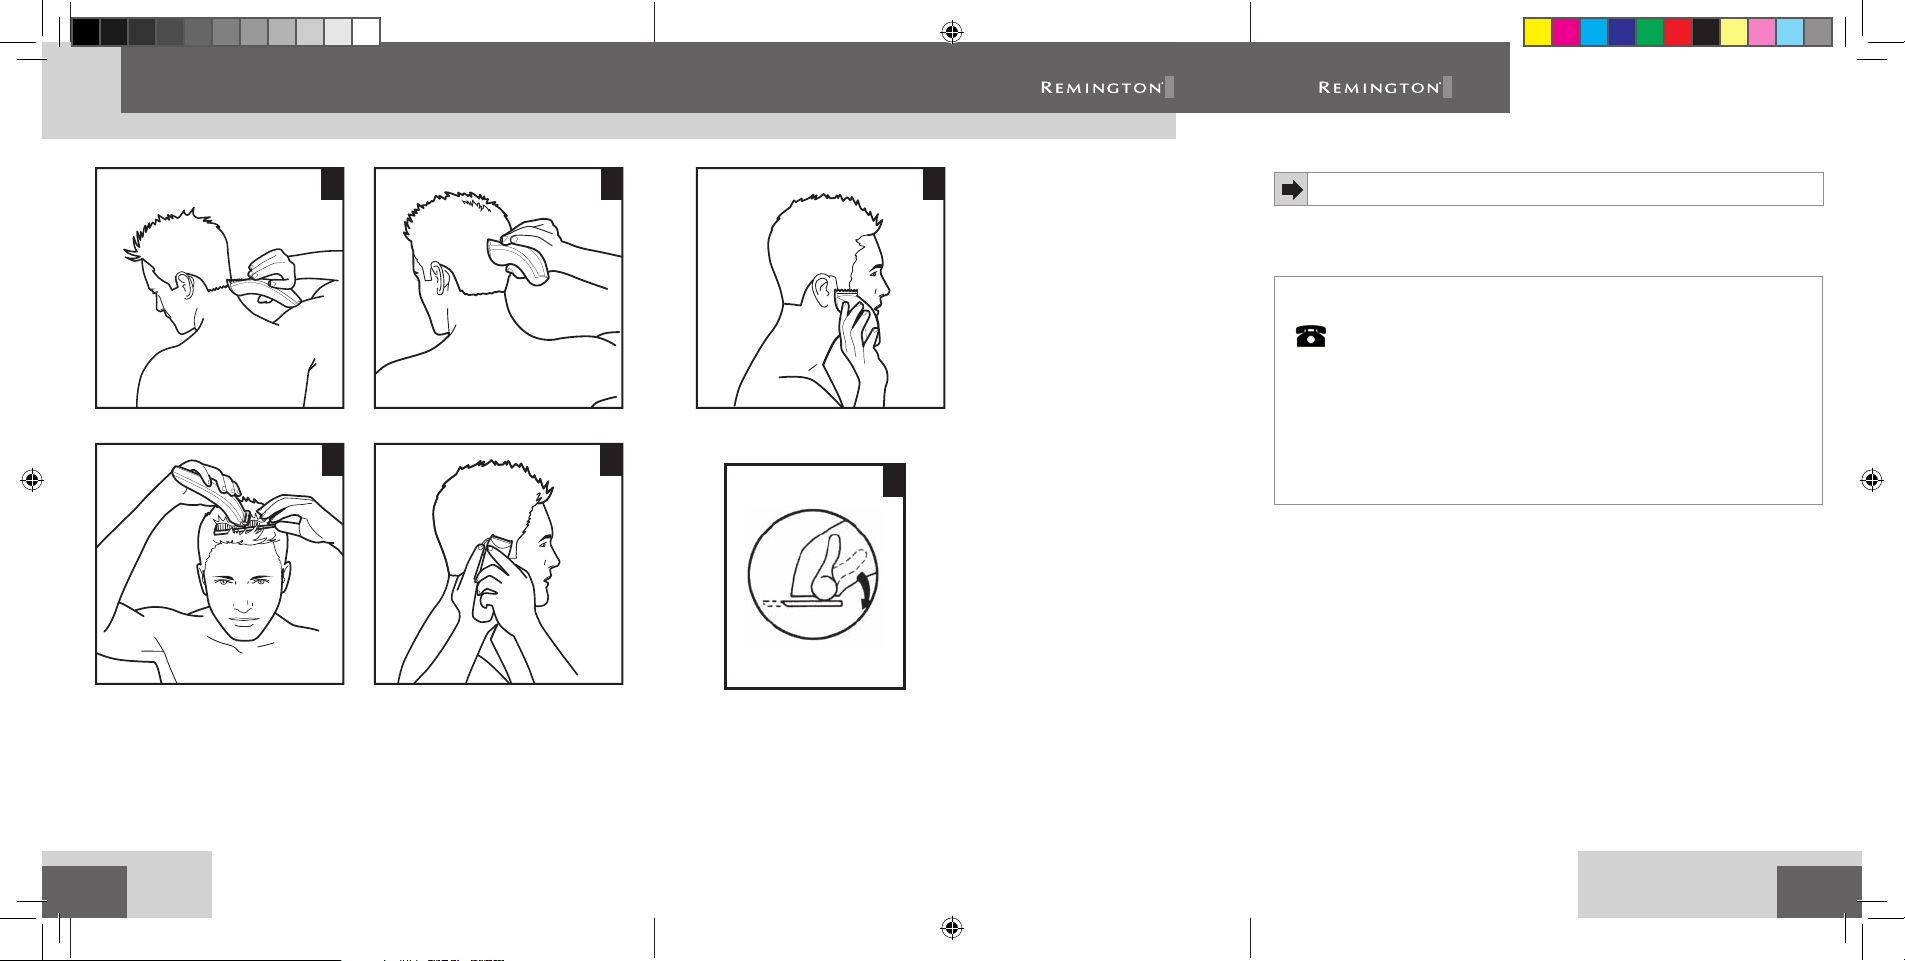
STEP 1 – N ape of t he neck – PICTU RE 1
Use 3mm o r 7mm guide comb.
Hold the clipper wit h the bl ade teeth poi nting upward s. Beg in starti ng at the c entre o f the
head at t he base of the neck.
Slowl y lift t he cli pper, work ing upw ards an d outw ards t hrough the hai r, trimming just a
litt le at a tim e.
STEP 2 – Back of t he head – PICTU RE 2
With t he 12mm or 18m m guide c omb at tached, cut t he hair at the ba ck of the h ead.
STEP 3 – S ide of the head – P ICTU RE 3
With t he 3mm gu ide com b atta ched, trim si debur ns. Th en cha nge to th e longe r 9mm guide
comb and conti nue to cu t to the t op of the head.
STEP 4 – Top of the head – P ICTU RE 4
With t he 18mm or 2 5mm guide comb attached, c ut hair on top of t he head a gain st the
direc tion in which t he hair n ormally grow s.
For lon ger hai r on top, u se wit hout a gu ide com b. Lif t the ha ir on top o f the he ad with a
small h and com b. Cut ove r the ha nd comb w ith th e hair li fted or hold the hair b etween the
fi nger s to lif t it and c ut it to t he desi red len gth .
Alway s work fro m the back of the h ead.
GB
080162_REM_IFU_HC365_UK.indd 3 28.02.2008 14:00:36
3
Page 6

ENGLISH
STEP 5 – The fi nis hing to uche s – PICTU RE 5
Use the c lipper without an attac hment comb for c lose trimmi ng aroun d the ba se and sides
of the ne ck. Use the ea r comb gu ides to get a cle an line a round e ach ear. For the req uired
ear com b guide , angl e the cli pper a nd lightly st roke arou nd each ear to t he back o f the
neck .
To produce a cl ean st raig ht line at the sid eburn s, reve rse the hair clipper. Pl ace the
revers ed clip per at right angles to t he head, tips o f the bl ades li ghtly touch ing the s kin an d
then wo rk downw ards .
SHORT TAPERED ST YLES – “ FL AT TOPS” & SH ORT CU TS
Star ting w ith th e longe st guide comb at tac hed (2 5mm) , cut fr om the b ack of th e neck to
the crow n. Hol d the guide comb fl at against t he head a nd slowly move th e clipper through
the hai r, as shown. (PI CTURE 1)
Use the s ame pro cedur e from th e lower si de to the upper s ide of th e head, as illu stra ted.
Then cu t the ha ir against th e direc tion in which i t grows an d level with the s ides .
(PICTURE 3)
To give a “fl at t op” loo k, the h air on to p of the head mus t be cut ove r the to p of a fl at
comb.
Use a clo ser gui de comb t o tape r the ha ir down t o the nec klin e as desired.
TAPER L EVER
This product h as a taper leve r locat ed a the l eft si de of the clipp er near t he bla des. Ad just
the leve r to cha nge the c losen ess of t he cut gr adua lly and also to im prove th e effe ctiveness o f
the com b attachme nts. T he tap er lever a lso extends t he life of the bl ades becaus e a diff erent
cutt ing edg e is used i n each setti ng.
CARE FOR YOUR HAIRCLIPPER
Your clipp er is fi t ted wi th high quali ty cer amic b lades t hat are p remanently lubr icate d. To
ensur e long la stin g perf orma nce of you r clipp er, clean t he blades and u nit reg ularl y. Alway s
keep th e prote ctive c ap on th e trim mer blade.
AFTER EACH U SE
Ensur e the clipper i s swit ched of f and di sconnected from the mains .
Brus h the accumula ted hai r from th e blade s. Do no t subme rge the clipp er in water.
To clean the unit , wipe with a damp clot h and dr y immediate ly.
Note : Ensure tha t the cli pper i s turne d off wh en cle aning .
EVERY SIX M ONTH S
At regular int ervals the B lade S et should be removed and clean ed.
Remove t he 2 screw s reta ining t he fi xed b lade wi th a scre wdrive r.
Do not re move bla de set .
4
080162_REM_IFU_HC365_UK.indd 4 28.02.2008 14:00:37
Page 7

Brus h out hai rs from b etwe en the b lades w ith so ft cle aning brush . Do not re move th e
lubri cating grea se from t he blad es. It i s not nec essary to re move the s mall moving bl ade
from th e unit .
If the moving bl ade ha s been re moved t his can be re-fi tte d by slot ting t he long g rooved
edge of t he blad e onto t he two white pl astic guide r idges a nd then seati ng the bl ade over
the plastic a ctua tor bar. The fi xed bl ade is fi tted w ith th e raise d profi le pointing ou twar ds
and fi xed with the 2 screw s.
Before fully tight ening t he 2 scre ws, adj ust the tape r lever to t he lower posit ion and a lign
the blades so t hat the ir cut ting edges are paral lel to one anot her. Tighten the 2 screws .
Note t hat if the blades are not correc tly al igned t hen cu ttin g effi ciency will b e impaired.
Place a f ew drops o f cutt er or sew ing mac hine oi l onto t he blad es. Wipe off e xcess oi l.
CAUTI ON : Do not use liqui d cleaners on t he blades or ha rsh or co rrosi ve chemicals o n
the blade cas ing. Al ways us e a soft brush to remove t he accum ulated hair s.
Unplu g the ch arge ad aptor f rom the power ou tlet when fi t ting or r emovi ng att achme nts,
or while cleaning the product.
Alway s store t his applian ce and cord in a mois ture -free a rea.
Do not wr ap the c ord of the charg ing ada ptor ar ound th e appliance .
TROUBLESHOOTING
If blades do no t seem to cut hair easily, the ta per leve r (PI CTU RE 6) c an be use d to remove
any hair c aught between the c omb and b lade . Switc h the cl ipper o n and move t he tap er lever
up and down a few times but d o not for ce the lever in either di rection. Th is shou ld remove
hairs a nd restore the cutt ing ef fi cie ncy. If no t, con tact your nea rest Re ming ton Se rvic e
Centre.
IMPORTANT SAFETY INSTRUCTIONS
WARNI NG – TO RE DUCE THE RI SK OF BURNS, ELECTRO CUTIO N, FI RE , OR
INJURY TO PER SON S:
An appliance should never be left un atte nded w hen plu gged i nto a power outlet.
Keep the power pl ug and cord away fro m heate d surf aces .
Make sure the power plug a nd cord do n ot get we t.
Do not pl ug or unp lug the shaver w ith wet h ands .
Do not us e the pro duct with a damaged c ord. A re place ment c an be obtaine d via our
Remington® service center.
Charg e, use and store the prod uct at a t emperatur e between 15°C and 35°C .
Alway s unplu g from th e mains when cl eaning.
Only use the parts supplied with the app lianc e.
Kee p this produc t out of re ach of ch ildre n. The use of thi s appli ance by person s with
reduced physi cal, sensor y or men tal ca pabilitie s or lack o f expe rienc e and knowledg e can
give cause to ha zard s. Persons respons ible fo r their s afet y shou ld give ex plicit inst ruct ions
or supe rvis e the use o f the ap plian ce.
GB
5
080162_REM_IFU_HC365_UK.indd 5 28.02.2008 14:00:37
Page 8

ENGLISH
PROTECT THE ENVIRONMENT
The product co ntains a Nickel Met al Hydride cell unit . Do not di spose t he tri mmer in
house hold wa ste at t he end of i ts use ful life. Dis posal can ta ke place a t our ser vice ce ntre s
or appropriate collection sites.
CAUTI ON : Do not pu t in fi re or m util ate your b attery packs as t hey may burst or release
toxic materials.
For further information on recycling see www.remington- europe.com
WARRANTY
This product has been checked and is free of defects. We warrant this product against any
defects that are due to faulty material or workmanship for the warranty period from the
original date of consumer purchase. If the product should become defective within the
warranty period, we will repair any such defect or elect to replace the product or any part
of it without charge provided there is proof of purchase. This does not mean an extension
of the warranty period.
In the case of a warranty simply call the Remington
This warranty is of fered over and above your normal statutory rights.
The warrant y shall apply in all countries in which our product was sold via an authorised
dealer.
This warranty does not include damage to the product by accident or misuse, abuse,
alter ation to the product or use inconsistent with the technical and/or safety instructions
required. This warr anty shall not apply if the product has been dismantled or repaired by a
person not authorised by us.
®
Service Center in your region.
6
080162_REM_IFU_HC365_UK.indd 6 28.02.2008 14:00:38
Page 9

080162_REM_IFU_HC365_UK.indd 7 28.02.2008 14:00:35
Page 10

GB7GB
080162_REM_IFU_HC365_UK.indd 7 28.02.2008 14:00:38
 Loading...