


 Prime
Prime
Blood Glucose Monitoring System
User
Instruction
Manual

CAUTION:
Before using any product to test your blood sugar (blood glucose), read all instructions and practice the test. Do all quality control checks as directed and consult with a diabetes healthcare professional. These recommendations apply to all blood glucose monitoring systems and are supported by the American Association of Diabetes Educators, the American Diabetes Association, the U.S. Food and Drug Administration, and the Health Industry Manufacturers Association.
2

TABLE OF CONTENTS
Introduction . . . . . . . . . . . . . . . . . . |
|
6 |
Intended Use . . . . . . . . . . . . . . . . . |
. |
7 |
Important Information. . . . . . . . . . . . . . |
. . |
. 8 |
The ReliOn® Prime System . . . . . . . . . . . . . |
. . . |
. 9 |
Understanding the ReliOn® Prime Blood Glucose Meter . . |
. . |
. 10 |
Explanation of the Full Display Screen. . . . . . . |
. . . |
11 |
ReliOn® Prime Test Strips . . . . . . . . . . . . . . |
. . |
. 12 |
Testing with ReliOn® Prime test strips. . . . . . . . . . |
. . |
13 |
Important Test Strip Information. . . . . . . . . . |
. . |
. 14 |
Changing the Battery . . . . . . . . . . . . . . |
. . |
. 15 |
Meter Set Up . . . . . . . . . . . . . . . . . |
|
18 |
Setting the Time and Date . . . . . . . . . . . . |
. . |
. 18 |
Blood Glucose Testing.. . . . . . . . . . . . . . . . . 22 |
||
ReliOn® Lancing Device. . . . . . . . . . . . . . . |
|
22 |
Obtaining a Drop of Blood . . . . . . . . . . . . |
. . |
. 25 |
Performing a Blood Glucose Test . . . . . . . . . . . |
. . |
. 27 |
3
Alternate Site Testing (AST) . . . . . . . . . . . . . . . |
31 |
Important Information About AST. . . . . . . . . . . |
31 |
Preparing to Test Your Blood Glucose From an Alternate Site. . . |
33 |
Performing a Blood Glucose Test From an Alternate Site. . . 34 |
|
Using Control Solution . . . . . . . . . . . . . . . . . |
. 39 |
Recommended Use of Control Solution. . . . . . . . . |
. 40 |
Performing a Control Solution Test. . . . . . . . . . . |
. 41 |
Comparing Control Solution Results. . . . . . . . . . . |
45 |
Downloading Test Results to a Computer. . . . . . . . . . . |
46 |
Understanding Test Results. . . . . . . . . . . . . . . |
47 |
Comparing Meter and Laboratory Results . . . . . . . . |
47 |
Expected Blood Glucose Readings. . . . . . . . . . . |
50 |
High Blood Glucose Readings.. . . . . . . . . . . . |
50 |
Low Blood Glucose Readings. . . . . . . . . . . . . |
51 |
Diabetes Findings . . . . . . . . . . . . . . . . . . 51 Meter Memory . . . . . . . . . . . . . . . . . . 54
4
Marking Results in the Memory .. . . . . . . . . . . . 54 Marking Control Solution Tests. . . . . . . . . . . . . 54 Marking Other Results.. . . . . . . . . . . . . . . . 55 Recalling Results. . . . . . . . . . . . . . . . . . 55 Display Screen Images . . . . . . . . . . . . . . . . . . 59 Caring For Your ReliOn® Prime Blood Glucose Meter. . . . . . 64 Cleaning the Meter. . . . . . . . . . . . . . . . . . 64 Storage.. . . . . . . . . . . . . . . . . . 64 Specifications . . . . . . . . . . . . . . . . . . 66 Warnings, Precautions, and Limitations. . . . . . . . . . . 67 Warranty.. . . . . . . . . . . . . . . . . . 69
5

INTRODUCTION
Thank you for choosing the ReliOn® Prime Blood Glucose Monitoring System. Frequent blood glucose testing is important. It tells you how your diabetes is affected by factors such as medication, diet, exercise, and stress management. Blood glucose test results can also tell you if your diabetes is changing in ways that affect your treatment plan.
diabetes healthcare professional before making any changes. information needed to use the ReliOn® Prime System is included in this manual. Please read it thoroughly before using the system. If you have any questions, call Customer Service at 800.631.0076 (24 hours a day, 7 days a
week). Contact your healthcare professional with questions if you are unable to reach Customer Service.
6
Intended Use
The ReliOn® Prime Blood Glucose Monitoring System is intended for the quantitative measurement of glucose in fresh capillary whole blood samples drawn from the fingertips or palm. Testing is done outside the body (In Vitro Diagnostic Use). It is indicated for use at home (over the counter [OTC]) by persons with diabetes, or in clinical settings by healthcare professionals, as an aid to monitor the effectiveness of diabetes control. It is not intended for the diagnosis of or screening for Diabetes Mellitus, and is not intended for use on neonates.
7
Important Information
•Test results below 70 mg/dL indicate low blood glucose (hypoglycemia)
•Test results above 240 mg/dL indicate high blood glucose (hyperglycemia)
•If results are below 70 mg/dL or above 240 mg/dL, repeat the test
•If results continue to measure below 70 mg/dL or above 240 mg/dL consult your diabetes healthcare professional immediately
•If symptoms are not consistent with test results AND all the instructions have been followed carefully, contact your diabetes healthcare professional
•Before testing, always make sure both the meter and test strips are at operating temperature
8

THE ReliOn® Prime SYSTEM
The ReliOn® Prime System Includes:
•ReliOn® Prime Meter
•Carrying Case
•User Instruction Manual
•Other materials required but not provided:
•Test Strips
•Control Solution
•Lancing Device and/or Lancets
9

UNDERSTANDING THE ReliOn® Prime BLOOD GLUCOSE METER
Front |
Back |
Data |
Display Screen |
Connection |
|
Port |
|
Back Button |
Forward Button |
|
On/Off Button |
|
Test Strip Port |
Battery Compartment
Cover
10
Explanation of the Full Display Screen
|
|
|
|
|
|
|
|
Control |
|
|
Low |
|
|||
|
|
|
|
|
|
|
|
Solution Test |
|
|
Battery |
|
|||
Time |
|
|
|
|
|
|
|
|
|
|
|
|
|
Memory Mode |
|
|
|
|
|
|
|
|
|
|
|
|
|
||||
Date |
|
|
|
|
|
|
|
|
|
|
|
|
|
|
|
|
|
|
|
|
|
|
|
|
|
|
|
|
|
||
|
|
|
|
|
|
|
|
|
|
|
|
|
Unit of |
|
|
|
|
|
|
|
|
|
|
|
|
|
|
||||
|
|
|
|
|
|
|
|
|
|
|
|
|
|
|
|
Average Test |
|
|
|
|
|
|
|
|
|
Measurement |
|
||||
|
|
|
|
|
|
|
|
|
|
|
|||||
Reading |
|
|
|
|
|
|
|
|
|
|
|
||||
Error Code |
|
|
|
|
|
|
|
|
|
|
Temperature |
|
|||
|
|
|
|
|
|
|
|
|
|
|
|
||||
Result Warning |
|
|
|
|
|
|
|
|
Warning |
|
|||||
|
|
|
|
|
|
|
|
|
|
|
|
Main Display: |
|
||
|
|
|
|
|
|
|
|
|
|
|
|
|
|
Test Countdown |
|
|
|
|
|
|
|
|
|
|
|
|
|
|
|
Test Results |
|
|
|
|
|
|
|
|
|
Insert/Remove |
|
|
|
||||
|
|
|
Test Strip |
|
|
|
|
|
Error Codes |
|
|||||
|
|
|
|
|
|
Test Strip |
|
|
|
||||||
|
|
|
|
|
|
|
|
|
|
|
|
||||
|
|
|
|
|
Apply Blood |
|
|
|
|
||||||
If any part of the display screen is missing when the meter is turned on call |
11 |
||||||||||||||
|
Customer Service at 800.631.0076. |
||||||||||||||
ReliOn® Prime TEST STRIPS
These capillary action test strips require only 0.5 micro-liter (µl) of blood and provide an end-fill sample application tip for easy blood application. The ReliOn® Prime Blood Glucose Monitoring System measures the amount of glucose (sugar) in fresh capillary whole blood. When a drop of blood is added to the sample application tip, the sample is drawn into the test strip reaction site. The glucose in the blood reacts with the enzyme on the test strip. This reaction produces
a current, proportional to the amount of glucose in the blood. The meter detects the current and converts it into a blood glucose reading.
12
TEST STRIP
Reaction |
Site |
Test Strip
Contact Bars
Sample Application Tip
(apply blood to end of test strip and capillary action will pull blood to reaction site quickly and easily)
TESTING WITH ReliOn® Prime TEST STRIPS
The ReliOn® Prime Blood Glucose Monitoring System works with the ReliOn® Prime Test Strips.
Important Test Strip Information
•Store the test strip bottle in a cool, dry place between 39°F–86°F (4°C–30°C)
•Keep away from direct sunlight and heat
•Do not refrigerate or freeze
•Do not store or transfer the test strips outside the original bottle
•As soon as you have removed a test strip, replace the cap securely on the bottle
•Use test strips within 90 days (3 months) of opening and not beyond the expiration date ( 

 )
)
13
Important Test Strip Information
•Write the date of opening on the bottle label to remind you to discard the strips after 90 days (3 months)
•Do not bend, cut, or alter a test strip
•Do not reuse a test strip
•Use only ReliOn® Prime Test Strips with the ReliOn® Prime Meter
•Ensure your hands are clean and dry before handling test strips
14

Changing the Battery
The ReliOn® Prime Blood Glucose Meter has a CR2032 battery installed.
Note:
Changing the battery should only take a few seconds. If the battery is changed within 30 seconds, the meter memory is not affected. You will not lose any past test results and the settings are not affected.
However, if it takes longer than 30 seconds to change the battery, or if the battery is dead before changing it, the time and date settings may need to be reset.
The first time the meter is turned on after changing the battery, you may see a display screen message (E00). This means you should check that the time and date are correct. (See pages 18-21 for detailed instructions on changing the time and date).
15

WARNING:
Keep all batteries out of children’s reach. If a battery is swallowed, consult a doctor immediately.
When the battery power is getting low, your meter shows  . You have enough power for about 100 tests before you need to replace the battery.
If the  is flashing, there is only enough power for about 20 tests. Replace the battery as soon as possible.
When the battery has run out, the meter will not work.
CR 2032
Li-Mn 3V
+
16
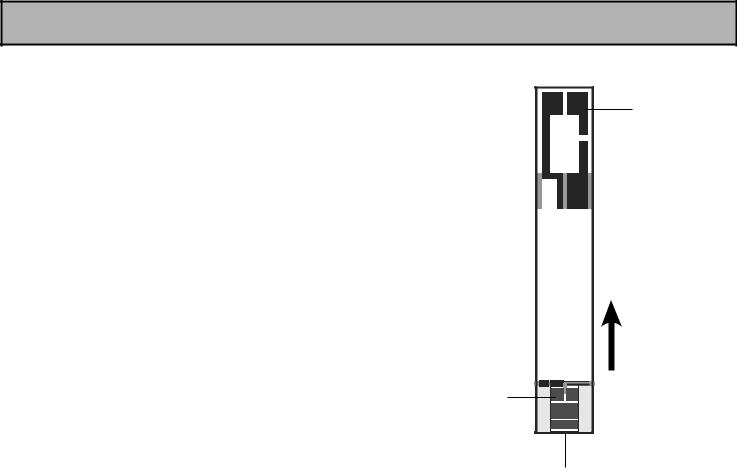
How to Change the Battery
Step 1
Turn the meter off. The battery cover is on the back of the meter.
Step 2
Pull the battery cover up with your finger or fingernail. Remove battery cover.
Step 3
Remove the old battery. If necessary, turn the meter over and tap it gently against the palm of your hand until the battery falls out. Avoid the use of sharp objects that may damage the meter.
Step 4
Insert the new battery. The “+” on the battery should be facing up.
Step 5
Replace the battery cover.
17
Meter Set Up
Before using the ReliOn® Prime Meter for the first time, you must set the time and date. You can choose between the 12-hour format (1-12 o’clock with am or pm) and the Military 24-hour format (0-23). The date format can either be displayed as month/day (U.S.A. format) or day/month (International format).
Do not perform a blood glucose test until you have set the meter correctly.
Setting the Time and Date
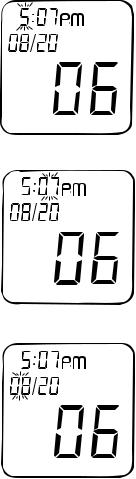
Step 1: Turn on meter
Press the On/Off button to turn the meter on. The full screen appears briefly. If any part of the display screen is missing (see page 11), call Customer Service. The meter then displays the time, date, unit of measurement, and the insert test strip symbol.
Step 2: Enter set-up mode
Press and hold down the On/Off button for more than 2 seconds to enter the set-up mode.
18

Step 3: Set the time format
The time can be displayed in either 24-hour format or 12-hour format with AM and PM. The meter displays the current time format. To change format, press either the Back or Forward button. Press the On/Off button to select the time format. The date format then appears on the display.
Step 4: Set the date format
The date format can either be displayed as month/ day (01/31) or day/month (31/01). The meter displays the current format. To change format, press either the
Back or Forward button. Press the On/Off button to select the date format. The hour setting then flashes on the display.
Month/Day Format
Day/Month Format
19
Step 5: Set the hour
Press and release the Back or Forward button to change the hour. Hold the Back or Forward button down to scroll through quickly.
When the correct hour is displayed, press the On/Off button. The minute setting then flashes on the display.
Step 6: Set the minute
Press and release the Back or Forward button until the correct minute appears. Hold the Back or Forward button down to scroll through quickly. When the correct minute is displayed, press the On/Off button. The month setting then flashes on the display.
Step 7: Set the month (If day/month format is selected then Step 7 will set day)
Press and release the Back or Forward button until the correct month appears. Hold the Back or Forward button down to scroll through quickly. When the correct month is displayed, press the On/Off button. The day setting then flashes on the display.
Hour flashing
Minute flashing
20 |
Month flashing |
Step 8: |
Set the day |
(If day/month format is selected then Step 8 will set |
|
month) |
Press and release the Back or Forward button until |
the correct day appears. Hold the Back or Forward button down to scroll through quickly. When the correct day is displayed, press the On/Off button. The year setting then
flashes on the display. |
Day flashing |
|
Step 9: Set the year
Press and release the Back or Forward button until the correct year appears. Hold the Back or Forward button down to scroll through quickly. When the correct year is displayed, press the On/Off button for two seconds to exit set up mode.
Year flashing
Note: |
|
Pressing the On/Off button for more than 2 seconds at any stage saves the time and |
|
date and exits the set-up mode. The meter automatically shuts off after 2 minutes if no |
|
buttons are pressed. Settings stored up to that point are saved. |
21 |
|
 Loading...