


Blood Glucose Monitoring System
User
Instruction
Manual

CAUTION:
Before using any product to test your blood sugar (blood glucose), read all instructions and practice the test. Do all quality control checks as directed and consult with a diabetes healthcare professional. These
recommendations apply to all blood glucose monitoring systems and are supported by the American Association of Diabetes Educators, the American Diabetes Association, the U.S. Food and Drug Administration, and the Health Industry Manufacturers Association.

TABLE OF CONTENTS |
|
Introduction. . . . . . . . . . . . . . . . . . . . . . 5 |
|
Intended Use . . . . . . . . . . . . . . . . . . . . 6. |
|
Understanding the ReliOn® Confirm Blood Glucose Meter . . . 7 |
|
Changing the Battery . . . . . . . . . . . . . . . . 10. |
|
Meter Set-up . . . . . . . . . . . . . . . . . . . . . 13 |
|
Basic Rules . . . . . . . . . . . . . . . . . . . . 13 |
|
Audible Beep. . . . . . . . . . . . . . . . . . . 16 |
|
Year . . . . . . . . . . . . . . . . . . . . . . . . . . . . . . . . |
. . . . . . . . . . . . 18 |
Month/Day . . . . . . . . . . . . . . . . . . . . . . . . . . |
. . . . . . . . . . . . 19. |
Hour/Minute. . . . . . . . . . . . . . . . . . . 20. |
|
Test Averaging . . . . . . . . . . . . . . . . . . 21. |
|
Ending Set-up . . . . . . . . . . . . . . . . . . . . . . . . |
. . . . . . . . . . . . 22 |
Performing a Control Solution Test . . . . . . . . . . . . |
. . . . . . . . . . . . 23 |
Troubleshooting Control Solution Test. . . |
. . . . . . 30 |
3
Blood Glucose Testing . . . . . . . . . . . . . . . . . . . . . . . . . . . . . . . . . . . . . . . . 33 The Lancing Device. . . . . . . . . . . . . . . . . . . . 33 Getting a Drop of Blood . . . . . . . . . . . . . . . . . . 36 Performing a Blood Glucose Test. . . . . . . . . . . . . . . 38 Flagging Test Results. . . . . . . . . . . . . . . . . . . . 42
Alternate Site Testing (AST) . . . . . . . . . . . . . . . . . . . . . . . . . . . . . . . . . . . . 44 Understanding Test Results. . . . . . . . . . . . . . . . . . . . . . . . . . . . . . . . . . 53 Recalling Results - Entering Memory Mode. . . . . . . . . . . . 58 Maintenance. . . . . . . . . . . . . . . . . . . . . . . . 62 Cleaning. . . . . . . . . . . . . . . . . . . . . . . . . 62 Storage and Handling . . . . . . . . . . . . . . . . . . . . . . . . . . . . . . . . . . . . . 63 Display Screen and Error Messages. . . . . . . . . . . . . . 64 Product Information . . . . . . . . . . . . . . . . . . . . . 69 Product Specifications. . . . . . . . . . . . . . . . . . . . . . . . . . . . . . . . . . . . . 69 Warnings, Precautions & Limitations . . . . . . . . . . . . . . . . . . . . . . . . . . 70 Warranty. . . . . . . . . . . . . . . . . . . . . . . . . 73
4

INTRODUCTION
Thank you for choosing the ReliOn® Confirm Blood Glucose Monitoring System. This system measures blood glucose in fresh capillary whole blood. Results are shown as plasma values. This makes it easy to compare the ReliOn® Confirm blood glucose meter and lab results.
Please read this manual before using the system. If you have any questions, call Customer Service at 800.631.0076 (24 hours a day, 7 days a week). Contact your healthcare professional with questions if you are unable to reach Customer Service.
5

Intended Use
The ReliOn® Confirm Blood Glucose Monitoring System meter is intended for the quantitative measurement of glucose in fresh capillary whole blood samples drawn from the fingertips or palm. Testing is done outside the body (In Vitro diagnostic use). It is indicated for use at home (over the counter [OTC]) by persons with diabetes, or in clinical settings by healthcare professionals, as an aid to monitor the effectiveness of diabetes control.
The System Includes:
• Meter
• Carrying Case
• User Instruction Manual
•Quick Reference Guide
•Self-testing Logbook
• Lancing Device
• Lancets
Carrying Case
6

UNDERSTANDING THE ReliOn® Confirm BLOOD GLUCOSE METER
Top |
Bottom |
Battery Compartment
Cover
Tab
Test Strip
Port
Connection Terminal
Up
Arrow
Down
Arrow
7
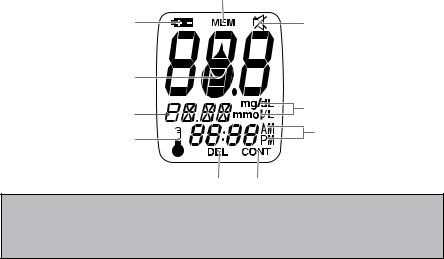
Explanation of the full display screen:
Memory Mode Symbol
Battery Symbol |
Audible Beep Off |
Apply Blood Symbol |
|
Date |
Unit of Measurement |
|
|
Temperature Warning |
Time Format |
|
Delete Symbol |
Control Solution |
NOTE: Meters in the USA are programmed to show results in mg/dL. Meters used outside the USA are programmed to show results in either mg/dL or mmol/L. Results displayed in mmol/L will always have a decimal point. Results displayed in mg/dL will never have a decimal point.
8
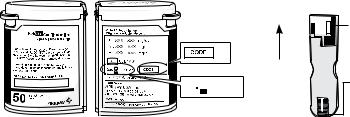
ReliOn® Confirm/micro test strips
These test strips need only 0.3 µL (microliter) of blood. Apply blood to the sample application tip. The strip draws in the blood by capillary action. The blood glucose reacts with the enzyme on the test strip. This produces a current proportional to the blood glucose level. The meter detects the current and converts it into a blood glucose reading.
Test Strip Bottle
Code No.
 Code(F-2, 3Noor. 4)
(F-2, 3 or 4)
F- 4
F-4 |
Expiration date |


 10
10

0018
Front |
Back |
|
Test Strip |
|
Contact Bars |
Insert this |
Sample |
way into |
Application |
meter |
Tip (Apply blood |
|
|
|
to end of test strip. |
|
Capillary draw will |
|
pull blood to |
|
reaction site). |
9

Changing the Battery
The ReliOn® Confirm blood glucose meter comes with one lithium battery CR2032 (or DL2032).
CAUTION: Replacing the battery will not delete meter settings or test results stored in the meter unless you:
•Touch the metal portion on main unit with your fingers or any metal.
•Take over 2 minutes to replace battery.
•Load the battery incorrectly.
•Load a used or weak battery.
NOTE:
•To save battery power, the meter turns itself off 3 – 5 minutes after last use.
•Replace batteries when low battery symbol  appears. Otherwise inaccurate results could be obtained.
•Discard used batteries as per local guidelines.
WARNING: Keep all batteries out of children’s reach. If a battery is swallowed, consult a doctor immediately.
10
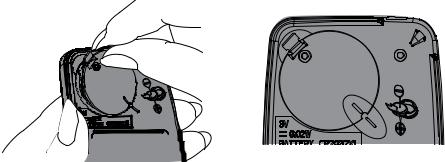
To replace battery:
1. Open the battery cover on the back side of the meter by pushing the tab in the direction of the arrow and pulling the cover up.
2. The battery is held in place on the underside of the cover. Slide the battery out of the cover.
CAUTION: Do not touch the metal contacts inside the battery compartment with your finger or any metal.
3. Load a new battery into the battery cover. Place the “+” side down when loading the battery into the cover.
4. Make sure the battery is loaded in the proper position. Otherwise, the preprogrammed times will be reset.
11
5. Put the battery cover back into correct position and snap to close.
If the clock setting has been deleted, either “12:00” or “0:00” will blink when you put a test strip into the meter. The low battery symbol  means you need to replace the battery as soon as possible. Discard used batteries as per local guidelines.
12

METER SET-UP
Before using the ReliOn® Confirm blood glucose meter for the first time, set the time and date. Do not perform a blood glucose test until you have setup the meter.
Meter set-up allows you to adjust the audible beep volume and to set time, date, and test averaging.
Basic rules for meter set-up:
Step 1: Enter meter set-up by first making sure the meter is turned off.
Up
Arrow
Down
Arrow
13

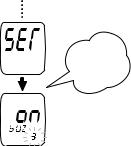
Step 2: Press the Up Arrow and Down Arrow buttons at the same time for 5 seconds. A beep sounds and the meter turns on. Next, a second beep sounds and “SET” shows on the screen.
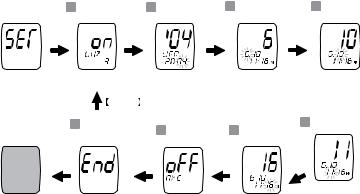
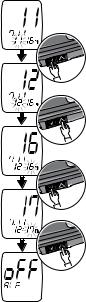
Step 3: Use the Up Arrow to change the set-up screen. When you press the Up Arrow, the set-up screen changes in the order shown in the diagram on the following page. Press the Down Arrow button to change a setting within a set-up screen menu.
Note: If you need to go back to a setting, you must scroll through each set-up option. You cannot go backwards in set-up mode.
In set-up mode, the meter will turn off automatically after 3 minutes of non-use.
14
|
Setting |
|
|
|
|
|
|
|
the |
|
Setting |
|
Setting the |
|
Setting the |
1 |
Audible |
2 |
3 |
4 |
|||
|
Beep |
|
the Year |
|
Month |
|
Day |
Up |
Up |
|
|
Up |
|
Up |
|
Arrow |
Arrow |
|
|
Arrow |
|
Arrow |
|
Gray Arrow |
Return |
|
|
|
|
8 |
Ending |
|
Setting |
|
Setting |
7 |
Test |
6 |
the |
||
|
Set-up |
Averaging |
Minute |
||
Up |
Up |
|
|
Up |
|
Arrow |
Arrow |
|
Arrow |
|
|
<Power OFF>
UP
 Arrow
Arrow
Setting the
5 Hour
UP
Arrow
15
Setting the Audible Beep
If the audible beep is turned “on”, the beep will sound when:
•You insert a test strip into the meter.
•You apply blood or control solution to a test strip.
•The test has ended and the result is displayed.
•The meter is turned on, but you do not use it for several minutes.
Meter will beep and automatically shut off.
•You go into Memory Mode.
Make sure the meter is off. Press the Up Arrow and Down Arrow buttons at the same time for 5 seconds. A beep sounds and the meter
turns on. Next, a second beep sounds and “SET” shows on the screen.
Beep
Press the Up Arrow button. The screen will display “bUZ” and the current beep setting.
16
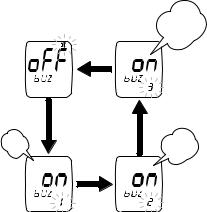
Press the Down Arrow button to cycle through the volume levels:
“OFF” (no sound) “on 1” (low)
“on 2”(middle) “on 3” (high)
“OFF” (no sound) …, etc.
A beep sounds at the set volume at each step. If “OFF” is set, the “audible beep mute (Off)” symbol lights up in the upper right of the screen. After you select the beep volume, press the Up Arrow button to confirm the setting. The screen changes to the year set-up screen.
[1]
Beep
p Bee
[1]
[1]
Beep
[1]
17
Setting the Year
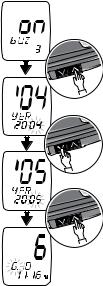
In the year set-up screen, the last two digits of the currently set year appear at the top of the screen. “yER” appears in the middle of the screen. All four [1] digits of the currently set year appear at the
bottom of the screen. The last two digits will blink.
Press the Down Arrow to change the last
two digits of the year to the correct year. After you [2] set the year, press the Up Arrow button to confirm
the setting. The screen changes to the month set-up screen.
[3]
18
Setting the Month
Press the Down Arrow button to change the month. After you set the month, press the Up Arrow button to [1] confirm the setting. The screen changes to the day set-up screen.
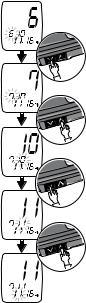
Setting the Day
Press the Down Arrow button to change the day. After you set the day, press the Up Arrow button to confirm the setting. The screen changes to the hour set-up screen.
[2]
[3]
[4]
19
Setting the Hour
Press the Down Arrow button to change the hour. After you set the hour, press the Up Arrow button to confirm the setting. The screen changes to the minute set-up screen.
Setting the Minute
Press the Down Arrow button to change the minute. After you set the minute, press the Up Arrow button to confirm the setting. The screen changes to the test averaging set-up screen.
[1]
[2]
[3]
[4]
20
Setting Test Averaging
NOTE: “Lo” results are included as 20 mg/dL in the averages. “Hi” results are included as 600 mg/dL in the averages.
Press the Down Arrow button to cycle through the test averaging choices: “oFF” (not displayed), “14” (14-day average), or“30” (30-day average).“AVE” appears near the middle of the screen.
If you select either 14-day or 30-day averaging, your average test result will appear when you recall results from memory. See page 58. 
After you set test averaging, press the
Up Arrow button to confirm the setting.
21
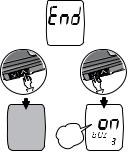
Ending Set-up
To make further changes to set-up settings, press the Down Arrow button while “End” is displayed. This will bring up the Audible Beep set-up screen. You can then move through the
set-up mode and adjust any settings that you wish
If you are done with set-up, press the Up Arrow button while “End” is displayed. This confirms all settings and turns the meter off.
Beep
<Power OFF>
The meter will turn off automatically 3 minutes after “End” is displayed.
22

PERFORM A CONTROL SOLUTION TEST
Use ReliOn® Confirm/micro CONTROL to check if:
•the meter and test strips are working correctly as a system.
•you are testing correctly.
To order control solution, call ReliOn® at 800.631.0076.
23
 Loading...