


INSTRUCTION MANUAL
ULTRA COMPACT EAR THERMOMETER
Model 510REL
ENGLISH ESPAÑOL

TABLE OF CONTENTS |
|
Introduction ................................................................................ |
3 |
Part Names ................................................................................ |
4 |
Conversion °F/°C ...................................................................... |
4 |
Before Use ................................................................................ |
5 |
Directions for Use and for Memory .......................................... |
5 |
Care and Maintenance ................................................................ |
6 |
Battery Replacement .................................................................. |
6 |
Specifications ............................................................................ |
7 |
Troubleshooting ............................................................................ |
8, 9 |
Warning .................................................................................... |
10 |
FCC Statement ........................................................................ |
11 |
Quick Reference ...................................................................... |
12 |
2

INTRODUCTION
Thank you for purchasing the ReliOn® Ultra Compact Ear Thermometer.
This ear thermometer offers a safe, accurate and quick temperature reading from the ear canal. This thermometer senses the infrared heat from the ear drum (tympanic membrane).
No need to worry about broken glass or mercury hazards.
An ear temperature is not affected by talking, eating or drinking. These factors do affect an oral temperature.
In one second it changes the heat measured into an equivalent temperature.
The unit is easy to use for children and adults. Temperatures can be taken when a child is sleeping.
We recommend you practice taking a temperature with the ReliOn® Ultra Compact Ear Thermometer on each member of your family when you are healthy. This way you will be confident in your technique when using the ear thermometer on a sick family member.
Contact your doctor if you have any questions regarding specific temperatures.
* ReliOn® is a registered trademark used under license by Omron Healthcare, Inc.
This product is intended for home use only.
Read this instruction manual completely before using your ReliOn® Ultra Compact Ear Thermometer.
SAVE THESE INSTRUCTIONS
3
|
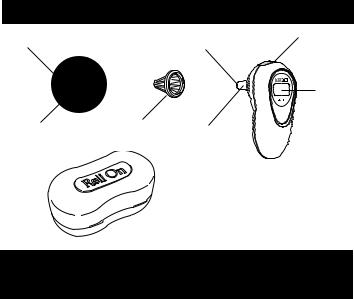
PARTITLENAMES |
|
|
Lens |
|
Lens |
Button |
|
|
||
|
|
|
Display |
Probe |
Lens cover |
Probe |
|
|
|
||
|
® |
|
|
Storage case
(with 10 lens covers inside, plus 1 on the thermometer)
CONVERSION BETWEEN FAHRENHEIT to CENTIGRADE (°F/°C)
•The thermometer is initially set at Fahrenheit °F
•Follow the steps below to change the measurement scale from °F to Centigrade °C:
Note:
Changing the measurement scale “°F” to “°C” or “°C” to “°F” deletes the previous valued measured.
1)Be sure unit is in the off position (blank display).
2)Press and hold the Button for 3 seconds until the "°F" flashes and you hear one beep.
3)Press button again, now "°C" flashes.
4)After five (5) seconds the unit will shut off.
•The desired mode has been set.
•Repeat the process to reverse measurement scale if desired.
4
BEFORETITLEUSE
•The thermometer will not work unless a lens cover is applied correctly.
•For hygienic use, attach a new lens cover each time.
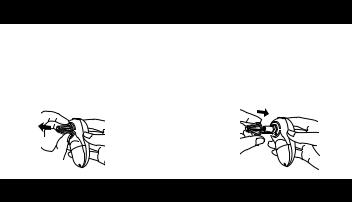
REPLACING LENS COVER
Use ReliOn ® lens cover (model MC-505LCREL) or Omron lens cover (model MC-505LC).
1) Remove the lens cover. |
2) Attach a new lens cover. |
|
Insert the lens cover |
|
until it clicks. |
DIRECTIONS FOR USE AND MEMORY
(1) Push button to turn on. (The display will illuminate for 2 seconds.)
Memory Feature:
(2) The previous value measured is shown on the display (Memory). For the 2nd and following measurements, the previous value measured
is shown with “M” symbol (Memory).
Note: When the unit is used for the first time the “M” symbol is not displayed.
(3)When “°F” or “°C” symbol flashes - insert lens into ear. Gently pull back the ear lobe before inserting for best results. Tugging on the earlobe provides a direct line to the eardrum to maximize the accuracy of results.
(4)Listen for ready beep (1 beep); an “O” symbol will appear indicating its reading. Angle is correct; ready for measurement.
(5)Press button again (While unit is placed in the ear) 4 beeps means measurement is complete.
(6)Remove probe from ear.
(7)Discard used lens cover, and replace with a new one, so that unit is ready for use again.
(8)If you are going to repeat measurements, wait until “°F” or “°C” flashes.
Note:
-You can measure consecutively up to three times. If you are going to measure more than this, wait ten minutes, then measure again (This is because the measurement may be inaccurate due to the probe warmed by body heat.).
-The thermometer will automatically turn off about 1 minute after a temperature has been taken. There is no button to turn the power off manually.
5
CARE AND MAINTENANCE
•How to Clean the Unit
-Wipe off the casing of the unit with a soft, dry cloth, or with rubbing alcohol
-When dirty clean the lens, only use a soft dry cloth or cotton swab.
-Do not clean any part of the unit with
detergent, thinner or benzene. - Do not immerse in water.
• How to Store your thermometer
- Keep your thermometer in the storage 


 case after attaching a lens cover to protect the lens.
-Store your thermometer in a place that is out of direct sunlight, is not in any extremes of temperature or humidity and is not likely to be affected by vibration, dust or shock.
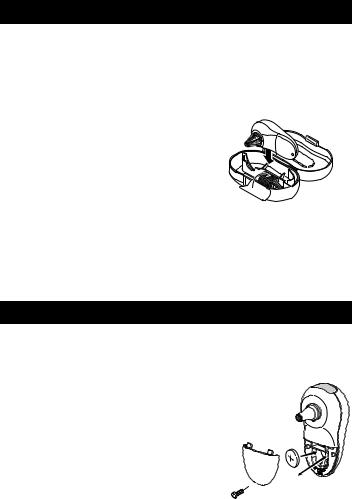
BATTERY REPLACEMENTTITLE
(1)Use a lithium battery CR2032.
(2)Remove the screw and battery cover.
(3)Remove old battery. Do not use a screw driver or metal
tweezers to remove battery.
(4) Place the new battery with the positive (+) side up.
(5) Replace the battery cover and tighten the screw.
Note: Disposal of any used battery in |
(4) |
accordance with local regulations. |
|
(2)(5)


 (3)
(3)
6
SPECIFICATIONSTITLE |
|
Name: |
ReliOn® Ultra Compact Instant Ear Thermometer |
Model: |
510REL |
Power Source: |
DC 3 Volt (lithium battery CR2032) |
Battery life: |
Approximately 2000 measurements |
Sensor: |
Thermopile |
Temperature indication: In 4 digits, every 0.1°F or °C |
|
Accuracy: |
93.2 ~ 96.7°F (34.0 ~ 35.9°C) : ±0.5°F (±0.3°C) |
|
96.8 ~ 102.2°F (36.0 ~ 39.0°C) : ±0.4°F (±0.2°C) |
|
102.3 ~ 108.0°F (39.1 ~ 42.2°C) : ±0.5°F (±0.3°C) |
Measurement range: |
93.2 to 108°F (34 to 42.2°C) |
Weight: |
Approx. 1.8 oz (50 g) (including the battery) |
Operating |
Ambient temperature; 50 to 104°F (10 to 40°C) |
temperature / humidity: |
Relative humidity; 30 to 85% |
Storage |
Ambient temperature; -4 to 140°F (-20 to 60°C) |
temperature / humidity: |
Relative humidity; 10 to 95% |
Memory: |
Memory function is to display the previous reading |
Contents: |
Thermometer, Storage Case, Instruction Manual, |
|
and 11 Lens Covers |
Options: |
Lens Cover using ReliOn® series |
|
MC-505LCREL or Omron model MC-505LC |
The specifications may be changed without prior notice.
7

TROUBLESHOOTINGTITLE
|
Display |
Meaning |
Action |
||||
Nothing is displayed |
Dead battery. |
Replace battery. |
|||||
|
|
||||||
even after unit |
Polarities of battery |
Replace the battery |
|||||
is turned on. |
|||||||
are (+ and -) wrong. |
with correct polarities. |
||||||
|
|
|
|
|
|||
|
|
|
|
|
|
|
|
|
|
|
|
|
The lens cover may |
Replace the lens cover |
|
|
|
|
|
|
be dirty. |
with a new one. |
|
“°F” or “°C”flashes, |
|
|
|||||
Lens may be dirty. |
Clean the lens with |
||||||
but “0” symbol |
|||||||
a cotton swab. |
|||||||
is NOT displayed |
|
||||||
|
|
||||||
|
|
|
|
|
Ear drum may |
Remove earwax. |
|
|
|
|
|
|
be blocked with earwax. |
||
|
|
|
|
|
|
|
|
|
|
|
|
|
The unit is working |
Place unit in ear, wait |
|
|
|
|
|
|
|||
|
|
|
|
|
|||
|
|
|
|
|
under high room |
2 seconds. Press button |
|
|
|
|
|
|
|||
|
|
|
|
|
temperature, where |
and wait for 4 beeps. |
|
A "0 0" symbol |
a special operation |
Remove from ear, |
|||||
is displayed. |
is needed. |
look at results. |
|||||
|
|
|
|
|
|
Low battery. |
Replace battery. |
|
|
|
|
|
|
|
|||
|
|
|
|
|
|
|||
|
|
|
|
|
|
|||
After all the symbols |
||||||||
on display illuminate, |
|
|
||||||
a " |
" mark |
|
|
|||||
is displayed. |
|
|
||||||
|
|
|
|
|
|
|
|
|
The display light is not |
Low battery. |
Replace battery. |
||||||
turned on. |
||||||||
|
|
|||||||
8
 Loading...