

Page 1
Thank you for purchasing the ReliOn® Digital Temple
Thermometer. The thermometer enables accurate
meas
utempe
rature rements in approximately 6-10 seconds,
using simple steps.
Table of Contents:
QUICK START
Section 1 About Body Temperature Measurement
Sect
ion 2 Installing and Replacing the Batteries
Sect
ion 3 Guidelines for Use
Sect
ion 4 Care and Cleaning
Sect
ion 5 Troubleshooting and Special Indications
Sect
ion 6 Technical Information
Sect
ion 7 Warranty and Service Information
IMPO
RTANT! Read user manual before using the thermometer.
QUICK START
1. Install batteries into the thermometer. Make sure the polarity is correct
(see section 2).
2. Pr
ess and release the blue ON/OFF button. Unit will beep once. Wait until it
beeps
again twice and °F appears in the display (see section 3).
3. Pl
ace and hold the thermometer probe firmly to the skin at the temple and
wait
several seconds for the device to beep once more (see section 3).
4. Re
ad the temperature on the display (see section 3).
General Warnings:
1. Measurement body location is the temple, in proximity to the temporal artery,
between the eye socket and the hairline.
2. Do
not place the thermometer on scarred tissue compromised by skin disorder,
open
sores or abrasions and patients in trauma.
3. Co
nsult your physician when using drug therapies that may raise the local skin
tempe
rature in the forehead; this may lead to incorrect reading.
4. Do
not place the thermometer on skin exposed to direct sunlight, fireplace heat,
air
conditioner flow and cold/warm compress therapies.
5. Ke
ep the thermometer out of reach of unsupervised children.
6. Do
not drop the thermometer or expose to heavy shock. The unit is not
shock
proof.
Instruction for Use
Digital Temple Thermometer
7. Do not immerse the thermometer in water or any other liquid. The unit is not
water proof.
8. In
order to ensure accurate measurement, please wait at least two minutes
betw
een consecutive measurements for the unit to readjust to room temperature.
9. Th
e device is not suitable for use in presence of flammable anesthetic mixture
with
air or with Oxygen or Nitrous Oxide.
10. D
o not store the unit in direct sunlight, at a high temperature, in high humidity
or d
ust. Performance of the unit may be degraded.
11. S
top using the thermometer if it operates erratically or if display malfunctions.
12. C
lean the thermometer probe before storing. (See section 4, Care & Cleaning)
13. D
o not attempt to disassemble the unit except to replace the batteries.
14. I
f the thermometer has been stored at below-freezing temperatures, allow the
unit
to warm naturally to room temperature before using.
15. P
erformance of the device may be degraded if operated or stored outside stated
tempe
ratures and humidity ranges or if the patient's temperature is below the
ambie
nt (room) temperature.
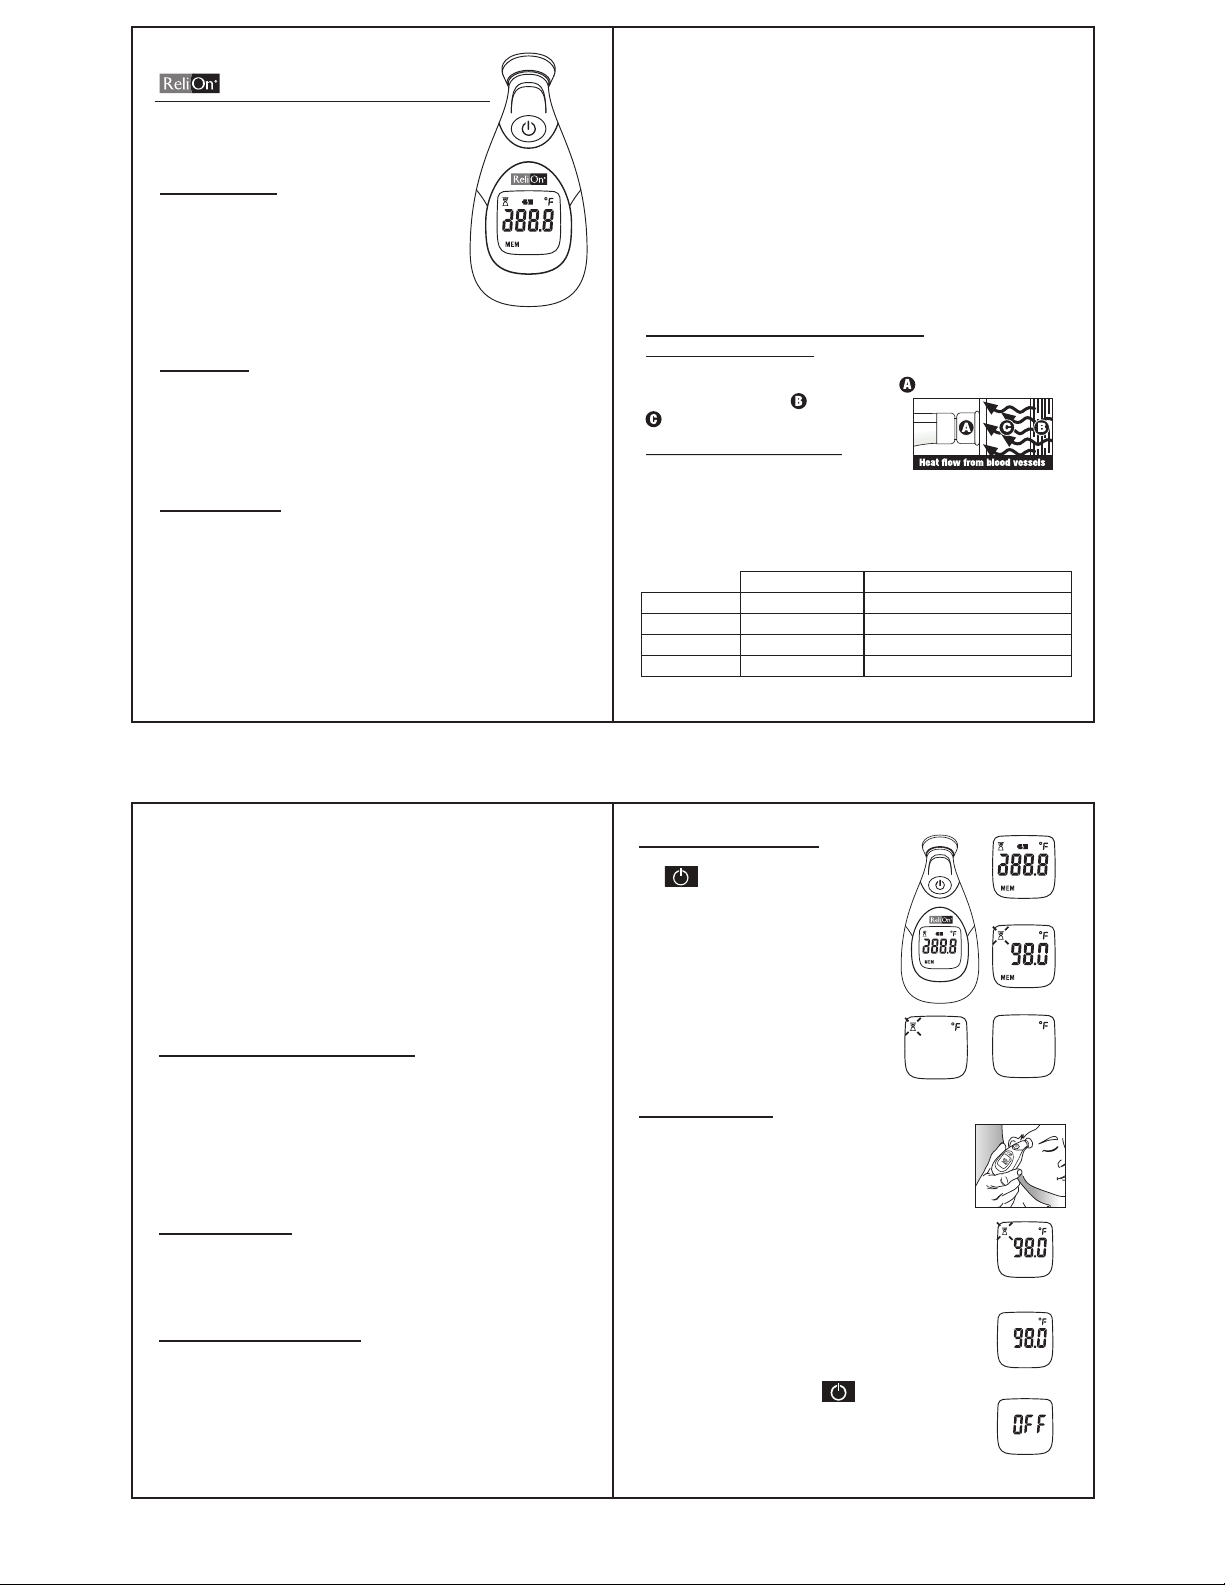
1. About Body Temperature Measurement:
How does the thermometer work?
Your ReliOn
®
Digital Temple Thermometer accurately measures body heat using
Rapid, Accurate, State of the Art Technology. Sensor rapidly tracks the heat flow
gener
ated from blood vessels to the skins surface
and converts measurement to body temperature.
Information about Body Temperature
What is "normal" body temperature?
"Normal" body temperatu
re varies from person to person and changes
according
to time of day and body location. Hot or cold baths, physical exercise,
smoking and dri
nking, hot or cold drinks may change body temperature by one
degree
or more.
The following table shows the Temperature ranges:
What is fever? Average normal temperature ranges
Forehead Over 100.0°F / 37.8°C 97.0°F - 100.0°F / 36.1°C – 37.8°C
Recta
l* Over
100.4°F / 38°C 97.3°F - 100.4°F / 36.3°C – 38°C
Oral (mouth)* Over
100.0°F / 37.8°C 97.0°F - 100.0°F / 36.1°C – 37.8°C
Axilla (armpit)* Over
99.0°F / 37.2°C 95.4°F - 99.0°F / 35.2°C – 37.2°C
* Fever definitions according to the American Medical Association
The thermometer is designed to measure with precision the temperature in the forehead,
in proximity to the temporal artery, between the eye socket and the hairline. It is
impor
tant to know that the thermal characteristics of each measurement body location –
tempo
ral, axillary, oral or rectal - are unique. The variance in temperature measurement in
diff
erent body locations is due to the human body and not the thermometer.
The t
hermometer readings are equivalent to oral measurements.
IMPOR
TANT:
" It
is recommended that you measure the body temperature of each
indiv
idual when healthy to establish a "normal" temperature.
" Due
to the unique body physiology of each person, it is recommended
that
you take a persons temperature at the same temple location in
compa
rative measurements.
2. Installing and Replacing the Batteries:
The thermometer uses 2 standard AAA 1.5v batteries. To install/replace :
1. Remove the battery cover by sliding it out of its housing.
2. Fi
rmly attach the batteries to their place, make sure polarity is correct.
3. Sl
ide the battery cover back into place.
IMPOR
TANT: It is recommended to remove the batteries from the thermometer
when
it is not used for a long period.
WARNI
NG: Do not dispose of batteries in fire, recharge, put in backwards, disassemble,
mix
with used or other battery types – they may explode or leak and cause injury. Waste
batt
eries should be deposited in batteries recycling trash only.
3. Guidelines for Use:
a. Use this thermometer on clean dry skin. Wipe away any perspiration prior to use.
b. Make sure that the thermometer and the patient do not move while
measu
rement is in progress.
c. Corr
ect placing and good contact with the body ensure reliable readouts.
d. Do n
ot try to take a measurement until the two beeps are heard.
Setti
ng the Operating Scale °F or°C
The d
evice setting is by default Fahrenheit (°F), however at any time, the scale may be
chang
ed. To change the scale to Celsius (°C), or back to °F, by pressing the Power button
with
in the first 3 seconds of turning on the unit.
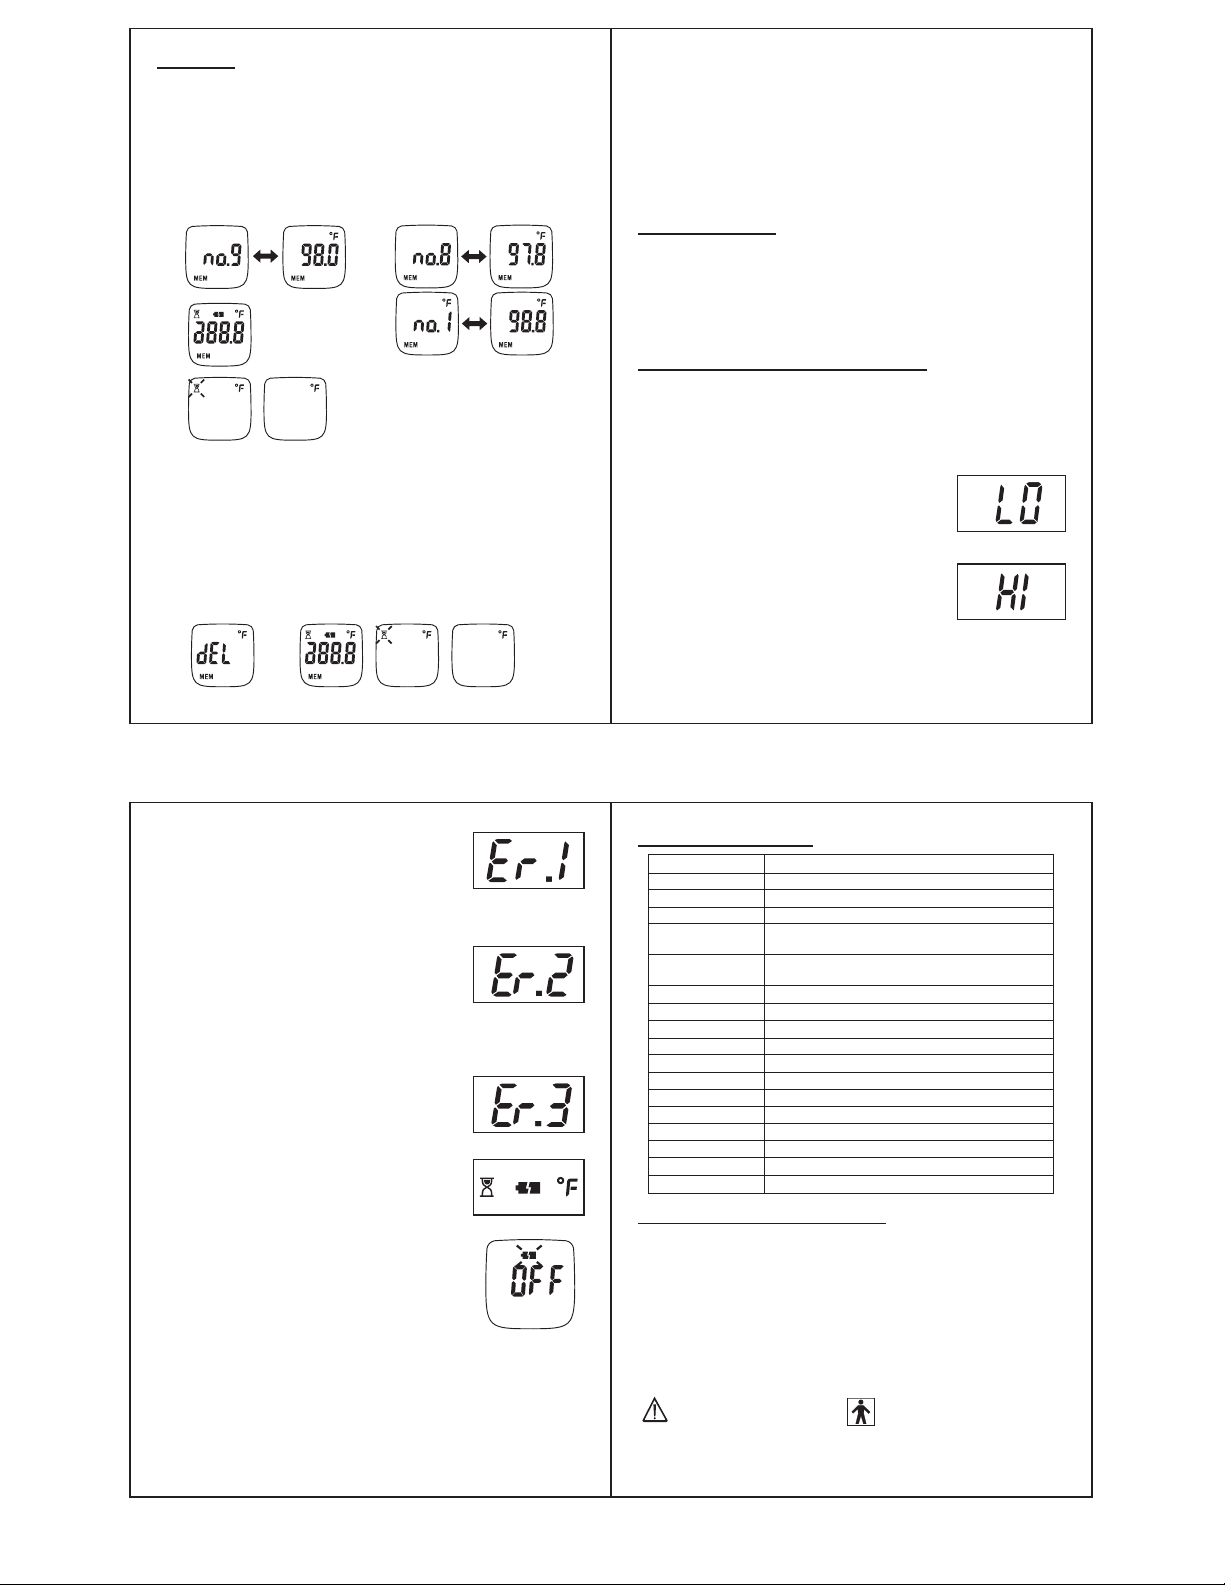
Operating the Thermometer
1. Press and release the blue Power
button. You will hear one
beep
. All segments will be displayed.
2. Th
e result of the last temperature
measu
rement will be displayed for 2 seconds*.
3. Wa
it for the hourglass icon to disappear,
then t
wo beeps will be heard to indicate that
the t
hermometer is now "ready to measure".
4. Ta
ke a measurement according to the
foll
owing guidelines:
Taking Temperature:
a. Make sure temporal area is dry and clean.
b. Remove hair from the temporal area.
c. Pl
ace the thermometer probe in the center of the temporal area
betwe
en the eye socket and the hairline. Gently press it against
th
e temple to ensure good contact with the skin is maintained.
d.
Hold the device still and keep the patient still for the duration of
the m
easurement.
e. As
soon as the thermometer is in place, the measurement starts
autom
atically. A running circle will appear indicating that
measu
rement is progressing successfully.
f. A
temperature reading will be displayed within 6 – 10 seconds. One
long
beep will be heard to indicate that measurement is complete.
g. Wa
it for the hourglass icon to disappear, then two beeps will be
hear
d to indicate that the thermometer is now
"rea
dy for measurement again".
h. Pr
ess and release the blue Power button to turn
the t
hermometer off.
i. If
you want to get the maximum accuracy,please wait two minutes
after
turning the thermometer off and then begin again at Step 1 of
"Ope
rating the Thermometer".
(1) One "Beep"
(g) Two "Beeps"
(h)
(f) One long "Beep"
(2)
(4) Two "Beeps"(3)
1 2
3 4
Page 2
(4)
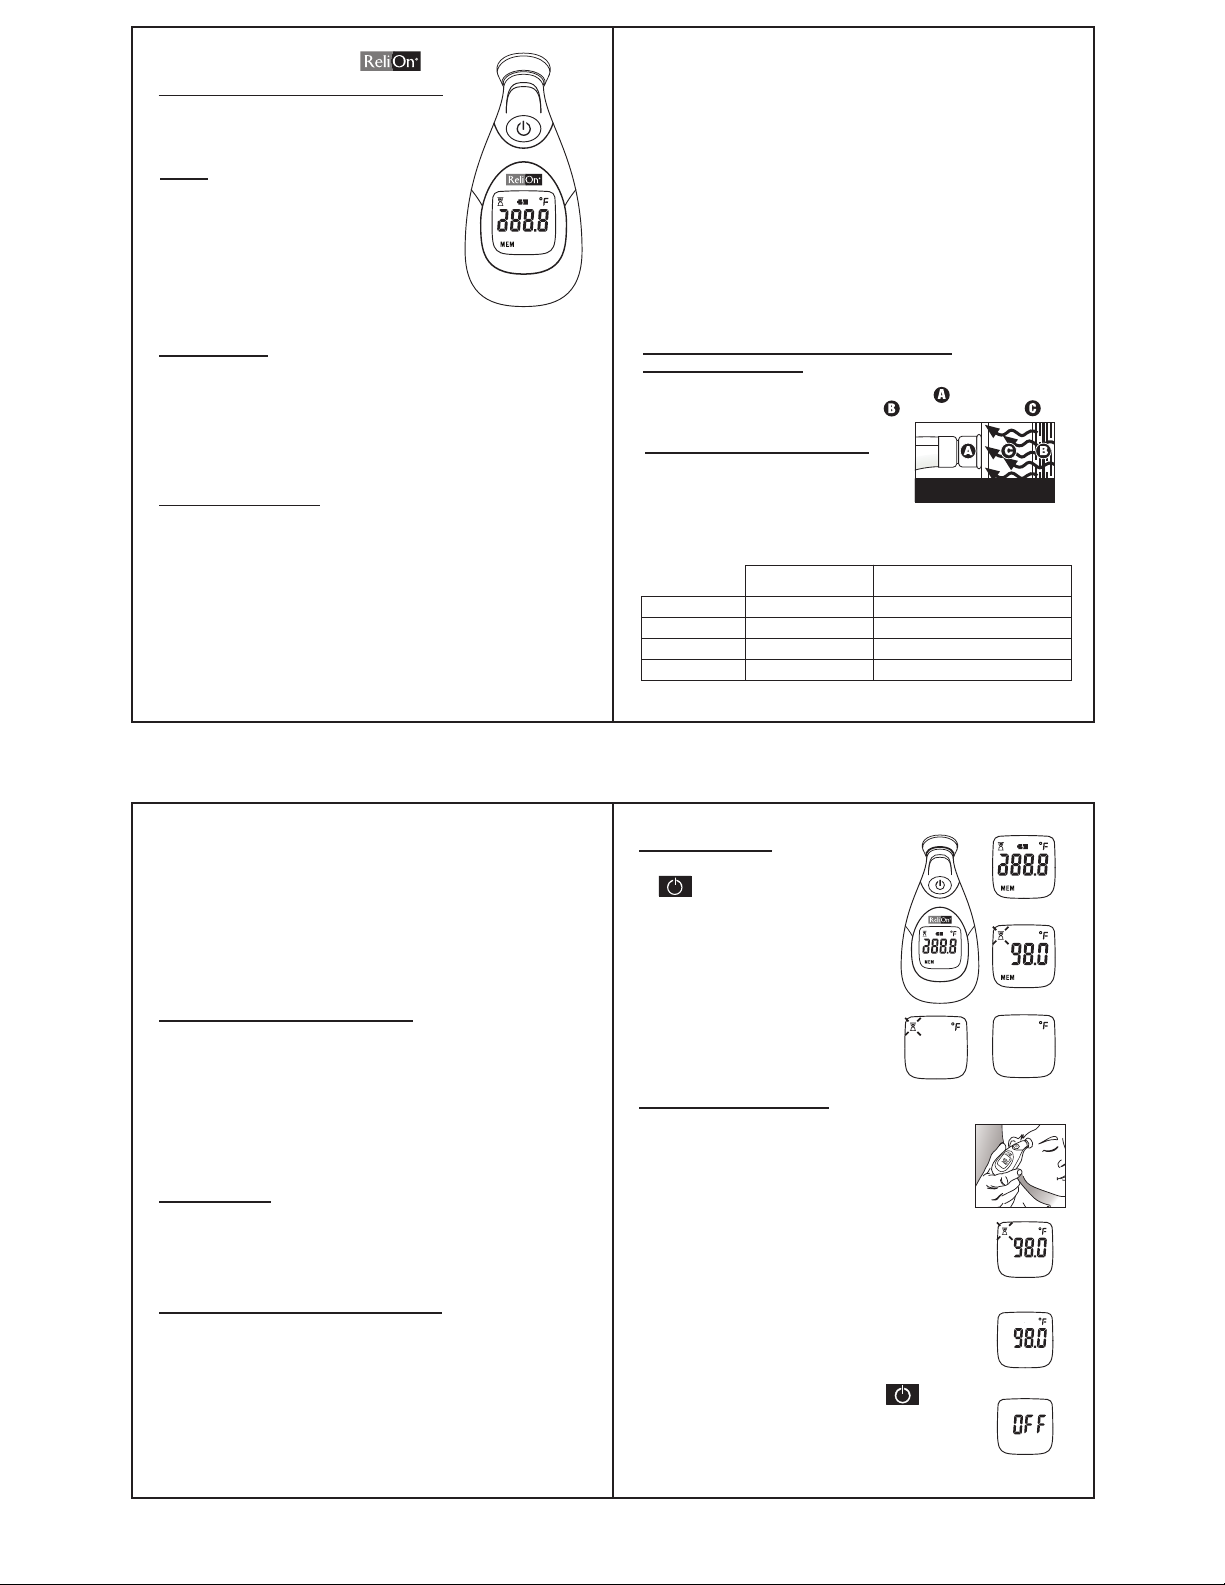
Memory Mode
Recalling Memory:
1. If the power is on, turn off the power first.
2. Pr
ess and hold the Power button for about 3 seconds until the last recorded
Temp
erature is displayed.
3. Pr
essing the Power button repeatedly will take you to each recorded temperature
in th
e memory.
4. A
fter you release the Power button the unit will return to all segments display.
5. W
ait for the hourglass icon to disappear, then two beeps will be heard to indicate that
the t
hermometer is now
"ready to measure".
Deleting Memories:
1.Repeat the first two steps of "Recalling Memories".
2.Pre
ss and hold the Power button for three seconds until "dEL" is displayed.
3. (a
) To delete:
Pres
s and release the Power button to erase all of the records in the unit. A beep
is he
ard.
(b) T
o cancel:
DO
NOT press the Power button for 10 seconds, the unit will return to all
segme
nts display.Wait for the hourglass icon to disappear, then two beeps will be
heard to indicate that the thermometer is now
"ready to measure".
Indication 1: The thermometer is too cold or too hot
to operate.
Instr
uction: Veri
fy room temperature is within product
range 60.8°F to 104.0°F (16°C to 40°C).
Reta
ke temperature using proper technique (see section 3).
Indic
ation 2: Temp
erature did not register because of
poor contact, patient movement or poor
plac
ement.
Instr
uction: Turn
the unit OFF, wait two minutes,
turn it ON again and retake temperature
usin
g proper technique (see section 3).
Indic
ation 3: Unit
malfunctioned.
Instruction: Do n
ot use the thermometer – contact
distributor for instructions (see section 7).
Low B
atteries Indication: Batt
ery icon is on continuously.
Instruction: The
batteries have enough remaining life
for approximately 30 more measurements.
Drain
ed Batteries Indication: Disp
lays OFF with battery
icon flashing when thermometer is turned
on a
nd the device automatically turns itself
OFF a
fter 15 seconds.
Instr
uction: The
batteries are drained - replace batteries
(see section 2).
IMPORTANT:
" Clean the thermometer after each use (see section 4).
"
In order to ensure accurate measurement,please wait at least two minutes
between consecutive measurements for the unit to readjust to room
tempe
rature.
" If the thermometer is not turned off, it will shut off automatically within 1 minute.
"
Once the thermometer is "ready to measure", it will shut off automatically after 1
minute if it has not made good contact or maintained good contact with the patient's skin.
" Because the thermometer is a very sensitive device, the patient and thermometer should
be in the same room temperature (approx. 60.8~104.0? ) for at least 20 minutes before
using to avoid any incorrect measurements.
4. Care and Cleaning:
* Wipe the tip and probe with an alcohol swab or cotton swab moistened with
70% isopropyl alcohol before & after each use. * After cleaning, wait at least 2
minutes before taking a measurement for the unit to readjust to room temperature.
* Use only a soft dry cloth to clean the body of the thermometer (if necessary).
* Neve
r use an abrasive cleanser or submerge the thermometer in
wate
r or other liquids.
* Do not expose the thermometer to extreme temperatures, humidity, direct
sunlight or shock. Store at room temperature.
5. Troubleshooting and Special Indications:
The thermometer has been designed to display feedback/warnings to ensure proper usage
and accurate temperature measurement. When an error or indication appears, one "beep"
sign
al will be heard once every second for 5 seconds and then the thermometer will turn
off a
utomatically. In the event of a malfunction or incorrect temperature measurement,
the f
ollowing warnings will be displayed:
Indication: The measured temperatur
e is below 95°F
(35°C) Displ
ay will read LO.
Instruction: Turn the uni
t OFF to wait at least 2 minutes
and then ON agai
n. Retake temperature using
proper technique
(see section 3).
Indication: The measured temperature is above 107.6°F
(42°C). Displ
ay will read HI.
Instruction: Turn the uni
t OFF to wait at least 2 minutes
and then ON agai
n. To verify the reading,
retake temper
ature using proper technique
(see section 3).
* * WA
RNING - A high fever condition requires seek
ing immediate
medical attention * *
HIGH FEVERS ARE DANGEROUS
6. Technical Specifications:
7. Warranty and Service Information:
This thermometer has a One Year Limited Warranty against manufacturers defect under
normal use. Following the directions closely will ensure years of dependable operation.
If th
e thermometer does not function properly, first check the batteries (see Battery
Repl
acement instructions – section 2). Replace if necessary.
If th
e thermometer does not function properly, please write BESTMED, LLC at 331
Corp
orate Circle, Ste E, Golden, CO 80401 or you may call customer service at 1-877-
299-6
700. Our representative will provide further instruction on how to correct the
trou
ble or will ask you to return it for repair or replacement.
* Int
ernally powered device * Type - BF Applied part.
* Deg
ree of protection against ingress of water: Ordinary
Read the Instructions For use Applied part type BF equipment
Distribu
ted by: BESTMED, LLC" Golden, CO 80401
Manufac
tured by: K-jump Health Co., Ltd.
Made in
China
Feature Performance / Data
Measurement time 6 –10 seconds
Meas
urement locations Temporal artery area of the forehead
Meas
urement range 95.5°F to 107.6°F (35°C to 42°C)
Operation environment 60.8°F to 104.0°F (16°C to 40°C)
Humidity: 15
-95% (non condensing)
Stora
ge environment -4°F to 122°F (-20° C to 50° C),
Humi
dity: 15-95% (non condensing)
Meas
urement readout Fahrenheit or Celsius
Accuracy Complies with ASTM
E 1112-00 standard requirements
Disp
lay TN L
CD 1" x 1" (27.0mm x 27.0mm)
Batteries 2 AAA
1.5volt batteries
Battery life Mini
mum 1000 full duty cycles over 24 month period
Weight 2.24oz (56.2gr) including batteries
Dime
nsions 3.86" x 1.79" x 1.17" (9.9 cm x 4.6 cm x 3.0 cm)
Memo
ry Nine sets
Auto shut off After 60
seconds
Case
material Food grade ABS plastic
Prob
e material Stain
less steel and food grade ABS plastic
Warranty 1 year
(2) (3)
(5)
Two "Beeps"
(2) (3b)
Two "Beeps"
5 6
87
Page 3
(h)
(2)
(3)
1 2
3 4
Instrucciones de uso
Termómetro digital para la sien
Gracias por comprar el ReliOn® termómetro digital para
la sien uso. El termómetro le permite medir la
temperatura con precisión en aproximadamente 6 a 10
segundos, siguiendo unos sencillos pasos.
Índice:
INICIO RÁPIDO
Sección 1 Sobre la medición de la temperatura corporal
Sección 2 Instalación y reemplazo de las pilas
Sección 3 Pautas de uso
Sección 4 Cuidado y limpieza
Sección 5 Resolución de problemas e indicaciones
especiales
Sección 6 Información técnica
Sección 7 Información sobre la garantía y reparaciones
¡IMPORTANTE! Lea el manual del usuario antes de
usar el termómetro.
INICIO RÁPIDO
1. Ponga las pilas en el termómetro. Asegúrese de usar la polaridad correcta
(consulte la sección 2).
2. Presione y suelte el botón azul de ENCENDIDO/APAGADO. La unidad emitirá un
pitido. Espere hasta que emita un segundo pitido y aparezca °F en la pantalla
(consulte la sección 3).
3.
Coloque la sonda del termómetro contra la piel de la sien y manténgala
firmemente mientras espera varios segundos hasta que el dispositivo pite una
vez más (consulte la sección 3).
4. Lea la temperatura en la pantalla (consulte la sección 3).
Advertencias generales:
1. El lugar de medición es la sien, cerca de la arteria temporal, entre la cavidad del
ojo y la línea del cabello.
2. No coloque el termómetro sobre tejido cicatrizado afectado por un trastorno
cutáneo, heridas o abrasiones abiertas ni a pacientes con traumatismo.
3. Consulte a su médico cuando use terapias farmacológicas que pueden elevar la
temperatura de la piel en la frente; esto puede causar una lectura incorrecta.
4. No coloque el termómetro sobre piel que esté expuesta a luz solar directa, al
calor de una chimenea, al flujo del aire acondicionado ni a terapia con
compresas frías o calientes.
5. Mantenga el termómetro fuera del alcance de niños sin supervisión.
6.
No deje caer el termómetro ni lo exponga a golpes fuertes. La unidad no es a
prueba de golpes.
Flujo de calor de
los vasos sanguíneos
7. No sumerja el termómetro en agua ni en ningún otro líquido. La unidad no es
impermeable.
8. Para obtener una medición precisa, espere al menos dos minutos entre
mediciones consecutivas para que la unidad se reajuste a la temperatura
ambiente.
9.
El uso de este dispositivo no es apropiado en presencia de mezclas anestésicas
inflamables con aire o con oxígeno u óxido nitroso.
10.
No guarde la unidad bajo luz solar directa, a altas temperaturas, en
condiciones de alta humedad o polvo. Se puede deteriorar el funcionamiento
de la unidad.
11.
Deje de usar el termómetro si funciona de manera irregular o si la pantalla no
funciona bien.
12.
Limpie la sonda del termómetro antes de guardarlo. (Vea sección 4, el
Cuidado & Limpiando)
13.
No intente desarmar la unidad excepto para cambiar las pilas.
14.
Si se ha guardado el termómetro a temperaturas bajo cero, deje que éste
vuelva de manera natural a la temperatura ambiente antes de usarlo.
15.
El funcionamiento del dispositivo puede verse deteriorado si se usa o se
guarda fuera de los rangos de temperatura y humedad mencionados o si la
temperatura del paciente es inferior a la temperatura ambiente (de la
habitación).
1. Sobre la medición de la temperatura corporal:
¿Cómo funciona el termómetro?
El termómetro digital para la sien ReliOn
®
mide con precisión el calor corporal
utilizando tecnología de punta, rápida y precisa. El sensor detecta rápidamente
el flujo de calor que va de los vasos sanguíneos a la superficie de la piel y
convierte la medición en temperatura corporal.
Información sobre la temperatura corporal
¿Cuál es la temperatura corporal “normal”?
La temperatura corporal “normal” varía de una
persona a otra y cambia según la hora del día y
la ubicación del cuerpo. Los baños fríos o calientes,
el ejercicio físico, fumar y beber, las bebidas calientes o frías pueden cambiar la
temperatura corporal un grado o más.
La siguiente tabla muestra los rangos de temperatura:
¿Qué es fiebre?
Rangos promedio de
temperatura normales
La frente
Rectal*
Oral (boca)*
Axila (sobaco)*
Más de 37.8°C / 100°F
Más de 38°C / 100.4°F
Más de 37.8°C / 100.0°F
Más de 37.2°C / 99.0°F
36.1°C -37.8°C / 97.0°F – 100.0°F
36.3°C - 38°C / 97.3°F – 100.4°F
36.1°C -37.8°C / 97.0°F – 100.0°F
35.2°C – 37.2°C / 95.4°F – 99.0°F
*Definiciones de fiebre según la American Medical Association (Asociación médica americana)
El termómetro está diseñado para medir con precisión la temperatura en la frente,
cerca de la arteria temporal, entre la cavidad del ojo y la línea del cabello. Es
importante saber que las características térmicas de cada parte del cuerpo (sien,
axila, boca o recto) son únicas. La variación de temperatura en las diferentes partes
del cuerpo se debe al propio cuerpo humano, no al termómetro. Las lecturas del
termómetro equivalen a las mediciones orales.
IMPORTANTE:
"
Se recomienda medir la temperatura corporal de cada individuo
cuando se está sano para establecer una temperatura “normal”.
"
Debido a la fisiología corporal única de cada persona, se recomienda
tomar la temperatura de dicha persona en el mismo punto en la sien
cuando se comparen mediciones.
2. Instalación y reemplazo de las pilas:
El termómetro usa 2 pilas estándar AAA de 1.5v. Para instalarlas o cambiarlas:
1. Quite la cubierta de las pilas deslizándola para sacarla de su lugar.
2. Coloque bien las pilas en su lugar y asegúrese de usar la polaridad correcta.
3. Deslice la cubierta de las pilas para volverla a colocar.
IMPORTANTE: Se recomienda quitar las pilas del termómetro cuando no se vaya a
usar en un largo periodo de tiempo.
ADVERTENCIA: No arroje las pilas al fuego
, las recargue, las coloque al revés, las
desarme, ni las mezcle con pilas usadas o de otro tipo; pueden explotar o tener
fugas y provocar lesiones. Las pilas que haya que desechar deben depositarse
únicamente en lugares de reciclaje de pilas.
3. Pautas de uso:
a. Use este termómetro sobre piel limpia y seca. Limpie el sudor antes de usarlo.
b. Asegúrese de que ni el termómetro ni el paciente se mueven mientras se está
tomando la temperatura.
c.
La colocación correcta y el buen contacto con el cuerpo aseguran que las lecturas
sean confiables.
d. No intente tomar una medición hasta que se oigan dos pitidos.
Fijación de la escala de funcionamiento en ˚F ó ˚C
El ajuste predeterminado del dispositivo es Fahr
enheit (°F); sin embargo, en
cualquier momento, se puede cambiar la escala. Para cambiar a Celsius (°C) o de
nuevo a °F, presione el botón de encendido dentro de los primeros 3 minutos de
haber encendido la unidad.
Uso del termómetro
1. Presione y suelte el botón azul de encendido
. Oirá un pitido. Aparecerán en pantalla
todos los segmentos.
2. El resultado de la medición de temperatura
anterior aparecerá durante 2 segundos*.
3. Espere a que desaparezca el ícono del reloj
de arena; después se oirán dos pitidos que
indican que ahora el termómetro está
“listo para usarse”.
4. Real
ice una medición de acuerdo a las
siguientes pautas:
Medición de la temperatura:
a. Asegúrese de que el área de la sien está seca y limpia.
b. Retire el cabello del área de la sien.
c. Coloque la sonda del termómetro en el centro del área de
la sien entre la cavidad del ojo y la línea del cabello.
Con cuidado, presiónelo contra la sien para asegurarse de
que se mantiene un buen contacto con la piel.
d. No mueva el dispositivo y mantenga quieto al paciente
mientras se realiza la medición.
e. La medición comienza automáticamente en cuanto se coloca el
termómetro. Aparece un círculo en movimiento que indica que
la medición se está llevando a cabo con éxito.
f. En 6 a 10 segundos, aparecerá una lectura de temperatura.
Se oirá un pitido largo que indica que ha terminado la medición.
g. Espere a que desaparezca el ícono del reloj de arena; después
se oirán dos pitidos que indican que ahora el termómetro está
“listo para tomar mediciones nuevamente”.
h. Presione y suelte el botón azul de encendido par
a
apagar el termómetro.
i. Si desea obtener la máxima precisión, espere dos minutos
después de apagar el termómetro y vuelva a comenzar en el
paso 1 de “Uso del termómetro”
.
(1) Un “pitido”
(4) Dos “pitidos”
(f)
Un “pitido” largo
(g)
Dos “pitidos”
Page 4

(4)
(2) (3)
(5)
(2) (3b)
5 6
87
Modo de memoria
Recuperación de la memoria:
1. Si la unidad está encendida, primero apáguela.
2. Mantenga presionado el botón de encendido durante aproximadamente 3 segundos
hasta que aparezca la última temperatura registrada.
3. Presionar de manera repetida el botón de encendido le llevará a cada temperatura
registrada en la memoria.
4. Después de soltar el botón de encendido, la unidad regresará a la pantalla con
todos los segmentos.
5. Espere a que desaparezca el ícono del reloj de arena; después se oirán dos pitidos
que indican que ahora el termómetro está “listo para usarse”.
Borrado de las memorias:
1. Repita los dos primeros pasos de “Recuperación de la memoria”.
2. Mantenga presionado el botón de encendido durante aproximadamente
3 segundos hasta que aparezca “dEL”.
3. (a) Para borrar:
Presione y suelte el botón de encendido para borrar todos los registros de
la unidad. Se oirá un pitido.
(b) Para cancelar:
NO presione el botón de encendido durante 10 segundos, la unidad
regresará a la pantalla con todos los segmentos. Espere a que desaparezca
el ícono del reloj de arena; después se oirán dos pitidos que indican que
ahora el termómetro está “listo para usarse”.
Dos “pitidos”
Dos “pitidos”
IMPORTANTE:
"
Limpie el termómetro después de cada uso (consulte la sección 4).
"
Para obtener una medición precisa, espere al menos dos minutos entre
mediciones consecutivas para que la unidad se reajuste a la temperatura
ambiente.
"
Si no se apaga el termómetro, éste se apagará automáticamente después de
1 minuto.
"
Una vez que el termómetro esté “listo para usarse”, se apagará automáticamente
después de un minuto si no ha establecido o no se ha mantenido buen contacto con
la piel del paciente.
"
Ya que el termómetro es un dispositivo muy sensible, para evitar mediciones
incorrectas, el paciente y el termómetro deben estar a la misma temperatura
ambiente (aproximadamente 16 a 40°C / 60.8 a 104.0°F) durante al menos
20 minutos antes de usarlo.
4. Cuidado y limpieza:
*
Antes y después de cada uso, limpie la punta y la sonda con un hisopo con alcohol
o un hisopo de algodón con alcohol isopropílico al 70%.
*
Después de limpiarlo,
espere al menos dos minutos antes de tomar una medición para que la unidad
se reajuste a la temperatura ambiente.
*
Use solamente un paño suave y seco para limpiar el cuerpo del termómetro (si es
necesario).
*
Nunca use un limpiador abrasivo ni sumerja el termómetro en agua ni en
otros líquidos.
*
No exponga el termómetro a temperaturas extremas, humedad, luz solar directa o
golpes. Guárdelo a temperatura ambiente.
5. Resolución de problemas e indicaciones especiales:
El termómetro ha sido diseñado para mostrar información y advertencias que aseguren
su uso apropiado y la medición precisa de la temperatura. Cuando aparezca un error o
una indicación, se oirá un “pitido” cada segundo durante 5 segundos y después el
termómetro se apagará automáticamente. En caso de que funcione mal o mida la
temperatura de manera incorrecta, aparecerán las siguientes advertencias:
Indicación: La temperatura medida es inferior a 35°C
(95°F). En la pantalla, aparece LO.
Instrucción: APAGUE la unidad, espere al menos 2 minutos
y luego ENCIÉNDALA nuevamente. Vuelva a
tomar la temperatura siguiendo la técnica
apropiada (consulte la sección 3).
Indicación:
La temperatura medida es superior a 42°C
(107.6°F). En la pantalla, aparece HI.
Instrucción: APAGUE la unidad, espere al menos 2 minutos
y luego ENCIÉNDALA nuevamente. Para
verificar la lectura, vuelva a tomar la
temperatura siguiendo la técnica apropiada
(consulte la sección 3).
* * ADVERTENCIA – Una fiebre alta requiere la búsqueda de atención
médica inmediata * *
LA FIEBRE ALTA ES PELIGROSA
Indicación 1:
El termómetro está demasiado frío o
demasiado caliente para funcionar.
Instrucción:
Verifique que la temperatura de la
habitación esté dentro del rango del
producto de 16°C a 40°C (60.8°F a 104°F).
Vuelva a tomar la temperatura siguiendo la
técnica apropiada (consulte la sección 3).
Indicación 2:
No se registró la temperatura debido a
insuficiente contacto, movimiento del
paciente o mala colocación.
Instrucción:
APAGUE la unidad, espere dos minutos,
ENCIÉNDALA de nuevo y vuelva a tomar la
temperatura siguiendo la técnica apropiada
(consulte la sección 3).
Indicación 3:
La unidad funcionó mal.
Instrucción:
No use el termómetro y póngase en
contacto con el distribuidor para recibir
instrucciones (consulte la sección 7).
Indicación de poca carga de las pilas:
El ícono de las
pilas está encendido continuamente.
Instrucción:
A las pilas les queda una carga como para
aproximadamente 30 mediciones más.
Indicación de pilas agotadas:
La pantalla indica
APAGADO con el ícono de la pila
parpadeando cuando se enciende el
termómetro y el dispositivo se APAGA
automáticamente después de 15 segundos
Instrucción:
Las pilas están agotadas; cámbielas
(consulte la sección 2).
6. Especificaciones técnicas:
7. Información sobre la garantía y reparaciones:
Este termómetro tiene una garantía limitada de un año contra defecto de fabricación bajo
condiciones de uso normales. Seguir con precisión las instrucciones asegurará años de
funcionamiento confiable.
Si el termómetro no funciona bien, primero revise las pilas (consulte las instrucciones para el
Reemplazo de las pilas – sección 2). Cámbielas si es necesario.
Si el termómetro no funciona bien, escriba a BESTMED, LLC en la dirección 331 Corporate
Circle, Ste E, Golden, CO 80401 ó llame al servicio de atención al cliente al 1-877-299-6700.
Nuestro representante le proporcionará instrucciones adicionales sobre cómo corregir el
problema o le pedirá que devuelva el termómetro para repararlo o reemplazarlo.
* Dispositivo con alimentación interna * Pieza aplicada tipo BF.
* Grado de protección contra la entrada de agua: Ordinario
Lea las Instrucciones de uso Equipo de pieza aplicada tipo BF
Distribuido por: BESTMED, LLC Golden, CO 80401
Fabricado por: K-jump Health Co., Ltd.
Hecho en China
Característica Rendimiento / Datos
Tiempo de medición 6 –10 segundos
Lugares de medición Área de la arteria temporal de la frente
Rango de medición 35°C a 42°C (95.5°F a 107.6°F)
Ambiente de funcionamiento 16°C a 40°C (60.8°F a 104°F)
Humedad: 15 a 95% (sin condensación)
Ambiente de almacenamiento -20°C a 50°C (-4°F a 122°F)
Humedad: 15 a 95% (sin condensación)
Lectura de la medición Fahrenheit o Celsius
Precisión Cumple los requisitos de la norma ASTM 1112-00
Pantalla TN LCD 27.0 mm x 27.0 mm (1 pulg. x 1 pulg.)
Pilas Pilas 2 AAA 1.5 voltios
Duración de las pilas Mínimo de 1000 ciclos de trabajo completos durante un
período de 24 meses
Peso 56.2 g (2.24 oz.) incluyendo las pilas
Dimensiones
9.9 cm x 4.6 cm x 3.0 cm (3.86 pulg. x 1.79 pulg. x 1.17 pulg.)
Memoria Nueve grupos
Apagado automático Después de 60 segundos
Material del estuche Plástico ABS de grado alimentario
Material de la sonda Acero inoxidable y plástico ABS de grado alimentario
Garantía 1 año
 Loading...