


3369-93110 (506)
OWNER/OPERATOR MANUAL
CHAINSAWS
G621AVS
WARNING |
|
WARNING |
The engine exhaust from this product |
|
Before using our products, please |
contains chemicals known to the State |
|
read this manual carefully to |
of California to cause cancer, birth |
|
understand the proper use of your |
defects or other reproductive harm. |
|
unit. |
|
|
|
APPLICABLE SERIAL NUMBERS : |
330138 and up |
|
|
 SAFETY FIRST
Instructions contained in warnings within this manual marked with a  symbol concern critical points which must be taken into consideration to prevent possible serious bodily injury, and for this reason you are requested to read all such instructions carefully and follow them without fail.
■ WARNINGS IN THE MANUAL

 WARNING
This mark indicates instructions which must be followed in order to prevent accidents which could lead to serious bodily injury or death.

 IMPORTANT
This mark indicates instructions which must be followed, or it leads to mechanical failure, breakdown, or damage.
 NOTE
NOTE
This mark indicates hints or directions useful in the use of the product.
CONTENTS
1.Parts location …………………………………3
2.Specifications …………………………………3
3.Symbols on the machine ……………………4
4.For safe operation ……………………………5
5.Installing guide bar and saw chain …………7
6.Fuel and chain oil ……………………………8
7.Operation ……………………………………10
8.Sawing ………………………………………14
9.Maintenance …………………………………17
10.Maintenance of Saw Chain and Guide Bar ………20
11.Storage ………………………………………21
12.Troubleshooting Guide ……………………22
13.Parts list ………………………………………23
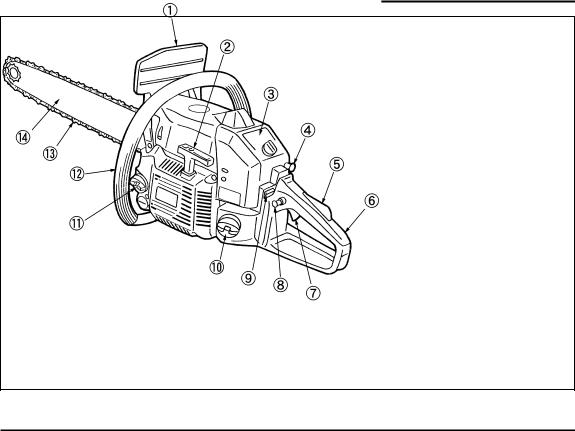
1. Parts location
1. Front guard
2. Starter knob
3. Air cleaner
4. Choke knob
5. Throttle interlock
6. Right handle
7. Throttle lever
8. Latch
9. Engine switch
10. Fuel tank
11. Oil tank
12. Left handle
13. Saw chain
14. Guide Bar
2. Specifications
G621AVS
Power unit :
Displacement ···················································································· 3.78(62.0) cu-in(cm3) Fuel ············································································· Mixture(Gasoline 50 : 2-cycle oil 1) Fuel tank capacity ················································································· 22.4(0.67) fl.oz(  ) Chain oil ························································································ Motor oil SAE #10W-30 Oil tank capacity ···················································································· 11.8(0.35) fl.oz(
  ) Carburetor ········································································· Diaphragm type (Walbro HDA) lgnition system ··································································································· Solid-state Spark plug ······························································································· Champion CJ-7Y Oil feeding system ··········································································· Variable delivery type Sprocket : Pitch – No. of teeth ··························································· 3/8in(9.53mm) – 7T Dimensions : L – W – H ········································ 17.3(433)x10.2(255)x11.4(285) in(mm) Dry weight ································································································ 11.9(5.3) lbs(kg)
Cutting attachment :
Guide bar : Type – Size ······················································· 18(45), 20(50), 24(60) in(cm) Saw chain : Type – Pitch – Gauge ······················· Oregon 72V – 3/8(9.53) – 0.050(1.27) in(mm)
Specifications are subject to change without notice.
3

3. Symbols on the machine

 WARNING
For safe operation and maintenance, symbols are carved in relief on the machine.
According to these indications, please be careful not to take a mistake.
(a). The port to refuel the "MIX GASOLINE"
Position: Fuel cap
(b). The port to refuel the chain oil
Position: Oil cap
(c). Put the switch to the "O" position, immediately the engine stops. Position: Rear-left of the unit
(d). Starting the engine, if you pull out the choke knob (at the backright of the rear handle) to the point of the arrow, you can set the starting mode as follows
•First-stage position – starting mode when the engine is warm.
•Second-stage position – starting mode when the engine is cool. Position: Upper-right of the aircleaner cover
(e). The screw under the "H" stamp is The High-speed adjustment screw.
The screw under the "L" stamp is The Slow-speed adjustment screw.
The screw at the left of the "T" stamp is the Idle adjustment screw.
Position: Left side of the rear handle
(f). It shows the directions that the chain brake is released (for the white arrow) and activated (for the black arrow).
Position: Front of the chain cover
IMPORTANT ENGINE INFORMATION
THIS ENGINE CONFORMS TO US EPA P H 1 F O R S M A L L O F F - ROA D E N G I N E S .
ENGINE FAMILY : 5KZXS. 0625MN:EM ENGINE DISPLACEMENT : 62cc
REFER TO OWNER'S MANUMAL FOR MAINTENANCE SPECIFICATIONS AND ADJUSTMENTS.
MANUFACTURED :
RedMax Made in Japan
INFORMATION IMPORTANTE CONCERNANT LE MOTEUR
Ce moteur conformc aux normcs U.S. EPA PH1 pour les petits moteurs tout-terrain.
Type de moteur : 5KZXS. 0625MN:EM Cylindrée du moteur : 62cc
Se référer au Manuel de l'utilisateur pour les spécifications d'entretien et les réglages.
Manufacturé :
RedMax Made in Japan
4


 4. For safe operation
1.Never operate a chain saw when you are fatigued, ill, or upset, or under the influence of medication that may make you drowsy, or if you are under the influence of alcohol or drugs.
2.Use safety footwear, snug fitting clothing and eye, hearing and head protection devices.
3.Always use caution when handling fuel. Wipe up all spills and then move the chain saw at least ten(10) feet(three(3)
m)from the fueling point before starting the engine.
3a) Eliminate all sources of sparks or flame (ie. smoking, open flames, or work that can cause sparks) in the areas where fuel is mixed, poured, or stored.
3b) Do not smoke while handling fuel or while operating the chain saw.
4.Do not allow other persons to be near the chain saw when starting the engine or cutting a wood. Keep bystanders and animals out of the work area. Children, pets, and bystanders should be a minimum of thirty(30) feet away when you start or operate the chain saw.
5.Never start cutting until you have a clear work area, secure footing, and planned retreat path from the falling tree.
6.Always hold the chain saw firmly with both hands when the engine is running. Use a firm grip with thumb and fingers encircling the chain saw handles.
7.Keep all parts of your body away from the saw chain when the engine is running.
8.Before you start the engine, make sure the saw chain is not contacting anything.
9.Always carry the chain saw with the engine stopped, the guide bar and saw chain to the rear, and the muffler away from your body.
10.Always inspect the chain saw before each use for worn, Ioose, or changed parts. Never operate a chain saw that is damaged, improperly adjusted, or is not completely and securely assembled. Be sure that the saw chain stops moving when the throttle control trigger is released.
11.All chain saw service, other than the items listed in the Operator’s Manual, should be performed by competent chain saw service personnel. (e.g., if improper tools are used to remove the flywheel, or if an improper tool is used to hold the flywheel in order to remove the clutch, structural damage to the flywheel could occur which could subsequently cause the flywheel to disintegrate).
12.Always shut off the engine before setting it down.
13.Use extreme caution when cutting small size brush and saplings because slender material may catch the saw chain and be whipped toward you or pull you off balance.
14.When cutting a limb that is under tension, be alert for spring back so that you will not be struck when the tension in the wood fibers is released.
15.Keep the handles dry, clean and free of oil or fuel mixture.
5


 4. For safe operation
16.Operate the chain saw only in well ventilated areas. Never start or run the engine inside a closed room or building. Exhaust fumes contain dangerous carbon monoxide.
17.Do not operate a chain saw in a tree unless specially trained to do so.
18.Guard against kickback. Kickback is the upward motion of the guide bar which occurs when the saw chain at the nose of the guide bar contacts an object. Kickback can lead to dangerous loss of control of the chain saw.
19.When transporting your chain saw, make sure the appropriate guide bar scabbard is in place.
20.This chain saw is equipped with a spark arrester built-in muffler. Periodically check the arrester to keep it in good order.
KICKBACK SAFETY PRECAUTIONS FOR
CHAIN SAW USERS

 WARNING
Kickback may occur when the nose or tip of the guide bar touches an object, or when the wood closes in and pinches the saw chain in the cut. Tip contact in some cases may cause a lightning fast reverse reaction, kicking the guide bar up and back towards the operator. Pinching the saw chain along the top of the guide bar may push the guide bar rapidly back towards the operator. Either of these reactions may cause you to lose control of the saw which could result in serious personal injury.
Do not rely exclusively on the safety devices built into your saw. As a chain saw user you should take several steps to keep cutting jobs free from accident or injury.
(1)With a basic understanding of kickback you can reduce or eliminate the element of surprise. Sudden surprise contributes to accidents.
(2)Keep a good grip on the saw with both hands, the right hand on the rear handle, and the left hand on the front handle, when the engine is running. Use a firm grip with thumbs and fingers encircling the chain saw handles. A firm grip will help you reduce kickback and maintain control of the saw. Don’t let go.
(3)Make certain that the area in which you’re cutting is free from obstructions. Do not let the nose of the guide bar contact a log, branch, or any other obstruction which could be hit while you are operating the saw.
(4)Cut at high engine speeds.
(5)Do not overreach or cut above shoulder height.
(6)Follow manufacturers sharpening and maintenance instructions for saw chain.
(7)Only use replacement bars and chains specified by the manufacturer or the equivalent.
6

5. Installing guide bar and saw chain
F1
F2
F3

 WARNING
The saw chain has very sharp edges. Use thick protective gloves for safety.
1.Loosen the nuts and remove the chain cover. (F1)
2.Install the attached spike to the power unit.
3.Fit the saw chain around the guide bar and, while gearing the chain to the sprocket, mount the guide bar to the power unit. Then fit the chain tensioner nut into the lower hole of the guide bar. (F1)
(1)Chain cover
(2)Chain tensioner nut
 NOTE
NOTE
Pay attention to the correct direction of the saw chain. (F2)
(1) Moving Direction
4.Fit the chain cover to the power unit and fasten the nuts to finger tightness.
5.While holding up the tip of the bar, adjust the chain tension by turning the tensioner screw until the tie straps just touch the bottom side of the bar rail.
6.Tighten the nuts securely with the bar tip held up (12~15 N·m). Then check the chain for smooth rotation and proper tension while moving it by hand. If necessary, readjust with the chain cover loose.
7.Tighten the tensioner screw. (F3)
(1)Loosen
(2)Tighten
 NOTE
NOTE
A new chain will expand its length in the beginning of use. Check and readjust the tension frequently as a loose chain can easily derail or cause rapid wear of itseif and the guide bar.
7

6. Fuel and Chain oil

 WARNING
•Gasoline is very flammable. Avoid smoking or bringing any flame or sparks near fuel. Make sure to stop the engine and allow it cool before refueling the unit. Select outdoor bare ground for fueling and move at least 3m (10ft) away from the fueling point before starting the engine.
•The RedMax engines are lubricated by oil specially formulated for air-cooled 2-cycle gasoline engine use. If RedMax oil is not available, use an anti-oxidant added quality oil expressly labeled for air-cooled 2-cycle engine use. (JASO FC GRADE OIL or ISO EGC GRADE)
•Do not use BIA or TCW (2-stroke watercooling type) mixed oil.
8
RECOMMENDED MIXING RATIO GASOLINE 50:OIL 1
50:1 MIXING CHART
GASOLINE |
gal. |
1 |
2 |
3 |
4 |
5 |
|
|
|
|
|
|
|
2-CYCLE OIL fl.oz |
2.6 |
5.2 |
7.8 |
10.4 |
13 |
|
|
|
|
|
|
|
|
|
|
|
|
|
|
|
GASOLINE |
liter |
1 |
2 |
3 |
4 |
5 |
|
|
|
|
|
|
|
2-CYCLE OIL |
ml |
20 |
40 |
60 |
80 |
100 |
|
|
|
|
|
|
|
•Exhaust emission are controlled by the fundamental engine parameters and components(eq., carburation, ignition timing and port timing) without addition of any major hardware or the introduction of an inert material during combustion.
•These engines are certified to operate on unleaded gasoline.
•Make sure to use gasoline with a minimum octane number of 89 RON (USA/Canada: 87AL)
•If you use a gasoline of a lower octane value than prescribed, there is a danger that the engine temperature may rise and an engine problem such as piston seizing may consequently occur.
•Unleaded gasoline is recommended to reduce the contamination of the air for the sake of your health and the environment.
•Poor quality gasolines or oils may damage sealing rings, fuel lines or fuel tank of the engine.
HOW TO MIX FUEL

 IMPORTANT
Pay attention to agitation.
1.Measure out the quantities of gasoline and oil to be mixed.
2.Put some of the gasoline into a clean, approved fuel container.
3.Pour in all of the oil and agitate well.
4.Pour In the rest of gasoline and agitate

6. Fuel and Chain oil
again for at least one minute. As some oils may be difficult to agitate depending on oil ingredients, sufficient agitation is necessary for the engine to last long. Be careful that, if the agitation is insufficient, there is an increased danger of early piston seizing due to abnormally lean mixture.
5.Put a clear indication on the outside of the container to avoid mixing up with gasoline or other containers.
6.Indicate the contents on outside of container for easy identification.
FUELING THE UNIT
1.Untwist and remove the fuel cap. Rest the cap on a dustless place.
2.Put fuel into the fuel tank to 80% of the full capacity.
3.Fasten the fuel cap securely and wipe up any fuel spillage around the unit.

 WARNING
1.Select bare ground for fueling.
2.Move at least 10feet (3meters) away from the fueling point before starting the engine.
3.Stop the engine before refueling the unit. At that time, be sure to sufficiently agitate the mixed gasoline in the container.
FOR YOUR ENGINE LIFE, AVOID;
1.FUEL WITH NO OIL(RAW GASOLINE) – It will cause severe damage to the internal engine parts very quickly.
2.GASOHOL – It can cause deterioration of rubber and/or plastic parts and disruption of engine lubrication.
3.OIL FOR 4-CYCLE ENGINE USE – It can cause spark plug fouling, exhaust port blocking, or piston ring sticking.
4.Mixed fuels which have been left unused for a period of one month or more may clog the carburetor and result in the engine failing to operate properly.
5.In the case of storing the product for a
long period of time, clean the fuel tank after rendering it empty. Next, activate the engine and empty the carburetor of the composite fuel.
6.In the case of scrapping the used mixed oil container, scrap it only at an authorized repository site.
 NOTE
NOTE
As lot details of quality assurance, read the description in the section Limited Warranty carefully. Moreover, normal wear and change in product with no functional influence are not covered by the warranty. Also, be careful that, if the usage in the instruction manual is not observed as to the mixed gasoline, etc. described therein, it may not be covered by the warranty.
CHAIN OIL
Use motor oil SAE 10W-30 all year round, or SAE 30-40 in summer and SAE 20 in winter.
 NOTE
NOTE
Do not use waste or regenerated oil that can cause damage to the oil pump.
9

7. Operation
F6
F7
F8
F9
F10

 WARNING
It is very dangerous to run a chainsaw that mounts broken parts or lacks any parts.
Before starting engine, make sure that all the parts including bar and chain are installed properly.
STARTING ENGINE
1.Fill fuel and chain oil tanks respectively, and tighten the caps securely. (F6)
2.Put the switch to "I" position. (F7)
3.While holding the throttle lever together with the throttle interlock, push in the side latch and release the throttle lever to hold it at the starting position. (F8)
4.Pull out the choke knob to the closed position. (F9)
(1) |
Chain oil |
(2) |
Fuel |
(3) |
Switch |
(4) |
Throttle lever |
(5) |
Throttle interlock |
(6) |
Latch |
(7) Choke knob
 NOTE
NOTE
When restarting immediately after stopping the engine, leave the choke knob at the open position.
5.While holding the saw unit securely on the ground, pull the starter rope vigorously. (F10)

 WARNING
Do not start the engine while hanging the chain saw with a hand. The saw chain may touch your body. It's very dangerous.
6.When engine has ignited first, push in the choke knob and pull the starter again to start the engine.
7.Allow the engine to warm up with the throttle lever pulled slightly.

 WARNING
Keep clear of the saw chain as it will start rotatIng upon starting of engine.
10
 Loading...