

Page 1
Page 2

Page2 of 18
WARNING: NAVIGATION AID
This unit is only an aid to navigation. Its accuracy can be affected by many factors,
including equipment failure or defects, environmental conditions, and improper
handling or use.
It is the User's responsibility to exercise common prudence and navigational
judgement. This unit should not be relied upon as a substitute for such prudence
and judgement. Always keep a proper look-out.
CAUTION
Your chartplotter is an aid to navigation and should not be used as a substitute for good navigational
practice nor for official government paper charts. You should always check that a route is safe. Take
every opportunity to compare the displayed objects with visual targets, such as buoys and coastal
structures.
CAUTION
Always check that your route to a waypoint is safe before travelling towards it.
D6722_1
Page 3
Page 3 of 18
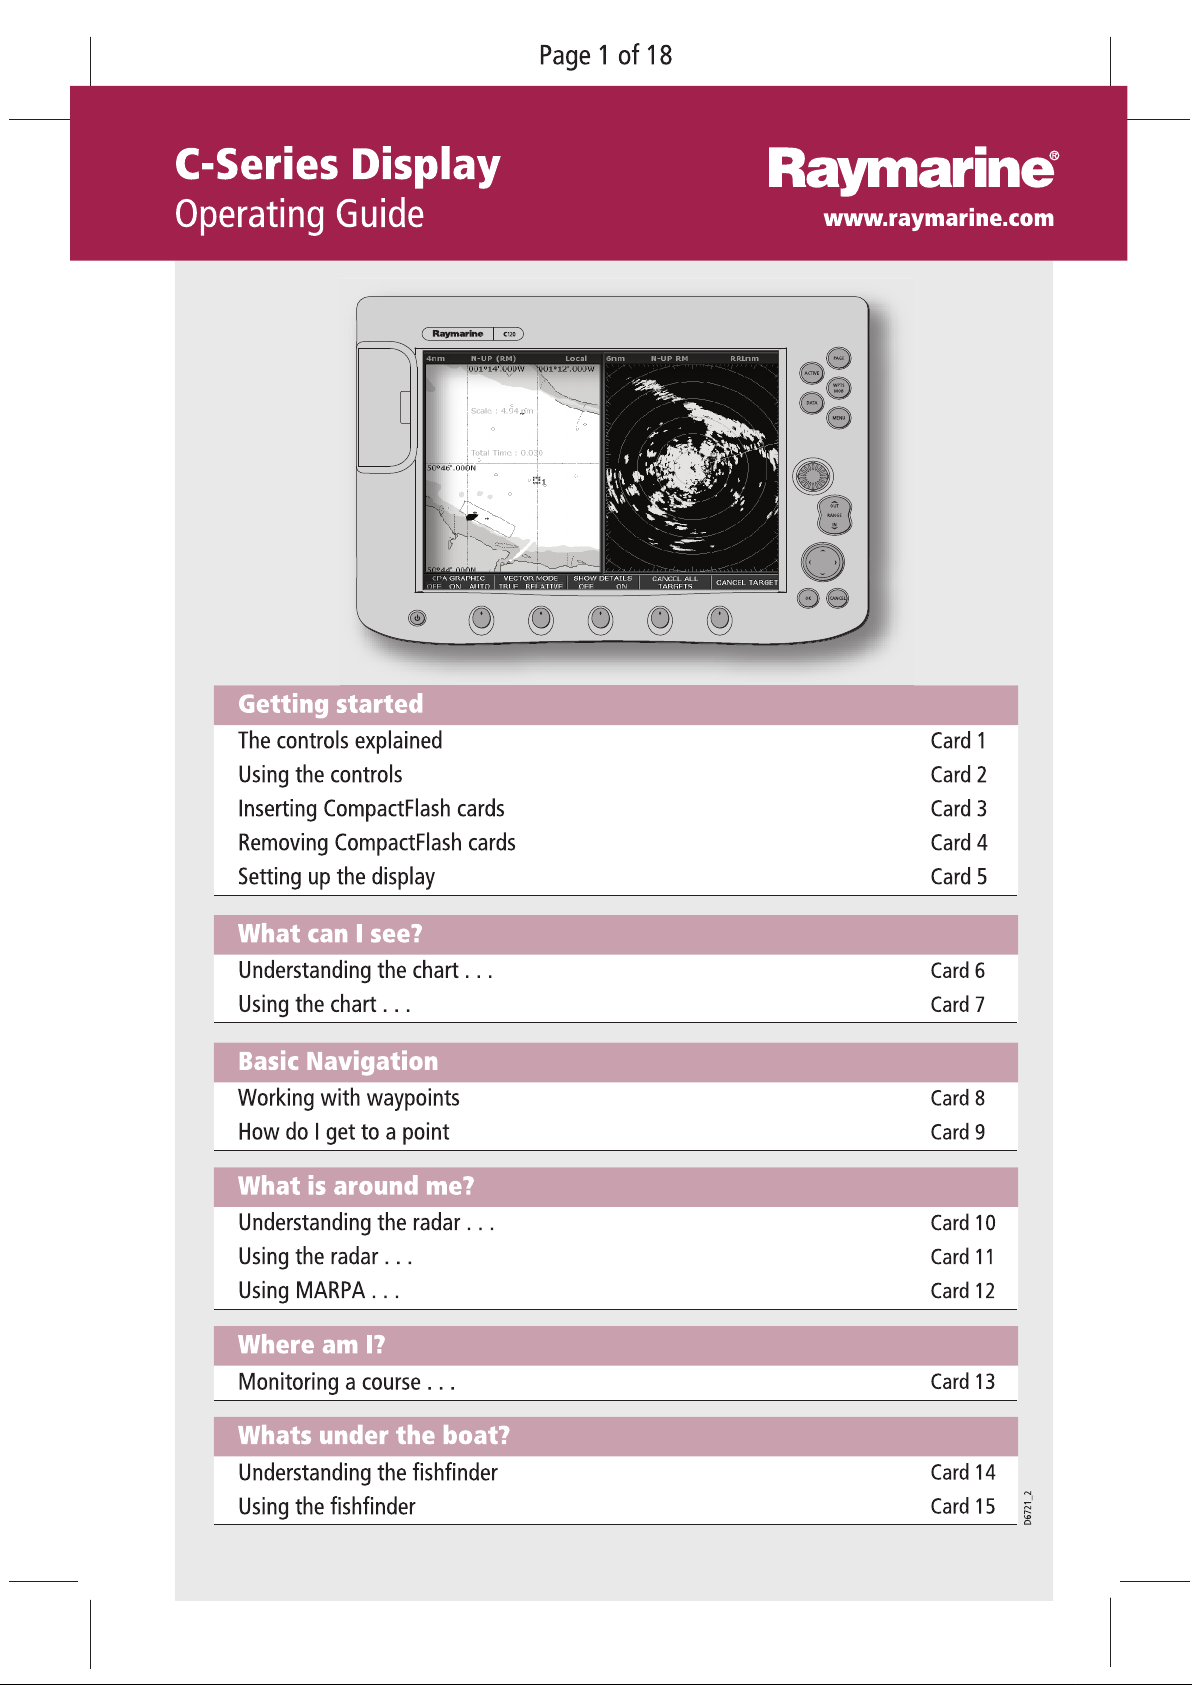
Getting Started
The controls explained
Card No. 1
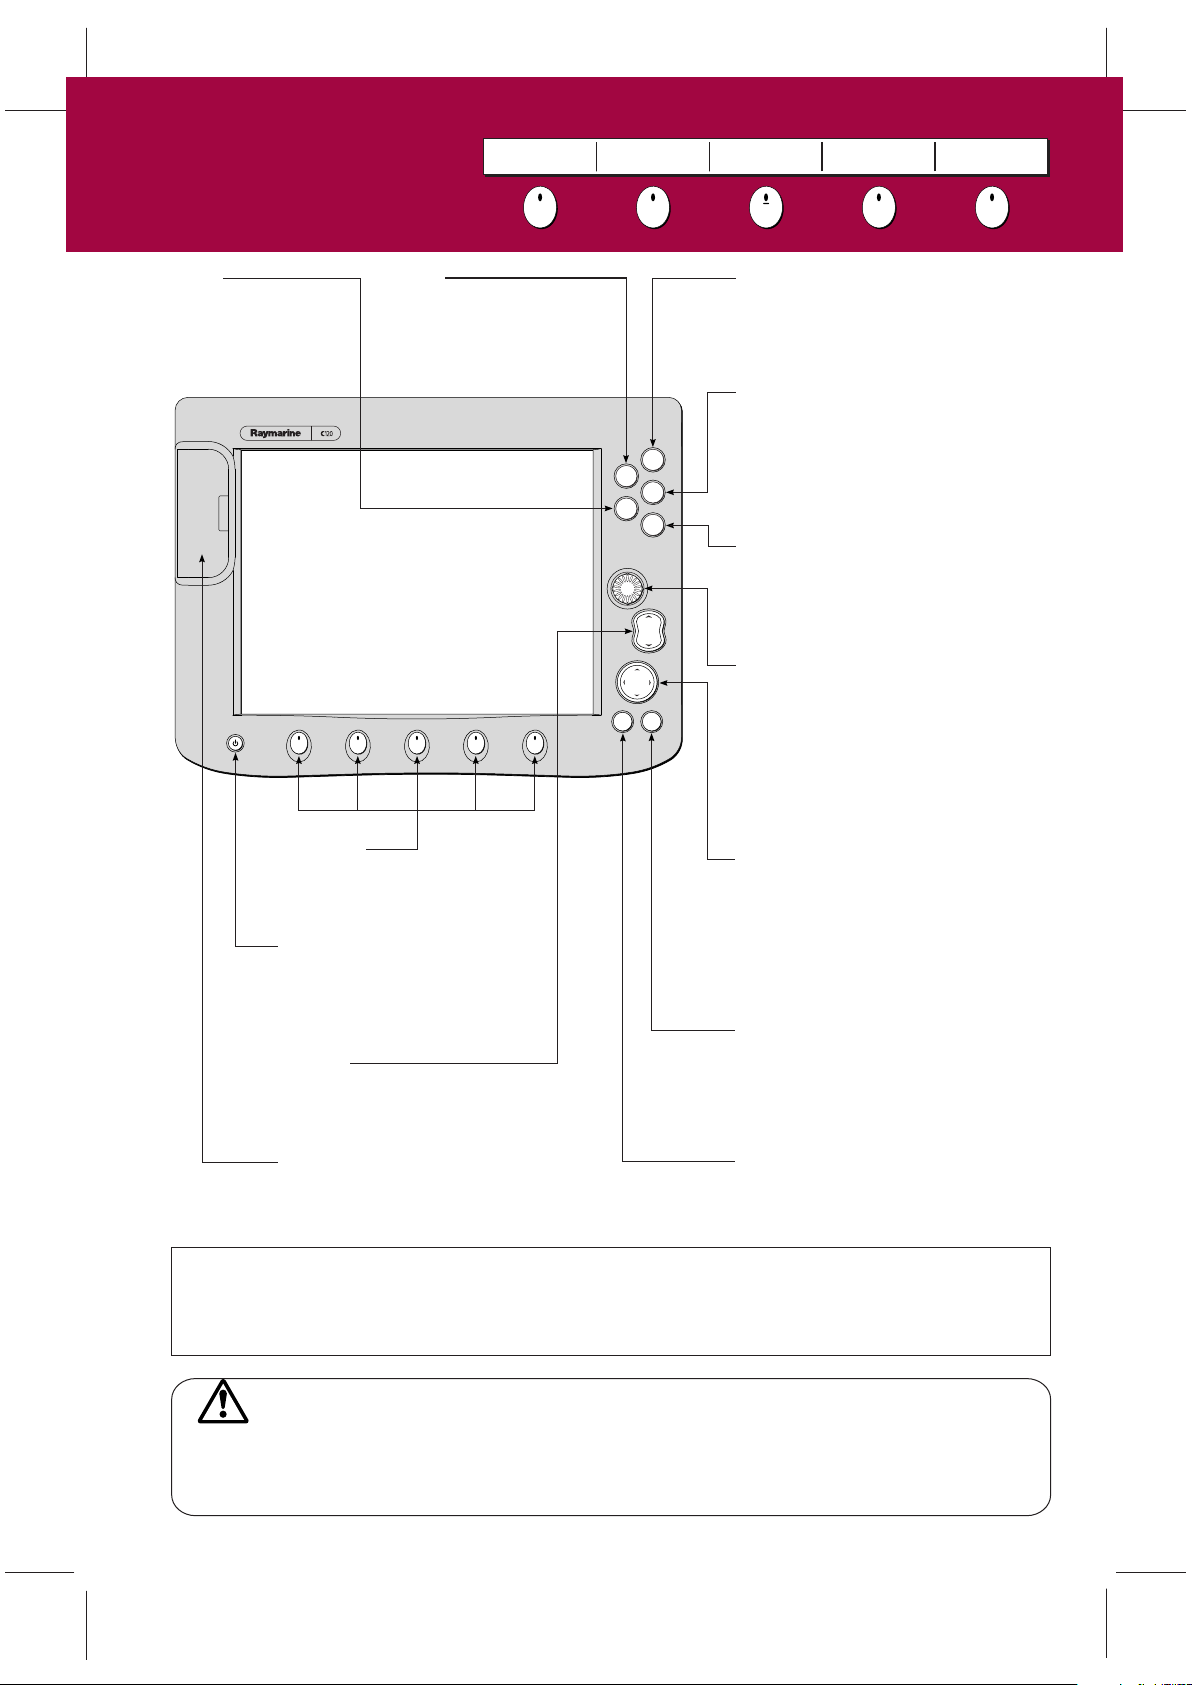
DATA
Pressing this button
displays the data
functions.
ACTIVE
When multiple windows are open:
- Press to select required window.
- Press and hold to maximise the
current window.
33.33% full size
FIND SHIP GOTO ROUTES... TRACKS... PRESENTATION...
PAGE
Press to scroll through available pages.
Press and hold as a short cut to page set
options.
WPTS/MOB
Press to display the waypoint soft keys.
Press again to place waypoint at your boat's
PAGE
ACTIVE
WPTS/
MOB
DATA
MENU
position.
Press and hold to place a Man Overboard
(MOB) marker at your current position.
MENU
Press to access the set up menus.
Press and hold to access the help
OUT
RANGE
IN
information.
Rotary control
Use to edit alpha-numeric values, and scroll
CANCELOK
through lists.
Turn clockwise to increase value.
Turn counter-clockwise to decrease value.
Press to move the cursor to the next
character when editing text.
Softkeys
Press to select the corres-ponding
function identified by the on-screen
label.
Power
Press once to turn ON.
Trackpad
Controls the on-screen cursor.
Also used to scroll through menu items.
Press the corresponding edge of the
trackpad to move the cursor horizontally,
vertically or diagonally.
Press again to access backlight
functions and scanner controls.
Press and hold to turn display OFF.
RANGE
Press to change the display scale so
that a smaller or larger area can be
seen on the screen.
Chart Card slot
Open the cover to install
CompactFlash cards.
CANCEL
Press to cancel the selected on-screen
option when editing data; also used to
return to the previous set of soft keys
or menu.
OK
Press to select an on-screen option, or return
to the previous set of soft keys or menu.
Where can I find out more about the controls?
Press and hold MENU to display help information for the currently displayed soft keys.
?
For more information on the controls refer to
Chapter 2 - General Operation and System Set Up of the C-Series Display Reference Manual
WARNING: NAVIGATION AID
This unit is only an aid to navigation. Its accuracy can be affected by many factors, including equipment failure
or defects, environmental conditions, and improper handling or use. It is the User's responsibility to exercise
common prudence and navigational judgements.This unit should not be relied upon as a substitute for such
prudence and judgement. Always keep a proper look-out.
D6723_2
Page 4
Page 4 of 18
Getting Started
…
GOTO
…
FIND SHIP
…
TRACKS
…
PRESENTATION
ROUTE
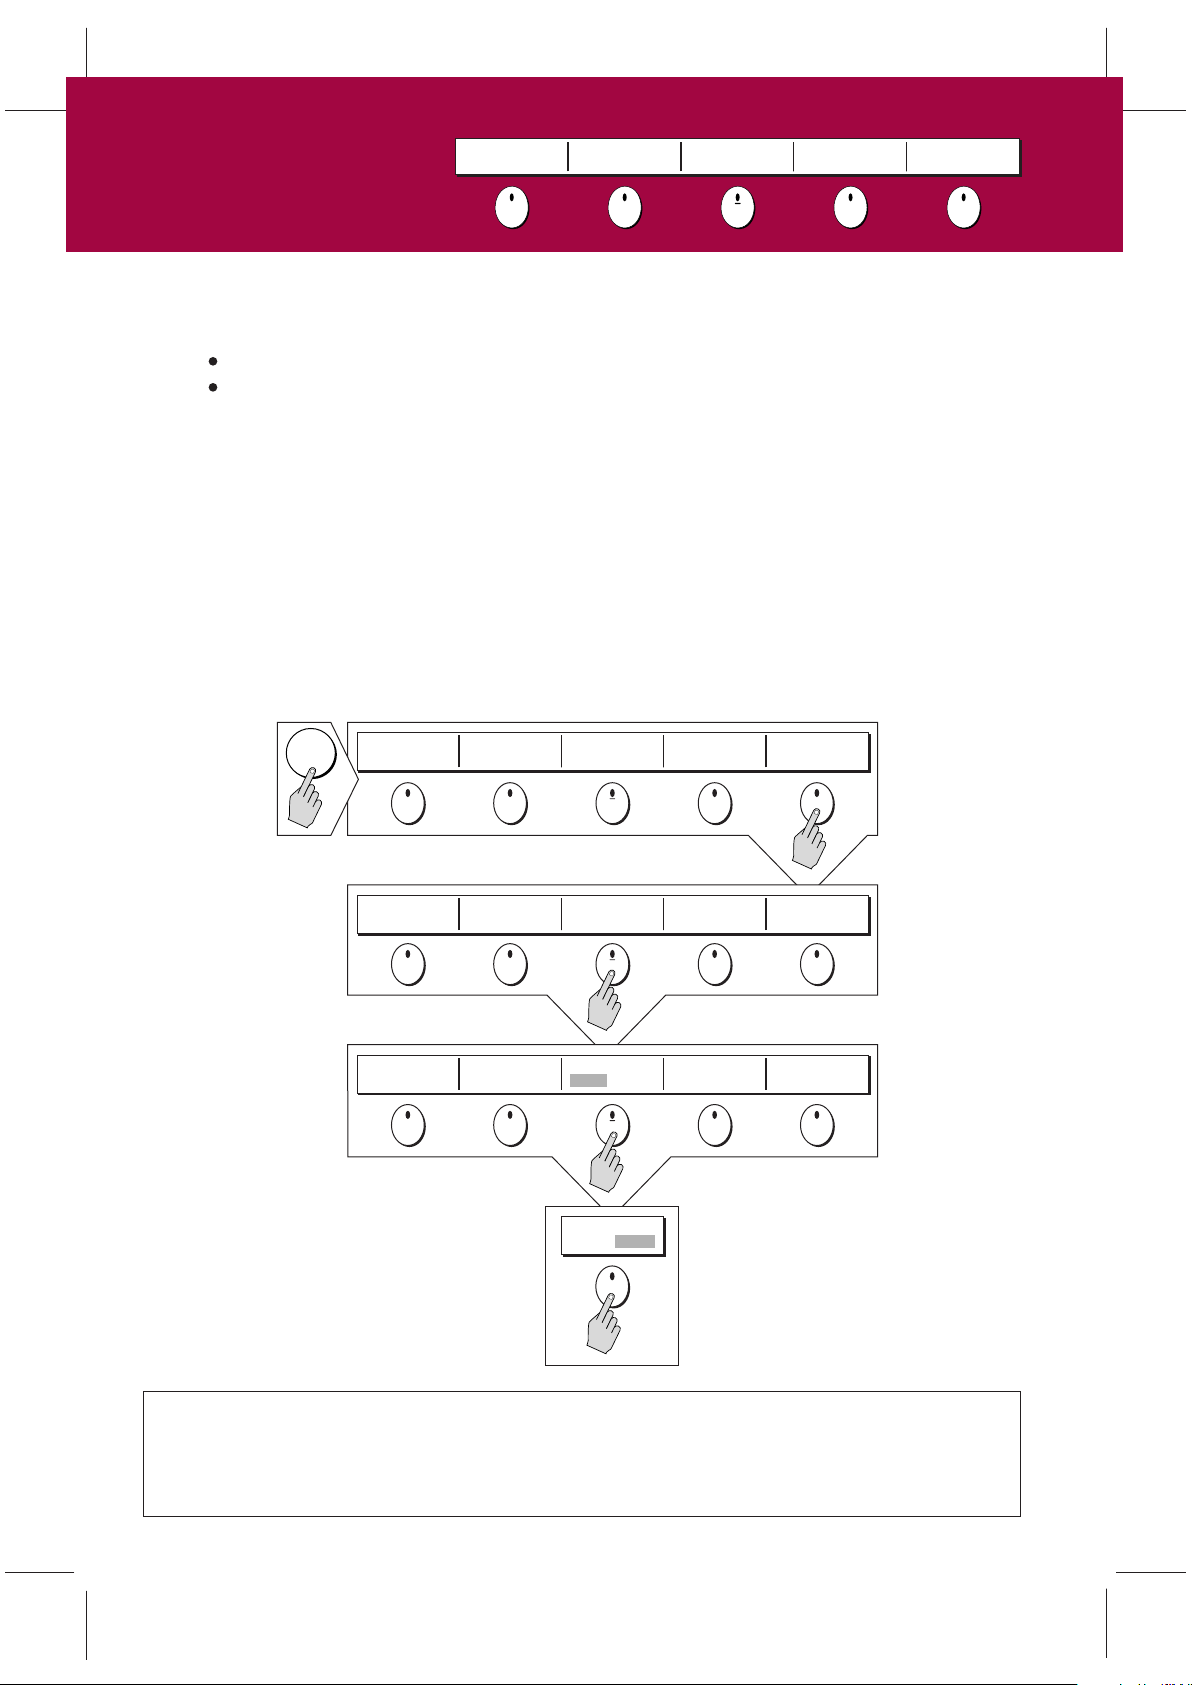
Using the controls
Card No. 2
How do the controls work?
The controls for your C-Series Display can be separated into two types:
Buttons
Soft keys
Buttons - allow you to access various functions of the display, or change what you see on the screen.
Soft keys - There are five soft keys below the screen. When a specific button is pressed the primary
soft key options for the active application are shown at the bottom of the screen.
Pressing a soft key will carry out one of the following functions:
- take an action.
- select one of several options.
- display on-screen information, dialog boxes or menus with new soft keys.
- display further soft key options.
…
Soft keys sometimes interact with other on-screen controls, such as dialog boxes - to edit names etc,
menus to select options.
WPTS/
MOB
WAYPOINT AT
CURSOR
ERASE WAYPOINT SORT LIST
WAYPOINT AT
VESSEL
WAYPOINT AT
POSITION…
SET DEFAULT SYM
& GROUP...
SET UP DEFAULT
SYMB GROUP
UL
A
F
DE
P
U
T
SE
OU
R
G
B
M
SY
GO TO WAYPOINT
OPTIONS…
WAYPOINT
GROUPS...
T
P
REVIEW AND EDIT
WAYPOINTS...
EDIT WAYPOINT…
EDIT DEFAULT
More information...
?
Press and hold MENU to display help information for the currently displayed soft keys.
For more information on the controls refer to
Chapter 2 - General Operation and System Set Up of the C-Series Display Reference Manual
D6762_2
Page 5
Getting Started
Inserting CompactFlash cards
Card No. 3
CAUTION
CompactFlash Card Installation
When installing CompactFlash cards ensure that the card is being fitted the correct
way around.
DO NOT try and force the card as this may result in irreparable damage to the
card.
Water Ingress
To prevent the ingress of water and consequent damage to the display, ensure
that the chart card door is firmly closed at all times during operation. This can be
confirmed by an audible click.
Card Removal
DO NOT use a metallic instrument such as a screwdrver or pliers to help you
remove a card, as doing this can cause irreparable damage.
Page 5 of 18
Card Writing
CompactFlash cards can be damaged if they are removed during either a read or
write operation. A warning is displayed during write operations. The unit is
continually reading the card. It is therefore essential that before removing the
card you follow the correct procedure.
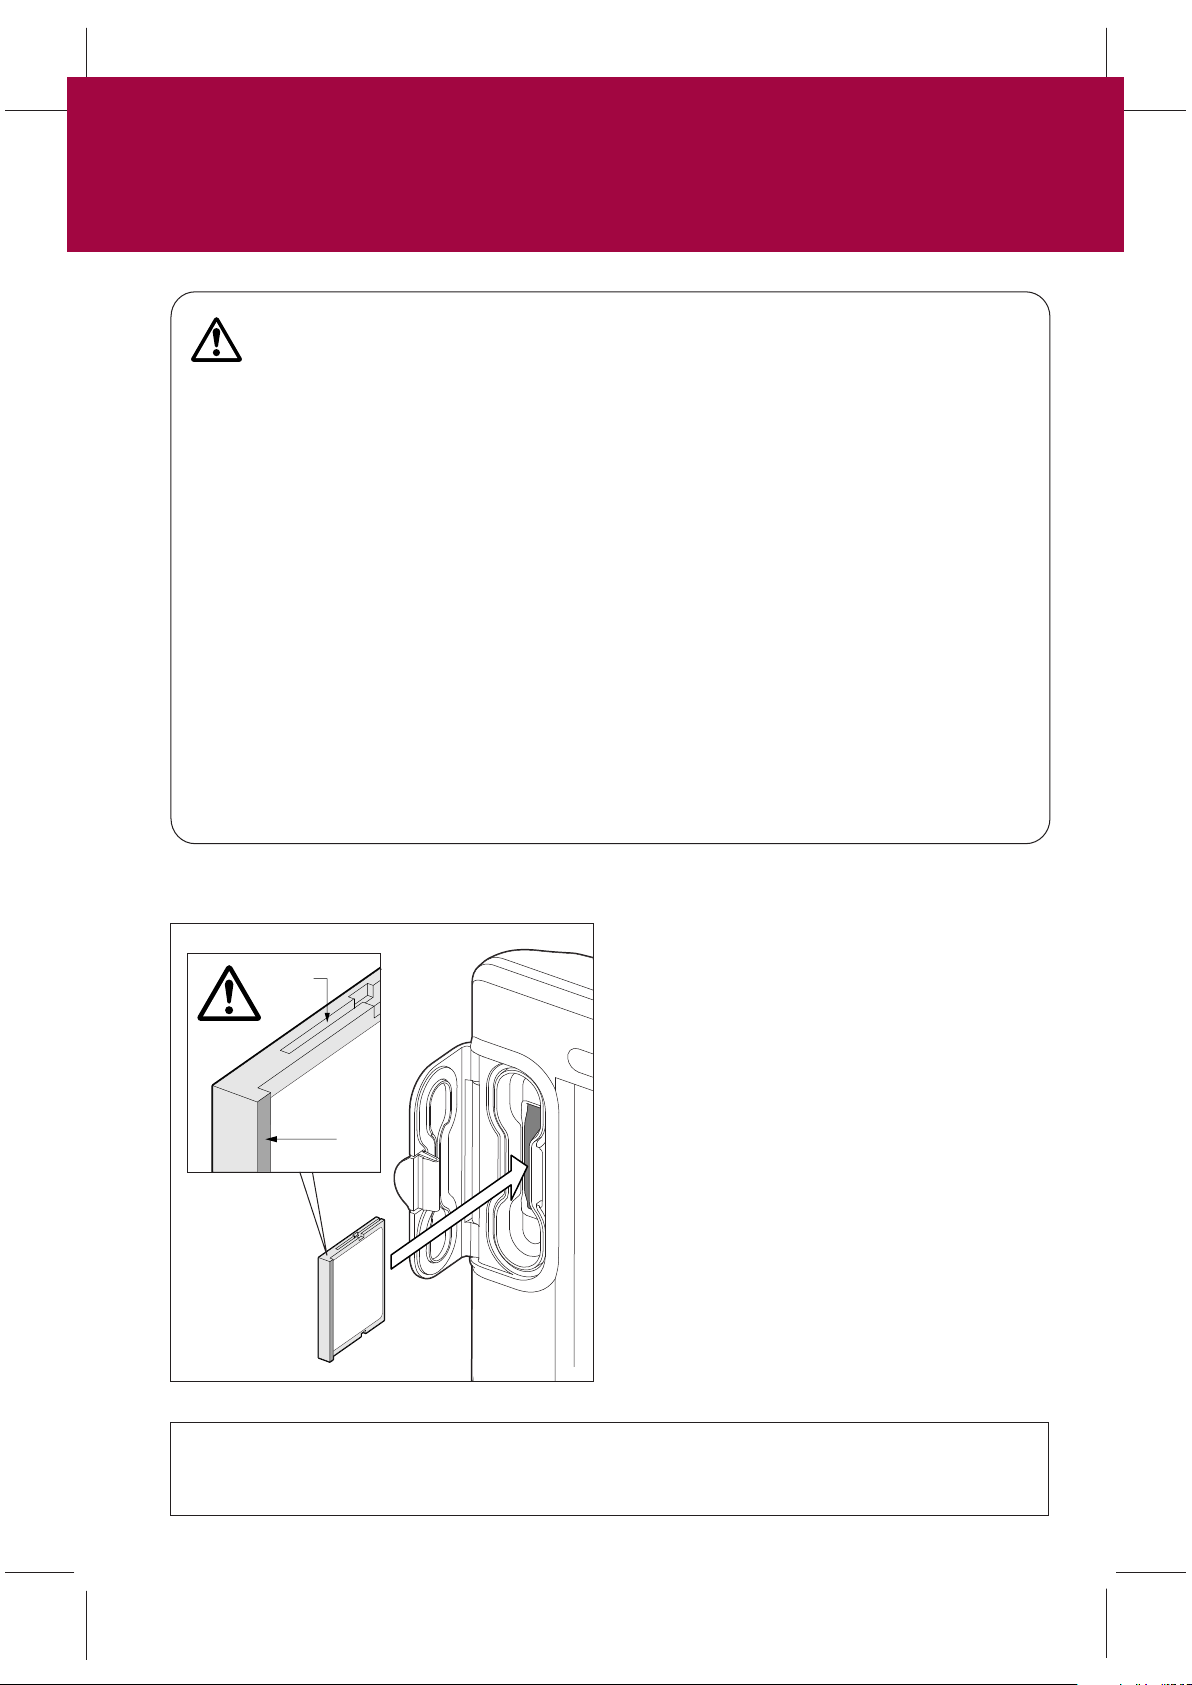
How do I insert a CompactFlash card?
Narrow
Groove
Lip
To insert a card, refer to the illustration, and:
1.Check that you are using the correct type of
card. Raymarine recommend Navionics Chart
cards or SAN DISK CompactFlash cards.
2.Open the chart card door, located on the front
left of the display.
3.Insert the card as shown, with the lip of the
card facing inwards, it should position easily. If
it does not, DO NOT force it, check the direction
in which the lip is facing.
4.Gently press the card home.
5.To prevent the ingress of water and consequent
damage,close the chart card door and press
firmly until a click is heard.
More information.....
?
For more information on using CompactFlash cards refer to Chapter 2 - General Operation &
Sysstem Set Up of the C-Series Reference Manual.
D6724_2
Page 6

Page 6 of 18
Getting Started
Removing CompactFlash cards
Card No. 4
How do I remove a CompactFlash card?
... with the unit powered down
To remove a card with the unit powered down,
refer to the illustration and:
1. Open the chart card door.
2. Grip the card and pull to remove it from its slot.
3. To prevent the ingress of water and
consequent damage, close the chart card door
and press firmly until a click is heard.
... with the unit powered
To remove a card with the unit powered, refer to
the illustration, and:
1. Press MENU. The Setup menu is displayed.
2. Use trackpad up/down to highlight CF CARD
REMOVAL.
3. Use trackpad right to select. The following
message appears:
System checking card access
Please wait until it is safe to remove card....
4. The system will now complete its checks, on
completion the following message will appear:
5. Open the chart card door.
6. Grip the card and pull to remove it from its
slot.
7. To prevent the ingress of water and
consequent, damage close the chart card door
and press firmly until a click is heard.
You may now safely remove your CompactFlash card.
Press OK or CANCEL when finished
Improper card removal
If you try to remove a card when the unit is powered, without accessing the SetUp menu, an error
message appears. Follow the instructions given in the message, and refer to the above section of
this card before proceeding.
D6725_2
Page 7

Page 7 of 18
Getting Started
Setting up the display
Card No. 5
How do I select how the applications are displayed?
The applications are shown using a combination of
page sets, pages and windows.
There are four pre-configured page sets each
containing four pages with a combination of
windows and applications in each.
If these sets are not appropriate, you can use the
custom option to define the combination that suits
Page set
Page
(1, 2, 3 or 4
window options)
your particular needs.
Once you have chosen the required configuration, the same pages, windows and applications will be
opened each time. You can change these preferences as many times as you wish.
Window
How do I select the Page Set?
PAGE
Press
and hold
How do I select a Page?
PAGE
Press
The soft keys reflect the current page set.
The displayed page option is highlighted
How do I select a Window?
For pre-configured page sets:
OK
Press to confirm.
Press up or down
to highlight
required page set.
Selection reflected
on soft keys.
To customise a set:
EDIT CUSTOM SET
Press
and follow
on-screen
instructions.
From multiple to single windows?
PAGE
Press
ACTIVE
Press to
move high-
The active window is
bordered in red.
More information- Refer to the C-Series Display Reference Manual:
?
light to next
window.
Repeat process, to return to multiple windows
ACTIVE
Press
and hold
Chapter 1 - Using the Display
Chapter 2 - General Operation and System Set Up
D6726_2
Page 8

Page 8 of 18
What can I see?
FIND SHIP GOTO ROUTES TRACKS PRESENTATION
Understanding the chart
Card No. 6
What does the chart show me?
The chart shows a high level of cartographic detail to help:
- Interpret your surroundings.
- Navigate to a specific point.
- Monitor where you are going.
- Record where you have been.
- Build and follow routes.
Chart
range
4nm North-Up (Relative Motion) Local
Chart
orientation
Motion
mode
Portside
Chart
view
Status bar
Chart boundary
Gully Ridge
Route
Port point
Creek point
FIND SHIP GOTO… ROUTES… TRACKS… PRESENTATION…
OUT
RANGE
To change the scale and reveal more detail - use the RANGE button.
Press OUT to see a larger area of the chart and press IN to see a smaller area.
IN
To display additional information on a cartographic feature - move the cursor
over the object and press OK.
Cursor
Waypoint
Active waypoint
Current position
Cartographic object
Track
Soft keys
MENU
More information . . .
?
To change the level of cartographic detail displayed on your chart - press MENU,
select Cartography Setup and then toggle the appropriate feature to ON or OFF.
For more information on setting up your display refer to:
Chapter 4 - Using the Chartplotter of the C-Series Reference Manual
D6727-2
Page 9

Page 9 of 18
FIND SHIP GOTO ROUTES TRACKS PRESENTATION
What can I see?
What can I see?
Using the chart ...
Using the chart ...
Card No. 7
Card No. 7
How do I find where I am on the chart?
If you cannot find your boat's position on the screen:
FIND SHIP
Press
How do I change the chart orientation?
FIND SHIP GOTO ROUTES TRACKS PRESENTATION
The screen automatically
pans to your boat's position.
The orientation of the chart refers to the relationship between
the chart and the direction that you are travelling in. It is used
in conjunction with motion mode (see below) to control how
your boat and chart relate to one another and how they are
displayed on screen.
The default mode for chart orientation is North Up (N-up). This
means that your chart is displayed with true north upwards. As
North-up
your heading changes the boat symbol moves accordingly.
If necessary, you can change the
orientation to Head Up (H-up) or
PRESENTATION...
CHART MODE AND
ORIENTATION...
ORIENTATION
H-UP N-UP C-UP
Course Up (C-up), using the
PRESENTATION soft keys.
Press
Press
Press
How do I change how my boat moves on the chart?
How your boat moves on the screen is referred to as the motion mode. The default setting for the
chart is Relative Motion. This means that your boat, (shown as ) is fixed on the screen and the
chart moves relative to your boat e.g.
If necessary, you can change the
motion mode to True (TM) or
Autorange (AR), using the
PRESENTATION soft keys.
More information ....
?
For more information on setting up your display refer to:
Chapter 4 - Using the Chartplotter of the C-Series Reference Manual
PRESENTATION...
Press
CHART MODE AND
ORIENTATION...
Press
MOTION MODE
TM RM AR
Press
D6740_2
Page 10

Page 10 of 18
Basic Navigation
WAYPOINT AT
CURSOR
WAYPOINT AT
VESSEL
WAYPOINT AT
POSITION ...
GO TO WAYPOINT
OPTIONS ...
REVIEW AND EDIT
WAYPOINTS
Working with Waypoints
Card No. 8
What is a waypoint?
A waypoint is a position marked on a chart, radar or fishfinder screen to indicate a site (for fishing, diving
etc), or as a position to go to. You can place a waypoint at the cursor position, your boat's position or at
a specified position (using Lat/Long or Loran TD co-ordinates). Waypoints are represented in chart or
radar applications as an 'X' - this can be changed if required and by a horizontal line labelled WPT in
Fishfinder. The details of each waypoint is stored in a waypoint list which can hold up to 1000 waypoints.
Infrequently used waypoints can be archived to a CompactFlash card or transferred to another NMEA
compatible instrument. Waypoints can be renamed, edited, grouped, or erased, as necessary. To make
full use of waypoint features, ensure your display is receiving heading and position data.
How do I place a waypoint ...
... at the cursor?
Move cursor to
required position
using trackpad.
WPTS/
MOB
Press
WAYPOINT AT
CURSOR
Press
... at the vessel?
WPTS/
MOB
WAYPOINT AT
Press
CURSOR
Press
... OR
WPTS/
MOB
Press x2
How do I navigate to a waypoint ...
... using the cursor?
GO TO WAYPOINT
Place the cursor over
the appropriate waypoint.
... using the waypoint list?
WPTS/
MOB
GO TO WAYPOINT
OPTIONS
...
Press
Press
More information ...
?
For more information on waypoints refer to:
Chapter 3 - Working with Waypoints of the
C-Series Reference Manual
Press
GO TO WAYPOINT
Highlight
required
Press
waypoint
CAUTION
Always check that your route to a waypoint
is safe before travelling towards it.
D6729_2
Page 11

Page 11 of 18
Basic Navigation
SHOW/HIDE
ROUTES
FOLLOW ROUTE
OPTIONS
BUILD NEW ROUTE
TRACKS
REVIEW AND EDIT
ROUTES
How do I get to a point?
Card No. 9
What is a route?
A route is made up of a series of waypoints. These waypoints can either be placed specifically for that
route and/or you can use existing waypoints. You can save a route for future use or follow it immediately
(Quick Route).
Routes can be named, edited, erased and archived. After routes have been created you can choose which
ones are displayed on your chart.
If a route is being followed, i.e. the active route, the current leg is shown as a dotted line and any
previous legs are removed from the screen, although any waypoints will remain displayed.
How do I build a route by placing waypoints on screen?
OUT
RANGE
IN
ROUTE...
BUILD NEW
ROUTE
Move cursor into
appropriate area
Select a
suitable scale
BUILD NEW
ROUTE
Move cursor to
required position
Press
for first waypoint
SAVE ROUTE
PRESS
If you place a waypoint in the incorrect position,
press UNDO WAYPOINT.
Press
Move cursor to required
position for next waypoint.
A dotted line appears
between previous
waypoint and cursor.
OK
PRESS
UNDO WAYPOINT
Press
PLACE WAYPOINT
The dotted line
will change to
a solid one.
More information ....
?
Press
For more information on routes refer to:
Chapter 4 - Using the Chartplotter of the C-Series Reference Manual
D6730_2
Page 12

Page 12 of 18
What is around me?
VRM/EBL
Understanding the radar
Card No. 10
What does the radar show me?....
Data bar
Range
Range
ring
Boat's
position
3nm
Orientation
Head-Up Relative Motion Rings ½nm
Motion mode Range ring spacing
TARGET
TRACKING
GAIN TARGETS PRESENTATION
Icon
confirming
radar
connection
Ship's
heading
marker
Surface
vessel
Landmass
VRM/EBL… GAIN…
TARGET
TRACKING…
TARGETS
DISPLAY…
PRESENTATION…
Waypoint
Typically your boats position is at the centre of the display, and its dead ahead bearing is indicated by a
vertical heading line, known as the Ship's Heading Marker (SHM).
Remember that the radar picture may vary from visual observations that you make; a nearby small object
may appear the same size on the screen as a distant large object. However, with experience the
approximate size of different objects can be determined by the relative size and brightness of the echoes.
More information ....
?
For more information on Radar and how to use it refer to:
Chapter 5 - Using the Radar of the C-Series Display Reference Manual
D6731_2
Page 13

Page 13 of 18
What is around me?
VRM/EBL
TARGET
TRACKING
GAIN TARGETS PRESENTATION
Using the radar....
Card No. 11
How can the radar help me avoid a collision?
You can set up your C-Series Display to sound an alarm when anything comes within a pre-set range of
the boat. This will allow you to take any necessary action to avoid a collision.
Guard zones
A sector or circular zone fixed with respect to the Ships Heading Marker (SHM). As the SHM moves or if
the centre is offset, or the range scale changes the zone moves accordingly.
MARPA
This function is used to track and analyse the risk of collision of up to ten individual targets.
What does a guard zone displayed?
SHM
SHM
IMPORTANT:
A guard zone will only operate when a whole
zone is displayed on the screen, or is displayed
by offsetting the centre. A guard zone is also
inactive for 10 seconds after it is placed or resized, to avoid inappropriate alarms.
Sector Zone
Circular Zone
How do I set up a circular guard zone?
1. Select guard zone function:
TARGET
TRACKING...
Press
2. Select guard zone option:
SECTOR CIRCLE
Toggle to
required type
NOTE: You can also set up a sector guard zone.
MONITOR
IN ZONES...
ZONE 1
OFF ON
Press Toggle to ON
SET INNER
Turn to set
Press Press
inner boundary.
Press to accept.
SET UP
ZONE 1
Press
SET OUTER
ZONE SHAPE
Press
OK
Press
Turn to set
outer boundary.
More information....
?
For more information on setting up and using guard zones refer to:
Chapter 5 - Using the radar of the C-Series Reference Manual
D6732_2
Page 14

Page 14 of 18
What is around me?
MONITOR
IN ZONES
ACQUIRE TARGET MARPA LIST MARPA OPTIONS
Using MARPA....
Card No. 12
What is MARPA?
Mini Automatic Radar Plotting Aid (MARPA) functions are use for target tracking and risk analysis.
MARPA improves your standards of collision avoidance by obtaining detailed information for up to 10
targets, and provides continuous and rapid situation evaluation.
MARPA tracks the selected targets and calculates target bearing, range, true speed, course, Closest Point
of Approach (CPA), and Time to Closest Point of Approach (TCPA). Each tracked target can be displayed
with a CPA graphic depicting the approximate target speed (vector length) and course (vector direction).
The calculated target data can also be shown on the screen. Each target is continually assessed and an
audible alarm is sounded if a target becomes dangerous or is lost.
How do I set up the MARPA functions?
TARGET
TRACKING...
MARPA
OPTIONS...
OK
Press
Press
How do I acquire a MARPA target?
Move cursor over
target to acquire
TARGET
TRACKING
Press
ACQUIRE TARGET
Press
How do I view details of MARPA targets?
MARPA LIST...
Press up/down
to select option.
Press right to
Turn to
alter option
value.
select value.
Repeat to
acquire further
targets (10 max)
Selected target
now acquired
How do I cancel MARPA target(s)?
CANCEL TARGET
Press
Press
Tracked targets with data listed.
More information.....
?
Move cursor
over target
For more information on MARPA functions refer to:
Chapter 5 - Using the radar of the C-Series Reference Manual
Alternately, use MARPA LIST
to cancel all or selected
MARPA targets.
Press
D6733_2
Page 15

Page 15 of 18
Where am I?
FIND SHIP GOTO ROUTES TRACKS PRESENTATION
Monitoring a course....
Card No. 13
How do I monitor my course?....
With your display receiving accurate heading and position information, you can use the Course Deviation
Indicator (CDI) to monitor your course and accurately steer to a target waypoint.
What does the CDI show me?....
The CDI gives a graphical representation of your boat's course. This 'rolling road' format represents
a width of sea equal to the Cross Track Error (XTE) limits that you have specified in the Setup menu.
As you travel towards the target waypoint, the checkered pattern moves down the screen to
simulate movement at a rate proportional to your boat's speed.
Status bar
'Rolling road'
3nm North-Up Relative Motion Local
Direction to
next waypoint
Target waypoint
FIND SHIP GOTO… ROUTES… TRACKS… PRESENTATION…
Correction
arrow
Boat
What do the steering instructions tell me?
On course
XTE
0.000nm
Target
waypoint
0ff course
On course
line
Data bar
XTE
0.027nm
Boat on center line.
Zero XTE
More information.....
?
Boat off center line.
Correction arrow(s) indicate direction to steer
to maintain course to target waypoint.
The greater the XTE, the more arrows.
For more information on monitoring a course, refer to:
Chapter 7 - Using the CDI of the C-Series Reference Manual
D6734_2
Page 16

Page 17

Page 17 of 18
Whats under the boat?
TRANSDUCER
SETTINGS
ZOOM BOTTOM LOCK A - SCOPE PRESENTATION
Using the fishfinder....
Card No. 15
How do I change the range or shift the image?
Your system automatically adjusts the display depth range, selecting the shallowest that keeps the
bottom on the lower half of the window. You can however set this manually if required and move
the image within the selected page up or down:
OUT
RANGE
IN
Press RANGE
(IN or OUT)
RANGE
AUTO MAN
Press
Press RANGE IN to
decrease the depth.
Press RANGE OUT to
increase the depth.
Note: Using the range controls will affect all fishfinder windows.
OUT
RANGE
IN
RANGE SHIFT
XX FT
Press
Turn to alter
shift value.
How do I select the operating frequency?
The fishfinder uses dual frequency sonar - 50 kHz and 200 kHz - and can be used in auto or manual
modes. In auto mode it will automatically select the most appropriate frequency at which to operate.
Alternatively you have the option of manually selecting either frequency.
FISHFINDER
SETTINGS...
Press
FREQUENCY...
Press Select MAN
FREQUENCY
AUTO MAN
FREQ MODE
SINGLE DUAL
Select SINGLE
SELECT FREQ
200 50
Select the required
operating frequency
How do I zoom in on an area of the screen?
ZOOM...
Press Select pre-defined
Select ON, for zoom
ZOOM
ON SPLIT MAN
image only.
Select SPLIT, for zoom
and fishfinder image.
*Selecting manual zoom range (xR) is described in the C-Series Reference Manual
ZOOM FACTOR
x2 x3 x4 xR
zoom level
(x2, x3 or x4)*
OK
Press
More information
?
For more information on using the fishfinder refer to:
Chapter 3 - Working with Waypoints
Chapter 6 - Using the Fishfinder of the C-Series Reference Manual
D6736_2
Page 18

Page18 of 18
Raymarine Ltd.
Anchorage Park
Portsmouth, Hampshire
England PO3 5TD
+44 (0)23 9269 3611
+44 (0)23 9269 4642 fax
www.raymarine.com
Raymarine Inc.
22 Cotton Road, Unit D
Nashua, NH 03063-4219
USA
603-881-5200
603-864-4756 fax
www.raymarine.com
D6826_1
 Loading...