


LightHouse™
OPERATION
Release 15
INSTRUCTIONS
English
Date: 09-2015
Document number: 81360-2-EN
© 2015 Raymarine UK Limited


Documentandsoftwarechanges
Thefollowingtablesdescribethemainchangesthathavebeenmadesincethelastreleaseofboththe
productsoftwareandthisdocument.
•Applicablesoftwareversion:LightHouseII—Release15.xx
•Applicabledocuments:81360–2
•Applicableproducts:a65/a65WiFi/a67/a67WiFi/a68/a68WiFi/a75/a75WiFi/a77/a77WiFi/
a78/a78WiFi/a95/a97/a98/a125/a127/a128/e7/e7D/c95/c97/c125/c127/e95/e97/e125
/e127/e165/eS75/eS77/eS78/eS97/eS98/eS127/eS128/gS95/gS125/gS165/gS195.
Newfeatures
Applicable
Description
applicationApplicablechapter(s)orsection(s)
NewCollisionAvoidanceandtarget
Chartapplication•12.9CollisionAvoidance
interceptionfeature
AddedabilitytochangeAIStarget’smotion
Radar/Chart•12.6VectorSet-upoptions
modeindependentlyoftheChart/Radar
application’smotionmode
NewcombinedTrackedtargetslistforAIS
Radar/Chart
andMARPA.
AddednewDangeroustargetsset-uppage
AddednewGuardzoneset-uppage.
RemovedSafezoneringfromChartand
Radar/Chart
Radar
Radar/ChartN/A
Radarapplications
NewAIStargetvesseltypesymbolsChart/Radar
applications
MFDAccesspoint/mobilehotspotSystem
–Targetinterceptiongraphics
–EnablingTargetinterception
–ShowingTargetinterceptionforindividualtargets
•12.10Rendez-Vous(Targetinterception)
•12.7Trackedtargetlist
•12.8Dangeroustargets
•16.11SettingupaGuardZoneAlarm
•AIStargettypes
•21.1MFDWi-Fi
•21.2ConnectingtoaWi-Fiaccesspoint/mobile
hotspot
CheckingonlineforsoftwareupdatesSystem•UsingyourMFDtoCheckforsoftwareupdatesonline
AddedsupportforLatvian,Lithuanianand
System
•5.1Languageselection
ThaiUserInterfacelanguages
AddedAX8specicoptionstoCamera
application
ChangedExternalDevicesWeatherSet-up
Camera•18.13Switchingonacamera’sLED/Light
•18.3Switchingvideostream
System
•Externaldevicesmenu
selectionfromnetworktypetoWeather
Receivertype.
Usabilityimprovements:
System
Various
•AISSafetymessageoptionmovedto
externaldevicesandalarmsmanager
•AISAlarmslogmovedtoMaintenance
menu
•Wi-FiandBluetoothoptionssplitinto
separatesub-menus
ENGLISH
Documentnumber:81360-2
Date:09-2015

Applicable
Description
applicationApplicablechapter(s)orsection(s)
Usabilityimprovements:
•AISmenuoptionsmovedtotoplevel
menu
•Radarpoweron/offoptionremovedfrom
Menu
•AdjustPresetmenurenamedSensitivity
settings
•RainoptionmovedtoNewSensitivity
menu
•Radar‘Wakes’havebeenrenamed
‘Trails’
•‘Targetoptions’menurenamed‘Vector
Set-up’
•‘PresetModes’menurenamed‘Modes’
Usabilityimprovements:
•RadaroverlayandTransparencysplit
intoseparatecontrols
•ChartSyncoptionmovedtoMotionmenu
•‘Targetoptions’menurenamed‘Vector
Set-up’
RadarVarious
Chart
Various
Documentchanges
InadditiontotheNewFeatures,thefollowingchangeshavebeenmadetothisdocumentsinceitslast
release.
Applicable
Description
Addedanewproceduresforconnectingsmartdevices
andaccessinganIPcameraswebinterfaceusingasmart
deviceconnectedtotheMFD.
CombinedRadartuningtableinto1table.
AddedThermalcameraaligntomobiledeviceprocedureThermalcamera•Aligningtomobiledevice
RemovedreferencetoJeppesen4DMaxfromAutomatic
routegenerationcompatiblecartographysection
AddednewexamplesofBuddyiconsChart/Radar
AddednewCollisionAvoidancefeaturestabletoRadar
andChartapplications
AddedfurtherguidancetoLaylinehistoryfeatureChart
Added‘SteertoLaylinedataitemintroducedwithR14
software.
AddeddetailsofJeppesenEasyRoutingsplitscreen
restrictions
applicationApplicablechapter(s)orsection(s)
System•Accessingaproduct’swebinterface
•21.3ConnectingyoursmartdeviceviaWi-Fi
Radar
Chart
Chart/Radar•14.7CollisionAvoidance
Chart/Data•17.3Listofdataitems
Chart•EasyRoutingSplitscreenRestrictions
•16.19Sensitivitysettingsmenu
•Automaticroutegeneration-compatible
cartography
•12.15Buddytracking
•Displayinghistoricallaylinedata
AddeddetailsofthenewLightHousechartsstore.Chart
Addeddetailsforimportinglegacy‘Archive.fsh’backup
lesintoMFDsrunningR14orgreater.
AddednewMARPAiconstoMARPAoverviewRadar•16.8MARPAoverview
System•Legacyarchive.fshsupport
•LightHousecharts

Applicable
Description
applicationApplicablechapter(s)orsection(s)
SplitDigitalswitchingrelatedPGNlistintoseparatetable.System•DigitalSwitchingNMEA2000sentences
Addednewexampleprocedureforsettingupan
Data
•Settingupaninstrumentpage(Example)
instrumentdatapageintheDataapplication
Trademarkandpatentsnotice
Raymarine,Tacktick,ClearPulse,Truzoom,HSB,SeaTalk,SeaTalk
hs
,SeaTalk
ng
,Micronet,Raytech,
GearUp,MarineShield,Seahawk,Autohelm,Automagic,andVisionalityareregisteredorclaimed
trademarksofRaymarineBelgium.
FLIR,DownVision,SideVision,Dragony,Instalert,InfraredEverywhere,andTheWorld’sSixth
SenseareregisteredorclaimedtrademarksofFLIRSystems,Inc.
Allothertrademarks,tradenames,orcompanynamesreferencedhereinareusedforidenticationonly
andarethepropertyoftheirrespectiveowners.
Thisproductisprotectedbypatents,designpatents,patentspending,ordesignpatentspending.
FairUseStatement
Youmayprintnomorethanthreecopiesofthismanualforyourownuse.Youmaynotmakeanyfurther
copiesordistributeorusethemanualinanyotherwayincludingwithoutlimitationexploitingthemanual
commerciallyorgivingorsellingcopiestothirdparties.
Softwareupdates
Important:ChecktheRaymarinewebsiteforthelatestsoftwarereleasesforyourproduct.
www.raymarine.com/software
Producthandbooks
ThelatestversionsofallEnglishandtranslatedhandbooksareavailabletodownloadinPDFformatfromthewebsite
www.raymarine.com.
Pleasecheckthewebsitetoensureyouhavethelatesthandbooks.
Copyright©2015RaymarineUKLtd.Allrightsreserved.


Contents
Chapter1Importantinformation........................11
Disclaimers...............................................................12
Memorycardsandchartcards...................................12
Thirdpartysoftwarelicenseagreements.....................13
Productdisposal........................................................13
Warrantyregistration..................................................13
IMOandSOLAS........................................................13
Technicalaccuracy....................................................13
Chapter2Documentandproduct
information...........................................................15
2.1Handbookinformation..........................................16
2.2Handbookconventions.........................................17
2.3Documentillustrations..........................................19
2.4HybridTouchoverview..........................................19
Chapter3Gettingstarted...................................21
3.1Switchingtheunitonandoff.................................22
3.2aSeriesControls.................................................23
3.3e7/e7DControls.................................................23
3.4c95/c97/c125/c127/e95/e97/e125/e127/
e165Controls............................................................24
3.5eSSeriesControls...............................................25
3.6Controls...............................................................26
3.7Keypadcontrols...................................................26
3.8Basictouchscreenoperations...............................27
3.9Multi-Touchgestures............................................28
3.10Touchicons.......................................................29
3.11Homescreenoverview—Touchonly
displays....................................................................29
3.12Homescreenoverview—HybridT ouchand
non-Touchdisplays....................................................30
3.13Pages................................................................32
3.14Applications.......................................................33
3.15Splitscreencontrols............................................34
3.16Screenoverview................................................35
3.17Initialsetupprocedures......................................38
3.18GNSSStatus.....................................................41
3.19Enablingautopilotcontrol....................................43
3.20Engineidentication...........................................44
3.21EnablingAISfunctions........................................46
3.22Sharedpreferences............................................46
3.23Memorycardsandchartcards............................47
3.24Simulatormode..................................................47
3.25Pairingthekeypad.............................................48
3.26Systemsoftwareupdates....................................48
3.27Learningresources.............................................50
Chapter4Managingdisplaydata......................51
4.1Savinguserdataandusersettings........................52
4.2Saveandrestoreitems.........................................55
4.3Screenshots........................................................57
4.4Resettingyoursystem..........................................57
Chapter5Customizingyourdisplay.................59
5.1Languageselection..............................................60
5.2Boatdetails..........................................................61
5.3Unitsset-up.........................................................62
5.4TimeandDateset-up...........................................63
5.5Displaypreferences.............................................64
5.6Databaranddataboxoverview..............................66
5.7Set-upmenuoptions............................................68
Chapter6Documentviewerapplication...........79
6.1Documentvieweroverview...................................80
Chapter7Autopilotcontrol................................83
7.1AutopilotControloverviewandfeatures.................84
7.2Enablingautopilotcontrol......................................84
7.3Engagingtheautopilot..........................................85
7.4Adjustingthecurrentlockedheading.....................85
7.5Disengagingtheautopilot.....................................86
7.6Manuallydisplayingthepilotcontroldialog
box...........................................................................87
7.7PilotControldialog...............................................87
7.8PilotBar..............................................................88
7.9PilotSet-up..........................................................89
7.10Pilotsettings......................................................89
7.11Commissioning...................................................92
7.12Autopilotstatussymbols.....................................96
7.13Autopilotalarms.................................................96
Chapter8Alarmmanagement............................97
8.1Alarmsoverview..................................................98
8.2AlarmManageroverview......................................98
8.3Alarmoptions.....................................................101
Chapter9ManOverboard(MOB).....................107
9.1Manoverboard...................................................108
Chapter10DSCVHFradiointegration.............111
10.1DSCVHFradiointegration.................................112
10.2EnablingDSCVHFradiointegration...................112
Chapter11Fuelmanager..................................113
11.1Fuelmanageroverview......................................114
Chapter12AIS(AutomaticIdentication
System)...............................................................117
12.1AISoverview.....................................................118
12.2AISprerequisites...............................................119
12.3EnablingAIS....................................................120
12.4AIScontextmenu.............................................120
12.5AISvectors......................................................121
12.6VectorSet-upoptions.......................................122
12.7Trackedtargetlist.............................................122
12.8Dangeroustargets............................................123
12.9CollisionAvoidance..........................................124
12.10Rendez-Vous(Targetinterception)...................128
7

12.11Displayingsafety-criticalAISinformation...........129
12.12DisplayingdetailedAIStarget
information..............................................................129
12.13AISsilentmode..............................................130
12.14AISSafetymessages.....................................130
12.15Buddytracking...............................................131
Chapter13Waypoints,Routesand
Tracks.................................................................133
13.1Waypointsoverview..........................................134
13.2Routes.............................................................142
13.3Tracks.............................................................152
13.4ImportandExport.............................................154
13.5Waypoints,routesandtracksstorage
capacity..................................................................154
Chapter14Chartapplication............................155
14.1Chartapplicationoverviewandfeatures.............156
14.2Electronicchartsoverview................................158
14.3Chartselection.................................................159
14.4GPSCheck......................................................160
14.5Chartrangingandpanning................................161
14.6Navigatemenuoptions.....................................162
14.7CollisionAvoidance..........................................164
14.8RaceStartlineandRaceTimer..........................165
14.9Vesselpositiononthechartdisplay...................166
14.10ChartOrientation............................................166
14.11Chartmotionmode.........................................167
14.12Multiplechartsynchronization.........................168
14.13Chartviews....................................................169
14.14Chartdisplay..................................................171
14.15Overlays........................................................172
14.16Chartvectors.................................................179
14.17Laylines.........................................................180
14.18Polartables....................................................181
14.19Cartographyobjects.......................................182
14.20Objectinformation..........................................184
14.21Depth&Contouroptions.................................188
14.22MyDataoptions.............................................189
14.23Measuringdistancesandbearings..................189
Chapter15Fishnderapplication....................191
15.1Sonartechnologies...........................................192
15.2Raymarinesonarmodules................................195
15.3Fishnderoverviewandfeatures.......................195
15.4Sonarcheck.....................................................197
15.5Multiplesonarmodulesupport..........................199
15.6Sonarcrosstalkinterference..............................201
15.7Customchannels.............................................203
15.8Dualchannelpingmodes.................................204
15.9Thesonarimage..............................................204
15.10DepthRange..................................................205
15.11SideVision
15.12Fishnderscrolling.........................................207
15.13Fishnderdisplaymodes................................207
TM
Range......................................206
15.14SideVision
TM
Views.......................................209
15.15Presentationmenuoptions..............................210
15.16Depthanddistance..........................................211
15.17WaypointsintheFishnderapplication............212
15.18Sensitivitysettings..........................................213
15.19Fishnderalarms............................................218
15.20Frequencytuning...........................................219
15.21Sounderset-upmenuoptions..........................221
15.22Transducerset-upmenuoptions.....................222
15.23Resettingthesonar........................................223
Chapter16Radarapplication...........................225
16.1Radarapplicationoverviewandfeatures............226
16.2Radarscannerstatussymbols..........................228
16.3Multipleradarscanners....................................229
16.4Radarcheck....................................................230
16.5Radarcontextmenu.........................................231
16.6Radarrangeandimagequality..........................231
16.7CollisionAvoidance..........................................234
16.8MARPAoverview.............................................235
16.9VectorSet-upoptions.......................................236
16.10Vesselvectors(CPAgraphics)overview...........237
16.11SettingupaGuardZoneAlarm.......................237
16.12Trails............................................................238
16.13Trackedtargetlist...........................................239
16.14Distances,range,andbearing.........................239
16.15Radarmodeandorientation............................241
16.16Radarpresentationmenuoptions....................244
16.17Radartuning:On-screengain
controls...................................................................246
16.18Radarmodes.................................................247
16.19Sensitivitysettingsmenu.................................248
16.20Dualrangeradaroperation.............................250
16.21RadarSet-upmenu........................................251
16.22Resettingtheradar.........................................253
Chapter17Dataapplication.............................255
17.1Dataapplicationoverview.................................256
17.2CustomizingtheDataapplication......................257
17.3Listofdataitems..............................................259
17.4Engineidentication.........................................265
17.5SettingboatdetailsfromtheData
application...............................................................267
17.6SettingengineRPMrangeandredzone............267
17.7Colortheme.....................................................268
17.8Unitsset-up.....................................................269
17.9Resettingminimumandmaximum
readings..................................................................270
17.10Resettingalldatapages..................................270
17.11SettingwinddampingfromtheData
application...............................................................271
Chapter18Cameraapplication........................273
18.1Cameraapplicationoverviewand
features..................................................................274
8
LightHouseMFDoperationinstructions

18.2Changingthecamerafeed................................275
18.3Switchingvideostream.....................................275
18.4DisplayingmultiplecamerafeedsusingQuad
View.......................................................................276
18.5Cameracycling................................................277
18.6Namingcamera/videofeeds............................278
18.7Adjustingthevideoimage.................................278
18.8Selectingtheaspectratio..................................279
18.9Selectingalocationtostorerecordings..............279
18.10Recordandplayback......................................280
18.11T akingphotos.................................................281
18.12Viewingphotos...............................................283
18.13Switchingonacamera’sLED/Light................283
Chapter19Thermalcameraapplication—
Panandtiltcameras..........................................285
19.1Thermalcameraapplicationoverview................286
19.2Thermalcameraimage.....................................286
19.3Thermalcamerasetupandchecks....................287
19.4Controlsoverview.............................................288
19.5Cameracontrol................................................288
19.6Imageadjustments...........................................291
19.7Panandtiltcamera—newcamera
interface..................................................................294
19.8Highpowerandhightorquemodes...................297
19.9Panandtiltcamera—oldcamera
interface..................................................................298
Chapter20Thermalcameraapplication—
xedmountcameras.........................................303
20.1Thermalcameraapplicationoverview................304
20.2Thermalcameraimage.....................................304
20.3Thermalcamerasetupandchecks....................305
20.4Controlsoverview.............................................306
20.5Cameracontrol................................................306
20.6Imageadjustments...........................................307
20.7Fixedmountcameramenu...............................308
Chapter21Wi-FiandMobileapplica-
tions....................................................................311
21.1MFDWi-Fi.......................................................312
21.2ConnectingtoaWi-Fiaccesspoint/mobile
hotspot....................................................................312
21.3ConnectingyoursmartdeviceviaWi-Fi.............313
21.4Raymarinemobileapps....................................314
21.5Wi-FiSharingSettings......................................316
Chapter22Mediaplayerapplication...............317
22.1Mediaplayerconnection...................................318
22.2EnablingBluetooth...........................................318
22.3PairingaBluetoothmediaplayer.......................319
22.4Enablingaudiocontrol......................................319
22.5Mediaplayercontrols.................................320
22.6Mediaplayercontrolsusingaremote
control....................................................................320
22.7UnpairingaBluetoothdevice............................321
Chapter23Fusionlinkapplication..................323
23.1Fusionlinkapplicationoverview........................324
23.2Mediasources.................................................325
23.3Browsingmusic................................................325
23.4Selectingshufeandrepeatfunctions................326
23.5Adjustingvolumelevelsforeachzone..............326
23.6Selectingthesystemtocontrol..........................327
23.7PoweringoffanNMEA2000Fusionunit............328
23.8PoweringonanNMEA2000Fusionunit............328
23.9Menuoptions...................................................329
Chapter24Siriusaudioapplication(North
Americaonly).....................................................331
24.1Siriusaudiooverview........................................332
Chapter25Weatherapplication(North
Americaonly).....................................................333
25.1Weatherapplicationoverview............................334
25.2Weatherapplicationsetup................................334
25.3Weatherapplicationdisplayoverview................335
25.4Weathermapnavigation...................................338
25.5Weathercontextmenu......................................338
25.6Weatherinformation.........................................339
25.7Weatherreports...............................................340
25.8Animatedweathergraphics...............................341
25.9Weatherapplicationmenuoptions.....................341
25.10Glossaryofweatherterms..............................343
Chapter26Troubleshooting.............................345
26.1Troubleshooting...............................................346
26.2Poweruptroubleshooting.................................347
26.3Radartroubleshooting......................................348
26.4GPStroubleshooting........................................349
26.5Troubleshootingautomaticroute
generation...............................................................350
26.6Sonartroubleshooting......................................352
26.7Sonarcrosstalkinterference..............................355
26.8Thermalcameratroubleshooting.......................357
26.9Systemdatatroubleshooting.............................359
26.10Videotroubleshooting.....................................360
26.11Wi-Fitroubleshooting......................................361
26.12Bluetoothtroubleshooting...............................362
26.13Touchscreentroubleshooting...........................363
26.14Touchscreenalignment...................................364
26.15Miscellaneoustroubleshooting........................365
Chapter27Technicalsupport..........................367
27.1Raymarineproductsupportandservicing...........368
27.2Learningresources...........................................369
27.3Third-partysupport...........................................369
AppendixASwitchpanelapplication..............371
AppendixBNMEA0183sentences.................373
9

AppendixCNMEAdatabridging.....................374
AppendixDNMEA2000sentences.................375
AppendixESoftwarereleases.........................378
AppendixFMultifunctiondisplay
compatibility......................................................385
10
LightHouseMFDoperationinstructions

Chapter1:Importantinformation
Warning:Trafcseparation
Warning:Ensuresafenavigation
Thisproductisintendedonlyasanaid
tonavigationandmustneverbeused
inpreferencetosoundnavigational
judgment.Onlyofcialgovernment
chartsandnoticestomarinerscontainall
thecurrentinformationneededforsafe
navigation,andthecaptainisresponsible
fortheirprudentuse.Itistheuser’s
responsibilitytouseofcialgovernment
charts,noticestomariners,cautionand
propernavigationalskillwhenoperating
thisoranyotherRaymarineproduct.
Warning:MinimumSafeDepth,
BeamandHeight
Dependingoncartographyvendor,the
minimumsafesettingsareusedduring
automaticroutegeneration,theyareused
torestrictcreatedroutesfromentering
waterthatisnotsuitableforthevessel.
Dataistakenfromcompatiblecartography.
Minimumsafesettingsareuserdened
calculations.Asbothofthesefactors
areoutsideofRaymarine’scontrol;
Raymarinewillnotbeheldliablefor
anydamage,physicalorotherwise,
resultingfromtheuseoftheautomatic
routegenerationfeatureortheMinimum
SafeDepth,MinimumSafeBeamor
MinimumSafeHeightsettings.
Warning:Automaticroute
generation
Routescreatedusingautomatic
routegenerationusedatatakenfrom
compatibleelectroniccartographyand
userdenedsettings.
•Donotrelyonautomaticroute
generationalonetoguaranteethatthe
routeissafetonavigate.YouMUST
reviewthesuggestedroutecarefully
andwherenecessaryedittheroute
beforefollowingit.
•AutomaticroutegenerationwillNOT
beusedwhenmovingwaypointswithin
routes,extracareshouldbetaken
toensurethattheroutelegandany
movedwaypointsaresafetonavigate.
Automaticroutegenerationfeatures
donotadheretotheTrafcSeparation
SchemesidentiedinRule10ofthe
InternationalRegulationsforPreventing
CollisionsatSea1972asamended.
Raymarine
thatyoudoNOTuseAutomaticroute
generationtocreateanypartofaroute
whichwillcrosstrafclanesorpass
neartotrafcseparationlines.Inthese
situationsAutomaticroutegeneration
MUSTbeswitchedOffandtheroute
orroutelegMUSTbebuiltmanually,
ensuringcompliancetotheruleslaidout
intheaboveregulations.
®
thereforerecommends
Warning:Radartransmission
safety
Theradarscannertransmits
electromagneticenergy.Ensureall
personnelareclearofthescannerwhen
theradaristransmitting.
Warning:Sonaroperation
•NEVERoperatethesonarwiththe
vesseloutofthewater.
•NEVERtouchthetransducerfacewhen
thesonarispoweredon.
•SWITCHOFFthesonarifdiversare
likelytobewithin7.6m(25ft)ofthe
transducer.
Warning:Touchscreendisplay
temperature
Ifthedisplayismountedwhereitwillbe
exposedtoprolongedperiodsofdirect
sunlight,thetouchscreenmaygetvery
hotduetotheabsorbedsolarenergy.
InsuchconditionsRaymarinehighly
recommendsthatyouavoidusingthe
touchscreen:
•ForHybridT ouchdisplays,usethe
integratedkeypadtooperatethe
display.
•Fortouch-onlysystemsitis
recommendedthatanexternal
keypadisttedtothesystem(for
example,theRMK-9accessory).
Warning:Touchscreendisplay
Exposuretoprolongedrainmaycause
erroneoustouchperformance,inthese
situationskeeptouchactivitytoa
minimumandwipethescreenwitha
drynon-abrasiveclothbeforeusingthe
touchscreen.
Importantinformation
11

Caution:Careofchartandmemory
cards
Toavoidirreparabledamagetoand/or
lossofdatafromchartandmemorycards:
•DONOTsavedataorlestoacard
containingcartographyasthecharts
maybeoverwritten.
•Ensurethatchartandmemorycards
arettedthecorrectwayaround.DO
NOTtrytoforceacardintoposition.
•DONOTuseametallicinstrumentsuch
asascrewdriverorplierstoinsertor
removeachartormemorycard.
Caution:Ensurecardreaderdoor
issecurelyclosed
Topreventwateringressandconsequent
damagetotheproduct,ensurethatthe
cardreaderdoorisrmlyclosed.
Caution:Suncovers
•Ifyourproductissuppliedwithasun
cover,toprotectagainstthedamaging
effectsofultraviolet(UV)light,always
tthesuncoverwhentheproductis
notinuse.
•Suncoversmustberemovedwhen
travellingathighspeed,whetherin
waterorwhenthevesselisbeing
towed.
Caution:Productcleaning
Whencleaningproducts:
•Ifyourproductincludesadisplay
screen,doNOTwipethescreenwith
adrycloth,asthiscouldscratchthe
screencoating.
•DoNOTuseabrasive,oracidor
ammoniabasedproducts.
•DoNOTuseajetwash.
LicenceAgreementincludedinthedocumentation
forthisproductorsuppliedwiththememorycard
(asapplicable).
Raymarinedoesnotwarrantthatthisproductis
error-freeorthatitiscompatiblewithproducts
manufacturedbyanypersonorentityotherthan
Raymarine.
Thisproductusesdigitalchartdata,andelectronic
informationfromtheGlobalPositioningSystem
(GPS)whichmaycontainerrors.Raymarinedoes
notwarranttheaccuracyofsuchinformationand
youareadvisedthaterrorsinsuchinformationmay
causetheproducttomalfunction.Raymarineisnot
responsiblefordamagesorinjuriescausedbyyour
useorinabilitytousetheproduct,bytheinteraction
oftheproductwithproductsmanufacturedbyothers,
orbyerrorsinchartdataorinformationutilizedby
theproductandsuppliedbythirdparties.
Memorycardsandchartcards
MicroSDmemorycardscanbeusedtobackup/
archivedata(e.g.Waypoint,andTracks).Once
dataisbackeduptoamemorycardolddatacan
bedeletedfromthesystem,creatingcapacityfor
newdata.Thearchiveddatacanberetrievedatany
time.Chartcardsprovideadditionalorupgraded
cartography.
Itisrecommendedthatyourdataisbackeduptoa
memorycardonaregularbasis.DoNOTsavedata
toamemorycardcontainingcartography.
Compatiblecards
ThefollowingtypesofMicroSDcardsarecompatible
withyourdisplay:
•MicroSecureDigitalStandard-Capacity
(MicroSDSC)
•MicroSecureDigitalHigh-Capacity(MicroSDHC)
Note:
•Themaximumsupportedmemorycardcapacity
is32GB.
•MicroSDcardsmustbeformattedtouseeither
theFATorFAT32lesystemformattoenable
usewithyourMFD.
Disclaimers
Thisproduct(includingtheelectroniccharts)is
intendedtobeusedonlyasanaidtonavigation.It
isdesignedtofacilitateuseofofcialgovernment
charts,notreplacethem.Onlyofcialgovernment
chartsandnoticestomarinerscontainallthecurrent
informationneededforsafenavigation,andthe
captainisresponsiblefortheirprudentuse.Itis
theuser’sresponsibilitytouseofcialgovernment
charts,noticestomariners,cautionandproper
navigationalskillwhenoperatingthisoranyother
Raymarineproduct.Thisproductsupportselectronic
chartsprovidedbythirdpartydatasupplierswhich
maybeembeddedorstoredonmemorycard.Use
ofsuchchartsissubjecttothesupplier’sEnd-User
12
Speedclassrating
Forbestperformanceitisrecommendedthatyou
useClass10orUHS(UltraHighSpeed)class
memorycards.
Chartcards
Yourproductispre-loadedwithelectroniccharts
(worldwidebasemap).Ifyouwishtousedifferent
chartdata,youcaninsertcompatiblechartcardsinto
theunit'smemorycardreader.
Usebrandedchartcardsandmemorycards
Whenarchivingdataorcreatinganelectronicchart
card,Raymarinerecommendstheuseofquality
brandedmemorycards.Somebrandsofmemory
cardmaynotworkinyourunit.Pleasecontact
customersupportforalistofrecommendedcards.
LightHouseMFDoperationinstructions

Thirdpartysoftwarelicense agreements
Thisproductissubjecttocertainthirdpartysoftware
licenseagreementsaslistedbelow:
•GNU—LGPL/GPL
•JPEGlibraries
•OpenSSL
•FreeType
Thelicenseagreementsfortheabovecanbefound
onthewebsitewww.raymarine.comandonthe
accompanyingdocumentationCDifsupplied.
Productdisposal
Disposeofthisproductinaccordancewiththe
WEEEDirective.
TheWasteElectricalandElectronicEquipment
(WEEE)Directiverequirestherecyclingofwaste
electricalandelectronicequipment.
Warrantyregistration
ToregisteryourRaymarineproductownership,
pleasevisitwww.raymarine.comandregisteronline.
Itisimportantthatyouregisteryourproductto
receivefullwarrantybenets.Y ourunitpackage
includesabarcodelabelindicatingtheserialnumber
oftheunit.Youwillneedthisserialnumberwhen
registeringyourproductonline.Y oushouldretain
thelabelforfuturereference.
IMOandSOLAS
Theequipmentdescribedwithinthisdocument
isintendedforuseonleisuremarineboatsand
workboatsNOTcoveredbyInternationalMaritime
Organization(IMO)andSafetyofLifeatSea
(SOLAS)CarriageRegulations.
Technicalaccuracy
Tothebestofourknowledge,theinformationinthis
documentwascorrectatthetimeitwasproduced.
However,Raymarinecannotacceptliabilityforany
inaccuraciesoromissionsitmaycontain.Inaddition,
ourpolicyofcontinuousproductimprovementmay
changespecicationswithoutnotice.Asaresult,
Raymarinecannotacceptliabilityforanydifferences
betweentheproductandthisdocument.Please
checktheRaymarinewebsite(www.raymarine.com)
toensureyouhavethemostup-to-dateversion(s)of
thedocumentationforyourproduct.
Importantinformation
13

14
LightHouseMFDoperationinstructions

Chapter2:Documentandproductinformation
Chaptercontents
•2.1Handbookinformationonpage16
•2.2Handbookconventionsonpage17
•2.3Documentillustrationsonpage19
•2.4HybridTouchoverviewonpage19
Documentandproductinformation
15

2.1Handbookinformation
UsermanualsPrintShop
Thishandbookcontainsimportantinformation
regardingyourmultifunctiondisplay.
ThehandbookisapplicabletoLightHouse
TM
poweredmultifunctiondisplays.
Aboutthishandbook
Thishandbookdescribeshowtooperateyour
multifunctiondisplayinconjunctionwithcompatible
electroniccartographyandperipheralequipment.
Itassumesthatallperipheralequipmenttobe
operatedwithitiscompatibleandhasbeencorrectly
installed.Thishandbookisintendedforusersof
varyingmarineabilities,butassumesagenerallevel
ofknowledgeofdisplayuse,nauticalterminology
andpractices.
Softwarerevision
Raymarineregularlyupdatesproductsoftwareto
addnewfeaturesandimproveexistingfunctionality.
Thishandbookcoversmultifunctiondisplay
softwareversion—LightHouseIIRelease15.
PleaserefertotheSoftwareReleasessection
fordetailsonsoftwarereleases.
ChecktheRaymarine
havethelatestsoftwareandusermanuals:
•www.raymarine.com/software
®
websitetoensureyou
RaymarineprovidesaPrintShopservice,enabling
youtopurchaseahigh-quality,professionally-printed
manualforyourRaymarineproduct.
Printedmanualsareidealforkeepingonboardyour
vessel,asausefulsourceofreferencewhenever
youneedassistancewithyourRaymarineproduct.
Visithttp://www.raymarine.co.uk/view/?id=5175to
orderaprintedmanual,delivereddirectlytoyour
door.
ForfurtherinformationaboutthePrintShop,
pleasevisitthePrintShopFAQpages:
http://www.raymarine.co.uk/view/?id=5751.
Note:
•Acceptedmethodsofpaymentforprinted
manualsarecreditcardsandPayPal.
•Printedmanualscanbeshippedworldwide.
•FurthermanualswillbeaddedtothePrintShop
overthecomingmonthsforbothnewandlegacy
products.
•Raymarineusermanualsarealsoavailableto
downloadfree-of-chargefromtheRaymarine
website,inthepopularPDFformat.ThesePDF
lescanbeviewedonaPC/laptop,tablet,
smartphone,oronthelatestgenerationof
Raymarinemultifunctiondisplays.
•www.raymarine.com/manuals
.
Productdocumentation
Thefollowingdocumentationisapplicabletoyour
product:
AlldocumentsareavailabletodownloadasPDFs
fromwww.raymarine.com
Documentation
DescriptionPartnumber
aSeries/cSeries/eSeries
installationinstructions
eSSeriesinstallation
instructions
gSSeriesinstallation
instructions
LightHouse
TM
displayoperationinstructions
(Thisdocument)
LightHouse
TM
multifunction
NewFeatures82331
87247
87250
87248
81360
Additionaldocumentation
DescriptionPartnumber
RMK-9Installationand
operationsinstructions
RCU-3Installationand
operationsinstructions
16
81351
87139
LightHouseMFDoperationinstructions

2.2Handbookconventions
Thefollowingconventionsareusedthroughoutthishandbookwhenreferringto:
TypeExampleConvention
IconsTheterm"select"isusedinproceduresinvolvingiconsto
refertotheactionofselectinganon-screenicon,eitherusing
touchorphysicalbuttons:
•Touch—Pressyourngerontheicontoselect.
•Physicalbuttons—UsetheJoysticktohighlightthe
iconandpresstheOkbutton.
Menus
Theterm"select"isusedinproceduresinvolvingmenus
torefertotheactionofselectingamenuitem,eitherusing
touchorphysicalbuttons:
•Touch—Pressyourngerontheicontoselect.
•Physicalbuttons—UsetheJoysticktohighlightthe
iconandpresstheOkbutton.
Theterm“scroll”isusedinproceduresinvolvingmenusand
dialogstorefertotheactionofscrollingalistormenu,either
bytouchorphysicalbuttons:
•Touch—Pressyourngeronthemenuandslideupor
downtoscroll.
•Physicalbuttons—TurntheRotarycontrolclockwise
oranti—clockwisetoscroll.
.
ApplicationsTheterm“select”isusedinproceduresinvolvingapplications
torefertotheactionofselectingalocation,objectortarget
on-screenusingtouchorphysicalbuttons:
•Touch—Pressandholdyourngeronalocationto
select,or
Numericadjust
controls
•Touch—Pressandreleaseyourngeronanobjector
target.
•Physicalbuttons—UsetheJoysticktohighlightthe
location,objectortargetandpresstheOkbutton.
Theterm“adjust”isusedinproceduresinvolvingnumerical
adjustcontrolstorefertotheactionofchangingthenumeric
valueusingtouchorphysicalbuttons:
•Touch—Pressyourngerontheupordownarrowto
increaseordecreasethenumericvalue.
•Physicalbuttons—UsetheRotarycontroltoincrease
ordecreasethenumericvalue.
Documentandproductinformation
17

TypeExampleConvention
WiththeNumericadjustcontroldisplayedyoucanalsoselect
onthekeypadiconorpressandholdtheOkbuttontoopen
anumerickeypadtoenteranewvalueforthesetting.
Sliderbar
controls
Waypoint(MOB)button/icon
Dependingonthemultifunctiondisplayvariant
therewillbeeitheraWaypoint(MOB)buttonoran
onscreenicon.
WPT
button
WPT
icons
•cSeries
•eSeries
•eSSeries
•RMK-9keypad
•aSeries
•gSSeries
Theterm“adjust”isusedinproceduresinvolvingsliderbar
controlstorefertotheactionofchangingtheassociated
numericvalueusingtouchorphysicalbuttons:
•Touch—Pressyourngerontheupordownarrowto
increaseordecreasethenumericvalue.
•Physicalbuttons—UsetheRotarycontroltoincrease
ordecreasethenumericvalue.
Throughoutthismanualtheterm:SelectWPT,refers
topressingthephysicalWPTbuttonorpressingthe
on-screenWPTicon.
Touchandnon-touchoperations
Thishandbookappliestobothtouchandnon-touch
operations.
Thishandbookusesiconstoidentifywhethera
particulartaskisspecicallyatouchoranon-touch
operation.Whereataskdoesnothaveatouchor
non-touchiconthenthetaskcanbeperformedusing
either.
Touch(T ouchscreenoperation)—
Touchoperationsapplytomultifunction
displayswhichhaveatouchscreen.
Non-touch(physicalbuttonoperation)
—Non-touchoperationsapplyto
multifunctiondisplayswithphysical
buttonsormultifunctiondisplaysthat
havearemotekeypadconnectedand
pairedtoit.
18
LightHouseMFDoperationinstructions

2.3Documentillustrations
D12596-2
2.4HybridTouchoverview
Productsmaydifferslightlyfromthoseshowninthe
illustrationsinthisdocument,dependingonproduct
variantanddateofmanufacture.
Theillustrationshownbelowisusedthroughout
thisdocumenttorepresentLightHouse
TM
powered
MFDsandunlessotherwisestatedappliestoall
multifunctiondisplayvariants.
IfyourmultifunctiondisplayfeaturesHybridT ouch,
thisenablesyoutooperatetheunitusingthe
touchscreenandthephysicalbuttons.
AHybridT ouchdisplayhasphysicalbuttons
whichcanbeusedinadditiontothetouchscreen.
Touchscreenonlymultifunctiondisplays(which
donothavephysicalbuttons)canbeconnected
toaremotekeypadwhichallowsHybridTouch
functionality.
Allfunctionscanbeaccessedusingthetouchscreen.
However,theremaybesituations(suchasrough
seaconditions)whenitisnotappropriatetouse
thetouchscreen.Inthesesituations,Raymarine
stronglyrecommendsthatyouactivatethetouch
lockandusethephysicalbuttonstooperateyour
multifunctiondisplay.
Documentandproductinformation
19

20
LightHouseMFDoperationinstructions

Chapter3:Gettingstarted
Chaptercontents
•3.1Switchingtheunitonandoffonpage22
•3.2aSeriesControlsonpage23
•3.3e7/e7DControlsonpage23
•3.4c95/c97/c125/c127/e95/e97/e125/e127/e165Controlsonpage24
•3.5eSSeriesControlsonpage25
•3.6Controlsonpage26
•3.7Keypadcontrolsonpage26
•3.8Basictouchscreenoperationsonpage27
•3.9Multi-Touchgesturesonpage28
•3.10T ouchiconsonpage29
•3.11Homescreenoverview—T ouchonlydisplaysonpage29
•3.12Homescreenoverview—HybridT ouchandnon-Touchdisplaysonpage30
•3.13Pagesonpage32
•3.14Applicationsonpage33
•3.15Splitscreencontrolsonpage34
•3.16Screenoverviewonpage35
•3.17Initialsetupproceduresonpage38
•3.18GNSSStatusonpage41
•3.19Enablingautopilotcontrolonpage43
•3.20Engineidenticationonpage44
•3.21EnablingAISfunctionsonpage46
•3.22Sharedpreferencesonpage46
•3.23Memorycardsandchartcardsonpage47
•3.24Simulatormodeonpage47
•3.25Pairingthekeypadonpage48
•3.26Systemsoftwareupdatesonpage48
•3.27Learningresourcesonpage50
Gettingstarted
21

3.1Switchingtheunitonandoff
Poweringthedisplayon
1.PressthePOWERbuttononthedisplay.
2.SelectAccepttoacknowledgethedisclaimer
message.
Poweringtheunitoff
1.PressandholdthePowerbuttonfor
approximately6seconds.
Ondisplayproductsa3secondcount-downtimer
willbedisplayed.
Tocancelthepoweroffprocess,releasethe
powerbuttonbeforetheunitpowersoff.
Note:Theunitwillstilldrawasmallamountof
powerfromthebatterywhenpoweredoff,ifthis
isaconcernunplugtheconnectorfromtheback
oftheunit.
PowerSavemode
InPowerSavemodeallfunctionsofthemultifunction
displayremainactive,buttheunitisplacedinto
alowpowerstate.TheLEDlightsaroundthe
Rotarycontrollerwillblinkonceevery1.5seconds
toindicatethattheunitisinPowerSavemode.
PowerSavemodeiscancelledbypressingaphysical
buttonorwhenanalarmeventoccurs.
Note:T oensureusersafetythePowerSave
featurewillnotbeavailableif:
•anyconnectedRadarsareswitchedon
•themultifunctiondisplayisprovidingautopilot
controlinasystemwithoutadedicatedpilot
headandtheautopilotisengaged.
AttentionLeavinganMFDinPowerSavemode
willcontinuetoconsumesomepowerfromyour
vessel’sbatteries.Theunitcoulddrainyourbatteries
ifleftinPowerSavemodeforprolongedperiodsof
time.Whenswitchingoffthepowertoyourvessel,
ensurethattheunitispoweredoffusingthepower
button.Formoreinformationontheamountofpower
consumedbytheunitinPowerSavemode,referto
theT echnicalspecicationsectionofyourproduct’s
installationinstructions.
Adjustingthedisplaybrightness
1.PressthePOWERbuttononce.
TheShortcutsmenuisdisplayed.
2.Adjustthebrightnesstotherequiredlevelusing
theon-screenbrightnesssliderbarcontrol,or
3.T ouchtheSunicontoincreasethebrightness
levelortheMoonicontodecreasethebrightness
level.
Note:Thebrightnesslevelcanalsobeincreased
bypressingthePowerbuttonmultipletimes.
Adjustingthedisplaybrightness
1.PressthePOWERbuttononce.
TheShortcutsmenuisdisplayed.
2.Adjustthebrightnesstotherequiredlevelusing
theRotarycontrol.
Note:Thebrightnesslevelcanalsobeincreased
bypressingthePowerbuttonmultipletimes.
EnablingPowerSavemode
ToenablePowerSavemodefollowthestepsbelow.
1.Ensureanyradarsconnectedtothesystemare
switchedoff.
2.PressthePOWERbutton.
Theshortcutsmenuisdisplayed.
3.SelectPowerSaveMode.
ThemultifunctiondisplaysisnowinPowerSave
mode.
4.Y oucanwaketheunitfromPowerSavemode
atanytimebypressingaphysicalbuttononthe
multifunctiondisplay.
Note:PowerSavemodeisautomaticallycancelled
ifanalarmeventoccurs.
22
LightHouseMFDoperationinstructions

3.2aSeriesControls
D1257 7-1
3
1
2
D1217 9-1
2
4
5
6
7
3
1
DescriptionFunctions
3.3e7/e7DControls
DescriptionFunctions
1Touch-
screen
2Power
Touchthescreentooperatefunctions,
includingallmenuoperations.
•PressoncetoswitchtheunitON.
•Oncepoweredon,pressthePower
1Touch-
screen
2MenuAccessesmenus.Pressagaintoclose
buttonagaintoopentheshortcutspage
3
whereyoucanadjustthebrightness,
UniControl
performascreencapture,access
Powersavemodeoraccessthepower
controlsofexternaldevices.
4BackPresstoreturntoapreviousmenuor
•PressandholdtoswitchtheunitOFF .
5
•Ifanintegratedpilotisengaged,press
WPT/MOB
andholdtoputtheautopilotinto
STANDBYmode.
3
Card
readerslot
MicroSDcardreader
•a6xanda7x=1xMicroSDcardslot
•a9xanda12x=2xMicroSDcardslots
6Power
youcantouchthescreentooperatemany
commonfunctions,includingallmenu
operations.
menus.
Providesajoystick,rotarycontroland
anOKpushbuttonforusingmenusand
applications.
dialoglevel.
•Pressandreleasetoaccessthe
waypointoptions.Pressagaintoplace
awaypoint.
•PressandholdtoplaceaMan
Overboard(MOB)markeratyour
currentposition.
•PressoncetoswitchtheunitON.
•Oncepoweredon,pressthePower
buttonagaintoadjustthebrightness,
performascreencapture,access
Powersavemodeoraccessthepower
controlsforexternaldevices.
•PressandholdtoswitchtheunitOFF .
•Ifanintegratedpilotisengaged,
pressandholdputtheautopilotinto
STANDBYmode.
7
Cardreader
slot
Openthecarddoortoinsertorremove
aMicroSDcard.Thereare2cardslots
(labelled1and2),usedforelectronic
chartsandarchivingwaypoint,route,
trackandsettingsdata.
Gettingstarted
23

3.4c95/c97/c125/c127/e95/e97/
D1227 6-1
1
2 3
4
5
6
7
11 10
8
9
D1218 0-1
1
2
3
e125/e127/e165Controls
DescriptionFunctions
10Pilot•Presstodisengageintegrated
autopilot.
•PressandholdtoactivateAutomode
onintegratedautopilot.
DescriptionFunctions
1Touch-
screen
youcantouchthescreentooperate
manycommonfunctions,includingall
menuoperations.
2HomePresstoreturntothehomescreen.
3MenuAccessesmenus.Pressagaintoclose
menus.
4
UniControl
Providesajoystick,rotarycontroland
anOKpushbuttonforusingmenusand
applications.
5
BackPresstoreturntoapreviousmenuor
dialoglevel.
11
Switch
ActivePane
•Presstoswitchtheactivepanein
splitscreenpages.
•Pressandholdtoexpandtheselected
panetofullscreen.
UniControl
Non-touch,HybridT ouchandtheremotekeypad
includeaUniControlwhichconsistsofRotary,
Joystickandapushbuttoncontrol.
6Range
In/Out
7
WPT/MOB
Pressminus(-)torangeoutandplus(+)
torangein
•Pressandreleasetoaccessthe
waypointoptions.Pressagaintoplace
awaypoint.
•PressandholdtoplaceaMan
Overboard(MOB)markeratyour
currentposition.
8Power
•PressoncetoswitchtheunitON.
•Oncepoweredon,pressthePower
buttonagaintoadjustthebrightness,
performascreencapture,access
Powersavemodeoraccessthepower
controlsforexternaldevices.
•PressandholdtoswitchtheunitOFF .
9
Cardreader
slot
Openthecarddoortoinsertorremove
aMicroSDcard.Thereare2cardslots
(labelled1and2),usedforelectronic
chartsandarchivingwaypoint,route,
trackandsettingsdata.
1.Rotary—usethistoselectmenuitems,move
theon-screencursor,andadjusttherangeinthe
chartandradarapplications.
2.Directioncontrols/Joystick—usethisto
movethecursorpositioninapplications,pan
up,down,leftandrightinthechart,weather
andshnderapplicationsortocyclethrough
datapagesinthedataapplication.
3.OKbutton—pushtheendofthejoystickto
conrmaselectionorentry .
24
LightHouseMFDoperationinstructions

3.5eSSeriesControls
D13286-1
11 10
9
4
5
6
7
8
1
2 3
D13321-1
1
2
3
DescriptionFunctions
eSSeriesUniController
1Touch-
screen
youcantouchthescreentooperate
manycommonfunctions,includingall
menuoperations.
2HomePresstoreturntotheHomescreen.
3MenuAccessesmenus.Pressagaintoclose
menus.
4
UniControl
5
OkOkpushbutton
Providesrotaryandjoystickcontrol.
6BackPresstoreturntoapreviousmenuor
dialoglevel.
7
WPT/MOB
•Pressandreleasetoaccessthe
waypointoptions.Pressagaintoplace
awaypoint.
•PressandholdtoplaceaMan
Overboard(MOB)markeratyour
currentposition.
8Power
•PressoncetoswitchtheunitON.
•Oncepoweredon,pressthePower
buttonagaintoadjustthebrightness,
performascreencapture,access
Powersavemodeoraccessthepower
controlsforexternaldevices.
1.Rotary—usetoselectmenuitems,movethe
onscreencursor,andadjusttherangeinthe
ChartandRadarapplications.
2.Directionalcontrol—usetomovethecursor
positioninapplications,panup,down,left
andrightintheChart,WeatherandFishnder
applicationsortocyclethroughdatapagesinthe
Dataapplication.
3.OKpushbutton—pushintoconrmaselection
orentry .
•PressandholdtoswitchtheunitOFF .
9
Cardreader
slot
Openthecarddoortoinsertorremove
aMicroSDcard.Thereare2cardslots
(labelled1and2),usedforelectronic
chartsandarchivingwaypoint,route,
trackandsettingsdata.
10Pilot•Presstodisengageintegrated
autopilot.
•PressandholdtoactivateAutomode
onintegratedautopilot.
11
Switch
ActivePane
•Presstoswitchtheactivepanein
splitscreenpages.
•Pressandholdtoexpandtheselected
panetofullscreen.
Gettingstarted
25

3.6Controls
D12701-1
1 2 3
D12711-1
1
3
5
7
9
2
4
6
8
10
1011 7
8
3 4
9 5 6 1 2
3.7Keypadcontrols
Connectingthekeypadallowsyoutocontrolyour
multifunctiondisplayremotely.
1.Home—presstoreturntotheHomescreen.
DescriptionFunctions
1Touch-
screen
Touchthescreentooperatefunctions,
includingallmenuoperations.
2Power•Pressoncetoswitchtheuniton.
•Whenpoweredon,pressthePower
buttonagainopentheShortcutspage.
•Whenpoweredon,pressandholdto
putthedisplayintoStandbymode.
•Ifanintegratedpilotisengaged,press
andholdtoputtheautopilotinto
STANDBYmode.
3
Card
reader
Openthecarddoortoinsertorremove
aMicroSDcard.Thereare2cardslots
(labelled1and2),usedforelectronic
chartsandarchivingwaypoint,route,track
andsettingsdata.
2.Menu—accessesmenus.Pressagaintoclose
menus.
3.UniControl—providesarotarycontrolanda
joystickwithanOKpushbuttonforusingmenus
andapplications.
4.Back—presstoreturntoapreviousmenuor
dialoglevel.
5.RangeOut—presstorangeout.
6.RangeIn—presstorangein.
7.SwitchActive—presstoswitchtheactive
pane,ortoswitchtheactivemultifunctiondisplay
(inmultipledisplaysystems).
8.WPT/MOB—pressandreleasetoaccess
thewaypointoptions.Pressagaintoplace
awaypoint.PressandholdtoplaceaMan
Overboard(MOB)markeratyourcurrent
position.
9.Standby(Auto)—presstodisengage
integratedautopilot,pressandholdtoactivate
Automodeonintegratedautopilot.
10.Power—seetablebelow:
26
Conguration
1
Multifunction
display
Display
State
Momentary
press
Off/Standby*Poweron
OnOpen
shortcuts
page
Multiple
multifunction
displays
Alldisplays
Offorin
Standby
Alldisplays
On
*Poweron
alldisplays
Open
shortcuts
pageon
activedisplay
1Display
Onand1
displayOff
orinStandby
Open
shortcuts
pageon
activedisplay
Note:*OnlyapplicabletogSSeriesdisplays.
aSeries,cSeriesandeSeriesdisplayscannot
bepoweredonusingthekeypad.
LightHouseMFDoperationinstructions
Pressand
hold
—
Poweroff
/putinto
Standby
—
Powerdown
alldisplays
Powerdown
activedisplay

Note:Inamultipledisplayconguration,
wheredisplaysareindifferentstates,displays
thatareturnedoffcanonlybeturnedonusing
thePowerbuttononthedisplay.
3.8Basictouchscreenoperations
Placingandmovingthecursorusing
touch
11.JoystickUpdirection.
Toplaceormovethecursoraroundthescreenon
atouchscreenmultifunctiondisplayfollowthesteps
below.
1.T ouchthescreenatanypositiononthescreento
placethecursorthere.
Touchscreenlock
OnamultifunctiondisplaywithHybridTouchyoucan
lockthetouchscreentopreventaccidentaluse.
Forexample,lockingthetouchscreenisparticularly
usefulinroughwaterorweatherconditions.
Thetouchscreencanbelockedandunlockedfrom
thehomescreen.Thetouchscreencanonlybe
unlockedusingphysicalbuttons.
Lockingthetouchscreen–HybridTouch
displays
OnHybridTouchmultifunctiondisplaysthe
HomescreencontainsadedicatedT ouchLockicon.
Withthehomescreendisplayed:
1.SelecttheTouchLockicon.
Itchangescolortoindicatethatthetouchscreen
isdisabled.Allfunctionsarestillavailableusing
thephysicalbuttons.
Touchscreenislocked.All
functionsremainavailableusing
physicalbuttons.
Lockingthetouchscreen-touchonly
displays
Whenatouchonlydisplayispairedwithanoptional
remotekeypadthetouchscreencanbelocked.
FromtheHomescreen:
1.SelecttheSet-upicon.
2.SelectTouch-LocksothatOnishighlighted.
Thetouchscreenisnowlocked.
Unlockingthetouchscreen–HybridTouch
displays
Youcanunlockthetouchscreenbyfollowingthe
stepsbelow.
WiththeHomescreendisplayed:
1.UsetheUniControltohighlighttheT ouchLock
icon.
2.PresstheOkbutton.
TheT ouchscreenisenabled.
Touchscreenisunlocked.
Gettingstarted
27
Unlockingthetouchscreen-touchonly
0
0
0
0
0
0
0
0
D12920-2
displays
Tounlockthetouchscreenofatouchonlydisplay
whenpairedwitharemotekeypadfollowthesteps
below.
FromtheHomescreen:
1.SelecttheSet-upicon.
2.SelectTouch-LocksothatOffishighlighted.
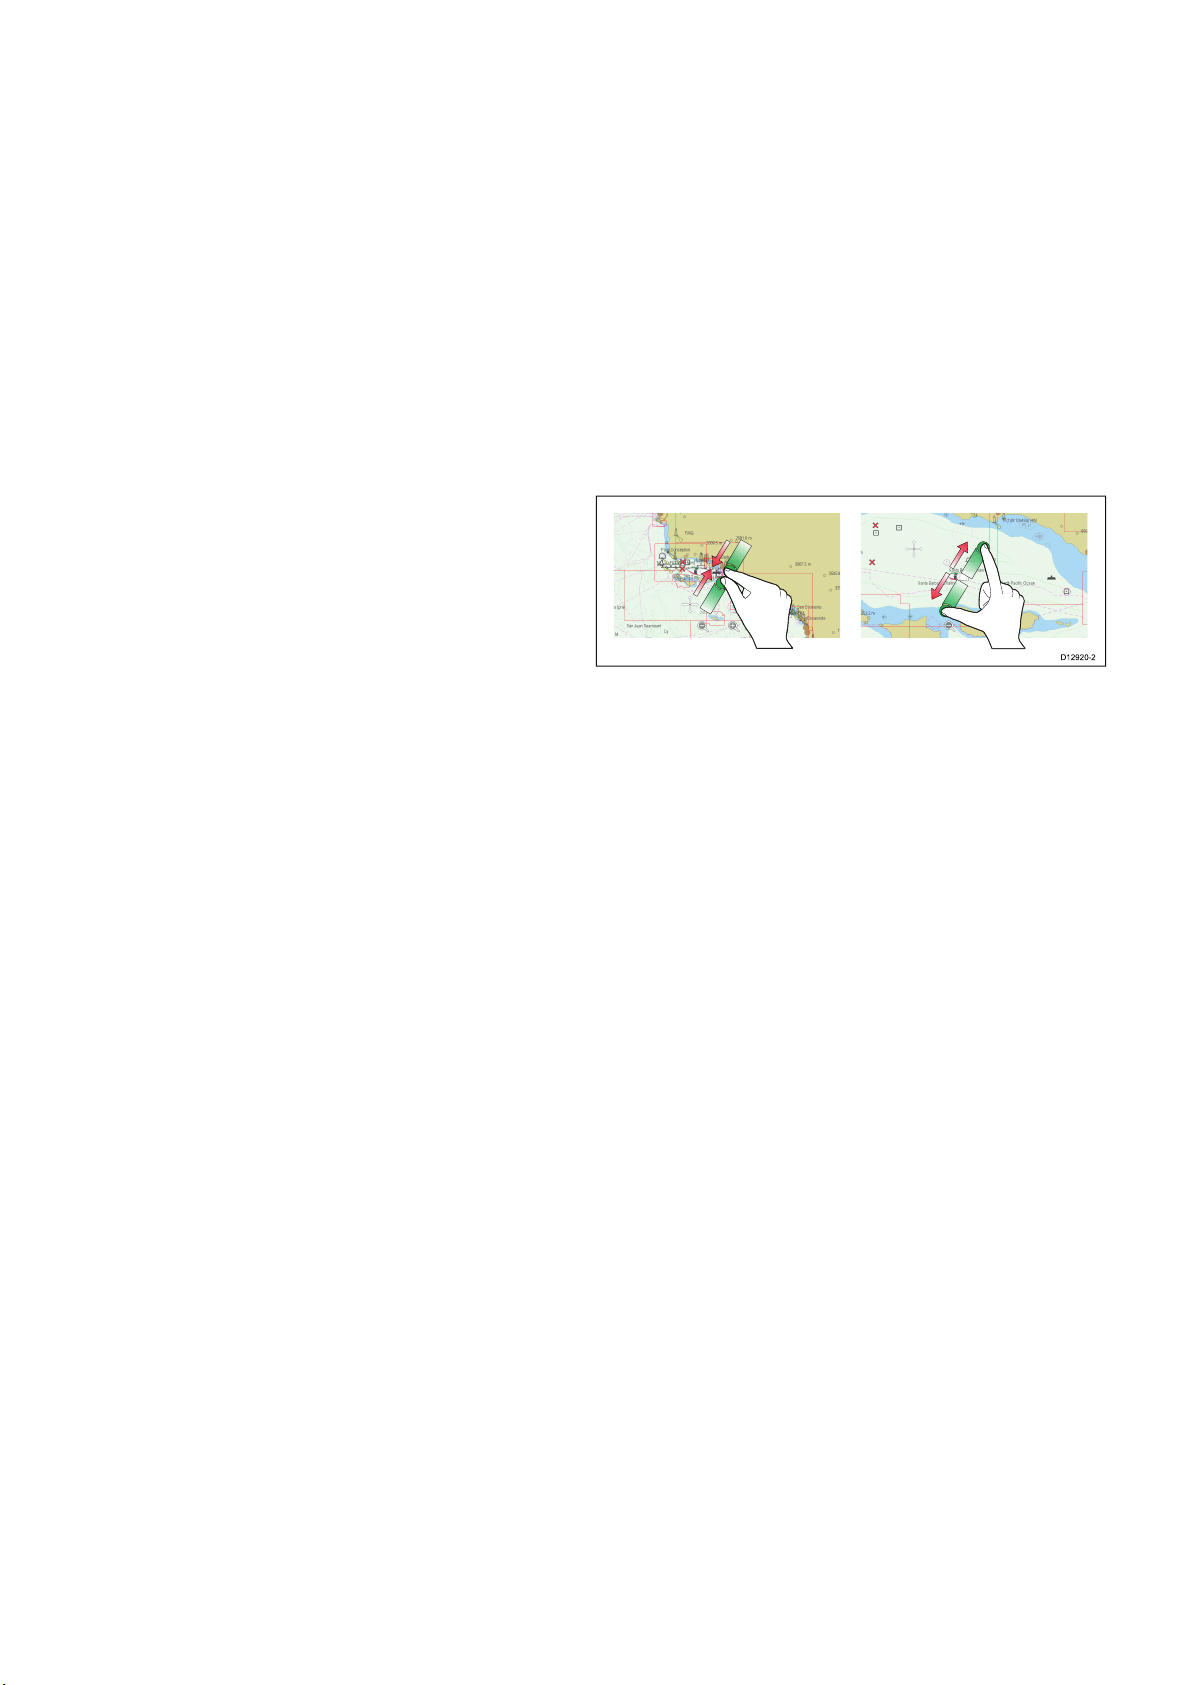
3.9Multi-Touchgestures
RaymarineaSeriesandgSSeriesmultifunction
displayssupportmulti-touch.
Multi-touchmeansthatthedisplayiscapableof
recognizingmultiplesimultaneoustouchinputs.
Thismeansthatyoucanuse2ormorengerson
thescreenatthesametimetoperformmulti-touch
gestures.
Thetouchscreenisnowunlocked.
PinchtoZoom
Thepinchtozoomgesturescanbeperformedon
multifunctiondisplaysthatsupportmulti-touch.
Pinchtozoomconsistsof2actions:
•Move2ngersaparttozoomin.
•Move2ngerstogethertozoomout.
PinchtoZoomcanbeusedinthefollowing
applications:
•Chartapplication.
•Weatherapplication.
28
LightHouseMFDoperationinstructions

3.10Touchicons
D7366_3
D7368_2
D7369-2
WPT
D12580-3
1 2
3
4
5 6
Touchscreenmultifunctiondisplayscanuse
theBACKandCLOSEiconstomovebetween
thedifferentlevelsofmenusavailableineach
application.
Back—gobackonelevel(sameeffectaspressing
theBACKbutton).
3.11Homescreenoverview—Touch
onlydisplays
TheHomescreenprovidesacentralpointofaccess
foryourdisplay'sapplications,dataandsettings.
•TheHomescreenprovidesquickaccesstoyour
data(waypoints,routes,tracks,imagesand
videos)andbackupsettings.
Close—closeallopenmenus(sameeffectas
pressingtheMENUbutton).
Usingthecursor
Thecursorisusedtomovearoundthescreen.
Thecursorappearsonthescreenasawhite
cross.
Ifthecursorhasnotbeenmovedforashort
periodoftime,itchangestoacirclewithacross
init,tomakeiteasiertolocateonthescreen.
Thecursoriscontext-sensitive.Whenitis
placedoveranobjectsuchasawaypointor
chartfeature,itchangescolorandalabel
orinformationassociatedwiththeobjectis
displayed.
Listofcursorlabels
LabelFeatureApplication
A/B
AISAIStargetChart
COGCourseOver
CTRCenterofradar
FLT
GRDGuardzone
HDG
MARPAMARPAtargetRadar
MOBManOverBoard
POS
RTERouteleg
SHMShip'sHeading
TIDETideindicator
TRACK
VRM/EBL
Rulerline
Groundvector
FloatingEBL/VRM
Headingvector
marker
Vessel'sposition
Marker
Trackline
VRMandEBL,1
or2
•TheHomescreenconsistsofanumberof
Homescreenpages.Swipethescreenleftorright
withyourngertoscrollthroughtheavailable
Homescreenpages.
•EachHomescreenpageconsistsofanumberof
icons.Applicationsarestartedbyselectingthe
relevanticon.
Chart
Screen
itemDescription
1Waypoint—selecttheicontoaccessthe
Chart
waypointlist.Selectandholdontheiconto
placeaManOverboard(MOB)markeratyour
Radar
Radar
2MyData—thisiconenablesyoutocentrally
vessel’scurrentposition.
manageyourdataincludingroute,track,and
Radar
Chart
3
waypointlists.Youcanalsoaccesssaved
picturesandvideosandbackupsettings.
Customize—selectthisicontocongure
applicationpagesanddisplaypreferences.
Chart,Radar
4
Set-up—selectthisicontoaccessthesystem
set-upmenus.
Chart
Chart
5
Radar
6
Chart
Icon—eachiconrepresentsanapplication
page.Apagecandisplaymultipleapplications
simultaneously.
Statusbar—thestatusiconsconrmthe
statusofexternally-connectedequipment,
includingGPS,AIS,radar,sonarandautopilot
Chart
units.
Radar
WINDWindindicator
WPTWaypoint
Gettingstarted
Chart
Chart,Radar
29

3.12Homescreenoverview—
1 2 3 4
6 5
HybridTouchandnon-T ouchdisplays
TheHomescreenprovidesacentralpointofaccess
foryourdisplay'sapplications,dataandsettings.
•TheHomescreenprovidesquickaccesstoyour
data(waypoints,routes,tracks,imagesand
videos)andbackupsettings.
•TheHomescreenconsistsofanumberof
Homescreenpages.Swipethescreenleftorright
withyourngertoscrollthroughtheavailable
Homescreenpages.
•EachHomescreenpageconsistsofanumberof
icons.Applicationsarestartedbyselectingthe
relevanticon.
Accessingthehomescreen
Thehomescreencanbeaccessedfromany
application.
Toaccessthehomescreenfollowthestepsbelow:
1.PresstheHomebutton.
Note:Thee7ande7DhaveacombinedMenu
andHomebutton,toaccessthehomescreenpress
andholdtheMenu/Homebuttonfor3seconds.
Databarstatussymbols
Thestatussymbolsonthedatabarconrmwhether
theappropriateconnectionstoyoursystemhave
beenmade.
Thesymbolsshowthestatusforthefollowing:
•Radarscanner.
•AISreceiver/transceiver.
•Sonarmodule.
•GPSreceiver.
Screen
itemDescription
1
TouchLock—(HybridT ouchdisplaysonly)select
thisicontolockthetouchscreen,preventing
accidentaluse.T ounlock,usetheUniControlto
deselecttheTouchLockicon.
2MyData—thisiconenablesyoutocentrally
manageyourdataincludingroute,track,and
waypointlists.Youcanalsoaccesssavedpictures
andvideosandbackupsettings.
3
Customize—selectthisicontocongure
applicationpagesanddisplaypreferences.
•Autopilot.
Autopilotstatussymbols
Theautopilotstatusisindicatedinthedatabar.
SymbolDescription
AutopilotisinStandbymode.
AutopilotisinTrackmode.
AutopilotisinAutomode.
Noautopilotdetected.
Autopilotalarmactive.
Dodgemodeisactive.
4
Set-up—selectthisicontoaccessthesystem
set-upmenus.
5
Icon—eachiconrepresentsanapplication
page.Apagecandisplaymultipleapplications
simultaneously.
6
Statusbar—thestatusiconsconrmthestatus
ofexternally-connectedequipment,includingGPS,
AIS,radar,sonarandautopilotunits.
Accessingthehomescreen
Thehomescreencanbeaccessedfromany
application.
Toaccessthehomescreenfollowthestepsbelow:
1.Selectthehomescreeniconon-screen.
30
Fishmodeisactive.
Autopilotcalibration.
Powersteeringactive.
WindVanemodeisactive.
LightHouseMFDoperationinstructions

Radarscannerstatussymbols
Theradarscannerpowermodestatusisindicated
inthedatabar.
Radar
power
Symbol
modeDescription
Transmit(TX)
Rotatingicon,signifyingthatthe
scannerisonandtransmitting.
WhenSCANNERissettoON,
selectthismodetoactivatethe
scanner.Thisistheusualmodeof
operation.
Standby
(STBY)
Staticicon,indicatingthatthe
scannerisonbutnottransmitting,
andtheantennaisnotrotating.
Thescannerdoesnottransmitand
theradardataisremovedfromthe
screen.Thisisapower-savemode
usedwhentheradarisnotneeded
forshorttimeperiods.When
youreturntotransmitmode,the
magnetrondoesnotneedtowarm
upagain.Thisisthedefaultmode.
OffScannerpoweredoffwhenradar
notrequired,butdisplayisinuse
forotherapplications,suchasthe
chart.Whenselected,thesystem
countsdown.Duringthistimeyou
cannotre-powerthescanner.
Timed
Transmit
Scannerswitchesbetween
on/transmitting,andstandbymode.
Scannergoesintopowersave
modewhenconstantuseofradar
isnotrequired.
SymbolDescription
AISunitisconnectedandswitched
on,buthasactivealarms.
AISunitisconnectedandswitched
on,butthedangerousandlostalarm
isdisabled.
Sonarstatussymbols
Thesonarstatusisindicatedinthedatabar.
SymbolDescription
Symbolanimated:thesonar
moduleisconnectedand
transmitting.
Symbolstatic:thesonar
moduleisconnectedbutnot
transmitting.
Symbolgreyed-out:thesonar
moduleisnotconnected,or
isnotdetected.
GPSstatussymbols
TheGPSreceiverstatusisindicatedinthedatabar.
SymbolDescription
AGPSreceiverisconnected
andhasobtainedax.
AGPSreceiverisnot
connected,orcannotobtain
ax.
AISstatussymbols
AISstatusisindicatedbyasymbolinthedatabar.
SymbolDescription
AISunitisswitchedonandoperating.
AIScurrentlyunavailable.
AISunitisswitchedoff,ornot
connected.
AISunitisinSilentMode.
AISunitisinSilentMode,withactive
alarms.
Gettingstarted
31

3.13Pages
Pagesaremadeupof1to4panesthatareused
todisplayapplicationsonyourmultifunctiondisplay
(MFD).
Pagesareaccessedusingtheiconsonthe
Homescreen.
•Youcancreateupto2applicationpanesperpage
usinganMFDthathasascreensizeof7inches
orless.
•Youcancreateupto4applicationpanesperpage
usinganMFDthathasascreensizeofgreater
than7inches.
•MFDswithascreensizeof7inchesorlesscan
viewpageswithmorethan2applicationpanes
butonlyiftheyaresharingtheHomescreenofan
MFDwhichiscapableofcreatingthosepages.
Pagescanbecustomized,enablingyoutogroup
yourapplicationsintodifferentpages,eachdesigned
foraspecicpurpose.Forexample,youcould
haveapagethatincludesthechartandshnder
applications,suitableforshing,andanotherpage
thatincludesthechartanddataapplications,which
wouldbesuitableforgeneralsailing.
Iconforapagefeaturingasingle
application.
Iconforapagefeaturingmultiple
applications.
Youcanalsodenethelayoutforeachpage,which
determineshowtheapplicationsarearrangedon
thescreen.
SettingthePower-uppage
Youcansetupyourmultifunctiondisplaytoshowa
pageinsteadoftheHomescreenatpowerup.
FormtheHomescreen:
1.SelectCustomize.
2.SelectDisplayPreferences.
3.SelectStartingpage.
Alistofoptionsisdisplayed
•Homescreen—Homescreenisdisplayedafter
power-up.
•Lastpage—Thepagelastviewedisdisplayed
afterpower-up
4.IfselectingChoosepagetheHomescreenis
displayed.
5.Selecttheiconforthepageyouwantdisplayed
whenthedisplayisturnedon.
Thestartingpagesettingappliestoeachindividual
displayandisnotautomaticallysharedonnetworked
displays.
Changinganexistingpageonthe
homescreen
Withthehomescreendisplayed:
1.SelectCustomize.
2.SelectHomescreen.
3.SelectEditPage.
4.Selectthepageiconthatyouwanttochange.
TheCustomizemenuoptionsaredisplayed.
5.Selecttheappropriatepagelayout(forexample,
“Splitscreen”).
6.Selecttheapplication(s)youwanttodisplayon
thepage,eitherbyselectingtherelevantmenu
itemordraggingitovertothedisplayedpage.
7.SelectFinish.
TheRenamePagedialogisdisplayed.
8.Usetheon-screenkeyboardtonamethepage,
thenselectSave.
Changinganemptypage
Withthehomescreendisplayed:
1.SelectCustomize.
2.SelectHomescreen.
3.SelectEditPage.
4.Selectanemptypageicon(labelled“Customize”).
TheCustomizemenuoptionsaredisplayed.
5.Selecttheappropriatepagelayout(forexample,
“Splitscreen”).
6.Selecttheapplication(s)youwanttodisplayon
thepage,eitherbyselectingtherelevantmenu
itemordraggingitovertothedisplayedpage.
7.SelectFinish.
TheRenamePagedialogisdisplayed.
8.Usetheon-screenkeyboardtonamethepage,
thenselectSave.
•Choosepage—Thepageyouselectwillbe
displayedafterpower-up
32
Movingapageonthehomescreen
Withthehomescreendisplayed:
1.SelecttheCustomizeicon.
2.SelectHomescreen.
3.SelectSwapPage.
LightHouseMFDoperationinstructions

4.Selectthepageiconthatyouwanttomove.
5.Selectthepageiconthatyouwanttoswap
positionswith.
Thepageiconismovedtothenewposition.
Renamingapageonthehomescreen
Withthehomescreendisplayed:
1.SelecttheCustomizeicon.
2.SelectHomescreen.
3.SelectRenamePage.
4.Selectthepagethatyouwanttorename.
Theon-screenkeyboardisdisplayed.
5.Usingtheon-screenkeyboard,enterthenew
nameforthepage.
6.SelectSAVE.
Deletingapagefromthehomescreen
Withthehomescreendisplayed:
1.SelecttheCustomizeicon.
2.SelectHomescreen.
3.SelectDeletePage.
4.Selectthepagethatyouwanttodelete.
Thepageisdeleted.
Resettingthehomescreentodefaultsettings
Withthehomescreendisplayed:
1.SelecttheCustomizeicon.
2.SelectHomescreen.
3.SelectReset.
Awarningmessageisdisplayedaskingfor
conrmation.
4.SelectYestoresetthehomescreentothedefault
rangeofpages,orNotocanceltheoperation.
3.14Applications
Chartapplication—providesa2Dor
3Dgraphicalviewofyourchartstohelp
younavigate.Waypoint,route,and
trackfunctionsenableyoutonavigate
toaspeciclocation,buildandnavigate
routes,orrecordwhereyou'vebeen.
Chartcardsprovidehigherlevelsof
detailand3Dviews.
Fishnderapplication—with
atransducerandasonarvariant
multifunctiondisplayorcompatible
SonarModule,youcanusethe
shnderapplicationtohelpyou
accuratelydistinguishbetweendifferent
sizesofsh,bottomstructure,and
underwaterobstacles.Youcanalso
viewseadepthandtemperaturedata
andmarkpointsofinterestsuchas
shingspotsorwrecks.
Radarapplication—withasuitable
radarscanner,youcanusethe
radarapplicationtotracktargetsand
measuredistancesandbearings.A
numberofautomaticgainpresetsand
colormodesareprovidedtohelpyou
getthebestperformancefromyour
radarscanner.
Dataapplication—viewsystemand
instrumentdataonyourmultifunction
display,forarangeofcompatible
instruments.Usethejoystickor
touchscreentoscrollthroughthe
availabledatapages.
Weatherapplication—(North
Americaonly).Withasuitableweather
receiverconnectedtoyoursystem,the
weatherapplicationoverlayshistorical,
live,andforecastedweathergraphics
onaworldmap.
Thermalcamapplication—view
andcontrolathermalcamerausinga
compatiblemultifunctiondisplay.
Note:Thethermalcamera
applicationisnotavailableona6x
anda7xvariantMFDs.
Cameraapplication—viewavideo
orcamerasourceonyourmultifunction
display.
DocViewer—viewpdfdocuments
storedonaMicroSDcard.
Gettingstarted
33

FUSIONLinkapplication—link
D12880-2
2 3
4
1
5
toandcontrolacompatibleFusion
entertainmentsystemfromyour
multifunctiondisplay.
SiriusAudioapplication—control
Siriusradiofromyourmultifunction
display.
UserManual—OpenstheEnglish
versionoftheproductusermanual
storedonthedisplay.Toopen
translatedusermanualsstoredon
memorycardusetheDocViewer.
3.15Splitscreencontrols
Whenviewingapagewithmorethan1application
displayedyoucanswitchapplicationsfromthe
splitscreenviewtofullscreenview.
Example1—Splitscreenpage
Example2—Fishnderapplicationexpanded
toFullscreen
Switchingtheactivepaneordisplayusing
thekeypad
TheSwitchActivebuttonisusedtoswitchtheactive
paneonamultiapplicationpageand/ortoswitch
theactivedisplay.
Withmultipledisplaysconnectedand/ormultiple
applicationpage(s)displayed:
Cyclesequence
1.PresstheSwitchActivebuttontoenterswitch
mode.
2.UsetheRotarycontroltocyclethroughthe
availablepanesand/ordisplays.
Thekeypadwillcyclethroughdisplaysinthe
orderinwhichtheywerepaired.Onmulti
applicationpagestheRangebuttonscanbeused
34
LightHouseMFDoperationinstructions

toswitchtheactiveapplicationbetweenfulland
7
6
1
2 3
4
5
splitscreen.
3.PresstheBackbuttonortheSwitchActive
buttontoexitswitchmode.
Expandingandretractingasplitscreen
application
ThefollowingstepsapplytoMFDsthathavea
SwitchActivePanebuttonorhaveanMFDkeypad
connected.
Withapagefeaturingmultipleapplicationsdisplayed:
1.Selecttheapplicationyouwanttoexpand.
3.16Screenoverview
2.PressandholdtheSwitchActivePane
button.
Theactivepaneisexpandedtofullscreen.
3.T orevertbacktothesplitscreenviewpressand
holdthe
SwitchActivePanebuttonagain.
Expandingandretractingasplitscreen
applicationusingmenuoptions
ThefollowingstepsapplytoMFDsthatdonothave
aSwitchActivePanebutton.
Withapagefeaturingmultipleapplicationsdisplayed:
1.SelectMenu.
2.SelectFullscreenViewtoexpandtheactive
applicationinfullscreen,or
3.SelectSplitscreenViewtoreverttothe
splitscreenpageview.
ScreenitemDescription
1Home
2
3
4
5
•Displayswithatouchscreen—Select
theonscreenHomeicontoaccessthe
Homescreen.
•Non-touchscreenandHybridTouch
displays—UsethephysicalHomebutton
toaccesstheHomescreen.
Databar—providesinformationaboutyour
vesselanditsenvironment.Thetypeof
informationinthedatabarcanbecustomized
fromtheHomescreen>Customize>
DatabarSet-upmenu,ifrequired.
Menu—menuoptionsarespecictothe
applicationthatyouarecurrentlyusing.
Statusbar—providesinformationspecic
toeachapplication.Thisinformationcannot
beeditedormoved.
Contextmenu—providesinformationand
optionsspecictoeachapplication.
6Menuoptions—menuoptionsaredisplayed
whentheMenuisselected.
7
Pop-upmessages—alertyoutoasituation
(suchasanalarm),orunavailablefunction.
Pop-upmessagesmayrequirearesponse
fromyou—forexample,selectOKtosilence
alarms.
Menus
Menusenableyouconguresettingsand
preferences.
Menusareusedinthe:
•Homescreen—tocongureyourmultifunction
displayandexternally-connectedequipment.
•Applications—tocongurethesettingsforthat
particularapplication.
Gettingstarted
35

D12281- 4
3
4
5
1 2
D12277-2
1 4
5
2 3
ScreenitemDescription
D13004-1
1
3
5
7
8
4
2
6
1Back
•Displayswithatouchscreen—Selectthe
onscreenBackicontogobacktothe
previousmenu.
•Non–touchscreenorHybridTouchdisplays
—UsetheBackbuttontogobacktothe
previousmenu.
2
Functionicons—Somedialogsinclude
iconswhichcanbeselectedtoaccess
additionalfunctions.Forexample,inthe
WaypointListdialog,theSortbyiconcan
Screen
itemDescription
1
Back—Ondisplayswithatouchscreenyoucan
3
presstheonscreen<<(back)icontogobackto
apreviousmenu.Onnon-touchscreendisplays
orHybridTouchdisplaysusetheBackbutton.
2
Close—Ondisplayswithatouchscreenyou
canpresstheonscreenX(close)icontogo
backtoapreviousmenu.Onnon-touchscreen
displaysorHybridT ouchdisplaysusetheBack
buttontobackoutofthemenustructure.
3
Selectedmenuoption—themenuoption
4
beusedtochangehowthewaypointslistis
sorted.
Menu/Listitem
•Displayswithatouchscreen—
Momentarilytouchinganitemautomatically
selectstheitemanddisplaystheitem
optionsmenu.
•Non–touchscreenorHybridTouchdisplays
—UsetheRotarycontroltohighlightan
item,andtheOkbuttontoselectitand
displaytheitemoptionsmenu.
Close
currentlyselectedwillbehighlighted.
•Displayswithatouchscreen—Selectthe
4
Scrollbar—indicatesthatfurthermenu
onscreenCloseicontoclosethedialog.
itemsareavailablebyscrollingthemenu.On
displayswithatouchscreentoscrollthrough
theavailablemenuitems,pressandholdyour
ngeronthemenuanddragitupordown.
5
•Non–touchscreenorHybridTouchdisplays
—UsetheBackbuttontoclosethedialog.
Scrollbar
Onnon-touchscreendisplaysorHybridTouch
displaysusetheRotarycontrol.
•Displayswithatouchscreen—Toscroll
throughtheavailableitems,pressand
5
On/Offswitch—Ondisplayswitha
touchscreenyoucanselectonscreenmenu
holdyourngeronthescrollbaranddrag
itupordown.
itemstoswitchfeaturesOnorOfftoenable
ordisablethefunction.Onnon-touchscreen
displaysorHybridTouchdisplaysusetheOK
buttontoswitchthefunctionOnorOff.
•Non–touchscreenorHybridTouchdisplays
—T oscrollthroughtheavailablemenu
items,usetheRotarycontrol.
Dialogs
Dialogsarefullscreenmenusthatenableyouto
managedataitemssuchaswaypointsandroutes.
36
Shortcutspage
Anumberofusefulfunctionscanbeaccessedfrom
theShortcutspage.
LightHouseMFDoperationinstructions

1Decreasedisplaybrightness
D12567-2
1 2 3 4
4.Selecttheàèòkeytoenterthecharacter.
2Increasedisplaybrightness
3
4
5
Powerup/PowerdownRadar
Radarstandby/Radartransmit
Autopilotstandby(duringactivenavigation)
6Displaypilotcontroldialog
7
8
PowerSavemode
Screenshot/Screencapture
Editdialogs
Editdialogsenableyoutoeditthedetailsofdata
itemsstoredonyourmultifunctiondisplay ,suchas
waypoints,routes,andtracks.
Numericmenuitems
Numericmenuitemsdisplaynumericdataand
enablesyoutoeitherselectapredenedvalueorto
increaseanddecreasethevalueasrequired.
Editingnumericalsettings
Toeditnumericalvaluesyoucanuseeitherthe
onscreennumericadjustcontrol,onscreennumeric
keypadortheRotaryControlonanon-touchor
HybridTouchdisplaytoincreaseordecreasenumeric
values.
Selectingatextelddisplaystheonscreenkeyboard,
whichcanbeusedtoeditthedetails.
Editinginformationindialogs
Withthedialogdisplayed:
1.Selecttheeldyouwanttoedit.
Theonscreenkeyboardisdisplayed:
2.Usetheonscreenkeyboardtomakethechanges.
3.SelectSAVEtosavethechanges.
Enteringspecialoraccentedcharacters
Withtheonscreenkeyboarddisplayed:
1.Selecttheonscreenkeyboard'sàèòkey.
2.Selectthecharacteryouwanttoaccent.
Theavailableaccentedcharactersaredisplayed
abovethetextentryeld.
3.Forcharactersthathavemultipleavailable
accents,usethecharacterkeytotogglebetween
them.
1.Selectthenumericdataeldyouwanttoedit.
Thenumericadjustcontrolisdisplayed.
2.Adjustthesettingtotherequiredvalueusing:
i.TheRotarycontrol—Non-touchscreenor
HybridTouchdisplays,or
ii.TheonscreenUpandDownarrows—
Touchscreendisplays.
3.T oaccesstheon-screennumerickeypad:
•Touchoperation—Selecttheonscreenkeypad
iconfromthenumericadjustcontrol.
•Non-Touchoperation—PressandholdtheOk
button.
Theonscreennumerickeypadisdisplayed.
4.Entertherequiredvalue.
5.SelectOktoexitthenumerickeypadandreturn
tothemenu.
Gettingstarted
37

Usingsliderbarcontrols
1
2
3
D1257 0-1
D12279-2
1
3
2
3.17Initialsetupprocedures
Sliderbarcontrolsprovideagraphicalrepresentation
ofnumericdataandenablesyoutoquicklychange
settingvalues.
Descrip-
Item
1
tion
Current
Non—Touch
operationTouchoperation
N/AN/A
value
2
3Auto
Slider
control
UsetheRotary
controltoadjust
value
PressOkbutton
toswitchbetween
Autoandmanual
adjustment.
SlidethesliderUp
orDowntoadjust
value.
Selecttoswitch
betweenAuto
andmanual
adjustment.
Usingcontroldialogs
Controldialogsenableyoutocontrolexternally
connectedequipment,suchasanautopilotunit.
Thefollowingdiagramshowsthemainfeaturesof
atypicalcontroldialog:
Onceyourdisplayhasbeeninstalledand
commissioned,Raymarinerecommendsthatyou
completetheStartupwizardandperformsome
additionalprocedures.
Startupwizard
Whenyoupower-upthedisplayforthersttimeor
afterasystemresetaStartupWizardisdisplayed.
Thewizardguidesyouthroughthefollowingbasic
congurationsettings:
1.Language
2.Boattype
3.CongureUnits(Unitsofmeasure)
4.BoatDetails
Note:Thesesettingscanalsobesetatanytime
usingthemenusaccessiblefromHomescreen
>Customize.
Additionalsettings
InadditiontothesettingscoveredbytheWizard,
itisalsorecommendedthatthefollowinginitialset
uptasksarecompleted:
•Setyourdateandtimepreferences.
•Designatethedatamaster.
•SelecttheGPSdatasource.
•Familiarizeyourselfwiththeproductusing
SimulatorMode.
Warning:MinimumSafeDepth,
BeamandHeight
Dependingoncartographyvendor,the
minimumsafesettingsareusedduring
automaticroutegeneration,theyareused
torestrictcreatedroutesfromentering
waterthatisnotsuitableforthevessel.
Dataistakenfromcompatiblecartography.
Minimumsafesettingsareuserdened
calculations.Asbothofthesefactors
ScreenitemDescription
1
Status—providesstatusinformationforthe
connectedequipment.Forexample,thePilot
Controldialogdisplaysthelockedheading
andcurrentnavigationmodeforaconnected
autopilotunit.
2
3
Controlicons—providedirectcontrolof
theconnectedequipment.Forexample,the
PilotControldialogStandbyandTrackicons
enableyoutoinstructaconnectedautopilot
unittoperformspecicfunctions.
Close—Closesthecontroldialog.
Minimumsafevesseldepth
AspartoftheInitialstartupwizardtheMinimum
SafeDepthvaluecanbeset.
MinimumSafeDepthcanbeestablishedbyadding
together:
•MaximumVesselDraft(i.e.thedistancefromthe
waterlinetothelowestpointofavessel’skeel.)
•SafetyMargin(anadequateclearancebelowthe
keeltoallowfordraftvariationandchangesin
waterorbottomconditions.)
38
areoutsideofRaymarine’scontrol;
Raymarinewillnotbeheldliablefor
anydamage,physicalorotherwise,
resultingfromtheuseoftheautomatic
routegenerationfeatureortheMinimum
SafeDepth,MinimumSafeBeamor
MinimumSafeHeightsettings.
LightHouseMFDoperationinstructions

i.e.:MinimumSafeDepth=MaximumVesselDraft
D13159-1
2
4
1
3
D1322-1
2
1
3
1
2
3
D13323-1
+SafetyMargin.
1.Portsafetymargin
1.Waterline
2.MaximumVesselDraft
3.SafetyMargin
4.MinimumSafeDepth
Important:Theinformationbelowisprovided
forguidanceonlyandisnotexhaustive.Some
inuencingfactorscanbeuniquetocertainvessels
and/orareasofwaterandmaynotbelisted
below.Y oushouldensureyouaccountforALL
factorsthatapplytoyourcurrentsituationwhen
makingcalculations.
Someofthefactorsthatcaninuencehowmucha
vesseldrawsareshownbelow:
•Vesseldisplacement(weight)—Avessel’sdraft
willincreasewhenitisfullyladenwhencompared
withitsunladendisplacement.
•Watertype—Avessel’sdraftwillincreaseby
approximately2%to3%infreshwatercompared
toseawater.
Someofthefactorsthatshouldbetakenintoaccount
whencalculatingaSafetyMarginare:
•Vesselmaneuveringcharacteristics—A
vessel’sdraftincreasesduetosquat,trim,roll,
pitchandheave.
•Chartaccuracy—Theelectronicchartdepth
maynotbeaccurateorthetruedepthmayhave
changedsincethelastsurvey.
•Weatherconditions—Highairpressure,and
prevailingwindstrengthanddirectioncanaffect
waveheight.
2.MaximumVesselWidth(Beam)
3.Starboardsafetymargin
Important:Theinformationbelowisprovided
forguidanceonlyandisnotexhaustive.Some
inuencingfactorscanbeuniquetocertainvessels
and/orareasofwaterandmaynotbelisted
below.Y oushouldensureyouaccountforALL
factorsthatapplytoyourcurrentsituationwhen
makingcalculations.
Someofthefactorsthatshouldbetakenintoaccount
whencalculatingaSafetyMarginare:
•Vesselmaneuveringcharacteristics—A
vessel’srequiredclearancewillincreasedueto
roll.
•Chartaccuracy—Theelectronicchartdatamay
notbeaccurateormayhavechangedsincelast
surveyed.
Minimumsafeheight
AspartoftheInitialstartupwizardtheMinimum
SafeHeightvaluecanbeset.Minimumsafeheight
isrequiredwhenusingJeppesen
MinimumSafeHeightcanbeestablishedbyadding
together:
•Maximumvesselheightfromwaterline
•SafetyMargin(anadequateclearanceabovethe
vesseltoaccountfortideandweathereffects.)
i.e.:MinimumSafeHeight=MaximumVessel
Height+SafetyMargin.
®
EasyRouting..
Minimumsafebeam
AspartoftheInitialstartupwizardtheMinimum
SafeBeamvaluecanbeset.Minimumsafebeamis
requiredwhenusingJeppesen
MinimumSafeBeamcanbeestablishedbyadding
together:
•MaximumVesselWidth(Beam)
•SafetyMargin(anadequateclearancetoeither
sideofthevessel.)
i.e.:MinimumSafeBeam=PortSafetyMargin+
Beam+StarboardSafetyMargin.
Gettingstarted
®
EasyRouting..
1.SafetyMargin
2.Maximumheightfromwaterline
3.Waterline
39

Important:Theinformationbelowisprovided
forguidanceonlyandisnotexhaustive.Some
inuencingfactorscanbeuniquetocertainvessels
and/orareasofwaterandmaynotbelisted
below.Y oushouldensureyouaccountforALL
factorsthatapplytoyourcurrentsituationwhen
makingcalculations.
Someofthefactorsthatcaninuencevesselheight
areshownbelow:
•Vesseldisplacement(weight)—Avessel’s
height(fromthewaterline)willdecreasewhen
itisfullyladenwhencomparedwithitsunladen
displacement.
•Watertype—Avessel’sheightwilldecreaseby
approximately2%to3%infreshwatercompared
toseawater.
Someofthefactorsthatshouldbetakenintoaccount
whencalculatingaSafetyMarginare:
•Vesselmaneuveringcharacteristics—A
vessel’sheightchangesduetosquat,trim,roll,
pitchandheave.
•Chartaccuracy—Theelectronicchartdatamay
notbeaccurateormayhavechangedsincethe
lastsurvey .
•Weatherconditions—Lowairpressure,and
prevailingwindstrengthanddirectioncanaffect
waterlevel.
•Cartography
•Routesandwaypoints
•Radar
•Sonar
•Datareceivedfromtheautopilot,instruments,the
engineandotherexternalsources.
Yoursystemmaybewiredforredundancywithdata
connectionsmadetorepeatdisplays.Howeverthese
connectionswillonlybecomeactiveintheeventofa
faultand/orreassignmentofthedatamaster.
Inanautopilotsystemwhichdoesnotcontaina
dedicatedpilotcontrolheadtheDatamasteralso
actsasthecontrolfortheautopilot.
Designatingthedatamaster
Forsystemswith2ormoredisplaysthefollowing
taskmustbeperformedonthemultifunctiondisplay
thatyouwanttodesignateasthedatamaster.
Withthehomescreendisplayed:
1.SelectSet-up.
2.SelectMaintenance.
3.SelectDataMaster.
4.Selectthedisplaythatyouwanttodesignateas
thedatamaster.
SettingthevesselMinimumSafeDepth,
BeamandHeight
FromtheHomescreen:
1.SelectCustomize.
2.SelectBoatDetails.
3.SelectMin.SafeDepth,Min.SafeBeamor
Min.SafeHeight.
4.Enteryourcalculatedminimumsafesettings.
Settingtimeanddatepreferences
Withthehomescreendisplayed:
1.SelectCustomize.
2.SelectTimeandDateSet-up.
3.UsetheDateFormat,TimeFormat,andLocal
Time:UTCmenuitemstosetyourtimeanddate
preferences.
Datamaster
Anysystemcontainingmorethanonenetworked
multifunctiondisplaymusthaveadesignateddata
master.
Thedatamasteristhedisplaywhichservesasa
primarysourceofdataforalldisplays,italsohandles
allexternalsourcesofinformation.Forexample
thedisplaysmayrequireheadinginformationfrom
theautopilotandGPSsystems,usuallyreceived
throughaSeaTalk
masteristhedisplaytowhichtheSeaT alk,NMEA
andanyotherdataconnectionsaremade,itthen
bridgesthedatatotheSeaT alk
compatiblerepeatdisplays.Informationsharedby
thedatamasterincludes:
40
ng
orNMEAconnection.Thedata
hs
networkandany
LightHouseMFDoperationinstructions

3.18GNSSStatus
1
2
3
D13122-1
TheGPSstatuspageenablesyoutoviewthestatus
oftheavailablesatellitesthatarecompatiblewith
yourreceiver.
Thesatelliteconstellationsareusedtopositionyour
vesselintheChartandWeatherapplications.You
cansetupyourreceiverandcheckitsstatusfrom
theGPSSet-upmenu:Homescreen>Set-up>
SystemSettings>GPSSet-up.Foreachsatellite,
thescreenprovidesthefollowinginformation:
1.Skyview
2.Satellitestatus
3.Positionandxinformation
Skyview
Skyviewisavisualrepresentationthatshows
thepositionofnavigationsatellitesandtheirtype.
Satellitetypesare:
•Circle—Acircleidentiesasatellitefromthe
GPSconstellation.
•*Diamond—Adiamondidentiesasatellitefrom
theGLONASSconstellation.
•Square—Asquareidentiesan(SBAS)
differentialsatellite.
Note:*GLONASSsatellitesareonlyavailable
whenconnectedtoacompatibleGNSSreceiver.
RefertotheT echnicalspecicationforyour
producttoidentifyyourreceivertype.
Satellitestatusarea
TheSatellitestatusareadisplaysthefollowing
informationabouteachsatellite:
•Type—Identieswhichconstellationthesatellite
belongsto.
•ID—Displaysthesatellitesidenticationnumber.
•CNO(Carrier-to-noiseratio)—Displaysthesignal
strengthofeachsatelliteshownintheSkyview:
–Grey=searchingforsatellite
–Green=satelliteinuse
–Orange=trackingsatellite
•AzimuthandElevation—Providestheangleof
elevationandazimuthbetweenthelocationofthe
receiverandthesatellite.
Positionandxinformation
Thefollowingpositionalandxinformationis
provided:
•HorizontalDilutionofPrecision(HDOP)
—HDOPisameasureofsatellitenavigation
Gettingstarted
accuracy,calculatedfromanumberoffactors
includingsatellitegeometry,systemerrorsin
thedatatransmissionandsystemerrorsinthe
receiver.Ahigherguresigniesagreater
positionalerror.Atypicalreceiverhasanaccuracy
ofbetween5and15m.Asanexample,assuming
areceivererrorof5m,anHDOPof2would
representanerrorofapproximately15m.Please
rememberthatevenaverylowHDOPgureis
NOguaranteethatyourreceiverisprovidingan
accurateposition.Ifindoubt,checkthedisplayed
vesselpositionintheChartapplicationagainst
youractualproximitytoaknownchartedobject.
•EstimatedHorizontalPositionError(EHPE)
—EHPEisameasureoftheestimatederrorof
apositionxinthehorizontalplane.Thevalue
displayedindicatesthatyourpositioniswithina
circleradiusofthestatedsize50%ofthetime.
•Fixstatus—indicatestheactualmodethe
receiverisreporting:
–Fix—Satellitexhasbeenacquired.
–NoFix—Nosatellitexcanbeacquired.
–DFix—Adifferentialbeaconxhasbeen
acquired.
–SDFix—Adifferentialsatellitexhasbeen
acquired.
•Position—Displaysthelatitudeandlongitude
positionofyourreceiver.
•Date/Time—Displaysthecurrentdateandtime
generatedbythepositionxinUTCformat.
•Mode—Identieswetherthereceiverisworking
indifferentialmodeornon-differentialmode.
•Datum—Thereceiver'sdatumsettingaffects
theaccuracyofthevesselpositioninformation
displayedintheChartapplication.Inorderforyour
receiverandMFDtocorrelateaccuratelywithyour
papercharts,theymustbeusingthesamedatum.
GlobalNavigationSatelliteSystems(GNSS)
AGNSSisasystemofsatellitesthatprovides
autonomousgeo-spatialpositioningthatallows
electronicdeviceswithcompatiblereceiversto
determinetheirlocation(longitude,latitudeand
altitude).
OperationalGNSS
•GPS(NAVSTAR)GlobalPositioningSystem
USownedconstellationofsatellitesthatbecame
fullyoperationalin1995.
•GLONASSacronymfor"GLObalnaya
NAavigatsionnayaSputnikovayaSistema"or
“GlobalNavigationSatelliteSystems”
Russianownedconstellationofsatellitesthat
offeredglobalcoveragein2010.
PlannedGNSS
•Galileo
Europeansatelliteconstellationininitial
deploymentphaseduetobecomeoperationalin
2020.
•COMPASS/Beidou-2
41

ChineseRegionalNavigationSatelliteSystem
WAAS
EGNOS
GAGAN
MSAS
D13121-1
(Beidou)iscurrentlybeingexpandedforglobal
coverage(COMPASSorBeidou-2)by2020.
Satellitebasedaugmentationsystems
(SBAS)
Satellitebasedaugmentationsystems(SBAS)are
systemsthatareusedtocomplimentexistingGNSS
byprovidingdifferentialcorrectionsthatimprovea
GNSS’sattributessuchasaccuracy,availabilityand
reliability.
TheimagebelowshowsSBASregionalcoverage.
Status/
TypeNameCompatiblereceivers
Oper-
EGNOS
ational
AllinternalandexternalRaymarine
GPSreceiversandGNSSreceivers
SBAS
Oper-
MSAS
ational
AllinternalandexternalRaymarine
GPSreceiversandGNSSreceivers
SBAS
Oper-
GAGAN
ational
AllinternalandexternalRaymarine
GPSreceiversandGNSSreceivers
SBAS
Planned
SBAS
QZSS*eSSeriesanda9x,a12xinternal
GNSSreceiver
Note:*Notcurrentlyoperationalbutwillbe
supportedviasoftwareupdateinthefuture.
GPSselection
Youcanuseaninternal(ifavailable)orexternalGPS
receiverorGNSSreceiver.
•WAAS—WideAreaAugmentationSystem
(OperatedbytheFederalAviationAuthority(FAA)
intheUSA.)
•EGNOS—EuropeanGeostationaryNavigation
OverlayService(OperatedbytheEuropean
SpaceAgency.)
•GAGAN—GPSAidedGeoAugmented
Navigation(OperatedbyIndia.)
•MSAS—Multi-functionalSatelliteAugmentation
System(OperatedbyJapan’sMinistryofLand,
InfrastructureandTransportandJapanCivil
AviationBureau(JCAB)
•QZSS—Quasi-ZenithSatelliteSystem(Proposed
byJapan)
RaymarineGPS/GNSSreceivercompatibility
RaymarineGPSreceiversandGNSS
(GPS/GLONASS)receiversarecompatible
withthefollowingGNSSandSBAS.
Status/
TypeNameCompatiblereceivers
Oper-
GPS
ational
GNSS
Operational
GLON-
ASS
GNSS
AllinternalandexternalRaymarine
GPSreceiversandGNSSreceivers
eSSeriesanda9x,a12xinternal
GNSSreceiver
•Yourmultifunctiondisplaymayfeatureaninternal
GPSorGNSSreceiver.
•Youcanalsoconnectanexternalreceiverusing
SeaTalk
ng
orNMEA0183.
•WhereappropriateusetheSystemSettingsmenu
toenableordisabletheinternalreceiver.
Enablingordisablingtheinternalreceiver
IfyourmultifunctiondisplayfeaturesaninternalGPS
receiverorGNSSreceiverthenthiscanbeenabled
anddisabledbyfollowingthestepsbelow.
WiththeHomescreendisplayed:
1.SelectSet-Up.
2.SelectSystemSettings.
3.T oenabletheinternalreceiver,selectInternal
GPSsothatOnishighlighted.
4.T odisabletheinternalreceiver,selectInternal
GPSsothatOffishighlighted.
Enablinganddisablingdifferentialsatellites
Youcanchoosewetherornotyourreceiveruses
differentialdataprovidedbySBASconstellations.
FromtheGPSSet-upmenu:Homescreen>Set-up
>SystemSettings>GPSSet-up:
1.SelectDifferentialGPS.
SelectingDifferentialGPSwillswitchdifferential
satellite(SBAS)receptionOn(default)andOff.
42
Planned
GNSS
Planned
GNSS
Operational
SBAS
COMPASS/
*eSSeriesanda9x,a12xinternal
GNSSreceiver
Beidou–2
Galileo*eSSeriesanda9x,a12xinternal
WAAS
GNSSreceiver
AllinternalandexternalRaymarine
GPSreceiversandGNSSreceivers
Choosingdifferentialsatellites
YoucanselectwhichconstellationsofSBASyour
receiverwilluse.
FromtheGPSSet-upmenu:Homescreen>Set-up
>SystemSettings>GPSSet-up:
1.SelectDifferentialSystem
Thefollowingdifferentialsystemsareavailable:
LightHouseMFDoperationinstructions

•WAAS
3.19Enablingautopilotcontrol
•EGNOS
•MSAS
•GAGAN
•AllOthers
2.Selecttherelevantdifferentialsystemfrom
themenutoswitchreceptionforthatsystem
On(default)andOff.
COG/SOGFilter
TheCOG/SOGlteraveragesthevelocityvectorsto
compensatefortheoscillatingmotionofthevessel,
givingaclearerindicationofthevessel’scourseand
speed.
Thelterdoesnotaffectthecalculationofyour
receiver’sreportedposition.Thevelocityvectors
calculatedfromthesignalprovideaninstantaneous
measureofspeedanddirectionofthereceiver.The
COGandSOGcanthereforseemerraticunder
certainconditions.Forexample,whenavesselis
movingslowlythroughroughseas,thereceiver
movesfromsidetosideaswellasinthedirection
oftravel.
Slowmovingvessels,orvesselssailinginrough
seaswillbenetfromahighsetting,whereasa
powerboatthatcanquicklychangespeedand
directionwillbenetfromalowsetting.
SelectingCOG/SOGlter
Youcanchangetheleveloflterappliedto
COG/SOG.
Enablingtheautopilotcontrolfunction—
SeaTalkandSPXSeaTalk
ToenablecontrolofyourSeaTalkorSPXSeaT alk
autopilotusingyourmultifunctiondisplayfollowthe
stepsbelow.
FromtheHomescreen:
1.SelectSet-up.
2.SelectSystemSettings.
3.SelectAutopilotControlsothatOnis
highlighted.
SelectingAutopilotControlwillswitchthecontrol
betweenOnandOff.
Onasystemcontainingmultipledisplaysthepilot
controlisenabledonalldisplaysatthesametime.
ng
autopilots
Enablingtheautopilotcontrolfunction—
Evolutionautopilots
ToenablecontrolofyourEvolutionautopilotusing
yourmultifunctiondisplayfollowthestepsbelow.
FromtheHomescreen.
1.SelectSet-up.
2.SelectSystemSettings.
3.SelectExternalDevices.
4.SelectPilotSet-up.
5.SelectPilotcontrolsothatOnishighlighted.
SelectingPilotcontrolwillswitchtheAutopilot
controlfunctiononandoff.
ng
FromtheGPSSet-upmenu:Homescreen>Set-up
>SystemSettings>GPSSet-up:
1.SelectCOG/SOGFilter.
Alistofavailablelterlevelsisdisplayed:
•Low
•Medium(default)
•High
2.Selecttherequirelterlevelfromthelist.
RestartingtheGNSS(GPS/GLONASS)
receiver
TorestarttheGNSS(GPS/GLONASS)receiver
followthestepsbelow:
FromtheGPSSet-upmenu:Homescreen>Set-up
>SystemSettings>GPSSet-up:
1.SelectRestartGPS.
Thereceiverwillberestarted.
Gettingstarted
43

3.20Engineidentication
EnginedatacanbedisplayedonyourMFDusing
theDataapplication,whichprovidessomepreset
Enginepagesfordisplayingsomeofthemost
commontypesofenginedata.
Important:BeforeyoucandisplayEnginedata
onyourMFD,youmust:
•EnsurethatyourMFDisrunningLightHouse
softwareversion8orlater.
•Refertotheimportant“Enginesetupwith
anECIinterface”and“Usingtheengine
identicationwizard”information.
•Makethedataconnections,accordingto
theinstructionsprovidedinthe87202ECI
Installationinstructions.
•Ensurealldatabusesarepoweredup(including
enginedataCANbuses,gateways,andalsothe
SeaTalk
•Starttheengine.Itisimportantthatonlyone
engineisrunningatatime,toensurethatthe
systemcanisolatethecorrectenginedata
message.
ng
bus).
•RuntheEngineidenticationwizardtoensure
thatyourenginesaredisplayedinthecorrect
orderintheDataapplication.
44
LightHouseMFDoperationinstructions

EnginesetupwithanECIinterface
BeforeyoucandisplayenginedataonyourMFD,youmayneedtousethe"EngineIdenticationwizard”on
theMFDtosetuptheengines.
Important:Whensettinguponamultipleenginesystem,enginesshouldalwaysbeturnedonin
sequencefromporttostarboard.
ThefollowingtabledetailsthedifferenttypesofenginesupportedbytheECIinterfaceunit,andthesetup
requirementsforeach:
EngineCANbus
protocolNumberofengines
NMEA20001
NMEA20002+
NMEA20002+
EngineCANbus
congurationNumberofECIunits
SingleCANbus
SinglesharedCANbus
SeparateCANbusfor
eachengine
J19391
J19392+
J19392+
SingleCANbus
SinglesharedCANbus
SeparateCANbusfor
eachengine
EngineinterfacingwithoutanECIunit
ForengineswithaNMEA2000CANbusitmay
bepossibletoconnecttoaRaymarineMFDviaa
SeaTalk
ng
systemwithouttheuseofaRaymarine
ECIunit.
Refertoyourenginedealerandalsoyourlocal
Raymarinedealerforadviceonanyengine
instancingrequirementsandsuitableconnection
cables.
Usingtheengineidenticationwizard
Ifyourenginedataappearsinthewrongorderonthe
enginedatapagesyoucancorrectthisbyrunning
theengineidenticationwizard.
FromtheHomescreen:
1.SelectSet-up>SystemSettings>External
Devices>EnginesSet-up.
2.Ifrequiredchangethenumberofenginesyour
vesselhasbyselectingNum.ofEngines:and
enteringthecorrectnumberofengines.
Setupviawizardon
MFDrequired
1
1
1foreachCANbus
1
1
1foreachCANbus
ii.TurnOntheportengineandselectOK.
Thewizardwillnowlistenfordataandassign
theengineinstanceastheportengine.
iii.TurnOnthecenterportengineandselect
OK.
Thewizardwillnowlistenfordataandassign
theengineinstanceasthecenterportengine.
iv.TurnOnthecenterengineandselectOK.
Thewizardwillnowlistenfordataandassign
theengineinstanceasthecenterengine.
v.TurnOnthecenterstarboardengineand
selectOK.
Thewizardwillnowlistenfordataandassign
theengineinstanceasthecenterstarboard
engine.
vi.TurnOnthestarboardengineandselectOK.
Thewizardwillnowlistenfordataandassign
theengineinstanceasthestarboardengine.
5.SelectOKontheIdentifyEnginesconrmation
dialog.
Youcanselectupto5engines.
3.SelectIdentifyengines.
Important:Itisimportantthatonlyoneengineis
runningatatime,toensurethatthesystemcan
isolatethecorrectenginedatamessage.
4.Followtheonscreenpromptstocompletethe
engineidenticationwizard.
Theenginesthatwillbeincludedinthe
identicationwizardaredeterminedbythe
Numberofenginessetduringstep2above.
i.SwitchOffALLvesselenginesandselect
Next.
Thewizardwillrunthroughallengines(max
of5asdenedinstep2above)fromportto
starboardinsequence.
Gettingstarted
Theengineswillnowappearinthecorrectlocation
ontheenginedatapage.
45

3.21EnablingAISfunctions
3.22Sharedpreferences
BeforeproceedingensureyourAISunitisconnected
toNMEAPort1.
Withthehomescreendisplayed:
1.SelectSet-Up.
2.SelectSystemSettings.
3.SelectNMEASet-Up.
4.SelectNMEAInputPort1.
5.SelecttheAIS38400option.
6.SelectBacktoreturntotheSystemSettings
menu.
7.SelectExternalDevices.
8.SelectAISUnitSet-up.
TheAISUnitSet-upmenuisdisplayed.
9.AdjusttheAISoptionsasappropriate.
TheSharedpreferencesschemeallowsall
compatiblenetworkedMFDsandinstrument
displaystoshareuserpreferencesettings.
Whenauserpreferenceischangedon1display
deviceallcompatiblenetworkeddisplaydevices
areautomaticallyupdatedtousethechanged
preference.
Sharedpreferencesareapplicabletothefollowing
devices:
•MFDsnetworkedusingSeaTalk
•MFDsnetworkedusingSeaTalk
•SeaTalk
SeaTalk
ng
instrumentsdisplaysnetworkedusing
ng
hs
ng
•SeaTalkinstrumentsdisplaysnetworkedviaa
SeaTalktoSeaTalk
ng
converter.
Note:Toensurecompatibilitycheckthat
alldevicesarerunningthelatestsoftware
versions.ChecktheRaymarine
®
website
www.raymarine.comforthelatestsoftwareforyour
products.
Listofsharedpreferences
Thetablebelowshowsthesettingsthatareshared
aspartoftheSharedpreferencescheme.
Units
•Speedunits
•Distanceunits
•Depthunits
•Windunits
•Temperatureunits
•FlowRateunits
•VolumeUnits
•Pressureunits
BoatDetails
•BoatType
•Numberofengines
•Numberoffueltanks
•Numberofbatteries
TimeandDate
•DateFormat
•TimeFormat
•LocalTime(UTC)offset
SystemPreferences
•Bearingmode
•Variation(manual)
•Language
Dataapplication
•MaxRPMrange
•RPMredzone
•RPMredzonevalue
46
LightHouseMFDoperationinstructions

3.23Memorycardsandchartcards
3.24Simulatormode
MicroSDmemorycardscanbeusedtobackup/
archivedata(e.g.Waypoint,andTracks).Once
dataisbackeduptoamemorycardolddatacan
bedeletedfromthesystem,creatingcapacityfor
newdata.Thearchiveddatacanberetrievedatany
time.Chartcardsprovideadditionalorupgraded
cartography.
Itisrecommendedthatyourdataisbackeduptoa
memorycardonaregularbasis.DoNOTsavedata
toamemorycardcontainingcartography.
Compatiblecards
ThefollowingtypesofMicroSDcardsarecompatible
withyourdisplay:
•MicroSecureDigitalStandard-Capacity
(MicroSDSC)
•MicroSecureDigitalHigh-Capacity(MicroSDHC)
Note:
•Themaximumsupportedmemorycardcapacity
is32GB.
•MicroSDcardsmustbeformattedtouseeither
theFATorFAT32lesystemformattoenable
usewithyourMFD.
Speedclassrating
Forbestperformanceitisrecommendedthatyou
useClass10orUHS(UltraHighSpeed)class
memorycards.
TheSimulatormodeenablesyoutopractice
operatingyourdisplaywithoutdatafromaGPS
antenna,radarscanner,AISunit,orshnder.
Thesimulatormodeisswitchedon/offinthe
SystemSetupMenu.
Note:RaymarinerecommendsthatyoudoNOT
usethesimulatormodewhilstnavigating.
Note:ThesimulatorwillNOTdisplayanyreal
data,includinganysafetymessages(suchas
thosereceivedfromAISunits).
Note:Anysystemsettingsmadewhilstin
SimulatormodeareNOTtransmittedtoother
equipment.
Enablinganddisablingsimulatormode
Youcanenableanddisablesimulatormodeby
followingthestepsbelow.
Withthehomescreendisplayed:
1.SelectSet-Up.
2.SelectSystemSettings.
3.SelectSimulator:.
4.SelectOntoturnsimulatormodeon,or
5.SelectOfftoturnsimulatormodeoff.
Note:TheDemomovieoptionisforretail
demonstrationpurposesonly.
Chartcards
Yourproductispre-loadedwithelectroniccharts
(worldwidebasemap).Ifyouwishtousedifferent
chartdata,youcaninsertcompatiblechartcardsinto
theunit'smemorycardreader.
Usebrandedchartcardsandmemorycards
Whenarchivingdataorcreatinganelectronicchart
card,Raymarinerecommendstheuseofquality
brandedmemorycards.Somebrandsofmemory
cardmaynotworkinyourunit.Pleasecontact
customersupportforalistofrecommendedcards.
Gettingstarted
47

3.25Pairingthekeypad
3.26Systemsoftwareupdates
Thekeypadcancontrol1ormoremultifunction
displays.Multiplekeypadscanbeconnectedtoa
system.Eachkeypadcanbepairedwithupto4
multifunctiondisplays.
Withthekeypadconnectedtothemultifunction
display:
1.SelectExternalKeypadfromtheExternal
Devicesmenu:homescreen>Set-up>System
Settings>ExternalDevices>External
Keypad.
2.SelectPairKeypad.
3.Pressanybuttonontheexternalkeypad.
4.Fromthepop-upmessageselecttheorientation
ofthekeypad.
Eitherlandscapeorportraitorientationsare
available.
Thekeypadisnowpaired.
Unpairingthekeypad
Thekeypadcanbeunpairedfromanindividual
display.
1.SelectExternalKeypadfromtheExternal
Devicesmenu:homescreen>Set-up>System
Settings>ExternalDevices>External
Keypad.
2.SelectClearPairings.
3.SelectYestounpairthekeypadwiththedisplay.
Raymarineregularlyissuessoftwareupdatesfor
itsproductsthatcanprovidenewandenhanced
featuresandimprovedperformanceandusability .
Youshouldensurethatyouhavethelatest
softwareforyourproductsbyregularlycheckingthe
Raymarine
®
websitefornewsoftware.Raymarine
MFDscanbeusedtocheckandupdatethesoftware
ofcompatibleRaymarine
®
products.
Youcanidentifyproductsoftwareversionsusing
theDiagnosticspageonyourMFD:Homescreen
>Set-up>Maintenance>Diagnostics>Select
Device.
Thesystemupdateprocesscanbeusedtoupdate
allcompatibleproductsconnectedoverSeaTalk
andSeaTalk
ng®
.
PleaserefertotheSoftwareUpdatesectionofthe
Raymarine
®
websitewww.raymarine.com/software
fordetailsofcompatibleproducts.
®
hs
Caution:Installingsoftware
updates
Thesoftwareupdateprocessiscarried
outatyourownrisk.Beforeinitiatingthe
updateprocessensureyouhavebacked
upanyimportantles.
Ensurethattheunithasareliablepower
supplyandthattheupdateprocessisnot
interrupted.
Damagecausedbyincompleteupdates
arenotcoveredbyRaymarinewarranty.
Bydownloadingthesoftwareupdate
package,youagreetotheseterms.
UsingyourMFDtoCheckforsoftware
updatesonline
WhenyourMFDisconnectedtoanAccesspoint
thatincludesaninternetconnectiontheMFDcan
checkonlineforavailablesoftwareupdatesforyour
Raymarineproducts.
Note:T ocheckforsoftwareupdatesforconnected
SeaTalk
MFD.
ng®
productsyoumustusetheDataMaster
FromtheMaintenancemenu:(Homescreen>
Set-up>Maintenance>
48
LightHouseMFDoperationinstructions

1.SelectCheckOnlineforUpdates.
g
S9 5 (This De vice ) v13.3 0 v13 .30
e
7 v13 .30 v 13.30 P art ial
a
97 v1 2.26 v13 .30
R
MK-9 v11. 16 v 9.30
CP 100 v11.1 2
i
70 v 2.16 v2. 18
Estimat ed time: a pprox. 9 mins
D13270-1
2
4
6
1
3
5
TheMFDwillnowattempttoestablishan
internetconnection.Pleasefollowanyonscreen
instructions.
2.OnceaconnectionisestablishedtheMFDwill
checkfornewsoftwareupdatesavailableforyour
Raymarineproducts.
3.Selectthesoftwareupdatesthatyouwantto
download.
Note:
•Softwarelesaredownloadedtointernal
storageortoMicroSDcarddependingonthe
freespaceavailable.
•Downloadedsoftwarelesaredeletedoncethe
softwareupdateprocessiscomplete.
4.SelectDownloadandInstall.
Thesoftwarewillnowbedownloadedtoyour
MFDandtheninstalledontheselectedproducts.
3.Ifthesoftwareonthewebsiteisnewerthanthe
softwareonyourproductsdownloadtherelevant
softwarepackage.
4.InserttheMicroSDcardintoyourPCorMaccard
reader.
Dependingonyourcomputerscardreadertype
anSDcardadaptormayberequired.
5.Unzipthedownloadedsoftwarepackage‘zip’le
totheMicroSDcard.
6.Ifused,removetheMicroSDcardfromtheSD
cardadaptor.
Performingsoftwareupdates
AttentionDoNOTperformsoftwareupdateswhilst
yourboatisunderway.
1.Backupyouruserdataandsettings.
2.InserttheMicroSDcardcontainingsoftware
updatelesintothecardreaderofyourData
MasterMFD.
Iftheinsertedcardcontainsupdatedsoftware
foradeviceonyoursystem,afterafewseconds
apop-upmessageisdisplayed.Ifyouneed
tore-installordowngradesoftwarethenselect
theCheckCardforUpdatesoptionfromthe
Maintenancemenu:Homescreen>Set-up>
Maintenance.
3.SelectYes.
Asecondpop-upisdisplayed.
4.SelectOk.
TheSoftwareupdatespageisdisplayed.
DownloadingsoftwareupdatestoMicroSD
card
Softwareupdatescanbedownloadedfromthe
Raymarinewebsite.
Toperformasoftwareupdateyouwillneed:
•APCorAppleMacwithaninternetconnection
andacardreader.
•AFAT32formattedMicroSDcardwithSDcard
adaptor.
Note:Donotuseacartographychartcardfor
softwareupdatesoruserdata/settingsbackups.
1.GototheSoftwareupdatesectionoftheRayma-
2.Comparethelatestavailablesoftwareagainstthe
Gettingstarted
®
rine
websitewww.raymarine.com/software
softwareversionofyourRaymarine
®
products.
1
2
3
Nosoftwareupdateavailableonmemorycard
Softwareupdateavailableonmemorycard
Softwareonmemorycardisolderthanthe
softwareinstalledontheproduct
4
5
6
Softwareupdateavailableonmemorycard
Partialsoftwareupdateavailableonmemorycard
Softwareversiononmemorycardisthesameas
thesoftwareinstalledontheproduct
Ifasoftwareupdateisavailableonthememory
cardtheUpdate?boxisautomaticallyticked.
5.Ontouchscreendisplaysyoucanselectandhold
ontheavailablesoftwareversiontoseefurther
detailsaboutthesoftwarethatwillbeinstalled.
49

6.Selecttheproductsthatyouwanttoupdate.
g
S9 5 (This De vice ) v13.3 0 v13 .30
e
7 v13 .30 v 13.30 P art ial
Re -ins tall
Dow ng rad e
a
97 v1 2.26 v13 .30
R
MK-9 v11. 16 v 9.30
CP 100 v11.1 2
i
70 v 2.16 v2. 18
Estimat ed time: a pprox. 9 mins
D13271-1
1
2
3.27Learningresources
Raymarinehasproducedarangeoflearning
resourcestohelpyougetthemostoutofyour
products.
Videotutorials
Raymarineofcialchannelon
YouTube:
•http://www.youtube.com/u-
ser/RaymarineInc
1
2
Softwaredowngradewillbeperformed
Thesamesoftwareversionwillbere-installed
7.SelectInstallNow.
Theinstallationprocesswillbegin.
Duringtheupdateprocessdetailsofeach
productsprogressisdisplayed.TheMFDserving
thesoftwareupdateswillbethelastdevicetobe
update.
8.SelectOk.ontheSoftwareUpdatespop-up
message.
9.RemovetheMicroSDcardfromthecardreader.
VideoGallery:
•http://www.rayma-
rine.co.uk/view/?id=2679
ProductSupportvideos:
•http://www.rayma-
rine.co.uk/view/?id=4952
Note:
•Viewingthevideosrequiresadevicewithan
Internetconnection.
•SomevideosareonlyavailableinEnglish.
Trainingcourses
Note:Turningonadisplaywhilstithasamemory
cardinsertedthatcontainssoftwareupdateles
savedtotherootdirectorywillstartastandalone
softwareupdateonthatdisplayonly.
50
Raymarineregularlyrunsarangeofin-depthtraining
coursestohelpyoumakethemostofyourproducts.
VisittheTrainingsectionoftheRaymarinewebsite
formoreinformation:
•http://www.raymarine.co.uk/view/?id=2372
FAQsandKnowledgeBase
RaymarinehasproducedanextensivesetofFAQs
andaKnowledgeBasetohelpyoundmore
informationandtroubleshootanyissues.
•http://www.raymarine.co.uk/knowledgebase/
Technicalsupportforum
YoucanusetheT echnicalsupportforumtoask
atechnicalquestionaboutaRaymarineproduct
ortondouthowothercustomersareusing
theirRaymarineequipment.Theresourceis
regularlyupdatedwithcontributionsfromRaymarine
customersandstaff:
•http://raymarine.ning.com/
LightHouseMFDoperationinstructions

Chapter4:Managingdisplaydata
Chaptercontents
•4.1Savinguserdataandusersettingsonpage52
•4.2Saveandrestoreitemsonpage55
•4.3Screenshotsonpage57
•4.4Resettingyoursystemonpage57
Managingdisplaydata
51

4.1Savinguserdataandusersettings
Youcansaveyourwaypoints,routes,tracksand
usersettingstoamemorycard.Waypoints,routes
andtracksaresavedasgpxdatales.Thegpxle
formatisadevice-independentdataformatmaking
iteasytoexchangedatabetweenyourdisplayand
otherGPSdevices/softwarethatsupportthegpx
leformat.
TypeofdataDescriptionNotes
Waypoints(user
data)
Routes(userdata)
Tracks(userdata)
Usersettings
Note:Itisrecommendedthatyousaveyouruser
dataandusersettingstoamemorycardona
regularbasis.
Note:DoNOTsaveuserdataorsettingstoa
chartcardcontainingcartography.
Legacyarchive.fshsupport
WiththeintroductionofLightHouseIIRelease9,
RaymarineaddedsupportfortheGPSExchange
(GPX)leformatforarchivingandtransferof
Waypoint,RouteandTrackdata.TheGPXle
formatisadevice-independentformatuniversally
used,simplifyingdataexchangebetweenRaymarine
andothermanufacturer’sproducts.Withthe
introductionofLightHouseIIRelease14,supportfor
Raymarine’slegacydataarchivingformatarchive.fsh
hasbeenremoved.
Theprocessforconvertinganarchive.fshletothe
newGPXleformatisasfollows:
1.UsinganMFDwithLightHouseIIRelease8
orlower,exportuserdatatoMicroSDcard
(archive.fshformat).
2.UpdatetheMFDtoLightHouseIIRelease13.
3.Importthearchive.fshlefromMicroSDcard.
4.ExportuserdatatoMicroSDcard(GPXformat).
5.UpdatetheMFDtoLightHouseIIRelease14
orgreater.
6.Importuserdata(GPXformat)fromtheMicroSD
card.
AlternativelyRaymarine’sVoyagePlannersoftware
canalsobeusedtoconvertarchive.fshletoGPX
format.
Savingalluserdatatoamemorycard
Youcansavealluserdatatoonearchivele.
WiththeHomescreendisplayed:
52
Eachwaypoint
groupcanbe
savedseparately
Eachroutecanbe
savedseparately
Eachtrackcanbe
savedseparately
Savesthesettings
you'vemadeinthe
set-upmenustoa
singlearchivele.
Only1user
settingsarchive
lecanbesaved
permemorycard.
1.Ensureyouhaveamemorycard(NOTachart
card)insertedintoacardslot.
2.SelectMyData.
3.SelectImport/Export.
4.SelectSaveDatatoCard.
5.SelectSaveAll.
Theon-screenkeyboardisdisplayed.
6.Usingtheon-screenkeyboardenterthelename
youwanttosavetheleas.
7.SelectSAVE.
Ifyourdisplayhasmorethan1cardslotthena
messageisdisplayedpromptingyoutoselectthe
slotyouwanttosavedatato,ifyourdisplayonly
has1cardslotthenyouwillnotbeprompted.
8.SelectSD1foramemorycardinthetopcardslot,
orSD2foramemorycardinthebottomcardslot.
Aconrmationdialogisdisplayed.
9.SelectOK.
Savingwaypointstoamemorycard
WiththeHomescreendisplayed:
1.Ensureyouhaveamemorycard(NOTachart
card)insertedintoacardslot.
2.SelectMyData.
3.SelectImport/Export.
4.SelectSaveDatatoCard.
5.SelectSaveWaypointstoCard.
TheWaypointGrouplistisdisplayed.
6.Selectthegrouporgroupsyouwanttosave,or
selectSelectAll.
7.SelectSave.
Theon-screenkeyboardisdisplayed.
8.Usingtheon-screenkeyboardenterthelename
youwanttosavetheleas.
9.SelectSAVE.
Ifyourdisplayhasmorethan1cardslotthena
messageisdisplayedpromptingyoutoselectthe
slotyouwanttosavedatato,ifyourdisplayonly
has1cardslotthenyouwillnotbeprompted.
10.SelectSD1foramemorycardinthetopcardslot,
orSD2foramemorycardinthebottomcardslot.
Aconrmationdialogisdisplayed.
11.SelectOK.
Savingroutestoamemorycard
WiththeHomescreendisplayed:
LightHouseMFDoperationinstructions

1.Ensureyouhaveamemorycard(NOTachart
card)insertedintoacardslot.
2.SelectMyData.
3.SelectImport/Export.
4.SelectSaveDatatoCard.
5.SelectSaveRoutestoCard.
TheRouteslistisdisplayed.
6.Selecttherouteorroutesyouwanttosave,or
selectSelectAll.
7.SelectSave.
Theon-screenkeyboardisdisplayed.
8.Usingtheon-screenkeyboardenterthelename
youwanttosavetheleas.
9.SelectSAVE.
Ifyourdisplayhasmorethan1cardslotthena
messageisdisplayedpromptingyoutoselectthe
slotyouwanttosavedatato,ifyourdisplayonly
has1cardslotthenyouwillnotbeprompted.
10.SelectSD1foramemorycardinthetopcardslot,
orSD2foramemorycardinthebottomcardslot.
Aconrmationdialogisdisplayed.
11.SelectOK.
Savingtrackstoamemorycard
WiththeHomescreendisplayed:
1.Ensureyouhaveamemorycard(NOTachart
card)insertedintoacardslot.
2.SelectMyData.
3.SelectImport/Export.
4.SelectSaveDatatoCard.
5.SelectSaveTrackstoCard.
TheTrackslistisdisplayed.
8.Usingtheon-screenkeyboardenterthelename
youwanttosavetheleas.
9.SelectSAVE.
Ifyourdisplayhasmorethan1cardslotthena
messageisdisplayedpromptingyoutoselectthe
slotyouwanttosavedatato,ifyourdisplayonly
has1cardslotthenyouwillnotbeprompted.
10.SelectSD1foramemorycardinthetopcardslot,
orSD2foramemorycardinthebottomcardslot.
Aconrmationdialogisdisplayed.
11.SelectOK.
Importingwaypoints,routes,ortracksfrom
amemorycard
WiththeHomescreendisplayed:
1.Ensureyouhaveamemorycardcontainingthe
userdataingpxformatinoneofthecardslots.
2.SelectMyData.
3.SelectImport/Export.
4.SelectRetrievefromCard.
Thelebrowserisopened.
5.Browsetoandselecttheleyouwanttoimport.
Aconrmationdialogisdisplayed.
6.SelectOK.
Note:WhenRoutesandTracksareimportedthey
willbehiddenbydefault,todisplaytheimported
routesandtrackspleaserefertotheShowingor
hidingroutesandtrackssection.
Erasinguserdatalesfromamemorycard
WiththeHomescreendisplayed:
1.Ensureyouhavethememorycardcontainingthe
datainoneofthecardslots.
2.SelectMyData.
3.SelectImport/Export.
4.SelectErasefromCard.
Thelebrowserisopened.
6.Selectthetrackortracksyouwanttosave,or
selectSelectAll.
7.SelectSave.
Theon-screenkeyboardisdisplayed.
Managingdisplaydata
53

5.Browsetoandselecttheleyouwanttoerase.
Aconrmationdialogisdisplayed.
6.SelectYes.
Erasingwaypoints,routes,andtracksfrom
thesystem
Note:Thefollowingprocedurepermanently
erasesselectedorALLwaypoints,routes,or
tracksstoredonthedisplay .BEFOREproceeding,
ensurethatyoubackupanydatathatyouwantto
keepontoamemorycard.
3.SelectImport/Export.
4.SelectRestoreSettings.
Ifyourdisplayhasmorethan1cardslotthena
messageisdisplayedpromptingyoutoselect
thememorydeviceyouwanttoretrievesettings
from,ifyourdisplayonlyhas1cardslotthenyou
willnotbeprompted.
5.SelectSD1foramemorycardinthetopcardslot,
orSD2foramemorycardinthebottomcardslot.
Aconrmationdialogisdisplayed.
6.SelectOK.
WiththeHomescreendisplayed:
1.SelectMyData.
2.SelectImport/Export.
3.SelectErasefromSystem.
4.SelectEraseWaypointsfromSystem,Erase
RoutesfromSystem,orEraseTracksfrom
System,asappropriate.
5.Selectthespecicdataitemsyouwanttoerase,
orselectEraseAll.
Amessageisdisplayedpromptingyoufor
conrmation.
6.SelectYestoproceedwiththedeletion,orNo
tocanceltheoperation.
Backingupusersettingstoamemorycard
WiththeHomescreendisplayed:
1.Ensureyouhaveamemorycard(NOTachart
card)inoneofthecardslots.
2.SelectMyData.
3.SelectImport/Export.
4.SelectBackupSettings.
Ifyourdisplayhasmorethan1cardslotthena
messageisdisplayedpromptingyoutoselectthe
memorydeviceyouwanttosavethesettingsto,
ifyourdisplayonlyhas1cardslotthenyouwill
notbeprompted.
5.SelectSD1foramemorycardinthetopcardslot,
orSD2foramemorycardinthebottomcardslot.
Aconrmationdialogisdisplayed.
6.SelectOK.
Restoringusersettingsfromamemorycard
WiththeHomescreendisplayed:
1.Ensureyouhavethememorycardcontainingthe
userdatainoneofthecardslots.
2.SelectMyData.
54
LightHouseMFDoperationinstructions

4.2Saveandrestoreitems
Thetablebelowdetailsthedataitemsandsettings
whichwillbesavedtoandrestoredfromamemory
cardonyourmultifunctiondisplay.
Homescreenandsettings
MenuSetting
Homescreen
Set-up>Systemsettings
Set-up>Systemsettings>
GPSSet-up
Defaultpageconguration
Autopilotcontrol
DSCalerts
GPSscreen
MenuSetting
Customize>DatabarSet-upDatabarcontent(cell1to6)
Compassintitlebar
StatusIconBar
DatabarAutohide
Customize>Display
StartingPage
Preferences
KeyBeep
ColorTheme
CursorAutohide
RangeControls
Set-up>Systemsettings>
ExternalDevices>AISUnit
Set-up
Set-up>Systemsettings>
ExternalDevices>Remote
control
Set-up>Systemsettings>
ExternalDevices>Weather
Set-up
Set-up>Systemsettings>
ExternalDevices>Engines
Set-up
Set-up>Systemsettings>
Systempreferences
Set-up>SystemsettingsSimulator
Customize
Customize>BoatDetails
Customize>UnitsSet-up
Customize>TimeandDate
Set-up
Silentmode
AISsafetymessages
Shortcutkey
Source
Numberofengines
Bearingmode
Variationsource
Manualvariation
SystemDatum
Language
BoatType
NumberofEngines
NumberofFuelTanks
NumberofBatteries
Distanceunits
SpeedUnits
DepthUnits
TemperatureUnits
PressureUnits
VolumeUnits
EconomyUnits
WindSpeedUnits
Dateformat
Timeformat
Localtimeoffset
AlarmManager
MenuSetting
SafetyAlarms
GeneralAlarms
GeneralAlarms>Fish
alarm
Chartapplication
MenuSetting
Presentation
Presentation>Overlays
ChartCtxtMenu
PilotControlBar
ScreenshotFile
Waypointarrival
Offtrackalarm
Anchoralarm
Lowfuelremaining
MOBDatatype
DangerousRadartargets
DangerousAIStargets
Alarmclock
Countdowntimer
Watertemperature
Enable
Fishalarmdepthlimits
Fishalarmshallowlimit
Fishalarmdeeplimit
ChartDisplay
Aerialoverlay
Chartgrid
2Dshading
Communityedits
Charttext
Chartboundaries
Boatsize
Databox1
Databox1content
Managingdisplaydata
55

MenuSetting
Presentation>VectorsVectorlength
Presentation>ObjectsShowrocks
Databox2
Databox2content
Vectorwidth
Navmarks
Dataapplication
MenuSetting
Presentation
Datapagesandcontent
Colortheme
Dialcolor
Numberofengines
MaximumRPMrange
Presentation>Depth&
Contours
Navmarkssymbols
Lightsectors
Routingsystems
Cautionareas
Marinefeatures
Landfeatures
Businessservices
Panoramicphotos
Roads
Additionalwrecks
Coloredseabedareas
Vesselicon
Showsoundings
Showcontours
Shallowcontour
Safetycontour
Weatherapplication
MenuSetting
DataboxesSet-up
Databox1
Databox1content
Databox2
Databox2content
Depthcontour
Deepwatercolor
Radarapplication
MenuSetting
PresentationRangerings
Presentation>DataboxesDatabox1
Databox1content
Databox2
Databox2content
Fishnderapplication
MenuSetting
ChannelChannels
Presentation>Databoxes
Databox1
Set-up
Databox1content
Databox2
Databox2content
56
LightHouseMFDoperationinstructions

4.3Screenshots
4.4Resettingyoursystem
Youcantakeascreenshotofwhatiscurrently
displayedonthescreen.
Screenshotsaresavedin.png(PortableNetwork
Graphic)formattoaMicroSDCard.Thesaved
imagescanbeviewedfromanydevicecapableof
viewing.pngimages.
Takingascreenshot
Youcantakeascreenshotbyfollowingthesteps
below.
1.InsertaMicroSDcardwithsuitablefreespace
intothecardreader.
2.PressthePowerbutton.
TheShortcutspageisdisplayed:
3.SelecttheCameraicon.
Aconrmationmessageisdisplayed.
4.SelectOK.
ThescreenshotisnowsavedtotheMicroSD
card.
TipIfyourdisplayhasaBackbuttonyoucanalso
takeascreenshotbypressingandholdingtheBack
buttonuntiltheconrmationmessageappears.
SelectingtheSDcardslotforscreenshots
Ifyourmultifunctiondisplayhas2cardreader
slots,youmustselectwhichcardslottosavethe
screenshotto.
Fromthehomescreen.
1.SelectCustomize.
2.SelectDisplayPreferences.
3.SelectScreenshotFile:.
4.SelecteitherMicroSD1orMicroSD2.
ViewinganimageontheMFD
Youcanviewimagessuchasscreenshotsonyour
MFD.
1.InsertaMicroSDcardcontainingtheimageinto
theMicroSDcardslotofyourMFD.
2.FromtheHomescreen,selectMyData.
3.SelectMyFiles.
Thelebrowserdialogisdisplayed.
4.Usethelebrowsertolocatetheleonthe
MicroSDcard.
5.Selecttheleyouwanttoview.
Thelewillnowopen.
6.SelectBackorClosetoclosetheimage.
Yoursystemmayberesettoitsfactorydefault
settingsifrequired.
Thereare2typesofresetoperation,bothofwhich
affectthecurrentdisplayyouareusing,ANDany
networkeddisplays.
•Settingsreset.
•Settingsanddatareset.
Settingsreset
Thisoptionresetsyoursetupmenus,pagesets,and
databarsettingstofactorydefault.ItwillNOTaffect
yourwaypoints,routes,ortracksdata.
Settingsanddatareset
Inadditiontothesettingsresetdetailedabove,
performingasettingsanddataresetwillalsoremove
ALLwaypoints,routes,andtracksdata.
Resettingsystemsettings
Withthehomescreendisplayed:
1.SelectSet-up.
2.SelectMaintenance.
3.SelectSystemSettingsReset.
Amessageisdisplayedpromptingyoutoconrm
theaction.
4.SelectYestoproceedwiththesettingsreset,or
Notocancel.
Resettingsystemsettingsanddata
Note:Performingasettingsanddatareseterases
ALLwaypoints,routes,andtrackdatafromyour
system.BEFOREproceedingwithasettingsand
datareset,ensurethatyoubackupanydatathat
youwanttokeepontoamemorycard.
Withthehomescreendisplayed:
1.SelectSet-up.
2.SelectMaintenance.
3.SelectSystemSettingsandDataReset.
Amessageisdisplayedpromptingyoutoconrm
theaction.
4.SelectYestoproceedwiththesettingsanddata
reset,orNotocancel.
Managingdisplaydata
57

58
LightHouseMFDoperationinstructions

Chapter5:Customizingyourdisplay
Chaptercontents
•5.1Languageselectiononpage60
•5.2Boatdetailsonpage61
•5.3Unitsset-uponpage62
•5.4TimeandDateset-uponpage63
•5.5Displaypreferencesonpage64
•5.6Databaranddataboxoverviewonpage66
•5.7Set-upmenuoptionsonpage68
Customizingyourdisplay
59

5.1Languageselection
Thesystemcanoperateinthefollowinglanguages:
English(US)English(UK)
Bulgarian
Chinese—
Simplied
CroatianCzech
Arabic
Chinese—
Traditional
Danish
DutchFinnishFrench
GermanGreek
Hebrew
HungarianIcelandicIndonesian
ItalianJapaneseKorean
LatvianLithuanianMalay
NorwegianPolishPortuguese
(Brazilian)
Russian
Swedish
SlovenianSpanish
ThaiTurkish
WiththeHomescreendisplayed:
1.SelectCustomize.
2.SelectLanguage.
3.Selectyourlanguagefromthelistoflanguages.
LanguageispartoftheSharedPreferencesscheme.
OnceanewlanguageisselectedtheUserinterface
languagewillchangeonallMFDsnetworkedusing
SeaTalk
hs
orSeaT alk
ng
and,ifthelanguageis
supportedanyinstrumentdisplaysnetworkedusing
SeaTalk
ng
.
60
LightHouseMFDoperationinstructions

5.2Boatdetails
Youcancustomizevarioussettingstomakethemspecictoyourvessel.
MenuitemDescriptionOptions
BoatType
Youcanchangetheappearanceofthevessel
inthechartapplication.Selecttheoptionthat
mostcloselyresemblesthetypeandsizeofyour
vessel.
Note:Whenboattypeisselectedduring
theinitialsetupofthemultifunctiondisplay
theboattypeshalldeterminethedatapage
congurationinthedataapplication.
ImportPolarTable
AllowsyoutoimportaPolartableis.csvformat.
Thisoptionisavailablewhenasailingvesselhas
beenselectedintheBoattypeoption.
DeletePolarTable
AnimportedPolartablecanbedeletedfromthe
system.
Min.SafeDepthTheMinimumSafeDepthsettingisrequiredwhen
buildingroutesusingtheAutoroutingorEasy
Routingfeature.
•PowerCruiser1(default)
•PowerCruiser2
•PowerCruiser3
•InboardSpeedBoat
•OutboardSpeedBoat
•Workboat
•RIB
•SailCruiser
•RaceSail
•Catamaran
•SportFishing
•ProFishing
Displayslebrowser
Conrmdeletion
Depthmeasurement
Min.SafeBeamTheMinimumSafeBeamsettingisrequiredwhen
buildingroutesusingtheEasyRoutingfeature.
Min.SafeHeightTheMinimumSafeHeightsettingisrequired
whenbuildingroutesusingtheEasyRouting
feature.
Num.ofEnginesAllowsyoutospecifythenumberofenginesyour
vesselhas.Thissettingdeterminesthenumber
ofenginesshownintheenginedataapplication.
Num.ofFuelT anksAllowsyoutospecifythenumberoffueltanksyour
vesselhas.Thissettingdeterminesthenumber
offueltanksavailableintheDataapplication.
Num.ofBatteriesAllowsyoutospecifythenumberofbatteriesyour
vesselhas.Thissettingdeterminesthenumber
ofbatteriesavailableintheDataapplication.
TotalFuelCapacityAllowsyoutospecifythetotalfuelcapacityof
yourvessel,thisisrequiredinordertoenablethe
fuelmanagerfunction.
Customizingthevesselicon
Withthehomescreendisplayed:
1.SelectCustomize.
2.SelectBoatDetails.
3.SelectBoatT ype.
4.Selecttheiconthatmostcloselyresemblesyour
vesseltypeandsize.
Beammeasurement
Heightmeasurement
•1to5
•1to5
•1to16
Totalfuelcapacitymeasurement
Customizingyourdisplay
61

5.3Unitsset-up
Youcanspecifyyourpreferencefortheunitsofmeasurementthatwillbeusedinallapplications.
MenuitemDescriptionOptions
DistanceUnits
Theunitsofmeasurethatwillbeusedinall
applicationsforthedisplayofallvaluesrelated
todistance.
SpeedUnitsTheunitsofmeasurethatwillbeusedinall
applicationsforthedisplayofallvaluesrelated
tospeed.
DepthUnits
Theunitsofmeasurethatwillbeusedinall
applicationsforthedisplayofallvaluesrelated
todepth.
TemperatureUnits
Theunitsofmeasurethatwillbeusedinall
applicationsforthedisplayofallvaluesrelated
totemperature.
PressureUnits
Theunitsofmeasurethatwillbeusedinall
applicationsforthedisplayofallvaluesrelated
topressure.
VolumeUnits
Theunitsofmeasurethatwillbeusedinall
applicationsforthedisplayofallvaluesrelated
tovolume.
•NauticalMiles
•NM&m(majorunits=NauticalMiles,
minorunits=meters)
•StatuteMiles
•Kilometers
•Knots
•MPH(MilesPerHour)
•KPH(KilometersPerHour)
•Feet
•Meters
•Fathoms
•Fahrenheit
•Celsius
•Bar
•PSI
•Kilopascals
•USGallons
•ImperialGallons
•Liters
EconomyUnits
Theunitsofmeasurethatwillbeusedinall
applicationsforthedisplayofallvaluesrelated
tofuelusage.
WindSpeedUnitsTheunitsofmeasurethatwillbeusedinall
applicationsforthedisplayofallvaluesrelated
towindspeed.
Specifyingpreferredunitsofmeasurement
1.SelectCustomize.
2.SelectUnitsSet-up.
3.Selectthetypeofmeasurementyouwantto
change(forexample,DistanceUnits).
4.Selectthepreferredtypeofunit(forexample,
StatuteMiles).
•DistanceperVolume
•VolumeperDistance
•Litersper100km
•Knots
•Metrespersecond
62
LightHouseMFDoperationinstructions

5.4TimeandDateset-up
Youcanspecifyyourpreferenceforthewaythattimeanddatewillappearinallapplications.
MenuitemDescriptionOptions
DateFormat
Allowsyoutospecifythepreferredformatforthe
displayofdateinformationinallapplications.
TimeFormat
Allowsyoutospecifythepreferredformatforthe
displayoftimeinformationinallapplications.
LocalTime:UTCAllowsyoutospecifythelocaltimezonethatwill
beused,intermsofanoffsetfromUTC(Universal
CoordinatedTime),in0.5hourincrements.
•MM:DD:YY(Month,Day,Year)
•DD:MM:YY(Day,Month,Year)
•12hr
•24hr
•–13to+13hours(in0.5hour
increments)
Customizingyourdisplay
63

5.5Displaypreferences
Youcanspecifyyourpreferenceforgeneraldisplaybehavior.
MenuitemDescriptionOptions
Startingpage
Allowsyoutoselectwhatpagethedisplayopens
atstartup.
KeyBeepAnaudiblesoundcanbemadeeachtimeabutton
ispressedorthetouchscreenisused.
ColorThemeAllowsyoutochangetheuserinterfacecolor
theme.
CursorAutohideIfsettoOn,thecursorwillbeautomaticallyhidden
afteraperiodofnomovement.IfsettoOff,the
cursorwillpersistonthescreenuntilmoved.
RangeControlsOnHybridTouchdisplaysyoucanspecifywhether
theChart,RadarandWeatherapplicationdisplay
theonscreenrangeinandrangeouticons.
Note:
•Onscreenrangecontrolsarenotavailable
onnon-touchscreendisplays.
•Onscreenrangecontrolscannotbehidden
ontouchonlydisplays.
•Homescreen(default)
•Lastpage—Afterpowerupthelast
usedpageisdisplayed.
•Choosepage—Afterpowerupthe
pageselectedisdisplayed.
•ON(default)
•OFF
•Dark(default)
•Light
•ON
•OFF(default)
•Show(default)
•Hide
ChartTouchCall-outs(Touchscreendisplaysonly)Determineswhether
Call-outsaredisplayedintheChartapplication.
PilotControlBar
Allowsyoutoenableanddisablethepilotbaron
eachdisplayindividually,whenconnectedtoan
SPXorSeaTalkautopilot.
Note:ForevolutionautopilotsthePilotBar
optionisinthePilotSet-uppage.
SharedBrightnessYoucansetupsharedbrightnessgroups(or
“zones”)toadjustthebrightnessonmultipleunits
simultaneously.
•On(default)
•Off
•Shown
•Hidden
ShareBrightness
•ON(default)
•OFF
BrightnessGroup
•Helm1(default)
•Helm2
•Cockpit
•Flybridge
•Mast
•Group1toGroup5
ScreenshotFileEnablesyoutospecifythedefaultmemorycard
slotforscreencaptureimages.
Note:Thisoptionisonlyavailableondisplays
withmultiplecardreaderslots.
64
•MicroSD1
•MicroSD2
LightHouseMFDoperationinstructions

Onscreenrangecontrols
Youcanenableanddisableonscreenrangecontrols
onHybridT ouchdisplaysbyfollowingthesteps
below.
FromtheHomescreen:
1.SelectCustomize.
2.SelectDisplayPreferences.
3.SelectRangeControls.
SelectingRangeControlswillswitchbetween
showingandhidingtheonscreenrangecontrols.
•Beforeaunitcanrespondtoasharedbrightness
adjustmentitmustbeassignedtotherelevant
BrightnessGroup.
•Asingleunitcanonlybelongtoonebrightness
groupatanyonetime.
•TheSharebrightnesssettingmustbesettoOn
forallunitsinthebrightnessgroup.
•WhensettingupabrightnessgroupaninitialSync
brightnessoperationmustbeperformed,withall
thedisplaysinthatgrouppoweredon,tocongure
thedisplaybrightnessofallunitsinthegroup.
Sharedbrightness
Youcansetupsharedbrightnessgroupstoadjust
thebrightnessonmultipleunitssimultaneously.
Thefollowingunitsarecompatiblewithshared
brightnessgroups:
•LightHouse
•SeaTalk
controllers
Oncecompatibleunitsareaddedtoashared
brightnessgroup,anybrightnessadjustmentmade
toanyoftheunitsinthegroupisalsoreectedin
allotherunitsinthatgroup.Anon-screensingle
brightnesscontrolisavailableforcontrollingany
unitsinthebrightnessgroup:
TM
poweredMFDs
ng®
InstrumentdisplaysandPilot
Settingupsharedbrightness
Withthehomescreendisplayed:
1.SelectCustomize.
2.SelectDisplayPreferences.
3.SelectSharedBrightness.
4.SelecttheOnoptionfortheSharedbrightness
menuitem.
5.SelectBrightnessGroup.
6.Selectanappropriatebrightnessgroup.
7.Repeattheprocessfortheotherdisplaysyou
wantinthebrightnessgroup.Ifthedisplayisnot
amultifunctiondisplay,refertothedocumentation
thataccompaniestheunitforinstructionson
setting-upsharedbrightness.
8.Onceallrequireddisplayshavebeenadded
tothesamebrightnessgroup,selectSync
Brightnessonthemultifunctiondisplay.
Asharedbrightnessmessageisdisplayed.
9.Ensurealldisplaysinthebrightnessgroupare
poweredon.
10.SelectSync.
Whencompletedamessageisdisplayed
conrmingthatsharedbrightnesshasbeen
congured.
Multiplebrightnessgroupscanbecongured.This
canreectthephysicallocationoftheunitsonyour
vesselifrequired.Forexample,theunitsatyour
helmcanbesettoonegroup,andtheunitsonthe
ybridgecanbesettoadifferentgroup.Inthis
example,anybrightnessadjustmentsmadetoaunit
atthehelmwouldbeautomaticallyreectedinthe
otherunitsatthehelmbutnotontheybridge.
Thesharedbrightnessfunctionrequiresthe
following:
•Allunitsmustbecompatiblewiththeshared
brightnessfunction(seelistofcompatibleunits
above).
Customizingyourdisplay
Oncesharedbrightnesshasbeensuccessfully
congured,changingthebrightnessofanydisplayin
thatbrightnessgroupwillautomaticallychangethe
brightnessofalldisplaysinthatgroup.
65

5.6Databaranddataboxoverview
D12296-3
2 3
5
1
4
D13003-1
1 2
Youcancustomizethedatadisplayedinthedatabar
andonscreendataboxes.
Customizabledataisdisplayedinthedatabar,
extendeddatabar(HybridTouchdisplaysonly)or
databoxes.Thedatabar,extendeddatabarand
databoxesareavailableinallapplications.
Theseareasofthescreenareillustratedand
describedbelow:
Auto-hidethedatabar
Onmultifunctiondisplaysthathaveatouchscreen,
thedatabarthatisdisplayedatthetopofall
applicationspagescanbesettoauto-hide.This
providesalargerscreenareafortheapplication
pages.
FromtheHomescreen:
1.SelectCustomize.
2.SelectDatabarSet-up.
3.SelectAuto-HidesothatOnisselected.
Whenviewingapplicationpagesthedatabarwill
nowauto-hideafter10seconds.Y oucanviewthe
databaragainbytouchingthedatabarwithyour
nger.
1.Databar—displayedatthetopofthescreenin
allapplications.Thedatabarcontainscellsthat
canbecustomizedtodisplaydatafromawide
rangeofcategories.Thedatabarcanalsobe
hiddentoprovide
2.ExpandedDatabar—(T ouchscreendisplays
only)displayedwhenyoutouchthedatabar.
Theextendeddatabarcanbedisplayed.The
expandeddatabarisdisplayeduntilthescreen
istouchedagain.
3.Statusicons—Youcandisplaythestatusicons
belowtheexpandeddatabar.Thisprovides
statusinformationforexternallyconnected
equipment:
4.StatusBar—Permanentlydisplayedinall
applications.Thestatusbarcontainsinformation
onthecurrentlyselectedsettingsofthe
applicationdisplayedonscreen.
5.Databoxes—upto2databoxescanbe
displayed.Eachboxcandisplayoneitemof
datafromtheavailabledatacategories.Datais
permanentlydisplayedonscreen.
Thedatabarcanbesettoauto-hidesothatonlythe
Statusbarisvisibleonscreen.
66
Customizingdataboxesinthechart
application
Toswitchdataboxesonandoffandtoselectdatato
displayfollowthestepsbelow.
FromtheChartapplicationmenu:
1.SelectPresentation.
2.SelectOverlay.
3.SelectDataboxes.
4.SelectDatabox1>On.
5.SelectDatabox2>On.
6.ChoosetheSelectDataoptionfortherelevant
databox.
7.Selectthecategorythatreectsthetypeofdata
youwanttodisplayinthedatabox.Forexample,
Depthdata.
8.Selectthedataitem.
Thedatayouselectedisdisplayedonscreenin
theappropriatedatabox.
CustomizingDataboxes
IntheRadar,Fishnder,orWeatherapplication:
1.SelectMenu.
2.SelectPresentation.
3.SelectDataboxes.
4.SelectDatabox1>ON.
5.SelectDatabox2>ON.
6.ChoosetheSelectDatabox1orSelectDatabox
2menuitem,asappropriate.
7.Selectthecategorythatreectsthetypeofdata
youwanttodisplayinthedatabox.Forexample,
Depthdata.
8.Selectthedataitem.
Thedatayouselectedisdisplayedonscreenin
theappropriatedatabox.
LightHouseMFDoperationinstructions

Customizingthedatabar
Fromthehomescreen:
1.SelectCustomize.
2.SelectDatabarSet-up.
3.SelectEditDatabar.
4.Inthedatabar,selectthecellthatyouwantto
change.
TheSelectDataCategorymenuwillbedisplayed.
5.Selectthecategorythatreectsthetypeofdata
youwanttodisplayinthecell.Forexample,
Depthdata.
6.Selectthedataitem.
Thedatayouselectedisdisplayedon-screenin
theappropriatecell.
7.SelectHomeorBackwhencompleted.
Displayingstatusiconsinthedatabar
Touchscreenmultifunctiondisplaysenableyouto
displaystatusiconsinthedatabar.
Fromthehomescreen:
1.SelectCustomize.
2.SelectDatabarSet-up.
3.SelectStatusIconBarsothatOnishighlighted.
Thestatusiconsarenowdisplayedbelowthe
expandeddatabar.
Customizingyourdisplay
67

5.7Set-upmenuoptions
TheSet-upmenuenablesyoutocongureyourMFDandconnecteddevices.
Thefollowingmenusareavailable:
MenuitemDescriptionNotes
Touch-Lock
Enablesyoutolockthetouchscreenofa
touchonlydisplaywhenthedisplayispaired
witharemotekeypad.
•ON
•OFF(default)
Note:Thisoptionisnotavailableon
touch-onlydisplayswhichdonothavea
remotekeypadconnected.
Note:Thisoptionisnotavailableon
displayswhichhavephysicalbuttons.
Alarms
DisplaytheAlarmManager.RefertoChapter
8Alarmmanagement
FuelManagerDisplaystheFuelmanagerpage
PilotControlsDisplaysthePilotControldialog.OnlyavailablewhenaRaymarineautopilot
isdetectedonthesystemandAutopilot
ControlissettoOn.
PilotResponse
Enablesselectionofthepilotresponselevel
whenconnectedtoanEvolutionautopilot.
Note:PilotResponseisnotavailableon
•Leisure
•Cruise
•Performance
SPXandSeaT alkautopilots.
AudioControls
Displaystheaudiocontrolspop-up.
Note:Notavailableonnon-touch
Onlyavailablewhenconnectedtoanaudio
deviceviabluetooth.
displays.
WirelessConnections
ProvidesaccesstotheWi-FiandBluetooth
menus.
TripResetsResetsthechosengroundtripdistance
countertozero.
SystemSettingsEnablesyoutocongurethesettingsfor
externaldevicesconnectedtothedisplay.
Maintenance
Providesdiagnosticinformation.Alsoenables
youtodesignatethedatamasterandreset
thedisplaytofactorysettings.
68
LightHouseMFDoperationinstructions

Groundtripresetsmenu
Thismenuenablesyoutoresetsthechosengroundtripdistancecountertozero.
MenuitemDescription
GroundTrip1Reset
GroundTrip2Reset
GroundTrip3Reset
GroundTrip4Reset
Systemsettingsmenu
MenuitemDescriptionOptions
Autopilot
Control
DSCAlerts
GPSSet-upProvidesGPS
InternalGPSSwitchesthe
DataSourcesEnablesselectionof
External
Devices
NMEASet-up
Enablesand
disablesautopilot
controlsfrom
yourmultifunction
display.
Enablesand
disablesDSC
radioalertson
yourmultifunction
display.
settingoptions.
multifunction
displaysinternal
GPSOnorOff.
Note:Not
applicableto
MFDsthatdo
notinclude
aninternal
GPS/GNSS
Receiver.
preferredsourcesof
dataforconnected
equipment.
Note:TheData
Sourcesmenuis
onlyavailableon
displayssetas
DataMaster.
Enablesset-up
ofcompatible
externally
connecteddevices.
Enablesyouto
conguresettings
forNMEAdevices.
Resetsthegroundtrip1distancecountertozero.
Resetsthegroundtrip2distancecountertozero.
Resetsthegroundtrip3distancecountertozero.
Resetsthegroundtrip4distancecountertozero.
•On
•Off
•On
•Off
•ViewSatellite
Status
•DifferentialGPS
•COG/SOGFilter
•RestartGPS
•On
•Off
•GPS
•GPSDatum
•TimeandDate
•Heading
•Depth
•Speed
•Wind
Refertothe
Externaldevices
menusectionofthe
manual.
RefertotheNMEA
set-upmenusection
ofthemanual.
MenuitemDescriptionOptions
System
Preferences
Enablesyouto
conguresystem
settings
RefertotheSystem
preferencesmenu
sectionofthe
manual.
SimulatorSwitchessimulator
modeOnorOff.
•Off
•On
•On(Demo
movie)
Multipledatasources(MDS)overview
Installationsthatincludemultipleinstancesofdata
sourcescancausedataconicts.Anexampleisan
installationfeaturingmorethanonesourceofGPS
data.
MDSenablesyoutomanageconictsinvolvingthe
followingtypesofdata:
•GPSPosition.
•Heading.
•Depth.
•Speed.
•Wind.
Typicallythisexerciseiscompletedaspartofthe
initialinstallation,orwhennewequipmentisadded.
IfthisexerciseisNOTcompletedthesystemwill
automaticallyattempttoresolvedataconicts.
However,thismayresultinthesystemchoosinga
sourceofdatathatyoudonotwanttouse.
IfMDSisavailablethesystemcanlisttheavailable
datasourcesandallowyoutoselectyourpreferred
datasource.ForMDStobeavailableallproducts
inthesystemthatusethedatasourceslisted
abovemustbeMDS-compliant.Thesystemcan
listanyproductsthatareNOTcompliant.Itmay
benecessarytoupgradethesoftwareforthese
non-compliantproductstomakethemcompliant.
VisittheRaymarinewebsite(www.raymarine.com)
toobtainthelatestsoftwareforyourproducts.If
MDS-compliantsoftwareisnotavailableandyoudo
NOTwantthesystemtoautomaticallyattemptto
resolvedataconicts,anynon-compliantproduct(s)
canberemovedorreplacedtoensuretheentire
systemisMDS-compliant.
Customizingyourdisplay
69

Datasourcesmenu
Thismenuenablesyoutoselecttheexternalsensorsanddevicesthatwillprovidedatatothedisplay.
Auto/manualselection
Eachdialogenablesyoutoviewandselectyourpreferreddatasource.selectionofdatasourcecan
bemanualorsettoautomatic:
•Auto—thedisplaywillautomaticallyselectadeviceandattempttoresolveanydataconictsthatmay
occurwherethereismorethanonesourceofdataforthatparticulardatasource(forexample,multiple
GPSreceivers).
•Manual—oncethedisplayhasperformedasearchforconnecteddevicesyoucanmanuallyselectthe
preferreddevicefromthelist.
Note:SelectingtheAutooptionmayresultinthesystemchoosingasourceofdatathatyoudonot
wanttouse.
Deviceselection
MenuitemDescription
GPSEnablesyoutosearchforanyexternally-connectedGPSdevices,and
selecttheoneyouwanttouse.
GPSDatumInorderforyourGPSreceiverandmultifunctiondisplaytocorrelate
accuratelywithyourpapercharts,theymustbeusingthesamedatum.This
optionenablesyoutochoosethedatasourceforthisdatum.
TimeandDate
Enablesyoutoselectthedeviceyouwanttouseforthetimeanddate
informationusedbythedisplay.
Heading
Depth
Enablesyoutoselectthedeviceyouwanttouseforheadingdata.
Enablesyoutoselectthedeviceyouwanttousefordepthdata.
SpeedEnablesyoutoselectthedeviceyouwanttouseforspeeddata.
Wind
Enablesyoutoselectthedeviceyouwanttouseforwinddata.
70
LightHouseMFDoperationinstructions

Externaldevicesmenu
Thismenuenablesyoutoconguretheexternaldevicesconnectedtothedisplay .
MenuitemDescriptionNotes
PilotSet-up
WhenconnectedtoanEvolutionautopilot
thisoptionallowsyoutoenableand
disablepilotcontrolandthepilotbar.You
canalsoaccesscertainpilotsettingsand
modes.
FishnderSet-up
Enablesyoutoselectanexternal
transducerandconguretheoptions
fortheunit,suchasdepthoffset.Also
enablesyoutoconguretheoptionsfor
aninternalorexternalsonarmodule.
AISUnitSet-upEnablesyoutocongureadditional
functionsforAISunits,suchasSilent
Mode.Thismenuitemisonlyavailable
whenanAISunitisdetectedorwhen
SimulatormodeisOn.
RemoteControl
Enablesyoutocustomizecertaincontrols
forRaymarineBluetoothremotecontrol
units(forexample,RCU-3).
TransducersSet-upDisplaysalistofconnectedtransducers
whichyoucanselectandcalibrate.
WeatherSet-up
EnablesyoutoselectyourRaymarine
weatherreceiver:
Foranexplanationoftheseoptionsrefer
totheTransducerset-upmenuoptions
describedintheFishndersectionofthis
document.
Foranexplanationoftheseoptionsrefer
totheAISmenuoptionsdescribedinthe
AISsectionofthisdocument.
Foranexplanationoftheseoptionsrefer
totheRemoteControlsectionofthis
document.
•SR6
•SR50
•SR100
•SR150(default)
SwitchPanelSet-up
Enablesyoutoinstallanduninstall
SwitchPanelcongurationles.
ExternalKeypadEnablesyoutopairandunpairremote
keypads.
EnginesSet-up
Enablesyoutoruntheengine
identicationwizard
Foranexplanationoftheseoptionsrefer
toEngineidenticationwizardsectionof
thisdocument.
Customizingyourdisplay
71

WirelessConnectionsmenu
ThismenuprovidesaccesstotheMFD’sBluetoothandWi-Fifunctions.
Bluetooth
MenuitemDescriptionOptions
BluetoothEnableordisableBluetoothonthedisplay.
ConnectionManagerProvidesalistofBluetoothdevicesinrange.
Whenyouhighlightaconnectioninthelistand
pressOK,thefollowingoptionsareavailable:
•Unpair/Forgetthisdevice—Disconnect
thedeviceandremoveitfromtheconnection
list.Ifyouunpairadeviceinthiswayyoumust
re-pairthedeviceifyouwanttoconnectionit
againtothemultifunctiondisplay.
•AudioControl—IfthisoptionissettoOn,you
cancontroltheaudioforacompatiblewireless
mediaplayer,fromthemultifunctiondisplay.
NewBluetoothConnectionSelectingthismenuiteminitiatestheBluetooth
pairingprocess.Thisisnecessaryforconnecting
awirelessremotecontrolunitormediaplayer
devicetothemultifunctiondisplay.
Wi-Fi
MenuitemDescriptionOptions
Wi-FiEnableordisableWi-Fionthedisplay.
•On
•Off(default)
•Unpair/Forgetthisdevice
•AudiocontrolOn/Off.
•On
•Off(default)
Wi-FiNetworks
Wi-FiSharing
ProvidesalistofallWi-FiAccesspointscurrently
withinrange.
Wi-FiName
EnablesyoutospecifyanSSID(Wi-FiName)
forconnectingWi-Fidevicesusinganencrypted
connection.Ifyouwanttopreventunauthorized
devicesfromconnectingtoyourdisplayyoumust
specifythesameSSIDforboththemultifunction
displayandthewirelessdeviceyouwantto
connecttothedisplay.
Wi-FiPassphrase
EnablesyoutospecifyapasswordfortheWi-Fi
connection.Ifyouwanttopreventunauthorized
devicesfromconnectingtoyourdisplayyou
mustspecifythesamepasswordforboththe
•Connect
•Forget
Wi-FiChannel
•1to11(2GHz)
Wi-FiSecurity
•None
•WPAOnly
•WPA2Only.(default)
•WPA/WP A2.
MobileApps
•Off(default)
multifunctiondisplayandthewirelessdeviceyou
wanttoconnecttothedisplay.
Wi-FiChannel
•Viewingonly
•RemoteControl
Bydefaultthemultifunctiondisplayautomatically
selectsanavailableWi-Fichannel.Ifyou're
experiencingdifcultieswithwirelessvideo
streamingitmaybenecessarytomanuallyspecify
aWi-Fichannelforboththemultifunctiondisplay
andthedeviceyouwanttostreamvideoto.
Wi-FiSecurity
YoucanencrypttheWi-Ficonnectiononthe
multifunctiondisplaytopreventunauthorized
devicesfromaccessingtheconnection.This
menuitemenablesyoutoselectthetypeofWPA
(Wi-FiProtectedAccess)encryptionyouwantto
use.WPA2providesstrongersecuritythanWPA.
MobileApps
72
LightHouseMFDoperationinstructions

MenuitemDescriptionOptions
Enablesyoutoselectthetypeofmobileappin
use:
•Viewingonly—RayView
•RemoteControl—RayRemoteorRayControl
Customizingyourdisplay
73

NMEASet-upmenu
ThismenuenablesyoutoconguresettingsforNMEAdevices.
MenuitemDescriptionOptions
BridgeNMEAHeading
NMEAOutputSettings
IfsettoON,NMEAheadingdatawillbebridged
ontotheSeaTalkdatabus,andwillbesentto
allNMEA-connecteddevices.IfsettoOFF,
NMEAheadingdatawillNOTbebridgedonto
theSeaTalkbus.Anexampleofauseforthis
settingiswhenusingMARPAwithanexternalfast
headingsensor,inwhichcaseyoushouldsetthis
optiontoOFFtoensurethatallNMEA-connected
unitsreceiveheadingdatafromtheexternal
headingsensor.
Allowsyoutoenableordisabletheindividual
NMEA“sentences”thataresentbythe
multifunctiondisplaytoanydevicesconnected
theNMEAoutputport.
•On
•Off(default)
•APB
•BWC
•BWR
•DBT
•DPT
•GGA
•GLL
•GSA
•GSV
•MTW
NMEAInputPort1
NMEAInputPort2
Enablesyoutospecifytheappropriateportspeed
fortheequipmentconnectedtoNMEAInputport
1.UsetheAIS38400optionforAISreceivers.
Enablesyoutospecifytheappropriateportspeed
fortheequipmentconnectedtoNMEAInputport
2.UsetheAIS38400optionforAISreceivers.
•MWV
•RMA
•RMB
•RMC
•RSD
•RTE
•TTM
•VHW
•VLW
•VTG
•WPL
•ZDA
•NMEA4800
•AIS38400
•NMEA4800
•AIS38400
74
LightHouseMFDoperationinstructions

Systempreferencesmenu
MenuitemDescriptionOptions
BearingmodeDetermineshowallbearingandheadingdatais
displayedin.Thisdoesnotaffecthowthechartor
radardisplaysaredrawn.
VariationSourceThissettingcompensatesforthenaturally
occurringoffsetoftheearth'smagneticeld.
WhensettoAuto,thesystemautomatically
compensates,anddisplaysthecompensation
valueinbrackets.Toenteryourown
compensationvalue,usetheManualoption,then
specifythevalueusingtheManualVariation
setting(seebelow).Thisvalueisalsotransmitted
toanyotherconnectedRaymarineinstruments.
ManualVariation
WhentheVariationSourcemenuitemissetto
Manual(seeabove),youusetheManualVariation
settingtospecifythecompensationvaluethatyou
wanttouse.
SystemDatumInorderforyourGPSreceiverandmultifunction
displaytocorrelateaccuratelywithyourpaper
charts,theymustbeusingthesamedatum.
Thedefaultdatumforyourmultifunctiondisplayis
WGS1984.Ifthisisnotthedatumusedbyyour
papercharts,youcanchangethedatumusedby
yourmultifunctiondisplay.
Whenyouchangethedatumforyourmultifunction
display,thechartgridwillsubsequentlymove
accordingtothenewdatum,andthelatitude/
longitudeofthecartographicfeatureswillalso
changeaccordingly.Yourmultifunctiondisplay
willattempttosetupanyGPSreceivertothenew
datum,asfollows:
•True(default)
•Magnetic
•Auto(compensationvalue
displayed)(default)
•Manual
•Range:0to30degrees,EastorWest
•
•TheinternalGPSreceiverwillautomatically
correlateeachtimeyouchangethedatum.
•IfyouhaveaRaymarineGPSreceiverusing
SeaTalkorSeaTalk
ng
,itwillautomatically
correlateeachtimeyouchangethedatumon
themultifunctiondisplay.
•IfyouhaveaRaymarineGPSreceiverusing
NMEA0183,orathird-partyGPSreceiver,you
mustcorrelateitseparately.
Itmaybepossibletouseyourmultifunction
displaytocorrelateanNMEA0183GPSreceiver.
FromthehomescreengotoSet-up>System
settings>GPSSet-up>ViewSatelliteStatus.
Ifthedatumversionisdisplayed,itmaybe
possibletochangeit.Fromthehomescreengo
toSet-up>Systemsettings>DataSources>
GPSDatum.
Note:Raymarinerecommendsthatyou
checkthedisplayedvesselpositioninthechart
applicationagainstyouractualproximitytoa
knownchartedobject.AtypicalGPShasan
accuracyofbetween5and15m.
Customizingyourdisplay
75

Maintenancemenu
Thismenuprovidesaccesstosystemssettingsanddiagnostics.
MenuitemDescriptionOptions
Diagnostics
Diagnosticsprovidesdetailedinformationonthe
multifunctiondisplayandconnecteddevices.The
rangeofinformationavailableincludesproduct
serialnumber,softwareversion,andnetwork
status.WhenyouselecttheDiagnosticsmenu
itemthemultifunctiondisplayscansforany
connectedequipmentandenablesyoutoselect
theproductyouwanttoview.Y oucanalsosave
thediagnosticsinformationtoamemorycard.
Thisisparticularlyusefulforsendingdetailed
informationtoRaymarine
®
CustomerSupportin
theeventofatechnicalissue.
TheInterfacesoptionallowsyoutoviewstatistics
andbufferinformationforNMEA0183ports1and
2andNMEA2000/SeaTalk
ng®
.
TheSiriusoptionisonlydisplayedwhen
connectedtorelevanthardwareandallowsyouto
viewreceivedmessages,memoryanderrors.
DataMasterAnysystemcontainingmorethanonenetworked
multifunctiondisplaymusthaveadesignateddata
master.Thedatamasteristhedisplaywhich
servesasaprimarysourceofdataforalldisplays,
italsohandlesallexternalsourcesofinformation.
CheckCardforUpdatesScansinsertedmemorycardsforsoftwareles
forconnectedproducts.
Thisoptioncanbeusedatanytimetomanually
starttheSystemSoftwareUpdateprocess.
•SelectDevice
•Sirius
•SaveLogs
•EraseLogs
•Interfaces
•AISAlarmsLog
•MFDselection
CheckOnlineforUpdates
SystemSettingsReset
SystemSettings&DataReset
TouchscreenAlignment
WhentheMFDisconnectedtoanaccess
pointthathasaninternetconnectiontheMFD
canchecktheRaymarinewebsiteforsoftware
updatesforconnecteddevices.
Thisoptionresetsyourmenuoptions,datapages,
anddatabarsettingstofactorydefault.ItwillNOT
affectyourwaypoints,routes,ortracksdata.
Inadditiontothesettingsresetdetailedabove,
performingasettingsanddataresetwillalso
removeALLwaypoints,routes,andtracksdata.
Ifthetouchscreenismisalignedtoyourtouch,
youcanrealignittoimprovetheaccuracy.
Realignmentinvolvesasimpleexercisetoalign
anon-screenobjectwithyourtouch.Forbest
results,performthisexercisewhenyourvessel
isanchoredormoored.
Note:TheTouchscreenalignmentisnot
requiredongSSeriesandnon-Touchscreen
MFDs.
•Yes
•No
•Yes
•No
76
LightHouseMFDoperationinstructions

Diagnosticsmenu
IfyouencounterproblemswithyourmultifunctiondisplayorperipheraldevicesyoucanusetheDiagnostics
menutoviewinformationaboutyourdeviceandconnectedequipment.
SelectDeviceEnablesyoutoviewalistofalldevices
connectedtotheSeaTalk
hs
network.
Youcanalsoselectaniteminthelisttoview
furtherdetailsforthatdevice.
SiriusIfconnectedtoaSiriusweatherreceiverthis
optionenablesyoutoviewSiriusweather
statistics.
SaveLogsAllowsyoutosaveerrorlogstoaMicroSD
cardfortroubleshootingpurposes.
EraseLogs
Selectingthisoptionwilleraseanycrash
logsonthedevice.
InterfacesEnablesviewingofstatisticsandviewing
andrecordingofbuffersonNMEAinputs
andtheSeaTalk
ng
bus.
Onmultifunctiondisplayswithmultiple
MicroSDcardslotsyoucanalsochoose
whichMicroSDcardslotthebufferwillbe
recordedto.
AISAlarmsLogViewalistofgeneratedAISalarms.
•Device
•SerialNo.
•Network
•Software
•NMEA1
•NMEA2
•SeaTalk
•RecordFile
ng
Customizingyourdisplay
77

78
LightHouseMFDoperationinstructions

Chapter6:Documentviewerapplication
Chaptercontents
•6.1Documentvieweroverviewonpage80
Documentviewerapplication
79

6.1Documentvieweroverview
D12755-1
1
2
3
D12597-1
1
7
3 42
5
6
YoucanviewPDFdocumentsonyourmultifunction
display.
Thedocumentviewerisavailablefromthe
homescreenandisusedtoviewandsearchPDF
documents(suchasproducthandbooks).
1
2
3
OpenstheMicroSDcardlebrowser.
Openstheusermanualstoredonthe
multifunctiondisplay.
Openstherelevantlicenseagreement
information.
•OpenFile—AllowsyoutobrowseaMicroSD
cardortheMFD’sinternalstorageforaPDF
documenttoopen.
•Gotopage:—Allowsyoutojumptoaspecic
pagenumber.
•Find—Allowsyoutosearchthedocumentfor
specicwords.
•FittoHeight—Scalestheopendocumenttot
theheightoftheapplicationwindow.
•FittoWidth—Scalestheopendocumenttot
thewidthoftheapplicationwindow.
•CloseFile—Closestheopendocument.
Openingtheusermanual
Theproductusermanualisstoredontheinternal
memory.
Fromthehomescreen:
1.SelectDocViewer.
2.SelectUserManual.
Theproductusermanualisopened.
Note:TheUsermanualcanalsobeopened
byselectingtheUserManualiconfromthe
Homescreen.
Note:Thedocumentviewerdoesnotsupport
passwordprotecteddocumentsordocuments
containingsecuritycerticates.Anerrormessage
willbedisplayedifyoutrytoopensuchdocuments.
1
2
Currentpagenumber(pagexofy).
Find(search)toolbar(onlydisplayedwhen
searchingadocument).
Note:ThePrevious,NextandCancel
buttonsareonlyshownontouch-only
products.Fornon-touchandHybridtouch
productsthephysicalbuttonsareused.
3
4Documentviewermenu.
5
6
7
FilenameofthecurrentPDF.
Scrollbar.
On-screenzoomcontrols(T ouchscreen
displaysonly).
PDFdocumentcontent.
Thefollowingoptionsareavailablefromthe
documentviewermenu:
80
OpeningaPDFdocument
YoucanopenPDFdocumentsstoredonaMicroSD
cardbyfollowingthestepsbelow.
Note:WhensavingPDFdocumentstoMicroSD
cards,ensureyoudonotoverwriteimportantdata.
1.SavetherequiredPDFdocumenttoaMicroSD
card.
2.InserttheMicroSDcardintothemultifunction
display’sMicroSDcardslot.
3.SelectMenu.
4.SelectOpenFile.
Thelebrowserdialogisdisplayed.
5.BrowsetheMicroSDcardcontainingthe
documentyouwanttoview.
6.Selectthedocumentyouwanttoview.
Thedocumentwillnowopen.
7.Ifthe‘CannotOpenFile’errormessageis
displayed,selectOktoconrmandthentry
openingthedocumentagain.Checkthatthe
PDFisnotcorrupted.Alsoensurethatthe
PDFdoesnotincludepasswordprotectionor
asecuritycerticate.ThesePDFlesecurity
featuresarenotsupportedbythedocument
viewerapplication.
Note:LargelesizePDFdocumentsmaytakea
whiletoopen.
Closinganopendocument
EachDocviewerinstanceisseparate,thelast
documentopenedwillautomaticallyopennexttime
youselectthatinstanceoftheDocviewerunlessit
itsclosedusingtheCloseFilemenuoption.
Withadocumentopen
LightHouseMFDoperationinstructions

1.SelectMenu.
2.SelectClosele.
ThedocumentiscloseandthemainDocviewer
pageisdisplayed.
Browsinganopendocument
Ontouchscreendisplaysyoucanbrowsepdf
documentsasdetailedbelow.
Withapdfdocumentopen:
•Moveyourngeruptoscrolldownthe
document.
•Moveyourngerdowntoscrollupthe
document.
Whenthedocumentwidthisgreaterthanthe
widthoftheapplicationwindow,moveyournger
leftorrighttopanthewidthofthedocument.
Selectingapage
Youcanskiptothepageyouwanttoviewby
enteringthepagenumber.
Withapdfdocumentopen:
1.SelectMenu.
2.SelectGotopage:.
Thenumerickeypadisdisplayed.
3.Enterthepagenumberofthepageyouwantto
view.
4.SelectOktoviewthepage.
Usingdocumenthyperlinks
Ontouchscreendisplaysyoucanuseinternal
documenthyperlinks.
Withapdfdocumentopenedonapagecontaining
ahyperlink:
1.Momentarilytouchyourngeronthehyperlink.
Youwillbetakentothehyperlinkedpage.
Note:Documenthyperlinkscannotbeactivated
onaNewcSeriesdisplay.
Note:Youcanalsousethescrollbarstonavigate
throughthedocument.
Browsinganopendocument
OnHybridTouchandnon-touchdisplaysyoucan
browsepdfdocumentsbyfollowingthestepsbelow.
Withapdfdocumentopen:
1.MovetheJoystickUporDowntomoveupand
downthroughthedocument.
2.MovetheJoystickLeftorRighttopanleftand
right.
Changingthezoomfactor
Ontouchscreendisplaysyoucanchangethezoom
factoroftheopendocumentbyfollowingthesteps
below.
Withapdfdocumentopen:
1.Selecttheon-screenZoominicontozoomin,or
2.Selecttheon-screenZoomouticontozoomout.
Searchingfortext
Tousethendfunctiontosearchfortextontouch
onlydisplayfollowthestepsbelow.
Withapdfdocumentopen:
1.SelectMenu.
2.SelectFind.
Theon-screenkeyboardisdisplayed.
3.Enterthekeywordyouwanttond.
4.SelectSAVE.
Thedocumentviewerwillenterndmodeand:
•Youmayseea‘Searching’iconwhileall
occurrencesarefound.
•Thendtoolbarisdisplayed.
•Therstoccurrenceofthekeywordis
highlighted.
5.SelectNexttondthenextoccurrenceofthe
keyword,or
6.SelectPrevioustogobacktothelastoccurrence
ofthekeyword.
7.Y oucanselectCancelatanytimetoclosethe
ndtoolbarandreturntothenormalviewing.
Changingthezoomfactor
OnHybridT ouchandnon-touchdisplays(excluding
thee7ande7D)youcanchangethezoomfactorof
theopendocumentbyfollowingthestepsbelow.
Withapdfdocumentopen:
1.UsetheRangeoutbuttontozoomout,or
2.UsetheRangeinbuttontozoomin.
Note:NewaSeriesande7/e7Dmultifunction
displaysdonothaveRangeinandRangeout
button.
Note:OnaNewcSeriesdisplayonlytheRotary
controlcanbeusedtochangethezoomfactor.
Documentviewerapplication
Searchingfortext
OnHybridTouchandnon-touchdisplaysyoucan
usethendfunctiontosearchfortextinanopenpdf
documentbyfollowingthestepsbelow.
Withapdfdocumentopen:
1.PresstheMenubutton.
2.SelectFind.
Theon-screenkeyboardisdisplayed.
3.Enterthekeywordyouwanttond.
4.SelectSAVE.
Thedocumentviewerwillenterndmodeand:
•Youmayseea‘Searching’iconwhileall
occurrencesarefound.
81

•Thendtoolbarisdisplayed.
•Therstoccurrenceofthekeywordis
highlighted.
5.MovetheJoystickDowntogotothenext
occurrenceofthekeyword,or
6.MovetheJoystickUptogototheprevious
occurrenceofthekeyword.
7.Y oucanpresstheBackbuttonatanytimeto
closethendtoolbarandreturntothenormal
viewing.
Keywordnotfound
Thedocumentviewerwillletyouknowifthekeyword
youhavesearchedfordoesnotappearinthe
document.
Ifthekeywordisnotfoundthenthendtoolbarwill
displayanexclamationmarkandapop-upmessage
isdisplayedon-screen.
SelectingNewSearchwilltakeyoubacktothe
on-screenkeyboardsothatyoucantryadifferent
keyword.SelectingCancelwillclosethendtool
barandresumenormaloperation.
82
LightHouseMFDoperationinstructions

Chapter7:Autopilotcontrol
Chaptercontents
•7.1AutopilotControloverviewandfeaturesonpage84
•7.2Enablingautopilotcontrolonpage84
•7.3Engagingtheautopilotonpage85
•7.4Adjustingthecurrentlockedheadingonpage85
•7.5Disengagingtheautopilotonpage86
•7.6Manuallydisplayingthepilotcontroldialogboxonpage87
•7.7PilotControldialogonpage87
•7.8PilotBaronpage88
•7.9PilotSet-uponpage89
•7.10Pilotsettingsonpage89
•7.11Commissioningonpage92
•7.12Autopilotstatussymbolsonpage96
•7.13Autopilotalarmsonpage96
Autopilotcontrol
83

7.1AutopilotControloverviewand features
Raymarine
fromacompatibleLightHousepoweredMFD,withor
withoutadedicatedPilotcontrolhead.
Note:Forinformationonconnectinga
Raymarine
tothedocumentationthataccompaniedyour
autopilot.
TheMFDcanbeusedto:
Controlaconnected
Autopilot.
EngagetheautopilotinTrack
mode(Gotoaspecied
positionorfollowaroute)or
Automode(Remainonthe
currentheading).
Adjustthecurrentlocked
headingwheninAutomode.
Disengagetheautopilot.•7.5Disengagingthe
Providecloseintegration
withtheChartapplicationfor
seamlessnavigation.
Selectdifferentperformance
modes,whenconnectedto
anEvolutionautopilot.
AdjustthePilotSettings,
whenconnectedtoan
Evolutionautopilot.
®
autopilotscanbecontrolleddirectly
®
autopilottoacompatibleMFD,refer
•3.19Enablingautopilot
control
•7.3Engagingtheautopilot
•7.4Adjustingthecurrent
lockedheading
autopilot
•14.6Navigatemenu
options
•7.9PilotSet-up
•7.10Pilotsettings
7.2Enablingautopilotcontrol
Enablingtheautopilotcontrolfunction—
SeaTalkandSPXSeaTalk
ToenablecontrolofyourSeaTalkorSPXSeaT alk
autopilotusingyourmultifunctiondisplayfollowthe
stepsbelow.
FromtheHomescreen:
1.SelectSet-up.
2.SelectSystemSettings.
3.SelectAutopilotControlsothatOnis
highlighted.
SelectingAutopilotControlwillswitchthecontrol
betweenOnandOff.
Onasystemcontainingmultipledisplaysthepilot
controlisenabledonalldisplaysatthesametime.
Enablingtheautopilotcontrolfunction—
Evolutionautopilots
ToenablecontrolofyourEvolutionautopilotusing
yourmultifunctiondisplayfollowthestepsbelow.
FromtheHomescreen.
1.SelectSet-up.
2.SelectSystemSettings.
3.SelectExternalDevices.
4.SelectPilotSet-up.
5.SelectPilotcontrolsothatOnishighlighted.
SelectingPilotcontrolwillswitchtheAutopilot
controlfunctiononandoff.
ng
autopilots
ng
Manageautopilotalarms.•7.13Autopilotalarms
Note:Inasystemthatdoesnotincludea
dedicatedPilotcontrolheadtheDataMasterMFD
cannotbeswitchedOfforputintoPowerSave
modewhilsttheautopilotisengaged.
84
LightHouseMFDoperationinstructions

7.3Engagingtheautopilot
Engagingtheautopilotusingthepilot
button
Onmultifunctiondisplayswhichhaveadedicated
pilotbuttonorwhenusingaremotekeypadyoucan
engagetheautopilotusingthePilotbutton.
Withtheautopilotdisengaged:
1.PressthePilotbutton.
Thepilotcontroldialogisdisplayed.
2.SelectAuto.
Theautopilotisengagedandwillmaintainthe
currentheading.
Note:Y oucanalsoautomaticallyengagethe
autopilotbypressingandholdingthePilotbutton.
Engagingtheautopilotfromthechart
applicationmenu
Youcanengagetheautopilotintrackmodeusing
theapplicationmenu.
7.4Adjustingthecurrentlocked heading
WhentheautopilotisinAutomodethecurrent
lockedheadingcanbeadjustedfromthePilot
ControldialogandfromthePilotBar.
WiththePilotBarorPilotControldialogdisplayed:
1.UsetheLeftArrowicontodecreasethecurrent
lockedheading,or
2.UsetheRightArrowicontoincreasethecurrent
lockedheading.
Inthechartapplication:
1.SelectMenu>Navigate>GotoCursor,Goto
Waypoint,orFollowRouteasappropriate.
ThePilotControldialogisdisplayed.
2.SelectYes(Track).
Engagingtheautopilotusingthecontext
menu
Youcanengagetheautopilotintrackmodeusing
thecontextmenu.
Fromthechartapplicationcontextmenu.
1.SelectanyofthefollowingoptionsfromtheChart
contextmenu:
•GotoWaypoint
•GotoCursor
•FollowRoute
•FollowfromHere
•FollowRouteinReverse
Thepilotcontroldialogisdisplayed.
2.SelectYes(Track).
Autopilotcontrol
85

7.5Disengagingtheautopilot
Caution:Disengagingtheautopilot
Onintegratedmultifunctiondisplaysthat
donothaveadedicatedpilotbutton,
inanemergencytheautopilotcanbe
disengagedbypressingandholdingthe
Powerbutton.
2.SelectST ANDBY.
ThePilotStatuschangeconrmationpop-upis
displayed.
3.SelectYestodisengagetheautopilot.
Theautopilotisdisengaged(putintostandby).
Disengagingtheautopilotfromthe
homescreen
DisengagingtheautopilotusingthePower
button
Onintegratedmultifunctiondisplaysthatdonot
haveadedicatedpilotbutton,whentheautopilot
isengageditcanbedisengagedusingthepower
button.Thisisusefulinemergencysituations,
especiallyontouchonlydisplaysintheeventthe
touchscreenbecomesunresponsiveduetoadverse
weatherconditionse.g.rain.
Withtheautopilotengaged:
1.PressandholdthePowerbutton.
A‘SettingpilottoSTANDBY’warningisdisplayed
andanaudiblealarmissounded.
2.ContinuetoholdthePowerbuttonandthepilot
willbeplacedintostandbymodethenthePilot
controldialogisdisplayed.
Disengagingtheautopilotusingthe
shortcutspage
YoucandisengagetheautopilotfromtheShortcuts
page.
Withtheautopilotengaged:
1.PressandreleasethePOWERbutton.
2.SelectStandby.
ThePilotStatuschangeconrmationpop-upis
displayed.
3.SelectYestodisengagetheautopilot.
Theautopilotisdisengaged(putintostandby)and
thePilotControldialogisdisplayed.
OnT ouchscreendisplaystheautopilotcanbe
disengagedfromtheHomescreen.
FromtheHomescreen:
1.SelectStandby.
ThePilotStatuschangeconrmationpop-upis
displayed.
2.SelectYestodisengagetheautopilot.
Theautopilotisdisengaged(putintostandby).
Disengagetheautopilotfromthepilotbar
TheautopilotcanbedisengagedfromthePilotbar.
WiththePilotBardisplayed.
1.SelectStandby.
Referto7.8PilotBarforfurtherinformationonthe
PilotBar.
Disengagingtheautopilotusingthepilot
button
Onmultifunctiondisplayswhichhaveadedicated
pilotbuttonorwhenusingaremotekeypadyoucan
disengagetheautopilotusingthePilotbutton.
Withtheautopilotengaged:
1.PressthePilotbutton.
Theautopilotisdisengaged(putintostandby)and
thePilotControldialogisdisplayed.
Disengagingtheautopilotfromthechart
application
Onallmultifunctiondisplayvariantstheautopilotcan
bedisengagedfromthechartapplication’smenu.
Inthechartapplicationwiththeautopilotengaged:
1.SelectMenu>Navigate>StopGotoorStop
Follow.
ThePilotControldialogisdisplayed.
86
LightHouseMFDoperationinstructions

7.6Manuallydisplayingthepilot
D12882-1
1
2
3
4
5 6
8
7
D12206-2
1
2
3
4
5 6
9
8
7
controldialogbox
YoucanalsoopenthePilotControldialogatany
timefromthehomescreenorchartapplication.
1.Fromthehomescreen:
i.SelectSet-up.
ii.SelectPilotControls.
2.Fromthechartapplication:
i.SelectMenu.
ii.SelectNavigate.
iii.SelectPilotsControls.
7.7PilotControldialog
ThePilotControldialogcanbeusedtocontrol
autopilotfunctions.
PilotControldialog(standby)
TheexamplebelowshowsthePilotControldialog
optionswhenthedialogisopenedfromamenuor
usingadedicatedphysicalPilotbutton.
SelectingAutowillengagetheautopilotand
maintainthecurrentheading.
PilotControldialog(Auto)
TheexamplebelowshowsthePilotControldialog
optionswhenAuto(lockedheading)hasbeen
engaged.
Description
1
PilotStatus—Currentpilotmode.
2
LeftArrow—Decreaselockedheadingangle.
3
Rudderbar—Indicatesthepositionoftherudder.
4
STANDBY—Disengagestheautopilotandreturnsto
manualvesselcontrol.
5
Currentlockedheading.
6Track—EngagestheautopilotinTrackmodeand
automaticallysteersyourvesseltoatargetwaypointor
alongarouteplottedonyourchartplotter.
7
RightArrow—Increaselockedheadingangle.
8
Close—ClosesthePilotControldialog.
PilotControldialog(Startingnavigation)
TheexamplebelowshowsthePilotControldialog
optionswhenGotoCursor,GotoWaypointor
FollowRoutehasbeenselected.
Autopilotcontrol
87

Description
1
PilotStatus—Currentpilotmode.
2
CurrentHeading.
3
No(Standby)—Disengagestheautopilotandreturns
tomanualvesselcontrol.
4
Rudderbar—Indicatesthepositionoftherudder.
5
Turnangle—Theturnangleisonlyavailablefor
SeaTalk
ng
autopilots.Thisindicatesthedirectionand
severityofturn.
6
Yes(Track)—EngagestheautopilotinTrackmode
andautomaticallysteersyourvesseltoatarget
waypointoralongarouteplottedonyourMFD.
7
Distancetonextwaypoint(DTW)andBearingtonext
waypoint(BTW).
8NextWaypointname.
9
Close—ClosesthePilotControldialog.
PilotControldialog(Track)
TheexamplebelowshowsthePilotControldialog
optionswhenintrackmode.
7.8PilotBar
ThePilotBarprovidesautopilotstatusinformation.
Fortouchscreendisplaysyoucandisengagethe
autopilotusingthePilotBar.
PilotBar—Trackmode
PilotBar—Automode
ThePilotBarisdisplayedwhenautopilotcontrol
isenabled,thePilotBarisswitchedonandthe
autopilotisengaged.
WhentheautopilotisdisengagedthePilotBaris
hidden.
OnasystemcontainingmultipledisplaysthePilot
Barcanbedisabledorenabledoneachdisplay.
EnablingthePilotBar
WhenconnectedtoaSeaTalkorSeaT alk
autopilotthePilotBarcanbeenabledbyfollowing
thestepsbelow.
FromtheHomescreen,withautopilotscontrols
enabled:
1.SelectCustomize.
2.SelectDisplayPreferences.
3.SelectPilotControlBarsothatShownis
highlighted.
SelectingPilotControlBarwillswitchthePilot
BarbetweenShownandHidden.
4.Engagetheautopilot.
ng
SPX
DisplayingthePilotControldialog
ThePilotControldialogisdisplayedunderthe
followingconditions:
1.WhenthephysicalPilotbuttonispressed.
2.WhenPilotControlsselectedfromtheshortcuts
page.
3.WhenyouselectMenu>Navigate>Goto
Waypoint,GotoCursororFollowRouteoption
intheChartapplication.
4.WhenyouselectGotoWaypointorGotoCursor
usingtheChartcontextmenu.
5.Whenyouplacethecursoroveranactiveroute
orwaypointintheChartapplicationandselect
StopGoto,StopFolloworAdvanceWaypoint
fromthecontextmenu.
6.Whenyouarefollowingarouteorgoingtoa
waypointorcursorposition,andselectMenu
>Navigate>StopGoto,StopFollow,or
AdvanceWaypoint.
7.Whenyouarriveatatargetwaypoint.
Note:Whenarrivingatawaypoint,thedialogtitle
barturnsredtoindicatewaypointarrival.
ThePilotBarisnowdisplayedatthebottomof
thescreeninallapplicationswhilsttheautopilotis
engaged.
Note:WhenconnectedtoanEvolutionautopilot
thePilotBarisenabledfromthePilotSet-uppage.
88
LightHouseMFDoperationinstructions

7.9PilotSet-up
D12883-1
9 10
4
6
7
5
8
21 3
7.10Pilotsettings
WhenconnectedtoanEvolutionautopilotthePilot
Set-uppageisavailable.
1
Back—Gobacktothepreviousmenu.
2
PilotStatus—Currentpilotmode.
3
Close—Closesthepilotset-uppageanddisplays
thehomescreen.
4
Pilotcontrol—Switchesautopilotcontrolviathe
multifunctiondisplayonandoff.
5
Pilotbar—SwitchesthePilotbaronandoff.
6Pilotsettings—Displaysavailablepilotsettingsthat
canbeconguredfromthemultifunctiondisplay.
Note:ThePilotsettingsmenuisonlyavailableon
thedatamastermultifunctiondisplay.
7
Leisure—PlacestheautopilotinLeisuremode.
Leisuremodeissuitableforlongpassageswheretight
headingcontrolisnotcritical.
8
Performance—PlacestheautopilotinPerformance
mode.Performancemodeprovidesgoodcourse
keepingwithoutoverworkingtheautopilot.
9
Cruise—PlacestheautopilotinCruisemode.Cruise
modeprovidestightheadingcontrol.
10
Rudderbar—Indicatesthepositionoftherudder.
AccessingthePilotSet-uppage.
WhenconnectedtoanEvolutionautopilotyoucan
accessthePilotSet-uppagebyfollowingthesteps
below.
FromtheHomescreen:
1.SelectSet-up.
2.SelectSystemSettings.
3.SelectExternalDevices.
4.SelectPilotSet-up.
Autopilotcontrol
ThePilotsettingsoptionisavailableonadata
mastermultifunctiondisplaywhenitisintegrated
withanEvolutionautopilot.
ThePilotsettingsenablethesetupand
commissioningofanEvolutionautopilotusinga
multifunctiondisplay.
ThePilotsettingsincludethefollowingoptions:
•VesselSettings
•DriveSettings
•SailBoatSettings
•Commissioning
Initialsetupandcommissioning
Vesselsettings
Thevesselsettingsaredesignedtoprovideoptimum
steeringperformancefortypicalvessels.
Itisimportanttocompletethevesselhulltype
selectionaspartoftheinitialset-up,asitformsa
keypartoftheautopilotcalibrationprocess.You
canalsoaccesstheoptionsatanytimebyselecting
PilotSettings>VesselsettingsfromthePilot
Set-uppage.
Vesselsettingincludethefollowingoptions:
•VesselHullType
•DriveType
•CompassOffset
•CalibrationLock
Vesselhulltypeselection
Thevesselhulltypeoptionsaredesignedtoprovide
optimumsteeringperformancefortypicalvessels.
Itisimportanttocompletethevesselhulltype
selectionaspartoftheinitialset-up,asitformsa
keypartofthecommissioningprocess.Y oucan
alsoaccesstheoptionsatanytimewiththepilotin
StandbyfromthePilotSet-uppagebyselecting:
PilotSettings>VesselSettings>VesselHull
Type.
Asageneralguide,selecttheoptionthatmost
closelymatchesyourvesseltypeandsteering
characteristics.Theoptionsare:
•Sail.
•Sail(slowturn).
•SailCatamaran.
•Power
•Power(slowturn).
•Power(fastturn).
Itisimportanttobeawarethatsteeringforces(and
thereforerate-of-turn)varysignicantlydepending
onthecombinationofvesseltype,steeringsystem,
anddrivetype.Therefore,theavailablevesselhull
typeoptionsareprovidedforguidanceonly.Y ou
maywishtoexperimentwiththedifferentvesselhull
typeoptions,asitmightbepossibletoimprovethe
steeringperformanceofyourvesselbyselectinga
differentvesseltype.
89

Whenchoosingasuitablevesseltype,theemphasis
150
o
155
o
5
1 2
D12928-1
shouldbeonsafeanddependablesteering
response.
Important:Ifyouchangethevesseltypeafter
completingtheDocksidewizard,allcommissioning
settingswillberesettodefaultsettings,andyou
willneedtocompletetheDocksidewizardagain.
2.Checktheautopilotheadingonyourmultifunction
display.
3.FromthePilotSet-uppageselectPilotSettings.
4.SelectVesselSettings.
5.SelectCompassOffset.
6.AdjusttheCompassOffsetsothattheautopilot
headingwillmatchthesteeringcompassheading.
Selectingavesselhulltype
TheVesselhulltypecanbeaccessedfromthePilot
Set-uppage.
1.SelectPilotSettings.
2.SelectVesselSettings.
3.SelectVesselHullT ype.
4.Selecttheoptionthatmostcloselymatchesyour
vesseltype.
Thenewselectionisapplied.
Selectingadrivetype
Drivetypeselectionisavailablefromthedockside
wizard,andalsofromtheVesselsettingsmenu:
PilotSet-up>PilotSettings>VesselType>Drive
type.
WiththeDriveTypemenudisplayed:
1.Selectyourdrivetypefromthelist.
Note:Thedrivetypesavailablearedependant
ontheACUtype.Ifyourdrivetypeisnotlisted
contactyourRaymarinedealerforadvice.
2.SelectOKtosaveyoursettinganddisplaythe
nextset-uppage.
Note:YoucancanceltheDocksidewizardatany
timebyselectingST ANDBY.
Aligningheading
Theautopilotheadingcanbealignedtotheship’s
compassusingtheCompassoffsetsetting.
Note:Toperformthisprocedureyouwillneed
anetworkeddevicesuchasaninstrument,pilot
controlheadormultifunctiondisplaytohavethe
currentautopilotheadingshownonscreen.
Manyfactorscancauseadifferencebetween
headingandcourseoverground(COG),youmust
aligntheheadingsoitmatchesthevessel’ssteering
compass(oraknowntransitbearing).
e.g.Ifthesteeringcompassheadingwas155°
andautopilotheadingwas150°applyinga
compassoffsetof5°wouldmeanthatthesteering
compassandautopilotheadingarealigned.
Thecompassoffsetwillbechangedautomaticallyif
requiredwhenthealigncompasstoGPSprocedure
iscarriedout.
Drivesettings
Thedrivesettingsaredesignedtoprovideoptimum
driveperformance.
Itisimportanttocheckandwherenecessaryadjust
thedrivesettingstosuityourdrivesetup.
Drivesettingsincludethefollowingsettings:
•*RudderDamping.
•AutoTurn.
•PowerSteer.
•Reverserudderref.
•RudderOffset.
•RudderLimit.
•HardOverTime.
Note:*Therudderdampingsettingshouldnot
beadjustedwithoutrstseekingadvicefrom
Raymarinetechnicalsupport.
Settingtheautoturnangle
Youcanspecifytheangleatwhichthevesselwillturn
whenperforminganAutoTurnusingaconnected
PilotcontrolHead.
FromthePilotSet-uppage:
1.SelectPilotSettings.
2.SelectDriveSettings.
3.SelectAutoT urn.
4.Adjusttheautoturnsettingtotherequiredvalue.
5.SelectBackorOktoconrmthesetting.
1.Setyourvesselonaknownheadingandcheck
90
thesteeringcompass.
PowerSteer
Ifyouhaveajoystickorap70Rpilotcontrolhead
connectedtoyourautopilotyoucanselectitsmode
ofoperation.Fordetailedinformationrefertothe
documentationthataccompaniedyourjoystickor
yourp70R.
Themodesofoperationareasfollows:
•Off—Joystickcontrolisturnedoff.
•Proportional—Proportionalmodeappliesrudder
inproportiontojoystickmovement—thefurther
thejoystickisheldover,thegreatertheapplied
rudder.
LightHouseMFDoperationinstructions

•Bang-Bang—Bang-bangmodesapplies
continuousrudderinthedirectionofthejoystick
movement,toimprovecontrol,thespeedofrudder
movementchangeswiththeangleofthejoystick.
Formaximumspeed,pushthejoystickhardover.
Ifyoureturnthejoysticktothecenterposition,the
rudderwillremaininitscurrentposition.
Reversingtherudderreferencephase
Onvesselsttedwitharudderreferencetransducer,
iftherudderbarmovesinthewrongdirectionyou
cancorrectthisbyreversingthephaseoftherudder
reference.
Note:Thisprocedureisnotrequiredonvessels
withoutarudderreferencetransducer.
FromthePilotSet-uppage:
1.SelectPilotSettings.
2.SelectDriveSettings.
3.SelectReverseRudderRef.
SelectingReverseRudderrefwillswitchbetween
OnandOff.
Settingtherudderoffset
Onvesselsttedwitharudderreferencetransducer,
youcansetanoffsettotherudder’scenterposition
ifrequired.
Note:Thisprocedureisnotrequiredonvessels
withoutarudderreferencetransducer.
Note:T operformthisprocedureitisdesirableto
haveanetworkeddevicesuchasaninstrument,
pilotcontrolheadormultifunctiondisplaythatcan
displaythecurrentrudderpositiononscreenwhilst
makingthisadjustment.
1.Usethesteeringwheeltocentertherudder.
2.FromthePilotSet-uppageselectPilotSettings.
3.SelectDriveSettings.
4.SelectRudderOffset.
5.AdjusttheRudderOffsetvalueuntiltherudder
barshowstherudderinthecentralposition.
Therudderadjustmentislimitedto±9°ifthe
adjustmentrequiredtocentertherudderbar
positionisbeyondtheselimitsthenthealignment
oftherudderreferencesensorwillneedtobe
physicallyadjusted.
Settingtherudderlimits
Onvesselsttedwitharudderreferencetransducer
therudderlimitsmustbeset.Therudderlimitis
usedtosettheruddercontrol.Therudderlimits
shouldbesettojustinsidethemechanicalendstops
topreventunnecessaryloadonthesteeringsystem.
Note:Thisprocedureisnotrequiredonvessels
withoutarudderreferencetransducer.
Note:T operformthisprocedureitisdesirableto
haveanetworkeddevicesuchasaninstrument,
pilotcontrolheadormultifunctiondisplaythatcan
displaythecurrentrudderpositiononscreenwhilst
makingthisadjustment.
Thelimitsshouldbesettoapproximately5°less
thanthemaximumrudderangle.
1.Turnthesteeringwheelallthewaytoportand
notetheangleontherudderbar.
2.Turnthesteeringwheelallthewaytostarboard
andnotetheangleontherudderbar.
3.FromthePilotSet-uppageselectPilotSettings.
4.SelectDriveSettings.
5.SelectRudderLimit.
6.Adjusttherudderlimittobe5°lessthanthe
lowestanglenotedinsteps1and2above.
7.SelectBackorOKtoconrmthesettings.
Settingthehardovertime
Oncethehardovertimehasbeenestablisheditcan
besetfollowingthestepsbelow.
FromthePilotSet-uppage:
1.SelectPilotSettings.
2.SelectDriveSettings.
3.SelectHardOverTime.
4.Enteryourhardovertimeinseconds.
SailboatSettings
Whenthevesseltypehasbeensettoasailboatthe
SailBoatsettingsmenuwillbeavailable.
Sailboarsettingsconsistofthefollowingoptions:
•WindTrimResponse—Windtrimresponse
controlshowquicklytheautopilotsystemresponds
tochangesinthewinddirection.Ahigherwind
trimsettingwillresultinasystemthatismore
responsivetowindchanges.
•GybeInhibit—Withgybeinhibitturnedon,to
preventaccidentalgybes,theautopilotwillprevent
thevesselfromperformingaturnawayfromthe
wind.Withgybeinhibitturnedoff,youcanperform
anAutoTackintoorawayfromthewind.Gybe
inhibitdoesnoteffectAutoTurn.
•WindTrim—Thisoptiondetermineswhetherthe
vesselsteerstoApparentorTruewindinwhenin
WindVanemode.
AligningcompasstoGPS
YoucanaligntheautopilotcompasstoyourCOG
heading.
Aligningthecompassmustbeperformedwhilst
headingintothetideorinslackwater.
FromthePilotSet-uppage:
1.SelectPilotSettings.
2.SelectCommissioning.
3.SelectAlignCompasstoGPS.
4.Steeryourvesselonasteadycourseandthen
selectStart.
5.Ensuresufcientvesselspeed,ifyouaregoing
tooslowa‘GoFaster’messageisdisplayed.
6.IfthealignmentissuccessfulselectOKto
completetheprocedure.
Autopilotcontrol
91

Ifrequiredthisprocedurewillautomaticallycorrect
thecompassoffsetvalueaccessiblefromtheVessel
Settingsmenu.
Note:Ifthealignmentfailsitmeansthatthepilot
sensorismorethana10°deviationbetweenyour
COGheadingandthepilotsensor,inthissituation
thepilotsensorpositionmustbechecked.
7.11Commissioning
YoucancommissionanEvolutionautopilotusing
thePilotsettingsmenuonyourmultifunctiondisplay .
Allset-upandcommissioningproceduresmustbe
carriedoutbeforeusingtheautopilot.
Commissioningtheautopilotsystemconsistsofthe
followingprocedures:
•VesselHullTypeselection.
•DriveTypeselection.
•Ruddercheck
•Motorcheck
Commissioningpre-requisites
Beforecommissioningyoursystemforthersttime,
checkthatthefollowingprocesseshavebeencarried
outcorrectly:
•Autopilotsysteminstallationcompletedin
accordancewiththeInstallationinstructions.
•SeaTalk
SeaTalk
•Wheretted,theGPSreceiverhasbeeninstalled
andconnectedinaccordancewiththeassociated
Installationinstructions.
Checkalsothatthecommissioningengineeris
familiarwiththeinstallationandcomponentsofthe
autopilotsystemincluding:
•Vesseltype.
•Vesselsteeringsysteminformation.
•Whattheautopilotwillbeusedfor.
•Systemlayout:componentsandconnections(you
shouldhaveaschematicofthevessel’sautopilot
system).
ng
networkinstalledinaccordancewiththe
ng
ReferenceManual.
Vesselhulltypeselection
Thevesselhulltypeoptionsaredesignedtoprovide
optimumsteeringperformancefortypicalvessels.
Itisimportanttocompletethevesselhulltype
selectionaspartoftheinitialset-up,asitformsa
keypartofthecommissioningprocess.Y oucan
alsoaccesstheoptionsatanytimewiththepilotin
StandbyfromthePilotSet-uppagebyselecting:
PilotSettings>VesselSettings>VesselHull
Type.
Asageneralguide,selecttheoptionthatmost
closelymatchesyourvesseltypeandsteering
characteristics.Theoptionsare:
•Sail.
•Sail(slowturn).
•SailCatamaran.
•Power
•Power(slowturn).
•Power(fastturn).
Itisimportanttobeawarethatsteeringforces(and
thereforerate-of-turn)varysignicantlydepending
onthecombinationofvesseltype,steeringsystem,
anddrivetype.Therefore,theavailablevesselhull
92
LightHouseMFDoperationinstructions

typeoptionsareprovidedforguidanceonly.Y ou
maywishtoexperimentwiththedifferentvesselhull
typeoptions,asitmightbepossibletoimprovethe
steeringperformanceofyourvesselbyselectinga
differentvesseltype.
Whenchoosingasuitablevesseltype,theemphasis
shouldbeonsafeanddependablesteering
response.
Important:Ifyouchangethevesseltypeafter
completingtheDocksidewizard,allcommissioning
settingswillberesettodefaultsettings,andyou
willneedtocompletetheDocksidewizardagain.
Selectingavesselhulltype
TheVesselhulltypecanbeaccessedfromthePilot
Set-uppage.
1.SelectPilotSettings.
2.SelectVesselSettings.
3.SelectVesselHullT ype.
4.Selecttheoptionthatmostcloselymatchesyour
vesseltype.
Thenewselectionisapplied.
PerformingtheDocksidewizard
Thedocksidewizardmustbecompletedbeforethe
Evolutionautopilotsystemcanbeusedfortherst
time.TheDocksidewizardguidesyouthroughthe
stepsrequiredforcommissioning.
TheDocksidewizardcontainsdifferentsteps
dependingonwhetheryouhavearudderreference
transducerttedtoyourvessel:
Selectingadrivetype
Drivetypeselectionisavailablefromthedockside
wizard,andalsofromtheVesselsettingsmenu:
PilotSet-up>PilotSettings>VesselType>Drive
type.
WiththeDriveTypemenudisplayed:
1.Selectyourdrivetypefromthelist.
Note:Thedrivetypesavailablearedependant
ontheACUtype.Ifyourdrivetypeisnotlisted
contactyourRaymarinedealerforadvice.
2.SelectOKtosaveyoursettinganddisplaythe
nextset-uppage.
Note:YoucancanceltheDocksidewizardatany
timebyselectingST ANDBY.
Checkingtherudderalignment
Thisprocedureestablishesportandstarboard
rudderlimitsforsystemsusingarudderreference
transducer.
Theruddercheckformspartofthedocksidewizard.
Thefollowingprocedureonly
appliestovesselswitha
rudderreferencetransducer.
1.CentertherudderandselectOK.
2.Whenprompted,turntherudderhardtoportand
selectOK.
3.Whenprompted,turntherudderhardtostarboard
andselectOK.
4.Whenprompted,turntherudderbacktocentre
andselectOK.
ThefollowingDockside
wizardproceduresonlyapply
tovesselswithoutarudder
referencetransducer:
•DriveTypeselection.
•RudderLimitsetting.
•Hard-overtimesetting
(Raymarinerecommends
thatthisinformation
isspeciedoncethe
ThefollowingDockside
wizardproceduresonlyapply
tovesselswitharudder
referencetransducer:
•DriveTypeselection.
•AlignRudder(rudder
alignment).
•RudderLimitsetting.
•RudderDrivecheck.
docksidewizardand
RudderDrivecheckis
complete,usingtheHard
OverTimemenuoption).
•RudderDrivecheck.
Toaccessthewizard,ensurethepilotisinstandby
modeandthenfromthePilotSet-uppage:
1.SelectPilotSettings.
2.SelectCommissioning.
3.SelectDocksideWizard.
Note:YoucancancelDocksidewizardatanytime
byselectingSTANDBY.
Rudderlimitsetting
AspartoftheDocksidewizard,thesystemwill
set-uptherudderlimits.
•Forvesselswitharudderreferencetransducer
—Thisprocedureestablishestherudderlimit.
Therudderlimitwillbedisplayedwithamessage
conrmingthattherudderlimithasbeenupdated.
Thisvaluecanbechangedifrequired.
•Forvesselswithoutarudderreference
transducer—Adefaultof30degreesis
displayed,andcanbechangedasrequired.
Hardovertime
Thehardovertimesettingcanbespeciedaspart
oftheDocksidewizard.
Thefollowinginformationonly
appliestovesselswithouta
rudderreferencetransducer.
Autopilotcontrol
93

•Ifyoualreadyknowthehard-overtimeforyour
vessel’ssteeringsystem:enterthistimeduring
theDocksidewizardprocedure.
•IfyoudoNOTknowthehard-overtimeforyour
vessel’ssteeringsystem:skipthisstepduringthe
DocksidewizardbyselectingSAVE,completethe
Docksidewizardprocedure.Oncethewizardis
complete,calculateandadjustthehard-overtime.
Checkingtherudderdrive
AspartoftheDocksidewizard,thesystemwillcheck
thedriveconnection.Onceithascompletedthe
checksuccessfully,amessagewillappearaskingif
itissafeforthesystemtotakethehelm.
Adjustingthehard-overtime
Onvesselswithoutarudderreferencetransducer,it
isimportanttosetthehard-overtimelimitscorrectly,
toensureaccurateautopilotoperation.Hard-over
timeisthetimeittakesthevessel’ssteeringsystem
todrivetherudderfromfullporttofullstarboard.
Beforeattemptingthefollowingprocedure,ensure
thatyou’veobservedandunderstoodtheRudder
checkwarningprovidedinthisdocument.
Thefollowinginformationonly
appliestovesselswithouta
rudderreferencetransducer.
Duringthisproceduretheautopilotwillmovethe
rudder.Ensureitissafetoproceedbeforeselecting
OK.
WhenintheDocksidewizard,withtheMotorCheck
pagedisplayed:
1.Centerandletgooftherudder.
2.Disengageanyrudderdriveclutch.
3.SelectCONTINUE.
4.CheckitissafetoproceedbeforeselectingOK.
Forvesselswitharudderreferencetransducer,
theautopilotwillnowautomaticallymovethe
ruddertoportandthenstarboard.
5.Forvesselswithoutarudderreference
transducer,youwillbeaskedtoconrmthe
rudderturnedtoportbyselectingYESorNO.
6.SelectOKifitissafetoengagetherudderinthe
oppositedirection.
7.Y ouwillbeaskedtoconrmtherudderturnedto
starboardbyselectingYESorNO.
8.Docksidewizardisnowcomplete,select
CONTINUE.
Note:Ifyouconrmeda“NO”responseforthe
ruddermovementtobothportandstarboard,the
wizardwillexit.Itispossiblethatthesteering
systemdidnotmovetherudderinanydirection,
anditwillbenecessarytocheckthesteering
systembeforecompletingtheDocksidewizard
procedureagain.
Note:Iftheruddermovesintheoppositedirection
thanexpectedyoumayneedtoreversethephase
oftherudderreferenceunit.Thiscanbeachieved
byaccessing:PilotSet-up>PilotSettings>
DriveSettings>ReverseRudderRef.
YoucancancelDocksidewizardatanytimeby
pressingSTANDBY.
Warning:Ruddercheck
Ifnorudderreferencehasbeenttedyou
MUSTensurethatadequateprovisionis
madetopreventthesteeringmechanism
fromimpactingtheendstops.
94
1.Withtheautopilotin‘Standby’mode,manually
turnthehelmfulltoport.
2.Placetheautopilotin‘Auto’mode.
3.Usingastopwatch,startthetimer,andthen
immediately:
4.Turn180degreesfromyourcurrentheading.
5.Oncetherudderhasreachedtherudderlimitthat
wasspeciedaspartoftheDocksidewizard,
stopthetimer.
6.T ocalculateyourhard-overtime,takethe
measuredtimeanddoubleit.
7.NowaccesstheHardOverTimemenutospecify
thishard-overtime.
Settingthehardovertime
Oncethehardovertimehasbeenestablisheditcan
besetfollowingthestepsbelow.
FromthePilotSet-uppage:
1.SelectPilotSettings.
2.SelectDriveSettings.
3.SelectHardOverTime.
4.Enteryourhardovertimeinseconds.
Compasslinearization
WithEvolutionautopilotsystems,whentheEVunit
isrstinstalledandpowered-up,itsinternalcompass
needstocompensateforlocalmagneticvariations
andtheearth’smagneticeld.Thisisachievedusing
anautomaticprocessknownaslinearization,which
formsanimportantpartoftheautopilotinstallation,
commissioningandset-upprocess.
Linearization
InEvolutionsystems,thelinearizationprocess
isperformedautomaticallybytheEVunitas
abackgroundtaskwhenthevessel'sspeedis
between3and15knots,nouserinterventionis
requiredhoweveratleasta270degreeturnis
required.Theprocesswilloccurduringyourrst
voyagewiththeautopilotsystem,andwilltypically
takenomorethan30minutes,butthisdoesvary
accordingtothecharacteristicsofthevessel,the
installationenvironmentoftheEVunit,andthelevels
ofmagneticinterferenceatthetimeofconducting
theprocess.Sourcesofsignicantmagnetic
interferencemayincreasethetimerequiredto
completethelinearizationprocess.Examplesof
suchsourcesinclude:
LightHouseMFDoperationinstructions

•Marinepontoons.
•Metal-hulledvessels.
•Underseacables.
Note:Youcanspeed-upthelinearizationprocess
bycompletinga360degreeturn(ataspeedof3
–15knots).Y oucanalsorestartthelinearization
processatanytimebyselectingtheRestart
Compassmenuitem.
Usethecompassdeviationindicator
Theuseofthecompassdeviationindicatoronthe
pilotcontrolheadmaybeusefulinthisprocess,
particularlyiftheEVunithasbeeninstalledin
alocationonthevesselwherethelevelsof
magneticinterferencearetoohighfortheEVunit
tocompensateappropriately .Ifthisisthecase,
thedeviationdisplaywillindicateavalueof25
degreesorhigher.Inthisscenario,Raymarine
highlyrecommendsthattheEVunitismovedand
re-installedinalocationwhichissubjecttoless
magneticinterference.If“--”isdisplayedasthe
Deviationvalue,itmeansthatlinearizationhasnot
beensuccessfullycompletedyet.
Compasslock
Onceyouaresatisedwiththecompassaccuracy,
youcanlockthesettingtopreventtheautopilot
systemfromcompletingafurtherautomatic
linearizationinthefuture.
Thisfeatureisparticularlyusefulforvesselsin
environmentsthatareexposedtostrongmagnetic
disturbancesonaregularbasis(suchasoffshore
windfarmsorverybusyrivers,forexample).Inthese
situationsitmaybedesirabletousetheCompass
lockfeaturetodisablethecontinuouslinearization
process,asthemagneticinterferencemaybuilda
headingerrorovertime.
Note:Thecompasslockmaybereleasedatany
time,toallowthecompasscontinuouslinearization
torestart.Thisisparticularlyusefulifplanninga
longvoyage.Theearth’smagneticeldwillchange
signicantlyfromonegeographicallocationto
another,andthecompasscancontinuously
compensateforthechanges,ensuringyou
maintainaccurateheadingdatathroughoutthe
voyage.
Checkthecompassheadingdata
Aspartoftheautopilotsystemcommissioning
process,Raymarinerecommendsthatyoucheckthe
compassheadingvaluedisplayedonyourautopilot
controlheadormultifunctiondisplay,againstagood
knownheadingsourceonvariousheadings.This
willhelpyoutodeterminewhentheEVunithas
completeditslinearizationprocess.
Note:Oncethelinearizationprocesshas
completed,itispossiblethattheheadingvalue
mayhaveaslightoffsetof2to3degrees.This
iscommonwhereinstallationspaceislimited,
andtheEVunitcannotbeproperlyalignedtothe
vessel'slongitudinalaxis.Inthiscase,itispossible
tomanuallyadjustthecompassoffsetvalueusing
thepilotcontrolheadormultifunctiondisplay,and
ne-tunetheheadingtoanaccuratevalue.
Note:DoNOTrelyontheheadingaccuracyuntil
youaresatisedthatcompasslinearizationand
alignmentiscomplete.
Systemmonitoringandadaptation
Toensureoptimumperformance,aftertheinitial
linearizationprocessiscompletetheEVcontinuesto
monitorandadaptthecompasslinearizationtosuit
currentconditions.
Iftheconditionsforlinearizationarelessthanideal,
theautomaticlinearizationprocesstemporarily
pausesuntilconditionsimproveagain.Thefollowing
conditionscancausethelinearizationprocessto
temporarilypause:
•Boatspeedislessthan3knots.
•Boatspeedisgreaterthan15knots.
•Rate-of-turnistooslow.
•Signicantexternalmagneticinterferenceis
present.
Autopilotcontrol
95

7.12Autopilotstatussymbols
7.13Autopilotalarms
Theautopilotstatusisindicatedinthedatabar.
SymbolDescription
AutopilotisinStandbymode.
AutopilotisinTrackmode.
AutopilotisinAutomode.
Noautopilotdetected.
Autopilotalarmactive.
Dodgemodeisactive.
Fishmodeisactive.
Autopilotcalibration.
Theautopilotfunctionprovidesalarmstoalertyouto
situationsthatrequireaction.
Yourmultifunctiondisplayshowsautopilotalarms,
regardlessofwhetherthereisactivenavigationon
thesystem.Ifautopilotcontrolisenabled,andan
alarmisraisedbytheautopilot,themultifunction
displayprovidesanaudiblealarmsound(providing
thatthealarmhasnotalreadybeensilenced).The
PilotControldialogisdisplayed,indicatinganew
alarm.Additionally,theautopilotstatusiconis
displayedinred,andremainsreduntilthealarmis
cleared.
Silencingautopilotalarms
1.SelectDismiss.
Thealarmissilencedandtheautopilotremains
engagedinautomode,continuingonthecurrent
lockedheading.
2.SelectAuto.
Thealarmissilencedandtheautopilotremains
engagedinautomode,continuingonthecurrent
lockedheading.
3.SelectTrack.
Thealarmissilencedandtheautopilot'tracks'to
thenextwaypoint.
Powersteeringactive.
WindVanemodeisactive.
Silencingautopilotalarmsanddisengaging
autopilot
1.SelectST ANDBY.
Thealarmissilenced,andtheautopilotis
disengagedandputinstandbymode.
96
LightHouseMFDoperationinstructions

Chapter8:Alarmmanagement
Chaptercontents
•8.1Alarmsoverviewonpage98
•8.2AlarmManageroverviewonpage98
•8.3Alarmoptionsonpage101
Alarmmanagement
97

8.1Alarmsoverview
8.2AlarmManageroverview
Alarmsalertyoutoasituationorhazardrequiring
yourattention,suchasshallowdepthorachangein
watertemperature.
Alarmsaretriggeredbysystemfunctions,and
externaldevicesconnectedtotheMultifunction
display(MFD).
Audibleandvisualwarningsaredisplayedonall
networkedMFDscreenswhenanalarmistriggered.
Thealarmmessageprovidesdetailsofthereason
forthealarm.
Alarmmessagesarecolorcodedtosignifytheir
severityasfollows:
•RedAlerts—immediateattentionrequireddue
topotentialorimmediatedangertolifeorvessel.
RedAlertscontinuetosounduntilacknowledged
ortheconditionsthattriggeredthealarmareno
longerpresent.RedAlertsareaccompaniedby
anurgentaudibletone.
•OrangeWarnings—usedtowarnauserabouta
changeinsituationthattheyneedtobeawareof.
OrangeWarningsareaccompaniedbyanormal
audibletone.
•BlueCautions—usedtoinformauserofany
otherinformation.BlueAlertsarealsousedfor
useracknowledgmentsanddisclaimers.Blue
Alertsarenotaccompaniedbyanaudibletone.
Acknowledginganactivealarm
Whenanalarmeventoccursitcanbeacknowledged
byselectingOk,thiswilldismissthealarmmessage
andstopthealarmtone.
Duringanactivealarmevent(i.e.analarmmessage
isdisplayed):
1.SelectOk.
Themessageisdismissedandthealarmtone
isstopped.
TipIfanalarmmessageincludesanEditbutton
thenthealarm’ssettingscanbeaccesseddirectly
fromthealarmmessage.
TheAlarmManagerisusedtocongurethebehavior
ofalarmsandtomanagealarmactivity .
TheAlarmManagercanbeusedto:
•Enableanddisablealarms
•Adjustalarmthresholds
•Viewalarmhistory
•Viewlistofcurrentlyactivealarms
IntheSettingstabalarmsaredisplayedinthe
followingcategories:
•SafetyAlarms
•GeneralAlarms
•*SwitchPanelAlarms
•**EngineAlarms
Note:
•*TheSwitchPanelAlarmscategoryisonly
displayedwhenyouhaveacorrectlycongured
RaymarineDigitalSwitchingsysteminstalledon
yourvessel.
•**Enginealarmswillonlybetriggeredwhenthe
relevantenginedataisavailableonthenetwork
andtransmittingappropriateNMEAmessages.
AlarmSettings
Mostalarmswillremainactiveuntiltheconditions
thattriggeredthealarmarenolongerpresente.g.a
ShallowDepthalarmwillautomaticallydismisswhen
thedepthbecomesdeeper.Whilstactivethealarm
willbetriggeredatasettimeinterval.
98
FromtheSettingstabyoucanenableanddisable
alarmsandchangealarmthresholds.
AlarmswithBlacktextarecurrentlyenabled,alarms
withGraytextarecurrentlydisabled.Thecurrently
highlightedalarm’stextwillalsobeBlack.
AlarmHistory
LightHouseMFDoperationinstructions

1.SelecttheSettingstab.
2.Selectthealarmcategoryforthealarmyouwant
toenable/disable.
AlarmsaredisplayedintheAlarmManagerin
thefollowingcategories:
•SafetyAlarms
•GeneralAlarms
•*SwitchPanelAlarms
•EngineAlarms
TheAlarmHistorytabprovidesdetailsofalarms
andthedateandtimethattheyweretriggeredand
cleared/acknowledged.TheAlarmhistorycan
displayupto1,000alarmeventsanddisplaysthem
sortedbytime.
WhentheAlarmhistoryhasreacheditscapacity
of1,000entries,theoldesteventsinthelistwillbe
automaticallydeletedwhensubsequentnewalarm
eventsoccur.
Alarmeventswillonlyberemovedfromthelistif:
•Clearalarmhistoryisselected.
•aSystemsandDataResetisperformed.
•itisautomaticallydeletedduetothelistreaching
itscapacityof1,000events.
ActiveAlarms
Note:*TheSwitchPanelAlarmscategoryisonly
displayedwhenyouhaveacorrectlycongured
RaymarineDigitalSwitchingsysteminstalledon
yourvessel.
3.Selectontherelevantalarm.
AlarmswithBlacktextarecurrentlyenabledand
alarmswithGraytextarecurrentlydisabled.
Thealarmwillbeexpandedtoshowthealarm
settings.
IftheEnableboxistickedthenthealarmis
currentlyenabled.
4.T odisablethealarm,selecttheEnabletickbox
sothatthetickisremoved.
5.T oenablethealarm,selecttheEnabletickbox
sothatatickisdisplayed.
TheActiveAlarmtablistsallcurrentlyactivealarms.
Alarmsareremovedfromthelistwhen:
•theconditionsthattriggeredthealarmareno
longerpresent.
•thealarmhasbeendisabled.
AccessingtheAlarmManager
FromtheHomescreen:
1.SelectSet-up.
2.SelectAlarms.
TheAlarmManagerisdisplayed.
Enablinganddisablinganalarm
YoucanenableanddisablealarmsusingtheAlarm
Manager.
FromtheAlarmManagerHomescreen>Set-up>
Alarms:
Alarmmanagement
Changingalarmthresholds
Alarmthresholdsaretheattributesassociatedwith
eachalarmwhichdictateswhenthealarmeventis
triggered.
WiththeAlarmManagerdisplayed:
1.SelecttheSettingstab.
2.Selectthealarmcategoryforthealarmyouwant
tochangethethresholdsof.
3.Selectontherelevantalarm.
Thealarmwillbeexpandedtoshowthealarm
settings.
4.Selecttherelevantthreshold.
Thenumericadjustmentcontrolisdisplayed.
99

5.Withthenumericadjustcontroldisplayed,select
theon-screenUpandDownarrowstoadjustthe
alarmthresholdvalue,or
6.T ousethenumerickeypad:
i.Selectontheactualvalueorthekeypadicon.
Thenumerickeypadisdisplayed.
5.SelectYes.
Thealarmhistoryisdeleted.
ThealarmhistoryisalsoclearedifaSystemsand
DataResetisperformed.
ii.Usetheon-screenkeypadtoenterthedesired
valueforthealarmthreshold.
iii.SelectOKtosavethenewvalueforthealarm
threshold.
iv.Y oucanalsochangetheunitofmeasure
forthealarmthresholdyouarecurrently
changingbyselectingontherelevantunitof
measurefromthenumerickeypad.
Clearingthealarmhistory
Youcanviewthehistoryofalarmeventsfromthe
AlarmManager.
FromtheHomescreen:
1.SelectSet-up.
2.SelectAlarms.
TheAlarmManagerisdisplayed.
3.SelectHistory.
Thealarmhistoryisdisplayed.
4.SelectClearalarmhistory.
Aconrmationmessageisdisplayed.
100
LightHouseMFDoperationinstructions
 Loading...