


Support
www.randmcnally.com/support 800-333-0136

DashCam 100, 200 & 300
Quick Start Guide

Important Information About Your Dash Cam
POWER BUTTON: Press and hold the power button to turn the device on or off. The power button can also be used to protect photos and videos saved to the microSD card. Once protected, the files cannot be overwritten or accidentally deleted.
RESET: Use the reset button on the left side of the device to restart. The hole for the button is located under the plastic cover. Insert a needle or paper clip into the hole to press the button, then power the unit on. Menu settings, photos, and videos will be saved.
BATTERY CHARGE: A red light around the Capture Photo/Delete button indicates the battery is charging; a green light indicates the battery is fully charged.
1

What’s Included in the Box
•Dash Cam
•microSD Card (optional)
•Suction Cup Mount
•Vehicle Charger
•USB Cable
2
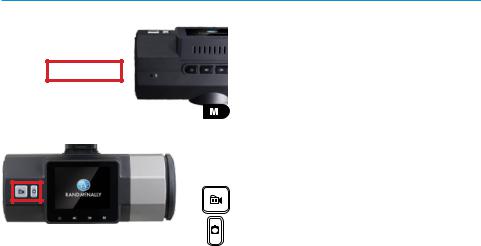
Your Device
 Power On/Off


 Navigate Up/Left in menu settings


 Navigate Down/Right in menu settings
Menu
• Tap once to access picture and video files
• Tap twice to access the menu
• Tap again to return to the camera
OK/Record Video
Capture Photo/Delete
3

Insert/Remove the microSD Card
Depending on the model, your dash cam may come with a microSD card. The microSD card must be inserted into the dash cam before you can record videos or take pictures.
NOTE: The device supports cards up to 64 GB.
To insert or remove the microSD card:
1.Pull back the cover that protects the card slot using a paper clip or other thin tool. The slot is on the left end of the dash cam.
2.If inserting, slide the card into the slot until it clicks into place, or
3.If removing, push down gently on the microSD card with the blunt tip of a pen. It will pop up and can then be removed.
NOTE: If your card needs to be formatted, refer to “Format the microSD Card” on page 10.
4

Install the Mount
NOTE: Follow all local regulations governing the placement of the mount. For GPS-enabled models, select an area with a line of sight to the sky and GPS satellites to ensure reliable GPS information.
To install the mount:
1.Slide the mount on to the front of the dash cam until it clicks.
2.Press the suction cup against the windshield.
5

Install the Mount - continued
3.Rotate the knob on the mount to lock it in place.
4.Adjust the angle of the camera to obtain the desired view.
6

Connect to the Vehicle/Charge the Battery
NOTE: The vehicle may need to be on for the device to charge.
To connect to the vehicle and charge the battery: |
Mini USB port |
1.Plug the charger into the mini USB port located on the suction lever as shown.
2. Plug the other end into the vehicle’s charging port.
3. Adjust the cord so that it doesn’t block the driver’s of sight.
The charger has an extra USB port that allows you to charge a phone, tablet or other device while your dash cam is connected to the vehicle.
7
 Loading...