


CAT.NO 15-2133
OWNER’S MANUAL
Please read before using this equipment.
6-IN-O
NE
T
OUCHSCREEN
R
EMOTE

TABLE OF CONTENTS
Introduction . . . . . . . . . . . . . . . . . . . . . . . . . . . . . .4
Quick Start Guide . . . . . . . . . . . . . . . . . . . . . . . . . .5
Installing Batteries . . . . . . . . . . . . . . . . . . . . . .5
Brightness Adjustment of the Kameleon
Display . . . . . . . . . . . . . . . . . . . . . . . . . . . . . . . .5
About the Keypad . . . . . . . . . . . . . . . . . . . . .6-9
Setting Up the Remote . . . . . . . . . . . . . . . . . .10
Programming TV/VCR Combo . . . . . . . . . . .11
Search Method . . . . . . . . . . . . . . . . . . . . . .12-13
Introducción . . . . . . . . . . . . . . . . . . . . . . . . . . . . .14
Guía de inicio rápido . . . . . . . . . . . . . . . . . . . . . .15
Instalación de baterías . . . . . . . . . . . . . . . . . .15
Ajuste del brillo de la pantalla Kameleon . . .16
Acerca del teclado . . . . . . . . . . . . . . . . . . .16-19
Configuración del 6-en-Uno . . . . . . . . . . . . . .20
Método de Búsqueda . . . . . . . . . . . . . . . . .21-23
Key Table . . . . . . . . . . . . . . . . . . . . . . . . . . . . .24-25
Code Verification . . . . . . . . . . . . . . . . . . . . . . . . .26
Quick code reference . . . . . . . . . . . . . . . . . . . .26
Vo lume Lock . . . . . . . . . . . . . . . . . . . . . . . . . .27-28
Favorite Channel Scan . . . . . . . . . . . . . . . . . . . . .29
Using Channel Scan . . . . . . . . . . . . . . . . . . . . . . .30
The Learning Feature . . . . . . . . . . . . . . . . . . . . . .31
To d el ete a l earned function . . . . . . . . . . . . . .32
To d el ete all le arned functions within a certain
mode . . . . . . . . . . . . . . . . . . . . . . . . . . . . . . . .32
Using Macros . . . . . . . . . . . . . . . . . . . . . . . . . . . .34
Macros . . . . . . . . . . . . . . . . . . . . . . . . . . . . . . .34
To e ra se a Macro . . . . . . . . . . . . . . . . . . . . . . .35
Reassigning Mode Keys . . . . . . . . . . . . . . . . . . . .36
Reset ting a device key . . . . . . . . . . . . . . . . . . .37
Upg radin g Your Remote . . . . . . . . . . . . . . . . . . . .38
Troubleshooting . . . . . . . . . . . . . . . . . . . . . . .40-41
Specifications . . . . . . . . . . . . . . . . . . . . . . . . . . . .42
FCC Statement . . . . . . . . . . . . . . . . . . . . . . . . . . .42
Care . . . . . . . . . . . . . . . . . . . . . . . . . . . . . . . . . . . .43
Limited 90-Day Warranty . . . . . . . . . . . . . . .44-45
Manufacturer’s Codes (CÓDIGOS DEL
FABRICANTE) . . . . . . . . . . . . . . . . . . . . . . . .46-61
6-IN
-ONE

SETUP CODES FOR AUDIO AMPLIFIERS
(CÓDIGOS DE CONFIGURACIÓN PARA
AMPLIFICADORES DE AUDIO) . . . . . . . . . . . . .46
SETUP CODES FOR AUDIO RECEIVERS
(CÓDIGOS DE CONFIGURACIÓN PARA
RECEPTORES DE AUDIO) . . . . . . . . . . . . . . .46-48
SETUP CODES FOR CABLE CONVERTERS
(CÓDIGOS DE CONFIGURACIÓN PARA
CONVERTIDORES DE CABLE) . . . . . . . . . . . . .48
SETUP CODES FOR CD PLAYERS
(CÓDIGOS DE CONFIGURACIÓN PARA
REPRODUCTORES DE CDS) . . . . . . . . . . . . . . . .49
SETUP CODES FOR DVD PLAYERS
(CÓDIGOS DE CONFIGURACIÓN PARA
REPRODUCTORES DVD) . . . . . . . . . . . . . . .49-50
SETUP CODES FOR HOME AUTOMATION
(CÓDIGOS DE CONFIGURACIÓN PARA LA
AUTO MATIZACIÓN DEL HOGAR) . . . . . . . . . .50
SETUP CODES FOR HOME-THEATER-IN-A-BOX
DEVICES (CÓDIGOS DE CONFIGURACIÓN
PA RA DISPOSITIVOS HOME-THEATER-
IN-A-BOX) . . . . . . . . . . . . . . . . . . . . . . . . . . . . . .51
SETUP CODES FOR SATELLITE RECEIVERS
(CÓDIGOS DE CONFIGURACIÓN PARA
RECEPTORES DE SATÉLITE) . . . . . . . . . . . . . . .51
SETUP CODES FOR TVS (CÓDIGOS DE
CONFIGURACIÓN PARA TELEVISORES) . .52-55
SETUP CODES FOR TV/VCR COMBOS
(CÓDIGOS DE CONFIGURACIÓN PARA
APARATOS COMBINADOS
TELEVISOR/VIDEOGRABADORA) . . . . . . .55-56
SETUP CODES FOR VCRS (CÓDIGOS
DE CONFIGURACIÓN PARA
VIDEOGRABADORAS) . . . . . . . . . . . . . . . . .56-59
SETUP CODES FOR TV/DVD COMBOS
(CÓDIGOS DE CONFIGURACIÓN PARA
APARATOS COMBINADOS TELEVISOR/
REPRODUCTORES DVD) . . . . . . . . . . . . . . . . . .60
SETUP CODES FOR PVRS
(CÓDIGOS DE CONFIGURACIÓN PARA VIDEO
GRABADORA PERSONAL) . . . . . . . . . . . . . . . . .60
SETUP CODES FOR XBOX (CÓDIGOS DE
CONFIGURACIÓN PARA XBOX) . . . . . . . . . . . .60
SETUP CODES FOR PLAYSTATION2
(CÓDIGOS DE CONFIGURACIÓN PARA
PLAYSTATION2) . . . . . . . . . . . . . . . . . . . . . . . . .60
USER
’S GUIDE

INTRODUCTION
Thank you for purchasing a RadioShack 6-in-One
Remote powered by Kameleon™. Your remote is
the next generation in remote control technology.
It only displays the active keys for each device, so
each screen is simple and unique.This easy to use
display interface also features animated icons to
identify the selected device.
Your remote is designed to operate up to six home
entertainment devices, including TV,VCR, cable
converter,satellite receiver, CD player,audio
receiver, amplifier, home-theater-in-a-box,DVD
player, and even some home automation devices
(e.g., remote controlled lights).Preprogrammed
with the most commonly used commands for
your home entertainment device,your 6-in-One is
also packed with advanced features such as:
• Macros – for instant activation of favorite key
sequences
• Learning – to capture and reproduce unique
functions from your devices’original remote
controls
• Code Search and Verification – helps you
quickly set up the remote control to operate
your devices
• Channel Scan and Favorite Channel Scan –
lets you “channel surf ” all available and favorite
channels
• Volume Lock – to assign volume controls to
individual devices or to one global device
• Dedicated Menu/Guide Keys – for instant
access to cable and satellite program guides and
menus
• Searchable Code Library – contains world’s
largest and most efficient group of infrared
remote control codes for virtually every current
brand and make
• Picture-in-Picture – supports TVs equipped
with Picture-in-Picture functionality
After installing four (4) new AAA alkaline batteries (not supplied,available at RadioShack),you
can immediately use the 6-in-One remote to control an RCA TV,VCR,DVD and satellite receiver,
and Pioneer CD and audio devices.
To c on tr ol other brands and devices, see “Setting
up the Remote”on page 10.
4 Introduction
6-IN
-ONE

QUICK STAR
T GUIDE
Para instrucciones en espanol, vea la pagina 14.
INSTALLING BATTERIES
Your remote requires four AAA batteries (not
supplied) for power. Batteries are available at
your local RadioShack store or online at
www.radioshack.com.
BATTERY NOTES
• D
ISPOSE OF OLD BATTERIES PROMPTLY AND PROPERLY.
• DONOT BURN OR BURY BATTERIES
.
• U
SE ONLY FRESH BATTERIES OF THE REQUIRED SIZE AND
RECOMMENDED TYPE
.
• D
ONOT MIX OLD AND NEW BATTERIES
, DIFFERENT
TYPESOFBATTERIES
(STANDARD,ALKALINE, OR
RECHARGEABLE), OR RECHARGEABLE BATTERIES OF
DIFFERENT CAPACITIES
.
• I
FYOUDONOT PLAN TO USE THE REMOTE FOR AN
EXTENDED PERIOD
, REMOVE THE BATTERIES.BAT TERIES
CAN LEAK CHEMICALS THAT CAN DESTROY ELECTRONIC
PAR T S
.
To I ns ta ll Batteries:
1. Loosen the screw on the battery compartment
cover on the back of the remote and remove the
cover.
2. Insert four AAA batteries according to the
polarity symbols (+ and –) marked inside.
3. Replace the battery cover and tighten the screw.
• YOU DO NOT HAVE TO REPROGRAM THE REMOTE AFTER REMOVING THE
BATTERIES
, BECAUSE YOUR REMOTE HAS PERMANENT MEMORY
RETENTION
.
• T
OEXTEND BATTERY LIFE, THE DISPLAY TURNS OFF AFTER 10 SEC ONDS
OF KEYPAD INACTIVITY AND TURNS ON AGAIN WHEN YOU MOVE THE
REMOTE CONTROL OR PRESS A KEY
.
BRIGHTNESS ADJUSTMENT OF THE KAMELEON DISPLAY
Follow the steps below to increase or decrease the
brightness on the remote’s screen.
1. Hold down P for at least 3 seconds. The bottom
of the Infared (IR) Indicator blinks twice,and a
circle appears around P.
2. Press 9 7 4.
3. To increase the brightness press CH+.
To d ec re ase the brightness press CH-.
4. Press P to store the brightness setting.
•
INCREASING THE BRIGHTNESS OF THE KAMELEON PANEL CAN SHORTEN
THE BATTERY LIFE
.BAT TERY LIFE VARIES FROM 3 - 12 MONTHS
(DEPENDING ON BRIGHTNESS SETTING).
Quick Start Guide 5
USER
’S GUIDE
QUICK START GUIDE (CONTINUED)
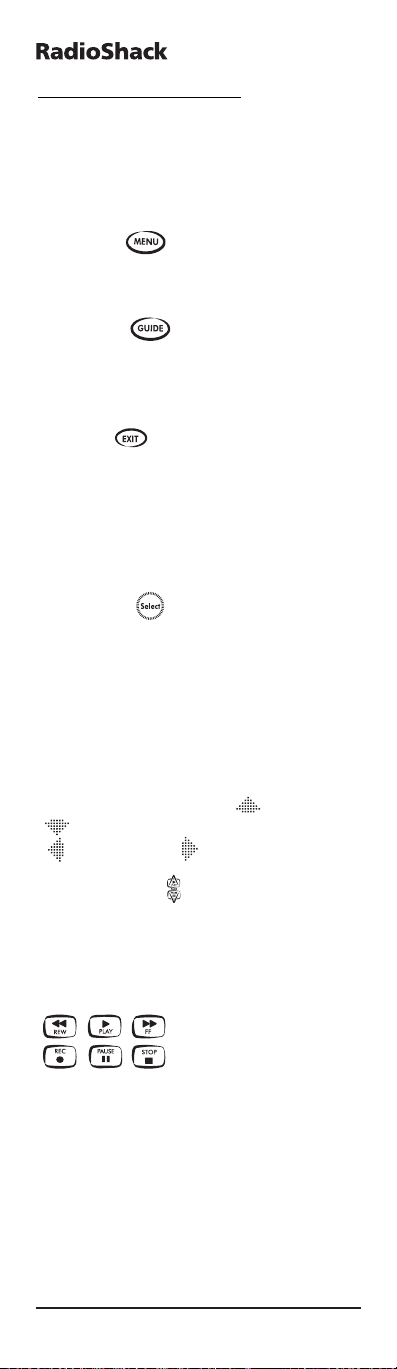
ABOUT THE KEYPAD
1. Kameleon panel
This remote is powered by Kameleon,a unique
backlit display that combines the functionality of
a traditional remote with the power of a touchscreen.It only displays the active keys for each
device mode.
Each mode has a main screen and menu screen.
Press MENU to access the menu screen for the
selected mode.
After 10 seconds of inactivity,the Kameleon
backlight turns off to conserve power.Pick up the
remote or press any key to turn the backlight back
on.
2. IR (infrared) Indicator
The IR Indicator animates when a signal is sent or
received. “Outgoing IR” appears on the screen
whenever a function key is pressed.When the
remote is learning, “incoming IR”appears.
3. Device keys
[]
The TV, VCR , SAT/CBL, CD, AUD and DVD keys
select the device to be controlled. For example,
pressing the TV key allows the remote to control
the functions of your television.As an added
value, your remote features animated device
(mode) keys.After pressing a mode key, an animation appears to show the currently
activated mode.
4. P [ ]
Use P for all programming sequences.When you
hold down P for at least 3 seconds, the bottom of
the IR Indicator blinks twice,and a circle appears
around P to show that you are in programming
mode.
5. SCREEN [ ]
The SCREEN key gives you the possibility to
move through the different screens (if applicable)
within a certain mode during normal use and set
up mode.
6. POWER [ ]
The POWER key controls the same function as on
your original remote.
6 Quick Start Guide
6-IN
-ONE

7. Digit keys
The digit (1 – 9, 0) keys control the same function
as on your original remote. In AUD mode,the
digit keys provide direct input selection.
8. +100
Use +100 on some devices to enter channels over
100 (e.g., for channel 131, press +100,then 3,and
then 1).
9. ENTER
Press ENTER once after entering the channel
numbers on some TVs,VCRs,Cable and Satellite
devices. The ENTER key controls the same function as on your original remote.
10.VOL (+/-)
The volume keys control the same function as on
your original remote.
11. LAST [ ]
Press LAST once to recall the last-viewed channel
or to page back one screen on the main menu.
12. MUTE [ ]
The MUTE key controls the same function as on
your original remote.
13. FAV SCAN [ ]
In the TV,VCR, DVD,SAT and CBL modes,press
FAV SCAN to scan through favorite channels
and/or all channels.
14. CH / SKIP (+/-)
These keys control the same functions as on your
original remote.In DVD and CD mode they function as SKIP +/- keys.
15. MENU [ ]
The MENU key controls the same function as on
your original remote.
16. GUIDE [ ]
Use GUIDE to display the program,guide, or
setup menu for the selected device.
17. EXIT [ ]
Press EXIT to exit the selected device’s program,
guide,or menu.
18. INFO [ ]
Use INFO to display the current channel and program information.
Quick Start Guide 7
USER
’S GUIDE
QUICK START GUIDE (CONTINUED)
19. SELECT [ ]
Press SELECT to choose options from your
selected device’s menu or guide.
20. Directional keys
Use the directional keys to move the cursor in the
program guide and menu screens.If your stereo
does not have a menu,these keys allow you to
adjust the volume of your rear speakers
+ ( ) or – ( ) and to adjust the balance
left ( ) and right( ).
21. PAGE KEYS / [ ]
Use the Page up and down keys to scroll the
pages of your program guide and menu screens in
SAT and CABLE modes.
22.VCR / DVD / SAT / CD / AUD
(transport) keys
When in VCR, DVD, SAT,CD, or AUD mode, these
keys operate the transport functions (PLAY, FF,
REW, etc.) of your device.To prevent accidental
recordi ng, RECORD must be pressed twice to
start recording.
23. PIP / [ ]
Use PIP to switch the Picture-in-Picture feature
on or off (if available on your TV). Instant
Replay [ ] operates the same function as on
your TiVo or Replay original remote control.
24. MOVE / [ ]
Use MOVE to move the window picture (if available) to different positions in the main picture.
Adva nce operates the same function as on your
TiVo or Replay original remote control.
25. FREEZE / LIVE TV [ ]
Press FREEZE once to capture a frame of video in
the main picture (if available).Press it again to
resume normal viewing. LIVE TV operates the
same function as on your TiVo or Replay original
remote control.
26. SWAP / [ ]
Use SWAP to switch images and sound (if avail-
able) between the main and window pictures.
Slow [ ] operates the same function as on
your TiVo or Replay original remote control.
8 Quick Start Guide
6-IN
-ONE

27. SUR SND / SLEEP [ ]
When in AUD mode,SUR SND is illuminated to
allow you to access Surround Sound functionality
on your audio device.When in TV, VCR, SAT,and
CBL modes, SLEEP is illuminated to allow you to
access Sleep functionality on devices that have a
built-in Sleep timer.These keys operate the same
function as they did on your original remote
control.
28. TV/VCR / A-B [ ]
Use TV/VCR (A-B) to switch the TV’s input to
view TV or VCR programs, or to act as your cable
box’s A/B switch.
29. M1, M2,M3, M4
These keys let you customize the remote by learning additional functions from your original
remote (see “The Learning Feature”on page 31).
Quick Start Guide 9
USER
’S GUIDE

QUICK START GUIDE (CONTINUED)
SETTING UP THE REMOTE
The remote is preprogrammed at the factory to
operate an RCA TV,VCR,DVD and satellite receiver,and Pioneer CD and audio devices.To control
devices other than the default brands,perform the
following steps and repeat them as needed for
each device to be programmed; otherwise skip
this section.
Direct code set up
T
OSET UP THE REMOTE FOR YOUR TELEVISION:
1. Find your device code in the Manufacturer’s
code section (page 46 – 60).
Codes are listed by device type and brand
name. The most popular code for each brand is
listed first.
2. Make sure your television is switched on.
3. Press and release TV.
4. Hold down P for at least 3 seconds. The bottom
of the IR Indicator blinks twice, and a circle
appears around P.
5. Enter your four-digit code using the number
keys. The bottom of the IR Indicator blinks
once after each of the first three digits are
entered.After the fourth digit, it blinks twice to
confirm that a valid four-digit code has
been entered.
6.Aim your remote at your television and press
POWER.Ifyour television switches off, your
remote is ready to control your television.
• IFYOURDEVICE DOES NOT RESPOND, FOLLOW STEPS 1 THROUGH 6 WITH
EACH CODE LISTED FOR YOUR BRAND
.IFNONEOFTHECODESLISTEDFOR
YOUR BRAND OPERATE YOUR DEVICE
, SEE “SEARCH METHOD” ON PAGE
12 FOR OTHER OPTIONS.
• S
OME C ODES ARE QUITE SIMILAR.IFYOURDEVIC E DOES NOT RESPOND
OR IS NOT FUNCTIONING PROPERLY WITH ONE OF THE CODES, TRY
ANOTHER CODE LISTED UNDER YOUR BRAND.
• I
F THE ORIGINAL REMOTE CONTROL FROM YOUR VCR DID NOT HAVE A
POWER KEY
, PRESS
PLAY INSTEAD OF POWER DURING STEP
6.
• T
OSETUPYOUR OTHER DEVICES, FOLLOW THE SAME INSTRUCTIONS
ABOVE
, BEING SURE TO PRESS THE APPROPRIATE DEVICE KEY DURING
STEP 3.
• R
EMEMBER TO PRESS THE CORRECT DEVICE KEY BEFORE OPERATING
YOUR DEVICE
.ONLY ONE DEVICE (CD, AMPLIFIER, CABLE,ETC.) CAN BE
10 Quick Start Guide
6-IN
-ONE

ASSIGNED TO A DEVICE KEY.IFYOURORIGINAL REMOTE OPERATES MORE
THAN ONE DEVICE
(FOR EXAMPLE, A RECEIVER, CD PLAYER, AND CAS-
SETTE PLAYER IN ONE REMOTE), YOU NEED TO SET UP EACH DEVICE
SEPARATELY.
• W
RITE YOUR CODE IN THE BOXES PROVIDED ON PAGE
26, FOR QUICK,
EASY REFERENCE.
Devices types that can be set up under the
following mode keys:
To s et up a second TV,VCR,SAT, CD,AUD or DVD,
see page 36.
Programming a TV/VCR Combo
1. Find the codes for the devices you want to program in Setup Codes for TV/VCR Combos on
page 55 and write them down or highlight
them.
2. Turn on the TV/VCR Combo and insert a videocassette.
3. Press and release VCR .
4. Hold down P for at least 3 seconds. The bottom
of the IR Indicator blinks twice, and a circle
appears around P.
5. Enter your four-digit code using the number
keys. The bottom of the IR Indicator blinks
once after each of the first three digits are
entered,and blinks twice after the fourth digit
to confirm that a valid four-digit code has been
entered.
6.Aim your remote at your TV/VCR and press
POWER.Ifyour television switches off, your
remote should be ready to control your
TV/VCR.
Quick Start Guide 11
USER
’S GUIDE
- TV
- S
ATELLITE
RECEIVER
- CABLE
BOX
- V
IDEO ACCESSORY
- AMP/TUNER
- AMPLIFIER
- HOME
THEATER
- CD PLAYER
- HOME ACCESSORY
- VCR
- C
ASSETTE
PLAYER
- DIGITAL
AUDIO TAPE
- PVR
- DVD
- L
ASER DISK
PLAYER
- XBOX
- PLAYSTATION
2

QUICK START GUIDE (CONTINUED)
• IFYOURDEVICE DOES NOT RESPOND, FOLLOW STEPS 1 THROUGH 6 WITH
EACH CODE LISTED FOR YOUR BRAND
.IFNONEOFTHECODESLISTEDFOR
YOUR BRAND OPERATE YOUR DEVICE
, THEN TRY “SEARCH METHOD” ON
PAG E 12.
• S
OME C ODES ARE QUITE SIMILAR
.I
FYOURDEVICE DOES NOT RESPOND
OR IS NOT FUNCTIONING PROPERLY WITH ONE OF THE CODES
, TRY
ANOTHER CODE LISTED UNDER YOUR BRAND
.
• I
F THE ORIGINAL REMOTE CONTROL DID NOT HAVEA
POWER KEY
,
PRESS PLAY INSTEAD OF POWER DURING STEP 5.
• WRITE YOUR CODE IN THE BOXES PROVIDED ON PAGE
26, FOR QUICK,
EASY REFERENCE
.
SEARCH METHOD
If your device does not respond to the remote
after trying all codes listed for your brand, try
manually searching for your code.The Search
Method allows you to find the code for your
device by scanning through all the codes contained in the memory of the remote. The Search
Method may also work if your brand is not listed
at all.
T
OSEARCH FOR YOUR TV CODE:
1. Switch your Television on (not on standby).
2. Press TV.
3.Aim the remote at your television. Hold down P
for at least 3 seconds.The bottom of the IR
Indicator blinks twice, and a circle appears
around P.
4. Press 9 9 1.The bottom part of the IR Indicator
blinks twice.
5. Press POWER.If the TV turns off,you have
found your code. If not, press the TV key to
cycle to the next code, and press POWER again.
Repeat this process until you find the code that
turns off your TV. You may have to repeat this
sequence many times so please be patient.
Remember to keep pointing the remote at your
television while pressing these keys.
6.When your television switches off, press P to
store the code.
Now your remote is ready to control your
television.
12 Quick Start Guide
6-IN
-ONE

Quick Start Guide 13
USER
’S GUIDE
• IFYOU CANNOT CONTROL YOUR TELEVISION PROPERLY, PLEASE CONTINUE
THE SEARCH METHOD AS YOU MAYBEUSINGTHEWRONGCODE.
• D
URING STEP 5, IT IS ALSO POSSIBLE TO SEND ANOTHER SIGNAL INSTEAD
OF THE POWER SIGNAL
.SIMPLY PRESS ANY OF THE FOLLOWING KEYS
DURING STEP
5 INSTEAD OF THE POWER KEY: 0,1, 2, 3, CH+,
VOL +, PLAY OR STOP.IF, FOR EXAMPLE, DURING STEP 5 YOUPRESS
“2” INSTEAD OF “POWER”, THE REMOTE WILL SEND THE “NUMBER 2”
SIGNAL
(MAKE SURE YOUR
TV IS SWITCHED TO A CHANNEL OTHER THAN
2).
• IFNOKEY IS PRESSED WITHIN
30 SECONDS DURING STEP 5, THE REMOTE
EXITS THE SET UP MODE AND RETURNS TO THE CODE PREVIOUSLY SET UP
BEFORE STARTING THIS PROCESS
.
• T
OSEARCH FOR YOUR OTHER DEVICES
, FOLLOW THE SAME INSTRUCTIONS
ABOVE
, ONLY PRESS THE APPROPRIATE DEVICE KEY DURING STEP 2 AND
5.
• IFYOUR
VCR’ SORIGINAL REMOTE CONTROL DOES NOT HAVE A
POWER
KEY
, PRESS
PLAY INSTEAD OF POWER DURING STEP
5.
Congratulations! You should now have your
remote set up to operate your home entertainment components. For instructions on how to
operate advanced features of your remote, like
Favorite Channel Scan, Volume Lock, and Macros,
see page 27.

14 GUÍA DE INICIO RÁPIDO
6-IN
-ONE
INTRODUCCIÓN
Gracias por comprar un control remoto
“Radioshack 6-in-one”potenciado por Kameleon.
Este dispositivo que acaba de adquirir representa
la última generación en tecnología de controles
remotos. Sólo muestra en pantalla las teclas activas para cada dispositivo,por lo que cada pantalla
resulta simple para el usuario y única para cada
dispositivo. Este control remoto de fácil manejo
también incluye iconos animados para identificar
el dispositivo seleccionado.
Está diseñado para operar hasta seis aparatos
domésticos de entretenimiento, incluyendo TV,
VCR, convertidor de cable, receptor de satélite,
reproductor de CD, receptor de audio, amplificador, home-theather-in-a-box (cinema en casa),
reproductor de DVD, y otros dispositivos
automáticos de la casa como el control automatizado de luces.Su 6-en-Uno viene ya
preprogramado con los comandos más usados en
sus aparatos domésticos de entretenimiento y con
características avanzadas como:
• Macros – para una instante activación de sus
preferidas secuencias de teclas.
• Aprendizaje – para capturar y reproducir fun-
ciones particulares propias de los controles
remotos originales de sus aparatos.
• Búsqueda de código y verificación – le ayuda
con la configuración de su control remoto para
que opere sus aparatos.
• Búsqueda de canales y de canal favorito – le
permite visualizar rápidamente todos los
canales disponibles y sus favoritos.
• Asignación fija de volumen – para asignar los
controles de volumen a cada aparato o a uno
mismo para todos.
• Menú dedicado/Teclas de guía – para acceder
de forma instantánea a guías y menús de programas de cable y satélite
• Biblioteca de códigos localizables – contiene
el grupo de códigos de controles remotos infrarrojos más grande y eficiente del mundo, práctica
mente para cada marca y fabricante existente.
• Picture-in-Picture – admite la funcionalidad
de una imagen dentro de otra imagen con la que
vienen algunas TVs.
Después de haber instalado cuatro (4) baterías
alcalinas AAA nuevas (sólo disponible en
RadioShack), podrá usar inmediatamente su control remoto 6-en-Uno para controlar sus aparatos
RCA como TV,VCR,DVD y receptor de satélite, al
igual que sus aparatos Pioneer de audio y CD.

GUÍA DE INICIO RÁPIDO 15
USER
’S GUIDE
Para controlar otras marcas y dispositivos, favor
de llevar a cabo las instrucciones de la página 14
en Configuración del 6-en-Uno.
GUÍA DE INICIO RÁPIDO
INSTALACIÓN DE BATERÍAS
Su control remoto necesita cuatro baterías AAA
(no incluidas) para el suministro de energía. Para
un mejor rendimiento y mayor duración,
recome ndamos las baterías alcalinas RadioShack.
NOTAS SOBRE LA BATERÍA:
• Deshágase de las baterías viejas de manera
apropiada.
• No las queme ni entierre.
• Utilice sólo baterías nuevas del tamaño y tipo
recome ndado.
• No mezcle baterías viejas y nuevas o de diferentes tipos (p.ej. estándar, alcalinas o
recar gables), o baterías recargables de diferentes
capacidades.
• Si no tiene pensado usar el control remoto por
un tiempo prolongado, es mejor quitar las
baterías.Las baterías pueden derramar químicos que pueden llegar a destruir las partes
electrónicas del equipo.
INSTALACIÓN DE BATERÍAS:
1. Desatornille y quite la tapa del compartimiento
de las baterías de su control 6-en-Uno.
2. Coloque los polos positivo (+) y negativo (-) de
las baterías con las marcas + y – indicadas en
el compartimiento.
3. Coloque de nuevo la tapa y los tornillos.
• REEMPLAZAR LAS BATERÍAS NO LE REQUERIRÁ REPROGRAMAR SU CON-
TROL REMOTO,YA QU E EL 6 EN-UNO CUENTA CON RETENCIÓN
PERMANENTE DE MEMORIA
.
• PARA ALARGAR LA VIDA DE LAS BATERÍAS, LA PANTALLA SE APAGA TRAS
10 SEGUNDOS DE INACTIVIDAD Y SE ENCIENDE DE NUEVO CUANDO SE
MUEVE EL CONTROL.
• T
AMBIÉN ES POSIBLE AUMENTAR O DISMINUIR EL BRILLO DEL PANEL
K
AMELEON DE SU 6-EN-UNO.PARA HACER ESTO, CONSULTE LA PÁGINA
16.
16 GUÍA DE INICIO RÁPIDO
6-IN
-ONE
GUÍA DE INICIO RÁPIDO
AJUSTE DEL BRILLO DE LA PANTALLA KAMELEON
Para aumentar o disminuir el brillo de la pantalla
Kameleon de su 6-en-Uno.
1. Presione y mantenga presionada la tecla P al
menos 3 segundos. La parte inferior del indicador IR parpadeará dos veces, y aparecerá un
círculo alrededor de la tecla P.
2. Presione 9 7 4.
3. Para aumentar el brillo,presione CH+.Para
disminuir el brillo,presione CH-.
4. Presione P para guardar la configuración del
brillo.
• AUMENTAR EL BRILLO DEL PANEL KAMELEON PUEDE ACORTAR LA
DURACIÓN DE LAS BATERÍAS.LA VIDA DE LAS BATERÍAS VARÍA ENTRE 3 Y
12
MESES,
DEPENDIENDO DE LA CONFIGURACIÓN DEL BRILLO.
ACERCA DEL TECLADO
1. Panel Kameleon
Este control remoto 6-en-Uno viene con
Kameleon, una panta lla iluminada que combina la
funcionalidad de un control remoto tradicional y
la comodidad de una pantalla sensible al tacto
(touchscreen).Sólo muestra las teclas activas para
el modo de cada aparato.
Cada modo tiene una pantalla principal y una
pantalla con el menú.Presione MENU para
acceder a la pantalla del menú correspondiente al
modo en el que está.
TRAS 10 SEGUNDOS DE INACTIVIDAD,LA ILUMINACIÓN DE FONDO DE LA
PANTALLA
KAMELEON SE APAGARÁ PARA CONSERVAR LAS BATERÍAS.AL
PRESIONAR CUALQUIER TECLA DEL CONTROL REMOTO
, VOLVERÁ LA LUMI-
NOSIDAD.
2. IR (infrared) Indicator
El IR Indicator (indicador de rayos infrarrojos) se
activa al estar enviando o recibiendo una señal de
rayos infrarrojos. El indicador mostrará “outgoing
IR”cuando se presiona una tecla de una función.
Cuando se esté usando la Característica de
Aprendizaje, el indicador mostrará “incoming IR”.
3. Teclas de aparatos
[]
Las teclas TV,VC R, SAT/CBL, CD,AU D y DV D
seleccionan el aparato que desea controlar. Así, si
presiona la tecla TV,su control remoto controlará
las funciones de su televisión. Como valor agregado,
su 6-en-Uno presenta teclas animadas para los
diferentes aparatos (modos). Después de presionar
una tecla de modo,empezará un movimiento animado,para mostrar la modalidad actualmente
activa.
GUÍA DE INICIO RÁPIDO 17
USER
’S GUIDE
4. P [ ]
Use P para todas las secuencias de programación.
Cuando presiona y mantiene presionada la tecla P
por al menos durante 3 segundos,la parte inferior
del IR Indicator parpadeará dos veces, y aparecerá un círculo alrededor de la tecla P para
indicarle que está en la modalidad de programación.
5. SCREEN [ ]
La tecla SCREEN le da la posibilidad de moverse
a través de las diferentes pantallas (si aplica) dentro de un modo determinado durante el uso
normal y el modo de configuración.
6. POWER [ ]
La tecla POWER controla la misma función que
en su control remoto original.
7. Teclas numéricas
Las teclas de números (1 – 9,0) controlan la
misma función que en su control remoto original.
En el modo AUD,estas teclas ofrecerán selección
de entrada directa.
8. +100
Use +100 para teclear canales superiores al 100
(p.ej.para el canal 131, presione +100,luego 3 y
luego 1).
9. ENTER
En algunos aparatos de TV,VCR,de cable y de
satélite,hay que presionar ENTER una vez
después de teclear el número del canal deseado.
La tecla ENTER controla la misma función que
en su control remoto original.
10.VOL (+/-)
Las teclas de volumen controlan la misma función
que en su control remoto original.
11. LAST [ ]
Presione LAST una vez para recuperar el último
canal visto o regresar a la pantalla anterior en el
menú principal.
12. MUTE [ ]
La tecla MUTE controla la misma función que su
control remoto original.
13. FAV SCAN [ ]
En los modos TV, VCR, DVD, SAT y CBL, presione
FAV SCAN para buscar a través de sus canales
favoritos y/o todos los canales.
18 GUÍA DE INICIO RÁPIDO
6-IN
-ONE
GUÍA DE INICIO RÁPIDO
14. CH / SKIP (+/-)
Estas teclas controlan las mismas funciones que
en su control remoto original. En los modos DVD
y CD,funcionan como las teclas SKIP +/-.
15. MENU [ ]
La tecla MENU controla la misma función que su
control remoto original.
16. GUIDE [ ]
Use GUIDE para mostrar el programa, la guía o el
menú de configuración para el aparato seleccionado.
17. EXIT [ ]
Presione EXIT para salir del programa,guía o
menú del aparato seleccionado.
18. INFO
Use INFO para mostrar la información sobre el
canal y el programa actual.
19. SELECT [ ]
Presione SELECT para seleccionar las opciones
desde el menú o guía de su aparato seleccionado.
20. Teclas direccionales
Use las teclas direccionales para mover el cursor a
través de las pantallas de la guía del programa y
del menú. Si su aparato estereofónico no tiene un
menú, estas teclas le permitirán ajustar el volumen de sus bocinas más alto ( ) o más bajo
( ) y para ajustar el balance a la izquierda
( ) o a la derecha ( ).
21. PAGE KEYS / [ ]
Use las teclas direccionales a voluta a través de
las pantallas de la guía del programa y del menú.
22. Teclas de movimiento de VCR / DVD / SAT /
CD / AUD
Estando en el modo VCR, DVD,SAT, CD o AUD,
estas teclas operan las funciones de movimiento
(PLAY, FF, REW etc.) de su aparato. En las pantallas del menú de los modos SAT y CBL, las teclas
Page Up/Down se iluminarán en su lugar. Para
prevenir la grabación accidental, la tecla
RECORD debe presionarse dos veces para que
empiece la grabación.

GUÍA DE INICIO RÁPIDO 19
USER
’S GUIDE
23. PIP / [ ]
Use PIP para activar y desactivar la característica
de Picture-in-Picture (sólo si su TV cuenta con
esta funcionalidad).La tecla [ ] Instant
Replay (reproducción instantánea) realiza la
misma función que en su control remoto original
TiVo o Replay.
24. MOVE / [ ]
Use MOVE para colocar la imagen de la ventana
(si está disponible) en diferentes posiciones dentro de la imagen principal. La tecla Ad vanc e
realiza la misma función que en su control remoto
original TiVo o Replay.
25. FREEZE / LIVE TV [ ]
Presione FREEZE una vez para capturar una
cuadro de video en la imagen principal (si está
disponible).Presione otra vez para volver a la
visualización normal. La tecla LIVE TV realiza la
misma función que en su control remoto original
TiVo o Replay.
26. SWAP / [ ]
Use SWAP para intercambiar la imagen y el
sonido (si está disponible) entre la imagen principal y la de la ventana.La tecla Slow key [ ]
realiza la misma función que en su control remoto
original TiVo o Replay.
27. SUR SND / SLEEP [ ]
Cuando se está en el modo AUD, la tecla SUR
SND se ilumina para permitirle el acceso a la fun-
ción Surround Sound de su aparato de audio.
Cuando se está en el modo TV,VCR,SAT o CBL,la
tecla SLEEP se ilumina para permitirle el acceso a
la función Sleep en los aparatos que incorporen
un temporizador. Estas teclas controlan las mismas funciones que en su control remoto original.
28. TV/VCR / A-B [ ]
Use TV/VCR (A-B) para cambiar la entrada de la
TV para ver programas de TV o VCR, o para
asumir las funciones del interruptor A/B de su
equipo de cable.
29. M1, M2,M3, M4
Estas teclas le dan la posibilidad de personalizar
el control 6-en-Uno usándolas como teclas Macro
o teclas adicionales para que asuman funciones
de su control remoto original a través de la
Característica de Aprendizaje (vea la página 31).

20 GUÍA DE INICIO RÁPIDO
6-IN
-ONE
GUÍA DE INICIO RÁPIDO
C
ONFIGURACIÓN DEL 6-EN-UNO
El control remoto viene preprogramado para
operar un aparato RCA TV,VCR, DVD,un receptor
de satélite y aparatos de audio y CD Pioneer. Para
controlar otros aparatos que no se ajustan a las
marcas por defecto, siga estos pasos y repítalos
tanto como sea necesario para cada aparato que
quiera programar. Si no es su caso,ignore esta
sección.
Configuración directa de código
E
JEMPLO
:PARA CONFIGURAR EL CONTROL 6-EN-UNO DE
SU TELEVISIÓN:
1. Busque el código de su aparato en la sección de
Códigos del fabricante (página 46 - 60).
Los códigos aparecen clasificados por tipo y
marca de aparato. Los códigos más populares
para cada marca aparecen en primer lugar.
2. Compruebe que su televisión está encendida.
3. Presione la tecla TV.
4. Presione y mantenga presionada la tecla P al
menos 3 segundos. La parte inferior del indicador IR parpadeará dos veces, y aparecerá un
círculo alrededor de la tecla P.
5. Escriba su código de cuatro dígitos usando las
teclas numéricas. La parte inferior del indicador IR parpadeará cada vez que se teclee un
dígito; tras el cuarto dígito,parpadeará dos
veces para confirmar que el código ingresado es
válido.
6.Ahora, apunte su control 6-en-Uno hacia su
televisión y presione POWER.Si su televisión
se apaga, su control 6-en-Uno está listo para
controlar su televisión.
• SIELAPARATONO RESPONDE, SIGA LOS PASOS DEL 1 AL 6 CON CADA
CÓDIGO LISTADO PARA SU MARCA.SININGUNO DE LOS CÓDIGOS FUN-
CIONA, INTENTE CON EL MÉTODO DE BÚSQUEDA DESCRITO EN LA
PÁGINA 21, AÚN CUANDO SU MARCA NO APAREZCA LISTADA.
• ALGUNOS CÓDIGOS SON MUY SIMILARES.SISUAPARATONO RESPONDE O
NO FUNCIONA CORRECTAMENTE CON ALGUNO DE LOS CÓDIGOS
, INTÉNTE-
LO CON OTRO CÓDIGO LISTADO PARA SU MARCA.
• SIELCONTROL REMOTO ORIGINAL DE SU VCR NO TIENE LA TECLA
POWER, PRESIONE PLAY EN SU LUGAR EN EL PASO 6.
• P
ARA CONFIGURAR LOS OTROS APARATOS,SIGA LAS MISMAS INSTRUC-
CIONES, ASEGURÁNDOSE DE QUE PRESIONA LA TECLA DEL APARATO
APROPIADO EN EL PASO
3.

GUÍA DE INICIO RÁPIDO 21
USER
’S GUIDE
• RECUERDE PRESIONAR LA TECLA DEL APARATO CORRECTO ANTES DE
OPERAR EL APARATO.SÓLO SE PUEDE ASIGNAR UN APARATO (CD,AMPLI-
FICADOR, CABLE, ETC.) A CADA TECLA DE APARATO.SISUCONTROL
REMOTO ORIGINAL OPERABA MÁS DE UN APARATO
(POR EJEMPLO, UN
RECEPTOR
, UN REPRODUCTOR DE CD YUNAREPRODUCTOR DE CASSETTE
EN UN MISMO CONTROL REMOTO), NECESITARÁ CONFIGURAR CADA
APARATO POR SEPARADO
.
• ESCRIBA SU CÓDIGO EN EL LUGAR OFRECIDO EN LA PÁGINA
26, PAR A S U
RÁPIDA LOCALIZACIÓN
.
Tipos de aparatos que pueden ser configurados bajo las siguientes teclas de modo:
Para configurar un segundo aparato de TV,VCR,
SAT,CD,AUD o DVD (vea la página 36)
Método de Búsqueda
Si su aparato no responde al control 6-en-Uno
después de haberlo intentado con todos los códigos enumerados para su marca, busque
manualmente su código. El Método de Búsqueda
le permite encontrar el código para su aparato
buscando entre todos los códigos contenidos en la
memoria del 6-en-Uno. El Método de Búsqueda
también funciona si la marca no aparece en el listado.
E
JEMPLO:PARA BUSCAR EL CÓDIGO DE SU TV:
1. Encienda su televisión (no en "standby").
2. Presione la tecla TV de su control 6-en-Uno.
3.Apunte el control hacia su televisión. Presione y
mantenga presionada la tecla P al menos 3
segundos. La parte inferior del indicador IR
parpadeará dos veces,y aparecerá un círculo
alrededor de la tecla P.
4. Presione 9 9 1.La parte inferior del IR Indicator
parpadeará dos veces.
- R
ECEPTOR DE
S
ATÉLITE
- CONVERTIDOR DE
CABLE
- R
ECEPTOR DE
A
UDIO
- AMPLIFICADOR
- HOME THEATER
- REPRODUCTOR DE
CD
- OTROS DISPOSTIVOS
AUTOMÁTICOS DE LA
CASA
- TELEVISOR
- VIDEO G
RABADORA
- REPRODUCTOR DEL
CASSETTE AUDIO
- REPRODUCTOR DE
CINTA AUDIO DIGITAL
- V
IDEO GRABADORA
PERSONAL
- DVD
- R
EPRODUCTOR DEL
DISCO L
ASER
- XBOX
- PLAYSTATION2

22 GUÍA DE INICIO RÁPIDO
6-IN
-ONE
GUÍA DE INICIO RÁPIDO
5. Enseguida, presione POWER.Si la TV se apaga,
significa que ha encontrado su código. Si no se
apaga, presione la tecla TV para pasar al siguiente código,entonces presione POWER de
nuevo. Repita este proceso hasta que encuentre
el código que apague su TV. Quizás tenga que
repetir esta secuencia varias veces,así que sea
paciente.Recuerde mantener su 6-en-Uno
apuntando a su televisión mientras presiona
estas teclas.
6. Cuando su televisión se apague, presione la
tecla P para que el control recuerde el código.
Ahora su 6-en-Uno está listo para controlar su
televisión.
• SINOPUEDE CONTROLAR SU TELEVISIÓN CORRECTAMENTE, POR FAVOR,
CONTINÚE CON EL
MÉTODO DE BÚSQUEDA HASTA QUE FUNCIONE COR-
RECTAMENTE.
• D
URANTE EL PASO 5, TAMBIÉN ES POSIBLE ENVIAR OTRA SEÑAL EN
LUGAR DE LA SEÑAL DE POWER.P
RESIONE CUALQUIERA DE LAS
TECLAS SIGUIENTES DURANTE EL PASO 5 EN LUGAR DE LA TECLA
POWER: 0, 1,2, 3, CH+, VOL+, PLAY O STOP.ASÍ, SI EN EL
PAS O
5 PRESIONA “2”EN LUGAR DE “POWER”, EL CONTROL 6-EN-UNO
ENVIARÁ LA SEÑAL
“NÚMERO
2” (ASEGÚRESE DE QUE SU TV NO ESTÁ
EN EL CANAL NÚMERO
2 PARA QUE PUEDA HACER EL CAMBIO).
• S
IDURANTE EL PASO 5 NO SE PRESIONA NINGUNA TECLA EN 30 SEGUN-
DOS
, EL CONTROL REMOTO ANULARÁ EL PROCESO DE CONFIGURACIÓN EN
EL QUE ESTÉ TRABAJANDO Y REGRESARÁ AL CÓDIGO CONFIGURADO
ANTES DE COMENZAR CON ESTE PROCESO
.
• PARA CONFIGURAR LOS OTROS APARATOS, SIGA LAS MISMAS INSTRUC-
CIONES
,
ASEGURÁNDOSE DE QUE PRESIONA LA TECLA DEL APARATO
APROPIADO EN LOS PASOS
2 Y 5..
• SIELCONTROL REMOTO ORIGINAL DE SU VCR NO TIENE LA TECLA
POWER,
PRESIONE
PLAY EN SU LUGAR EN EL PASO
5.
¡Felicidades! Ahora debe tener su control
remoto 6-en-Uno configurado para manejar
los aparatos de entretenimiento de su casa.

GUÍA DE INICIO RÁPIDO 23
USER
’S GUIDE

24 Key Table
6-IN
-ONE
KEY TABLE
KEY LABEL
1
2
3
4
5
6
7
8
9
0
C
HANNEL/
SKIP UP
CHANNEL
/SKIP D
N
TV
DIGIT 1
D
IGIT 2
D
IGIT
3
D
IGIT
4
DIGIT 5
DIGIT
6
DIGIT
7
D
IGIT 8
D
IGIT 9
DIGIT 0
CHANNEL UP
C
HANNEL DN
LAST
TV/V
IDEO
MENU
GUIDE
DISPLAY
EXIT
U
P
DOWN
LEFT
RIGHT
+100
PIP ON/PIP
PIP M
OVE
PIP OFF;
PIP F
REEZE
PIP SWA P
S
LEEP
VCR
DIGIT 1
D
IGIT 2
D
IGIT
3
D
IGIT
4
DIGIT 5
DIGIT
6
DIGIT
7
D
IGIT 8
D
IGIT 9
DIGIT 0
CHANNEL UP
C
HANNEL DN
LAST
TV/VCR
M
ENU
GUIDE;MENU
DISPLAY
;MENU
EXIT
U
P
DOWN
LEFT
RIGHT
-----
INSTANT REPLAY
ADVANCE;
QUICK SKIP
LIVE TV
S
LOW
S
LEEP
DVD
DIGIT 1
D
IGIT 2
D
IGIT
3
D
IGIT
4
DIGIT 5
DIGIT
6
DIGIT
7
D
IGIT 8
D
IGIT 9
DIGIT 0
CHANNEL UP;
S
KIP FORWARD
C
HANNEL DN;
SKIP REV
LAST;REPEAT
TV/DVD
M
ENU;
SETUP MENU
DISPLAY
EXIT
U
P
DOWN
LEFT
RIGHT
+100; +10
-----
D
ISC
-----
-----
-----

Key Table 25
USER
’S GUIDE
CABLE/SAT
VIDEO
ACC
.
D
IGIT 1
D
IGIT 2
D
IGIT
3
D
IGIT
4
DIGIT 5
DIGIT
6
DIGIT
7
D
IGIT 8
D
IGIT 9
DIGIT 0
CHANNEL UP
C
HANNEL DN
LAST
A/B; B
YPASS
MENU
GUIDE
INFO
EXIT
U
P
DOWN
LEFT
RIGHT
-----
INSTANT REPLAY
ADVANCE;
QUICK SKIP
LIVE TV
S
LOW
S
LEEP
CD
DIGIT 1; TRACK 01
D
IGIT 2; TRACK
02
D
IGIT
3; TRACK 03
D
IGIT
4; TRACK 04
DIGIT 5; T
RACK
05
D
IGIT
6; TRACK 06
DIGIT
7; TRACK
07
D
IGIT 8; T
RACK 08
DIGIT 9; TRACL 09
DIGIT 0; TRACK 10
CHANNEL UP
C
HANNEL DN
REPEAT
-----
M
ENU;PROG RAM
-----
D
ISPLAY
EXIT;CLEAR
U
P;DISC UP
DOWN;DISC D OWN
LEFT
RIGHT
+10
-----
D
ISC
-----
-----
-----
A
UDIO
SOURCE 1
S
OURCE 2
S
OURCE
3
S
OURCE
4
SOURCE 5
SOURCE
6
SOURCE
7
S
OURCE
8
SOURCE 9
SOURCE 10
PRESET UP;
S
TATI ON UP
P
RESET D
N;
S
TATI ON DN
REPEAT
I
NPUT
MENU
GUIDE;SETUP MENU;
PROGRA M;MENU
DISPLAY
EXIT;CLEAR
U
P;REAR +
D
OWN;REAR –
L
EFT
;BALANCE LEFT
RIGHT;BALANCE RIGHT
BAND; AM/FM
-----
-----
-----
-----
S
URROUND MODE;
S
URROUND ON/OFF

26 Code Verification
6-IN
-ONE
CODE VERIFICATION
If you have set up your remote via the Search
Method, you can “blink” back your code for future
reference. Please notice that the bottom part of
the IR Indicator will indicate the 4 digits by blinking the number of times to represent each digit.
T
O BLINK BACK YOUR TELEVISION CODE
:
1. Press TV on your remote.
2. Hold down P for at least 3 seconds. The bottom
of the IR Indicator blinks twice, and a circle
appears around P.
3. Press 9 9 0.The bottom part of the IR Indicator
blinks twice.
4. For the first digit of your four-digit code, press
1 and count the number of times the animated
IR Indicator blinks.If it does not blink, the digit
is “0”.
5. For the second digit, press 2and count the animat-
ed blinks. If it does not blink, the digit is “0”.
6. For the third digit, press 3and count the animated
blinks. If it does not blink,the digit is “0”.
7. For the fourth digit, press 4 and count the animat-
ed blinks. If it does not blink, the digit is “0”.
• TO BLINK BACK THE CODE FOR YOUR OTHER DEVICES FOLLOW THE
INSTRUCTIONS ABOVE
, BEING SURE TO PRESS THE APPROPRIATE DEVICE
KEY DURING STEP 1.
• IFYOU PRESS ANY DIGIT BESIDES 1 AFTER PRESSING 9 9 0, THE REMOTE
EXITS SET UP MODE
.IFYOU DO NOT PRESS A KEY FOR 30 SEC ONDS, THE
REMOTE WILL EXIT THE SET UP MODE
.
QUICK CODE REFERENCE
Write dow n the codes for your devices in the
boxes below for quick and easy reference.
Device type Code
VCR
CBL/SAT
TV
CD
DVD
AUD I O

Volume Lock 27
USER
’S GUIDE
VOLUME LOCK
In its default (unlocked) state, the remote allows
each device to control its own volume only in its
own mode (e.g., TV volume in the TV mode, VCR
volume in VCR mode,etc.). However, using your
remote’s Volume Lock feature,you can adjust the
volume for a certain device (e.g., TV) while in a
different mode (e.g.,VCR). For example, if you’re
watching a movie on your VCR,you can adjust the
volume on your TV without first pressing TV.
You ca n further customize the setting by unlocking the volume controls (see “To Cancel the
Vo lume Lock Across All Modes”on page 28), so
your device’s volume controls are unlocked in one
mode, but locked in all other modes.
To l oc k th e v ol ume control to the TV while in
another mode (VCR,DVD,SAT,AUD or CD
mode):
1. Hold down P for at least 3 seconds. The bottom
of the IR Indicator blinks twice, and a circle
appears around P.
2. Press 9 9 3.The bottom ofthe IR Indicator
blinks twice.
3. Press TV and the bottom part of the IR
Indicator blinks twice. Now you can control
VOL+/- or MUTE functions of your TV while in
other modes.
To u nl ock th e vo lu me control for a specific
mode:
T
O CANCEL THE VOLUME LOCK TO YOUR CD
1. Press CD once.
2. Hold down P for at least 3 seconds. The bottom
of the IR Indicator blinks twice, and a circle
appears around P.
3. Press 9 9 3.The bottom ofthe IR Indicator
blinks twice.
4. Press VO L (-) and the bottom part of the IR
Indicator blinks four times. Now when in CD
mode, you will be able to control VOL+/- functions of your CD (provided it has volume
control).

28 Volume Lock
6-IN
-ONE
VOLUME LOCK (CONTINUED)
To c an ce l th e v ol um e lock across all modes
1. Hold down P for at least 3 seconds. The bottom
of the IR Indicator blinks twice, and a circle
appears around P.
2. Press 9 9 3.The bottom ofthe IR Indicator
blinks twice.
3. Then press the VOL (+) key and the bottom
part of the IR Indicator blinks four times.Now
in all modes, the VOL+ , VOL - and MUTE keys
operate the original function again.
• V
OLUME LOCKDOE SNOT APPLY FOR MODES THAT HAVE BEEN CHANGED
(
SEE PAGE
36).

Favorite Channel Scan 29
USER
’S GUIDE
FAVORITE CHANNEL SCAN
In the TV,VCR, DVD,SAT, or CBL mode,the
remote can store up to 10 favorite channels,in any
order, that immediately scan when you press FAV
SCAN once (see Using Channel Scan on the next
page).
NOTE: O
NLY CHANNELS OF ONE MODE CAN BE STORED AND ANY PREVI
-
OUSLY STORED CHANNELS WILL BE CLEARED
.
TOSET UP FAVORITE CHANNEL SCAN FOR YOUR
TV
1. Press TV on your remote.
2. Hold down P for at least 3 seconds. The bottom
of the IR Indicator blinks twice, and a circle
appears around P.
3. Press 9 9 6.The bottom ofthe IR Indicator
blinks twice.
4. Use the number keys to enter a favorite channel
number (e.g., 0 3 1).
NOTE: IF THE ORIGINAL REMOTE CONTROL REQUIRED PRESSING
ENTER TO CHANGE THE CHANNEL, ALSO PRESS ENTER AFTER THE
CHANNEL NUMBER
(
E.G
., 0 - 3 - 1 - ENTER).
5. If desired, press P and then use the number
keys to enter your next favorite channel.Up to
10 favorite channels can be stored.
6.When finished, hold down P for at least 3 sec-
onds. The bottom of the IR Indicator blinks
twice.
NOTE: ONCE THE TENTH CHANNEL HAS BEEN ENTERED, THE REMOTE
EXITS THE PROGRAMMING MODE AUTOMATICALLY
.
• T
OSETUPFAVO RITE CHANNEL SCAN FOR A DIFFERENT MODE, PRESS
THE APPROPRIATE MODE IN STEP 1 AND FOLLOW THE SAME INSTRUC-
TIONS ABOVE
.
• E
ACHFAVO RITE CHANNEL CAN BE UP TO FIVE DIGITS IN LENGTH.AFTER
A FIFTH DIGIT IS ENTERED, THE REMOTE STORES THAT CHANNEL NUM-
BER AND IS READY TO STORE THE NEXT CHANNEL NUMBER.ITISNOT
NECESSARY TO PRESS
P TO ENTER THE NEXT CHANNEL NUMBER.

30 Using Channel Scan
6-IN
-ONE
USING CHANNEL SCAN
In the VCR, CBL, SAT, TV, and DVD modes, use
the FAV SCAN key to start a 3-second scan of all
channels for the selected mode, or your favorite
channels (if programmed – see Favorite Channel
Scan on the previous page).Once Favorite
Channel Scan has been set up under a mode,
pressing the FAV SCAN key will only cycle
through your favorite channel list in that mode.
1. If Favorite Channel Scan has been set up,skip
to step 2. Otherwise, press VCR, CBL, SAT, TV,
or DVD once.
2. Press FAV SCAN once.
• If Favorite Channel Scan has been set up, the
remote starts scanning the favorite channels
and cycles through the list.
• If Favorite Channel Scan has not been set up,
scanning starts with the current channel,then
proceeds to the next channel up,and continues
until all channels of the selected device are
scanned.
3. To stop scanning channels at any time, press
any key once.

The Learning Feature 31
USER
’S GUIDE
THE LEARNING FEATURE
The remote comes with a complete library of preprogrammed codes. After you have set up the
remote for your device, you may find that there
are one or more keys that you had on the original
remote control, which do not have a place on your
remote’s keypad.
The remote includes a Learning Feature so you
can add functions that are unique to your home
entertainment devices (e.g.,VCR Tracking Up or
Down). The custom keys (M1 – M4) have been
provided for this feature. If you need to learn
more than four functions per mode (max.approximately 25 functions),place the function on
another key.
Howeve r, there are some considerations:
• Your original remote controls must be in work-
ing order for the Learning Feature to work
properly.
• Learned keys are mode specific, so each one can
store a unique function for each mode.
• Learned keys can be used in Macros (see Using
Macros on page 34).
• You can use any key for learning, except device
keys, P, SCREEN and FAV SCAN.
• Once you program a key,the original function
will be overwritten.
• For optimum learning,avoid high levels of
ambient light such as natural sunlight or energyefficient fluorescent lights.
NOTE: P
LEASE HAVE YOUR ORIGINAL REMOTES AVAILABLE WHILE USING
THE
LEARNING FEATURE.BESURE TO PRESS EACH KEY WITHIN 5 SEC-
ONDS OF THE PREVIOUS ENTRY, OR THE REMOTE TIMES OUT, ANDYOU
MUST PRESS THE DESIRED KEY AGAIN.
EXAMPLE:TOCOPYTHE “MONO/STEREO” FUNCTION
FROM YOUR ORIGINAL TV REMOTE CONTROL ONTO THE
M4 KEY OF YOUR REMOTE.
1. Place the remote and your original remote con-
trol on a flat surface. Make sure the ends that
you normally point at your device are facing
each other. Point the original remote to the
front left side of the remote (see picture below).
Keep the remotes at a distance of no more than
1 to 2 inches apart.
1 TO 2
INCHES

32 The Learning Feature
6-IN
-ONE
THE LEARNING FEATURE
(CONTINUED)
2. Hold down P on your remote for at least 3 seconds. The bottom of the IR Indicator blinks
twice, and a circle appears around P.
3. Press 9 7 5 on your remote. The bottom part of
the IR Indicator blinks twice.
4. Press the device key on the remote to select the
mode to which you want to copy the learned
function (Example: TVkey).
5. Press the key (Example: M4 key) on the remote
where you want to place the learned function.
Incoming IR blinks on and off three times on
the IR indicator. Then the screen switches off.
6. Hold down the original remote’s key (Example:
mono/stereo key on your original remote control) until your remote’s display switches back
on. The IR Indicator blinks twice if it is learning
successfully.A long blink indicates failure.
7. If you want to copy other functions within the
same mode, simply repeat steps 5 and 6,pressing the next key you want to copy.
8. To exit the learning mode, hold down P. The
bottom part of IR Indicator blinks four times.
• ASSOONAS THE DISPLAY SWITCHES OFF IN STEP 5, YOU NEED TO PRESS
THE KEY ON YOUR ORIGINAL REMOTE WITHIN 5 SEC ONDS.OTHERWISE,
THE REMOTE WILL EXIT THE LEARNING MODE
.
• A
FTER 30 SECONDS OF INACTIVITY WHILE IN LEARNING MODE, THE
REMOTE WILL RETURN TO USER MODE.
• DURING LEARNING, KEYS SUCH AS (TV) MENU WILL NOT CHANGE
SCREEN WHEN PRESSED.
• I
FYOU LEARN A FUNCTION ON ANOTHER KEY BESIDES M1, M2, M3, OR
M4, THE ORIGINAL FUNCTION IS OVERWRITTEN.
• IFYOU WANT TO LEARN A FUNCTION ON A KEY THAT IS NOT IN THE MAIN
SCREEN, USE THE SCREEN KEY TO CHANGE THE SCREEN.
• T
HE LEARNING FEATURE IS MODE SPECIFIC.THEREFORE YOU CAN PLACE
ONE LEARNED FUNCTION PER MODE ON THE SAME KEY
.
• T
HE REMOTE CAN LEARN APPROXIMATELY 25 FUNCTIONS.
• Y
OU CAN REPLACE A LEARNED FUNCTION BY PLACING ANOTHER
LEARNED FUNCTION ON TOP
.
• L
EARNING SHOULD NOT BE DONE IN DIRECT SUNLIGHT OR UNDER
INCANDESCENT LIGHTS.
• MAKE SURE YOU ARE USING NEW BATTERIES BEFORE FOLLOWING THE
INSTRUCTIONS ABOVE
.
• U
PON CHANGING THE BATTERIES, YOUR LEARNED FUNCTIONS WILL BE
RETAINED
.

The Learning Feature 33
USER
’S GUIDE
TO DELETE A LEARNED FUNCTION
To d el ete a single learned function key, follow the
steps below.
1. Hold down P for at least 3 seconds. The bottom
of the IR Indicator blinks twice, and a circle
appears around P.
2. Press 9 7 6.The bottom part of the IR Indicator
blinks twice.
3. Press the mode key (TV, VCR , etc.) that con-
tains the key you wish to delete.
4. Press the key that holds the function you wish
to delete (M1, M2, etc.).
5. Press the key again to confirm.The IR Indicator
blinks twice.
• THE ORIGINAL FUNCTIONS OF THE REMOTE ARE RESTORED.
• I
F THERE IS ANOTHER LEARNED FUNCTION YOU WANT TO DELETE
,
REPEAT STEPS
1 – 5.
To d el et e a ll le arn ed fu nctions within a certain
mode
TO DELETE ALL LEARNED FUNCTIONS WITHIN THE TV
MODE
1. Hold down P for at least 3 seconds. The bottom
of the IR Indicator blinks twice, and a circle
appears around P.
2. Press 9 7 6.The bottom part of the IR Indicator
blinks twice.
3. Press the mode key for the device in which you
want to delete all functions.Press it again to
confirm. In our example, you would press TV
twice. The IR Indicator blinks twice to confirm.

34 Using Macros
6-IN
-ONE
USING MACROS
MACROS
You ca n p ro g ram your remote to issue a sequence
of commands at the press of one button. For
example, you may want to turn off your TV,VCR,
and Satellite at the same time.Any sequence of
commands you regularly use can be reduced to
one key press for your convenience.A key that is
programmed with a Macro works through all
modes (provided its available in that mode).
Therefore a Macro should only be set on the
Custom keys (M1 – M4).You can install a Macro
on any key,except for the device keys (TV, VCR,
SAT/CBL, CD,AUD, and DVD),P, SCREEN, and
FAV SCAN.
T
OSETUP THE MAC RO ME NTIONED ABOVE ON THE KEY
LABELED
“M4” ON YOUR REMOTE:
1. Hold down P for at least 3 seconds. The bottom
of the IR Indicator blinks twice, and a circle
appears around P.
2. Press 9 9 5.The bottom ofthe IR Indicator
blinks twice.
3. Press M4.This is where your macro is assigned.
4. Press TV, POWER,VCR,POWER,SAT,
POWER.
5. To store the Macro, hold down P for at least 3
seconds.The bottom of the IR Indicator blinks
twice.Whenever you press the M4 key, the
remote will turn off your TV, VCR, and Satellite.
• EACH MACRO CAN CONSIST OF A MAXIMUM OF 15 KEYSTROKES.
• TOINCLUDE AFUNCTION FROM A PARTICULAR SCREEN IN A MODE, USE
SCREEN.
• M
AKE SURE THAT YOU PROGRAM A
MACRO ON A SPARE KEY THAT YOU
DON
’TUSEINANY MODE.
• M
ACROSPRO GRAMMED ON SPECIFIC KEYS WORK REGARDLESS OF THE
MODE (TV,VCR, SAT, C D, AU D , OR DVD). THE FUNCTION ORIGINAL-
LY PROGRAMMED ON THAT SPECIFIC KEY IS OVERWRITTEN WHEN YOU
PROGRAM A MACRO
.
• T
OAVO ID ACCIDENTAL RECORDINGS WITH THE REMOTE
, YOU MUST PRESS
RECORD TWICETOBEGIN RECORDING.IFYOUASSIGNA MACRO ON
RECORD, THE DOUBLE KEY PRESS IS DEACTIVATED.THEREFORE WE
RECOMMEND NOT ASSIGNING A MACRO ON THIS KEY.
• IFYOUHAD TO HOLD DOWN A KEY FOR A FEW SECONDS ON THE ORIGI-
NAL REMOTE CONTROL TO GET A FUNCTION
, THIS FUNCTION MAY NOT
WORK IN A
MACRO ON YOUR REMOTE.

Using Macros 35
USER
’S GUIDE
TO ERASE A MACRO
• To erase the Macro from M4,press:
* 9 9 5 *
(*) HOLD D OWN P FOR AT LEAST
3 SECONDS
.T
HE BOTTOM OF THE
IR
I
NDICATOR BLINKS TWICE
, AND A CIRCLE APPEARS AROUND
P.

36 Reassigning Mode Keys
6-IN
-ONE
REASSIGNING MODE KEYS
Although you have six mode keys (TV, VCR, etc.),
the remote can be set up to control a second TV,
VCR , DVD player, or other device not listed on the
device keys. The code for this device can be set up
using Direct Code Set Up (p. 10) or Search
Method (p. 12).To reassign a mode key, please follow the two examples below.
THE DEVICE KEY ANIMATION LOOKS THE SAME WHEN THE MODE
CHANGES
.
E
XAMPLE 1: IF YOU WISH TO PROGRAM A SECOND
TV ON
THE
DVD KEY.
EXAMPLE 2: IF YOU WISH TO PROGRAM A SECOND VC R
ON THE CD KEY.
(*) HOLD D OWN P FOR AT LEAST 3 SECONDS.THE BOTTOM OF THE IR
I
NDICATOR BLINKS TWICE, AND A CIRCLE APPEARS AROUND
P.
(**) THE BOTTOM PART OF THE IR INDICATOR BLINKS TWICE.
I
FYOU PROGRAM A DIFFERENT DEVICE T YPE ON ANOTHER KEY (E.G., SEC-
OND TV ON DV D) THE ORIGINAL DEVICE KEY ICON REMAINS, BUT THE
FUNCTION CHANGES TO SUIT THE NEW DEVICE MODE.FOR EXAMPLE, IF A
SECOND
TV IS PROGRAMMED ON DV D, THE PIP KEYS ARE NOW AVAIL-
ABLE.
E
XAMPLE 1:
1. TOPRO GRAM A SECOND TELEVISION ON
DVD, PRESS
:
DVD IS NOW A SECOND TV KEY
.
2. E
NTER THE DEVICE CODE FOR YOUR SECOND TV:
E
XAMPLE 2:
TOPROGRAMASECONDVCR ON CD, PRESS:
THECD KEY ISNOWASECONDVC R KEY
.
2. ENTER THE DEVIC E CODE FOR YOUR SECOND VCR:
*
9 9 2
**
*
_ _ _ _
(TV CODE)
**
*
9 9 2
**
*
_ _ _ _
(VCR CODE)
**

Reassigning Mode Keys 37
USER
’S GUIDE
RESETTING A DEVICE KEY
(*) H
OLD D OWN
P FOR AT LEAST
3 SECONDS
.THE BOTTOM OF THE IR
I
NDICATOR BLINKS TWICE, AND A CIRCLE APPEARS AROUND P.
(**) T
HE BOTTOM PART OF THE IR INDICATOR BLINKS TWICE.
*
9 9 2
**
EXAMPLE:TO RESET DVD TO ITS OR IGINAL MODE, PRESS:

38 Upgradeability
6-IN
-ONE
UPGRADING YOUR REMOTE
Your remote contains a unique feature that allows
new codes to be added to its memory over the
phone. In a matter of seconds,your remote quickly and reliably records the new information
without complex plugs, adapters, or attachments.
This means that as you buy new products the
remote will never become obsolete. Simply call
our consumer help-line at
1-800-950-7044, and one of our customer service
representatives will assist you through the entire
process of upgrading your remote. To ensure the
process goes smoothly,here are a few steps to follow:
1.Write down the brand name(s) and model
number(s) of your device(s) before you call.
2. Next, call our consumer help-line and explain
which device(s) you would like added to your
remote .
3.After our customer service agent records the
brand name(s) and model number(s) of your
device(s),he/she will lead you through the set
up procedure and then will ask you to put the
speaker portion of your telephone next to
SCREEN on the remote (see diagram below). In
doing this, the information needed for your
device is transferred through the telephone into
your remote in a matter of seconds.
NOTE: CORDLESS TELEPHONES, SPEAKER TELEPHONES, AND MOBILE
TELEPHONES ARE NOT RECOMMENDED
.
4.After your remote has been upgraded by telephone, stay on the line.Our customer service
agent will ensure that your remote is working
properly with your device(s) and answer any
other questions you may have.

Upgradeability 39
USER
’S GUIDE

40 Troubleshooting
6-IN
-ONE
TROUBLESHOOTING
Problem
My brand is not listed on the Manufacturer’s Code
list.
The remote does not operate my device(s).
I cannot find a working code using the
instructions in “Search Method”.
The remote is not performing commands properly.
The remote does not change channels correctly.
CH+, CH-,and LAST do not work on my RCA TV.
VCR does not record.
The remote does not respond after pressing a key.
The IR Indicator does not show incoming or outgoing IR.
The remote turns on audio devices and controls
volume, but does not change preset channels.
My satellite receiver does not respond to the codes
listed on page 51.
I
FYOU HAVEANY OTHER PROBLEMS, SEEOUR WEBSITE AT
WWW.RADIOSHACK.COM, VISITYOUR LOCAL RADIOSHACK STORE, OR
CALL CUSTOMER SERVICE AT 1-800-950-7044

Troubleshooting 41
USER
’S GUIDE
Solution
Try th e “S earch Method”on page 12.
1. Try all the codes listed for your brand.
2. Try the “Search Method” on page 12.
See our website (www.radioshack.com) for help or
take your remote to your local RadioShack store.
You may be using the wrong code. Try repeating
the “Direct Code Set Up” procedure (page 10)
using another code listed for your brand,or start
the “Search Method”(page 12) over again to
locate the proper code.
Enter the channel number exactly as you would
on your original remote. If the original remote
control required Enter to be pressed to change
channels, press ENTER on the remote after
entering the channel number.
Due to RCA design from 1983 to 1987, only the
original remote control will operate these
functions.
As a safety feature on your remote, you must press
RECORD twice.
Make sure you are using new batteries and are
aiming the remote at your device.
Replace batteries with 4 new alkaline batteries.
Some products may need both a Tuner (or
Receive r) code and an Audio Amplifier code for
remote control of all features on your audio
device.
Make sure the satellite receiver can be operated
with an infrared (IR) remote control and is not set
up to receive only radio frequency (RF) signals.

42 Specifications/FCC Statement
6-IN
-ONE
SPECIFICATIONS
Remote Control Power 4 AAA Batteries
Remote Control Dimensions
(H x W x D) 9.38 x 2.79 x 0.69 in.
(H x W x D) 238.3 x 70.8 x 6.9 mm
Remote Control Weight
(without Batteries) 0.36 lb (160 g)
NOTE: S
PECIFICATIONS ARE TYPICAL
.I
NDIVIDUAL UNITS MIGHT VARY
.
S
PECIFICATIONS ARE SUBJECT TO CHANGE AND IMPROVEMENT WITHOUT
NOTICE
.
FCC ST
ATEMENT
This equipment has been tested and found to
comply with the limits for a class B digital device,
pursuant to part 15 of the FCC Rules.These limits
are designed to provide reasonable protection
against harmful interference in a residential
installation.This equipment generates,uses and
can radiate radio frequency energy and if not
installed and used in accordance with the instructions,may cause harmful interference to radio
communications.However, there is no guarantee
that interfence will not occur in a particular
installation.If this equipment does cuase harmful
interfence to radio or television reception, which
can be deteremined by turning the equipment off
and on, the user is encouraged to try to correct
the interfecnce by one or more of the following
measures:
• Reorient or relocate the receiving antenna.
• Increase the separation between the equipment
and receiver.
• Connect the equipment into an outlet on a cir-
cuit different from that to which the receiver is
connected.
• Consult the dealer or an experienced radio/TV
technician for help.
This equipment has been verified to comply with
the limits for a class B computing device, pursuant to FCC Rules. In order to maintain
compliance with FCC regulations,shielded cables
must be used with this equipment. Operation
with non-approved equipment or unshielded
cables is likely to result in interference to radio
and TV reception. The user is cautioned that
changes and modifications made to the equipment without the approval of manufacturer could
void the user’s authority to operate this equipment.

Care 43
USER
’S GUIDE
CARE
Keep the remote dr y; if it gets wet, wipe it dry
immediately. Use and store the remote only in
normal temperature environments. Handle the
remote carefully; do not drop it. Keep the remote
away from dust and dirt, and wipe it with a damp
cloth occasionally to keep it looking new.
If your remote is not performing as it should, take
it to your local RadioShack store for assistance. To
locate your nearest RadioShack, use the store
locator feature on RadioShack's website
(www.radioshack.com), or call 1-800-The Shack
(843-7422) and follow the menu options.
Modifying or tampering with the remote's internal components can cause a malfunction and
might invalidate its warranty and void your FCC
authorization to operate it.

44 Limited 90-day Warranty
6-IN
-ONE
LIMITED 90-DAY WARRANTY
This product is warranted by RadioShack against
manufacturing defects in material and workmanship under normal use for ninety (90) days from
the date of purchase from RadioShack companyowned stores and authorized RadioShack
franchisees and dealers.
EXCEPT AS PROVIDED HEREIN, RadioShack
MAKES NO EXPRESS WARRANTIES AND ANY
IMPLIED WARRANTIES, INCLUDING THOSE OF
MERCHANTABILITY AND FITNESS FOR A PARTICULAR PURPOSE,ARE LIMITED IN
DURATION TO THE DURATION OF THE WRITTEN LIMITED WARRANTIES CONTAINED
HEREIN. EXCEPT AS PROVIDED HEREIN,
RadioShack SHALL HAVE NO LIABILITY OR
RESPONSIBILITY TO CUSTOMER OR ANY
OTHER PERSON OR ENTITY WITH RESPECT
TO ANY LIABILITY,LOSS OR DAMAGE CAUSED
DIRECTLY OR INDIRECTLY BY USE OR PERFORMANCE OF THE PRODUCT OR ARISING
OUT OF ANY BREACH OF THIS WARRANTY,
INCLUDING, BUT NOT LIMITED TO,ANY DAMAGES RESULTING FROM INCONVENIENCE,
LOSS OF TIME,DATA, PROPERTY, REVENUE, OR
PROFIT OR ANY INDIRECT, SPECIAL,INCIDENTAL, OR CONSEQUENTIAL DAMAGES,EVEN IF
RadioShack HAS BEEN ADVISED OF THE POSSIBILITY OF SUCH DAMAGES.
Some states do not allow limitations on how long
an implied warranty lasts or the exclusion or limitation of incidental or consequential damages, so
the above limitations or exclusions may not apply
to you.
In the event of a product defect during the warranty period,take the product and the RadioShack
sales receipt as proof of purchase date to any
RadioShack store.RadioShack will, at its option,
unless otherwise provided by law: (a) correct the
defect by product repair without charge for parts
and labor; (b) replace the product with one of the
same or similar design; or (c) refund the purchase
price. All replaced parts and products, and products on which a refund is made,become the
property of RadioShack. New or reconditioned
parts and products may be used in the performance of warranty service. Repaired or replaced
parts and products are warranted for the remainder of the original warranty period.You will be
charged for repair or replacement of the product
made after the expiration of the warranty period.

This warranty does not cover: (a) damage or failure caused by or attributable to acts of God,
abuse, accident, misuse,improper or abnormal
usage, failure to follow instructions,improper
installation or maintenance,alteration,lightning
or other incidence of excess voltage or current; (b)
any repairs other than those provided by a
RadioShack Authorized Service Facility; (c) consumables such as fuses or batteries; (d) cosmetic
damage; (e) transportation,shipping or insurance
costs; or (f ) costs of product removal, installation,set-up service adjustment or reinstallation.
This warranty gives you specific legal rights, and
you may also have other rights,which vary from
state to state.
RadioShack Customer Relations,
200 Taylor Street,6th Floor,
Fort Worth, TX 76102
Cat.No. 15-2133 12/02
Fort Worth, Texas 76102
Limited 90-day Warranty 45
USER
’S GUIDE

46 Manufacturer’s Codes
6-IN
-ONE
MANUFACTURER’S CODES
(CÓDIGOS DEL FABRICANTE)
SETUP CODES FOR AUDIO AMPLIFIERS
(
CÓDIGOS DE C
ONFIGURACIÓN PARA AMPLIFI-
CADORES DE
AUDIO)
Accuphase 0382
Carver 0269
Denon 0160
Harman/Kardon 0892
JVC 0331
Left Coast 0892
Linn 0269, 0282
Magnavox 0269
Marantz 0892, 0269
McIntosh 0251
Optimus 0395, 0823
Philips 0892, 0269
Pioneer 0823
Plasse Audio 0733
Polk Audio 0892, 0269
Proceed 1099
RCA 0823
Realistic 0395
Victor 0331
Ya maha 0354
SETUP CODES FOR AUDIO RECEIVERS
(
CÓDIGOS DE C
ONFIGURACIÓN PARA
RECEPTORES DE AUDIO)
ADC 0531
Admiral 0182
Aiwa 1089, 1405, 0121,1388
Akai 0115
Alco 1390
Anam 1074, 1609
Apex Digital 1257
Audiotronic 1189
Audiovox 1390
B & K 0701
Bang & Olufsen 1040
Capetronic 0531, 0690
Carver 1089, 1189,0042, 0360
Casio 0195
Clarinette 0195
Denon 1104, 1160
Fisher 0042, 0219,0360
GPX 0744
Garrard 0440, 0744
Glory Horse 1263
Hanwah 0741
Harman/Kardon 0891

Manufacturer’s Codes 47
USER
’S GUIDE
SETUP CODES FOR AUDIO RECEIVERS
(
CÓDIGOS DE CONFIGURACIÓN PARA
RECEPTORES DE A
UDIO)
JBL 1306
JVC 1263
Jensen 0754
KLH 1390
Kansai 0440
Kenwood 1313, 1027, 1570,1569,
0042, 0186
Koss 0744, 1366
LXI 0181, 0744
Lexicon 1076
Lloyd's 0195
Luxman 0267
Magnavox 1089, 1189,0195, 0364,
0531
Marantz 1089, 1189
Memorex 0335
Modulaire 0195
Musicmagic 1089
NAD 0320
NTDE Geniesom 0744
Nakamichi 0347, 0876
Niles 0413
Onkyo 0380, 1298
Optimus 1023, 0042,0177, 0181,
0186, 0219,0440, 0531,
0622, 0670,0690, 0738,
0744, 0754,0797, 0801,
0849, 1074
Orient Power 0744
Panasonic 1518
Parasound 0895
Penney 0195
Philips 1089, 1189, 1269
Pioneer 1023, 0531,1123
Proscan 1254
RCA 1023, 1254,0360, 0531,
1074, 1122,1123, 1390,
1609
RadioShack 0744, 1263
Realistic 0001, 0025,0163, 0178,
0181, 0182,0195, 0534
Rotel 0852
Samsung 1295
Sansui 1089
Sanyo 0219, 0801
Schneider 0364
Scott 0163, 0418
Sharp 0186
Sherwood 1653
Sony 1058,1258, 1158, 0415
Soundesign 0670

48 Manufacturer’s Codes
6-IN
-ONE
SETUP CODES FOR AUDIO RECEIVERS
(
CÓDIGOS DE CONFIGURACIÓN PARA
RECEPTORES DE AUDIO)
Stereophonics 1023
Sunfire 1313
Symphonic 0182
Te ac 0163, 1074
Te c hnics 1308, 1309, 1518
Te chwood 0364
Thorens 1189
Ve nturer 0849, 1390
Ya maha 0176, 0186,1176, 1276
Yo rx 0195
Zenith 0622, 0744
SETUP CODES FOR CABLE CONVERTERS
(
CÓDIGOS DE CONFIGURACIÓN PARA
CONVERTIDORES DE CABLE)
ABC 0003, 0008, 0014
Americast 0899
Archer 0797
Bell & Howell 0014
Bell South 0899
Director 0476
Emerson 0797
Gemini 0797
General Instrument 0476, 0003,0276, 0810
GoldStar 0144
Goodmind 0797
Jerrold 0476,0003, 0276, 0014,
0810
Memorex 0000
Motorola 0476, 1106, 0276,0810
Pace 0237
Panasonic 0000, 0107
Paragon 0000
Philips 0305, 0317
Pioneer 0877, 0144,0533, 1877
Pulsar 0000
Quasar 0000
RadioShack 0303, 0797, 0883
Runco 0000
Samsung 0144
Scientific Atlanta 0877, 0008, 0477,1877
Sony 1006
Starcom 0003
Stargate 0797
Supercable 0276
To rx 0003
To shiba 0000
ViewMaster 0883
Zenith 0000, 0525, 0899

Manufacturer’s Codes 49
USER
’S GUIDE
SETUP CODES FOR CD PLAYERS
(
CÓDIGOS DE CONFIGURACIÓN PARA
REPRODUCTORES DE CDS)
Burmester 0420
Classic 1297
DKK 0000
Denon 0873
GPX 1296
Garrard 0420
Genexxa 0032
Hitachi 0032
JVC 0072, 1294
KLH 1318
Kenwood 0681, 0826, 0626,0028,
0190
Koss 1317
MTC 0420
Marantz 0626
Miro 0000
Onkyo 0868
Optimus 1063, 0000,0032, 0420,
0468, 0536,0850, 1075
Parasound 0420
Philips 0626
Pioneer 1063, 1062,0032, 0468
RCA 1062, 0032,0053, 0468
RadioShack 1075, 1083
Realistic 0420
Rotel 0420
Sharp 0861
Sherwood 1067
Sony 0490,0000, 0100
TDK 1208
Ta scam 0420
Te ac 0420
Victor 0072
Wa rds 0053
Ya maha 0888
SETUP CODES FOR DVD PLAYERS
(
CÓDIGOS DE CONFIGURACIÓN PARA
R
EPRODUCTORES DVD)
Apex Digital 0672, 0717,0755, 0794,
0795, 0796,0797, 0830
Blue Parade 0571
Broksonic 0695
Denon 0490
Emerson 0591
Enterprise 0591
Fisher 0670
GE 0522, 0717,0815

50 Manufacturer’s Codes
6-IN
-ONE
SETUP CODES FOR DVD PLAYERS
(
CÓDIGOS DE CONFIGURACIÓN PARA
REPRODUCTORES DVD
)
Go Video 0715, 0783
Gradiente 0651
Greenhill 0717
Hitachi 0573, 0664
Hiteker 0672
InterAct 0697
JVC 0558, 0623,0867
KLH 0717
Kenwood 0534, 0682
Konka 0719
Koss 0651
Lasonic 0798
Magnavox 0503, 0675
Marantz 0539
Microsoft 0522
Mitsubishi 0521
Onkyo 0503
Oritron 0651
Panasonic 0490, 0632,0677
Pelican Accessories 0731
Philips 0503, 0539, 0854
Pioneer 0525, 0571,0632
Proscan 0522
RCA 0522, 0571,0717, 0822,
1022
Rowa 0823
Saitek 0731
Samsung 0573, 0820
Sansui 0695
Sanyo 0670
Sharp 0630
Sony 0533,0772
Sylvania 0821
Te c hnics 0490
Theta Digital 0571
Thrustmaster 0498
To shiba 0503, 0695, 1045
Tredex 0800
Urban Concepts 0503
Ya maha 0490, 0545
Zenith 0503, 0591
SETUP CODES FOR HOME AUTOMATION
(
CÓDIGOS DE CONFIGURACIÓN PARA LA
AUTOMATIZACIÓN DEL HOGAR)
GE 0240
One For All 0167
RadioShack 0240
Security System 0167
Universal X10 0167
X10 0167

Manufacturer’s Codes 51
USER
’S GUIDE
SETUP CODES FOR HOME-THEATER-IN-A-BOX
D
EVICES
(
CÓDIGOS DE CONFIGURACIÓN PARA
DISPOSITIVOS HOME-THEATER-IN-A-BOX)
Aiwa 1388
Alco 1390
Anam 1609
Apex Digital 1257
Audiovox 1390
JBL 1306
KLH 1390
Koss 1366
Onkyo 1298
RCA 1390, 1609
Samsung 1295
Ve nturer 1390
S
ETUP CODES FOR
SATELLITE
RECEIVERS
(CÓDIGOS DE CONFIGURACIÓN PARA
R
ECEPTORES DE SATÉLITE)
AlphaStar 0772
Crossdigital 1109
Echostar 1005, 0775
Expressvu 0775
GE 0566
GOI 0775
General Instrument 0869
HTS 0775
Hitachi 0819
Hughes Network
Systems 1142, 0749, 1749
JVC 0775
Magnavox 0724, 0722
Memorex 0724
Mitsubishi 0749
Motorola 0869
Next Level 0869
Panasonic 0701
Paysat 0724
Philips 1142, 0749, 0724,1076,
0722
Proscan 0392
RCA 0392, 0566,0855, 0143
RadioShack 0869
Samsung 1109
Sony 0639
Star Choice 0869
To shiba 0749, 0790, 1749
Uniden 0724,0722
Zenith 0856

52 Manufacturer’s Codes
6-IN
-ONE
SETUP C
ODES FOR
TVS
(
CÓDIGOS DE CONFIGURACIÓN PARA
TELEVISORES)
A-Mark 0003
AOC 0030, 0019, 0003
Abex 0032
Admiral 0093, 0463
Advent 0761
Aiko 0092
Aiwa 0701
Akai 0030
Alaron 0179
America Action 0180
Ampro 0751
Anam 0180
Apex Digital 0748, 0765,0767
Archer 0003
Audiovox 0451, 0180,0003, 0092,
0623
Baysonic 0180
Belcor 0019
Bell & Howell 0154, 0016
Bradford 0180
Brockwood 0019
Broksonic 0236, 0463, 0003
CXC 0180
Candle 0030, 0056
Carnivale 0030
Carver 0054
Celebrity 0000
Changhong 0765
Cineral 0451,0092
Citizen 0060, 0030, 0056,0039,
0092
Concerto 0056
Contec 0180
Craig 0180
Crosley 0054
Crown 0180, 0039
Curtis Mathes 0047, 0054, 0154,0051,
0451, 0093,0060, 0030,
0145, 0056,0016, 0039,
0166, 0466,0702, 1147,
1347
Daewoo 0451, 0019,0039, 0092,
0623, 0624
Daytron 0019
Denon 0145
Dumont 0017, 0019
Dwin 0720,0774
Electroband 0000

Manufacturer’s Codes 53
USER
’S GUIDE
Electrohome 0409
Emerson 0154, 0236,0463, 0180,
0178, 0019,0179, 0039,
0623, 0624
Envision 0030
Fisher 0154
Fujitsu 0179, 0683
Funai 0180, 0179,0171
Futuretech 0180
GE 0047, 0051,0451, 0093,
0178, 0021,1147, 1347
Gibralter 0017, 0030, 0019
GoldStar 0030, 0178, 0019, 0056,
0032, 0409
Gradiente 0053, 0056
Grunpy 0180, 0179
Hallmark 0178
Harley Davidson 0179
Harman/Kardon 0054
Harvard 0180
Havermy 0093
Hitachi 0145, 0056, 0016,0032,
0409
Infinity 0054
Inteq 0017
JBL 0054
JCB 0000
JVC 0053
KEC 0180
KTV 0180, 0030,0039
Kenwood 0030, 0019
Konka 0628, 0632, 0638,0703,
0707
LG 0056
LXI 0047, 0054, 0154, 0156,
0178
Logik 0016
Luxman 0056
MGA 0150, 0030, 0178,0019
MTC 0060, 0030, 0019,0056
Magnavox 0054, 0030,0179, 1254
Majestic 0016
Marantz 0054, 0030
Matsushita 0250
Megatron 0178, 0145, 0003
Memorex 0154,0250, 0463, 0150,
0178, 0179,0056, 0016
Midland 0047,0017, 0051, 0039,
0032
Minutz 0021
Mitsubishi 0093,0150, 0178, 0019
Motorola 0093
Multitech 0180

54 Manufacturer’s Codes
6-IN
-ONE
SETUP CODES FOR TVS
(
CÓDIGOS DE CONFIGURACIÓN PARA
TELEVISORES)
NAD 0156, 0178, 0166
NEC 0030, 0019, 0056
NTC 0092
Nikko 0030, 0178, 0092
Onwa 0180
Optimus 0154, 0250,0166
Optonica 0093, 0165
Orion 0236, 0463, 0179
Panasonic 0250, 0051
Penney 0047,0156, 0051, 0060,
0030, 0178,0021, 0019,
0056, 0039,0003, 0032,
1347
Philco 0054, 0463, 0030, 0145,
0019
Philips 0054
Pilot 0030, 0019, 0039
Pioneer 0166, 0679
Portland 0019, 0039, 0092
Princeton 0717
Prism 0051
Proscan 0047
Proton 0178, 0003,0466
Pulsar 0017, 0019
Quasar 0250, 0051,0165
RCA 0047, 0051,0093, 0019,
0090, 0679,1047, 1147,
1247, 1347,1447, 1547
RadioShack 0047, 0154, 0165,0180,
0030, 0178,0019, 0056,
0039, 0032,0409
Realistic 0154, 0165,0180, 0030,
0178, 0019,0056, 0039,
0032
Runco 0017, 0030, 0603
SSS 0180, 0019
Sampo 0030, 0039, 0032
Samsung 0060, 0030, 0178,0019,
0056, 0032,0702, 0766
Samsux 0039
Sansei 0451
Sansui 0463
Sanyo 0154
Scimitsu 0019
Scotch 0178
Scott 0236, 0180, 0178,0019,
0179
Sears 0047, 0054,0154, 0156,
0178, 0179,0056, 0171
Semivox 0180
Semp 0156

Manufacturer’s Codes 55
USER
’S GUIDE
Sharp 0093, 0165, 0039, 0688,
0689
Shogun 0019
Signature 0016
Sony 0000,1100
Soundesign 0180, 0178, 0179
Spectricon 0003
Squareview 0171
Starlite 0180
Supreme 0000
Sylvania 0054, 0030, 0171
Symphonic 0180, 0171
TMK 0178, 0056
TNCi 0017
Ta ndy 0093
Ta tung 0003
Te c hnics 0250, 0051
Te chnol Ace 0179
Te chwood 0051, 0056, 0003
Te k nika 0054, 0180, 0150, 0060,
0019, 0179,0056, 0016,
0039, 0092
Te lefunken 0056,0702
To shiba 0154, 0156, 0060,1256
To tevision 0039
Ve ctor Research 0030
Victor 0053
Vidikron 0054
Vidtech 0178, 0019
Wa rds 0054, 0165,0030, 0178,
0021, 0019,0179, 0056,
0016
Wa ycon 0156
White Westinghouse 0463, 0623, 0624
Ya maha 0030, 0019
Zenith 0017, 0463, 0016,0092,
0624
Zonda 0003
SETUP CODES FOR TV/VCR COMBOS
(
CÓDIGOS DE CONFIGURACIÓN PARA APARATOS
COMBINADOS TELEVISOR/VIDEOGRABADORA)
Broksonic 0002, 1479
Citizen 0278, 1278
Colt 0072
Curtis Mathes 1035
Daewoo 1278
Emerson 0002, 1278, 1479
Funai 0000
GE 0807, 0240,1035, 1060
Goldstar 1237
Harley Davidson 0000
Hitachi 0000
JVC 0067

56 Manufacturer’s Codes
6-IN
-ONE
SETUP CODES FOR TV/VCR COMBOS
(
CÓDIGOS DE CONFIGURACIÓN PARA APARATOS
COMBINADOS TELEVISOR/VIDEOGRABADORA)
Lloyd's 0000
Magnasonic 0278, 0593, 1278
Magnavox 0000, 1781
Magnin 0240
Memorex 0037, 0454, 1037,1162,
1237, 1262
MGA 0240
Mitsubishi 0807
Optimus 0454, 0593,1162, 1262
Orion 0002, 1479
Panasonic 1035, 1162,1262, 1362
Penney 0240,1035, 1237
Quasar 1035, 1162
RCA 0807, 0240,1035, 1060
RadioShack 1037
Sansui 0000, 1479
Sanyo 0240
Sears 0000, 1237
Sharp 0807
Sony 0000,1232
Sylvania 1781
Symphonic 0000, 0593
Thomas 0000
To shiba 0845
White Westinghouse 1278
Zenith 0000, 1479
SETUP CODES FOR VCRS
(
CÓDIGOS DE C
ONFIGURACIÓN PARA
VIDEOGRABADORAS)
Admiral 0048, 0209
Adventura 0000
Aiko 0278
Aiwa 0037, 0000, 0307
Akai 0041
America Action 0278
American High 0035
Asha 0240
Audiovox 0037
Beaumark 0240
Bell & Howell 0104
Broksonic 0184, 0121,0209, 0002,
0479, 1479
CCE 0072, 0278
Calix 0037
Canon 0035
Carver 0081
Cineral 0278
Citizen 0037, 0278, 1278
Colt 0072
Craig 0037, 0047, 0240,0072

Manufacturer’s Codes 57
USER
’S GUIDE
Curtis Mathes 0060, 0035, 0162,0041,
1035
Cybernex 0240
Daewoo 0045, 0278,1278
Denon 0042
Dynatech 0000
Electrohome 0037
Electrophonic 0037
Emerex 0032
Emerson 0037, 0184,0000, 0121,
0043, 0209,0002, 0278,
0479, 1278,1479
Fisher 0047, 0104,0066
Fuji 0035, 0033
Funai 0000
GE 0060, 0035,0048, 0240,
0202, 0807,1035, 1060
Garrard 0000
Go Video 0432
GoldStar 0037, 0038, 0480, 1237
Gradiente 0000
HI-Q 0047
Harley Davidson 0000
Harman/Kardon 0081, 0038
Harwood 0072
Headquarter 0046
Hitachi 0000, 0042, 0041
Hughes Network
Systems 0042
JVC 0067, 0041
Jensen 0041
KEC 0037,0278
KLH 0072
Kenwood 0067, 0041, 0038
Kodak 0035, 0037
LXI 0037
Lloyd's 0000
Logik 0072
MEI 0035
MGA 0240, 0043
MGN Technology 0240
MTC 0240, 0000
Magnasonic 0278, 0593, 1278
Magnavox 0035, 0039,0081, 0000,
0149, 0563,1781
Magnin 0240
Marantz 0035, 0081
Marta 0037
Matsushita 0035, 0162,0454
Memorex 0035, 0162, 0037,0048,
0039, 0047,0240, 0000,
0104, 0209,0046, 0268,
0299, 0307,0454, 0479,
1037, 1162,1237, 1262
Minolta 0042

58 Manufacturer’s Codes
6-IN
-ONE
SETUP CODES FOR VCRS
(
CÓDIGOS DE CONFIGURACIÓN PARA
VIDEOGRABADORAS)
Mitsubishi 0048,0067, 0043, 0807
Motorola 0035, 0048
Multitech 0000, 0072
NAD 0058
NEC 0104, 0067, 0041, 0038
Nikko 0037
Noblex 0240
Olympus 0035
Optimus 1062, 0162,0037, 0048,
0104, 0058,0432, 0454,
0568, 0593,0619, 1048,
1162, 1262
Optonica 0062
Orion 0184, 0209, 0002, 0479,
1479
Panasonic 1062, 0035,0162, 0225,
0454, 0616,1035, 1162,
1262, 1362
Penney 0035,0037, 0240, 0042,
0038, 1035,1237
Pentax 0042
Philco 0035, 0209, 0479
Philips 0035, 0081, 0062,0618,
1081, 1181
Pilot 0037
Pioneer 0067, 0058
Polk Audio 0081
Profitronic 0240
Proscan 0060, 0202, 1060
Protec 0072
Pulsar 0039
Quarter 0046
Quartz 0046
Quasar 0035, 0162,0454, 1035,
1162
RCA 0060, 0035,0048, 0240,
0042, 0149,0058, 0202,
0619, 0807,1035, 1060
RadioShack 0000, 1037
Radix 0037
Randex 0037
Realistic 0035, 0037,0048, 0047,
0000, 0104,0062, 0046,
0066
ReplayTV 0614, 0616
Runco 0039
STS 0042
Samsung 0240, 0045
Sanky 0048, 0039

Manufacturer’s Codes 59
USER
’S GUIDE
Sansui 0000, 0067,0209, 0041,
0479, 1479
Sanyo 0047, 0240,0104, 0046,
0268
Scott 0184, 0045, 0121,0043
Sears 0035, 0037,0047, 0000,
0042, 0104,0046, 0066,
1237
Semp 0045
Sharp 0048, 0062, 0807, 0848
Shintom 0072
Shogun 0240
Singer 0072
Sonic Blue 0614
Sony 0035,0032, 0000, 0033,
0636, 1032,1232
Sylvania 0035, 0081, 0000, 0043,
1781
Symphonic 0000, 0593
TMK 0240
Ta tung 0041
Te ac 0000, 0041
Te c hnics 0035, 0162
Te k nika 0035, 0037, 0000
Thomas 0000
Tivo 0618, 0636
To shiba 0045, 0043, 0066,0845
To tevision 0037, 0240
Unitech 0240
Ve ctor 0045
Ve ctor Research 0038
Video Concepts 0045
Videomagic 0037
Videosonic 0240
Villain 0000
Wa rds 0060, 0035,0048, 0047,
0081, 0240,0000, 0042,
0072, 0149,0062
White Westinghouse 0209, 0072, 0278, 1278
XR-1000 0035, 0000,0072
Ya maha 0038
Zenith 0039, 0000, 0209,0033,
0479, 1479

60 Manufacturer’s Codes
6-IN
-ONE
SETUP CODES FOR TV/DVD COMBOS
(
CÓDIGOS DE CONFIGURACIÓN PARA APARATOS
COMBINADOS T
ELEVISOR/
REPRODUCTORES DVD)
Broksonic 0695
Konka 0719
Philips 0854
RCA 1022
Sharp 0630
Sylvania 0821
To shiba 0695, 1045
SETUP
CODES FOR PVRS
(CÓDIGOS DE CONFIGURACIÓN PARA VIDEO
GRABADORA
PERSONAL)
Panasonic 0616
Philips 0618
ReplayTV 0614, 0616
Sonic Blue 0614, 0616
Sony 0636
Tivo 0618, 0636
SETUP CODES FOR XBOX
(
CÓDIGOS DE C
ONFIGURACIÓN PARA XBOX)
Microsoft 0522
XBox 0522
SETUP CODES FOR PLAYSTATION2
(CÓDIGOS DE CONFIGURACIÓN PARA
P
LAYSTATION
2)
InterAct 0697
Pelican Accessories 0731
Saitek 0731
Sony 0533,0772
Thrustmaster 0498

This product uses technologies licensed under
one or more of the following U.S.patents:
4,959,810 5,228,077 5,255,313
5,414,761 5,552,917 5,537,463
5,959,751 5,481,256 5,515,052
6,014,092 6,195,033 6,097,309
6,330,091
Manufacturer’s Codes 61
USER
’S GUIDE

05A03
 Loading...