

43-947.fm Page 1 Thursday, May 25, 2000 11:36 AM
CID-947 79-Memory
Caller ID Module
with Backlight
Owner’s Manual
Please read before using this equipment.

43-947.fm Page 2 Thursday, May 25, 2000 11:36 AM
Contents
ˆ
Features ................................................................................. 4
FCC Information .............................................................. 6
Preparation ............................................................................ 8
Installing Batteries ........................................................... 8
Connecting the AC Adapter ........................................... 10
Connecting the Module ................................................... 11
Mounting the Module ..................................................... 13
Adjusting the Display Contrast ...................................... 15
Choosing a Language ................................................... 16
Setting Your Local Area Code ....................................... 16
Operation ............................................................................. 17
Receiving and Storing Calls .......................................... 17
Reviewing Call Records ................................................ 17
Redialing From Call Record Memory ............................ 21
Deleting Calls .............................................. ...... ............ 21
VIP Call List ................................................................... 22
Troubleshooting .................................................................. 24
Care and Maintenance ........................................................ 25
The FCC Wants You to Know ........................................ 26
Lightning ........................................................................ 26
©
RadioShack and RadioShack.com are trademarks used by Tandy Corporation.
2
2000 Tandy Corporation. All Rights Reserved.
!
43-947.fm Page 3 Thursday, May 25, 2000 11:36 AM
WARNING:
shock hazard, do not expose this product to rain
or moisture.
To reduce the risk of fire or
CAUTION
RISK OF ELECTRIC SHOCK.
DO NOT OPEN.
CAUTION:
ELECTRIC SHOCK, DO NOT REMOVE
COVER OR BACK. NO USER-SERVICEABLE PARTS INSIDE. REFER SERVICING
TO QUALIFIED PERSONNEL.
!
TO REDUCE THE RISK OF
This symbol is intended to alert
you to the presence of uninsulated dangerous voltage within
the product’s enclosure that might
be of sufficient magnitude to constitute a risk of electric shock. Do
not open the product’s case.
This symbol is intended to inform
you that important operating and
maintenance instructions are
included in the literature accompanying this product.
The graphical symbols with supplemental markings are located on the bottom of the module.
3
43-947.fm Page 4 Thursday, May 25, 2000 11:36 AM
Features
ˆ
Your RadioShack 7 9-M em ory Ca lle r ID Module with B ack li ght i s
the latest in telephone technology. The module displays the
caller’s telephone number (and name, if available in your area)
and the current date and time, as provided by your local phone
company to Caller ID service subscribers. (The date and time
are set with your first in coming Ca ller ID call .) Your mo dule includes these features:
Caller ID Memory
multiple (name and number) Caller ID records.
Bright Illuminator Backlight
press any button, making it easy to view and change information even in a dimly-lit area.
Dial Back
Caller ID call memory and VIP record memory.
New Call Indicator
call you have not reviewed.
VIP Call List
they will not be deleted when you delete other calls from the
module’s memory.
Call Summary
ceived.
Easy Installation
phone line so you can quickly begin using it.
Record Scrolling
in Caller ID memory.
4
— lets you redial a telephone number stored in the
— the module stores and displays up to 79
— the display lights when you
— flashes when you have at least one new
— lets you save up to 20 important call records so
— displays the number of new calls you re-
— the module easily connects to your tele-
– lets you easily look through all call records
Features

43-947.fm Page 5 Thursday, May 25, 2000 11:36 AM
Trilingual Operation
— lets you set the m odule to dis play mes-
sages in English, French, or Spanish.
Large Liquid Crystal Display
— makes it easy to see caller in-
formation and the current time and date.
Contrast Control
— lets you a dj u st t he di sp la y cont r ast f or t he
best readability.
Time and Date Display
— displays the current time and date
as provided to Caller I D service su bscribers by your loca l telephone company.
Mounting Options
— you can place the module on a desk,
shelf, or table, or mount it on a wall.
Note:
Your module requires f our AAA b atte rie s (not s upp lie d) to
protect its memory during a power ou tage.
This module has be en te sted and found to comply with a ll appli-
cable FCC standards and is ETL listed.
To use this module, you m ust be in a n area where Calle r ID ser-
vice is available and you must subscribe to the service.
Where Caller ID is offered, one or more of the following options
are generally available:
• caller's number only
• caller's name only
• caller's name and number
Your module displays the caller's name only if that option is
available in your area.
Features
5

43-947.fm Page 6 Thursday, May 25, 2000 11:36 AM
The actual number of Caller ID records your module will store
depends on the amount of Caller ID information sent by the
phone company.
FCC INFORMATION
This module has be en te sted and found to comply with a ll applicable FCC standards.
We have designed your module to conform to federal regulations, and you can connect it to most telephone lines. However,
each module (and each device, such as a telephone or answering machine) that you connect to the telephone line draws power from the telephone line. We refer to this power draw as the
device’s ringer equ ivalenc e numb er, or REN . The REN i s on the
bottom of your module.
If you use more than one phone or other device on the line, add
up all of the RENs. If the total is more than five (or three in rural
areas), your telephones might not ring. If ringer operation is impaired, re move a device from the line.
Your module complies with Part 68 of
FCC Rules
. You must,
upon request, provide the FCC registration number and the
REN to your telephone company. Both numbers are on the bottom of the module.
Note:
You must not connect your module to:
• coin-operated systems
• party-line systems
• most electronic key telephone systems
6
Features

43-947.fm Page 7 Thursday, May 25, 2000 11:36 AM
This equipment complies with the limits for a Class B digital device as specified in Part 15 of
FCC Rules
. These limits provide
reasonable protection against radio and TV interference in a
residential area. However, your equipment might cause TV or
radio interference even when it is operating properly. To eliminate interference, you can try one or more of the following corrective measures:
• reorient or relocate the receiving antenna
• increase the dis tance between the e qui pm ent and the radio
or TV
• use outlets on different electrical circuits for the equipment
and the radio or TV
Consult your local RadioShack store if the problem still exists.
Features
7

43-947.fm Page 8 Thursday, May 25, 2000 11:36 AM
Preparation
ˆ
Your module’s disp lay is protected by a piece of plas ti c fil m d uring shipment. Peel off this film before you use the module.
INSTALLING BATTERIES
Your module requires four AAA batteries (not supplied) to protect its memory during a power failure. For the best performance and longest life, we recommend RadioShack alkaline
batteries.
Cautions:
• Use only fresh batteries of the required size and recommended type.
• Do not mix old and new batteries or different types of batteries (standard, alkaline, or rechargeable), or rechargeable batteries of different capacities.
• When you replace the batteries, do not press any buttons
on the modu le after you remove the old batteries. Doing so
could erase all stored information.
• When replacing the batteries, have fresh ones on hand
before you begin. If you do not install the new batteries
within about 2 minute s a fter re moving the old ones, yo u wil l
lose all the information stored in the module.
Follow these steps to install batteries.
1. If you are replacing batteries, unplug the module from the
telephone line, the telephone, and AC power. Unplug both
modular line cords from the back of the module.
8
Preparation
43-947.fm Page 9 Thursday, May 25, 2000 11:36 AM
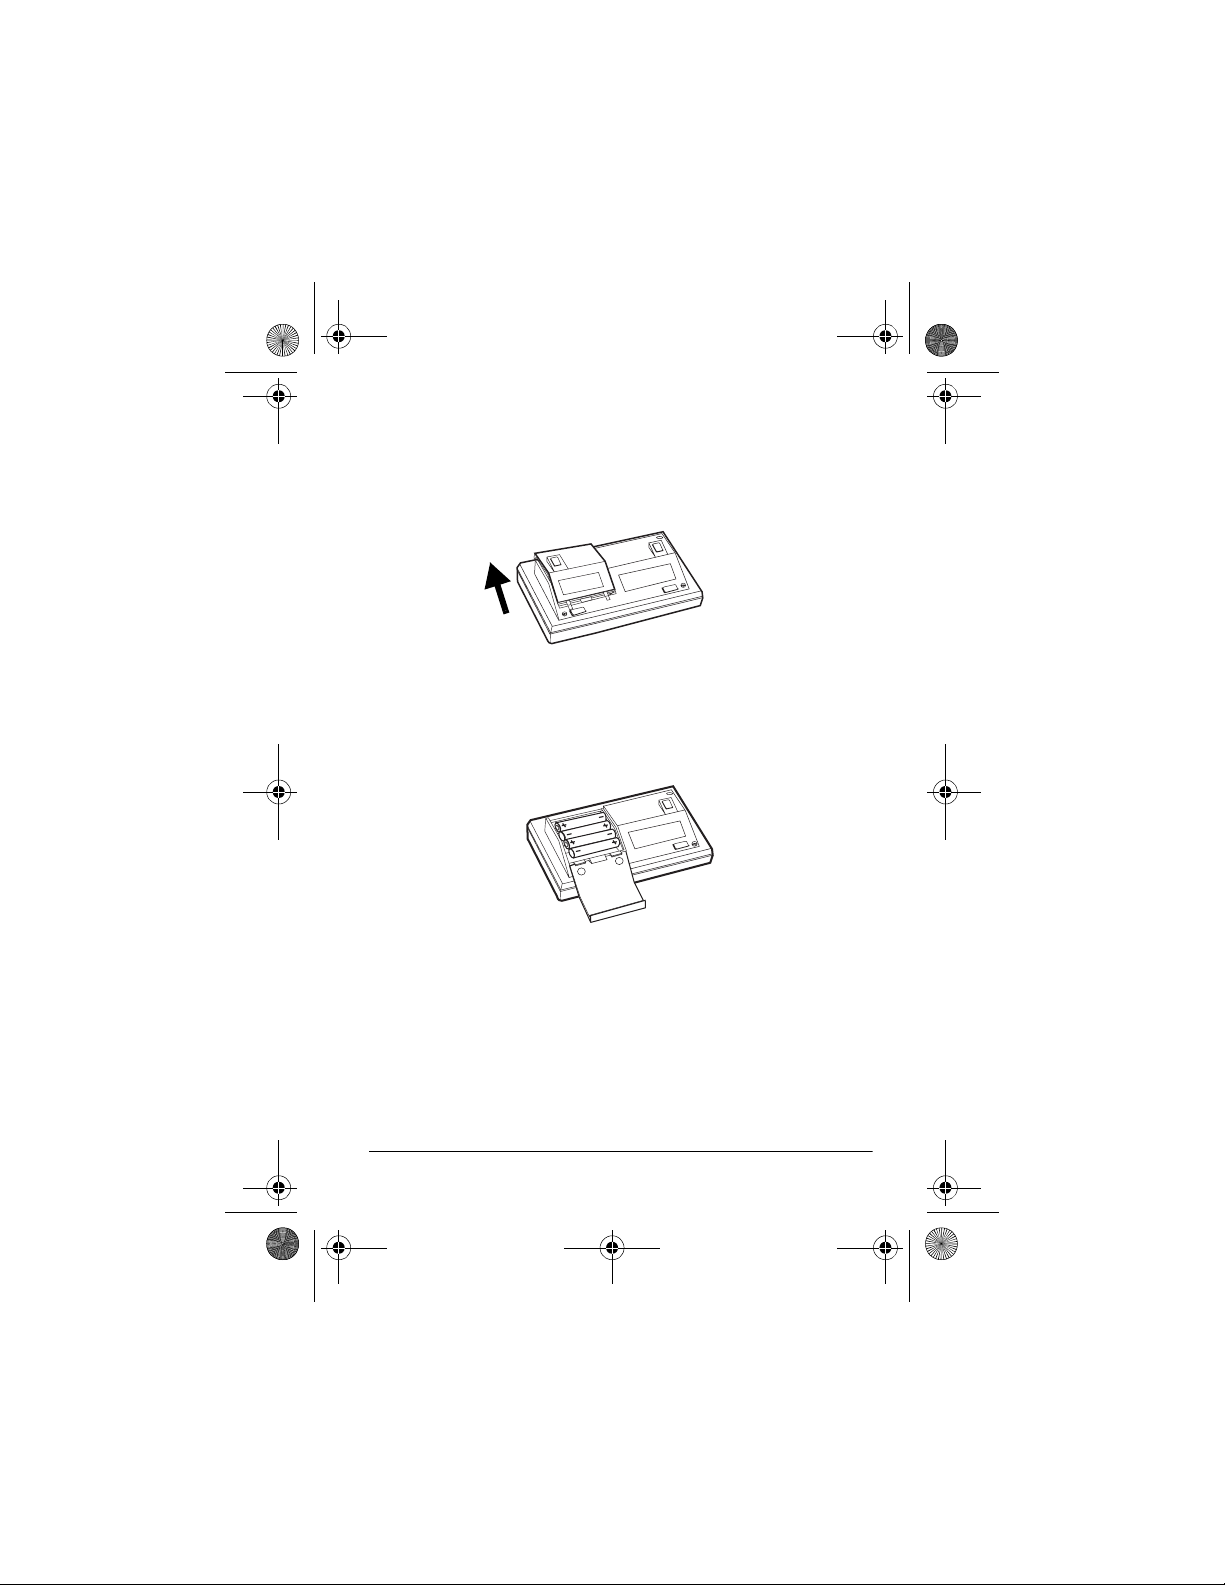
2. Use a Phillips screwdriver to remove the screw from the
battery compartment cover.
3. Slide the battery compartment cover in the direction of the
arrow until it stops, then lift up the cover.
Caution:
The battery compartment cover is attached to the
module. Do not try to remove it completely.
4. Place the batteries in the compartment, as indicated by the
polarity symbols (+ and –) marked inside.
5. Close the cover and secure it with the screw. If you are
replacing the batteries, reconnect the phone line, AC
adapter, and the phone.
BATT
When
(battery) appears or the display dims, replace the
batteries.
Warning:
Dispose of old batteries promptly and properly. Do
not burn or bury them.
Preparation
9

43-947.fm Page 10 Thursday, May 25, 2000 11:36 AM
Caution:
more, remove the batteries. Batteries can leak chemicals that
can destroy electronic parts.
If you do not plan to use the module for a month or
CONNECTING THE AC ADAPTER
The module uses the suppli ed 9V, 200-m A AC ad apte r for pow er.
Cautions:
You must use a Class 2 power source that supplies 9V DC and delivers a t least 200 mA. Its plug
!
must fit the module's
plied adapter meets these specifications. Using an adapter
that does not meet these specifications could damage the
module or the adapter.
• Always connect the AC adapter to the module before you
connect it to AC power. When you finish, disconnect the
adapter from AC power before you disconnect it from the
module.
• The supplied adapter was designed specifically for your
module. Use only the supplied adapter.
To power the module, plug the adapter’s barrel plug into
200mA
on the back of the module. Then connect the other end
of the adapter to a standard AC outlet.
9V DC 200mA
jack. The sup-
9V DC
10
Preparation

43-947.fm Page 11 Thursday, May 25, 2000 11:36 AM
CONNECTING THE MODULE
Your module connects to any modular phone jack and your
phone. You can also connect it to an answering machine.
Note:
The module might not work with older phones, such as
Western Electric phones.
Connecting to a Single-Line Phone
9V DC 200mA
1. Disconnect the telephone line cord from the phone and
plug it into the module’s
TO LINE
TO PHONE
TO LINE
jack.
2. Plug one end of the supplied line cord into the module’s
PHONE
jack.
TO
3. Plug the other end of the cord into the phone’s jack.
Connecting to a Two-Line Phone
To record information about calls received on a two-line phone,
you can connect two CID-947 modules using a triplex adapter.
Each module only records information about calls received on
the line to which it is connected.
Preparation
11

43-947.fm Page 12 Thursday, May 25, 2000 11:36 AM
Follow these steps to connect two CID-947 modules to a twoline phone.
Triplex
Adapter
L1 L2
L1+L2
1. Disconnect the telep hone lin e cord from the mod ular phon e
jack (on the wall) and plug it into L1+L2 on the triplex
adapter.
2. Plug the triplex adapter into the modular phone jack.
3. Plug one end of the supplied line cord into the
TO LINE
on one of the modules.
4. Plug the other end of the cord into either L1 or L2 on the triplex adapter.
5. Repeat Steps 3 and 4 to connect another module to the
remaining open jack (L1 or L2) on the triplex adapter.
12
Preparation
jack

43-947.fm Page 13 Thursday, May 25, 2000 11:36 AM
Connecting to an Answering Machine
TO LINE
TO PHONE
To Phone
1. Disconnect the phone line cord that connects your answering machine to the phone line from the answering
machine’s ja ck . T hen plug it into the m odu le ’s
2. Plug one end of the supplied line cord into the module’s
PHONE
jack.
TO LINE
jack.
TO
3. Plug the cord’s other end into the answering machine’s
jack.
4. Set your answering machine to answer after two or more
rings. This gives the module tim e to record the ca ll inform ation that the phone company sends between the first and
second rings.
MOUNTING THE MODULE
You can place the module directly on a desk, shelf, or table by
itself or using the stand on the supplied mounting bracket. Or,
you can use the bracket to mount the module on a wall.
Preparation
13

43-947.fm Page 14 Thursday, May 25, 2000 11:36 AM
Attaching the Mounting Bracket
1. Align the slots on the bottom of the module with the hooks
on the mounting bracket.
2. Gently push the module down on the bracket to secure it.
If you are placing the module on a desk, shelf, or table, pull out
the stand on the back of the bracket until it clicks.
To remove the module from the bracket, press up from the bottom of the module until it snaps off the bracket.
Mounting on a Wall
To mount the module on the wall, you need two screws (not
supplied) with heads larger than the keyhole slots on the back
of the mounting bracket.
1. Using the keyhole s lots i n the su pplie d moun ting bra cket a s
a template, mark the mounting screw locations on the wall.
2. Drill a hole in the wall at each marked location .
3. Thread a screw through each hole, letting the head extend
1
/8-inch (3.5-mm) from the wall.
14
Preparation

43-947.fm Page 15 Thursday, May 25, 2000 11:36 AM
4. Attach the mounting bracket to the module (see “Attaching
the Mounting Bracket” on Page 14).
5. Route the phone line cords and AC adapter cord through
the slots on the back of the bracket.
6. Align the keyhole slots on the bracket with the screws in
the wall, then s li de th e module down onto the screws until it
is secure.
ADJUSTING THE DISPLAY CONTRAST
To lighten or darken the display, hold down
VIEW
press
REVIEW
CONTRAST ADJUST
until
to increase the contrast.
appears. Repeatedly
Preparation
ERASE
and
RE-
15

43-947.fm Page 16 Thursday, May 25, 2000 11:36 AM
CHOOSING A LANGUAGE
Your module is programmed to display messages in English,
but you can change it to display in French or Spanish.
1. Hold down
REVIEW
onds until the current language (
Spanish, or
2. Repeatedly press
appears, then press
FRANCAIS
REVIEW
REVIEW
CALL BACK
and
for about 3 sec-
ENGLISH, ESPANOL
for French) appears.
until the language you want
to set the language you
selected.
Note:
If you do not press any button within about 10 seconds,
the time (if set) appears.
SETTING YOUR LOCAL AREA CODE
1. Hold down
LOCAL AREA CODE
REVIEW
appears.
2. To change the area code’s first digit, repeatedly press
REVIEW
ERASE
until the desired digit appears, then press
to confirm.
3. Repeat Step 2 to set the area code’ s se cond an d third digi t.
4. To set the area code, do not press any button. Or, press
REVIEW
to set the module to its idle mode.
and
REVIEW
together until
for
16
Preparation

43-947.fm Page 17 Thursday, May 25, 2000 11:36 AM
Operation
ˆ
RECEIVING AND STORING CALLS
Caller ID is a service provided by your telephone company.
When you subscribe to this service, the telephone company
sends the caller’s telephone number (and name, if available)
and the call’s date and time between the first and second rings.
The module receives and displays this information for each call
and updates the display with the current date and time. Your
module saves up to 79 call records, then replaces the oldest
call record with each new one.
During an incoming call, the new call indicator on the right side
of the modu le fl ash es, the dis play lig hts , and
number of calls appear. During an incoming VIP call, the new
call indicator flashes continuously.
NEW
and the total
REVIEWING CALL RECORDS
Each time you receive a call, the module saves a call record in
memory that you can see while you are on the phone or review
later.
Each call record includes the time and date of the call, the call
number (the order in which the call is received), the caller’s telephone number, and the caller’s name (if available).
To scroll through the call records, repeatedly press (or hold
REVIEW
down)
Notes:
• If no call i nformation is stor ed, NO
REVIEW
press
or
REVIEW
REVIEW
or
Operation
.
CALL
appears when you
.
17

43-947.fm Page 18 Thursday, May 25, 2000 11:36 AM
• If you do not press a button within about 10 seconds, the
module automatically returns to the time and date display.
• After you review all calls,
press
REVIEW
or
END OF LIST
REVIEW
appears. Simply
to view again.
Displayed Call Information
The module can display the following information.
Display (English,
French, S panish)
REPT
LONG DISTANCE
LONGUE DISTANCE
LARGA DISTANCIA
–UNKNOWN NAME–
–NOM INCONNU–
NOM DESCONOCIDO
UNKNOWN NUMBER
NUMERO INCONNU
NUM DESCONOCIDO
Appears with a number if you have
received a call from the same phone
number more than once (between 2
and 9 times).
Appears along with
tance call) if your phone company
sends information indicating that the
incoming call is long distance.
The incoming call is from a area that
does not send Caller ID name information.
The incoming call is from an area that
does not send Caller ID number information.
Description
LDC
(long dis-
UNKNOWN CALLER
APPELER INCONNU
DESCONOCIDO
18
The incoming call is from an area that
does not send any Caller ID information.
Operation

43-947.fm Page 19 Thursday, May 25, 2000 11:36 AM
Display (English,
French, Spanish)
CALL 1
–BLOCKED NAME–
–NOM BLOQUE–
NOMBRE PRIVADO
BLOCKED NUMBER
–NUMERO BLOQUE–
NUMERO PRIVADO
BLOCKED CALL
APPEL BLOQUE
LLAMADA PRIVADA
–SERVICE ERROR–
ERREUR DE LIGNE
ERROR EN LINEA
BATT
–NO CALL–
–PAS D APPEL–
–NO LLAMADA–
Description
Appears when you received a call for
the first tim e .
The caller has blocked the Caller ID
name information from being sent.
The caller has blocked the Caller ID
number information from being sent.
The caller has blocked any Caller ID
information from being sent.
Call information was distorted before
reaching the module. Normal static on
the telephone can cause this message.
If it happens often, contact your phone
company.
Appears when battery level is low.
No call information is stored in the
module.
NEW
NOUV
NUEVO
#NEW
The module has received incoming
calls that have not been reviewed.
The total number of received calls
which have not been reviewed.
Operation
19

43-947.fm Page 20 Thursday, May 25, 2000 11:36 AM
Display (English,
French, S panish)
TOTAL
TOT.
TOTAL
–RECORD STORED–
–MEMORISE–
–MEMORIZADO–
VIP
–VIP MEMO FULL–
–VIP PLEIN–
–VIP LLENO–
DELETE ALL?
EFFACER TOUT?
BORRAR TODO?
–NO DATA SENT–
PAS DE DONNEES
–NO ENVIADO–
M
MESSAGE
or
WAITING
M
MESSAGE
or
MENSAJE
M
or
Description
The total number of incoming calls (not
including VIP calls).
The caller ID record is stored in VIP
memory.
VIP memory is active.
Appears when the VIP number mem-
ory is full.
Delete all Caller ID records from memory except VIP records.
Call information was not sent by the
phone company.
Appears when you have message
waiting.
–END OF LIST–
–FIN DE LISTE–
–FIN DE LISTA–
20
End of the list of stored Caller ID
records.
Operation

43-947.fm Page 21 Thursday, May 25, 2000 11:36 AM
Display (English,
French, Spanish)
DIALING
COMPOSER
The module is dialing a stored Caller
ID record.
Description
MARCAR
LOCAL AREA CODE
Appears when you set the area code.
INDICATIF
PREFIJO
REDIALING FROM CALL RECORD MEMORY
You can redial a telephone number stored in the Caller ID’s
memory.
1. Press
REVIEW
or
REVIEW
to view the desired call
record.
2. Lift your phone’s handset and check for a dial tone.
3. Press
CALL BACK
to redial the telephone number. If the
number to be redialed is out of your area code, dial 1 on
your phone before pressing
CALL BACK
.
DELETING CALLS
Deleting a Single Call
1. Repeatedly press (or hold down)
REVIEW
until you see the call record you want to
delete.
REVIEW
or
ERASE
2. Press
. The module deletes that record and automatically renumbers the remaining call records. After 10
seconds, the time and date reappear.
Operation
21

43-947.fm Page 22 Thursday, May 25, 2000 11:36 AM
Deleting All Calls
1. While the module displays the time and date, press
REVIEW
or
REVIEW
.
2. Hold down
While
CALL
button. After about 5 seconds,
ERASE
DELETE ALL?
appears. Or, to cancel the deletion, do not press any
DELETE ALL?
until
appears, press
appears.
ERASE
DELETE ALL?
again.
disappears.
NO
VIP CALL LIST
Your system lets you save up to 20 call records in its VIP call list
so they will not be deleted if you delete all calls from the system’s memory. This lets you save a list of important callers.
Follow these steps to store call records in the VIP call list.
1. Repeatedly press
see the call record you want to store as a VIP call.
2. Hold down
STORED
VIP call record.
appears. The system stores the call record as a
REVIEW
VIP MEM
until
REVIEW
or
VIP
flashes and
until you
RECORD
22
Operation

43-947.fm Page 23 Thursday, May 25, 2000 11:36 AM
Notes:
• If the system’s memory is full (20 VIP call records are
already stored),
VIP MEM
press
VIP MEMO FULL
appears when you
. To store another VIP call record, you
must first delete an existing one.
• If you save a call record as a VIP call record, the total
number of call records decreases by 1.
To review VIP call records, press
press
REVIEW
or
REVIEW
To delete a VIP call record, press
record you want to delete, then press
VIP MEM
.
VIP MEM
ERASE
To delete all entries from the VIP call list, press
hold down
ERASE
DELETE ALL?
.
appears. Press
, then repeatedly
, select the call
.
VIP MEM
, then
ERASE
again to confirm. Or, to cancel deletion, do not press any button. After about 5 seconds,
DELETE ALL?
Operation
disappears.
23

43-947.fm Page 24 Thursday, May 25, 2000 11:36 AM
Troubleshooting
ˆ
If your system is not working as it should, these suggestions
might help you eliminate the problem.
Problem Solution
Blank screen The module is not receiving power.
Make sure the batteries are installed
and the AC adapter is plugged in.
Adjust the contrast as described in
“Adjusting the Display Contrast” on
Page 15.
You have an incoming
call, but do not receive
any Caller ID information.
No dial tone on the phone
attached to the module.
You answered the call before the
module received the call information.
Wait until your phone rings at least 2
times before answering a call.
Check all wires and cables to make
sure that all connections are secure.
Check your phone line by disconnecting the module then reconnecting the phone and checking for a dial
tone.
If you see a message that you do not understand, see “Displayed Call Information” on Page 18.
24
Troubleshooting

43-947.fm Page 25 Thursday, May 25, 2000 11:36 AM
Care and Maintenance
ˆ
Your
RadioShack 79-Memory Caller ID Module with Backlight
is an example of superior design and craftsmanship. The following suggestions will help you care for your module so you
can enjoy it for years.
Keep the module dry. If it gets wet, wipe it dry immediately. Liquids might contain minerals that can
corrode the electronic circuits.
Use and store the module only in normal temperature environments. Temperature extremes can
shorten the life of electronic devices, damage batteries, and distort or melt plastic parts.
Keep the module away from dust and dirt, which
can cause premature wear of parts.
Handle the module gentl y and care fully. Droppi ng it
can damage circuit boards and cases and can
cause the module to work improperly.
Use only fresh batteries of the required size and
recommended type. Batteries can leak chemicals
that damage your module’s electronic parts.
Wipe the module with a damp cloth occasionally to
keep it look ing new. Do not us e harsh chemica ls,
cleaning solvents, or s trong detergents to clean the
module.
Care and Maintenance
25

43-947.fm Page 26 Thursday, May 25, 2000 11:36 AM
Modifying or tampering with the module’s internal components
can cause a malfunction and might invalidate its warranty and
void your FCC authorization to operate it. If your module is not
performing as it shou ld, take i t to your local Radi oShack s tore
for assistance. If the trouble is affecting the telephone lines, the
phone company can ask you to disconnect your module until
you have resolved the problem.
THE FCC WANTS YOU TO KNOW
In the unlikely event that your module causes problems on the
phone line, the phone company can temporarily discontinue
your service. If this happens, the phone company attempts to
notify you in advance. If advance notice is not practical, the
phone company notifies you as soon as possible and advises
you of your right to file a complaint with the FCC.
Also, the phone company can make changes to its lines, equipment, operations, or procedures that could affect the operation
of this module. The telephone company notifies you of these
changes in advance, so you can take the necessary steps to
prevent interruption of your t ele pho ne se rvic e.
LIGHTNING
Your module has built-in protection circuits to reduce the risk of
damage from surges in telephone line and power line current.
These protection circuits meet or exceed the FCC requirements. However, lightning striking the telephone or power lines
can damage your module.
Lightning damage i s not com mon. Never theles s, if you live in an
area that has severe electrical storms, we suggest that you unplug your module when storms approach to reduce the possibility of damage.
26
Care and Maintenance

43-947.fm Page 27 Thursday, May 25, 2000 11:36 AM
Notes
ˆ
Notes
27

43-947.fm Page 28 Thursday, May 25, 2000 11:36 AM
Limited One-Year Warranty
This product is warranted by RadioShack against manufacturing defects in material
and workmanship under normal use fo r one (1) year f rom the da te of p urcha se fro m
RadioShack company-owned stores and authorized RadioShack franchisees and
dealers. EXCEPT AS PROVIDED HEREIN, RadioShack MAKES NO EXPRESS
WARRANTIES AND ANY IMPLIED WARRANTIES, INCLUDING THOSE OF MERCHANTABILITY AND FITNESS FOR A PARTICULAR PURPOSE, ARE LIMITED
IN DURATION TO THE DURATION OF THE WRITTEN LIMITED WARRANTIES
CONTAINED HEREIN. EXCEPT AS PROVIDED HEREIN, RadioShack SHALL
HAVE NO LIABILITY OR RESPONSIBILITY TO CUSTOMER OR ANY OTHER
PERSON OR ENTITY WITH RESPECT TO ANY LIABILITY, LOSS OR DAMAGE
CAUSED DIRECTLY OR INDIRECTLY BY USE OR PERFORMANCE OF THE
PRODUCT OR ARISING OUT OF ANY BREACH OF THIS WARRANTY, INCLUDING, BUT NOT LIMITED TO, ANY DAMAGES RESULTING FROM INCONVENIENCE, LOSS OF TIME, DATA, PROPERTY, REVENUE, OR PROFIT OR A NY
INDIRECT, SPECIAL, INCIDENTAL, OR CONSEQUENTIAL DAMAGES, EVEN IF
RadioShack HAS BEEN ADVISED OF THE POSSIBILIT Y OF SUCH DAMAGES.
Some states do not allow limitations on how long an implied warranty lasts or the
exclusion or limitation of incidental or consequential damages, so the above limitations or exclusions may not apply to you.
In the event of a product defect d uring the warranty period, take the product and th e
RadioShack sales receipt as proof of purchase date to any RadioShack store. RadioShack will, at its option, unless otherwise provided by law: (a) correct the defect
by product repair without charge for parts and labor; (b) replace the product with
one of the same or similar design; or (c) refund the purchase price. All replaced
parts and products, and products on which a refund is made, become the property
of RadioShack. New or recondi tione d pa rts a nd p rodu cts ma y be used i n th e per formance of warranty service. Repaired or replaced parts and products are warranted
for the remainder of the original warranty period. You will be charged for repair or
replacement of the product made after the expiration of the warranty period.
This warranty does not cover: (a) damage or failure caused by or attributable to
acts of God, abuse, accident, misuse, improper or abnormal usage, failure to follow
instructions, improper installation or maintenance, alteration, lightning or other incidence of excess voltage or current; (b) any repairs other than those provided by a
RadioShack Authorized Service Facility; (c) consumables such as fuses or batteries; (d) cosmetic damage; (e) transportation, shipping or insurance costs; or (f)
costs of product removal, installation, set-up service adjustment or reinstallation.
This warranty gives you specific legal rights, and you may also have other rights
which vary from state to state.
RadioShack Customer Relations, 200 Taylor Street, 6th Floor,
Fort Worth, TX 76102
We Service What We Sell
12/99
RadioShack — A Division of
Tandy Corporation
Fort Worth, Texas 76102
43-947
04A00
Printed in China
 Loading...