


19-1207.fm Page 1 Friday, November 10, 2000 11:04 AM
BTX-128
2-Channel 1-Watt
UHF Business Band
Transceiver
with CTCSS
Owner’s Manual
Please read before using this equipment.
19-1207.fm Page 2 Friday, November 10, 2000 11:04 AM
ˆ
Contents
FCC Regulations ............................... . 5
FCC License Required ..................... 5
FCC Part 90 Rules ........................... 7
A Quick Look at
Your Transceiver .............................. 13
Preparation ....................................... 14
Installing the Battery Pack ............. 14
Charging the Battery Pack ............. 15
Connecting the Antenna ................ 17
Using the Belt Clip ......................... 19
Connecting an Earphone /
External Speaker ........................... 19
Using an External Speaker/
Microphone .................................... 22
Setting Frequency Options ............ 22
©
2000 RadioShack Corporation. All Rights Reserved .
RadioShack and RadioShack.com are trademarks
used by RadioShack Corporation.
2
Contents
19-1207.fm Page 3 Friday, November 10, 2000 11:04 AM
Setting a UHF Business Band
Frequency ..................................... 23
About Quiet Tone ........................... 28
Operation .......................................... 33
Care ................................................... 35
Specifications .................................. 36
ˆ
Features
Your RadioShack 2-Channel 1-Watt UHF
Business Band Transceiver is a portable,
two-way business radio service transceiver that you can carry almost anywhere. The transceiver is compact and
light, making it an ideal choice for your
business needs.
Programmable Frequencies
thorized service facility can program the
Features
— an au-
3

19-1207.fm Page 4 Friday, November 10, 2000 11:04 AM
transceiver to any UHF business band
frequency you have a license to use – no
crystals to buy!
Note:
Your local RadioShack store must
send the transceiver to an author ized s ervice facility to program the transceiver
with a frequency. You must show your license to store personnel.
38 Quiet Tone CTCSS (Continuous
Tone Control Squelch System)
—
helps reduce interference from other
transceivers which are operating on the
same frequency, in the same area.
PLL-Controlled Circuitry
— provides
accurate and stable channel selection.
TX/BATT Indicator
— flashes green
while the transceiver is turned on, lights
green while transmitting, and turns red
when battery is low.
4
Features
19-1207.fm Page 5 Friday, November 10, 2000 11:04 AM
ˆ
FCC Regulations
FCC LICENSE REQUIRED
This transceiver is intended for use in the
operation of commer cial a ctivi ties, e ducational, philanthropic, or ecclesiastical institutions, and hospitals, clinics, or
medical associations.
The
Federal Communications Commis-
(FCC) requires you t o ha ve a l ic ens e
sion
before you operate this transceiver. Unless you are already licensed to operate
on one of the preset frequencies, you
must apply for a frequency through the
PCIA (Personal Communication Industry
Association), a non-profit organization
that assigns frequencies nationwide to
help prevent conflicts between different
businesses using transceivers in the
FCC Regulations
5
19-1207.fm Page 6 Friday, November 10, 2000 11:04 AM
same area. For more information about
getting a license, contact the PCIA at
800-759-0300, extension 3068 (in Virginia 703-739-0300, extension 3068).
For other questions concerning the license application, contact the FCC at
717-337-1212, or write:
FCC
P.O. Box 1040
Gettysburg, PA 17325
For the latest FCC application form and
instructions, call the FCC's fax-ondemand service at 1-202-418-0177 from
a fax machine and request one or more
of the following documents:
To receive: Enter:
All forms and instructions 000600
6
FCC Regulations
19-1207.fm Page 7 Friday, November 10, 2000 11:04 AM
To receive: Enter:
Form 600 instructions only 006001
Main Form 600 only 006002
Form 600 schedules only 006003
If you do not have a fax mach ine , you ca n
call the Government Forms Distribution
Center at 1-800-418-FORM and request
that the form and instructions be mailed
to you.
FCC PART 90 RULES
You must be familiar with Part 90 of
before you operate your transceiv-
Rules
FCC
er. The operation instructions in th is ma nual conform t o Part 90, but do not cover
all items in Part 90.
FCC Regulations
7

19-1207.fm Page 8 Friday, November 10, 2000 11:04 AM
Overall, Part 90 states that:
• You must have a valid license before
you use the transceiver.
• As licensee, you are responsible for
proper operation of all transceivers
operating under your license authority.
• Y o u ca n let unl icensed person s operate this transmitter, as long as you
take precautions to prevent unauthorized transmissions.
• You must use this transceiver only
for the comme rcial use of your busi ness, and on ly when othe r commercial channels (such as the
telephone) are either not available or
not practical.
8
FCC Regulations
19-1207.fm Page 9 Friday, November 10, 2000 11:04 AM
ou must always yield the operating
•Y
frequency to communications that
involve the safety of life or property.
• You must take reasonable precau-
tions to prevent harmful interference
to other services operating on the
same frequency.
• You must not transmit program
material of an y kind used in connection with commercial broadcasting.
• You must not provide a service that
is normally handled by telephone or
telegraph unless such broadcasts
involve the safety of life or property
or in emergencies such as an earthquake, hurricane, flood or a similar
disaster where normal communication channels are disrupted.
FCC Regulations
9

19-1207.fm Page 10 Friday, November 10, 2000 11:04 AM
• During each transmission or
exchange of transmissions, you
must identify your station with the
call sign issu ed to you by the FCC,
or once each 15 minutes dur ing periods of continuous operation.
• You must keep a written record of
any maintenance or modification
made to the transceiver, and you
must make this record available for
inspection upon demand by the
FCC.
Violating any of the provisions of Part 90
can result in fines and/or confiscation of
equipment.
Your equipment might cause TV or radio
interference even when it is operating
properly. To eliminate interference, you
can try one or more of the following corrective measures:
10
FCC Regulations

19-1207.fm Page 11 Friday, November 10, 2000 11:04 AM
• reorient or relocate the receiving
antenna
• increase the distance between the
equipment and the radio or TV
• use outlets on different electrical cir-
cuits for the equipment and the radio
or TV
Consult your local RadioShack store if
the problem still exists.
You must use shielded interface cables
with this equipment.
Additional FCC Regulations
The Business Radio Service is under the
jurisdiction of the Federal Communications Commission (FCC). Any adjustments or alte rations that would a lter the
FCC Regulations
11

19-1207.fm Page 12 Friday, November 10, 2000 11:04 AM
performance of the transceiver so it no
longer meets the original FCC type acceptance or would change the frequencydetermining method are strictly prohibited.
Replacement or substitution of crystals,
transistors, integrated circuits, regulator
diodes, or any other component that is of
a unique nature with components other
than those recommended can violate the
technical regulations of the
FCC Rules
or
violate type acceptance requirement of
the rules.
Before you operate the transceiver, you
must obtain your license. It is illegal to
transmit without the appropriate license,
which you can get by submitting a completed FCC Form 600 to the FCC (or
through the PCIA). Furthermore, you are
required to understand Part 90 of the
12
FCC Regulations

19-1207.fm Page 13 Friday, November 10, 2000 11:04 AM
FCC Rules
ceiver. It is the u se r's re sp ons ib ili ty to se e
that this unit is operating at all times in
accordance with the
ˆ
prior to operating your trans-
FCC Rules
.
A Quick Look at
Your Transceiver
CHANNEL A/B
VOLUME/OFF
PTT
MON
A Quick Look at Your Transceiver
TX/BATT
EAR/MIC
13

LOCK
19-1207.fm Page 14 Friday, November 10, 2000 11:04 AM
ˆ
Preparation
INSTALLING THE BATTERY
PACK
The supplied Ni-MH battery pack, when
fully charged, provides power to your
transceiver for up to 10 hours. You must
install the battery pack into your transceiver, then charge it.
Caution:
from the battery pack. Doing so can permanently damage the battery.
14
Do not remove the plastic wrap
LOCK
1. Slide
battery compartment
cover to the right to
unlock it, then slide
the battery compart-
on the
Preparation

19-1207.fm Page 15 Friday, November 10, 2000 11:04 AM
ment cover in the direction of the
arrows and lift it off.
2. Plug the battery pack’s connector
into the connector inside the battery
compartment. Then place the battery
pack in the compartment.
Note:
The connector fits only one
way. Do not force it.
3. Replace the battery compartment
cover, then slide
lock the cover.
LOCK
to the le ft to
CHARGING THE BATTERY
PACK
Before you use the battery pack for the
first time, you must use the supplied battery charger to charge it for about 14
hours. You cannot use the transceiver
while you charge the battery pack.
Preparation
15

19-1207.fm Page 16 Friday, November 10, 2000 11:04 AM
To ensure maximum range, operate the
transceiver with the battery pack fully
charged. As the voltage decreases, the
range decreases.
Caution:
The supplied 12V DC, 200 mA
battery charger was designed specifically
for your transceiver. Use only the supplied battery charger.
1. Turn
VOLUME/OFF
fully counterclockwise unt il it clic ks to tu rn off the
transceiver.
2. Pull out the rubber cover on the
12V
jack on the lower side of the
DC
transceiver and insert the charger’s
barrel plug into the jack. Then plug
the other end of the charger into a
standard AC outlet.
If TX/BATT lights red and flashes
green when the transceiver is on, the
transceiver has about 60 minutes of
16
Preparation

19-1207.fm Page 17 Friday, November 10, 2000 11:04 AM
battery power remaining. Recharge
the battery pack.
3. Unplug the AC adapter from the AC
outlet after the battery is fully
charged.
Caution:
signed to be charged using the supplied
battery charger for up to a year, do not
charge the battery pack longer than 24
hours at a time.
Although the bat tery pa ck i s d e-
CONNECTING THE
ANTENNA
1. Align the slots around the antenna’s
connector with the tabs on the
antenna ja ck on t he top o f the tr ansceiver.
Preparation
17

19-1207.fm Page 18 Friday, November 10, 2000 11:04 AM
2. Press the antenna down over the
jack and turn the antenna’s base
clockwise until it locks into place.
3. To detach the antenna, turn the
antenna’s base counterclockwise.
Then lift off the antenna.
Connecting an Optional
Antenna
Although the supplied rubber duck antenna provides excellent local reception, you
can connect an optional external mobile
antenna or o utdoo r base s tation a ntenna
to your transceiver for better reception of
weak signals. The antenna jack on the
top of the transceiver makes it easy to
use the tran sceiver with a varie ty of antennas. Your local RadioShack store
sells a variety of antennas.
18
Preparation

19-1207.fm Page 19 Friday, November 10, 2000 11:04 AM
USING THE BELT CLIP
The supplied belt clip lets you easily attach the transceiver to your belt.
Slide the belt clip onto the tab at the back
of the transceiver until it clicks. To remove the clip, pull up on its middle tab
and slide it down.
CONNECTING AN
EARPHONE/EXTERNAL
SPEAKER
To listen privately or to hear better in a
large area such as a warehouse, you can
pull up the rubber cover on the
MIC
jacks, then plug a monaural earphone or an external speaker with a 3.5
mm (1/8 inch) plug ( not suppli ed) into the
EAR
jack on the side of th e transceiver.
EAR
and
Preparation
19

19-1207.fm Page 20 Friday, November 10, 2000 11:04 AM
This automatically disconnects the builtin speaker.
Listening Safely
To protect your hearing, follow these
guidelines when you use an earphone.
• Set the volume to the lowest setting
before you begin listening. After you
begin listening, adjust the volume to
a comforta ble level.
• Do not listen at extremely high vol-
ume levels. Extended high-volume
listening can lead to permanent
hearing loss.
• Once you set the volume, do not
increase it. Over time, your ears
adapt to the volume level, so a volume level that does not cause dis-
20
Preparation

19-1207.fm Page 21 Friday, November 10, 2000 11:04 AM
comfort might still damage your
hearing.
Traffic Safety
Do not use an earphone with your transceiver when operating a motor vehicle or
riding a bicy cle in or near traffic. Doing so
can create a traffic hazard and could be
illegal in some areas.
If you use an earphone with your transceiver while riding a bicycle, be very
careful. Do not listen to a continuous
broadcast. Even though some earphones
let you hear some outside sounds when
listening at normal volume levels, they
still can present a traffic hazard.
Preparation
21

19-1207.fm Page 22 Friday, November 10, 2000 11:04 AM
USING AN EXTERNAL
SPEAKER/MICROPHONE
An external speaker/microphone can
make it easier to use the transceiver
when you clip it to your belt, so you do
not have to lift the transceiver to your
mouth each time yo u tra ns mi t. Pu ll u p th e
rubber cover from the
and plug the speaker/microphone’s 2.5
mm (3/32 inch) plug into the jacks. This
automatically disconnects the transceiver’s built-in speaker and microphone.
EAR
and
MIC
jacks
SETTING FREQUENCY
OPTIONS
Before you can use your transceiver, you
must set your transceiver to a UHF business band frequency you have a license
to use. Then you can select a preset quiet tone CTCSS (Continuous Tone Con-
22
Preparation

19-1207.fm Page 23 Friday, November 10, 2000 11:04 AM
trol Squelch System) frequency and set
your transceiver to use it.
1. Set your transceiver to a UHF business band frequency (see “Setting a
UHF Business Band Frequency” on
Page 23).
2. Select a quiet tone frequency then
set the DIP switches to that frequency (see “Using a Quiet Tone
Frequency” on Page 29).
You can select one quiet tone frequency
at a time. If you do no t want to us e a qui et
tone frequency, skip Step 2.
SETTING A UHF BUSINESS
BAND FREQUENCY
There are eight UHF business band frequencies available in your transceiver.
Preparation
23

19-1207.fm Page 24 Friday, November 10, 2000 11:04 AM
• 464.50 MHz (Brown Dot)
• 464.550 MHz (Yellow Dot)
• 467.7625 MHz (J Dot)
• 467.8125 MHz (K Dot)
• 467.850 MHz (Silver Star)
• 467.875 MHz (Gold Star)
• 467.900 MHz (Red Star)
• 467.925 MHz (Blue Star)
Channel A is preset to 464.550 MHz and
Channel B is preset to 464.500 MHz. You
can set Channel A or B to any frequency
listed on Page 24.
1. Turn
VOLUME/OFF
fully counterclockwise unt il it clic ks to tu rn off the
transceiver.
2. Remove the battery compartment
cover. Then lift up t he plastic cover
marked QUIET.
24
Preparation

19-1207.fm Page 25 Friday, November 10, 2000 11:04 AM
Note:
Be sure the battery pack is
connected.
3. Hold down
VOLUME/OFF
PTT
clockwise to turn on
and
MON
, then turn
the transceiver. The transceiver
beeps once.
MON
4. Press
once. The transceiver
sounds a two-tone sequence.
5. Rotate
CHANNEL A/B
to select the
channel you want to set.
Preparation
25

19-1207.fm Page 26 Friday, November 10, 2000 11:04 AM
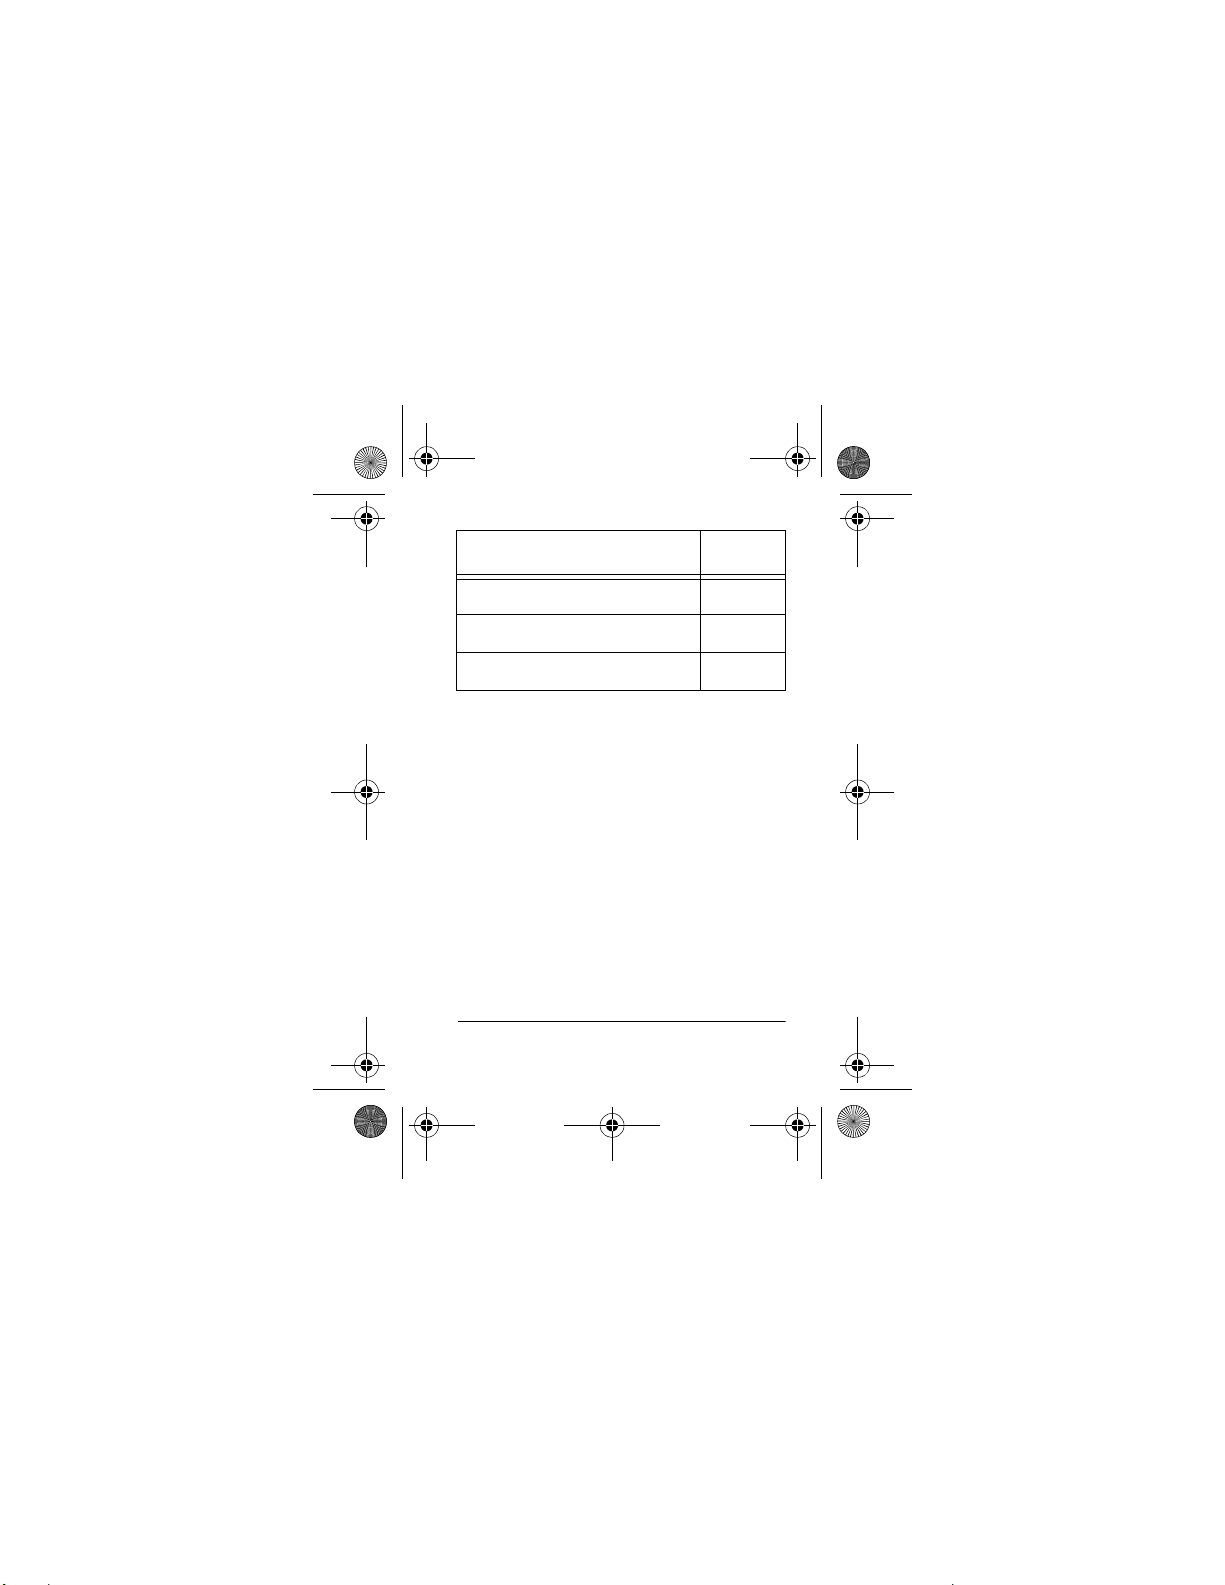
6. Choose a UHF
dot frequency
from the list on
Page 24. Then
use a pointed
object such as
a straightened
paper clip to
DIP
Switches
set the position of each
DIP switch to 1
(up) or 0 (down) as indicated in the
following table.
Channel
Number
Frequency
(MHz)
1 464.5000 000001
2 464.5500 000010
3 467.7625 000011
4 467.8125 000100
5 467.8500 000101
DIP Switch S et t i ng
0 = down
1 = up
26
Preparation

19-1207.fm Page 27 Friday, November 10, 2000 11:04 AM
Channel
Number
7. Press
Frequency
(MHz)
6 467.8750 000110
7 467.9000 000111
8 467.9250 001000
MON
DIP Switch S et t i ng
0 = down
1 = up
once. If the DIP switch
setting is correct, the transceiver
sounds a three-tone sequence. If the
DIP switch setting is incorrect, the
transceiver beeps once.
8. Turn the transceiver off then on.
Note:
If you do not turn off the transceiver to reset the power, the original frequency setting remains unchanged.
If you want to set your transceiver to a
UHF business band frequency other than
Preparation
27

19-1207.fm Page 28 Friday, November 10, 2000 11:04 AM
the frequencies listed on Page 24, you
can take your transceiver to an authorized facility to set your transceiver to a
frequency you have a license to use.
ABOUT QUIET TONE
Quiet tone helps eliminate interference
between different users of the same frequency, letting you talk and listen to people who are using other transceivers set
to the same frequency and quiet tone
code. This is like having a sub-channel
within a channel, giving you greater communication flexibility. When you set a quiet tone code — there are 38 to choose
from — and turn on your transceiver’s
quiet tone, the transceiver transmits a
tone with your transmission, letting you
communicate with anyone who has a
transceiver set to the same frequency
28
Preparation

19-1207.fm Page 29 Friday, November 10, 2000 11:04 AM
and code. This tone is too low for you to
hear, but other transceivers can detect it.
Once you set a quiet tone on the transceiver, it only receives those transmissions that include the same tone. If two
different groups operate transceivers in
the same area on the same frequency,
they do not hear ea ch oth er’ s broadcast if
they both use quiet to ne and ea ch selects
a different quiet tone.
Using a Quiet Tone Frequency
1. Turn
VOLUME/OFF
fully counterclockwise unt il it clic ks to tu rn off the
transceiver.
2. Remove the battery compartment
cover. Then lift up the plastic cover
marked QUIET.
Preparation
29

19-1207.fm Page 30 Friday, November 10, 2000 11:04 AM
3. Choose a quiet tone code from the
following table, then use a pointed
object such as a straightened paper
clip to set the position of each DIP
switch to 1 (up) or 0 (down) as indicated in the following table.
Quiet
Frequency
Code
None 000000
1 67.0 000001
2 71.9 000010
3 74.4 000011
4 77.0 000100
5 79.7 000101
6 82.5 000110
7 85.4 000111
8 88.5 001000
9 91.5 001001
10 94.8 001010
30
(Hz)
DIP Switch Setting
0 = down
1 = up
Preparation

19-1207.fm Page 31 Friday, November 10, 2000 11:04 AM
Quiet
Frequency
Code
11 97.4 001011
12 100.0 001100
13 103.5 001101
14 107.2 001110
15 110.9 001111
16 114.8 010000
17 118.8 010001
18 123.0 010010
19 127.3 010011
20 131.8 010100
21 136.5 010101
22 141.3 010110
23 146.2 010111
24 151.4 011000
25 156.7 011001
26 162.2 011010
(Hz)
DIP Switch Setting
0 = down
1 = up
Preparation
31

19-1207.fm Page 32 Friday, November 10, 2000 11:04 AM
Quiet
Frequency
Code
27 167.9 011011
28 173.8 011100
29 179.9 011101
30 186.2 01111 0
31 192.8 011111
32 203.5 100000
33 210.7 100001
34 218.1 100010
35 225.7 100011
36 233.6 100100
37 241.8 100101
38 250.3 100110
(Hz)
DIP Switch Setting
0 = down
1 = up
4. Replace the plastic cover and the
battery compartment cover. Then
VOLUME/OFF
32
turn
Preparation
clockwise until it

19-1207.fm Page 33 Friday, November 10, 2000 11:04 AM
clicks to turn on the transceiver. The
transceiver sets the quiet tone code.
Note:
If the DIP switch setting is not
listed in the table on Pages 30–32,
no tone is set.
ˆ
Operation
Notes:
• You can only communicate with
another transceiver that is using the
same channel and/or the same quiet
tone code as your transceiver.
• Your transceiver’s range varies
depending on factors such as position, terrain, and battery condition.
Buildings absorb transmitted signals
and, if they contain metal, might
Operation
33

19-1207.fm Page 34 Friday, November 10, 2000 11:04 AM
completely block the signals. Trees
and heavy cloud formations have a
similar effect, though not as severe.
1. Turn
VOLUME/OFF
clockwise to turn
on the transceiver. The TX/BATT
indicator flashes green about once
per second.
2. Rotate
CHANNEL A/B
to select the
preset channel A or B.
3. To transmit, hold down
hold the transceiver about 3 inches
from your mouth and speak slowly in
a normal voice. The TX/BATT indicator lights green. Release
you finish your transmission.
Note:
If you hold down
PTT
than 2 minutes, the transceiver automatically stops transmitting and
34
Operation
PTT
. Then
PTT
when
for more

19-1207.fm Page 35 Friday, November 10, 2000 11:04 AM
sounds an alert tone. The TX/BATT
indicator flashes green.
4. To hear everything that happens on
the channel includin g wea k transmi ssions, press
MON
.
5. Turn
ˆ
Modifying or tampering with the transceiver’s internal components can cause a
malfunction and might invalidate its warranty and void your FCC authorization to
operate it. If your transceiver is not performing as it should, take it to your local
RadioShack store for ass ist anc e.
VOLUME/OFF
clockwise unt il it clic ks to tu rn off the
transceiver.
fully counter-
Care
Care
35

19-1207.fm Page 36 Friday, November 10, 2000 11:04 AM
ˆ
Specifications
Frequency Range .. 461.0375–469.5625 MHz
Channels ...................................................... 2
Modulation Type ........................................FM
Power Supply .......................... 6V, 1400 mAh
Channel Bandwidth ............. 25 kHz/12.5 kHz
Transmit Power ................................ 1W ERP
External Earphone Jack
External Microphone Jack ................
Dimensions ........... 2
Weight (with battery pack) .................. 11.6 oz
Ni-MH battery pack
.............................1
13
/16 × 53/16 × 15/8 inches
(72 × 132 × 41 mm)
/8-inch
(3.5 mm)
3
/32-inch
(2.5 mm)
0.33 kg)
36
Specifications

19-1207.fm Page 37 Friday, November 10, 2000 11:04 AM
Specifications are typical; individual units
might vary. Specifications are subject to
change and improvement without notice.
Specifications
37

19-1207.fm Page 38 Friday, November 10, 2000 11:04 AM
ˆ
Notes
38
Notes

19-1207.fm Page 39 Friday, November 10, 2000 11:04 AM
Limited One-Year Warranty
This product is warranted by RadioShack against manufacturing defects in material and workmanship under normal use for
one (1) year from the date of purchase from RadioShack company-owned stores and authorized RadioShack franchisees
and dealers. EXCEPT AS PROVIDED HEREIN, RadioShack
MAKES NO EXPRESS WARRANTIES AN D ANY IMPLIED
WARRANTIES, INCLUDING THOSE OF MERCHANTABILITY AND FITNESS FOR A PARTICULAR PURPOSE, ARE
LIMITED IN DURATION TO THE DURATION OF THE WRITTEN LIMITED WARRANTIES CONTAINED HEREIN. EXCEPT AS PROVIDED HEREIN, RadioShack SHALL HAVE
NO LIABILITY OR RESPONSIBILITY TO CUSTOMER OR
ANY OTHER PERSON OR ENTITY WITH RESPECT TO
ANY LIABILITY, LOSS OR DAMAGE CAUSED DIRECTLY
OR INDIRECTLY BY USE OR PERFORMANCE OF THE
PRODUCT OR ARISING OUT OF ANY BREACH OF THIS
WARRANTY, INCLUDING, BUT NOT LIMITED TO, ANY
DAMAGES RESULTING FROM INCONVENIENCE, LOSS
OF TIME, DATA, PROPERTY, REVENUE, OR PROFIT OR
ANY INDIRECT, SPECIAL, INCIDENTAL, OR CONSEQUENTIAL DAMAGES, EVEN IF RadioShack HAS BEEN AD VISED
OF THE POSSIBILITY OF SUCH DAMAGES.
Some states do not allow limitations on how long an implied
warranty lasts or the exclusion or limitation of incidental or
consequential damages, so the above limitations or exclusions may not apply to you.
In the event of a product defect during the warranty period,
take the product and the RadioShack sales receipt as proof of
purchase date to any RadioShack store. RadioShack will, at
its option, unless otherwise provided by law: (a) correct the
defect by product repair without charge for parts and labor; (b)
replace the product with one of th e sam e or similar
(continued)
Notes
39

19-1207.fm Page 40 Friday, November 10, 2000 11:04 AM
design; or (c) refund the purchase price. All re-
(continued)
placed parts and products, and products on which a refund is
made, become the property of RadioShack. New or reconditioned parts and products may be used in the performance of
warranty service. Repaired or replaced parts and products are
warranted for the remainder of the original warranty period.
You will be charged for repair or replacement of the product
made after the expiration of the warranty period.
This warranty does not cover: (a) damage or failure caused by
or attributable to acts of God, abuse, accident, misuse, improper or abnormal usage, failure to follow instructions, improper installation or maintenance, alteration, lightning or
other incidence of excess voltage or current; (b) any repairs
other than those provided by a RadioShack Authorized Service Facility; (c) consumables such as fuses or batteries; (d)
cosmetic damage; (e) transportation, shipping or insurance
costs; or (f) costs of product removal, installation, set-up service adjustment or reinstallation.
This warranty gives you specific legal rig hts, and you m ay also
have other rights which vary from state to state.
RadioShack Customer Relations, 200 Taylor Street,
6th Floor, Fort Worth, TX 76102
We Service What We Sell
RadioSha ck Corporation
Fort Worth, Texas 76102
Printed in China
12/99
19-1207
811082110A
11A00
 Loading...