

Rademacher 34810060 User guide

Operating Manual
EN
DuoFern Central Operating Unit
Item no. 3481 00 60
VBD 520-2 (05.13)
EN
Dear Customer,
i
By purchasing the DuoFern central operating unit you have chosen a quality product
manufactured by RADEMACHER. Thank you for the trust you have placed in us.
This product has been developed with the greatest possible convenience in mind.
The intuitive menu navigation make it considerably easier to use. Having applied
uncompromising quality standards, and carried out thorough testing, we are proud
to be able to present you with this innovative product.
It’s brought to you by all the highly-qualified personnel
here at RADEMACHER.
These instructions...
i
...describe how to use the DuoFern central operating unit.
Before you begin, please read these instructions through completely and follow all
the safety instructions.
Please store these instructions in a safe place and pass them on to any future owners.
Damage resulting from non-compliance with these instructions and safety instructions
will void the guarantee. We assume no liability for any consequential damage.
CE Mark and Conformity
i
The DuoFern central operating unit (item no. 3481 00 60) complies with the requirements
of the current European and national directives. The conformity has been verified
and the corresponding declarations and documentation are available on file at the
manufacturer’s premises.
2

EN
i
Contents
Dear Customer, .........................................2
These instructions... ..................................2
CE Mark and Conformity ............................2
Key to symbols .........................................4
General view ............................................5
Functional description ..............................6
The „WR ConfigTool“ PC software ...............7
Functions for DuoFern actuators ................7
Commissioning the central operating unit ..8
The control keys ......................................10
The various menu views ..........................14
Normal view ........................................... 15
The main menu.......................................17
The system settings menu
Examples of application .......................... 19
– Connecting a DuoFern actuator. .......20
– Connecting a DuoFern actuator
via a radio code. ..............................24
– Configuring switching times for a
group .............................................26
– Setting the position of the sun ......... 28
Automatic functions in the main menu ....30
Menu overview / main menu ................... 31
Main menu ............................................. 32
System settings ......................................43
– Menu overview /
– Menu overview /
– Menu overview / 1
operating unit .................................52
– Menu overview / 1
– Menu overview / 2 Radio settings ... 58
...............18
1. 1 Actuators ......... 44
1.2 Groups ............. 49
.
3 Central
.
4 Sensors ............ 57
Technical Specifications ..........................60
Battery replacement ...............................60
Time zone table ......................................61
Suggested names for groups and
members ................................................ 63
Menu overview ....................................... 64
CE Mark and EC Conformity .....................66
Warranty conditions ...............................67
3

EN
Key to symbols
i
This concerns your safety
Please pay particular attention and carefully
follow all instructions marked with this symbol.
NOTE / IMPORTANT / WARNING
Safety instructions to draw your attention to additional information that is important
for trouble-free operation.
Please read the operating instructions for the external device (e.g. a DuoFern actuator)
described at this point.
Proper use
i
Only use the DuoFern central operating unit ...
... and the associated components of the DuoFern radio system (actuators, sensors,
etc.) for remotely controlling the following equipment:
◆ Roller shutters
◆ Venetian blinds
◆ Awnings
◆ Electrical appliances (e.g. lamps)
Operating conditions
◆ The installation and operation of the DuoFern radio system and its components is
only permitted for those systems and devices where a malfunction in the transmitter
or receiver would not cause a danger to personnel or property or where this risk
is already covered by other safety equipment.
◆ Only use the DuoFern central operating unit in dry rooms.
Improper use
i
Never use the DuoFern central operating unit to...
...remote control devices and systems with increased safety-relevant requirements
or where there is an increased risk of accidents. This shall require additional safety
equipment. Observe the respective statutory regulations for the installation of such
systems.
4

EN
i
OK
M
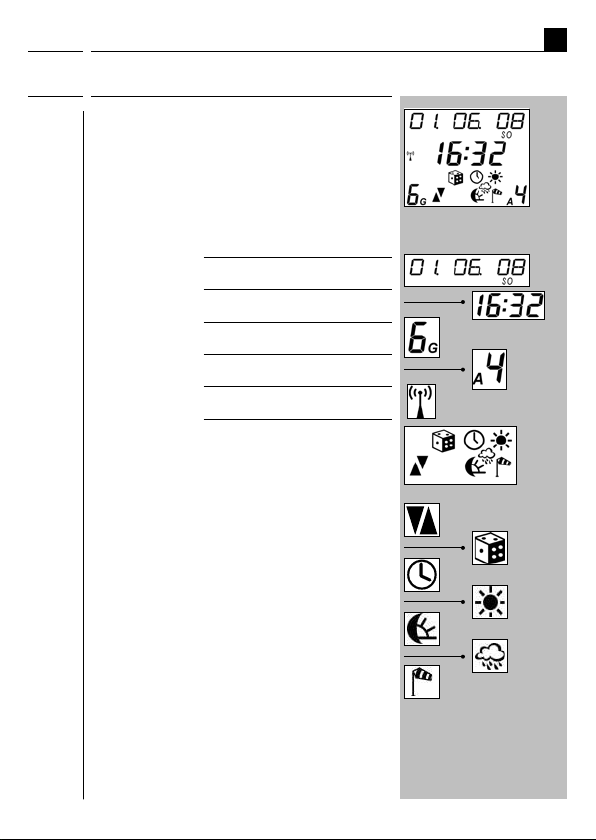
General view
Display
Battery
compartment on
the rear side (incl.
USB port
Group
key
Function
key
Menu
key
Function
key
Member
key
Function
key
OK key
5

EN
Functional description
i
The DuoFern central operating unit is the universal input device for the DuoFern radio
system. The DuoFern central operating unit makes it possible to configure the functions
you require (e.g. connecting and disconnecting actuators and sensors / creating groups
/ automatic switching times, etc.) The settings are transmitted wirelessly to all of the
actuators and connected end units (appliances).
The actuators/sensors must be connected to the central operating unit.
Each DuoFern actuator/sensor has to be assigned to the central operating unit for
your settings and manual switching commands to be executed.
Explanation of terms
The following terms are used in this manual: actuators/members and end units.
Two members or two end units can be controlled by a two-channel actuator after
connection to the central operating unit.
Creating groups
You can collate the logged-on end units together into groups.
Maximum number of groups and members
Groups:
Members per group:
End units
(appliances connected to the actuators)
The following rules apply:
◆ An end unit can only be placed into a group as a member once.
◆ An end unit can be placed in numerous groups.
◆ The central operating unit always suggests the next free group slot.
This serves to avoid unintentional changes.
You can assign a name for all end units and groups
An individual name can be assigned to all end units and groups in order to facilitate a
better overview (e.g. lounge, kitchen, etc.). A table with preprogrammed suggested
names is included on page 63.
9
9
81
6

EN
The „WR ConfigTool“ PC software
i
Alternative function input using the PC software "WR ConfigTool"
Alternately it is possible to set all
functions quickly and clearly on a
computer (which must have a USB
port) using the configuration software
and then to transfer the settings to
the central operating unit.
The "WR ConfigTool" PC software offers the following options:
◆ Convenient configuration via computer.
◆ Assignment of individual names for groups and members.
◆ Backup your settings.
NOTE
◆ You can download the latest version of the configuration software at any time
from the download area on our website (www.rademacher.de/download).
◆ The USB port is located under the battery compartment cover.
◆ It is not possible to directly control end units with WR ConfigTool.
Functions for DuoFern actuators
i
An overview of all central operating unit functions which can be configured for use with
the individual DuoFern actuators can be found on our website (rademacher.de/duofern).
7
EN
Commissioning the central operating unit
OK
i
Insert batteries (pay attention to the polarity)
Insert the batteries into the battery compartment at the rear of the central operating
unit. Please pay attention to the correct polarity when inserting the batteries.
Only use the following battery type: 3 x 1.5 V type AAA (Micro).
NOTE
The central operating unit will not work if the batteries are inserted incorrectly.
Incorrectly inserted batteries can cause damage to the central operating unit.
Setting the date and time
After changing the batteries, you will be prompted to set the current time and date;
see page 53. If you have DCF signal reception at the site of operation, you can ignore
this prompt. Pressing the
-key multiple times enables you to quit setting mode.
8

EN
Commissioning the central operating unit
i
Check DCF signal reception
The central operating unit is equipped with a DCF radio timer. The current date and
time will be set automatically once the DCF signal is received.
The DCF signal scan begins:
◆ as soon as the batteries are inserted (commissioning).
◆ the next day at 03:01 AM, in the event that no DCF signal was available at the
time of commissioning.
◆ every Sunday at 03:01 AM.
NOTE
Reception of a valid signal can take up to 5 minutes.
Under what circumstances is it possible that no valid /
correct DCF signal is received?
◆ If the place of use of the central operating unit is more than 1500 km
from Frankfurt am Main / Germany.
◆ If you are operating the central operating unit in another time zone.
◆ If building conditions restrict reception.
◆ If DCF reception is deactivated.
What can I do if the DCF signal is not detected?
◆ Activate the DCF clock, see page 53.
◆ Enter the current time and date manually; see page 53.
Observe the radio clock icon on the display:
Status Message
A DCF signal is being scanned for. The icon flashes.
A DCF signal has been received. The icon lights up.
No DCF signal has been received. The icon remains off.
DCF reception is deactivated. The icon remains off.
9

EN
The control keys
M
i
The controls keys can be used to navigate within the menus and sub-menus of the
central operating unit as well as to carry out all of the required programming settings.
The various menu views are described from page 14 on.
The following section serves to briefly describe the individual keys and their functions.
A precise functional description shall follow in the latter part of this manual, as part
of the description for the individual settings.
NOTE
For space reasons, the keys are depicted in all of the chapters with substitute icons
instead of the original depiction. Observe the corresponding icons in the following
key description and on page 5.
Keys DisplayDescription
Name: Menu key
Function: a) Access the main menu.
b) Return to the previous
menu item.
c) When encountering problems,
you can return to the normal
view by pressing and holding
this key (approx. 2 seconds).
Symbol: =
M
10

DisplayDescriptionKeys
EN
The control keys
OK
OK
i
Name: OK key
Function: a) Open the selected menu.
b) Open the selected menu
function (e.g. random function).
c) Save or confirm the
current setting.
d) Briefly pressing the key causes
the status of the current
member to be displayed in the
normal view.
e) Press and hold = toggles
between automatic and manual
mode in normal view.
Symbol: =
Name: Function keys
Function: a) Navigate back and forth in the
main menu and all sub-menus.
b) Change the selected value.
c) Manual operation (e.g
switch on an end unit).
Symbol: =
/
Example
11
DisplayDescriptionKeys
EN
The control keys
i
Name: Function key
Function: a) Switch off manual operation (e.g.
end unit) or pause a running
roller shutter.
b) Different functions depending
on the menu, e.g. status display.
Symbol: =
Name: Group key
Function: Select a group.
NOTE: No other group can be selected if a
point appears next to the number.
Symbol: =
12
DisplayDescriptionKeys
EN
The control keys
i
Name: Member key
Function: Select a member from a group.
NOTE: No other member can be selected if a
point appears next to the number.
Symbol: =
NOTE: The following table describes the
relationship between the groups and
members view as well as the resulting
functions.
13

EN
The various menu views
i
The respective settings are undertaken in the menus and sub-menus of the DuoFern
central operating unit. The menus are grouped according to topics, in order to provide
a clearer overview and easier configuration (e.g. manual mode / timer functions /
automatic functions / system settings).
NOTE
A complete overview of the menus can be found on page 64.
Various menu views are used depending on the application (normal mode / main
menu settings or system settings). The following pages serve to briefly describe
the menu views and the individual display icons.
14
DisplayDescriptionKeys
EN
Normal view
i
Name: Normal view
Function: Provides information on:
- The current date
- The current time
- The active group
- The active actuator
- DCF signal
- The last received status for
the selected group or
selected actuator:
Automatic switching times
Random function
Automatic timer
Automatic solar function
Automatic darkness function
Rain function
Automatic wind function
NOTE: The actuator status icons switch
off after approx. 30 seconds in order
to save the battery. Briefly pressing
the OK key causes the status to be
shown again.
Example
15
DisplayDescriptionKeys
EN
Normal view
i
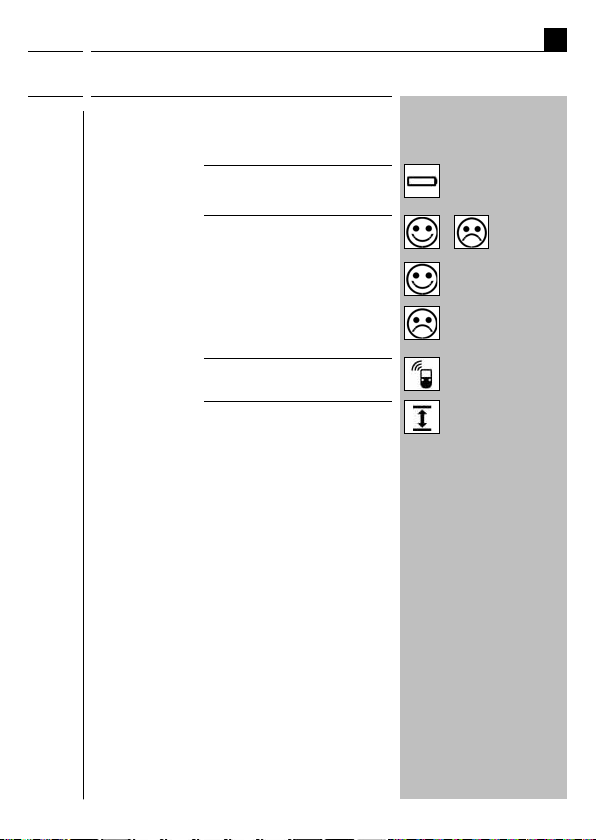
Additional display icons in normal view:
- Battery status
- Data transfer status
Successful
data transfer
Unsuccessful
data transfer
- Radio transmission
- USB status, the central
operating unit is connected
to a computer via USB cable.
/
16
EN
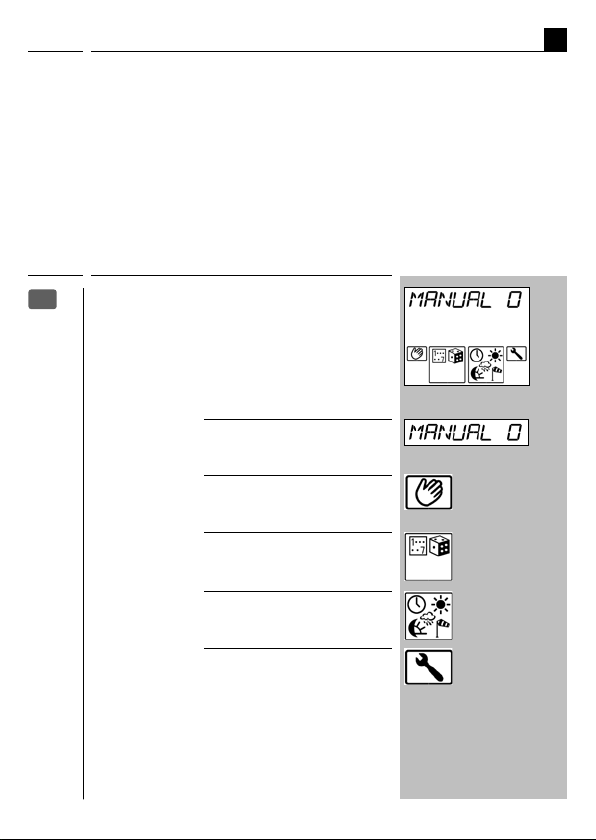
The main menu
i
From the main menu you can select four sub-menus.
Graphical icons are used for these sub-menus to enable easier orientation. As soon
as a sub-menu is selected, the border flashes and the name of the menu is shown at
the top of the display in the ticker.
Key
Name: Main menu
M
Function: Display and select menus.
Key: - Menu title (as ticker)
- Manual mode
- Timer functions
- Automatic functions
- System settings
DisplayDescription
17
EN
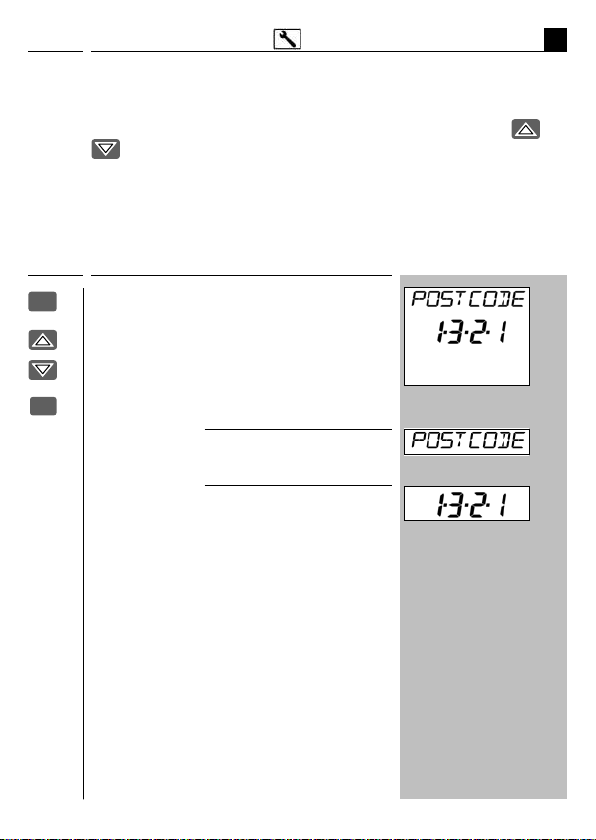
The system settings menu
i
The "system settings" menu enables you to undertake all important basic settings
(see page 43). All of the sub-menus within the system settings menu are designated
with a menu number in order to simplify orientation. The function keys
enable you to quickly select the desired sub-menu and function.
NOTE
An overview of the system settings menu is provided on page 65.
and
Keys
M
OK
18
Name: System settings
Function: Basic settings and individual
functions.
Key: - Menu title
- Menu number of the submenu
(e.g.
set postcode)
1.3.2.1 = postcode =
DisplayDescription
Beispiel

EN
Examples of application
i
The easiest way to familiarise yourself with the menu structure and operation of the
central operating unit is to carry out the most important tasks for setting up a DuoFern
radio network step-by-step.
In order to do so, the following pages describe several basic examples:
◆ Connecting a DuoFern actuator.
◆ Connecting a DuoFern actuator via a radio code.
◆ Configuring a switching time for a group.
◆ Setting the position of the sun for an end unit (e.g. a tubular motor via tubular
motor actuator).
19

EN
Examples of application
i
Connecting a DuoFern actuator.
2.,1
Each DuoFern device (actuator/sensor) has to be assigned to the central operating
unit in order that your settings and manual switching commands can be executed.
In doing so, you can combine the DuoFern actuators into groups.
The maximum number of groups and members can be taken from the table on page 6.
Name assignment when connecting.
An individual name can be assigned to each end unit and group (e.g. lounge, etc.). A
table with the default suggested names is included on page 63.
Foregoing considerations
In order to maintain a clear overview of the settings, we suggest that you enter the end
unit assignment and desired settings into a table (name / group / member number). A
suitable template is available on our website under www.rademacher.de/download.
20
Keys Display
EN
Examples of application
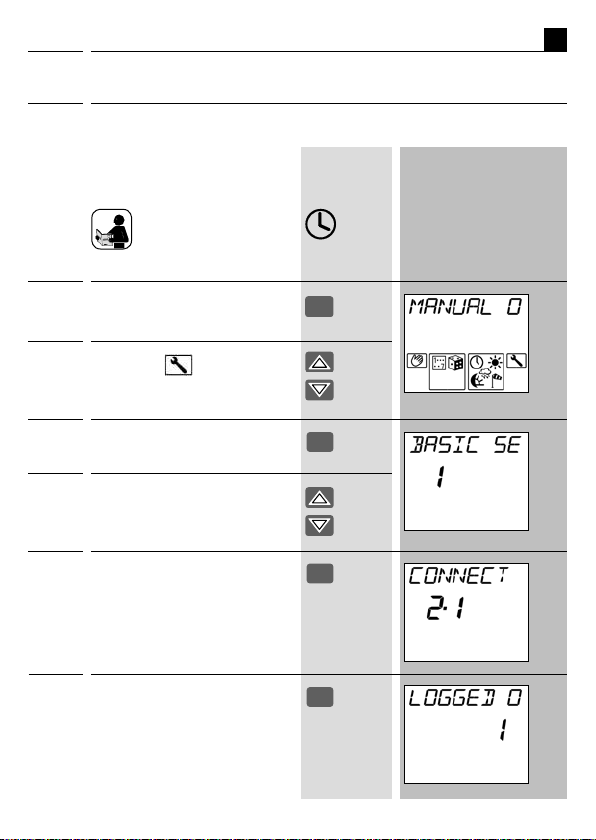
M
OK
OK
OK
i
Connecting a DuoFern actuator.
2.,1
1. Activate the actuator's connect
mode.
Connect mode remains active
for approx. 1 minute.
2. Call up the main menu.
Approx. 1 min.
3. Select the "
settings menu".
4. Confirm selection.
5. Select the menu "2 radiosettings".
6. Confirm selection.
7. Activate function "2
Connect".
The number of connected actuators
is indicated on the display (e.g. [0]
in the event of initial installation).
system
.
,1
21
 Loading...