

Page 1
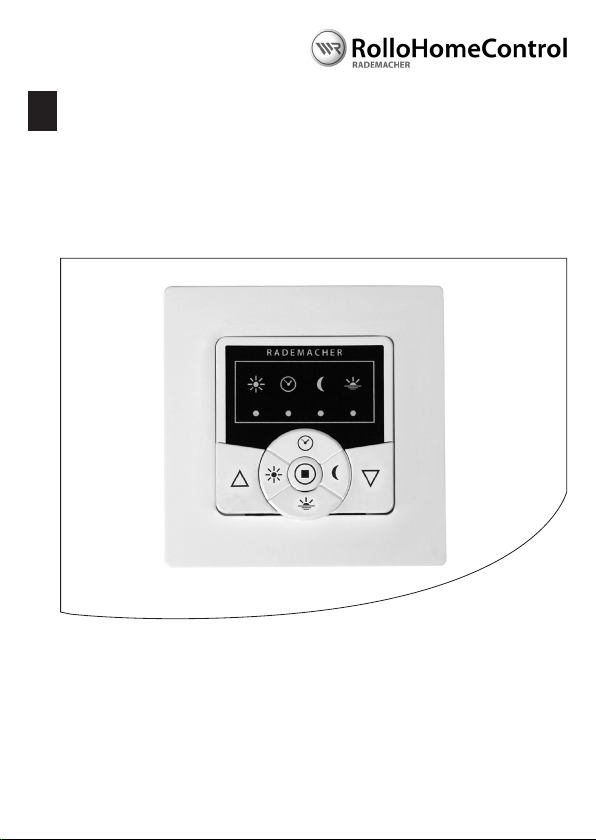
Troll Basic DuoFern 5615 / 5615-AL
EN
Operating and Assembly Manual for 50mm Switch Range
Item No.:
3650 01 72 (ultra-white)
3650 01 82 (aluminium)
VBD 600-2 (07.13)
Page 2
Dear Customer,
i
With your purchase of a Troll Basic DuoFern, you have chosen a quality product manufactured
by RADEMACHER. Thank you for the trust you have placed in us.
The Troll Basic D uoFern has been designed both in order to provide optimal convenience
and operability as well as to ensure solidity and durability. Having applied uncompromising
quality standards and thorough testing, we are proud to be able to present this innovative
product to you.
It’s brought to you by all the highly-qualied personnel here at
RADEMACHER.
These instructions...
...describe how to install, connect the electrical system and operate your Troll Basic DuoFern.
Before you begin, please read these in structions through completely and
follow all the safety instructions.
Please store these instructions in a safe place and pass them on to any future
owners.
Damage resulting from non-compliance with these instructions and safety
instructions will void the guarantee. We assume no liability for any consequential damage.
EN
2
Page 3

Table of Contents
i
EN
i Dear Customer, ............................................... 2
1. Included in delivery ....................................... 4
2. General view - operating unit .........................5
2.1 Brief description of the keys .................. 5
3. The function of the keys and LEDs ................... 6
4. Key to symbols ............................................... 7
5. General safety information ............................. 8
6. Proper use ................................................ 9
7. Improper use ................................................ 9
8. Brief description ........................................... 10
8.1 Compatible switch ranges .................. 11
8.2 DuoFern network function table.......... 12
8.3 Troll Basic DuoFern function
overview ............................................. 14
9. Important information prior to electrical
installation and mounting ............................ 15
9.1 Safety instructions for
electrical connection ........................... 16
9.2 Connecting a tubular motor ................ 17
10. Assembly .............................................. 18
11. Important information prior to
initial commissioning ................................... 19
12. Manual operation ......................................... 19
12.1 Manual operation (jog mode) ............. 20
13. Logging DuoFern transmitters on / o;
brief description............................................ 21
13.1 Login for DuoFern transmitters ............22
13.2 Logging o DuoFern transmitters ........23
13.3 Clearing the DuoFern network ............. 24
14. Automatic mode; brief description ............... 25
14.1 Switch all automatic functions
on / o simultaneously........................ 25
15. Set the motor running time .......................... 26
15.1 Setting the motor running time with
the Troll Basic DuoFern ........................26
15.2 Time the running duration of the
motor and enter it into the
DuoFern controller. ..............................27
16. Setting the sunshine position ....................... 27
16.1 Switching the automated
solar function on/o............................ 28
17. Switching the automatic timer on/o ...........29
18. Switching the automatic
dusk function on/o ..................................... 30
19. Switching the automatic
dawn function on/o. ................................... 30
20. Automatic wind function; brief description .. 31
21. Rain function; brief description ..................... 32
22. Set the ventilation position ........................... 33
23. Venetian blinds mode; brief description ....... 34
24. Switching reversal of
rotation direction on/o ............................... 35
25. End point adjustment ................................... 35
26. Function of external inputs E1 and E2 ........... 37
27. Software reset (restore factory settings). ...... 37
28. Dismantling .............................................. 38
29. CE Mark and EC Conformity ........................... 38
30. Technical Specications ................................39
31. Factory settings ............................................ 39
32. Warranty conditions ..................................... 40
3
Page 4
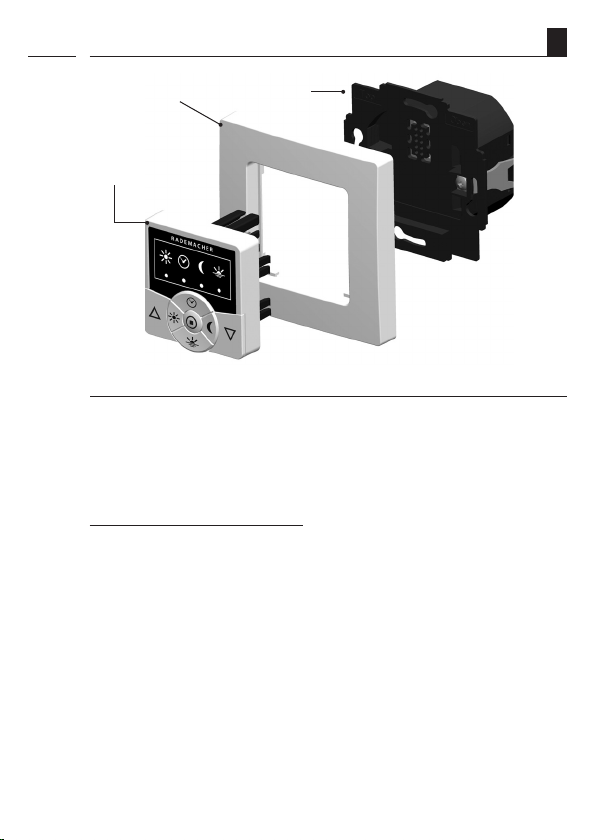
1. Included in delivery
i
EN
2. 3.
1.
Legend
1. Control unit (50 x 50 mm)
2. Frame
3. Installation housing
Operating instructions (no illustration)
Installation, see page 18
4
Page 5
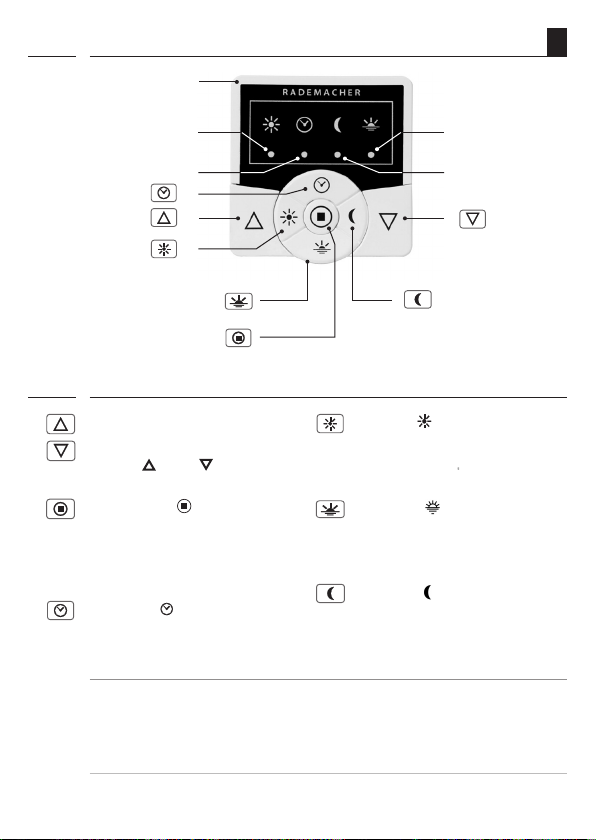
2. General view - operating unit
i
Operating unit
EN
Sun LED
Timer LED
Timer key
Up key
Sun key
Dawn key
SET/Stop key
i
2.1 Brief description of the keys
The operating keys [ up / down ]
◆ Manual operation
[ up
/ down ].
SET/Stop key, [
]
◆ Manual stop or
simultaneously switch all
Sun key, [ ]
Dawn key [ ]
Dusk key
◆ Switches the automated solar
function on/o.
◆ Switches the automatic dawn
function on/o.
automatic functions on/o.
Timer key, [ ]
◆ Switches the automatic timer
Dusk key [
◆ Switches the automatic dusk
]
function on/o.
on/o
NOTE:
◆ All of the keys are also used in various combinations in order to set the dierent functions.
◆ The Troll Basi c DuoFern features automatic LED d imming. The LEDs dim as the roller
shutters are lowered.
Dawn LED
Dusk LED
Down key
5
Page 6
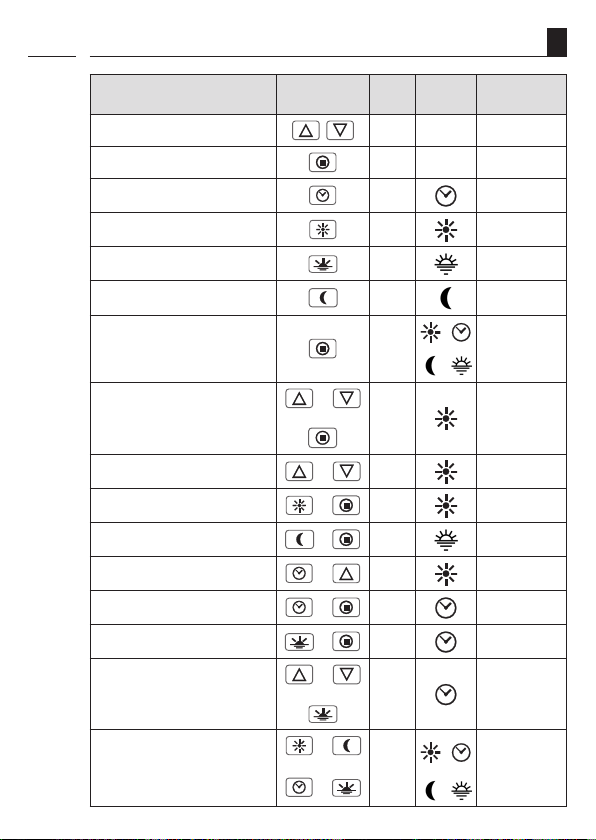
3. The function of the keys and LEDs
i
EN
Function Key
up / stop / down / stop
Stop
Automatic timer on / o
Automated solar function on / o
Automatic dawn function on / o
Automatic dusk function on / o
Automatic system on / o
End point setting only for RADEMACHER
electronic tubular motors
Reversal of direction of rotation +
Accept sunshine position
Accept ventilation position
Set the motor running time
Login for DuoFern transmitters
Logging o DuoFern transmitters
Clearing the DuoFern network
Dura-
LED Action
tion
1 s
1 s
1 s
1 s
1 s
/
+
4 s
+
+
+
+
+
+
+
1 s
1 s
4 s
4 s
4 s
4 s
Lights red
Lights red
Lights red
Lights red
max. all LEDs
light up red or are
switched o
Flashes red
Flashes red
Flashes red
Flashes red
Flashes red
Flashes green
Flashes red
Flashes red >
lights up green
Software reset
+
+ +
+
4 s
All of the LEDs
ash red
6
Page 7
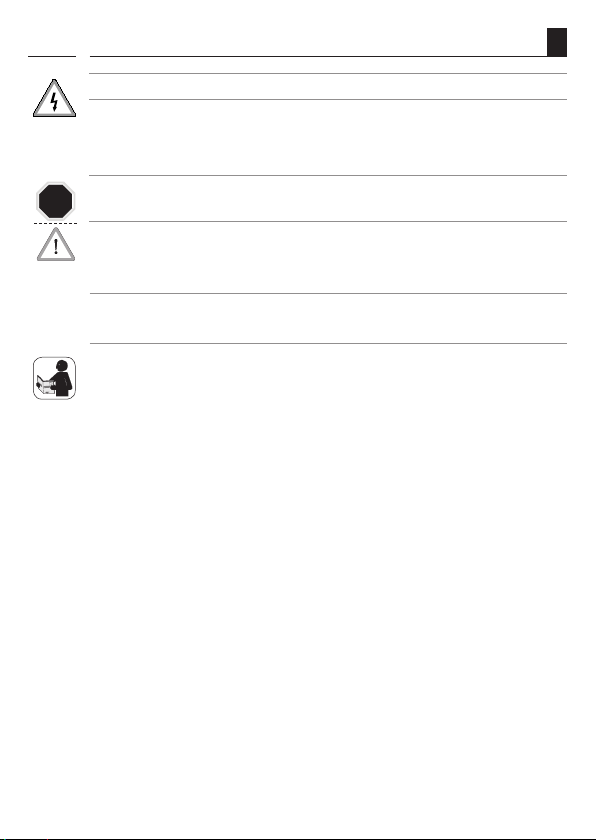
4. Key to symbols
i
Risk of fatal electric shock.
This sign warns of danger when working on electrical connections, components, etc. It requires
that safety precautions be taken to protect the life and health of the person concerned.
This concerns
STOP
your safety.
Please pay particular attention and carefully follow all instructions marked with this symbol.
NOTE / I MPORTANT / C AUTION
This is to draw your attention to information that is important for trouble-free operation.
Please read the operating instructions for external devices described at this point,
(e.g. a tubular motor).
EN
7
Page 8
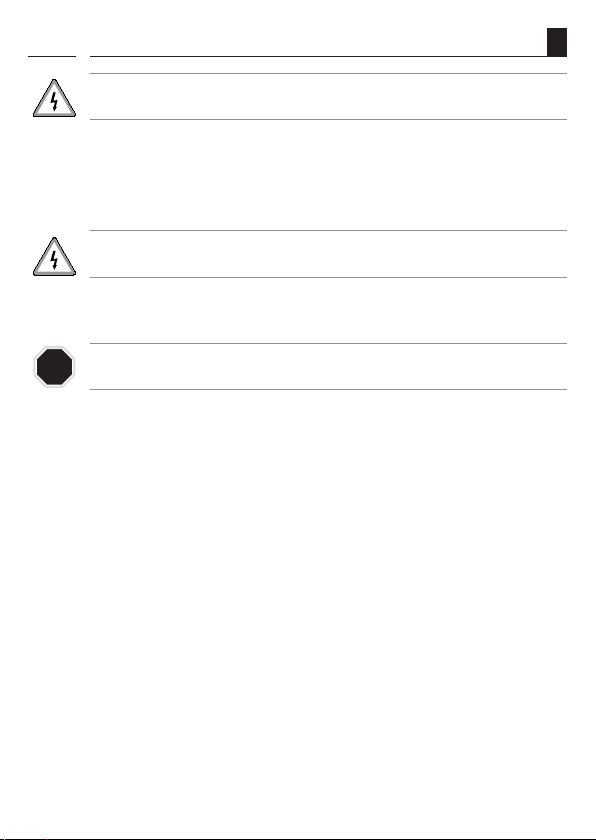
5. General safety information
i
Danger due to electric shock when working on all
electrical systems.
The electrical connection and all work on electrical systems must only be carried out by a quali-
◆
ed electrician in accordance with the connection instructions in these operating instructions,
see page 17.
◆ Carry out all installation and connection work only in an isolated, de-energised state.
The use of defective equipment can lead to personal injury and damage to
property (electric shocks, short circuiting).
◆ Never use defective or damaged equipment. Please contact our Customer Service depart-
ment in the event of faults, see page 40.
Incorrect use leads to an increased
STOP
risk of injury.
◆ Children may not be permitted to play with the Troll Basic DuoFern.
◆ Train all personnel to use the Troll Basic DuoFern safely.
◆ Avoid allowing persons with limited abilities to operate the equipme nt and prevent
children from playing with xed controllers.
◆ Never remove the operating unit from the installation housing during operation.
EN
8
Page 9

6. Proper use
i
Only use the Troll Basic DuoFern for connecting and controlling a tubular motor for:
◆ Roller shutters
◆ Venetian blinds and slats
◆ Awnings
Operating conditions:
◆ The tubular motor must be tted with a mechanical or electronic end position switch.
◆ Only operate the Troll Basic DuoFern in dry rooms.
◆ A 230 V / 50 Hz power supply, together with a site-provided disconnecting device (fuse,
MCB), must be available at the installation location.
◆ The installation and operation of the Troll Basic DuoFern is only permitted for those systems
and devices where a malfunction in the transmitter or receiver would not cause a danger
to personnel or property or where this risk is already covered by other safety equipment.
IMPORTANT
Radio systems which transmit on the same frequency can cause interference.
i
7. Improper use
Using the Troll Basic DuoFern for purposes other than previously mentioned is
impermissible and is regarded as improper use.
◆ Never use the DuoFern radio system and its components (e.g. Troll Basic DuoFern) for
remote control of devices and systems with heightened safety-relevant requirements or
where there is a heightened risk of accidents. This shall require additional safety equipment. Observe the respective statutory regulations for the installation of such systems.
◆ Do not install the Troll Basic DuoFern outside.
EN
9
Page 10

8. Brief description
i
The Troll Basic DuoFern serves as a DuoFern receiver for controlling roller shutters, Venetian
blinds, slats or awnings by connecting a corresponding tubular motor.
The Troll Basic D uoFern can be controlled individually on site or it can be integrated into a
DuoFern network.
Central control of DuoFern devices with a HomePilot® or DuoFern manual central
operating unit.
A DuoFern network generally includes the HomePilot® or the DuoFern manual central
operating unit as central controllers.
The DuoFern receivers (actuators) and transmitters must be connected to the
DuoFern network.
NOTE
You can nd a detailed description of the various func tions, conguration options and possible
combinations for the DuoFern system at:
http://www.rademacher.de/duofern
Roller shutter control
The system enables roller shutters to be automated.
Manual operation (normal mode)
It is possible to manually control the connected tubular motor at any time by using the controls.
Manual operation (jog mode)
If Venetian blinds mode is activated for the DuoFern network from an overriding controller,
then manual operation can also be undertaken on site in jog mode.
EN
External controller via the two inputs E1 and E2
The Troll Basic DuoFern features two congurable inputs E1 and E2 (230 V / 50 Hz) for
connecting an external switch (e.g. Venetian blinds switch, etc.), see page 17.
10
Page 11

8. Brief description
i
Automatic functions
All automated functions of the Troll Basic DuoFern are controlled via the D uoFern network.
A complete overview of the functions can be found on page 12.
Assembly
The Troll Basic D uoFern can be integrated into most commercially available switch ranges with
the help of a corresponding intermediate frame 50 x 50 (DIN 49075). S uitable switch ranges
are detailed on the following page.
8.1 Compatible switch ranges (w ww.rademacher.de)
i
Manufacturer switch range
BERKER Arsys / K1 / S1
BUSCH-JAEGER Busch-Duro 2000 Si / Reex Si / alpha exclusive / alpha nea /
solo / impuls
GIRA Standard-System / S-Color-System / stainless steel range /
Standard 55
JUNG CD 500 / ST 550 / LS 990 / CDplus as per CD but with coloured rings
MERTEN M1 / Atelier / Artec / Trancent / Antik Neu
PEHA Standard / Dialog / Aura
LEGRAND Creo / Tenara
VEDDER Alessa (plus)
EN
NOTE
◆ It may be necessary to use an intermediate frame 50 x 50 * (DIN 49075), depending on
the respective switch range used.
* not included
11
Page 12
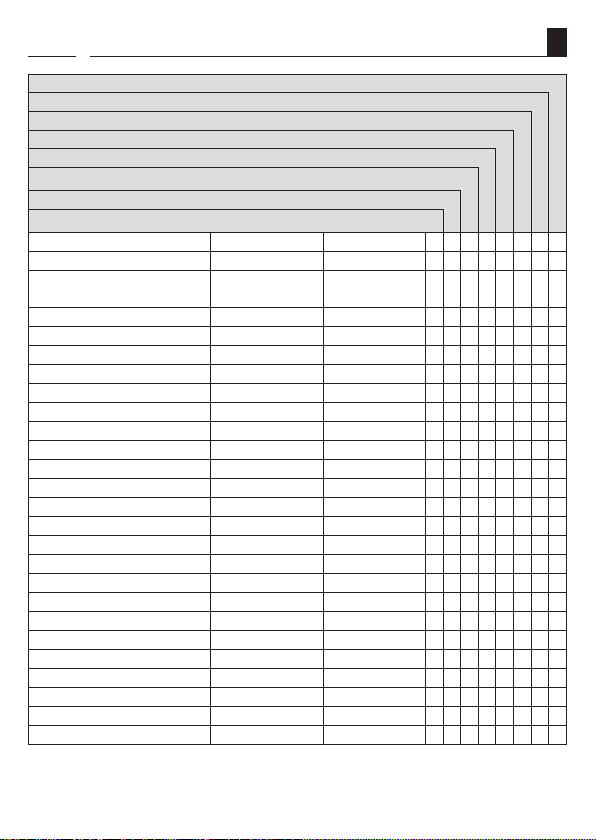
8.2 DuoFern network function table
i
EN
DuoFern environmental sensor
1
WR CongTool with DuoFern manual central operating unit
DuoFern manual central operating unit
RolloTron Comfort DuoFern
DuoFern manual transmitter standard
DuoFern wall controller
DuoFern radio transmitter, ush-mounted
DuoFern functions Value range Factory setting A
1. Manual operation Up / Stop / Down -
2. Direct drive to a desired
%-position *
0 % - 100 % -
3. Manual mode on / o on / o O
4. Automatic timer on / o on / o On
5. Random function - -
6. Automatic dawn function - -
7. Automatic dawn function on / o on / o O
8. Automatic dusk function - -
9. Automatic dusk function on / o on / o O
10. Sun function - -
11. Automated solar function on / o on / o O
12. Sunshine position 0 % - 100 % 50 %
13. Wind function - -
14. Automatic wind function on / o * on / o O
15. Travel direction wind * Up / Down Up
16. Rain function - -
17. Automatic rain function on / o * on / o O
18. Travel direction rain * Up / Down Up
19. Running time 2 s - 150 s 150 s
20. Ventilation position on / o O
21. Ventilation position 1 % - 99 % 80 %
22. Reversal of direction of rotation on / o O
23. Connectivity test - -
24. Connect with radio code ** - -
25. Remote log on/o - -
DuoFern HomePilot®
C D E F G H
B
● ● ● ● ● ●
● ● ● ●
● ● ● ●
● ● ●
● ● ● ●
● ● ●
● ● ● ●
● ● ●
● ●
● ● ●
● ● ●
●
● ● ●
● ● ●
●
● ● ●
● ● ●
● ● ●
● ● ●
● ● ●
● ● ● ● ●
● ●
● ● ●
● ● ●
●
12
Page 13
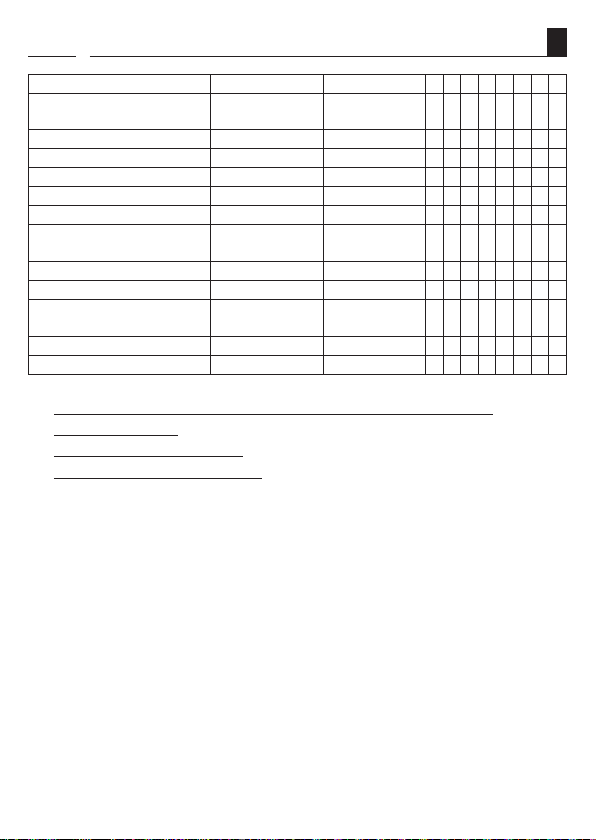
8.2 DuoFern network function table
i
DuoFern functions Value range Factory setting A B C D E F G H
26. End point setting for RADEMACHER
tubular motors via radio **
- -
27. Reset via radio (3-stage) - -
28. Single-button operation - -
29. Jog mode - -
30. Blinds mode on / o O
31. Standard slat position * /
32. auto Tilt after manual stop
direction "Down" *
33. auto Tilt in sunshine position * /
34. auto Tilt in sunshine position * /
35. auto Tilt after moving to a
%-position *
36. Slat run time * /
#
/
#
/
#
#
0 % - 100 % 0 %
on / o On
#
#
on / o O
on / o O
on / o On
100 ms - 5000 ms 1500 ms (1.5 s)
37. Motor dead time * 0 ms / 160 ms / 480 ms 0 ms (o)
1
The "WR CongTool" soft ware can be downloaded from our website at www.rademacher.de
● ●
● ●
●
● ● ●
● ● ●
● ●
● ●
● ●
● ●
● ●
● ●
● ●
* Only available via radio
** Not supported by Troll Basic DuoFern.
#
only with Venetian blinds mode activated
EN
13
Page 14

8.3 Troll Basic DuoFern function overview
i
◆ Manual operation on site
◆ Automatic timer on / o
◆ Switch the automatic solar function on/o
◆ Automatic dawn function on / o
◆ Automatic dusk function on / o
◆ End point setting (example circuit for RADEMACHER electronic tubular motors,
from 2000 onwards)
◆ Switching reversal of rotation direction on/o
◆ Logging on/o in DuoFern network
◆ Clear
◆ Deleting all settings (Reset)
◆ Ex ternal control via the two inputs E1 / E2
◆ Set total running time
◆ Set the sunshine position
◆ Set ventilation position
Description and conguration of the individual functions.
A precise description of the individual functions and settings is included starting on page 21.
EN
14
Page 15
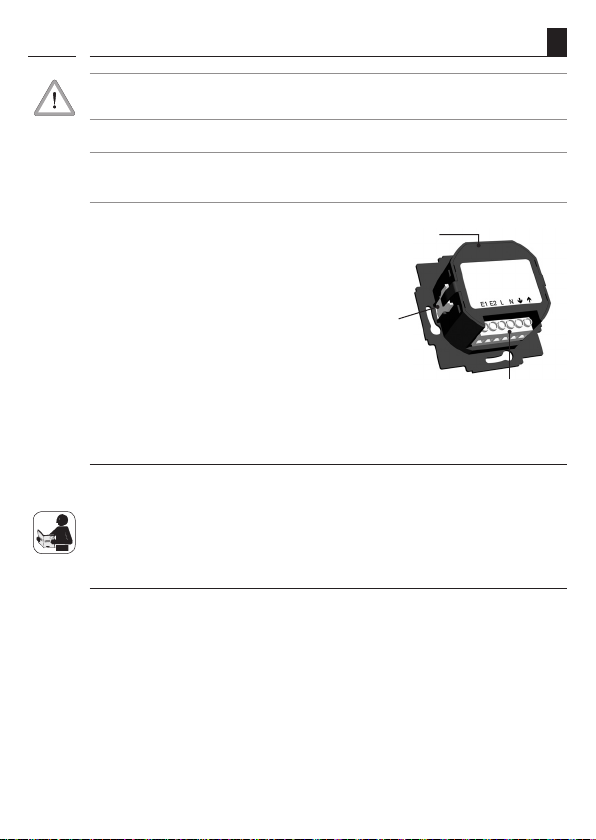
9. Important information prior to electrical installation and mounting
i
Installation and electrical connection of the Troll Basic DuoFern may only be
undertaken with the supplied installation housing [ 3 ].
The connecting terminals [ 4 ] are located at the bottom of the installation housing [ 3 ].
NOTE
Installation housings for other variants of the Troll controller are not compatible.
[ 3 ]
[ 5 ]
Parallel connection of electronic tubular motors
A maximum of 3 tubular motors can be connected in parallel to the Troll Basic DuoFern (e.g.
RADEMACHER electronic tubular motors).
To do so, please refer to the operating manual for the corresponding tubular motor.
Parallel connection of mechanical tubular motors
A cut-o relay is required in order to connect mechanical tubular motors in parallel.
EN
[ 4 ]
15
Page 16
9.1 Safety instructions for electrical connection
i
Danger due to electric shock when working on
all electrical systems.
◆ The electric al connection and all work on electrical systems must only be carried out by
a qualied electrician in accordance with the connection instructions in these operating
instructions.
◆ Carr y out all installation and connec tion work only in an isolated, zero-volts state.
◆ Disconnect all phas es of the mains power su pply cable and sec ure it to prevent any
reconnection.
◆ Check the system for a zero-voltage status.
◆ Prior to connecting, compare the information about voltage / frequency on the device
with that of the local electrical grid operator.
Incorrect wiring may lead to short-circuits and
destroy the device.
◆ Follow the pin assignment detailed in the wiring diagram.
◆ Follow all the electrical connection specications in the operating instructions of your
tubular motor and that of the external controller (when using E1/E2).
Connection of a second phase to E1 or E2 will cause the
Troll Basic DuoFern to be damaged.
◆ When inputs E1 / E2 are used, they must always be connected to the same phase.
◆ If another phase is connected, the incorrect mains voltage (380 V / 50 Hz) will be
applied to the inputs and damage the Troll Basic DuoFern.
EN
16
Page 17
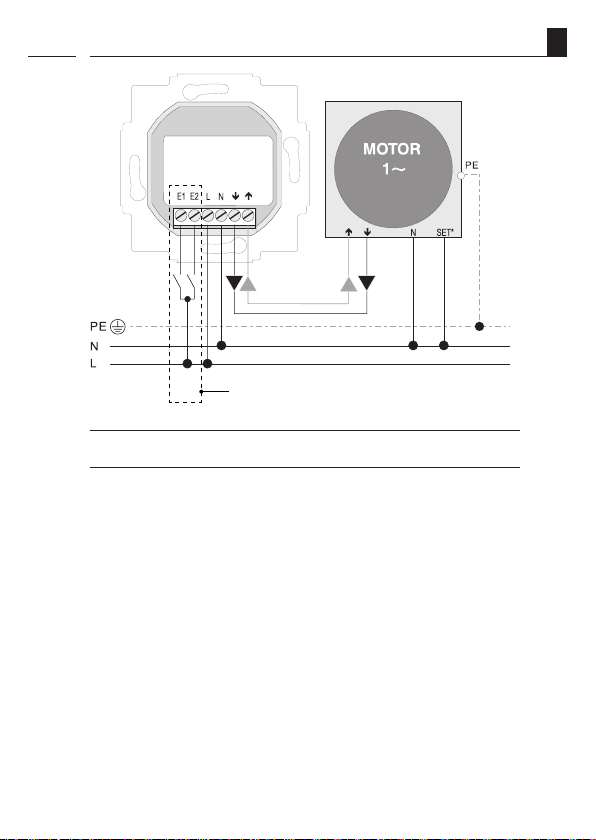
9.2 Connecting a tubular motor
i
Inputs E1 / E2 (230 V / 50 Hz) , only if required.
Connecting the white set cord (SET) from RADEMACHER tubular motors
* The white set cord (SET) from RADEMACHER tubular motors must be con-
nected to the neutral terminal [ N ] to ensure trouble-free operation of the
tubular motor.
EN
17
Page 18
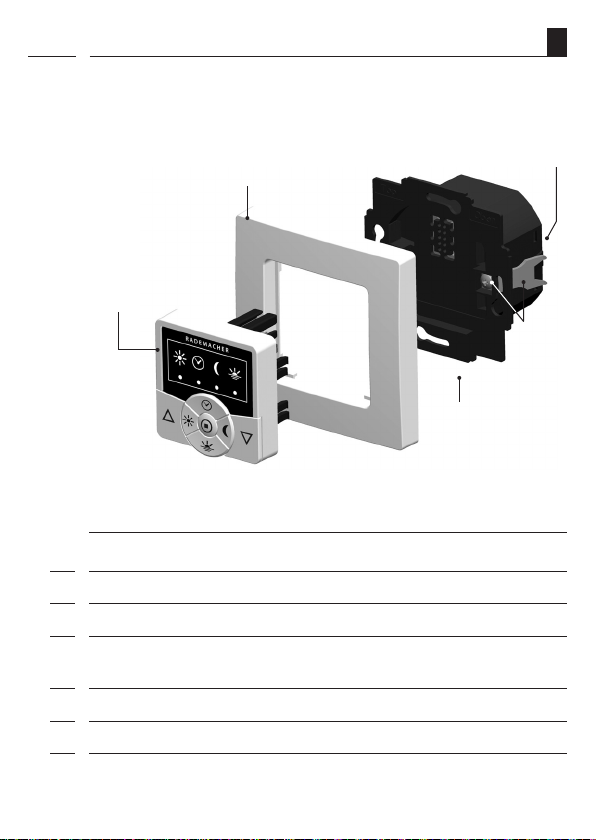
10. Assembly
i
The Troll Basic DuoFern is designed for ush-mounted installation. For this, you require a
58mm ush-mounted box. We recommend using a deep box.
Connecting terminals on bottom > [ 4 ]
[ 2 ]
[ 1 ]
[ 3 ]
Installation procedure:
Switch o the mains.
1.
Make the electrical connection according to the wiring diagram (see page 17).
2.
Route the power cables to the ush-mounted box.
3.
Slide the installation housing [ 3 ] into the ush-mounted box and clamp the claws [ 5 ] in
4.
place with the screws provided.
Fit the frame [ 2 ].
5.
Carefully insert the operating unit [ 1 ] into the installation housing [ 3 ].
6.
Switch the mains power back on again.
7.
EN
[ 5 ]
18
Page 19
11. Important information prior to initial commissioning
i
IMPORTANT
◆ Prior to initial commissioning of the Troll Basic DuoFern, it must be ensured that the end
points are congured for the connected tubular motor.
◆ If the end points have not yet been congured, it is vital that both end points are congured
for the tubular motor, as failure to do so can lead to malfunctions.
◆ In order to do so, follow the information provided in the operating manual for the
respective tubular motor.
◆ For electronic RADEMACHER tubular motors from year of manufacture 2000 onwards,
the end points can be congured with the help of the Troll Basic DuoFern, see page 35.
12. Manual operation
Manual operation is always possible and has priority over the programmed automatic functions.
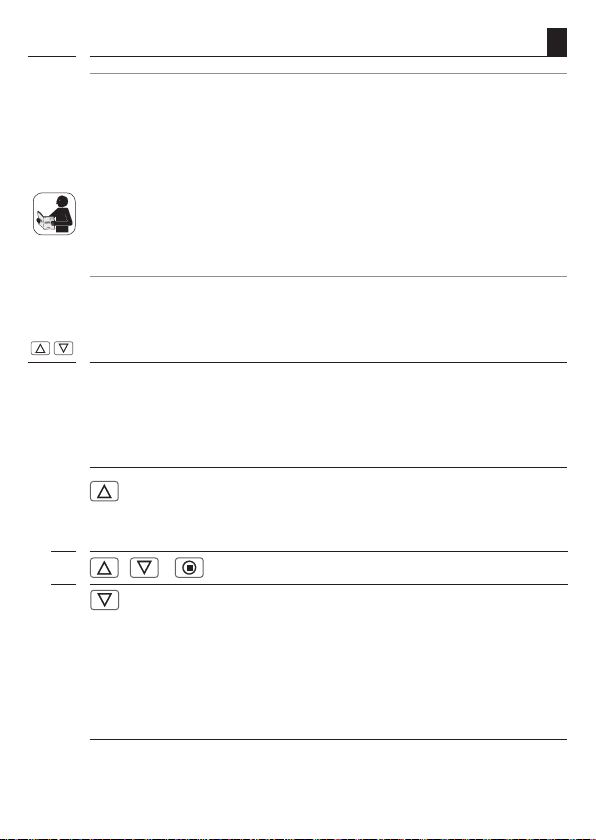
Example for manual control of a roller shutter
Open the roller shutters.
1.
Briey pressing the button causes the roller shutters to move
to the upper end point.
/ or causes the roller shutters to stop in the interim.
2.
Close the roller shutters.
3.
The roller shutte rs move to the configu red vent ilation
position or to the lower end point.
EN
Ventilation position, see page 33
If the ventilation position is congured, the roller shutters will rst roll down to this position.
Pressing the [
Down
] key once more causes the roller shutters to continue downwards.
19
Page 20
12.1 Manual operation ( jog mode)
i
As soon as Venetian blinds mode is activated with the h elp of a DuoFern controller (e.g.
HomePilot®), it is possible to manually operate the Troll Basic DuoFern in jog mode.
Jog mode provides a convenient way to congure Venetian blinds. In doing so, the Venetian
blinds motor is powered only as long as the control key is ac tuated.
NOTE
Pressing the respective operating key [ Up / Down ] for an extended period causes the Troll
Basic DuoFern to automatically move the Venetian blinds to the corresponding end position.
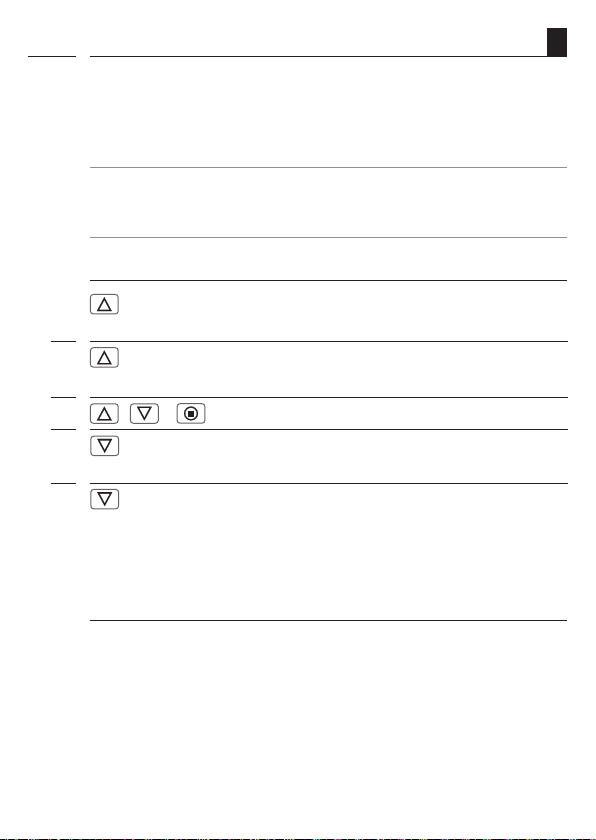
Example for manual control of Venetian blinds in jog mode.
1.
1.1.
2.
3.
3.1.
Press briey
or
Press
/ or Causes the Venetian blinds to stop in the interim.
Press briey
or
Press
Ventilation position, see page 33
If the ventilation position is congured, the roller shutters will rst roll down to this position.
Pressing the [
The Venetian blinds move upwards briey.
The Venetian blinds open.
The Venetian blinds move up to the upper end point.
The Venetian blinds move downwards briey.
The Venetian blinds close.
The Venetian blinds move to the configur ed ven tilation
position or to the lower end point.
Down
] key once more causes the roller shutters to continue downwards.
EN
20
Page 21

13. Logging DuoFern transmitters on / o; brief description
In order for your Troll Basic DuoFern to react to control signals from the DuoFern network, it
is necessary to log each DuoFern device (e.g. DuoFern manual central operating unit, etc.)
onto the Troll Basic DuoFern.
To do so, please read the operating instructions for the respective DuoFern device.
Maximum number of connected devices
You can assign a maximum of 20 DuoFern devices to a single Troll Basic DuoFern.
NOTE
◆ A Troll Basic DuoFern cannot be connected to another Troll Basic DuoFern device.
◆ Additional information about logging on can be obtained from the login matrix on our
website under: www.rademacher.de
EN
21
Page 22
13.1 Login for DuoFern transmitters
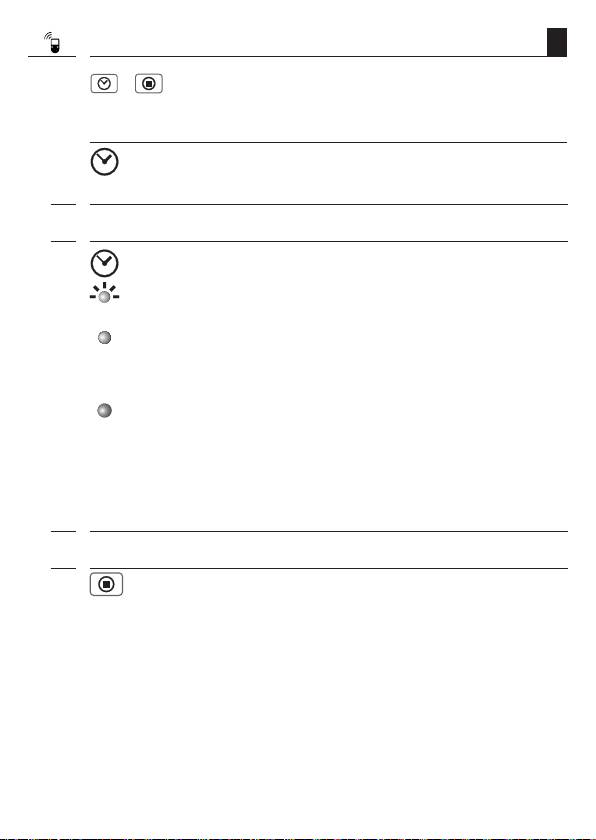
+
1.
Simultaneously press and hold the buttons for
approx. 4 seconds.
Login mode remains active for approx. 120 seconds.
Switch the desired DuoFern transmitter to login mode.
2.
3.
Flashes green
Login mode is active.
Login was successful. Afterwards, the LED will light up red
again, if the automatic timer has been activated.
The login process failed,
for example if:
Log the next DuoFern transmitter on / o. In order to do so, repeat steps 1 to 2.
4.
Activate login mode.
The timer LED ashes green:
Pay attention to the timer LED.
green (for 5 seconds)
red
◆ 20 DuoFern transmitters have already been registered.
◆ An attempt was made to register an unsuitable device
(e.g. other DuoFern actuator).
EN
5.
Cancel registration.
You can cancel the login process at any time by briey pressing
the [ SET/Stopp ] key.
22
Page 23
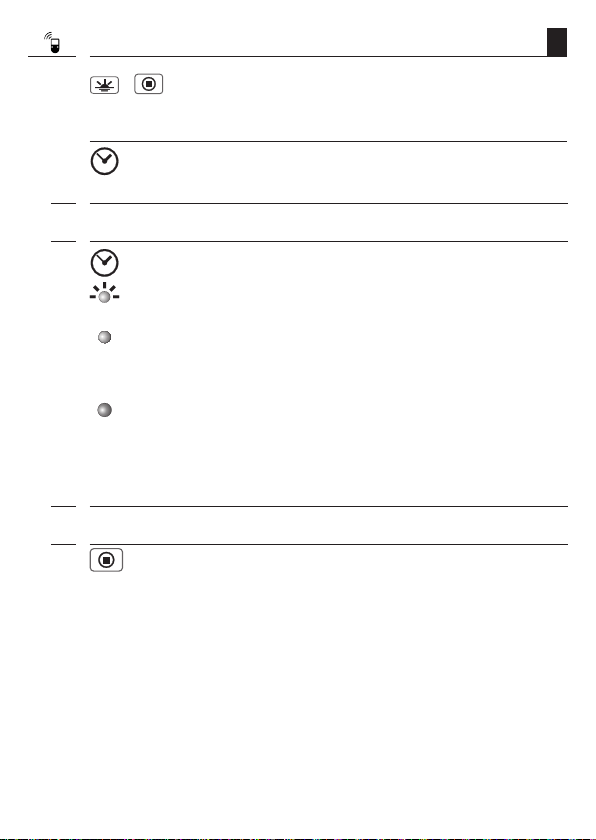
13.2 Logging o DuoFern transmitters
+
1.
Simultaneously press and hold the buttons for
approx. 4 seconds.
Logout mode remains active for approx. 120 seconds.
Switch the desired DuoFern transmitter to logout mode.
2.
3.
ashes red
Logout mode is active.
Log o was successful. Afterwards, the LED will light up red
again, if the automatic timer has been activated.
The logout process failed,
for example if:
Log the next DuoFern transmitter on / o. In order to do so, repeat steps 1 to 2.
4.
Activate logout mode.
The timer LED ashes red:
Pay attention to the timer LED.
green (for 5 seconds)
red
◆ An attempt was made to log-o a DuoFern transmitter
that is not logged-on.
EN
5.
Cancel the logout process.
You ca n cance l the logout process at any time by briey
pressing the [ SET/Stopp ] key.
23
Page 24
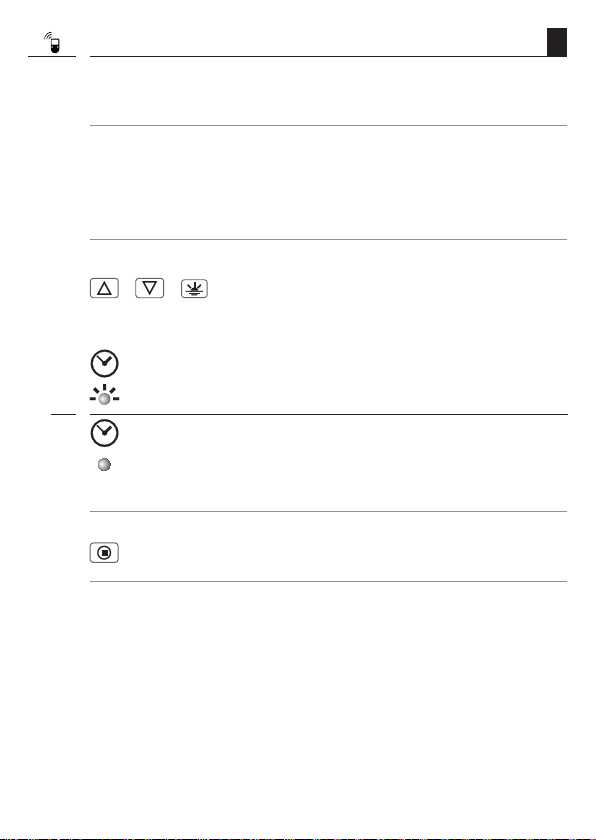
13.3 Clearing the DuoFern network
This function enables you to log o all DuoFern transmitters from the Troll Basic DuoFern that
are no longer accessible via radio.
NOTE
◆ Not all batter y- operated DuoFern transmitters (e.g. the DuoFern manual central operating
unit) can be logged o in this way.
◆ A software reset must be carried out in order to logout and delete all DuoFern transmit-
ters (see page 37).
+ + Activate the clear function.
1.
Simultaneously press and hold the three buttons for
approx. 4 seconds.
The timer LED ashes red:
The timer LED will light up green for 5 seconds as
2.
soon as the clearing process has completed.
Purge was successful. Afterwards, the LED will light up red
again, if the automatic timer has been activated.
NOTE
You can cancel the clearing process at any time by briey
pressing the [ SET/Stopp ] key.
EN
24
Page 25

14. Automatic mode; brief description
i
The Tro ll B asic DuoFern featur es fo ur a utomatic modes whi ch ca n be swi tched on/off
individually on the device.
◆ Automated solar function
◆ Automatic timer
◆ Automatic dusk function
◆ Automatic dawn function
The automatic func tions are only available if the Troll Basic DuoFern is operated with a respective
controller (e.g. HomePilot®, DuoFern manual central operating unit, etc.) (see page 21). All of the
automatic functions can be combined as well as independently activated and deactivated on
the Troll Basic DuoFern. The status of each automatic function is indicated by the respec tive LED.
The two automatic modes:
◆ Automatic wind function
◆ Automatic rain function
can also be switched on/o by an overriding DuoFern control system (e.g. HomePilot®, DuoFern
manual central operating unit; etc.).
14.1 Switch all automatic functions on / o simultaneously
i
Press and hold [SET] for
1.
approx. 1 second.
All automatic functions will be simultaneously switched on or o.
2.
Observe the LEDs indicating the status of the automatic functions.
3.
Once automatic mode is deactivated, it is only possible to operate the
4.
system manually.
EN
NOTE
The automatic wind function is not aected by this procedure, if active, as this is a safetyrelated function.
25
Page 26
15. Set the motor running time
i
In order to be able to use all of the functions, such as ventilation position and sunshine position,
it is vital that the motor running time is correctly congured beforehand.
The running time can be congured directly with the Troll Basic DuoFern or you can enter it in
the central DuoFern controller (e.g. HomePilot®).
NOTE
◆ Tubular motor running times can vary depending on temperature. For this reason, targeted
movement to a specic position is subject to certain tolerances.
◆ The motor running time must be recongured if the end points are changed.
15.1 Setting the motor running time with the Troll Basic DuoFern
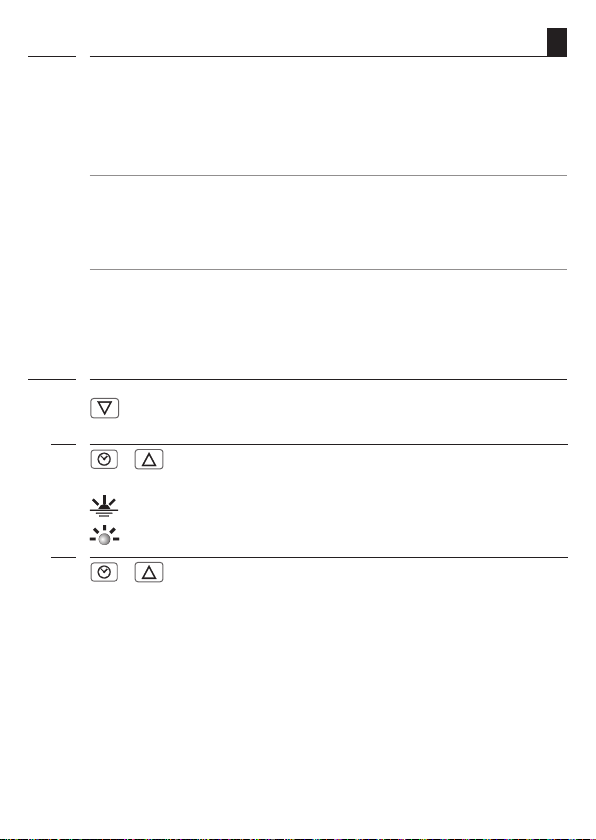
i
Move the roller shutters or blinds to the lower
1.
end point.
+
2.
[ Up ] buttons.
roller shutters or blinds move to the upper end point.
3.
stop at the upper end point.
Simultaneously press and hold the [ Timer ] and
After approx. 4 seconds, the solar LED ashes red and the
+
Release both buttons as soon as the roller shutters
The running time will be timed and stored during the up cycle.
EN
26
Page 27
15.2 Time the running duration of the motor and enter it into the DuoFern controller.
i
Subsequently move the roller shutters to the upper
1.
end point and make a note of the time required.
Enter the noted time in the central DuoFern controller (e.g. HomePilot®).
2.
NOTE
◆ As soon as the motor running time is transferred from the central DuoFern controller to
the Troll Basic DuoFern, you will receive conrmation from the system by way of the roller
shutter briey starting up.
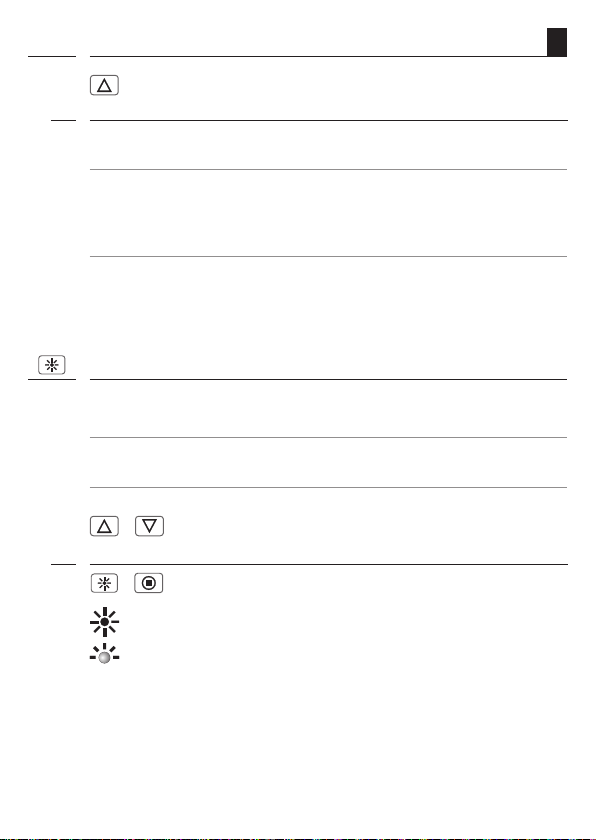
16. Setting the sunshine position
You can set an arbitrary position (sunshine position) which your roller shutters will lower
to when the automated solar function is activated.
NOTE
The running time must be congured prior to setting the sunshine position, see page 26.
/
1.
and stop.
2.
the key is released, the automated solar function is activated
and the LED lights up permanently red.
Move the roller shutters to the desired position
+
Save the sunshine position.
The solar LED ashes rapidly by way of conrmation. Once
EN
27
Page 28
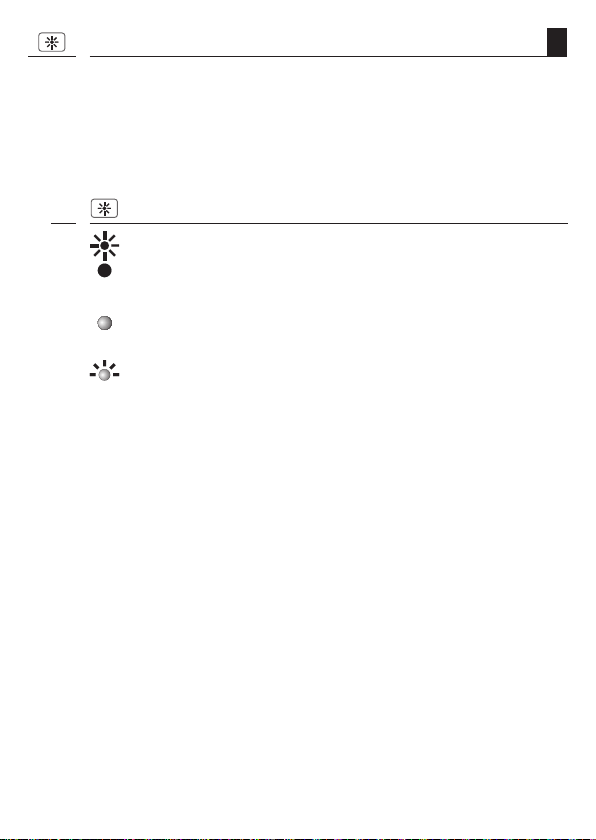
16.1 Switching the automated solar function on/o
The automated solar function enables brightness-dependent control of your roller shutters.
The control signals for this function are provided by a light sensor on the DuoFern net work.
When the automated solar function is triggered, your roller shutters will then lower to the
congured sunshine position. Once the solar program is ended, the roller shutters move
completely up to the upper end point.
Press and hold the solar button for approx. 1 second.
1.
Observe the solar LED:
2.
OFF
The automatic solar function is switched o.
ON
The automatic solar function is switched on.
Flashing
The automated solar function is active, the roller shutters will
be lowered to the sunshine position. The LED continues to
ash when the roller shutters are in the sunshine position.
EN
28
Page 29
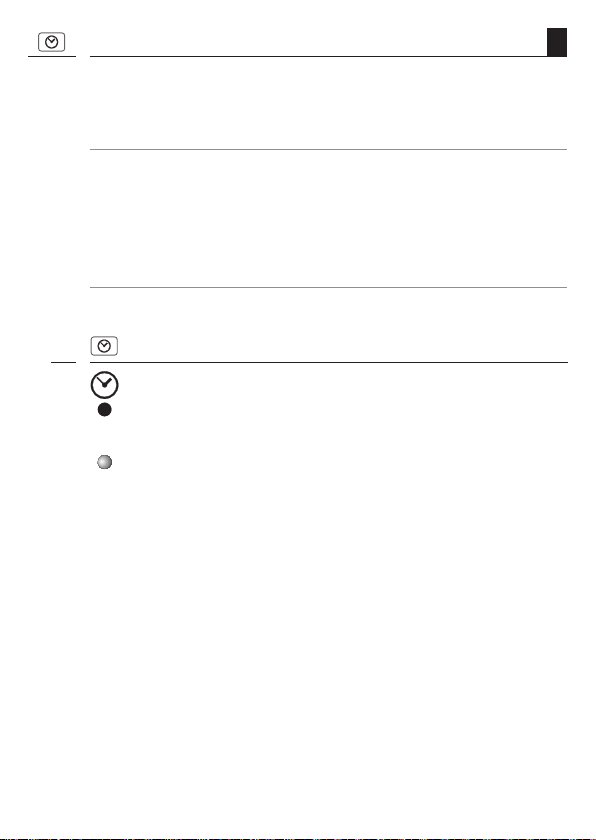
17. Switching the automatic timer on/o
Execution of control signals from the DuoFern network.
If the automatic timer is activated, control signals for opening and closing times will be received
from the DuoFern network and executed by the system.
NOTE
◆ Executing a random function.
If the Troll Basic DuoFern receives a control signal from a DuoFern transmitter with activated
random function (e.g. from a HomePilot®), then it is also able to execute the random
function. The random function enables a random delay of between 0 and 30 minutes.
◆ The random function cannot be switched on/o on site.
Press the timer key for approx. 1 second.
1.
Pay attention to the timer LED.
2.
OFF
The automatic timer is switched o.
ON
The automatic timer is switched on.
EN
29
Page 30
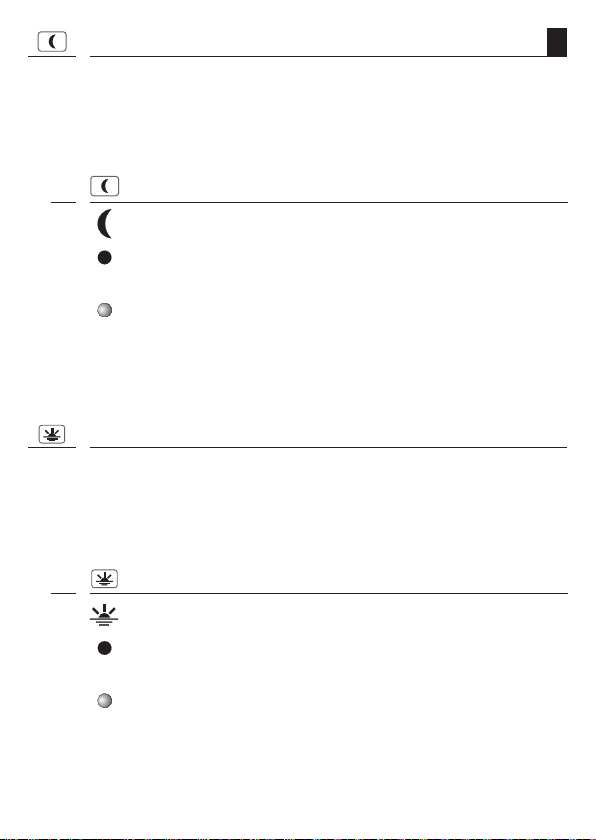
18. Switching the automatic dusk function on/o
The automatic dusk function causes the roller shutters to close automatically to their lower
end point or the congured ventilation position (see page 33).
The control signals for this func tion are provided by a DuoFern transmitter on the DuoFern
network.
Press and hold the dusk button for approx. 1 second.
1.
Pay attention to the dusk LED.
2.
OFF
The automatic dusk function is switched o.
ON
The automatic dusk function is activated.
19. Switching the automatic dawn function on/o.
The automatic dawn function causes the roller shutters to open automatically to the upper
end point.
The control signals for this func tion are provided by a DuoFern transmitter on the DuoFern
network.
Press and hold the dawn button for approx. 1 second.
1.
Pay attention to the dawn LED.
2.
EN
OFF
The automatic dawn function is switched o.
ON
The automatic dawn function is switched on.
30
Page 31
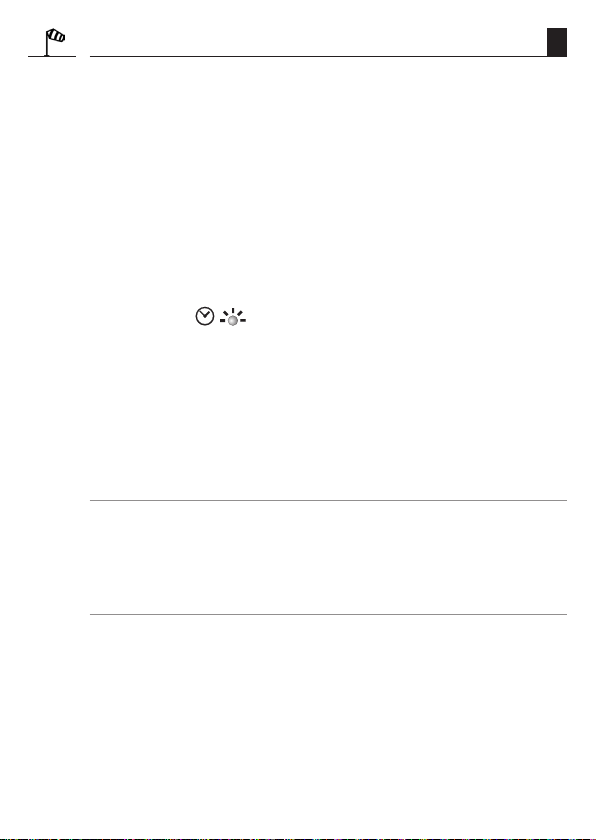
20. Automatic wind function; brief description
EN
This function enables you to use the Troll Basic DuoFern to operate, for example, connected
Venetian blinds or awnings in relation to the weather conditions. The automatic wind function
can also be switched on/o by an overriding DuoFern controller (e.g. HomePilot®).
As soon as an external "wind" signal transducer is detected, the control signal can be transferred
from the DuoFern network on the Troll Basic DuoFern.
The direction of operation in the event of wind can also be congured by an
overriding DuoFern controller (e.g. HomePilot®).
In the event of windy conditions, the Venetian blinds or awnings can be retracted or a draught
stop closed.
If the automatic wind function is active ...
◆ the timer LED [
] ashes green in a 2 second cycle.
◆ manual operation is no longer possible. automatic movements are no longer executed.
■ the last automatic movement command to be received will be stored and will be
resumed as soon as the wind subsides.
Manual mode and the automatic wind functions are active again:
◆ as soon as a period of 15 minutes has elapsed where no wind command was received
or the registered signal transducer (e.g. DuoFern environmental sensor) deactivates the
automatic wind functions.
NOTE
◆ The automatic wind function is interrupted in the event of power failure.
◆ If the direction of rotation for wind is set to DOWN and wind is detected when the drive
is at the upper end position, then the drive moves back to the upper end position as soon
as no more wind is detected.
Behaviour of the automatic wind function when the automated solar function
is active:
◆ If the automatic wind function is started when the automated solar func tions are active,
then the awning moves back to the sunshine position as soon as the automatic wind
function is ended, assuming the automated solar functions are still active.
■ This does not apply if the automatic rain function has activated in the mean time.
31
Page 32

21. Rain function; brief description
EN
This function enables you to use the Troll Basic DuoFern to operate, for example, a connec ted
awning in relation to the weather conditions. The automatic rain function can also be switched
on/o by an overriding DuoFern controller (e.g. HomePilot®).
As soon as an external "rain" signal transducer is detected, the control signal can be transferred
from the DuoFern network on the Troll Basic DuoFern.
The direction of operation in the event of rain can also be congured by an overriding DuoFern controller (e.g. HomePilot®).
The awning can be retracted (up) or used as a rain cover (down) in the event of rain.
Once the automatic rain function is active ...
◆ the timer LED [
] ashes green in a 2 second cycle.
◆ manual operation is still possible.
◆ automatic movements are no longer executed.
■ The previously received automatic movement commands are no longer carried out
but will be resumed as soon as the rain subsides.
Manual mode and the automatic wind functions are active again:
◆ as soon as a period of 15 minutes has elapsed where no rain command was received or
the registered signal transducer (e.g. DuoFern environmental sensor) deactivates the
automatic rain functions.
NOTE
◆ The automatic rain function is interrupted in the event of power failure.
◆ If the direction of rotation for rain is set to DOWN and rain is detected when the drive is
at the upper end position, then the drive moves back to the upper end position as soon
as no more rain is detected.
Behaviour of the automatic rain function when the automated solar function is
active:
◆ If the automatic rain func tion is started when the automated solar functions are active,
then the awning moves back to the sunshine position as soon as the automatic rain
function is ended, assuming the automated solar functions are still active.
■ This does not apply if the automatic wind function has been activated in the mean
time.
32
Page 33
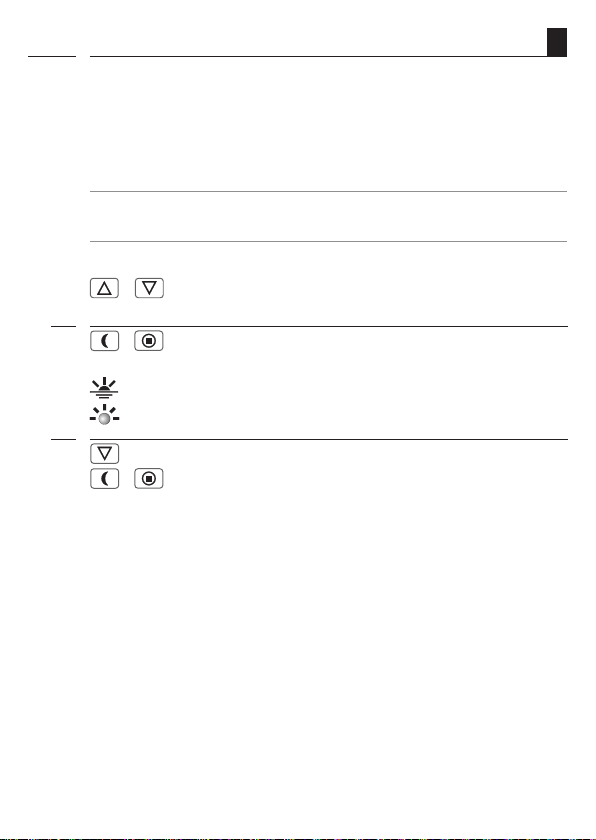
22. Set the ventilation position
i
If you do not want the roller shutters to close fully to the lower end point, you can use this
function to congure an arbitrary position (e.g. as ventilation position).
◆ When closing automatica lly, the roller shutters wil l stop at the ventilation position,
however, they can subsequently be closed completely via manual operation.
◆ The ventilation position can be changed at any time.
NOTE
The motor running time must be congured prior to setting the ventilation position, see page 26.
/
1.
position and stop.
2.
press both keys for approx. one second.
3.
roller shutters fully and then save the position again. This will
set the ventilation position to the lower end point.
Move the roller shutters to the desired ventilation
+
Store the ventilation position. In order to do so,
The dawn LED ashes red by way of conrmation.
Revoke the ventilation position.
+
If you want to revoke the ventilation position, rst close the
EN
33
Page 34

23. Venetian blinds mode; brief description
i
This function enables you to use the Troll Basic DuoFern to control Venetian blinds. The Venetian
blinds mode can also be switched on/o by an overriding DuoFern controller (e.g. HomePilot®).
The following modes are possible:
◆ Jog mode
◆ Automatic wind function / tilting time
Additional Venetian blinds functions can be congured, for example, with a
HomePilot®:
◆ Standard slat position
◆ Automatic tilt after manual stop in direction "Down"
◆ Auto tilt to sunshine position
◆ Auto tilt to ventilation position
◆ Automatic tilt after moving to a target position
◆ Slat run time
◆ Motor dead time
Brief description of jog mode, see page 20.
Briefl y tapp ing th e operat ing bu ttons enables Vene tian b linds slats to be convenient ly
congured.
NOTE
Pressing the respective operating key [ Up / Down ] for an extended period causes the Troll
Basic DuoFern to automatically move the Venetian blinds to the corresponding end position.
Brief description of automatic slat adjustment function
If the Troll Basic DuoFern controls the Venetian blinds motor in the down direction until the
total running time has elapsed or the Venetian blinds motor is stopped manually, then the motor
reverses automatically for a brief period (automatic slat adjustment). This serves to position
the slats to the desired angle, in order to provide sun shading to the room.
The slat position can also be congured by a registered DuoFern controller (e.g. HomePilot®
or DuoFern manual central operating unit).
EN
34
Page 35
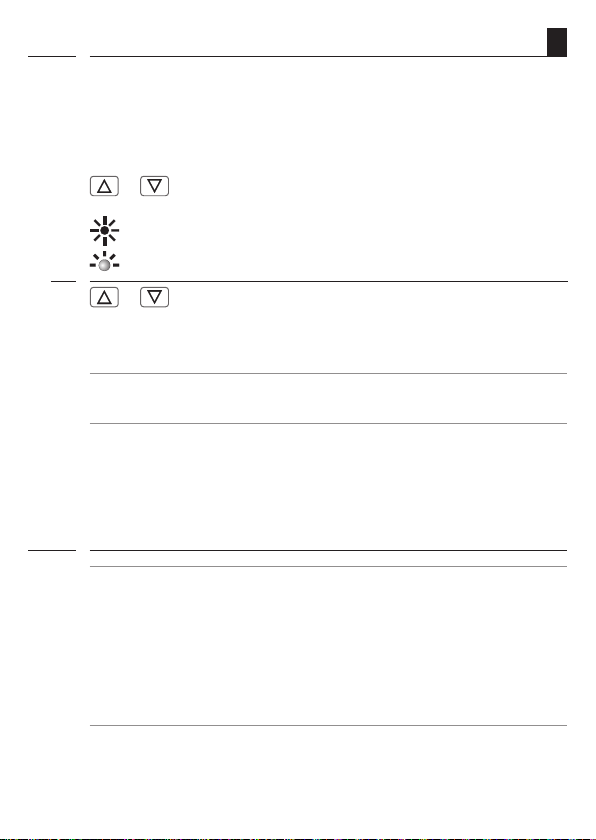
24. Switching reversal of rotation direction on/o
i
It is not necessary to re-wire the motor if the direction of rotation for the connected motor
is wrong [ Up ] key moves the roller shutters downwards and [ Down ] key moves the roller
shutters upwards). The direction of the motor can be easily changed using the reversal of
rotation direction function.
+
1.
approx. 4 seconds.
2.
The direction of rotation is now reversed and stored.
The tubular motor starts up briey by way of conrmation.
NOTE
The reversal of rotation direction is permanently stored, even in the event of power failure.
25. End point adjustment
i
IMPORTANT
◆ The end points must be congured in order for the roller shutters to stop at the desired
◆ The end point setti ng function is only availab le for RADEMACHER electronic tu bular
◆ The end point setting can not be adjusted for tubular motors connected in parallel.
Simultaneously press and hold both buttons for
The solar LED ashes red by way of conrmation.
+
Release both buttons.
upper and lower positions. It is imperative that both end points are congured, otherwise
malfunctions may occur.
motors from 2000 onwards.
EN
35
Page 36
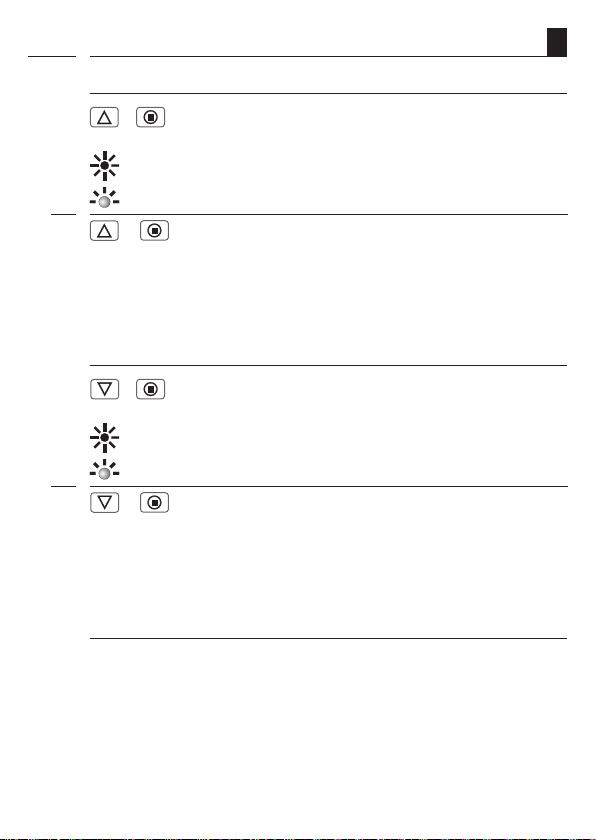
25. End point adjustment
i
Set the upper end point.
+
1.
2.
...as soon as the roller shutter achieve the desired position for
the upper end point. The roller shutters stop and the upper
end point is stored.
Set the lower end point.
3.
4.
...as soon as the roller shutters achieve the desired position
for the lower end point. The roller shutters stop and the lower
end point is stored.
S imultaneously press and hold the buttons.
The roller shutters travel up.
The solar LED ashes red by way of conrmation.
+ Release the buttons...
+
S imultaneously press and hold the buttons.
The roller shutters travel down.
The solar LED ashes red by way of conrmation.
+ Release the buttons...
EN
Changing or correcting the end points
Move the roller shutters to the centre position and congure the respective end
5.
point again.
36
Page 37

26. Function of external inputs E1 and E2
i
The Troll Basic DuoFern features two external inputs E1 (up) and E2 (down) for connecting
an external switch. If all automatic functions are deactivated, the inputs will not be taken into
consideration by the system.
Function in normal mode
The mode of operation and order of switching corresponds to manual mode, as described
on page 19.
Press the up key (E1). The roller shutters travel up.
1.
Press the down key (E2). The roller shutters travel down.
2.
Function in jog mode:
◆ Jog mode is active only if the Venetian blinds function has been previously ac tivated in
the DuoFern controller (e.g. HomePilot®).
◆ The mode of operation and order of switching corresponds to manual jog mode, as
described on page 20.
27. Software reset (restore factory settings).
i
If necessary, you can erase all of your settings and return the Troll Basic DuoFern system to its
original factory settings.
+ + +
1.
4 seconds.
All of the LEDs ash red by way of conrmation.
2.
Release the buttons...
3.
All settings will be erased and reset to the default factory settings.
Simultaneously press and hold all four buttons for
EN
NOTE
If the Troll Basic DuoFern fails to reac t to the software reset, then we recommend briey
disconnecting the device from the mains.
37
Page 38
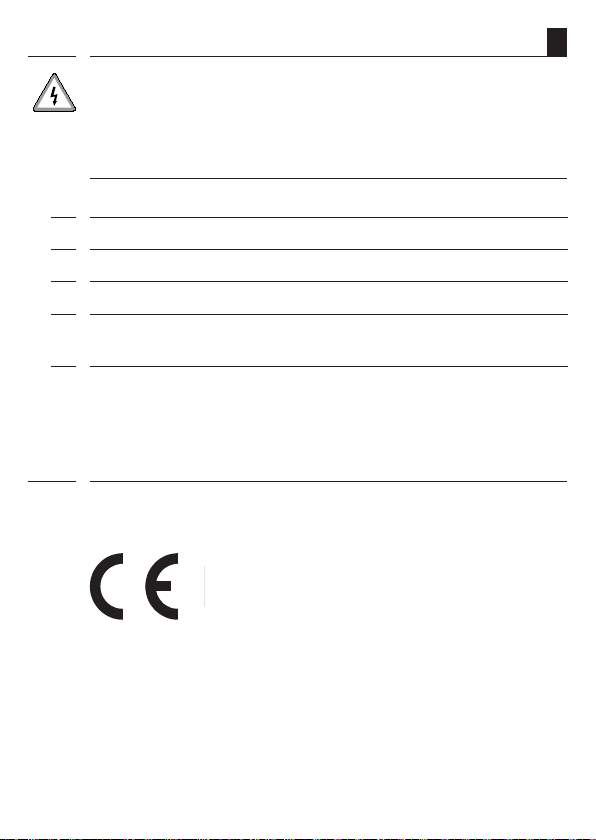
28. Dismantling
i
There is also a risk of fatal electric shocks when dismounting the Troll Basic DuoFern.
Follow the safety instructions for electrical connection on page 16.
Procedure for dismantling:
Switch o the mains.
1.
Secure the connector against reconnection and check that the system is de-energised.
2.
Carefully remove the operating unit [ 1 ] from the installation housing [ 3 ].
3.
Remove the frame [ 2 ]
4.
Release the installation housing [ 3 ] from the ush-mounted box and disconnect from the
5.
mains lead.
Leave the connector so that it is secured against reconnection or t with a new unit if required.
6.
i
29. CE Mark and EC Conformity
The Troll Basic DuoFern (item no. 3650 01 72 / 3650 01 82) complies with the requirements
of the following European and national directives:
1999/5/EC
R&TTE directive
EN
Conformity has been veried. The corresponding declarations and documentation are available
on le at the manufacturer’s premises.
RADEMACHER Geräte-Elektronik GmbH
Buschkamp 7
46414 Rhede (Germany)
38
Page 39

30. Technical Specications
i
External dimensions control unit [ 1 ]: 50 x 50 x 12 mm (according to DIN 49075)
Colour: ultra-white / aluminium
Nominal voltage: 230 V / 50 Hz; 230 V / 60 H z
Max. switching capacity: 8 (4) A µ (Type 1B)
Standby consumption: < 0.4 W
Extension inputs: 2 (E1 and E2)
Connection diameter: 1.5 mm²
Installation depth: 32 mm
Permissible ambient temperature: 0 to 40°C
Data retention: permanent
Protection class: II (only for use in dry areas)
i
31. Factory settings
Automatic: On
Automatic time: On
Automatic dawn function: O
Automatic dusk function: O
Automated solar function: O
Sunshine position: 50 %
Motor running time: 150 seconds
Ventilation position: O / 80 %
Blinds mode: O, tilting time: = 1.50 seconds
■ Auto tilt to:
– Sunshine position: O
– Ventilation position: O
■ Auto tilt after:
– Moving to a target position: On
– Manual stop in direction "Down" On
■ Standard slat position: 0 %
■ Motor dead time: O
Jog mode: O
EN
39
Page 40

32. Warranty conditions
i
EN
RADEMACHER Geräte-Elektronik GmbH provides a 24-month warranty for new systems that have
been installed in compliance with the installation instructions. All construction faults, material
defects and manufacturing defects are covered by the warranty.
The following are not covered by the warranty:
◆ Incorrect tting or installation
◆ Non-observance of the installation and operating instructions
◆ Improper operation or wear and tear
◆ External inuences, such as impacts, knocks or weathering
◆ Repairs and modications by third party, unauthorised persons
◆ Use of unsuitable accessories
◆ Damage caused by unacceptable excess voltage (e.g. stroke of lightning)
◆ Operational malfunctions caused by radio frequency overlapping and other such radio
interference
RADEMACHER shall remedy any defects, which occur within the warranty period free of charge
either by repair or by replacement of the aec ted parts or by supply of a new replacement unit or
one to the same value. There is no general extension of the original warranty period by delivery of
a replacement or by repair as per the terms of the warranty.
RADEMACHER
Geräte-Elektronik GmbH
Buschkamp 7
46414 Rhede (Germany)
[email protected]
www.rademacher.de
Service:
Hotline 01807 933-171*
Fax +49 2872 933-253
[email protected]
* 30 seconds free of charge, subsequently 14 cents / minute from German xed line networks
and max. 42 cents / minute from German cellular networks.
Subject to technical modications, misprints and errors.
Illustrations not binding.
40
 Loading...