


Aladdin Hearth Products, warrants their wood heating appliances to the original purchaser for the lifetime of the appliance, tobe free from defects in material and workmanship. This warranty gives you specific legal rights; you may have other rights which may vary from state to state.
This limited Lifetime Warranty covers items such as but not limited to combustion chambers, doors, gold plating, steel baffles, manifold tubes, and glass damaged by thermal breakage.
All parts to be replaced must be returned to an authorized Aladdin Hearth Products dealer at purchaser’s expense for inspection and approval by Aladdin Hearth Products prior to repair or replacement. No repair or replacement costs will be honored without approval of Aladdin Steel Products, Inc.
This new Quadra-Fire product must be installed by a competent, authorized service contractor. It must be installed and operated at all times in accordance with the Installation and Operating Instructions in this manual, as well as any applicable local and national codes. Any alteration, willful abuse, accident, or misuse of the product shall void this warranty.
Any installation, construction, transportation, or other related costs or expenses arising from defective part(s), repair, replacement, etc., will not be covered by this warranty, nor will Aladdin Hearth Products assume responsibility for them. Further, Aladdin Hearth Products, will not be responsible for any incidental, indirect, or consequential damages, except as provided by law.
All electrical components such as but not limited to blowers, wiring, speed controls, and thermodisc switches are covered by Aladdin’s one year warranty program.
Aladdin Hearth Products, will not be responsible for any alteration to the unit which causes sooting that results in damage to the interior or exterior of the building in which this appliance is installed.
This warranty is void if the stove has been operated in atmospheres contaminated by chlorine, fluorine, or other damaging chemicals, the stove is subjected to prolonged periods of dampness or condensation, or there is any damage to the stove or other components due to water or weather damage which is the result of, but not limited to, improper chimney or venting installation.
This limited Lifetime Warranty does not extend to or include paint, door gasketing, glass gasketing, firebrick, kaowool or other ceramic insulating materials. It does not cover installation or operational-related problems such as overfiring, use of corrosive driftwood, downdrafts or spillage caused by environmental conditions, nearby trees, buildings, hilltops, mountains, inadequate venting or ventilation, excessive offsets, or negative air pressures caused by mechanical systems such as furnaces, fans, clothes dryers, etc.
This limited Lifetime Warranty does not apply to venting components, hearth components or other accessories used in conjunction with the installation of this product not manufactured by Aladdin Hearth Products.
This limited Lifetime Warranty is effective on all wood stories sold after September 1, 1996, and supersedes any and all warranties currently in existence.
—IMPORTANT--
This warranty is not valid unless the warranty registration card has been properly completed in full and returned within 10 days from the date of purchase.
FOR YOUR RECORDS:
DATE PURCHASED _________________________________ |
MODEL ______________________________________________ |
AUTHORIZED DEALER ______________________________ |
SERIAL ________________________________________________ |

 North America’s Best
INSTALLATION, OPERATION, AND MAINTENANCE INSTRUCTIONS
QUADRA-FIRE 1900
CONGRATULATIONS—You are now the proud owner of one of the finest stoves in the world for your home —the QUADRA-FIRE. Now, before installing your stove and building your first fire—record the serial number on the warranty card. Serial number is located on the safety label on the rear of the stove.
PLEASE READ ALL OF THE OWNERS MANUAL AND SAFETY NOTES
IMPORTANT SAFETY NOTES:
1.When installing your stove, particular attention should be paid to fire protection. If this unit is not properly installed, a house fire may result. For your safety, follow the installation instructions and contact local building or fire officials about restrictions and installation inspection requirements in your area.
2.Never use gasoline or similar liquids to start a fire in this unit. Keep all such liquids well away from stove.
3.During operation, if any part of the stove starts to glow, the stove is in an overfired condition. Close the air control completely until the glowing has stopped. OVERFIRING VOIDS WARRANTY.
4.Cool ashes should be disposed of carefully, using a metal container.
5.Do not burn wet or green wood. Store wood in dry location.
6.Do not burn garbage, treated wood, or wood with salt (driftwood, etc.). Burning materials other than wood (including charcoal) under adverse conditions may generate carbon monoxide in the home, resulting in illness or possible death.
7.Do not permit creosote or soot to accumulate excessively in the chimney or inside the firebox.
8.Check your chimney system thoroughly when installing into an existing metal or masonry chimney. Seek professional advice if in doubt about its condition.
9.Do not connect this unit to a chimney flue already serving another appliance.
10.Comply with all minimum clearances to combustibles as shown in this manual for this appliance.
11.Build fire on brick firebox floor. Do not use grates, andirons or other method to support fuel.
12.HOT WHILE IN OPERATION. Keep children, pets, clothing and furniture away. Contact can cause skin burns.
13.Do not connect to any air distribution duct or system.
14.RISK OF FIRE! Do not operate with stove door or ash removal system door open.
15.For further information refer to NFPA 211 (U.S.) or CAN/CSA-B365 (Canada).
16.WARNING: WHEN ASSEMBLING A UNIBODY APPLIANCE, USE ONLY GENUINE ALADDIN HEARTH PRODUCTS MANUFACTURED COMPONENTS. USE OF ANY OTHER COMPONENTS WILL VOID YOUR WARRANTY, AND COULD PRESENT A SERIOUS SAFETY HAZARD.
17.WARNING: DO NOT OPERATE YOUR QUADRA-FIRE STOVE BEFORE FULLY ASSEMBLING ALL COMPONENTS. BURNING YOUR STOVE WITHOUT A PEDESTAL OR LEG KIT ATTACHED WILL VOID YOUR WARRANTY, AND COULD PRESENT A SERIOUS SAFETY HAZARD.
401 N. WYNNE |
|
www.aladdinhearth.com |
|
COLVILLE, WA 99114 |
SAVE THESE INSTRUCTIONS |
aladdin@aladdinhearth.com |
|
(Revised 10/08/1999) |
Part #250-2481/ 832-3080 |
||
|
TABLE OF CONTENTS |
NOTES |
Safety label ......................................................................................................................................... |
3 |
Pedestal and leg model dimensions .................................................................................................... |
4 |
Clearances to combustibles ................................................................................................................ |
5 |
Safety listing ....................................................................................................................................... |
6 |
Installation materials needed .............................................................................................................. |
6 |
Venting system ................................................................................................................................... |
6 |
Chimney connector ............................................................................................................................. |
7 |
Chimney height/draft .......................................................................................................................... |
7 |
Connection to a masonry chimney |
|
1. Chimney .................................................................................................................................. |
7 |
2. Thimble ................................................................................................................................... |
10 |
A. Brick chimney thimble assembly ...................................................................................... |
10 |
B. 6”/152mm solid pack chimney with metal supports ......................................................... |
11 |
Connection to a metal prefabricated chimney .................................................................................... |
13 |
Mobile home installation .................................................................................................................... |
14 |
Outside air kit installation .................................................................................................................. |
15 |
Pedestal and leg installation ............................................................................................................... |
16 |
Operating instructions |
|
Burning process .......................................................................................................................... |
17 |
Combustion air system................................................................................................................ |
17 |
Fan operating instructions ........................................................................................................... |
18 |
Operating tips .............................................................................................................................. |
18 |
Burning guidelines ...................................................................................................................... |
18 |
Building a fire ............................................................................................................................. |
19 |
Wood selection and storage ........................................................................................................ |
19 |
Maintenance |
|
Creosote ...................................................................................................................................... |
20 |
Care and cleaning of glass and plated surfaces ........................................................................... |
20 |
Chimney cleaning ....................................................................................................................... |
20 |
Firebrick ...................................................................................................................................... |
20 |
Overfiring.................................................................................................................................... |
20 |
Door handle assembly and glass replacement .................................................................................... |
21 |
Baffle removal and replacement ......................................................................................................... |
22 |
Brick pattern ....................................................................................................................................... |
23 |
Installation of optional blower ........................................................................................................... |
24 |
Top heat shield installation ................................................................................................................. |
25 |
Accessories and service parts ............................................................................................................. |
26 |
Notes................................................................................................................................................... |
27 |
Warranty ............................................................................................................................................. |
28 |
Warranty card ..................................................................................................................................... |
Insert |
Page 2 |
Page 27 |

|
ACCESSORIES AND SERVICE PARTS |
|
|
ACCESSORIES |
|
831-1621 |
Top shield, black |
|
|
||
|
||
831-1750 |
Outside air kit, pedestal |
|
831-1300 |
Outside air kit, leg |
|
831-1700 |
Blower |
|
832-0721 |
Black door |
|
832-1891 |
Trim door |
|
832-0711 |
Gold door |
|
|
Leg mounting bracket (for mobile home installations) |
|
|
SERVICE PARTS |
|
832-2530 |
Kaowool blanket (4 piece) |
|
832-2470 |
Firebox brick set |
|
832-0550 |
Individual brick |
|
832-2480 |
Baffle, 3 piece set |
|
832-0740 |
Door glass |
|
832-0540 |
Door handle assembly |
|
832-1760 |
Door rope |
|
832-0620 |
Spring handle, door, 1/2” |
|
832-0630 |
Spring handle, air control, 1/4” |
|
832-2740 |
Front manifold tube |
|
832-2750 |
Middle manifold tube |
|
832-2760 |
Back manifold tube |
|
1900 SAFETY LABEL (found on back of stove)
|
Model: |
|
|
Serial No. |
|
|
|
Quadra-Fire |
|
|
|
|
|
|
|
|
|
|||
|
1900 |
|
|
|
|
|
|
|
|
|
|||
|
|
|
|
|
|
|
|
|
|
|
|
|
|
|
|
|
|
Manufactured by: |
||
|
|
|
|
|
|
|
Page 26 |
Page 3 |
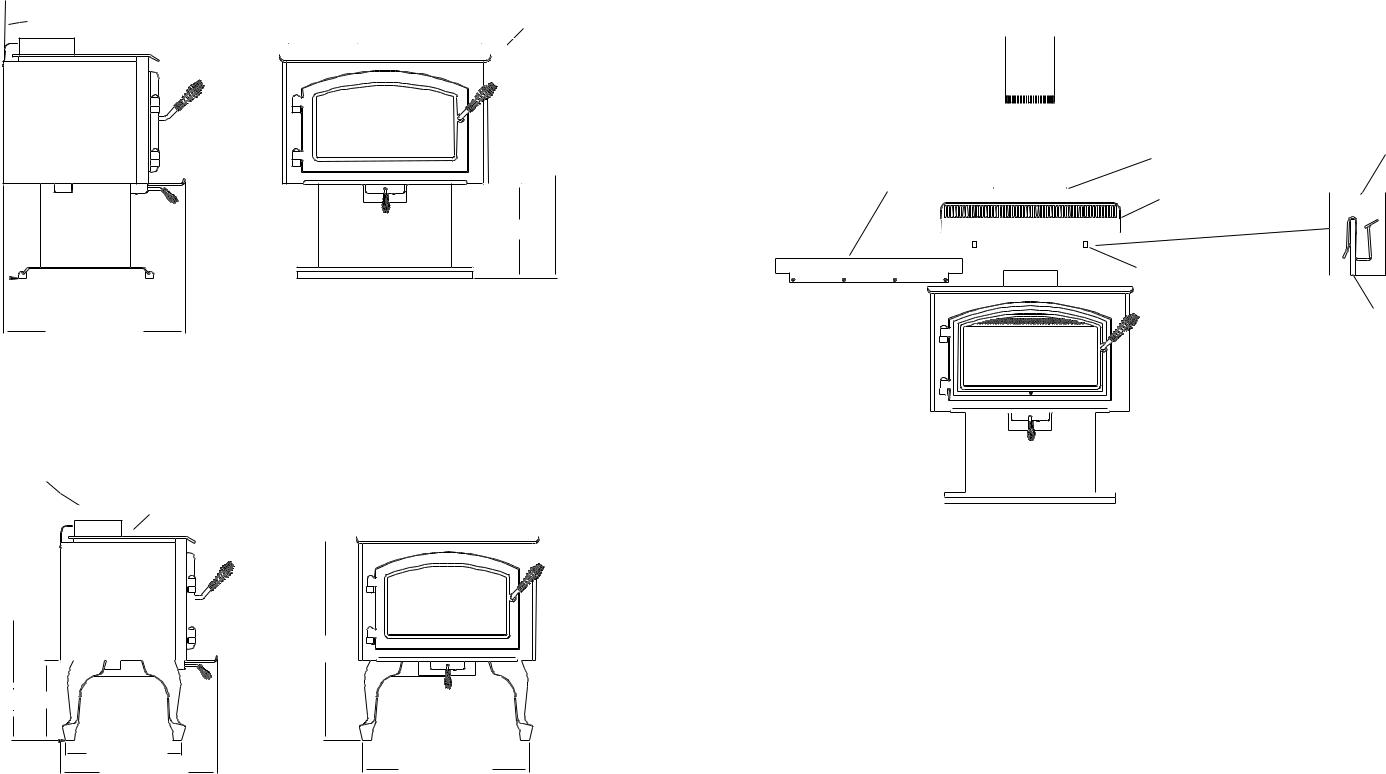
DIMENSIONS
PEDESTAL MODEL
|
|
|
19 5/16" (491mm) |
|
|
|
|
|
|
|
|
26 3/4" (680mm) |
|
|
|
|
|
|
|
|
||
|
|
1 7/8" (48mm) |
|
|
|
|
|
|
|
|
|
|
2" (51mm) |
|||||||||
|
|
|
|
|
|
|
|
|
|
|
|
|
|
|
||||||||
|
|
|
|
|
|
|
|
|
|
|
|
|
|
|
||||||||
|
|
|
|
|
|
|
|
|
|
|
|
|
|
|
|
|
|
|
||||
|
|
|
|
|
|
|
|
|
|
|
|
|
|
|
|
|
|
|
|
|
|
|
|
|
|
|
|
|
|
|
|
|
|
|
|
|
|
|
|
|
|
|
|
|
|
|
|
|
|
|
|
|
|
|
|
|
|
|
|
|
|
|
|
|
|
|
|
|
|
|
|
|
|
|
|
|
|
|
|
|
|
|
|
|
|
|
|
|
|
|
|
|
|
|
|
|
|
|
|
|
|
|
|
|
|
|
|
|
|
|
|
|
|
|
|
|
|
|
|
|
|
|
|
|
|
|
|
|
|
|
|
|
|
|
|
|
|
|
|
|
|
|
|
|
|
|
|
|
|
|
|
|
|
|
|
|
|
|
|
|
29 3/4" (756mm)
11 5/16" (287mm)

 16 1/4" (413mm)

22 1/2" (572mm)
FIGURE 1
LEG MODEL
5 3/16" (81mm) |
19 5/16" (491mm) |
|
|
|
|
|
|
|
|
|
|
26 3/4" (680mm) |
|
|
|
||||||||||||||
|
|
|
|
|
|
|
|
|
|
|
|
|
|
|
|
|
|
|
|||||||||||
|
|
|
|
|
|
|
|
|
|
|
|
13 3/8" (340mm) |
|
|
|
|
|
|
|||||||||||
|
|
|
|
|
|
|
|
|
|
2" (51mm) |
|
|
|
|
|
|
|
|
|
||||||||||
|
|
|
|
|
|
|
|
|
|
|
|
|
|
|
|
|
|
|
|
|
|
|
|
||||||
|
|
|
|
|
|
|
|
|
|
|
|
|
|
|
|
|
|
|
|
|
|
|
|
|
|
|
|
|
|
|
|
|
|
|
|
|
|
|
|
|
|
|
|
|
|
|
|
|
|
|
|
|
|
|
|
|
|
|
|
|
|
|
|
|
|
|
|
|
|
|
|
|
|
|
|
|
|
|
|
|
|
|
|
|
|
|
|
|
|
|
|
|
|
|
|
|
|
|
|
|
|
|
|
|
|
|
|
|
|
|
|
|
|
|
|
|
|
|
|
|
|
|
|
|
|
|
|
|
|
|
|
|
|
|
|
|
|
|
|
|
|
|
|
|
|
|
|
|
|
|
|
|
|
|
|
|
|
|
|
|
|
|
|
|
|
|
|
|
|
|
|
|
|
|
|
|
|
|
|
|
|
|
|
|
|
|
|
|
|
|
|
|
|
|
|
|
|
|
|
|
|
|
|
|
|
|
|
|
|
|
|
|
|
|
|
|
|
|
|
|
|
|
|
|
|
|
|
|
|
|
|
|
|
|
|
|
|
|
|
|
|
|
|
|
|
|
|
|
|
|
|
|
|
|
|
|
|
|
|
|
|
|
|
|
|
|
|
|
|
28 7/16" (722mm)
26 7/8" (683mm)
10" (254mm)
16 3/4" (426mm) |
|
22 1/2" (572mm) |
23 1/8" (587mm) |
FIGURE 2
Page 4
TOP HEAT SHIELD INSTALLATION
 Chimney pipe
|
|
Trim ring |
|
Top shield |
||
|
|
|
|
|||
Rear heat deflector |
|
|
||||
|
|
Top heat shield |
|
|
|
|
|
|
|
|
|
|
|
|
|
|
|
|
|
|
|
|
|
|
|
|
|
|
|
|
|
|
|
|
“S” clips
Outer wall
1.Unscrew and remove the rear heat deflector.
2.Attach the two “S” clips to the upper edge of the outer wall of the stove.
3.Set top heat shield on stove and push down into “S” clips
4.Install chimney pipe through hole in top heat shield.
NOTE: SEE PAGE 5 FOR REDUCED CLEARANCES WITH THE STANDARD TOP SHIELD.
Page 25
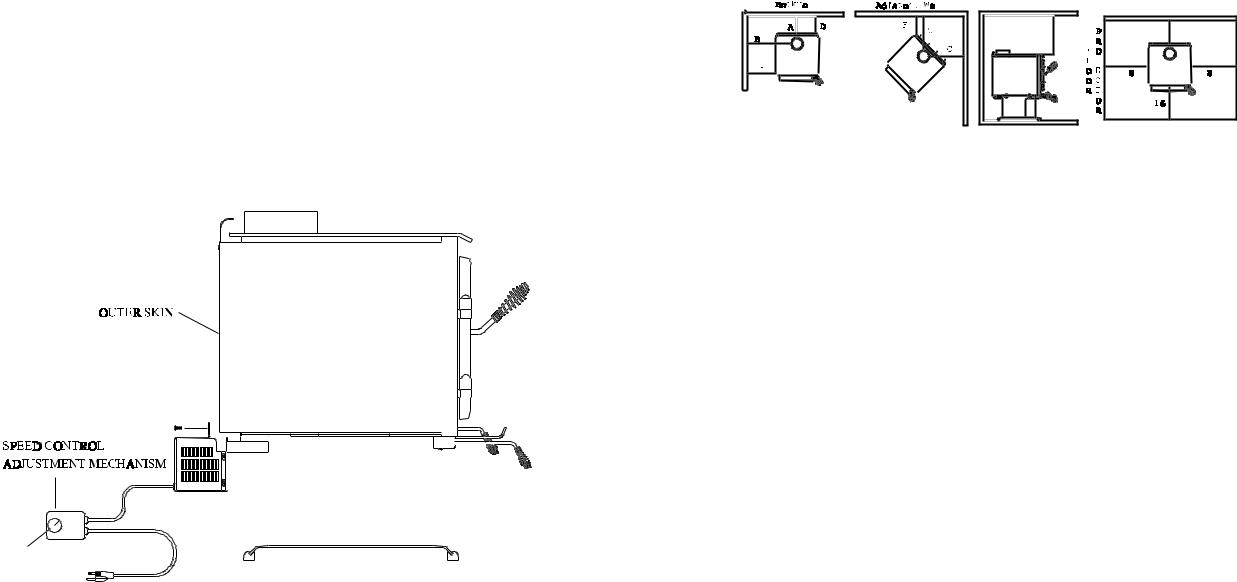
INSTALLATION OF OPTIONAL BLOWER
Part #831-1700
The blower is shipped fully assembled and ready for installation.
1.Remove three 1/4”-20 (3/8” hex head) bolts from blower cover, and remove nutbar. Discard nutbar.
2.Using bolts, attach blower to lower rear of stove, as shown.
3.Plug blower cord into a grounded outlet. Do not remove ground prong from plug. Route power cord to avoid heat from the stove, or other damage.
4.Adjust the blower speed control to the desired speed.
BLOWER SPEED CONTROL
BLOWER SWITCH ADJUSTMENTS
The blower speed control for this unit is adjusted at the factory, and should not require further adjustment. When the speed control is turned clockwise, it will click on to high speed. Turn the speed control clockwise to decrease the speed. At full clockwise, the blower should blow gently, but should not stop.
STEPS FOR ADJUSTING THE BLOWER SPEED CONTROL
1.With the unit plugged in, turn the speed control knob to slow (full clockwise).
2.With a small screwdriver, adjust the blower speed by turning the adjustment mechanism through the hole on the side of the speed control.
3.Adjust the speed so the blower runs slowly, but does not stop. Turn clockwise to slow the blower and counterclockwise to increase the speed.
CLEARANCES TO COMBUSTIBLES (UL AND ULC)
G |
8 |
FLOOR PROTECTOR: Floor protector must be noncombustible material or equivalent, extending beneath heater and to the front/ sides/rear as indicated.
NOTE: A 3/8” (10mm) minimum thickness tile or equivalent is recommended, but not required.
Minimum clearances to Combustible Materials (in inches and millimeters) for Quadra-Fire 1900 Standard Stove |
|
|
|||||||
|
|
Chimney & |
|
|
|
|
|
|
|
Installation |
Clearance |
Connector |
A |
B |
C |
D |
E |
F |
G |
Residential |
Standard |
Note 1 |
20”(508) |
25”(635) |
22”(559) |
18”(457)* |
15”(381) |
12”(305) |
52”(1321) |
Residential/Mobile Home |
Reduced |
Note 2 |
11”(280) |
20”(508) |
19”(483) |
9”(229) |
10”(254) |
9”(229) |
52”(1321) |
Alcove |
Standard |
Note 2 & 3 |
11”(280) |
20”(508) |
19”(483) |
9”(229) |
10”(254) |
9”(229) |
52”(1321) |
Minimum clearances to Combustible Materials (in inches and millimeters) for Quadra-Fire 1900 with top shield |
|
|
|||||||
|
|
Chimney & |
|
|
|
|
|
|
|
Installation |
Clearance |
Connector |
A |
B |
C |
D |
E |
F |
G |
Residential |
Standard |
Note 1 |
20”(508) |
25”(635) |
19”(483) |
18”(457)* |
15”(381) |
9”(229) |
44”(1118) |
Residential/Mobile Home |
Reduced |
Note 2 |
7”(178) |
18”(457) |
13”(330) |
6”(152) |
8”(203) |
3”(76) |
44”(1118) |
Alcove |
Standard |
Note 2 & 3 |
7”(178) |
18”(457) |
13”(330) |
6”(152) |
8”(203) |
3”(76) |
44”(1118) |
*Note: Dimension D (residential standard) can be 16” (406mm) in the United States.
Note 1: 6” (152mm) diameter single wall, minimum 24 MSG black or blued steel connector pipe with a listed factorybuilt type HT chimney suitable for use with solid fuels or a masonry chimney.
Note 2: 6” (152mm) diameter double wall insulated connector pipe with listed factory-built type HT chimney or a masonry chimney. (Mobile home venting system must be equipped with a rain cap and spark arrestor.) For installations with a preexisting class A chimney system, a listed stainless steel chimney liner should be installed, or the existing chimney examined by a chimney sweep for acceptable further use.
Note 3: Alcove specifications: Maximum depth of alcove shall be no more than 48” (1219mm). For additional alcove information and clearances, refer to clearances to combustibles above.
NOTE: Unit is approved for use with listed double wall air-insulated chimney connector or elbows.
When locating your stove consider safety, convenience, traffic flow, and the fact that the stove will need a chimney and chimney connector.
FLOOR PROTECTION: Floor protector must be noncombustible material, extending beneath heater and to the front/ sides/rear as indicated.
NOTE: A 3/8” (10mm) minimum thickness tile or equivalent is recommended, but not required.
NFPA 211: Use a noncombustible material with 1” (25mm) ventilated air space to reduce clearances. However, this is not to exceed 50% of Quadra-Fire’s specified clearances.
NOTE: Must follow NFPA 211 spacing and materials to qualify. It is also subject to local jurisdiction.
AVOID FIRE: Maintain the designated clearances to combustibles. Insulation must not touch the chimney. You must maintain the designated air space clearance around the chimney. This space around a chimney is necessary to allow natural heat removal from the area. Insulation in this space will cause a heat buildup, which may ignite wood framing.
Page 24 |
Page 5 |
 Loading...