

Page 1
TABLE OF CONTENTS
Introduction
Before Using …………………………………………………………………………… 1
Packing List ……………………………………………………………………………. 2
Technical Specifications ……………………………………………………………….. 3
PVR Layout ……………………………………………………………………………. 4
SD Card Information …………………………………………………………………. . 5
Connection Diagram …………………………………………………………………… 7
Function Setup
PIP Function ……………………………………………………………………………. 7
Image Setup ……………………………………………………………………………. .8
Date/time Setup ………………………………………………………………………… 9
Record AVI/Photo Setup ………………………………………………………………. 11
NTSC/PAL Setup ……………………………………………………………………… 13
Image Quality Setup ……………………………………………………………………16
Motion Detection ON/OFF ……………………………………………………………..17
Motion Detection Area ………………………………………………………………….19
Motion Detection Count ……………………………………………………………….. 21
Motion Detection Interval ……………………………………………………………. ..23
Motion Detection Sensitivity ………………………………………………………….. 25
Playback Operation
Image Playback …………………………………………………………………………27
Playback Mode ………………………………………………………………………….28
Browse Pictures …………………………………………………………………………29
Deleting Images …………………………………………………………………………32
Q-See Warranty ………………………………………………………………………….35
1
Page 2

.
BEFORE USING
Special Attention
1. Connect all the parts before turning on the power.
2. Cut off the power before inserting or pulling out SD Card to avoid
damage to the equipment.
3. Physical electrostatic discharge can damage the SD card permanently,
so please don't touch the metal part of the card.
4. Only use the AC/DC adaptor that comes with the unit or batteries.
5. Keep water or any liquid away from the equipment.
6. Do not press multiple buttons at the same time, only use device
according to the instructions.
Introduction to Unit’s Functions
To summarize the function of the Pocket Digital Motion Detect Video
Recorder (PVR), it is a combination of CCTV and DVR that can view and
record manually or automatically when motion is detected.
The QSW1001R records Video, it saves the files on an SD card. The
user can view images on a TV (monitor) or computer (need to install a SD
reader) at any time and can save the images to the computer.
1. Immediately getting into the work of "Detect motion object" after
power on;
2. Automatically take photos/record immediately when motion is
detected in front of a camera.
3. If there is no motion in front of the camera or a moving object stops
moving, DVR doesn't record or stops recording.
4. A 128MB SD card can store about 2000 photos or 400 video clips.
5. A 2GB SD card can store about 28800 photos or 4850 video clips.
6. The QSW1001R uses a DC 12V adapter for recording in a car.
7. Memorizes preset parameters and will not lose the settings when
power is off.
8. The stored photos/video clips will not be lost if power is lost.
9. Can connect with alarm system/ video door phone.
10. Supports NT SC/ PA L video signals.
11. The saved file name is the recording date, the picture format i s J P EG,
and the video format is AVI.
12. Search for photos or videos by recording date and time.
13. No special installation needed, start working once camera is attached
and system turned on.
14. No need to install software.
15. Has a button to lock system.
16. Supports playing back the image on TV/ monitor, or Computer
(through SD card reader);
Range of Applications
The QSW1001R has many possible applications in the home,
supermarket, store, schools, preschools and offices. It can also be used as an
alarm system, or as a DVR system..
Packing List
1. One QSW1001R
2. One DC 12V Adapter
3. One detect signal output control wire
4. One Audio Video wire
5. One instruction manual
2
Page 3
TECHNICAL SPECIFICATIONS
Product Model QSW1001R
Voltage DC 12V
Power Consumption 300mA
Standard memory 128MB SD Card
Maximum memory 2GB SD Card
Photo format JPEG
Photo pixels 640*480
Video format AV I
Video pixels 320 *240
Frames/Second 8fps
Video record time 10s/pc
Compression format Motion JPEG
Record signal Video/Audio & Video
Video Input
Video output
Dimensions 5.25 x 3.75 x 1 in
Weight 10.5 oz
75 Ω Typ.1Vp-p
75
Ω Typ.1Vp-p
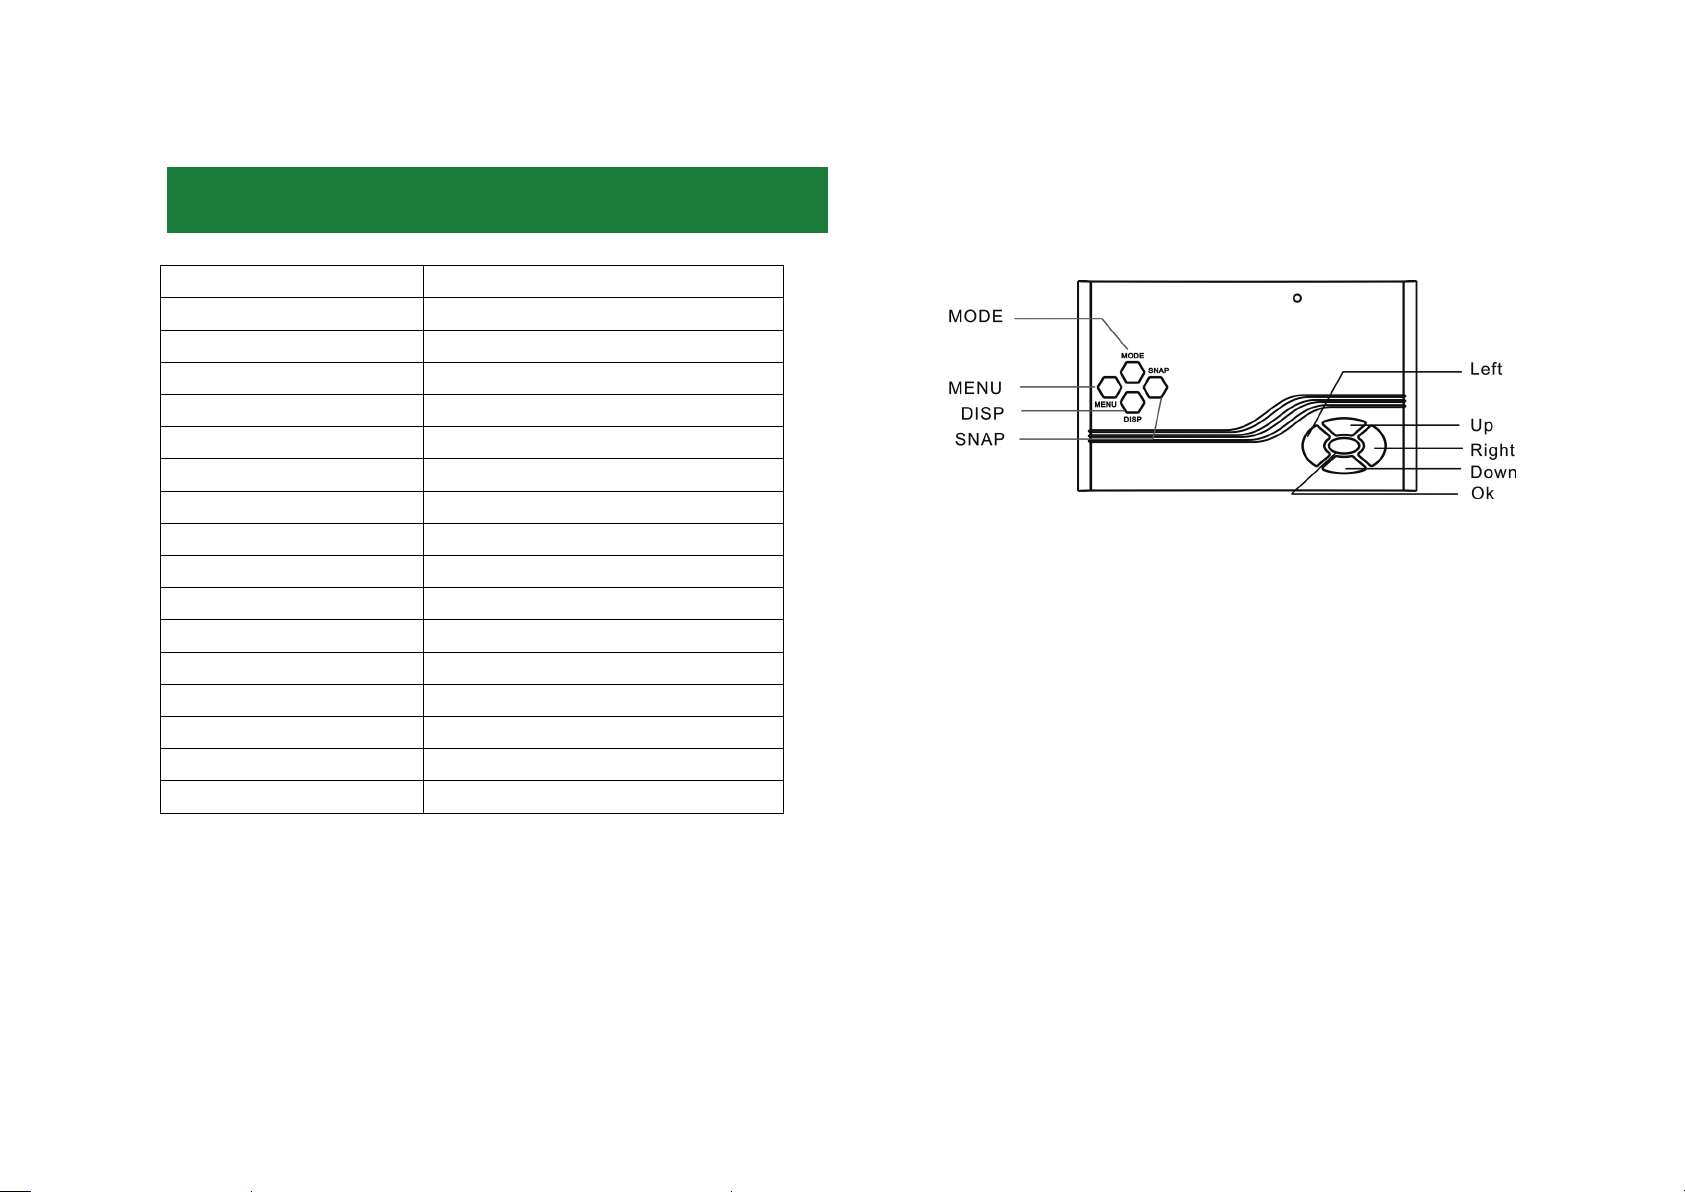
PVR Layout
The Top of PVR
MODE: Change the mode of PVR between preview mode and playback
mode.
MENU: Enter the system main menu.
DISP: Switch the channels to display.
SNAP: Capture image or record AVI files.
UP: Move up
DOWN: Move down
LEFT: Move left
RIGHT: Move right
OK: Enter/Select
3
Page 4
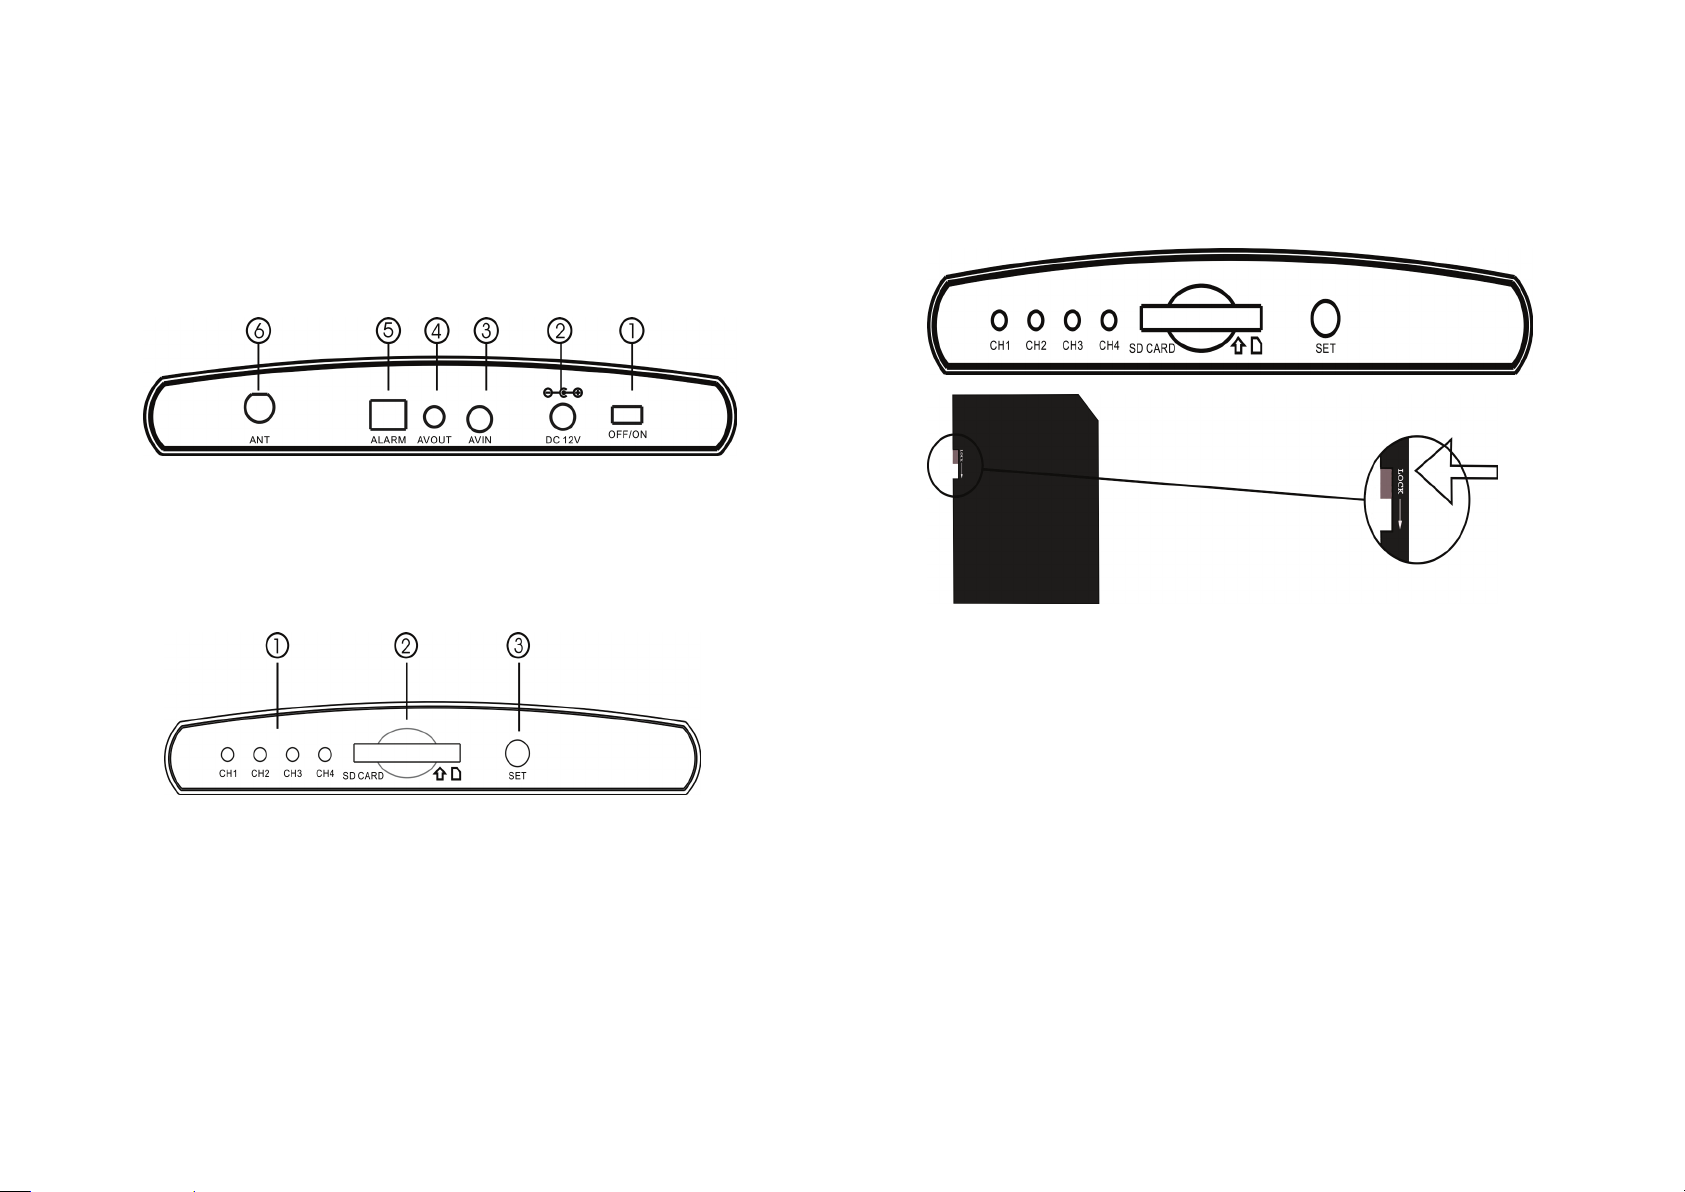
Front Cover
1) Power Switch
2) Power Input Jack
3) Video & Audio In
4) Video & Audio Out
5) Alarm
6) ANT
Back Cover
1) Channel Indicator
2) SD CARD: SD Card slot
3) Wireless Channel Selecting Button
SD Card Information
The unit can support a SD Card up to 2GB.
It supports FAT32 file system
SD Card Caution
Physical electrostatic charge can damage the SD card, so
please do not touch the metal part of the card.
Please turn off power before you insert or pull out a SD card.
Directions for SD Card Operation
Please insert SD card according to the following diagram:
SD CARD
Please make sure that the SD card is not locked.
4
Page 5
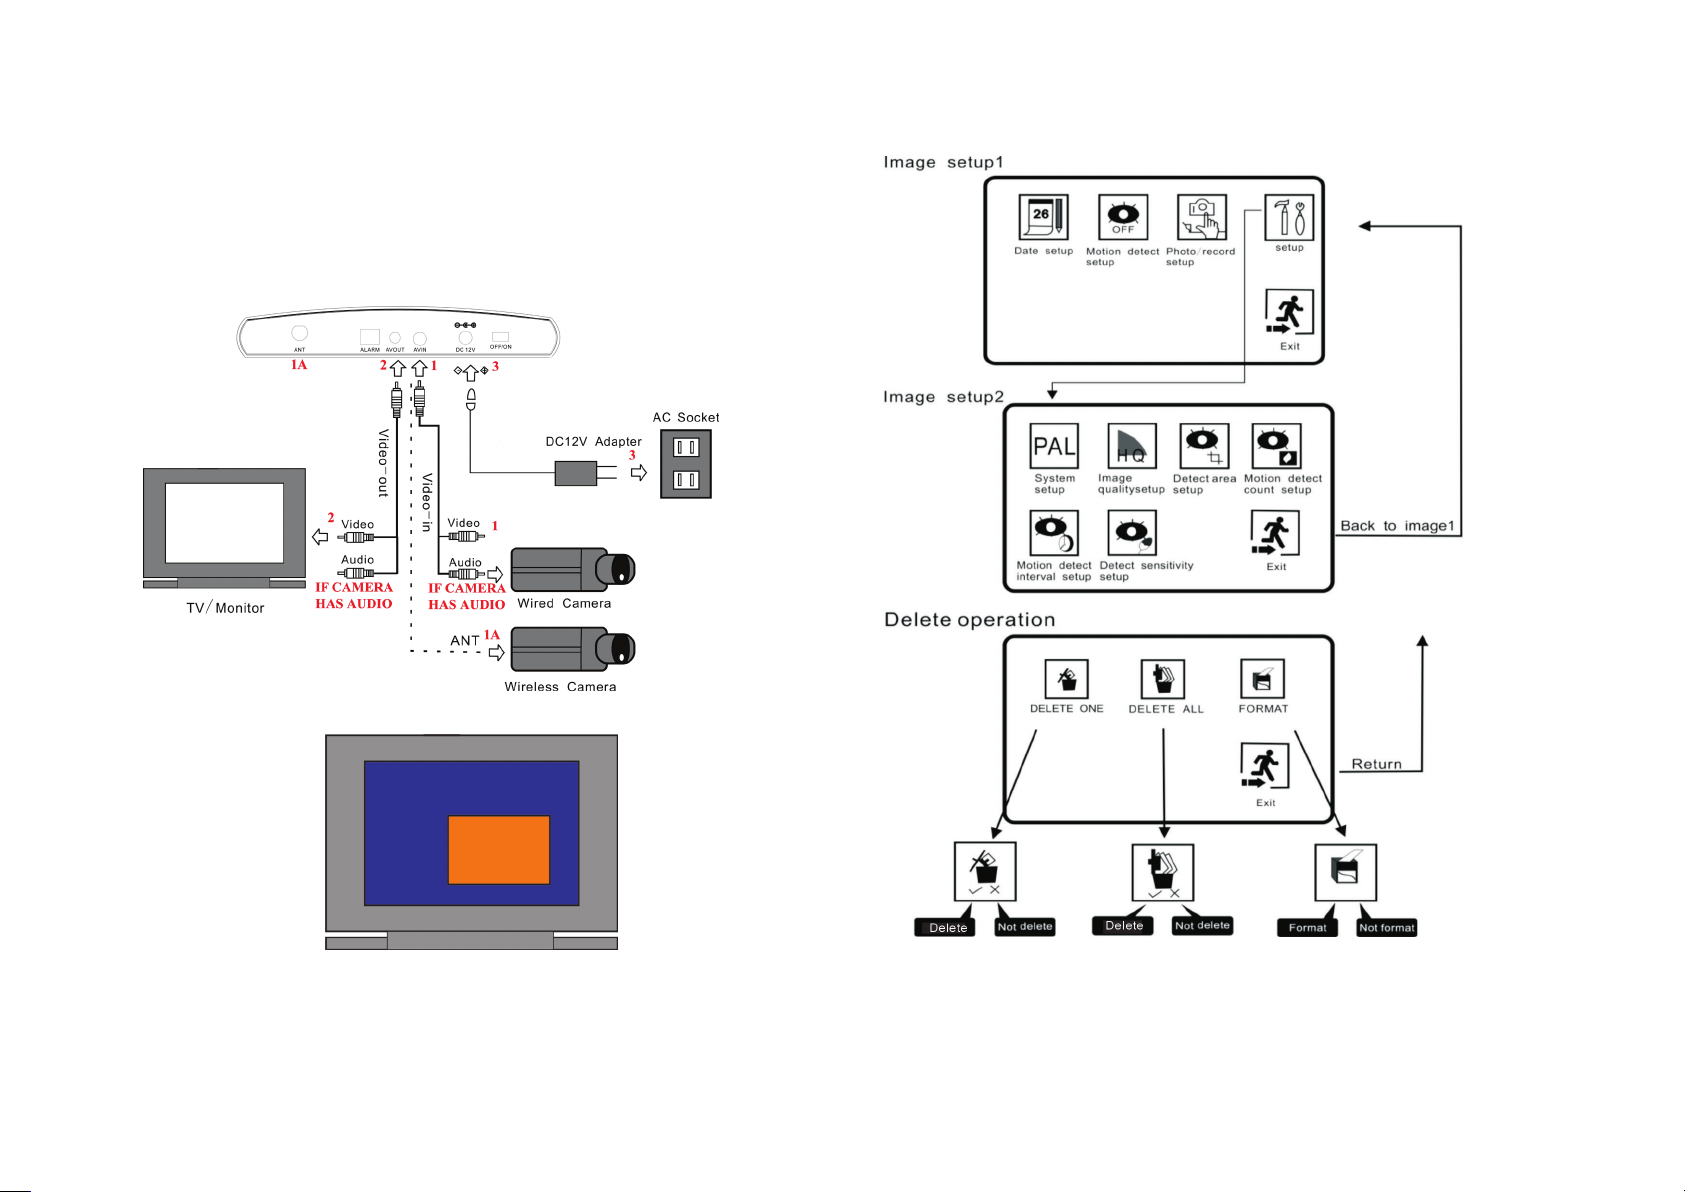
The Connection Diagram.
1. Connect PVR video-in port and camera with video wire.
A wireless camera will communicate with the wireless antenna
2. Connect video -out port and TV with video wire.
3. Please use special AC/DC Adapter or battery.
4. Please connect when power off.
Image setup
PIP (Picture in Picture) Function:
Wired AV
Wireless AV
Monitor
When the wired camera and wireless camera are on at the same time, it
will show a dual-screen on the monitor, with the wireless camera showing a
small screen inside the larger wired camera display.
When you choose “ √ ”,“ √ ”will turn green, then press OK to confirm.
5
Page 6

Date/Time Setup
(1) Press MENU to enter system main menu.
(2) Press LEFT/RIGHT to set date and then press OK.
(3) Press LEFT/RIGHT to the needed option.
Year/month/day
(4) Press UP/DOWN to set the date.
Year/month/day
(5) After setting year/month/day, press RIGHT button to set
hour/minute/second.
hour/minute/second
(6) Press UP/DOWN to set time, and then press OK to confirm.
hour/minute/second
(1) Press LEFT/RIGHT to exit option and then press OK.
(2) Press MENU to exit directly
Exit Setup
6
Page 7

Record AVI/Photo Setup
(1) Press MENU to enter system main menu.
(2) Press LEFT/RIGHT to capture format AVI/Photo option.
(2) Press OK to switch photo option.
Exit setup
(1) Press LEFT/RIGHT to exit option and then press ok.
(2) Press MENU to exit directly.
Photo/AVI quick setup
Pressing DOWN directly in the preview mode can switch the capture
format photo/AVI.
AVI setup status
(3) Press OK to switch record option..
Photo setup status
7
Page 8

NTSC/PAL Setup
(1) Press MENU to enter system main menu.
(5) Press OK again to switch to NTSC mode.
(2)Press LEFT/RIGHT to setup option, then press OK to confirm.
(3) Press LEFT/RIGHT to NTSC/PAL option, then press OK to confirm.
(4) Press OK to switch to PA L mode (default is NTSC mode).
(6) Press LEFT/RIGHT to Exit option then press OK to exit..
Exit Setup
Press MENU to exit directly.
8
Page 9

Image Quality Setup
(1) Press MENU to enter system main menu.
(2) Press LEFT/RIGHT to setup option and then press OK to
confirm.
(3) Press LEFT/RIGHT to image quality setup option.
(5) Press OK again to switch to High image quality mode.
(6) Press LEFT/RIGHT to exit option
(4) Press OK to switch to Low image quality mode(default is High).
(7) Press OK to return to the setup.
Exit Setup
Press MENU to exit directly.
9
Page 10

(4) Press OK again to enter motion detect off status
Motion Detection ON/OFF
(1) Press MENU to enter system main menu.
(4) Press LEFT/RIGHT to motion detect on/off option.
(3) Press OK to enter motion detect on status.
Exit Setup
(1) Press LEFT/RIGHT to exit option and then press OK.
(2) Press MENU to exit directly.
Motion Detection Quick Setup
Press UP Key to directly switch the motion detect state.
10
Page 11

The dashed frame is the motion detect area.
Detect area can be divided into L / M / S
Motion Detection Area
(1) Press MENU to enter system main menu.
(2) Press LEFT/RIGHT to setup option, and then press OK to confirm.
(3) Press LEFT/RIGHT to motion detect area option.
Motion Detect Off
(4) Press OK to motion detect area setup.
(5) Press LEFT/RIGHT to choose detect area and then press OK.
(6) Press UP/DOWN/LEFT/RIGHT to move detect area and then press OK
to exit motion detect area setup.
11
Page 12

(7) Press LEFT/RIGHT to exit the option and then press OK to return to the
setup.
Exit Setup
Press MENU to exit directly.
Motion Detection Count
Motion detection count means number of photos that you choose
to take in one motion detection (you can choose 1, 3, or 5 pictures).
(1) Press MENU to enter system main menu.
(2) Press LEFT/RIGHT to setup option, and then press OK to confirm.
(3) Press LEFT/RIGHT to motion detect count option, and at the bottom of
the screen it shows the current count.
(4) Press OK to choose count number.
(5) Press LEFT/RIGHT to exit the option and then press OK to return to the
setup menu.
12
Page 13

Exit setup
Press MENU to exit directly.
Motion Detection Interval
Motion detection interval means that you can set 1, 3, or 5 second
intervals between two motion detection events.
(1) Press MENU to enter system main menu.
(3) Press LEFT/RIGHT to motion detect interval setup option,and at the
bottom of the screen shows the current interval
(4) Press OK to switch time.
(2) Press LEFT/RIGHT to setup option,and then press OK to
confirm.
(5) Press LEFT/RIGHT to exit the option,and then press OK to return
to the setup.
13
Page 14

Exit Setup
Press MENU to exit directly.
Motion Detection Sensitivity
The motion detection sensitivity range is 01-99. The lower the value, the
lower the sensitivity is, the higher the value, the higher the sensitivity is.
(1) Press MENU to enter system main menu.
(2) Press LEFT/RIGHT to setup option and then press OK to confirm.
(3) Press LEFT/RIGHT to motion detect sensitivity option.
(4) Press OK to sensitivity setup interface and there are target value/current
value on the screen.
(5) Press UP/DOWN to set sensitivity and then press OK to return to the
setup
14
Page 15

(6) Press LEFT/RIGHT to exit option and then press OK return to setup.
Exit Setup
Press MENU to exit directly.
The Motion detect sensitivity value setting will be different in different
situations, users can set the proper sensitivity value according to the spot
simulation test.
Image playback
The photos can be browsed by one or six thumbnails, or by folder. They
can be deleted manually and you can also delete all, or the SD card can be
formatted.
For motion detection sensitivity refer to the following diagram. When it
reaches the target value, the system would start to record automatically.
Playback Mode
15
Page 16

(1) Press MODE to playback interface in preview mode and the
current image information will be shown at the bottom of the screen.
(2) Press MODE again to return to preview mode.
Browsing Pictures
Browse Six Pictures
(1) Press MODE to go to playback interface in preview mode.
(2) Press OK to go to six thumbnail browse.
(3) Press LEFT/RIGHT to select the pictures which you want to see.
(4) Press OK to see it in full screen.
16
Page 17

Next Picture
(5) Press MODE to return to preview mode.
Using six thumbnail browse
EXIT
Delete/Format
Choose Folder
Previous Picture
Previous Group
Next Group
Single or Six Pictures
Choose Folder
(1) Press MODE to go to playback interface in preview mode.
(2) Press DISP to choose folder.
(3) Press UP/DOWN to select the folder you want to see and then press
OK to confirm.
(4) The picture shows the first photo in current folder.
Deleting Images
Delete One
17
Page 18

(1) Press MODE to go to playback interface in preview mode.
(2) Press MENU to go to delete menu.
(3) Press LEFT/RIGHT to select Delete One, and then press
OK to confirm.
(2) Press MENU to delete menu.
(3) Press LEFT/RIGHT to select Delete All, and then press
OK to confirm.
(4) Press LEFT/RIGHT to select DELETE or NOT DELETE option,
and then press OK to confirm.
Delete All
(1) Press MODE to go to playback interface in preview mode.
(4) Press LEFT/RIGHT to select DELETE or NOT DELETE option,
and then press OK to confirm.
Format
(1) Press MODE to go to playback interface in preview mode.
18
Page 19

(2) Press MENU to go to delete menu.
(3) Press LEFT/RIGHT to Format and then press OK to confirm.
(4) Press LEFT/RIGHT to format or not format option, and then press
OK to confirm.
Thank you for choosing our products.
All of our products have a conditional free warranty repair service for
hardware within 12 months starting from purchase date, and a free exchange
service within one month (valid for manufacturing defects). Permanent
upgrading service is provided for the software.
Liability Exclusions:
Any product malfunction, abnormalities in operation or damage caused
by following reasons are not within the free service scope of our company.
You would need to pay for repair in these cases.
(1) Equipment damage caused by improper operation
(2) Improper environment and conditions in/on which the equipment operates,
e.g., improper power, environment temperature, humidity and lightening
strike etc. that cause equipment damage.
(3) Damage caused by acts of nature: earthquake and fire etc.
(4) Equipment damage caused by the maintenance of personnel not
authorized by our company.
(5) Product sold over 12 months ago.
In order to provide various services to you, please complete registration
procedure after you purchase the product. Cut off or copy User’s Information
Card and fax or mail it to us after the card is filled in. You can also register
the product by going to the
Registration link.
www.q-see.com website and clicking on the
Q-SEE Product Warranty
Customer Information Card
User’s Name Mr. /Mrs.
19
 Loading...