

Page 1

One Maxi
Page 2

Page 3
EN
NL
ES
IT
DA/NO
FR
ES
DE
One Maxi
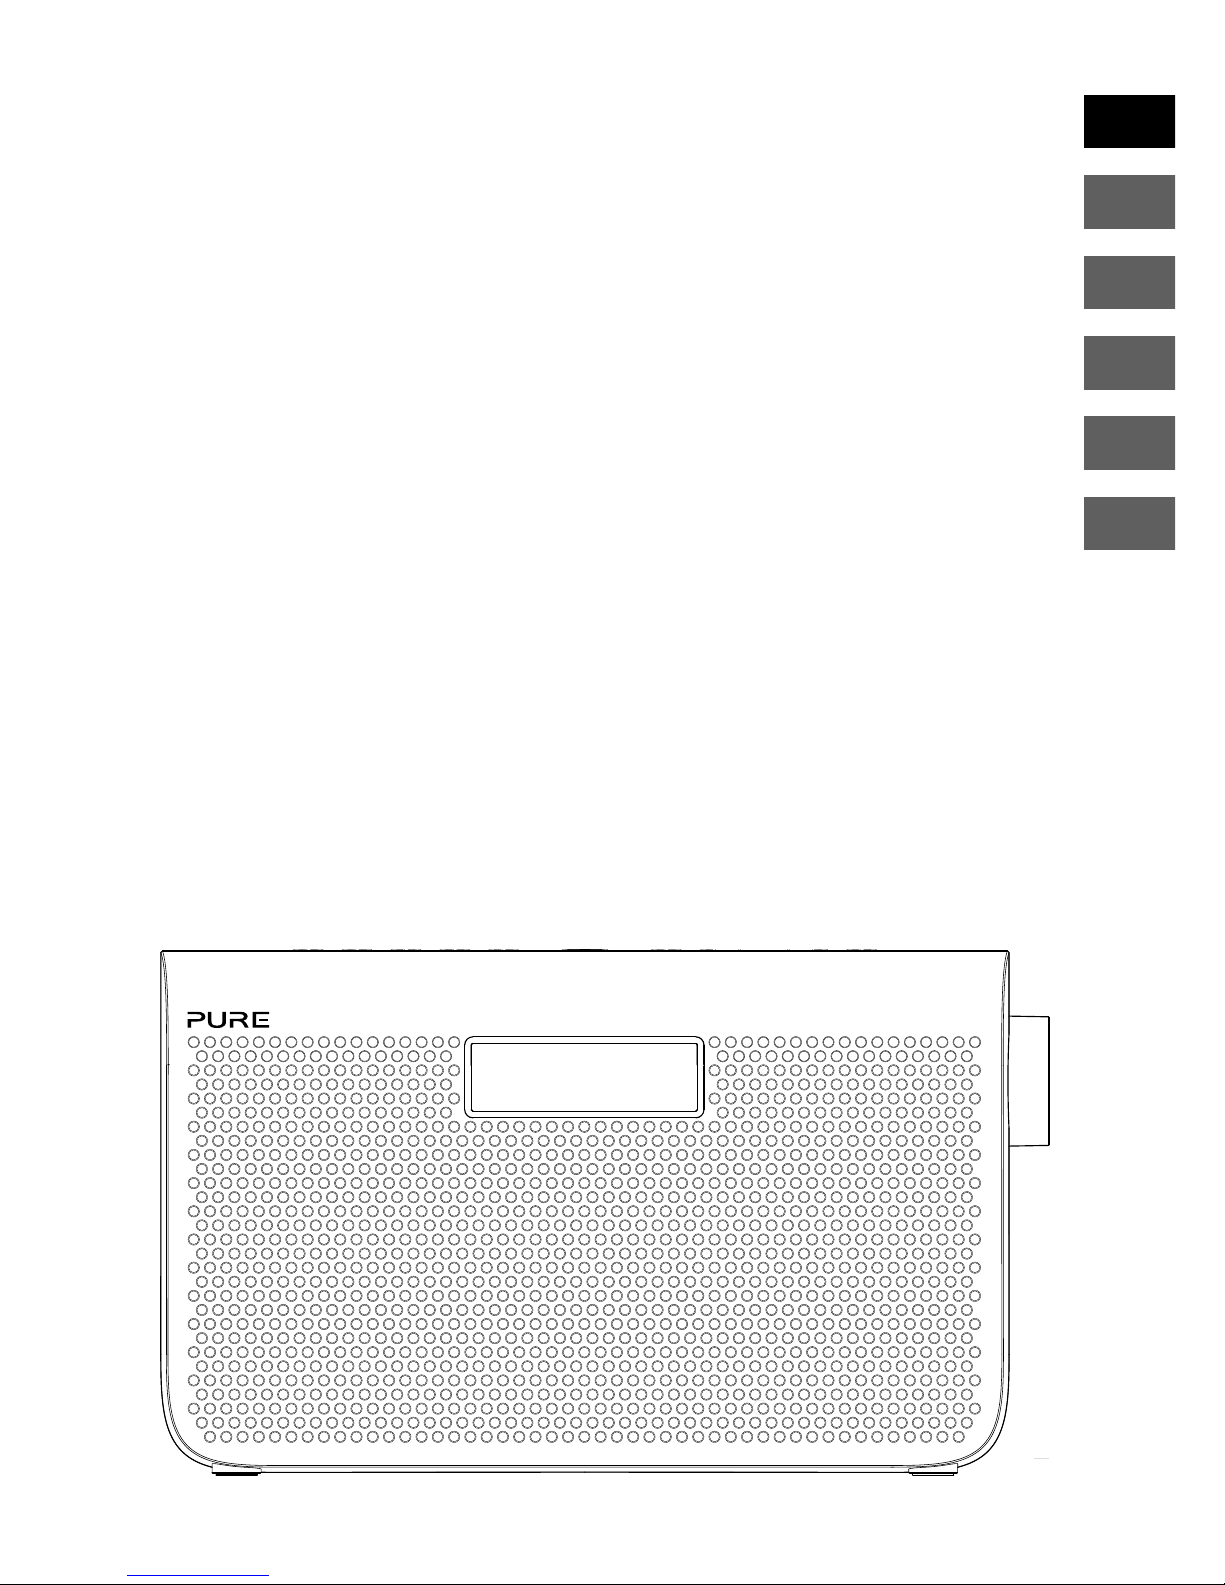
Thank you for choosing One Maxi. This manual will
help you get your product up and running in no
time and explains how to get the best out of all its
great features. If you need any further assistance,
please visit the support pages on our website at
support.pure.com.
Page 4

2
1. WARNING: Do not use the included power supply (with model number ZDD055200 or
ZDD055200BS) to power up another apparatus as this may cause damage.
2. Use only power supplies listed in the user manual/user instructions (supplied
by Pure with model number ZDD055200 or ZDD055200BS).
3. Fit the mains adapter to an easily accessible socket, located near the radio and ONLY
use the mains power adapter supplied
4. WARNING: To reduce the risk of fire or electric shock, do not expose this apparatus
to rain or moisture. The apparatus shall not be exposed to dripping or splashing and
objects filled with liquids, such as vases, shall not be placed on apparatus.
5. CAUTION: Danger of explosion if battery is incorrectly replaced. Replace only with the
same or equivalent type.
6. WARNING: The battery (battery or batteries or battery pack) shall not be exposed to
excessive heat such as sunshine, fire or the like.
7. WARNING: The direct plug–in adapter is used as a disconnect device, the disconnect
device shall remain readily operable.
8. Keep the radio away from heat sources such as radiators, heaters or other appliances
that produce heat.
9. Do not expose the unit to direct sunlight.
10. Do not use the radio near water.
11. Avoid objects or liquids getting into the radio.
12. Do not remove screws from or open the radio casing.
13. Always switch the radio off and disconnect it from mains power before inserting or
removing a ChargePAK.
14. Should not be immersed in water, used in shower or bathroom if plugged into the mains.
15. The mark label is on the exterior of the bottom of the apparatus.
Safety instructions
Page 5

3
EN
Contents
4 Introduction
4 Controls
4 Connectors
5 Display
6 Getting started
6 Quick set up
8 Listening to your One Maxi
8 Listening to digital radio
8 Listening to FM radio
9 Storing and selecting presets
9 To quick-store a station to a preset button (1-4)
9 To store a station to the preset list (1-10)
9 To recall a preset when listening to a digital or FM radio station
10 Using the auxiliary input
11 Alarms and timers
11 Setting an alarm
12 Cancelling a sounding alarm
12 Snoozing a sounding alarm
12 Disabling an alarm
12 Setting the sleep timer
12 Setting the kitchen timer
13 Options and settings
13 General settings
14 Digital radio settings
14 FM radio settings
15 Audio settings
17 Display settings
18 Clock settings
20 Appendix
20 Using a ChargePAK D1 or six AA batteries
21 Help and advice
22 Technical specifications
Page 6
4
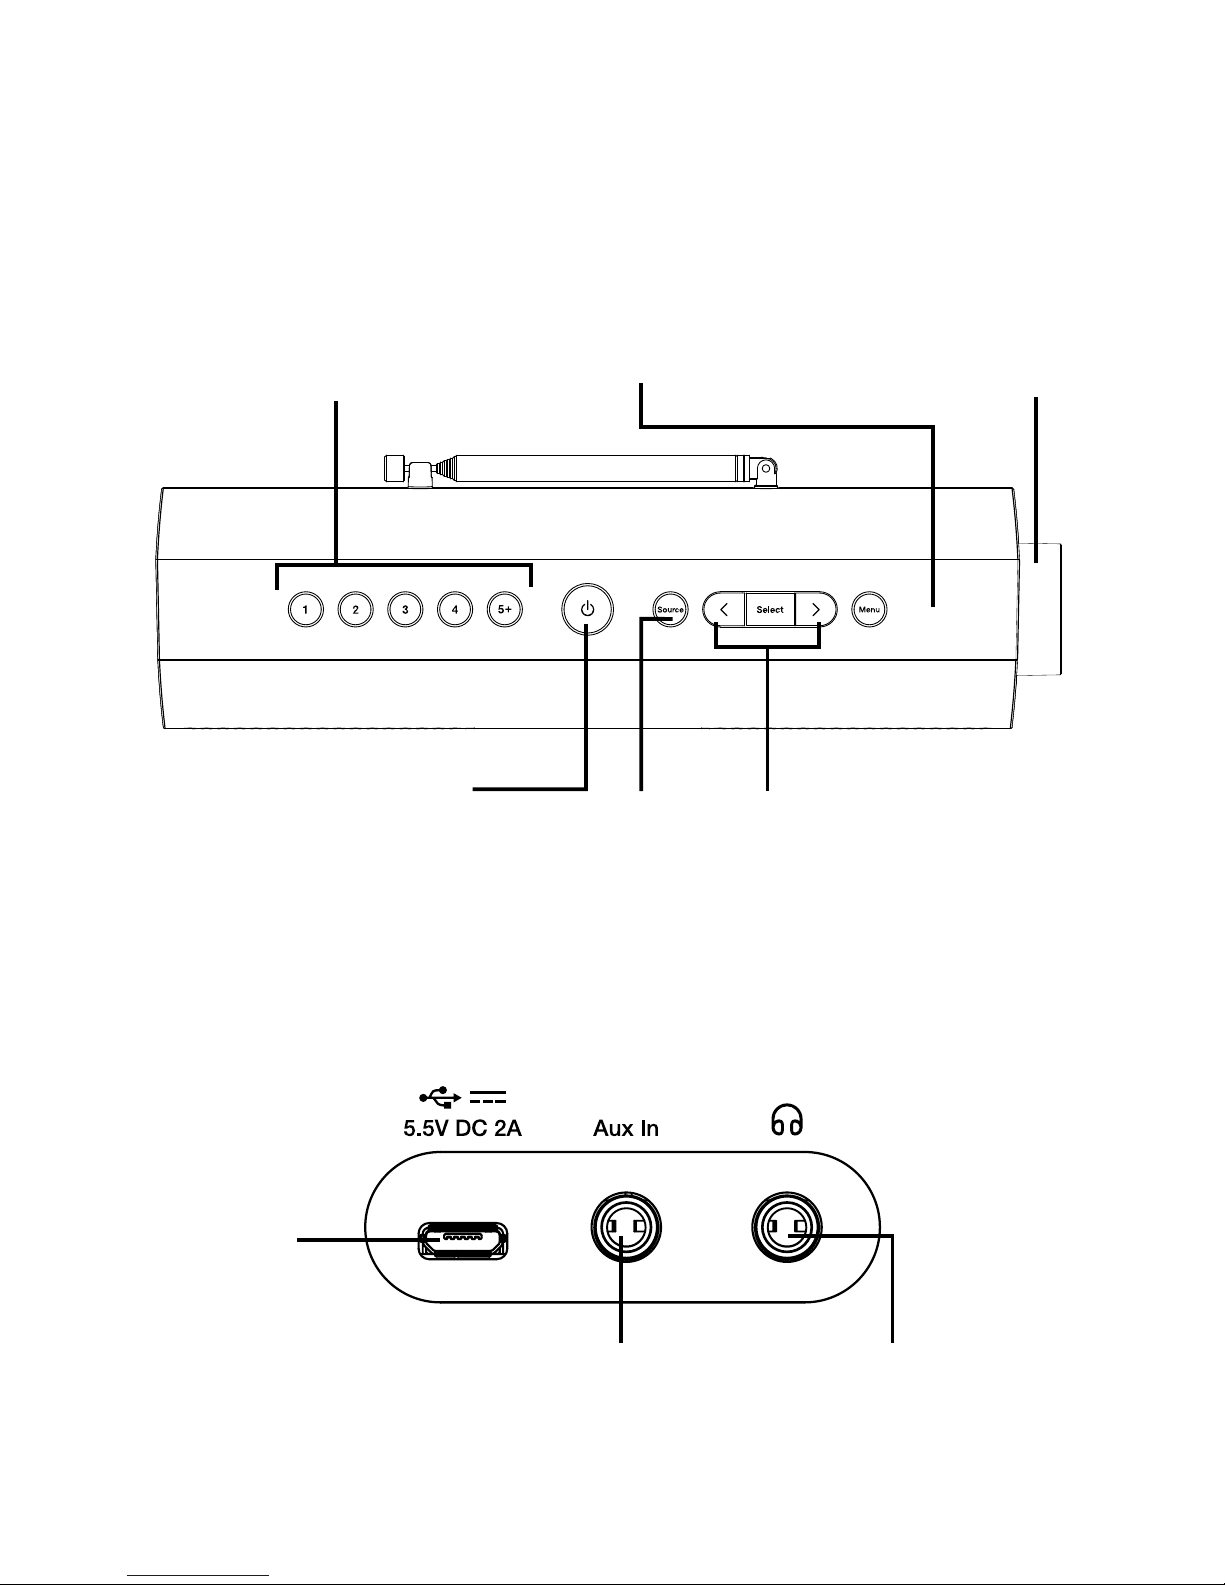
Controls
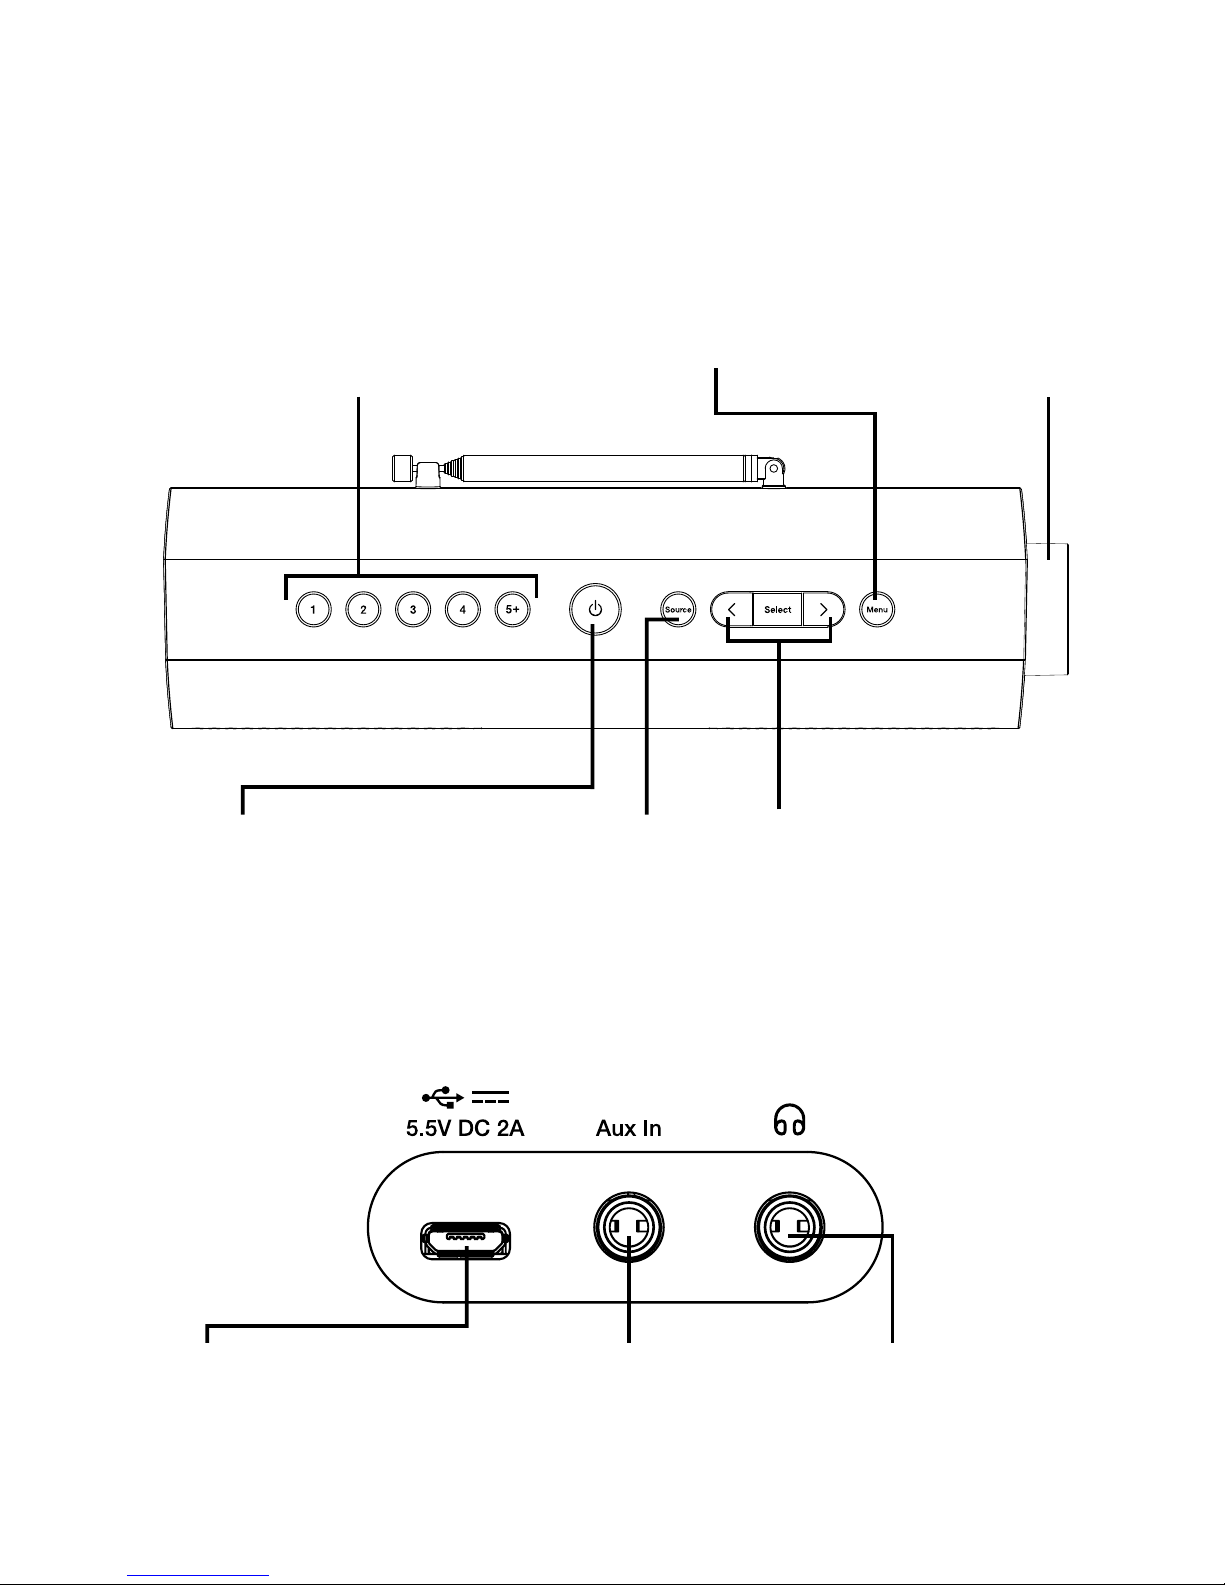
Introduction
Select buttons
Press to change radio
stations (see page 8)
or press to scroll and
select menu options.
Menu button
Press to change various
settings on One Maxi
(see page 13).
Source button
Press to switch
between listening to
digital radio, FM radio
and auxiliary input
Power button
Press to switch One
Maxi on/off.
Presets 1-5+ buttons
Store up to 10 digital and 10 FM
radio preset stations (see page
9 for more information).
Connectors
Micro–B USB 5.5V
power connector
Connect to supplied
mains adapter only.
Auxiliary input (3.5mm)
Analogue stereo input for
your mobile, tablet etc.
3.5 mm stereo
headphone socket
Volume dial
Turn to adjust
volume. Push to
mute and un-mute.
Page 7
5
EN
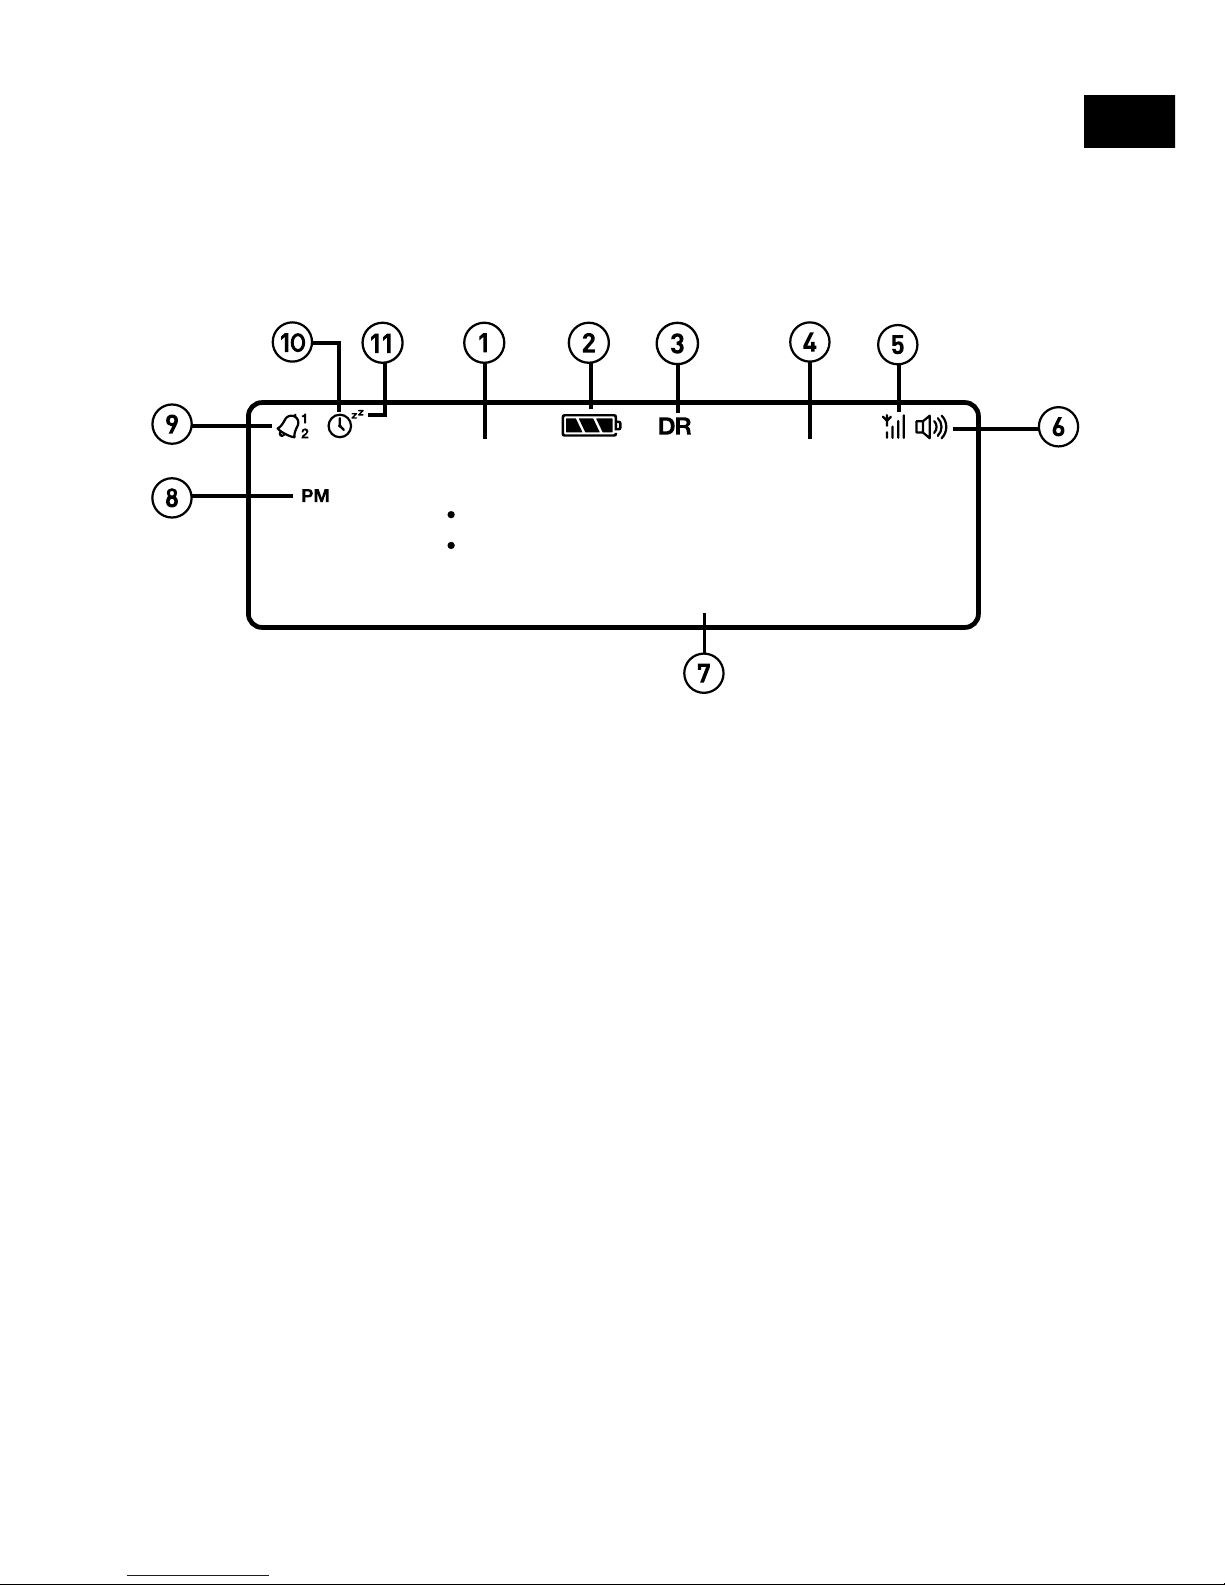
Display
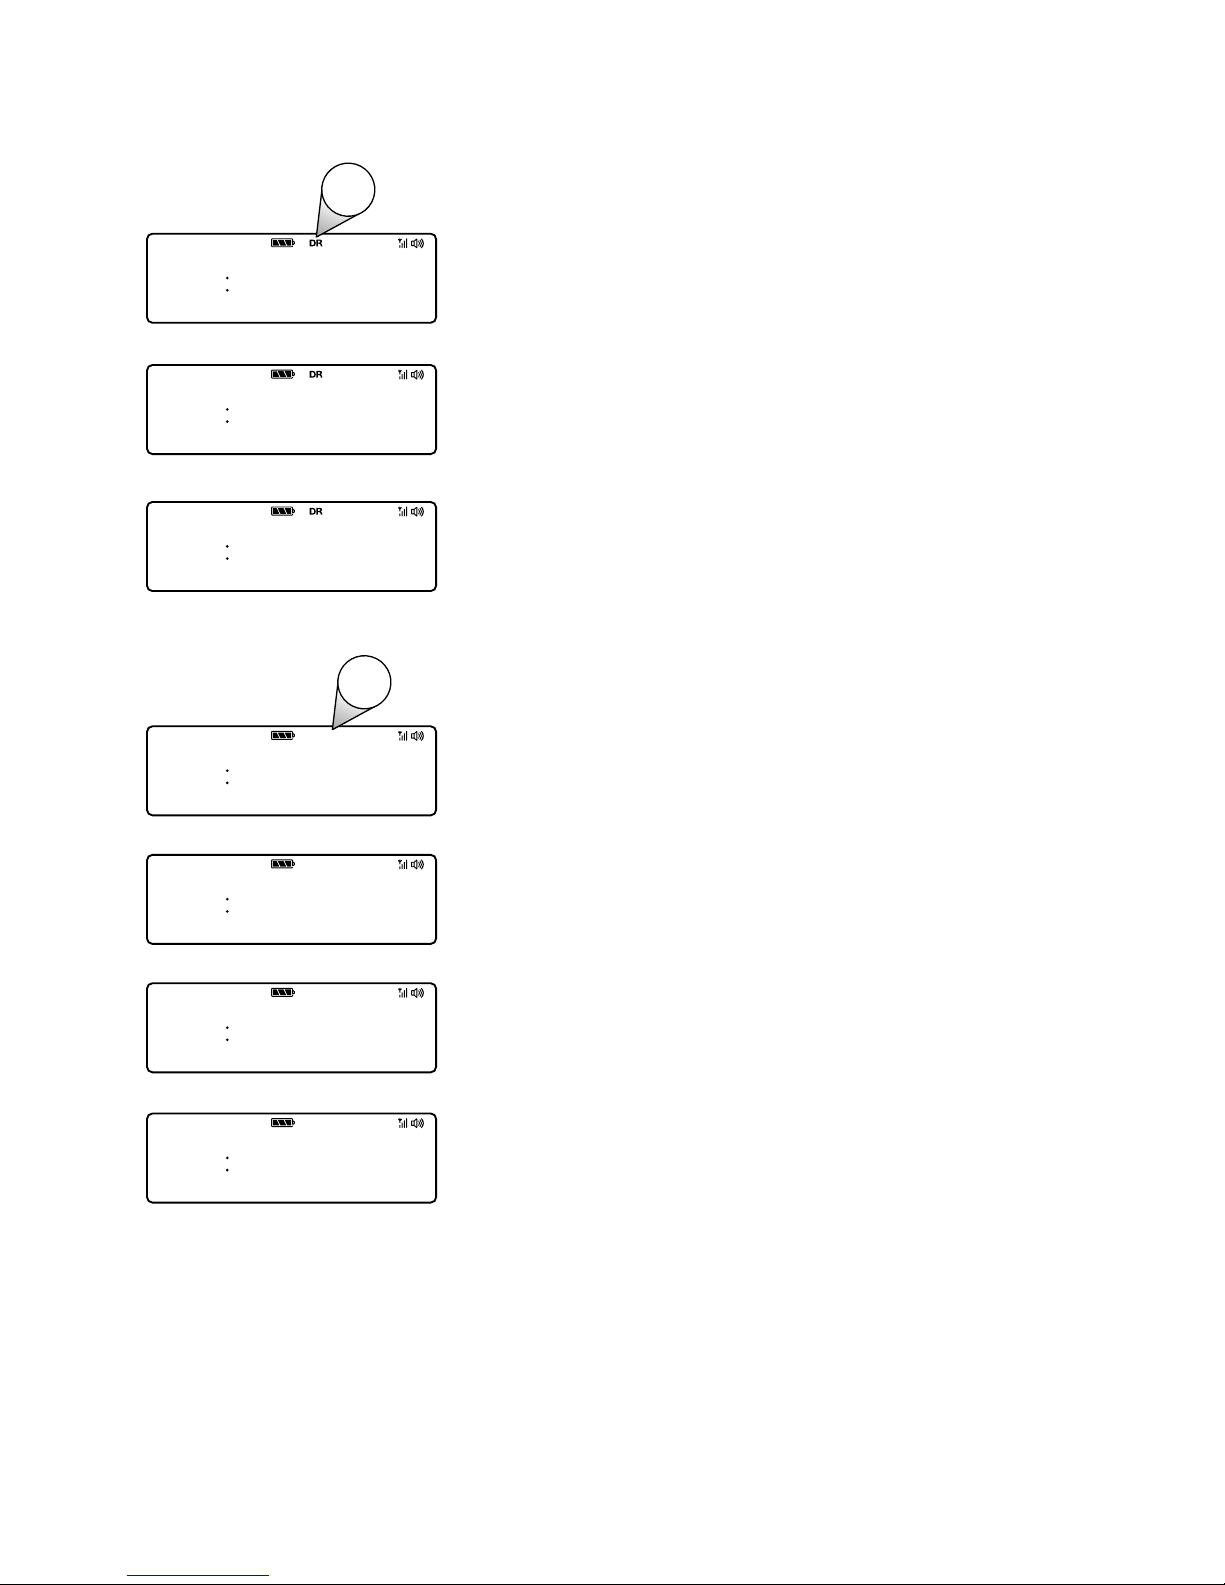
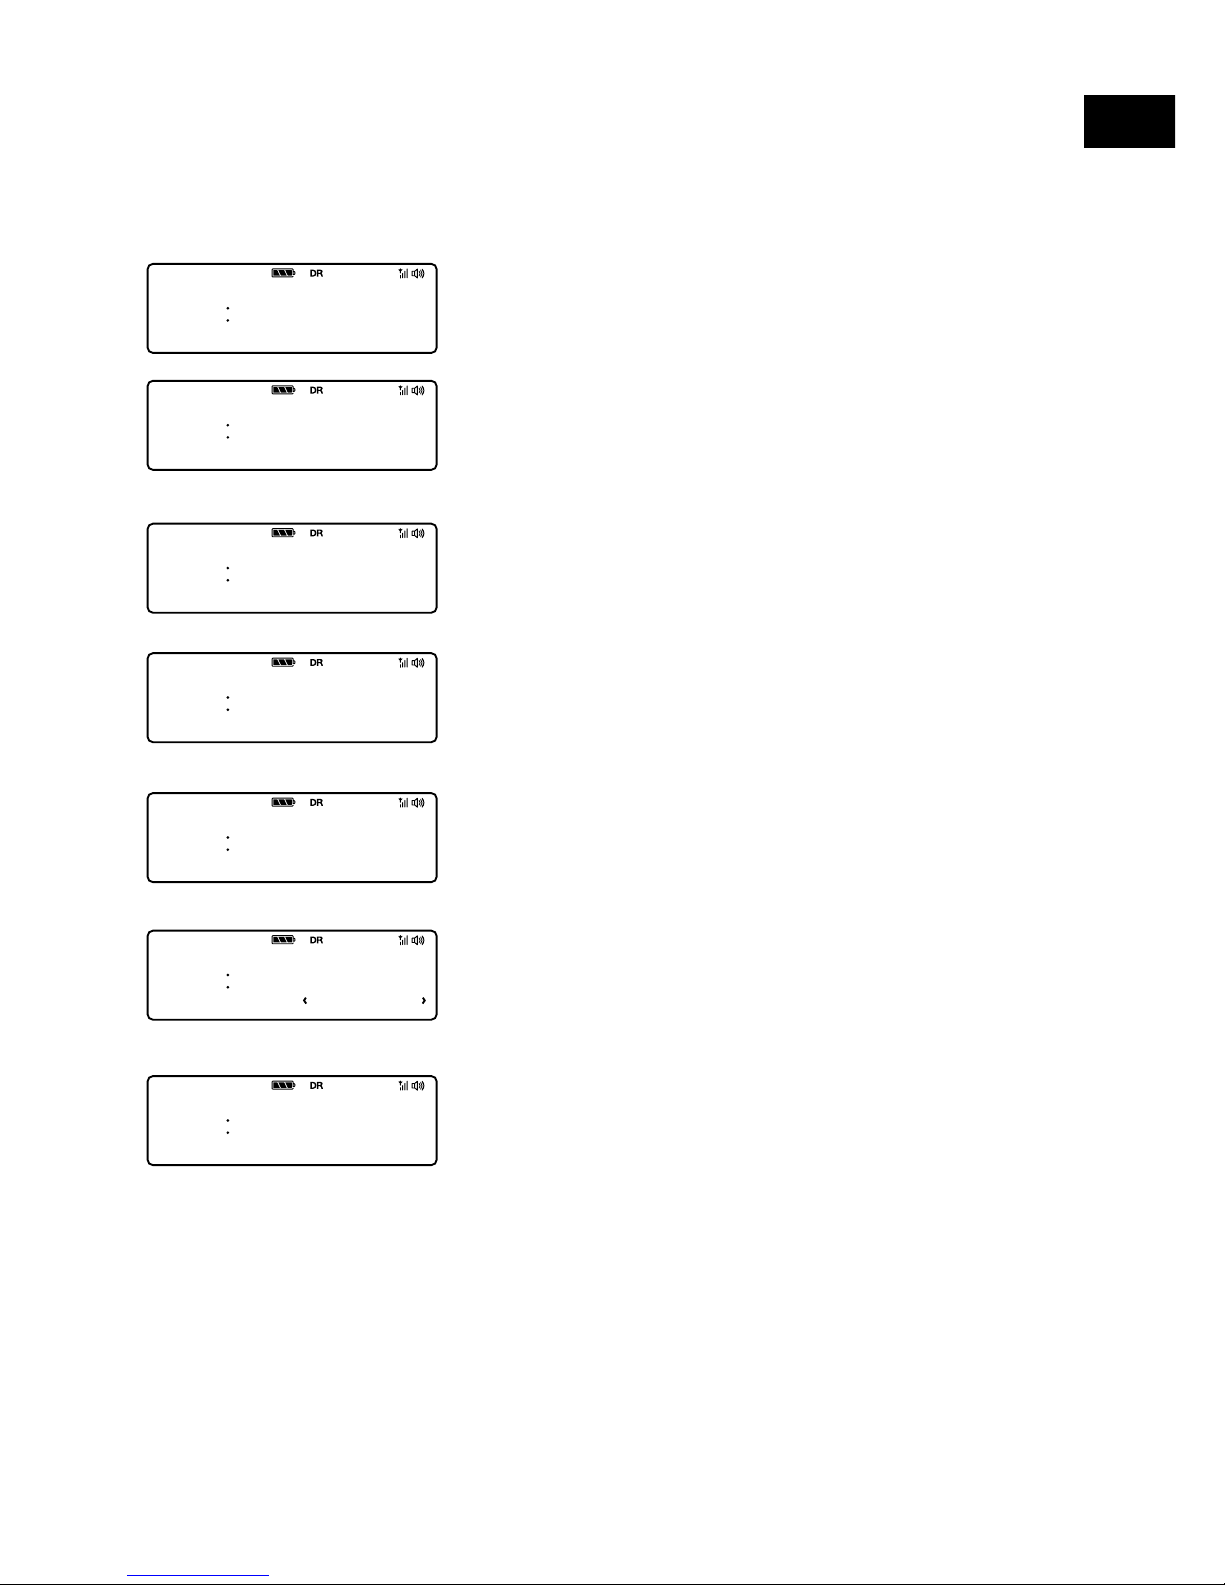
1. Displays current time.
2. ChargePAK or battery indicator.
3. Source indicator (DR: digital radio, FM: FM radio, AUX: auxiliary input).
4. Station name.
5. Signal strength.
6. Volume indicator.
7. Displays date, scrolling text, settings and station information (see page 17).
8. AM/PM indicator.
9. Alarm set indicator (see page 11).
10. Sleep and kitchen timer indicator (see page 12).
11. Snooze indicator (see page 12).
700
TOP 40
BBC R1
Page 8

6
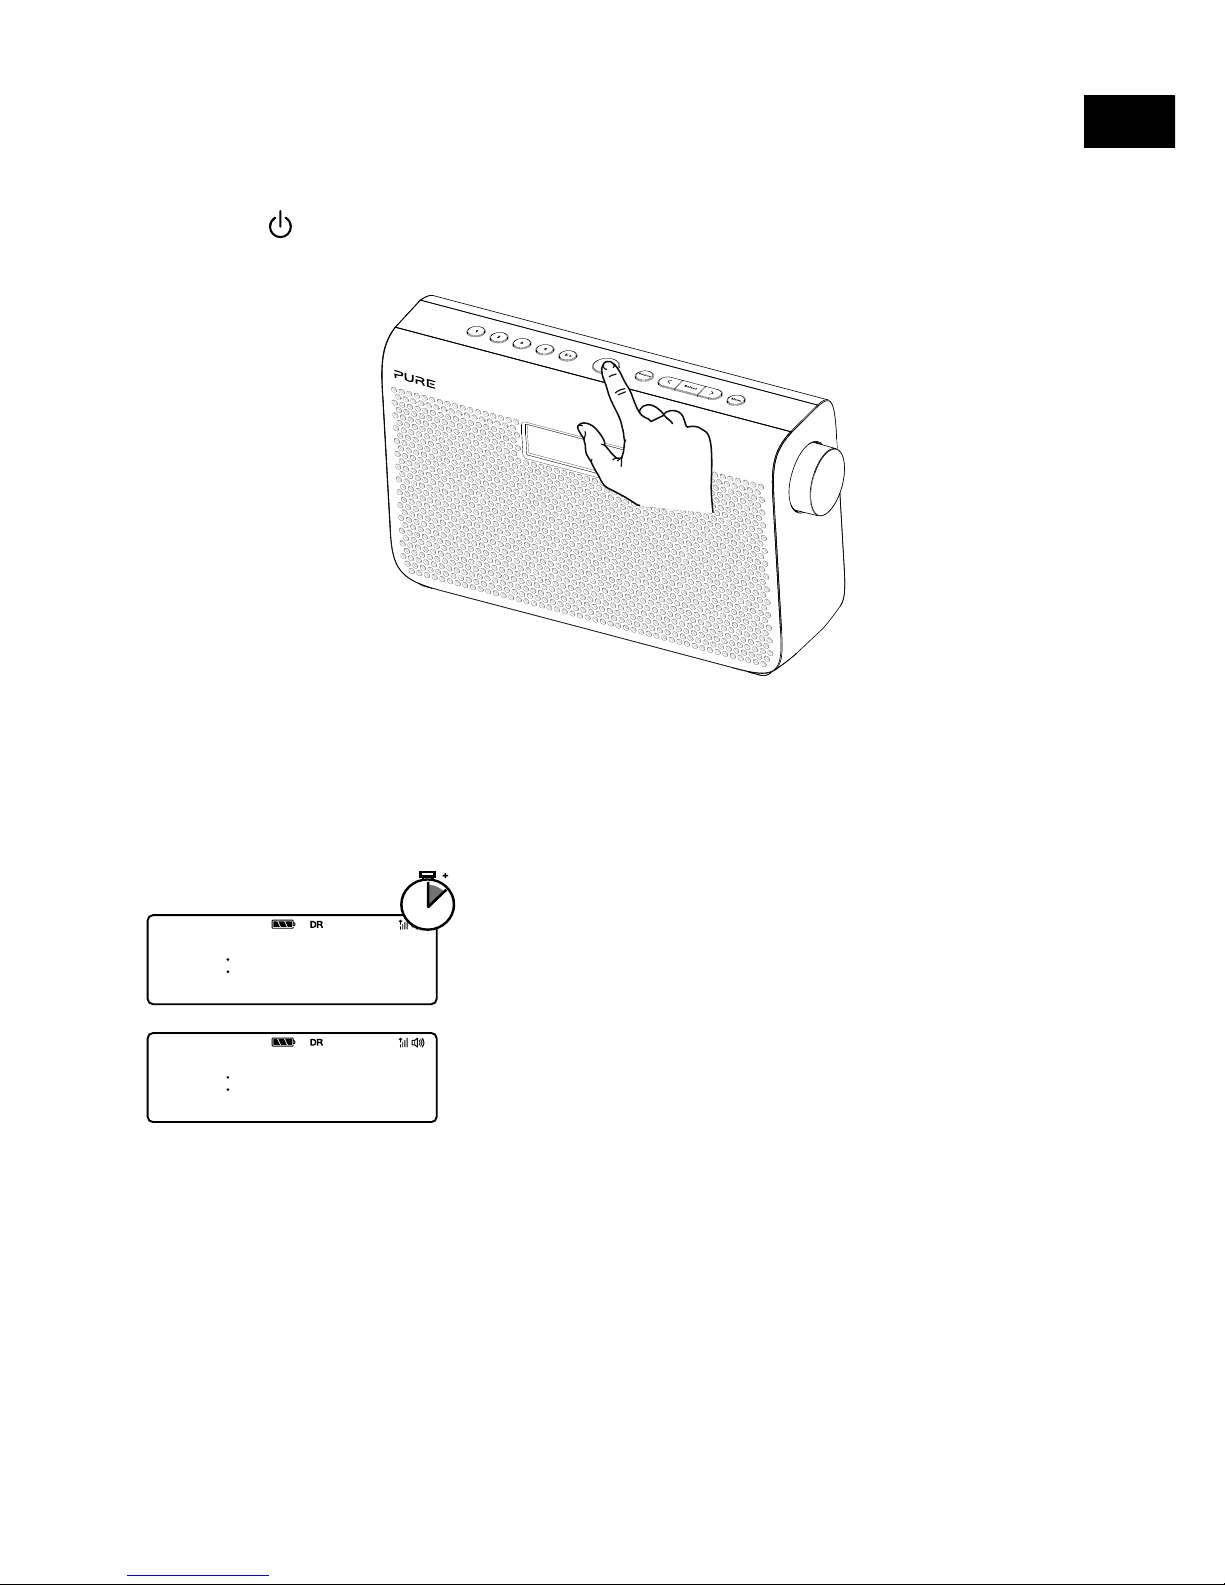
Quick set up
Getting started
1
Note: If you have a ChargePAK D1 rechargeable battery (sold separately) or
AA batteries fit them now before plugging One Maxi in. See page 20 for
more information.
1
• Unclip the aerial and fully extend it (steps A and B).
• Insert the jack of the supplied mains adapter into the socket on the rear
of the radio (C) and switch on the power.
A
B
C
A
Page 9
7
EN
2
3
• Wait for One Maxi to complete an Autotune for all
available digital radio stations.
• When the Autotune is complete, a digital radio
station will be selected.
Push ( ) to switch on
Station Select
Snooze
1059
1
min
SCAN 14
******
1100
BBC R2
PICK OF
Page 10
8
Listening to your One Maxi
Listening to digital radio
Press the Source button to switch to digital radio.
Changing digital stations
1. Press the < > buttons to scroll through the list of
stations.
2. When you have found the station that you want to
listen to, press the Select button.
Listening to FM radio
Press the Source button to switch to FM radio.
Changing FM stations
Manual tuning
Press the < > buttons to step up or down 0.05 MHz.
Seek tuning
Press and hold the < > buttons to seek to the next or
previous FM radio station that has a strong signal.
1100
DR
BBC R2
PICK OF
1100
STATIONS
BBC R3
1100
BBC R3
TUnING
1100
DR FM
FM
106T20
1100
DR FM
1O6T20
107T60
1100
DR FM
SCANnING
107T60
1100
DR FM
Page 11
9
EN
Storing and selecting presets
To quick-store a station to a preset
button (1-4)
Tune in to the digital or FM radio station that you want
to store. Press and hold one of the numbered preset
buttons (1-4) for two seconds to save the current station
as a preset. You can save over existing presets.
To store a station to the preset list
(1-10)
1. Tune in to the digital radio or FM radio station you
want to store.
2.
Press and hold the 5+ button to view the numerical list
of stored presets, then press < > to choose any preset
number between 1 and 10.
You can overwrite existing presets.
3. Press the Select button until you see the ‘PRESET
STORED’ message.
To recall a preset when listening to
a digital or FM radio station
To tune to presets 1 to 4, press the corresponding
numbered button on One Maxi (1 to 4).
To access the full list of presets (from 1 to 10):
1. Press and release the 5+ button.
2. Press < > to scroll through the list of presets and push
the Select button to tune to the selected preset.
You can store up to 10 digital and 10 FM radio stations for quick access.
1100
BBC R2
PICK OF
1100
PRESET 2
STORED
1100
CLASSIC
MOZART
1100
STORE
6<EMPTY>
1100
PRESET 6
STORED
1100
CLASSIC
MOZART
1100
RECALL
6 CLASS
Page 12
10
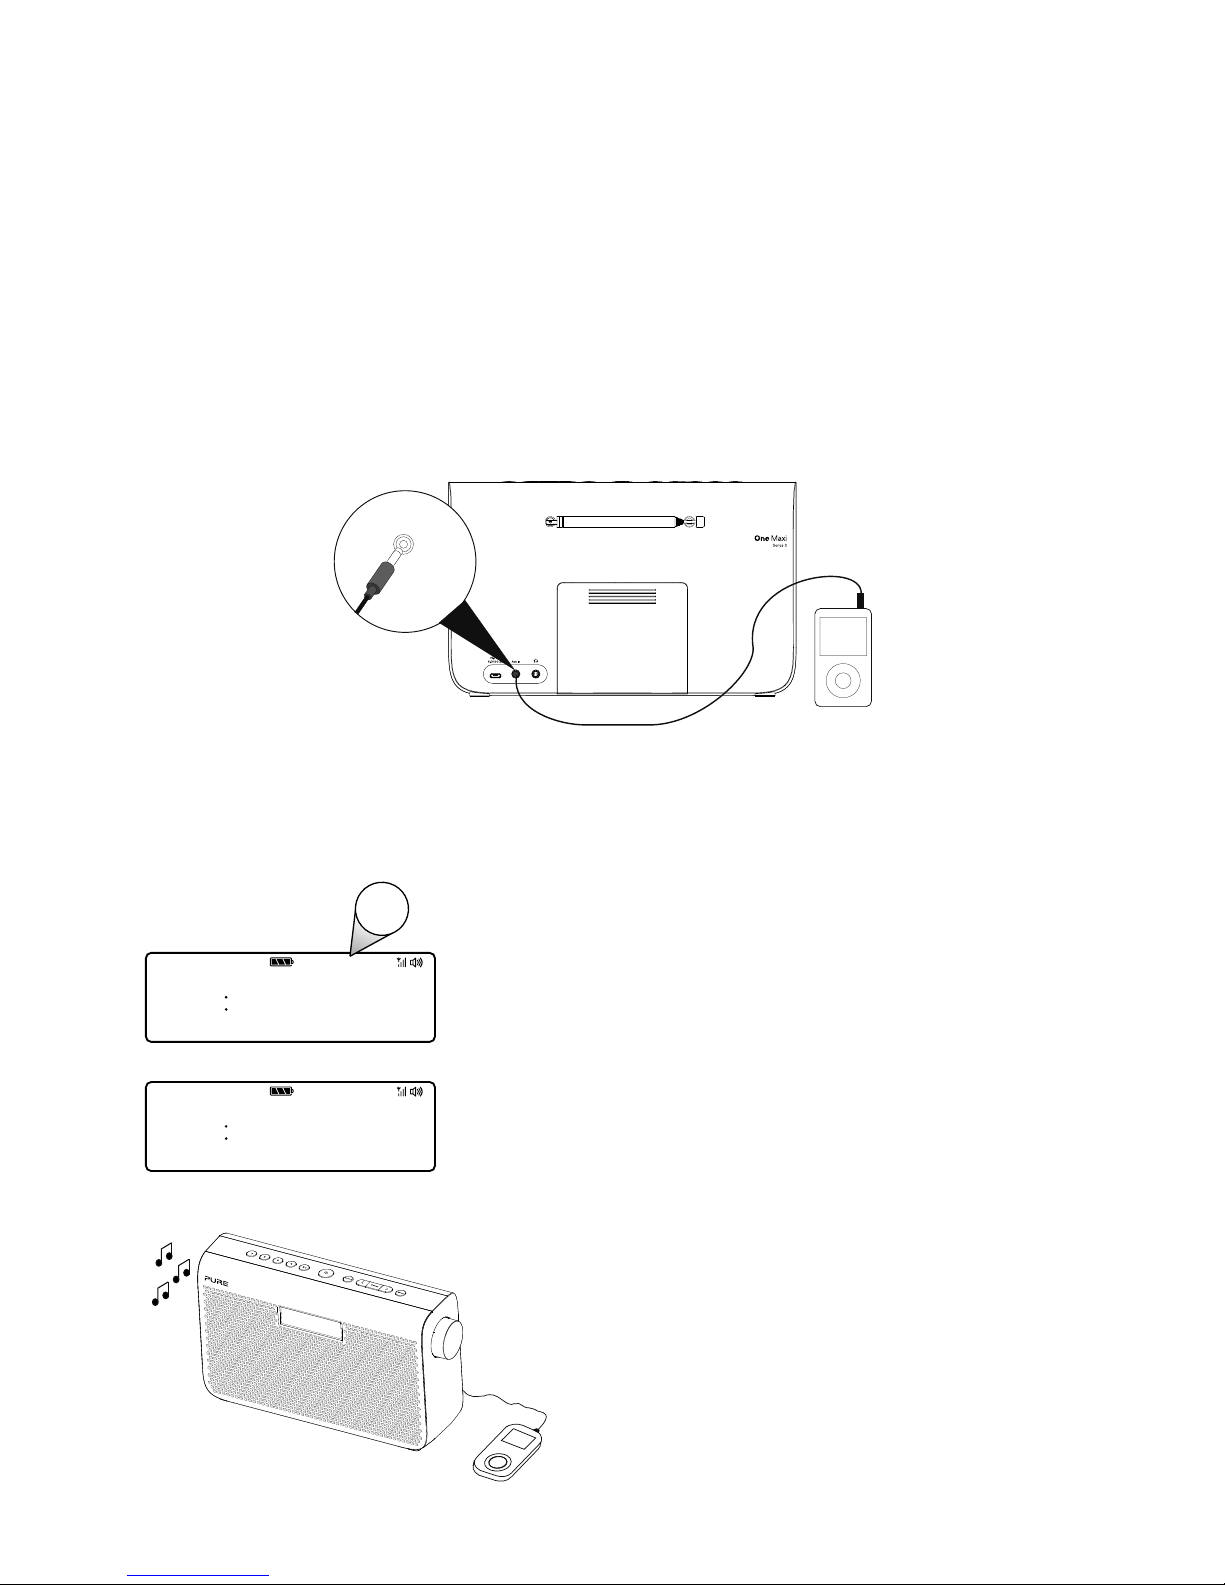
Using the auxiliary input
You can use One Maxi’s auxiliary input to play any music from your phone or
tablet through One Maxi.
Connecting an auxiliary device to One Maxi
Connect the line out or headphone socket of your auxiliary device to the Aux In
socket on your One Maxi using a suitable cable.
Selecting the auxiliary input
1.
Press the Source button
to switch to auxiliary
input.
2. On your auxiliary device, select the content that
you want to listen to on One Maxi.
One Maxi will start to play the content that you
selected on your auxiliary device.
Aux In
1100
DR FM AUX
AUX
AUX
1100
DR FM AUX
AUX
20-10-15
Page 13

11
EN
Alarms and timers
Setting an alarm
One Maxi has two alarms which can switch the radio
on and tune to a digital or FM radio station or sound
an alarm tone.
1. Press the Menu button.
2. Scroll < > to ‘ALARM’ and press the Select button.
3. Scroll < > to ‘ALARM1’ or ‘ALARM2’ and press the
Select button.
4. Scroll < > to ‘ON’ and press the Select button.
5. Scroll < > to set the hour for the alarm and press
the Select button. Repeat to set the minute for the
alarm.
6. Scroll < > to set the duration of the alarm and press
the Select button.
7.
Scroll < > to specify ‘FM’, ‘DIGITAL’ or ‘TONE’
and press the Select button to confirm. If you are
specifying a tone alarm, skip to step 8.
8. Scroll < > to specify which station should be played
when the alarm goes off. You have the option of
selecting one of your preset stations or you can
select ‘LAST USED’ to select the station that you
were last listening to. Press Select to confirm.
9. Scroll < > to specify one of the following alarm
repeat options:
‘DAILY’, ‘WEEKDAYS’, ‘WEEKENDS’ or ‘ONCE’ and
press the Select button to confirm.
10. Use < > to set the volume that the radio will play at
when the alarm sounds and press the Select button
to confirm.
11
. The alarm icon will light steadily on the display to
show that the alarm has set.
Note: If One Maxi is running on batteries or a ChargePAK, One Maxi’s alarm
function will not work if you turn One Maxi off after setting an alarm.
1700
AM
MENU
ALARM
1700
AM
SOURCE
DIGITAL
1700
AM
STATION
LAST USE
1700
AM
ALARM1
SAVED
DR FM AUX BTDR FM AUX BTDR FM AUX BTDR FM AUX BTDR FM AUX BTDR FM AUX BTDR FM AUX BTDR FM AUX BTDR FM AUX BTDR FM AUX BTDR FM AUX BTDR FM AUX BTDR FM AUX BTDR FM AUX BTDR FM AUX BTDR FM AUX BTDR FM AUX BTDR FM AUX BTDR FM AUX BTDR FM AUX BTDR FM AUX BTDR FM AUX BTDR FM AUX BTDR FM AUX BTDR FM AUX BTDR FM AUX BTDR FM AUX BTDR FM AUX BTDR FM AUX BTDR FM AUX BTDR FM AUX BTDR FM AUX BTDR FM AUX BTDR FM AUX BTDR FM AUX BTDR FM AUX BTDR FM AUX BTDR FM AUX BTDR FM AUX BTDR FM AUX BTDR FM AUX BTDR FM AUX BTDR FM AUX BT
DR
ALARM
ALARM1
1700
AM
ALARM1
ON
1700
AM
ON TIME
06-00AM
1700
AM
DUrATION
60 MINS
1700
AM
1700
AM
REPEAT
DAILY
VOLUME
10
1700
AM
Page 14

12
Cancelling a sounding alarm
To cancel a sounding alarm, press the Source, <Select> or Menu buttons.
Snoozing a sounding alarm
To snooze a sounding alarm, press one of the Preset buttons. By default, One
Maxi‘s snooze time is set to eight minutes. To change the default snooze time see
page 19.
Disabling an alarm
To disable an alarm after it has been set:
1. Press the Menu button and scroll < > to ‘ALARM’ and press the Select button.
2. Scroll < > to the alarm that you want to disable (‘ALARM1’ or ‘ALARM2’) and
press the Select button.
3. Scroll < > to ‘OFF’ and press the Select button.
4
.
The alarm icon will turn off on One Maxi’s display to show that the alarm has
been disabled.
Setting the sleep timer
The sleep timer can be set to switch One Maxi off after a specific period of time.
Note: If One Maxi is running on batteries or a ChargePAK, One Maxi’s sleep
function is disabled.
1. Press the Menu button.
2. Scroll < > to ‘SLEEP’ and press the Select button.
3. Scroll < > and press the Select button to set the timer for up to 90 minutes or
choose ‘OFF’ to cancel.
Setting the kitchen timer
One Maxi has a countdown kitchen timer which will sound an alarm after a set
period of time.
1. Press the Menu button.
2. Scroll < > to ‘TIMER’ and press the Select button.
3. Scroll < > to change the hours and press the Select button.
4. Scroll < > again to change the minutes and push to confirm and start the
countdown timer.
The alarm will sound after the time period you have set whether the radio is on
or in standby. Cancel the beeping alarm tone by pressing either the Source,
<Select> or Menu buttons.
Page 15

13
EN
Options and settings
General settings
Changing the language shown on the display
To switch the display language on One Maxi between English, French, German,
Italian and Spanish:
1. Press the Menu button.
2. Scroll < > to ‘SETTINGS’ and press the Select button.
3. Scroll < > to ‘LANG.’ and press the Select button.
4. Scroll < > and press the Select button to choose the language that you want
One Maxi to display.
Resetting One Maxi to factory settings
Resetting your One Maxi radio removes all presets, clears the station list and
resets all options to defaults. To carry out a factory reset:
1. Press the Menu button.
2. Scroll < > to ‘SETTINGS’ and press the Select button.
3. Scroll < > to ‘RESET’ and press the Select button.
4. Scroll < > to ‘YES’ and press the Select button.
Displaying One Maxi’s software version
To display software version that is currently running on One Maxi:
1. Press the Menu button.
2. Scroll < > to ‘SETTINGS’ and press the Select button.
3. Scroll < > to ‘VERSION’ and press the Select button.
Updating One Maxi to the latest version of software
Contact Pure technical support (http://support.pure.com) for more
information on how to update One Maxi to the latest software version.
Page 16

14
Digital radio settings
Autotune
You can use the autotune function to automatically scan for new digital radio
stations and remove inactive ones.
Note: Autotune is only available when you have selected ‘Digital radio’ as the
radio source.
To carry out an autotune:
1. Press the Menu button.
2. Scroll < > to ‘AUTOTUNE’ and press the Select button.
The number of stations
found will be displayed during the autotune.
When the autotune has finished, One Maxi will tune to the last station that you
were listening to.
FM radio settings
FM stereo option
You can choose between ‘Stereo’ or ‘Mono’ reception when listening to FM radio.
Choosing ‘Mono’ may improve clarity where stereo signals are weak.
Note: The FM stereo option is only available when you have selected ‘FM radio’
as the radio source.
To change between Stereo or Mono reception:
1. Press the Menu button.
2. Scroll < > to ‘FM STEREO’ and press the Select button.
3. Scroll
< > to
choose between ‘STEREO’ or ‘MONO’ FM reception
and press
the Select button.
Page 17

15
EN
Audio settings
Adjusting the bass and treble
One Maxi features two bass and treble profiles that automatically adjust the bass
and treble levels based on whether you are listening to One Maxi via its internal
speaker or connected headphones.
Note: You will need to connect headphones to One Maxi to adjust the bass and
treble level when listening via headphones. To adjust the bass and treble levels
of the internal speaker, remove any connected headphones before adjusting the
bass and treble.
To adjust One Maxi’s bass and treble settings:
1. Press the Menu button.
2. Scroll < > to ‘AUDIO’ and press the Select button.
3. Scroll < > to ‘BASS’ or ‘TREBLE’ and press the Select button.
4. Scroll < > to adjust the bass or treble levels. You can choose a level between
‘-5’ and ‘+5’.
5. Press the Select button to confirm the bass or treble level.
Switching on audio boost
If you are listening to a talk radio show in a noisy environment you can switch on
audio boost to increase the average listening level of the broadcast. If you mainly
listen to radio stations that play music we recommend switching this setting off.
1. Press the Menu button.
2. Scroll < > to ‘AUDIO’ and press the Select button.
3. Scroll < > to ‘BOOST’ and press the Select button.
4. Scroll < > and press the Select button to turn audio boost ‘ON’ or ‘OFF’.
Page 18

16
Adjusting the auxiliary input level
If you have connected your phone or tablet to One Maxi’s auxiliary socket, you
can change the auxiliary input level to match the settings of your phone or tablet.
Check your phone or tablet’s user manual for more information. To change One
Maxi’s auxiliary input level:
1. Press the Menu button.
2. Scroll < > to ‘AUDIO’ and press the Select button.
3. Scroll < > to ‘AUX LEVEL’ and press the Select button.
4. Scroll < > and press the Select button to choose between ‘LOW’, ‘MEDIUM’
and ‘HIGH’.
Switching on stereo wide
You can switch on the stereo wide setting to improve the stereo reproduction from
stereo broadcasts. To switch the stereo wide setting on One Maxi on or off:
1. Press the Menu button.
2. Scroll < > to ‘AUDIO’ and press the Select button.
3. Scroll < > to ‘W-SOUND’ and press the Select button.
4. Scroll < > and press the Select button to turn the stereo wide setting ‘ON’ or
‘OFF’.
Page 19

17
EN
Display settings
Adjusting the display brightness
You can adjust the brightness of the display when One Maxi is switched on or in
standby. To change the brightness of One Maxi’s display:
1. Press the Menu button.
2. Scroll < > to ‘DISPLAY’ and press the Select button.
3. Scroll < > to ‘BACKLIGHT’ and press the Select button.
4. Scroll < > to ‘ACTIVE’ and press the Select button to change the settings that
apply when One Maxi is switched on, or scroll to < > ‘STANDBY’ and press the
Select button to change settings that apply in standby.
5. Scroll < > to ‘LEVEL’ and press the Select button.
6. Scroll < > to choose a brightness level between ‘1’ and ‘5’.
7. Press the Select button to confirm the brightness setting.
Adjusting how long the display backlight stays on for
You can adjust how long One Maxi’s display backlight stays on for:
1. Press the Menu button.
2. Scroll < > to ‘DISPLAY’ and press the Select button.
3. Scroll < > to ‘BACKLIGHT’ and press the Select button.
4. Scroll < > to ‘ACTIVE’ and press the Select button to change the settings that
apply when One Maxi is switched on, or scroll to < > ‘STANDBY’ and press the
Select button to change settings that apply in standby.
5. Scroll < > to ‘DURATION’ and press the Select button.
6. Scroll < > and press the Select button to choose one of the following options:
ON: Choose this option if you want the backlight to always stay on.
TIMED: Choose this option if you want the backlight to turn off after 10 seconds.
Page 20

18
Changing the information shown on One Maxi’s display
If you are listening to a digital or FM radio station, you can change the information
that is shown on One Maxi’s display:
1. Press the Menu button.
2. Scroll < > to ‘DISPLAY’ and press the Select button.
3. Scroll < > to ‘INFO’ and press the Select button.
4. Scroll < > and press the Select button to choose one of the following options:
TEXT: Choose this option if you want to display the information broadcast
by the station you are currently listening to. The information displayed may
include song titles, programme details, news, etc.
STRENGTH: Choose this option if you want to display the signal strength of
the radio station you are currently listening to. The number of asterisks
indicate the reliable reception level.
DATE: Choose this option if you want to display the current date.
Clock settings
Setting the time and date
The time and date on One Maxi are automatically set by the FM or digital radio
signal. If the time/date on One Maxi is not updating automatically, you can manually
set it.
1. Press the Menu button.
2. Scroll < > to ‘CLOCK’ and press the Select button.
3. Scroll < > to ‘TIME/DATE’ and press the Select button.
4. Scroll < > to set the hour and press the Select button. Repeat to set the minutes.
5. Scroll < > to set the day and press the Select button. Repeat to set the month
and the year.
Changing the time format
1. Press the Menu button.
2. Scroll < > to ‘CLOCK’
and press the Select button.
3. Scroll < > to ‘12/24 HR’ and press the
Select
button.
4. Scroll < > to choose between ‘12 HOUR’ and ‘24 HOUR’ and press the
Select
button to confirm.
Page 21

19
EN
Changing the date format
1. Press the Menu button.
2. Scroll < > to ‘CLOCK’ and press the Select button.
3. Scroll < > to ‘FORMAT’ and press the Select button.
4. Scroll < > to choose between displaying the date in day, month and year
order ‘DD-MM-YYYY’ or in month, day and year order ‘MM-DD-YYYY’ and
press the
Select
button to confirm.
Clock synchronization options
You can select the radio sources that you want to use for setting the time. By
default, One Maxi uses both the FM and digital radio signals to synchronize
the time.
To specify the clock synchronization options:
1. Press the Menu button.
2. Scroll < > to ‘CLOCK’ and press the Select button.
3. Scroll < > to ‘SYNC TO’ and press the Select button.
4. Scroll < > to choose the required clock synchronization option and press the
Select
button to confirm.
Changing the snooze time
You can change the amount of time an alarm will snooze for when you press one
of One Maxi’s preset buttons during a sounding alarm. By default, One Maxi’s
snooze time is set to eight minutes.
To change One Maxi’s snooze time:
1. Press the Menu button.
2. Scroll < > to ‘CLOCK’ and press the Select button.
3. Scroll < > to ‘SNOOZE’ and press the Select button.
4. Scroll < > to choose a snooze time between ‘5’ and ‘59’ minutes and press
the
Select
button to confirm.
Page 22
20
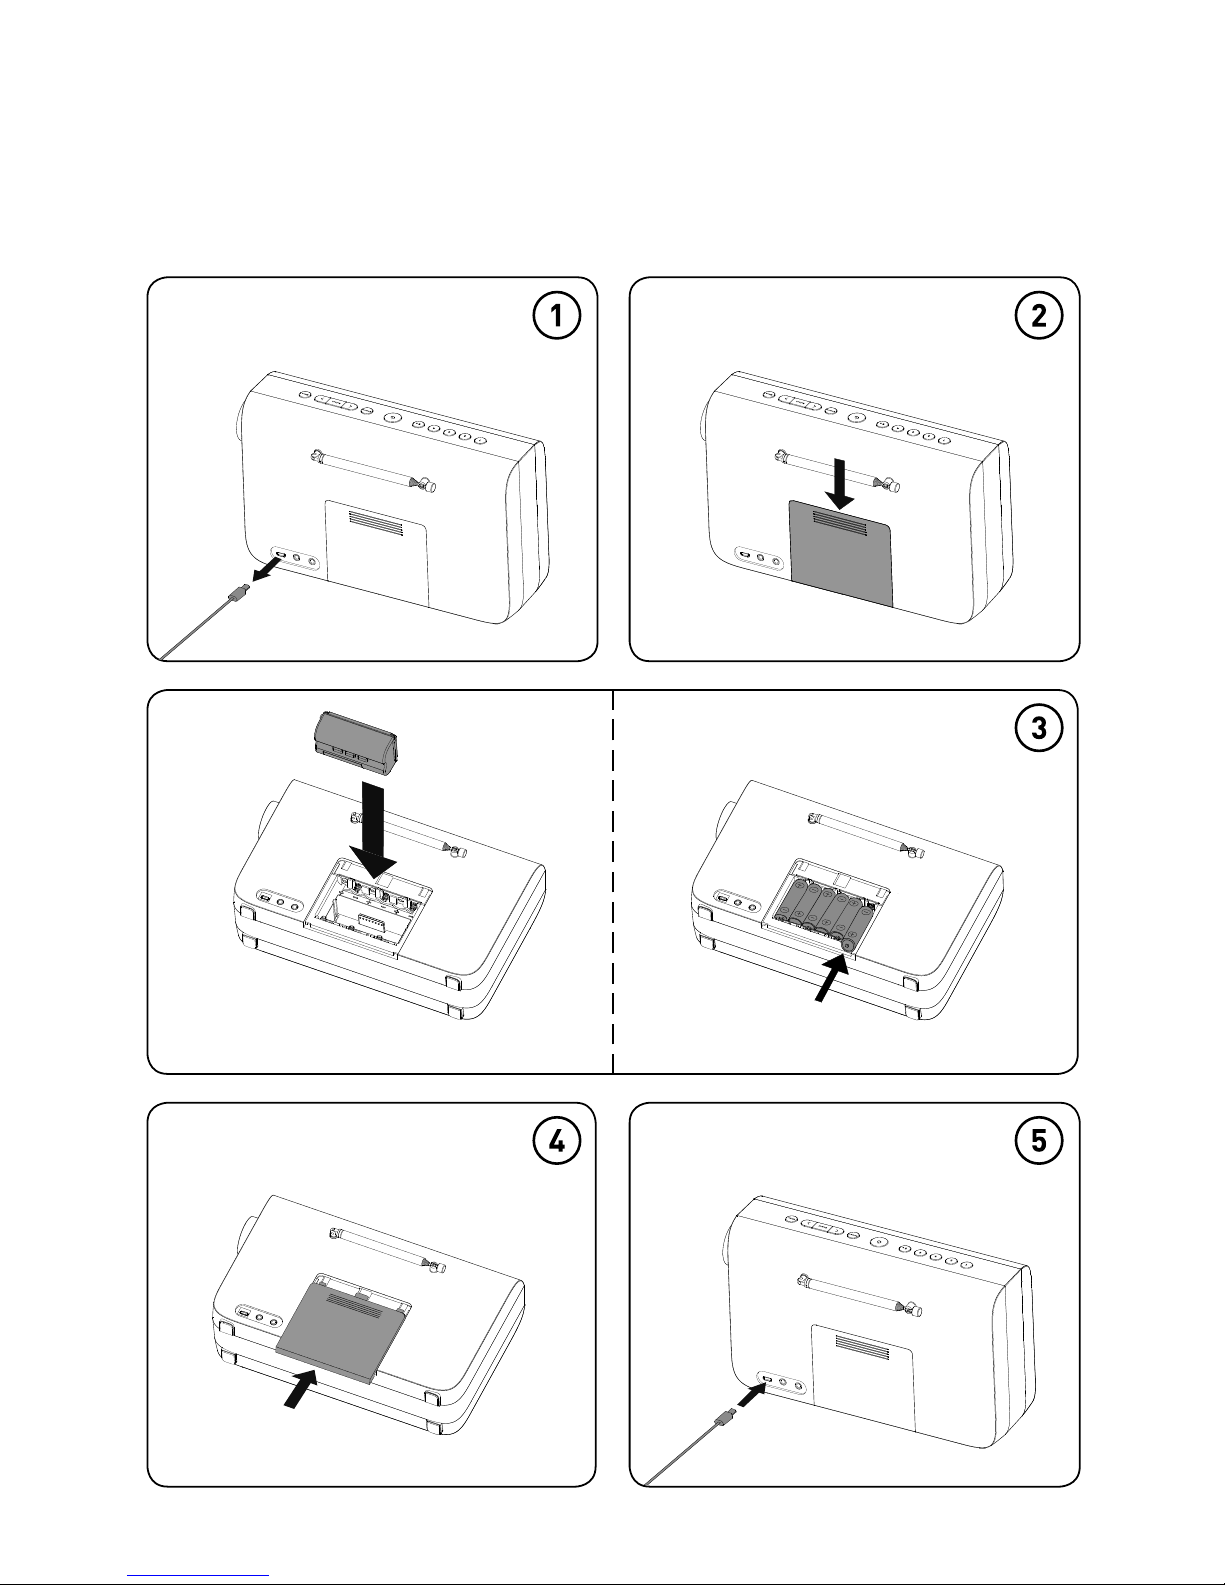
Appendix
Using a ChargePAK D1 or six AA batteries
ChargePAK D1 6x AA batteries
Page 23

21
EN
Help and advice
Secondary and inactive stations
(</>) Secondary digital radio services
Some stations have accompanying secondary services which provide extra
information or alternative content and may only be broadcast at certain times. If a
station has a secondary service available, the station shows ‘>’ next to its name in
the station list and the secondary service appears next to the station in the list. A
secondary service has a ‘<’ before its name in the station list.
(?) Inactive or unavailable digital radio stations
Inactive or unavailable stations appear on the station list preceded by ‘?’ and
cannot be tuned to. A station may be inactive or unavailable because the station
is not broadcasting at the current time (check programme listings) or has stopped
broadcasting altogether. Also, you may not have a strong enough signal to
receive the radio station.
Hints and tips
Display says ‘NOT AVAILABLE’
Try using One Maxi’s autotune function to automatically scan for new digital radio
stations and remove inactive ones (see page 14). You can also try adjusting
your aerial or radio position.
Receiving new digital radio stations that have started broadcasting
Try using One Maxi’s autotune function to search for new digital stations (see
page 14). You can also try adjusting your aerial or radio position.
Page 24

22
Technical specifications
Radio Digital and FM radio
Frequencies
DAB/DAB+, FM radio 87.5-108 MHz
Speaker Twin
full-range 3
" drive units
Audio power output
2 x 3W RMS
Input connectors 5.5V DC power adaptor socket (230V supplied), 3.5 mm
Line-in for auxiliary devices, micro USB socket for
software updates
Output connectors 3.5mm stereo headphone socket
Presets 10 digital radio and 10 FM radio presets
Power supply 230V AC to 5.5V (2.0A) DC external power adapter
(supplied), optional ChargePAK D1 rechargeable battery
pack or six AA batteries
Power consumption Standby with display off: <0.5W
Standby with display on: <1W
Dimensions 275 mm wide x 155 mm high x 83 mm deep
Weight 1.371 kg
Aerial Telescopic aerial
Approvals CE marked. Compliant with the EMC and Low Voltage
Directives (2004/108 EC and 2006/95/EC). ETSI EN 300 401
compliant. Australian C-Tick N1600 and Electrical Safety.
Page 25

23
EN
Copyright
Copyright 2016 by Imagination Technologies Limited. All rights reserved. No part
of this publication may be copied or distributed, transmitted, transcribed, stored
in a retrieval system, or translated into any human or computer language, in any
form or by any means, electronic, mechanical, magnetic, manual or otherwise, or
disclosed to third parties without the express written permission of Imagination
Technologies Limited. Version 1 January 2016.
Trademarks
One Maxi, ChargePAK, Pure, the Pure logo, Imagination Technologies, and
the Imagination Technologies logo are trademarks or registered trademarks of
Imagination Technologies Limited. All other product names are trademarks of their
respective companies.
Warranty Information
Imagination Technologies Limited warrants to the end user that this product will be
free from defects in materials and workmanship in the course of normal use for a
period of three years from the date of purchase. This guarantee covers breakdowns
due to manufacturing or design faults; it does not apply in cases such as accidental
damage, however caused, wear and tear, negligence, adjustment, modification or
repair not authorised by us. Please visit account.pure.com to register your product
with us. Should you have a problem with your unit please contact your supplier or
contact Pure Support at the address shown on the rear of this manual.
Disclaimer
Imagination Technologies Limited makes no representation or warranties with
respect to the content of this document and specifically disclaims any implied
warranties of merchantability or fitness for any particular purpose. Further,
Imagination Technologies Limited reserves the right to revise this publication and to
make changes in it from time to time without obligation of Imagination Technologies
Limited to notify any person or organisation of such revisions or changes.
Correct disposal of this product
This marking indicates that this product should not be disposed
with other household waste throughout the EU. To prevent possible
harm to the environment or human health from uncontrolled waste
disposal, recycle it responsibly to promote the sustainable reuse of
material resources. To return your used device, please use the return
and collection system or contact the retailer where the product was
purchased. They can take this product for environmental safe recycling.
Page 26

24
Page 27
1
EN
NL
ES
IT
DA/NO
FR
ES
DE
One Maxi
Vielen Dank, dass Sie sich für One Maxi entschieden
haben. Dieses Handbuch hilft Ihnen, Ihr Produkt in
kürzester Zeit in Betrieb zu nehmen. Sie erfahren hier,
wie Sie all seine großartigen Funktionen optimal nutzen
können. Wenn Sie weitere Hilfe benötigen, besuchen
Sie unsere Support-Seiten auf unserer Website unter
support.pure.com.
Page 28

2
1. WARNUNG! Verwenden Sie das mitgelieferte Netzteil (Modellnummer ZDD055200 oder
ZDD055200BS) nicht zur Stromversorgung eines anderen Geräts; dies könnte Schäden
verursachen.
2. Verwenden Sie nur die im Benutzerhandbuch bzw. in den Benutzeranleitungen
aufgelisteten Netzteile (im Lieferumfang von Modell ZDD055200 oder
ZDD055200BS enthalten).
3. Verbinden Sie den Netzadapter mit einer gut erreichbaren Steckdose in der Nähe des
Radios und verwenden Sie NUR den mitgelieferten Netzadapter.
4. WARNUNG! Setzen Sie das Gerät nicht Regen oder Feuchtigkeit aus, um das Risiko
eines Brandes oder Stromschlags zu verringern. Das Gerät darf nicht mit Tropfen
oder Spritzern in Berührung kommen, und es dürfen keine mit Flüssigkeiten gefüllten
Gegenstände, z. B. Vasen, auf das Gerät gestellt werden.
5. ACHTUNG! Bei einem unsachgemäßen Austausch des Akkus besteht Explosionsgefahr.
Tauschen Sie den Akku nur gegen einen baugleichen oder gleichwertigen Akku aus.
6. WARNUNG! Die Batterien bzw. der Akku-Pack dürfen nicht extremer Hitze wie direkter
Sonneneinstrahlung, Feuer oder ähnlichen Einflüssen ausgesetzt werden.
7. WARNUNG! Der direkt eingesteckte Netzadapter dient als Trennvorrichtung.
Diese Trennvorrichtung muss immer betriebsbereit sein.
8. Achten Sie auf einen ausreichenden Abstand des Radios zu allen Wärmequellen wie
Heizkörpern, Heizlüftern und anderen Geräten, die Wärme erzeugen.
9. Setzen Sie das Gerät nicht direkter Sonneneinstrahlung aus.
10. Nutzen Sie das Radio nicht in der Nähe von Wasser.
11. Lassen Sie keine Objekte oder Flüssigkeiten in das Radio eindringen.
12. Lösen Sie keine Schrauben vom Gehäuse des Radios.
13. Schalten Sie das Radio immer aus und trennen Sie es vom Netz, bevor Sie ein
ChargePAK einsetzen oder entnehmen.
14. Das Gerät darf nicht in Wasser getaucht oder in der Dusche oder im Badezimmer
verwendet werden, wenn es an den Netzstrom angeschlossen ist.
15. Das Markierungsetikett ist an der Außenseite oder unten am Gerät.
Sicherheitsanweisungen
Page 29

3
ES
DE
Inhalt
4 Einführung
4 Bedientasten
4 Anschlüsse
5 Anzeige
6 Erste Schritte
6 Schnellstart
8 Verwendung Ihres One Maxi
8 Digitalradio hören
8 UKW-Radiobetrieb
9 Speicherplätze speichern und anwählen
9 Schnellspeichern eines Senders auf einem der Speicherplätze (1–4)
9 Speichern eines Senders in der Voreinstellungsliste (1–10)
9 Aufruf eines gespeicherten Senders beim Empfang von Digitalradio oder
UKW
10 Verwendung des AUX-Eingangs
11 Wecker und Timer
11 Einstellen eines Weckalarms
12 Abbrechen eines Alarmtons
12 Schlummerfunktion verwenden
12 Deaktivieren eines Alarms
12 Einstellen des Sleep-Timers
12 Einstellen des Küchen-Timers
13 Optionen und Einstellungen
13 Allgemeine Einstellungen
14 Digitalradio-Einstellungen
14 Audio-Einstellungen
16 Anzeigeeinstellungen
17 Uhr-Einstellungen
19 Anhang
19 Verwendung mit einem ChargePAK D1 oder vier AA-Batterien
20 Hilfe und Tipps
21 Technische Daten
Page 30
4
Bedientasten
Einführung
Auswahltasten
Drücken Sie diese Tasten,
um den Sender zu wechseln
(siehe Seite 8) oder drücken
Sie sie, um Menüoptionen
durchzublättern und
auszuwählen.
Menu-Taste
Drücken Sie diese Taste, um
verschiedene Einstellungen
beim One Maxi zu ändern
(siehe Seite 13).
Source-Taste:
Drücken Sie diese
Taste, um zwischen
der Wiedergabe von
Digitalradio oder
UKW-Radio und über
den AUX-Eingang
umzuschalten.
Netztaste
Drücken Sie diese Taste,
um das One Maxi einoder auszuschalten.
Speicherplatztasten 1 bis 5+
Speichern Sie bis zu 10 Digitalund 10 UKW-Radiosender
(siehe Seite 9 für weitere
Informationen).
Anschlüsse
Micro-B USB
5,5-V-Stromanschluss
Nur mit mitgelieferten
Netzadapter verbinden.
AUX-Eingang (3,5 mm)
Analoger Stereo-Eingang für Ihr
Handy, Tablet usw.
3,5-mm-Buchse für
Stereokopfhörer
Lautstärkeregler
Drehen Sie den Regler, um die Lautstärke
einzustellen. Drücken Sie auf den Regler,
um die Lautstärke stummzuschalten oder
wieder einzuschalten.
Page 31

5
ES
DE
Anzeige
1. Zeigt die aktuelle Uhrzeit an.
2. Anzeige für ChargePAK oder Batterie.
3. Anzeige der Quelle
(DR: Digitalradio, UKW: UKW-Radio, AUX: AUX-Eingang).
4. Sendername.
5. Signalstärke.
6. Lautstärkeanzeige.
7. Anzeige Datum, Lauftext, Einstellungen und Senderinformationen
(siehe Seite 16).
8. AM/PM-Anzeige.
9. Anzeige Weckeraktivierung (siehe Seite 11).
10. Anzeige Sleep- und Küchen-Timer (siehe Seite 12).
11. Schlummerfunktionsanzeige (Seite 12).
7:00
SWR 3
PopUp
Page 32

6
Schnellstart
Erste Schritte
1
Anmerkung: Wenn Sie über einen (separat erhältlichen) aufladbaren
ChargePAK D1 oder AA-Akkus verfügen, setzen Sie diese jetzt ein, bevor Sie
das One Maxi an eine Netzsteckdose anschließen. Siehe Seite 19 für weitere
Informationen.
1
• Drücken Sie die Antenne aus ihrer Arretierung und ziehen Sie sie
vollständig heraus (Schritte A und B).
• Stecken Sie den Stecker des mitgelieferten Netzteils in die Buchse auf
der Rückseite des Radios (C) und schalten Sie das Radio ein.
A
B
C
A
Page 33

7
ES
DE
2
3
• Warten Sie, bis das One Maxi eine
automatische Sendersuche für alle verfügbaren
Digitalradiosender abgeschlossen hat.
• Wenn die automatische Sendersuche
abgeschlossen ist, wird ein digitaler Sender
ausgewählt.
DR FM AUX BTDR FM AUX BTDR FM AUX BTDR FM AUX BTDR FM AUX BTDR FM AUX BTDR FM AUX BTDR FM AUX BTDR FM AUX BTDR FM AUX BTDR FM AUX BTDR FM AUX BTDR FM AUX BTDR FM AUX BTDR FM AUX BTDR FM AUX BTDR FM AUX BTDR FM AUX BTDR FM AUX BTDR FM AUX BTDR FM AUX BTDR FM AUX BTDR FM AUX BTDR FM AUX BTDR FM AUX BTDR FM AUX BTDR FM AUX BTDR FM AUX BTDR FM AUX BTDR FM AUX BTDR FM AUX BTDR FM AUX BTDR FM AUX BTDR FM AUX BTDR FM AUX BTDR FM AUX BTDR FM AUX BTDR FM AUX BTDR FM AUX BTDR FM AUX BTDR FM AUX BTDR FM AUX BTDR FM AUX BTDR
09:59
1
min
Drücken Sie (
Station Select
Snooze
), um das Radio einzuschalten.
DR FM AUX BTDR FM AUX BTDR FM AUX BTDR FM AUX BTDR FM AUX BTDR FM AUX BTDR FM AUX BTDR FM AUX BTDR FM AUX BTDR FM AUX BTDR FM AUX BTDR FM AUX BTDR FM AUX BTDR FM AUX BTDR FM AUX BTDR FM AUX BTDR FM AUX BTDR FM AUX BTDR FM AUX BTDR FM AUX BTDR FM AUX BTDR FM AUX BTDR FM AUX BTDR FM AUX BTDR FM AUX BTDR FM AUX BTDR FM AUX BTDR FM AUX BTDR FM AUX BTDR FM AUX BTDR FM AUX BTDR FM AUX BTDR FM AUX BTDR FM AUX BTDR FM AUX BTDR FM AUX BTDR FM AUX BTDR FM AUX BTDR FM AUX BTDR FM AUX BTDR FM AUX BTDR FM AUX BTDR FM AUX BTDR
10:00
SWR 3
PopUp
SCAN 14
******
Page 34

8
Verwendung Ihres One Maxi
Digitalradio hören
Drücken Sie die Taste Source, um zu Digitalradio zu
wechseln.
Wechsel des Digitalsenders
1. Drücken Sie die Tasten < >, um durch die
Senderliste zu scrollen.
2. Wenn Sie den gewünschten Sender gefunden
haben, drücken Sie die Taste Select.
UKW-Radiobetrieb
Drücken Sie die Taste Source, um zu UKW-Radio zu
wechseln.
UKW-Sender wechseln
Manuelle Senderwahl
Drücken Sie die Tasten < > , um in Schritten von 0,05
MHz nach oben oder unten zu blättern.
Automatische Sendersuche
Drücken Sie die Tasten < > und halten Sie sie
gedrückt, um den nächsten oder vorherigen UKWRadiosender mit starkem Signal zu suchen.
DR FM AUX BTDR FM AUX BTDR FM AUX BTDR FM AUX BTDR FM AUX BTDR FM AUX BTDR FM AUX BTDR FM AUX BTDR FM AUX BTDR FM AUX BTDR FM AUX BTDR FM AUX BTDR FM AUX BTDR FM AUX BTDR FM AUX BTDR FM AUX BTDR FM AUX BTDR FM AUX BTDR FM AUX BTDR FM AUX BTDR FM AUX BTDR FM AUX BTDR FM AUX BTDR FM AUX BTDR FM AUX BTDR FM AUX BTDR FM AUX BTDR FM AUX BTDR FM AUX BTDR FM AUX BTDR FM AUX BTDR FM AUX BTDR FM AUX BTDR FM AUX BTDR FM AUX BTDR FM AUX BTDR FM AUX BTDR FM AUX BTDR FM AUX BTDR FM AUX BTDR FM AUX BTDR FM AUX BTDR FM AUX BTDR FM
10:00
PM
DRFM
DR FM AUX BTDR FM AUX BTDR FM AUX BTDR FM AUX BTDR FM AUX BTDR FM AUX BTDR FM AUX BTDR FM AUX BTDR FM AUX BTDR FM AUX BTDR FM AUX BTDR FM AUX BTDR FM AUX BTDR FM AUX BTDR FM AUX BTDR FM AUX BTDR FM AUX BTDR FM AUX BTDR FM AUX BTDR FM AUX BTDR FM AUX BTDR FM AUX BTDR FM AUX BTDR FM AUX BTDR FM AUX BTDR FM AUX BTDR FM AUX BTDR FM AUX BTDR FM AUX BTDR FM AUX BTDR FM AUX BTDR FM AUX BTDR FM AUX BTDR FM AUX BTDR FM AUX BTDR FM AUX BTDR FM AUX BTDR FM AUX BTDR FM AUX BTDR FM AUX BTDR FM AUX BTDR FM AUX BTDR FM AUX BTDR
10:00
SENDER
SWR 1
DR FM AUX BTDR FM AUX BTDR FM AUX BTDR FM AUX BTDR FM AUX BTDR FM AUX BTDR FM AUX BTDR FM AUX BTDR FM AUX BTDR FM AUX BTDR FM AUX BTDR FM AUX BTDR FM AUX BTDR FM AUX BTDR FM AUX BTDR FM AUX BTDR FM AUX BTDR FM AUX BTDR FM AUX BTDR FM AUX BTDR FM AUX BTDR FM AUX BTDR FM AUX BTDR FM AUX BTDR FM AUX BTDR FM AUX BTDR FM AUX BTDR FM AUX BTDR FM AUX BTDR FM AUX BTDR FM AUX BTDR FM AUX BTDR FM AUX BTDR FM AUX BTDR FM AUX BTDR FM AUX BTDR FM AUX BTDR FM AUX BTDR FM AUX BTDR FM AUX BTDR FM AUX BTDR FM AUX BTDR FM AUX BTDR
10:00
SWR 1
TUNING
106\20
DR FM AUX BTDR FM AUX BTDR FM AUX BTDR FM AUX BTDR FM AUX BTDR FM AUX BTDR FM AUX BTDR FM AUX BTDR FM AUX BTDR FM AUX BTDR FM AUX BTDR FM AUX BTDR FM AUX BTDR FM AUX BTDR FM AUX BTDR FM AUX BTDR FM AUX BTDR FM AUX BTDR FM AUX BTDR FM AUX BTDR FM AUX BTDR FM AUX BTDR FM AUX BTDR FM AUX BTDR FM AUX BTDR FM AUX BTDR FM AUX BTDR FM AUX BTDR FM AUX BTDR FM AUX BTDR FM AUX BTDR FM AUX BTDR FM AUX BTDR FM AUX BTDR FM AUX BTDR FM AUX BTDR FM AUX BTDR FM AUX BTDR FM AUX BTDR FM AUX BTDR FM AUX BTDR FM AUX BTDR FM AUX BTDR FM
10:00
107\60
SCANNEN
DR FM AUX BTDR FM AUX BTDR FM AUX BTDR FM AUX BTDR FM AUX BTDR FM AUX BTDR FM AUX BTDR FM AUX BTDR FM AUX BTDR FM AUX BTDR FM AUX BTDR FM AUX BTDR FM AUX BTDR FM AUX BTDR FM AUX BTDR FM AUX BTDR FM AUX BTDR FM AUX BTDR FM AUX BTDR FM AUX BTDR FM AUX BTDR FM AUX BTDR FM AUX BTDR FM AUX BTDR FM AUX BTDR FM AUX BTDR FM AUX BTDR FM AUX BTDR FM AUX BTDR FM AUX BTDR FM AUX BTDR FM AUX BTDR FM AUX BTDR FM AUX BTDR FM AUX BTDR FM AUX BTDR FM AUX BTDR FM AUX BTDR FM AUX BTDR FM AUX BTDR FM AUX BTDR FM AUX BTDR FM AUX BTDR FM
10:00
107\60
DR FM AUX BTDR FM AUX BTDR FM AUX BTDR FM AUX BTDR FM AUX BTDR FM AUX BTDR FM AUX BTDR FM AUX BTDR FM AUX BTDR FM AUX BTDR FM AUX BTDR FM AUX BTDR FM AUX BTDR FM AUX BTDR FM AUX BTDR FM AUX BTDR FM AUX BTDR FM AUX BTDR FM AUX BTDR FM AUX BTDR FM AUX BTDR FM AUX BTDR FM AUX BTDR FM AUX BTDR FM AUX BTDR FM AUX BTDR FM AUX BTDR FM AUX BTDR FM AUX BTDR FM AUX BTDR FM AUX BTDR FM AUX BTDR FM AUX BTDR FM AUX BTDR FM AUX BTDR FM AUX BTDR FM AUX BTDR FM AUX BTDR FM AUX BTDR FM AUX BTDR FM AUX BTDR FM AUX BTDR FM AUX BTDR FM
10:00
106\20
DR FM AUX BTDR FM AUX BTDR FM AUX BTDR FM AUX BTDR FM AUX BTDR FM AUX BTDR FM AUX BTDR FM AUX BTDR FM AUX BTDR FM AUX BTDR FM AUX BTDR FM AUX BTDR FM AUX BTDR FM AUX BTDR FM AUX BTDR FM AUX BTDR FM AUX BTDR FM AUX BTDR FM AUX BTDR FM AUX BTDR FM AUX BTDR FM AUX BTDR FM AUX BTDR FM AUX BTDR FM AUX BTDR FM AUX BTDR FM AUX BTDR FM AUX BTDR FM AUX BTDR FM AUX BTDR FM AUX BTDR FM AUX BTDR FM AUX BTDR FM AUX BTDR FM AUX BTDR FM AUX BTDR FM AUX BTDR FM AUX BTDR FM AUX BTDR FM AUX BTDR FM AUX BTDR FM AUX BTDR FM AUX BTDR
10:00
PM
DR
SWR 3
PopUp
Page 35

9
ES
DE
Speicherplätze speichern und
anwählen
Schnellspeichern eines Senders auf
einem der Speicherplätze (1–4)
Stellen Sie den Digital- bzw. UKW-Radiosender ein, den
Sie speichern wollen. Drücken Sie eine der nummerierten
Speicherplatztasten (1)–4 und halten Sie sie zwei
Sekunden lang gedrückt, um den aktuellen Sender als
Voreinstellung zu speichern. Sie können bereits belegte
Speicherplätze überschreiben.
Speichern eines Senders in der
Voreinstellungsliste (1–10)
1. Stellen Sie den Digital- bzw. UKW-Sender ein, den Sie
speichern wollen.
2.
Drücken Sie die Taste 5+ und halten Sie sie gedrückt,
um eine Liste der Speicherplätze anzuzeigen. Drücken
Sie anschließend < >, um eine Speicherplatznummer
zwischen 1 und 10 auszuwählen.
Sie können bereits verwendete Speicherplätze
überschreiben.
3. Drücken Sie die Taste Select, bis die Meldung
„PROGR. GESP.“ angezeigt wird.
Aufruf eines gespeicherten Senders
beim Empfang von Digitalradio oder
UKW
Um einen der Speicherplätze 1 bis 4 aufzurufen, drücken
Sie die Taste mit der entsprechenden Zahl (1 bis 4) am
One Maxi.
So erhalten Sie die vollständige Liste der Speicherplätze
(von 1 bis 10):
1. Drücken Sie die Taste 5+ und lassen Sie sie wieder los.
2. Drücken Sie < >, um durch die Liste der Speicherplätze
zu blättern, und drücken Sie die Taste Select , um den
ausgewählten Speicherplatz einzustellen.
Sie können für einen schnellen Zugang bis zu zehn digitale und zehn
UKW-Radiosender speichern.
DR FM AUX BTDR FM AUX BTDR FM AUX BTDR FM AUX BTDR FM AUX BTDR FM AUX BTDR FM AUX BTDR FM AUX BTDR FM AUX BTDR FM AUX BTDR FM AUX BTDR FM AUX BTDR FM AUX BTDR FM AUX BTDR FM AUX BTDR FM AUX BTDR FM AUX BTDR FM AUX BTDR FM AUX BTDR FM AUX BTDR FM AUX BTDR FM AUX BTDR FM AUX BTDR FM AUX BTDR FM AUX BTDR FM AUX BTDR FM AUX BTDR FM AUX BTDR FM AUX BTDR FM AUX BTDR FM AUX BTDR FM AUX BTDR FM AUX BTDR FM AUX BTDR FM AUX BTDR FM AUX BTDR FM AUX BTDR FM AUX BTDR FM AUX BTDR FM AUX BTDR FM AUX BTDR FM AUX BTDR FM AUX BTDR
10:00
SWR 3
PopUp
DR FM AUX BTDR FM AUX BTDR FM AUX BTDR FM AUX BTDR FM AUX BTDR FM AUX BTDR FM AUX BTDR FM AUX BTDR FM AUX BTDR FM AUX BTDR FM AUX BTDR FM AUX BTDR FM AUX BTDR FM AUX BTDR FM AUX BTDR FM AUX BTDR FM AUX BTDR FM AUX BTDR FM AUX BTDR FM AUX BTDR FM AUX BTDR FM AUX BTDR FM AUX BTDR FM AUX BTDR FM AUX BTDR FM AUX BTDR FM AUX BTDR FM AUX BTDR FM AUX BTDR FM AUX BTDR FM AUX BTDR FM AUX BTDR FM AUX BTDR FM AUX BTDR FM AUX BTDR FM AUX BTDR FM AUX BTDR FM AUX BTDR FM AUX BTDR FM AUX BTDR FM AUX BTDR FM AUX BTDR FM AUX BTDR
10:00
SPLATZ 2
GESICHERT
DR FM AUX BTDR FM AUX BTDR FM AUX BTDR FM AUX BTDR FM AUX BTDR FM AUX BTDR FM AUX BTDR FM AUX BTDR FM AUX BTDR FM AUX BTDR FM AUX BTDR FM AUX BTDR FM AUX BTDR FM AUX BTDR FM AUX BTDR FM AUX BTDR FM AUX BTDR FM AUX BTDR FM AUX BTDR FM AUX BTDR FM AUX BTDR FM AUX BTDR FM AUX BTDR FM AUX BTDR FM AUX BTDR FM AUX BTDR FM AUX BTDR FM AUX BTDR FM AUX BTDR FM AUX BTDR FM AUX BTDR FM AUX BTDR FM AUX BTDR FM AUX BTDR FM AUX BTDR FM AUX BTDR FM AUX BTDR FM AUX BTDR FM AUX BTDR FM AUX BTDR FM AUX BTDR FM AUX BTDR FM AUX BTDR
10:00
KLASSIK
MOZART
DR FM AUX BTDR FM AUX BTDR FM AUX BTDR FM AUX BTDR FM AUX BTDR FM AUX BTDR FM AUX BTDR FM AUX BTDR FM AUX BTDR FM AUX BTDR FM AUX BTDR FM AUX BTDR FM AUX BTDR FM AUX BTDR FM AUX BTDR FM AUX BTDR FM AUX BTDR FM AUX BTDR FM AUX BTDR FM AUX BTDR FM AUX BTDR FM AUX BTDR FM AUX BTDR FM AUX BTDR FM AUX BTDR FM AUX BTDR FM AUX BTDR FM AUX BTDR FM AUX BTDR FM AUX BTDR FM AUX BTDR FM AUX BTDR FM AUX BTDR FM AUX BTDR FM AUX BTDR FM AUX BTDR FM AUX BTDR FM AUX BTDR FM AUX BTDR FM AUX BTDR FM AUX BTDR FM AUX BTDR FM AUX BTDR
10:00
PLATZ 6
LEER
DR FM AUX BTDR FM AUX BTDR FM AUX BTDR FM AUX BTDR FM AUX BTDR FM AUX BTDR FM AUX BTDR FM AUX BTDR FM AUX BTDR FM AUX BTDR FM AUX BTDR FM AUX BTDR FM AUX BTDR FM AUX BTDR FM AUX BTDR FM AUX BTDR FM AUX BTDR FM AUX BTDR FM AUX BTDR FM AUX BTDR FM AUX BTDR FM AUX BTDR FM AUX BTDR FM AUX BTDR FM AUX BTDR FM AUX BTDR FM AUX BTDR FM AUX BTDR FM AUX BTDR FM AUX BTDR FM AUX BTDR FM AUX BTDR FM AUX BTDR FM AUX BTDR FM AUX BTDR FM AUX BTDR FM AUX BTDR FM AUX BTDR FM AUX BTDR FM AUX BTDR FM AUX BTDR FM AUX BTDR FM AUX BTDR
10:00
PLATZ 6
GESICHERT
DR FM AUX BTDR FM AUX BTDR FM AUX BTDR FM AUX BTDR FM AUX BTDR FM AUX BTDR FM AUX BTDR FM AUX BTDR FM AUX BTDR FM AUX BTDR FM AUX BTDR FM AUX BTDR FM AUX BTDR FM AUX BTDR FM AUX BTDR FM AUX BTDR FM AUX BTDR FM AUX BTDR FM AUX BTDR FM AUX BTDR FM AUX BTDR FM AUX BTDR FM AUX BTDR FM AUX BTDR FM AUX BTDR FM AUX BTDR FM AUX BTDR FM AUX BTDR FM AUX BTDR FM AUX BTDR FM AUX BTDR FM AUX BTDR FM AUX BTDR FM AUX BTDR FM AUX BTDR FM AUX BTDR FM AUX BTDR FM AUX BTDR FM AUX BTDR FM AUX BTDR FM AUX BTDR FM AUX BTDR FM AUX BTDR
10:00
KLASSIK
MOZART
DR FM AUX BTDR FM AUX BTDR FM AUX BTDR FM AUX BTDR FM AUX BTDR FM AUX BTDR FM AUX BTDR FM AUX BTDR FM AUX BTDR FM AUX BTDR FM AUX BTDR FM AUX BTDR FM AUX BTDR FM AUX BTDR FM AUX BTDR FM AUX BTDR FM AUX BTDR FM AUX BTDR FM AUX BTDR FM AUX BTDR FM AUX BTDR FM AUX BTDR FM AUX BTDR FM AUX BTDR FM AUX BTDR FM AUX BTDR FM AUX BTDR FM AUX BTDR FM AUX BTDR FM AUX BTDR FM AUX BTDR FM AUX BTDR FM AUX BTDR FM AUX BTDR FM AUX BTDR FM AUX BTDR FM AUX BTDR FM AUX BTDR FM AUX BTDR FM AUX BTDR FM AUX BTDR FM AUX BTDR FM AUX BTDR
10:00
AUFRUFEN
6 KLASS
Page 36

10
Verwendung des AUX-Eingangs
Sie können den AUX-Eingang des One Maxi verwenden, um Musik von Ihrem
Smartphone oder Tablet über das One Maxi abzuspielen.
Anmerkung:
Wenn Sie den AUX-Eingang des One Maxi zur Musikwiedergabe
nutzen, müssen Sie die Lautstärke Ihres One Maxi über die Lautstärkeregelung
Ihres Smartphones oder Tablets steuern.
Anschluss eines Zusatzgeräts an das One Maxi
Verbinden Sie über ein geeignetes Kabel den Line-out- oder Kopfhöreranschluss
Ihres Zusatzgeräts mit dem AUX-Eingang an Ihrem One Maxi.
Auswahl des AUX-Eingangs
1.
Drücken Sie die Taste Source,
um zum AUX-
Eingang zu wechseln
.
2. Wählen Sie bei Ihrem Zusatzgerät den Inhalt, den
Sie auf dem One Maxi hören möchten.
Das One Maxi beginnt mit der Wiedergabe des
Inhalts, den Sie auf Ihrem Zusatzgerät ausgewählt
haben.
DR FM AUX BTDR FM AUX BTDR FM AUX BTDR FM AUX BTDR FM AUX BTDR FM AUX BTDR FM AUX BTDR FM AUX BTDR FM AUX BTDR FM AUX BTDR FM AUX BTDR FM AUX BTDR FM AUX BTDR FM AUX BTDR FM AUX BTDR FM AUX BTDR FM AUX BTDR FM AUX BTDR FM AUX BTDR FM AUX BTDR FM AUX BTDR FM AUX BTDR FM AUX BTDR FM AUX BTDR FM AUX BTDR FM AUX BTDR FM AUX BTDR FM AUX BTDR FM AUX BTDR FM AUX BTDR FM AUX BTDR FM AUX BTDR FM AUX BTDR FM AUX BTDR FM AUX BTDR FM AUX BTDR FM AUX BTDR FM AUX BTDR FM AUX BTDR FM AUX BTDR FM AUX BTDR FM AUX BTDR FM AUX BTDR FM AUX
10:00
AUX
2-4-2015
Aux In
Page 37

11
ES
DE
Wecker und Timer
Einstellen eines Weckalarms
Das One Maxi bietet zwei Alarme, bei denen das
Radio eingeschaltet und ein Digital- bzw. UKW-Sender
eingestellt oder eine Geräuschkulisse bzw. ein Alarmton
aktiviert werden kann.
1. Drücken Sie die Taste Menu und scrollen Sie mit < >
zu „ALARM“.
2. Scrollen Sie mit < > zu „ALARM1“ oder „ALARM2“,
und drücken Sie die Taste Select.
3. Scrollen Sie mit < > zu „AN“ und drücken Sie die Taste
Select.
4. Scrollen Sie mit < >, um die Stunde für den Alarm
festzulegen, und drücken Sie die Taste Select.
Wiederholen Sie diesen Vorgang, um die Minuten für
den Alarm einzustellen.
5. Scrollen Sie mit < >, um die Dauer des Alarms
festzulegen, und drücken Sie die Taste Select.
6.
Scrollen Sie mit < >, um „UKW“, „DIGITAL“
oder „KLANG“ festzulegen, und drücken Sie zur
Bestätigung die Taste Select. Wenn Sie einen TonAlarm angeben wollen, fahren Sie fort mit Schritt 8.
7. Scrollen Sie mit < >, um zu bestimmen, welcher
Sender beim Losgehen des Alarms gespielt werden
soll. Sie können einen bereits gespeicherten Sender
verwenden oder mit „ZULETZT GENUTZT“ den Sender
auswählen, den Sie zuletzt gehört haben. Bestätigen
Sie den Vorgang durch Drücken der Taste Select.
8. Scrollen Sie mit < >, um eine der folgenden
Alarmwiederholungsoptionen festzulegen:
„TÄGLICH“, „MO.-FR.“, „SA.-SO.“ oder „EINMAL“, und
drücken Sie zur Bestätigung die Taste Select.
9. Verwenden Sie < >, um die Wecklautstärke des Radios
einzustellen, und drücken Sie zur Bestätigung die Taste
Select .
10
. Auf dem Display leuchtet das Alarmsymbol, um
anzuzeigen, dass der Alarm eingestellt wurde.
Anmerkung: Wenn das One Maxi mit Batterien oder einem ChargePAK betrieben wird,
steht die Weckfunktion des One Maxi nicht zur Verfügung, wenn Sie das One Maxi nach
dem Einstellen eines Weckalarms ausschalten.
7:00
ALARM 1
AN
7:00
BEI ZEIT
11=25PM
7:00
DAUER
45 MIN.
7:00
QUELLE
DIGITAL
7:00
SENDER
ZUL. VERW.
7:00
WIEDERH.
TÄGLICH
7:00
LAUTST.
2
7:00
DR FM AUX BTDR FM AUX BTDR FM AUX BTDR FM AUX BTDR FM AUX BTDR FM AUX BTDR FM AUX BTDR FM AUX BTDR FM AUX BTDR FM AUX BTDR FM AUX BTDR FM AUX BTDR FM AUX BTDR FM AUX BTDR FM AUX BTDR FM AUX BTDR FM AUX BTDR FM AUX BTDR FM AUX BTDR FM AUX BTDR FM AUX BTDR FM AUX BTDR FM AUX BTDR FM AUX BTDR FM AUX BTDR FM AUX BTDR FM AUX BTDR FM AUX BTDR FM AUX BTDR FM AUX BTDR FM AUX BTDR FM AUX BTDR FM AUX BTDR FM AUX BTDR FM AUX BTDR FM AUX BTDR FM AUX BTDR FM AUX BTDR FM AUX BTDR FM AUX BTDR FM AUX BTDR FM AUX BTDR FM AUX BT
DR
GESP.
ALARM 1
7:00
MENU
ALARM
7:00
ALARM
ALARM 1
Page 38

12
Abbrechen eines Alarmtons
Zum Abbrechen eines Alarms drücken Sie die Taste Source , <Select> oder Menu.
Schlummerfunktion verwenden
Wenn Sie bei einem Alarm die Schlummerfunktion verwenden wollen, drücken Sie eine
der Speicherplatztasten. Standardmäßig ist die Schlummerdauer des Alarms beim
OneMaxi auf acht Minuten eingestellt. Hinweise zum Ändern der Schlummerdauer
finden Sie unter Seite 18.
Deaktivieren eines Alarms
So deaktivieren Sie einen Alarm, nachdem er gesetzt wurde:
1. Drücken Sie die Taste Menu, scrollen Sie mit < > zu „ALARM“ und drücken Sie die
Taste Select.
2. Scrollen Sie mit < > zum Alarm, der deaktiviert werden soll („ALARM1“ oder
„ALARM2“), und drücken Sie die Taste Select.
3. Scrollen Sie mit < > zu „AUS“ und drücken Sie die Taste Select.
4
.
Das Alarmsymbol auf dem Display des One Maxi erlischt als Hinweis darauf, dass
der Alarm deaktiviert wurde.
Einstellen des Sleep-Timers
Der Sleep-Timer kann so eingestellt werden, dass das One Maxi nach einer bestimmten
Zeit ausgeschaltet wird.
Anmerkung: Wenn das One Maxi mit Batterien oder einem ChargePAK betrieben wird, ist
die Sleep-Timer-Funktion deaktiviert.
1. Drücken Sie die Taste Menu.
2. Scrollen Sie mit < > zu „SCHLAF“ und drücken Sie die Taste Select.
3. Scrollen Sie mit < > und drücken Sie die Taste Select, um den Timer auf bis zu
90Minuten einzustellen, oder wählen Sie zum Abbrechen „AUS“.
Einstellen des Küchen-Timers
Das One Maxi verfügt über einen Küchen-Timer mit Countdown, der nach einer
festgelegten Zeit einen Alarm auslöst.
1. Drücken Sie die Taste Menu.
2. Scrollen Sie mit < > zu „TIMER“ und drücken Sie die Taste Select.
3. Scrollen Sie mit < >, um die Stunden zu ändern, und drücken Sie die Taste Select.
4. Scrollen Sie erneut mit < >, um die Minuten zu ändern, und drücken Sie, um die
Auswahl zu bestätigen und den Countdown-Timer zu starten.
Der Alarm ertönt nach Ablauf des gewählten Zeitraums unabhängig davon, ob das
Radio eingeschaltet oder im Standby-Modus ist. Sie können den piependen Alarmton
abbrechen, indem Sie eine der Tasten Source, <Select> oder Menu drücken.
Page 39

13
ES
DE
Optionen und Einstellungen
Allgemeine Einstellungen
Ändern der Sprache auf dem Display
So können Sie bei der Anzeigesprache des One Maxi zwischen English, Français,
Deutsch, Italiano und Español wechseln:
1. Drücken Sie die Taste Menu.
2. Scrollen Sie mit < > zu „EINSTELLUNGEN“ und drücken Sie die Taste Select.
3. Scrollen Sie mit < > zu „SPRACHE“ und drücken Sie die Taste Select.
4. Scrollen Sie mit < > und drücken Sie die Taste Select, um die gewünschte
Anzeigesprache beim One Maxi auszuwählen.
Rücksetzung des One Maxi auf die Werkseinstellungen
Setzt das Radio zurück, leert alle Speicherplätze, löscht die Senderliste und setzt
alle Optionen auf die Standardwerte zurück.So führen Sie eine Rücksetzung
durch:
1. Drücken Sie die Taste Menu.
2. Scrollen Sie mit < > zu „EINSTELLUNGEN“ und drücken Sie die Taste Select.
3. Scrollen Sie mit < > zu „RESET“ und drücken Sie die Taste Select.
4. Scrollen Sie mit < > zu „JA“ und drücken Sie die Taste Select.
Anzeige der Softwareversion des One Maxi
So können Sie sich die aktuelle Softwareversion Ihres One Maxi anzeigen lassen:
1. Drücken Sie die Taste Menu.
2. Scrollen Sie mit < > zu „EINSTELLUNGEN“ und drücken Sie die Taste Select.
3. Scrollen Sie mit < > zu „VERSION“ und drücken Sie die Taste Select.
Aktualisierung des One Maxi auf die neueste Softwareversion
Wenden Sie sich an den technischen Support von Pure (http://support.pure.
com), wenn Sie weitere Informationen zur Aktualisierung des One Maxi auf die
neueste Softwareversion wünschen.
Page 40

14
Digitalradio-Einstellungen
Automatische Sendersuche
Sie können die automatische Sendersuche verwenden, um automatisch nach
neuen Digitalradiosendern zu suchen und inaktive Sender zu entfernen.
Anmerkung: Die automatische Sendersuche „Autotune“ ist nur verfügbar, wenn
Sie „Digitalradio“ als Radiosenderquelle gewählt haben.
So führen Sie eine automatische Sendersuche durch:
1. Drücken Sie die Taste Menu.
2. Scrollen Sie mit < > zu „AUTOTUNE“ und drücken Sie die Taste Select.
DieAnzahl der gefundenen Sender wird während der automatischen
Sendersuche angezeigt.
Nach Abschluss der automatischen Sendersuche stellt One Maxi den von Ihnen
zuletzt gehörten Sender ein.
Audio-Einstellungen
Bass- und Höheneinstellung
Ihr One Maxi verfügt über zwei Bass- und Höhenprofile, die den Bass- und
Höhenpegel automatisch einstellen, je nachdem ob Sie über die integrierten
Lautsprecher des One Maxi oder über angeschlossene Kopfhörer hören.
Anmerkung: Wenn Sie über Kopfhörer hören möchten, müssen Sie die Kopfhörer
zur Bass- und Höheneinstellung an das One Maxi anschließen. Wenn Sie den
Bass und die Höhen des integrierten Lautsprechers einstellen möchten, ziehen
Sie bitte vor der Bass- und Höheneinstellung die Kopfhörer vom Radio ab.
So stellen Sie am One Maxi den Bass und die Höhen ein:
1. Drücken Sie die Taste Menu.
2. Scrollen Sie mit < > zu „AUDIO“ und drücken Sie die Taste Select.
3. Scrollen Sie mit < > zu „BASS“ oder „HÖHEN“ und drücken Sie die Taste
Select.
4. Scrollen Sie mit < >, um die Bässe oder Höhen einzustellen. Sie können eine
Einstellung zwischen „-5“ und „+5“ auswählen.
5. Drücken Sie die Taste Select, um die Einstellungen für den Bass bzw. die
Höhen zu bestätigen.
Page 41

15
ES
DE
Einschalten der Audioboost-Funktion
Wenn Sie sich in lauter Umgebung eine Talkshow im Radio anhören,
können Sie die Audioboost-Funktion einschalten, um den durchschnittlichen
Wiedergabepegel der Sendung zu erhöhen. Wenn Sie hauptsächlich Musiksender
hören, empfehlen wir Ihnen, diese Funktion auszuschalten.
1. Drücken Sie die Taste Menu.
2.
Scrollen Sie mit < > zu „AUDIO“ und drücken Sie die Taste Select.
3. Scrollen Sie mit < > zu „BOOST“ und drücken Sie die Taste Select.
4. Scrollen Sie mit < > und drücken Sie die Taste Select, um die AudioboostFunktion „AN“ oder „AUS“ zu schalten.
Einstellung des Pegels am AUX-Eingang
Wenn Sie Ihr Smartphone oder Tablet an den AUX-Eingang des One Maxi
angeschlossen haben, können Sie den Pegel für den AUX-Eingang an die
Einstellungen Ihres Smartphones oder Tablets anpassen. Weitere Informationen
hierzu erhalten Sie im Benutzerhandbuch zu Ihrem Smartphone oder Tablet. So
ändern Sie den Pegel am AUX-Eingang des One Maxi:
1. Drücken Sie die Taste Menu.
2. Scrollen Sie mit < > zu „AUDIO“ und drücken Sie die Taste Select.
3. Scrollen Sie mit < > zu „AUX-PEGEL“ und drücken Sie die Taste Select.
4. Scrollen Sie mit < > und drücken Sie die Taste Select, um zwischen
„NIEDRIG“, „MITTEL“ und „HOCH“ auszuwählen.
Einschalten der Stereobreite-Einstellung
Wenn Sie einen zusätzlichen Lautsprecher an die Kopfhörerbuchse des One Maxi
angeschlossen haben, können Sie die Einstellung für die Stereobreite einschalten,
um die Stereowiedergabe von Stereosendungen zu verbessern. So können Sie
die Stereobreite-Einstellung ein- oder ausschalten:
1. Drücken Sie die Taste Menu.
2. Scrollen Sie mit < > zu „AUDIO“ und drücken Sie die Taste Select.
3. Scrollen Sie mit < > zu „W-SOUND“ und drücken Sie die Taste Select.
4. Scrollen Sie mit < > und drücken Sie die Taste Select, um die StereobreiteEinstellung „AN“ oder „AUS“ zu schalten.
Page 42

16
Anzeigeeinstellungen
Einstellen der Anzeigehelligkeit
Sie können die Helligkeit der Anzeige anpassen, während das One Maxi in Betrieb
oder im Standby-Modus ist. So stellen Sie die Helligkeit der Anzeige am One Maxi
ein:
1. Drücken Sie die Taste Menu.
2. Scrollen Sie mit < > zu „ANZEIGE“ und drücken Sie die Taste Select.
3. Scrollen Sie mit < > zu „BELEUCHTUNG“ und drücken Sie die Taste Select.
4. Scrollen Sie mit < > zu „AKTIV“ und drücken Sie die Taste Select, um die
beim Einschalten des One Maxi aktiven Einstellungen zu ändern. Sie können
auch mit < > zu „STANDBY“ scrollen und die Taste Select drücken, um die im
Standby aktiven Einstellungen zu ändern.
5. Scrollen Sie mit < > zu „HELLIGKEIT“ und drücken Sie die Taste Select.
6. Scrollen Sie mit < >, um eine Helligkeitseinstellung zwischen „1“ und „5“
auszuwählen.
7. Drücken Sie die Taste Select, um die Helligkeitseinstellung zu bestätigen.
Einstellen der Leuchtdauer der Anzeigenhintergrundbeleuchtung
Sie können einstellen, wie lange die Anzeigenhintergrundbeleuchtung des One
Maxi leuchtet:
1. Drücken Sie die Taste Menu.
2. Scrollen Sie mit < > zu „ANZEIGE“ und drücken Sie die Taste Select.
3. Scrollen Sie mit < > zu „BELEUCHTUNG“ und drücken Sie die Taste Select.
4. Scrollen Sie mit < > zu „AKTIV“ und drücken Sie die Taste Select, um die
beim Einschalten des One Maxi aktiven Einstellungen zu ändern. Sie können
auch mit < > zu „STANDBY“ scrollen und die Taste Select drücken, um die im
Standby aktiven Einstellungen zu ändern.
5. Scrollen Sie mit < > zu „DAUER“ und drücken Sie die Taste Select.
6. Scrollen Sie mit < > und drücken Sie die Taste Select, um eine der folgenden
Optionen auszuwählen:
AN: Wählen Sie diese Option aus, wenn die Hintergrundbeleuchtung immer an
bleiben soll.
ZEITGESTEUERT: Wählen Sie diese Option aus, wenn sich die
Hintergrundbeleuchtung nach 10 Sekunden abschalten soll.
Page 43

17
ES
DE
Änderung der Informationsanzeige im Display des One Maxi
Wenn Sie einen Digital- oder UKW-Radiosender hören, können Sie auswählen, welche
Informationen auf dem Display des One Maxi angezeigt werden sollen:
1. Drücken Sie die Taste Menu.
2. Scrollen Sie mit < > zu „ANZEIGE“ und drücken Sie die Taste Select.
3. Scrollen Sie mit < > zu „INFO“ und drücken Sie die Taste Select.
4. Scrollen Sie mit < > und drücken Sie die Taste Select, um eine der folgenden
Optionen auszuwählen:
LAUFTEXT: Wählen Sie diese Option aus, wenn die von dem momentan
gehörten Sender übertragenen Informationen angezeigt werden sollen.
Dieangezeigten Informationen können Liedtitel, Programmdaten, Nachrichten
usw. enthalten.
STÄRKE: Wählen Sie diese Option aus, wenn die Signalstärke des momentan
gehörten Senders angezeigt werden soll. Die Anzahl der Sterne zeigt die
Zuverlässigkeit des Empfangs-Levels an.
DATUM: Wählen Sie diese Option aus, wenn das aktuelle Datum angezeigt
werden soll.
Uhr-Einstellungen
Einstellung von Uhrzeit und Datum
Uhrzeit und Datum werden beim One Maxi automatisch über das UKW- oder
Digitalradiosignal eingestellt. Wenn Uhrzeit und Datum beim One Maxi nicht automatisch
aktualisiert werden, können Sie sie manuell einstellen.
1. Drücken Sie die Taste Menu.
2. Scrollen Sie mit < > zu „UHR“ und drücken Sie die Taste Select.
3. Scrollen Sie mit < > zu „ZEIT/DATUM“ und drücken Sie die Taste Select.
4. Scrollen Sie mit < >, um die Stunde einzustellen, und drücken Sie die Taste Select.
Wiederholen Sie diesen Schritt, um die Minuten einzustellen.
5. Scrollen Sie mit < >, um den Tag einzustellen, und drücken Sie die Taste Select.
Wiederholen Sie diesen Schritt, um Monat und Jahr einzustellen.
Änderung des Uhrzeitformats
1. Drücken Sie die Taste Menu.
2. Scrollen Sie mit < > zu „UHR“ und drücken Sie die Taste Select.
3. Scrollen Sie mit < > zu „12/24 STD“ und drücken Sie die Taste
Select
.
4. Scrollen Sie mit < >, um entweder das „12 STD.“- oder „24 STD.“ -Format
auszuwählen, und drücken Sie zur Bestätigung die Taste
Select
.
Page 44

18
Änderung des Datumsformats
1. Drücken Sie die Taste Menu.
2. Scrollen Sie mit < > zu „UHR“ und drücken Sie die Taste Select.
3. Scrollen Sie mit < > zu „FORMAT“ und drücken Sie die Taste Select.
4. Scrollen Sie mit < > , um das Datum in der Reihenfolge Tag-Monat-Jahr
„TT-MM-JJJJ“ oder Monat-Tag-Jahr „MM-TT-JJJJ“ anzuzeigen, und drücken
Sie zur Bestätigung die Taste
Select
.
Optionen für die Uhrensynchronisation
Sie können die Radioquellen auswählen, die Sie für die Einstellung der Uhrzeit
verwenden wollen. Standardmäßig werden beim One Maxi sowohl UKW- als auch
digitale Radiosignale zum Synchronisieren der Uhrzeit verwendet.
So legen Sie die Optionen zur Uhrensynchronisation fest:
1. Drücken Sie die Taste Menu.
2. Scrollen Sie mit < > zu „UHR“ und drücken Sie die Taste Select.
3. Scrollen Sie mit < > zu „SYNC MIT“ und drücken Sie die Taste Select.
4. Scrollen Sie mit < > zur Auswahl der gewünschten Option zur
Uhrensynchronisation und drücken Sie zur Bestätigung die Taste
Select
.
Änderung der Schlummerzeit
Ein ausgelöster Alarm wird nach dem Drücken einer der Speicherplatztasten am
One Maxi eine Zeit lang unterdrückt; Sie können diese „Schlummerzeit“ einstellen.
Standardmäßig ist die Schlummerzeit des Alarms beim One Maxi auf acht
Minuten eingestellt.
So ändern Sie die Schlummerzeit beim One Maxi:
1. Drücken Sie die Taste Menu.
2. Scrollen Sie mit < > zu „UHR“ und drücken Sie die Taste Select.
3. Scrollen Sie mit < > zu „SCHLUMMERN“ und drücken Sie die Taste Select .
4. Scrollen Sie mit < > zur Auswahl einer Schlummerzeit zwischen „5“ und „59“
Minuten, und drücken Sie zur Bestätigung die Taste
Select
.
Page 45

19
ES
DE
Anhang
Verwendung mit einem ChargePAK D1 oder sechs
AA-Batterien
ChargePAK D1 6x AA Batterien
Page 46

20
Hilfe und Tipps
Sekundärsender und inaktive Sender
(</>) Sekundäre Digitalradio-Dienste
Manche Sender bieten sekundäre Dienste mit zusätzlichen Informationen oder
alternativen Inhalten; diese Dienste werden eventuell nur zu bestimmten Zeiten
ausgestrahlt. Stehen für einen Sender sekundäre Dienste zur Verfügung, wird
hierfür „>“ neben dem Namen in der Senderliste angezeigt. Der sekundäre Dienst
erscheint neben dem Sender in der Liste. Ein sekundärer Dienst weist vor dem
Namen in der Senderliste die Markierung „<“ auf.
(?) Inaktive oder nicht verfügbare Sender
Inaktive oder nicht verfügbare Sender erscheinen auf der Senderliste mit einem
vorangestellten „?“ und können nicht ausgewählt werden. Ein Sender kann inaktiv
oder nicht verfügbar sein, weil er im Moment nicht sendet (schlagen Sie in den
Programmlisten nach) oder weil der Sendebetrieb insgesamt eingestellt wurde.
Eventuell ist auch das Sendesignal nicht stark genug für den Radioempfang.
Tipps und Tricks
Auf der Anzeige erscheint „NICHT VERFÜGBAR“
Versuchen Sie, die „Autotune“-Funktion des One Maxi zu nutzen, um automatisch
nach neuen Digitalradiosendern zu suchen und inaktive Sender zu entfernen
(siehe Seite 14). Sie können auch versuchen, die Position Ihrer Antenne oder
Ihres Radios zu ändern.
Empfang neuer Digitalradiosender, die ihren Sendebetrieb gerade
aufgenommen haben
Versuchen Sie die „Autotune“-Funktion des One Maxi zu nutzen, um nach
neuen Digitalsendern zu suchen (siehe Seite 14). Sie können auch versuchen,
diePosition Ihrer Antenne oder Ihres Radios zu ändern.
Page 47

21
ES
DE
Technische Daten
Radio Digital- und UKW-Radio
Frequenzen
DAB/DAB+, UKW-Radio 87,5–108 MHz
Lautsprecher Zwei
vollbereich 3
Zoll
Audioausgabe
2 x 3 W eff.
Eingänge Netzadapterbuchse 5,5 V DC (für 230 V)
Ausgänge: 3,5-mm-Buchse für Stereokopfhörer
Speicherplätze 10 Senderspeicherplätze für Digitalradio und 10 für
UKW-Radio
Netzteil Externes Netzteil für 230 V AC auf 5,5 V (2,0 A) DC
(mitgeliefert) oder optional ein ChargePAK D1-Akkupack
bzw. sechs AA-Batterien
Leistungsaufnahme
Standby mit Uhrenanzeige: 0,5 W, Aktivbetrieb: <1 W
Maße 275 mm breit x 155 mm hoch x 83 mm tief
Antenne Teleskopantenne
Zulassungen CE-Zeichen. Entspricht EMC- und Niederspannungsrichtlinie
Richtlinien (2004/108 EG und 2006/95/EG).
Gemäß ETSI EN 300 401. Australian C-Tick N1600 &
Electrical Safety.
Page 48

22
Copyright
Copyright 2016, Imagination Technologies Limited. Alle Rechte vorbehalten. Ohne
ausdrückliche schriftliche Einwilligung durch Imagination Technologies Limited ist
jede Vervielfältigung dieser Publikation, auch auszugsweise, verboten. Ebenso ist ihre
Verbreitung, Übermittlung, Abschrift, Speicherung in einem Datenverarbeitungssystem
oder Übersetzung in eine natürliche Sprache oder Programmiersprache in jeglicher
Form, sei sie elektronisch, mechanisch, magnetisch, manuell oder anderweitig, und
jegliche Offenlegung gegenüber Dritten verboten. Version 1. Januar 2016.
Marken
One Maxi Series 3, ChargePAK, Pure, das Pure-Logo, Imagination Technologies und
das Imagination-Technologies-Logo sind Marken oder eingetragene Markenzeichen
von Imagination Technologies Limited.Alle anderen Produktnamen sind Marken der
jeweiligen Unternehmen.
Garantieerklärung
Imagination Technologies Limited garantiert dem Endverbraucher, dass dieses Gerät frei
von Material- und Herstellungsfehlern im Rahmen des normalen Gebrauchs ist. Diese
Garantie gilt für einen Zeitraum von drei Jahren ab Kaufdatum. Die Garantie umfasst
Störungen aufgrund von Herstellungs- oder Ausführungsfehlern. Sie gilt jedoch nicht für
Unfallschäden jeglicher Art und Schäden, die auf Verschleiß, Fahrlässigkeit oder von uns
nicht autorisierte Anpassungen, Änderungen oder Reparaturen zurückzuführen sind. Bitte
registrieren Sie Ihr Produkt unter account.pure.com. Sollte es ein Problem mit Ihrem Gerät
geben, wenden Sie sich bitte an Ihren Händler oder an den Kundenservice von Pure unter
der Adresse, die auf der Rückseite dieses Handbuchs aufgeführt ist.
Haftungsausschluss
Imagination Technologies Limited übernimmt keine Verantwortung oder Garantie
bezüglich des Inhalts dieses Dokuments und weist insbesondere alle implizierten Zusagen
der Marktgängigkeit und der Eignung für einen bestimmten Zweck zurück. Weiterhin
behält sich Imagination Technologies Limited das Recht vor, diese Veröffentlichung zu
überarbeiten und von Zeit zu Zeit Änderungen vorzunehmen, ohne dass Imagination
Technologies Limited dazu verpflichtet ist, Personen oder Organisationen über solche
Überarbeitungen oder Änderungen zu benachrichtigen.
Korrekte Entsorgung dieses Produkts
Diese Markierung weist darauf hin, dass dieses Produkt innerhalb der EU
nicht zusammen mit anderen Haushaltsabfällen entsorgt werden darf.
UmGesundheits- oder Umweltschäden durch unkontrollierte Abfallentsorgung
zu vermeiden, sorgen Sie für ein verantwortungsvolles Recycling.
Sieermöglichen damit gleichzeitig eine nachhaltige Wiederverwendung von
Ressourcen. Wenn Sie Ihr gebrauchtes Gerät zurückgeben wollen, nutzen Sie
das Rückgabe- und Sammelsystem, oder wenden Sie sich an den Händler,
bei dem Sie das Gerät gekauft hatten. Diese Stellen können das Produkt
einem umweltgerechten Recycling zuführen.
Page 49

1
EN
NL
ES
IT
DA/NO
FR
ES
DE
One Maxi
Merci d'avoir choisi One Maxi. Ce manuel a pour
but de vous aider à mettre en service votre appareil
en un rien de temps et de vous expliquer comment
tirer le meilleur parti de toutes ses fonctionnalités.
Pour de plus amples renseignements, veuillez visiter
les pages de support sur notre site Web, à l'adresse
support.pure.com.
Page 50

2
1. AVERTISSEMENT: le bloc d'alimentation fourni (avec le numéro de modèle ZDD055200
ou ZDD055200BS) ne doit en aucun cas être utilisé avec un autre appareil car cela
pourrait causer des dommages.
2. Utilisez uniquement les sources d'alimentation répertoriées dans le manuel
d'utilisation/guide de l'utilisateur (fourni par Pure avec le numéro de modèle
ZDD055200 ou ZDD055200BS).
3. Branchez l'adaptateur secteur sur une prise facilement accessible, située à proximité de
la radio, et utilisez UNIQUEMENT l'adaptateur secteur fourni
4. AVERTISSEMENT: afin de réduire le risque d'incendie ou de choc électrique, n'exposez
pas l'appareil à la pluie ni à l'humidité. N'exposez pas cet appareil à des éclaboussures
ni à des gouttes d'eau; ne placez aucun objet contenant du liquide (tel qu'un vase) sur
l'appareil.
5. ATTENTION: danger d’explosion si la pile n’est pas remise en place correctement.
Remplacez-la uniquement avec le même type de pile ou un type équivalent.
6. AVERTISSEMENT: les piles (pile, piles ou bloc-piles) ne doivent pas être exposées à une
source de chaleur excessive (telle que les rayons du soleil, le feu, etc.).
7. AVERTISSEMENT: l'adaptateur directement enfichable est utilisé comme dispositif de
débranchement, lequel doit être prêt à fonctionner à tout moment.
8. Conservez votre radio à l’écart des sources de chaleur, telles que des radiateurs,
desappareils de chauffage ou tout autre appareil produisant de la chaleur.
9. N'exposez pas votre appareil à la lumière directe du soleil.
10. N'utilisez pas l'appareil à proximité d'un point d'eau.
11. Évitez que des objets ou des liquides ne pénètrent dans la radio.
12. Ne retirez pas les vis du boîtier de la radio et n'ouvrez pas son boîtier.
13. Éteignez toujours la radio et débranchez-la du secteur avant d'insérer ou de retirer une
batterie ChargePAK.
14. Ne mettez pas l'appareil sous l'eau, ne l'utilisez pas sous la douche ou dans la salle de
bain lorsqu'il est branché au secteur.
15. L'étiquette est apposée sur la face externe à la base de l'appareil.
Instructions de sécurité
Page 51

3
FR
Table des matières
4 Introduction
4 Commandes
4 Connecteurs
5 Affichage
6 Pour commencer
6 Configuration rapide
8 Utilisez votre One Maxi
8 Écoute de la radio numérique
8 Écoute de la radio FM
9 Mémorisation et rappel des présélections
9 Pour mémoriser rapidement une station sur un bouton de présélection (1-4)
9 Pour mémoriser une station dans la liste des présélections (1-10)
9 Pour rappeler une présélection lorsque vous écoutez une station radio
numérique ou FM
10 Utilisation de l'entrée auxiliaire
11 Alarmes et minuteries
11 Programmation d'une alarme
12 Arrêt d'une alarme qui retentit
12 Interruption d'une alarme qui retentit
12 Désactivation d'une alarme
12 Programmation de la minuterie de mise en veille
12 Programmation de la minuterie de cuisine
13 Options et paramètres
13 Réglages généraux
14 Réglage de la radio numérique
14 Paramètres audio
16 Paramètres d'affichage
17 Paramètres de l'horloge
19 Annexe
19 Installation d'une batterie ChargePAK D1 ou de quatre piles AA
20 Aide et conseils
21 Caractéristiques techniques
Page 52

4
Commandes
Introduction
Boutons Select
appuyez pour modifier les
stations de radio (voir page
8) ou pour naviguer et
sélectionner des options
de menu.
Bouton Menu
Permet de modifier les
divers paramètres de One
Maxi (voir page 13).
Bouton Source
Appuyez sur
cette touche pour
sélectionner une
source d'écoute: radio
numérique, radio FM
ou entrée auxiliaire
Témoin d'alimentation
Appuyez sur le bouton
pour allumer/éteindre
One Maxi.
Boutons de présélections 1 à 5+
Permet de mémoriser jusqu'à
10stations numériques et
10stations FM (pour en savoir plus,
voir page 9).
Connecteurs
Connecteur de puissance
micro-USB 5,5V
Connexion à l'adaptateur
secteur fourni uniquement.
Entrée auxiliaire (3,5mm)
Entrée stéréo analogique
pour votre téléphone
portable, tablette, etc.
Prise casque stéréo
format mini-jack
Bouton Volume
Tournez le bouton pour
régler le volume. Appuyez
sur le bouton pour activer ou
désactiver le mode silence.
Page 53

5
FR
Écran
1. Affiche l'heure actuelle.
2. Témoin de charge des piles ou de la batterie ChargePAK.
3. Indicateur de la source
(DR = radio numérique, FM = radio FM, AUX = entrée auxiliaire).
4. Nom de station.
5. Puissance du signal.
6. Indicateur du volume.
7. Affiche la date, du texte défilant, les réglages et des informations sur les
stations (reportez-vous à la page 16).
8. Indicateur matin/après-midi (AM/PM).
9. Indicateur d'alarme active (reportez-vous à la page 11).
10. Indicateur de la minuterie de veille prolongée et de la minuterie
(reportez-vous à la page 12).
11. Indicateur de répétition (voir page 12).
7:00
France Inter
LE JEU
Page 54

6
Configuration rapide
Pour commencer
1
Remarque: si vous disposez d'une batterie rechargeable ChargePAKD1
(vendue séparément) ou de piles rechargeables AA, installez-les avant de
brancher votre One Maxi. Voir page 19pour plus d'informations.
1
• Détachez l'antenne et déployez-la complètement (étapes A et B).
• Insérez la fiche de l'adaptateur secteur fourni dans la prise
correspondante à l'arrière de la radio (C) et allumer One Maxi.
A
B
C
A
Page 55

7
FR
2
3
• Attendez que votre One Maxi ait terminé la
syntonisation automatique Autotune, qui recherche
toutes les stations numériques disponibles.
• Lorsque l'Autotune est terminé, une station de
radio numérique est sélectionnée.
DR FM AUX BTDR FM AUX BTDR FM AUX BTDR FM AUX BTDR FM AUX BTDR FM AUX BTDR FM AUX BTDR FM AUX BTDR FM AUX BTDR FM AUX BTDR FM AUX BTDR FM AUX BTDR FM AUX BTDR FM AUX BTDR FM AUX BTDR FM AUX BTDR FM AUX BTDR FM AUX BTDR FM AUX BTDR FM AUX BTDR FM AUX BTDR FM AUX BTDR FM AUX BTDR FM AUX BTDR FM AUX BTDR FM AUX BTDR FM AUX BTDR FM AUX BTDR FM AUX BTDR FM AUX BTDR FM AUX BTDR FM AUX BTDR FM AUX BTDR FM AUX BTDR FM AUX BTDR FM AUX BTDR FM AUX BTDR FM AUX BTDR FM AUX BTDR FM AUX BTDR FM AUX BTDR FM AUX BTDR FM AUX BTDR
09:59
1
min
Appuyez sur ( ) pour mettre l'appareil en marche
Station Select
Snooze
DR FM AUX BTDR FM AUX BTDR FM AUX BTDR FM AUX BTDR FM AUX BTDR FM AUX BTDR FM AUX BTDR FM AUX BTDR FM AUX BTDR FM AUX BTDR FM AUX BTDR FM AUX BTDR FM AUX BTDR FM AUX BTDR FM AUX BTDR FM AUX BTDR FM AUX BTDR FM AUX BTDR FM AUX BTDR FM AUX BTDR FM AUX BTDR FM AUX BTDR FM AUX BTDR FM AUX BTDR FM AUX BTDR FM AUX BTDR FM AUX BTDR FM AUX BTDR FM AUX BTDR FM AUX BTDR FM AUX BTDR FM AUX BTDR FM AUX BTDR FM AUX BTDR FM AUX BTDR FM AUX BTDR FM AUX BTDR FM AUX BTDR FM AUX BTDR FM AUX BTDR FM AUX BTDR FM AUX BTDR FM AUX BTDR
10:00
France 2
LE JEU
RECH. 14
******
Page 56

8
DR FM AUX BTDR FM AUX BTDR FM AUX BTDR FM AUX BTDR FM AUX BTDR FM AUX BTDR FM AUX BTDR FM AUX BTDR FM AUX BTDR FM AUX BTDR FM AUX BTDR FM AUX BTDR FM AUX BTDR FM AUX BTDR FM AUX BTDR FM AUX BTDR FM AUX BTDR FM AUX BTDR FM AUX BTDR FM AUX BTDR FM AUX BTDR FM AUX BTDR FM AUX BTDR FM AUX BTDR FM AUX BTDR FM AUX BTDR FM AUX BTDR FM AUX BTDR FM AUX BTDR FM AUX BTDR FM AUX BTDR FM AUX BTDR FM AUX BTDR FM AUX BTDR FM AUX BTDR FM AUX BTDR FM AUX BTDR FM AUX BTDR FM AUX BTDR FM AUX BTDR FM AUX BTDR FM AUX BTDR FM AUX BTDR
10:00
France Inter
LE JEU
Utilisation de votre One Maxi
Écoute de la radio numérique
Appuyez sur le bouton Source pour passer sur la
radio numérique.
Changement de stations numériques
1. Appuyez sur les boutons < > pour naviguer parmi
la liste de stations.
2. Une fois que vous avez trouvé la station que vous
souhaitez écouter, appuyez sur le bouton Select
(Sélectionner) .
Écoute de la radio FM
Appuyez sur le bouton Source pour passer à une
radio FM.
Changement de stations FM
Syntonisation manuelle
Appuyez sur les boutons de défilement < > pour
avancer ou reculer de 0,05MHz dans la gamme de
fréquences.
Syntonisation automatique
Appuyez sur les boutons de défilement < > pour
rechercher la station radio FM suivante ou précédente
émettant un signal fort.
PM
DR
DR FM AUX BTDR FM AUX BTDR FM AUX BTDR FM AUX BTDR FM AUX BTDR FM AUX BTDR FM AUX BTDR FM AUX BTDR FM AUX BTDR FM AUX BTDR FM AUX BTDR FM AUX BTDR FM AUX BTDR FM AUX BTDR FM AUX BTDR FM AUX BTDR FM AUX BTDR FM AUX BTDR FM AUX BTDR FM AUX BTDR FM AUX BTDR FM AUX BTDR FM AUX BTDR FM AUX BTDR FM AUX BTDR FM AUX BTDR FM AUX BTDR FM AUX BTDR FM AUX BTDR FM AUX BTDR FM AUX BTDR FM AUX BTDR FM AUX BTDR FM AUX BTDR FM AUX BTDR FM AUX BTDR FM AUX BTDR FM AUX BTDR FM AUX BTDR FM AUX BTDR FM AUX BTDR FM AUX BTDR FM AUX BTDR FM
10:00
PM
DRF
M
DR FM AUX BTDR FM AUX BTDR FM AUX BTDR FM AUX BTDR FM AUX BTDR FM AUX BTDR FM AUX BTDR FM AUX BTDR FM AUX BTDR FM AUX BTDR FM AUX BTDR FM AUX BTDR FM AUX BTDR FM AUX BTDR FM AUX BTDR FM AUX BTDR FM AUX BTDR FM AUX BTDR FM AUX BTDR FM AUX BTDR FM AUX BTDR FM AUX BTDR FM AUX BTDR FM AUX BTDR FM AUX BTDR FM AUX BTDR FM AUX BTDR FM AUX BTDR FM AUX BTDR FM AUX BTDR FM AUX BTDR FM AUX BTDR FM AUX BTDR FM AUX BTDR FM AUX BTDR FM AUX BTDR FM AUX BTDR FM AUX BTDR FM AUX BTDR FM AUX BTDR FM AUX BTDR FM AUX BTDR FM AUX BTDR
10:00
STATIONS
France Culture
DR FM AUX BTDR FM AUX BTDR FM AUX BTDR FM AUX BTDR FM AUX BTDR FM AUX BTDR FM AUX BTDR FM AUX BTDR FM AUX BTDR FM AUX BTDR FM AUX BTDR FM AUX BTDR FM AUX BTDR FM AUX BTDR FM AUX BTDR FM AUX BTDR FM AUX BTDR FM AUX BTDR FM AUX BTDR FM AUX BTDR FM AUX BTDR FM AUX BTDR FM AUX BTDR FM AUX BTDR FM AUX BTDR FM AUX BTDR FM AUX BTDR FM AUX BTDR FM AUX BTDR FM AUX BTDR FM AUX BTDR FM AUX BTDR FM AUX BTDR FM AUX BTDR FM AUX BTDR FM AUX BTDR FM AUX BTDR FM AUX BTDR FM AUX BTDR FM AUX BTDR FM AUX BTDR FM AUX BTDR FM AUX BTDR
10:00
France Culture
RÉGLAGE
106\20
DR FM AUX BTDR FM AUX BTDR FM AUX BTDR FM AUX BTDR FM AUX BTDR FM AUX BTDR FM AUX BTDR FM AUX BTDR FM AUX BTDR FM AUX BTDR FM AUX BTDR FM AUX BTDR FM AUX BTDR FM AUX BTDR FM AUX BTDR FM AUX BTDR FM AUX BTDR FM AUX BTDR FM AUX BTDR FM AUX BTDR FM AUX BTDR FM AUX BTDR FM AUX BTDR FM AUX BTDR FM AUX BTDR FM AUX BTDR FM AUX BTDR FM AUX BTDR FM AUX BTDR FM AUX BTDR FM AUX BTDR FM AUX BTDR FM AUX BTDR FM AUX BTDR FM AUX BTDR FM AUX BTDR FM AUX BTDR FM AUX BTDR FM AUX BTDR FM AUX BTDR FM AUX BTDR FM AUX BTDR FM AUX BTDR FM
10:00
107\60
RECH.
DR FM AUX BTDR FM AUX BTDR FM AUX BTDR FM AUX BTDR FM AUX BTDR FM AUX BTDR FM AUX BTDR FM AUX BTDR FM AUX BTDR FM AUX BTDR FM AUX BTDR FM AUX BTDR FM AUX BTDR FM AUX BTDR FM AUX BTDR FM AUX BTDR FM AUX BTDR FM AUX BTDR FM AUX BTDR FM AUX BTDR FM AUX BTDR FM AUX BTDR FM AUX BTDR FM AUX BTDR FM AUX BTDR FM AUX BTDR FM AUX BTDR FM AUX BTDR FM AUX BTDR FM AUX BTDR FM AUX BTDR FM AUX BTDR FM AUX BTDR FM AUX BTDR FM AUX BTDR FM AUX BTDR FM AUX BTDR FM AUX BTDR FM AUX BTDR FM AUX BTDR FM AUX BTDR FM AUX BTDR FM AUX BTDR FM
10:00
107\60
DR FM AUX BTDR FM AUX BTDR FM AUX BTDR FM AUX BTDR FM AUX BTDR FM AUX BTDR FM AUX BTDR FM AUX BTDR FM AUX BTDR FM AUX BTDR FM AUX BTDR FM AUX BTDR FM AUX BTDR FM AUX BTDR FM AUX BTDR FM AUX BTDR FM AUX BTDR FM AUX BTDR FM AUX BTDR FM AUX BTDR FM AUX BTDR FM AUX BTDR FM AUX BTDR FM AUX BTDR FM AUX BTDR FM AUX BTDR FM AUX BTDR FM AUX BTDR FM AUX BTDR FM AUX BTDR FM AUX BTDR FM AUX BTDR FM AUX BTDR FM AUX BTDR FM AUX BTDR FM AUX BTDR FM AUX BTDR FM AUX BTDR FM AUX BTDR FM AUX BTDR FM AUX BTDR FM AUX BTDR FM AUX BTDR FM
10:00
106\20
Page 57

9
FR
Mémorisation et rappel des
présélections
Pour mémoriser rapidement
une station sur un bouton
deprésélection (1-4)
Recherchez la station numérique ou FM que vous souhaitez
mémoriser. Maintenez enfoncé pendant deux secondes un
des boutons de présélection numérotés (1–4) pour enregistrer
la station en cours d'écoute dans les présélections. Vous
pouvez remplacer les présélections existantes à tout moment.
Pour mémoriser une station dans
laliste des présélections (1-10)
1. Recherchez la station radio numérique ou FM que vous
souhaitez mémoriser.
2.
Appuyez sur le bouton 5+ pour afficher les présélections
mémorisées dans leur ordre numérique, puis sur < >
pour sélectionner un numéro de présélection, compris
entre1et10.
Vous pouvez remplacer les présélections existantes.
3. Maintenez le bouton Select (Sélectionner) enfoncé jusqu'à
ce que le message PRÉSÉL. ENREG. s'affiche.
Pour rappeler une présélection
lorsque vous écoutez une station
radio numérique ou FM
Pour choisir une présélection de1 à 4, appuyez sur le bouton
correspondant sur votre One Maxi (boutons de1 à 4).
Pour accéder à la liste de présélections complète (de1 à 10):
1. Appuyez sur le bouton 5+ et relâchez-le aussitôt.
2. Appuyez sur < > pour naviguer dans les numéros des
présélections, puis sur le bouton Select (Sélectionner) pour
syntoniser sur la présélection choisie.
Vous pouvez mémoriser jusqu'à 10stations radio numériques et 10stations
radioFM pour y accéder rapidement.
DR FM AUX BTDR FM AUX BTDR FM AUX BTDR FM AUX BTDR FM AUX BTDR FM AUX BTDR FM AUX BTDR FM AUX BTDR FM AUX BTDR FM AUX BTDR FM AUX BTDR FM AUX BTDR FM AUX BTDR FM AUX BTDR FM AUX BTDR FM AUX BTDR FM AUX BTDR FM AUX BTDR FM AUX BTDR FM AUX BTDR FM AUX BTDR FM AUX BTDR FM AUX BTDR FM AUX BTDR FM AUX BTDR FM AUX BTDR FM AUX BTDR FM AUX BTDR FM AUX BTDR FM AUX BTDR FM AUX BTDR FM AUX BTDR FM AUX BTDR FM AUX BTDR FM AUX BTDR FM AUX BTDR FM AUX BTDR FM AUX BTDR FM AUX BTDR FM AUX BTDR FM AUX BTDR FM AUX BTDR FM AUX BTDR
10:00
France 2
LE JEU
DR FM AUX BTDR FM AUX BTDR FM AUX BTDR FM AUX BTDR FM AUX BTDR FM AUX BTDR FM AUX BTDR FM AUX BTDR FM AUX BTDR FM AUX BTDR FM AUX BTDR FM AUX BTDR FM AUX BTDR FM AUX BTDR FM AUX BTDR FM AUX BTDR FM AUX BTDR FM AUX BTDR FM AUX BTDR FM AUX BTDR FM AUX BTDR FM AUX BTDR FM AUX BTDR FM AUX BTDR FM AUX BTDR FM AUX BTDR FM AUX BTDR FM AUX BTDR FM AUX BTDR FM AUX BTDR FM AUX BTDR FM AUX BTDR FM AUX BTDR FM AUX BTDR FM AUX BTDR FM AUX BTDR FM AUX BTDR FM AUX BTDR FM AUX BTDR FM AUX BTDR FM AUX BTDR FM AUX BTDR FM AUX BTDR
10:00
PRÉSÉL. 2
MÉM.SÉ
DR FM AUX BTDR FM AUX BTDR FM AUX BTDR FM AUX BTDR FM AUX BTDR FM AUX BTDR FM AUX BTDR FM AUX BTDR FM AUX BTDR FM AUX BTDR FM AUX BTDR FM AUX BTDR FM AUX BTDR FM AUX BTDR FM AUX BTDR FM AUX BTDR FM AUX BTDR FM AUX BTDR FM AUX BTDR FM AUX BTDR FM AUX BTDR FM AUX BTDR FM AUX BTDR FM AUX BTDR FM AUX BTDR FM AUX BTDR FM AUX BTDR FM AUX BTDR FM AUX BTDR FM AUX BTDR FM AUX BTDR FM AUX BTDR FM AUX BTDR FM AUX BTDR FM AUX BTDR FM AUX BTDR FM AUX BTDR FM AUX BTDR FM AUX BTDR FM AUX BTDR FM AUX BTDR FM AUX BTDR FM AUX BTDR
10:00
CLASSIQUE
MOZART
DR FM AUX BTDR FM AUX BTDR FM AUX BTDR FM AUX BTDR FM AUX BTDR FM AUX BTDR FM AUX BTDR FM AUX BTDR FM AUX BTDR FM AUX BTDR FM AUX BTDR FM AUX BTDR FM AUX BTDR FM AUX BTDR FM AUX BTDR FM AUX BTDR FM AUX BTDR FM AUX BTDR FM AUX BTDR FM AUX BTDR FM AUX BTDR FM AUX BTDR FM AUX BTDR FM AUX BTDR FM AUX BTDR FM AUX BTDR FM AUX BTDR FM AUX BTDR FM AUX BTDR FM AUX BTDR FM AUX BTDR FM AUX BTDR FM AUX BTDR FM AUX BTDR FM AUX BTDR FM AUX BTDR FM AUX BTDR FM AUX BTDR FM AUX BTDR FM AUX BTDR FM AUX BTDR FM AUX BTDR FM AUX BTDR
10:00
PRÉSÉL. 6
VIDE
DR FM AUX BTDR FM AUX BTDR FM AUX BTDR FM AUX BTDR FM AUX BTDR FM AUX BTDR FM AUX BTDR FM AUX BTDR FM AUX BTDR FM AUX BTDR FM AUX BTDR FM AUX BTDR FM AUX BTDR FM AUX BTDR FM AUX BTDR FM AUX BTDR FM AUX BTDR FM AUX BTDR FM AUX BTDR FM AUX BTDR FM AUX BTDR FM AUX BTDR FM AUX BTDR FM AUX BTDR FM AUX BTDR FM AUX BTDR FM AUX BTDR FM AUX BTDR FM AUX BTDR FM AUX BTDR FM AUX BTDR FM AUX BTDR FM AUX BTDR FM AUX BTDR FM AUX BTDR FM AUX BTDR FM AUX BTDR FM AUX BTDR FM AUX BTDR FM AUX BTDR FM AUX BTDR FM AUX BTDR FM AUX BTDR
10:00
PRÉSÉL. 6
MÉM.SÉ
DR FM AUX BTDR FM AUX BTDR FM AUX BTDR FM AUX BTDR FM AUX BTDR FM AUX BTDR FM AUX BTDR FM AUX BTDR FM AUX BTDR FM AUX BTDR FM AUX BTDR FM AUX BTDR FM AUX BTDR FM AUX BTDR FM AUX BTDR FM AUX BTDR FM AUX BTDR FM AUX BTDR FM AUX BTDR FM AUX BTDR FM AUX BTDR FM AUX BTDR FM AUX BTDR FM AUX BTDR FM AUX BTDR FM AUX BTDR FM AUX BTDR FM AUX BTDR FM AUX BTDR FM AUX BTDR FM AUX BTDR FM AUX BTDR FM AUX BTDR FM AUX BTDR FM AUX BTDR FM AUX BTDR FM AUX BTDR FM AUX BTDR FM AUX BTDR FM AUX BTDR FM AUX BTDR FM AUX BTDR FM AUX BTDR
10:00
CLASSIQUE
MOZART
DR FM AUX BTDR FM AUX BTDR FM AUX BTDR FM AUX BTDR FM AUX BTDR FM AUX BTDR FM AUX BTDR FM AUX BTDR FM AUX BTDR FM AUX BTDR FM AUX BTDR FM AUX BTDR FM AUX BTDR FM AUX BTDR FM AUX BTDR FM AUX BTDR FM AUX BTDR FM AUX BTDR FM AUX BTDR FM AUX BTDR FM AUX BTDR FM AUX BTDR FM AUX BTDR FM AUX BTDR FM AUX BTDR FM AUX BTDR FM AUX BTDR FM AUX BTDR FM AUX BTDR FM AUX BTDR FM AUX BTDR FM AUX BTDR FM AUX BTDR FM AUX BTDR FM AUX BTDR FM AUX BTDR FM AUX BTDR FM AUX BTDR FM AUX BTDR FM AUX BTDR FM AUX BTDR FM AUX BTDR FM AUX BTDR
10:00
RAPPEL
6 CLASS
Page 58

10
Utilisation de l'entrée auxiliaire
Vous pouvez utiliser l'entrée auxiliaire de One Maxi pour diffuser la musique de
votre choix à partir de votre téléphone ou tablette.
Remarque:
Lorsque vous utilisez l'entrée auxiliaire de One Maxi pour écouter
de la musique, vous devrez régler le volume sur votre téléphone ou votre tablette
pour modifier le volume de votre One Maxi.
Connexion d'un appareil auxiliaire à One Maxi
Reliez la sortie ligne ou la prise casque de votre lecteur auxiliaire à l'entrée
auxiliaire de votre One Maxi, en utilisant le câble approprié.
Sélection de l'entrée auxiliaire
1.
Appuyez sur le bouton Source
pour sélectionner
l'entrée auxiliaire (AUX) comme source.
2.
Sur votre périphérique auxil
iaire, sélectionnez le
contenu que v
ous souhaitez écouter sur votre
One Maxi.
Le contenu sélectionné sur votre appareil auxiliaire
est alors diffusé sur votre One Maxi.
DR FM AUX BTDR FM AUX BTDR FM AUX BTDR FM AUX BTDR FM AUX BTDR FM AUX BTDR FM AUX BTDR FM AUX BTDR FM AUX BTDR FM AUX BTDR FM AUX BTDR FM AUX BTDR FM AUX BTDR FM AUX BTDR FM AUX BTDR FM AUX BTDR FM AUX BTDR FM AUX BTDR FM AUX BTDR FM AUX BTDR FM AUX BTDR FM AUX BTDR FM AUX BTDR FM AUX BTDR FM AUX BTDR FM AUX BTDR FM AUX BTDR FM AUX BTDR FM AUX BTDR FM AUX BTDR FM AUX BTDR FM AUX BTDR FM AUX BTDR FM AUX BTDR FM AUX BTDR FM AUX BTDR FM AUX BTDR FM AUX BTDR FM AUX BTDR FM AUX BTDR FM AUX BTDR FM AUX BTDR FM AUX BTDR FM AUX
10:00
AUX
2-4-2015
Aux In
Page 59

11
FR
Alarmes et minuteries
Programmation d'une alarme
One Maxi dispose de deux alarmes pouvant allumer la
radio et syntoniser sur une station radio numérique ou
FM, ou faire retentir une alarme.
1. Appuyez sur le bouton Menu, puis utilisez les boutons
de défilement < > pour choisir «ALARME».
2. Utilisez les boutons de défilement < > pour choisir
«ALARME1» ou «ALARME2» puis appuyez sur le
bouton Select.
3. Utilisez les boutons de défilement < > pour choisir
«MARCHE» puis appuyez sur le bouton Select.
4. Utilisez les boutons de défilement < > pour régler
l'heure de l'alarme, puis appuyez sur le bouton Select.
Répétez cette opération pour régler les minutes de
l'alarme.
5. Utilisez les boutons de défilement < > pour régler la
durée de l'alarme, puis appuyez sur le bouton Select.
6.
Utilisez les boutons de défilement < > pour spécifier
«FM», «NUMÉRIQUE» ou «SONNERIE», puis
appuyez sur le bouton Select pour confirmer.
Sivous spécifiez une tonalité d'alarme basée sur une
sonnerie, passez directement à l'étape8.
7. Utilisez les boutons de défilement < > pour spécifier la
station qui doit être lue lorsque l'alarme s'éteint. Vous
avez le choix entre sélectionner l'une de vos radios
présélectionnées ou opter pour «DERNIÈRE UTILIS.»
(la dernière station que vous avez écoutée). Appuyez
sur la touche Select pour valider.
8. Utilisez les boutons de défilement < > pour sélectionner
l'une des options de répétition d'alarme:
«QUOTIDIENNE», «JOURS DE SEMAINE»,
«WEEK-END» ou «UNE FOIS», puis appuyez sur
Select pour confirmer.
9. Utilisez les boutons de défilement < > pour régler le
volume de la radio lorsque l'alarme se déclenche, puis
appuyez sur Select pour confirmer.
10
. L'icône d'alarme reste allumée en permanence pour
indiquer que l'alarme est réglée.
Remarque: Si votre One Maxi fonctionne avec des piles ou une batterie
ChargePAK, la fonction d'alarme de One Maxi ne fonctionnera pas si vous
l'éteignez après avoir réglé une alarme.
7:00
ALARME 1
MARCHE
7:00
À L'HR.
11=25PM
7:00
DURÉE
45 MIN
7:00
SOURCE
NUMÉRIQUE
7:00
STATION
DERNIÈRE
7:00
RÉPÉTER
QUOTID.
7:00
VOLUME
2
7:00
DR FM AUX BTDR FM AUX BTDR FM AUX BTDR FM AUX BTDR FM AUX BTDR FM AUX BTDR FM AUX BTDR FM AUX BTDR FM AUX BTDR FM AUX BTDR FM AUX BTDR FM AUX BTDR FM AUX BTDR FM AUX BTDR FM AUX BTDR FM AUX BTDR FM AUX BTDR FM AUX BTDR FM AUX BTDR FM AUX BTDR FM AUX BTDR FM AUX BTDR FM AUX BTDR FM AUX BTDR FM AUX BTDR FM AUX BTDR FM AUX BTDR FM AUX BTDR FM AUX BTDR FM AUX BTDR FM AUX BTDR FM AUX BTDR FM AUX BTDR FM AUX BTDR FM AUX BTDR FM AUX BTDR FM AUX BTDR FM AUX BTDR FM AUX BTDR FM AUX BTDR FM AUX BTDR FM AUX BTDR FM AUX BT
DR
ENREG.
ALARME 1
7:00
MENU
ALARME
7:00
ALARME
ALARME 1
Page 60

12
Arrêt d'une alarme qui retentit
Pour annuler une alarme qui retentit, appuyez sur les boutons Source, <Select> ou Menu.
Arrêt momentané d'une alarme qui retentit
Pour arrêter momentanément une alarme qui retentit, appuyez sur l'un des boutons Preset.
Pardéfaut, le temps de répétition d'alarme de One Maxi est réglée sur huit minutes. Pour modifier
la durée d'interruption de l'alarme, voir page 18.
Désactivation d'une alarme
Pour désactiver une alarme une fois qu'elle a été réglée:
1. Appuyez sur le bouton Menu, utilisez les boutons de défilement < > pour choisir «ALARME»,
puis appuyez sur le bouton Select.
2. Utilisez les boutons de défilement < > pour choisir l'alarme que vous souhaitez désactiver
(«ALARME1» ou «ALARME2»), puis appuyez sur le bouton Select.
3. Utilisez les boutons de défilement < > pour choisir «ARRÊT», puis appuyez sur le bouton
Select.
4
.
L'icône d'alarme s'éteint sur l'affichage de One Maxi pour indiquer que l'alarme a été
désactivée.
Programmation de la minuterie de veille
La minuterie de veille peut être activée pour éteindre votre One Maxi après un délai déterminé.
Remarque: si votre One Maxi fonctionne sur piles ou sur une batterie ChargePAK, la fonction de
veille de One Maxi est désactivée.
1. Appuyez sur le bouton Menu.
2. Utilisez les boutons de défilement < > pour choisir «VEILLE», puis appuyez sur le bouton
Select.
3. Utilisez les boutons de défilement < >, puis appuyez sur Select pour régler la minuterie
jusqu'à 90minutes, ou sélectionnez «ARRÊT» pour annuler.
Programmation de la minuterie de cuisine
One Maxi offre une fonction de minuterie dont le compte à rebours déclenche une alarme après
une durée définie.
1. Appuyez sur le bouton Menu.
2. Utilisez les boutons de défilement < > pour choisir «MINUTERIE», puis appuyez sur le bouton
Select.
3. Utilisez les boutons de défilement < > pour modifier les heures, puis appuyez sur le bouton
Select.
4. Utilisez à nouveau les boutons de défilement < > pour modifier les minutes, puis appuyez pour
confirmer et déclencher le compte à rebours de la minuterie.
L'alarme se déclenche à l'expiration de la durée que vous avez programmée, que la radio
soit allumée ou en veille. Annulez la sonnerie de l'alarme en appuyant sur l'un des boutons
suivants: Source, <Select> ou Menu.
Page 61

13
FR
Options et paramètres
Réglages généraux
Modification de la langue affichée
Pour changer la langue d'affichage de votre One Maxi (English, Français, Deutsch,
Italiano et Español):
1. Appuyez sur le bouton Menu.
2. Utilisez les boutons de défilement < > pour choisir «PARAMÈTRES», puis
appuyez sur le bouton Select.
3. Utilisez les boutons de défilement < > pour choisir «LANGUE», puis appuyez
sur le bouton Select.
4. Utilisez les boutons de défilement < > puis appuyez sur le bouton Select pour
choisir la langue d'affichage souhaitée sur votre One Maxi.
Réinitialisation de One Maxi aux réglages d'usine
Réinitialiser la radio de votre One Maxi vous permet d'en effacer toutes les
présélections et la liste des stations mémorisées, ainsi que de rétablir toutes les
options à leur choix par défaut. Pour restaurer les réglages d'usine:
1. Appuyez sur le bouton Menu.
2. Utilisez les boutons de défilement < > pour choisir «PARAMÈTRES», puis
appuyez sur le bouton Select.
3. Utilisez les boutons de défilement < > pour choisir «RESET», puis appuyez
sur le bouton Select.
4. Utilisez les boutons de défilement < > pour choisir «OUI», puis appuyez sur le
bouton Select.
Affichage de la version logicielle de One Maxi
Pour afficher la version logicielle actuellement utilisée sur One Maxi:
1. Appuyez sur le bouton Menu.
2. Utilisez les boutons de défilement < > pour choisir «PARAMÈTRES», puis
appuyez sur le bouton Select.
3. Utilisez les boutons de défilement < > pour choisir «VERSION», puis appuyez
sur le bouton Select.
Mise à jour de One Maxi vers la dernière version logicielle
Contactez le support technique de Pure (http://support.pure.com) pour obtenir
davantage d'informations sur la mise à jour du firmware de votre One Maxi selon
la dernière version disponible.
Page 62

14
Réglage de la radio numérique
Syntonisation automatique
Vous pouvez utiliser la fonction de syntonisation automatique pour rechercher
automatiquement de nouvelles stations de radio numérique et supprimer celles
qui sont inactives.
Remarque: cette fonction est uniquement disponible si vous avez sélectionné
«Radio numérique» comme source radio.
Pour effectuer une syntonisation automatique:
1. Appuyez sur le bouton Menu.
2. Utilisez les boutons de défilement < > pour choisir «SYNCHRO AUTO»,
puis appuyez sur le bouton Select. Le nombre de stations trouvées s'affiche
pendant la syntonisation automatique.
Lorsque la syntonisation automatique est terminée, votre One Maxi se syntonise
sur la dernière station que vous écoutiez.
Réglages audio
Permet de régler les graves et les aigus
One Maxi inclut deux profils de graves et d'aigus qui permettent de régler
automatiquement le niveau de graves et d'aigus selon que vous écoutez votre
One Maxi à travers son enceinte incorporée ou un casque.
Remarque: Afin de pouvoir régler le niveau de graves et d'aigus en écoutant
depuis un casque, il est nécessaire d'en brancher au préalable un à One Maxi.
Pour régler les graves et les aigus entendus à travers l'enceinte incorporée à One
Maxi, il est nécessaire de débrancher le casque avant de procéder au réglage.
Pour régler les paramètres audio des graves et des aigus:
1. Appuyez sur le bouton Menu.
2. Utilisez les boutons de défilement < > pour choisir «AUDIO», puis appuyez
sur le bouton Select.
3. Utilisez les boutons de défilement < > pour choisir «GRAVES» ou «AIGUS»,
puis appuyez sur le bouton Select.
4. Utilisez les boutons de défilement < > pour ajuster le niveau des graves ou
des aigus. Vous pouvez choisir un niveau entre «-5» et «+5».
5. Appuyez sur le bouton Select pour confirmer le niveau des basses ou des
aigus.
Page 63

15
FR
Passage au mode amplification audio
Si vous écoutez un débat à la radio, se déroulant dans un environnement
bruyant, vous pouvez passer en mode amplification audio afin d'améliorer le son
de l'émission. Si vous écoutez surtout des stations de radio pour la musique,
nous vous conseillons de désactiver cette fonction.
1. Appuyez sur le bouton Menu.
2. Utilisez les boutons de défilement < > pour choisir «AUDIO», puis appuyez
sur le bouton Select.
3. Utilisez les boutons de défilement < > pour choisir «AMPLIFICATION», puis
appuyez sur le bouton Select.
4. Utilisez les boutons de défilement < > et appuyez sur le bouton Select pour
passer le mode Amplificationaudio sur «MARCHER» ou «ARRÊT».
Réglage du niveau de l'entrée auxiliaire
Si vous souhaitez brancher votre téléphone ou votre tablette à la prise de sortie
auxiliaire de One Maxi, vous pouvez modifier le niveau de l'entrée auxiliaire pour
qu'il s'adapte à celui de votre dispositif externe. Reportez-vous au manuel de
votre téléphone ou de votre tablette pour obtenir des informations spécifiques.
Pour changer le niveau de l'entrée auxiliaire de votre One Maxi:
1. Appuyez sur le bouton Menu.
2. Utilisez les boutons de défilement < > pour choisir «AUDIO», puis appuyez
sur le bouton Select.
3. Utilisez les boutons de défilement < > pour choisir «NIVEAU AUX», puis
appuyez sur le bouton Select.
4. Utilisez les boutons de défilement < >, puis appuyez sur le bouton Select
pour choisir entre «BAS», «MOYEN» ou «HAUT».
Passage en mode effet stéréo
Si vous avez branché une enceinte externe à la prise du casque de One Maxi,
vous pouvez passer en mode effet stéréo afin d'optimiser la lecture en stéréo
des émissions offrant cette modalité.Pour activer ou désactiver la fonction effet
stéréo sur One Maxi:
1. Appuyez sur le bouton Menu.
2. Utilisez les boutons de défilement < > pour choisir «AUDIO», puis appuyez
sur le bouton Select.
3. Utilisez les boutons de défilement < > pour choisir «EFFET STÉRÉO», puis
appuyez sur le bouton Select.
4. Utilisez les boutons de défilement < > et appuyez sur le bouton Select pour
passer le mode effet stéréo sur MARCHE ou ARRÊT.
Page 64

16
Paramètres d'affichage
Paramétrage de la luminosité de l'affichage
Vous pouvez régler la luminosité de l'affichage lorsque One Maxi est en utilisation et en
veille. Pour modifier la luminosité de l'affichage de One Maxi:
1. Appuyez sur le bouton Menu.
2. Utilisez les boutons de défilement < > pour choisir «AFFICHAGE», puis appuyez
sur le bouton Select.
3. Utilisez les boutons de défilement < > pour choisir «RÉTROÉCLAIRAGE», puis
appuyez sur le bouton Select.
4. Utilisez les boutons de défilement < > pour choisir «ACTIVÉ», puis appuyez sur
le bouton Select pour modifier les paramètres applicables lorsque One Maxi est
en marche, ou utilisez les boutons de défilement < > pour choisir «VEILLE», puis
appuyez sur le bouton Select pour modifier les paramètres qui s'appliquent en
mode veille.
5. Utilisez les boutons de défilement < > pour choisir «NIVEAU», puis appuyez sur le
bouton Select.
6. Utilisez les boutons de défilement < > pour choisir un niveau de luminosité entre
«1» et «5».
7. Appuyez sur le bouton Select pour confirmer le réglage de la luminosité.
Réglage de la durée d'activation du rétroéclairage
Pour régler la durée d'activation du rétroéclairage de One Maxi:
1. Appuyez sur le bouton Menu.
2. Utilisez les boutons de défilement < > pour choisir «AFFICHAGE», puis appuyez
sur le bouton Select.
3. Utilisez les boutons de défilement < > pour choisir «RÉTROÉCLAIRAGE», puis
appuyez sur le bouton Select.
4. Utilisez les boutons de défilement < > pour choisir «ACTIVÉ», puis appuyez sur
le bouton Select pour modifier les paramètres applicables lorsque One Maxi est
en marche, ou utilisez les boutons de défilement < > pour choisir «VEILLE», puis
appuyez sur le bouton Select pour modifier les paramètres qui s'appliquent en
mode veille.
5. Utilisez les boutons de défilement < > pour choisir «DURÉE» puis appuyez sur le
bouton Select.
6. Utilisez les boutons de défilement < >, puis appuyez sur le bouton Select pour choisir
l'une des options suivantes:
MARCHE: sélectionnez cette option si vous souhaitez que le rétroéclairage soit
toujours activé.
MINUTÉ: sélectionnez cette option si vous souhaitez que le rétroéclairage se
désactive après 10secondes
Page 65

17
FR
Modification des informations affichées sur One Maxi
Si vous écoutez une station de radio numérique ou FM, vous pouvez modifier les
informations affichées sur l'écrande One Maxi:
1. Appuyez sur le bouton Menu.
2. Utilisez les boutons de défilement < > pour choisir «AFFICHAGE», puis appuyez
sur le bouton Select.
3. Utilisez les boutons de défilement < > pour choisir «INFO», puis appuyez sur le
bouton Select.
4. Utilisez les boutons de défilement < >, puis appuyez sur le bouton Select pour
choisir l'une des options suivantes:
TEXTE: sélectionnez cette option si vous souhaitez afficher les informations sur
la station que vous écoutez. Les informations affichées peuvent inclure des titres
de chanson, des détails de programme, des nouvelles, etc.
PUISSANCE: sélectionnez cette option si vous souhaitez afficher la puissance
du signal de la station de radio que vous écoutez. Le nombre d'astérisques
indique le niveau de fiabilité de la réception.
DATE: sélectionnez cette option si vous souhaitez afficher la date actuelle.
Paramètres de l'horloge
Réglage de la date et de l'heure
L'heure et la date de One Maxi sont automatiquement définies par signal radio
FM ou numérique. Si la date et l'heure de votre One Maxi ne se mettent pas à jour
automatiquement, vous pouvez les régler manuellement.
1. Appuyez sur le bouton Menu.
2. Utilisez les boutons de défilement < > pour choisir «HORLOGE», puis appuyez sur
le bouton Select.
3. Utilisez les boutons de défilement < > pour choisir «HEURE/DATE», puis appuyez
sur le bouton Select.
4. Utilisez les boutons de défilement < > pour régler l'heure, puis appuyez sur le bouton
Select. Répétez l'opération pour régler les minutes.
5. Utilisez les boutons de défilement < > pour régler le jour, puis appuyez sur le bouton
Select. Répétez cette opération pour régler le mois et l'année.
Sélection du format de l'heure
1. Appuyez sur le bouton Menu.
2. Utilisez les boutons de défilement < > pour choisir «HORLOGE», puis appuyez sur
le bouton Select.
3. Utilisez les boutons de défilement < > pour choisir «12/24H», puis appuyez sur le
bouton
Select
.
4. Utilisez les boutons de défilement < > pour choisir entre «12HEURES» et
«24HEURES», puis appuyez sur le bouton
Select
pour confirmer.
Page 66

18
Modification du format de date
1. Appuyez sur le bouton Menu.
2. Utilisez les boutons de défilement < > pour choisir «HORLOGE», puis
appuyez sur le bouton Select.
3. Utilisez les boutons de défilement < > pour choisir «FORMAT», puis appuyez
sur le bouton Select.
4. Utilisez les boutons de défilement < > pour choisir entre l'affichage de la date
dans l'ordre jour, mois et année «JJ-MM-AAAA» ou dans l'ordre mois, jour,
année «MM-JJ-AAAA», puis appuyez sur le bouton
Select
pour confirmer.
Options de synchronisation d'horloge
Vous pouvez sélectionner les sources radio que vous souhaitez utiliser pour
le réglage de l'heure. Par défaut, One Maxi utilise à la fois la FM et la radio
numérique pour synchroniser l'heure.
Pour spécifier les options de synchronisation d'horloge:
1. Appuyez sur le bouton Menu.
2. Utilisez les boutons de défilement < > pour choisir «HORLOGE», puis
appuyez sur le bouton Select.
3. Utilisez les boutons de défilement < > pour choisir «SYNCHRONISATION»,
puis appuyez sur le bouton Select.
4. Utilisez les boutons de défilement < > pour choisir l'option de synchronisation
d'horloge requise, puis appuyez sur
Select
pour confirmer.
Modification de la durée de l'arrêt momentané
Vous pouvez modifier la durée de l'arrêt momentané d'une alarme en appuyant
sur l'un des boutons de présélection de One Maxi lorsque l'alarme retentit. Par
défaut, la durée de l'arrêt momentané d'alarme de One Maxi est réglé sur huit
minutes.
Pour modifier le temps de répétition de One Maxi:
1. Appuyez sur le bouton Menu.
2. Utilisez les boutons de défilement < > pour choisir «HORLOGE», puis
appuyez sur le bouton Select.
3. Utilisez les boutons de défilement < > pour choisir «ARRÊT MOMENTANÉ»,
puis appuyez sur le bouton Select.
4. Utilisez les boutons de défilement < > pour choisir une durée d'arrêt comprise
entre «5» et «59» minutes, puis appuyez sur le bouton
Select
pour
confirmer.
Page 67

19
FR
Annexe
Installation d'une batterie ChargePAK D1 ou desix
piles AA
ChargePAK D1 6x piles AA
Page 68

20
Aide et conseils
Stations annexes et inactives
(</>) Services de radio numérique annexes
Certaines stations proposent des services annexes, fournissant des informations
supplémentaires ou des contenus alternatifs, et pouvant être diffusés à certains
moments seulement. Si une station propose un service annexe, le symbole «>»
apparaît en regard de son nom dans la liste des stations et le service annexe
apparaît à la suite de la station dans la liste. Le symbole «<» précède un service
annexe.
(?) Stations radio numériques inactives ou indisponibles
Les stations inactives ou indisponibles sont précédées d'un «?» dans la liste
et sont impossibles à syntoniser. Une station peut être inactive ou indisponible
parce qu'elle ne diffuse pas de programmes à cet instant (vérifiez les listes de
programmes) ou parce qu'elle a définitivement cessé toute diffusion. De même,
vous pouvez ne pas disposer d'un signal assez fort pour recevoir la station radio.
Conseils et astuces
L'écran affiche «NON DISPONIBLE»
Vous pouvez utiliser la fonction de syntonisation automatique de One Maxi
pour rechercher automatiquement de nouvelles stations de radio numérique
et supprimer celles qui sont inactives (voir page 14).Essayez de changer la
position de la radio ou de l’antenne.
Réception des nouvelles stations radio numériques qui viennent
decommencer à émettre
Essayez d'utiliser la fonction de syntonisation automatique de votre One Maxi
pour rechercher de nouvelles stations de radio numérique (voir page 14).
Essayez de changer la position de la radio ou de l’antenne.
Page 69

21
FR
Caractéristiques techniques
Radio Radio numérique et FM
Fréquences
DAB/DAB+, radio FM87,5 - 108MHz
Haut-parleur 2x 3" à gamme étendue
Puissance de sortie
2x .3W RMS
Connectique d'entrée Prise pour adaptateur secteur 230 V-5,5V
CC. (fournie)
Connectique de sortie Prise casque stéréo format mini-jack
Présélections 10présélections de radio numérique et
10présélections de radio FM
Alimentation électrique Adaptateur secteur externe 230VCA à 5,5
VCC (2,0A) fourni, ou, en option, batterie
ChargePAK D1 rechargeable ou six piles AA
Consommation électrique
Veille avec affichage de l'heure: 0,5W, en
fonctionnement: <1W
Dimensions
275mm × 155mm × 83mm (L × h × P)
Antenne Antenne télescopique
Homologations Certifié CE. Conforme aux directives CEM et
basse tension
Directives (2004/108 CE et 2006/95/CE).
Conformité ETSIEN300401. Marquage
C-Tick N1600 et de sécurité électrique pour
l'Australie.
Page 70

22
Copyright
©2016 Imagination Technologies Limited. Tous droits réservés. Aucune partie de cette
publication ne peut être copiée, distribuée, transmise, transcrite, stockée dans un système
de restauration, ou traduite dans un langage humain ou informatique, en tout ou partie,
sous quelque forme et par quelque procédé que ce soit, électronique, mécanique,
magnétique, manuel ou autre, ni divulguée à des tiers, sans le consentement écrit
préalable d'Imagination Technologies Limited. Version 1 janvier 2016.
Marques déposées
One Maxi série 3, ChargePAK, Pure, le logo Pure, Imagination Technologies et le logo
Imagination Technologies sont des marques ou des marques déposées d'Imagination
Technologies Limited.Tous les autres noms de produits sont des marques déposées de
leurs détenteurs respectifs.
Informations sur la garantie
Imagination Technologies Limited garantit à l’utilisateur final que le présent produit est
exempt de défauts de matière et de main-d’œuvre dans le cadre d’une utilisation normale,
pour une période de trois ans à compter de la date d’achat. La présente garantie couvre
les pannes dues à un défaut de conception ou de fabrication; elle n'est pas applicable
aux dommages accidentels, quelle qu'en soit la cause, à l'usure normale du produit,
ainsi qu'à tous les dommages dus à la négligence et aux interventions, modifications ou
réparations effectuées sans notre autorisation. Connectez-vous à la page account.pure.
com pour enregistrer votre produit. Pour tout problème, veuillez vous adresser à votre
revendeur ou prendre contact avec l'assistance technique de Pure, à l'adresse indiquée
au dos du présent manuel d'utilisation.
Avis de non-responsabilité
Imagination Technologies Limited décline toute responsabilité et n'accorde aucune
garantie quant au contenu du présent document, notamment en ce qui concerne
les garanties implicites de valeur marchande ou d’adéquation à un usage spécifique.
En outre, Imagination Technologies Limited se réserve le droit de réviser la présente
publication et d’y apporter des modifications à tout moment, sans obligation de sa part de
signaler à qui que ce soit de telles révisions ou modifications.
Comment éliminer ce produit
Ce marquage indique que ce produit ne doit pas être éliminé avec les autres
déchets ménagers au sein de l'UE. L'élimination incontrôlée des déchets
pouvant porter préjudice à l'environnement ou à la santé humaine, séparez
ces composants des autres types de déchets et recyclez-les conformément
au principe de réutilisation des ressources matérielles. Pour rapporter votre
appareil usagé, utilisez les systèmes de reprise et de collecte mis à votre
disposition ou contactez le détaillant auprès duquel vous avez acheté le
produit. Celui-ci peut procéder au recyclage du produit en toute sécurité.
Page 71

1
EN
NL
ES
IT
DA/NO
FR
ES
DE
One Maxi
Grazie per aver scelto One Maxi. Il presente manuale
indica come accendere e attivare in breve tempo il
prodotto e descrive l'utilizzo ottimale di tutte le sue
eccezionali caratteristiche. Per ricevere ulteriore
assistenza, visitare le pagine di supporto sul nostro sito
web all'indirizzo support.pure.com.
Page 72

2
1. AVVERTENZA: non utilizzare l'alimentatore fornito (modelli numero ZDD055200 o
ZDD055200BS) per accendere un altro apparecchio, in quanto potrebbe provocare dei
danni.
2. Utilizzare solo gli alimentatori indicati nel manuale di utilizzo / istruzioni di
utilizzo (forniti da Pure con i modelli numero ZDD055200 o ZDD055200BS).
3. Collegare l'adattatore di rete a una presa facilmente accessibile, vicino alla radio,
eutilizzare SOLO l'adattatore di rete fornito.
4. AVVERTENZA: per ridurre il rischio di incendi o scosse elettriche, non esporre
l'apparecchio alla pioggia o all'umidità. L'apparecchio non deve essere esposto a spruzzi
o gocciolamento. Non collocare sull'apparecchio oggetti contenenti liquidi (ad esempio
vasi).
5. ATTENZIONE: rischio di esplosione se la batteria viene sostituita in modo non corretto.
Sostituire solo con una batteria identica o di tipo equivalente.
6. AVVERTENZA: non esporre la batteria (la batteria o le batterie) a temperature
eccessivamente alte, raggi solari diretti o fuoco.
7. AVVERTENZA: l'adattatore di collegamento diretto è utilizzato come dispositivo di
disconnessione; tale dispositivo sarà sempre pronto all'uso.
8. Tenere la radio lontana da fonti di calore, come radiatori, stufe o altri apparecchi che
producono calore.
9. Non esporre l'unità alla luce solare diretta.
10. Evitare il contatto con l’acqua.
11. Evitare che oggetti o liquidi penetrino nella radio.
12. Non rimuovere le viti dalla custodia della radio e non aprirla.
13. Prima di inserire o rimuovere un ChargePAK, è indispensabile spegnere la radio e
scollegarla dalla rete di alimentazione.
14. Se l'unità è collegata alla rete elettrica, non immergerla in acqua e non utilizzarla sotto
ladoccia o in bagno.
15. Il marchio si trova esternamente nella parte inferiore dell'apparecchio.
Istruzioni di sicurezza
Page 73

3
ES
IT
Sommario
4 Introduzione
4 Comandi
4 Connettori
5 Display
6 Per iniziare
6 Impostazione rapida
8 Utilizzo di One Maxi
8 Ascolto della radio digitale
8 Ascolto della radio FM
9 Memorizzazione e richiamo delle preselezioni
9 Per memorizzare in modo rapido una stazione e richiamarla con un
pulsante di preselezione (1-4)
9 Per memorizzare una stazione nell’elenco di preselezione (1-10)
9 Per richiamare una preselezione durante l’ascolto di stazioni radio digitali o FM
10 Utilizzo dell'ingresso ausiliario
11 Sveglie e timer
11 Impostazione di una sveglia
12 Annullamento della sveglia
12 Ripetizione della sveglia
12 Disattivazione di una sveglia
12 Impostazione del timer di autospegnimento
12 Impostazione del timer da cucina
13 Opzioni e impostazioni
13 Impostazioni generali
14 Impostazioni della radio digitale
14 Impostazioni audio
16 Impostazioni del Display
17 Impostazioni dell'orologio
19 Appendice
19 Utilizzo di un ChargePAK D1 o quattro batterie AA
20 Guida e suggerimenti
21 Caratteristiche tecniche
Page 74

4
Comandi
Introduzione
Pulsanti Select
Premere per cambiare le
stazioni radio (vedere a pagina
8) o scorrere e selezionare
le opzioni del menu.
Pulsante Menu
Premere per cambiare le
impostazioni di One Maxi
(vedere a pagina 13).
Pulsante Source
Premere per commutare
tra radio digitale, FM e
ingresso ausiliario
Pulsante di
alimentazione
Premere per accendere/
spegnere One Maxi.
Tasti di preselezione 1 - 5+
Per memorizzare fino a 10 stazioni
radio digitali e 10 stazioni radio FM
preselezionabili (vedere a pagina
9 per ulteriori informazioni).
Connettori
Connettore di alimentazione
Micro-B USB da 5,5 V
Collegamento solo al
trasformatore fornito in dotazione.
Ingresso ausiliario (3,5 mm)
Ingresso stereo analogico per
telefono, tablet, ecc.
Presa cuffie stereo da
3,5 mm
Manopola Volume
Ruotare per regolare il
volume. Premere per attivare
e disattivare l’audio.
Page 75

5
ES
IT
Display
1. Visualizza l'ora attuale.
2. Indicatore ChargePAK o batteria.
3. Indicatore della sorgente
(DR= radio digitale, FM= radio FM, AUX= ingresso ausiliario).
4. Nome della stazione.
5. Intensità del segnale.
6. Indicatore del volume.
7. Data, testo a scorrimento, impostazioni e informazioni sulle stazioni (vedere a
pagina 16).
8. Indicatore AM/PM.
9. Indicatore impostazione sveglia (vedere a pagina 11).
10. Indicatore timer di autospegnimento e da cucina (vedere a pagina 12).
11. Indicatore ripetizione (vedere a pagina 12).
7:00
RDS
TOP 40
Page 76

6
Impostazione rapida
Per iniziare
1
Nota: se si dispone di una batteria ricaricabile ChargePAK D1 (venduta
separatamente) o di batterie ricaricabili AA, installarle prima di collegare One Maxi.
Vedere a pagina 19 per ulteriori informazioni.
1
• Sganciare l’antenna e allungarla completamente (passaggi A e B).
• Inserire il jack del trasformatore fornito in dotazione nella presa della
parte posteriore della radio (C) e attivare l'alimentazione.
A
B
C
A
Page 77

7
ES
IT
2
3
• Attendere che One Maxi completi la
sintonizzazione automatica per tutte le stazioni
radio digitali disponibili.
• Una volta completata la sintonizzazione
automatica, verrà selezionata una stazione radio
digitale.
DR FM AUX BTDR FM AUX BTDR FM AUX BTDR FM AUX BTDR FM AUX BTDR FM AUX BTDR FM AUX BTDR FM AUX BTDR FM AUX BTDR FM AUX BTDR FM AUX BTDR FM AUX BTDR FM AUX BTDR FM AUX BTDR FM AUX BTDR FM AUX BTDR FM AUX BTDR FM AUX BTDR FM AUX BTDR FM AUX BTDR FM AUX BTDR FM AUX BTDR FM AUX BTDR FM AUX BTDR FM AUX BTDR FM AUX BTDR FM AUX BTDR FM AUX BTDR FM AUX BTDR FM AUX BTDR FM AUX BTDR FM AUX BTDR FM AUX BTDR FM AUX BTDR FM AUX BTDR FM AUX BTDR FM AUX BTDR FM AUX BTDR FM AUX BTDR FM AUX BTDR FM AUX BTDR FM AUX BTDR FM AUX BTDR
09:59
1
min
Premere ( ) per accendere
Station Select
Snooze
DR FM AUX BTDR FM AUX BTDR FM AUX BTDR FM AUX BTDR FM AUX BTDR FM AUX BTDR FM AUX BTDR FM AUX BTDR FM AUX BTDR FM AUX BTDR FM AUX BTDR FM AUX BTDR FM AUX BTDR FM AUX BTDR FM AUX BTDR FM AUX BTDR FM AUX BTDR FM AUX BTDR FM AUX BTDR FM AUX BTDR FM AUX BTDR FM AUX BTDR FM AUX BTDR FM AUX BTDR FM AUX BTDR FM AUX BTDR FM AUX BTDR FM AUX BTDR FM AUX BTDR FM AUX BTDR FM AUX BTDR FM AUX BTDR FM AUX BTDR FM AUX BTDR FM AUX BTDR FM AUX BTDR FM AUX BTDR FM AUX BTDR FM AUX BTDR FM AUX BTDR FM AUX BTDR FM AUX BTDR FM AUX BTDR
10:00
RDS
TOP 40
SCAN 14
******
Page 78

8
DR FM AUX BTDR FM AUX BTDR FM AUX BTDR FM AUX BTDR FM AUX BTDR FM AUX BTDR FM AUX BTDR FM AUX BTDR FM AUX BTDR FM AUX BTDR FM AUX BTDR FM AUX BTDR FM AUX BTDR FM AUX BTDR FM AUX BTDR FM AUX BTDR FM AUX BTDR FM AUX BTDR FM AUX BTDR FM AUX BTDR FM AUX BTDR FM AUX BTDR FM AUX BTDR FM AUX BTDR FM AUX BTDR FM AUX BTDR FM AUX BTDR FM AUX BTDR FM AUX BTDR FM AUX BTDR FM AUX BTDR FM AUX BTDR FM AUX BTDR FM AUX BTDR FM AUX BTDR FM AUX BTDR FM AUX BTDR FM AUX BTDR FM AUX BTDR FM AUX BTDR FM AUX BTDR FM AUX BTDR FM AUX BTDR
10:00
RDS
TOP 40
Utilizzo di One Maxi
Ascolto della radio digitale
Premere il pulsante Source per passare alla radio
digitale.
Modifica delle stazioni digitali
1. Agire su < > per scorrere l'elenco di stazioni
preselezionabili.
2. Una volta trovata la stazione che si desidera
ascoltare, premere il pulsante Select.
Ascolto di radio FM
Premere il pulsante Source per passare alla radio FM.
Modifica delle stazioni FM
Sintonizzazione manuale
Agire su < > per aumentare o diminuire la frequenza
per passi di 0,05 MHz.
Sintonizzazione
Premere e tenere premuti i pulsanti < > per cercare
una stazione radio FM successiva o precedente con
un forte segnale.
PM
DR
DR FM AUX BTDR FM AUX BTDR FM AUX BTDR FM AUX BTDR FM AUX BTDR FM AUX BTDR FM AUX BTDR FM AUX BTDR FM AUX BTDR FM AUX BTDR FM AUX BTDR FM AUX BTDR FM AUX BTDR FM AUX BTDR FM AUX BTDR FM AUX BTDR FM AUX BTDR FM AUX BTDR FM AUX BTDR FM AUX BTDR FM AUX BTDR FM AUX BTDR FM AUX BTDR FM AUX BTDR FM AUX BTDR FM AUX BTDR FM AUX BTDR FM AUX BTDR FM AUX BTDR FM AUX BTDR FM AUX BTDR FM AUX BTDR FM AUX BTDR FM AUX BTDR FM AUX BTDR FM AUX BTDR FM AUX BTDR FM AUX BTDR FM AUX BTDR FM AUX BTDR FM AUX BTDR FM AUX BTDR FM AUX BTDR FM
10:00
PM
DRF
M
DR FM AUX BTDR FM AUX BTDR FM AUX BTDR FM AUX BTDR FM AUX BTDR FM AUX BTDR FM AUX BTDR FM AUX BTDR FM AUX BTDR FM AUX BTDR FM AUX BTDR FM AUX BTDR FM AUX BTDR FM AUX BTDR FM AUX BTDR FM AUX BTDR FM AUX BTDR FM AUX BTDR FM AUX BTDR FM AUX BTDR FM AUX BTDR FM AUX BTDR FM AUX BTDR FM AUX BTDR FM AUX BTDR FM AUX BTDR FM AUX BTDR FM AUX BTDR FM AUX BTDR FM AUX BTDR FM AUX BTDR FM AUX BTDR FM AUX BTDR FM AUX BTDR FM AUX BTDR FM AUX BTDR FM AUX BTDR FM AUX BTDR FM AUX BTDR FM AUX BTDR FM AUX BTDR FM AUX BTDR FM AUX BTDR
10:00
STAZIONI
RDS
DR FM AUX BTDR FM AUX BTDR FM AUX BTDR FM AUX BTDR FM AUX BTDR FM AUX BTDR FM AUX BTDR FM AUX BTDR FM AUX BTDR FM AUX BTDR FM AUX BTDR FM AUX BTDR FM AUX BTDR FM AUX BTDR FM AUX BTDR FM AUX BTDR FM AUX BTDR FM AUX BTDR FM AUX BTDR FM AUX BTDR FM AUX BTDR FM AUX BTDR FM AUX BTDR FM AUX BTDR FM AUX BTDR FM AUX BTDR FM AUX BTDR FM AUX BTDR FM AUX BTDR FM AUX BTDR FM AUX BTDR FM AUX BTDR FM AUX BTDR FM AUX BTDR FM AUX BTDR FM AUX BTDR FM AUX BTDR FM AUX BTDR FM AUX BTDR FM AUX BTDR FM AUX BTDR FM AUX BTDR FM AUX BTDR
10:00
RDS
SINTONIZ.
106\20
DR FM AUX BTDR FM AUX BTDR FM AUX BTDR FM AUX BTDR FM AUX BTDR FM AUX BTDR FM AUX BTDR FM AUX BTDR FM AUX BTDR FM AUX BTDR FM AUX BTDR FM AUX BTDR FM AUX BTDR FM AUX BTDR FM AUX BTDR FM AUX BTDR FM AUX BTDR FM AUX BTDR FM AUX BTDR FM AUX BTDR FM AUX BTDR FM AUX BTDR FM AUX BTDR FM AUX BTDR FM AUX BTDR FM AUX BTDR FM AUX BTDR FM AUX BTDR FM AUX BTDR FM AUX BTDR FM AUX BTDR FM AUX BTDR FM AUX BTDR FM AUX BTDR FM AUX BTDR FM AUX BTDR FM AUX BTDR FM AUX BTDR FM AUX BTDR FM AUX BTDR FM AUX BTDR FM AUX BTDR FM AUX BTDR FM
10:00
107\60
SCANS.
DR FM AUX BTDR FM AUX BTDR FM AUX BTDR FM AUX BTDR FM AUX BTDR FM AUX BTDR FM AUX BTDR FM AUX BTDR FM AUX BTDR FM AUX BTDR FM AUX BTDR FM AUX BTDR FM AUX BTDR FM AUX BTDR FM AUX BTDR FM AUX BTDR FM AUX BTDR FM AUX BTDR FM AUX BTDR FM AUX BTDR FM AUX BTDR FM AUX BTDR FM AUX BTDR FM AUX BTDR FM AUX BTDR FM AUX BTDR FM AUX BTDR FM AUX BTDR FM AUX BTDR FM AUX BTDR FM AUX BTDR FM AUX BTDR FM AUX BTDR FM AUX BTDR FM AUX BTDR FM AUX BTDR FM AUX BTDR FM AUX BTDR FM AUX BTDR FM AUX BTDR FM AUX BTDR FM AUX BTDR FM AUX BTDR FM
10:00
107\60
DR FM AUX BTDR FM AUX BTDR FM AUX BTDR FM AUX BTDR FM AUX BTDR FM AUX BTDR FM AUX BTDR FM AUX BTDR FM AUX BTDR FM AUX BTDR FM AUX BTDR FM AUX BTDR FM AUX BTDR FM AUX BTDR FM AUX BTDR FM AUX BTDR FM AUX BTDR FM AUX BTDR FM AUX BTDR FM AUX BTDR FM AUX BTDR FM AUX BTDR FM AUX BTDR FM AUX BTDR FM AUX BTDR FM AUX BTDR FM AUX BTDR FM AUX BTDR FM AUX BTDR FM AUX BTDR FM AUX BTDR FM AUX BTDR FM AUX BTDR FM AUX BTDR FM AUX BTDR FM AUX BTDR FM AUX BTDR FM AUX BTDR FM AUX BTDR FM AUX BTDR FM AUX BTDR FM AUX BTDR FM AUX BTDR FM
10:00
106\20
Page 79

9
ES
IT
Memorizzazione e richiamo delle
preselezioni
Per memorizzare in modo rapido
una stazione e richiamarla con un
pulsante di preselezione (1–4)
Sintonizzare la radio sulla stazione digitale o FM da
memorizzare. Per memorizzare la stazione corrente tra
le preselezioni, mantenere premuto uno dei pulsanti
numerati di preselezione (1–4) per due secondi. È
possibile sovrascrivere le stazioni preselezionabili
esistenti.
Per memorizzare una stazione
nell’elenco di preselezione (1-10)
1. Sintonizzare la radio sulla stazione digitale o FM da
memorizzare.
2.
Premere e tenere premuto il pulsante 5+ per
visualizzare l'elenco numerico delle preselezioni
memorizzate, quindi agire su < > per scegliere qualsiasi
numero preselezionato compreso tra 1 e 10.
È possibile sovrascrivere preselezioni esistenti.
3. Premere il pulsante Select fino a visualizzare il
messaggio "PRESEL. MEMOR.".
Per richiamare una preselezione
durante l’ascolto di stazioni radio
digitali o FM
Per selezionare le stazioni preselezionabili da 1 a 4,
premere il pulsante numerato corrispondente su One
Maxi (da 1 a 4).
Per accedere all'elenco delle stazioni preselezionabili
(da1 a 10):
1. Premere e rilasciare il pulsante 5+.
2. Agire su < > per scorrere l'elenco delle stazioni
preselezionabili e poi premere il pulsante Select per
sintonizzarsi su quella desiderata.
È possibile memorizzare un massimo di 10 stazioni radio digitali e 10 stazioni FM
di accesso rapido.
DR FM AUX BTDR FM AUX BTDR FM AUX BTDR FM AUX BTDR FM AUX BTDR FM AUX BTDR FM AUX BTDR FM AUX BTDR FM AUX BTDR FM AUX BTDR FM AUX BTDR FM AUX BTDR FM AUX BTDR FM AUX BTDR FM AUX BTDR FM AUX BTDR FM AUX BTDR FM AUX BTDR FM AUX BTDR FM AUX BTDR FM AUX BTDR FM AUX BTDR FM AUX BTDR FM AUX BTDR FM AUX BTDR FM AUX BTDR FM AUX BTDR FM AUX BTDR FM AUX BTDR FM AUX BTDR FM AUX BTDR FM AUX BTDR FM AUX BTDR FM AUX BTDR FM AUX BTDR FM AUX BTDR FM AUX BTDR FM AUX BTDR FM AUX BTDR FM AUX BTDR FM AUX BTDR FM AUX BTDR FM AUX BTDR
10:00
RDS
TOP 40
DR FM AUX BTDR FM AUX BTDR FM AUX BTDR FM AUX BTDR FM AUX BTDR FM AUX BTDR FM AUX BTDR FM AUX BTDR FM AUX BTDR FM AUX BTDR FM AUX BTDR FM AUX BTDR FM AUX BTDR FM AUX BTDR FM AUX BTDR FM AUX BTDR FM AUX BTDR FM AUX BTDR FM AUX BTDR FM AUX BTDR FM AUX BTDR FM AUX BTDR FM AUX BTDR FM AUX BTDR FM AUX BTDR FM AUX BTDR FM AUX BTDR FM AUX BTDR FM AUX BTDR FM AUX BTDR FM AUX BTDR FM AUX BTDR FM AUX BTDR FM AUX BTDR FM AUX BTDR FM AUX BTDR FM AUX BTDR FM AUX BTDR FM AUX BTDR FM AUX BTDR FM AUX BTDR FM AUX BTDR FM AUX BTDR
10:00
PRESEL. 2
IN MEM
DR FM AUX BTDR FM AUX BTDR FM AUX BTDR FM AUX BTDR FM AUX BTDR FM AUX BTDR FM AUX BTDR FM AUX BTDR FM AUX BTDR FM AUX BTDR FM AUX BTDR FM AUX BTDR FM AUX BTDR FM AUX BTDR FM AUX BTDR FM AUX BTDR FM AUX BTDR FM AUX BTDR FM AUX BTDR FM AUX BTDR FM AUX BTDR FM AUX BTDR FM AUX BTDR FM AUX BTDR FM AUX BTDR FM AUX BTDR FM AUX BTDR FM AUX BTDR FM AUX BTDR FM AUX BTDR FM AUX BTDR FM AUX BTDR FM AUX BTDR FM AUX BTDR FM AUX BTDR FM AUX BTDR FM AUX BTDR FM AUX BTDR FM AUX BTDR FM AUX BTDR FM AUX BTDR FM AUX BTDR FM AUX BTDR
10:00
CLASSICA
MOZART
DR FM AUX BTDR FM AUX BTDR FM AUX BTDR FM AUX BTDR FM AUX BTDR FM AUX BTDR FM AUX BTDR FM AUX BTDR FM AUX BTDR FM AUX BTDR FM AUX BTDR FM AUX BTDR FM AUX BTDR FM AUX BTDR FM AUX BTDR FM AUX BTDR FM AUX BTDR FM AUX BTDR FM AUX BTDR FM AUX BTDR FM AUX BTDR FM AUX BTDR FM AUX BTDR FM AUX BTDR FM AUX BTDR FM AUX BTDR FM AUX BTDR FM AUX BTDR FM AUX BTDR FM AUX BTDR FM AUX BTDR FM AUX BTDR FM AUX BTDR FM AUX BTDR FM AUX BTDR FM AUX BTDR FM AUX BTDR FM AUX BTDR FM AUX BTDR FM AUX BTDR FM AUX BTDR FM AUX BTDR FM AUX BTDR
10:00
PRESEL.6
VUOTO
DR FM AUX BTDR FM AUX BTDR FM AUX BTDR FM AUX BTDR FM AUX BTDR FM AUX BTDR FM AUX BTDR FM AUX BTDR FM AUX BTDR FM AUX BTDR FM AUX BTDR FM AUX BTDR FM AUX BTDR FM AUX BTDR FM AUX BTDR FM AUX BTDR FM AUX BTDR FM AUX BTDR FM AUX BTDR FM AUX BTDR FM AUX BTDR FM AUX BTDR FM AUX BTDR FM AUX BTDR FM AUX BTDR FM AUX BTDR FM AUX BTDR FM AUX BTDR FM AUX BTDR FM AUX BTDR FM AUX BTDR FM AUX BTDR FM AUX BTDR FM AUX BTDR FM AUX BTDR FM AUX BTDR FM AUX BTDR FM AUX BTDR FM AUX BTDR FM AUX BTDR FM AUX BTDR FM AUX BTDR FM AUX BTDR
10:00
PRESEL. 6
IN MEM
DR FM AUX BTDR FM AUX BTDR FM AUX BTDR FM AUX BTDR FM AUX BTDR FM AUX BTDR FM AUX BTDR FM AUX BTDR FM AUX BTDR FM AUX BTDR FM AUX BTDR FM AUX BTDR FM AUX BTDR FM AUX BTDR FM AUX BTDR FM AUX BTDR FM AUX BTDR FM AUX BTDR FM AUX BTDR FM AUX BTDR FM AUX BTDR FM AUX BTDR FM AUX BTDR FM AUX BTDR FM AUX BTDR FM AUX BTDR FM AUX BTDR FM AUX BTDR FM AUX BTDR FM AUX BTDR FM AUX BTDR FM AUX BTDR FM AUX BTDR FM AUX BTDR FM AUX BTDR FM AUX BTDR FM AUX BTDR FM AUX BTDR FM AUX BTDR FM AUX BTDR FM AUX BTDR FM AUX BTDR FM AUX BTDR
10:00
CLASSICA
MOZART
DR FM AUX BTDR FM AUX BTDR FM AUX BTDR FM AUX BTDR FM AUX BTDR FM AUX BTDR FM AUX BTDR FM AUX BTDR FM AUX BTDR FM AUX BTDR FM AUX BTDR FM AUX BTDR FM AUX BTDR FM AUX BTDR FM AUX BTDR FM AUX BTDR FM AUX BTDR FM AUX BTDR FM AUX BTDR FM AUX BTDR FM AUX BTDR FM AUX BTDR FM AUX BTDR FM AUX BTDR FM AUX BTDR FM AUX BTDR FM AUX BTDR FM AUX BTDR FM AUX BTDR FM AUX BTDR FM AUX BTDR FM AUX BTDR FM AUX BTDR FM AUX BTDR FM AUX BTDR FM AUX BTDR FM AUX BTDR FM AUX BTDR FM AUX BTDR FM AUX BTDR FM AUX BTDR FM AUX BTDR FM AUX BTDR
10:00
RICHIAMA
CLASS 6
Page 80

10
Utilizzo dell'ingresso ausiliario
È possibile utilizzare l'ingresso ausiliario di One Maxi per riprodurre la musica da
smartphone o tablet su One Maxi.
Nota:
durante la riproduzione di musica dall'ingresso ausiliario di One Maxi, per
regolare il volume occorre utilizzare i tasti per la regolazione del volume su tablet
o smartphone.
Collegamento di un dispositivo ausiliario a One Maxi
Con un cavo adeguato, collegare la presa "line out" o la presa cuffie del
dispositivo ausiliario alla presa Aux In di One Maxi.
Selezione dell'ingresso ausiliario
1.
Premere il tasto Source
per passare all'ingresso
ausiliario.
2. Dal dispositivo ausiliario, selezionare il contenuto
che si desidera ascoltare su One Maxi.
One Maxi avvierà la riproduzione del contenuto
selezionato sul dispositivo ausiliario.
DR FM AUX BTDR FM AUX BTDR FM AUX BTDR FM AUX BTDR FM AUX BTDR FM AUX BTDR FM AUX BTDR FM AUX BTDR FM AUX BTDR FM AUX BTDR FM AUX BTDR FM AUX BTDR FM AUX BTDR FM AUX BTDR FM AUX BTDR FM AUX BTDR FM AUX BTDR FM AUX BTDR FM AUX BTDR FM AUX BTDR FM AUX BTDR FM AUX BTDR FM AUX BTDR FM AUX BTDR FM AUX BTDR FM AUX BTDR FM AUX BTDR FM AUX BTDR FM AUX BTDR FM AUX BTDR FM AUX BTDR FM AUX BTDR FM AUX BTDR FM AUX BTDR FM AUX BTDR FM AUX BTDR FM AUX BTDR FM AUX BTDR FM AUX BTDR FM AUX BTDR FM AUX BTDR FM AUX BTDR FM AUX BTDR FM AUX
10:00
AUX
2-4-2015
Aux In
Page 81

11
ES
IT
Sveglie e timer
Impostazione di una sveglia
One Maxi dispone di due sveglie che possono
accendere la radio e sintonizzarla su una stazione
digitale o FM o attivare un segnale di allarme.
1. Premere il pulsante Menu e agire su < > per
selezionare "SVEGLIA".
2. Agire su < > per selezionare "SVEGLIA1" o
"SVEGLIA2" e premere il pulsante Select.
3. Agire su < > per selezionare "ON" e premere il
pulsante Select.
4. Impostare l'ora della sveglia con i pulsanti < >
e premere Select. Ripetere la procedura per
impostare i minuti della sveglia.
5. Impostare la durata della sveglia con i pulsanti < >
e premere Select.
6.
Agire su < > per selezionare"FM", "DIGITALE"
o "TONO" e premere il pulsante Select per
confermare. Per impostare una sveglia con
suoneria, passare al punto 8.
7. Agire su < > per selezionare la stazione da
trasmettere quando la sveglia si spegne. È possibile
selezionare una delle stazioni preselezionabili
oppure "ULTIMA IN USO" per scegliere l'ultima
stazione ascoltata. Premere il pulsante Select per
confermare.
8. Selezionare una delle seguenti opzioni di ripetizione
della sveglia utilizzando i pulsanti < >:
"OGNI GIORNO", "FERIALI", "WEEKEND" o
"1 VOLTA" e premere il pulsante Select per
confermare.
9. Impostare il volume della radio al momento della
sveglia con i pulsanti < > e premere il pulsante
Select per confermare.
10
. Sul Display viene visualizzata l'icona della sveglia
per indicare che la sveglia è impostata.
Nota: se One Maxi sta funzionando a batterie o con ChargePAK, la sveglia non
funziona se si spegne One Maxi dopo averla impostata.
7:00
SVEGLIA 1
ON
7:00
ORA
23:25
7:00
DURATA
45 MIN
7:00
SORGENTE
DIGITALE
7:00
STAZIONE
ULT. USO
7:00
RIPETI
OGNI GIORNO
7:00
VOLUME
2
7:00
DR FM AUX BTDR FM AUX BTDR FM AUX BTDR FM AUX BTDR FM AUX BTDR FM AUX BTDR FM AUX BTDR FM AUX BTDR FM AUX BTDR FM AUX BTDR FM AUX BTDR FM AUX BTDR FM AUX BTDR FM AUX BTDR FM AUX BTDR FM AUX BTDR FM AUX BTDR FM AUX BTDR FM AUX BTDR FM AUX BTDR FM AUX BTDR FM AUX BTDR FM AUX BTDR FM AUX BTDR FM AUX BTDR FM AUX BTDR FM AUX BTDR FM AUX BTDR FM AUX BTDR FM AUX BTDR FM AUX BTDR FM AUX BTDR FM AUX BTDR FM AUX BTDR FM AUX BTDR FM AUX BTDR FM AUX BTDR FM AUX BTDR FM AUX BTDR FM AUX BTDR FM AUX BTDR FM AUX BTDR FM AUX BT
DR
SALVATA
SVEGLIA 1
7:00
MENU
SVEGLIA
7:00
SVEGLIA
SVEGLIA 1
Page 82

12
Annullamento della sveglia
Per annullare una sveglia, premere il pulsante Source, <Select> o Menu.
Ripetizione della sveglia
Per ripetere una sveglia, premere uno dei pulsanti di preselezione. Il tempo di ripetizione
predefinito della sveglia di One Maxi è di otto minuti. Per modificare il tempo di ripetizione
predefinito vedere pagina 18.
Disattivazione di una sveglia
Per disattivare una sveglia dopo averla impostata:
1. Premere il pulsante Menu, agire su < > per selezionare "SVEGLIA" e premere il
pulsante Select.
2. Agire su < > per selezionare la sveglia che si desidera disattivare ("SVEGLIA1" o
"SVEGLIA2") e premere il pulsante Select.
3. Agire su < > per selezionare "SPENTO" e premere il pulsante Select.
4
.
L'icona della sveglia sul display di One Maxi si spegne a indicare che la sveglia è
stata disattivata.
Impostazione del timer modalità spegnimento
Il timer di autospegnimento può essere impostato per spegnere One Maxi dopo un
determinato periodo di tempo.
Nota: se One Maxi funziona a batterie o con ChargePAK, la funzione di autospegnimento
è disabilitata.
1. Premere il pulsante Menu.
2. Agire su < > per selezionare "AUTOSPEGNIMENTO" e premere il pulsante Select.
3. Agire su < > e premere il pulsante Select per impostare il timer fino a 90 minuti oppure
scegliere SPENTO per annullare.
Impostazione del timer da cucina
One Maxi dispone di un timer di conto alla rovescia da cucina che attiva un allarme dopo
un periodo preimpostato.
1. Premere il pulsante Menu.
2. Agire su < > per selezionare "TIMER" e premere il pulsante Select.
3. Agire su < > per modificare l'ora e premere il pulsante Select.
4. Agire nuovamente sui pulsanti < > per modificare i minuti e premere per confermare e
avviare il timer di conto alla rovescia.
La sveglia suonerà dopo il periodo di tempo impostato, sia che la radio sia accesa o in
standby. Per annullare il tono beep, premere il pulsante Source, <Select> o Menu.
Page 83

13
ES
IT
Opzioni e impostazioni
Impostazioni generali
Modifica della lingua visualizzata sullo schermo
Per cambiare la lingua visualizzata sul display di One Maxi tra English, Français,
Deutsch, Italiano ed Español:
1. Premere il pulsante Menu.
2. Agire su < > per selezionare "IMPOSTAZIONI" e premere il pulsante Select.
3. Agire su < > per selezionare "LINGUA" e premere il pulsante Select.
4. Agire su < > e premere il pulsante Select per scegliere la lingua che si desidera
visualizzare sul display di One Maxi.
Ripristino delle impostazioni predefinite di One Maxi.
Il reset di One Maxi rimuove tutte le preselezioni, elimina l’elenco delle stazioni
e ripristina tutte le impostazioni predefinite. Per ripristinare le impostazioni
predefinite:
1. Premere il pulsante Menu.
2. Agire su < > per selezionare "IMPOSTAZIONI" e premere il pulsante Select.
3. Agire su < > per selezionare "RESET" e premere il pulsante Select.
4. Agire su < > per selezionare "SÌ" e premere il pulsante Select.
Visualizzazione della versione del software di One Maxi
Per conoscere l'attuale versione software di One Maxi:
1. Premere il pulsante Menu.
2. Agire su < > per selezionare "IMPOSTAZIONI" e premere il pulsante Select.
3. Agire su < > per selezionare "VERSIONE" e premere il pulsante Select.
Aggiornamento di One Maxi alla versione software più recente
Per ulteriori informazioni su come installare la versione software più aggiornata di
One Maxi, contattare l'assistenza tecnica Pure (http://support.pure.com).
Page 84

14
Impostazioni radio digitale
Sintonizzazione automatica
È possibile utilizzare la funzione di sintonizzazione automatica per cercare
automaticamente nuove stazioni radio digitali ed eliminare quelle inattive.
Nota: la sintonizzazione automatica è disponibile solo se è stata selezionata
"Radio digitale" come sorgente radio.
Per eseguire una sintonizzazione automatica:
1. Premere il pulsante Menu.
2. Agire su < > per selezionare "SINTONIZ" e premere il pulsante Select.
Durante
la sintonizzazione automatica viene visualizzato il numero di stazioni rilevate.
Al termine del processo, One Maxi si sintonizza sull'ultima stazione ascoltata.
Impostazioni audio
Regolazione di bassi e acuti
One Maxi comprende due diversi profili che regolano automaticamente i livelli di
bassi e acuti in base all'ascolto da altoparlante o cuffie.
Nota: quando si ascolta One Maxi con le cuffie, per regolare i livelli di bassi e acuti
è necessario collegare le cuffie a One Maxi. Prima di regolare i livelli di bassi e
acuti dell'altoparlante, rimuovere le cuffie collegate.
Per regolare le impostazioni di bassi e acuti su One Maxi:
1. Premere il pulsante Menu.
2. Agire su < > per selezionare "AUDIO" e premere il pulsante Select.
3. Agire su < > per selezionare "BASSI" o "ACUTI" e premere il pulsante Select.
4. Agire su < > per regolare il livello dei bassi o degli acuti. Il livello può essere
scelto tra "-5" e "+5".
5. Premere il pulsante Select per confermare il livello dei bassi o degli acuti.
Page 85

15
ES
IT
Attivazione dell'amplificazione dell'audio
Se si ascolta un programma radio in un ambiente rumoroso, è possibile attivare
l'amplificazione dell'audio per migliorare l'ascolto della trasmissione. Se si
ascoltano stazioni radio che trasmettono principalmente musica, si consiglia di
lasciare questa funzione disattivata.
1. Premere il pulsante Menu.
2. Agire su < > per selezionare "AUDIO" e premere il pulsante Select.
3. Agire su < > per selezionare "AMPLIFICAZIONE" e premere il pulsante Select.
4. Agire su < > e premere il pulsante Select per attivare o disattivare
l'amplificazione.
Regolazione del livello dell'ingresso ausiliario
Se si collega un telefono o tablet all'ingresso ausiliario di One Maxi, è possibile
cambiare il livello dell'ingresso ausiliario per far sì che corrisponda alle
impostazioni del telefono o tablet. Per ulteriori informazioni, consultare il manuale
utente del telefono o tablet. Per modificare il livello dell'ingresso ausiliario
di OneMax
i:
1. Premere il pulsante Menu.
2. Agire su < > per selezionare "AUDIO" e premere il pulsante Select.
3. Agire su < > per selezionare "LIVELLO AUX" e premere il pulsante Select.
4. Agire su < > e premere il pulsante Select per scegliere tra "BASSO", "MEDIO"
e "ALTO".
Attivazione dell'ampiezza stereo
Se si connette un altoparlante ausiliario all'uscita auricolari di One Maxi, è
possibile attivare l'impostazione di ampiezza stereo per migliorare la riproduzione
dalle trasmissioni stereo. Per attivare o disattivare la funzione di ampiezza stereo:
1. Premere il pulsante Menu.
2. Agire su < > per selezionare "AUDIO" e premere il pulsante Select.
3. Agire su < > per selezionare "W-SOUND" e premere il pulsante Select.
4. Agire su < > e premere il pulsante Select per attivare o disattivare la funzione
di ampiezza stereo.
Page 86

16
Impostazioni del display
Regolazione della luminosità dello schermo
È possibile regolare la luminosità dello schermo con One Maxi accesa o in standby.
Per modificare la luminosità dello schermo di One Maxi:
1. Premere il pulsante Menu.
2. Agire su < > per selezionare "DISPLAY" e premere il pulsante Select.
3. Agire su < > per selezionare "RETROILLUMINAZIONE" e premere il pulsante
Select.
4. Agire su < > per selezionare "ATTIVO" e premere il pulsante Select per
modificare le impostazioni da applicare all'accensione di One Maxi oppure agire
su < > per selezionare "STANDBY" e premere il pulsante Select per modificare
le impostazioni da applicare con il dispositivo in standby.
5. Agire su < > per selezionare "LIVELLO" e premere il pulsante Select.
6. Agire su < > per scegliere il livello di luminosità tra "1" e "5".
7. Premere il pulsante Select per confermare l'impostazione della luminosità.
Regolazione della durata dell'accensione della retroilluminazione
La durata dell'accensione della retroilluminazione di One Maxi può essere regolata:
1. Premere il pulsante Menu.
2. Agire su < > per selezionare "DISPLAY" e premere il pulsante Select.
3. Agire su < > per selezionare "RETROILLUMINAZIONE" e premere il pulsante
Select.
4. Agire su < > per selezionare "ATTIVO" e premere il pulsante Select per
modificare le impostazioni da applicare all'accensione di One Maxi oppure agire
su < > per selezionare "STANDBY" e premere il pulsante Select per modificare
le impostazioni da applicare in standby.
5. Agire su < > per selezionare "DURATA" e premere il pulsante Select.
6. Agire su < > e premere il pulsante Select per selezionare una delle opzioni
seguenti:
ACCESO: selezionare questa opzione se si desidera che la retroilluminazione
rimanga sempre accesa.
TEMPORIZZATA: selezionare questa opzione se si desidera che la
retroilluminazione si spenga dopo 10 secondi.
Page 87

17
ES
IT
Modifica delle informazioni sul display di One Maxi
Se si ascolta una stazione radio digitale o radio FM, è possibile selezionare i dati
visualizzati sullo schermo di One Maxi:
1. Premere il pulsante Menu.
2. Agire su < > per selezionare "DISPLAY" e premere il pulsante Select.
3. Agire su < > per selezionare "INFO" e premere il pulsante Select.
4. Agire su < > e premere il pulsante Select per selezionare una delle opzioni
seguenti:
TESTO: selezionare questa opzione se si desidera visualizzare
le informazioni trasmesse dalla stazione che si sta ascoltando.
Leinformazioni visualizzate possono includere titoli di canzoni, dati sul
programma, notizie, ecc.
INTENSITÀ: selezionare questa opzione se si desidera visualizzare la
potenza del segnale della stazione radio che si sta ascoltando. Il numero di
asterischi indica l'affidabilità del livello di ricezione.
DATA: selezionare questa opzione se si desidera visualizzare la data attuale.
Impostazioni dell'orologio
Impostazione di ora e data
L'ora e la data di One Maxi vengono impostate automaticamente tramite il
segnale della radio FM o digitale. Se l'ora/data su One Maxi non si aggiornano
automaticamente, è possibile impostarle manualmente.
1. Premere il pulsante Menu.
2. Agire su < > per selezionare "OROLOGIO" e premere il pulsante Select.
3. Agire su < > per selezionare"ORA/DATA" e premere il pulsante Select.
4. Agire su < > per impostare l'ora e premere il pulsante Select. Ripetere per
regolare i minuti.
5. Agire su < > per impostare il giorno e premere il pulsante Select. Ripetere per
impostare il mese e l'anno.
Modifica del formato dell'ora
1. Premere il pulsante Menu.
2. Agire su < > per selezionare "OROLOGIO" e premere il pulsante Select.
3. Agire su < > per selezionare "12/24 ORE" e premere il pulsante
Select
.
4. Agire su < > per scegliere "12 ORE" o "24 ORE" e premere il pulsante
Select
per confermare.
Page 88

18
Modifica del formato della data
1. Premere il pulsante Menu.
2. Agire su < > per selezionare "OROLOGIO" e premere il pulsante Select.
3. Agire su < > per selezionare "FORMATO" e premere il pulsante Select.
4. Agire su < > per scegliere il formato di visualizzazione della data tra giorno/
mese/anno "GG-MM-AAAA" e mese/giorno/anno "MM-GG-AAAA" e premere
il pulsante
Select
per confermare.
Opzioni di sincronizzazione dell'orologio
È possibile scegliere le sorgenti radio da utilizzare per l'impostazione dell'ora. Per
impostazione predefinita, per la sincronizzazione dell'ora One Maxi utilizza segnali
radio sia FM che digitali.
Per selezionare le opzioni di sincronizzazione dell'orologio:
1. Premere il pulsante Menu.
2. Agire su < > per selezionare "OROLOGIO" e premere il pulsante Select.
3. Agire su < > per selezionare "SINCRONIZZA SU" e premere il pulsante Select.
4. Agire su < > per scegliere l'opzione di sincronizzazione dell'orologio desiderata
e premere il pulsante
Select
per confermare.
Modifica della durata della funzione di ripetizione
È possibile modificare l'intervallo di tempo che deve trascorrere prima della
ripetizione della sveglia quando si preme uno dei pulsanti di preselezione di One
Maxi mentre la sveglia sta suonando. Il tempo di ripetizione predefinito della
sveglia di One Maxi è di otto minuti.
Per modificare il tempo di ripetizione di One Maxi:
1. Premere il pulsante Menu.
2. Agire su < > per selezionare "OROLOGIO" e premere il pulsante Select.
3. Agire su < > per selezionare "RIPETIZIONE" e premere il pulsante Select.
4. Agire su < > per scegliere il tempo di ripetizione tra "5" e "59" minuti e
premere il pulsante
Select
per confermare.
Page 89

19
ES
IT
Appendice
Utilizzo di un ChargePAK D1 o sei batterie AA
ChargePAK D1 6x AA batterie
Page 90

20
Guida e suggerimenti
Stazioni secondarie e inattive
(</>) Servizi secondari delle radio digitali
Alcune stazioni radio offrono servizi secondari, fornendo informazioni extra
o contenuti alternativi, che potrebbero essere trasmessi solo in determinati
momenti. Se una stazione fornisce servizi secondari, è contrassegnata dal
simbolo ">" a fianco del nome; il servizio è indicato a fianco della stazione
(nell’elenco). Nell’elenco delle stazioni, il servizio secondario viene indicato con il
simbolo "<" riportato prima del nome.
(?) Stazioni radio digitali inattive o non disponibili
Le stazioni inattive o non disponibili appaiono nell’elenco delle stazioni precedute
da "?" Non è possibile sintonizzarsi su queste stazioni. Una stazione può
essere inattiva o non disponibile perché non sta trasmettendo al momento
della sintonizzazione (verificare l'elenco dei programmi) o ha interrotto tutte le
trasmissioni. È anche possibile che il segnale per la ricezione della stazione radio
non sia abbastanza potente.
Domande e risposte
Sul display è visualizzato il messaggio "NOT AVAILABLE" (Non disponibile)
È possibile utilizzare la funzione di sintonizzazione automatica per cercare
automaticamente nuove stazioni radio digitali ed eliminare quelle inattive (vedere
pagina 14). È possibile regolare la posizione dell’antenna o della radio.
Ricezione di nuove stazioni radio digitali che hanno appena iniziato a
trasmettere
È possibile utilizzare la funzione di sintonizzazione automatica di One Maxi per
cercare nuove stazioni digitali (vedere a pagina 14). È possibile regolare la
posizione dell’antenna o della radio.
Page 91

21
ES
IT
Caratteristiche tecniche
Radio Radio digitale ed FM
Frequenze
DAB/DAB+, radio FM 87,5-108 MHz
Altoparlante 2 x
unità di comando 3
" full-range
Uscita alimentazione
audio 2 x 3W RMS
Connettori
in ingresso Adattatore da 5,5 V CC (230 V, in dotazione)
Connettori in uscita Presa cuffie stereo da 3,5 mm
Stazioni
preselezionabili 10 stazioni radio digitali e 10 stazioni FM preselezionabili
Alimentazione Adattatore esterno da 230 V CA a 5,5 V CC (2,0 A)
(indotazione), pacco di batterie ricaricabili ChargePAK D1
opzionale o sei batterie AA
Consumo di energia
Standby con visualizzazione orologio: <0,5 W;
in funzione: <1 W
Dimensioni
275 mm larghezza x 155 mm altezza x 83 mm profondità
Antenna Antenna telescopica
Approvazioni Marchio CE. Conforme alle direttive EMC e Bassa Tensione
(2004/108 CE e 2006/95/CE).
Conforme a ETSI EN 300 401. Conforme alle direttive
australiane C-Tick N1600 sulla sicurezza elettrica.
Page 92

22
Copyright
Copyright 2016 by Imagination Technologies Limited. Tutti i diritti riservati.
Nessuna parte della presente pubblicazione può essere copiata o distribuita,
trasmessa, trascritta, memorizzata in un sistema di archiviazione o tradotta in
un formato comprensibile dall’uomo o da un computer, in qualsiasi forma o con
qualsiasi mezzo, elettronico, meccanico, magnetico, manuale o altro, o divulgata
a terze parti senza il permesso scritto di Imagination Technologies Limited.
Versione 1 gennaio 2016.
Marchi
One Maxi Series 3, ChargePAK, Pure, il logo Pure, Imagination Technologies e
il logo Imagination Technologies sono marchi o marchi registrati di Imagination
Technologies Limited. Tutti gli altri nomi di prodotto sono marchi commerciali di
proprietà delle rispettive aziende.
Informazioni sulla garanzia
Imagination Technologies Limited garantisce all’utente finale che questo prodotto,
se usato normalmente, non presenterà difetti di materiale e manodopera per
un periodo di tre anni dalla data di acquisto. Questa garanzia copre i guasti
dovuti ad anomalie di fabbricazione o progettazione; non si applica in caso di
danni accidentali di qualunque tipo, dovuti a usura e negligenza o a interventi di
regolazione, modifica o riparazione non autorizzati da noi. Per registrare il prodotto,
accedere alla pagina web account.pure.com. Qualora si dovessero presentare
problemi relativi all’apparecchio, rivolgersi al rivenditore oppure contattare
l’assistenza Pure all’indirizzo riportato sul retro del manuale.
Esonero di responsabilità
Imagination Technologies Limited non rilascia attestazioni o garanzie rispetto
al contenuto di questo documento e, in particolare, nega qualunque garanzia
implicita di commerciabilità o adeguatezza all’uso per qualunque particolare scopo.
Inoltre, Imagination Technologies Limited si riserva il diritto di rivedere la presente
pubblicazione e di apportarvi delle modifiche senza l’obbligo di dover notificare ad
alcun soggetto tali revisioni o modifiche.
Corretto smaltimento del prodotto
Questo simbolo indica che all'interno dell'UE, questo prodotto non
può essere gettato via con gli altri rifiuti domestici. Per evitare qualsiasi
danno all'ambiente o all'uomo dovuti ad uno smaltimento dei rifiuti
non controllato, si consiglia di riciclarlo in maniera responsabile per
promuovere il riutilizzo sostenibile delle risorse materiali. Se si desidera
restituire il dispositivo usato, contattare il sistema di raccolta e resa o
il punto vendita presso cui è stato acquistato il prodotto. Il negoziante
potrà ritirarlo per riciclarlo rispettando l'ambiente.
Page 93

1
EN
NL
ES
IT
DA/NO
FR
ES
DE
One Maxi
Hartelijk dank dat u de One Maxi hebt gekozen.
Met deze handleiding hebt u uw product in een
mum van tijd geïnstalleerd. Hierin vindt u ook de
gebruiksaanwijzingen om optimaal te profiteren van
alle fantastische functies. Als u meer hulp nodig
hebt, kijkt u op de ondersteuningspagina's van onze
website op support.pure.com.
Page 94

2
1. WAARSCHUWING: gebruik de meegeleverde voedingsadapter (met modelnummer
ZDD055200 of ZDD055200BS) niet voor het voeden van andere apparaten omdat dit
schade kan veroorzaken.
2. Gebruik alleen voedingsadapters die genoemd worden in de gebruiksaanwijzing
(geleverd door Pure met modelnummer ZDD055200 of ZDD055200BS).
3. Sluit de netspanningsadapter aan op een gemakkelijk toegankelijk stopcontact dat zich
vlakbij de radio bevindt. Gebruik ALLEEN de meegeleverde netspanningsadapter.
4. WAARSCHUWING: stel het apparaat niet bloot aan regen of vocht om het risico op
brand of elektrische schokken te verkleinen. Stel het apparaat niet bloot aan druppels of
spetters en plaats geen met water gevulde voorwerpen, zoals een vaas, op het apparaat.
5. VOORZICHTIG: explosiegevaar als de batterij niet correct is vervangen. Vervang de
batterij uitsluitend door eenzelfde of een gelijkwaardig type.
6. WAARSCHUWING: de batterij (of batterijen of batterijpakket) mag niet blootgesteld
worden aan te hoge temperaturen, zoals direct zonlicht en vuur.
7. WAARSCHUWING: de insteekadapter wordt gebruikt om het apparaat uit te schakelen
en moet te allen tijde gebruiksklaar zijn.
8. Plaats de radio niet dicht bij warmtebronnen zoals radiatoren, kachels of andere
apparaten die warmte produceren.
9. Stel het apparaat niet bloot aan direct zonlicht.
10. Gebruik de radio niet in de nabijheid van water.
11. Voorkom dat voorwerpen of vloeistof in de radio terecht kunnen komen.
12. Verwijder geen schroeven uit de behuizing van de radio en open deze niet.
13. Voordat u een ChargePAK-batterij plaatst of verwijdert, moet u de radio altijd eerst
uitzetten en de stekker uit het stopcontact halen.
14. Niet in water onderdompelen, onder een douche of in een badkamer gebruiken als de
stekker in het stopcontact zit.
15. De markeringssticker bevindt zich aan de buitenkant op de onderkant van het toestel.
Veiligheidsaanwijzingen
Page 95

3
NL
Inhoud
4 Inleiding
4 Bedieningstoetsen
4 In- en uitgangen
5 Scherm
6 Aan de slag
6 Snelle instelling
8 De One Maxi gebruiken
8 Naar digitale radio luisteren
8 Naar FM-radio luisteren
9 Keuzestations opslaan en oproepen
9 Een station snel als keuzestation opslaan (toets 1–4)
9 Een station opslaan in de lijst met keuzestations (1–10)
9 Een keuzestation oproepen terwijl u naar een digitaal of FM-radiostation
luistert
10 De aux-ingang gebruiken
11 Wekkers en timers
11 Een wekker instellen
12 Een afgaande wekker uitzetten
12 Een afgaande wekker uitstellen
12 Een eerder ingestelde wekker wissen
12 De slaaptimer instellen
12 De keukenwekker instellen
13 Opties en instellingen
13 Algemene instellingen
14 Digitale radio-instellingen
14 Audio-instellingen
16 Scherminstellingen
17 Klokinstellingen
19 Bijlage
19 Een ChargePAK D1-batterij of zes AA-batterijen gebruiken
20 Help en advies
21 Technische specificaties
Page 96

4
Bedieningstoetsen
Inleiding
Select-toetsen
Druk hier op om van
radiostation te veranderen
(zie pagina 8) of om
menuopties te bekijken
en te selecteren.
Menu-toets
Druk op deze toets om verschillende
instellingen van de One Maxi te
wijzigen (zie pagina 13).
Source-toets
Druk hier op om te luisteren
naar digitale radio, FM-radio of
apparatuur die is aangesloten
op de aux-ingang.
Aan/uit-toets
Druk hier op om de One
Maxi aan of uit te zetten.
Keuzestationstoetsen 1 tot 5+
Hiermee kunt u maximaal 10
digitale of 10 FM-keuzestations
opslaan (zie pagina 9 voor
meer informatie).
In- en uitgangen
Micro-B USB-ingang van 5,5 V
Gebruik alleen de meegeleverde
netspanningsadapter voor de
aansluiting.
Aux-ingang (3,5 mm)
Analoge stereo-ingang voor uw
mobiele telefoon, tablet, enz.
Aansluiting van 3,5 mm
voor hoofdtelefoon
Volumeknop
Draai hier aan om het volume
aan te passen.
Druk hier op om het volume uit
en weer in te schakelen.
Page 97

5
NL
Scherm
1. Geeft de huidige tijd aan.
2. ChargePAK- of batterij-indicator.
3. Bronindicator (DR= digitale radio, FM= FM-radio, AUX = aux-ingang).
4. Stationsnaam.
5. Signaalsterkte.
6. Volume-indicator.
7. Geeft de datum, schuivende tekst, instellingen en stationsinformatie weer
(zie pagina 16).
8. Ochtend/middag-indicator.
9. Indicator van wekker (indien ingesteld, zie pagina 11).
10. Indicator van slaaptimer en keukenwekker (indien ingesteld, zie pagina 12).
11. Sluimerindicator (zie pagina 12).
7:00
NPO R1
Nieuws
Page 98

6
Snelle instelling
Aan de slag
1
Opmerking: als u een oplaadbare ChargePAK D1-batterij (deze wordt apart
verkocht) of oplaadbare AA-batterijen hebt, moet u deze nu invoeren voordat u de
One Maxi op het elektriciteitsnet aansluit. Zie pagina 19 voor meer informatie.
1
• Trek de antenne los en trek deze helemaal uit (stappen A en B).
• Steek de kleine stekker van de meegeleverde netspanningsadapter in het
aansluitpunt aan de achterkant van de radio (C) en schakel de stroom in.
A
B
C
A
Page 99

7
NL
2
3
• Wacht totdat de One Maxi met de functie
Autotune (automatisch afstemmen) alle
beschikbare digitale radiostations heeft gevonden.
• Wanneer de automatische afstemming is voltooid,
wordt een digitaal radiostation geselecteerd.
DR FM AUX BTDR FM AUX BTDR FM AUX BTDR FM AUX BTDR FM AUX BTDR FM AUX BTDR FM AUX BTDR FM AUX BTDR FM AUX BTDR FM AUX BTDR FM AUX BTDR FM AUX BTDR FM AUX BTDR FM AUX BTDR FM AUX BTDR FM AUX BTDR FM AUX BTDR FM AUX BTDR FM AUX BTDR FM AUX BTDR FM AUX BTDR FM AUX BTDR FM AUX BTDR FM AUX BTDR FM AUX BTDR FM AUX BTDR FM AUX BTDR FM AUX BTDR FM AUX BTDR FM AUX BTDR FM AUX BTDR FM AUX BTDR FM AUX BTDR FM AUX BTDR FM AUX BTDR FM AUX BTDR FM AUX BTDR FM AUX BTDR FM AUX BTDR FM AUX BTDR FM AUX BTDR FM AUX BTDR FM AUX BTDR
SCAN 14
******
09:59
1
min
DR FM AUX BTDR FM AUX BTDR FM AUX BTDR FM AUX BTDR FM AUX BTDR FM AUX BTDR FM AUX BTDR FM AUX BTDR FM AUX BTDR FM AUX BTDR FM AUX BTDR FM AUX BTDR FM AUX BTDR FM AUX BTDR FM AUX BTDR FM AUX BTDR FM AUX BTDR FM AUX BTDR FM AUX BTDR FM AUX BTDR FM AUX BTDR FM AUX BTDR FM AUX BTDR FM AUX BTDR FM AUX BTDR FM AUX BTDR FM AUX BTDR FM AUX BTDR FM AUX BTDR FM AUX BTDR FM AUX BTDR FM AUX BTDR FM AUX BTDR FM AUX BTDR FM AUX BTDR FM AUX BTDR FM AUX BTDR FM AUX BTDR FM AUX BTDR FM AUX BTDR FM AUX BTDR FM AUX BTDR FM AUX BTDR
BBC R2
TOP 40
10:00
Druk op (
Station Select
Snooze
) om de radio aan te zetten.
Page 100

8
De One Maxi gebruiken
Naar digitale radio luisteren
Druk op Source om over te schakelen naar digitale radio.
Een ander digitaal station selecteren
1. Druk op de toetsen < > om door de lijst van
stations te schuiven.
2. Als u het gewenste radiostation hebt gevonden,
drukt u op Select .
Naar FM-radio luisteren
Druk op Source om over te schakelen naar FM-radio.
Een ander FM-station selecteren
Handmatige afstemming
Druk op de toetsen < > om met stappen van 0,05 MHz
verder of terug te gaan.
Automatisch zoeken
Houd een van de toetsen < > ingedrukt om het
volgende of vorige radiostation met een sterk signaal
te zoeken.
PM
DR
DR FM AUX BTDR FM AUX BTDR FM AUX BTDR FM AUX BTDR FM AUX BTDR FM AUX BTDR FM AUX BTDR FM AUX BTDR FM AUX BTDR FM AUX BTDR FM AUX BTDR FM AUX BTDR FM AUX BTDR FM AUX BTDR FM AUX BTDR FM AUX BTDR FM AUX BTDR FM AUX BTDR FM AUX BTDR FM AUX BTDR FM AUX BTDR FM AUX BTDR FM AUX BTDR FM AUX BTDR FM AUX BTDR FM AUX BTDR FM AUX BTDR FM AUX BTDR FM AUX BTDR FM AUX BTDR FM AUX BTDR FM AUX BTDR FM AUX BTDR FM AUX BTDR FM AUX BTDR FM AUX BTDR FM AUX BTDR FM AUX BTDR FM AUX BTDR FM AUX BTDR FM AUX BTDR FM AUX BTDR FM AUX BTDR
10:00
NPO 1
NIEUWS
PM
DR
DR FM AUX BTDR FM AUX BTDR FM AUX BTDR FM AUX BTDR FM AUX BTDR FM AUX BTDR FM AUX BTDR FM AUX BTDR FM AUX BTDR FM AUX BTDR FM AUX BTDR FM AUX BTDR FM AUX BTDR FM AUX BTDR FM AUX BTDR FM AUX BTDR FM AUX BTDR FM AUX BTDR FM AUX BTDR FM AUX BTDR FM AUX BTDR FM AUX BTDR FM AUX BTDR FM AUX BTDR FM AUX BTDR FM AUX BTDR FM AUX BTDR FM AUX BTDR FM AUX BTDR FM AUX BTDR FM AUX BTDR FM AUX BTDR FM AUX BTDR FM AUX BTDR FM AUX BTDR FM AUX BTDR FM AUX BTDR FM AUX BTDR FM AUX BTDR FM AUX BTDR FM AUX BTDR FM AUX BTDR FM AUX BTDR FM
10:00
PM
DRFM
DR FM AUX BTDR FM AUX BTDR FM AUX BTDR FM AUX BTDR FM AUX BTDR FM AUX BTDR FM AUX BTDR FM AUX BTDR FM AUX BTDR FM AUX BTDR FM AUX BTDR FM AUX BTDR FM AUX BTDR FM AUX BTDR FM AUX BTDR FM AUX BTDR FM AUX BTDR FM AUX BTDR FM AUX BTDR FM AUX BTDR FM AUX BTDR FM AUX BTDR FM AUX BTDR FM AUX BTDR FM AUX BTDR FM AUX BTDR FM AUX BTDR FM AUX BTDR FM AUX BTDR FM AUX BTDR FM AUX BTDR FM AUX BTDR FM AUX BTDR FM AUX BTDR FM AUX BTDR FM AUX BTDR FM AUX BTDR FM AUX BTDR FM AUX BTDR FM AUX BTDR FM AUX BTDR FM AUX BTDR FM AUX BTDR
10:00
STATIONS
NPO 2
DR FM AUX BTDR FM AUX BTDR FM AUX BTDR FM AUX BTDR FM AUX BTDR FM AUX BTDR FM AUX BTDR FM AUX BTDR FM AUX BTDR FM AUX BTDR FM AUX BTDR FM AUX BTDR FM AUX BTDR FM AUX BTDR FM AUX BTDR FM AUX BTDR FM AUX BTDR FM AUX BTDR FM AUX BTDR FM AUX BTDR FM AUX BTDR FM AUX BTDR FM AUX BTDR FM AUX BTDR FM AUX BTDR FM AUX BTDR FM AUX BTDR FM AUX BTDR FM AUX BTDR FM AUX BTDR FM AUX BTDR FM AUX BTDR FM AUX BTDR FM AUX BTDR FM AUX BTDR FM AUX BTDR FM AUX BTDR FM AUX BTDR FM AUX BTDR FM AUX BTDR FM AUX BTDR FM AUX BTDR FM AUX BTDR
10:00
NPO 2
TUNING
106\20
DR FM AUX BTDR FM AUX BTDR FM AUX BTDR FM AUX BTDR FM AUX BTDR FM AUX BTDR FM AUX BTDR FM AUX BTDR FM AUX BTDR FM AUX BTDR FM AUX BTDR FM AUX BTDR FM AUX BTDR FM AUX BTDR FM AUX BTDR FM AUX BTDR FM AUX BTDR FM AUX BTDR FM AUX BTDR FM AUX BTDR FM AUX BTDR FM AUX BTDR FM AUX BTDR FM AUX BTDR FM AUX BTDR FM AUX BTDR FM AUX BTDR FM AUX BTDR FM AUX BTDR FM AUX BTDR FM AUX BTDR FM AUX BTDR FM AUX BTDR FM AUX BTDR FM AUX BTDR FM AUX BTDR FM AUX BTDR FM AUX BTDR FM AUX BTDR FM AUX BTDR FM AUX BTDR FM AUX BTDR FM AUX BTDR FM
10:00
107\60
SCANNING
DR FM AUX BTDR FM AUX BTDR FM AUX BTDR FM AUX BTDR FM AUX BTDR FM AUX BTDR FM AUX BTDR FM AUX BTDR FM AUX BTDR FM AUX BTDR FM AUX BTDR FM AUX BTDR FM AUX BTDR FM AUX BTDR FM AUX BTDR FM AUX BTDR FM AUX BTDR FM AUX BTDR FM AUX BTDR FM AUX BTDR FM AUX BTDR FM AUX BTDR FM AUX BTDR FM AUX BTDR FM AUX BTDR FM AUX BTDR FM AUX BTDR FM AUX BTDR FM AUX BTDR FM AUX BTDR FM AUX BTDR FM AUX BTDR FM AUX BTDR FM AUX BTDR FM AUX BTDR FM AUX BTDR FM AUX BTDR FM AUX BTDR FM AUX BTDR FM AUX BTDR FM AUX BTDR FM AUX BTDR FM AUX BTDR FM
10:00
107\60
DR FM AUX BTDR FM AUX BTDR FM AUX BTDR FM AUX BTDR FM AUX BTDR FM AUX BTDR FM AUX BTDR FM AUX BTDR FM AUX BTDR FM AUX BTDR FM AUX BTDR FM AUX BTDR FM AUX BTDR FM AUX BTDR FM AUX BTDR FM AUX BTDR FM AUX BTDR FM AUX BTDR FM AUX BTDR FM AUX BTDR FM AUX BTDR FM AUX BTDR FM AUX BTDR FM AUX BTDR FM AUX BTDR FM AUX BTDR FM AUX BTDR FM AUX BTDR FM AUX BTDR FM AUX BTDR FM AUX BTDR FM AUX BTDR FM AUX BTDR FM AUX BTDR FM AUX BTDR FM AUX BTDR FM AUX BTDR FM AUX BTDR FM AUX BTDR FM AUX BTDR FM AUX BTDR FM AUX BTDR FM AUX BTDR FM
10:00
106\20
 Loading...