

Page 1
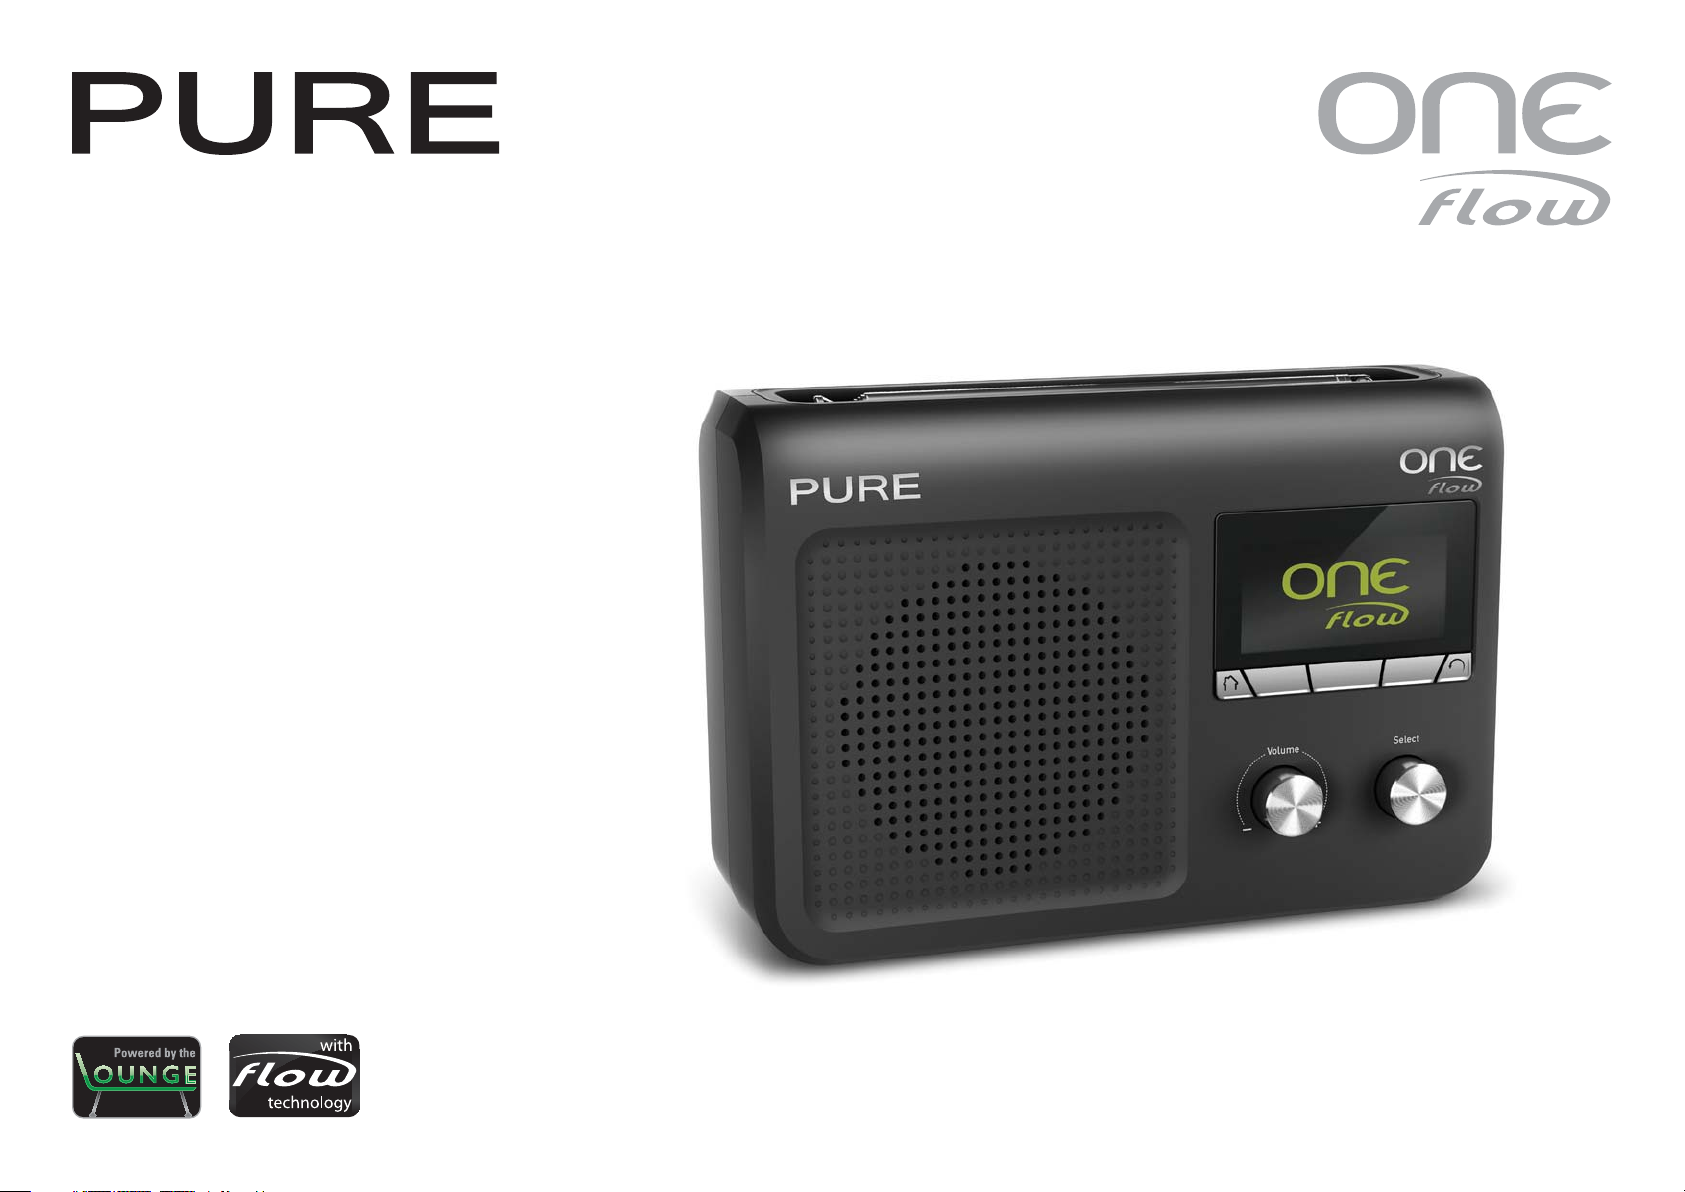
Owner’s Manual
This is the Owner’s Manual for ONE Flow.
It expands on the Quickstart provided
with the radio and covers more functions.
Page 2

Contents
Using a ChargePAK 3
Using the snooze, kitchen and sleep timers 4
Setting the clock 4
Join the Lounge 5
Connecting your radio to the Lounge 5
The Lounge settings 6
Display settings 7
Additional settings 9
FM settings 10
PURE Flowserver 11
Media player settings 12
Network settings 13
Help and advice 14
Technical Specifications 15
2
Page 3
+
+
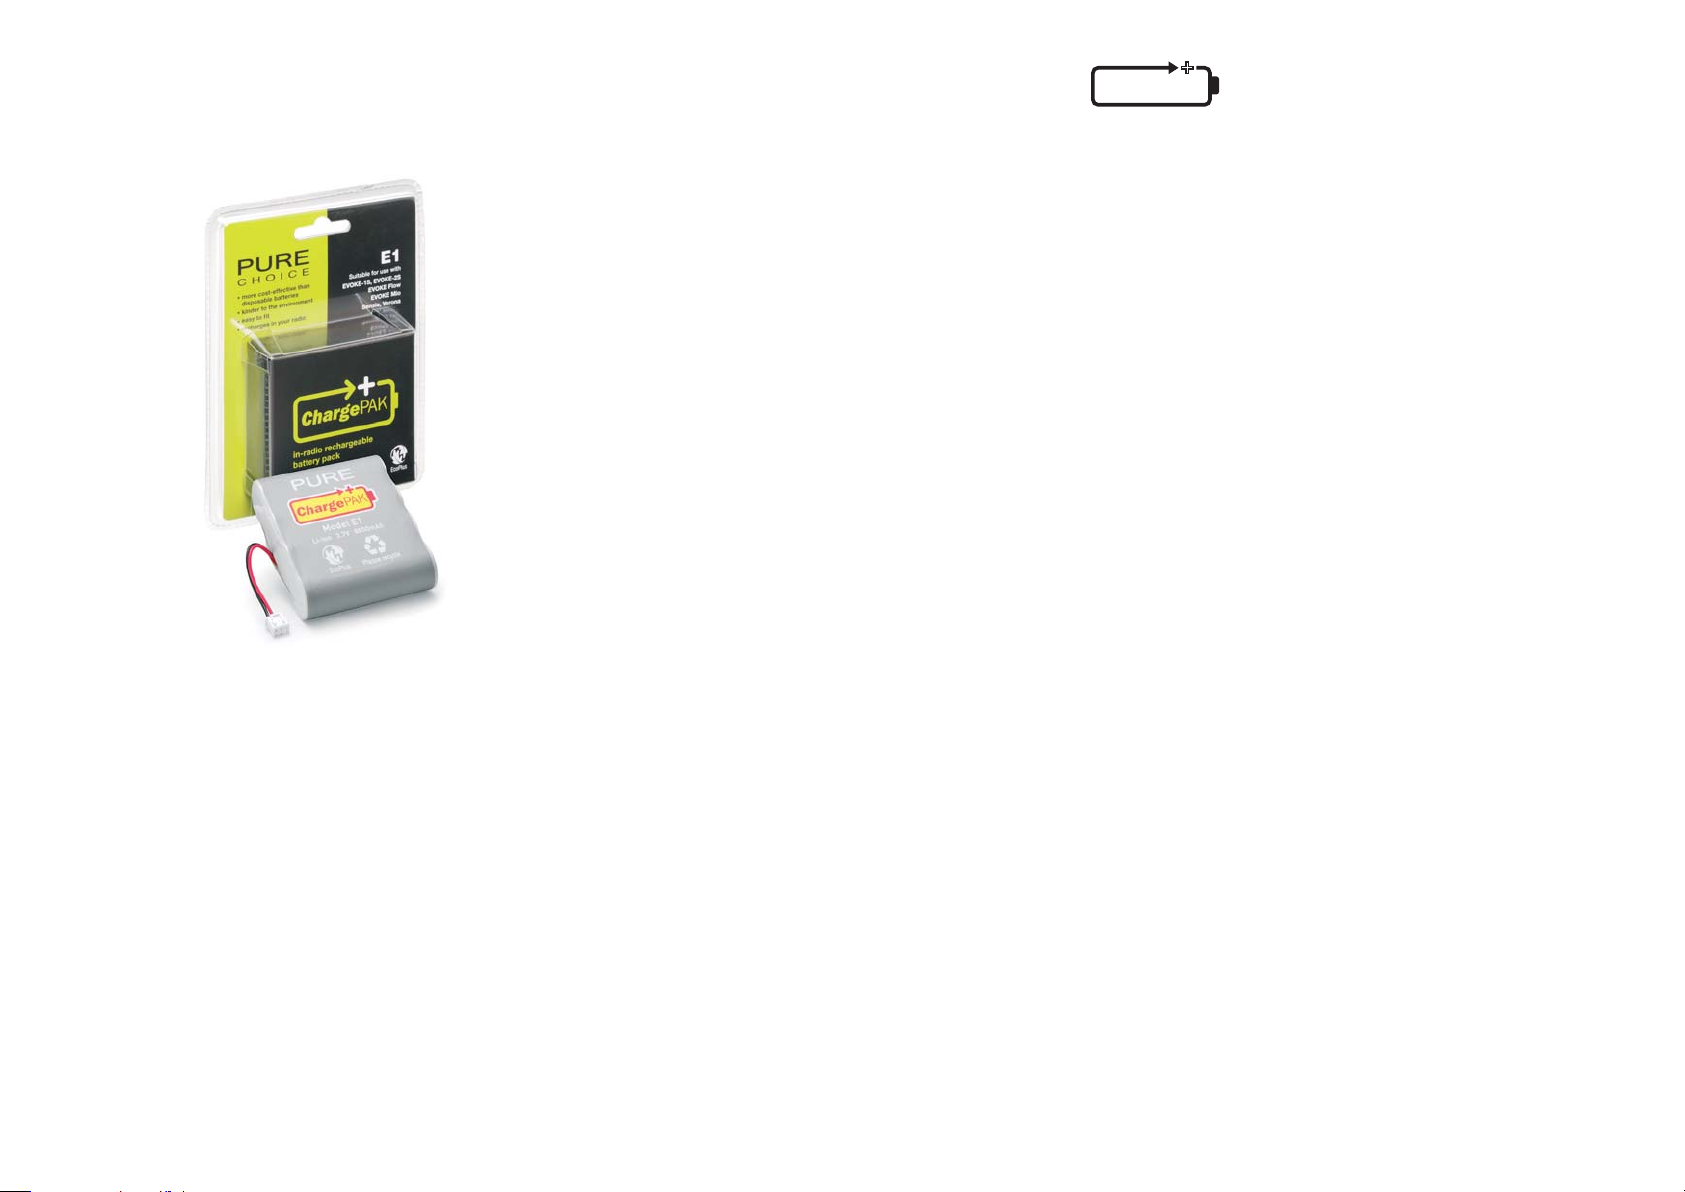
Using an optional ChargePAK
ChargePAK
™
ChargePAK E1 is a rechargeable battery pack (sold separately) for your ONE Flow. ChargePAK
provides the benefits of rechargeable batteries without the inconvenience of removing and
recharging separate batteries. ChargePAK is designed to be left in your unit, so if usually connected
to the mains, your product will always be charged up, ready to go.
Installing a ChargePAK
1. Switch your radio off and disconnect from the mains power supply.
2. Open the battery compartment and push the ChargePAK connector plug into the socket in
the compartment. Line up the ridges on the plug with the slots in the socket. Do not force
the plug.
3. Insert ChargePAK into the battery compartment.
4. Replace the battery door and connect your product to a power supply.
5. ChargePAK will begin charging. When charging your ChargePAK for the first time or after an
extended period of inactivity we recommend that you charge it for around 24 hours to ensure
full battery power. If ChargePAK is flat there may be a slight delay before the battery charging
indicator is displayed.
Notes for use
It is perfectly normal for your ChargePAK to get warm to the touch in use, especially during
charging. Your ChargePAK should give years of trouble-free use under normal circumstances,
however, as for all rechargeable batteries the operating life will gradually reduce with age.
Important: ONE Flow can only be powered with a ChargePAK E1 and is not compatible with any
other batteries, either disposable or rechargeable, or any other ChargePAK model.
3
Page 4
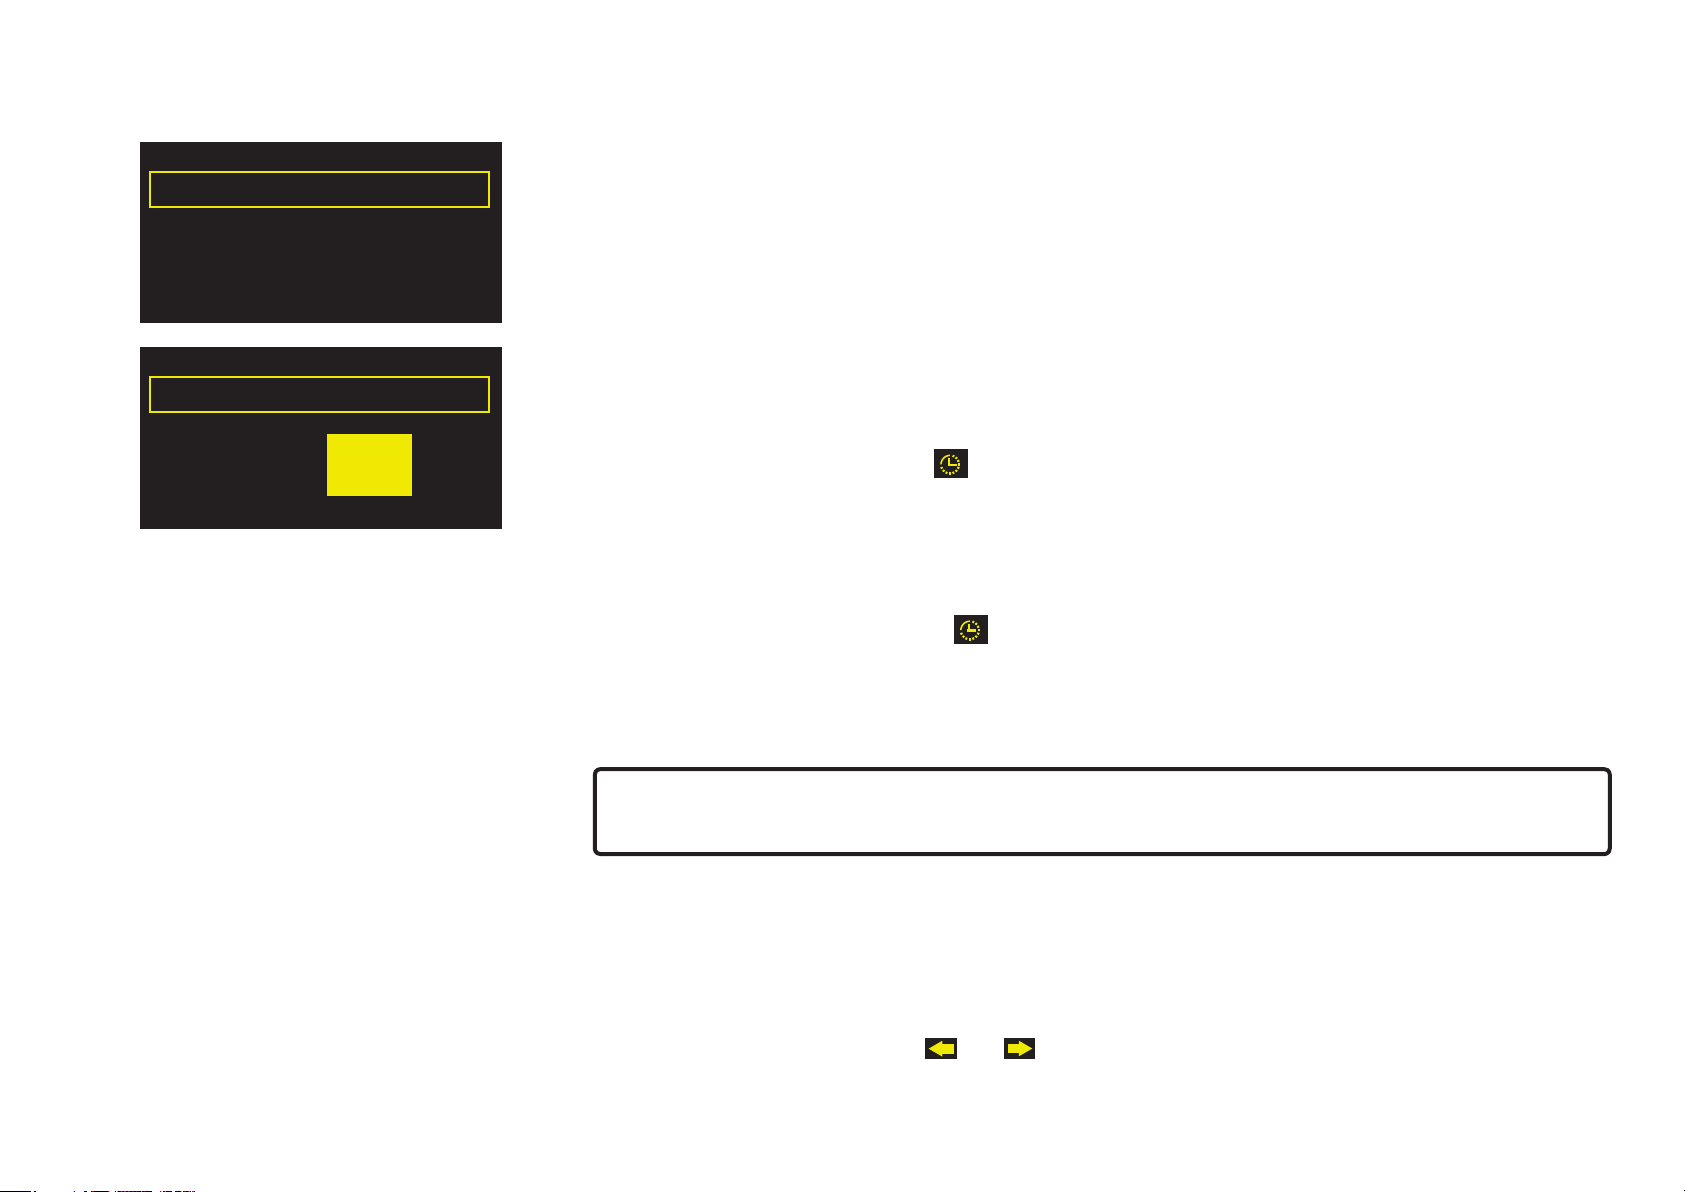
Using the snooze, kitchen and sleep timers
Sleep timer (hh:mm)
00:15
OKClear Save Menu
Kitchen timer: set mins
00:45
Clear Save Hours
ONE Flow has snooze (for the alarm), kitchen and sleep timers. To set a timer up, press
and select Alarm or timer.
Setting the Snooze timer (for alarms only)
From the Alarm or timer menu, select Snooze time. Use the Select dial to adjust the duration of
the snooze from 5 to 15, then either 20/25/30/40 minutes, or 1 hour.
Setting the sleep timer
The sleep timer switches your radio into standby after a set period of time. From the Alarm or timer
menu, select Sleep timer. Use the Select dial to adjust the length of the sleep timer in 15 minute
steps from 15 mins to 1 hour 30 mins. Press Save to store.
A set sleep timer is indicated by in the icon bar.
Setting the kitchen timer
The kitchen timer sounds a beeping tone after a set period of time.
From the Alarm or timer menu select Kitchen timer and use the Select dial to adjust the length of
time. Press mins to toggle between minutes and hours. Press Save to confirm.
A set kitchen timer is indicated by in the icon bar.
Cancelling a sounding timer
To cancel a sounding alarm or timer, push either the Select or Volume dial. A sounding alarm will
automatically cancel after 1 hour.
Options
Warning: when powered by ChargePAK E1, pressing Standby switches the radio off and any
set alarm or timer will not sound.
Setting the clock
The clock will automatically set itself using your network or a digital radio signal. However, if you
cannot receive an updated time signal, or see the message ‘Time not available’, the time and date
can be manually set by selecting Set Clock from the Alarm or timer menu. Use the select dial to
adjust the time and date. Press or to move to the previous or next setting.
4
Page 5
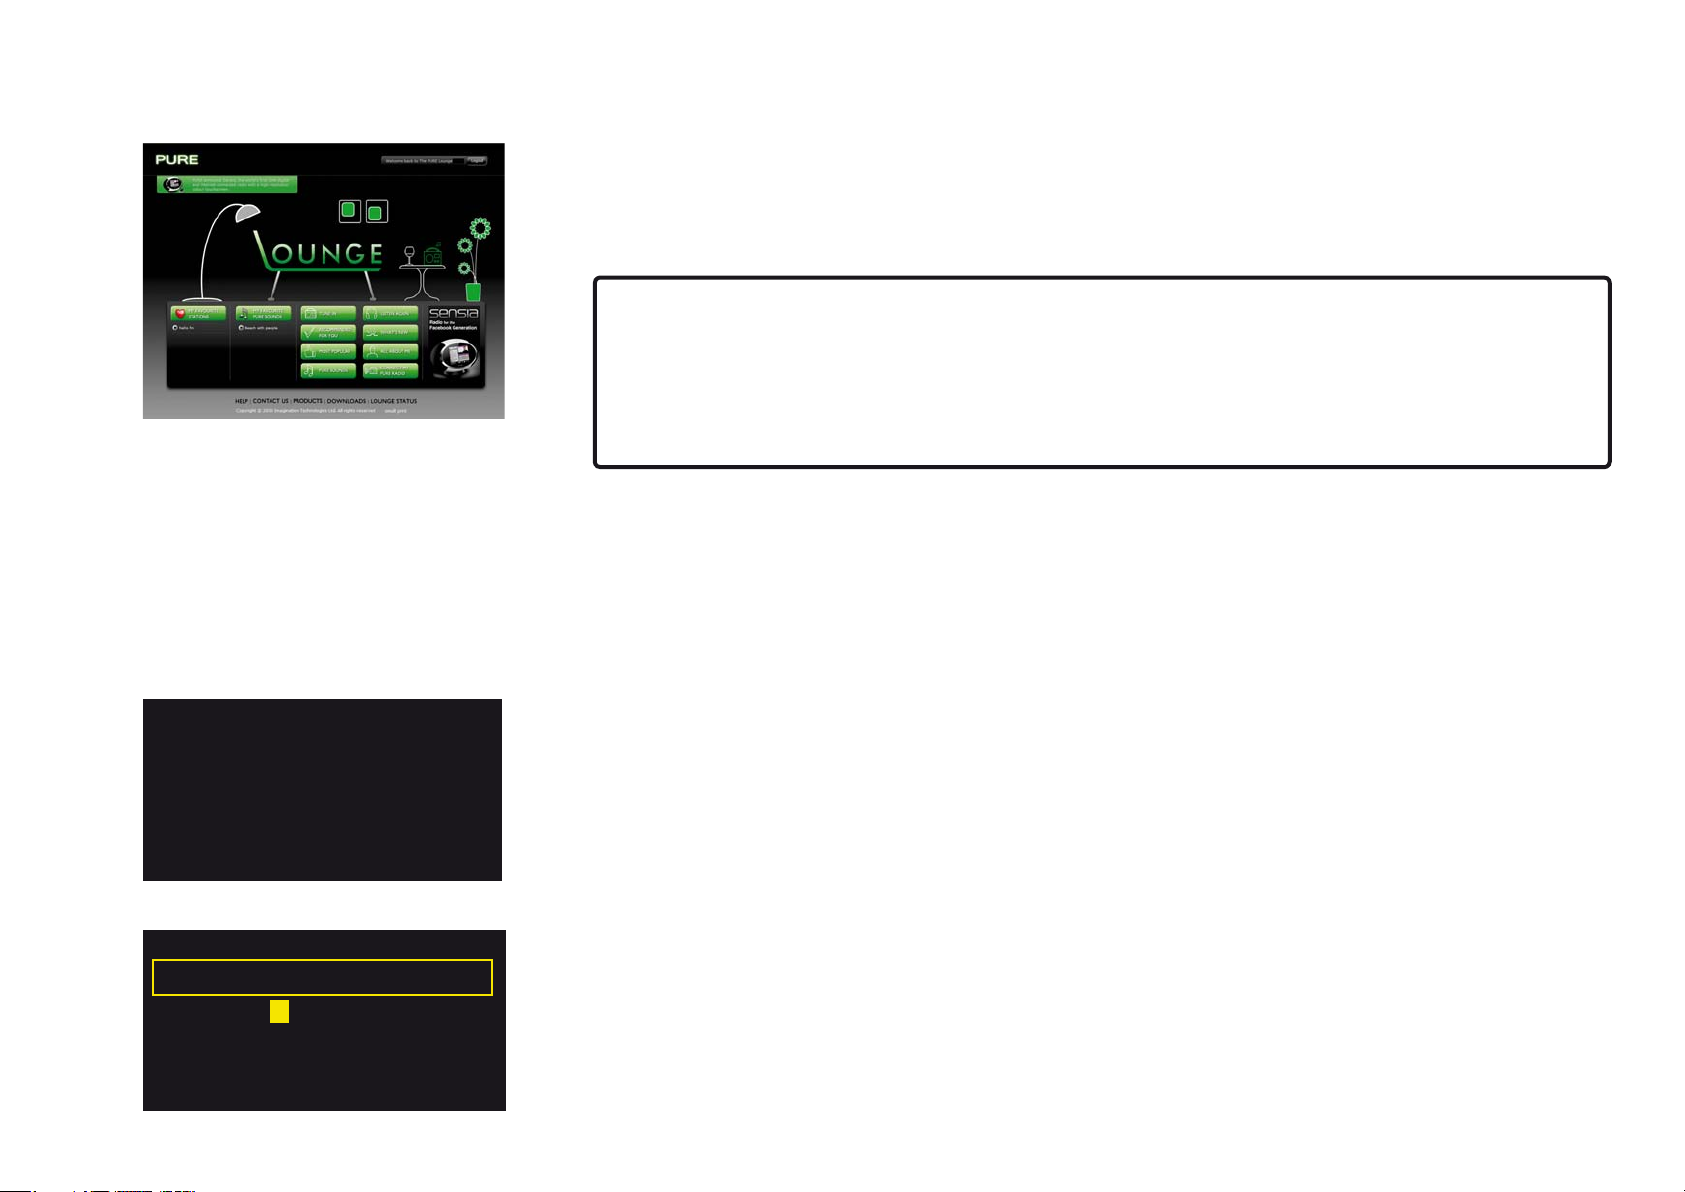
Join the Lounge
Join and connect your Flow radio to the Lounge and you can make the wealth of content more
manageable by saving as many favourites as you like and organizing them in folders however you
choose – these favourites and folders are synchronized with all of your Lounge-connected radios.
If you are already a member of the Lounge, see ‘Connecting your radio to the Lounge’ below.
To join the Lounge and connect your radio you will need:
1. A valid personal e-mail address. We will send you a couple of e-mails during the
membership and connection process to enable you to activate your Lounge membership
and connect your radio. You won’t be able to complete the process without these e-mails.
2. Your radio’s unique serial number. You can find this on the back of your radio.
Open your internet browser, go to www.thelounge.com and click the 'Join' button. When you
have filled in your details, the Lounge website will automatically send you an e-mail containing a
membership activation link. Click this and a new browser window will open confirming that your
membership has been activated. You are now a Lounge member and are ready to log in.
Connecting your radio to the Lounge
Optional registration at
www.thelounge.com adds
advanced features to your
radio. Register now?
Yes NeverLater
–YOUR CODE –
Enter registration code
ABCDE FGHIJKLM
NOPQRSTUVWXYZ
sp0123456789
Del Save More...
1. Log in to the Lounge and click the ‘My Radios’ > ‘Connect my radio’ > ‘Start’. When you have
filled in your details, you will receive an e-mail with your radio’s connection code.
2. From
the Select dial to highlight and select characters; press Delete to erase characters; and press
Save to finish.
You now have a registered radio. Any favourites you have already stored on your radio will now be
visible on the Lounge and you can organize them however you wish. Any changes will be reflected
on your radio, and changes you make on your radio will also apply on the Lounge.
Lounge settings on your radio, select Register with the Lounge to enter your code. Use
5
Page 6

The Lounge settings
Clear favourites
The Lounge settings
Clear favourites
View/change radio name
Register with the Lounge
Select Clear favourites to remove all stations/podcasts/PURE Sounds from your favourites list, as
well as from the Lounge if your radio is connected.
Change radio name
So that you can find your radio easily when using the Lounge website to manage your listening,
your ONE Flow has a name. By default this name is ‘My ONE Flow’, but here you can change this
to anything you like to make it more memorable. Select View/Change radio name. The current
name is at the top of the screen. Enter a new name and press Save to confirm.
Register with the Lounge
Enter your Lounge registration code if you have not already done so.
6
Page 7

Display settings
Adjust display options, such as screen duration, brightness and the information displayed while
you are listening to each source. Press Options then Display to open the menu.
Information
Different information displays are available for each audio source:
Digital radio
Scrolling text Text information broadcast by the current station. May include song titles,
programme details, news, etc.
Broadcast info The Multiplex to which the station belongs, a description of the station’s
content (e.g., ‘Pop music’), the bit rate (audio quality) of the broadcast in
kbps and a Stereo/Mono indicator.
Reception info The current channel and frequency, signal quality and signal strength.
Time and date Displays the date with a full-screen clock (as in standby mode).
The Lounge
Description Broadcast by the current station. May include song titles and programme
details.
Location and Genre Information about the current station, e.g., UK Gospel.
Time offset Most stations will be live streams, but otherwise displays how far into a
broadcast the station is.
Wi-Fi signal strength Displays a bar indicating the current Wi-Fi signal strength.
Station URL Displays the URL address of the current station.
Time and date Displays the date with a full-screen clock (as in standby mode).
Media player
Track info Displays artist and album information (id3 tags).
Time offset/duration Displays a progress bar and timers indicating the current track position.
Wi-Fi signal strength Displays a bar indicating the current Wi-Fi signal strength.
Time and date Displays the date with a full-screen clock (as in standby mode).
7
Page 8

FM
Scrolling text Text information broadcast by the current station. May include song titles,
programme details, news, etc.
Reception info Displays the current frequency and signal strength.
There are no Information options for the AUX audio source.
Active and Standby backlight
You can adjust the duration that the screen is illuminated when switched on or in standby. Select
Active backlight to adjust the display settings that apply when the radio is switched on or Standby
backlight to adjust the display settings that apply when your radio is in standby. Choose from
Always on or Off after 7 seconds.
8
Page 9

Additional settings
Additional settings
Upgrade
Software updates may be issued in the future to provide new features and functions.
Upgrade
Language
To upgrade over your network (recommended)
1. Tap Options, select Additional settings > Upgrade
2. Your radio will search for any available upgrades. If an update is available the message ‘New
version available: vX.X’ will appear on screen (X.X is the version number, i.e. v2.1).
3. Tap OK to download and install the new software. This can take up to 5 minutes.
To upgrade using a USB cable (when a network is not available)
1. Visit support.pure.com to check if an update is available for your radio.
2. If updates are listed on the website, download the most recent update to your computer.
3. Connect your radio to your PC’s USB port using a USB cable (not supplied). Run the update
software on your computer and follow the on-screen instructions.
Warning: do not switch off your radio while it is updating.
Language
Switch the display language between English, French, Italian and German.
9
Page 10

FM settings
FM settings
These settings are only available when listening to FM radio. Press Options, then select
FM settings.
FM tuning
FM stereo
FM tuning
Switch between Seek tune and Manual tune.
Seek tune Turning the Select dial automatically tunes to the next station with a strong signal.
Manual tune Turning the Select dial tunes up or down in steps of 0.5MHz.
FM stereo
Switch between receiving FM stations in Mono (default) or Stereo. If listening with headphones,
you may want to change this setting to stereo.
10
Page 11

PURE Flowserver
Flowserver is our PURE media server software that enables you to play music streamed from your
computer through your Flow radio. It is available for the following operating systems:
®
Microsoft
Apple Mac OS X Leopard, Snow Leopard
To download a copy of Flowserver, go to the Lounge website, www.thelounge.com, click ‘Tune in’,
then ‘Downloads’.
Entering your license key
During installation, or on first start up (depending on your operating system) you will be asked to
enter a Flowserver license key. You can find your key by logging into the Lounge and clicking on
‘My radios > View my radios’. Your key will be listed in the table alongside your radio.
For a step-by-step guide to installing and setting up Flowserver, visit our support website at
support.pure.com
Windows XP, Windows Vista, Windows 7
11
Page 12

Media player settings
Media player settings
Repeat
Shue
Media server
These settings are only available when listening to the Media player source. Press
select Media player settings.
Options, then
Repeat
Select the repeat type:
Off (default) Tracks are played until the end of the current album, folder, playlist or search results.
All Continuously repeats the current album, folder, playlist, or your search results.
Track Repeats the current track.
Shuffle
Select the order that tracks in the current album, folder, playlist or search results are played:
Off (default) Tracks play in the order that they are displayed on-screen.
On Tracks play in random order.
When Shuffle is on, pressing or selects a random track from the current album, folder,
playlist or search results.
Media server
View technical details about your media server or re-scan for alternative servers.
Current details The name of your media server.
The name of the server software you are currently using, e.g., Flowserver.
The software version of the server software you are currently using.
The IP address and port of your media server.
A web address for further information or software updates.
Scan for servers Scans for all available media servers.
12
Network settings
The network settings menu, which allows you to configure your network, is available when listening
to Media player or The Lounge.
Page 13

Wi-Fi settings
Connection wizard
View details
Manual setup
Network settings
Press Options from either The Lounge or Media player, then select Network settings to view
options for configuring your network connections.
Connection wizard
Scan for wireless networks to connect to. See your radio’s Quickstart Guide for instructions.
View details
Displays the configuration of the wireless network that your radio is connected to:
Network name (Wi-Fi) The Network Name (SSID) is shown at the top of the screen.
Encryption (Wi-Fi) The encryption method is listed (WEP, WPA or WPA2).
IP address IP address of the radio.
Net mask (Wi-Fi) The configured network mask.
DNS (Wi-Fi) Domain Name Server IP address.
Router (Wi-Fi) Gateway router IP address.
Radio Name Name of the radio
MAC address (Wi-Fi) MAC address of the radio (a fixed address that identifies your radio).
Access point (Wi-Fi) MAC address of the wireless router that the radio is connected to.
Manual setup
Manually configure your wireless network settings (for advanced users only).
Retry connection Attempts to reconnect to the selected network.
Network name Scan for networks or Enter SSID manually to specify a new SSID for your
wireless network.
Encryption mode Change the encryption mode between WEP, WPA (PSK), WPA2 (PSK) or
None. ONE Flow automatically detects the mode for your network. Only
change this setting if you think the encryption mode is incorrect.
Key or password Enter a new encryption key or password.
IP address Choose between DHCP (dynamic) or Static.
Clear network settings
ONE Flow will delete all previous Wi-Fi connections, passwords and settings and perform a fresh
scan for available networks.
Select network type
Choose between Wi-Fi or Ethernet connection. This will reset your radio’s network connection
type.
13
Page 14

Help and advice
I am having trouble connecting to my network
s Your radio cannot connect to wireless networks that are hidden or access controlled, such as
office networks, without a WEP, WPA or WPA2 key or password (see Quickstart Guide for more
information).
s Your radio needs to be positioned within the range of your wireless network, which will be
reduced if there are walls between your router and radio. Although ONE Flow is very good at
picking up wireless networks, the strength of the Wi-Fi signal will vary depending on your router
and the surrounding environment. If ONE Flow fails to find your wireless network, or the signal
drops off, move the radio closer to the router.
s Unless your wireless network is ‘open’ (this is generally not recommended due to the risk of
unauthorized access), make sure you have your WEP, WPA or WPA2 key to hand.
s If you also experience trouble connecting to your network with the ethernet adapter, check your
internet connection using a computer. If this is ok, try restarting your modem.
14
Screen displays ‘Station not available’
s )FASTATIONWILLNOTPLAYTELLUSABOUTTHEPROBLEMATTHE@#ONTACTUSPAGEAT4HE,OUNGEOR
visit support.pure.com for more help.
Media player is not working
s To share your music files with your radio you need to download and install Flowserver from
www.thelounge.com (available as a free download when you join the Lounge).
s Make sure that your computer is switched on.
s Your radio cannot play files which are restricted by Digital Rights Management (DRM).
s Make sure your music files are saved as a supported file format: MP2, MP3, WMA4, WMA7,
WMA8, WMA9, AAC (including .m4a) or Real Audio.
Visit support.pure.com for further help, step-by-step guides, and downloads.
Page 15

Technical Specifications
Radio: Digital, FM and internet (Wi-Fi).
Frequencies: DAB/DAB+/DMB-R/Parametric stereo decode up to 256 kbps. FM 87.5-108 MHz.
Wireless: 802.11b and 802.11g supported with WEP and WPA/WPA2 encryption. 0.5 MB
broadband speed recommended.
Media Streaming: Audio codecs supported include WMA (Standard V9), AAC, MP3, MP2, Real
Audio (cook). Media streaming requires UPnP server or PC/MAC running UPnP server software
(supplied upon registration to www.thelounge.com).
Speaker: 3.5" full range driver.
Audio power output: 2.5 W RMS.
Input connectors: 5.5V DC power adaptor socket (adapter supplied). 3.5mm Line-in for auxiliary
devices. USB (mini-AB type) for product updates (also available over Wi-Fi).
Output connectors: 3.5mm stereo out.
Presets: 30 digital radio, 10 FM radio and unlimited internet radio favourites (requires registration at
www.thelounge.com).
Display: Graphical LCD. 128 x 64 pixels. Yellow Green LED backlight
Mains power supply: 100-240V, 50/60Hz 5.5V DC external power adapter.
ChargePAK: ChargePAK E1 rechargeable battery pack (available separately).
Power consumption: Standby: 2W, Active: 2.5W.
Approvals: Compliant with the EMC and Low Voltage Directives (2004/108/EC and 2006/95/EC).
ETSI EN 300 401 compliant
Dimensions: 147 mm high x 207 mm wide x 80 mm deep
Weight: 0.65 kg.
Warranty: Comprehensive two year warranty.
15
Page 16

Trademarks
ONE Flow, the ONE Flow logo, ChargePAK, PURE, the PURE Lounge, PURE sounds, PURE
Flowserver, the PURE logo, Imagination Technologies, and the Imagination Technologies logo are
trademarks or registered trademarks of Imagination Technologies Limited. Windows Media is either
a registered trademark or trademark of Microsoft Corporation in the United States and/or other
countries All other product names are trademarks of their respective companies. Version 1 2010.
Copyright
Copyright © 2010 Imagination Technologies Limited. All rights reserved. No part of this publication
may be copied or distributed, transmitted, transcribed, stored in a retrieval system, or translated
into any human or computer language, in any form or by any means, electronic, mechanical,
magnetic, manual or otherwise, or disclosed to third parties without the express written permission
of Imagination Technologies Limited.
Warranty information
Imagination Technologies Ltd. warrants to the end user that this product will be free from defects
in materials and workmanship in the course of normal use for a period of two years from the date
of purchase. This guarantee covers breakdowns due to manufacturing or design faults; it does
not apply in cases such as accidental damage, however caused, wear and tear, negligence,
adjustment, modification or repair not authorised by us. Should you have a problem with your unit
please contact your supplier or contact PURE Support at support.pure.com. If you need to return
your product please use the original packaging and include all parts and accessories. We reserve
the right to refuse incomplete or badly packaged returns.
16
Disclaimer
Imagination Technologies Limited makes no representation or warranties with respect to the
content of this document and specifically disclaims any implied warranties of merchantability or
fitness for any particular purpose. Further, Imagination Technologies Limited reserves the right to
revise this publication and to make changes in it from time to time without obligation of Imagination
Technologies Limited to notify any person or organization of such revisions or changes.
Acknowledgement of License Agreements
Portions of the code used in ONE Flow are subject to the following licenses and copyright:
GNU General Public License Version 2 (GPLv2). For the full text of the license agreement go to
www.gnu.org/licenses/gpl-2.0.txt
GNU Lesser General Public License Version 2.1 (LGPLv2.1). For the full text of the license
agreement go to www.gnu.org/licenses/lgpl-2.1.txt
 Loading...