

PURE Milano Owner's Manual
Standby
Volume
Source
+ Menu Presets Alarm Sleep
Volume
–
–
Select
+
DK
Owner’s manual
Bedienungsanleitung
Manuel de l’utilisateur
Manuale dell’utente
Brugsvejledning

Safety instructions
Keep the radio away from heat sources.
Do not use the radio near water.
Avoid objects or liquids getting into the radio.
Do not remove screws from or open the radio casing.
Fit the mains adaptor to an easily accessible socket,
located near the radio and ONLY use the mains
power adapter supplied.
Copyright
Copyright 2009 by Imagination Technologies Limited.
All rights reserved. No part of this publication may
be copied or distributed, transmitted, transcribed,
stored in a retrieval system, or translated into any
human or computer language, in any form or by any
means, electronic, mechanical, magnetic, manual or
otherwise, or disclosed to third parties without the express
written permission of Imagination Technologies Limited.
Trademarks
Milano, textSCAN, Intellitext, PURE, the PURE logo,
PURE Digital, the PURE Digital logo, EcoPlus, the
EcoPlus logo, Imagination Technologies, and the
Imagination Technologies logo are trademarks or
registered trademarks of Imagination Technologies
Limited. All other product names are trademarks of
their respective companies. Version 1. February 2009.
Sicherheitshinweise
Halten Sie das Radio fern von Heizquellen.
Benutzen Sie das Radio nicht in der Nähe von Wasser.
Verhindern Sie, dass Gegenstände oder Flüssigkeiten
in das Radio gelangen.
Entfernen Sie keine Schrauben vom Gehäuse und
öffnen Sie dieses nicht.
Schließen Sie das Netzteil an eine leicht erreichbare
Steckdose in der Nähe des Radios an, und benutzen
Sie AUSSCHLIESSLICH das mitgelieferte Netzteil.
Consignes de sécurité
Tenir la radio éloignée de toute source de chaleur.
Ne pas utiliser la radio à proximité d’un point d’eau.
Éviter que des objets ou des liquides ne pénètrent à
l’intérieur de la radio.
Ne pas ouvrir le boîtier de la radio ou en enlever
les vis.
Branchez l’adaptateur sur une prise de courant
facilement accessible, à proximité de la radio et
utilisez UNIQUEMENT l’adaptateur fourni.
Istruzioni di sicurezza
Tenere la radio lontana da fonti di calore.
Non utilizzare la radio vicino all’acqua.
Evitare che oggetti o liquidi penetrino nella radio.
Non rimuovere le viti né aprire l’involucro della radio.
Collegare l’adattatore di rete ad una presa della
corrente facilmente accessibile, situata vicino alla
radio e utilizzare ESCLUSIVAMENTE l’adattatore di
rete fornito.
Copyright
Copyright 2009 by Imagination Technologies Limited.
Alle Rechte vorbehalten. Kein Teil dieser Publikation
darf ohne ausdrückliche und schriftliche Zustimmung
von Imagination Technologies Limited in irgendeiner
Form (elektronisch, mechanisch, magnetisch, manuell
oder auf andere Weise) kopiert, verteilt, übermittelt,
überschrieben, in einem Suchsystem gespeichert, in
eine andere natürliche oder Computersprache
übersetzt oder Dritten zugänglich gemacht werden.
Copyright
Copyright 2009 Imagination Technologies Limited. Tous droits
réservés. Aucune partie de la présente publication ne doit
être copiée ou diffusée, transmise, retranscrite, stockée
dans un système de récupération de données ou traduite,
que ce soit dans une langue humaine ou dans un langage
informatique, sous quelque forme et par quelque moyen que
ce soit, électronique, mécanique, magnétique, manuel ou
autre, ou encore diffusée auprès de tiers sans autorisation
écrite expresse de Imagination Technologies Limited.
Copyright
Copyright 2009 by Imagination Technologies Limited. Tutti i
diritti riservati. Nessuna parte della presente pubblicazione
può essere copiata o distribuita, trasmessa, trascritta,
memorizzata in un sistema di archiviazione, o tradotta
in un formato normalmente comprensibile, in qualsiasi
forma o con qualsiasi mezzo, elettronico, meccanico,
magnetico, manuale o altro, o divulgata a terze parti senza
il permesso scritto di Imagination Technologies Limited.
Warenzeichen
Milano, textSCAN, Intellitext, PURE, das PURE Logo,
PURE Digital, das PURE Digital Logo, EcoPlus, das
EcoPlus Logo, Imagination Technologies und das
Imagination Technologies Logo sind Warenzeichen oder
eingetragene Warenzeichen von Imagination Technologies
Limited. Alle anderen Produktnamen sind Warenzeichen
ihrer jeweiligen Besitzer. Version 1. Februar 2009.
Marques commerciales
Milano, textSCAN, Intellitext, PURE, le logo PURE, PURE
Digital, le logo PURE Digital, EcoPlus, le logo EcoPlus,
Imagination Technologies et le logo Imagination Technologies
sont des marques commerciales ou des marques déposées
de Imagination Technologies Limited. Tous les autres
noms de produits sont des marques commerciales de
leurs détenteurs respectifs. Version 1. Février 2009.
Marchi
Milano, textSCAN, Intellitext, PURE, il logo PURE, PURE
Digital, il logo PURE Digital, EcoPlus, il logo EcoPlus,
Imagination Technologies e il logo Imagination Technologies
sono marchi o marchi registrati di Imagination Technologies
Limited. Tutti gli altri nomi di prodotti sono marchi di
proprietà delle rispettive società. Versione 1 Febbraio 2009.
Sikkerhedsforskrifter
Hold radioen på afstand af varmekilder.
Brug ikke radioen i nærheden af vand.
Undgå at der kommer genstande eller væske
i radioen.Fjern ikke skruer fra og åbn ikke
radiokabinettet.De bør tilslutte strømforsyningen til
et lettilgængeligt strømudtag tæt på radioen. De bør
KUN bruge den medfølgende strømforsyning.
Copyright
Copyright 2009 tilhører Imagination Technologies Limited.
Alle rettigheder forbeholdes. Ingen dele af denne publikation
må kopieres eller distribueres, transmitteres, omskrives,
gemmes i et system, hvor den kan hentes, eller oversættes
til menneskeligt forståeligt sprog eller computersprog, i nogen
som helst form eller med nogen som helst midler, det være
sig elektroniske, mekaniske, magnetiske, manuelle eller på
anden måde, eller fremvises til tredje parter uden udtrykkelig,
skriftlig tilladelse fra Imagination Technologies Limited.
Varemærker
Milano, textSCAN, Intellitext, PURE, PURE-logoet, PURE
Digital, PURE Digital-logoet, EcoPlus, EcoPlus-logoet,
Imagination Technologies og Imagination Technologieslogoet er varemærker eller registrerede varemærker,
der tilhører Imagination Technologies Limited. Alle
andre produktnavne er varemærker, der tilhører deres
respektive virksomheder. Version 1. Februar 2009.

Contents
Start ...................................................................2
Quick set up ............................................................................... 2
Overview of controls and connectors ............................................. 3
Symbols on the screen ................................................................ 3
Using the radio ....................................................4
Switching between DAB and FM ................................................... 4
Changing stations ....................................................................... 4
Using textSCAN™ to pause and control scrolling text...................... 4
Changing the information shown on screen ................................... 5
Storing and selecting presets ....................................................... 5
Setting alarms .....................................................6
Setting an alarm − quick guide .................................................... 6
Setting an alarm − step-by-step guide .......................................... 6
Waking up ...........................................................8
Cancelling an alarm .................................................................... 8
Snoozing an alarm ...................................................................... 8
Cancelling an alarm that you have snoozed ................................... 8
Changing the alarm snooze time .................................................. 8
Extra features ......................................................9
Set the sleep timer .................................................................... 9
Cancel the sleep timer ................................................................ 9
Intellitext® .................................................................................. 9
Options ..............................................................10
Options available in DAB ............................................................ 10
Options available in FM .............................................................. 10
General options ......................................................................... 11
Help and specifications .......................................12
Secondary and inactive stations .................................................. 12
Troubleshooting ......................................................................... 12
Technical Specifications ............................................................. 12
1
Start
Quick set up > Overview of controls and connectors > Symbols on the screen
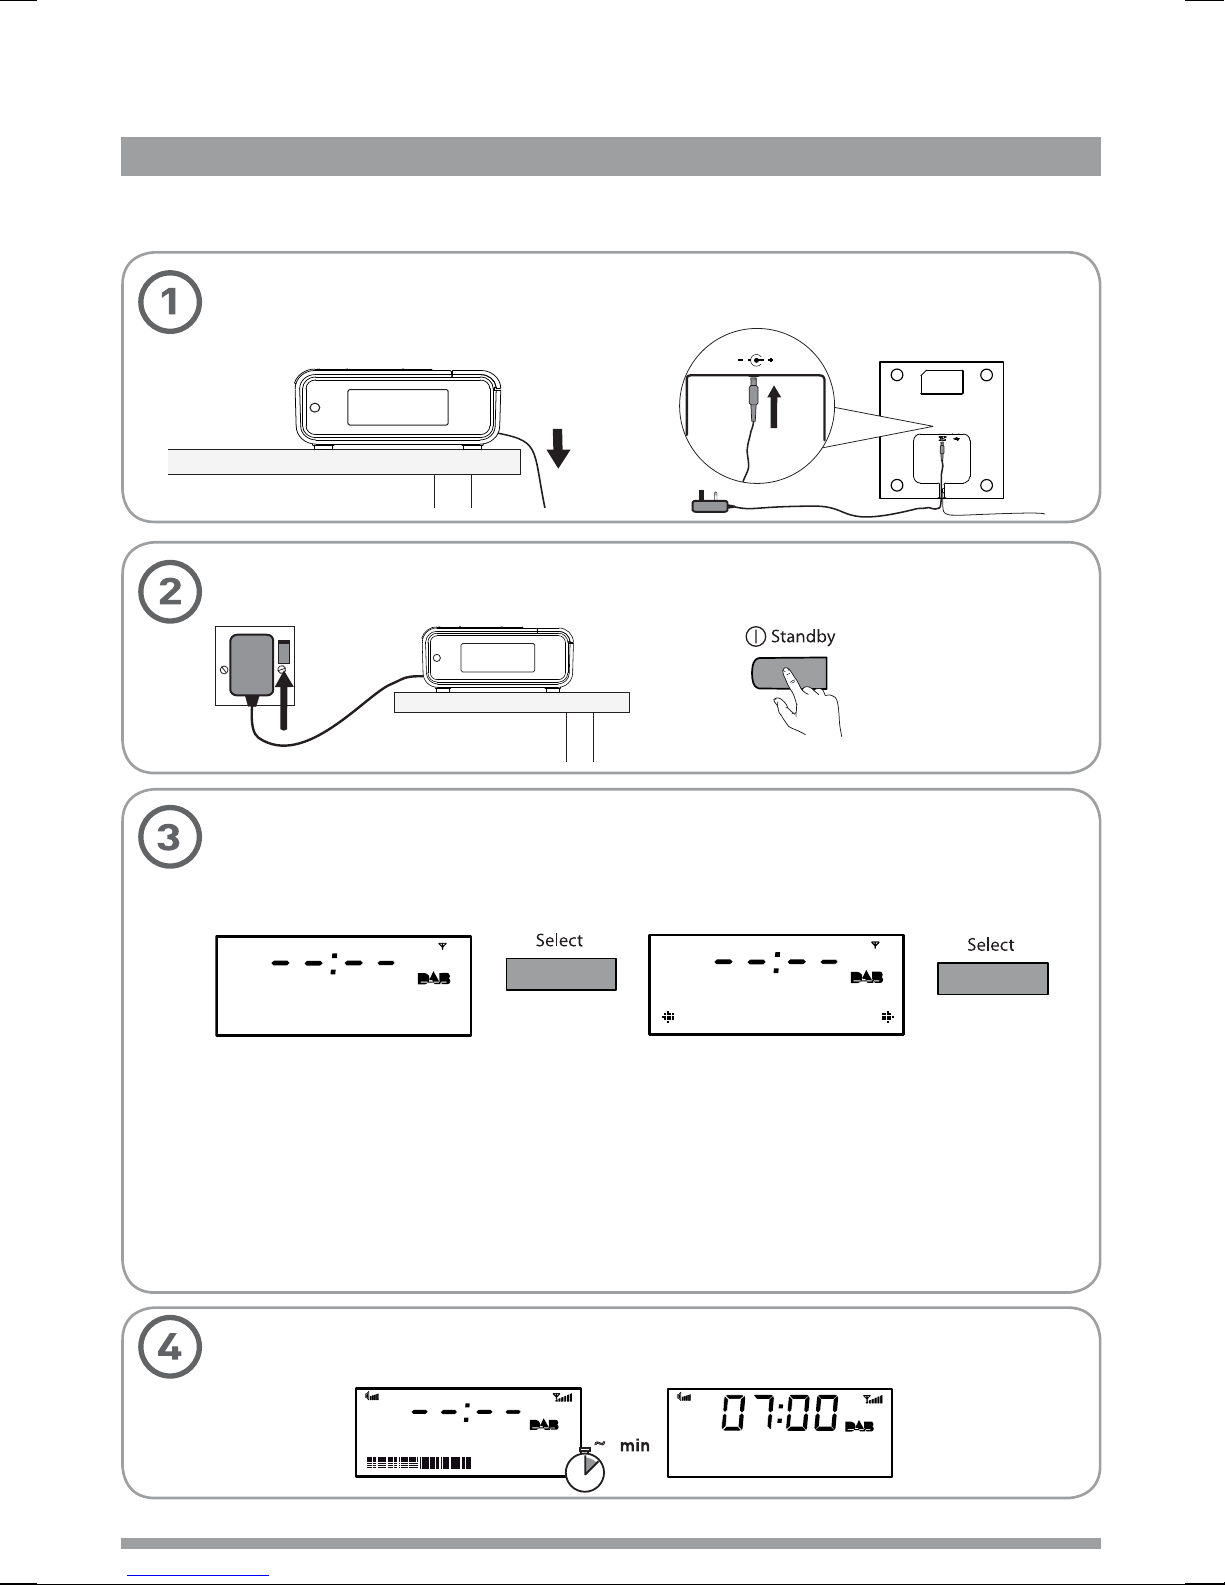
Quick set up
Uncoil the aerial wire and hang it vertically, then connect the mains adapter to the
bottom of the unit as shown.
Plug the mains adapter into the mains supply and press the Standby button.
5.5V DC
Set energy saving mode.
Press the Select button when you see the message ‘Enable energy saving?’.
Press Select again to switch on energy saving mode.
Enable energy
saving?
When energy saving mode is switched on, the radio uses less power because it does
not collect and store Intellitext messages in standby. It still collects and stores Intellitext
messages while the radio is switched on (see page 11).
With energy saving mode switched on, the power consumption of Milano in standby is
less than 1 Watt.
For more information: Intellitext
Wait until Milano completes an Autotune for available radio stations (about a minute).
> page 9 energy saving mode > page 11
Energy saving
On
PURE milano 32
Start
2
~
1
BBC Radio 2
Text the show on
C
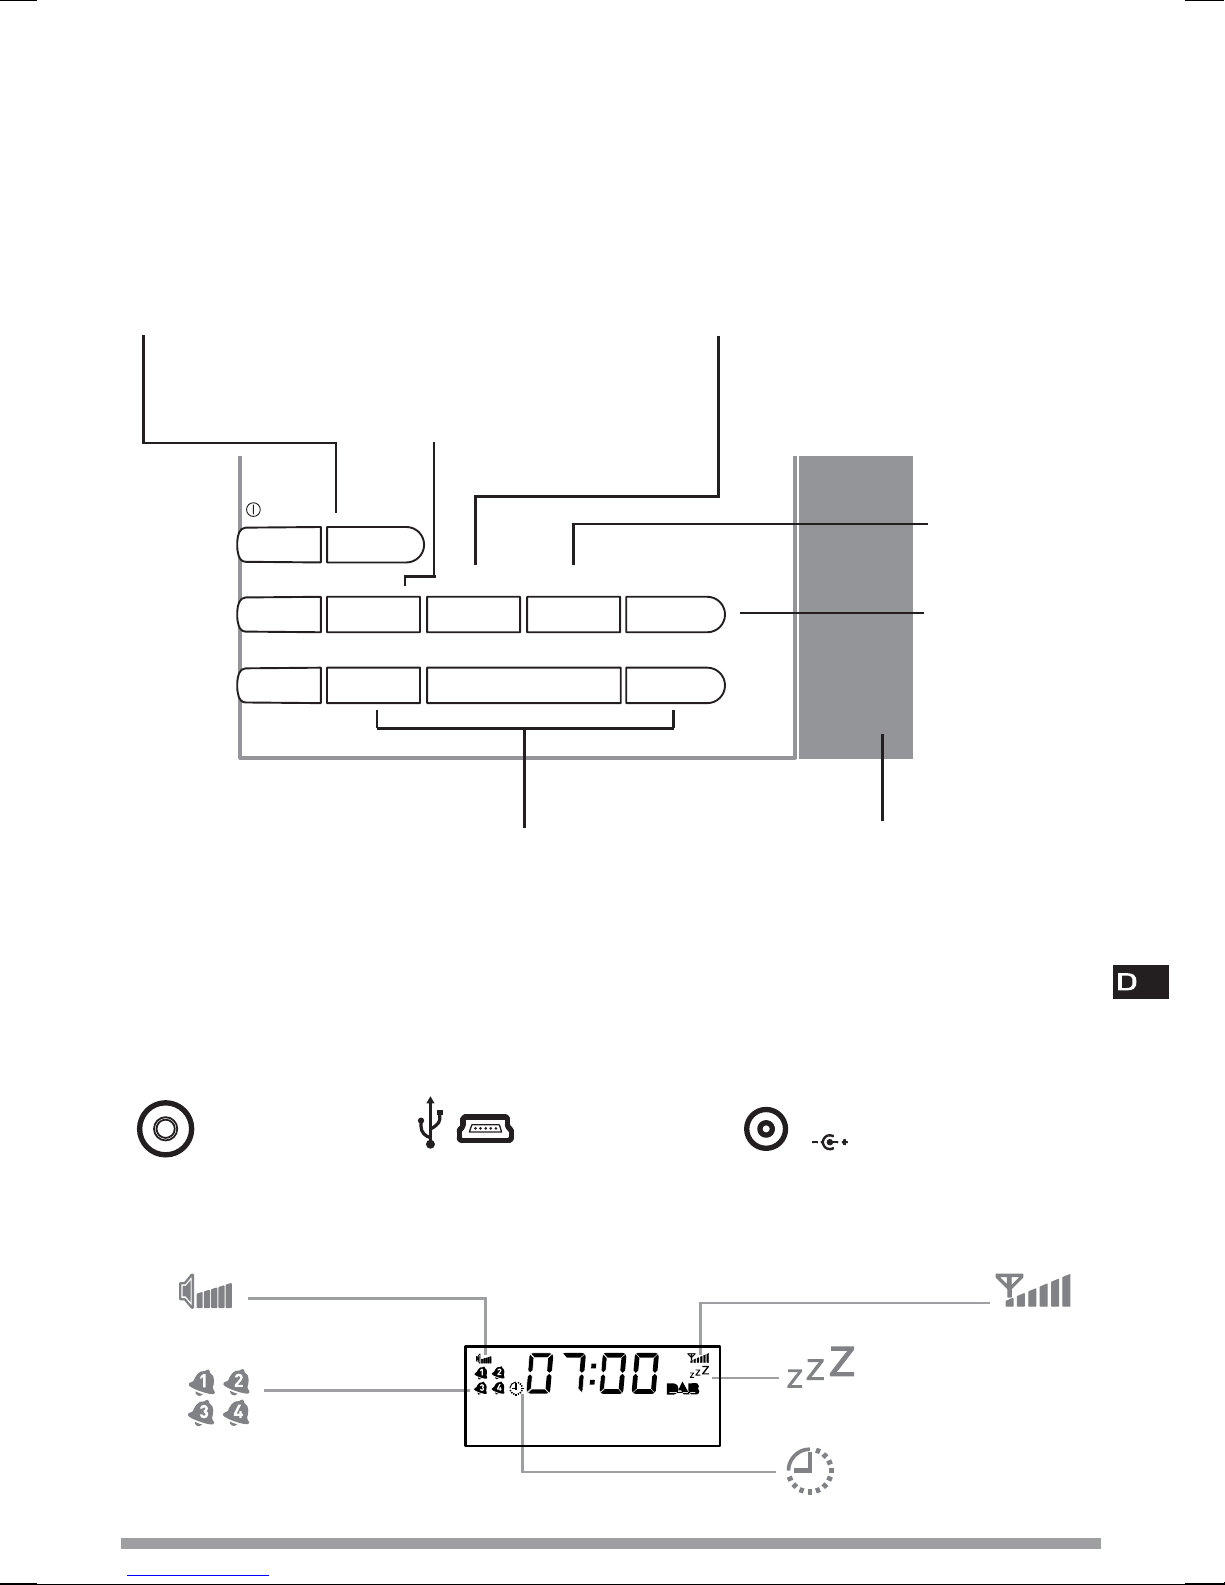
Overview of controls and connectors
Source
Switch between DAB
and FM > page 4
Standby
Volume
+ Menu Presets Alarm Sleep
–
Volume
Select and +/−
Source
–
Menu
Enter options menu
Info display > page 8
Browse Intellitext > page 9
Other options > pages 10-11
Select
+
Presets
Store and select
preset stations
> page 8
Alarm
Set 4 different alarms
> page 6
Sleep
Set sleep timer
> page 9
Snooze
Browse and select radio stations > page 4
Press to enter textSCAN > page 4
Scroll, change and confirm menu options
Side
3.5mm
headphone
socket
Symbols on the screen
Volume level
Alarm active
indicators > page 7
Underneath
USB input socket
(mini B type) for
upgrades
BBC Radio 2
Now playing: How
Snooze an alarm > page 8
Power input socket
5.5V D
for supplied 5.5V DC
mains adapter
Snoozed alarm > page 8
Sleep timer > page 9
Signal
strength
Start
3
Using the radio
DAB/FM > Change stations > Use textSCAN™ > Change info on screen > Use presets
Switching between DAB and FM
Press the Source button to switch between DAB and FM.
BBC Radio 2
test your knowle
'&$<7i5<
Changing stations
When listening to DAB
1. Press the +/− buttons to browse through the list of available stations.
BBC Radio 2
test your knowle
2. Press the Select button to tune.
SMOOTH radio
text your reques
When listening to FM
Press +/− to step up or down 0.05 MHz.
BBC Radio 2
SMOOTH Radio
Hold and release +/− to scan to the next station with a strong signal.
Using textSCAN™ to pause and control scrolling text
1. When scrolling text is shown press Select to pause the scrolling text.
BBC Radio 6Music
favourite track
2. Press +/− to move left and right through the scrolling text. To exit textSCAN press Select.
Using the radio
4
BBC Radio 6Music
avourite track
BBC Radio 6Music
vote for your
Exit
Changing the information shown on screen
1. In DAB or FM, press the Menu button then press Select to access the ‘Info display’ options.
Info display
2. Change the current information display option using +/− to browse and select to choose:
Scrolling text Info broadcast by most DAB stations and FM (RDS) stations.
Date Displays the current date below the station name.
Programme type Content broadcast by the current station, e.g., Pop Music.
(Menu > Info display)
Scrolling text
Scrolling text
Sig. strength
Sig. quality Displays DAB signal quality: 85 to 100 Good, 70 to 84 OK, 0 to 69 poor.
Bit Rate Displays DAB signal data rate and a stereo or mono indicator.
Multiplex name Displays the DAB multiplex in which the current station is broadcast.
Multiplex info Displays the channel and frequency of the current Multiplex, e.g., 12B.
Mono/stereo (FM) Indicates stereo or mono sound (only available in FM).
Displays a signal strength meter.
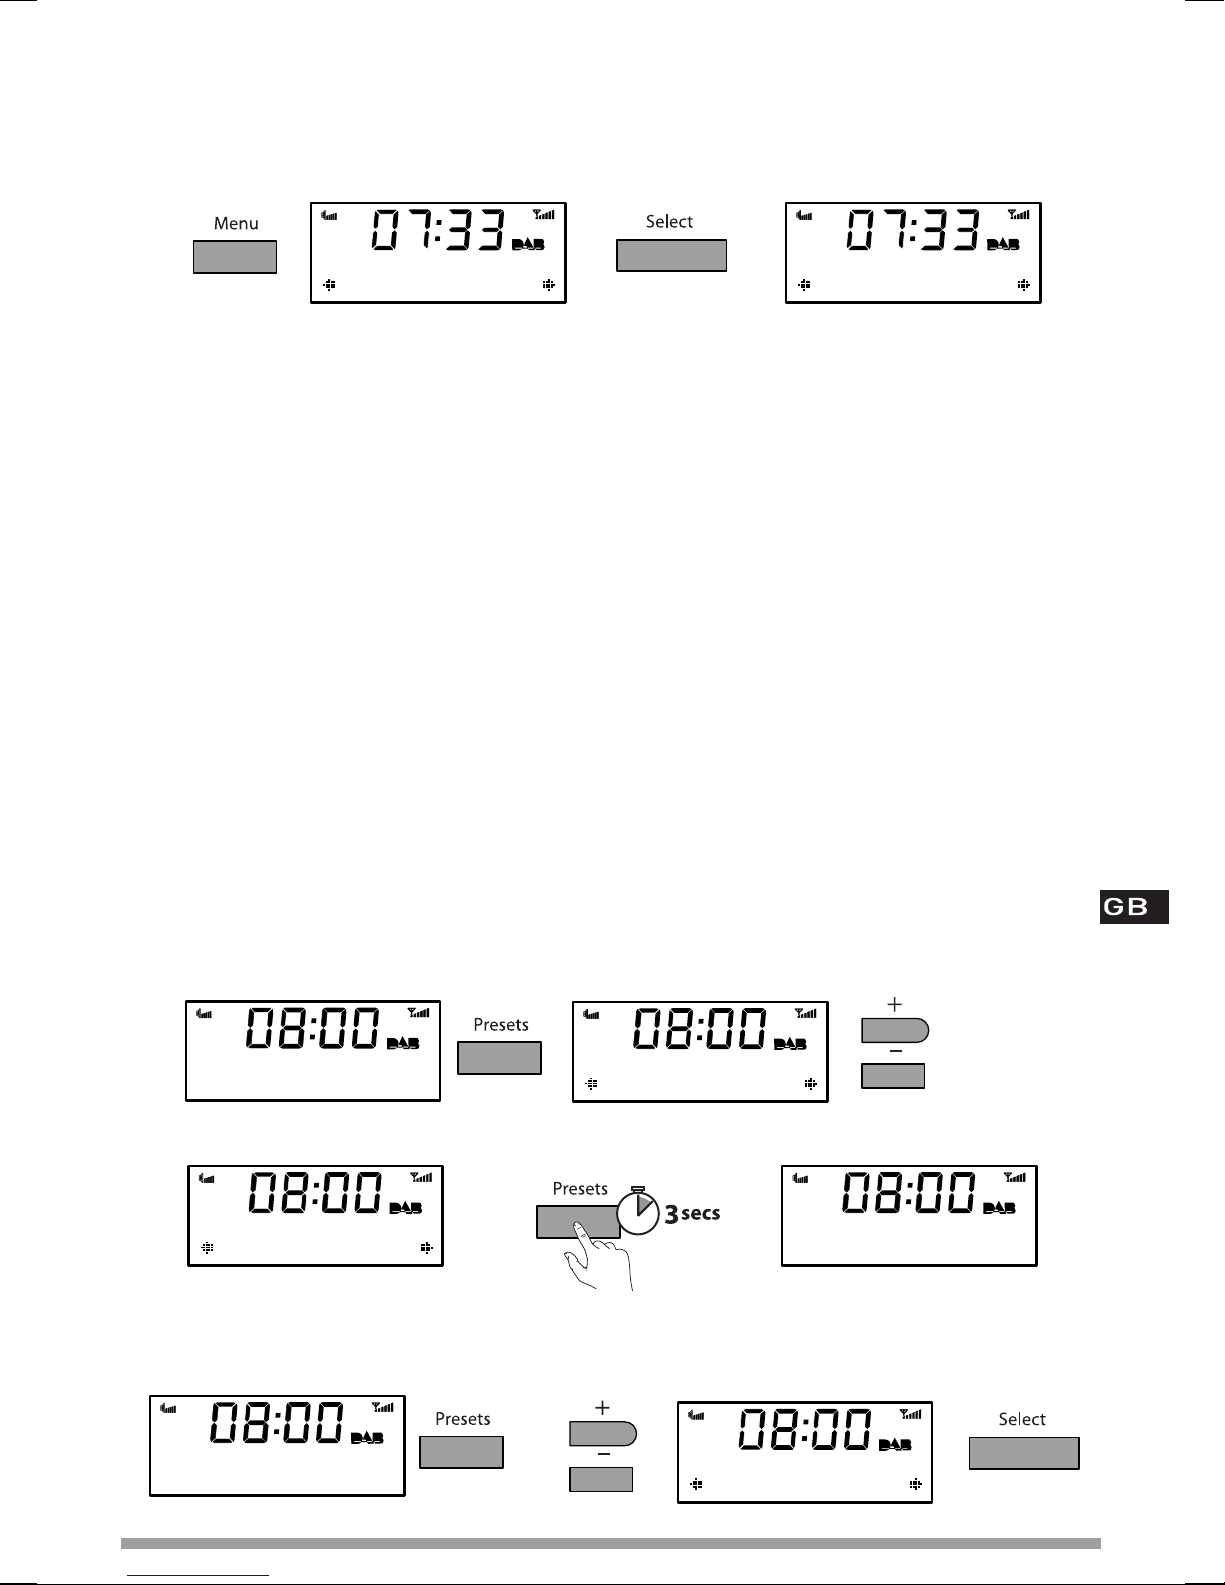
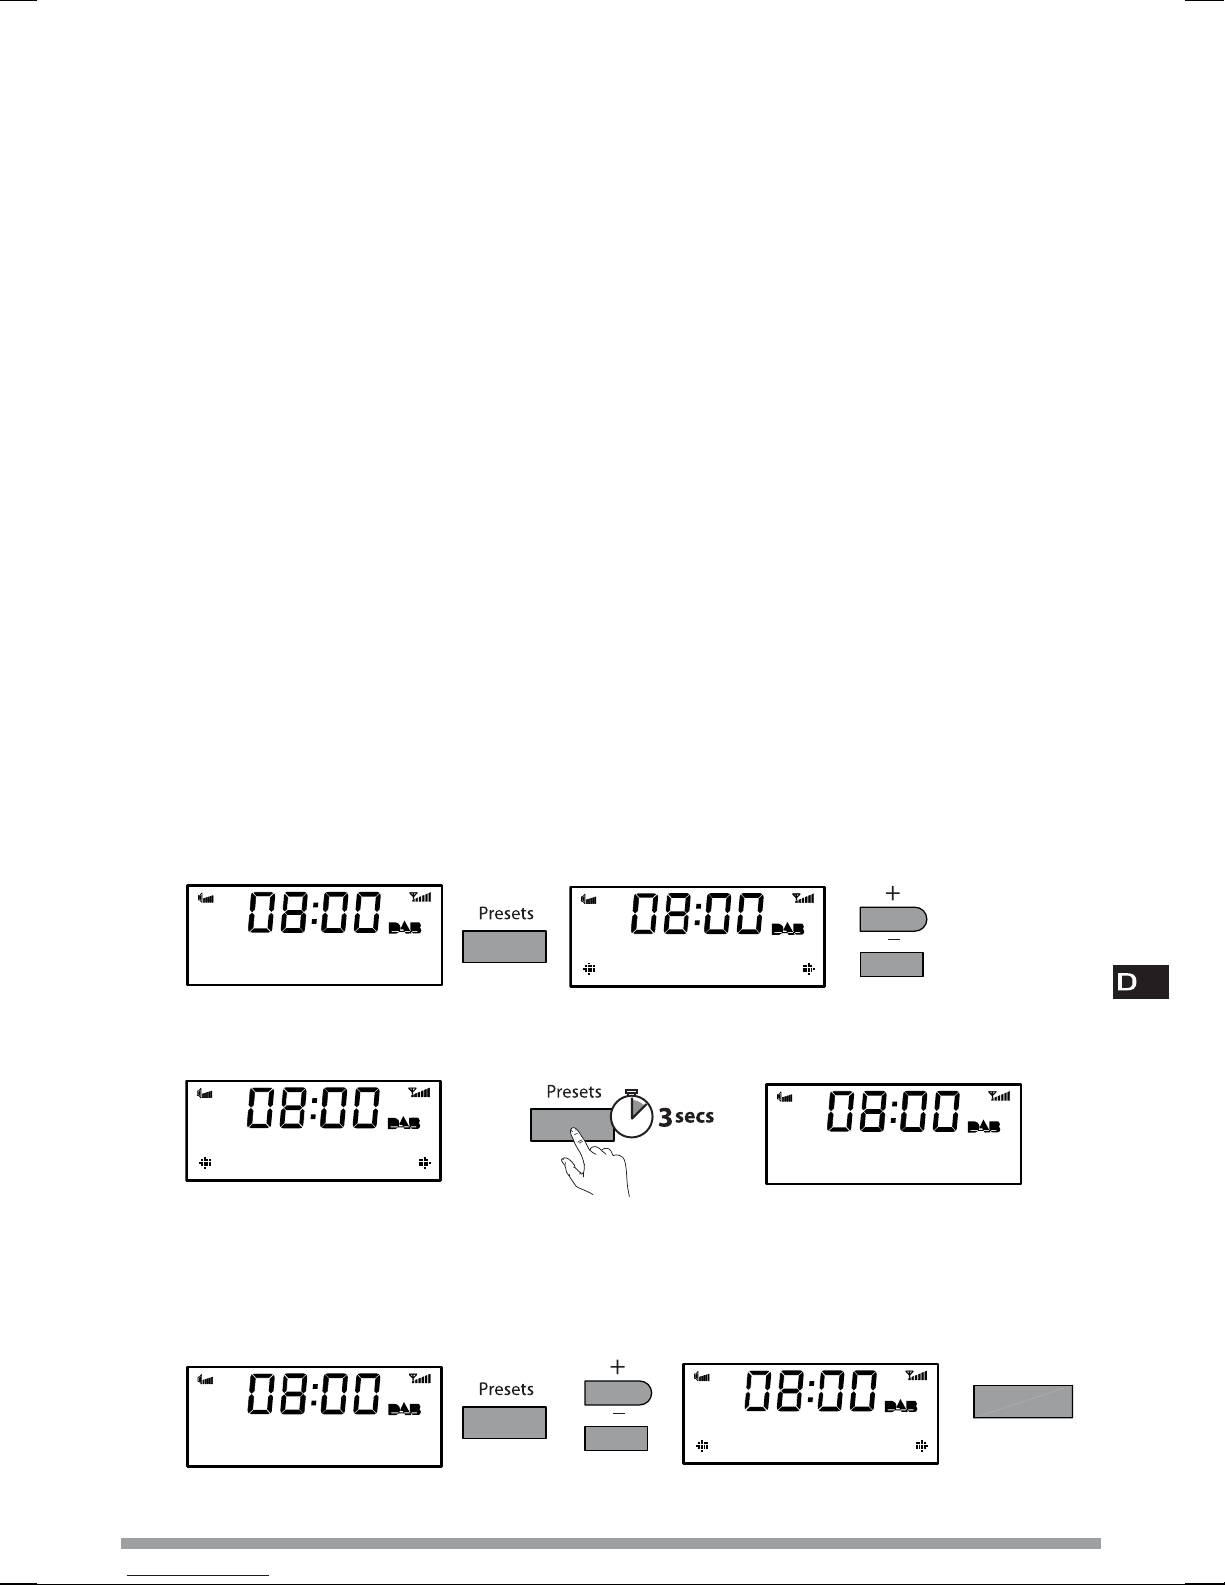
Storing and selecting presets
Store up to 10 DAB and 10 FM radio stations for easy access to your favourite stations.
To store a preset
1. Tune to the DAB or FM station you want to store.
2. Press the Presets button and use +/− to scroll to a preset number between 1 and 10.
SMOOTH Radio
by Luther Vandro
Preset 04
Empty preset
3. Press and hold the Presets or Select button for 3 seconds until you see ‘Preset saved’ message.
Preset 04
To select a preset
When listening to DAB or FM, press Presets to access the DAB or FM preset list. Use +/− to
browse to the stored preset number, e.g. Preset 2, and press Select to listen.
Absolute Radio
SMOOTH Radio
Preset 04 saved Empty preset
Preset 04
Smooth Radio
Using the radio
5
Setting alarms
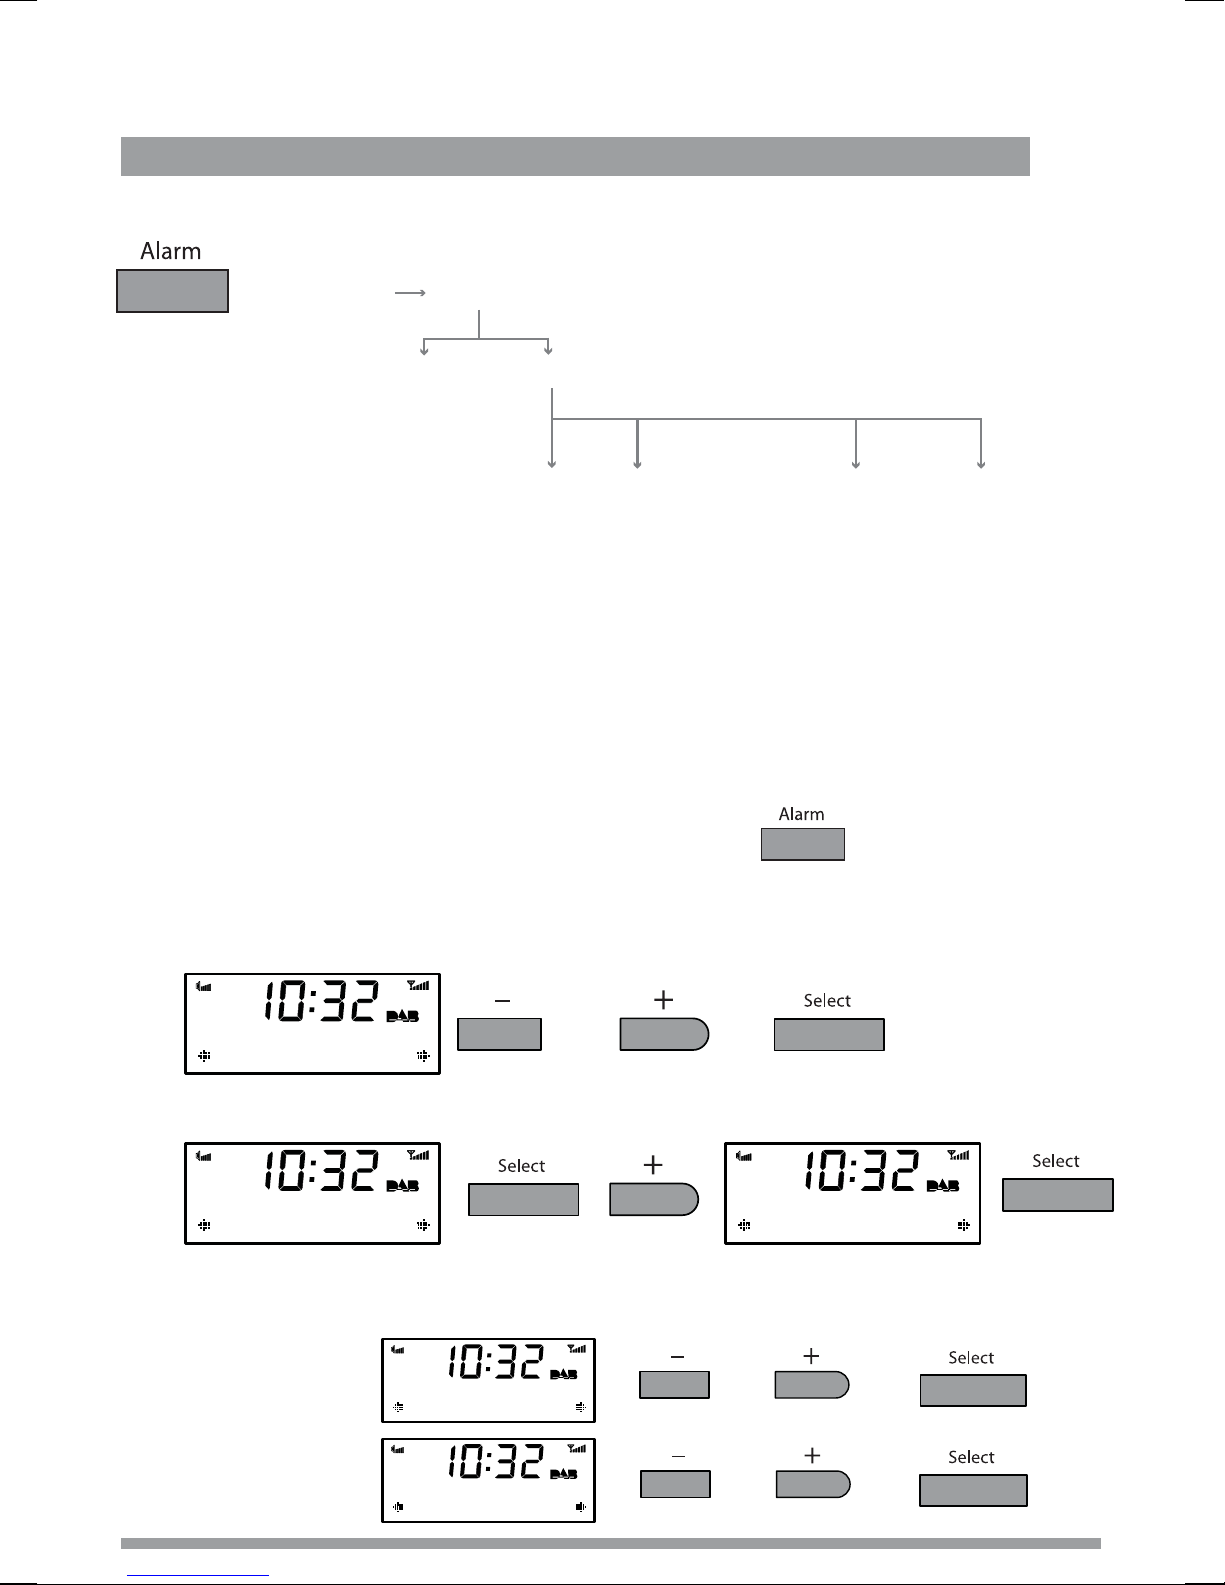
Quick guide > Step-by-step guide > Changing an alarm that you have set
Setting an alarm − quick guide
Alarm 1/2/3/4
(alarm will
not sound)
Set alarm
OFF
ON
Set time
Hours
Minutes
Set days
Daily Saturday
Weekday Sunday
Weekend Once only
Set mode
DAB
FM
Tone
Alarm volume
Vol 1-20
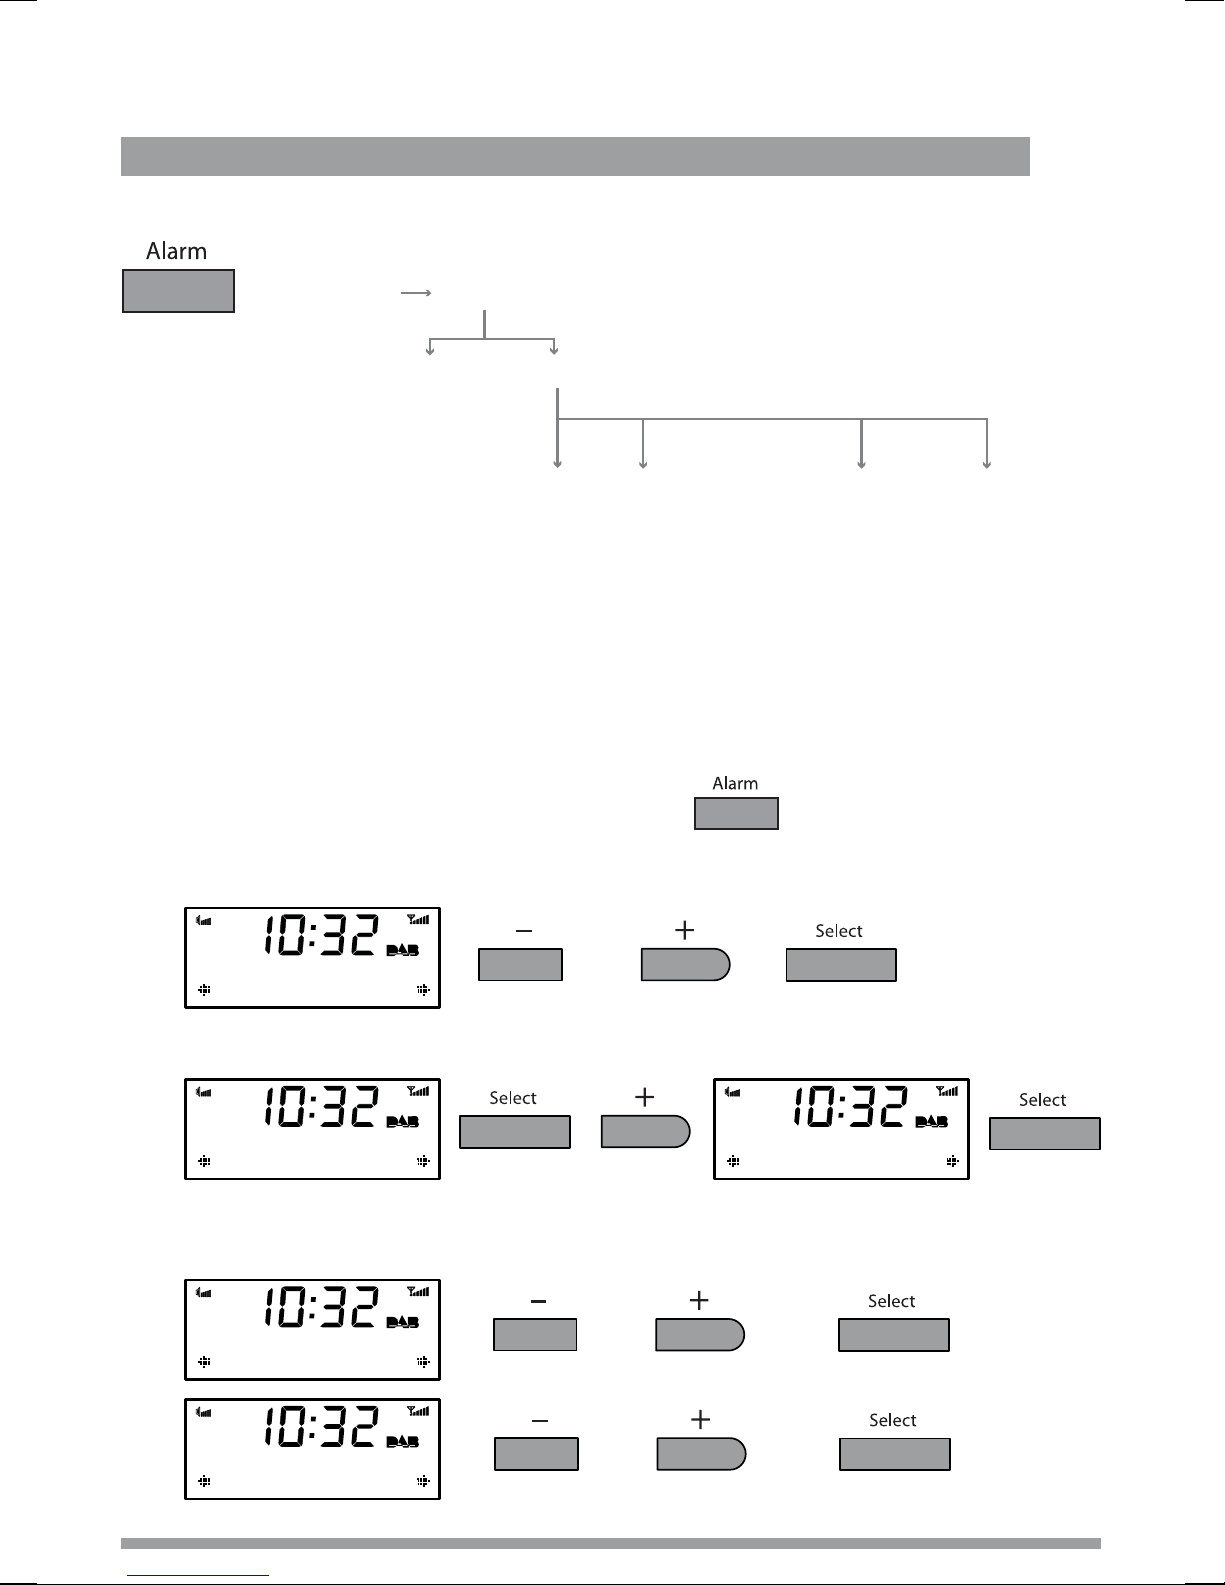
Setting an alarm − step-by-step guide
Milano has four alarms which you can set to sound at different times as either DAB, FM or tone
alarms. DAB and FM alarms switch your radio on (if in standby) and tune to the DAB or FM
station you last listened to; tone alarms sound an alarm tone.
1. Press the Alarm button to access the alarm menu.
2. Choose either Alarm 1, 2, 3 or 4 using +/− and Select.
07:00 Daily Off
Alarm 1
3. Select ‘Set alarm’ and choose ‘On’ to turn the alarm on.
Off
Set alarm
Alarm Off
Alarm On
4. Select ‘Set time’ to set the time you want the alarm to sound. Adjust the hours using +/−
and press Select to confirm, then adjust the minutes in the same way.
07:00
07:00 Set hour
07:00
07:30 Set mins
Setting alarms
6
5. Select ‘Set days’. Choose when you want the alarm to repeat by pressing +/− to choose and
Select to confirm. The following options are available:
Daily Every day.
Weekday Monday − Friday, every week.
Weekend Every weekend.
If you want to set
a ‘one-off’ alarm
choose ‘Once only’.
Saturday Every Saturday.
Sunday Every Sunday
Once only The alarm will sound at the time you have selected and not recur.
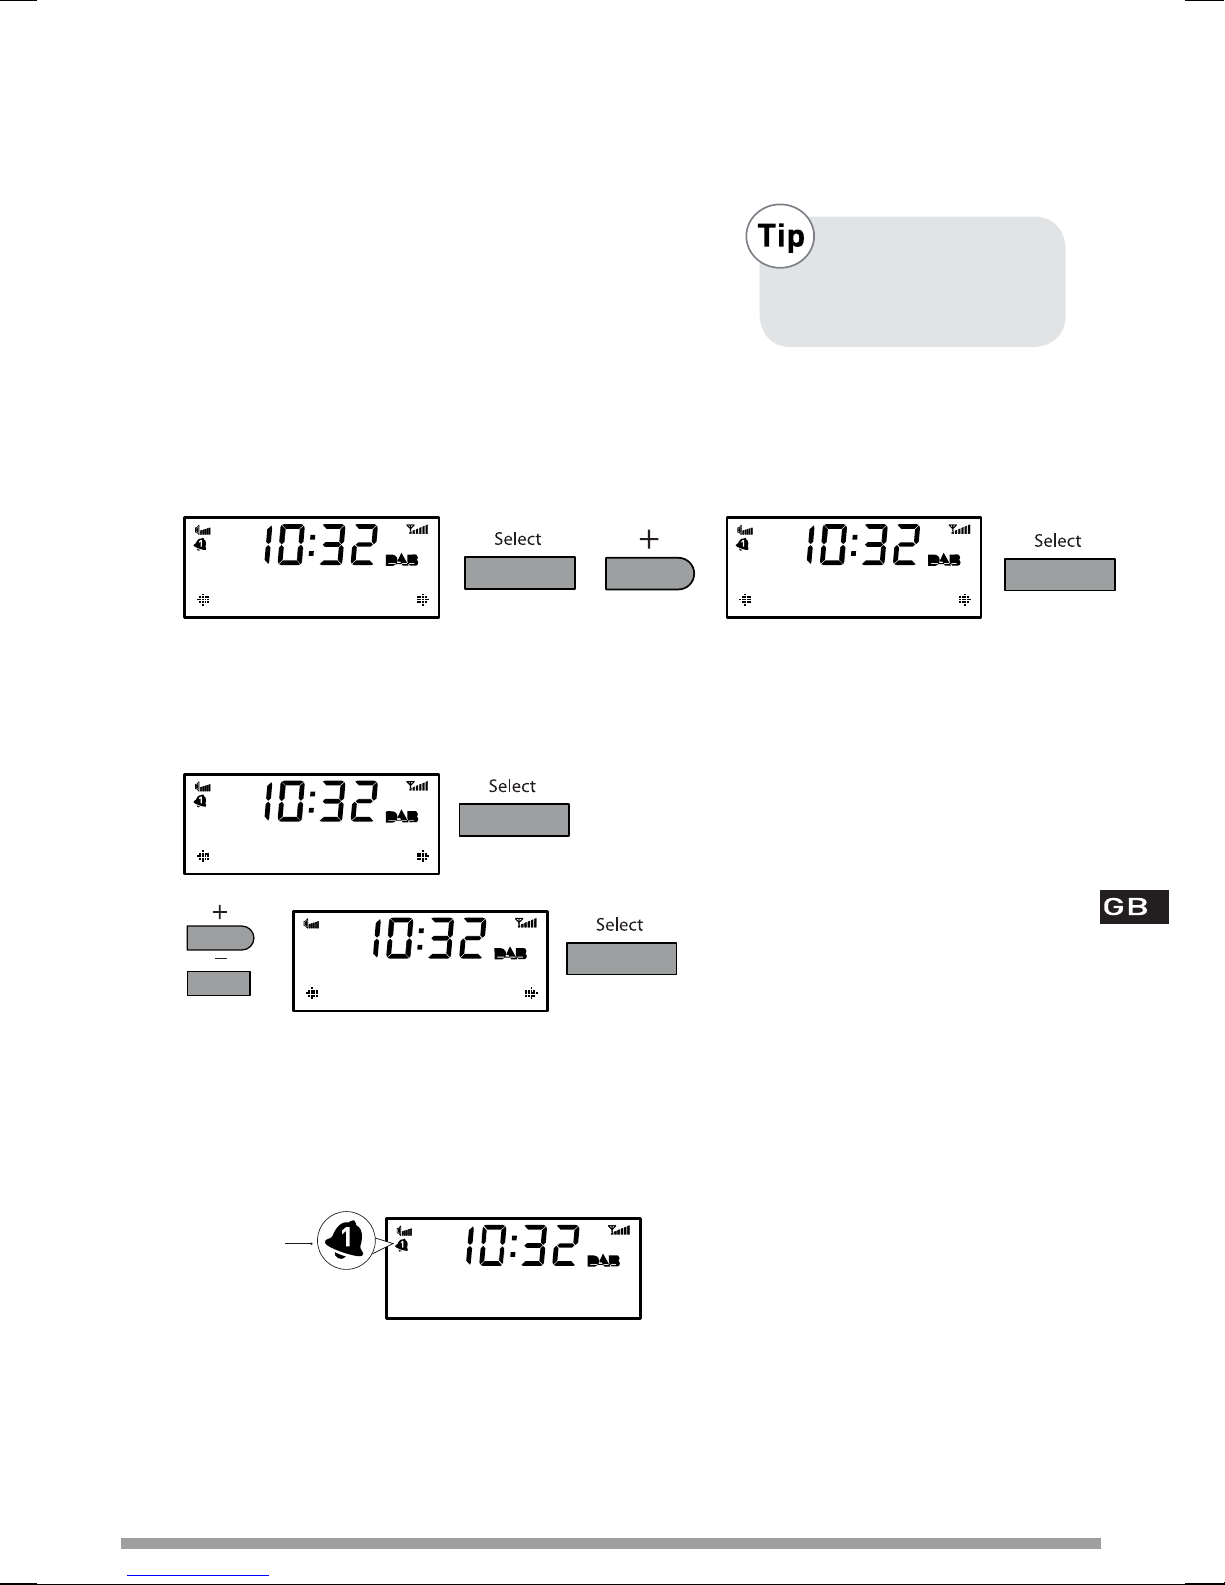
6. Select ‘Set Mode’ to choose the type of alarm you want: DAB, FM or Tone.
DAB
Set Mode
DAB
Tone
If you select DAB or FM the alarm will tune to the station that was most recently listened to.
7. Finally, set the volume of the alarm from 1 to 20 using the +/- buttons
(not applicable for tone alarms).
08
Alarm volume
09
11 set volume
That’s it! You can easily see which alarms are currently switched on by looking at the
alarm bell icons on the screen, in either active or standby mode. When an alarm is sounding,
the alarm clock icon will flash.
For example:
Alarm 1 is
currently
switched on
BBC Radio 1
go online now to
Changing an alarm that you have set
You can change the settings for an alarm by pressing Alarm and adjusting the settings as
described above. Remember, you can do this when Milano is switched on or in standby.
Setting alarms
7
Waking up
Cancel an alarm > Snooze > Cancel a snooze > Change the snooze time
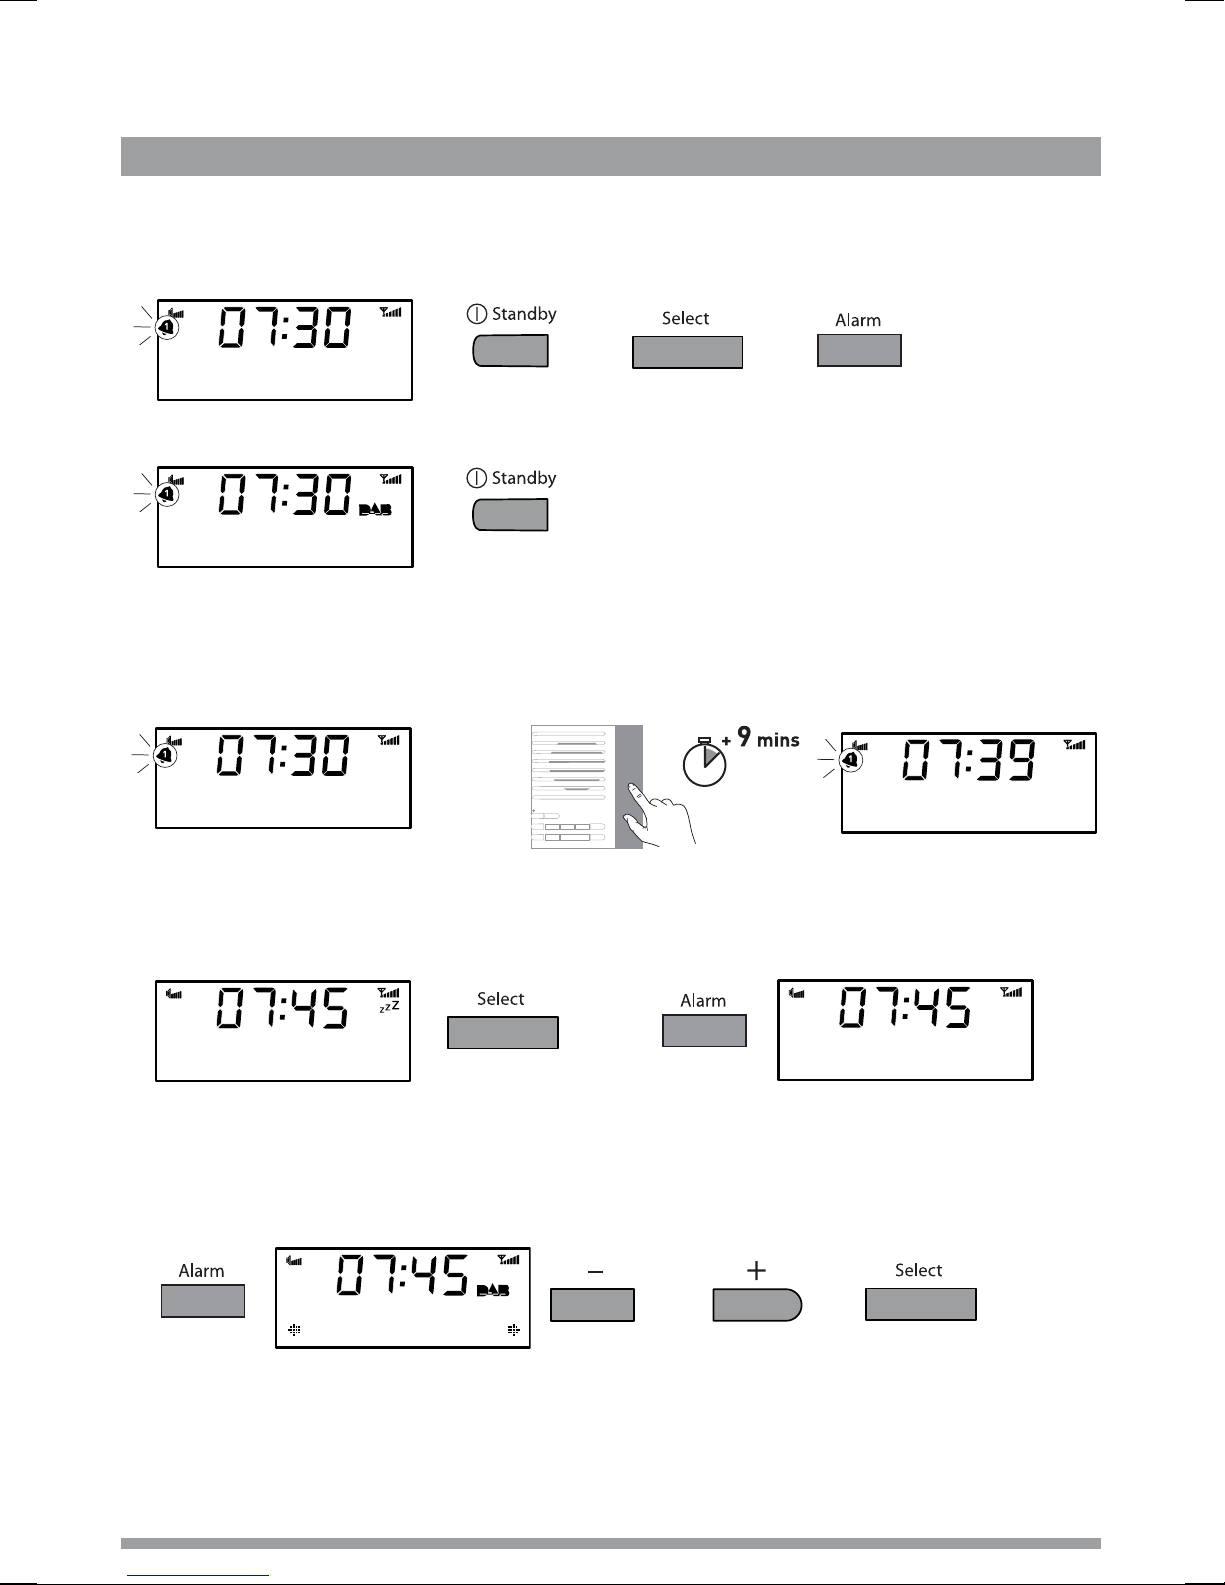
Cancelling an alarm
To cancel a tone alarm
or
or
To cancel a radio alarm
press any button
or
(except Volume +/–)
BBC Radio 1
Breakfast Show
(switches the unit into standby)
Snoozing an alarm
To temporarily silence an alarm press the Snooze bar. The alarm will pause and Milano will return
to standby before sounding the alarm again after 9 minutes have elapsed.
Cancelling an alarm that you have snoozed
To cancel a snooze countdown and leave the unit in standby, press either the Alarm or Select
button, or press the Standby button to turn the radio on and cancel the snooze countdown.
Standby Source
Volume
+ Menu Presets Alarm Sleep
–
Volume
–
Select
+
Changing the alarm snooze time
Press Alarm and select ‘Snooze time’. Use +/− to change between 5 and 60 minutes and press
Select to confirm.
09
Snooze time
Alarm time-out
Note that a sounding alarm will stop after one hour if no buttons are pressed (excluding the
volume buttons).
Waking up
8
or
Alarm Cancelled
(Alarm > Snooze time)
Extra features
Set the sleep timer > Cancel the sleep timer > Use Intellitext
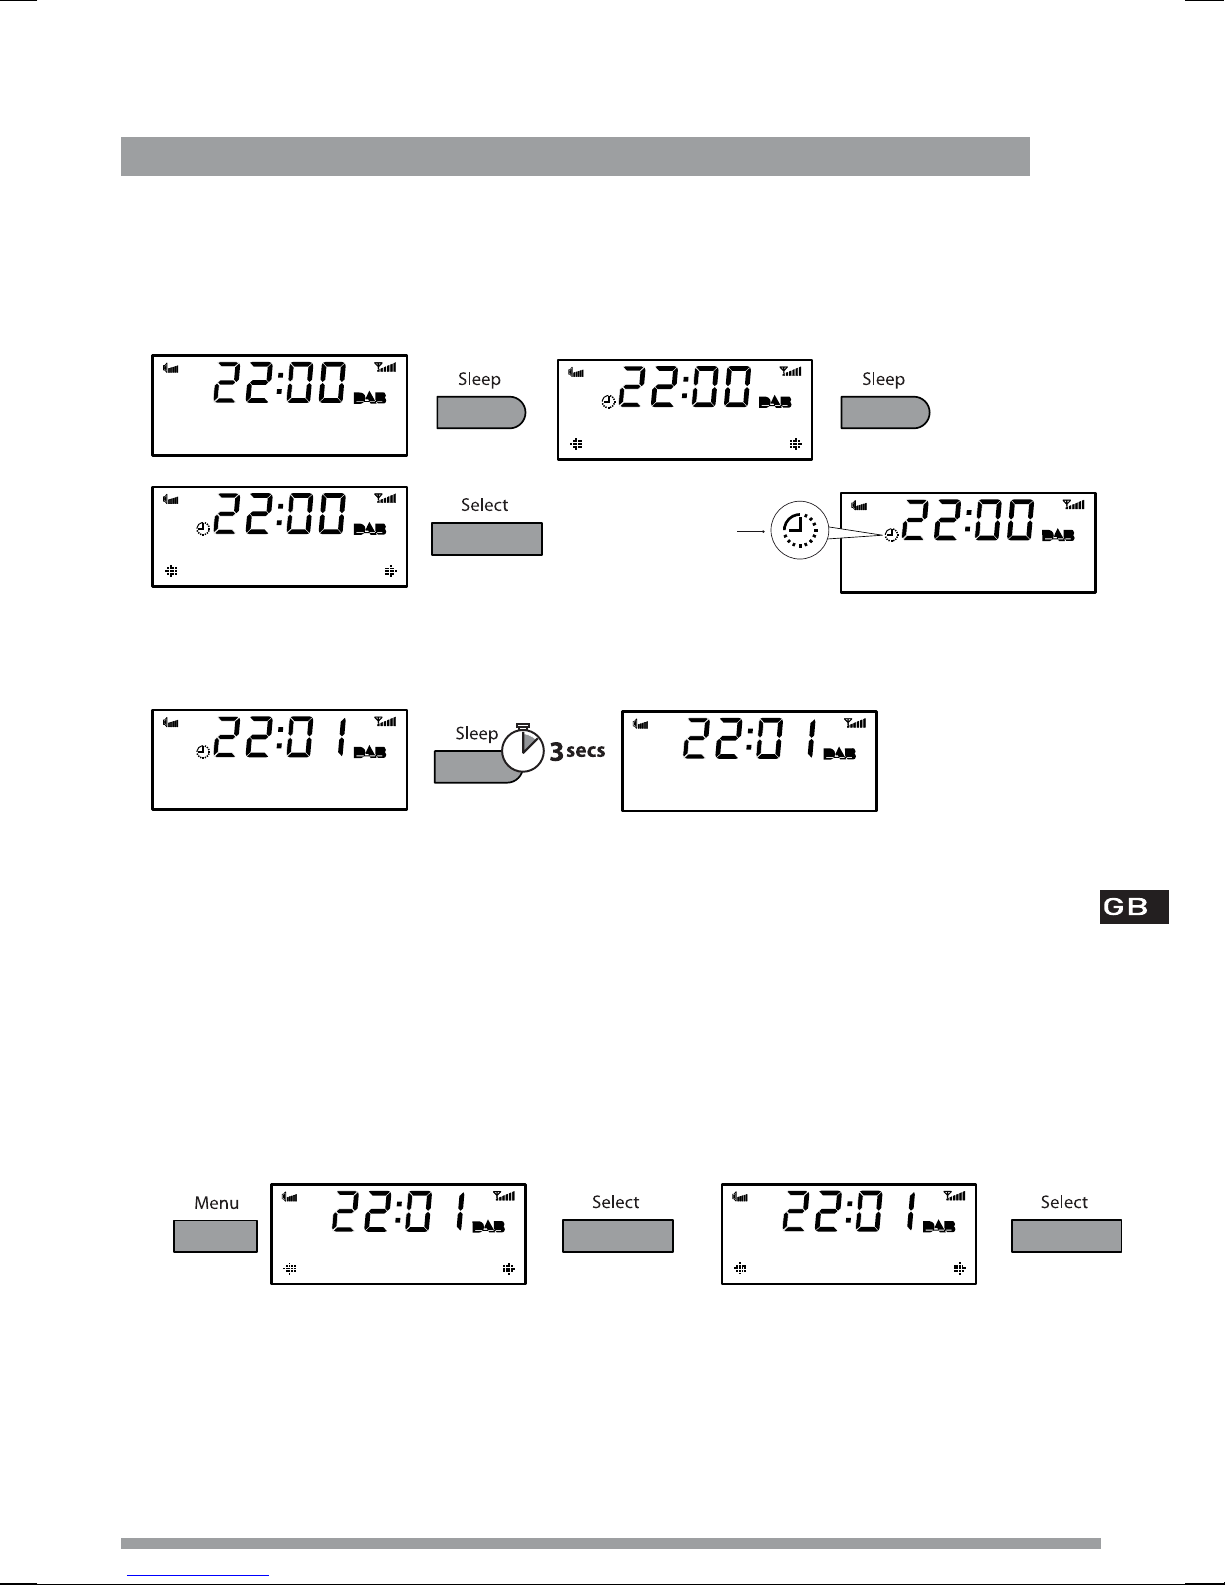
Set the sleep timer
The sleep timer switches your radio into standby after a number of minutes has elapsed.
Press the Sleep button and repeat to choose the duration of the sleep timer from 15 to 90
minutes, then press Select to confirm.
Planet Rock
erosmith - on to
Planet Rock
Sleep 30 mins
Planet Rock
Sleep 15 mins
Sleep timer
is currently
switched on
Planet Rock
aroline by Statu
Cancel the sleep timer
Press and hold Sleep for three seconds, or press sleep, cycle to ‘Sleep Off’ and press Select .
Planet Rock
uo. This is Plan
®
Intellitext
Intellitext provides on-demand text information such as sports headlines and news from DAB
stations. The text is updated by the broadcasters and stored in your radio while you listen to
stations. Intellitext is listed by station and split into categories. For example, the broadcaster may
send information on Football, Cricket, Headlines, etc.
(Menu > Intellitext)
Planet Rock
This is Planet R
To view Intellitext data
1. Press Menu and select Intellitext>View to view a list of stations for which you have Intellitext
information. Select a station and use +/− and Select to view Intellitext categories for that
station, e.g. talkSPORT > Football > News. The information will scroll across the screen.
Intellitext
View
You can use textSCAN when viewing the text by pressing Select (page 4). Intellitext is available for
stations that broadcast the service.
(Menu > Intellitext >View> station name)
View
talkSPORT
Extra features
9

Options
Options available in DAB > Options available in FM > General options
Press Menu to access the following options. Use +/− and Select to adjust options.
Options available in DAB
Intellitext options (Menu > Intellitext )
Set timeout
Choose to delete old Intellitext data after 1 week (default) or 1 day.
Clear all
Delete all stored Intellitext data immediately.
DRC value (Menu > DRC value)
DRC (Dynamic Range Control) value makes the quieter sounds in a DAB broadcast easier to hear
at low volume or in a noisy environment. Check with the broadcasters to find out if they use DRC.
DRC off Any DRC level broadcast will be ignored.
DRC half DRC level is set to half that sent with the broadcast.
DRC full Applies the DRC level as sent with the broadcast.
Station order (Menu > Station order)
Alphanumeric Lists all stations in alphanumeric (alphabetical) order.
Active station Lists active stations first on the station list.
Multiplex Lists stations in groups according to their multiplex.
Autotune (Menu > Autotune)
Scans all DAB Band III frequencies for stations and automatically adds any new stations found to
the station list. This may take a few minutes. To stop an Autotune press Menu.
Options available in FM
FM stereo mode (Menu > FM stereo mode)
Choose from Stereo or Mono (default) − mono may improve audio clarity where stereo signals are
weak.
Options
10

General options
Energy saving (Menu > Energy saving)
Milano is designed and manufactured to minimise power consumption when the unit is switched
on and to use less than 1 Watt in standby. One way this low power consumption is enabled is by
not collecting and storing Intellitext messages when the unit is in standby. You can override this
option by switching off energy saving mode, but this will increase standby power consumption.
Two options are available:
Energy saving On (the default setting)
Intellitext will be collected when you have been tuned for a short while to a station that
broadcasts Intellitext. Intellitext data is not collected in standby, reducing power consumption.
Energy saving Off
Milano collects Intellitext data in standby from the station you last viewed Intellitext data, which
increases standby power consumption.
Upgrade (Menu > Upgrade)
You can upgrade your Milano using a PC connected to the USB port. Upgrades may be issued
to provide enhanced functions or improve performance. To upgrade, select Upgrade and follow
the instructions provided with the upgrade software. Register your product and include an e-mail
address to receive notification of upgrades or visit our website at www.pure.com/support.
Note USB upgrade requires a PC (not Mac) running Microsoft
suitable USB cable (not included).
® Windows
TM
Vista/XP and a
Clock (Menu > Clock)
Set clock
Manually set the time and date if required. If you have good DAB reception these will
automatically be updated from the DAB radio signal.
12/24 Hr clock
Choose 12 hour or 24 hour clock display.
Warranty information
Imagination Technologies Ltd. warrants to the end user that this product will be free from defects in materials and
workmanship in the course of normal use for a period of two years from the date of purchase. This guarantee covers
breakdowns due to manufacturing or design faults; it does not apply in cases such as accidental damage, however
caused, wear and tear, negligence, adjustment, modification or repair not authorised by us. Please return your
warranty card or visit www.pure.com/register to register your product with us. Should you have a problem with your
unit please contact your supplier or contact PURE Support at the address shown on the rear of this manual. If you
need to return your product please use the original packaging and include all parts and accessories. We reserve the
right to refuse incomplete or badly packaged returns.
Options
11

Help and specifications
Secondary and inactive stations
Secondary DAB services
Secondary services accompany some stations, providing extra information or alternative content
and may only be broadcast at certain times. A secondary service has a ‘<<’ before its name in the
station list.
(?) Inactive or unavailable DAB stations
Inactive or unavailable stations are those which appear on the station list but are not currently
available. Inactive stations have a ‘?’ before their name on the station list. If you select a station
which has this symbol, your radio tries to tune in or returns to the previous station.
Troubleshooting
Display says ‘No stations available’
Use Autotune (page 10) to search for stations. Try adjusting your aerial or radio position.
Receiving new DAB stations that have started broadcasting
Use Autotune (page 10) to scan for new stations. Any new stations that you can receive will be
added to the station list.
Resetting your radio
Resetting your radio removes all presets and stored stations and resets all options to defaults.
1. Press and hold the Menu button for three seconds.
2. Press Select to confirm the reset or press no buttons to cancel the reset.
Technical Specifications
DAB Digital radio with full Band III and FM RDS reception. ETSI EN 300 401 compliant
and capable of decoding all DAB transmission modes 1-4 up to and including
256 kbps. DAB+ supported as standard.
Frequency ranges DAB Band III 174–240 MHz, FM 87.5–108 MHz.
Audio 3" full-range speaker. 1.7W RMS amplifier. Active speaker equalization filter.
Input connectors 5.5V DC power adaptor socket (230V supplied). USB connector for upgrades.
Output connectors 3.5mm stereo output for headphones.
LCD Display 16 x 2 characters, plus additional function icons. Auto-dimming backlight.
Mains power 230V AC to 5.5V (1A) DC external power adapter (supplied).
Power consumption Standby: 0.9 Watt. Active: 2.4 Watts average dependent on use.
Approvals CE marked. Compliant with the EMC and Low Voltage Directives 2004/108/EC
and 2006/95/EC).
Aerial Wire aerial attached.
Dimensions (mm) 135 wide x 150 deep x 58 high.
Help and specifications
12

Inhalt
Zu Beginn ............................................................2
Quick Setup - Schnellstart ........................................................... 2
Übersicht über Bedienelemente und Anschlüsse ............................ 3
Symbole auf dem Display ............................................................ 3
Verwendung des Radios ........................................4
Wechsel zwischen DAB und UKW .................................................. 4
Senderwechsel ........................................................................... 4
textSCAN™ zum Anhalten und Überprüfen von Lauftext ................... 4
Angezeigte Display-Informationen ändern ...................................... 5
Voreinstellungen speichern und anwählen ..................................... 5
Einstellen des Alarms ...........................................6
Alarmeinstellung − Schnellanleitung ............................................. 6
Alarmeinstellung − Schritt für Schritt ............................................ 6
Alarmfunktion ......................................................8
Abstellen eines Alarms ............................................................... 8
Snooze-Funktion für einen Alarm .................................................. 8
Abstellen eines Alarms in der Snooze-Funktion .............................. 8
Snooze-Dauer des Alarms ändern ................................................. 8
Sonderfunktionen ................................................. 9
Einstellen des Sleep-Timers ........................................................ 9
Abstellen des Sleep-Timers .......................................................... 9
Intellitext® .................................................................................. 9
Optionen ............................................................10
Optionen im DAB-Betrieb ............................................................ 10
Optionen im FM-Betrieb .............................................................. 10
Allgemeine Optionen .................................................................. 11
Hilfe und Spezifikationen .....................................12
Sekundärstationen / inaktive Stationen ....................................... 12
Beheben von Störungen .............................................................. 12
TECHNISCHE DATEN .................................................................... 12
1
Zu Beginn
Quick Setup > Übersicht über Bedienelemente und Anschlüsse > Symbole auf dem Display
Quick Setup - Schnellstart
Wurfantenne abrollen und senkrecht aufhängen; dann Netzadapter unten an das Gerät
anschließen (siehe Abb.).
Netzadapter mit der Steckdose verbinden und Standby drücken.
5.5V DC
Einstellen des Energiesparmodus
Bestätigen Sie die Meldung ‘Enable energy saving?’ auf dem Display mit der
Auswahltaste Select. Auswahltaste erneut drücken, um Energiesparmodus einzuschalten.
Enable energy
saving?
Bei eingeschaltetem Energiesparmodus verbraucht das Gerät im Standby-Betrieb weniger
Energie, da im Standby-Betrieb keine Intellitext-Nachrichten empfangen und gespeichert
werden; sobald Sie einen Sender mit Intellitext anwählen, werden diese Informationen
jedoch wieder empfangen und gespeichert.
Bei eingeschaltetem Energiesparmodus liegt der Stromverbrauch des Geräts im StandbyBetrieb unter 1 Watt.
Weitere Informationen: Intellitext
Warten Sie ungefähr eine Minute ab, während das Gerät automatisch nach verfügbaren
Radiosendern sucht (Autotune-Funktion).
> Seite 9 Energiesparmodus > Seite 11
Energy saving
On
PURE milano 32
Zu Beginn
2
~
1
BBC Radio 2
Text the show on
Übersicht über Bedienelemente und Anschlüsse
Source
Wechsel DAB / UKW
> Seite 4
Standby
Volume
Volume
Select + / -
Radiosender suchen und auswählen > Seite 4
Gedrückt halten zur Auswahl, Loslassen für textSCAN >
Seite 4
Menu
Menü mit Optionen aufrufen
Info-Anzeige > Seite 8
Voreinstellungen
Speichern und Anwählen von
voreingestellten Sendern > Seite 5
In Intellitext blättern > Seite 9
Weitere Optionen
> Seite 10-11
Source
+ Menu Presets Alarm Sleep
–
–
Select
+
Alarm
Einstellen von 4
unterschiedlichen
Alarmen > Seite
6
Sleep
Einstellen des
Sleep-Timers
> Seite 9
Snooze
Alarm auf
Schlummerfunktion
schalten> Seite 8
Scrollen, Ändern und Bestätigen der Menüoptionen
Seite
Unterseite
3,5-mmBuchse für
Stereokopfhörer
Symbole auf dem Display
Lautstärke
Anzeigen für aktive
Alarme > Seite 7
USB-Eingang
(Typ Mini B) für
Upgrades
BBC Radio 2
Now playing: How
5.5V DC
für den mitgelieferten
5.5V DC Netzadapter
Signalstärke
Alarm in Schlummerstellung
> Seite 8
Sleep-Timer > Seite 9
Zu Beginn
Stromanschlussbuchse
3

Verwendung des Radios
DAB / FM > Sender wechseln > textSCAN™ > Display-Info ändern > Voreinstellungen verwenden
Wechsel zwischen DAB und UKW
Zum Wechseln zwischen DAB (digital-terrestrisch) und FM (UKW) die DAB/FM-Taste drücken.
BBC Radio 2
test your knowle
'&$<7i5<
Senderwechsel
Bei DAB-Betrieb
1. Mit den +/− Tasten bewegen Sie sich durch die Liste verfügbarer Sender.
BBC Radio 2
test your knowle
2. Mit der Auswahltaste Select wählen Sie einen Sender aus.
SMOOTH radio
text your reques
Bei UKW-Betrieb (UKW)
Mit den +/− Tasten ändern Sie die Frequenz in Schritten von 0.05 MHz nach oben bzw. unten.
BBC Radio 2
SMOOTH Radio
Wenn Sie die +/− Taste gedrückt halten, sucht das Gerät automatisch nach dem nächsten
Sender mit starkem Signal.
textSCAN™ zum Anhalten und Überprüfen von Lauftext
1. Drücken Sie Select der Lauftext wird stoppen.
BBC Radio 6Music
favourite track
2. Mit den +/− Tasten bewegen Sie sich nach links bzw. nach rechts durch den Lauftext. Um
den textSCAN-Modus zu verlassen, Auswahltaste Select erneut drücken.
Verwendung des Radios
4
BBC Radio 6Music
avourite track
Angezeigte Display-Informationen ändern
(Menu > Info display)
1. Im DAB- oder UKW-Betrieb drücken Sie die Menü-Taste und anschließend die Auswahltaste
Select, um die ‘Info Display’-Optionen aufzurufen.
2. Mit den +/− Tasten können Sie die aktuelle Info Display Option wechseln und mit der
Auswahltaste Select bestätigen; folgende Optionen sind verfügbar:
Scrolling text Lauftext, der von den DAB und UKW-Sendern mit RDS gesendet wird.
Date Anzeige zeigt unter dem Sendernamen das aktuelle Datum und die
Uhrzeit an.
Programme type Programmart des aktuellen Senders, z. B. Popmusik.
Sig. strength
Zeigt die Signalstärke an.
Sig. quality Zeigt die Qualität des DAB-Signals an: 85 bis 100 gut, 70 bis 84
passabel, 0 bis 69 schlecht.
Bit Rate DAB-Signalübertragungsrate sowie Stereo-/Mono-Betriebsanzeige.
Multiplex name Zeigt DAB-Multiplex an, in dem der aktuelle Dienst gesendet wird.
Multiplex info Zeigt den Kanal und die Frequenz des aktuellen Multiplex an, z. B. 12B.
Mono/stereo (FM) Zeigt Stereo- oder Mono-Wiedergabe an (nur im UKW-Betrieb).
Voreinstellungen speichern und anwählen
Speichern Sie bis zu 10 DAB- und 10 UKW-Lieblingssender für schnellen Zugriff.
Zum Speichern eines Senders
1. Stellen Sie den Sender (DAB oder UKW) ein, den Sie speichern wollen.
2. 'Presets' -Taste drücken und mit den +/− Tasten einen Speicherplatz zwischen 1-10 auswählen.
SMOOTH Radio
by Luther Vandro
Preset 04
Empty preset
3. Speichern Sie den Sender, indem Sie die 'Presets' oder Select 3 Sekunden gedrückt
halten, bis ‘Preset saved’ angezeigt wird.
Preset 04
Empty preset
Um einen zuvor gespeicherten Sender aufzurufen
Im DAB- oder UKW-Betrieb können Sie die gespeicherten DAB- bzw. UKW-Sender mit der 'Presets'Taste aufrufen. Mit den +/− Tasten bewegen Sie sich durch die gespeicherten Senderplätze, z. B.
Preset 2; zur Auswahl des Senders Auswahltaste Select drücken.
Absolute Radio
SMOOTH Radio
Preset 04 saved
Preset 04
Smooth Radio
Verwendung des Radios
select
5
Einstellen des Alarms
Quick Guide > Schritt-für-Schritt-Anleitung > Ändern eines eingestellten Alarms
Alarmeinstellung − Schnellanleitung
Alarm 1/2/3/4
(alarm will
not sound)
Set alarm
OFF
ON
Set time
Hours
Minutes
Set days
Daily Saturday
Weekday Sunday
Weekend Once only
Set mode
DAB
FM
Tone
Alarm volum
Vol 1-20
Alarmeinstellung − Schritt für Schritt
Milano verfügt über vier Alarme, die Sie auf verschiedene Weckzeiten (DAB-, UKW-Empfang
oder Tonalarm) einstellen können. Bei DAB- und UKW-Alarm schaltet sich das Radio zur
entsprechenden Zeit ein (falls im Standby-Betrieb) und empfängt den DAB- oder UKW-Sender,
der zuletzt eingestellt war; bei Tonalarmen ertönt ein Weckton.
1. Alarm taste drücken, um das Alarmmenü aufzurufen.
2. Wählen Sie mit den +/− Tasten zwischen Alarm 1, Alarm 2 oder Alarm 3 und bestätigen Sie
mit der Select-Taste.
07:00 Daily Off
Alarm 1
3. Wählen Sie ‘Set alarm’ aus und aktivieren Sie den Alarm mit ‘On’.
Off
Set alarm
Alarm Off
Alarm On
4. Wählen Sie ‘Set time’ zur Einstellung der Weckzeit. Mit den +/− Tasten stellen Sie die Stunden
ein; Bestätigen mit der Auswahltaste Select. Die Einstellung der Minuten erfolgt auf dieselbe
Weise.
07:00
07:00 Set hour
07:00
07:30 Set mins
Einstellen des Alarms
6
 Loading...