

Page 1
PC -K A1138_ IM 10.03.2017
Bedienungsanleitung / Garantie
Gebruiksaanwijzing • Mode d’emploi
Istruzioni per l’uso • Instruction Manual • Instrukcja obsługi / Gwarancja
Kaffeeautomat mit Mahlwerk
PC-KA 1138
Kofezetapparaat met kofemolen • Cafetière avec moulin à café
Macchina del caffè con macinacaffè • Coffee Machine with Grinder • Ekspres z młynkiem do kawy
Page 2

PC -KA11 38_ IM 10.03.2017
Bedienungsanleitung ..............................................................................................................Seite 6
Gebruiksaanwijzing ............................................................................................................. Pagina 13
Mode d’emploi ..........................................................................................................................Page 20
Istruzioni per l’uso ............................................................................................................... Pagina 27
Instruction Manual ...................................................................................................................Page 34
Instrukcja obsługi .................................................................................................................Strona 40
2
Page 3
Übersicht der Bedienelemente
Overzicht van de bedieningselementen • Liste des différents éléments de commande
Elementi di comando • Overview of the Components
Przegląd elementów obsługi
3
PC -KA11 38_ IM 10.03.2017
Page 4
Abbildungen A und B
Illustraties A en B • Illustrations A et B
Illustrazioni A e B • Illustrations A and B
Rysunki A i B
4
Page 5
Abbildungen C - H
Illustraties C - H • Illustrations C - H
Illustrazioni C - H • Illustrations C - H
Rysunki C - H
5
Page 6
PC -KA11 38_ IM 10.03.2017
Bedienungsanleitung
Vielen Dank, dass Sie sich für unser Produkt entschieden haben. Wir
wünschen Ihnen viel Freude mit dem Gerät.
Symbole in dieser Bedienungsanleitung
Wichtige Hinweise für Ihre Sicherheit sind besonders gekennzeichnet.
Beachten Sie diese Hinweise unbedingt, um Unfälle und Schäden am
Gerät zu vermeiden:
WARNUNG:
Warnt vor Gefahren für Ihre Gesundheit und zeigt mögliche Verletzungsrisiken auf.
ACHTUNG:
Weist auf mögliche Gefährdungen für das Gerät oder andere Gegenstände hin.
HINWEIS: Hebt Tipps und Informationen für Sie hervor.
Inhalt
Übersicht der Bedienelemente .................................................................3
Abbildungen A und B ................................................................................4
Abbildungen C - H ......................................................................................5
Allgemeine Hinweise .................................................................................6
Spezielle Sicherheitshinweise für dieses Gerät .....................................6
Bestimmungsgemäßer Gebrauch ............................................................7
Auspacken des Gerätes ............................................................................7
Hinweisschild auf dem Gerät ...................................................................7
Übersicht der Bedienelemente / Lieferumfang ......................................7
Anwendungshinweise ...............................................................................8
Standort ..................................................................................................8
Europäische Maßgaben zur Energieeinsparung ...................................8
Elektrischer Anschluss ............................................................................8
Bedienfeld ...............................................................................................8
Kaffeebohnen..........................................................................................8
Einstellung des Mahlgrads .....................................................................8
Restliche Kaffeebohnen .........................................................................8
Inbetriebnahme ..........................................................................................8
Uhrzeit einstellen ....................................................................................8
Das Gerät ein- und ausschalten .............................................................8
Vor der ersten Benutzung des Gerätes ..................................................8
Bedienung...................................................................................................8
Warmhaltezeit einstellen .........................................................................8
Kaffeeautomat vorbereiten .....................................................................9
Zubereitung mit Kaffeebohnen ...............................................................9
Zubereitung mit Kaffeepulver .................................................................9
Unterbrechung des Brühvorgangs .........................................................9
Der Kaffee ist fertig ...............................................................................10
Kaffeezubereitung mit programmiertem Timer-Betrieb ........................10
Betrieb beenden .......................................................................................10
Entkalken ..................................................................................................10
Reinigung ..................................................................................................10
Filterhaltereinsatz..................................................................................10
Wartung des Mahlwerkes .....................................................................10
Aufbewahrung ..........................................................................................11
Störungsbehebung ..................................................................................11
Technische Daten ....................................................................................12
Hinweis zur Richtlinienkonformität .......................................................12
Garantie .....................................................................................................12
Garantiebedingungen ...........................................................................12
Garantieabwicklung ..............................................................................12
Entsorgung ...............................................................................................12
Bedeutung des Symbols „Mülltonne“ ...................................................12
Allgemeine Hinweise
Lesen Sie vor Inbetriebnahme dieses Gerätes die Bedienungsanleitung
sehr sorgfältig durch und bewahren Sie diese inkl. Garantieschein,
Kassenbon und nach Möglichkeit den Karton mit Innenverpackung gut
auf. Falls Sie das Gerät an Dritte weitergeben, geben Sie auch die Bedienungsanleitung mit.
• Benutzen Sie das Gerät ausschließlich für den privaten und den dafür
vorgesehenen Zweck. Dieses Gerät ist nicht für den gewerblichen
Gebrauch bestimmt.
• Benutzen Sie das Gerät nicht im Freien. Halten Sie es vor Hitze,
direkter Sonneneinstrahlung, Feuchtigkeit (auf keinen Fall in Flüssigkeiten tauchen) und scharfen Kanten fern. Benutzen Sie das Gerät
nicht mit feuchten Händen. Bei feucht oder nass gewordenem Gerät
sofort den Netzstecker ziehen.
• Schalten Sie das Gerät aus und ziehen Sie immer den Stecker aus
der Steckdose (ziehen Sie am Stecker, nicht am Kabel), wenn Sie das
Gerät nicht benutzen, Zubehörteile anbringen, zur Reinigung oder bei
Störung.
• Betreiben Sie das Gerät nicht unbeaufsichtigt. Sollten Sie den Raum
verlassen, schalten Sie das Gerät immer aus. Ziehen Sie den Stecker
aus der Steckdose.
• Das Gerät und das Netzkabel müssen regelmäßig auf Zeichen von
Beschädigungen untersucht werden. Wird eine Beschädigung festgestellt, darf das Gerät nicht mehr benutzt werden.
• Verwenden Sie nur Original-Zubehör.
• Zur Sicherheit Ihrer Kinder lassen Sie keine Verpackungsteile (Plastikbeutel, Karton, Styropor, etc.) erreichbar liegen.
WARNUNG:
Lassen Sie kleine Kinder nicht mit Folie spielen. Es besteht
Erstickungsgefahr!
Spezielle Sicherheitshinweise für dieses Gerät
WARNUNG: Verbrennungsgefahr!
• Die Warmhalteplatte und die Kanne werden sehr heiß. Fassen Sie die Glaskanne nur am Handgriff an. Auch nach
der Anwendung verfügt die Oberäche der Warmhalteplatte noch über Restwärme.
• Öffnen Sie während des Kochvorgangs niemals den Wassertankdeckel.
ACHTUNG:
Dieses Gerät ist nicht dazu bestimmt, bei der Reinigung in Wasser eingetaucht zu werden. Beachten Sie die Anweisungen, die wir Ihnen im Kapitel „Reinigung“ dazu geben.
• Betreiben Sie das Gerät nur auf einer ebenen Arbeitsäche.
• Benutzen Sie das Gerät nur, wenn Wasser im Wasserbehälter eingefüllt ist.
6
Page 7
PC -KA11 38_ IM 10.03.2017
• Bewegen Sie das Gerät nicht, wenn es in Betrieb ist.
• Dieses Gerät kann von Kindern ab 8 Jahren und darüber benutzt werden, wenn sie beaufsichtigt werden oder
bezüglich des sicheren Gebrauchs des Gerätes unterwiesen wurden und die daraus resultierenden Gefahren verstanden haben.
• Reinigung und die Wartung durch den Benutzer dürfen nicht durch Kinder vorgenommen werden, es sei denn, sie
sind 8 Jahre oder älter und werden beaufsichtigt.
• Das Gerät und seine Anschlussleitung sind von Kindern jünger als 8 Jahre fernzuhalten.
• Kinder dürfen nicht mit dem Gerät spielen.
• Geräte können von Personen mit reduzierten physischen, sensorischen oder mentalen Fähigkeiten oder Mangel an
Erfahrung und / oder Wissen benutzt werden, wenn sie beaufsichtigt oder bezüglich des sicheren Gebrauchs des
Gerätes unterwiesen wurden und die daraus resultierenden Gefahren verstanden haben.
• Reparieren Sie das Gerät nicht selbst, sondern suchen Sie einen autorisierten Fachmann auf. Wenn die Netzanschlussleitung dieses Gerätes beschädigt wird, muss sie durch den Hersteller oder seinen Kundendienst oder eine
ähnlich qualizierte Person ersetzt werden, um Gefährdungen zu vermeiden.
Bestimmungsgemäßer Gebrauch
• Dieses Gerät dient zum
- Mahlen von gerösteten Kaffeebohnen und
- Kochen von gemahlenem Bohnenkaffee.
• Benutzen Sie das Gerät nur in trockenen Innenräumen.
• Es ist für den Gebrauch im Haushalt und ähnlichen Anwendungsbereichen vorgesehen wie z. B.
- in Personalküchen von Läden, Büros und anderen gewerblichen Bereichen;
- von Gästen in Hotels, Motels und anderen Wohneinrichtungen;
Es ist nicht für die Anwendung in landwirtschaftlichen Anwesen oder Frühstückspensionen bestimmt.
Auspacken des Gerätes
1. Nehmen Sie das Gerät aus seiner Verpackung.
2. Entfernen Sie sämtliches Verpackungsmaterial, wie Folien, Füllmaterial,
Kabelhalter und Kartonverpackung.
3. Prüfen Sie den Lieferumfang auf Vollständigkeit.
4. Sollte der Verpackungsinhalt unvollständig oder Beschädigungen
feststellbar sein, nehmen Sie das Gerät nicht in Betrieb. Bringen Sie
es umgehend zum Händler zurück.
5. Entfernen Sie die Schutzfolie vom Gerät.
HINWEIS:
Am Gerät können sich noch Staub oder Produktionsreste benden.
Wir empfehlen Ihnen, das Gerät wie unter „Reinigung“ beschrieben zu
säubern.
Hinweisschild auf dem Gerät
Beachten Sie das Hinweisschild auf dem Verschluss des Mahlwerks:
ACHTUNG:
Füllen Sie keine Flüssigkeiten und kein Kaffeepulver in den KaffeebohnenBehälter!
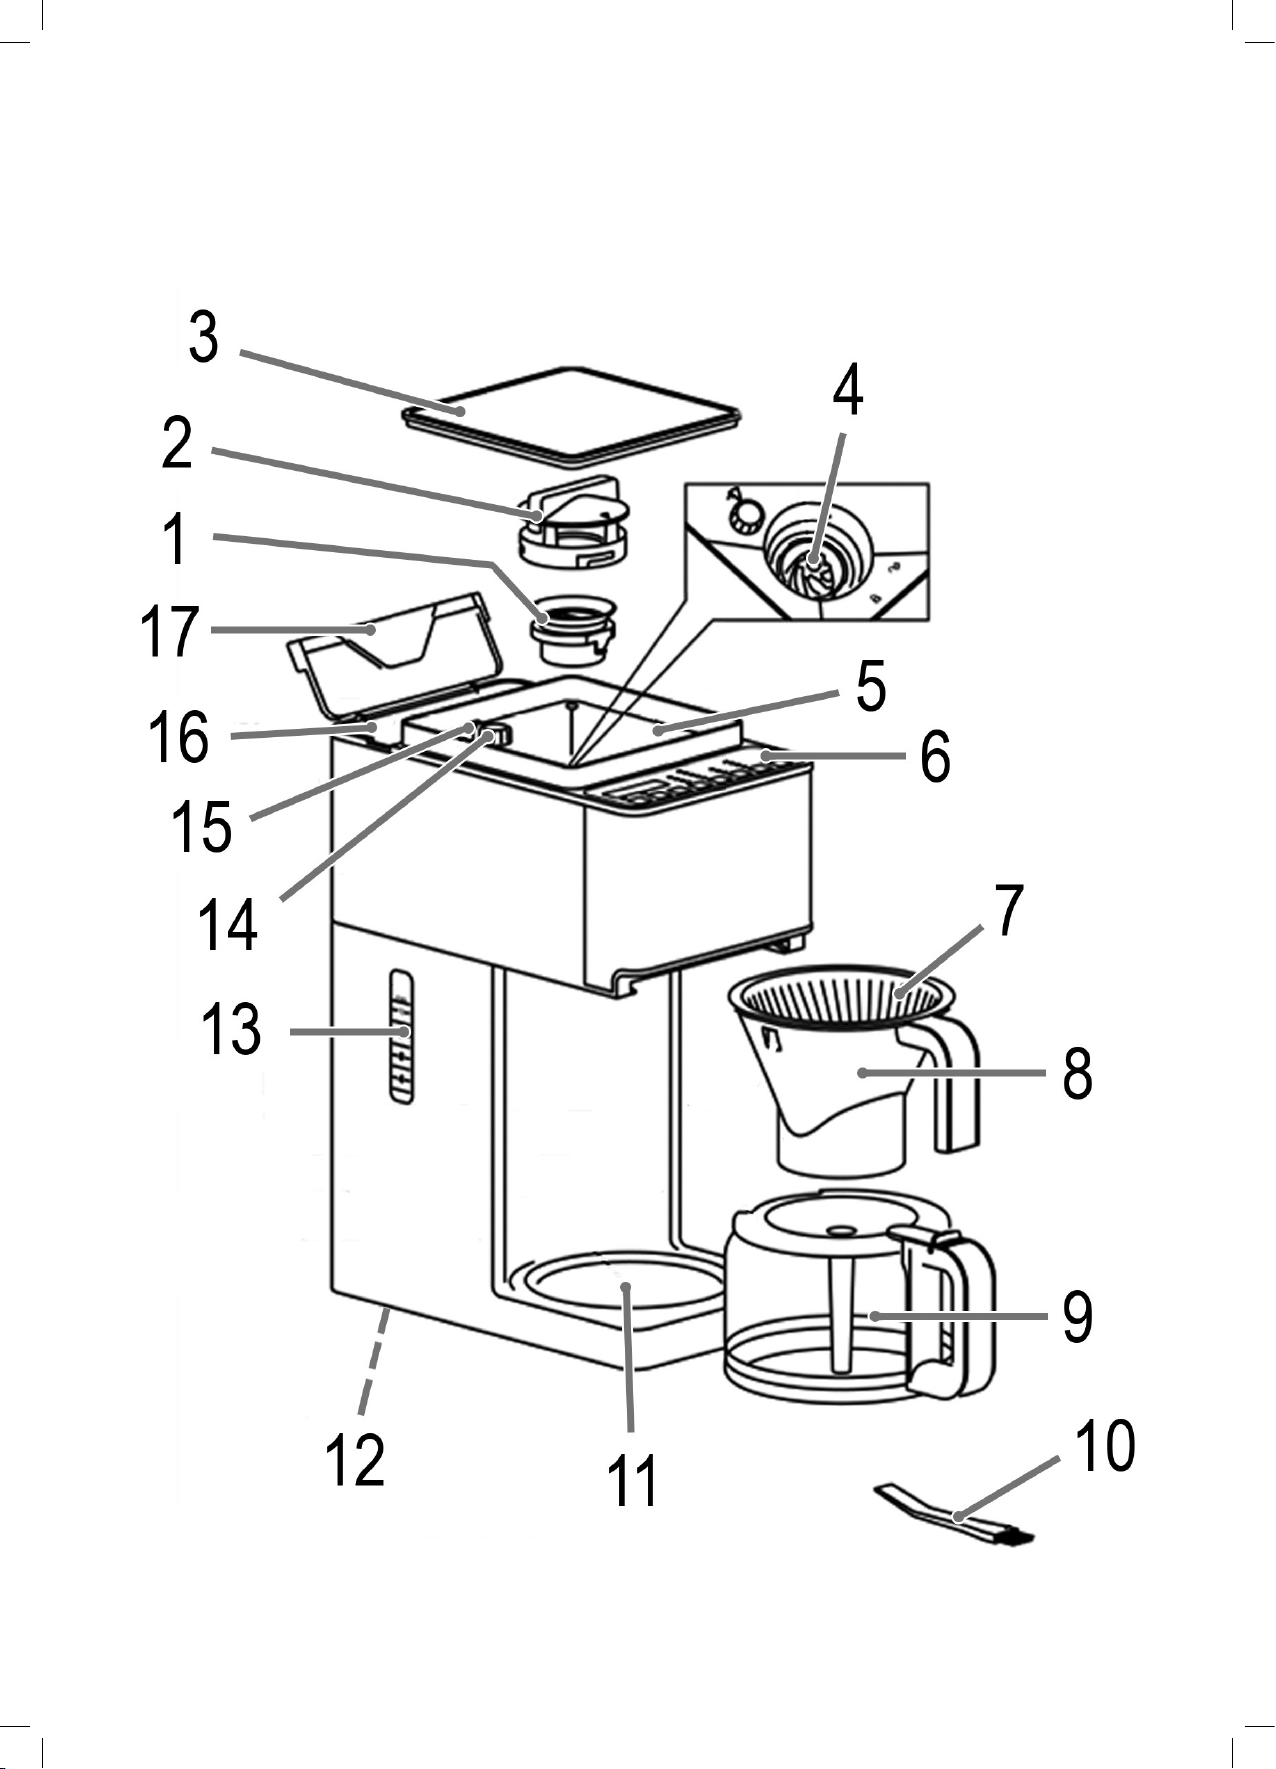
Seite 3:
1 Oberer Mahlkegel
2 Verschluss des Mahlwerks
3 Abdeckung für den Kaffeebohnen-Behälter
4 Unterer Mahlkegel
5 Kaffeebohnen-Behälter
6 Bedienfeld
7 Überlauoch und Dampfaustritt
8 Filterhalter
9 Glaskanne mit Deckel
10 Reinigungspinsel
11 Warmhalteplatte
12 Kabelhalter
13 Wasserstandanzeige
14 Regler des Mahlgrads
15 Anzeiger des Mahlgrads
16 Wassertank
17 Wassertankdeckel
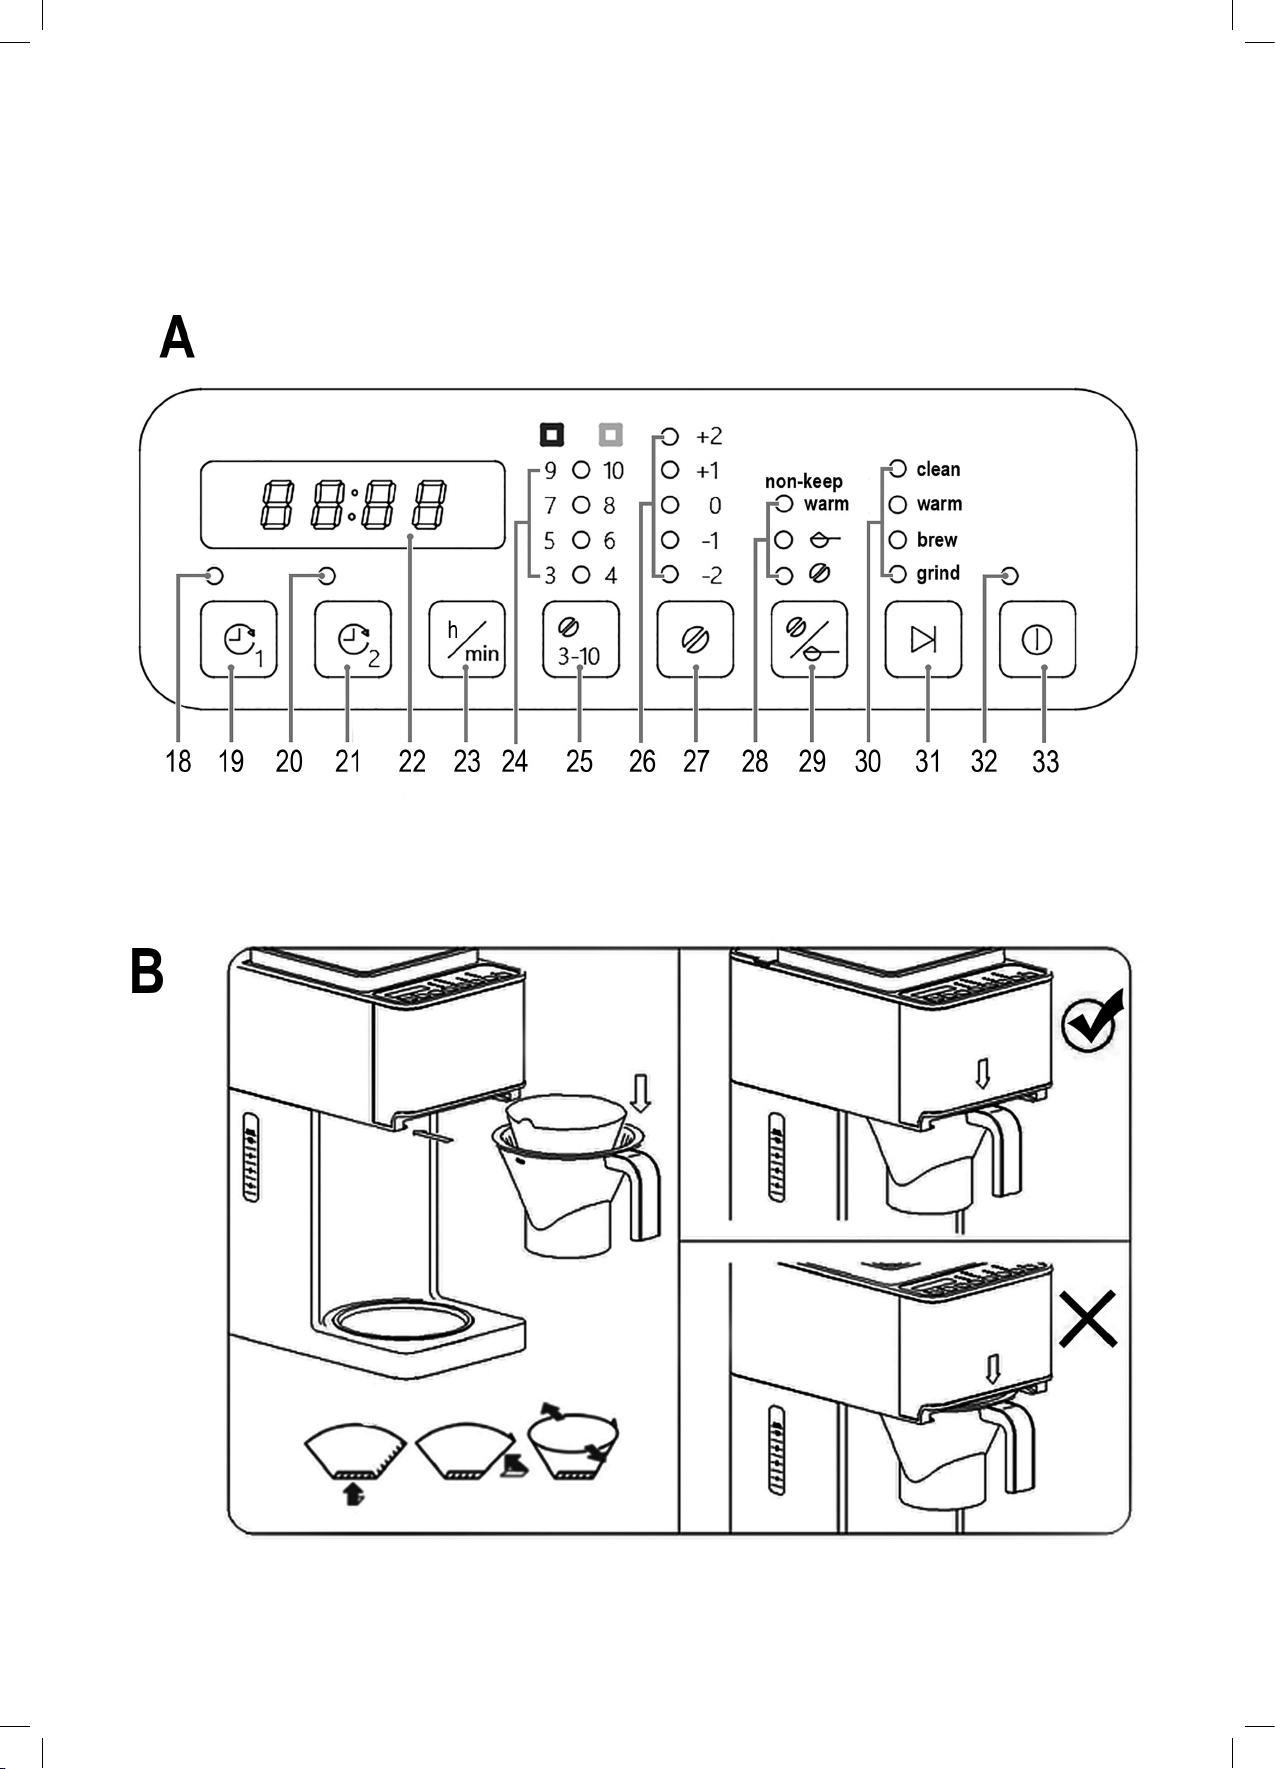
Seite 4: Bedienfeld (Abbildung A)
18 Kontrollleuchte Programm1
19 Taste Programm 1
20 Kontrollleuchte Programm 2
21 Taste Programm 2
22 Display
23 Taste Stunden / Minuten
24 Kontrollleuchte Anzahl der Tassen
25 Taste Anzahl der Tassen
26 Kontrollleuchte Kaffeestärke
Übersicht der Bedienelemente /
Lieferumfang
7
Page 8
PC -KA11 38_ IM 10.03.2017
27 Taste Kaffeestärke
28 Kontrollleuchte Funktionsauswahl
29 Taste Funktionsauswahl
30 Kontrollleuchte Betriebsmodus
31 Taste Start
32 Betriebs-Kontrollleuchte
33 Taste Ein / Aus
Anwendungshinweise
Standort
• Stellen Sie den Kaffeeautomaten auf eine feste und ebene Oberäche.
Stellen Sie das Gerät so auf, dass es nicht kippen kann.
• Stellen Sie das Gerät nicht direkt neben einem Gas- oder Elektroherd
oder einer anderen Wärmequelle auf.
Europäische Maßgaben zur Energieeinsparung
HINWEIS:
Die europäische Richtlinie 2009 / 125 / EG (Ökodesign) bündelt
Maßnahmen zur Energieersparnis.
Für Kaffeeautomaten gilt: Die Warmhaltephase wird auf maximal 40 Minuten begrenzt. Das Gerät schaltet sich anschließend automatisch aus.
Sie protieren von der erhöhten Sicherheit und einem geringeren
Stromverbrauch.
Restliche Kaffeebohnen
Entfernen Sie die Kaffeebohnen aus dem Gerät, wenn sie älter als eine
Woche sind. Sie haben ihr Aroma verloren und mindern den Kaffeegeschmack.
HINWEIS:
Bewahren Sie Kaffeebohnen in einem verschlossenen, luftundurchlässigen Behälter im Kühlschrank auf. Nur so behält der Kaffee sein
typisches Aroma.
Inbetriebnahme
Uhrzeit einstellen
Nach dem Anschluss an die Stromversorgung blinkt im Display die Anzeige der Uhrzeit.
1. Tippen Sie auf die Taste
2. Tippen Sie erneut auf die Taste
stellen.
3. Bestätigen Sie Ihre Einstellung mit der Taste 1. Die Minutenanzeige
blinkt.
4. Wiederholen Sie die Schritte 2 und 3, um die aktuelle Minute einzustellen. Ihr Kaffeeautomat ist nun betriebsbereit.
HINWEIS:
Wenn Sie die Taste
h
. Die Stundenanzeige blinkt.
min
h
, um die aktuelle Stunde einzu-
min
h
gedrückt halten, startet ein Schnelllauf.
min
Elektrischer Anschluss
1. Prüfen Sie, ob die Netzspannung, die Sie benutzen wollen, mit der
des Gerätes übereinstimmt. Die Angaben hierzu nden Sie auf dem
Typenschild am Gerät.
2. An der Unterseite des Gerätes bendet sich ein Kabelhalter. Wickeln
Sie das benötigte Netzkabel ab. Führen Sie das Netzkabel durch eine
der Öffnungen, damit das Gerät einen sicheren Stand hat.
3. Schließen Sie das Netzkabel an eine vorschriftsmäßig installierte
Schutzkontakt-Steckdose an. Die Betriebskontrollleuchte leuchtet.
Bedienfeld
Bei den Tasten am Gerät handelt es sich um Multifunktions-Touch-Tasten.
Um die unterschiedlichen Funktionen zu verwenden, muss die entsprechende Taste entweder kurz angetippt werden, oder länger gehalten
werden.
Kaffeebohnen
ACHTUNG:
Verwenden Sie zum Mahlen ausschließlich geröstete Kaffeebohnen.
Rohe, gefrorene oder in Flüssigkeit eingelegte Kaffeebohnen können
das Mahlwerk beschädigen.
Einstellung des Mahlgrads
Das Kaffeemahlwerk verfügt über 14 Mahlgradeinstellungen.
Stufe 1 = fein gemahlen (starker Kaffee)
Stufe 14 = grob gemahlen (milder Kaffee)
Wie fein oder grob Sie den Kaffee mahlen, hängt von Ihren Vorlieben
ab. Die Sorte und Röstung der Kaffeebohnen beeinussen zusätzlich
den Geschmack. Mit etwas Übung werden Sie herausnden, welche
Mahlgradeinstellung für Sie die richtige ist.
EMPFEHLUNG:
Füllen Sie nur die Menge Kaffeebohnen in das Mahlwerk, die Sie für
einen Kochvorgang brauchen. So erhalten Sie das beste Aroma.
Das Gerät ein- und ausschalten
• Wenn Sie innerhalb von 3 Minuten keine Taste betätigen, wechselt
das Gerät automatisch in den Standby-Betrieb. Das Display und alle
Kontrollleuchten erlöschen.
• Sie können das Gerät auch manuell ausschalten indem Sie die Taste
2 Sekunden lang gedrückt halten.
• Um das Gerät wieder in einzuschalten, halten Sie die Taste für
2 Sekunden gedrückt. Die Uhrzeit und die letzte Programmeinstellung
werden wieder sichtbar.
Vor der ersten Benutzung des Gerätes
Vor dem ersten Aufbrühen von Kaffee nehmen Sie das Gerät 2-mal nur
mit sauberem Wasser und ohne Papierlter in Betrieb. Dies entfernt
Staub, der sich während des Transports innen angesammelt haben könnte. Gehen Sie vor wie unter „Zubereitung mit Kaffeepulver“ beschrieben.
Aber füllen Sie kein Kaffeepulver ein!
Bedienung
Warmhaltezeit einstellen
Stellen Sie die Zeit ein, wie lange Ihr Kaffee nach dem Brühvorgang über
die Warmhalteplatte warm gehalten werden soll.
HINWEIS:
• Die Warmhaltezeit kann nur im Standby-Betrieb eingestellt werden.
• Sie können eine Zeit zwischen 5 und 40 Minuten einstellen.
1. Halten Sie die Taste 2 so lange gedrückt, bis im Display die Zeit
angezeigt wird.
2. Stellen Sie mit der Taste
3. Bestätigen Sie Ihre Einstellung mit der Taste 2. Die aktuelle Uhrzeit
wird wieder angezeigt.
h
die gewünschte Warmhaltezeit ein.
min
8
Page 9
PC -KA11 38_ IM 10.03.2017
Kaffeeautomat vorbereiten
1. Schließen Sie den Kaffeebohnen-Behälter.
2. Klappen Sie den Wassertankdeckel auf.
3. Füllen Sie entsprechend der gewünschten Tassenzahl kaltes Wasser
in den hinteren Wasserbehälter. Den Wasserstand können Sie an der
Skala ablesen.
HINWEIS:
• Zum Befüllen des Wassertanks können Sie die Kanne zur Hilfe
nehmen.
• Füllen Sie nur so viel Wasser ein, wie Sie Tassen aufbrühen
möchten. Der Inhalt des Wassertanks wird bei jedem Brühvorgang unabhängig von den Einstellungen komplett geleert.
ACHTUNG:
Überfüllen Sie den Tank nicht! Füllen Sie nicht über die Marke 10
hinaus.
4. Schließen Sie den Wassertankdeckel.
5. Beachten Sie die Abbildung B auf Seite 4! Knicken Sie die untere
Falz des Papierlters (Größe 1 x 4), legen Sie ihn in den Filterhalter.
Der Papierlter darf nicht über den Rand des Filterhalters überstehen!
6. Schieben Sie den Filterhalter bis zum Anschlag in das Gerät. Er muss
hörbar einrasten.
HINWEIS:
Ein Sicherheitsschalter verhindert den Start des Brühvorgangs,
wenn der Filterhalter nicht richtig eingesetzt ist.
7. Stellen Sie die Kanne auf die Warmhalteplatte.
ACHTUNG: Nachtropfsicherung
Ihr Gerät verfügt über eine Nachtropfsicherung. Sie schließt, wenn
die Kanne entnommen wird. Dies verhindert, dass Kaffee auf die
Warmhalteplatte tropft, wenn sich noch Wasser im Filter bendet.
• Stellen Sie sicher, dass sich der Deckel auf der Kanne bendet.
Durch ihn wird die Nachtropfsicherung geöffnet.
• Bendet sich noch Wasser im Tank, stellen Sie die Kanne recht-
zeitig wieder unter. Der Filter könnte sonst überlaufen.
• Beachten Sie auch das Kapitel „Unterbrechung des Brühvor-
gangs“.
8. Möchten Sie Ihren Kaffee mit Kaffeepulver zubereiten, lesen Sie
weiter unter Kapitel „Zubereitung mit Kaffeepulver“.
Zubereitung mit Kaffeebohnen
Verfahren Sie wie unter den Punkten „Kaffeeautomat vorbereiten“
beschrieben.
9. Öffnen Sie den Kaffeebohnen-Behälter.
10. Stellen Sie mit dem Regler (14) den Mahlgrad ein.
11. Füllen Sie die gewünschte Menge Kaffeebohnen in das Mahlwerk.
Die maximale Füllmenge von 150 g darf nicht überschritten werden.
12. Schließen Sie den Kaffeebohnen-Behälter.
13. Schalten Sie das Gerät mit der Taste ein.
14. Tippen Sie wiederholt auf die Taste , bis die Kontrollleuchte neben
dem Symbol leuchtet.
HINWEIS:
Wenn Sie nicht möchten, dass Ihr Kaffee nach dem Brühvorgang
warm gehalten wird, tippen Sie so oft auf die Taste , bis die
Kontrollleuchte neben dem Symbol und die Kontrollleuchte
neben „non-keep warm“ (nicht warm halten) leuchten.
15. Wählen Sie mit der Taste
die Anzahl der Tassen Kaffee, die Sie
3 -10
brühen möchten.
HINWEIS:
Mit jeder Tastenberührung wechseln Sie zu einer anderen Anzahl
Tassen. Die rote Kontrollleuchte zeigt die ungerade, die grüne
Kontrollleuchte die gerade Anzahl Tassen an.
16. Sie können die Stärke des Kaffees zusätzlich beeinussen. Mit der
Taste bestimmen Sie, ob mehr oder weniger Kaffee gemahlen
wird. Tippen Sie wiederholt auf die Taste, bis die Kontrollleuchte
neben der gewünschten Einstellung leuchtet.
0 = Standard-Einstellung
+1 / +2 = jeweils ca. + 6 % stärkerer Kaffee (mehr Kaffeepulver)
– 1 / – 2 = jeweils ca. – 6 % milderer Kaffee (weniger Kaffeepulver)
17. Halten Sie die Taste 2 Sekunden gedrückt, um die Kaffeezubereitung zu starten. Im Display sehen Sie eine Rotation der Segmentbeleuchtung . Die Kontrollleuchte neben „grind“ blinkt. Das
Kaffeemahlwerk wird entriegelt, der Kaffee gemahlen.
HINWEIS:
Wenn der Filterhalter nicht richtig eingesetzt wurde, erscheint im
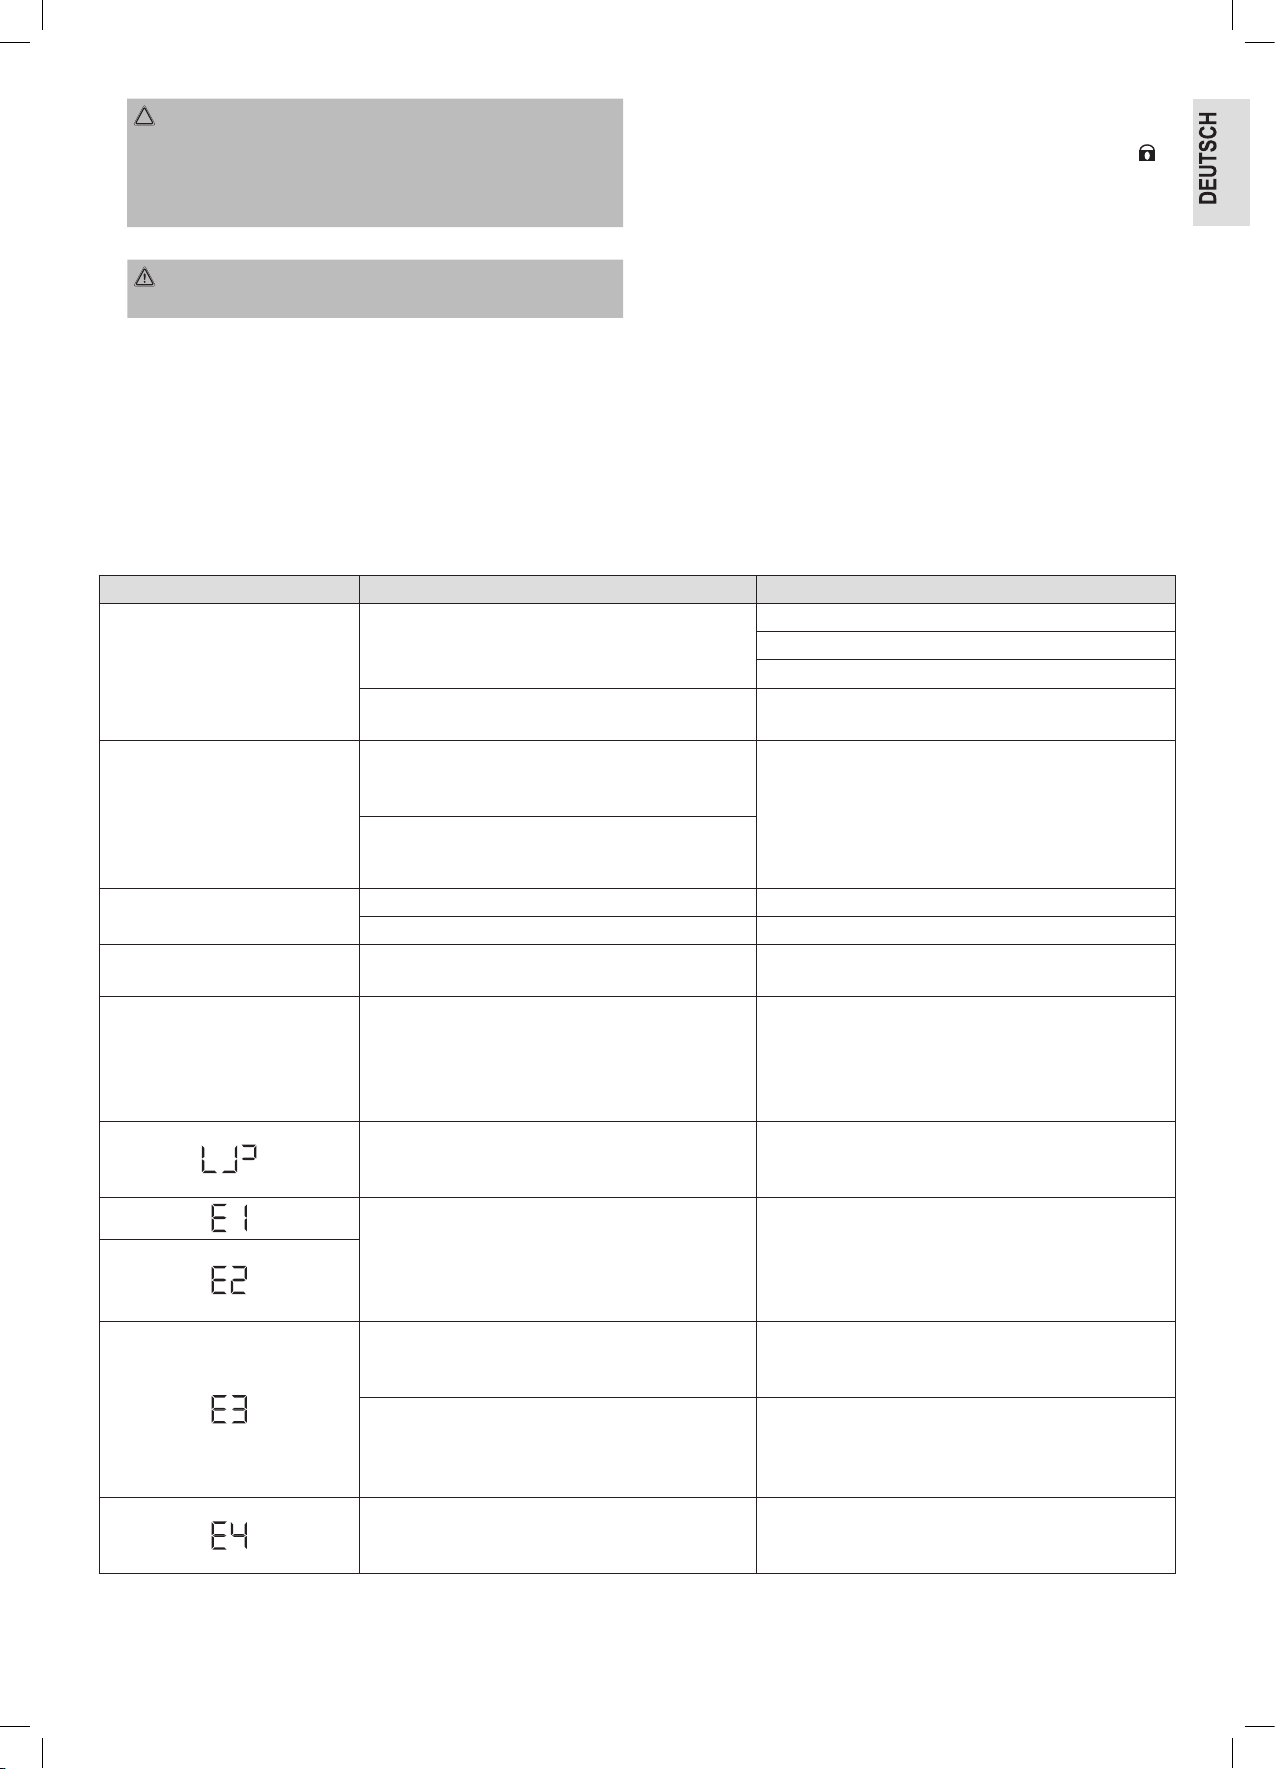
Display folgendes Symbol: .
• Ziehen Sie den Filterhalter heraus und setzen Sie korrekt ein.
Drücken Sie erneut die Taste .
18. Nach dem Mahlvorgang verriegelt das Gerät das Kaffeemahlwerk
automatisch. Anschließend beginnt der Brühvorgang. Die Kontrollleuchte neben „brew“ blinkt.
Zubereitung mit Kaffeepulver
Verfahren Sie wie unter den Punkten „Kaffeeautomat vorbereiten“
beschrieben. Bevor Sie den Filterhalter in den Kaffeeautomat schieben,
füllen Sie ihn mit Kaffeepulver.
HINWEIS:
Füllen Sie nicht zu viel Kaffeepulver in den Filter, da dieser sonst überlaufen kann.
9. Schalten Sie das Gerät mit der Taste ein.
10. Tippen Sie wiederholt auf die Taste , bis die Kontrollleuchte neben
dem Symbol leuchtet.
HINWEIS:
Wenn Sie nicht möchten, dass Ihr Kaffee nach dem Brühvorgang
warm gehalten wird, tippen Sie so oft auf die Taste , bis die
Kontrollleuchte neben dem Symbol und die Kontrollleuchte
neben „non-keep warm“ (nicht warm halten) leuchten.
11. Halten Sie die Taste 2 Sekunden gedrückt, um die Kaffeezubereitung zu starten. Im Display sehen Sie eine Rotation der Segmentbeleuchtung . Die Kontrollleuchte neben „brew“ blinkt.
Unterbrechung des Brühvorgangs
ACHTUNG:
Wenn Sie die Glaskanne während des Brühvorgangs entnehmen, wird
der Vorgang nicht gestoppt. Stellen Sie die Glaskanne innerhalb von
20 Sekunden auf die Warmhalteplatte zurück, da der Kaffee über den
Rand des Filterhalters laufen kann.
Möchten Sie die Glaskanne während des Brühvorgangs für kurze Zeit
entnehmen, gehen Sie wie folgt vor:
• Tippen Sie kurz auf die Taste . Die Rotation der Segmente im
Display stoppt. Die Kontrollleuchte neben „brew“ leuchtet. Der Brühvorgang stoppt.
• Möchten Sie den Brühvorgang fortsetzen, stellen Sie die Glaskanne
wieder auf die Warmhalteplatte und tippen Sie erneut kurz auf die
Taste .
9
Page 10
PC -KA11 38_ IM 10.03.2017
Der Kaffee ist fertig
• Ist der Brühvorgang beendet, erlischt die Kontrollleuchte neben „brew“.
Wenn Sie zuvor eine Warmhaltezeit eingestellt haben, blinkt die Kontrollleuchte neben „warm“. Das Display zeigt . Der Warmhaltevorgang
beginnt. Das Gerät zählt auf den eingestellten Wert der Zeit hoch.
• Nach Ablauf der Warmhaltezeit erlischt die Kontrollleuchte neben
„warm“. Die Kontrollleuchte neben „clean“ leuchtet, um Sie daran zu
erinnern, den Papierlter zu entsorgen. Sie erlischt erst, wenn Sie den
Filterhalter entnommen haben.
• Haben Sie keine Warmhaltezeit eingestellt oder bei der Vorbereitung
die Funktion „non-keep warm“ aktiviert, leuchtet die Kontrollleuchte
neben „clean“ sofort nach dem Brühvorgang.
• Nachdem kein Kaffee mehr durch den Filter läuft, können Sie die
Kanne entnehmen.
• Schalten Sie das Gerät aus.
• Möchten Sie den restlichen Kaffee warmhalten? Lassen Sie das Gerät
bis zum Ende der Warmhaltephase eingeschaltet. Möchten Sie den
Kaffee auch nach der Warmhaltephase warmhalten, schütten Sie den
restlichen Kaffee in eine Isolierkanne um.
HINWEIS:
Wir empfehlen, den Filterhalter sofort aus dem Kaffeeautomaten zu
ziehen, damit der Filterhaltereinsatz abtrocknet.
WARNUNG:
Möchten Sie sofort eine weitere Kanne Kaffee kochen, schalten Sie das
Gerät aus. Lassen Sie es bei geöffnetem Wassertank abkühlen, um
heiße Wasserspritzer beim Auffüllen des Wassers zu vermeiden.
Kaffeezubereitung mit programmiertem Timer-Betrieb
Sie haben die Möglichkeit, 2 verschiedene Startzeiten einzustellen, wann
Ihr Kaffeeautomat mit der Kaffeezubereitung beginnen soll.
ACHTUNG:
Es muss alles für die Zubereitung des Kaffees vorbereitet sein. Siehe
Kapitel „Kaffeeautomat vorbereiten“.
HINWEIS:
Das Gerät muss sich im Standby-Betrieb benden, damit es zur eingestellten Zeit automatisch startet.
Entkalken
Eine Entkalkung wird nötig, wenn die Zubereitungszeit wesentlich
zunimmt.
• Verwenden Sie zum Entkalken nur handelsübliche Entkalkungsmittel
auf Zitronensäurebasis.
• Dosieren Sie, wie auf der Verpackung oder Beipackzettel angegeben.
• Wählen Sie mit der Taste die Funktion und „non-keep warm“.
WARNUNG:
• Kochen Sie danach 3 - 4-mal frisches Wasser auf, um Rückstände
des Entkalkungsmittels auszuspülen.
• Verwenden Sie kein Kaffeepulver!
• Dieses Wasser nicht als Trinkwasser verwenden.
Reinigung
WARNUNG:
• Ziehen Sie vor der Reinigung immer den Netzstecker
und warten Sie, bis das Gerät abgekühlt ist.
• Tauchen Sie das Gerät nicht in Wasser. Es könnte zu
einem elektrischen Schlag oder Brand führen.
ACHTUNG:
• Benutzen Sie keine Drahtbürste oder andere scheuernde Gegenstände.
• Benutzen Sie keine scharfen oder scheuernden Reinigungsmittel.
• Die Außenseite des Gerätes reinigen Sie nach Bedarf mit einem leicht
feuchten Tuch – ohne Zusatzmittel.
• Kanne und Filterhalter reinigen Sie in gewohnter Weise in einem
Spülbad. Benutzen Sie ggf. eine weiche Bürste.
Filterhaltereinsatz
Beachten Sie die Abbildung C auf Seite 5.
• Wischen Sie den Filterhaltereinsatz nach jedem Gebrauch mit einem
Papiertuch ab.
• Entfernen Sie Kaffeepulverreste mit dem Reinigungspinsel.
Programm-Timer einstellen
1. Schalten Sie das Gerät mit der Taste ein.
2. Halten Sie die Taste 1 (Programm 1) oder 2 (Programm 2)
4 Sekunden lang gedrückt. Die jeweilige Kontrollleuchte blinkt. Im
Display erscheint die Zeit.
3. Stellen Sie mit der Taste
4. Bestätigen Sie die Eingabe mit der jeweiligen Programm-Taste.
5. Stellen Sie mit der Taste
6. Bestätigen Sie die Eingabe mit der jeweiligen Programm-Taste. Im
Display erscheint wieder die aktuelle Uhrzeit.
Programm-Timer ein- / und ausschalten
HINWEIS:
Sie können nur einen von beiden Programm-Timern aktivieren.
1. Schalten Sie das Gerät mit der Taste ein.
2. Tippen Sie auf die Programm-Taste, deren Timer Sie aktivieren oder
deaktivieren möchten. Ist der Timer aktiviert, leuchtet die jeweilige
Kontrollleuchte über den Tasten.
h
die Stunde der Startzeit ein.
min
h
die Minuten der Startzeit ein.
min
Betrieb beenden
1. Schalten Sie das Gerät mit der Taste aus. (Standby-Betrieb)
2. Ziehen Sie den Netzstecker aus der Steckdose.
3. Reinigen Sie das Gerät nach jedem Gebrauch.
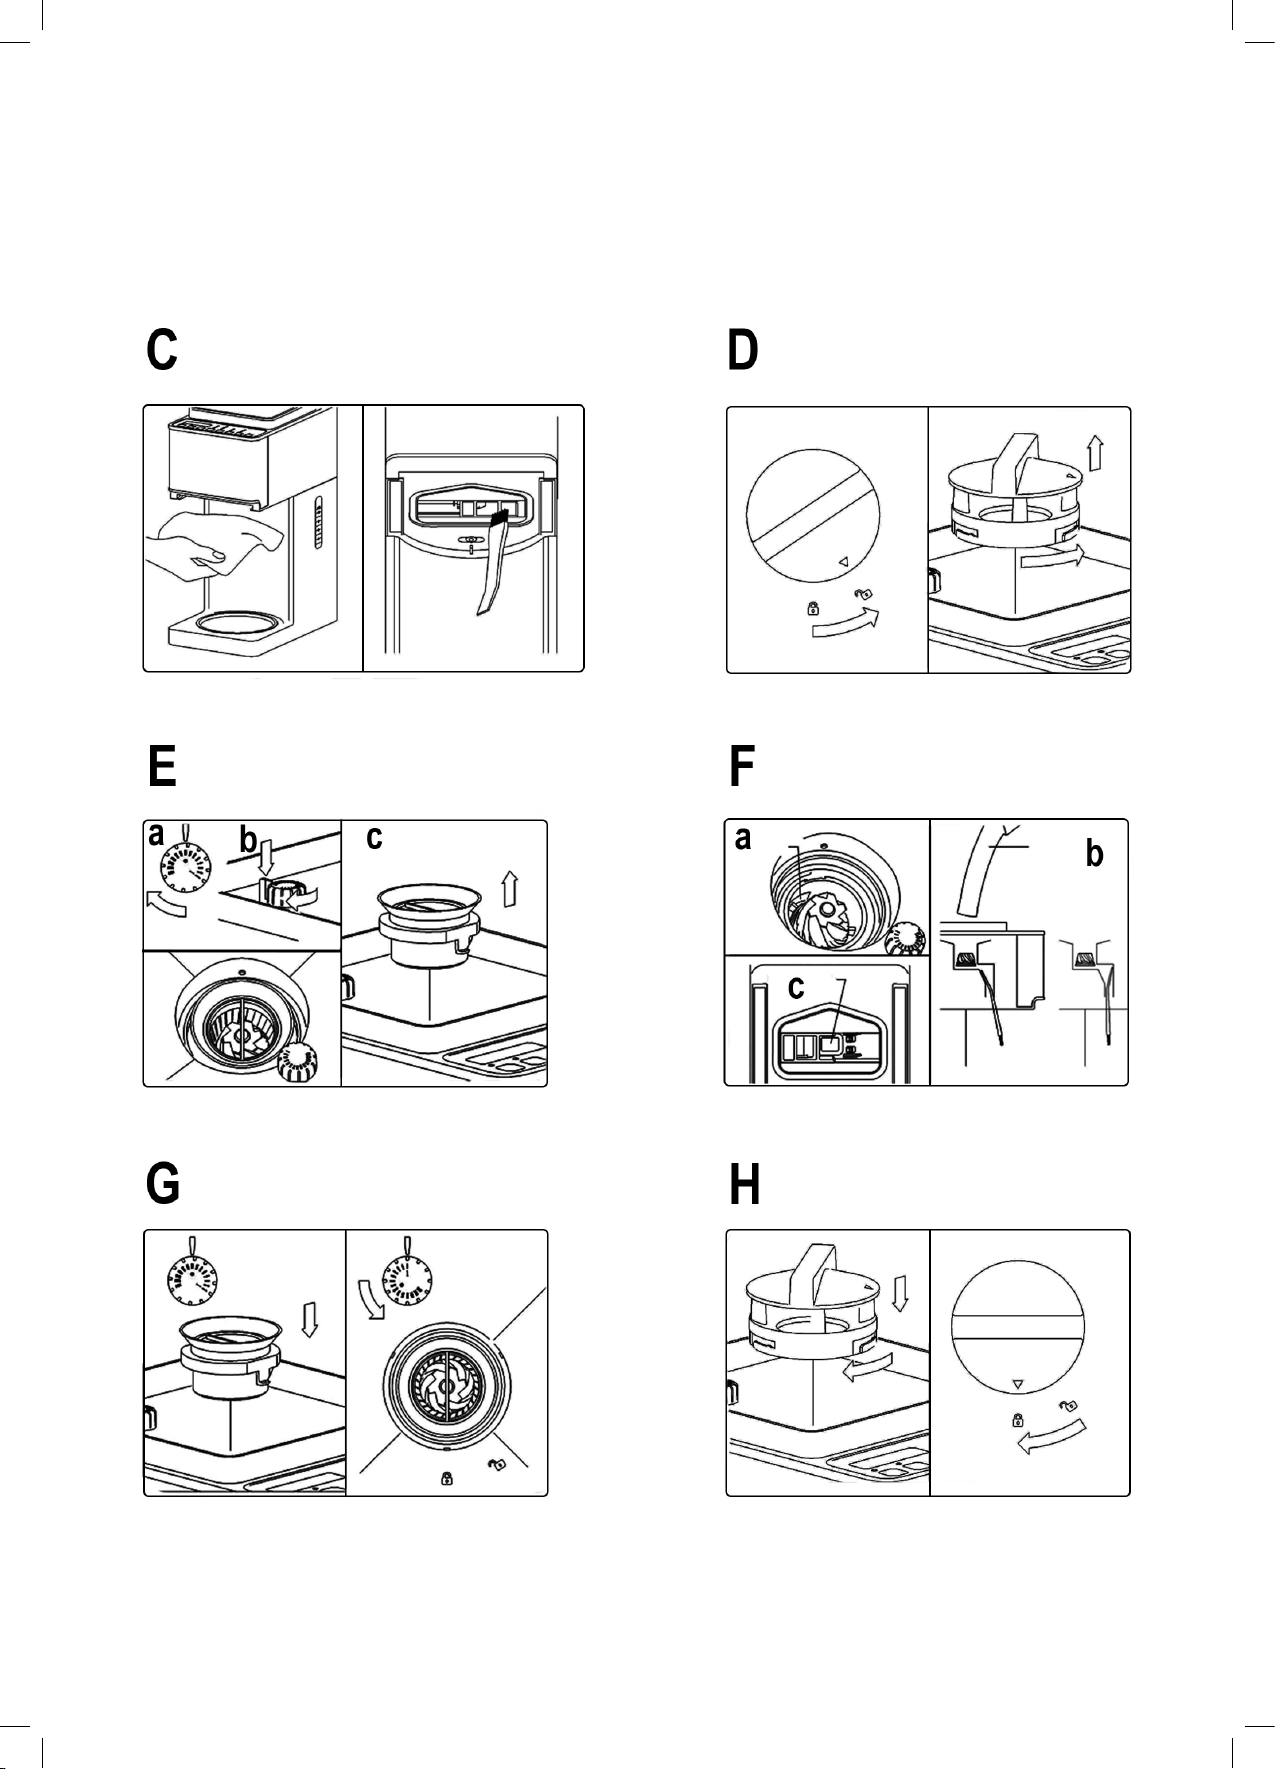
Wartung des Mahlwerkes
Warten Sie das Mahlwerk wöchentlich. Beachten Sie die Abbildungen D
bis H auf der Seite 5.
HINWEIS:
Leeren Sie den Kaffeebohnenbehälter am besten, indem Sie alle darin
bendlichen Bohnen bei der Kaffeezubereitung aufbrauchen.
1. Schieben Sie den Filterhalter mit einer neuen Filtertüte in den Kaffeeautomaten, um das restliche Kaffeepulver aufzufangen. Alternativ
können Sie auch ein trockenes Gefäß auf die Warmhalteplatte stellen.
2. Schalten Sie das Gerät mit der Taste aus.
3. Halten Sie die Taste so lange gedrückt, bis die Kontrollleuchte neben „clean“ blinkt. Nach ein paar Sekunden dreht sich das Mahlwerk
kurz und die Verriegelung des Mahlwerks öffnet sich. Das restliche
Kaffeepulver fällt heraus. Das Display zeigt .
4. Ziehen Sie den Netzstecker.
5. Öffnen Sie den Kaffeebohnen-Behälter.
6. Drehen Sie den Verschluss des Mahlwerks gegen den Uhrzeigersinn,
um ihn zu öffnen. Nehmen Sie ihn ab. (Abb. D)
7. Drehen Sie den Regler des Mahlgrads im Uhrzeigersinn auf die
gröbste Stufe. (Abb. E a)
8. Drücken Sie den Anzeiger des Mahlgrads nach unten und drehen Sie
gleichzeitig den Regler im Uhrzeigersinn, bis der Anzeiger auf den
roten Punkt zeigt. (Abb. E b)
10
Page 11
PC -KA11 38_ IM 10.03.2017
ACHTUNG:
Versuchen Sie nicht, den Regler mit Gewalt zu drehen! Setzen Sie
den Verschluss des Mahlwerks wieder ein und wiederholen Sie die
Punkte 1 - 8, bis sich der Regler drehen lässt. Ist der Regler komplett blockiert, geben Sie Ihren Kaffeeautomaten zur Reparatur.
9. Ziehen Sie den oberen Mahlkegel heraus. (Abb. E c)
10.
WARNUNG: Verletzungsgefahr!
Die Klingen des Mahlkegels sind scharf.
11. Reinigen Sie den oberen Mahlkegel vorsichtig mit dem Reinigungspinsel und einem trockenen Tuch.
12. Reinigen Sie den Mahlwerk-Tunnel vorsichtig mit dem Reinigungspinsel. (Abb. F a)
13. Nehmen Sie einen Staubsauger. Halten Sie den Saugschlauch über
das offene Mahlwerk und saugen Sie die Mahlreste heraus. (Abb. F b)
14. Saugen Sie den Mahlwerk-Tunnel von unten aus. (Abb. F c)
15. Setzen Sie den gereinigten oberen Mahlkegel wieder ein. Beachten
Sie, dass der Steg des Mahlkegels in einer Linie zu dem Symbol
steht. (Abb. G)
16. Drehen Sie den Regler des Mahlwerks gegen den Uhrzeigersinn über
die Mahlstufe 1 hinaus, bis er hörbar ausrastet.
17. Setzen Sie den Verschluss des Mahlwerks ein und drehen Sie ihn im
Uhrzeigersinn fest. Er muss hörbar einrasten. (Abb. H)
Aufbewahrung
• Reinigen Sie das Gerät wie beschrieben und lassen Sie es vollständig
trocknen.
• Wir empfehlen, das Gerät in der Original-Verpackung aufzubewahren,
wenn Sie es über einen längeren Zeitraum nicht benutzen möchten.
• Lagern Sie das Gerät immer außerhalb der Reichweite von Kindern an
einem gut belüfteten und trockenen Ort.
Störungsbehebung
Tritt eine Störung auf, liegt es oft nur an einer Kleinigkeit. Bevor Sie sich an unseren Service wenden, beachten Sie bitte folgende Hinweise:
Störung Mögliche Ursache Hinweise / Abhilfe
Das Gerät ist ohne Funktion. Das Gerät hat keine Stromversorgung. Überprüfen Sie die Steckdose mit einem anderen Gerät.
Setzen Sie den Netzstecker richtig ein.
Kontrollieren Sie die Haussicherung.
Das Gerät ist defekt. Wenden Sie sich an unseren Service oder an einen
Fachmann.
Rückstau im Filter: Der Kaffeesatz
tritt über den Filterrand.
Im Kaffee ist Kaffeesatz enthalten. Der Papierlter ist zu klein. Verwenden Sie einen Papierlter mit der Größe „1 x 4“.
Die Dauer des Brühvorgangs ist
erheblich zu lang.
Das Gerät schaltet sich von alleine
aus.
Die Nachtropfsicherung ist geschlossen: Die Kanne
steht nicht auf der Warmhalteplatte oder der Deckel
bendet sich nicht auf der Kanne.
Es ist zu viel Kaffeepulver im Filter.
Es ist zu viel Kaffeepulver im Filter. Nehmen Sie weniger Kaffeepulver.
Im Gerät benden sich Kalkrückstände. Entkalken Sie das Gerät wie beschrieben.
Dies ist kein Fehler vom Gerät.
Zur Einhaltung der Ökodesign-Richtline
(2009 / 125 / EG), schaltet sich das Gerät nach dem
Ende des Brühvorgangs, nach maximal 40 Minuten,
automatisch aus.
Der Filterhalter ist falsch eingesetzt. Ziehen Sie ihn heraus und schieben Sie den Filterhalter
Der Filterhalter ist verschmutzt. 1. Reinigen Sie den Filterhaltereinsatz am Gerät wie im
Das Mahlwerk hat sich verkantet. 1. Ziehen Sie den Netzstecker.
Der Mahlgradregler ist durch häuge Nutzung überhitzt.
Der Mahlwerkdeckel wurde falsch eingesetzt. Setzen Sie den Mahlwerkdeckel richtig ein. Um die
1. Schalten Sie das Gerät aus. Ziehen Sie den Netzstecker.
2. Stellen Sie die Kanne mit Deckel auf die Warmhalteplatte, damit der Filter entleert wird.
3. Entsorgen Sie den Papierlter.
4. Reinigen Sie das Gerät wie beschrieben.
so hinein, dass er nach oben abschließt. Er muss hörbar
einrasten.
Kapitel „Filterhaltereinsatz“ beschrieben.
2. Trennen Sie das Gerät von der Stromversorgung.
Warten Sie einige Augenblicke und schließen Sie es
dann wieder an.
2. Führen Sie eine Wartung durch wie unter „Wartung
des Mahlwerkes“ beschrieben.
1. Lassen Sie den Motor abkühlen.
2. Trennen Sie das Gerät von der Stromversorgung.
Warten Sie einige Augenblicke und schließen Sie es
dann wieder an.
Fehlermeldung zu löschen, müssen Sie den Netzstecker
ziehen.
11
Page 12
PC -KA11 38_ IM 10.03.2017
Störung Mögliche Ursache Hinweise / Abhilfe
Der Mahlgradregler lässt sich nicht
verstellen.
Das Mahlwerk wird langsamer und
lauter.
Eine Bohne hat sich verklemmt. Starten Sie einen neuen Mahlvorgang und versuchen sie
es danach erneut. Versuchen Sie nicht mit Gewalt den
blockierten Regler zu drehen.
Starke Verschmutzung und Fremdkörper im Mahlgut. Führen Sie eine Wartung durch.
Technische Daten
Modell: ........................................................................................PC-KA 1138
Spannungsversorgung: .............................................220 - 240 V~, 50 / 60 Hz
Leistungsaufnahme: ................................................................900 W max.*
Füllmenge: ....................................................................................... 1,3 Liter
Schutzklasse: ...............................................................................................
Nettogewicht: ............................................................................... ca. 3,85 kg
(*Gesamtleistung aller Komponenten)
Technische und gestalterische Änderungen im Zuge stetiger Produktent-
wicklungen vorbehalten.
Hinweis zur Richtlinienkonformität
Hiermit erklärt der Hersteller, dass sich das Gerät PC-KA 1138 in Überein-
stimmung mit den folgenden Anforderungen bendet:
• Europäische Niederspannungsrichtlinie 2014 / 35 / EU
• EU-Richtlinie für elektromagnetische Verträglichkeit 2014 / 30 / EU
• Ökodesign Richtlinie 2009 / 125 / EG
• RoHS-Richtlinie 2011 / 65 / EU
Garantie
Garantiebedingungen
1. Gegenüber Verbrauchern gewähren wir bei privater Nutzung des
Geräts eine Garantie von 24 Monaten ab Kaufdatum.
Ist das Gerät zur gewerblichen Nutzung geeignet, gewähren wir beim
Kauf durch Unternehmer für das Gerät eine Garantie von 12 Monaten.
Die Garantiezeit für Verbraucher reduziert sich auf 12 Monate, sofern
sie ein zur gewerblichen Nutzung geeignetes Gerät – auch teilweise –
gewerblich nutzen.
2. Voraussetzung für unsere Garantieleistungen sind der Kauf des Geräts
in Deutschland bei einem unserer Vertragshändler sowie die Übersendung einer Kopie des Kaufbelegs und dieses Garantiescheins an uns.
Bendet sich das Gerät zum Zeitpunkt des Garantiefalls im Ausland,
muss es auf Kosten des Käufers uns zur Erbringung der Garantieleistungen zur Verfügung gestellt werden.
3. Mängel müssen innerhalb von 14 Tagen nach Erkennbarkeit uns
gegenüber schriftlich angezeigt werden. Besteht der Garantieanspruch
zu Recht, entscheiden wir, auf welche Art der Schaden / Mangel
behoben werden soll, ob durch Reparatur oder durch Austausch eines
gleichwertigen Geräts.
4. Garantieleistungen werden nicht für Mängel erbracht, die auf der Nicht-
beachtung der Gebrauchsanweisung, unsachgemäßer Behandlung
oder normaler Abnutzung des Geräts beruhen. Garantieansprüche sind
ferner ausgeschlossen für leicht zerbrechliche Teile, wie zum Beispiel
Glas oder Kunststoff. Schließlich sind Garantieansprüche ausgeschlossen, wenn nicht von uns autorisierte Stellen Arbeiten an dem Gerät
vornehmen.
5. Durch Garantieleistungen wird die Garantiezeit nicht verlängert. Es
besteht auch kein Anspruch auf neue Garantieleistungen. Diese
Garantieerklärung ist eine freiwillige Leistung von uns als Hersteller
des Geräts. Die gesetzlichen Gewährleistungsrechte (Nacherfüllung,
Rücktritt, Schadensersatz und Minderung) werden durch diese Garantie nicht berührt.
Stand 06 2012
12
Garantieabwicklung
24 Stunden am Tag, 7 Tage in der Woche
Sollte Ihr Gerät innerhalb der Garantiezeit einen Mangel aufweisen, steht
Ihnen die schnellste und komfortabelste Möglichkeit der Reklamationsanmeldung über unser SLI - Internet-Serviceportal zur Verfügung.
www.sli24.de
Bitte melden Sie direkt den Servicevorgang auf unserem Online
Serviceportal www.sli24.de an. Sie erhalten wenige Sekunden nach
Abschluss der Anmeldung ein kostenloses Versandticket per E-Mail
übermittelt. Zusätzlich erhalten Sie weitere Informationen zur Abwicklung
Ihrer Reklamation.
Mit Ihren persönlichen Zugangsdaten, die direkt nach Ihrer Anmeldung
per E-Mail an Sie übermittelt werden, können Sie den Status Ihres Vorgangs auf unserem Serviceportal www.sli24.de online verfolgen.
Sie brauchen das kostenlose Versandticket nur noch auf die Verpackung
Ihres gut verpackten Gerätes zu kleben und das Paket bei der nächsten
Annahmestelle der Deutschen Post / DHL abzugeben. Der Versand erfolgt
für Sie kostenlos an unser Servicecenter bzw. Servicepartner. So einfach
kann Service sein!
1. Anmelden
2. Einpacken
3. Ab zur Post damit
Fertig, so einfach geht es!
Bitte vergessen Sie nicht, dem Gerät eine Kopie Ihres Kaufbeleges (Kassenbon, Rechnung, Lieferschein) als Garantienachweis beizulegen, da
wir sonst keine kostenlosen Garantieleistungen erbringen können.
Unser Serviceportal www.sli24.de bietet Ihnen weitere Leistungen an:
• Downloadbereich für Bedienungsanleitungen
• Downloadbereich für Firmwareupdates
• FAQ‘s, die Ihnen Problemlösungen anbieten
• Kontaktformular
• Zugang zu unseren Zubehör- und Ersatzteile-Webshops
Auch nach der Garantie sind wir für Sie da! – Kostengünstige
Reparaturen zum Festpreis!
Bitte nehmen Sie in keinem Fall eine unfreie Einsendung Ihres Gerätes
vor. Unfreie Lieferungen werden von uns nicht angenommen. Es entstehen Ihnen damit erhebliche Kosten.
Stand 06 2012
Entsorgung
Bedeutung des Symbols „Mülltonne“
Schonen Sie unsere Umwelt, Elektrogeräte gehören nicht in
den Hausmüll.
Nutzen Sie die für die Entsorgung von Elektrogeräten vorgesehenen Sammelstellen und geben dort Ihre Elektrogeräte ab,
die Sie nicht mehr benutzen werden.
Sie helfen damit die potenziellen Auswirkungen, durch falsche Entsorgung, auf die Umwelt und die menschliche Gesundheit zu vermeiden.
Sie leisten damit Ihren Beitrag zur Wiederverwertung, zum Recycling und
zu anderen Formen der Verwertung von Elektro- und ElektronikAltgeräten.
Informationen, wo die Geräte zu entsorgen sind, erhalten Sie über Ihre
Kommunen oder die Gemeindeverwaltungen.
Page 13
PC -KA11 38_ IM 10.03.2017
Gebruiksaanwijzing
Dank u voor uw keuze van dit product. We hopen dat u er veel plezier van
beleeft.
Symbolen in deze bedieningshandleiding
Belangrijke aanwijzingen voor uw veiligheid zijn speciaal gekenmerkt.
Neem deze aanwijzingen strikt in acht om ongevallen en schade aan het
apparaat te vermijden:
WAARSCHUWING:
Waarschuwt voor gevaren voor uw gezondheid en toont mogelijk
letselrisico’s.
LET OP:
Wijst op mogelijke gevaren voor het apparaat of andere voorwerpen.
OPMERKING: Kenmerkt tips en informatie voor u.
Inhoud
Overzicht van de bedieningselementen ..................................................3
Illustraties A en B .......................................................................................3
Illustraties C - H ...........................................................................................3
Algemene opmerkingen ..........................................................................13
Speciale veiligheidsaanwijzingen voor dit apparaat ...........................13
Beoogd gebruik ........................................................................................14
Uitpakken van het apparaat ....................................................................14
Waarschuwingsetiket op het apparaat ..................................................14
Overzicht van de bedieningselementen / Omvang van de levering ...14
Opmerkingen voor het gebruik ..............................................................14
Plaatsing ...............................................................................................14
Europese verordening inzake energiebesparing .................................15
Elektrische aansluiting ..........................................................................15
Bedieningspaneel .................................................................................15
Kofebonen ...........................................................................................15
Instellen van de grofheid van de maling ...............................................15
Overgebleven kofebonen ...................................................................15
Ingebruikneming ......................................................................................15
Tijdinstelling ..........................................................................................15
Het apparaat in- en uitschakelen ..........................................................15
Voor de eerste ingebruikname van het apparaat .................................15
Bediening ..................................................................................................15
Instellen warmhoudtijd ..........................................................................15
Kofeautomaat voorbereiden ...............................................................15
Voorbereiding met kofebonen .............................................................16
Voorbereiding met gemalen kofe ........................................................16
Onderbreken van het brouwproces ......................................................16
De kofe is klaar ...................................................................................16
Kofezetten met gebruik van de programmeerbare timer ...................17
Stop bediening .........................................................................................17
Ontkalken ..................................................................................................17
Reiniging ...................................................................................................17
Filterhouder plaatsen ............................................................................17
Onderhoud van de kofemolen ............................................................17
Opslaan .....................................................................................................18
Probleemoplossing .................................................................................18
Technische gegevens ..............................................................................19
Verwijdering ..............................................................................................19
Betekenis van het symbool “vuilnisemmer”..........................................19
Algemene opmerkingen
Lees vóór de ingebruikname van dit apparaat de handleiding uiterst
zorgvuldig door en bewaar deze goed, samen met het garantiebewijs, de
kassabon en zo mogelijk de doos met de binnenverpakking. Geef ook de
handleiding mee wanneer u de machine aan derden doorgeeft.
• Gebruik het apparaat uitsluitend privé en uitsluitend voor de voorgeschreven toepassing. Dit apparaat is niet geschikt voor commercieel
gebruik.
• Gebruik het apparaat niet buiten. Bescherm het tegen hitte, directe
zonnestralen, vocht (in geen geval in vloeistofen dompelen) en scherpe randen. Gebruik het apparaat niet met vochtige handen. Bij vochtig
of nat geworden apparaat onmiddellijk de stroomtoevoer onderbreken.
• Schakel het apparaat uit en onderbreek altijd de stroomtoevoer (trek
aan de stekker, niet aan de kabel) wanneer u het apparaat niet gebruikt, hulpstukken aanbrengt, reinigt of wanneer storingen optreden.
• Laat het ingeschakelde apparaat niet zonder toezicht werken. Schakel
het apparaat altijd uit voordat u de ruimte verlaat. Trek de netstekker
uit de contactdoos.
• Het apparaat en de netkabel moeten regelmatig op zichtbare schade
worden gecontroleerd. Wanneer u schade vaststelt, mag het apparaat
niet meer worden gebruikt.
• Gebruik alleen originele reserveonderdelen.
• Laat om veiligheidsredenen geen verpakkingsdelen (plasticzak, doos,
piepschuim, enz.) binnen het bereik van uw kinderen liggen.
WAARSCHUWING:
Laat kleine kinderen niet met de folie spelen. Er bestaat gevaar voor
verstikking!
Speciale veiligheidsaanwijzingen voor dit apparaat
WAARSCHUWING: Risico op brandwonden!
• De verwarmingsplaat en de pot worden erg heet. De glazen pot alleen met het handvat aanraken. Het oppervlak
van de warmhoudplaat kan nog heet zijn nadat u het apparaat gebruikt hebt.
• Het deksel van het waterreservoir niet openen tijden gebruik.
LET OP:
Dit apparaat dient niet ondergedompeld te worden in water. Raadpleeg de instructies die zijn opgenomen in het
hoofdstuk “Reiniging”.
• Plaats het apparaat altijd alleen op een vlakke ondergrond.
• Het apparaat alleen inschakelen wanneer het waterreservoir met water is gevuld.
• Het apparaat niet verplaatsen wanneer het in gebruik is.
• Het apparaat kan worden gebruikt door kinderen van 8 jaar en ouder onder toezicht van een volwassene of als zij
geïnstrueerd zijn in veilig gebruik van het apparaat en bewust zijn van de gevaren.
13
Page 14
PC -KA11 38_ IM 10.03.2017
• Reiniging en onderhoud door de gebruiker mogen niet door kinderen worden verricht, tenzij ze ouder dan 8 jaar zijn
en begeleid worden.
• Houd het apparaat en het snoer buiten bereik van kinderen jonger dan 8 jaar.
• Kinderen mogen niet met het apparaat spelen.
• Apparaten kunnen worden gebruikt door personen met verminderde lichamelijke, zintuiglijke of geestelijke vermogens, of gebrek aan ervaring en kennis als zij onder toezicht staan of geïnstrueerd zijn voor het gebruik van het
apparaat in een veilige manier en als zij de gevaren begrijpen.
• Repareer het apparaat niet zelf. Neem contact op met een bevoegde reparateur. Als de stroomkabel is beschadigd,
moet deze door de fabrikant, zijn dealer of vergelijkbare, erkende personen vervangen worden om gevaar te
vermijden.
Beoogd gebruik
• Dit toestel is ontworpen voor
- Het malen van geroosterde kofebonen en
- Het zetten van zuivere bonenkofe
• Gebruik het apparaat uitsluitend binnenshuis en op een droge plek.
• Het is bestemd voor huishoudelijk gebruik en op dergelijke plaatsen zoals bijv.:
- In personeelkeukens in winkels, op kantoren en andere commerciële plaatsen;
- Door gasten in hotels, motels en andere accommodatiefaciliteiten.
Het is niet bestemd voor gebruik op boerderijaccommodaties of Bed & Breakfast verblijven.
Uitpakken van het apparaat
1. Haal het apparaat uit zijn verpakking.
2. Verwijder alle verpakkingsmaterialen, zoals plastic folie, opvulmateriaal,
kabelbinders en kartonnen verpakking.
3. Controleer de inhoud op eventueel ontbrekende onderdelen.
4. Als de inhoud van de verpakking niet compleet is of wanneer bescha-
dingen worden geconstateerd, het apparaat niet gebruiken. Breng het
apparaat terug naar de leverancier.
5. Verwijder de beschermende folie van het apparaat.
OPMERKING:
Er kan stof en productieresidu op het apparaat aanwezig zijn. We raden
u aan het toestel reinigen zoals beschreven in het hoofdstuk “Reiniging”.
Waarschuwingsetiket op het apparaat
Let op het waarschuwingsetiket op de deksel van de molen:
LET OP:
Doe geen vloeistoffen of gemalen kofe in de kofebonenhouder!
Overzicht van de bedieningselementen /
Omvang van de levering
Pagina 3:
1 Bovenste konische maalschijf
2 Deksel van de molen
3 Deksel voor de kofebonenhouder
4 Onderste konische maalschijf
5 Kofebonenhouder
6 Bedieningspaneel
7 Overloopgat en stoomuitlaat
8 Filterhouder
9 Glazen kan met deksel
10 Reinigingsborstel
11 Verwarmingselement
12 Kabelopslag
13 Waterniveau indicator
14 Grofheid-instelling
15 Grofheid-instelling
16 Waterreservoir
17 Deksel waterreservoir
Pagina 4: Bedieningspaneel (Afbeelding A)
18 Indicatielampje Programma 1
19 Programma 1 knop
20 Indicatielampje Programma 2
21 Programma 2 knop
22 Scherm
23 Uren / minutenknop
24 Indicatielampje Aantal kopjes
25 Aantal kopjes knop
26 Indicatielampje Kofesterkte
27 Kofesterkte knop
28 Indicatielampje Functiekeuze
29 Functiekeuze knop
30 Indicatielampje Gebruikswijze
31 Startknop
32 Indicatielampje Gebruik
33 Aan / Uitknop
Opmerkingen voor het gebruik
Plaatsing
• Plaats het kofezetapparaat op een stabiele en vlakke ondergrond. Zet
het zo neer, dat het niet kan omvallen.
• Plaats het apparaat niet dicht bij en gas of elektrisch fornuis of andere
hittebronnen.
14
Page 15

PC -KA11 38_ IM 10.03.2017
Europese verordening inzake energiebesparing
OPMERKING:
De Europese richtlijn 2009 / 125 / EG (Richtlijn Ecodesign) omvat
maatregelen voor energiebesparing.
De volgende maatregel is van toepassing op kofezetapparaten: De
warmhoudperiode is beperkt tot max. 40 minuten, waarna het apparaat
automatisch uitschakelt.
U behaalt meer projt bij betere veiligheid en een lager energieverbruik.
Elektrische aansluiting
1. Zorg ervoor dat uw elektriciteit overeenkomt met de specicaties van
het apparaat. De specicaties zijn op het typeplaatje afgedrukt.
2. U kunt de voedingskabel oprollen aan de onderkant van het apparaat.
Rol het netsnoer volledig af. Leid het netsnoer door één van de openingen zodat het apparaat nog stevig staat.
3. Steek de stekker in een juist geïnstalleerd en geaard stopcontact. Het
controlelampje voor gebruik gaat aan.
Bedieningspaneel
De knoppen op het apparaat zijn multifunctionele drukknoppen. Om de
verschillende functies te selecteren dient de betreffende knop kort ingedrukt of langer vastgehouden worden.
Kofebonen
LET OP:
Gebruik voor het malen alleen geroosterde kofebonen. Rauwe, bevroren
of vloeibare kofebonen kunnen de molen beschadigen.
Instellen van de grofheid van de maling
De kofemolen heeft meer dan 14 instellingen voor de grofheid van de
maling.
Instelling 1 = jn gemalen (sterke kofe)
Instelling 14 = grof gemalen (milde kofe)
How jn of grof u de kofe maalt hangt af van uw smaakvoorkeur. De
soort en de branding van de kofebonen heeft ook invloed op de smaak.
Met een beetje proberen zult u er eenvoudig achterkomen welke instelling
voor u de juiste is.
AANBEVELING:
Gebruik voor de beste smaak slechts de hoeveelheid kofebonen die
nodig is voor eenmaal kofezetten.
Overgebleven kofebonen
Haal de kofebonen uit het apparaat als ze ouder dan een week zijn. Ze
kunnen hun smaak verloren hebben, en zorgen voor een minder smaak-
volle kofe.
OPMERKING:
Bewaar kofebonen in een afgesloten, luchtdichte container in de koelkast zodat de kofe zijn typische smaak blijft behouden.
Ingebruikneming
Tijdinstelling
Zodra de stekker in het stopcontact zit wordt de tijd op het scherm
zichtbaar.
1. Druk op de
2. Druk nogmaals op de
3. Bevestig uw keuze met de 1 knop. De minuten lichten op
4. Herhaal stappen 2 en 3 om de minuten in te stellen. Uw kofezetap-
paraat is nu klaar voor gebruik.
h
knop. De uren lichten op.
min
h
knop om de huidige waarde in te stellen.
min
OPMERKING:
Als u de knop
h
ingedrukt houdt, dan komt u in de snelle mode.
min
Het apparaat in- en uitschakelen
• Als u 3 minuten lang geen knop indrukt, dan schakelt het apparaat
automatisch in standby-mode. Het scherm en alle indicatielampjes
worden uitgeschakeld.
• U kunt het apparaat ook handmatig uitschakelen door op de knop te
drukken en deze 2 seconden vast te houden.
• Om het apparaat weer in te schakelen drukt u op de knop en houdt
deze weer 2 seconden vast. De tijd en de laatste instellingen worden
opnieuw getoond.
Voor de eerste ingebruikname van het apparaat
Gebruik het apparaat eerst tweemaal met schoon water en zonder lter,
alvorens het te gebruiken om kofe te zetten. Dit verwijdert stof dat zicht
tijdens het transport verzameld kan hebben. Volg de instructies onder
“Voorbereiding met gemalen kofe”. Vul het apparaat niet met gemalen
kofe!
Bediening
Instellen warmhoudtijd
Stel in hoe lang uw kofe na het brouwen warmgehouden wordt.
OPMERKING:
• De tijd kan alleen worden ingesteld wanneer het apparaat in
stand-by staat.
• U kunt een tijd instellen tussen de 5 en 40 minuten.
1. Druk de 2 knop in en houd deze vast totdat op het scherm de
tijd getoond wordt.
2. Gebruik de
3. Bevestig uw keuze met de 2 knop. De huidige tijd wordt wederom
weergegeven.
Kofeautomaat voorbereiden
1. Sluit de kofebonenhouder.
2. Open het deksel van het waterreservoir.
3. Vul het waterreservoir met genoeg koud water voor het gewenste
aantal kopjes kofe. U kunt het waterniveau bepalen met behulp van
de maatverdeling in het waterreservoir.
OPMERKING:
• U kunt de glazen kan gebruiken om het waterreservoir te vullen.
• Doe precies zoveel water als u nodig heeft in het reservoir. De
Maak de tank niet te vol! Vul de tank maximaal tot de markering 10.
4. Sluit het deksel van de watertank.
5. Raadpleeg hiervoor afbeelding B op pagina 4! Knik de onderste
vouw van de papierlter (maat 1 x 4) en plaats deze in de ltertrechter.
Het papieren lter mag niet over de rand van de lterhouder heenste-
ken!
6. Schuif de lterhouder in het apparaat totdat het met een hoorbare klik
op zijn plaats klikt.
OPMERKING:
Een veiligheidsschakelaar voorkomt dat het brouwen begint als de
lterhouder niet goed is geplaatst.
7. Plaats de kan op de warmhoudplaat.
h
knop om de gewenste warmhoudtijd in te stellen.
min
inhoud van het waterreservoir wordt volledig gebruikt tijdens het
kofezetten, en hangt niet af van de instellingen.
LET OP:
15
Page 16

PC -KA11 38_ IM 10.03.2017
LET OP: Lekstop
Uw apparaat is uitgerust met een lekstop. Deze sluit zich als de
kofepot wordt verwijderd. Dit voorkomt dat de kofe op de warmhoudplaat druppelt als er nog water in het lter is.
• Zorg ervoor dat het deksel op de kofepot zit. Deze opent de
lekstop.
• Wanneer zich nog water in de tank bevindt, plaatst u de kan op
tijd terug. In het andere geval zou de lter kunnen overlopen.
• Raadpleeg daarvoor a.u.b. hoofdstuk “Onderbreken van het
brouwproces”.
8. Als u kofe wilt maken met gemalen kofe, lees dan hoofdstuk
“Voorbereiding met gemalen kofe”.
Voorbereiding met kofebonen
Ga te werk als onder de punten “Kofeautomaat voorbereiden”
beschreven.
9. Sluit het deksel van de watertank.
10. Open de kofebonenhouder.
11. Gebruik de keuzeknop (14) om de grofheid van de maling in te stellen.
12. Doe de gewenste hoeveelheid kofebonen in de molen. De maxi-
mumcapaciteit van 150 gr. mag niet overschreden worden.
13. Sluit de kofebonenhouder.
14. Druk op de knop om het apparaat in te schakelen.
15. Druk meerdere malen op de , knop totdat het indicatielampje
naast het icoon aangaat.
OPMERKING:
Als u uw kofe na het zetten niet warm wilt houden, druk dan op
de knop totdat het indicatielampje naast het symbool en het
indicatielampje naast “non-keep warm” aangaan.
16. Gebruik de knop
om het aantal te zetten kopjes te selecteren.
3 -10
OPMERKING:
Iedere druk op de knop wijzigt het aantal kopjes. Het rode indicatielampje geeft de oneven aantallen aan, het groene indicatielampje
geeft de even aantallen kopjes aan.
17. U kunt ook de sterkte van de kofe instellen. Gebruik de knop om
in te stellen of er meer of minder kofe wordt gemalen. Druk meerdere
malen op de knop totdat het indicatielampje naast de gewenste optie
aangaat.
0 = Standaardinstelling
+1 / +2 = ong. + 6 % sterkere kofe (meer gemalen kofe)
– 1 / – 2 = ong. - 6 % mildere kofe (minder gemalen kofe)
18. Druk de knop in en houd deze 2 seconden vast om te beginnen
met kofezetten. Op het scherm worden roterende segmenten
weergegeven . Het controlelampje naast “grind“ licht op. De
kofemolen wordt ontgrendeld en de kofebonen worden gemalen.
OPMERKING:
Als de lterhouder niet goed is geplaatst, dan verschijnt het volgende symbool op het scherm: .
• Verwijder de lterhouder en plaats deze op de juiste manier.
Druk opnieuw op de knop.
19. Na het vermalen wordt door het apparaat de kofemolen automatisch
geblokkeerd. Het bereidingsproces begint nu. Het indicatielampje
naast “brew” zal gaan branden.
Voorbereiding met gemalen kofe
Ga te werk als onder de punten “Kofeautomaat voorbereiden”
beschreven. Voeg de gemalen kofe toe voordat u de lterhouder in het
kofezetapparaat doet.
OPMERKING:
Doe niet teveel kofe in het lter om morsen te voorkomen.
9. Druk op de knop om het apparaat in te schakelen.
10. Druk meerdere malen op de knop totdat het indicatielampje naast
hetl icoon aangaat.
OPMERKING:
Als u uw kofe na het zetten niet warm wilt houden, druk dan op de
knop totdat het indicatielampje naast het symbool en het
indicatielampje naast “non-keep warm” aangaan.
11. Druk de 2 knop in en houd deze 2 seconden vast om te beginnen
met kofezetten. Op het scherm worden roterende segmenten weergegeven . Het controlelampje naast „brew“ licht op.
Onderbreken van het brouwproces
LET OP:
Als u de glazen pot tijdens het kofezetten verwijdert wordt de bereiding
niet gestopt. Als u de glazen pot niet binnen 20 seconden weer op het
verwarmingselement terugzet, dan kan de kofe over de rand van de
lterhouder lopen.
Als u de kofepot tijdens het kofezetten kort wilt verwijderen, ga dan als
volgt te werk:
• Druk kort op de knop. Op het scherm worden de roterende seg-
menten gestopt. Het indicatielampje naast “brew” zal gaan branden.
Het brouwproces wordt gestopt.
• Als u het kofezetten wilt hervatten, zet dan de glazen pot terug op het
verwarmingselement en druk weer kort op de knop.
De kofe is klaar
• Als het bereidingsproces klaar is, dan zal het indicatielampje naast
“brew” gaan branden. Als u hiervoor een warmhoudtijd hebt ingesteld,
dan licht het controlelampje naast “warm“ op. Op het scherm wordt
getoond. Het warmhoudproces wordt gestart. Het apparaat telt op tot
de ingestelde tijd.
• Zodra de warmhoudtijd is verstreken gaat het indicatielampje naast
“warm” uit. Het indicatielampje naast “clean” gaat branden om u eraan
te herinneren het papieren lter weg te gooien. Het apparaat schakelt
niet uit totdat u de lterhouder verwijdert.
• Als u geen warmhoudtijd heeft ingesteld, of de “non-keep warm”
functie is geactiveerd dan gaat het indicatielampje naast “clean” direct
na het bereidingsproces branden.
• Zodra geen kofe meer door de lter in de kan loopt, kunt u de kan
verwijderen.
• Schakel het apparaat uit.
• Wilt u de resterende kofe warm houden? Laat het apparaat ingescha-
keld tot de warmhoudperiode is verstreken. Als u de kofe ook na de
warmhoudperiode warm wenst te houden, dient u de resterende kofe
in een thermoskan te schenken.
OPMERKING:
We raden u aan de lterhouder direct uit het kofezetapparaat te halen,
om te zorgen dat de lterhouder opdroogt.
16
WAARSCHUWING:
Als u meteen een nieuwe pot kofe wilt zetten, dient u het apparaat
eerst uit te schakelen. Laat het apparaat met het waterreservoir geopend afkoelen om te voorkomen dat er heet water opspat tijdens het
opnieuw vullen met water.
Page 17

PC -KA11 38_ IM 10.03.2017
Kofezetten met gebruik van de programmeerbare timer
U kunt uw kofemachine met 2 verschillende startijden zo instellen dat
automatisch begonnen wordt met kofezetten.
LET OP:
Alles moet klaarstaan voor het zetten van de kofe. Zie hoofdstuk
“Kofeautomaat voorbereiden”.
OPMERKING:
Voor het automatisch beginnen van het kofezetten op de ingestelde tijd
dient het apparaat in standby-mode te staan.
Het instellen van de programmatimer
1. Druk op de knop om het apparaat in te schakelen.
2. Druk de 1 (programma 1) of 2 (programma 2) knop in en houd
deze 4 seconden vast. Het betreffende controlelampje gaat aan. Op
het scherm wordt de tijd getoond.
3. Gebruik de
in te stellen
4. Bevestig uw keuze met de betreffende programmaknop.
5. Gebruik de
in te stellen.
6. Bevestig uw keuze met de betreffende programmaknop. De huidige
tijd verschijnt wederom op het scherm.
Het in- / uitschakelen van de programmatimer
OPMERKING:
U kunt slecht één van de twee programmatimers inschakelen.
1. Druk op de knop om het apparaat in te schakelen.
2. Druk op de programmaknop van de timer die u wilt in- of uitschakelen.
Als de timer is geactiveerd dan gaat het betreffende indicatielampje
boven de knop branden.
h
knop om het uur van de gewenste starttijd
min
h
knop om de minuten van de gewenste starttijd
min
Stop bediening
1. Druk op de knop om het apparaat uit te schakelen. (Standbymode)
2. Trek de stekker uit het stopcontact.
3. Maak het apparaat na elk gebruik schoon.
Ontkalken
Wanneer de bereidingstijd aanzienlijk toeneemt, moet u het apparaat
ontkalken.
• Gebruik voor het ontkalken alleen in de handel verkrijgbare ontkal-
kingsmiddelen op citroenzuurbasis.
• Doseer het middel zoals op de verpakking of de bijsluiter beschreven
staat.
• Gebruik de knop om de functies en “non-keep warm” te
selecteren.
WAARSCHUWING:
• Breng daarna 3 - 4 maal water aan de kook om alle resten van het
ontkalkingsmiddel weg te spoelen.
• Gebruik daarbij geen kofepoeder!
• Dit water is niet geschikt voor consumptie.
Reiniging
WAARSCHUWING:
• Trek vóór de reiniging altijd de netstekker uit de contactdoos en wacht totdat het apparaat afgekoeld is.
WAARSCHUWING:
• Dompel het apparaat nooit onder water. Dit zou tot
een elektrische schok of brand kunnen leiden.
LET OP:
• Gebruik geen draadborstel of andere schurende voorwerpen.
• Gebruik geen scherpe of schurende reinigingsmiddelen.
• Reinig de buitenkant van het apparaat zo nodig met een iets vochtige
doek zonder reinigingsmiddelen.
• Kan en lterinzet kunt u op normale wijze in water met wat afwasmid-
del reinigen. Gebruik eventueel een zachte borstel.
Filterhouder plaatsen
Raadpleeg hiervoor afbeelding C op pagina 5.
• Veeg de lterhouder na ieder gebruik schoon met een velletje keuken-
papier.
• Verwijder de restanten gemalen kofe met een borstel.
Onderhoud van de kofemolen
Onderhoud de kofemolen wekelijks. Raadpleeg hiervoor afbeeldingen D
en H op pagina 5.
OPMERKING:
U kunt voor het legen van de kofebonenhouder het best alle bonen
voor de bereiding gebruiken.
1. Doe de lterhouder met een nieuw kofelter in het kofezetapparaat
om de achtergebleven kofe op te vangen. U kunt ook een droge
container op het verwarmingselement plaatsen.
2. Druk op de knop om het apparaat uit te schakelen.
3. Druk de knop in en houd deze vast totdat het indicatielampje naast
“clean“ oplicht. Na een paar seconden gaat de molen heel even
draaien en deblokeert dan. De achtergebleven kofe valt eruit. Op het
scherm wordt getoond.
4. Trek de stekker uit het stopcontact.
5. Open de kofebonenhouder.
6. Draai het blokkeergedeelte van de kofemolen rechtsom om deze te
openen. Haal hem eraf. (Afb. D)
7. Draai de knop voor de keuze van de grofheid rechtsom tot het grofste
niveau (Afb. E a)
8. Druk de grofheids-keuzeknop in, en draai hem rechtsom totdat de
markering bij de rode stip zit. (Afb. E b)
LET OP:
Draai de knop niet met veel kracht om! Doe de deksel van de molen
er weer op, en herhaal stappen 1 - 8 totdat de knop draait. Als de
knop volledig is geblokkeerd, biedt dan uw kofezetapparaat ter
reparatie aan.
9. Trek de bovenste konische maalschijf los. (Afb. E c)
10.
WAARSCHUWING: Risico op letsel!
De bladen van de messen zijn scherp.
11. Maak voorzichtig de bovenste konische maalschijf schoon met een
schoonmaakborstel en een droge doek.
12. Maak voorzichtig de molentunnel schoon met een schoonmaakbor-
stel. (Afb. F a)
13. Gebruik eventueel een stofzuiger. Plaats de zuigmond over de open
kofemolen en zuig de restjes op. (Afb. F b)
14. Zuig de molentunnel van onderen schoon. (Afb. F c)
15. Plaats de bovenste konische maalschijf weer terug. Zorg a.u.b. dat de
markering op de maalschijf is uitgelijnd met het symbool (Afb. G).
16. Draai de knop van de molen linksom voorbij de instelling 1, totdat
deze hoorbaar vastklikt.
17. Plaats de deksel van de molen en draai deze rechtsom. Hij moet
hoorbaar vastklikken. (Afb. H))
17
Page 18

PC -KA11 38_ IM 10.03.2017
Opslaan
• Reinig het apparaat zoals beschreven en laat het volledig opdrogen.
• Als het lange tijd niet gebruikt wordt raden wij aan om het apparaat in
de originele verpakking te bewaren.
• Bewaar het apparaat altijd in een goed geventileerde en droge plaats,
buiten bereik van kinderen.
Probleemoplossing
Storingen worden vaak maar door kleine problemen veroorzaakt. Neem onderstaande tabel door voordat u contact opneemt met onze klantenservice:
Probleem Mogelijke oorzaak Opmerkingen / Oplossing
Het apparaat werkt niet. Het apparaat is niet op het elektriciteitsnet
aangesloten.
Het apparaat is stuk. Neem contact op met uw reparateur of service centrum.
Filterblokkade: er komt gemalen
kofe over de rand van het lter.
Er zit kofedik in de kofe. Het kofelter is te klein. Gebruik een kofelter maat “1 x 4”.
Het kofezetten duurt te lang. Kalkaanslag in het apparaat. Ontkalk het apparaat zoals beschreven.
Het apparaat schakelt automatisch
uit.
De knop voor het instellen van de
grofheid van de maling kan niet
gedraaid worden.
De molen wordt trager en maakt
meer lawaai.
De lekstop is gesloten: De kan staat niet op de warm-
houdplaat of de deksel is niet op de kofepot.
Er zit teveel kofe in het lter.
Er zit teveel kofe in het lter. Gebruik minder kofe.
Dit is niet een defect van het apparaat.
Om te voldoen aan de Ecodesign Richtlijn
(2009 / 125 / EG), schakelt het apparaat automatisch uit
na max. 40 minuten nadat het brouwproces is voltooid.
De lterhouder is niet goed geplaatst. Verwijder hem en plaats hem opnieuw. Hij dient de
De lterhouder is vuil. 1. Reinig het lter in het apparaat, zoals beschreven in
De molen staat scheef. 1. Trek de stekker uit het stopcontact.
De knop voor het instellen van de grofheid van de
maling is oververhit door te frequent gebruik.
Het deksel van de molen is niet goed geplaatst. Plaats het deksel van de molen op de juiste manier. Om
Een kofeboon blokkeert de werking. Begin met malen en probeer het daarna opnieuw.
Veel vervuiling en vreemde voorwerpen in het
maalsel.
Controleer het stopcontact met behulp van een ander
apparaat.
Steek de stekker goed in het stopcontact.
Controleer de stop.
1. Schakel het apparaat uit. Trek de stekker uit het
stopcontact.
2. Plaats de kofepot met het deksel op de warmhoud-
plaat so zodat het lter wordt geleegd.
3. Gooi het kofelter weg.
4. Reinig het apparaat zoals beschreven.
bovenkant volledig af te sluiten. Hij moet hoorbaar
vastklikken.
hoofdstuk “Filterhouder plaatsen”.
2. Het apparaat zonodig loskoppelen van de voedingsadapter. Wacht een paar seconden en sluit dan
opnieuw aan.
2. Voer onderhoud uit, zoals beschreven in “Onder-
houd van de kofemolen”.
1. Laat het apparaat afkoelen.
2. Het apparaat zonodig loskoppelen van de voedingsadapter. Wacht een paar seconden en sluit dan
opnieuw aan.
de foutmelding te verwijderen dient u de stekker uit het
stopcontact te trekken.
Probeer niet uit alle macht de knop te draaien.
Voer onderhoud uit.
18
Page 19

PC -KA11 38_ IM 10.03.2017
Technische gegevens
Model:.........................................................................................PC-KA 1138
Spanningstoevoer: ....................................................220 - 240 V~, 50 / 60 Hz
Opgenomen vermogen: ........................................................... 900 W max.*
Volume: ..............................................................................................1,3 liter
Beschermingsklasse: ...................................................................................
Nettogewicht: .............................................................................ong. 3,85 kg
(*Totaal vermogen van alle onderdelen)
Het recht om technische en ontwerpaanpassingen te maken in de loop
van voortdurende productontwikkeling blijft voor behouden.
Dit apparaat is gekeurd conform de op dit moment van toepassing zijnde
CE-richtlijnen zoals bijvoorbeeld elektromagnetische compatibiliteit en
laagspanningsvoorschriften en is geconstrueerd volgens de nieuwste
veiligheidstechnische voorschriften.
Verwijdering
Betekenis van het symbool “vuilnisemmer”
Bescherm ons milieu, elektrische apparaten horen niet in het
huisafval.
Maak voor het afvoeren van elektrische apparaten gebruik van
de voorgeschreven verzamelpunten en geef daar de elektrische apparaten af die u niet meer gebruikt.
Daardoor helpt u de potentiële effecten te voorkomen die een verkeerde
afvoer op het milieu en de menselijke gezondheid kunnen hebben.
Op deze wijze levert u uw bijdrage aan het hergebruik, de recycling en
andere verwerkingsvormen voor oude elektronische en elektrische apparaten.
Voor informatie over verzamelpunten voor uw apparaten kunt u contact
opnemen met uw gemeente of gemeenteadministratie.
19
Page 20

PC -KA11 38_ IM 10.03.2017
Mode d’emploi
Merci d’avoir choisi notre produit. Nous espérons que vous saurez proter
votre appareil.
Symboles de ce mode d’emploi
Les informations importantes pour votre sécurité sont particulièrement
indiquées. Veillez à bien respecter ces indications an d’éviter tout risque
d’accident ou d’endommagement de l’appareil :
AVERTISSEMENT :
Prévient des risques pour votre santé et des risques éventuels de
blessure.
ATTENTION :
Indique les risques pour l’appareil ou tout autre appareil.
NOTE : Attire votre attention sur des conseils et informations.
Sommaire
Liste des différents éléments de commande .........................................3
Illustrations A et B......................................................................................4
Illustrations C - H ........................................................................................5
Notes générales .......................................................................................20
Conseils de sécurité spéciques à cet appareil ..................................20
Utilisation conforme ................................................................................21
Déballer l’appareil ....................................................................................21
Symboles d’informations sur l’appareil ................................................21
Liste des différents éléments de commande / Livraison .....................21
Notes d’utilisation ....................................................................................21
Positionnement .....................................................................................21
Directives européennes sur l’économie d’énergie ...............................22
Branchement électrique ........................................................................22
Panneau de commande .......................................................................22
Grains de café.......................................................................................22
Réglage du niveau de broyage ............................................................22
Grains de café restants.........................................................................22
Mise en service ........................................................................................22
Réglage de l’heure ................................................................................22
Allumer et éteindre l’appareil ................................................................22
Avant la première utilisation de l’appareil .............................................22
Utilisation ..................................................................................................22
Régler le temps de maintien au chaud .................................................22
Préparer la machine à café ..................................................................22
Préparation à partir de grains de café ..................................................23
Préparation à partir de café moulu .......................................................23
Interruption du cycle de préparation .....................................................23
Le café est prêt .....................................................................................23
Préparation de café avec minuteur programmable ..............................24
Arrêter le fonctionnement .......................................................................24
Détartrage .................................................................................................24
Nettoyage ..................................................................................................24
Support du porte-ltre ...........................................................................24
Entretien du moulin à café ....................................................................24
Stockage ...................................................................................................25
Dépannage ................................................................................................25
Données techniques ................................................................................25
Élimination ................................................................................................26
Signication du symbole « Élimination » ..............................................26
Notes générales
Lisez attentivement ce mode d’emploi avant de mettre l’appareil en
marche pour la première fois. Conservez le mode d’emploi ainsi que
le bon de garantie, votre ticket de caisse et si possible, le carton avec
l’emballage se trouvant à l’intérieur. Si vous remettez l‘appareil à des tiers,
veuillez-le remettre avec son mode d‘emploi.
• N’utilisez cet appareil que pour un usage privé et pour les taches auxquelles il est destiné. Cet appareil n’est pas prévu pour une utilisation
professionnelle.
• Ne l’utilisez pas en plein air. Protégez-le de la chaleur, des rayons
directs du soleil, de l’humidité (ne le plongez en aucun cas dans l’eau)
et des objets tranchants. N’utilisez pas cet appareil avec des mains
humides. S’il arrive que de l’humidité ou de l’eau atteignent l’appareil,
débranchez aussitôt le câble d’alimentation.
• Arrêtez l’appareil et débranchez toujours le câble d’alimentation de
la prise de courant (en tirant sur la che et non pas sur le câble) si
vous n’utilisez pas l’appareil, si vous installez les accessoires, pour le
nettoyage ou en cas de panne.
• Ne laissez jamais fonctionner l’appareil sans surveillance. Lorsque
vous quittez la pièce, toujours arrêter l’appareil. Débranchez la che de
la prise.
• Il y a lieu d’inspecter l’appareil et le bloc d’alimentation régulièrement
en vue d’éventuels signes d’endommagements. Lorsqu’un endommagement est détecté, l’appareil ne doit plus être utilisé.
• N’utilisez que les accessoires d’origine.
• Par mesure de sécurité vis-à-vis des enfants, ne laissez pas les emballages (sac en plastique, carton, polystyrène) à leur portée.
AVERTISSEMENT :
Ne pas laisser les jeunes enfants jouer avec le lm. Il y a risque
d’étouffement !
Conseils de sécurité spéciques à cet appareil
AVERTISSEMENT : Surface chaude !
• La plaque chauffante et le récipient sont très chauds. Tenez uniquement le récipient en verre par la poignée. La
surface de la plaque chauffante peut être encore chaude après l’arrêt de l’appareil.
• N’ouvrez jamais le couvercle du réservoir à eau pendant la cuisson.
ATTENTION :
Ne plongez pas l’appareil dans l’eau pour le nettoyer. Consultez les instructions fournies au chapitre « Nettoyage ».
• Veillez toujours à ce que le couvercle soit bien fermé.
• N’utilisez l’appareil que si le récipient à eau est rempli d’eau.
• Ne déplacez pas l’appareil lorsqu’il fonctionne.
• Cet appareil peut être utilisé par des enfants de plus de 8 ans s’ils sont surveillés ou ont été informés de la bonne
utilisation de l’appareil et s’ils comprennent les risques encourus.
20
Page 21

PC -KA11 38_ IM 10.03.2017
• Le nettoyage et l’entretien par l’utilisateur ne peuvent pas être effectués par les enfants à moins qu’ils soient âgés de
plus de 8 ans et supervisés.
• Conservez l’appareil et son cordon hors de portée des enfants de moins de 8 ans.
• Les enfants ne doivent pas jouer avec l’appareil.
• Les appareils peuvent être utilisés par des personnes dont les capacités physiques, sensorielles ou mentales sont
réduites, ou des personnes dénuées d’expérience ou de connaissance, si elles bénécient d’une surveillance ou
d’instructions concernant l’utilisation de l’appareil en toute sécurité et qu’elles comprennent les risques encourus.
• N’essayez pas de réparer l’appareil vous-même. Contactez toujours un technicien agrée. Si le cordon d’alimentation
est endommagé, il doit être remplacé par le fabricant, son agent de service ou des personnes ayant qualité sem-
blable an d’éviter un risque.
Utilisation conforme
• Cet appareil est conçu pour
- Moudre des grains de café torréés et
- Préparer du café pur en grains.
• Utilisez cet appareil uniquement dans un endroit sec et à l’intérieur.
• Cet appareil est destiné à un usage domestique ou assimilé comme par exemple :
- Les cuisines des employés dans les magasins, les bureaux et autres zones commerciales ;
- Pour les invites des hôtels, motels et autre hébergement.
Cet appareil n’est pas destiné aux hébergements ruraux ou aux Bed & Breakfast.
Déballer l’appareil
1. Enlevez l’appareil de son emballage.
2. Enlevez tout le matériel d’emballage tels que les lms, le matériel de
remplissage, les colliers de câble et le carton.
3. Vériez l’intégralité du contenu.
4. En cas de contenu d’emballage incomplet et de dommages apparents,
n’utilisez pas l’appareil. Renvoyez-le immédiatement au détaillant.
5. Enlevez le lm de protection de l’appareil.
NOTE :
L’appareil peut présenter des résidus de production ou de la poussière.
Nous vous conseillons de nettoyer l’appareil conformément au chapitre
« Nettoyage ».
Symboles d’informations sur l’appareil
Veuillez vous référer à l’étiquette située sur le couvercle du moulin à café:
ATTENTION :
Ne versez aucun liquide ni café moulu dans le récipient à grains de café !
Liste des différents éléments de commande / Livraison
Page 3 :
1 Meule conique supérieure
2 Capuchon du moulin à café
3 Couvercle du récipient à grains de café
4 Meule conique inférieure
5 Récipient à grains de café
6 Panneau de commande
7 Orice de trop-plein et buse vapeur
8 Porte-ltre
9 Carafe en verre avec couvercle
10 Brosse de nettoyage
11 Plaque chauffante
12 Rangement du cordon
13 Témoin du niveau d’eau
14 Régulateur du niveau de broyage
15 Témoin du niveau de broyage
16 Réservoir d’eau
17 Couvercle du réservoir d’eau
Page 4 : Panneau de commande (Figure A)
18 Témoin lumineux Programme 1
19 Bouton Programme 1
20 Témoin lumineux Programme 2
21 Bouton Programme 2
22 Afchage
23 Bouton Heures / Minutes
24 Témoin lumineux Nombre de tasses
25 Bouton Nombre de tasses
26 Témoin lumineux Intensité du café
27 Bouton Intensité du café
28 Témoin lumineux Sélection de fonctions
29 Bouton Sélection de fonctions
30 Témoin lumineux Mode de fonctionnement
31 Bouton Démarrer
32 Témoin lumineux Fonctionnement
33 Bouton Marche / Arrêt
Notes d’utilisation
Positionnement
• Placez la cafetière automatique sur une surface stable et plate. Installez l’appareil de manière à ce qu’il ne se renverse pas.
• N’installez pas l’appareil très prés d’une cuisinière électrique ou à gaz
ou de toute autre source de chaleur.
21
Page 22

PC -KA11 38_ IM 10.03.2017
Directives européennes sur l’économie d’énergie
NOTE :
La directive européenne 2009 / 125 / EC (Directive Ecodesign) intègre
des mesures pour économiser l’énergie.
La condition suivante s’applique aux cafetières : La période de maintien
au chaud est limitée à 40 minutes maximum après quoi l’appareil
s’éteindra automatiquement.
Vous protez d’une meilleure sécurité et d’une faible consommation
d’énergie.
Branchement électrique
1. Veillez à ce que la tension de votre domicile corresponde aux
caractéristiques de l’appareil. Les caractéristiques sont imprimées sur
l’étiquette.
2. Un espace de rangement réservé au cordon se situe au bas de
l’appareil. Déroulez le cordon d’alimentation requis. Faites passer le
cordon d’alimentation dans une des ouvertures pour s’assurer que
l’appareil est bien positionné.
3. Branchez le câble d’alimentation à une prise murale reliée à la terre
et correctement installée. Le témoin lumineux de fonctionnement
s’allume.
Panneau de commande
Les boutons situés sur l’appareil sont des boutons tactiles multifonctions.
Pour sélectionner les différentes fonctions, touchez brièvement le bouton
correspondant ou appuyez plus longtemps.
Grains de café
ATTENTION :
Utilisez uniquement des grains de café torréés à moudre.
Les grains de café verts, congelés ou sous forme liquide peuvent
endommager le moulin à café.
Réglage du niveau de broyage
Le moulin à café dispose de plus de 14 niveaux de broyage.
Étape 1 = nement moulu (café fort)
Étape 14 = grossièrement moulu (café doux)
Le niveau de broyage de grains de café dépend de votre goût. Le type
et la torréfaction des grains de café ont un impact sur le goût. Avec un
peu d’habitude, vous trouverez facilement le niveau de broyage qui vous
convient.
CONSEIL :
Pour obtenir le meilleur goût, utilisez la quantité de grains de café
nécessaire pour une préparation uniquement.
Grains de café restants
Enlevez les grains de café de l’appareil s’ils datent de plus d’une semaine.
Ils ont peut-être perdu leur arôme et altéreront ainsi le goût de votre café.
NOTE :
Rangez les grains de café dans un récipient scellé et hermétique dans
le réfrigérateur pour s‘assurer que le café gardera son goût particulier.
Mise en service
Réglage de l’heure
Après avoir branché l’appareil à l’alimentation, l’heure s’allumera sur
l’afchage.
1. Touchez le bouton
2. Touchez à nouveau le bouton
3. Conrmez votre réglage à l’aide du bouton 1. Les minutes s’allumeront.
h
. L’heure s’allumera.
min
h
min
pour régler l’heure actuelle.
4. Répétez l’étape 2 et 3 pour régler les minutes actuelles. Votre cafetière est maintenant prête à fonctionner.
NOTE :
Si vous maintenez le bouton
h
,un mode rapide commence.
min
Allumer et éteindre l’appareil
• Si vous n’appuyez sur aucun bouton pendant 3 minutes, l’appareil
passe automatiquement en mode veille. L’afchage et tous les témoins
lumineux s’éteindront.
• Vous pouvez également éteindre l’appareil manuellement en maintenant
le bouton enfoncé pendant 2 secondes.
• Pour rallumer l’appareil, maintenez le bouton enfoncé pendant
2 nouvelles secondes. Le temps et les derniers paramètres du pro-
gramme s’afcheront à nouveau.
Avant la première utilisation de l’appareil
Avant de faire du café pour la première fois, utilisez l’appareil deux fois
avec de l’eau pure et sans ltre à café en papier. Cela enlève la poussière, qui a pu s’accumuler pendant le transport. Suivez les instructions
décrites dans « Préparation à partir de café moulu ». Ne versez pas de
café moulu !
Utilisation
Régler le temps de maintien au chaud
Dénissez la durée pendant laquelle vous souhaitez maintenir au chaud
votre café une fois préparé.
NOTE :
• Le temps de maintien au chaud ne peut être réglé qu’en mode veille.
• Vous pouvez régler une durée entre 5 et 40 minutes.
1. Maintenez le bouton 2 enfoncé jusqu’à ce que l’afchage
indique le temps.
2. Utilisez le bouton
souhaité.
3. Conrmez votre réglage à l’aide du bouton 2. L’heure actuelle
s’afche à nouveau.
Préparer la machine à café
1. Fermez le récipient à grains de café.
2. Ouvrez le couvercle du réservoir d’eau.
3. Versez l’eau froide selon la quantité de tasses à café souhaitée à
l’arrière du réservoir d’eau. Le niveau d’eau s’afche sur le témoin.
NOTE :
• Pour remplir le réservoir d’eau, vous pouvez vous servir de la
cafetière.
• Versez uniquement la quantité d’eau que vous souhaitez pour
les tasses. Le réservoir d’eau est entièrement vidé pendant
chaque préparation, quels que soient les réglages.
ATTENTION :
Ne pas trop remplir le réservoir ! Ne pas remplir au-delà du marquage 10.
4. Fermez le couvercle du réservoir d’eau.
5. Référez-vous à la gure B de la page 4 ! Pliez le pli inférieur du
ltre à papier (taille 1 x 4), placez-le dans l’entonnoir à ltres. Le ltre à
papier ne doit pas dépasser le bord du porte-ltre !
6. Faites glisser le porte-ltre dans l’appareil jusqu’à ce qu’il s’emboîte
en émettant un clic.
NOTE :
Un interrupteur de sécurité empêche le démarrage de la préparation
si le porte-ltre n’est pas placé correctement.
7. Posez la carafe sur la plaque chauffante.
h
pour dénir le temps de maintien au chaud
min
22
Page 23

PC -KA11 38_ IM 10.03.2017
ATTENTION : Anti-goutte
Votre appareil est équipé d’un dispositif anti-goutte. Il se ferme
lorsque vous enlevez la cafetière. Cela évitera ainsi au café de
goutter sur la plaque chauffante s’il reste de l’eau dans le ltre.
• Veillez à ce que le couvercle soit xé sur la cafetière. Il ouvre le
dispositif anti-goutte.
• Si le réservoir contient toujours de l’eau, remettez la cafetière ra-
pidement sur son support. Sinon, le ltre risquerait de déborder.
• Consultez également le chapitre « Interruption du cycle de
préparation ».
8. Si vous souhaitez préparer du café à partir de café moulu, lisez le
chapitre « Préparation à partir de café moulu ».
Préparation à partir de grains de café
Procédez comme décrit dans les points « Préparer la machine à café ».
9. Fermez le couvercle du réservoir d’eau.
10. Ouvrez le récipient à grains de café.
11. Utilisez le régulateur (14) pour régler le niveau de broyage.
12. Versez la quantité de grains de café souhaitée dans le moulin à café.
Ne dépassez pas la quantité de remplissage maximale de 150 g.
13. Fermez le récipient à grains de café.
14. Appuyez sur le bouton pour allumer l’appareil.
15. Touchez plusieurs fois le bouton , jusqu’à ce que le témoin lumineux à côté de l’icône s’allume.
NOTE :
Si vous ne souhaitez pas que votre café soit maintenu au chaud
après le cycle de préparation, touchez le bouton jusqu‘à ce que
les témoins lumineux à côté du symbole et de « non-keep warm
» (aucun maintien au chaud) s’allument.
16. Utilisez le bouton
pour sélectionner le nombre de tasses à café
3 -10
que vous souhaitez préparer.
NOTE :
Chaque pression sur le bouton ajoute une tasse au nombre de
tasses précédent. Le témoin lumineux rouge indique le nombre de
tasses impair et le témoin lumineux vert le nombre de tasses pair.
17. Vous pouvez également choisir l’intensité du café. Utilisez le bouton
pour réduire ou augmenter la quantité de café à moudre. Touchez
plusieurs fois le bouton jusqu’à ce que le témoin lumineux à côté du
réglage souhaité s’allume.
0 = Réglage standard
+1 / +2 = env. + 6 %, café plus intense (plus de café moulu)
– 1 / – 2 = env. - 6 %, café plus doux (moins de café moulu)
18. Maintenez le bouton enfoncé pendant 2 secondes pour démarrer
la préparation du café. Le segment . qui brille tourne sur l’af-
chage. Le témoin lumineux à côté de « grind » (moudre) s’allume. Le
moulin à café sera déverrouillé et le café moulu.
NOTE :
Si le porte-ltre n‘est pas placé correctement, le symbole suivant
s’afche : .
• Retirez le porte-ltre et replacez-le. Appuyez à nouveau sur le
bouton .
19. À la n du broyage, l’appareil ferme automatiquement le moulin à
café. Maintenant, le cycle de préparation commence. Le témoin de
contrôle à côté de « brew » (préparer) s’allume.
Préparation à partir de café moulu
Procédez comme décrit dans les points « Préparer la machine à café ».
Ajoutez le café moulu avant de placer le porte-ltre dans la cafetière.
NOTE :
Ne mettez pas trop de café en poudre dans le ltre an d’éviter un
débordement.
9. Appuyez sur le bouton pour allumer l’appareil.
10. Touchez plusieurs fois le bouton , jusqu’à ce que le témoin lumineux à côté de l’icône s’allume.
NOTE :
Si vous ne souhaitez pas que votre café soit maintenu au chaud
après le cycle de préparation, touchez le bouton , jusqu‘à ce
que les témoins lumineux à côté du symbole et de « non-keep
warm » (aucun maintien au chaud) s’allument.
11. Maintenez le bouton enfoncé pendant 2 secondes pour démarrer
la préparation du café. Le segment . Le témoin lumineux à côté
de „brew“ s’allume.
Interruption du cycle de préparation
ATTENTION :
Si vous enlevez la carafe en verre pendant le cycle de préparation,
celui-ci n’est pas arrêté. Si vous ne remettez pas en place la carafe en
verre sur la plaque chauffante au bout de 20 secondes, le café peut
dépasser le rebord du porte-ltre.
Si vous souhaitez retirer la carafe un court instant pendant le cycle de
préparation, procédez comme suit :
• Touchez brièvement le bouton . La rotation des segments sur l’af-
chage s’arrête. Le témoin de contrôle à côté de « brew » (préparer)
s’allume. Le cycle de préparation s’arrête.
• Pour poursuivre le cycle de préparation, remettez la carafe sur la
plaque chauffante et touchez brièvement le bouton à nouveau.
Le café est prêt
• Une fois le cycle de préparation terminé, le témoin de contrôle
« brew » (préparer) s’éteint. Si vous avez déjà déni un temps de
maintien au chaud, le témoin lumineux à côté de « warm » (chaud)
s’allume. L’afchage indique . Le cycle de maintien au chaud com-
mence. L’appareil compte jusqu’au temps déni.
• Une fois le temps de maintien au chaud écoulé, le témoin lumineux
à côté de « warm » (chaud) s’éteint. Le témoin lumineux à côté de
« clean » (nettoyer) s’allume pour vous rappeler de jeter le ltre à papier. Cela n’éteindra pas l’appareil jusqu’ à ce vous retiriez le porte-ltre.
• Si vous n’avez pas déni un temps de maintien au chaud ou que la
fonction « non-keep warm » (aucun maintien au chaud) est activée, le
témoin de contrôle à côté de « clean » (nettoyer) s’allume immédiate-
ment après le cycle de préparation.
• Une fois tout le café passé par le ltre, vous pouvez enlever la
cafetière.
• Arrêter l’appareil.
• Souhaitez-vous maintenir au chaud le reste du café ? Laissez
l’appareil allumer jusqu’à la n de la période de maintien au chaud. Si
vous souhaitez maintenir le café au chaud même après la période de
maintien au chaud, versez le reste de café dans un thermos.
NOTE :
Nous vous conseillons de retirer immédiatement le porte-ltre de la
cafetière pour s’assurer que le support du porte-ltre est bien sec.
AVERTISSEMENT :
Si vous souhaitez immédiatement faire du café, éteignez d’abord l’appareil. Laissez-le refroidir avec le réservoir d’eau ouvert pour éviter les
éclaboussures d’eau chaude lorsque vous remplissez avec de l’eau.
23
Page 24

PC -KA11 38_ IM 10.03.2017
Préparation de café avec minuteur programmable
Vous pouvez régler 2 temps de démarrage différents pour une préparation
automatique du café.
ATTENTION :
Tout doit être prêt pour la préparation du café. Consultez le chapitre
« Préparer la machine à café ».
NOTE :
Pour démarrer automatiquement le cycle de préparation du café à
l’heure programmée, l’appareil doit être en mode veille.
Régler le minuteur programmable
1. Appuyez sur le bouton pour allumer l’appareil.
2. Maintenez le bouton 1 (programme 1) ou 2 (programme 2) enfoncé
pendant 4 secondes. Le témoin lumineux correspondant s’allume.
L’écran afche l’heure.
3. Utilisez le bouton
4. Conrmez le réglage souhaité à l’aide du bouton de programme
approprié.
5. Stellen Sie mit der Taste
6. Conrmez le réglage souhaité à l’aide du bouton de programme
approprié. L’heure actuelle s’afche à nouveau.
Allumer / éteindre le minuteur programmable
NOTE :
Vous pouvez uniquement activer un des deux minuteurs programmables.
1. Appuyez sur le bouton pour allumer l’appareil.
2. Touchez le bouton de programme du minuteur que vous souhaitez
activer ou désactiver. Si le minuteur est activé, le témoin de contrôle
correspondant s’allume au-dessus des boutons.
h
die Stunde der Startzeit ein.
min
h
pour régler l’heure de démarrage.
min
Arrêter le fonctionnement
1. Appuyez sur le bouton pour éteindre l’appareil. (Mode veille)
2. Débranchez le cordon d’alimentation de la prise murale.
3. Nettoyez l’appareil après chaque utilisation.
Détartrage
Un détartrage devient nécessaire lorsque le temps de préparation augmente sensiblement.
• Pour le détartrage, veuillez utiliser exclusivement des produits de
détartrage à base d’acide citrique que l’on trouve dans le commerce.
• Veuillez doser tel qu’indiqué sur l’emballage ou la notice jointe.
• Utilisez le bouton pour sélectionner la fonction et « non-keep
warm » (aucun maintien au chaud).
AVERTISSEMENT :
• Ensuite, faites bouillir de l’eau fraîche 3 ou 4 fois pour rincer les
résidus de l’agent dés entartrant.
• Ne pas utiliser de la poudre à café !
• Ne consommez en aucun cas cette eau.
Nettoyage
AVERTISSEMENT :
• Avant tout nettoyage, toujours débrancher l’appareil
et patienter jusqu’à ce que l’appareil ait refroidi.
• Ne pas plonger l’appareil dans de l’eau. Vous risqueriez de provoquer une électrocution ou un incendie.
ATTENTION :
• Ne pas utiliser de brosse en l de fer ou autres objets abrasifs.
• Ne pas utiliser de détergents agressifs ou abrasifs.
• En cas de besoin, vous nettoierez la face extérieure de l’appareil à
l’aide d’un chiffon légèrement mouillé - sans adjuvant.
• Lavez le récipient en verre et le porte-ltre normalement à l‘eau savon-
neuse. En cas de besoin, utilisez une brosse à poils souples.
Support du porte-ltre
Veuillez également vous référer à la gure C de la page 5.
• Essuyez le support du porte-ltre avec un papier absorbant après
chaque utilisation.
• Enlevez les résidus de café moulu à l’aide de la brosse de nettoyage.
Entretien du moulin à café
Effectuez l’entretien du moulin à café une fois par semaine. Référez-vous
aux gures D à H de la page 5.
NOTE :
Videz au mieux le récipient à grains de café en utilisant tous les grains
pour la préparation du café.
1. Placez le porte-ltre avec un nouveau sachet ltre dans la cafetière
pour attraper le café moulu restant. Sinon, vous pouvez poser un
récipient sec sur la plaque chauffante.
2. Appuyez sur le bouton pour éteindre l’appareil.
3. Maintenez le bouton enfoncé jusqu’à ce que le témoin de contrôle
à côté de « clean » (nettoyer) s’allume. Après quelques secondes, le
moulin à café tournera brièvement et se déverrouillera. Le café moulu
restant tombe. L’afchage indique .
4. Débranchez le cordon d’alimentation.
5. Ouvrez le récipient à grains de café.
6. Tournez la partie verrouillée du moulin à café dans le sens des
aiguilles d’une montre pour ouvrir. Enlevez-la. (Fig. D)
7. Tournez le régulateur du niveau de broyage dans le sens des aiguilles
d’une montre au niveau le plus gros (Fig. E a)
8. Appuyez sur le témoin du niveau de broyage et tournez le régulateur
dans le sens des aiguilles d’une montre, jusqu’à ce que le témoin
indique le point rouge. (Fig. E b)
ATTENTION :
N‘essayez pas de tourner le régulateur en forçant ! Remettez en
place le capuchon du moulin à café et répétez les étapes 1 - 8
jusqu‘à ce que le régulateur tourne. Si le régulateur est complètement bloqué, faites réparer votre cafetière.
9. Retirez la meule conique supérieure. (Fig. E c)
10.
AVERTISSEMENT : Risque de blessure !
Les lames du cône sont tranchantes.
11. Nettoyez avec précaution la meule conique supérieure à l’aide de la
brosse de nettoyage et d’un chiffon sec.
12. Nettoyez avec précaution le tunnel du moulin à café à l’aide de la
brosse de nettoyage. (Fig. F a)
13. Prenez un aspirateur. Placez le tuyau d’aspirateur au-dessus du
moulin à café ouvert et aspirez les résidus. (Fig. F b)
14. Aspirez le tunnel du moulin à café par le bas. (Fig. F c)
15. Remettez en place la meule conique supérieure nettoyée. Assu-
rez-vous que la barre de la meule conique se situe devant le symbole
(Fig. G)
16. Tournez le bouton du moulin à café dans le sens inverse des aiguilles
d’une montre vers le niveau de broyage 1, jusqu’à ce qu’il s’emboîte
en émettant un clic.
17. Placez le capuchon du moulin à café et tournez-le dans le sens des
aiguilles d’une montre. Il doit s’emboîter en émettant un clic. (Fig. H)
24
Page 25

PC -KA11 38_ IM 10.03.2017
Stockage
• Nettoyez l’appareil comme décrit et laissez-le entièrement sécher.
• Pour des périodes d’inactivité plus longues, nous conseillons de ranger
l’appareil dans son emballage d’origine.
• Rangez toujours l’appareil dans un endroit sec et bien ventilé hors de
la portée des enfants.
Dépannage
Une défaillance est souvent due à de légers problèmes. Avant de contacter notre service à la clientèle, veuillez vérier le tableau ci-dessous :
Problème Raison possible Notes / Solution
L’appareil ne fonctionne pas. L’appareil n’est pas branché à l’alimentation. Vériez la sortie murale avec un autre appareil.
Insérez correctement la che dans la prise murale.
Vériez le fusible.
L’appareil est défectueux. Contactez notre service ou un centre d’entretien.
Blocage du ltre : des grains de
café sont tombés au bord du ltre.
Présence de grains de café dans
le café.
Le processus de préparation dure
trop longtemps.
L’appareil s’éteint automatiquement.
Le dispositif anti-gouttes est fermé : La cafetière n’est
pas sur la plaque chauffante ou le couvercle n’est pas
sur la cafetière.
Trop de café en poudre dans le ltre.
Le ltre à café en papier est trop petit. Utilisez un ltre à café en papier de taille « 1 x 4 ».
Trop de café en poudre dans le ltre. Utilisez moins de café en poudre.
Dépôt de tartre dans l’appareil. Décalciez l’appareil comme décrit.
Cela ne vient pas de l’appareil.
Pour respecter la directive Ecodesign (2009 / 125 / EC),
l’appareil s’éteint automatiquement après 40 minutes
maximum à la n du processus de préparation.
Le porte-ltre n’est pas placé correctement. Retirez-le et placez-le à nouveau. Il doit se fermer com-
Le porte-ltre est sale.
1. Éteignez l’appareil. Débranchez l’alimentation.
2. Placez la cafetière avec le couvercle sur la plaque
chauffante pour vider le ltre.
3. Jetez le ltre à café en papier.
4. Nettoyez l’appareil comme décrit.
plètement vers le haut. Il doit s’emboîter.
1. Nettoyez le support du porte-ltre de l’appareil comme
décrit au chapitre « Support du porte-ltre ».
2. Débranchez l’appareil de l’alimentation. Attendez
quelques secondes et rebranchez.
Le moulin à café est incliné. 1. Débranchez le cordon d’alimentation.
Surchauffe du régulateur du niveau de broyage en
raison d’une utilisation fréquente.
Le couvercle du moulin à café n’est pas placé correctement.
Le régulateur du niveau de
broyage ne peut pas être réglé.
Le moulin à café devient plus lent
et plus bruyant.
Un grain est bloqué. Commencez un nouveau cycle de broyage, puis rées-
Moulin à café fortement encrassé et objets étrangers
dans les grains.
Données techniques
Modèle : .....................................................................................PC-KA 1138
Alimentation : ............................................................220 - 240 V~, 50 / 60 Hz
Consommation : .......................................................................900 W max.*
Quantité de remplissage : ................................................................ 1,3 litres
Pression de service : ....................................................................................
Poids net : ............................................................................. environ 3,85 kg
(*Production totale de tous les composants)
Nous nous réservons le droit d’apporter des modications techniques
ainsi que des modications de conception dans le cadre du développe-
ment continu de nos produits.
2. Effectuez l’entretien comme décrit dans « Entretien
du moulin à café ».
1. Laissez le moteur refroidir.
2. Débranchez l’appareil de l’alimentation. Attendez
quelques secondes et rebranchez.
Placez le couvercle du moulin à café correctement. Pour
effacer le message d’erreur, vous devez enlever la che
d’alimentation.
sayez. Ne tournez pas le régulateur bloqué en forçant.
Effectuez un entretien.
Cet appareil a été contrôlé d’après toutes les directives européennes
actuelles applicables, comme par exemple concernant la compatibilité
électromagnétique et la basse tension. Cet appareil a été fabriqué en
respect des réglementations techniques de sécurité les plus récentes.
25
Page 26

PC -KA11 38_ IM 10.03.2017
Élimination
Signication du symbole « Élimination »
Protégez votre environnement, ne jetez pas vos appareils
électriques avec les ordures ménagères.
Utilisez, pour l’élimination de vos appareils électriques, les
bornes de collecte prévues à cet effet où vous pouvez vous
débarrasser des appareils que vous n’utilisez plus.
Vous contribuez ainsi à éviter les impacts potentiels dans l’environnement
et sur la santé de chacun, causés par une mauvaise élimination de ces
déchets.
Vous contribuez aussi au recyclage sous toutes ses formes des appareils
électriques et électroniques usagés.
Vous trouverez toutes les informations sur les bornes d’élimination des
appareils auprès de votre commune ou de l’administration de votre
communauté.
26
Page 27

PC -KA11 38_ IM 10.03.2017
Istruzioni per l’uso
Grazie per aver scelto il nostro prodotto. Vi auguriamo un buon utilizzo del
dispositivo.
Simboli per questo manuale di istruzioni per l’uso
Le indicazioni importanti per la propria sicurezza sono indicati appropriatamente. Osservare assolutamente queste indicazioni, per evitare incidenti
e danni all’apparecchio:
AVVISO:
Previene i rischi della propria salute ed indica possibili rischi di ferite.
ATTENZIONE:
Indica possibili pericoli per l’apparecchio o altri oggetti.
NOTA: Mette in risalto consigli ed informazioni.
Indice
Elementi di comando .................................................................................3
Illustrazioni A e B .......................................................................................4
Illustrazioni C - H .........................................................................................5
Note generali ............................................................................................27
Avvertenze speciali di sicurezza per questo apparecchio .................27
Utilizzo conforme alla destinazione .......................................................28
Disimballaggio dell’apparecchio ...........................................................28
Etichetta informativa sull’apparecchio .................................................28
Elementi di comando / Nella fornitura ....................................................28
Note per l’uso ...........................................................................................28
Posizionamento ....................................................................................28
Normative europee sul risparmio energetico .......................................29
Collegamento elettrico ..........................................................................29
Pannello di controllo .............................................................................29
Chicchi di caffè .....................................................................................29
Regolazione della nezza .....................................................................29
Chicchi di caffè rimanenti .....................................................................29
Messa in funzione ....................................................................................29
Impostazioni dell’orario ........................................................................29
Accensione e spegnimento dell’apparecchio .......................................29
Prima di utilizzare l’apparecchio per la prima volta .............................29
Uso .............................................................................................................29
Impostazione del tempo di mantenimento in caldo .............................29
Preparare la macchina automatica per il caffè .....................................29
Preparazione con chicchi di caffè ........................................................30
Preparazione con polvere di caffè .......................................................30
Interruzione dell’erogazione ................................................................30
Il caffè è pronto .....................................................................................30
Preparazione programmata del caffè tramite il timer ...........................31
Terminare il funzionamento ....................................................................31
Decalcicazione .......................................................................................31
Pulizia ........................................................................................................31
Inserto del supporto del ltro ...............................................................31
Manutenzione del macinacaffè ............................................................31
Conservazione .........................................................................................32
Risoluzione di problemi ..........................................................................32
Dati tecnici ................................................................................................33
Smaltimento .............................................................................................33
Signicato del simbolo “Eliminazione” ..................................................33
Note generali
Prima di mettere in funzione questo apparecchio, leggere molto attentamente le istruzioni per l’uso e conservarle con cura unitamente al
certicato di garanzia, allo scontrino e, se possibile, alla scatola di cartone
con la confezione interna. Se passate l‘apparecchio a terzi, consegnate
anche le istruzioni per l‘uso.
• Utilizzare l’apparecchio esclusivamente per scopi privati e conformemente al tipo di applicazione previsto. Questo prodotto non è stato
concepito ai ni di un impiego in ambito industriale.
• Non utilizzarlo all’aperto. Proteggerlo dal calore, nonché dall’esposizione diretta ai raggi solari e dall’umidità (non immergerlo mai in sostanze
liquide) e tenerlo a distanza da oggetti con spigoli aflati. Non utilizzare
l’apparecchio con le mani umide. Nel caso in cui si bagni o si inumidisca l’apparecchio, staccare immediatamente la spina.
• Disattivare l’apparecchio e staccare sempre la spina dalla relativa
presa (prendendo in mano la spina, non tirando il cavo) allorché non si
utilizza l’apparecchio, quando si applicano degli accessori oppure nel
caso in cui lo si debba pulire o si siano manifestate anomalie.
• Non mettere in funzione l’apparecchio senza sorveglianza. Spegnere
sempre l’apparecchio, se si desidera uscire dalla stanza. Estrarre la
spina dalla presa.
• Controllare regolarmente che l‘apparecchio e il cavo non presentino
tracce di danneggiamento. In tal caso l‘apparecchio non deve più
essere utilizzato.
• Utilizzare esclusivamente accessori originali.
• Per sicurezza tenere l’imballaggio (sacchetto di plastica, scatola,
polistirolo, ecc.) fuori dalla portata dei bambini.
AVVISO:
Non lasciar giocare i bambini piccoli con la pellicola. Pericolo di
soffocamento!
Avvertenze speciali di sicurezza per questo apparecchio
AVVISO: Rischio di ustioni!
• La piastra e la pentola diventano bollenti. Afferrare la pentola di vetro solo per il manico. La supercie della piastra
di riscaldamento può essere ancora calda dopo aver usato l’apparecchio.
• Non aprire mai il coperchio del serbatoio dell’acqua durante la cottura.
ATTENZIONE:
L’apparecchio non deve essere immerse in acqua prima della pulizia. Consulta le istruzioni fornite nel capitolo “Pulizia”.
• Usare l’apparecchio solo su superci da lavoro livelli.
• Usare solo l’apparecchio quando l’acqua è nell’apposito contenitore.
• Non spostare l’apparecchio quando è in funzione.
27
Page 28

PC -KA11 38_ IM 10.03.2017
• Quest’apparecchio può essere usato da bambini dagli 8 anni in su se sono supervisionati o istruiti riguardo l’uso
sicuro dell’apparecchio comprendendo i pericoli a esso associati.
• La pulizia e la manutenzione utente non devono essere eseguiti da bambini, a meno che di età superiore agli 8 anni
e non siano controllati.
• Tenere il dispositivo e il cavo fuori dalla portata dei bambini di età inferiore agli 8 anni.
• II bambini non devono giocare con l’apparecchio.
• Gli apparecchi possono essere utilizzato da persone con ridotte capacità siche, sensoriali o mentali e mancanza
di esperienza e conoscenza sotto la supervisione o grazie alle istruzioni sull’uso dell’apparecchio in modo sicuro e
quando essi capiscono i pericoli potenziali derivanti dall’utilizzo dell’apparecchio.
• Non tentare di riparare l’apparecchio da soli. Contattare sempre un tecnico autorizzato. Se il cavo di alimentazione
è danneggiato, farlo sostituire dal produttore, dall’agente addetto all’assistenza oppure da personale qualicato per
evitare situazioni pericolose.
Utilizzo conforme alla destinazione
• Questo apparecchio serve per:
- La macinatura di chicchi di caffè tostati e
- La produzione di caffè dai chicchi.
• Usare l’apparecchio solo in un’area asciutto e al chiuso.
• È previsto per uso domestico e aree d’uso simili come ad esempio.
- In cucine in negozi, ufci e altre aree commerciali;
- Da ospiti in alberghi, motel e altre strutture.
Non è adatto all’uso in stabilimenti simili a Bed & Breakfast.
Disimballaggio dell’apparecchio
1. Rimuovere l’apparecchio dal materiale d’imballaggio.
2. Rimuovere tutto il materiale d’imballaggio come pellicola, materiale di
riempimento, fascette per cavi e cartone.
3. Controllare l’integrità della confezione.
4. Nel caso in cui il contenuto dell’imballaggio sia incompleto o sei i danni
sono evidenti, non mettere in funzione l’apparecchio. Restituirla immediatamente al rivenditore.
5. Rimuovere la pellicola protettiva dall’unità.
NOTA:
Residui di produzione o polvere potrebbero essersi raccolti nell’apparecchio. Si consiglia di pulire l’apparecchio secondo il capitolo “Pulizia”.
Etichetta informativa sull’apparecchio
Si prega di notare l’etichetta sul tappo del macinacaffè:
ATTENZIONE:
Non versare liquidi o polvere di caffè nel contenitore del caffè in grani!
Elementi di comando / Nella fornitura
Pagina 3:
1 Cono di macinazione superiore
2 Tappo del macinacaffè
3 Coperchio per il contenitore del caffè in grani
4 Cono di macinazione inferiore
5 Contenitore del caffè in grani
6 Pannello di controllo
7 Foro del troppo pieno e uscita del vapore
8 Supporto del ltro
9 Caraffa in vetro con coperchio
28
10 Spazzola di pulizia
11 Piastra termica
12 Vano portacavo
13 Indicatore del livello dell’acqua
14 Regolatore della nezza
15 Indicatore della nezza
16 Serbatoio dell’acqua
17 Coperchio del serbatoio dell’acqua
Pagina 4: Pannello di controllo (Figura A)
18 Spia del Programma 1
19 Pulsante del Programma 1
20 Spia del Programma 2
21 Pulsante del Programma 2
22 Display
23 Pulsante ore / minuti
24 Indicatore del numero di tazze
25 Pulsante del numero di tazze
26 Spia dell’intensità del caffè
27 Pulsante dell’intensità del caffè
28 Spia di selezione della funzione
29 Pulsante di selezione della funzione
30 Spia della modalità di funzionamento
31 Pulsante di avvio
32 Spia di funzionamento
33 Pulsante On / Off
Posizionamento
• Posizionare la macchina per caffè automatica su una supercie stabile
e regolare. Mettere l’apparecchio in modo che non cada.
• Non mettere l’apparecchio vicino a fornelli a gas o elettrici o altre fonti
di calore.
Note per l’uso
Page 29

PC -KA11 38_ IM 10.03.2017
Normative europee sul risparmio energetico
NOTA:
La direttiva europea 2009 / 125 / CE (Direttiva sulla Progettazione
Ecocompatibile) comprende misure per il risparmio energetico.
Quanto segue si applica alle macchine per il caffè: il periodo di mantenimento in caldo è limitato a max. 40 minuti dopo di che l’apparecchio si
spegne automaticamente.
Ciò consente di ottenere una maggiore sicurezza e un minor consumo
di energia.
Collegamento elettrico
1. Assicurarsi che l’alimentazione principale corrisponda alle speciche
tecniche dell’apparecchio. Le speciche tecniche sono stampate
sull’etichetta del modello.
2. L’apparecchio è dotato di un vano portacavi nella parte inferiore.
Svolgere il cavo di alimentazione. Far passare il cavo di alimentazione
attraverso una delle aperture per garantire la posizione stabile dell’unità.
3. Collegare il cavo di corrente ad una presa a parete installata correttamente e a terra da. La spia di funzionamento si accende.
Pannello di controllo
I pulsanti del dispositivo sono di tipo touch. Per selezionare le diverse
funzioni, occorre premere brevemente o più a lungo il pulsante corrispondente.
Chicchi di caffè
ATTENZIONE:
Utilizzare solo chicchi di caffè tostato per la macinazione.
L’utilizzo di chicchi di caffè crudi o congelati oppure di liquidi può danneggiare il macinacaffè.
Regolazione della nezza
Il macinacaffè ha più di 14 impostazioni della nezza.
Regolazione 1 = macinatura ne (caffè forte)
Regolazione 14 = macinatura grossolana (caffè leggero)
Il grado di nezza dipende dal proprio gusto. Il sapore è anche inuenzato
dal tipo e dalla tostatura dei chicchi di caffè. Con un po’ di pratica, sarà
facile capire quale impostazione della nezza è quella preferita.
CONSIGLIO:
Per ottenere il miglior sapore, usare la quantità di chicchi di caffè che
serve per una sola erogazione.
Chicchi di caffè rimanenti
Rimuovere i chicchi di caffè dal apparecchio se sono più vecchi di una
settimana. Potrebbero aver perso il loro aroma e il gusto del caffè ne
risulterebbe diminuito.
NOTA:
Conservare i chicchi di caffè in un contenitore a tenuta stagna in frigorifero per garantire che il caffè mantenga il suo tipico aroma.
Messa in funzione
Impostazioni dell’orario
Dopo aver collegato l’alimentazione, il display visualizza l’ora.
1. Premere il pulsante
2. Premere nuovamenet il pulsante
3. Confermare l’immissione con il pulsante 1. Vengono visualizzati i
minuti.
4. Ripetere i passaggi 2 e 3 per impostare i minuti. La macchina da caffè
è pronta per il funzionamento.
h
. Viene visualizzata l’ora.
min
h
, per impostare l’ora corrente.
min
NOTA:
Se si tiene premuto il pulsante
h
si avvia una modalità veloce.
min
Accensione e spegnimento dell’apparecchio
• Se non si preme alcun pulsante per 3 minuti, l’apparecchio passa
automaticamente in modalità standby. Il display e tutte le spie si
spengono.
• È possibile anche spegnere l’apparecchio manualmente tenendo premuto il pulsante per 2 secondi.
• Per riaccendere il dispositivo, tenere nuovamente premuto il pulsante
per 2 secondi. Verranno visualizzati nuovamente l’orario e le ultime
impostazioni del programma.
Prima di utilizzare l’apparecchio per la prima volta
Prima di fare il caffè per la prima volta mettere due volte in funzione l’ap-
parecchio solo con acqua pulita e senza ltro in carta. Questo rimuove la
polvere che potrebbe raccogliersi durante il trasporto. Seguire le istruzioni
fornite in “Preparazione con polvere di caffè ”. Non riempirlo di polvere di
caffè!
Uso
Impostazione del tempo di mantenimento in caldo
Impostare quanto a lungo si desidera che il caffè venga tenuto in caldo
dopo l’erogazione.
NOTA:
• Il tempo di mantenimento in caldo può essere impostato solo in
modalità standby.
• È possibile impostare qualsiasi periodo tra 5 e 40 minuti.
1. Tenere premuto il pulsante 2 , nché il display non indica
l’orario.
2. Utilizzare il pulsante
caldo richiesto.
3. Confermare l’impostazione con il pulsante 2. Viene visualizzata di
nuovo l’ora corrente.
Preparare la macchina automatica per il caffè
1. Chiudere il contenitore del caffè in grani.
2. Aprire il coperchio del serbatoio dell’acqua.
3. Riempire il serbatoio di acqua posteriore con acqua fredda secondo la
quantità desiderata di tazze di caffè. Il livello dell’acqua viene visualizzato sull’indicatore.
NOTA:
• Per il riempimento del serbatoio, potete utilizzare il bricco dell’apparecchio stesso.
• Versare solo la quantità di acqua che si desidera per le tazze. Il
contenuto del serbatoio si svuota completamente durante ogni
erogazione, indipendentemente dalle impostazioni.
ATTENZIONE:
Non riempire troppo il serbatoio! Non riempire al di là della marcatura 10.
4. Chiudete il coperchio del serbatoio dell’acqua.
5. Fare riferimento alla gura B a pagina 4! Ripiegate il bordo inferiore
del ltro in carta (grandezza 1 x 4) e disponetelo nell’imbuto porta ltro.
Il ltro di carta non può sporgere oltre il bordo del supporto del ltro!
6. Far scorrere il supporto del ltro all’interno dell’apparecchio no a che
si blocca con un suono udibile.
NOTA:
Se il supporto del ltro non è inserita correttamente, un interruttore
di sicurezza impedisce l‘avvio dell’erogazione.
7. Collocare la caraffa sulla piastra di riscaldamento.
h
per impostare il tempo di mantenimento in
min
29
Page 30

PC -KA11 38_ IM 10.03.2017
ATTENZIONE: Arresto gocce
L’apparecchio è dotato di un dispositivo di arresto gocce. Si chiude
quando si rimuovere il bricco del caffè. In questo modo il caffè non
gocciola sulla piastra di riscaldamento se vi è ancora acqua nel
ltro.
• Assicurarsi che il coperchio sia montato sul bricco per caffè. Apre
il dispositivo di arresto gocce.
• Se si dovesse trovare ancora acqua nel serbatoio, poggiarci in
tempo la caffettiera al di sotto. Il ltro potrebbe traboccare.
• Si prega di fare riferimento anche al capitolo “Interruzione
dell’erogazione”.
8. Se si vuole preparare il caffè con la polvere, leggere il capitolo
“Preparazione con polvere di caffè”.
Preparazione con chicchi di caffè
Procedere con descritto nei punti “Preparare la macchina automatica
per il caffè”.
9. Chiudete il coperchio del serbatoio dell’acqua.
10. Aprire il contenitore del caffè in grani.
11. Utilizzare il regolatore (14) per impostare la nezza.
12. Inserire la quantità desiderata di chicchi di caffè nel macinatore. Non
deve essere superata la capacità massima di riempimento pari
a 150 g.
13. Chiudere il contenitore del caffè in grani.
14. Premere il pulsante per accendere il dispositivo.
15. Premere il pulsante , ripetutamente, no all’accensione della spia
accanto all’icona .
NOTA:
Se non si desidera che il caffè venga tenuto in caldo dopo l’erogazione, premere il pulsante no all’accensione della spia accanto
al simbolo e della la spia accanto alla dicitura „non-keep warm“.
16. Utilizzare il pulsante
per selezionare il numero di tazze di caffè
3 -10
che si desidera preparare.
NOTA:
Ogni tocco del pulsante imposta un diverso numero di tazze. La
spia rossa indica i numeri dispari, la spia verde indica i numeri pari
di tazze.
17. È anche possibile impostare l’intensità del caffè. Utilizzare il pulsante
per determinare la quantità di caffè da macinare. Premere il pul-
sante più volte, no all’accensione della spia accanto all’impostazione
desiderata.
0 = Impostazione standard
+1 / +2 = caffè più forte del 6% circa (più polvere di caffè)
– 1 / – 2 = caffè più leggero del 6% circa (meno polvere di caffè)
18. Tenere premuto il pulsante per 2 secondi per avviare la preparazione del caffè. Il display mostra una rotazione del segmento illuminato
. Si accende la spia accanto alla dicitura “grind”. Il macinacaffè
si sblocca e il caffè viene macinato.
NOTA:
Se il supporto del ltro non è inserito correttamente, sul display
appare questo simbolo: .
• Estrarre il supporto del ltro e inserirlo correttamente. Premere
nuovamente il pulsante .
19. Dopo il processo di macinazione, la macchina blocca automaticamente il macinacaffè. Ora inizia il processo di erogazione. Si accende la
spia di controllo accanto alla dicitura “brew”.
Preparazione con polvere di caffè
Procedere con descritto nei punti “Preparare la macchina automatica
per il caffè”. Aggiungere la polvere di caffè prima di inserire il supporto del
ltro nella macchina.
NOTA:
Non mettere troppa polvere di caffè nel ltro per evitare fuoriuscite.
9. Premere il pulsante per accendere il dispositivo.
10. Premere il pulsante ripetutamente, no all’accensione della spia
accanto all’iconal
NOTA:
Se non si desidera che il caffè venga tenuto in caldo dopo l’erogazione, premere il pulsante , no all’accensione della spia accanto al simbolo e della la spia accanto alla dicitura „non-keep
warm“.
11. Tenere premuto il pulsante per 2 secondi per avviare la preparazione del caffè. Il display mostra una rotazione del segmento illuminato
. Si accende la spia accanto alla dicitura “brew”.
Interruzione dell’erogazione
ATTENZIONE:
Se si rimuove la caraffa di vetro durante l’erogazione, il processo non
viene interrotto. Se non si appoggia di nuovo la caraffa di vetro sulla
piastra entro 20 secondi, il caffè può versarsi oltre il bordo del portaltro.
Se si desidera rimuovere la caraffa per un breve periodo di tempo durante
il processo di erogazione, procedere nel modo seguente:
• Premere brevemente toccare il pulsante . La rotazione dei segmenti
sul display si ferma. Si accende la spia di controllo accanto alla dicitura
“brew”. L’erogazione si interrompe.
• Se si desidera continuare il processo di erogazione, appoggiare
di nuovo la caraffa di vetro sulla piastra e ripremere brevemente il
pulsante .
Il caffè è pronto
• Una volta terminata l’erogazione, la spia di controllo accanto alla dici-
tura “brew” si spegne. Se in precedenza è stato impostato un tempo di
mantenimento in caldo, si accende la spia accanto alla dicitura “warm”.
Il display mostra il simbolo . Inizia il processo di mantenimento in
caldo. Il dispositivo tiene conto del tempo impostato.
• Una volta trascorso il tempo di mantenimento in caldo, la spia accanto
alla dicitura “warm” si spegne. La spia accanto alla dicitura “clean” si
illumina per ricordare di rimuovere il ltro di carta. Non si spegne no a
quando non si rimuove il supporto del ltro.
• Se non è stato impostato un tempo di mantenimento in caldo, o è
attivata la funzione “non-keep warm”, la spia di controllo accanto
alla dicitura “clean” si accende immediatamente dopo il processo di
erogazione.
• Una volta che non uisce più caffè dal ltro, potete togliere il bricco.
• Spegnete l‘apparecchio.
• Desiderate tenere caldo il caffè rimasto? Lasciare l’apparecchio acce-
so no al termine del periodo di mantenimento in caldo. Se si desidera
mantenere caldo il caffè anche oltre il termine di tale periodo, versare il
caffè rimanente in un thermos.
NOTA:
Si raccomanda di estrarre immediatamente dalla macchina il supporto
del ltro, per garantire che si asciughi.
AVVISO:
Se vuoi preparare subito dell’altro caffè, spegni per prima cosa il dispositivo. Lascialo raffreddare con il serbatoio dell’acqua aperto per evitare
schizzi di acqua bollente durante il riempimento.
30
Page 31

PC -KA11 38_ IM 10.03.2017
Preparazione programmata del caffè tramite il timer
È possibile impostare 2 diversi tempi di avvio della macchina per erogare
il caffè in modo automatico.
ATTENZIONE:
Tutto deve essere pronto per la preparazione del caffè. Vedere il
capitolo “Preparare la macchina automatica per il caffè”.
NOTA:
Per l‘avvio automatico della preparazione all’orario impostato, l‘apparecchio deve essere in modalità standby.
Impostazione del timer di programmazione
1. Premere il pulsante per accendere l’apparecchio.
2. Tenere premuto il pulsante 1 (programma 1) o 2 (programma 2)
per 4 secondi. Si accende la spia corrispondente. Il display visualizza
l’orario.
3. Utilizzate il pulsante
4. Confermare l’impostazione desiderata con il pulsante del relativo
programma.
5. Utilizzare il pulsante
6. Confermare l’impostazione desiderata con il pulsante del relativo
programma. L’ora attuale appare nuovamente sul display.
Accensione e spegnimento del timer di programmazione
NOTA:
È possibile attivare solo uno dei due timer programmati.
1. Premere il pulsante per accendere l’apparecchio.
2. Premere il pulsante di programmazione del timer che si desidera
attivare o disattivare. Se il timer è attivato, la spia di controllo corrispondente si accende sopra i pulsanti.
h
per impostare l’orario dell’avvio.
min
h
per impostare i minuti dell’orario di avvio.
min
Terminare il funzionamento
1. Premere il pulsante per spegnere l’apparecchio. (Modalità standby)
2. Scollegare il cavo di alimentazione dalla presa a muro.
3. Pulire il dispositivo dopo ogni utilizzo.
Decalcicazione
Una decalcicazione si rende necessaria se il tempo di preparazione
aumenta notevolmente.
• Per decalcicare usare solo decalcicanti comunemente in commercio
a base di acido citrico.
• Per cortesia dosare come indicato sull’imballaggio o sul foglio d’istru-
zioni accluso.
• Utilizzare il pulsante per selezionare la funzione e “non-keep
warm”.
AVVISO:
• Poi far bollire 3 - 4 volte acqua fresca per togliere i residui di decalci-
cante.
• Non utilizzare caffè in polvere!
• Non usare quest’acqua come acqua potabile.
Pulizia
AVVISO:
• Staccate sempre la spina di collegamento alla rete
elettrica, prima di procedere alla pulizia ed attendete
che l’apparecchio si sia raffreddato.
ATTENZIONE:
• Non usare pagliette o altri oggetti abrasivi.
• Per la pulizia non usare detersivi forti o abrasivi.
• All’occorrenza pulite la parte esterna dell’apparecchio con panno
leggermente umido – senza aggiunte di detergenti.
• Lavare la caraffa ed il ltro come al solito in acqua e detersivo per
stoviglie. Utilizzate eventualmente una spazzola morbida.
Inserto del supporto del ltro
Si prega di fare riferimento alla gura C a pagina 5.
• Pulire l’inserto del supporto del ltro con un tovagliolo di carta dopo
ogni utilizzo.
• Rimuovere i residui di polvere di caffè con una spazzola.
Manutenzione del macinacaffè
Mantenere il macinacaffè con cadenza settimanale. Fare riferimento alle
gure da D a H a pagina 5.
NOTA:
Svuotare il contenitore del caffè in grani utilizzando tutti i grani per la
preparazione del caffè.
1. Inserire il supporto del ltro con un nuovo ltro nella macchina per
raccogliere il caffè in polvere rimanente. In alternativa, è possibile
appoggiare un contenitore asciutto sulla piastra di riscaldamento.
2. Premere il pulsante per spegnere l’apparecchio.
3. Tenere premuto il pulsante no all’accensione della spia di controllo
accanto alla dicitura “clean”. Dopo alcuni secondi, il macinacaffè si
accende brevemente e si sblocca. La polvere di caffè rimanente cade.
Il display mostra il simbolo .
4. Scollegare il cavo di alimentazione.
5. Aprire il contenitore del caffè in grani.
6. Ruotare la parte di bloccaggio del macinacaffè in senso orario per
aprirla. Rimuoverla. (Fig. D)
7. Ruotare il regolatore del livello di granulosità in senso orario no al
livello più grossolano (Fig. E a)
8. Premere verso il basso l’indicatore di livello di nezza e ruotarlo il
senso orario, no a quando indica il punto rosso. (Fig. E b)
ATTENZIONE:
Non cercare di forzare la rotazione del regolatore! Reinserire il
tappo del macinacaffè e ripetere i passaggi da 1 a 8 no a quando
il regolatore si gira. Se il regolatore è completamente bloccato,
portare la macchina da caffè in riparazione.
9. Estrarre il cono di macinazione superiore. (Fig. E c)
10.
AVVISO: Pericolo di lesioni!
Le lame del cono sono taglienti.
11. Pulire accuratamente il cono di macinazione superiore con una spaz-
zola e un panno asciutto.
12. Pulire accuratamente il tunnel del macinacaffè con una spazzola. (Fig.
F a)
13. Aiutarsi con un aspirapolvere. Posizionare il tubo di aspirazione sopra
il macinacaffè aperto e aspirare i residui. (Fig. F b)
14. Aspirare il tunnel del macinacaffè da sotto. (Fig. F c)
15. Reinserire il cono di macinazione superiore pulito. Si prega di assicu-
rarsi che la barra del cono di macinazione sia allineata con il simbolo
(Fig. G)
16. Girare la manopola del macinacaffè in senso antiorario sul livello di
nezza 1, no a quando si sblocca in modo udibile.
17. Inserire il tappo del macinacaffè e girarlo in senso orario. Si deve
bloccare con un suono udibile. (Fig. H)
• Non immergere l’apparecchio in acqua. Ne potrebbe
conseguire un corto circuito o incendio.
31
Page 32

PC -KA11 38_ IM 10.03.2017
Conservazione
• Pulire l’apparecchio come descritto e lasciarlo asciugare completamente.
• Per lunghi periodi di non utilizzo si consiglia di conservare l’apparecchio nella confezione originale.
• Tenere sempre l’apparecchio fuori dalla portata dei bambini in un luogo
asciutto e ben ventilato.
Risoluzione di problemi
I malfunzionamenti sono spesso causati da problemi lievi. Prima di contattare il seervizio assistenza, si prega di vericare la seguente tabella:
Problema Causa possibile Note / Soluzione
L’apparecchio non funziona. L’apparecchio non è collegato alla corrente. Controllare la presa a muro con un apparecchio diverso.
Inserire la spina correttamente nella presa a parete.
Controllare il fusibile.
L’apparecchio è difettoso. Contattare il centro assistenza e un tecnico.
Blocco del ltro: i chicchi di caffè
sono caduti sul bordo del ltro.
Chicchi di caffè nel caffè. Il ltro di carta è troppo piccolo. Utilizzare un ltro di carta della dimensione “1 x 4”.
Il processo di preparazione del
caffè impiega troppo tempo.
L’apparecchio si spegne automaticamente.
Il regolatore di livello di nezza
non può essere regolato.
Il macinacaffè diventa più lento e
produce più rumore.
L’arresto goccia è chiuso: il bricco per caffè non è
sulla piastra di riscaldamento oppure il coperchio non
è sul bricco per caffè.
Troppa polvere di caffè nel ltro.
Troppa polvere di caffè nel ltro. Utilizzare meno polvere di caffè.
Depositi di calcare si formano nell’apparecchio. Decalcicare l’apparecchio come descritto.
Questo non è un malfunzionamento dell’apparecchio.
Per rispettare la Direttiva sulla Progettazione Ecocompatibile (2009 / 125 / CE), l’apparecchio si spegne
automaticamente dopo massimo 40 minuti dalla ne
dell’erogazione.
Il supporto del ltro è inserito in modo non corretto. Estrarlo e reinserirlo. È necessario chiudere completa-
Il supporto del ltro è sporco. 1. Pulire l’inserto del supporto del ltro come descritto
Il macinacaffè è inclinato. 1. Scollegare il cavo di alimentazione.
Il regolatore di livello di nezza è surriscaldato da un
uso frequente.
Il coperchio del macinacaffè è stato inserito in modo
non corretto.
Un chicco di caffè si è incastrato. Avviare un nuovo processo di macinazione e poi riprova-
Forte sporcizia e oggetti estranei nel materiale da
macinare.
1. Spegnere l’apparecchio. Scollegare il dispositivo
dall’alimentazione principale.
2. Mettere il bricco del caffè con il coperchio sulla
piastra di riscaldamento per drenare il ltro.
3. Smaltire il ltro di carta.
4. Pulire l’apparecchio come descritto.
mente con il lato superiore. Deve inserirsi con un suono
udibile.
nel capitolo “Inserto del supporto del ltro”.
2. Scollegare il dispositivo dall’alimentatore. Attendere
qualche secondo e ricollegarlo di nuovo.
2. Effettuare la manutenzione come descritto nel capitolo
“Manutenzione del macinacaffè”.
1. Lasciare che il motore si raffreddi.
2. Scollegare il dispositivo dall’alimentatore. Attendere
qualche secondo e ricollegarlo di nuovo.
Inserire correttamente il coperchio del macinacaffè. Per
cancellare il messaggio di errore, è necessario staccare
la spina di alimentazione.
re. Non forzare la rotazione del regolatore se è bloccato
Effettuare la manutenzione.
32
Page 33

PC -KA11 38_ IM 10.03.2017
Dati tecnici
Modello: ......................................................................................PC-KA 1138
Alimentazione rete: ...................................................220 - 240 V~, 50 / 60 Hz
Consumo di energia: .............................................................. 900 W mass.*
Capacità: ............................................................................................. 1,3 litri
Classe di protezione: ...................................................................................
Peso netto: ................................................................................... ca. 3,85 kg
(*Potenza totale di tutti i componenti)
Si riserva il diritto di apportare modiche tecniche e di design nel corso
dello sviluppo del prodotto.
Questo apparecchio è stato controllato sulla base di tutte le direttive
CE attuali in vigore in questo settore, quali per esempio la normativa in
materia di compatibilità elettromagnetica e la direttiva in materia di bassa
tensione, ed è stato costruito conformemente alle norme di sicurezza più
moderne.
Smaltimento
Signicato del simbolo “Eliminazione”
Salvaguardare l’ambiente, gli elettrodomestici non vanno elimi-
nati come riuti domestici.
Per l’eliminazione degli elettrodomestici, fare uso dei posti di
raccolta previsti per questo tipo e porre quegli elettrodomestici
che non sono più in uso.
Si contribuisce così ad evitare un effetto potenziale sull’ambiente e sulla
salute, dovuto magari ad una eliminazione sbagliata.
Questo signica un contributo personale alla riutilizzazione, al riciclaggio
e altre forme di utilizzazione di elettrodomestici ed apparecchi elettronici
usati.
Si possono trovare le corrispondenti informazioni sugli appositi luoghi di
raccolta, nelle amministrazioni dei comuni.
33
Page 34

PC -KA11 38_ IM 10.03.2017
Instruction Manual
Thank you for choosing our product. We hope you will enjoy using the
appliance.
Symbols in these Instructions for Use
Important information for your safety is specially marked. It is essential
to comply with these instructions in order to avoid accidents and prevent
damage to the appliance:
WARNING:
This warns you of dangers to your health and indicates possible injury
risks.
CAUTION:
This refers to possible hazards to the appliance or other objects.
NOTE: This highlights tips and information.
Contents
Overview of the Components ...................................................................3
Illustrations A and B ..................................................................................4
Illustrations C - H ........................................................................................5
General Notes ...........................................................................................34
Special Safety Instructions for this Appliance .....................................34
Designated Use ........................................................................................35
Unpacking the Appliance ........................................................................35
Information Sign on the Appliance ........................................................35
Overview of the Components / Delivery Scope ....................................35
Notes on Use ............................................................................................35
Placement .............................................................................................35
European Regulations on Energy Saving ............................................35
Electric Connection ...............................................................................36
Control panel .........................................................................................36
Coffee Beans ........................................................................................36
Adjustment of the Coarseness Setting .................................................36
Remaining Coffee Beans ......................................................................36
Initial Operation ........................................................................................36
Time Setting ..........................................................................................36
Switch the Appliance On and Off ..........................................................36
Before Using the Appliance for the First Time ......................................36
Operation ..................................................................................................36
Set the Warm-Keeping Time ................................................................36
Preparing the Coffee Machine ..............................................................36
Preparation with Coffee Beans .............................................................36
Preparation with Coffee Powder ...........................................................37
Interruption of the Brewing Process .....................................................37
The Coffee is Ready .............................................................................37
Coffee Preparation with Programmed Timer Operation.......................37
Stop Operation .........................................................................................38
De-scaling .................................................................................................38
Cleaning ....................................................................................................38
Filter Holder Insert ................................................................................38
Maintenance of the Grinder ..................................................................38
Storage ......................................................................................................38
Troubleshooting .......................................................................................38
Technical Data ..........................................................................................39
Disposal ....................................................................................................39
Meaning of the “Dustbin” Symbol .........................................................39
General Notes
Read the operating instructions carefully before putting the appliance into
operation and keep the instructions including the warranty, the receipt
and, if possible, the box with the internal packing. If you give this appliance to other people, please also pass on the operating instructions.
• The appliance is designed exclusively for private use and for the envis-
aged purpose. This appliance is not t for commercial use.
• Do not use it outdoors. Keep it away from sources of heat, direct sunlight, humidity (never dip it into any liquid) and sharp edges. Do not use
the appliance with wet hands. If the appliance is humid or wet, unplug
it immediately.
• When cleaning or putting it away, switch off the appliance and always
pull out the plug from the socket (pull the plug itself, not the lead) if the
appliance is not being used and remove the attached accessories.
• Do not operate the appliance without supervision. If you leave the
room you should always turn the appliance off. Remove the plug from
the socket.
• The appliance and the mains lead have to be checked regularly for
signs of damage. If damage is found the appliance must not be used.
• Use only original spare parts.
• In order to ensure your children’s safety, please keep all packaging
(plastic bags, boxes, polystyrene etc.) out of their reach.
WARNING:
Do not allow small children to play with the foil. There is a danger of
suffocation!
Special Safety Instructions for this Appliance
WARNING: Risk of burns!
• The hotplate and the pot get very hot. Only grab the glass pot by the handle. The surface of the warming plate may
still be hot after having used the appliance.
• Never open the lid of the water reservoir during the cooking process.
CAUTION:
The appliance must not be immersed in water for cleaning. Refer to the instructions provided in the chapter “Cleaning”.
• Use the appliance only on a level work surface.
• Only use the appliance when water is lled into the water container.
• Do not move the appliance when it is in operation.
• This appliance can be used by children aged from 8 years and above if they have been given supervision or instruction concerning the safe use of the appliance understand the hazards involved.
• Cleaning and maintenance by the user shall not be made by children unless they are older 8 years and supervised.
• Keep the appliance and its cord out of reach of children less than 8 years.
34
Page 35

PC -KA11 38_ IM 10.03.2017
• Children shall not play with the appliance.
• Appliances can be used by persons with reduced physical, sensory or mental capabilities or lack of experience and
knowledge if they have been given supervision or instruction concerning use of the appliance in a safe way and if
they understand the hazards involved.
• Do not try to repair the appliance on your own. Always contact an authorized technician. If the supply cord is dam-
aged, it must be replaced by the manufacturer, its service agent or similarly qualied persons in order to avoid a
hazard.
Designated Use
• This appliance is intended to be used for
- Grinding of roasted coffee beans and
- Cooking of pure bean coffee.
• Only use the appliance in a dry, indoor area.
• It is intended for domestic use and similar areas of use such as e. g.
- In staff kitchens in shops, ofces and other commercial areas;
- By guests in hotels, motels and other accommodation facilities.
It is not intended for use in farm accommodation or Bed & Breakfast establishments.
Unpacking the Appliance
1. Remove the appliance from its packaging.
2. Remove all packaging materials such as lms, ller material, cable clips
and carton.
3. Check the contents for completeness.
4. In the event that the packaging content should be incomplete or if
damages are noticeable, do not operate the appliance. Return it to the
dealer immediately.
5. Remove the protection foil from the appliance.
NOTE:
Production residue or dust may have collected on the appliance. We
recommend cleaning the appliance according to chapter “Cleaning”.
Information Sign on the Appliance
Please note the label on the cap of the grinder:
CAUTION:
Do not ll any liquids or coffee powder into the coffee bean container!
Overview of the Components / Delivery Scope
Page 3:
1 Upper grinding cone
2 Cap of the grinder
3 Cover for the coffee bean container
4 Lower grinding cone
5 Coffee bean container
6 Control panel
7 Overow hole and steam outlet
8 Filter holder
9 Glass jug with lid
10 Cleaning brush
11 Hotplate
12 Cable storrage
13 Water level indicator
14 Regulator of coarseness setting
15 Indicator of coarseness setting
16 Water tank
17 Water tank cover
Page 4: Control Panel (Figure A)
18 Indicator light Program 1
19 Program 1 button
20 Indicator light Program 2
21 Program 2 button
22 Display
23 Hours / minutes button
24 Indicator light Number of cups
25 Number of cups button
26 Indicator light Coffee strength
27 Coffee strength button
28 Indicator light Function selection
29 Function selection button
30 Indicator light Operating mode
31 Start button
32 Indicator light Operation
33 On / Off button
Placement
• Place the automatic coffee maker on a stable and level surface. Place
the appliance in such way that it cannot tip over.
• Do not place the appliance in close proximity to a gas or electric stove
or any other heat source.
European Regulations on Energy Saving
NOTE:
The European Directive 2009 / 125 / EC (Ecodesign Directive) incorporates measurements for energy saving.
The following applies to coffee makers: The keep-warm period is limited
to max. 40 minutes after which the appliance turns off automatically.
You benet from better safety and lower energy consumption.
Notes on Use
35
Page 36

PC -KA11 38_ IM 10.03.2017
Electric Connection
1. Ensure that your mains power corresponds with the specications of
the appliance. The specications are printed on the type label.
2. There is a cable storrage at the bottom of the appliance. Unwind the
required power cord. Pass the power cord through one of the open-
ings to ensure the rm stand of the unit.
3. Connect the mains cable to a properly installed and earthed wall
outlet. The indicator light for operation lights up.
Control panel
The buttons on the appliance are multi-functional touch buttons. To select
the different functions, the corresponding button must either be briey
tapped, or pressed longer.
Coffee Beans
CAUTION:
Use only roasted coffee beans for grinding.
Raw, frozen or liquid coffee beans may damage the grinder.
Adjustment of the Coarseness Setting
The coffee grinder has got 14 different coarseness setting.
Stage 1 = nely ground (strong coffee)
Stage 14 = coarsely ground (mild coffee)
How ne or coarse you grind the coffee depends on your taste. The sort
and roasting of the coffee beans also inuence the taste. With a little
practice, you easily will nd out which coarseness setting is the right one
for you.
RECOMMENDATION:
To reach the best avour, use the amount of coffee beans you need for
one brewing process only.
Remaining Coffee Beans
Remove the coffee beans from the appliance if they are older than one
week. They maybe have lost their aroma and will reduce the avour of
your coffee.
NOTE:
Store coffee beans in a sealed, air-tight container in the refrigerator to
ensure that the coffee will keep its typical avour.
Initial Operation
Time Setting
After connecting the devise the power supply, the time will light up in the
display.
1. Tap the
2. Tap the
3. Conrm your setting with the 1. button. The minutes will light up.
4. Repeat step 2 and 3 to set the current minute. Your coffee machine is
NOTE:
If you keep the
Switch the Appliance On and Off
• If you do not press any button for 3 minutes, the appliance switches
into standby- mode automatically. The display and all indicator lights
will turn off.
• You also can switch off the appliance manually by pressing and holding
the button for 2 seconds.
• To switch on the appliance again, press and hold the button for
2 seconds again. The time and the last program settings will be
displayed again.
36
h
button. The hours will light up.
min
h
, button again, to set the current hour.
min
now ready for operation.
h
button pressed, a fast mode starts.
min
Before Using the Appliance for the First Time
Before making coffee for the rst time operate the appliance twice with
clean water only and without paper lter. This removes dust, which may
have collected during transport. Follow the instructions given under the
chapter “Preparation with Coffee Powder”. Do not ll in coffee powder!
Operation
Set the Warm-Keeping Time
Set the time period you want your coffee to be kept warm after the brewing process.
NOTE:
• The warm-keeping time can only be set whilst standby- mode.
• You can set any time between 5 and 40 minutes.
1. Press and hold the 2 button, until the display shows the time .
2. Use the
3. Conrm your setting with the 2 button. The current time is displayed
again.
Preparing the Coffee Machine
1. Close the coffee bean container.
2. Open the lid of the water tank.
3. Fill cold water according to the desired amount of cups of coffee into
the rear water tank. The water level is displayed on the indicator.
4. Now close the lid of the water tank.
5. Refer to gure B on page 4! Turn over the lower fold of the paper
lter (size 1 x 4) and place it in the lter funnel. The paper lter may
not protrude over the edge of the lter holder!
6. Slide the lter holder into the appliance until it will lock in audible.
7. Place the jug onto the warming plate.
8. If you want to make your coffee with coffee powder, read the chapter
“Preparation with Coffee Powder”.
Preparation with Coffee Beans
Please follow the instructions under points “Preparing the Coffee
Machine”.
9. Open the coffee bean container.
10. Use the regulator (14) to adjust the coarseness setting.
11. Fill the desired amount of coffee beans into the grinder. The maximum
lling capacity of 150 g may not be exceeded.
12. Close the coffee bean container.
h
button to set the required warm-keeping time.
min
NOTE:
• You can use the pot to ll the water tank.
• Pour in only as much water as you want to brew cups. The
content of the water tank will be emptied completely during each
brewing process, regardless of the settings.
CAUTION:
Do not overll the tank! Do not ll it above the 10 mark.
NOTE:
A safety switch prevents the start of the brewing process if the lter
holder is not inserted correctly.
CAUTION: Drip stop
Your appliance comes with a drip stop. It closes when removing the
coffee pot. This prevents the coffee from dripping onto the warming
plate if there is still water in the lter.
• Ensure that the lid is attached to the coffee pot. It opens the drip
stop.
• If there is still water in the tank, place the pot underneath as soon
as possible. Otherwise the lter might overow.
• Please also refer to the chapter “Interruption of the Brewing
Process”.
Page 37

PC -KA11 38_ IM 10.03.2017
13. Press the button to turn on the appliance.
14. Tap the button repeatedly, until the indicator light beside icon
lights up.
NOTE:
If you do not want your coffee to be kept warm after the brewing
process, tap the button until the indicator light beside the
symbol as well as the indicator light beside “non-keep warm” lights
up.
14. Use the button
to select the number of cups of coffee you want to
3 -10
brew.
NOTE:
Each touch of the button changes to a different number of cups. The
red control light indicates the odd numbers, the green control light
indicates the even numbers of cups.
15. You also have inuence on the strength of the coffee. Use the
button to determine, whether more or less coffee will be ground.
Tap the button repeatedly, until the indicator light next to the desired
setting switches on.
0 = Standard setting
+1 / +2 = approx. + 6 % stronger coffee (more coffee powder)
– 1 / – 2 = approx. - 6 % more mild coffee (less coffee powder)
16. Press and hold the button for 2 seconds to start the coffee preparation. The display shows a rotation of the segment lighting .
The indicator light next to “grind” lights up. The coffee grinder will be
unlocked and the coffee will be ground.
NOTE:
If the lter holder is not inserted correctly, the following symbol
appears in the display: .
• Pull out the lter holder and insert it correctly. Press the button
again.
17. After the grinding process, the appliance automatically locks the
coffee grinder. Now the brewing process starts. The control lamp next
to “brew” lights up.
Preparation with Coffee Powder
Please follow the instructions under points “Preparing the Coffee
Machine”. Add coffee powder before you insert the lter holder into the
coffee machine.
• Briey tap the button. The rotation of the segments in the display
stops. The control lamp next to “brew” lights up. The brewing process
stops.
• If you want to continue the brewing process, place back the glass jug
onto on the hotplate and briey tap the button again.
The Coffee is Ready
• Once the brewing process is nished, the control lamp next to “brew”
turns off. If you have previously set a keep- warm time, the indicator
light next to “warm” lights up. The display shows . The warm-keeping
process starts. The appliance counts up to the set time.
• After the keep-warm period has elapsed, the light next to “warm”
switches off. The indicator light next to “clean” lights up on to remind
you to dispose of the paper lter. It will not switch off until you remove
the lter holder.
• If you have not set a keep-warm time, or the “non-keep warm” function
is activated, the control light next to “clean” lights up immediately after
the brewing process.
• When no more coffee is owing through the lter you can remove the
pot.
• Turn the appliance off.
• Would you like to keep the remaining coffee warm? Leave the appliance turned on until the end of the keep-warm period. If you wish to
keep the coffee warm even after the keep-warm period has nished,
pour the remaining coffee into a thermal ask.
NOTE:
We recommend to pull out the lter holder out of the coffee machine
immediately, to ensure that the lter holder insert dries out.
WARNING:
If you want to make another pot of coffee immediately, switch off the
appliance rst. Let it cool down with the water tank open in order to
avoid hot water splashing when relling with water.
Coffee Preparation with Programmed Timer Operation
You have the option to set 2 different starting times for your coffee machine to start with the coffee automatically.
CAUTION:
Everything must be ready for the preparation of the coffee. See chapter
“Preparing the Coffee Machine”.
NOTE:
Do not put too much coffee powder into the lter to avoid spillage.
9. Press the button to turn on the appliance.
10. Tap the button repeatedly, until the indicator light beside icon
lights up.
NOTE:
If you do not want your coffee to be kept warm after the brewing
process, tap the , button until the indicator light beside the
symbol as well as the indicator light beside “non-keep warm” lights
up
11. Press and hold the button for 2 seconds to start the coffee preparation. The display shows a rotation of the segment lighting . The
indicator light next to „brew“ lights up.
Interruption of the Brewing Process
CAUTION:
If you remove the glass jug during the brewing process, the process
is not stopped. If you do not place back the glass jug onto the hotplate
within 20 seconds, the coffee may run over the edge of the lter holder.
If you want to remove the jug for a short time during the brewing process,
proceed as follows:
NOTE:
For automatic start of preparation at the set time, the appliance need to
be in standy-mode.
Set the Program Timer
1. Press the button to switch on the appliance.
2. Press and hold the 1 (program 1) or 2 (program 2) button for 4
seconds. The corresponding indicator light lights up. The display
shows the time.
3. Use the
4. Conrm your desired setting with the relevant program button.
5. Use the
h
button to set the hour of the start time.
min
h
button to set the minutes of the start time.
min
6. Conrm your desired setting with the relevant program button. The
current time appears in the display again.
Switch the Program Timer On / Off
NOTE:
You are only able to activate one of the two program timers.
1. Press the button to switch on the appliance.
2. Tap the program button of the timer you want to activate or disable. If
the timer is activated, the corresponding control lamp lights up above
the buttons.
37
Page 38

PC -KA11 38_ IM 10.03.2017
Stop Operation
1. Press the button to switch off the appliance. (Standby mode)
2. Unplug the power cord from the wall outlet.
3. Clean the appliance after each use.
De-scaling
De-scaling is necessary when the brewing time increases substantially.
• Use only commercially available citrus acidbased de-scaler.
• Follow the recommended instructions for use.
• Use the button to select the function and “non-keep warm”.
WARNING:
• Afterwards you should boil fresh water in the pot three or four times
in order to rinse out residues of the descaling agent.
• Do not use any coffee powder!
• Do not use this water for consumption.
Cleaning
WARNING:
• Before cleaning, always remove the mains plug and
wait until the appliance has cooled down.
• Do not immerse the appliance in water. Otherwise
this might result in an electric shock or re.
CAUTION:
• Do not use a wire brush or any abrasive items.
• Do not use any acidic or abrasive detergents.
• The exterior of the appliance should be cleaned as necessary with a
slightly damp cloth – without any additives.
• The coffee pot and the lter pad should be cleaned by rinsing in warm
water. Use a soft brush if necessary.
Filter Holder Insert
Please refer to gure C on page 5.
• Wipe the lter holder insert with a paper towel after each use.
• Remove the coffee powder residue with a cleaning brush.
Maintenance of the Grinder
Maintain the grinder on a weekly basis. Refer to gures D to H on page 5.
NOTE:
Empty the coffee bean container best by using all beans for the coffee
preparation.
1. Insert the lter holder with a new lter bag into the coffee machine to
catch the remaining coffee powder. Alternatively, you can place a dry
container onto the hot plate.
2. Press the button to switch off the appliance.
3. Press and hold the button until the control light next to “clean” lights
up. After a few seconds, the grinder will turn briey and unlock. The
remaining coffee powder falls out. The display shows .
4. Unplug the power cord.
5. Open the coffee bean container.
6. Rotate the lock part of the grinder clockwise to open. Take it off. (Fig. D)
7. Turn the regulator of the coarseness level clockwise to the coarsest
level (Fig. E a)
8. Press down on the coarseness level indicator and turn the regulator
clockwise, until the indicator points to the red dot. (Fig. E b)
CAUTION:
Do not try to turn the regulator by force! Reinsert the grinder cap
and repeat steps 1 - 8 until the regulator turns. If the regulator is
completely blocked, hand in your coffee machine for repair.
9. Pull out the upper grinding cone. (Fig. E c)
10.
WARNING: Risk of injury!
The blades of the cone are sharp.
11. Carefully clean the upper grinding cone with a cleaning brush and a
dry cloth.
12. Carefully clean the grinder tunnel with a cleaning brush. (Fig. F a)
13. Take a vacuum for help. Place the suction hose over the open grinder
and vacuum out the residues. (Fig. F b)
14. Vacuum the grinder tunnel from below. (Fig. F c)
15. Re-insert the cleaned upper grinding cone. Please make sure that the
bar of the grinding cone is in line with the symbol (Fig. G)
16. Turn the knob of the grinder counter-clockwise over coarseness
setting 1, until it audibly unlocks.
17. Insert the grinder cap and turn it clockwise. It must audibly lock in.
(Fig. H)
Storage
• Clean the appliance as described and let it dry completely.
• For longer periods of non-use we recommend storing the appliance in
its original packaging.
• Always store the appliance in a well-ventilated and dry place out of
reach of children.
Troubleshooting
Malfunctions are often just caused due to minor problems. Before contacting our customer service, please check the table below:
Problem Possible cause Notes / Solution
The appliance does not work. The appliance is not connected to mains power. Check the wall outlet with a different appliance.
Insert the plug properly in the wall outlet.
Check the fuse.
The appliance is defective. Contact our service or a repair center.
Filter blockage: coffee grounds
spill over the edge of the lter.
38
The drip stop is closed: The coffee pot is not on the
warming plate or the lid is not on the coffee pot.
Too much coffee powder in the lter.
1. Switch the appliance off. Disconnect from mains
power supply.
2. Put the coffee pot with lid on the warming plate so
that the lter is emptied.
3. Dispose of the paper lter.
4. Clean the appliance as described.
Page 39

PC -KA11 38_ IM 10.03.2017
Problem Possible cause Notes / Solution
Coffee grounds in the coffee. The paper lter is too small. Use a paper lter size “1 x 4”.
Too much coffee powder in the lter. Use less coffee powder.
The brewing process takes too
long.
The appliance turns off automatically.
The coarseness level regulator
cannot be adjusted.
The grinder becomes slower and
louder.
Limescale deposits in the appliance. Decalcify the appliance as described.
This is not a malfunction of the appliance.
In order to comply with the Ecodesign Directive
(2009 / 125 / EC), the appliance turns off automatically
after max. 40 minutes after the brewing process has
nished.
The lter holder is inserted incorrectly. Pull it out and insert it again. It need to close up with the
upper side completely. It must audibly lock into place.
The lter holder is dirty. 1. Clean the lter holder insert of the appliance as
described in the chapter “Filter Holder Insert“ .
2. Disconnect the unit from the power supply. Wait a
few seconds and reconnect again.
The grinder is tilted. 1. Unplug the power cord.
2. Carry out maintenance as described under chapter
“Maintenance of Grinder“.
The coarseness level regulator is overheated by
frequent use.
The grinder lid was inserted incorrectly. Insert the grinder lid correctly. To clear the error mes-
A bean has jammed. Start a new grinding process and then try again. Do not
Heavy contamination and foreign objects in the grist. Carry out maintenance.
1. Allow the engine to cool down.
2. Disconnect the unit from the power supply. Wait a
few seconds and reconnect again.
sage, you have to pull out the mains plug.
force the blocked regulator to turn.
Technical Data
Model:.........................................................................................PC-KA 1138
Power supply:............................................................220 - 240 V~, 50 / 60 Hz
Power consumption: ................................................................ 900 W max.*
Filling quantity: ................................................................................. 1,3 Litre
Protection class: ...........................................................................................
Net weight: ............................................................................approx. 3,85 kg
(*Total output of all components)
The right to make technical and design modications in the course of
continuous product development remains reserved.
This appliance has been tested according to all relevant current CE guide-
lines, such as electromagnetic compatibility and low voltage directives,
and has been constructed in accordance with the latest safety regulations.
Disposal
Meaning of the “Dustbin” Symbol
Protect our environment: do not dispose of electrical equipment in the domestic waste.
Please return any electrical equipment that you will no longer
use to the collection points provided for their disposal.
This helps avoid the potential effects of incorrect disposal on
the environment and human health.
This will contribute to the recycling and other forms of re-utilisation of
electrical and electronic equipment.
Information concerning where the equipment can be disposed of can be
obtained from your local authority.
39
Page 40

PC -KA11 38_ IM 10.03.2017
Instrukcja obsługi
Dziękujemy za wybór naszego produktu. Mamy nadzieję, że korzystanie z
urządzenia sprawi Państwu radość.
Symbole użyte w tej instrukcji obsługi
Ważne informacje dotyczące bezpieczeństwa użytkownika są specjalnie
wyróżnione. Koniecznie stosuj się do tych wskazówek, aby uniknąć
wypadków i uszkodzenia urządzenia.
OSTRZEŻENIE:
Ostrzega przed zagrożeniami dla zdrowia i wskazuje na potencjalne
ryzyka obrażeń.
UWAGA:
Wskazuje na potencjalne zagrożenia dla urządzenia lub innych przedmiotów.
WSKAZÓWKA:
Wyróżnia porady i informacje ważne dla użytkownika.
Spis treści
Przegląd elementów obsługi ....................................................................3
Rysunki A i B ..............................................................................................4
Rysunki C - H ...............................................................................................5
Ogólne uwagi ...........................................................................................40
Specjalne wskazówki związane z bezpieczną
obsługą tego urządzenia .........................................................................40
Użytkowanie zgodnie z przeznaczeniem ..............................................41
Wypakowanie urządzenia .......................................................................41
Tabliczka informacyjna na urządzeniu ..................................................41
Przegląd elementów obsługi / Zakres dostawy.....................................41
Wskazówki dotyczące użytkowania ......................................................42
Umieszczenie .......................................................................................42
Europejskie przepisy dotyczące oszczędzania energii ........................42
Połączenie elektryczne .........................................................................42
Panel sterowania ..................................................................................42
Ziarna kawy ...........................................................................................42
Regulacja grubości mielenia.................................................................42
Ustawianie godziny ...............................................................................42
Uruchomienie ...........................................................................................42
Ustawianie godziny ...............................................................................42
Włączanie i wyłączanie urządzenia ......................................................42
Przed użyciem urządzenia po raz pierwszy .........................................42
Obsługa .....................................................................................................42
Ustawianie czasu podgrzewania ..........................................................42
Przygotowanie automatu do kawy .......................................................42
Parzenie kawy z kawy ziarnistej ...........................................................43
Parzenie kawy z kawy mielonej ............................................................43
Przerywanie procesu parzenia .............................................................43
Koniec parzenia kawy ...........................................................................43
Przygotowanie kawy o zaprogramowanym czasie ..............................44
Czynność wyłączania ..............................................................................44
Odkamienianie .........................................................................................44
Czyszczenie ..............................................................................................44
Uchwyt ltra ..........................................................................................44
Konserwacja młynka .............................................................................44
Przechowywanie ......................................................................................45
Usterki i sposoby ich usuwania .............................................................45
Dane techniczne .......................................................................................46
Warunki gwarancji ...................................................................................46
Usuwanie ..................................................................................................46
Znaczenie symbolu „Pojemnik na śmieci” ............................................46
Ogólne uwagi
Przed uruchomieniem urządzenia proszę bardzo dokładnie przeczytać
instrukcję obsługi. Proszę zachować ją wraz z kartą gwarancyjną,
paragonem i w miarę możliwości również kartonem z opakowaniem
wewnętrznym. Przekazując urządzenie innej osobie, oddaj jej także
instrukcję obsługi.
• Proszę wykorzystywać urządzenie jedynie dla prywatnego celu, jaki
został przewidziany dla urządzenia.
Urządzenie to nie zostało przewidziane do użytku w ramach działalności gospodarczej.
• Proszę nie korzystać z urządzenia na zewnątrz. Proszę trzymać
urządzenie z daleka od ciepła, bezpośredniego promieniowania słonecznego, wilgoci (w żadnym wypadku nie zanurzać w substancjach
płynnych) oraz ostrych krawędzi. Proszę nie obsługiwać urządzenia
wilgotnymi dłońmi. Jeżeli urządzenie jest wilgotne lub mokre, proszę
natychmiast wyciągnąć wtyczkę.
• Jeżeli nie korzystacie Państwo z urządzenia, jeżeli chcecie Państwo
zamontować jakieś akcesoria, w celu wyczyszczenia lub w przypadku
jakichkolwiek zakłóceń, proszę zawsze wyłączyć urządzenie i wyjąć
wtyczkę z gniazdka (należy ciągnąć za wtyczkę, nie za przewód).
• Pracującego urządzenia nie należy pozostawiać bez nadzoru. Przed
opuszczeniem pomieszczenia urządzenie należy zawsze wyłączać i
wyciągać wtyczkę sieciową z gniazda.
• Należy regularnie sprawdzać, czy urządzenie i kabel sieciowy nie
są uszkodzone. W razie uszkodzenia należy przestać korzystać z
urządzenia.
• Proszę stosować tylko oryginalne akcesoria.
• Dla bezpieczeństwa dzieci proszę nie zostawiać swobodnie dostęp-
nych części opakowania (torby plastikowe, kartony, styropian itp.).
OSTRZEŻENIE:
Nie pozwalaj dzieciom bawić się folią. Niebezpieczeństwo
uduszenia!
Specjalne wskazówki związane z bezpieczną
obsługą tego urządzenia
OSTRZEŻENIE: Gorąca powierzchnia!
• Płyta grzewcza i garnek bardzo się nagrzewają. Chwytać szklane naczynie tylko za pomocą uchwytu. Po użyciu
urządzenia powierzchnia płyta grzejna może być gorąca.
• Podczas procesu gotowania nigdy nie otwierać zbiornika z wodą.
UWAGA:
Urządzenia nie wolno zanurzać w wodzie podczas czyszczenia. Sprawdzić instrukcje w rozdziale „Czyszczenie”.
• Urządzenie powinno być używane wyłącznie na płaskiej powierzchni roboczej.
40
Page 41

PC -KA11 38_ IM 10.03.2017
• Korzystać z urządzenia wyłącznie, gdy w zbiorniku znajduje się woda.
• Nie poruszać urządzeniem, kiedy pracuje.
• Urządzenie może być użytkowane przez dzieci od 8 roku, jeśli znajdują się pod nadzorem lub zostały poinstruowane
odnośnie użytkowania urządzenia w bezpieczny sposób i rozumieją związane z tym ryzyko.
• Dzieci nie mogą zajmować się czyszczeniem ani konserwacją urządzenia, chyba, że ukończyły 8 lat i są nadzoro-
wane.
• Trzymać urządzenie i jego przewód z dala od dzieci poniżej 8 roku życia.
• Dzieciom nie wolno bawić się urządzeniem.
• Urządzenia mogą być użytkowane przez osoby z ograniczonymi zdolnościami zycznymi, czuciowymi lub mental-
nymi oraz bez doświadczenia i wiedzy w zakresie użytkowania, jeśli znajdują się pod nadzorem lub zostały poinstruowane odnośnie użytkowania urządzenia w bezpieczny sposób i rozumieją związane z tym ryzyko.
• Nie próbować naprawiać urządzenia samodzielnie. Skontaktować się z pracownikiem autoryzowanego serwisu.
Jeśli przewód zasilania jest uszkodzony, należy go wymienić u producenta, przedstawiciela serwisu lub podobnie
wykwalikowanej osoby, aby uniknąć zagrożenia.
Użytkowanie zgodnie z przeznaczeniem
• Urządzenie to służy do
- Mielenia palonych ziaren kawy oraz
- Parzenia kawy z kawy ziarnistej.
• Korzystać z urządzenia tylko na suchym obszarze wewnątrz budynków.
• Urządzenie przeznaczone jest do użytku domowego oraz podobnych obszarów użytkowania, jak przykładowo:
- W kuchniach dla personelu w sklepach, w biurach i innych miejscach komercyjnych;
- Przez gości w hotelach, motelach i innych miejscach, gdzie przyjmowani są goście.
Nie jest przeznaczone do użytkowania w gospodarstwach agroturystycznych oraz miejscach typu „nocleg ze
śniadaniem”.
Wypakowanie urządzenia
1. Wyjmij urządzenie z opakowania.
2. Usuń wszystkie elementy opakowania, takie jak folia, materiał wypeł-
niający, zaciski do kabli i karton.
3. Sprawdź, czy w opakowaniu znajdowały się wszystkie elementy.
4. W razie, gdy zawartość opakowania jest niepełna lub jest zauważalnie
uszkodzona nie wolno korzystać z urządzenia. Należy zwrócić je
bezzwłocznie do sprzedawcy.
5. Zdejmij folię ochronną z urządzenia.
WSKAZÓWKA:
Na urządzeniu może występować osad produkcyjny lub kurz. Zalecane
jest wyczyszczenie urządzenia zgodnie z rozdziałem „Czyszczenie”.
Tabliczka informacyjna na urządzeniu
Proszę zwrócić uwagę na etykietę na pokrywie młynka:
UWAGA:
Nie wlewaj żadnych płynów ani nie wsypuj zmielonej kawy do pojemnika
na ziarna kawę!
Przegląd elementów obsługi / Zakres dostawy
Strona 3:
1 Górne żarno
2 Pokrywa młynka
3 Pokrywa pojemnika na kawę ziarnistą
4 Dolne żarno
5 Pojemnik na ziarna kawy
6 Panel kontrolny
7 Otwór przelewowy i wylot pary
8 Uchwyt ltra
9 Dzbanek szklany z pokrywką
10 Szczoteczka do czyszczenia
11 Płyta grzejna
12 Schowek na kabel
13 Wskaźnik poziomu wody
14 Regulacja grubości mielenia
15 Wskaźnik grubości mielenia
16 Zbiornik na wodę
17 Pokrywa pojemnika wody
Strona 4: Panel sterowania (rysunek A)
18 Wskaźnik Programu 1
19 Przycisk Programu 1
20 Wskaźnik Programu 2
21 Przycisk Programu 2
22 Wyświetlacz
23 Przycisk godziny / minut
24 Wskaźnik ilości kubków
25 Przycisk ilości kubków
26 Wskaźnik mocy kawy
41
Page 42

PC -KA11 38_ IM 10.03.2017
27 Przycisk mocy kawy
28 Wskaźnik wyboru funkcji
29 Przycisk wyboru funkcji
30 Wskaźnik trybu pracy
31 Przycisk start
32 Wskaźnik pracy
33 Przycisk włączania / wyłączania
Wskazówki dotyczące użytkowania
Umieszczenie
• Automatyczny ekspres do kawy należy postawić na stabilnej i równej
powierzchni. Urządzenie należy ustawić w taki sposób, aby się nie
przewróciło.
• Urządzenia nie należy stawiać w pobliżu piecyka gazowego lub elektrycznego ani żadnego innego źródła ciepła.
Europejskie przepisy dotyczące oszczędzania energii
WSKAZÓWKA:
Europejska Dyrektywa 2009 / 125 / EC (Dyrektywa Eco-design) zawiera
informacje dotyczące oszczędzania energii.
Poniższe dotyczy urządzeń do parzenia kawy: Okres utrzymywania
ciepła ogranicza się do maks. 40 minut, poczym urządzenie wyłącza się
automatycznie.
W ten sposób korzystamy na zwiększonym bezpieczeństwie oraz
niższym zużyciu energii.
Połączenie elektryczne
1. Upewnij się, że napięcie sieci jest zgodne ze specykacjami urządze-
nia. Specykacje znajdują się na tabliczce znamionowej.
2. Na dole urządzenia znajduje się miejsce na kabel. Rozwiń przewód
zasilający. Przeprowadź przewód zasilający przez jeden z otworów,
aby zapewnić stabilność urządzenia.
3. Podłącz przewód zasilający do odpowiednio zainstalowanego i uzie-
mionego gniazdka ściennego. Wskaźnik pracy zaświeci się.
Panel sterowania
Przyciski na urządzeniu to wielofunkcyjne przyciski dotykowe. Aby wybrać
różne funkcje, odpowiedni przycisk musi być albo krótko naciśnięty, albo
wciśnięty na dłużej.
Ziarna kawy
UWAGA:
Używaj tylko palonych ziaren kawy.
Surowe, mrożone lub ziarna kawy w płynie mogą uszkodzić młynek.
Regulacja grubości mielenia
Młynek do mielenia kawy posiada ponad 14 ustawień grubości kawy.
Stopień 1 = drobno mielona (mocna kawa)
Stopień 14 = grubo mielona (łagodna kawa)
Grubość mielenia kawy zależy od Twojego gustu. Rodzaj palenia kawy
ma również wpływ na jej smak. Przy odrobinie praktyki łatwo będzie ustalić, które ustawienie grubości mielenia kawy jest w sam raz dla Ciebie.
ZALECENIE:
Aby osiągnąć najlepszy smak, używaj tylko tyle kawy, ile potrzeba do
jednego parzenia.
Ustawianie godziny
Usuń ziarna kawy z urządzenia, jeśli są starsze niż tydzień. Prawdopodobnie straciły już swój aromat i pogorszą smak Twojej kawy.
WSKAZÓWKA:
Ziarna kawy przechowuje w zamkniętym, szczelnym pojemniku w
lodówce, aby upewnić się, że kawa zachowa swój typowy smak.
Uruchomienie
Ustawianie godziny
Po podłączeniu urządzenia do prądu, na wyświetlaczu pojawi się godzina.
1. Stuknij w przycisk
2. Stuknij ponownie w przycisk
h
. Zaświeci się godzina.
min
h
, aby ustawić aktualną godzinę.
min
3. Potwierdzić ustawienie przyciskiem 1. Zaświecą się minuty.
4. Powtórz kroki 2 i 3, aby ustawić minuty. Ekspres jest teraz gotowy do
pracy.
WSKAZÓWKA:
Jeśli przytrzymasz przycisk
h
, włączy się szybki tryb.
min
Włączanie i wyłączanie urządzenia
• Jeśli nie naciśniesz żadnego przycisku przez 3 minuty, urządzenie
przełączy się automatycznie w tryb czuwania Na wyświetlaczu zgasną
wszystkie wskaźniki.
• Można również wyłączyć urządzenie ręcznie poprzez naciśnięcie i
przytrzymanie przycisku przez 2 sekundy.
• Aby włączyć urządzenie ponownie, naciśnij i przytrzymaj przycisk
przez 2 sekundy. Godzina i ostatnie ustawienia programu wyświetlone
zostaną ponownie.
Przed użyciem urządzenia po raz pierwszy
Przed pierwszym zaparzeniem kawy urządzenie powinno wykonać
dwukrotną pracę tylko z czystą wodą i bez papierowego ltra. Umożliwi
to usunięcie kurzu, który mógł się zebrać podczas transportu. Należy
wykonać instrukcje podane w rozdziale „Parzenie kawy z kawy mielonej”.
Nie napełniaj zmieloną kawą!
Obsługa
Ustawianie czasu podgrzewania
Ustaw okres czasu, przez który urządzenie ma podgrzewać Twoją kawę
po zaparzeniu.
WSKAZÓWKA:
• Czas podgrzewania można ustawić tylko w trybie oczekiwania.
• Możesz ustawić przedział czasu pomiędzy 5 a 40 minut.
1. Wciśnij i przytrzymaj przycisk 2 , aż wyświetlacz pokaże czas.
2. Użyj przycisku
3. Potwierdź ustawienie przyciskiem 2. Na wyświetlaczu zostanie
ponownie wyświetlona aktualna godzina.
Przygotowanie automatu do kawy
1. Zamknij pojemnik na kawę ziarnistą.
2. Otwórz pokrywę zbiornika na wodę.
3. Wlej zimną wodę do znajdującego się z tyłu zbiornika na wodę zgod-
nie z żądaną liczbą liżanek kawy. Poziom wody można odczytać za
pomocą wskaźnika.
WSKAZÓWKA:
• Do napełnienia zbiornika wody można użyć dzbanka.
• Wlej tylko tyle wody, ile potrzeba do zaparzenia żądanej ilości
kawy. Zbiornik jest opróżniany całkowicie w każdym procesie
parzenia, niezależnie od ustawienia.
h
aby ustawić żądany czas podgrzewania.
min
42
Page 43

PC -KA11 38_ IM 10.03.2017
UWAGA:
Nie należy przepełniać zbiornika! Nie napełniaj zbiornika powyżej
kreski 10.
4. Zamknąć pokrywę pojemnika na wodę.
5. Patrz: rys. B na str. 4! Otworzyć pokrywę ltra. Zagiąć dolną
krawędź ltra papiero-wego (rozmiar 1 x 4). Filtr papieru nie może
wystawać poza krawędź uchwytu ltra!
6. Wsuń uchwyt ltra w urządzenie, aż się słyszalnie zablokuje.
WSKAZÓWKA:
Wyłącznik bezpieczeństwa zapobiega uruchomieniu procesu parzenia, jeżeli uchwyt ltra nie jest włożony prawidłowo
7. Postawić dzbanek na płytce grzejnej.
UWAGA: Blokada kapania
Urządzenie wyposażone jest w blokadę kapania. Zamyka się ona w
momencie wyjęcia dzbanka na kawę. Zapobiega to kapaniu kawy
na płytkę grzejną, jeśli w ltrze pozostała woda.
• Należy się upewnić, że na dzbanek na kawę założono pokrywę.
Otwiera ona blokadę kapania.
• Jeżeli w zbiorniku jest woda, podstaw w odpowiednim momencie
dzbanek. W przeciwnym razie może dojść do przepełnienia ltra.
• Należy również zapoznać się z rozdziałem „Przerywanie
procesu parzenia”.
8. Jeśli chcesz zaparzyć zmieloną kawę, przeczytaj rozdział „Parze-
nie zmielonej kawy”.
WSKAZÓWKA:
• Wyciągnij uchwyt ltra i włóż go prawidłowo. Ponownie naciśnij
przycisk .
18. Po zakończeniu procesu mielenia, urządzenie automatycznie zablo-
kuje młynek do kawy. Teraz rozpocznie się proces parzenia. Wskaźnik
obok „brew” zapali się.
Parzenie kawy z kawy mielonej
Proszę postępować zgodnie z opisem zawartym w punktach
„Przygotowanie automatu do kawy”. Wsyp zmieloną kawę przed włożeniem pojemnika na ltr do ekspresu do kawy.
WSKAZÓWKA:
Nie należy wsypywać zbyt dużej ilości kawy w proszku do ltra, aby
uniknąć wycieku.
9. Naciśnij przycisk aby włączyć urządzenie.
10. Stuknij kilkakrotnie przycisk , aż zaświeci się wskaźnik obok ikonki
.
WSKAZÓWKA:
Jeśli nie chcesz podgrzewać kawy po jej zaparzeniu, stukaj w
przycisk , aż wskaźnik obok symbolu jak również wskaźnik
obok „non-keep warm” zaświecą się.
11. Naciśnij i przytrzymaj przycisk przez 2 sekundy, aby rozpocząć
parzenie kawy. Na wyświetlaczu pojawi się obracający się podświetlony . Wskaźnik obok „brew” zapali się.
Parzenie kawy z kawy ziarnistej
Proszę postępować zgodnie z opisem zawartym w punktach
„Przygotowanie automatu do kawy”.
9. Otwórz pojemnik na kawę ziarnistą.
10. Użyj regulacji mielenia (14), aby dopasować ustawienie grubości
mielenia kawy.
11. Napełnij młynek odpowiednią ilością ziaren kawy. Maksymalna pojem-
ność napełniania 150 g nie może zostać przekroczona.
12. Zamknij pojemnik na kawę ziarnistą.
13. Naciśnij przycisk aby włączyć urządzenie.
14. Stuknij kilkakrotnie przycisk , aż zaświeci się wskaźnik obok ikonki
.
WSKAZÓWKA:
Jeśli nie chcesz podgrzewać kawy po jej zaparzeniu, stukaj w przycisk , aż wskaźnik obok symbolu jak również wskaźnik obok
„non-keep warm” zaświecą się.
15. Użyj przycisku
, aby wybrać ile liżanek kawy chcesz zaparzyć.
3 -10
WSKAZÓWKA:
Każde dotknięcie przycisku zmienia liczbę liżanek. Czerwona
lampka kontrolna wskazuje numery nieparzyste, zielona lampka
kontrolna wskazuje parzystą liczbę liżanek.
16. Można również zmienić moc kawy. Użyj przycisku aby określić, czy
mniej lub więcej kawy ma być zmielone. Stuknij kilkakrotnie przycisk,
aż wskaźnik obok żądanego ustawienia zaświeci się.
0 = Ustawienie standardowe
+1 / +2 = Kawa mocniejsza o ok. 6% (więcej zmielonej kawy)
– 1 / – 2 = Kawa słabsza o ok. 6% (mniej zmielonej kawy)
17. Naciśnij i przytrzymaj przycisk przez 2 sekundy, aby rozpocząć
parzenie kawy. Na wyświetlaczu pojawi się obracający się podświetlony . Wskaźnik obok „grind” zapali się. Młynek zostanie
odblokowany i kawa zostanie zmielona.
WSKAZÓWKA:
Jeżeli uchwyt ltra nie został prawidłowo włożony, na wyświetlaczu
pojawi się następujący symbol: .
Przerywanie procesu parzenia
UWAGA:
Po wyjęciu szklanego dzbanka podczas procesu parzenia, proces
nie zostanie zatrzymany. Jeśli nie umieścisz z powrotem szklanego
dzbanka na płycie grzejnej w przeciągu 20 sekund, kawa może przelać
się przez krawędź uchwytu ltra.
Jeśli chcesz wyjąć dzbanek na krótką chwilę podczas procesu parzenia,
należy postąpić w następujący sposób:
• Krótko dotknij przycisku . Ruch obrotowy segmentów na wyświetlaczu zatrzyma się. Wskaźnik obok „brew” zapali się. Proces parzenia
zatrzyma się.
• Jeśli chcesz kontynuować proces parzenia, umieść z powrotem szklany dzbanek na płycie grzejnej i ponownie krótko stuknij przycisk .
Koniec parzenia kawy
• Po zakończeniu parzenia wskaźnik obok „brew” zgaśnie. Jeśli wcześniej ustawiono czas podgrzewania, wskaźnik obok „warm” zapali
się. Wyświetlacz pokaże . Rozpocznie się proces podgrzewania.
Urządzenie odliczy do ustawionego czasu.
• Po upłynięciu okresu podgrzewania, wskaźnik obok „warm” zgaśnie.
Wskaźnik obok „clean” zapali się, aby przypomnieć o wyrzuceniu
papierowego ltra. Nie wyłączy się dopóki nie wyjmiesz uchwytu ltra.
• Jeśli nie ustawisz czasu podgrzewania lub gdy włączona jest funkcja
„non-warm”, wskaźnik obok „clean” zapali się natychmiast po zakoń-
czeniu procesu parzenia.
• Gdy kawa przestanie skapywać do dzbanka, można zdjąć go z
podstawy.
• Wyłączyć urządzenie.
• Czy chcesz podgrzać pozostałą kawę? Pozostawić urządzenie
włączone aż do końca okresu utrzymywania ciepła. Jeśli chcemy
utrzymać ciepłą kawę nawet po zakończeniu tego okresu, należy
przelać pozostałą kawę do termosu.
WSKAZÓWKA:
Zaleca się, aby natychmiast wyciągnąć uchwyt ltra z ekspresu do
kawy, aby upewnić się, że wkładka uchwytu ltra wyschnie.
43
Page 44

PC -KA11 38_ IM 10.03.2017
OSTRZEŻENIE:
Jeśli chcemy natychmiast przygotować kolejny kubek kawy, należy
najpierw wyłączyć urządzenie. Poczekać na ostygnięcie z otwartym
zbiornikiem wody, aby uniknąć rozprysków gorącej wody podczas
dolewania.
Przygotowanie kawy o zaprogramowanym czasie
Użytkownik ma możliwość ustawienia 2 różnych godzin automatycznego
włączenia ekspresu do kawy.
UWAGA:
Wszystko musi być gotowe do przygotowania kawy. Patrz: rozdział
„Przygotowanie automatu do kawy”.
WSKAZÓWKA:
Dla automatycznego włączenia się parzenia kawy o ustalonej godzinie,
urządzenie musi być w trybie czuwania.
Ustawianie włącznika czasowego
1. Naciśnij przycisk aby włączyć urządzenie.
2. Wciśnij i przytrzymaj przycisk (program 1) 1 lub 2 (program 2)
przez 4 sekundy. Zapali się odpowiednia kontrolka. Wyświetlacz
pokaże godzinę.
3. Użyj przycisku
4. Potwierdź ustawienie przyciskiem odpowiedniego programu.
5. Użyj przycisku
6. Potwierdź ustawienie przyciskiem odpowiedniego programu. Na
wyświetlaczu zostanie ponownie wyświetlona aktualna godzina.
Włącz / wyłącz program
WSKAZÓWKA:
Można włączyć tylko jeden z tych dwóch programów.
1. Naciśnij przycisk aby włączyć urządzenie.
2. Stuknij przycisk tego zaprogramowanego parzenia, które chcesz
włączyć lub wyłączyć. Jeśli zaprogramowane parzenie jest włączone,
nad przyciskami świeci się odpowiedni wskaźnik.
h
aby ustawić godzinę włączenia.
min
h
aby ustawić minuty godziny włączenia.
min
Czynność wyłączania
1. Naciśnij przycisk , aby wyłączyć urządzenie. (Tryb czuwania)
2. Wyciągnij wtyczkę z gniazdka.
3. Po każdorazowym użyciu wyczyść urządzenie.
Odkamienianie
Gdy czas przygotowywania kawy ulega znacznemu wydłużeniu niezbędne jest odkamienianie urządzenia.
• Do usuwania kamienia proszę używać preparatów dostępnych w
handlu na bazie kwasku cytrynowego.
• Proszę dozować środek tak, jak podane zostało na ulotce.
• Użyj przycisku , aby wybrać funkcję i „non-keep warm”.
OSTRZEŻENIE:
• Następnie zagotuj świeżą wodę 3 - 4 razy, aby wypłukać pozostałości
środka odwapniającego.
• Nie używaj zmielonej kawy!
• Tej wody nie używaj do spożycia.
Czyszczenie
OSTRZEŻENIE:
• Przed każdym czyszczeniem wyciągnąć wtyczkę z
sieci i odczekać, aż urządzenie ostygnie.
• Nie zanurzaj urządzenia w wodzie. Może to doprowadzić do porażenia elektrycznego lub pożaru.
UWAGA:
• Nie używaj szczotki drucianej ani innych podobnych przed-miotów.
• Nie używaj ostrych lub ściernych środków czyszczących.
• Zewnętrzną stronę urządzenia czyścić w miarę potrzeby lekko wilgotną
ściereczką – bez dodatkowych środków czyszczących.
• Czajnik i nasadkę ltra myć należy normalnie w wodzie z dodatkiem
płynu do mycia naczyń. W razie potrzeby użyć miękkiej szczotki.
Uchwyt ltra
Patrz: rys. C na str. 5.
• Przetrzyj uchwyt ltra papierowym ręcznikiem po każdym użyciu.
• Usuń pozostałości osadu kawy szczoteczką.
Konserwacja młynka
Czyść młynek raz w tygodniu. Patrz: rys. D i H na str. 5.
WSKAZÓWKA:
Najlepiej opróżniać pojemnik na ziarna kawy poprzez zużycie wszystkich ziaren do przygotowania kawy.
1. Włóż uchwyt na ltr z nowym ltrem do ekspresu do kawy, aby zebrać
pozostały osad kawy. Można również umieścić suchy pojemnik na
płycie grzejnej.
2. Naciśnij przycisk aby wyłączyć urządzenie.
3. Wciśnij i przytrzymaj przycisk , aż wskaźnik obok „clean” zapali się.
Po kilku sekundach, młynek na krótko włączy się i odblokuje. Wysypie
się pozostała zmielona kawa. Wyświetlacz pokaże .
4. Wyjmij wtyczkę z kontaktu.
5. Otwórz pojemnik na kawę ziarnistą.
6. Obróć część blokady młynka w prawo, aby go otworzyć. Wyjmij go.
(rys. D)
7. Obróć regulator grubości mielenia kawy w prawo do opcji mielenia
najgrubiej (rys. E a)
8. Naciśnij wskaźniku poziomu grubości mielenia kawy i przekręć
pokrętło regulatora w prawo, aż wskaźnik wskaże czerwoną kropkę.
(rys. E b)
UWAGA:
Nie staraj się obrócić regulatora na siłę! Ponownie włóż pokrywę
młynka i powtórz kroki 1 - 8, aż regulator przekręci się. Jeśli regulator jest całkowicie zablokowany, oddaj ekspres do naprawy.
9. Wyciągnij górne żarno. (rys. E c)
10.
OSTRZEŻENIE: Ryzyko obrażeń!
Ostrza żarna są bardzo ostre.
11. Dokładnie wyczyść górne żarno szczoteczką i suchą szmatką.
12. Starannie oczyścić lejek młynka szczoteczką . (rys. F a)
13. Użyj odkurzacza. Umieść wąż ssący nad otwartym młynkiem i odkurz
pozostałości. (rys. F b)
14. Odkurz lejek młynka z dołu. (rys. F c)
15. Włóż z powrotem oczyszczone górne żarno. Upewnij się, że pasek
żarna znajduje się na równo z symbolem (rys. G).
16. Obróć pokrętło młynka w lewo do ustawienia grubości 1, aż usłyszysz
jak się odblokuje.
17. Włożyć pokrywę żarna i obrócić w prawo. Musi się ona słyszalnie
zablokować (rys. H).
44
Page 45

PC -KA11 38_ IM 10.03.2017
Przechowywanie
• Urządzenie należy wyczyścić zgodnie z opisem i zostawić w celu
całkowitego ostygnięcia.
• W przypadku dłuższych okresów nieużywania zalecane jest przechowywanie urządzenia w oryginalnym opakowaniu.
• Urządzenie należy zawsze przechowywać w odpowiednio wentylowanym i suchym miejscu poza zasięgiem dzieci.
Usterki i sposoby ich usuwania
Wszelkie nieprawidłowości często spowodowane są przez drobne problemy. Przed skontaktowaniem się z obsługą klienta, prosimy sprawdzić poniższą
tabelkę:
Problem Możliwa przyczyna Uwagi / Rozwiązanie
Urządzenie nie działa. Urządzenie nie zostało podłączone do zasilania. Sprawdź działanie gniazdka ściennego przy użyciu
innego urządzenia.
Włóż prawidłowo wtyczkę do gniazdka ściennego.
Sprawdź bezpieczniki.
Urządzenie jest wadliwe. Skontaktuj się z centrum serwisowym lub naprawczym.
Niedrożność ltra: ziarenka kawy
wysypują się poza krawędź ltra.
W zaparzonej kawie znajdują się
ziarenka kawy.
Proces parzenia trwa zbyt długo. W urządzeniu nagromadził się kamień. Usuń kamień z urządzenia zgodnie z opisem.
Urządzenie wyłącza się automa-
tycznie.
Nie można regulować grubości
mielenia.
Młynek pracuje coraz wolniej i
coraz głośniej.
Blokada kapania jest zamknięta: dzbanek na kawę
nie został postawiony na płycie grzejnej lub nie założono na niego pokrywy.
W ltrze znajduje się zbyt dużo mielonej kawy.
Papierowy ltr jest zbyt mały. Użyj papierowego ltra w rozmiarze „1 x 4”.
W ltrze znajduje się zbyt dużo mielonej kawy. Wsyp mnie mielonej kawy.
Nie jest to usterka urządzenia.
Aby zachować zgodność z Dyrektywą Ecodesign
(2009 / 125 / EC), urządzenie wyłącza się automatycznie
po maks. 40 minutach po zakończeniu procesu parze-
nia.
Uchwyt ltra jest nieprawidłowo włożony. Wyciągnij go i włóż ponownie. Musi się całkowicie
Uchwyt ltra jest zabrudzony.
Młynek jest przechylony. 1. Wyjmij wtyczkę z kontaktu.
Regulator poziomu grubości jest przegrzany od
częstego używania.
Pokrywa młynka została włożona nieprawidłowo. Włóż poprawnie pokrywę młynka. Aby usunąć komunikat
Ziarenko kawy zablokowało regulator. Rozpocznij nowy procesu mielenia, a następnie spróbuj
Jest zanieczyszczony i znajdują się w nim ciała obce. Przeprowadzić konserwację
1. Wyłącz urządzenie. Odłącz je od zasilania.
2. Postaw dzbanek na kawę z pokrywą na płycie grzej-
nej w celu opróżnienia ltra.
3. Wyrzuć papierowy ltr.
4. Wyczyść urządzenie zgodnie z opisem.
zamknąć od góry. Musi słyszalnie wskoczyć na swoje
miejsce.
1. Oczyść uchwyt ltra, jak opisano w rozdziale
„Uchwyt ltra”.
2. Odłącz urządzenie od zasilania. Odczekaj kilka
sekund i podłącz ponownie.
2. Przeprowadzić konserwację zgodnie z opisem w
„Konserwacja młynka ”.
1. Pozwól silnikowi ostygnąć.
2. Odłącz urządzenie od zasilania. Odczekaj kilka
sekund i podłącz ponownie.
o błędzie, trzeba wyciągnąć wtyczkę z kontaktu.
ponownie. Nie obracaj na siłę zablokowanego regulatora.
45
Page 46

PC -KA11 38_ IM 10.03.2017
Dane techniczne
Model:.........................................................................................PC-KA 1138
Napięcie zasilające: ..................................................220 - 240 V~, 50 / 60 Hz
Pobór mocy: ........................................................................... 900 W maks.*
Wielkość napełnienia: ........................................................................ 1,3 litry
Stopień ochrony: ..........................................................................................
Masa netto: .................................................................................. ok. 3,85 kg
(*Moc całkowita wszystkich części składowych)
Zastrzegamy sobie prawo wprowadzania zmian technicznych i projekto-
wych w trakcie ciągłego rozwoju produktu.
Niniejsze urządzenie odpowiada wymaganiom normy bezpieczeństwa
użytkowania oraz spełnia wymagania dyrektywy niskonapięciowej i kompatybilności elektromagnetycznej.
Warunki gwarancji
Przyznajemy 24 miesiące gwarancji na produkt licząc od daty zakupu.
W tym okresie będziemy bezpłatnie usuwać w terminie 14 dni od daty
dostarczenia wadliwego sprzętu z kartą gwarancyjną do miejsca zakupu
wszystkie uszkodzenia powstałe w tym urządzeniu na skutek wady materiałów lub wadliwego wykonania, naprawiając oraz wymieniając wadliwe
części lub (jeśli uznamy za stosowne) wymieniając całe urządzenie na
nowe.
Sprzęt do naprawy powinien być dostarczony w komplecie wraz z
dowodem zakupu oraz z ważną kartą gwarancyjną do sprzedawcy w
miarę możliwości w oryginalnym opakowaniu lub innym odpowiednim
dla zabezpieczenia przed uszkodzeniem. W razie braku kompletnego
opakowania fabrycznego, ryzyko uszkodzenia sprzętu podczas transportu
do i z miejsca zakupu ponosi reklamujący.
Naprawa gwarancyjna nie dotyczy czynności przewidzianych w instrukcji
obsługi, do wykonania których zobowiązany jest użytkownik we własnym
zakresie i na własny koszt.
Gwarancja nie obejmuje:
• mechanicznych, termicznych, chemicznych uszkodzeń sprzętu i
wywołanych nimi wad,
• uszkodzeń powstałych w wyniku działania sił zewnętrznych takich
jak wyładowania atmosferyczne, zmiana napięcia zasilania i innych
zdarzeń losowych,
• nieprawidłowego ustawienia wartości napięcia elektrycznego, zasilanie
z nieodpowiedniego gniazda zasilania,
• sznurów połączeniowych, sieciowych, żarówek, baterii, akumulatorów,
• uszkodzeń wyrobu powstałych w wyniku niewłaściwego lub niezgod-
nego z instrukcją jego użytkowania, przechowywania, konserwacji,
samowolnego zrywania plomb oraz wszelkich przeróbek i zmian kon-
strukcyjnych dokonanych przez użytkownika lub osoby niepowołane,
• roszczeń z tytułu parametrów technicznych wyrobu, o ile są one zgod-
ne z podanymi przez producenta,
• prawidłowego zużycia i uszkodzeń, które mają nieistotny wpływ na
wartość lub działanie tego urządzenia.
Karta gwarancyjna bez pieczątki sklepu, daty sprzedaży, nie wypełniona,
źle wypełniona, ze śladami poprawek, nieczytelna wskutek zniszczenia,
bez możliwości ustalenia miejsca sprzedaży oraz dołączonego dowodu
zakupu jest nieważna.
Korzystanie z usług gwarancyjnych nie jest możliwe po upływie daty
ważności gwarancji. Gwarancja na części lub całe urządzenie, które są
wymieniane kończy się, wraz z końcem gwarancji na to urządzenie.
Wszystkie inne roszczenia, wliczając w to odszkodowania są wykluczone
chyba, że prawo przewiduje inaczej. Roszczenia wykraczające poza tą
umowę nie są uwzględniane przez tą gwarancję.
Gwarancja na sprzedany towar konsumpcyjny nie wyłącza, nie ogranicza
ani nie zawiesza uprawnień kupującego wynikających z niezgodności
towaru z umową.
Gwarancja oraz zawarte w niej warunki obowiązują na terenie Rzeczpo-
spolitej Polskiej.
Dystrybutor:
CTC Clatronic Sp. z o.o
Ul. Brzeska 1
45-960 Opole
Usuwanie
Znaczenie symbolu „Pojemnik na śmieci”
Proszę oszczędzać nasze środowisko, sprzęt elektryczny nie
należy do śmieci domowych.
Proszę korzystać z punktów zbiorczych, przewidzianych do
zdawania sprzętu elektrycznego, i tam proszę oddawać sprzęt
elektryczny, którego już nie będą Państwo używać.
Tym sposobem pomagają Państwo unikać potencjalnych następstw niewłaściwego usuwania odpadów, mających wpływ na środowisko i zdrowie
ludzi.
Tą drogą przyczyniają się Państwo do ponownego użycia, do recyklingu i
do innych form wykorzystania starego sprzętu elektrycznego i elektronicz-
nego.
Informacje, gdzie można zdać sprzęt, otrzymają Państwo w swoich urzę-
dach komunalnych lub w administracji gminy.
46
Page 47

Page 48

Page 49

Page 50

PC -KA11 38_ IM 10.03.2017
PC-KA 1138
Stand 03 / 2017
Internet: www.procook.de
Made in P.R.C.
 Loading...