

Page 1
Operation
Extend Holding Bin
Manual
ATTENTION: Read the instructions before using the machine.
LIMITED WARRANTY
This product is warranted to be free from defects in material and/or workmanship
for a period of 3 years (repair parts) and 2 years (service labor) from date of original installation, not to exceed 30 months from the date of manufacture.
Any component which proves to be faulty in material and/or workmanship will be
replaced or repaired (at the option of Prince Castle LLC) without cost to the customer for parts and labor. This warranty covers on location service (i.e. trip charges
and or mileage). Travel mileage is limited to 100 miles (200 Kilometers) round trip
(one trip warranty) from an authorized service agency or its sub-service agency.
This warranty is subject to the following exceptions/conditions:
• Use of any non-genuine Prince Castle parts voids this warranty.
• All labor to be performed during regular work hours. Overtime premium
(the incremental amount) will be charged to the customer.
• Damage caused by carelessness, neglect and/or abuse
(e.g., dropping, tampering or altering parts, equipment damaged in shipment,
by fire, flood or an act of nature) is not covered under this warranty.
• All problems due to operation at voltages other than that specified on equipment
nameplates are not covered by this warranty. Conversion to correct voltage is the
customer’s responsibility.
• This equipment must be serviced by Prince Castle Authorized Service Agency
or a Prince Castle Service Technician during the warranty period.
Note: When connected to the Kitchen Minder, the Transfer and Menu
functions are disabled on the button bar.
EHB Series
TABLE OF CONTENTS
Model Identification . . . . . . . . . . . . . . . . . . . . . . . . . . . . . . . . . . . . . . 2
Model Specifications . . . . . . . . . . . . . . . . . . . . . . . . . . . . . . . . . . . . .2
Safety Information . . . . . . . . . . . . . . . . . . . . . . .. . . . . . . . . . . . . . . . .2
Configurations . . . . . . . . . . . . . . . . . . . . . . . . . .. . . . . . . . . . . . . . . . .3
Product Identification . . . . . . . . . . . . . . . . . . . . . . . . . . . . . . . . . . . . .4
Installation . . . . . . . . . . . . . . . . . . . . . . . . . . . . . . . . . . . . . . . . . . . . .4
Operation . . . . . . . . . . . . . . . . . . . . . . . . . . . . . . . . . . . . . . . . . . . . . .5
Standalone Mode. . . . . . . . . . . . . . . . . . . . . . . . . . . . . . . . . . . . . .6
Setting Product Location (Standalone Mode) . . . . . . . . . . . . . . . . . .7
Cleaning . . . . . . . . . . . . . . . . . . . . . . . . . . . . . . . . . . . . . . . . . . . . . . 7
Setting the Temperature . . . . . . . . . . . . . . . . . . . . . . . . . . . . . . . . . . 8
Calibrating the Heaters . . . . . . . . . . . . . . . . . . . . . . . . . . . . . . . . . . . 9
Changing the Hold and Cook More Times . . . . . . . . . . . . . . . . . . . .10
Changing Product Names . . . . . . . . . . . . . . . . . . . . . . . . . . . . . . . . .11
Changing Temperature Scale . . . . . . . . . . . . . . . . . . . . . . . . . . . . . .12
Adjusting Alarm Volume. . . . . . . . . . . . . . . . . . . . . . . . . . . . . . . . . . 12
Default Menu . . . . . . . . . . . . . . . . . . . . . . . . . . . . . . . . . . . . . . . . . . 13
Zone Layouts . . . . . . . . . . . . . . . . . . . . . . . . . . . . . . . . . . . . . . . . . ..13
Troubleshooting . . . . . . . . . . . . . . . . . . . . . . . . . . . . . . . . . . . . . . . . 14
Diagnostics . . . . . . . . . . . . . . . . . . . . . . . . . . . . . . . . . . . . . . . . . . . 15
Wiring Diagrams . . . . . . . . . . . . . . . . . . . . . . . . . . . . . . . . . . . . . . . .16-17
Exploded Views . . . . . . . . . . . . . . . . . . . . . . . . . . . . . . . . . . . . . . . ..18
355 EAST KEHOE BLVD. ~ CAROL STREAM, IL, 60188, USA
PHONE: 630-462-8800 ~ TOLL FREE: 1-800-PCASTLE
FAX 630-462-1460 ~ WWW.PRINCECASTLE.COM
540-537revG-EN 1 Printed in USA 04/16 © 2016
Page 2
Extend Holding Bin
EHB Series
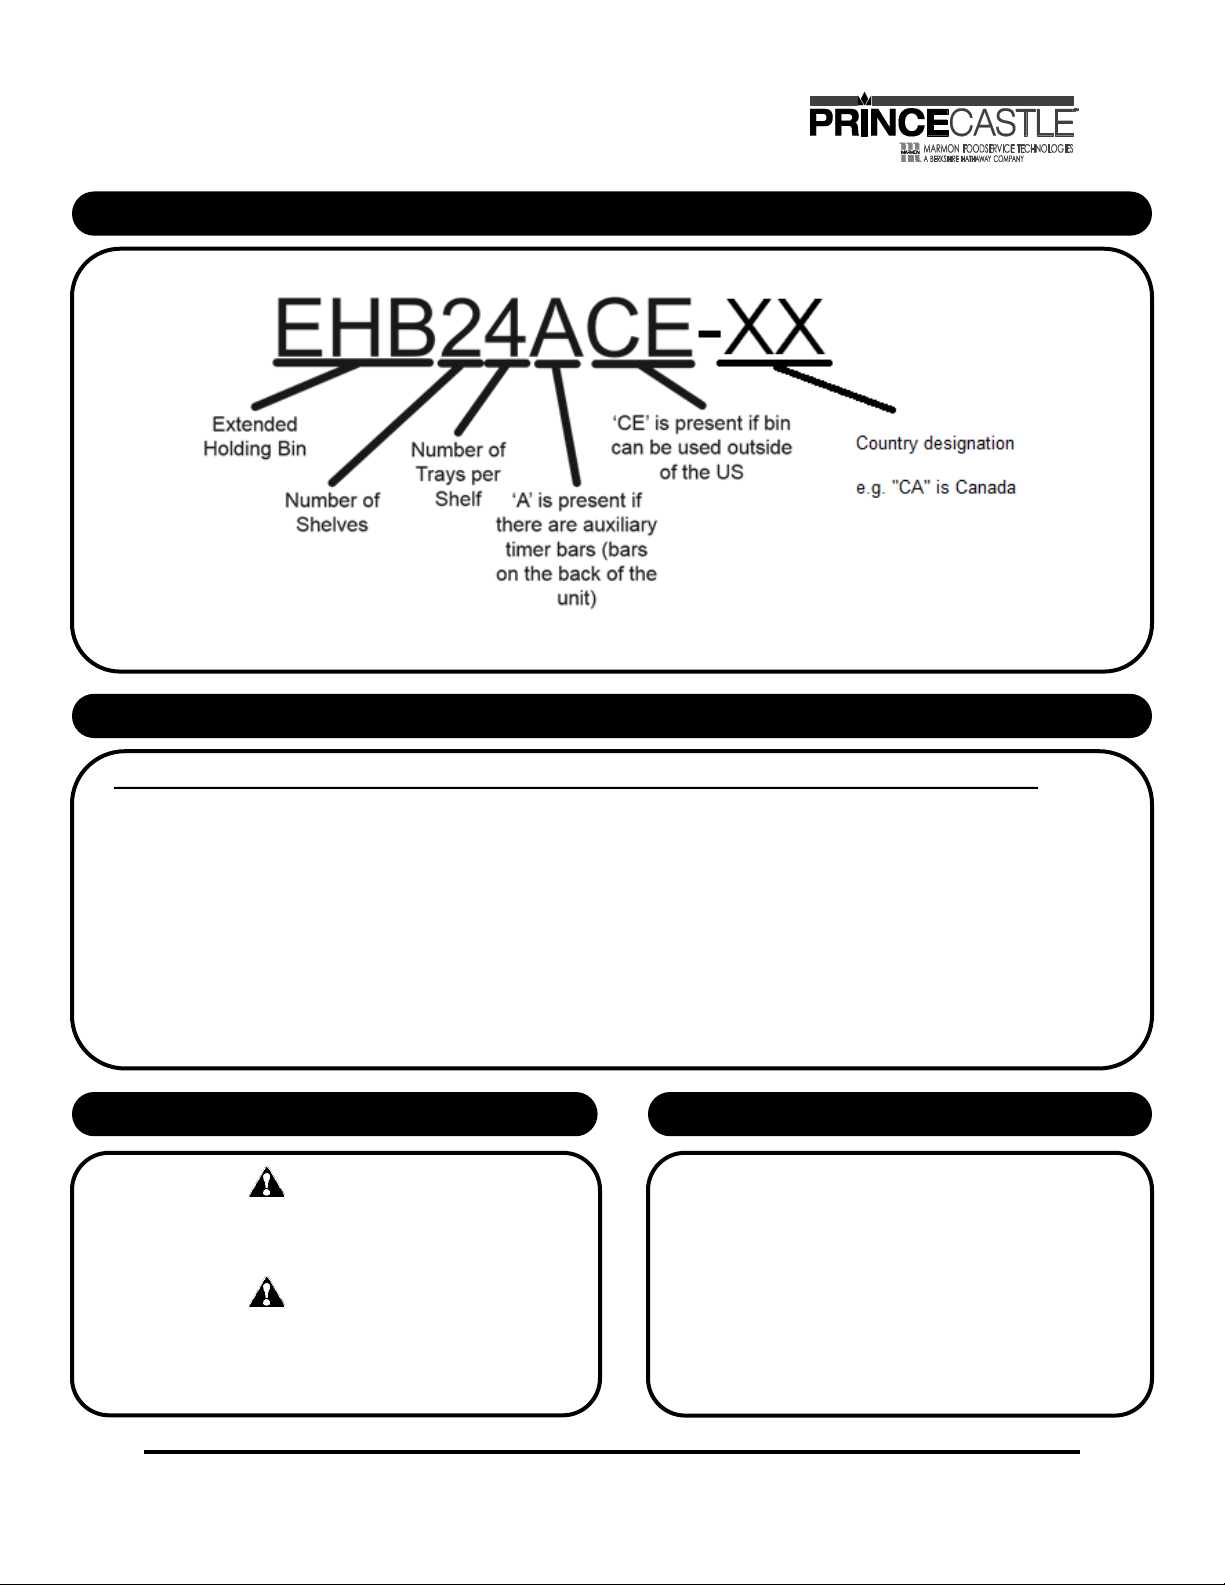
Model Identification
Model Specifications
STYLE MODEL NO. WIDTH (mm) HEIGHT (mm) DEPTH (mm) WEIGHT (kgs) VOLTAGE AMPS
2H X 2W EHB22A 19.7 (500) 11.1 (282) 14.1 (358) 64 lbs. (29.0) 208-240 3.8-4.3
2H X 3W EHB23A 27.2 (691) 11.1 (282) 14.1 (358) 74 lbs. (33.6) 208-240 6.8-7.8
2H X 4W EHB24A 33.2 (843) 11.1 (282) 14.1 (358) 97 lbs. (44.0) 208-240 9.0-10.4
3H X 2W EHB32A 19.7 (500) 18.3 (465) 14.1 (358) 80 lbs. (36.3) 208-240 6.8-7.8
3H X 4W EHB34A 33.2 (843) 18.3 (465) 14.1 (358) 120 lbs. (54.4) 208-240 13.5-15.6
4H X 2W EHB42A 19.7 (500) 20.6 (523) 14.1 (358) 94 lbs. (42.6) 208-240 7.5-8.7
NOTE: All Model Num bers above are for d ouble-sided units (with auxiliary timer bars). For single-sided, remove the letter “A”
NOTE: For inter national (out side of th e US) add “ CE” t o t he end o f the model number.
NOTE: Weight (kg s) is shippi ng weight .
Safety Information
WARNING
Indicates information important to the proper operation of the unit.
Failure to observe may result in damage to the equipment and/or
severe bodily injury or death.
CAUTION
Indicates information important to the operation of the unit.
Failure to observe may result in damage to the equipment.
The service manual is intended for use by persons having
electrical and mechanical training and a level of knowledge.
PRINCE CASTLE cannot be responsible, or assume any
liability for injury or damage arising from the use of this manual.
To avoid personal injury and/or property damage, it is important
that safe service practices be observed, including the following:
- Do not service this unit without first reading this manual.
- Do not attempt a repair, if you have doubt as to your ability.
- Do not attempt to replace any components, unless all power
has been disconnected.
Safe Service Practice
Printed in USA 04/16 © 2016 2 540-537revG-EN
Page 3

Extend Holding Bin
EHB Series
Conguraons
EHB22A
EHB32A
EHB23A
EHB24A
EHB42A
540-537revG-EN 3 Printed in USA 04/16 © 2016
EHB34A
Page 4
Extend Holding Bin
EHB Series
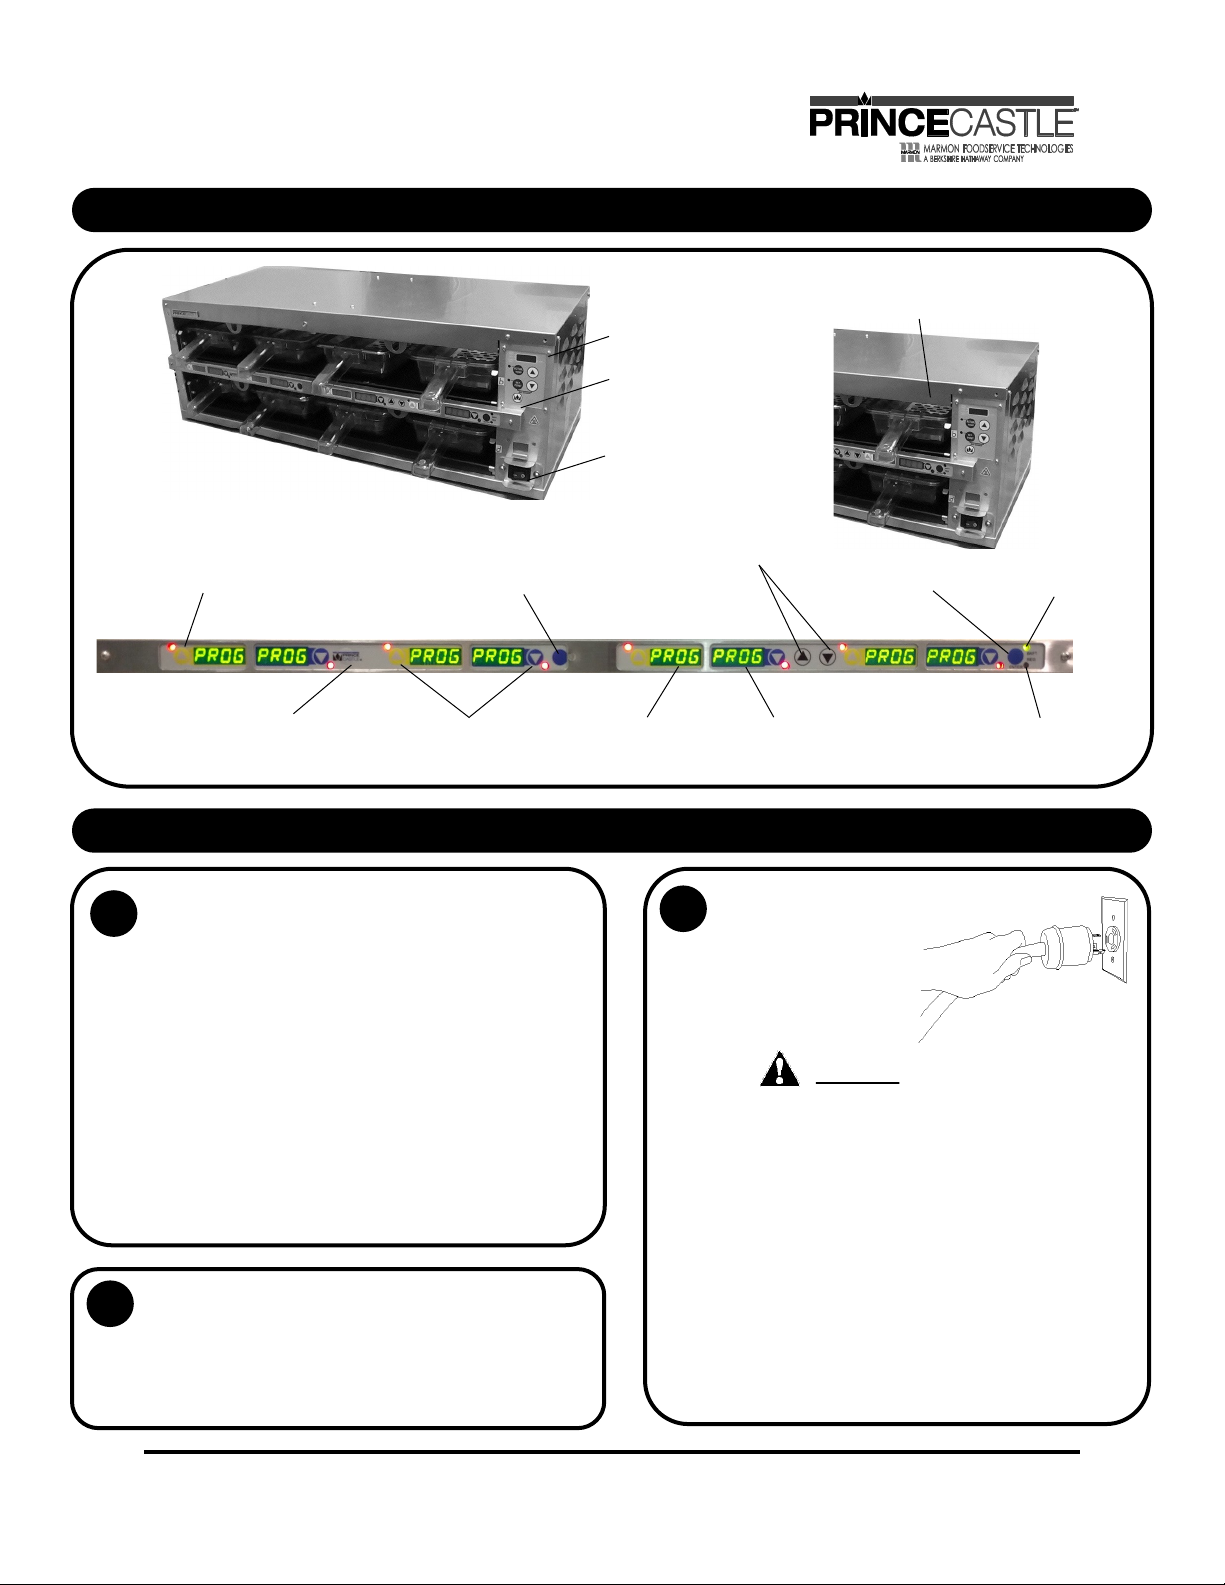
Product Identification
PAN LIDS, ONLY used with broiled products.
(Fried products DO NOT require lids)
Temperature
Control Panel
Button Bar
Power
ON/OFF
Switch
LED TIMERS ( tri-color)
(1 for each pan arrow button)
BUTTON BAR
PRINCE CASTLE
LOGO Button
TRANSFER Button
(Not used)
PAN ARROW Buttons
(2 for each slot wide)
UP and DOWN ARROW
UPPER PAN Display
(1 for each slot wide)
Installation
Remove the unit from the carton and inspect for signs of
1
damage. If there is damage to the unit:
• notify the carrier within 24 hours of delivery
• save carton and packaging materials for inspection purposes
• contact your local dealer, or if purchased directly,
the Prince Castle Sales Department at 800-722-7853
or 1-630-462-8800 to arrange for a replacement unit.
NOTE: Plug the pow er c ord in to th e proper elec trical
receptacle. All electrical connections must be in accordance
with local electrical codes and any other applicable codes.
Place Extend Holding Bin on flat surface.
2
Remove blue and/or white protective covering.
NOTE: When installin g th is unit, the am bient temperat ure
at the mounting site should not exceed 100°F (38°C)
ENTER Button
LOWER PAN Display
(1 for each slot wide)
Plug unit into a grounded
3
receptacle with a matching
plug configuration.
WARNING:
All electrical connections must be in accordance with local
electrical codes and any other applicable codes.
If the supply cord is damaged, it must be replaced by the
manufacturer, its service agent, or similarly qualified persons
in order to avoid a hazard.
To prevent an electric shock hazard this device must be
bonded to equipment in close proximity with an equipotential
bonding conductor. This device is equipped with a grounding
lug for this purpose.
BKFT LED
(Breakfast)
REG LED
(Regular Menu)
Printed in USA 04/16 © 2016 4 540-537revG-EN
Page 5
Extend Holding Bin
EHB Series
Operation
WARNING: This application is not intended for use by persons (including children) with reduced physical, sensory
or mental capabilities, or lack of experience and knowledge, unless they have been given supervision or instruction
concerning use of the appliance by a person responsible for their safety.
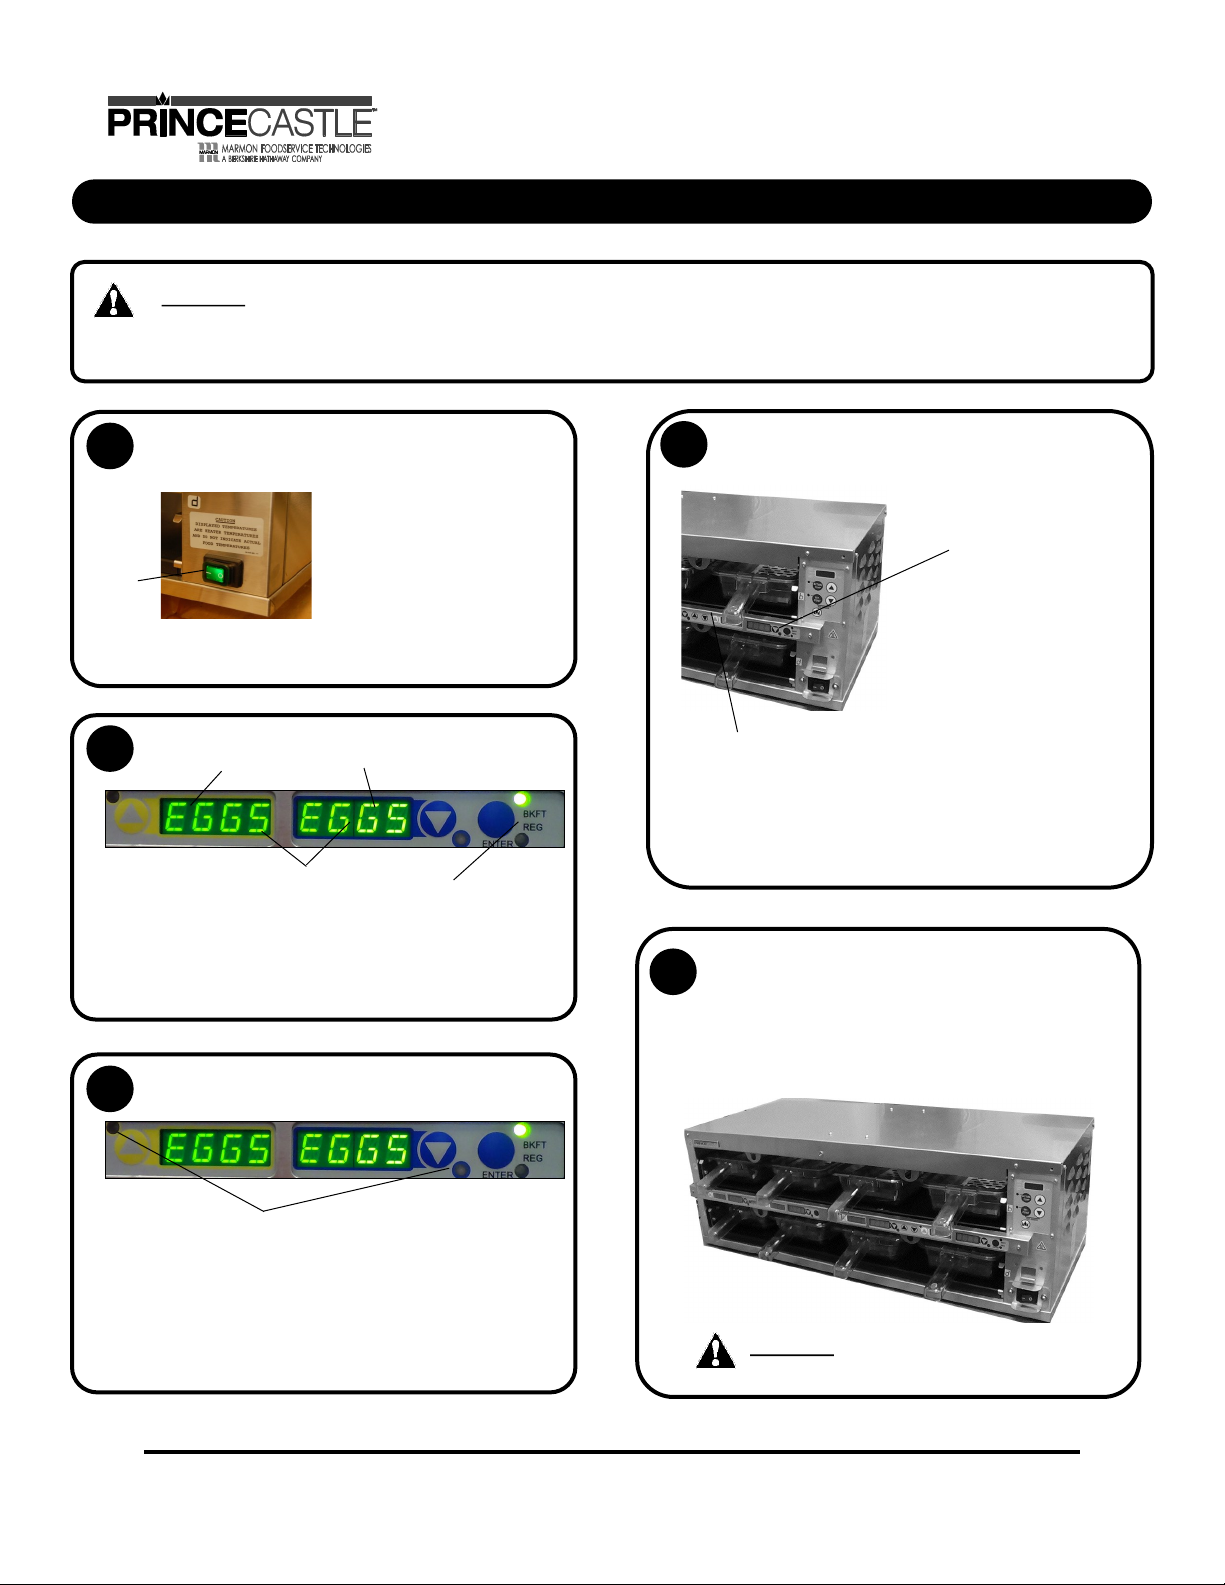
To turn on the unit,
1
Turn Power On/Off switch (A) to ON position.
Allow 20 minutes for heaters to
reach operating temperature.
The button bar will read “WARM
(A)
NOTE: Load pan c overs (if used) and insert pans i nto th e
unit.
Press all Pan Arrow buttons.
2
The Pan displays will show the assigned product name.
If no product is assigned, the display
will be dim and show “----”. Pressing
the Pan Arrow button will not activate
the timer if “----” is displayed. Pressing
Pan Arrow button when product name
is displayed will start timing cycle.
UP” as the unit warms up, they
will display the product names.
BKFT (Br eakf ast) or
REG (Regu lar Menu)
will be lit depending on
pre-programmed menu.
When LED is off, load product and press
4
the Pan Arrow button.
If more than one pan
is active for a product,
the LED for the first
pan loaded will turn to
GREEN.
The LED for the 2nd pan loaded
with the same product will turn
If only one pan is active
for a product, the LED
will turn to GREEN.
When any of the timer LED flash, cook more product.
5
If red LED is flashing, remove and discard product as
from GREEN to YELLOW.
The LED timer can be stopped
(cancelled) at any time by
pressing and releasing the
corresponding PAN Arrow button.
GREEN (flashin g) = Cook mor e prod uct
YELLOW (flashing) = Cook more pr od uct
LED Timing Status
3
LED TIMERS
OFF (steady) = Read y f or pro duct
RED (flashin g) = Discard pro duct
GREEN (steady) = Ol dest pr od uct, us e fi rst
GREEN (flashing) = Cook more prod uct
YELLOW (steady) = New er produc t, use green fir st
YELLOW (flashing) = Cook more prod uct
RED (flashin g) = Discard pro duct
WARNING: HOT SURFACES
540-537revG-EN 5 Printed in USA 04/16 © 2016
Page 6
Extend Holding Bin
EHB Series
Standalone Mode
NOTE: Pr in ce Castle Ho ld ing bins are not t o b e co nn ected to each
other unless a Kitchen Minder is in use. If attempting to configure bins with
Kitchen Minder, please refer to the included Kitchen Minder Setup Manual
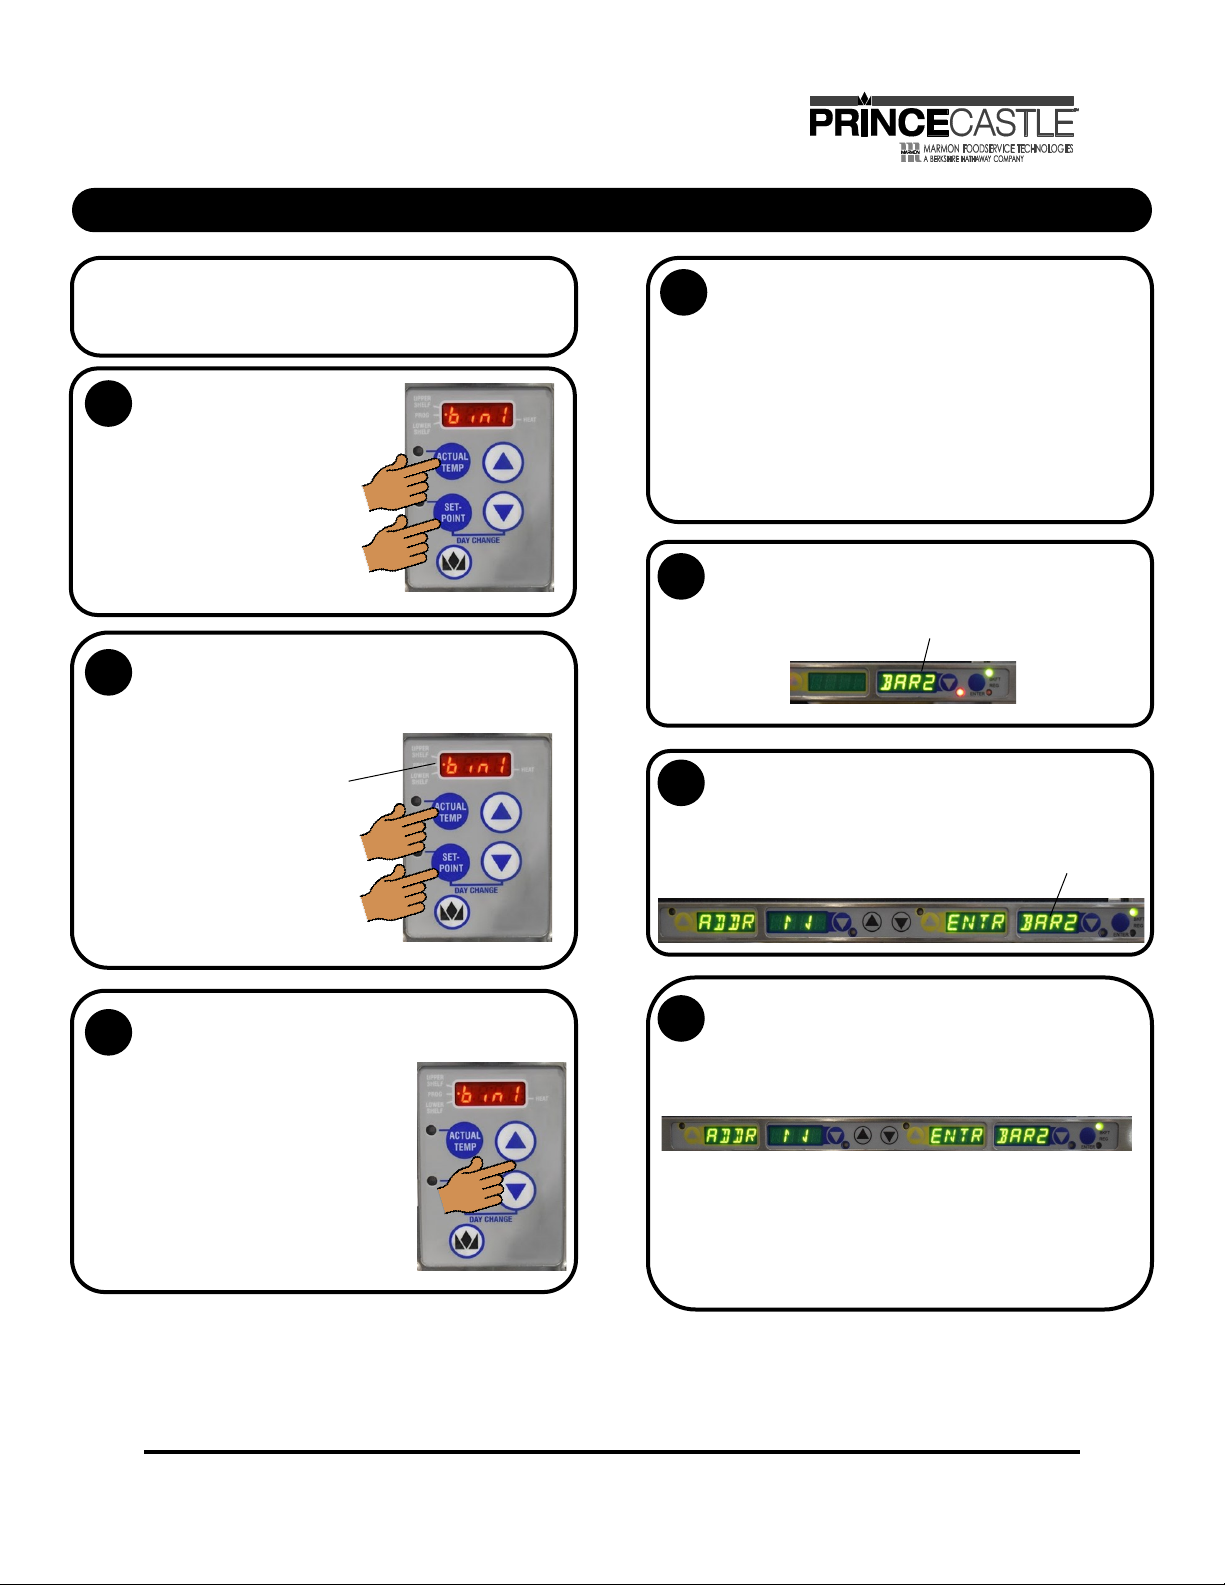
Set all bin addresses to bin1.
1
The factory default address for all bins
and timers is address bin1.
To check the bin address, press and
hold the ACTUAL TEMP and SETPOINT
buttons. The display will show the
bin address.
Default for a new address is bin1.
To change a bin address, disconnect power to the unit and wait
2
10 seconds. Reconnect power to the unit and immediately press
and hold the ACTUAL TEMP and SETPOINT buttons.
PROG LED
NOTE: Con ti nue to h ol d
the buttons until PROG LED turns on.
Set Timer Bar addresses.
4
Since each bin is addressed bin1, the bottom bar on each bin will
be addressed bar2. If there is an upper bar on a bin, it will be
addressed bar3.
Remember: if there are bars on the back of the unit, they do not
need to be addressed separately, they follow the front.
NOTE: Thi s n aming sch eme onl y is tr ue w ithou t a k it chen
management system, if hooked up to a system like Kitchen Minder, it
is different. See its user manual for details.
To check the timer address, press and hold the PRINCE CASTLE
5
LOGO bu tt on on the b ut ton bar and th e DOWN Arro w b ut ton.
The current timer address will be displayed in the far right timer
display. To change the timer address, proceed to Step 6.
To change the timer address, disconnect power to the unit and
6
wait 10 seconds. Reconnect power to the unit and immediately.
Press and hold the PRINCE CASTLE LOGO button on the button
bar and the DOWN Arrow button until the display shows
SET ADDR ↑↓ ENTR BAR2. Th e addr ess nu mb er will bl ink on /
off.
Use the UP or DOWN Arrow button to scroll to the desired address.
3
Press the PRINCE CASTLE CROWN button to store the new address.
Available addresses are:
bin1 thru bin6,
bin1 will always be used when not using
Kitchen Minder.
Use the UP or DOWN Arrow button to scroll to the desired address.
7
Press the ENTER button to store the new address and return to
normal operating mode. Press the PRINCE CASTLE LOGO button
on the button bar to save the setting.
Available addresses are: Bar2 thru Bar7
NOTE: Bar addresses are numbered from the bottom up
Printed in USA 04/16 © 2016 6 540-537revG-EN
Page 7
Extend Holding Bin
EHB Series
Setting Product Location (Standalone Mode)
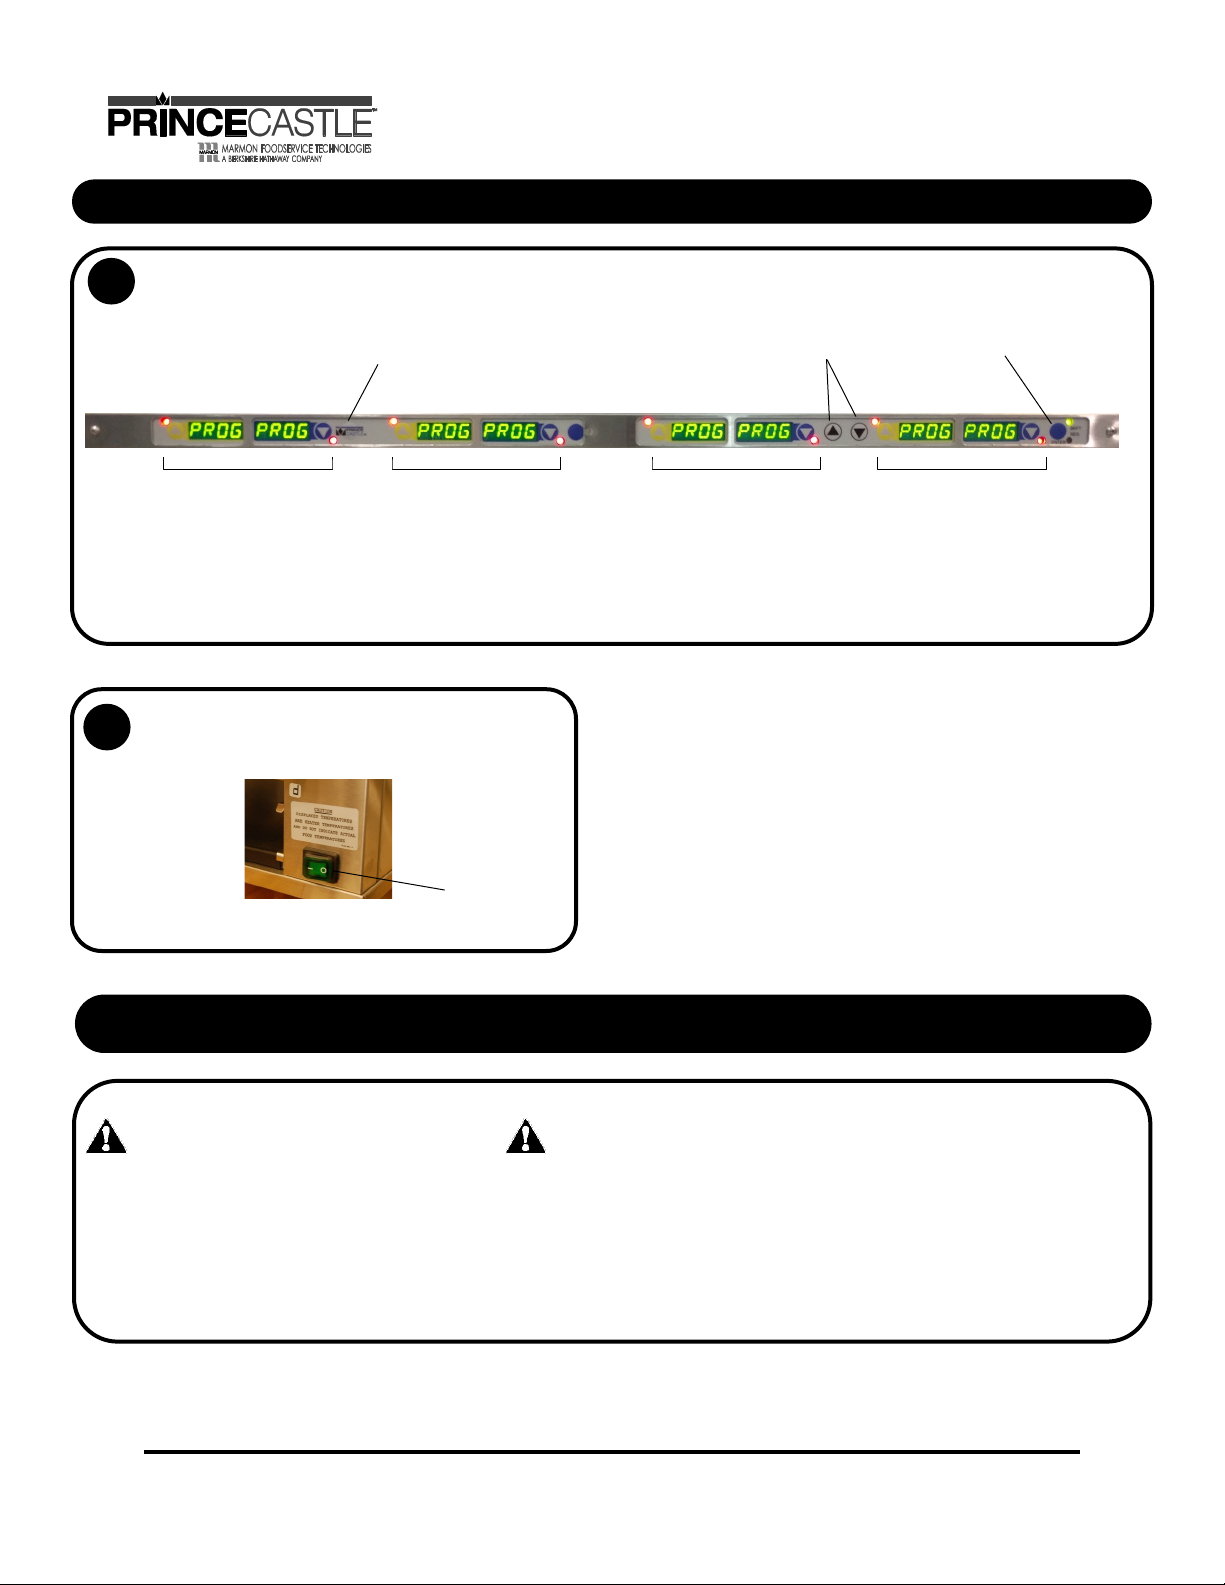
To change a menu selection for a specific pan cavity, use the following steps:
1
A. Press and hold the PRINCE CASTLE LOGO button for 6 seconds.
All Pan displays will show PROG. All LED Timers will be RED.
B. Press a Pan Arrow button to change the menu. The LED Timer will
change to YELLOW and the display will change from PROG to the
assigned menu item.
NOTE: Setti ng a p an t o a p articular pr oduct wi ll automatically ch ang e the oth er p an in th at zone to the same prod uct.
To shut down the unit,
2
turn the Power On/Off switch (A) to OFF position.
(A)
C. Press the UP or DOWN Arrow
button to scroll to the desired
menu item.
E. Repeat steps A – D as required for other Pan displays. Press the PRINCE
CASTLE LOGO button to exit the Program Mode.
NOTE: A pan may be set as “not used” by assigning “- - - -” as its product.
D. Press the ENTER button
to select the menu item.
Cleaning
WARNING:
Before performing any maintenance, turn the
power switch to the OFF position and unplug
the power cord from the electrical receptacle.
540-537revG-EN 7 Printed in USA 04/16 © 2016
CAUTION:
This unit is not watertight. Do not clean with a water jet/jet spray.
Do not immerse the unit in water.
1. Turn the unit off and unplug the power cord from electrical receptacle.
2. Remove the pans and covers. Wipe all parts and unit with a damp cloth.
DO NOT use a green Scotch Bright p ad cl eaner, i ce or water .
Page 8
Extend Holding Bin
EHB Series
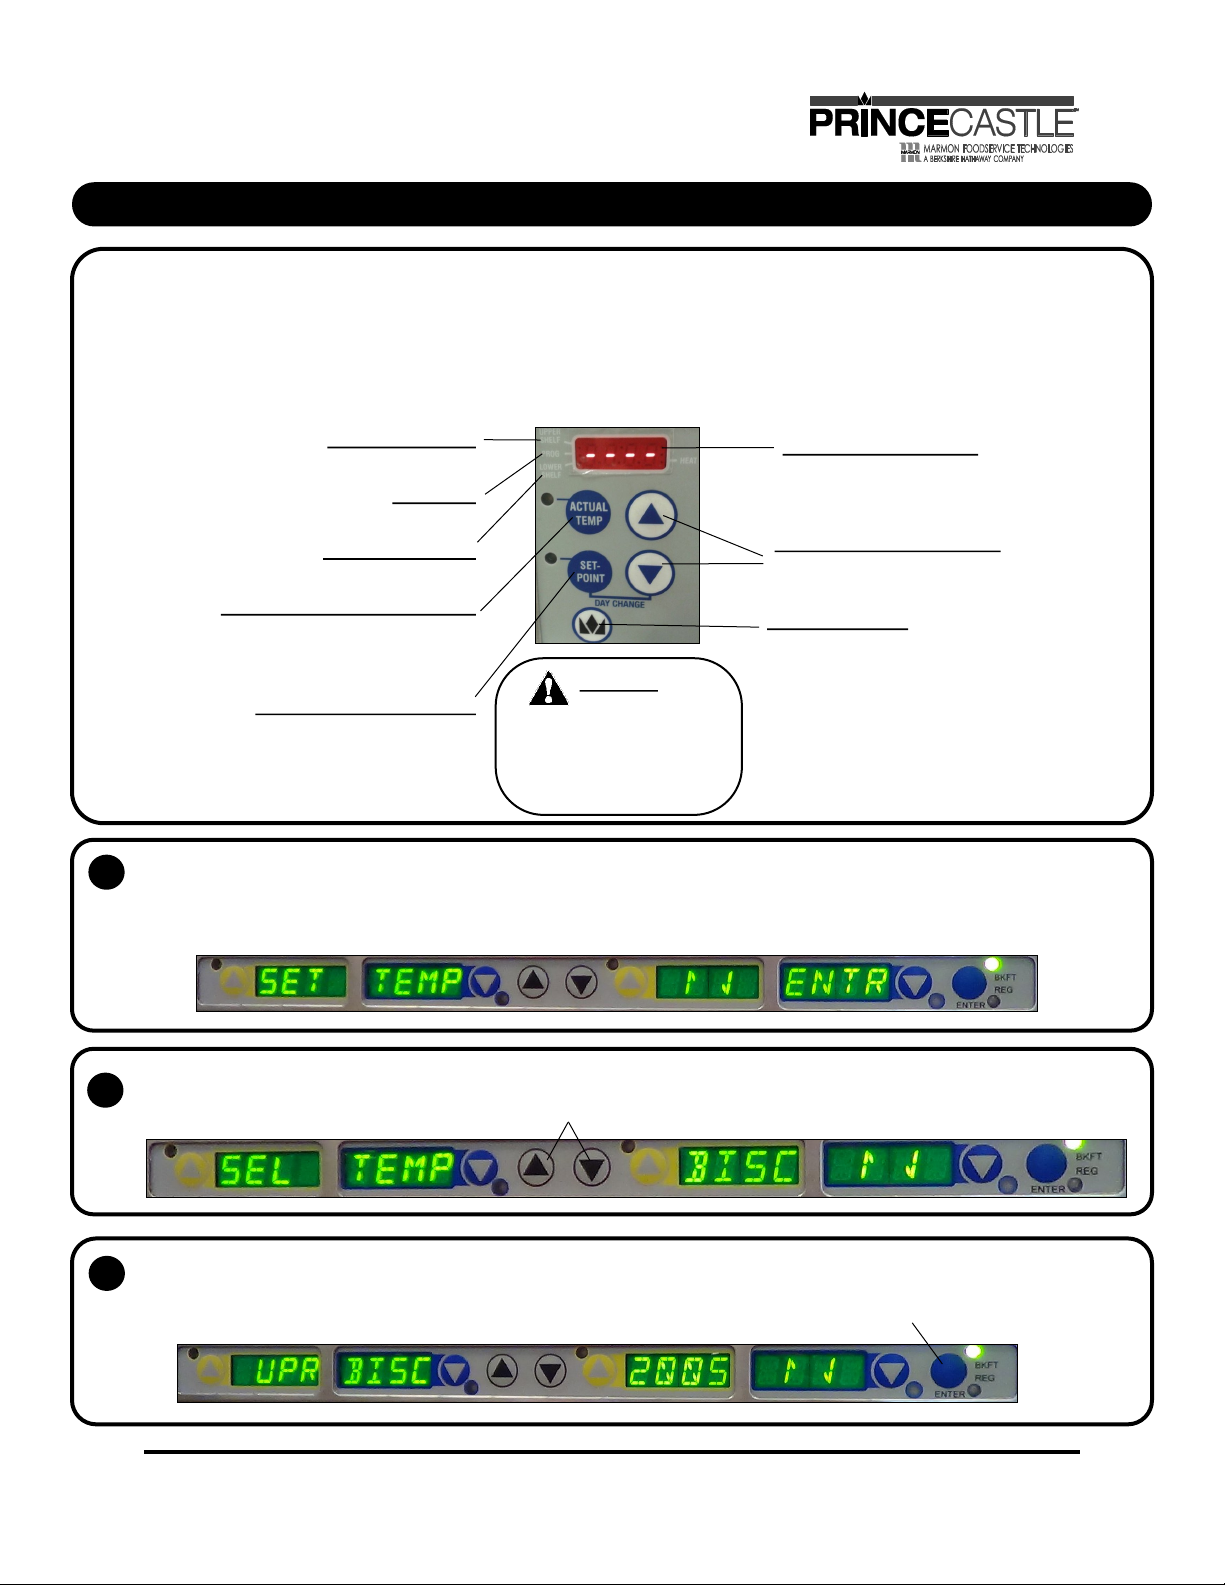
Setting the Temperature
The unit has multiple shelves, each with both an upper and lower heater for each zone.
The heaters follow the default setpoints of the preset products for each pan
Each heater has a programmable range of 150° – 275°F (66° – 135°C).
Use the instructions below and the following steps to set the setpoint temperatures for each heater.
NOTE: Only applic able in s tan d-alone mode when not connected to Product Management sys-
tem, setpoint cannot be changed when connected to a kitchen manager.
UPPER SHELF LED
This LED will be lit to indicate upper shelf is selected.
PROG LED
This LED will be lit to indicate unit is in Program Mode.
LOWER SHELF LED
This LED will be lit to indicate lower shelf is selected.
ACTUAL TEMP BUTTON and LED
Press to display actual temperature for the
selected heater. LED will be lit when actual
temperature is displayed.
SETPOINT BUTTON and LED
Press to display setpoint temperature of a
selected heater. LED will be lit when setpoint
temperature is displayed.
The SET PRODUCT TEMP menu is used to change the Hold and Cook-More times.
1
Press and hold the PRINCE CASTLE LOGO button on the button bar, then immediately press and hold the MENU/ENTER button on the
button bar until the display shows one of six programming menus…..(hold for about 5 seconds)
Use the UP or DOWN Arrow button to scroll to the SET TEMP ↑ ↓ ENTR (Set Product Temperature) menu.
ARE HEATER TEMPERATURES
AND DO NOT INDICATE ACTUAL
CAUTION:
DISPLAYED TEMPERATURES
FOOD TEMPERATURES.
TEMPERATURE DISPLAY
A, B, C, D ( E, F ) = ZONES
Upper and Lower Heater
UP/DOWN ARROW BUTTONS
Used with other Buttons to scroll through heater
and temperature selections.
CROWN BUTTON
Press to enter temperature selections.
NOTE: To r eset all c ali br ati ons to th e factor y s ettings, turn the unit off, then press and hold the UP and
DOWN Arrow buttons simultaneously while turning the
unit back on. A “P” will appear in the display and all
calibrations will be reset to original factory settings.
Press and release the MENU/ENTER button to enter the programming menu, the display should then read SEL TEMP XXXX ↑ ↓
2
(the XXXX is where the product abbreviation is displayed). Use the UP and DOWN arrows to navigate to the desired product.
Press the MENU/ENTER button to select that product profile to update, the display will read SET UPR XXXX ###s↑ ↓ the XXXX
3
is where the product abbreviation is displayed, and ### is the temperature. Use the UP and DOWN arrows to set the temperature of
the upper heater of that zone. Confirm setpoint by pressing MENU/ENTER
Printed in USA 04/16 © 2016 8 540-537revG-EN
Page 9

Extend Holding Bin
EHB Series
Setting the Temperature (Continued)
The display will now show SET LWR XXXX ###s ↑ ↓. Use the UP and DOWN arrows to set the temperature of the Lower heater of that zone.
4
Press MENU/ENTER to confirm setpoint temperature.
NOTE: Changing th e profile o n one bar in a li nked system o f bin (s) is enough, it does not need to b e ch anged on all bar s in th e
system.
Press PRINCE CASTLE LOGO BUTTON to save the setpoints. Repeat steps 2-5 for all necessary profile upgrades.
5
NOTE: Setpoints ar e di splayed on the front di splay board, and shou ld be updated acco rding to th e produ ct at this po int.
Calibrating Heaters
Use the following steps to calibrate the individual heaters
1
Select ACTUAL TEMP. Press the UP or
DOWN Ar ro w b utton un ti l the des ir ed
shelf LED and upper or lower heater is
selected.
NOTE: Allo w s ufficien t am o un t o f t ime
for temperatures to stabilize before
Take a temperature reading within the shelf near
2
the center of each heater surface.
WARNING: HOT SURFACES
Use caution when taking
temperature readings
within the shelf.
NOTE: Use an independent temperature met er (n ot suppl ied).
Press and hold the CROWN BUTTON and ACTUAL TEMP buttons
3
for 5 seconds. The colon (:) LED indicator will light. The temperature
displayed is the actual heater temperature sensed by the controller.
Press the UP or DOWN Arrow button until the temperature
displayed matches the reading obtained in Step 2.
4
Press the CROWN BUTTON to save the temperature value and exit
the Calibration Mode. To undo changes before saving, press the
SETPOINT bu tt on. This cl ears t he o ff set s ent ered .
NOTE: On t he 3x 4
unit, during calibration,
a HOLD message will
appear on the display.
When it does, release
all buttons until it
disappears, then
continue.
Selecting Day Part
Press and hold the SETPOINT button
1
and the DOWN Arrow button for
3 seconds to change Day Part to
change the menu.
NOTE: Only applicable in s tan dalone mode when not connected to
Product Management system.
NOTE: The displ ay w ill sh ow
DAY # if th e daypart has been
successfully changed.
NOTE: Whenever a bin i s powered
ON it def aults to DAY PART 1 no
matter what time of day it is.
**For more info, see Menu Setup Manual 540-550**
540-537revG-EN 9 Printed in USA 04/16 © 2016
Page 10

Extend Holding Bin
EHB Series
Changing the Hold and Cook-More Times (Standalone Mode)
The SET PRODUCT TIME menu is used to change the Hold and Cook-More times.
1
Press and hold the PRINCE CASTLE LOGO button on the button bar,
then immediately press and hold the ENTER button until the display shows one of six programming menus.
Use the UP or DOWN Arrow button to scroll to the PROD TIME ↑ ↓ ENTR (Set Product Time) menu.
Press and release the ENTER button to enter the Set Product Time menu. The display will show BURG TIME ↑↓ ENTR.
2
Use the UP or DOWN Arrow button to scroll through the list of products.
When the desired product is displayed, press the ENTER button to select it.
NOTE: Holding th e UP or DOWN Arr ow butto n for lon ger than 2 seconds wi ll caus e th e produ ct li st to automati cally scrol l up or down.
The display will show 90 ↑↓ ENTR.
3
Use the UP or DOWN Arrow button to scroll to the desired
Hold time. When the desired Hold time is displayed, press
the ENTER button to save the desired Hold time.
NOTE: Hold tim e can not be r educed to less th an t he Cook-More
time plus one minute. NOTE: All times are displayed in minutes only.
For example, 2 and half hours is displayed as 150
The display will show BURG TIME ↑ ↓ENTR. Repeat Steps 2 – 4 for any other product.
5
Press and release the PRINCE CASTLE LOGO button at any time to exit the Program Mode and return to the Run Mode.
NOTE: If the ENTER butt on has not been pressed to sav e any changes, th e pr ogram will revert to th e origi nal values.
The display will show COOK 03 ↑ ↓ ENTR.
4
Use the UP or DOWN Arrow button to scroll to the desired
Cook-More time. When the desired Cook-More time is
displayed, press the ENTER button to save it.
NOTE: Cook-More time cannot be increased to more than the
Hold time, minus one minute.
Printed in USA 04/16 © 2016 10 540-537revG-EN
Page 11

Extend Holding Bin
EHB Series
Changing Product Names (Standalone Mode)
The EDIT PRODUCT NAME menu is used to change a default product name to one of your own choosing.
1
Press and hold the PRINCE CASTLE LOGO button on the button bar,
then immediately press and hold the ENTER button until the display shows one of six programming menus.
Use the UP or DOWN Arrow button to scroll to the PROD NAME ↑ ↓ ENTR (Edit Product Name) menu.
NOTE: Only applic able in s tan d-alone mode when not connected to Product Management system.
NOTE: The default men u i tems and nam es ar e li sted on page 13.
Press and release the ENTER button to enter the Edit Product Name menu.
2
Use the UP or DOWN Arrow button to scroll through the list of products.
When the desired product is displayed, press the ENTER button to select it.
The first letter (in this case, the B ) will start blinking.
To change the blinking B, use the UP or DOWN Arrow button to scroll to the desired letter/number/symbol.
3
When the desired selection is displayed, press the PAN Arrow button to move to the next digit. Repeat for all digits.
NOTE: Holding th e UP or DOWN Arr ow butto n for lon ger than 2 seconds wi ll caus e th e displ ay t o autom ati cally scr oll up or down.
When all four digits have been changed, press the ENTER button to select the new name.
4
...
The display will show PROD NAME ↑↓ ENTR. Repeat St eps 2 – 4 for any other product.
5
Press and release the PRINCE CASTLE LOGO button at any time to exit the Program Mode and return to the Run Mode.
NOTE: If the ENTER butto n h as n ot been pressed to save any changes , th e progr am will revert to the o ri gi nal names.
540-537revG-EN 11 Printed in USA 04/16 © 2016
Page 12

Extend Holding Bin
EHB Series
The SET F/C menu is used to change the temperature scale.
1
Press and hold the PRINCE CASTLE LOGO button on the button bar,
then immediately press and hold the ENTER button until the display shows one of six programming menus.
Use the UP or DOWN Arrow button to scroll to the SET F/C XXXX ↑ ↓ ENTR (Edit Product Name) menu.
Press the ENTER button to enter the menu.
2
Bar will display SET DEGR F/C ↑ ↓ ENTR and either the F or C will be blinking.
Changing Temperature Scale (Standalone Mode)
Use the UP and DOWN arrows to select the desired temperature mode (the selected mode will blink)
3
Press the ENTER button to confirm the selection. Press the PRINCE CASTLE LOGO button to save the setting.
Adjusng Alarm Volume (Standalone Mode)
The SET VOLUME menu is used to change the alarm volume.
1
1
Press and hold the PRINCE CASTLE LOGO button on the button bar,
then immediately press and hold the ENTER button until the display shows one of six programming menus.
Use the UP or DOWN Arrow button to scroll to the SET VOL ↑ ↓ ENTR (Set Volum e) menu.
NOTE: Only applic able in s tan d-alone mode when not connected to Product Management system.
A mer alarm is included to sound aer a hold mer
2
is complete.
The volume is adjustable from level 0-3.
Once the menu is on the bar, press ENTER to enter
the menu
Scroll to the desired volume seng and hit ENTER
3
to accept.
Printed in USA 04/16 © 2016 12 540-537revG-EN
Page 13

Extend Holding Bin
Default Menu Items
BREAKFAST PRODUCTS
KM NAME PRODUCT NAME
EGGS SANDWICH EGGS 90 5 230 200
PCAK PANCAKES 30 2 180 170
BISC BISCUIT 60 18 200 200
FTST FRENCH TOAST 90 2 245 230
SAUS SAUSAGE PATTY 120 2 235 215
HOLD TIME
(MINUTES)
BURGER PRODUCTS
KM NAME PRODUCT NAME
BURG BURGER 90 3 240 220
WHPR WHOPPER 90 3 240 220
WHJR WHOPPER JR. 90 3 240 220
HOLD TIME
(MINUTES)
CHICKEN PRODUCTS
KM NAME PRODUCT NAME
BCKN BREAKFAST CHICKEN 60 4 250 220
CFRY CHICKEN FRIES 60 2 180 160
OCS ORIGINAL CHICKEN 90 4 250 220
CKJR CRISPY CHICKEN JR. 60 3 260 235
CRIS CRISPY CHICKEN 30 7 190 172
GCHK GRILLED CHICKEN 90 3 240 215
CNUG CHICKEN NUGGET 60 3 260 235
JFRY JALAPENO CHK. FRIES 60 2 180 160
HOLD TIME
(MINUTES)
OTHER PRODUCTS
KM NAME PRODUCT NAME
CZST CHEESE STICK 60 4 200 200
RGCH CHILI 10 OZ. 240 3 210 200
SMCH CHILI 4 OZ. 240 3 210 200
FISH FISH 60 5 260 235
GDOG GRILLED DOG 90 3 240 200
HOLD TIME
(MINUTES)
COOK MORE TIME
(MINUTES) TOP TEMP (°F) BOTTOM TEMP (°F)
COOK MORE TIME
(MINUTES) TOP TEMP (°F) BOTTOM TEMP (°F)
COOK MORE TIME
(MINUTES) TOP TEMP (°F) BOTTOM TEMP (°F)
COOK MORE TIME
(MINUTES) TOP TEMP (°F) BOTTOM TEMP (°F)
EHB Series
Zones
2X2 2X3
All bin configurations are set up with zones,
which correspond to a set of heaters that
work together to hold the product. A single
product can be programmed into each zone.
The timer bars are equipped with this
knowledge. If the product in one slot of a
zone is changed, the other slot will automatically change to that product as well.
540-537revG-EN 13 Printed in USA 04/16 © 2016
2X4
4X2
3X2
3X4
Page 14

Extend Holding Bin
EHB Series
Troubleshoong
WARNING: To avoid personal injury and possible damage to the unit, troubleshooting and repair of electrical equipment
should be performed by qualified service personnel. This unit should be unplugged when servicing. Except when electrical
tests are required. Use extreme caution during electrical circuit tests as live circuits may be exposed.
Problem Probable Cause Solution
Power switch is turned off,
No Power
Power cord is not plugged in.
Unit will not heat up
Unit heats up but timer
bars do not work
Unit under/over heats Check temperature settings
Display flashes OPN and
REL
Display flashes SHR and
REL
Display shows HHH for
extended period and heater surface temperature is
hot
Wrong power cord, loose connection on
power switch and/or heater
Timer bar wiring disconnected,
timer bar is defective
Open relay, circuit or heater inoperable
Shorted relay, circuit inoperable,
open heater, unplugged ribbon cable
Temperature is above 300 F (149 C),
Abnormal operation
Turn power switch to ON position,
Ensure power cord is connected
to proper receptacle
CALL TECH SUPPORT
1-800-722-7853
CALL TECH SUPPORT
1-800-722-7853
CALL TECH SUPPORT
1-800-722-7853
CALL TECH SUPPORT
1-800-722-7853
CALL TECH SUPPORT
1-800-722-7853
CALL TECH SUPPORT
1-800-722-7853
HOLD message means the 2 PC
boards in the bin are communicating, wait until
the message disappears
Wait until the message disappears
Bin is learning Kitchen Minder menus,
wait for message to disappear
Refer to Kitchen Minder setup manual
Display shows HOLD
Display shows WAIT
Display shows INIT
Timer bar displays
COMM DOWN
Only displayed on a 3X4 Bin display
board, when the operator changes the bin
address or during calibration
When in stand alone mode and the operator makes change to the product profile
When switching from Kitchen Minder
to stand alone mode
Bin is not communicating with
Kitchen Minder
For all technical support in North America, please contact PRINCE CASTLE LLC 1-800-722-7853
For technical support worldwide, contact your local service representative / installer.
Printed in USA 04/16 © 2016 14 540-537revG-EN
Page 15

Extend Holding Bin
Diagnoscs
DIAGNOSTICS
For all diagnostic messages on the holding bin, the message will appear on the timer bar located at the pan that is triggerin g the message.
The message is a two-word message that will cycle through on the timer bar in addition to the product name at that pan location.
1. WARM | UP | XXXX – When turning on holding bin the warm up message will appear until heaters reach within 15°F set point.
a. Cleared when within 15°F of the set point.
2. HTR | OFF | XXXX – Heater off message appears when both the upper and lower heaters are off.
a. Cleared when heater is turned on.
3. HTR | LOW | XXXX – Heater low appears if the temperature falls 15°F below the set point.
a. Cleared when temperature is back in range. If not cleared, would require a service technician to repair.
4. HTR | HIGH | XXXX – Heater high appears if the heater is above 285°F for 20 minutes.
a. Cleared when temperature is back in range. If not cleared, would require a service technician to repair.
5. RLY | SHRT | XXXX – Relay short error occurs when there is a thermocouple or heater problem.
a. Bin requires service to further troubleshoot and repair.
6. RLY | OPEN | XXXX – Relay open error occurs when there is a thermocouple or heater problem.
a. Bin requires service to further troubleshoot and repair.
7. COMM | DOWN | XXXX – Communication down error occurs when the temperature data is not being properly communicated.
a. Check that the Kitchen Minder/Visor/Sicom system is connected properly. Requires service technician to troubleshoot.
EHB Series
USB Update Procedure (all bins except the 3Hx4W)
1. First, un-plug Kitchen Minder, translator box, and any cable translation cables from the PHU. These devices will interfere with the timer bar boot loading process.
2. Place the update files on the USB flash drive in the main directory (Do not put them in a folder on the flash drive). There are five files that you will need to put on
the drive. Two for the controller board, mainbin.hex and DHBFWBIN.TXT. Three for the timer bars, mainbar.hex, auxbar.hex an d DHBFWBAR.TXT.
3. Once all files are on USB drive, turn power off to bin and place the USB drive with the files into USB port on the front o f the bin.
4. While holding down crown button on front right side of the bin, above the power switch, turn the power to the bin on.
5. Keeping the crown button pressed, wait for the “BL” (boot load) message to appear on the screen. Release the button approx . 5 seconds after the “BL” message
appears or once the USB stick light begins to flash.
6. Wait for the display to show:
a. (blank while upgrading main bin firmware) e. BL00 (0 timer bars left to upgrade)
b. BL00 (searching for timer bars to upgrade) f. BN02 (2 timer bars detected and done with programming)
c. BL02 (2 timer bars left to upgrade)
d. BL01 (1 timer bar left to upgrade)
7. You can check the version number on the timer bars by pressing the Prince Castle logo button and the down button on timer bar.
USB Update Procedure (3Hx4W Bin Only)
1. The 3x4 bin requires two sets of files for the update, 10 files total. You will have a set of 5 files for the lower board and 5 files for the upper board. You can use
one USB flash drive; however you can only have one set of 5 files on the USB drive at one time. The 5 files have the same names and therefore can not be kept on
the USB drive at the same time.
2. Go through steps 1-7 as above placing the USB drive in the USB port labeled 1 on the front of the holding bin. When the bin i s done updating, place the second
set of files on the USB drive.
3. Once all files are on the USB drive, turn the power off to the bin and place the USB drive with the files into the USB por t labeled 2 on the front of the bin.
4. While holding down crown button on front right side of the bin, above the power switch, turn the power to the bin on.
5. Keeping the crown button pressed, wait for the “BL” message, “BLnU” message, and the BL00 message
(THIS WILL TAKE APPROX. 15 SECONDS) to appear on screen, then release the crown button.
6. Observe the top row of timer bars
a. The top row will show dashed lines (indicating that it has entered the boot loader).
b. The top row will show Prince Castle boot up, before going back into dashed lines display (boot loader for second time).
c. The top row will go again to the Prince Castle boot-up and back to the dashes a third and final time.
d. The Prince Castle boot-up will show again and the update is done.
7. You can check the version number on the timer bars (top and bottom) by pressing the Prince Castle logo button and the down button on timer bar.
540-537revG-EN 15 Printed in USA 04/16 © 2016
Page 16

Extend Holding Bin
EHB Series
This Wiring diagram is
used in all configura-
tions except the 3X4
Wiring Diagrams
Printed in USA 04/16 © 2016 16 540-537revG-EN
Page 17

This wiring diagram
is used in the 3X4
configuration only
Extend Holding Bin
EHB Series
Wiring Diagrams
540-537revG-EN 17 Printed in USA 04/16 © 2016
Page 18

Extend Holding Bin
EHB Series
Exploded View
2
EHB22A
ITEM
PART NUMBER DESCRIPTION
NO.
1 197-232S FOOT (4 PACK)
2 540-1107S
3 540-1109S HEATER ASSY, UPPER, 2W
4 540-1111S
5 540-1120S UPPER HEATER TOP SHELF
6 510-242S* TIMER BAR, 4 MAIN
HEATER ASSY LOWER
SHELF, 2W
HEATER ASSY, LOWER TOP
SHELF 2W
ITEM
PART NUM-
NO.
7 510-243S* SERVICE KIT BB 4CH AUX
8 540-1158S LATCH, CATCH
9 540-1002S LID (4 PACK)
11 72-476S POWER CORD
12 540-1215S* OVERLAY AND DISPLAY
13 78-184S POWER SWITCH
14 95-1819S USB CORD
15 540-1263S* PCB, CONTROL BOARD
BER
3
DESCRIPTION
ITEM
PART NUM-
NO.
16 88-709-2-11S SPEAKER
17 95-2011S ETHERNET CONNECTOR
18 88-824S LINE FILTER
BER
*Recommended spares for
stocking
1. AUX TIMER BAR (510-243S) USED ONLY ON EHB22A AND EHB24ACE.
2. POWER CORD (72-476S) USED ONLY ON EHB22 AND EHB22A. USE POWER CORD (72-404S) FOR EHB22CE AND EHB22ACE.
3. LINE FILTER (88-824S) ONLY USED ON EHB22ACE AND EHB22CE.
DESCRIPTION
Printed in USA 04/16 © 2016 18 540-537revG-EN
Page 19

Extend Holding Bin
EHB Series
Exploded View
2
EHB23A
ITEM
PART NUMBER DESCRIPTION
NO.
1 197-232S FOOT (4 PACK)
2 540-1118S
3 540-1123S
4 540-1116S
5 540-1122S LOWER HEATER BASE
6 510-240S* TIMER BAR, 6 MAIN
HEATER ASSY LOWER
SHELF, UPPER 3W
HEATER ASSY, TOP SHELF
LOWER 3W
HEATER ASSY, UPPER TOP
3W
3
ITEM
PART NUM-
NO.
7 510-241S* SERVICE KIT BB 8CH AUX
8 540-1158S LATCH, CATCH
9 540-1002S
11 72-476S POWER CORD
12 540-1215S* OVERLAY AND DISPLAY
13 78-184S POWER SWITCH
14 95-1819S USB CORD
BER
DESCRIPTION
LID (4 PACK)
(NOT SHOWN)
4
ITEM
PART NUM-
NO.
15 540-1265S* PCB, CONTROL BOARD
16 95-2011S ETHERNET CONNECTOR
17 88-824S POWER FILTER
18 88-709-2-11S SPEAKER
BER
DESCRIPTION
*Recommended spares for
stocking
1. AUX TIMER BAR (510-241S) USED ONLY ON EHB23A AND EHB23ACE.
2. POWER CORD (72-476S) USED ONLY ON EHB23 AND EHB23A. USE POWER CORD 72-404S FOR EHB23CE AND EHB23ACE.
3. LINE FILTER (88-824S) ONLY USED ON EHB23ACE AND EHB23CE.
4. FOR MODEL # EHB23V, USE MAIN BOARD PART # 540-1290S
540-537revG-EN 19 Printed in USA 04/16 © 2016
Page 20

Extend Holding Bin
EHB Series
Exploded View
2
EHB24A
ITEM
PART NUMBER DESCRIPTION
NO.
1 197-232S FOOT (4 PACK)
2 540-1226S
3 540-1224S
4 540-1222S
5 540-1072S LOWER HEATER BASE
6 510-098S* TIMER BAR, 8 MAIN
HEATER ASSY LOWER
SHELF, UPPER 4W
HEATER ASSY, TOP SHELF
LOWER 4W
HEATER ASSY, UPPER TOP
4W
3
ITEM
PART NUMBER DESCRIPTION
NO.
7 510-099S* SERVICE KIT BB 8CH AUX
8 540-1158S LATCH, CATCH
9 540-1002S
11 72-476S POWER CORD
12 540-1215S* OVERLAY AND DISPLAY
13 78-184S POWER SWITCH
14 95-1819S USB CORD
LID (4 PACK)
(NOT SHOWN)
4
ITEM
PART NUM-
NO.
15 540-1232S* PCB, CONTROL BOARD
16 95-2011S ETHERNET CONNECTOR
17 88-824S POWER FILTER
18 88-709-2-11S SPEAKER
BER
DESCRIPTION
*Recommended spares for
stocking
1. AUX TIMER BAR (510-099S) USED ONLY ON EHB24A AND EHB24ACE.
2. POWER CORD (72-476S) USED ONLY ON EHB24 AND EHB24A. USE POWER CORD 72-404S FOR EHB24CE AND EHB24ACE.
3. LINE FILTER 88-824S ONLY USED ON EHB24ACE AND EHB24CE.
4. FOR MODEL # EHB24V, USE MAIN BOARD PART # 540-1286S
Printed in USA 04/16 © 2016 20 540-537revG-EN
Page 21

Extend Holding Bin
EHB Series
Exploded View
2
EHB42A
ITEM
PART NUMBER DESCRIPTION
NO.
1 197-232S FOOT (4 PACK)
2 540-1107S
3 540-1109S
4 540-1120S
5 540-1111S
HEATER ASSY, LOWER PAN-
EL, BOTTOM SHELF
HEATER ASSY, LOWER
SHELF, UPPER 4x2
HEATER ASSY, UPPER
SHELF,TOP 4X2
HEATER ASSY, UPPER SHELF
BOTTOM 4X2
ITEM
NO.
6 510-242S* TIMER BAR, 4 MAIN
7 510-243S* SERVICE KIT BB 4CH AUX
8 540-1002S LID (4 PACK)
10 72-476S POWER CORD
11 540-1215S* OVERLAY, DISPLAY BRD
12 78-184S POWER SWITCH
3 4
PART NUM-
BER
DESCRIPTION
ITEM
PART NUMBER DESCRIPTION
NO.
13 95-1819S USB CORD
14 95-2011S ETHERNET CORD
15 88-824S POWER FILTER
16 540-1267S* MAIN BOARD
17 88-709-2-11S SPEAKER
18 540-1158S KIT, LATCH CATCH
*Recommended spares for
stocking
1. AUX TIMER BAR (510-243S) USED ONLY ON EHB42A AND EHB42ACE.
2. POWER CORD (72-476S) USED ONLY ON EHB42 AND EHB42A. USE POWER CORD (72-404S) FOR EHB42CE AND EHB42ACE.
3. LINE FILTER (88-824S) ONLY USED ON EHB42ACE AND EHB42CE.
4. FOR MODEL # EHB42V, USE MAIN BOARD PART # 540-1289S
540-537revG-EN 21 Printed in USA 04/16 © 2016
Page 22

Extend Holding Bin
EHB Series
Exploded View
EHB32A
3
ITEM
PART NUMBER DESCRIPTION
NO.
1 197-232S FOOT (4 PACK)
2 540-1107S
3 540-1109S
4 540-1120S
5 540-1111S
6 510-277S* TIMER BAR, 4 MAIN
1. AUX TIMER BAR (510-278S) AND (510-248S) USED ONLY ON EHB32A AND EHB32ACE.
2. POWER CORD (72-404S) USED ONLY ON EHB32 AND EHB32A. USE POWER CORD 72-404S FOR EHB32CE AND EHB32ACE.
3. LINE FILTER 88-824s ONLY USED ON EHB32ACE AND EHB32CE.
HEATER ASSY, LOWER PAN-
EL, BOTTOM SHELF
HEATER ASSY, LOWER
SHELF, UPPER 4x2
HEATER ASSY, UPPER
SHELF,TOP 4X2
HEATER ASSY, UPPER SHELF
BOTTOM 4X2
ITEM
PART NUM-
NO.
7 510-278S* SERVICE KIT BB 4CH AUX
8 540-1002S LID (4 PACK)
10 72-476S POWER CORD
11 540-1215S* OVERLAY, DISPLAY BRD
12 78-184S POWER SWITCH
13 95-1819S USB CORD
14 95-2011S ETHERNET CORD
15 88-824S POWER FILTER
BER
DESCRIPTION
2
ITEM
PART NUMBER DESCRIPTION
NO.
16 540-1285S* MAIN BOARD
17 88-709-2-11S SPEAKER
18 540-1158S KIT, LATCH CATCH
19 510-244S MAIN BB, UPPER
20 510-245S AUX BB UPPER
*Recommended spares for
stocking
Printed in USA 04/16 © 2016 22 540-537revG-EN
Page 23

Extend Holding Bin
EHB Series
Exploded View
4
5
EHB34A
ITEM
PART NUMBER DESCRIPTION
NO.
1 197-232S FOOT (4 PACK)
2 540-1198S
3 540-1230S
4 540-1228S
5 540-1229S
1. AUX TIMER BAR (510-099S) AND (510-239S ) USED ONLY ON EHB34A AND EHB34ACE.
2. POWER CORD (72-476S) USED ONLY ON EHB34 AND EHB34A. USE POWER CORD (72-404S) FOR EHB34CE AND EHB34ACE.
3. LINE FILTER 88-824s ONLY USED ON EHB34ACE AND EHB34CE.
4. FOR MODEL # EHB34V, USE MAIN BOARD 2 PART # 540-1288S.
5. FOR MODEL # EHB34V, USE MAIN BOARD 1 PART # 540-1287S.
HEATER ASSY, LOWER PAN-
EL, BOTTOM SHELF
HEATER ASSY, LOWER
SHELF, UPPER 3X4
HEATER ASSY, UPPER
SHELF,TOP 3X4
HEATER ASSY, UPPER SHELF
BOTTOM 3X4
ITEM
PART NUM-
NO.
6 510-098S* TIMER BAR, 8 MAIN
7 510-238S* KIT BB 8CH MAIN TOP
8 510-239S* TIMER BAR 8 AUX TOP
9 510-099S* TIMER BAR 8 AUX
10 540-1158S KIT, LATCH CATCH
11 540-1002S LID (4 PACK)
13 72-476S POWER CORD
BER
3
DESCRIPTION
ITEM
PART NUMBER DESCRIPTION
NO.
14 540-1215S* OVERLAY, DISPLAY BRD
15 78-184S POWER SWITCH
16 95-1995S USB CORD
17 540-1282S* BOARD 1
18 540-1283S* BOARD 2
19 95-2012S ETHERNET CONNECTOR
20 88-824S POWER FILTER
21 88-709-2-11S SPEAKER
*Recommended spares for
stocking
2
540-537revG-EN 23 Printed in USA 04/16 © 2016
Page 24

Extend Holding Bin
EHB Series
REV. DATE DESC.
A 8/8/16 RELELASE
B 8/18/16 EHB CONROL BOARD # CHANGE
C 9/6/16 ADDED 3X2 PARTS LIST, VISOR
MAIN BOARD PART #’S
D 9/22/16 CHANGED SPEAKER # ON 3X4
E 4/5/17 WARRANTY CORRECTED TO 3
YEARS PARTS, 2 YEARS LABOR;
ADDED WIRING SCHEMATICS
F 5/10/17 UPDATED WITH CORRECTIONS
G 8/3/17 CHANGED POWER CORD & INLET
Printed in USA 04/16 © 2016 24 540-537revG-EN
 Loading...