

Page 1
Operation
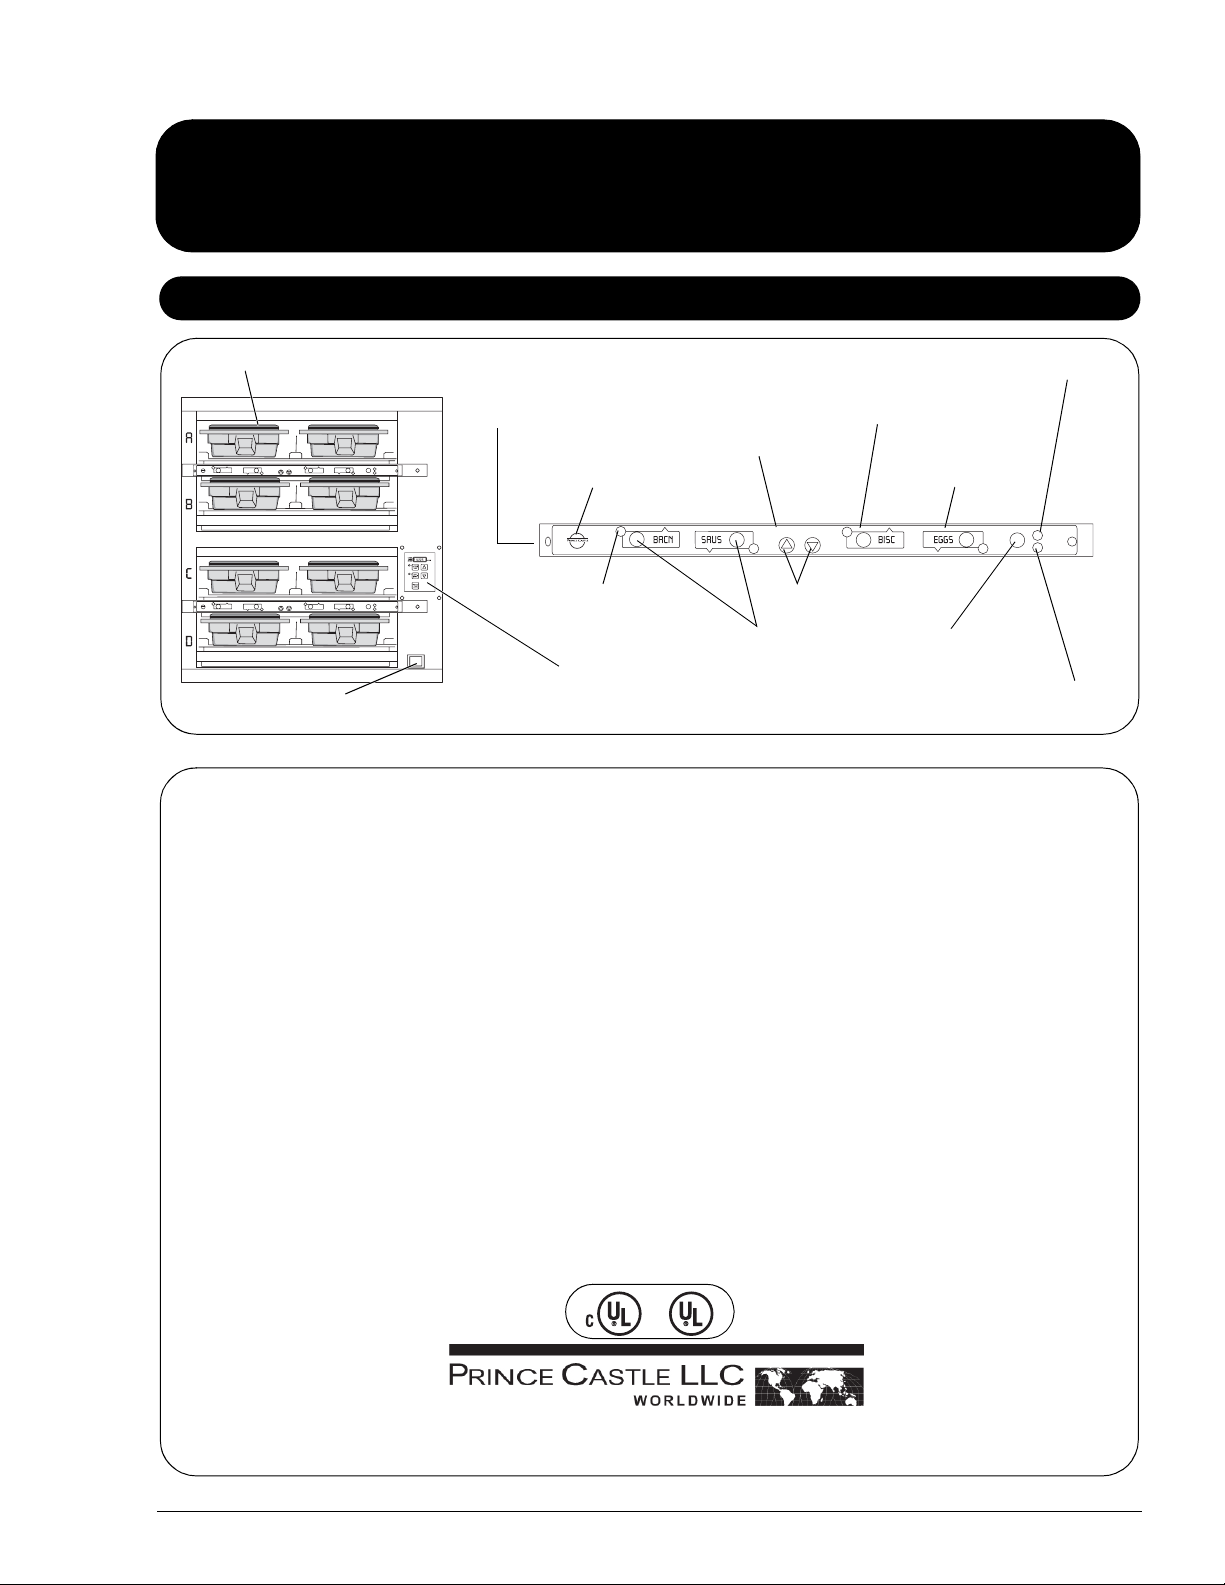
Product Holding Bin
Manual
Pan and Cover
Power On/Off Switch
Product Identification
Button Bar
(DHB4PT-20 Model)
PRINCE CASTLE
LOGO Button
LED Timers (tri-color)
(qty. 8, each side)
Temperature Control Panel
Transfer Button
TRANSFER
UP and DOWN
Arrow Buttons
Pan Bu ttons
(qty. 8)
DHB4PT-20 Series
Upper Pan Displays
(qty. 4, each side)
Lower Pan Displays
(qty. 4, each side)
MENU/ENTER Button
REG (Regular Menu) LED
BKFT (Breakfast) LED
MENU
BKFT
REG
ENTER
This product is warranted to be free from defects in material and/or
LIMITED WARRANTY
workmanship for a period of one (1) year from date of original installation
(with the exception of racks, pans, and covers), not to exceed 18 months
from date of shipment from our factory. Any component which proves to be
faulty in material and/or workmanship will be replaced or repaired (at the
option of Prince Castle, Inc.) without cost to the customer for parts or
labor. This warranty covers on location service (i.e. trip charges and/or
mileage). Travel mileage is limited to 100 miles (200 kilometersInternational) round trip (one trip warranty) from an authorized ser vice
agency or its sub-ser vice agency.
This warranty is subject to the following exceptions/conditions:
• Use of any non-genuine Prince Castle parts voids this warranty.
• All labor shall be performed during regular work hours. Overtime
premium will be charged to the buyer.
• Damage caused by carelessness, neglect, and/or abuse (e.g.,
dropping, tampering or altering parts, equipment damaged in shipment,
by fire, flood or an act of God) is not covered under this warranty.
TABLE OF CONTENTS
Product Identification . . . . . . . . . . . . . . . . . . . . . . . . . . . . . . . . . . . . . . 1
Safety Information . . . . . . . . . . . . . . . . . . . . . . . . . . . . . . . . . . . . . . . . 2
Installation . . . . . . . . . . . . . . . . . . . . . . . . . . . . . . . . . . . . . . . . . . . . . . 2
Operation . . . . . . . . . . . . . . . . . . . . . . . . . . . . . . . . . . . . . . . . . . . . . . . 3
Cleaning. . . . . . . . . . . . . . . . . . . . . . . . . . . . . . . . . . . . . . . . . . . . . . . . 4
Programming . . . . . . . . . . . . . . . . . . . . . . . . . . . . . . . . . . . . . . . . . 6 – 9
CastleNet
Factory Presets . . . . . . . . . . . . . . . . . . . . . . . . . . . . . . . . . . . . . . . . . . 11
Troubleshooting . . . . . . . . . . . . . . . . . . . . . . . . . . . . . . . . . . . . . . . . . . 12
Exploded View and Parts List . . . . . . . . . . . . . . . . . . . . . . . . . . . . . . . 13
Wiring Diagram . . . . . . . . . . . . . . . . . . . . . . . . . . . . . . . . . . . . . . . . . . 14
®
Communications Network . . . . . . . . . . . . . . . . . . . . . . . . . 10
355 East Kehoe Blvd. • Carol Stream, IL 60188 USA
Telephone: 630-462-8800 • Toll Free: 1-800-PCASTLE
Fax: 630-462-1460 • www.princecastle.com
541-542revE_EN Printed in USA 11/10 © 2010
Page 2

Product Holding Bin
DHB4PT-20 Series
Safety Information
WARNING CAUTION
Indicates information important to the proper operation of the unit.
Failure to observe may result in damage to the equipment and/or
severe bodily injury or death.
Indicates information important to the operation of the unit. Failure to
observe may result in damage to the equipment.
Installation
A. Remove the unit from the car ton and inspect for signs of damage. If
there is damage to the unit:
• notify the carrier within 24 hours of delivery
• save carton and packaging materials for inspection purposes
• contact your local dealer, or if purchased directly, the Prince Castle
Sales Department at 800-722-7853 or 1-630-462-8800 to arrange for a
replacement unit.
NOTE: When installing this unit, the ambient temperature at the mounting
site should not exceed 100°F.
B. Place the bin on a counter and seal the base to the counter with food-
approved sealant.
C. Plug the power cord into the bin and connect the plug into the proper
electrical outlet (15 amp, 120 Volt). All connections must be in
accordance with local electrical codes and any other applicable codes.
NOTE: The electrical receptacle should be a dedicated outlet. No other
equipment should be operating on the line (refrigerators, fryers, etc.).
D. If used, plug a Prince Castle external timer bar (consult factory for
model) data cable into the blue plug jack (external) located on the rear
of the Prince Castle holding bin. If cable from timer is too short, use
Prince Castle Extender Cable Kit, P/N PC-COMEXT.
E. Install the racks, pans and pan covers into the cavities.
F. Turn the power switch to ON. Allow 30 minutes for warm-up.
NOTE: If the unit is to be networked with other Prince Castle units, an
external timer may be connected to any one bin in the chain. Refer to
CASTLENET COMMUNICATIONS NETWORK in this manual.
Rear of PHU
White Plug
Jack (in from
another unit)
BIN 1 BIN 2 BIN 3
Power Cord Inlet
Blue Plug Jack
(Plug external timer
data cable into here)
Black Plug
Jack (out to
another unit)
Prince Castle reserves the right to change specifications and product design without notice. Such revisions do not entitle the buyer to
corresponding changes, improvements, additions or replacements for previously purchased equipment.
Printed in USA 11/10 © 2010 2 541-542revE_EN
Page 3

Operation
Product Holding Bin
DHB4PT-20 Series
Turn power On/Off switch to ON position.
1
Load pan covers (if used) onto pan racks
and insert racks into the unit.
Allow 30 minutes for heaters
to reach operating
temperature. The
Temperature Display will
show temperature as unit
warms up to the operating
temperature.
LED Timing Status
3
LED Timers
Power On/Off Switch
Press all PAN buttons (if applicable).
2
The PAN displays will show the
assigned product name.
If no product is assigned, the
display will be dim and show “- - - -”.
Pressing the PAN button will not
activate the timer if “- - - -” is
displayed. Pressing PAN button
when product name is displayed will
start timing cycle.
When LED is steady RED, load product and press the PAN
4
button.
BKFT (Breakfast) or REG
(Regular Menu) will be lit
depending on preprogrammed menu.
If no other pan is active for a
product, the LED for the first
pan loaded will turn from RED
to GREEN.
The LED for the 2nd pan (3rd
pan, etc.) loaded will turn from
RED to YELLOW.
RED (steady) = Ready for product
RED (flashing) = Discard product
GREEN (steady) = Oldest product, use first
GREEN (flashing) = Cook more product
YELLOW (steady) = Newer product, use green first
YELLOW (flashing) = Cook more product
When any of the timer LEDs flash, cook more product or remove
5
and discard product as indicated.
GREEN (flashing) = Cook
more product
YELLOW (flashing) = Cook
more product
RED (flashing) = Discard
product
WARNING
Hot surfaces.
An LED timer can be stopped
(cancelled) at any time by
pressing and releasing the
corresponding PAN button.
If only one pan is active for a product, the LED will turn
from RED to GREEN.
Product, along with any remaining time, can be transferred from
6
one cavity to another as follows:
A. Press and release the
TRANSFER button on the timer
bar of the product to be moved.
Displays for all pans available
for transfer will be brightly lit. All
others will be dimly lit.
TRANSFER
B. Press and release the PAN
button of the product to be
moved.
NOTE: If product transfer is not completed within a pre-programmed
transfer time, the transfer will be cancelled. See your Manager.
C. Press and release the
TRANSFER button on the bar
where the product will be
moved. All available pan
locations on the bar will be
brightly lit.
D. Press and release the PAN
button for the new location. The
new location will finish timing
the product. When the
transferred pan time expires,
the location will revert back to
the original menu settings.
MENU
ENTER
541-542revE_EN 3 Printed in USA 11/10 © 2010
Page 4
Product Holding Bin
DHB4PT-20 Series
Operation (continued)
To shut down the unit, turn the power On/Off switch to OFF.
7
NOTE: To load preset times/menus:
A. Turn power switch to OFF.
B. Press and hold both the UP and DOWN Arrow buttons.
C. Turn power switch ON.
D. When the four right-most displays show PRESET LOADED, release the buttons.
Cleaning
WARNING CAUTION
Before performing any maintenance, turn the power switch to the
OFF position and unplug the power cord from the electrical
receptacle.
This unit is not watertight. Do not clean with a water jet/jet spray. Do not
immerse the unit in water.
1. Turn the unit off and unplug the power cord from the electrical
receptacle.
2. Remove the pan covers and pan racks. Wipe all parts and unit with a
damp cloth. DO NOT use a green Scotch Bright pad cleaner, ice or
water.
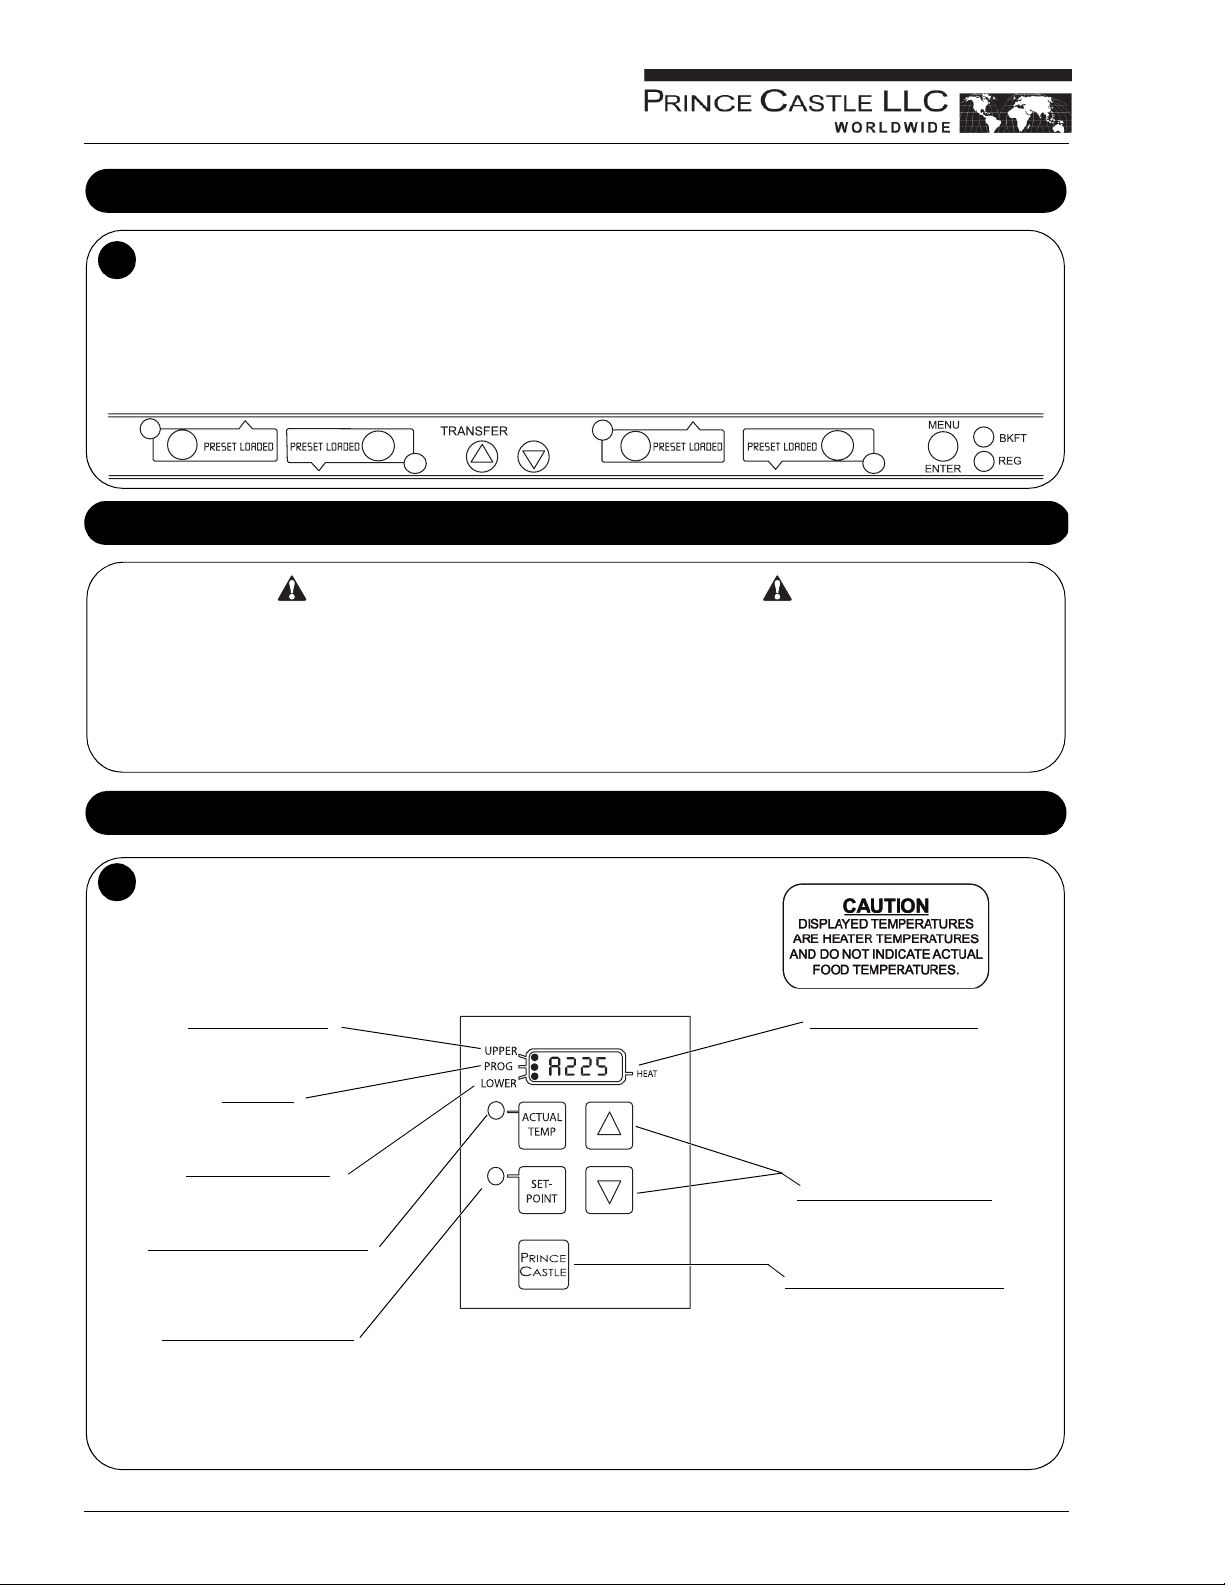
Setting the Temperature
The unit has four shelves, each with an upper and lower heater (eight heaters total).
1
The factory pre-set for the upper heaters is 225°F.
The factory pre-set for the lower heaters is 195°F.
Each upper heater has a programmable range of 150° – 275°F.
Each lower heater has a programmable range of 150° – 225°F.
Use the control below and the following steps to set the setpoint temperature for each heater.
UPPER HEATER LED
This LED will be lit to indicate upper shelf is
selected.
This LED will be lit to indicate unit is in Program
Mode.
This LED will be lit to indicate lower shelf is
selected.
ACTUAL TEMP BUTTON and LED
Press to display actual temperature for the
selected heater. LED will be lit when actual
temperature is displayed.
Press to display setpoint temperature of a
selected heater. LED will be lit when setpoint
temperature is displayed.
PROG LED
LOWER HEATER LED
SETPOINT BUTTON and LED
TEMPERATURE DISPLAY
NOTE: The unit is preset to display temperature
in Fahrenheit. To display in Celsius, press and
hold the DOWN Arrow button immediately after
turning on the power switch. To switch back to
Fahrenheit, press and hold the UP Arrow button
after turning on the power switch.
Used with other buttons to scroll through heater
and temperature selections.
Press to enter temperature selections.
A, b, C or d Shelf
UP/DOWN ARROW BUTTONS
PRINCE CASTLE LOGO BUTTON
NOTE: To reset all times and temperatures to the factory settings, turn the unit off, then press and hold the UP and DOWN Arrow buttons simultaneously
while turning the unit back on. A “P” will appear in the display and all times and temperatures will be reset to original factory settings.
Printed in USA 11/10 © 2010 4 541-542revE_EN
Page 5
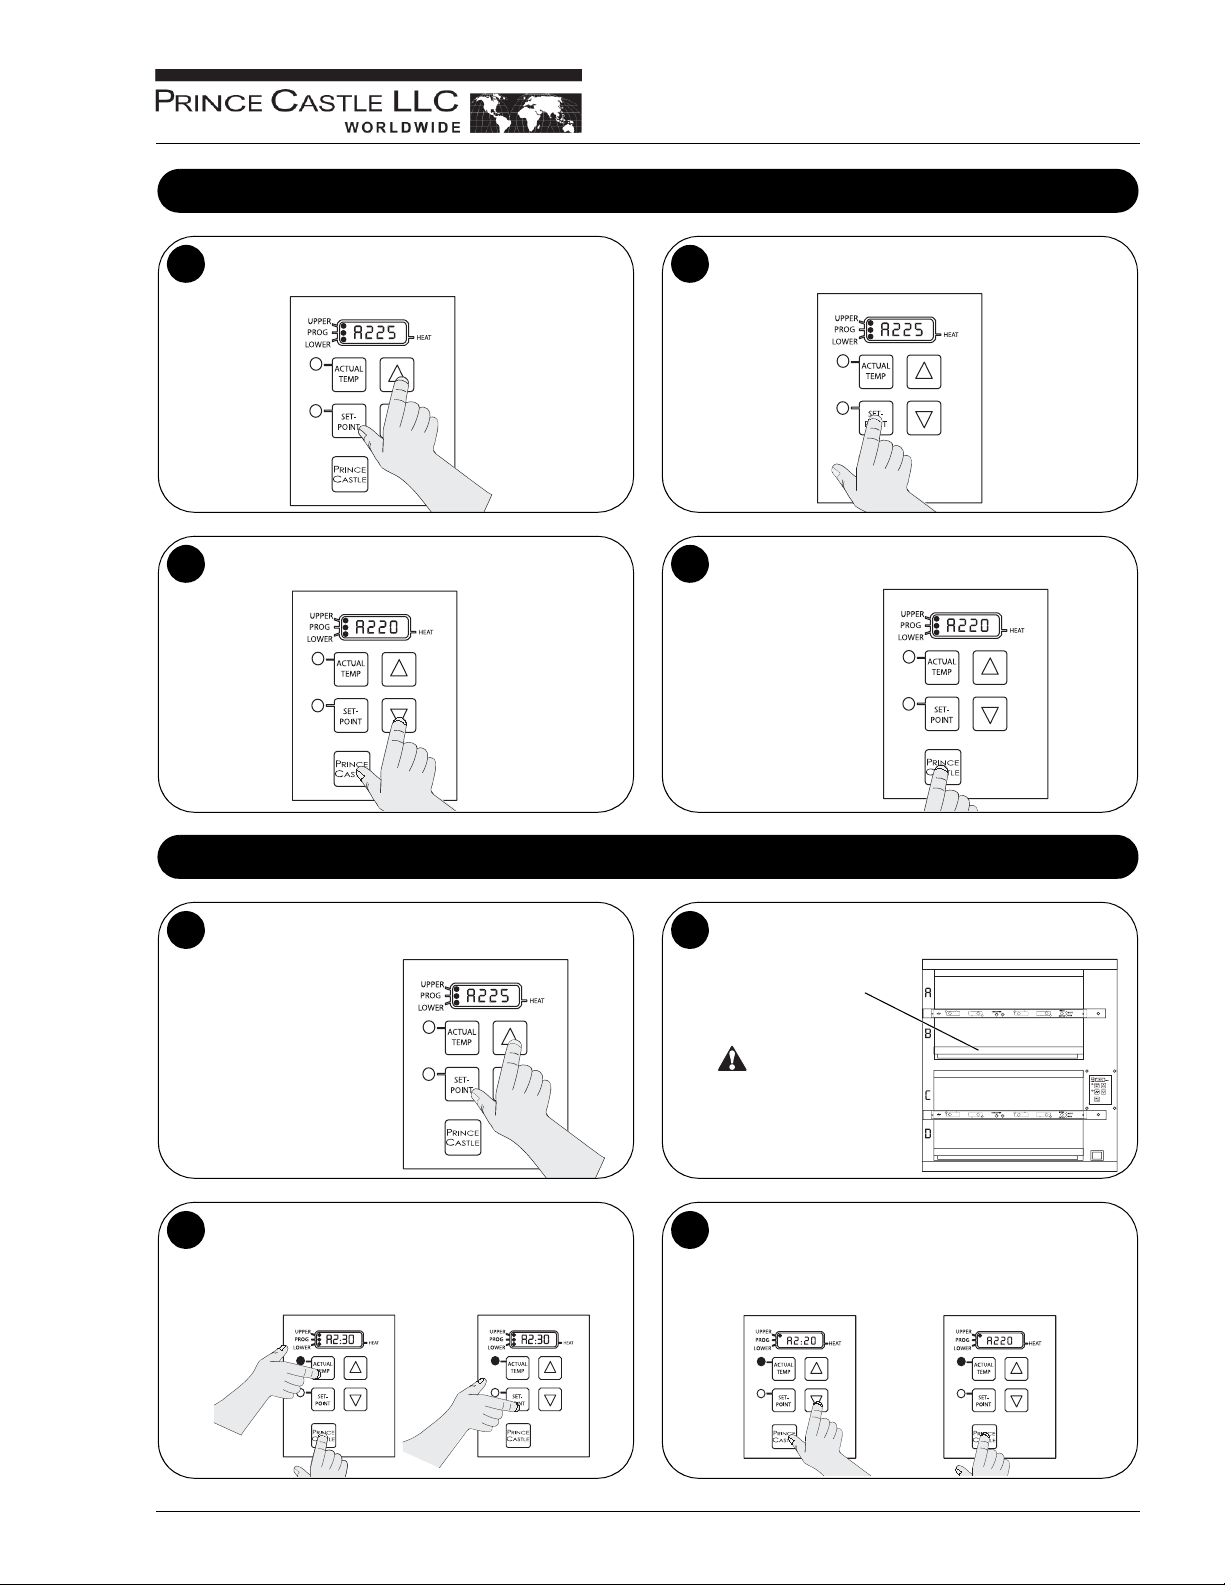
Setting the Temperature (continued)
Product Holding Bin
DHB4PT-20 Series
Press the UP or DOWN Arrow button until the desired shelf (A, b,
2
C or d) LED and upper (U) or lower (L) heater is selected.
Press the UP or DOWN Arrow button until the desired setpoint
4
temperature is displayed.
Press and hold the SETPOINT button and the PRINCE
3
CASTLE LOGO button for 5 seconds. The Program LED
will light.
Press the PRINCE CASTLE LOGO button to save the new
5
setpoint value. Repeat steps 2 – 5 to change the setpoint for any
other heater.
Use the following steps to calibrate the individual heaters.
1
NOTE: Allow sufficient amount of
time for temperatures to stabilize
before starting calibration.
Press the UP or DOWN Arrow
button until the desired heater LED
and upper (U) or lower (L) shelf is
selected.
A. Press and hold the PRINCE CASTLE LOGO and ACTUAL
3
TEMP buttons for 5 seconds. The colon (:) LED indicator will
light. The temperature displayed is the actual heater
temperature sensed by the controller.
B. To clear any offset readings, press the SETPOINT button.
A
B
Calibrating Heaters
Take a temperature reading within the shelf near the center
2
of the heater surface.
Use a stand-alone temperature
meter (not supplied).
Hot surfaces. Use caution
when taking temperature
readings within the shelf.
A. Press the UP or DOWN Arrow button until the temperature
4
displayed matches the reading obtained in Step 2.
B. Press the PRINCE CASTLE LOGO button to save the
temperature value and exit the Calibration Mode.
A
WARNING
B
541-542revE_EN 5 Printed in USA 11/10 © 2010
Page 6

Product Holding Bin
DHB4PT-20 Series
Selecting Breakfast and Regular Menus
There are six menus available:
1
BKFT LED ON = Menu1 or Menu6
REG LED ON = Regular2, Regular3, Regular4, or Regular5
Press and hold the MENU/ENTER button, then use the UP or
DOWN Arrow button to scroll through the 6 menus.
When scrolling, menu numbers
appear in this display.
Programming the Menus
Press and hold the PRINCE CASTLE LOGO button (on the
1
button bar) until all the displays show PROG and the PAN buttons
LEDs all glow RED.
When the desired menu is displayed, release the MENU/
2
ENTER button. The food products for the menu will be
displayed in the upper and lower PAN displays.
When timers for a different menu are still active, those BKFT
or REG LEDs will flash until they are all cancelled.
Press and hold the MENU/ENTER button. The display next to
2
the MENU/ENTER button will show the menu choices. Use the
UP or DOWN Arrow button to scroll through the 6 menus.
Release the MENU/ENTER button when the desired menu is
displayed.
A. Press the PAN button next to the display to be changed. The
3
LED will change from RED to YELLOW and the display will
change from PROG to the assigned product choice.
B. Press the UP or DOWN Arrow button to scroll to the desired product
choice.
C. Press the MENU/ENTER button to save the selection. All displays
will show PROG.
When the MENU/ENTER button is released, all displays will
again show PROG.
A. Repeat Steps 2 and 3 as required.
4
B. Press the PRINCE CASTLE LOGO button to exit the
Program Mode and return to the Run Mode.
NOTE: Up to six items (one for each menu) may be
programmed for each PAN button. A pan may be set as “not
used” by assigning “- - - -” as its product.
NOTE: Timer Bar Factory Presets: 1) Turn BIN off. 2) Press and hold UP and DOWN arrows on the Timer Bar while reapplying power. 3) Repeat for each
Timer Bar.
Printed in USA © 6 541-542rev(B(1
Page 7

Product Holding Bin
DHB4PT-20 Series
Changing the Hold and Cook-More Times
A. The SET PRODUCT TIME menu is used to change the Hold and Cook-More times.
1
B. Press and hold the PRINCE CASTLE LOGO button, then immediately press and hold the MENU/ENTER button until the display shows one
of the programming menus.
C. Use the UP or DOWN Arrow button to scroll to the PROD TIME
PRINCE CASTLE LOGO Button MENU/ENTER Button
ENTR menu.
TIMEPRODSET
A. Press and release the MENU/ENTER button to enter the Set
2
Product Time menu. The display will show, for example, SET
EGGS TIME
B. Use the UP or DOWN Arrow button to scroll through the list of
products. When the desired product is displayed, press the
MENU/ENTER button to select it.
Refer to the Product Menu Details on page 11 for a list of products and
their corresponding display names.
NOTE: Holding the UP or DOWN Arrow button for longer than 2 seconds
will cause the product list to automatically scroll up or down.
A. The display will now show current Cook-More time. Use the UP
4
or DOWN Arrow button to scroll to the desired Cook-More time.
B. When the desired Cook-More time is displayed, press the MENU/
ENTER button to save it.
NOTE: Cook-More time cannot be increased to more than the Hold
time minus one minute.
.
TIMEEGGSSET
A. The display now shows the current Hold time.
3
B. Use the UP or DOWN Arrow button to scroll to the desired Hold time.
When the desired Hold time is displayed, press the MENU/ENTER
button to save the desired Hold time.
2:10EGGSHOLD
NOTE: Hold time cannot be reduced to less than the Cook-More time
plus one minute.
A. The display will show SET PROD TIME . Repeat Steps 2 – 4 for
5
any other product.
B. Press and release the PRINCE CASTLE LOGO button at any
time to exit the Program Mode and return to the Run Mode.
NOTE: If the MENU/ENTER button has not been pressed to save
any changes, the program will revert to the original values.
⇑
⇑
541-542rev(B(1 7 Printed in USA ©
Page 8

Product Holding Bin
DHB4PT-20 Series
A. The EDIT PRODUCT NAME menu is used to change a default product name to one of your own choosing.
1
B. Press and hold the PRINCE CASTLE LOGO button, then immediately press and hold the MENU/ENTER button until the display shows one
of the programming menus.
C. Use the UP or DOWN Arrow button to scroll to the EDIT PROD NAME
NOTE: The default names available for editing are listed on page 11.
PRINCE CASTLE LOGO Button MENU/ENTER Button
Changing Product Names
menu.
NAMEPRODEDIT
A Press and release the MENU/ENTER button to enter the
2
Edit Product Name menu. The display will read sel pROD
XXXX
.
B. Use the UP or DOWN Arrow button to scroll through the list
of products.
C. When the desired product is displayed, press the MENU/
ENTER button to select it. The first letter (in this case, the E )
will start blinking.
When all four digits have been changed, press the MENU/
4
ENTER button to save the new name.
A. To change the blinking E, use the UP or DOWN Arrow button to
3
scroll to the desired letter/number/symbol.
B. When the desired selection is displayed, press the PAN button
(to the left or right of the selected display) to move to the next
digit.
C. Repeat for all digits.
NOTE: Holding the UP or DOWN Arrow button for longer than 2 seconds
will cause the selected digit to automatically scroll up or down.
A. The display will show EDIT PROD NAME . Repeat Steps 2 – 4 for
5
any other product.
B. Press and release the PRINCE CASTLE LOGO button at any
time to exit the Program Mode and return to the Run Mode.
NOTE: If the MENU/ENTER button has not been pressed to save
any changes, the program will revert to the original names.
Printed in USA © 8 541-542rev(B(1
Page 9

Product Holding Bin
DHB4PT-20 Series
Set Maximum Transfer Time
A. The SET MAXIMUM TRANSFER TIME menu is used to set the amount of time allowed to make a product transfer from one pan to another.
1
B. Press and hold the PRINCE CASTLE LOGO button, then immediately press and hold the MENU/ENTER button until the display shows one of
the programming menus.
C. Use the UP or DOWN Arrow button to scroll to the max xFR TIME
PRINCE CASTLE LOGO Button MENU/ENTER Button
(Set Maximum Transfer Time) menu.
A. Press and release the MENU/ENTER button to enter the Set
2
Maximum Transfer Time menu.
B. The display shows max xFR :20
seconds.
. This shows a value of 20
A. To change the time, use the UP or DOWN Arrow button to
3
scroll to the desired time. When the desired selection is
displayed, press the MENU/ENTER button to enter the
selection.
B. Press and release the PRINCE CASTLE LOGO button at any
time to exit the Programming Mode and return to the Run
Mode.
NOTE: If the MENU/ENTER button has not been pressed to save
any changes, the program will revert to the original time.
Product Linking
Any Timer Bar (except bun holding timers) can be linked to others (see Special Programming Mode, this page). If Timer Bars are set to the same link
group, any product started in any bar of the same group will be compared to all other products in the same group, and its LED color will be determined
based on all timers in the group with the same product (not just with all timers on its own Timer Bar).
Special Programming Mode
A. Press and hold the PRINCE CASTLE LOGO button then immediately press and hold the MENU/ENTER button. Hold both buttons for six
1
seconds. The displays will change to show the first menu — depending on model.
B. Press and release the UP and DOWN Arrow buttons to scroll through the list of Special Modes.
PRINCE CASTLE LOGO Button MENU/ENTER Button
Set Link Group
2
A. When the displays show SET LINK GRPx ENTR, the X indicates the currently assigned Link Group. Press and release the MENU/ENTER
button to set the Link Group Mode.
B. The link group number (X) will flash. Press and release the UP and DOWN Arrow buttons to change the group number. The maximum
number allowed is 3, and the minimum is 0. When a Timer Bar is assigned to Link Group 0, it is isolated and not associated with any other
Timer Bar (linking is disabled).
C. When the desired link group is displayed, press and release the MENU/ENTER button to save it. The program will revert to Set Link Group
Mode.
ENTR
541-542rev(B(1 9 Printed in USA ©
Page 10

Product Holding Bin
DHB4PT-20 Series
CastleNet® Communications Network
The Prince Castle DHB Bins, external timers, and New Bun Cabinet
Timers can be inter-connected to form the CastleNet
Network. The network can be used for data transfer between bins and
timers for menu updates or to transfer product Hold time from bin-tobin. A PDA (or similar device) or a notebook with Prince Castle
MenuView
desired changes.
Each bin is supplied with a standard 25' cable and allows units to be
“daisy-chained” together to form the network. If cable is too short, use
Prince Castle Extender Cable Kit, P/N PC-COMEXT.
The factory default address for Main bins and timers is address 1. The
factory default address for Specialty bins and timers is address 2. If a
third bin is used, the address must be set at 3.
2
BAR 2
BAR 1
®
software is used to connect to the network and enter the
IMPORTANT: Each timer must have a different address. If a
location has three bins, it is recommended that the bins and
timers be set consecutively to addresses 1 through 6.
BIN 1 BIN 2 BIN 3
BAR 4
BAR 3
Example
BAR 6
BAR 5
®
Communication
Telephone jack plugs are located on the back of the unit. Connect
the units using the cables provided as shown here.
1
BIN 1 BIN 2 BIN 3
Example
A Turn the power switch off, wait 15 seconds. Turn the switch to
3
ON while pressing and holding the ACTUAL TEMP and
SETPOINT buttons. The display will show the current bin
address.
B. Continue to hold the buttons until PROG LED turns on.
A
B
Use the UP or DOWN Arrow button to scroll to the desired
4
address. Press the PRINCE CASTLE LOGO button to store the
new address.
Available addresses are:
BIN
1 thru BIN9, BINA, BINB, BINC, BIND,
BIN
E and BINF.
IMPORTANT: Continue to Step 5 to
check the timer address. No two
timers can have the same address.
To change the timer address, turn the unit power switch off and
6
wait 15 seconds. Turn the power switch back on and immediately
press and hold the PRINCE CASTLE LOGO button and the
DOWN Arrow button for approximately 6 seconds or until the
display shows SET ADDR
The address number will blink on/off.
BAR2.
BAR2
To check the timer address, press and hold the PRINCE CASTLE
5
LOGO button and the DOWN Arrow button. The current timer
address will be displayed in the far right timer display.
To change the timer address, proceed to Step 6.
Use the UP or DOWN Arrow button to scroll to the desired
7
address. Press the MENU/ENTER button to store the new
address and return to normal Operating Mode.
Available addresses are:
BAR1 thru BAR9 and A thru F.
BAR3
Printed in USA © 10 541-542rev(B(1
Page 11

Factory Presets
Product Menu Details
Product Display Name Hold Minutes
Burger BUR1 30 3
Burger BUR2 30 3
Chicken Patty CHX1 30 3
Chicken Patty CHX2 30 3
Chicken Patty CHX3 30 3
Chicken Wing WING 30 3
Fish FISH 5 3
Eggs EGGS 30 3
Sausage SAUS 30 3
Bacon BACN 30 3
Ham HAM 30 3
Popper POP 30 3
Mozzarella Stick MOZ 30 3
Onion ONIN 10 7
Mushroom MUSH 30 3
Chicken Nuggets NUGG 30 3
Spicy Chicken SPCY 30 26
French Toast TOST 10 8
Chicken Stars STAR 30 27
Large LRG 20 17
$6 Burger SIX 20 17
BBQ Chicken BBQ 20 17
Crispy Chicken CRSP 30 26
Special #1 SPC1 30 3
Special #2 SPC2 30 3
1. Hold and Cook-More times may be re-programmed. See page 7.
2. Product abbreviations SPC1 and SPC2 may be reprogrammed. See page 8.
1
Product Holding Bin
DHB4PT-20 Series
Cook-More Minutes
1
Menus
UP DOWN UP DOWN UP DOWN UP DOWN Menu LED
CRSP ONIN BBQ SPCY SIX SIX LRG LRG MNU1 Bkft
BUR1 BUR1 BUR1 BUR1 BUR2 BUR2 BUR2 BUR2 MNU2 Reg
CHX1 CHX1 CHX2 CHX2 CHX3 CHX3 WING FISH MNU3 Reg
CHX1 CHX2 WING WING MOZ MOZ POP POP MNU4 Reg
CHX1 CHX2 WING WING WING POP ONIN MUSH MNU5 Reg
EGGS EGGS EGGS EGGS HAM BACN SAUS SAUS MNU6 Bkft
541-542rev(B(1 1 Printed in USA ©
Page 12

Product Holding Bin
DHB4PT-20 Series
Troubleshooting
PROBLEM PROBABLE CAUSE SOLUTION
Display flashes
Display flashes
Display flashes
Display shows
time and heater surface temperature is hot.
Display shows
time and heater surface temperature is cool.
Opn and rEL. Open relay. Circuit inoperable. Replace power circuit board.
SHr and rEL. Shorted relay. Circuit inoperable.
Opn and rEL. Temperature is below 75°F.
HHH for an extended period of
HHH for an extended period of
Open heater.
Unplugged ribbon cable between power and
main circuit boards.
Heater inoperable.
Probe inoperable.
Relay inoperable.
Temperature is above 300°F (abnormal
operation).
Probe is inoperable. Check for pinched thermocouple wires from
Replace power circuit board.
Test heater resistance (150.2 Ohms).
Replace heater if necessary.
Verify ribbon cable connection.
Normal display during warmup.
Test heater resistance (150.2 Ohms).
Check for open thermocouple wires from
probe. Replace heater/probe assembly.
Replace power circuit board.
Diagnostic circuit inoperable. Replace
power circuit board.
probe. Replace heater/probe assembly.
Printed in USA © 1 541-542rev(BEN
Page 13

Exploded View and Parts List
2
2
1
2
1
Product Holding Bin
DHB4PT-20 Series
11
4
6
5
14
Ref. Part No. Description
1 542-154S Heater Assy Kit (Upper), DHB4PT-20, -20A, -20B
542-156S Heater Assy Kit (Upper), DHB4PT-20AU, -20F,
542-159S Heater Assy Kit (Upper), DHB4PT-20J
2 542-153S Heater Assy Kit (Lower), DHB4PT-20, -20A, -20B
542-155S Heater Assy Kit (Lower), DHB4PT-20AU, -20F,
542-158S Heater Assy Kit (Lower), DHB4PT-20J
N/S 88-600-200S Fuse Kit (Pkg of 10) (Fuse on Main PCB)
4 541-723e4s Pan Cover Kit (Pkg of 4)
5 155695n-12 1/3 Size Dual Handle Pans (Pkg of 12)
6 541-821S Timer Bar
7 541-719S Display PCB Kit
8 541-802S Main PCB Kit, DHB4PT-20, -20A, -20B
541-827S Main PCB Kit, DHB4PT-20AU, -20F, -20CE,
-20CE, -20GB
-20CE, -20GB
-20GB, -20J
10
13
12
6
8
14
14
Ref. Part No. Description
9 78-184S Lighted Rocker Switch
10 88-609S Power Inlet Connector, DHB4PT-20, -20A, -20B
88-720-01S Power Inlet Connector, DHB4PT-20AU, -20F,
-20CE, -20GB, -20J
11 72-200-15S Power Cord, DHB4PT-20, -20A, -20B
72-367S Power Cord, DHB4PT-20AU
72-237S Power Cord, DHB4PT-20F, - 20J
72-230S Power Cord, DHB4PT-20CE
72-236S Power Cord, DHB4PT-20GB
12 541-959S Audio Interface PCB
13 88-709-2-11S Speaker Assembly
14 197-232S Mounting Foot (Pkg of 4)
541-542rev(BEN 1 Printed in USA ©
Page 14

Product Holding Bin
DHB4PT-20 Series
Wiring Diagram
UPPER
HEATER
(A)
LOWER
HEATER
(A)
UPPER
HEATER
(b)
LOWER
HEATER
(b)
UPPER
HEATER
(C)
LOWER
HEATER
(C)
UPPER
HEATER
(d)
LOWER
HEATER
(d)
GRN/YEL
GRN/YEL
GRN/YEL
GRN/YEL
GRN/YEL
GRN/YEL
GRN/YEL
GRN/YEL
MAIN1MAIN2SPKR
INPU T
EXTRA
BLU
TIMER
BRN
TC
YEL
TC
BRN
TC
YEL
TC
BRN
TC
YEL
TC
BRN
TC
YEL
TC
TC
TC
OUT
IN
TC
TC
BLK
WHT
DISPLAY PCB
RIBBON
CABLE
MAIN
PAN
AUX
TIMERS
ICSP
MAIN
AUX
IN/WHT
J5
TC
JC
TX
J7
TC
J8
TC
12VDC
12VAC
EXTRA/BLU
J22
J11
#1
#2
#3
#4
J15
MAIN PCB
T1
J12
J16 0 1
ON OFF
OUT/BLK
MAIN
XX
AUX
EXTRA
AUX2
EXBB
AUX1
SPKR
J20
J14
J1
#1
J2
#2
J3
#3
J4
F2
P5
#4
P1 P2
WHT OR BLU
SPKR
P4
BLK OR BRN
MAIN
AUX
TIMERSPAN
P3
HEATER POWER
XX
HEATER POWER
INLET
N
L
POWER
HEATER POWER
BLK OR BRN
HEATER POWER
GRN/YEL
WHT OR BLU
GRN/YEL
POWER
SWITCH
BLK OR BRN
GND
WHT OR BLU
Printed in USA ©
Prince Castle //&
355 East Kehoe Blvd. • Carol Stream, IL 60188 USA
Telephone: 630-462-8800 • Fax: 630-462-1460
Toll Free: 1-800-PCASTLE
www.princecastle.com
 Loading...