

Page 1
Operation
Manual
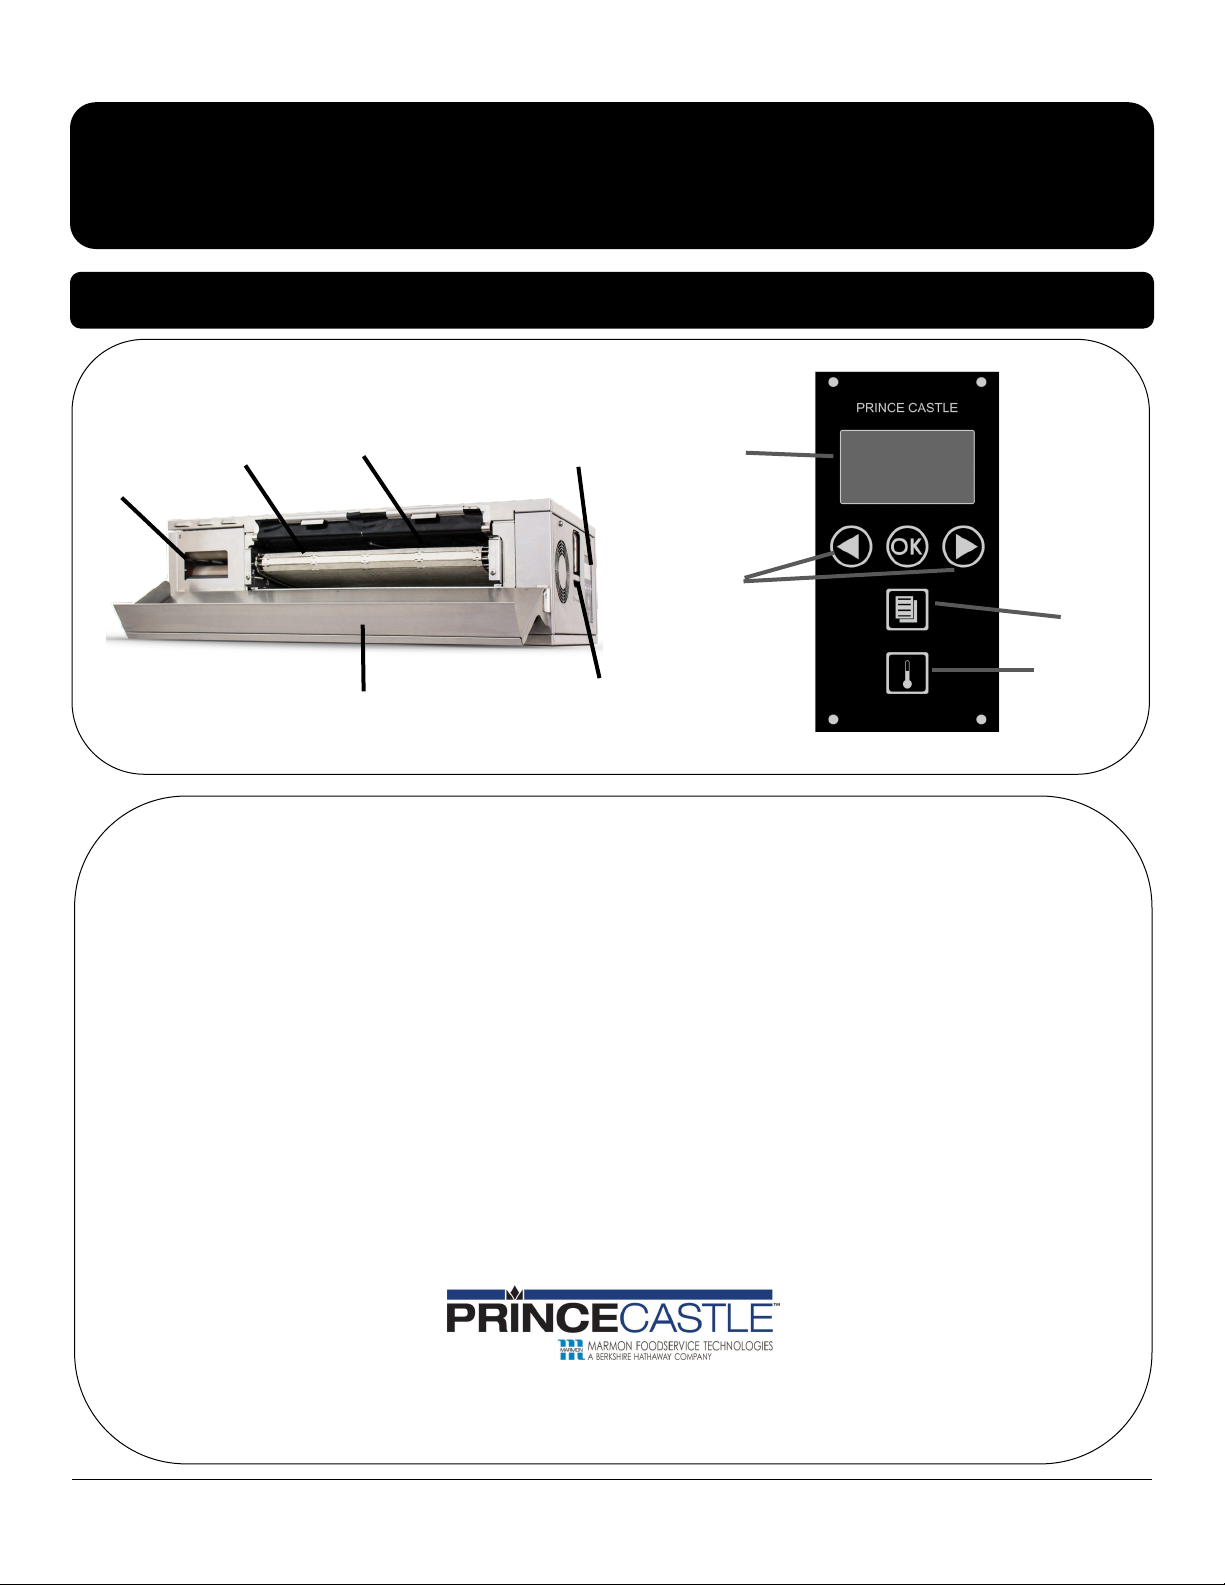
Heel Secon
Club Secon
Crown Secon
Landing Zone
Horizontal Core Bun Toaster
Product Identification
Display and
Touchpad
Compression
Adjustment
LCD
Display
LEFT and
RIGHT Scroll
Buons
CBT-SB-NA-1PS
MENU
Buon
TEMPERATURE
Buon
This product is warranted to be free from defects in material and/or
LIMITED WARRANTY
workmanship for a period of two (2) years from date of original
installation, not to exceed 30 months from date of shipment from
our factory. Any part or component which proves to be faulty in
material and/or workmanship within the warranty period will be
replaced or repaired (at the option of Prince Castle, Inc.) without
cost to the customer for parts or labor.
This warranty is subject to the following exceptions/conditions:
• Use of any non-genuine Prince Castle parts voids this warranty
and all work must be performed by an authorized Prince Castle
Service Agent.
• All labor shall be performed during regular work hours. Overtime
premium will not be covered.
• Travel charges are limited to 200 kilometers (100 miles) round
trip, 2 hours travel time, one trip per repair.
• Damage caused by carelessness, neglect, and/or abuse (e.g.,
using wrong current, dropping, tampering with or altering electrical
components, or improper cleaning) is not covered.
• Equipment damaged in shipment, by fire, flood or an act of God
is not covered.
• Damage to non-stick coated surfaces is not covered by this warranty.
355 East Kehoe Blvd. • Carol Stream, IL 60188 USA
Telephone: 630-462-8800 • Toll Free: 1-800-PCASTLE
Fax: 630-462-1460 • www.princecastle.com
Product Idencaon……………………………………………….…………….Page 1
Warranty Statement…………………………………….….…………………..…Page 1
Table of Contents…..……………………….…………………………….……..…Page 1
Electrical Specicaons.……………….………………….…………………..…Page 2
Safe Service Pracces.……………………………………..…………………..…Page 2
Serial Number Matrix…………………………….……………………………….Page 2
Installaon…...……….……………………….……………………….…………..…Page 5
Operaon…………...………………………….…………………..………………….Page 6
Cleaning—Daily…………………………....………………...…………………..…Page 7
Cleaning—Weekly....…………………....………………...…………………..…Page 10
Release Sheet Replacement..…………………….…….……………………..Page 11
Club Belt Replacement...………...…….………….………………..……..…..Page 12
Display Menu Opons…..……………….……………….………..…..…..…..Page 14
Management Programming…..……….………………………..…..…..…..Page 16
Exploded View and Parts List...……….………………………..…..…..…..Page 19
Troubleshoong Guide……..…..……….………………………..…..…..…..Page 27
TABLE OF CONTENTS
CBT-SB-NA-1PS 1 Printed in USA 3/14/16
353-564
Page 2
Horizontal Core Bun Toaster
CBT-SB-NA-1PS
Electrical Specicaons
CBT-SB-NA-1PS 200-240VAC, 50/60 Hz, 1 Ph.
Disconnect Power
WARNING
Failure to turn off the unit before
servicing could result in severe
bodily injury or death. Switch the
On/Off switch to the Off position
Important
Prince Castle reserves the right to change specifications
and product design without notice. Such revisions do not
entitle the buyer to corresponding changes, improvements,
additions, or replacements for previously purchased equipment.
Safe Service Pracces
Indicates information important to the proper operation of
the unit. Failure to observe may result in damage to the
equipment and/or severe bodily injury or death.
Indicates information important to the operation of the unit.
Failure to observe may result in damage to the equipment.
This appliance is designed for toasting bread products in a commercial
McDonalds kitchen. The dimensions of the bread products as defined
by McDonalds.
Do not hose down or use a water jet on the unit. Keep the unit
away from running water. Disconnect power cord before performing any cleaning or maintenance.
Equipment must be elevated from the floor at all times during
cleaning and operation.
WARNING
CAUTION
GENERAL
CAUTION
CAUTION
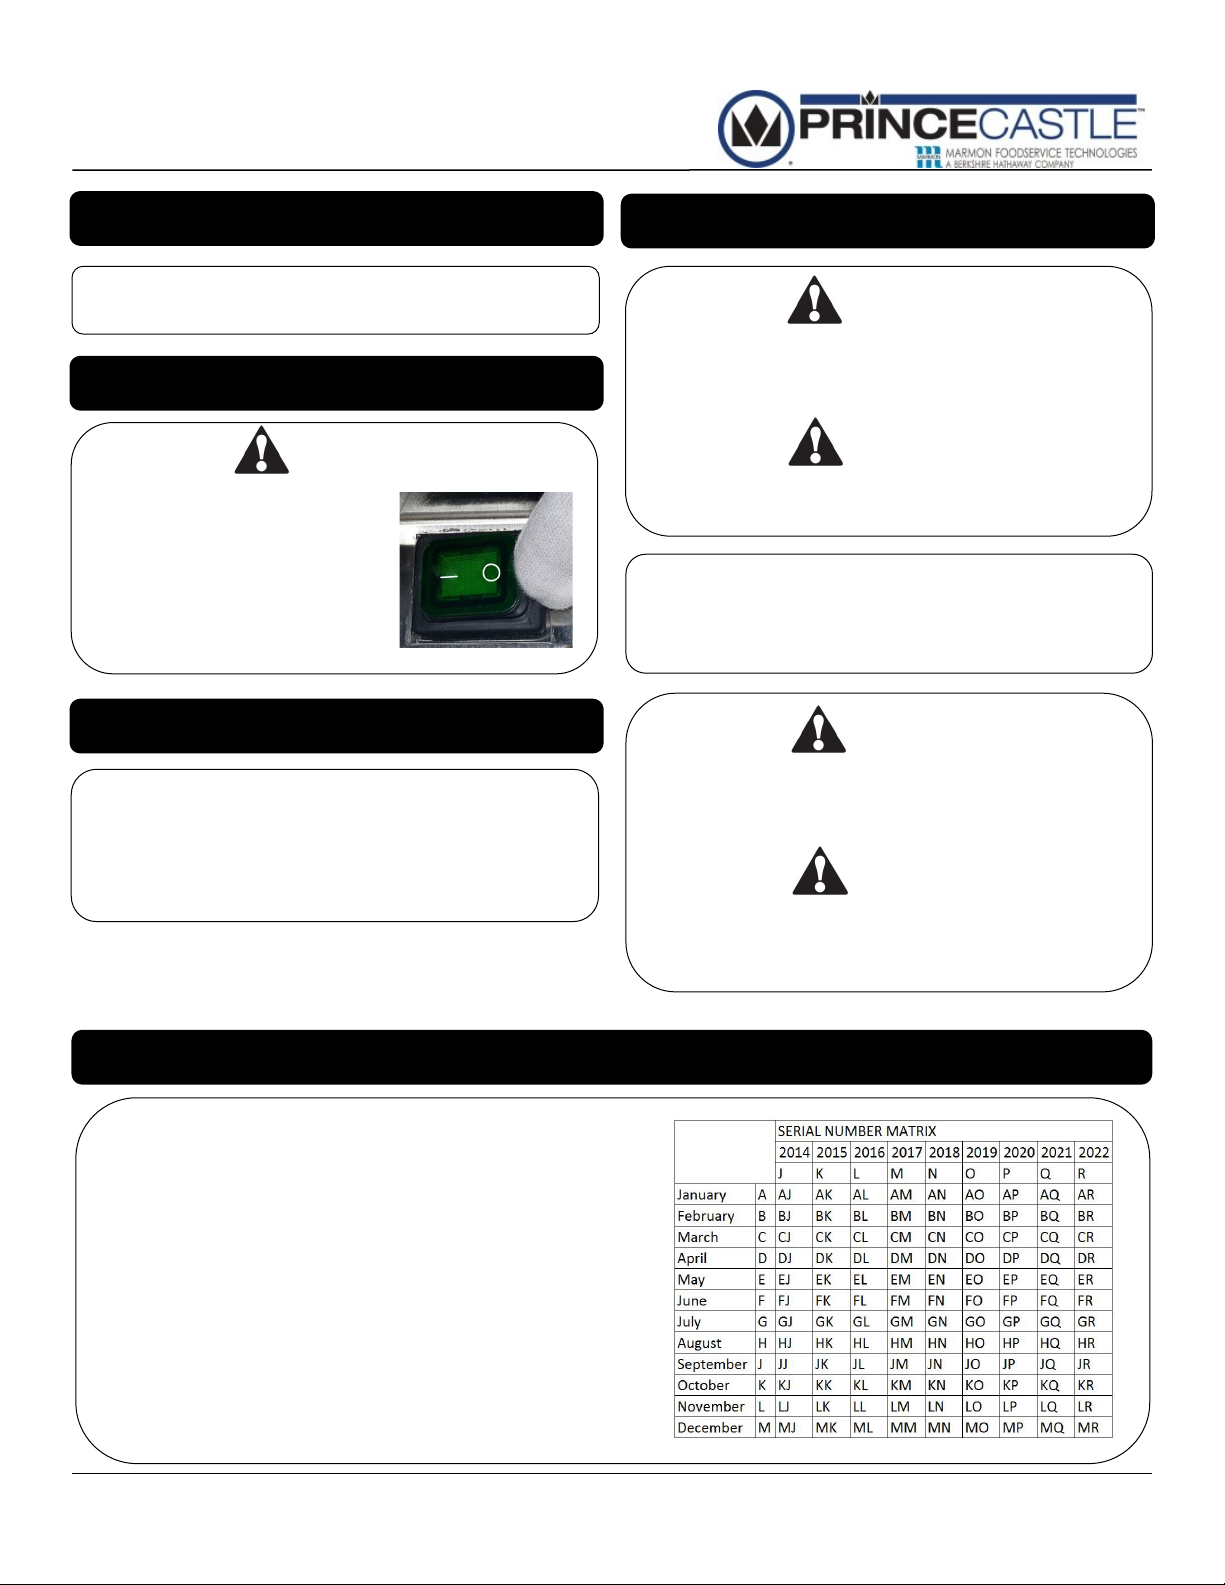
Serial Number Matrix
The manufacture date is encoded in the unit’s serial number. The
service bench installaon date (used to determine warranty
coverage) is considered to be the end of the following month. For
example:
Serial Number: FJ0000458
Manufacture Date: June 2014
Service Bench Installaon Date: July 31, 2014
CBT-SB-NA-1PS 2 Printed in USA 3/14/16
353-564
Page 3

Horizontal Core Bun Toaster
CBT-SB-NA-1PS
Installaon
Unpack and Inspect. Remove the uni t f rom th e car-
1
ton and inspect for signs of damage. If there is damage
to the unit:
Notify the carrier within 24 hours of delivery
Save carton and packaging materials for inspection
purposes.
Contact your local dealer.
Verify parts. Verify t hat al l par ts have b een received.
When replacing parts use Prince Castle parts only.
2
Horizontal Core Bun Toaster
In-Feed Rack
Landing Zone
Release Sheet Clips
Release Sheet Mounting Bars (2X)
Place toaster on flat surface. Remove bl ue and/or
3
white protective covering.
CAUTION
Two man lift, unit weight is more than 150 lbs.
Follow daily PM procedures. (for fi rst ti me use)
4
Connect heated landing zone. Slide th e heated landing zone into the connec tor verifyin g th e pins are in
5
the correct orientation. The connector can only be inserted one way. Once the connector is fully inserted,
secure by turning clockwise.
Release Sheets (2X)
Install heated landing zone . Slide the lan ding zo ne
onto 1 hook on each side. Ensure the landing zone is
secure before operating the unit.
Install In-Feed Rack. Insert t he infeed rack on to the
two notches on the front side of the unit
CBT-SB-NA-1PS 3 Printed in USA 3/14/16
353-564
Page 4
Horizontal Core Bun Toaster
CBT-SB-NA-1PS
Installaon
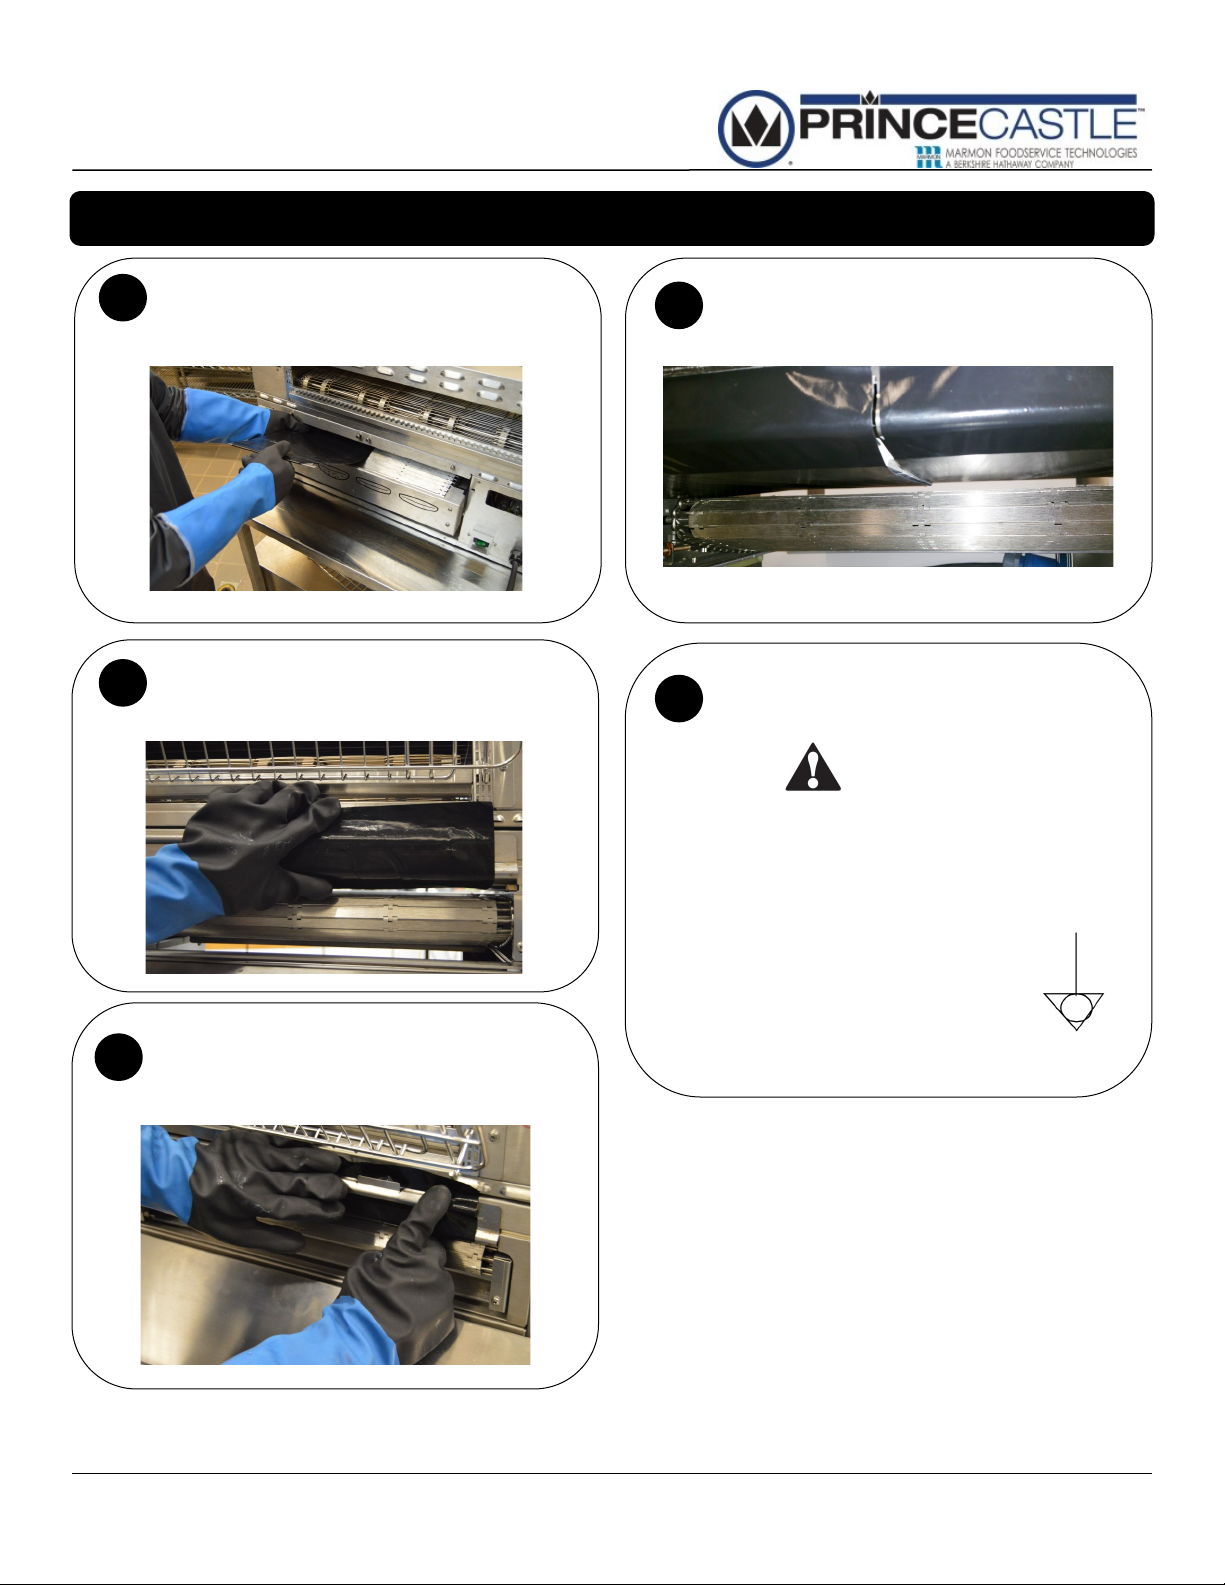
Feed release sheets through the toaster, in-feed to out-
6
feed and connect the release sheet mounting bars.
Clip the heel-side release sheet first being sure to shift
7
the sheet toward the upper step corner on the platen as
shown.
Connect retaining clips by holding the release sheet tight
over the mounting rods, ensuring that they are straight.
8
Press clips over rods until there is solid engagement.
Visually inspect that the sheets are taught and ripple free
9
over the heater platen afterwards by peering down the
heating chamber. Disconnect clips and reset if not.
Plug unit in. Plug uni t into a
grounded receptacle with a
10
matching plug configuration.
WARNING
All electrical connections must be in accordance with local electrical codes and any other applicable codes.
If the supply cord is damaged, it must be replaced by the manufacturer, its service agent, or similarly qualified persons in order to
avoid hazards.
To prevent an electric shock hazard, this device must
be bonded to equipment in close proximity with an
equipotential bonding conductor. This device is
equipped with grounding lug for this purpose and is
marked with the following symbol.
CBT-SB-NA-1PS 4 Printed in USA 3/14/16
353-564
Page 5
Horizontal Core Bun Toaster
CBT-SB-NA-1PS
Operaon
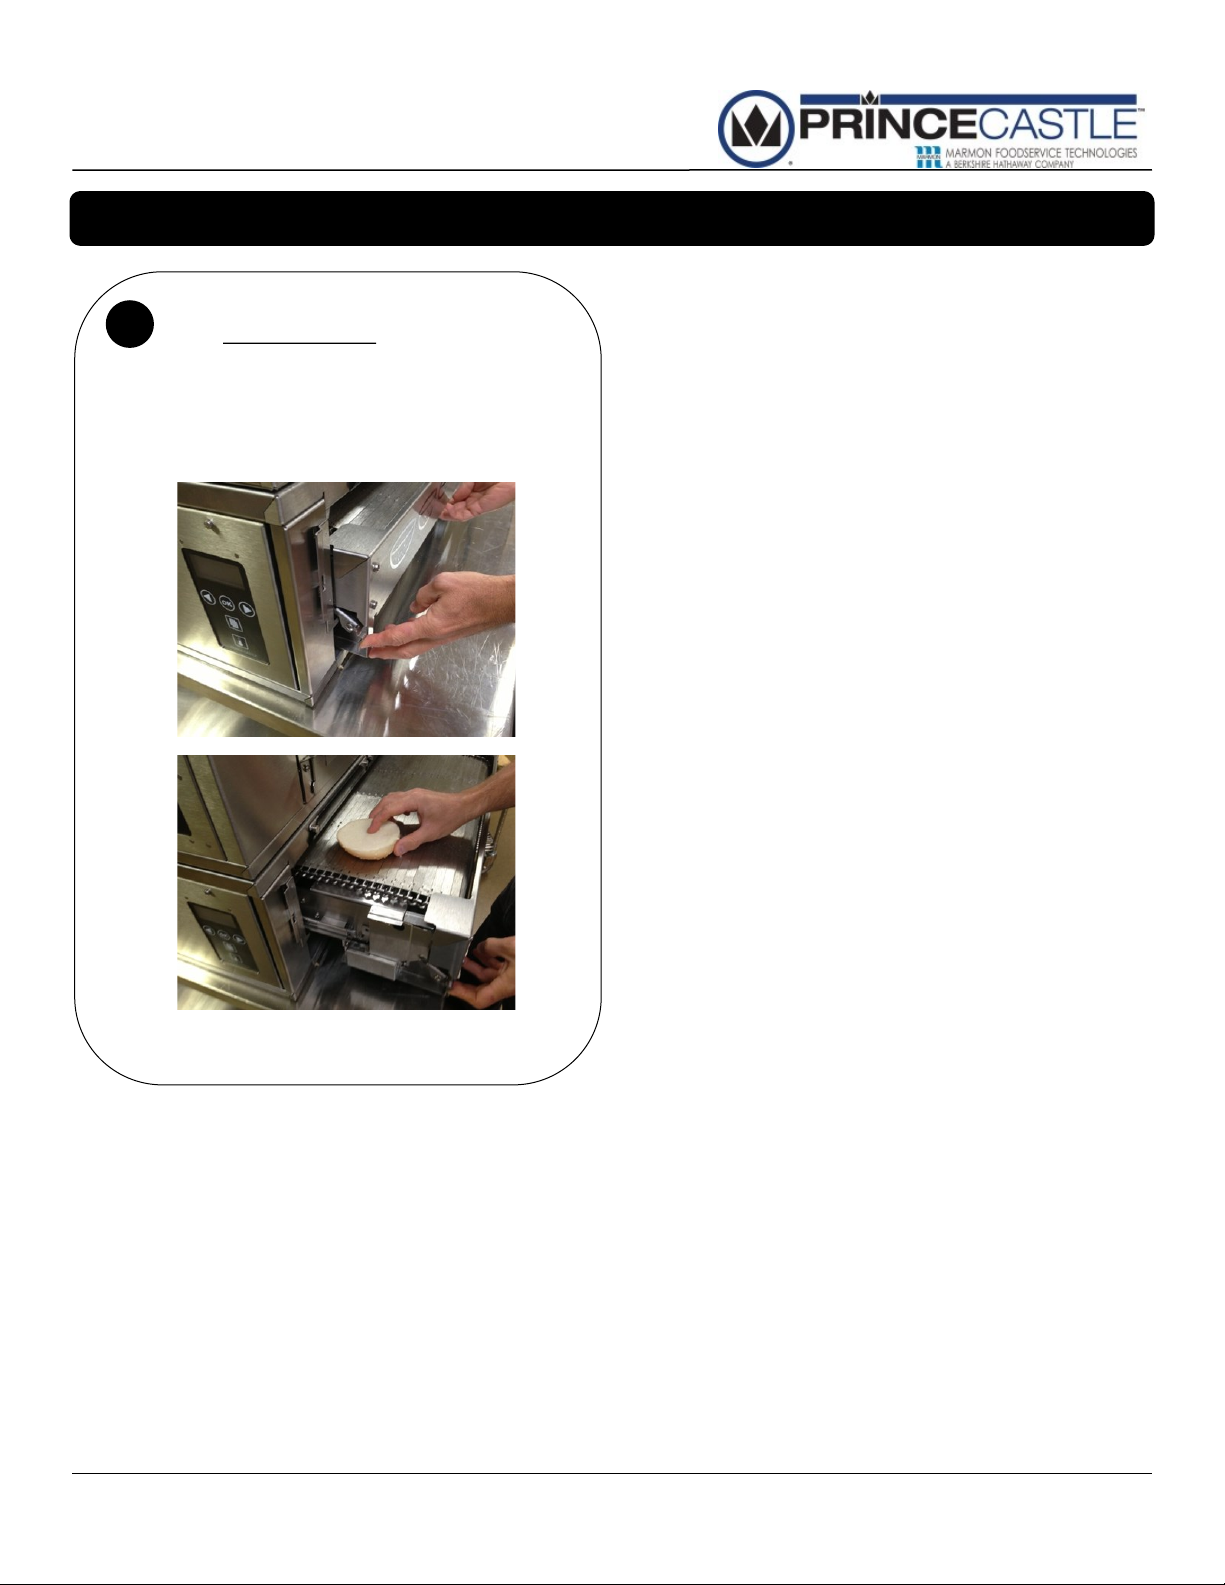
Turn unit ON. Turn the
1
On/Off switch located on
back of toaster to ON. The
Prince Castle screen will
appear in the display for
three seconds.
(Ensure the conveyor is
fully closed)
Wait through Warm-Up. During Warm-Up, the LCD display
2
will read “WARMING UP”. Warm-Up me, is about 20
minutes.
3
BURN/ELECTRICAL SHOCK HAZARD! Platen sections
are HOT and can cause severe burns or severe shock.
Keep hands and objects out of the toaster unit! Failure
to exercise caution may result in serious injury! Turn
the unit off, and let it cool down completely before
touching or working on internal apparatus.
WARNING
Choose the compression adjust-
4
ments. Dial th e plat en adjus tmen t
for the product part (Crown and
Heel). The default settings are set to
a compression of 3. To adjust compression, press in on the metal plate,
and move compression adjustment
lever to the desired position.
Because of variances in bun production, it may be necessary to adjust
the bun compression for the Crown
and Heel. The Club compression is
not adjustable. Increase bun compression if buns are toasted too light.
Be careful not to over compress the
buns.
Feeding in Buns. Feed buns cut side up in the appro-
5
priate lanes of the in-feed rack. Facing the in-feed rack
from left to right, the proper order is:
Lane 1 Lane 2 Lane 3 Lane 4 Lane 5
CROWN CROWN HEEL HEEL CLUB
Watch for READY
status. When r eady
temperature is
reached, the LCD
display will read
“READY”.
View temperatures, if
4
desired. Pressing the
TEMPERATURE button
once will display the front
and rear platen actual
temperatures. Pressing a
second time will return the
LCD display to the READY
screen.
READY
- - - - -
Adjusting Toast. For l ighter toast, p ress and hol d, ~5
6
seconds, directional key (left) until indicator move towards lighter rectangle. For darker toast, repeat with the
direction key (right) that points toward the blackened
rectangle.
- - - - - -
READY
CBT-SB-NA-1PS 5 Printed in USA 3/14/16
353-564
Page 6
Horizontal Core Bun Toaster
CBT-SB-NA-1PS
Remove Stuck Product. Retrieve stu ck p roduc t
7
by first shutting off the power to the unit. Depressing
latch on left side of in-feed conveyor assembly and
gently open enough to retrieve the stuck product.
BE CAREFUL NOT TO CONTACT HEATER
PLATEN DURING RETRIEVAL, IT WILL BE VERY
HOT. Gently cl ose the c onveyor assembly until
latch is closed when retrieval is complete.
Operaon
CBT-SB-NA-1PS 6 Printed in USA 3/14/16
353-564
Page 7
Horizontal Core Bun Toaster
CBT-SB-NA-1PS
Cleaning—Daily
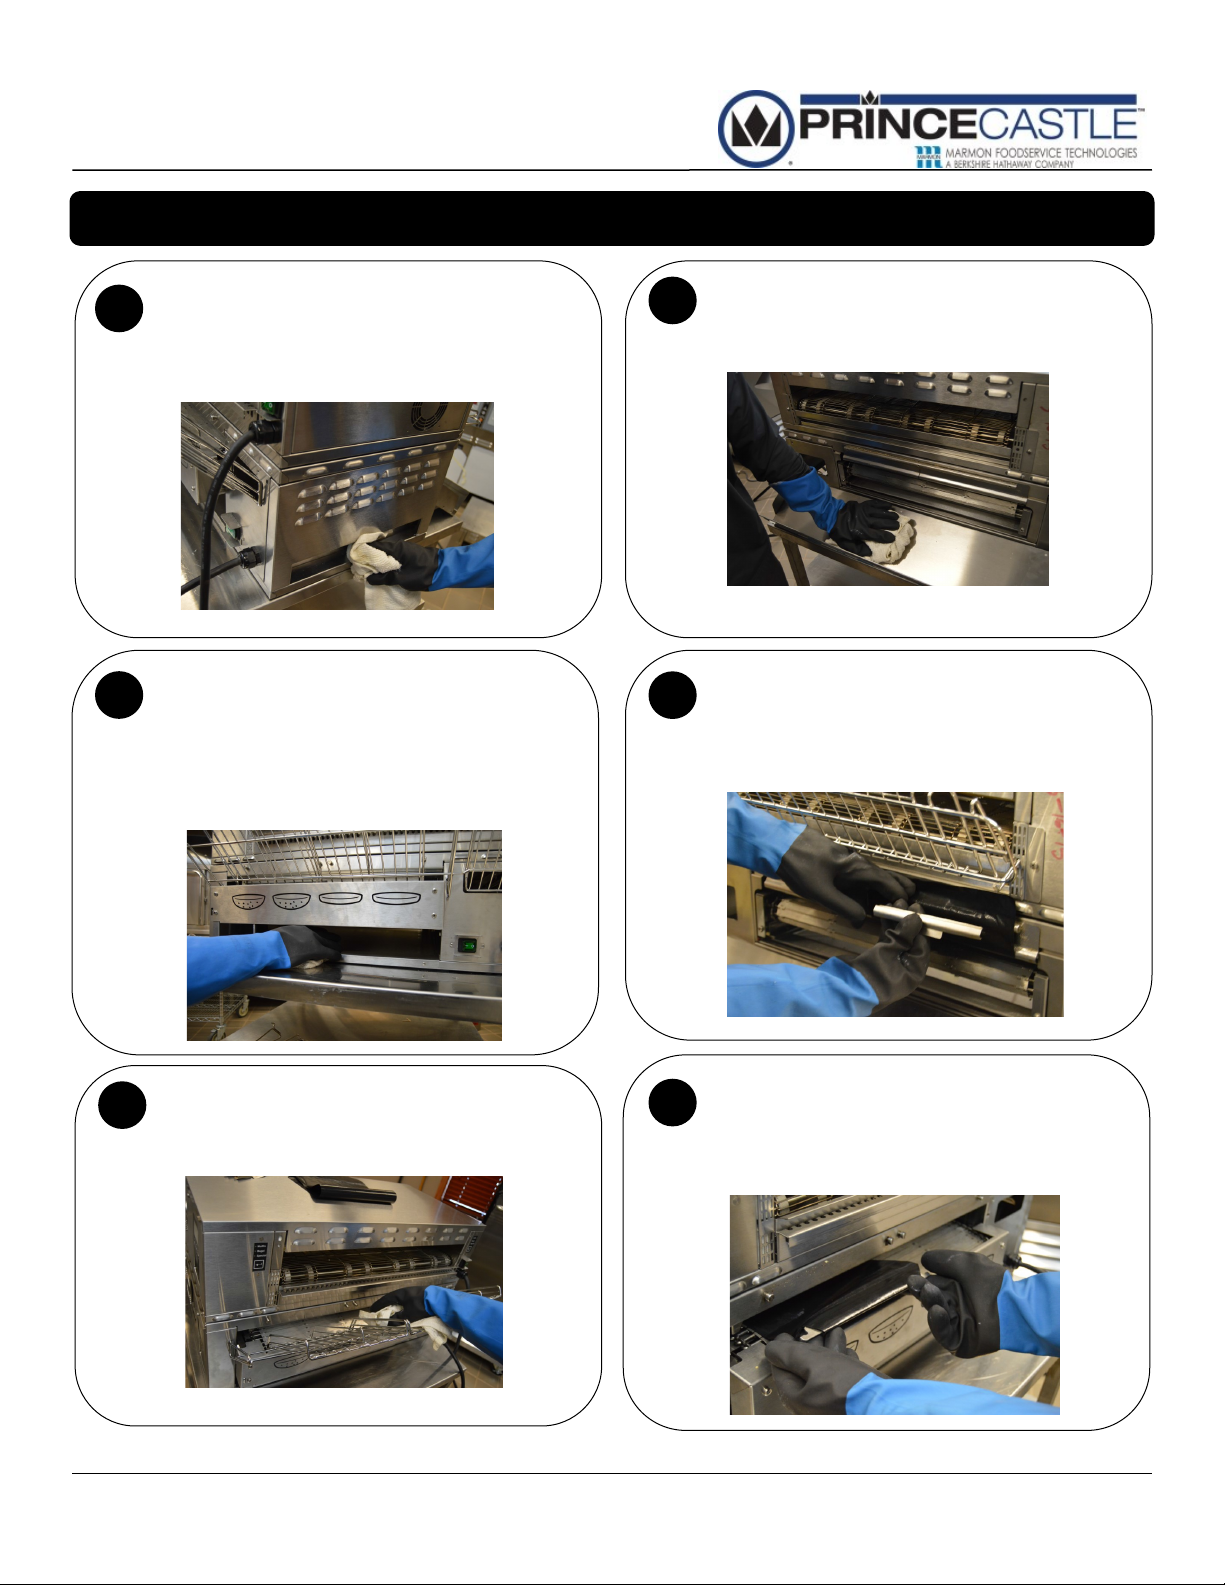
Remove crumbs from the crumb collection portal by wiping
1
with a clean, sanitizer-soaked towel. Then, clean the crumb
collection portal with a clean, sanitizer-soaked towel
sprayed with Heavy Duty Degreaser solution. Rinse with a
separate, clean, sanitizer-soaked towel.
2
Wipe out crumbs from conveyor crumb collection shelf
below the conveyor tray with sanitizer-soaked towel.
Gently, un-latch and pull forward the conveyor assembly
and further wipe away. Then wipe the conveyor crumb
collection shelf with a clean, sanitizer-soaked towel
sprayed with Heavy Duty Degreaser solution. Rinse with
a separate clean sanitizer-soaked towel.
Wipe out landing zone tray with a clean, sanitizer-soaked
4
towel sprayed with Heavy Duty Degreaser solution. Rinse
with a separate, clean sanitizer-soaked towel.
Remove Teflon release sheet retaining clips located over
landing zone by lifting straight up. Be careful not to lose
5
the retaining clips. Clean with a with a clean, sanitizersoaked towel sprayed with Heavy Duty Degreaser solution. Rinse with a separate clean, sanitizer-soaked towel.
Wipe down in-feed rack with a clean, sanitizer-soaked
3
towel sprayed with Heavy Duty Degreaser solution. Rinse
with a separate clean, sanitizer-soaked towel.
Remove Teflon release sheets by first removing the in-feed
6
rack and the by lifting up gently on the front retaining brackets located over the in-feed. Be careful not to lose the retaining brackets. Lay release sheets on a clean surface before cleaning.
CBT-SB-NA-1PS 7 Printed in USA 3/14/16
353-564
Page 8
Horizontal Core Bun Toaster
CBT-SB-NA-1PS
Cleaning—Daily
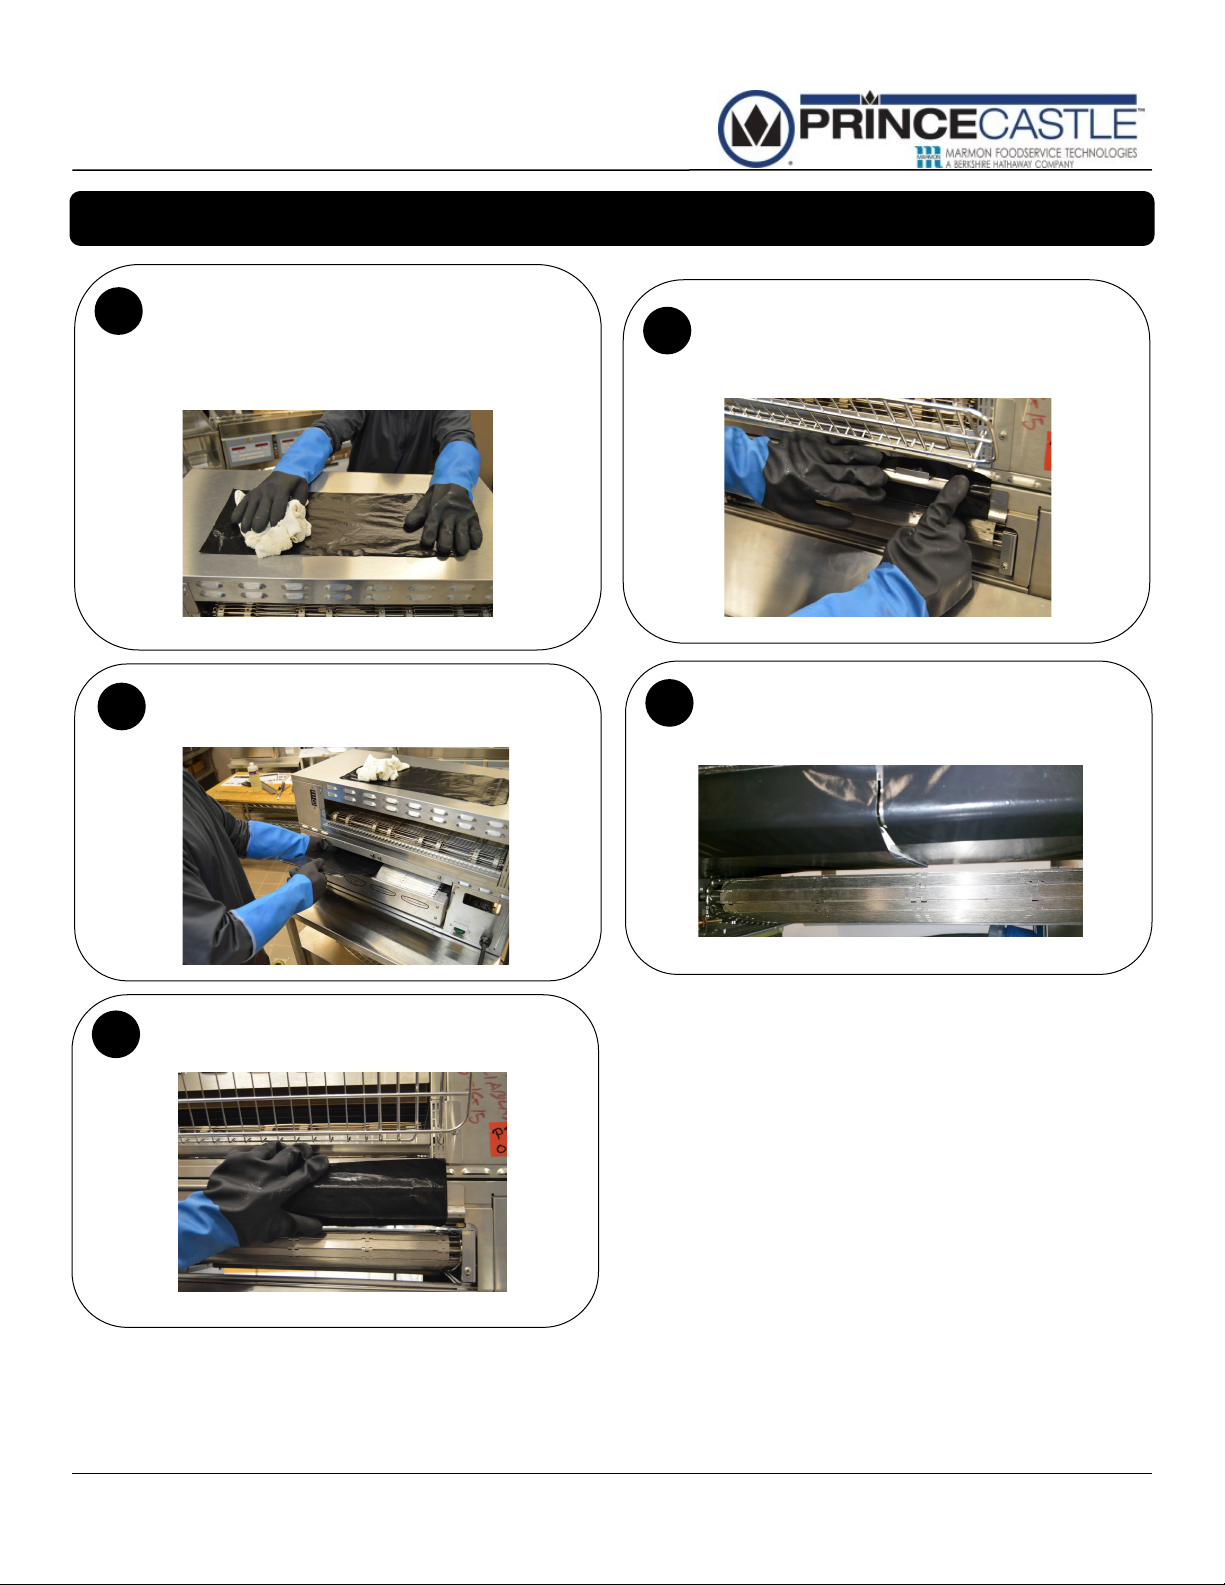
Being careful not to crease the sheet, wipe release
7
sheets with a clean, sanitizer-soaked towel sprayed with
APSC solution. Rinse with a separate clean, sanitizersoaked towel. Wash, rinse, and sanitize the retaining
clips at the 3-compartment sink. Allow to air dry.
Re-feed the clean release sheets back through the toaster,
8
in-feed to out-feed and reconnect the brackets.
10
11
Reconnect retaining clips by holding the release sheet
tight over the mounting rods, ensuring that they are
straight. Press clips over rods until there is solid
engagement.
Visually inspect that the sheets are taught and ripple free
over the heater platen afterwards by peering down the
heating chamber. Disconnect clips and reset if not.
Re-clip heel-side release sheet first being sure to shift the
9
sheet toward the upper step corner on the platen as
shown.
CBT-SB-NA-1PS 8 Printed in USA 3/14/16
353-564
Page 9
Horizontal Core Bun Toaster
CBT-SB-NA-1PS
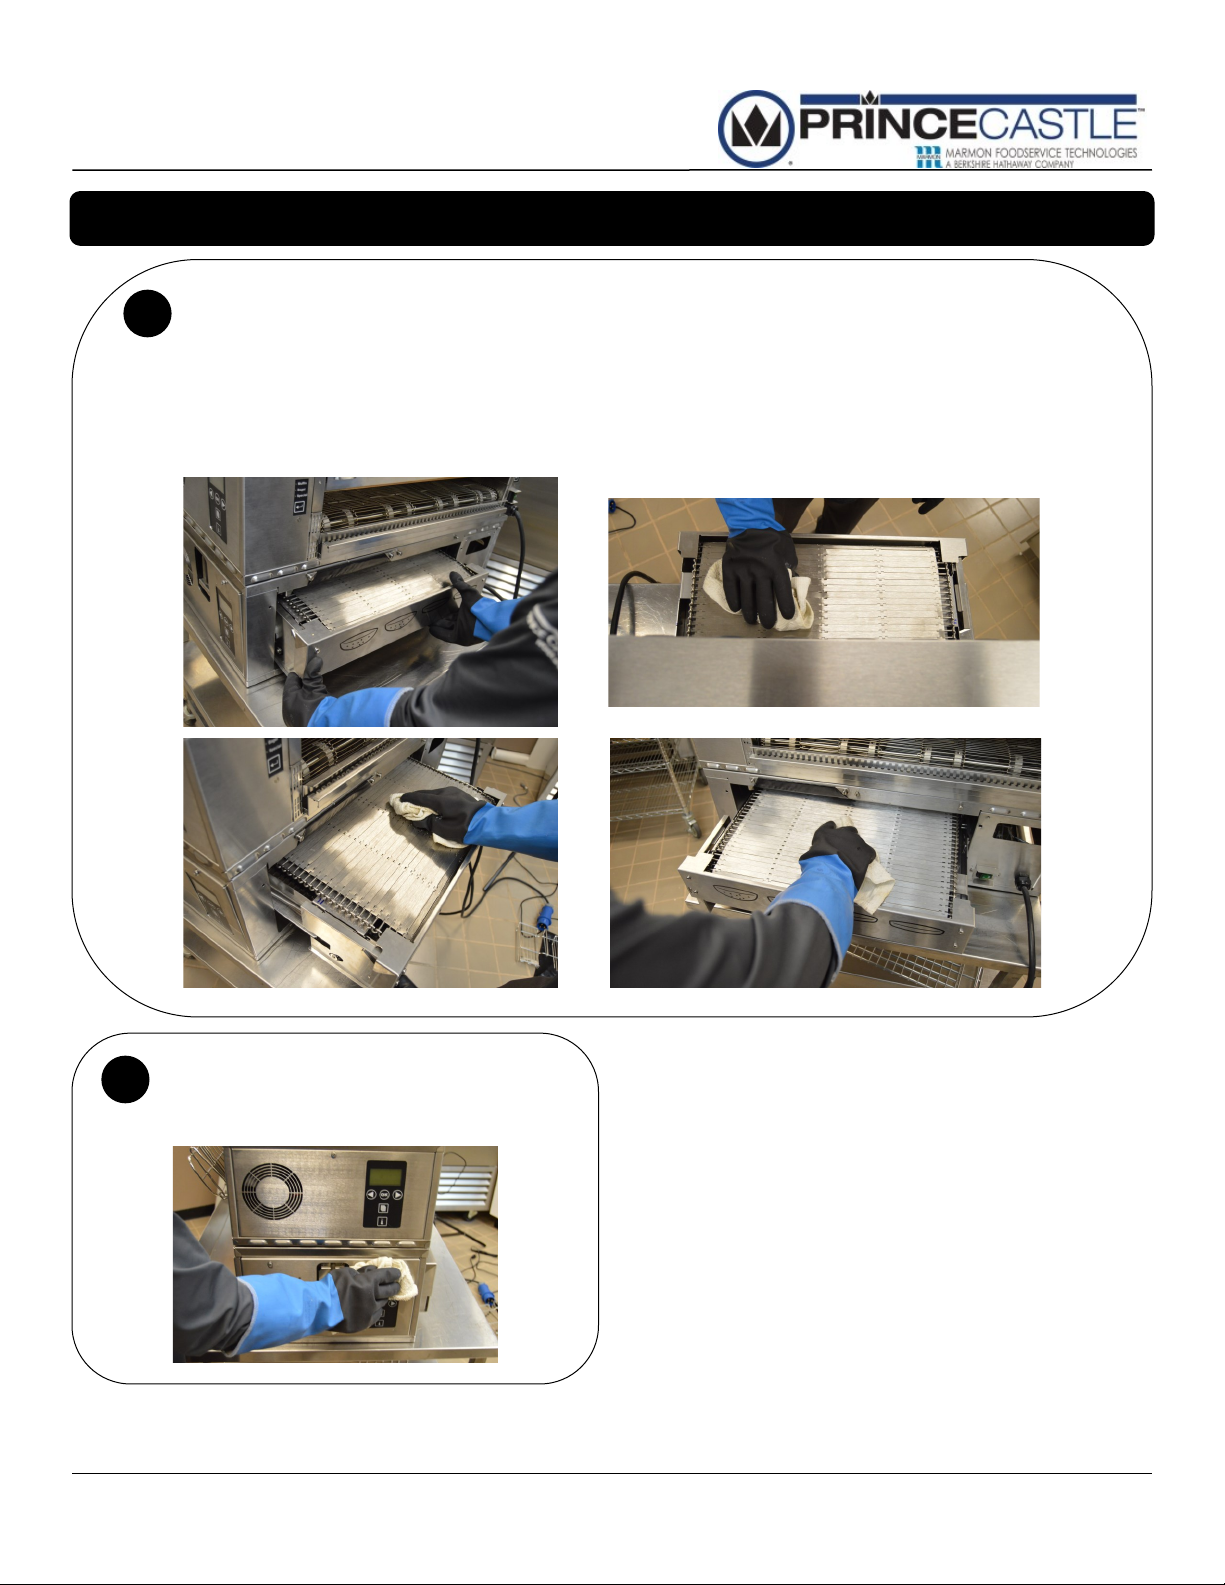
Remove in-feed rack and the depress latch on left hand side of in-feed and gently pull out conveyor until it stops. Clean conveyor
12
belt with Kay Heavy duty Degreaser as follows:
1. Spray conveyor belt with heavy duty degreaser solution
2. Wipe belt from side to side, parallel with belt grain, removing brown residue
3. Rinse the same area with a clean, sanitizer-soaked towel to clear particulate.
4. Manually advance the conveyor belt to clean the next section.
Repeat steps 1-4 until entire conveyor belt has been cleaned.
Cleaning—Daily
Wipe down entire unit with a clean, sanitizer-soaked
13
towel sprayed with Heavy Duty Degreaser solution.
Rinse with a clean, sanitizer-soaked towel.
CBT-SB-NA-1PS 9 Printed in USA 3/14/16
353-564
Page 10

Horizontal Core Bun Toaster
CBT-SB-NA-1PS
Cleaning—Weekly / As Needed
Put on Heat Resistant Gloves. Open the conveyor drawer.
1
Ensure toaster is hot before applying Heat Activated Grill &
Toaster Cleaner (HAGTC). Apply a small amount HAGTC
to a clean, sanitizer-soaked grill cloth and then spread
evenly across exposed section of belt to completely coat
the belts. Repeat applying product until all areas of the belt
are coated. Close conveyor and let run for 5 seconds to
advance the belt to new location before applying additional
cleaner.
2
Spread solution onto belt, going across/with the grain of
the belt.
Wipe stains with a clean, sanitizer-soaked grill cloth,
4
wiping straight across the belts until soils are removed.
Open/close conveyor until entire belt has been cleaned.
Rinse entire belt with a separate, clean sanitizer-soaked
5
grill cloth thoroughly.
Close the conveyor drawer by sliding in, until locked in
Close the conveyor assembly, and allow conveyor to run
3
for 6 minutes. (Stains will begin to darken)
6
place.
CBT-SB-NA-1PS 10 Printed in USA 3/14/16
353-564
Page 11

Horizontal Core Bun Toaster
CBT-SB-NA-1PS
Release Sheet Replacement
Remove Teflon release sheets retaining clips located
1
over landing zone by lifting up on them. Be careful not to
lose the retaining clips.
Remove Teflon release sheets by first removing the in-
2
feed rack and the by lifting up gently on the front retaining
brackets located over the in-feed. Be careful not to lose
the retaining brackets.
Re-clip heel-side release sheet first being sure to shift the
4
sheet toward the upper step corner on the platen as
shown.
Reconnect retaining clips by holding the release sheet
5
tight over the mounting rods, ensuring that they are
straight. Press clips over rods until there is solid
engagement.
Re-feed new release sheets back through the toaster,
3
from the in-feed to out-feed side and reconnect the
brackets.
Visually inspect that the sheets are taught and ripple free
6
over the heater platen afterwards by peering down the
heating chamber. Disconnect clips and reset if not.
CBT-SB-NA-1PS 11 Printed in USA 3/14/16
353-564
Page 12

Horizontal Core Bun Toaster
CBT-SB-NA-1PS
Club Belt Replacement
Depending on toaster use, the club belts should be replaced
approximately every 6 months. Belts should be replaced if worn
or torn.
Torn belt should be replaced
Turn Toaster OFF
1
and Unplug Toaster.
Put on a pair of high temperature gloves.
2
Remove right side cover from unit.
3
Remove old belts.
5
Install new belts.
6
Be sure the bead on belt rides in grove in belt rollers.
7
Pivot latch arm counterclockwise, and remove belt
4
tension by pivoting tension arms towards the left..
CBT-SB-NA-1PS 12 Printed in USA 3/14/16
353-564
Page 13

Horizontal Core Bun Toaster
CBT-SB-NA-1PS
Club Belt Replacement
Pivot tension arms down and engage latch arm.
8
Replace right side cover on unit.
9
CBT-SB-NA-1PS 13 Printed in USA 3/14/16
353-564
Page 14

Horizontal Core Bun Toaster
CBT-SB-NA-1PS
Display Menu Opons
CBT-SB-NA-1PS 14 Printed in USA 3/14/16
353-564
Page 15

Horizontal Core Bun Toaster
CBT-SB-NA-1PS
Display Menu Opons (Connued…)
CBT-SB-NA-1PS 15 Printed in USA 3/14/16
353-564
Page 16

Horizontal Core Bun Toaster
CBT-SB-NA-1PS
Management Programming
1
To Enter Programming screens
Press and hold the MENU
button for 6 seconds. The
PROGRAMMING VERSION
screen will appear in the LCD
display.
From the PROGRAMMING
VERSION screen, you may:
Press RIGHT scroll
button to advance to the
next menu item
2
3
To Adjust PLATEN
TEMPERATURE from the
SELECT LANUGAGE Screen,
press the RIGHT scroll button.
Press the OK button to enter the
programming screen.
A. From the PLATEN
TEMPERATURE screen that
that appears adjust the temperature using the RIGHT
and LEFT scroll buttons.
Accept the new Temperature by
pressing OK.
NOTE : To cancel without
accepting the new setting,
press the MENU logo button to
return to the previous screen
4
To Change the LANGUAGE
from the PROGRAMMING
VERSION
Screen, PRESS the left scroll
button.
From the SELECT
LANGUAGE Screen,
Press OK button
A. From the
LANGUAGE screen
that appears, use
the RIGHT and
LEFT scroll buttons.
TO select different
Language
B. Accept the new
language by pressing
OK button to return to
the SELECT
LANGUAGE screen
To adjust SELECT F/C
From The PLATEN
TEMPERATURE screen,
press the RIGHT scroll
button.
From the SELECT F/C screen
that appears, press the OK
button.
A. From the SET F/C
Screen that appears,
Use the LEFT and
RIGHT scroll buttons to
Select TEMP = F
( Fahrenheit ) or
C (Celsius )
B. Accept the new scale
By pressing the OK
Button to return to
The SELECT F/C
screen
CBT-SB-NA-1PS 16 Printed in USA 3/14/16
353-564
Page 17

Horizontal Core Bun Toaster
CBT-SB-NA-1PS
Management Programming (Connued)
5
To adjust set TOAST TIME
from the SELECT F/C
screen, press the RIGHT
scroll button
From the SELECT
TOAST TIME Screen,
Press OK button
A. From the SELECT TOAST
TIME that appears, Adjust
the set point Time Using the
RIGHT and LEFT
Scroll buttons. Accept
The new toast time by
Pressing OK.
NOTE : To cancel with\out
accepting the new setting,
press the MENU logo button to
return to the previous screen
6
To adjust CLUB TOAST
TIME from the SELECT
TOAST TIME screen, press
the RIGHT scroll button
From the SELECT CLUB
TOAST TIME Screen,
Press OK button
A. From the SELECT CLUB
TOAST TIME that appears,
Adjust the set point Time
Using the RIGHT and LEFT
Scroll buttons. Accept
The new toast time by
Pressing OK.
7
To enter LON SERVICE CALL
from CLUB TOAST TIME screen,
press the RIGHT scroll button.
From the LON SERVICE CALL
Screen, Press OK button
From the LON SERVICE CALL screen
that appears, the following options are
available
YES = LEFT scroll button
NO = RIGHT scroll button
OK = Cancel / Go Back
8
To enter MFY STORE from LON
SERVICE CALL screen, press
the RIGHT scroll button.
From the MFY STORE Screen, Press
OK button
From the MFY STORE screen that
appears, the following options are
available
YES = LEFT scroll button
NO = RIGHT scroll button
OK = Cancel / Go Back
NOTE : To cancel with\out
accepting the new setting,
press the MENU logo button to
return to the previous screen
CBT-SB-NA-1PS 17 Printed in USA 3/14/16
353-564
Page 18

Horizontal Core Bun Toaster
CBT-SB-NA-1PS
Management Programming (Connued)
9
To view Service Codes, From
the MFY Store screen, press the
RIGHT scroll button once.
From the Service
Codes screen,
A. Select OK to check
the service codes
B. Refer to Service
codes page to understand the operation of
the unit.
10
Exit Programming
Press the MENU button from
any screen to exit programming
mode.
CBT-SB-NA-1PS 18 Printed in USA 3/14/16
353-564
Page 19

Horizontal Core Bun Toaster
CBT-SB-NA-1PS
Exploded View and Parts List
Item # Part # Description Qty
1 72-477 POWERCORD 1
2 66-045S STRAIN RELEIF 1
3 78-223S
4 353-394S
NOT SHOWN 527-127S SERVICE KIT, CUTOFF SWITCH314 1
NOT SHOWN 353-206S TRAY, OUTFEED ASSY 1
CBT-SB-NA-1PS 19 Printed in USA 3/14/16
353-564
SWITCH, ROCKER, DPST, IP65, 16A
THERMOSTAT, SNAP DISC CONTROL, 120
1
1
Page 20

Horizontal Core Bun Toaster
CBT-SB-NA-1PS
Exploded View and Parts List (Connued)
Item # Part # Description Qty
5 353-054S
6 353-053S
CBT-SB-NA-1PS 20 Printed in USA 3/14/16
353-564
RELEASE SHEET BAR
RELEASE SHEET CLIP
2
2
Page 21

Horizontal Core Bun Toaster
CBT-SB-NA-1PS
Exploded View and Parts List (Connued)
Item # Part # Description Qty
7 353-300S
8
CBT-SB-NA-1PS 21 Printed in USA 3/14/16
353-564
353-442S SKID BAR, CONVEYOR
CONVEYOR, MAIN
1
4
Page 22

Horizontal Core Bun Toaster
CBT-SB-NA-1PS
Exploded View and Parts List (Connued)
Item # Part # Description Qty
9
11
12
13
14
CBT-SB-NA-1PS 22 Printed in USA 3/14/16
353-564
353-241S STEPPER MOTOR 2
353-333S BELT 3MM HTD 106 TEETH 1
353-343S PULLEY, 3MM PITCH .44 GROOVE 2
353-257S SHAFT, TENSIONING ASSY 1
353-205S CONVEYOR SPROCKET SHAFT ASSY 1
Page 23

Horizontal Core Bun Toaster
CBT-SB-NA-1PS
Exploded View and Parts List (Connued)
Item # Part # Description Qty
15 77-093S
16
17 65-067S
18
19
20
CBT-SB-NA-1PS 23 Printed in USA 3/14/16
353-564
526-281S TSTAT, HI-LIMIT BULB & CAP, 700F
85-144-24S PWER SUPPLY, 24VDC 100W
353-262CS PCB, MAIN CONTROLLER
65-058S RELAY, SS,50A,280VAC,3-32VDC
TERMINAL BLOCK 12POS 2ROW INSULATED
RELAY, DPST, 30A, 200/240, 50/60
1
3
1
1
1
3
Page 24

Horizontal Core Bun Toaster
CBT-SB-NA-1PS
Exploded View and Parts List (Connued)
Item # Part # Description Qty
21 353-208S
CBT-SB-NA-1PS 24 Printed in USA 3/14/16
353-564
HEATER PLATEN
1
Page 25

Horizontal Core Bun Toaster
CBT-SB-NA-1PS
Exploded View and Parts List (Connued)
Item # Part # Description Qty
22 527-370S
23
CBT-SB-NA-1PS 25 Printed in USA 3/14/16
353-564
37814S MOTOR FAN 230V UF12A23
ASSY, MEMBRANE SWITCH & OVERLAY
1
1
Page 26

Horizontal Core Bun Toaster
CBT-SB-NA-1PS
Exploded View and Parts List (Connued)
Item # Part # Description Qty
9
12 353-343S PULLEY, 3MM PITCH .44 GROOVE 2
24 353-357S BELT 3MM 80 TEETH 1
25 527-819S GEAR, SPUR,56,TEETH,24.P,2.33P.D..25 2
26 353-233S CLUB ASSY BOTTOM 1
27 353-231S CLUB ASSY TOP 1
NOT SHOWN 527-822S CLUB PROBE TOP 1
NOT SHOWN 527-636S CLUB PROBE BOTTOM 1
353-242S STEPPER MOTOR 2
CBT-SB-NA-1PS 26 Printed in USA 3/14/16
353-564
Page 27

Horizontal Core Bun Toaster
CBT-SB-NA-1PS
Troubleshoong Guide
BURN/ELECTRICAL SHOCK HAZARD! Platen is HOT and can cause severe burns or severe shock.
Keep hands and objects out of the toaster unit! Failure to exercise cauon may result in serious injury!
Turn the unit o, let it cool down completely before touching or working on internal apparatus.
Master Display Messages
PROBLEM PROBABLE CAUSE SOLUTION
Unit will not heat up No power to unit. Ensure power cord is connected to
proper receptacle.
Inoperable power cord Call for Service (800) 722-7853
Loose connecon on power switch Call for Service (800) 722-7853
Inoperable power switch Call for Service (800) 722-7853
High limit switch tripped Call for Service (800) 722-7853
Inoperable Temperature Probe Call for Service (800) 722-7853
Inoperable Platen Call for Service (800) 722-7853
Unit heats up, but the conveyor does
not run
Unit under-and over-heats, but does
not respond to programming.
Buns under-or over-done. Check platen adjustment. See opera-
Loose motor switch connecon. Call for Service (800) 722-7853
Inoperable motor. Call for Service (800) 722-7853
Inoperable motor switch. Call for Service (800) 722-7853
Stripped drive gear Call for Service (800) 722-7853
Loose chain sprockets Call for Service (800) 722-7853
Check temperature sengs Adjust temperature set point seng.
Inoperable temperature probe Call for Service (800) 722-7853
on manual
Check conveyor temperature. From
READY screen, press the INFOR-
MATION buon to display the actual
See management programming.
Move platen adjustment to the correct
product part seng.
Adjust temperature set point seng.
See management programming.
Improper toast me. Adjust toast me as needed.
CBT-SB-NA-1PS 27 Printed in USA 3/14/16
353-564
 Loading...