

Page 1
Service
Manual
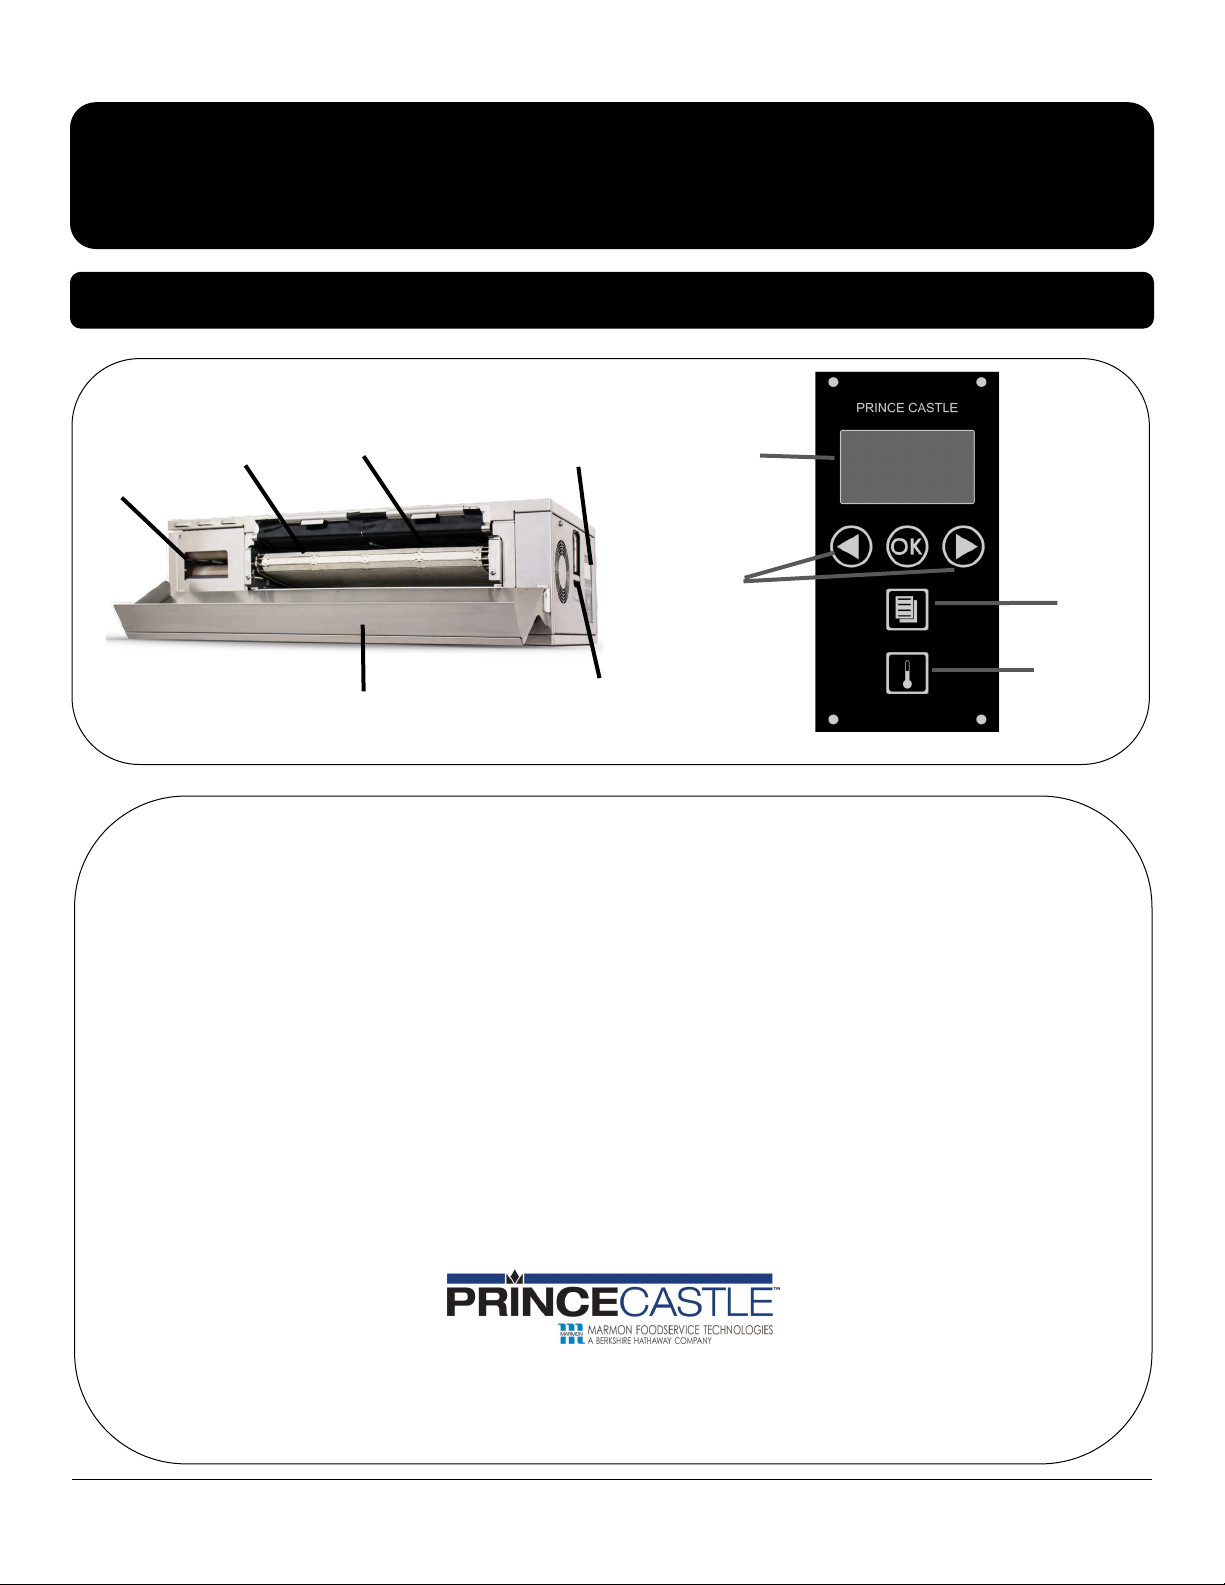
Club Secon
Heel Secon
Crown Secon
Landing Zone
Horizontal Core Bun Toaster
Product Identification
Display and
Touchpad
Compression
Adjustment
LCD
Display
LEFT and
RIGHT Scroll
Buons
CBT-SB-NA-1PS
MENU
Buon
TEMPERATURE
Buon
LIMITED WARRANTY
This product is warranted to be free from defects in material and/or workmanship for a period of two (2)
years from date of original installation, not to exceed 30 months from date of shipment from our factory.
Any part or component which proves to be faulty in material and/or workmanship within the warranty period
will be replaced or repaired (at the option of Prince Castle, Inc.) without cost to the customer for parts or
labor.
This warranty is subject to the following exceptions/conditions:
• Use of any non-genuine Prince Castle parts voids this warranty and all work must be performed by an
authorized Prince Castle Service Agent.
• All labor shall be performed during regular work hours. Overtime premium will not be covered.
• Travel charges are limited to 200 kilometers (100 miles) round trip, 2 hours travel time, one trip per repair.
• Damage caused by carelessness, neglect, and/or abuse (e.g., using wrong current, dropping, tampering
with or altering electrical components, or improper cleaning) is not covered.
• Equipment damaged in shipment, by fire, flood or an act of God is not covered.
• Damage to non-stick coated surfaces is not covered by this warranty.
355 East Kehoe Blvd. • Carol Stream, IL 60188 USA
Telephone: 630-462-8800 • Toll Free: 1-800-PCASTLE
Fax: 630-462-1460 • www.princecastle.com
CBT-SB-NA-1PS 1 Printed in USA 11/15
Page 2

Horizontal Core Bun Toaster
CBT-SB-NA-1PS
Table of Contents
Product Idencaon……………………………………………..…………….Page 1
Warranty Statement…………………………………….….……….………..…Page 1
Table of Contents…..……………………….…………………………..……..…Page 2
Electrical Specicaons.……………….………………….…………….…..…Page 3
Safe Service Pracces.……………………………………..………………...…Page 3
Serial Number Matrix…………………………….…………………………..….Page 3
Tools Required..…….……………………….……………………….………….…Page 4
Fault Idencaon..……………………….…………………..………………...Page 5
Troubleshoong Steps…..…………....………………...…………………….Page 6
Wiring Diagram……..…………………....………………...……..…………..…Page 7
Test Points..…………………….…….……………………………………………...Page 8
Exploded View and Parts List………….………….………………..…..…...Page 12
Display Menu Opons…..……………….……………….………..….…..…..Page 17
Management Programming…..……….………………………..….…..…..Page 19
Remove/Replace PCB…..…………….….………………………..….…..…..Page 22
Remove/Replace Relay…….…..……….…….…………………..….…..…..Page 24
Remove/Replace Conveyor Belt...……...….………………..….…..…..Page 26
Remove/Replace Teon Bars..………………………….……..….…..…..Page 29
Remove/Replace Motor and Belt Assembly…...….…………...…..Page 32
Remove/Replace Display Assembly………...……..….…………...…..Page 34
Remove/Replace Club Belt…...………………………..………....…..…..Page 35
Remove/Replace Club Probe..………………………..…………..…..…..Page 36
Remove/Replace Club Assembly.…………….……………...….…..…..Page 38
Remove/Replace Platen High Limit Switch………….…..….…..…..Page 40
Allowable Labor Limits...……….………………………………..….…..…..Page 43
CBT-SB-NA-1PS 2 Printed in USA 11/15
Page 3
Horizontal Core Bun Toaster
CBT-SB-NA-1PS
Electrical Specicaons
CBT-SB-NA-1PS 200-240VAC, 50/60 Hz, 1 Ph.
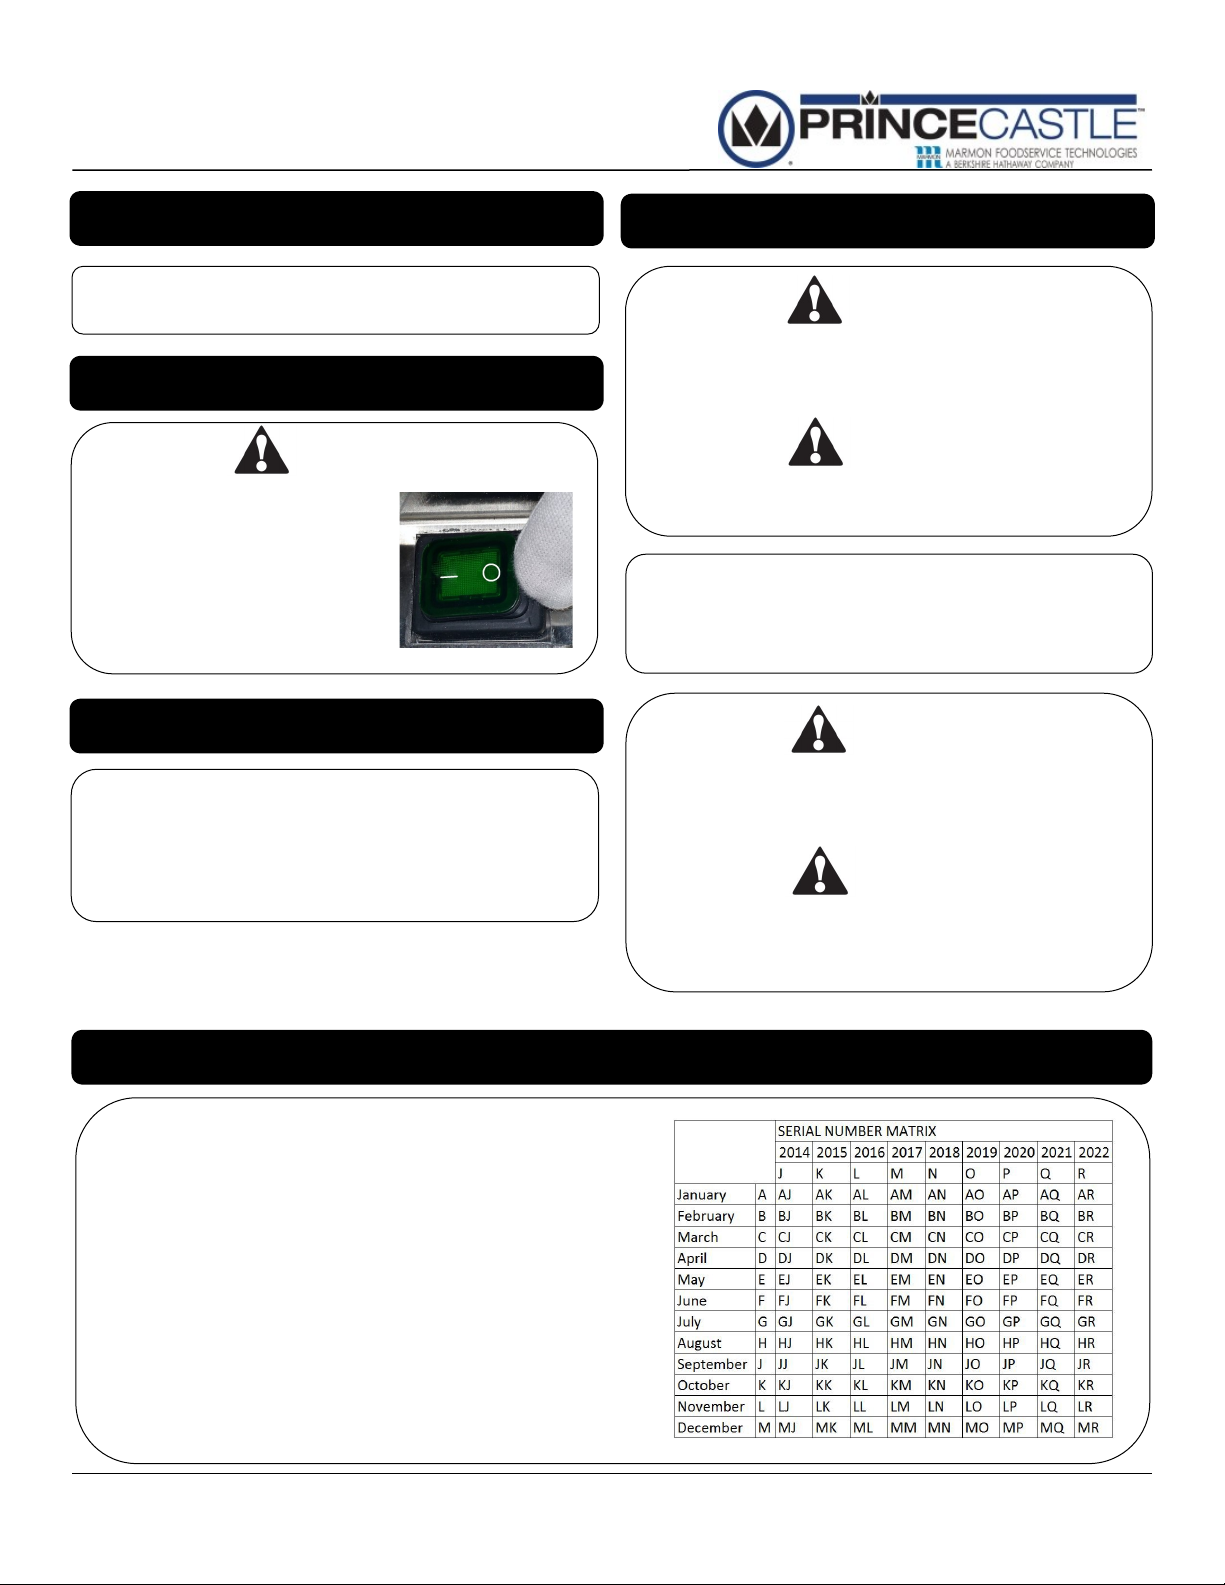
Disconnect Power
WARNING
Failure to turn off the unit before
servicing could result in severe
bodily injury or death. Switch the
On/Off switch to the Off position
Important
Prince Castle reserves the right to change specifications
and product design without notice. Such revisions do not
entitle the buyer to corresponding changes, improvements,
additions, or replacements for previously purchased equipment.
Safe Service Pracces
Indicates information important to the proper operation of
the unit. Failure to observe may result in damage to the
equipment and/or severe bodily injury or death.
Indicates information important to the operation of the unit.
Failure to observe may result in damage to the equipment.
This appliance is designed for toasting bread products in a commercial
McDonalds kitchen. The dimensions of the bread products as defined
Do not hose down or use a water jet on the unit. Keep the unit
away from running water. Disconnect power cord before performing any cleaning or maintenance.
Equipment must be elevated from the floor at all times during
cleaning and operation.
WARNING
CAUTION
GENERAL
CAUTION
CAUTION
Serial Number Matrix
The manufacture date is encoded in the unit’s serial number. The
service bench installaon date (used to determine warranty
coverage) is considered to be the end of the following month. For
example:
Serial Number: FJ0000458
Manufacture Date: June 2014
Service Bench Installaon Date: July 31, 2014
CBT-SB-NA-1PS 3 Printed in USA 11/15
Page 4
Horizontal Core Bun Toaster
CBT-SB-NA-1PS
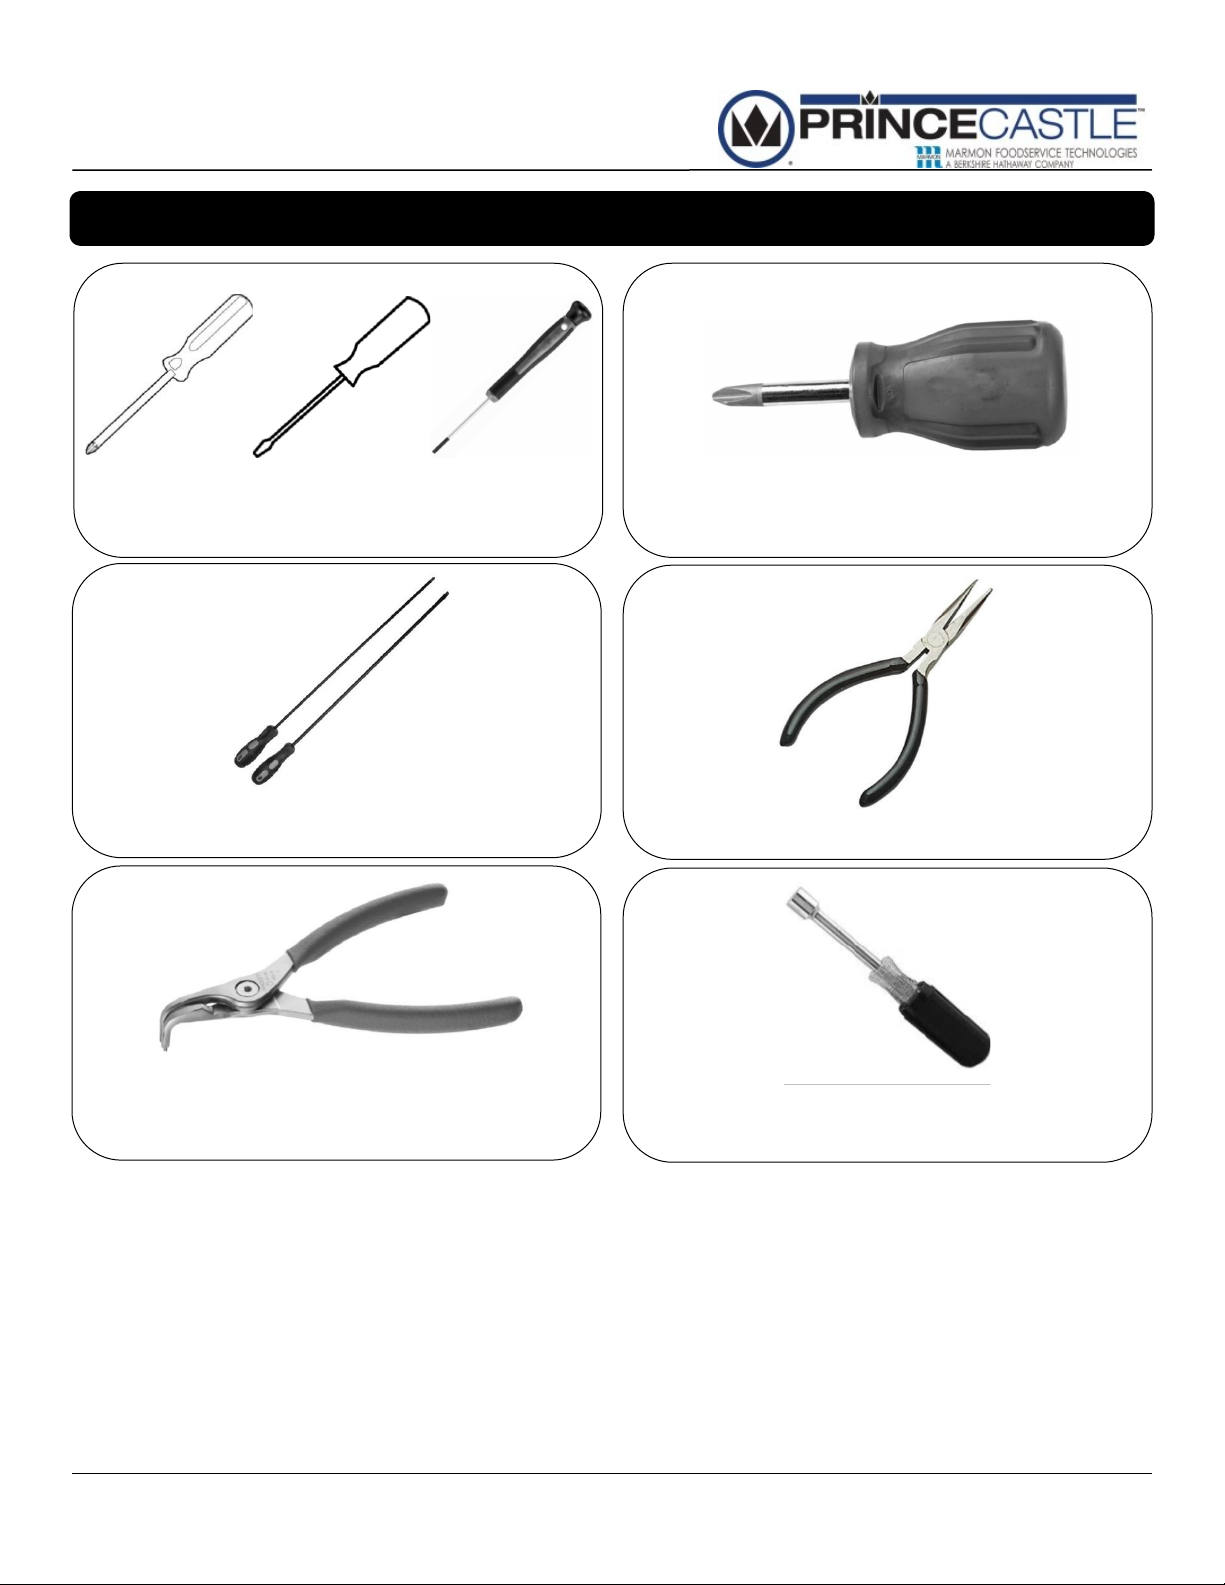
Tools Required
Medium Phillips / Flathead Screwdriver
Long Phillips/Flathead Screwdriver
Stubby Phillips Screw Driver
Needle Nose Pliers
Selecon of Nut Spinners or an Appropriate
C-Clip Pliers
CBT-SB-NA-1PS 4 Printed in USA 11/15
Small Socket Set
Page 5
Horizontal Core Bun Toaster
Component
Designation
Error
code
Problem Description Action to take
Initial screen (1.5 sec.) Toggle Screen (1.5 sec.)
Initial screen (1.5 sec.) Toggle Screen (1.5 sec.)
Initial screen (1.5 sec.) Toggle Screen (1.5 sec.)
Initial screen (1.5 sec.) Toggle Screen (1.5 sec.)
Initial screen (1.5 sec.) Toggle Screen (1.5 sec.)
Initial screen (1.5 sec.) Toggle Screen (1.5 sec.)
Initial screen (1.5 sec.) Toggle Screen (1.5 sec.)
Initial screen (1.5 sec.) Toggle Screen (1.5 sec.)
Initial screen (1.5 sec.) Toggle Screen (1.5 sec.)
Initial screen (1.5 sec.) Toggle Screen (1.5 sec.)
Initial screen (1.5 sec.) Toggle Screen (1.5 sec.)
Initial screen (1.5 sec.) Toggle Screen (1.5 sec.)
Probe shorted
Shut off power to the toaster, wait 30 seconds and
turn back on. If the error code is still present or
reappears within 24 hours, call for service.
CBT-MCD ERROR CODE MATRIX
Main Platen11Probe open
Shut off power to the toaster, wait 30 seconds and
turn back on. If the error code is still present or
reappears within 24 hours, call for service.
Main Probe
Open
Call for service
Error Message to Display
N/A
Dual Display Mode
Main Probe
Shorted
Call for service
N/A
Main Platen
10
Heater switch-
over error
Call for service
N/A
Main Platen
12
Redundant heater switchover mode
Heater switch-
over mode
Call for service
N/A
Main Platen
13
Redundant heater switchover error
Shut off power to the toaster, wait 30 seconds and
turn back on. If the error code is still present or
reappears within 24 hours, call for service.
Shut off power to the toaster, wait 30 seconds and
turn back on. If the error code is still present or
reappears within 24 hours, call for service.
Front Club
Probe open
Call for service
N/A
Front Club Platen20Probe shorted
Front Club
Probe shorted
Call for service
N/A
Front Club Platen21Probe open
Shut off power to the toaster, wait 30 seconds and
turn back on. If the error code is still present or
reappears within 24 hours, call for service.
Shut off power to the toaster, wait 30 seconds and
turn back on. If the error code is still present or
reappears within 24 hours, call for service.
Rear Club
Probe shorted
Call for service
N/A
Front Club Platen
22
Heater temperature drifted too low for too
long. 25F below setpoint for 5 minutes.
Front Club
Low temp error
Power OFF
Wait 30 seconds
Power ON
If problem exist
Call for service
Rear Club Platen30Probe shorted
Shut off power to the toaster, wait 30 seconds and
turn back on. If the error code is still present or
reappears within 24 hours, call for service.
Shut off power to the toaster, wait 30 seconds and
turn back on. If the error code is still present or
reappears within 24 hours, call for service.
Rear Club
Low temp error
Power OFF
Wait 30 seconds
Power ON
If problem exist
Call for service
Rear Club Platen31Probe open
Rear Club
Probe open
Call for service
N/A
Rear Club Platen
32
Heater temperature drifted too low for too
long. 25F below setpoint for 5 minutes.
Shut off power to the toaster, wait 30 seconds and
turn back on. If the error code is still present or
reappears within 24 hours, call for service.
Shut off power to the toaster, wait 30 seconds and
turn back on. If the error code is still present or
reappears within 24 hours, call for service.
Motor load
error
Power OFF
Wait 30 seconds
Power ON
If problem exist
Call for service
Motor40Motor tach error
Motor speed
error
Power OFF
Wait 30 seconds
Power ON
If problem exist
Call for service
Motor41Motor load error
Shut off power to the toaster, wait 30 seconds and
turn back on. If the error code is still present or
reappears within 24 hours, call for service.
Shut off power to the toaster, wait 30 seconds and
turn back on. If the error code is still present or
reappears within 24 hours, call for service.
CBT-SB-NA-1PS
Fault Idencaon
CBT-SB-NA-1PS 5 Printed in USA 11/15
Page 6
Horizontal Core Bun Toaster
CBT-SB-NA-1PS
Troubleshoong Steps
BURN/ELECTRICAL SHOCK HAZARD! Platen is HOT and can cause severe burns or severe shock.
Keep hands and objects out of the toaster unit! Failure to exercise cauon may result in serious injury!
Turn the unit o, unplug it and let it cool down completely before touching or working on internal apparatus.
Master Display Messages
PROBLEM PROBABLE CAUSE SOLUTION
Unit will not heat up No power to unit. Ensure power cord is connected to
proper receptacle.
Inoperable power cord Call for Service (800) 722-7853
Loose connecon on power switch Call for Service (800) 722-7853
Inoperable power switch Call for Service (800) 722-7853
High limit switch tripped Call for Service (800) 722-7853
Inoperable Temperature Probe Call for Service (800) 722-7853
Inoperable Platen Call for Service (800) 722-7853
Unit heats up, but the conveyor does
not run
Unit under-and over-heats, but does
not respond to programming.
Buns under-or over-done. Check platen adjustment. See opera-
Loose motor switch connecon. Call for Service (800) 722-7853
Inoperable motor. Call for Service (800) 722-7853
Inoperable motor switch. Call for Service (800) 722-7853
Stripped drive gear Call for Service (800) 722-7853
Loose chain sprockets Call for Service (800) 722-7853
Check temperature sengs Adjust temperature set point seng.
Inoperable temperature probe Call for Service (800) 722-7853
on manual
Check conveyor temperature. From
READY screen, press the INFOR-
MATION buon to display the actual
See management programming.
Move platen adjustment to the correct
product part seng.
Adjust temperature set point seng.
See management programming.
Improper toast me. Adjust toast me as needed.
CBT-SB-NA-1PS 6 Printed in USA 11/15
Page 7
Horizontal Core Bun Toaster
CBT-SB-NA-1PS
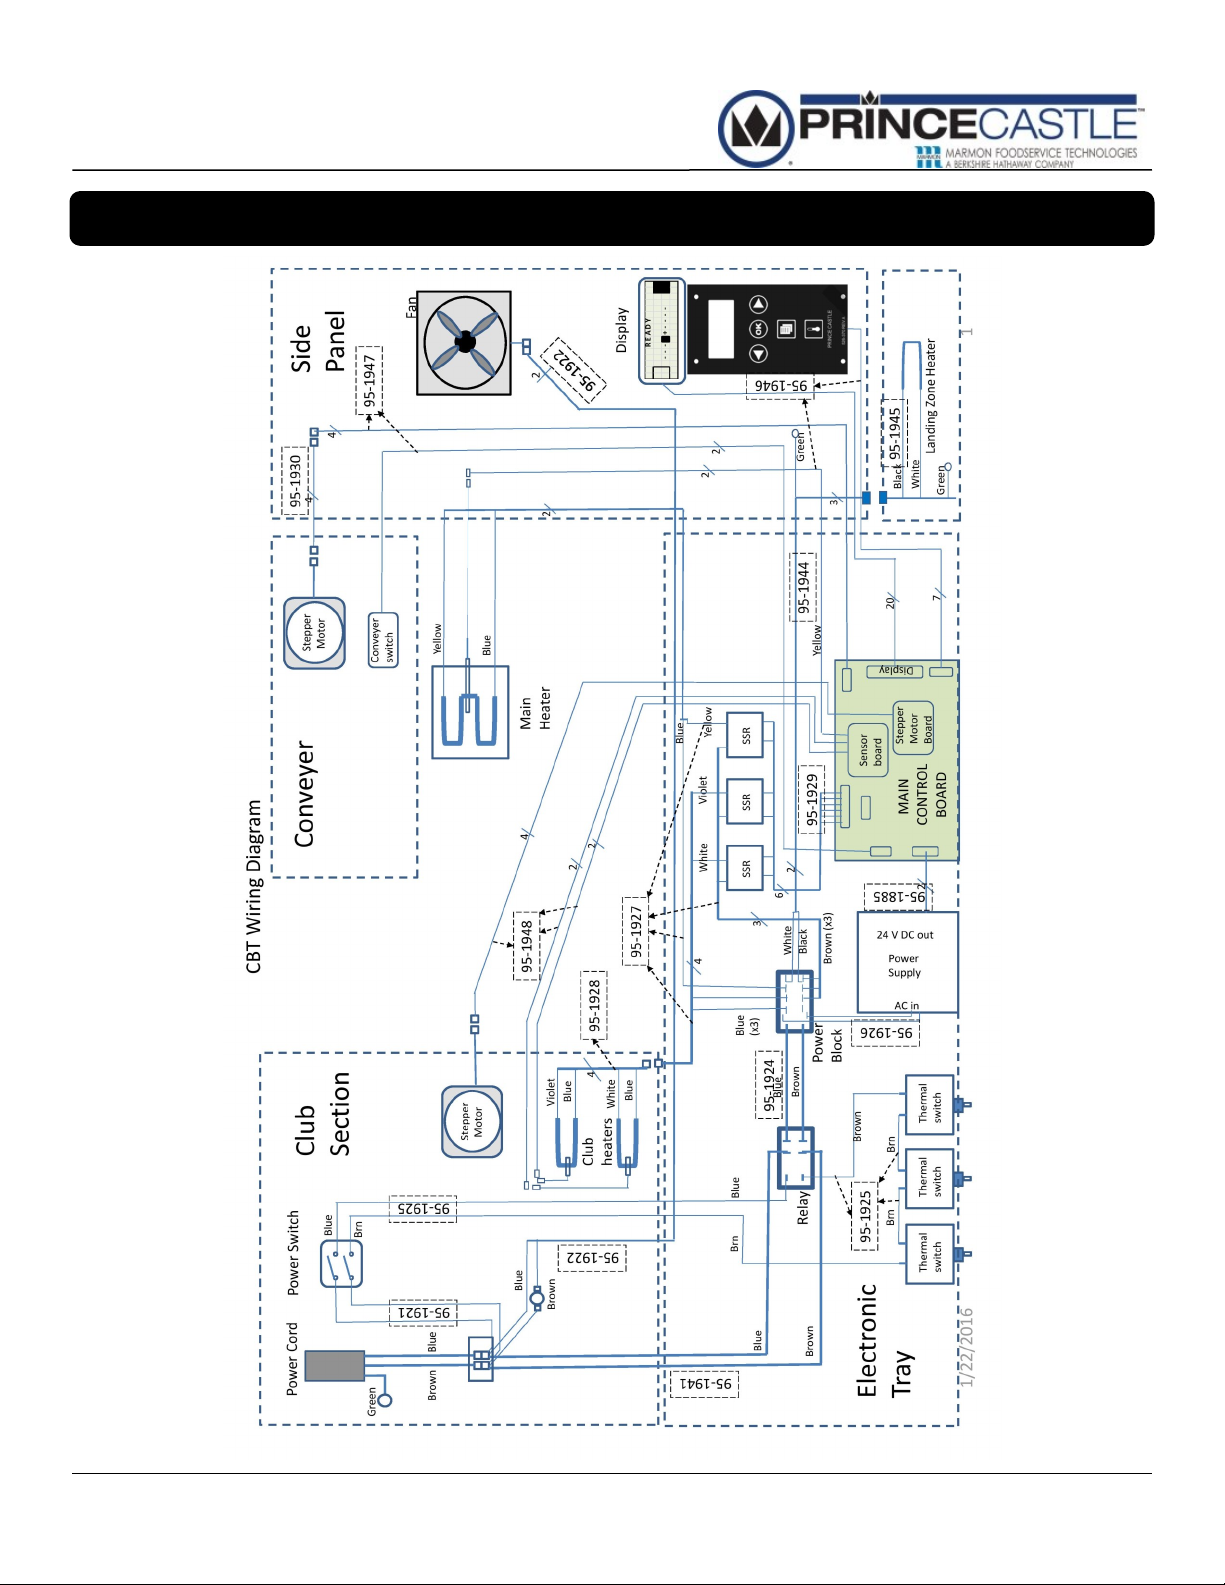
Wiring Diagram
CBT-SB-NA-1PS 7 Printed in USA 11/15
Page 8
Horizontal Core Bun Toaster
CBT-SB-NA-1PS
Test Points
Test Points
Component Operating Range
1 Main Platen 15-20Ω
2 Club Platen Top 37-42 Ω
3 Club Platen Bottom 37-42 Ω
4 Main Sensor Probe 1084 Ω @ Room temperature
5 Club sensor probe top 1084 Ω @ Room temperature
6 Club sensor probe bottom 1084 Ω @ Room temperature
7 Heater relays
8 AC fan 440-450 Ω
Operating Ranges for CBT
4-32 VDC Input
24-280 VAC Output
CBT-SB-NA-1PS 8 Printed in USA 11/15
Page 9
Horizontal Core Bun Toaster
CBT-SB-NA-1PS
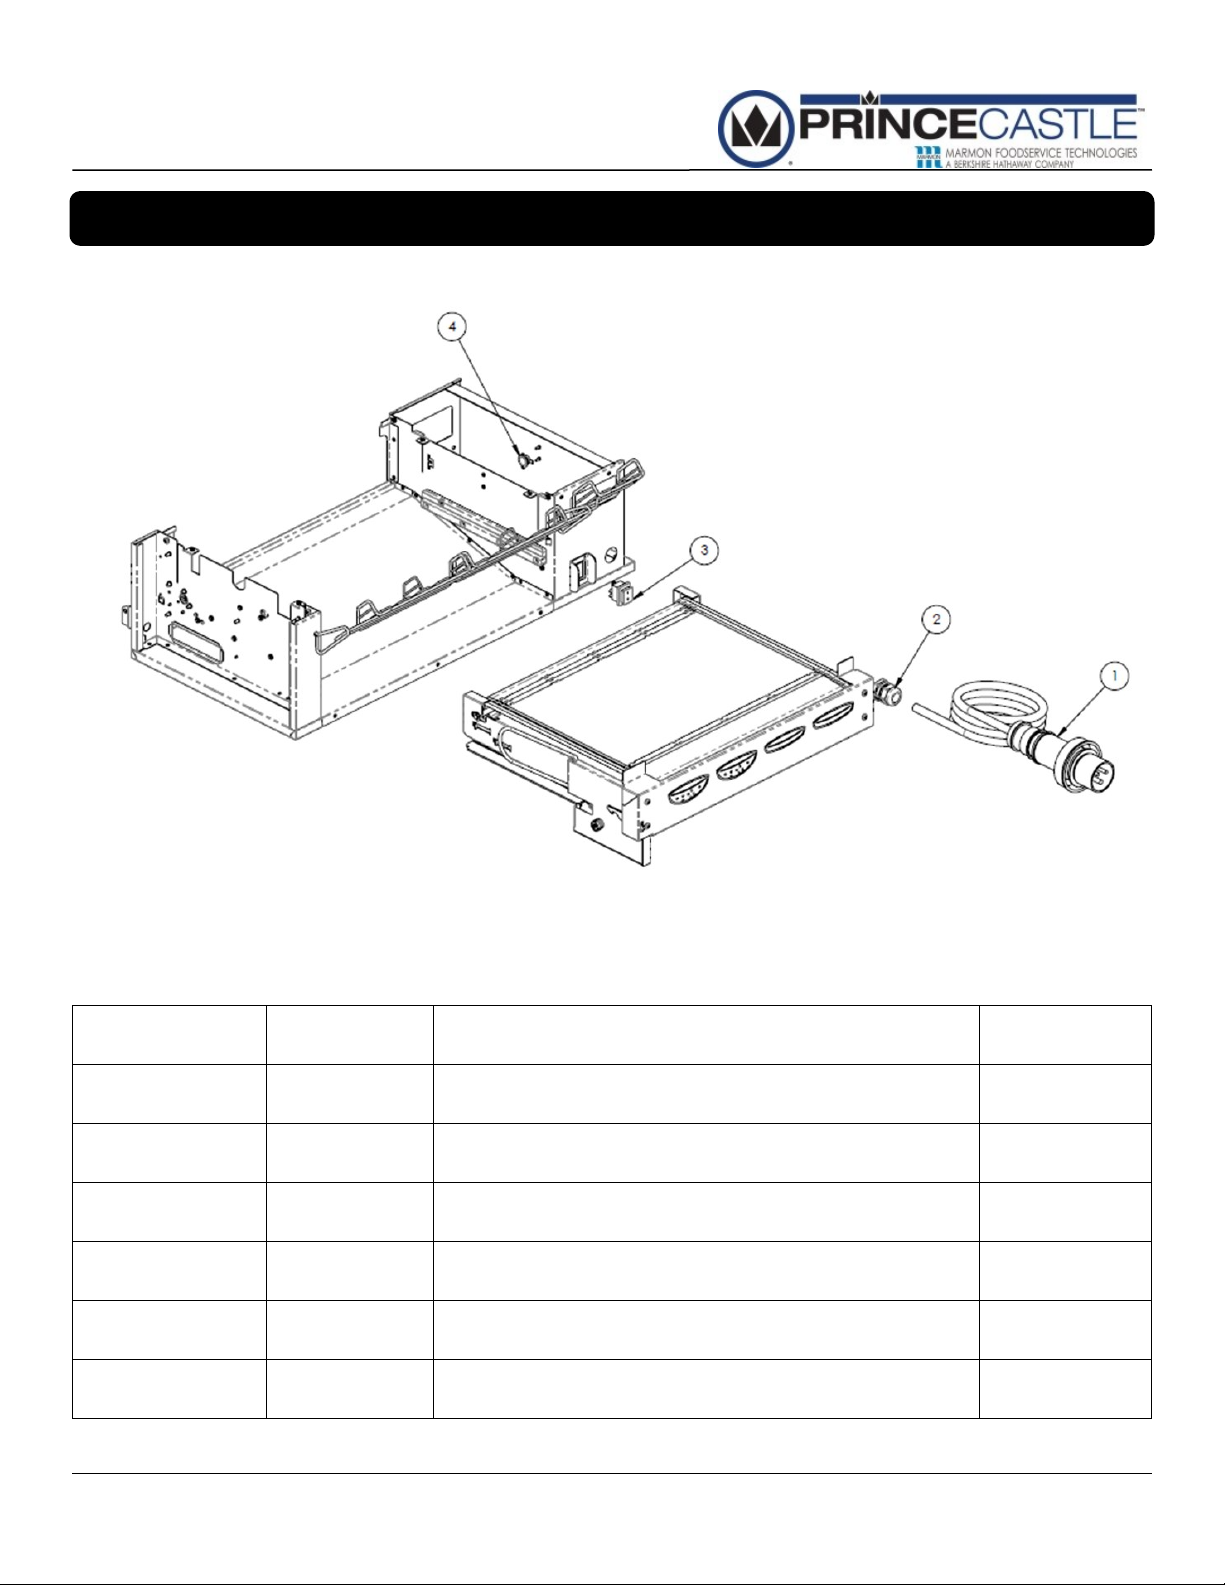
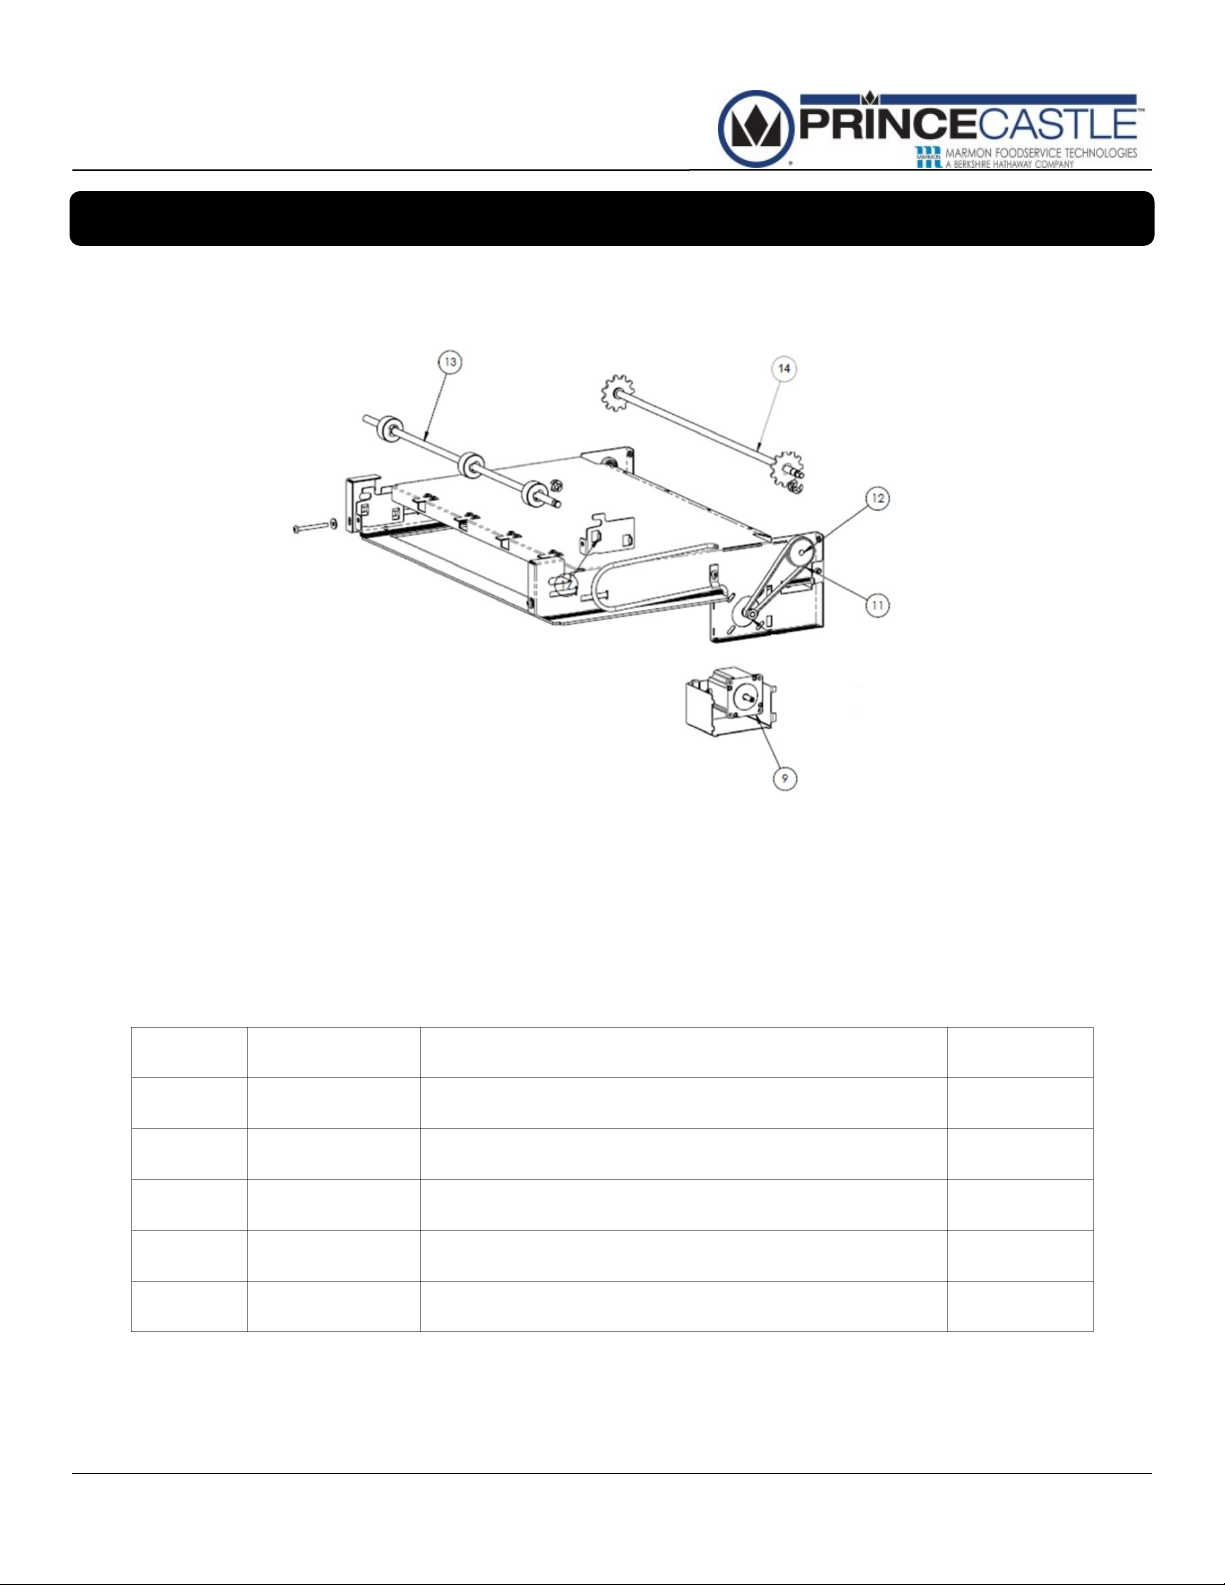
Exploded View and Parts List
Item # Part # Description Qty
1 72-477 POWERCORD 1
2 66-045S STRAIN RELEIF 1
3 78-223S
4 353-394S
NOT SHOWN 527-127S SERVICE KIT, CUTOFF SWITCH314 1
NOT SHOWN 353-206S TRAY, OUTFEED ASSY 1
CBT-SB-NA-1PS 9 Printed in USA 11/15
SWITCH, ROCKER, DPST, IP65, 16A
THERMOSTAT, SNAP DISC CONTROL, 120
1
1
Page 10

Horizontal Core Bun Toaster
CBT-SB-NA-1PS
Exploded View and Parts List (Connued)
Item # Part # Description Qty
5 353-054S
6 353-053S
CBT-SB-NA-1PS 10 Printed in USA 11/15
RELEASE SHEET BAR
RELEASE SHEET CLIP
2
2
Page 11

Horizontal Core Bun Toaster
CBT-SB-NA-1PS
Exploded View and Parts List (Connued)
Item # Part # Description Qty
7 353-300S
8
CBT-SB-NA-1PS 11 Printed in USA 11/15
353-442S SKID BAR, CONVEYOR
CONVEYOR, MAIN
1
4
Page 12
Horizontal Core Bun Toaster
CBT-SB-NA-1PS
Exploded View and Parts List (Connued)
Item # Part # Description Qty
9
11
12
13
14
CBT-SB-NA-1PS 12 Printed in USA 11/15
353-241S STEPPER MOTOR 2
353-333S BELT 3MM HTD 106 TEETH 1
353-343S PULLEY, 3MM PITCH .44 GROOVE 2
353-257S SHAFT, TENSIONING ASSY 1
353-205S CONVEYOR SPROCKET SHAFT ASSY 1
Page 13
Horizontal Core Bun Toaster
CBT-SB-NA-1PS
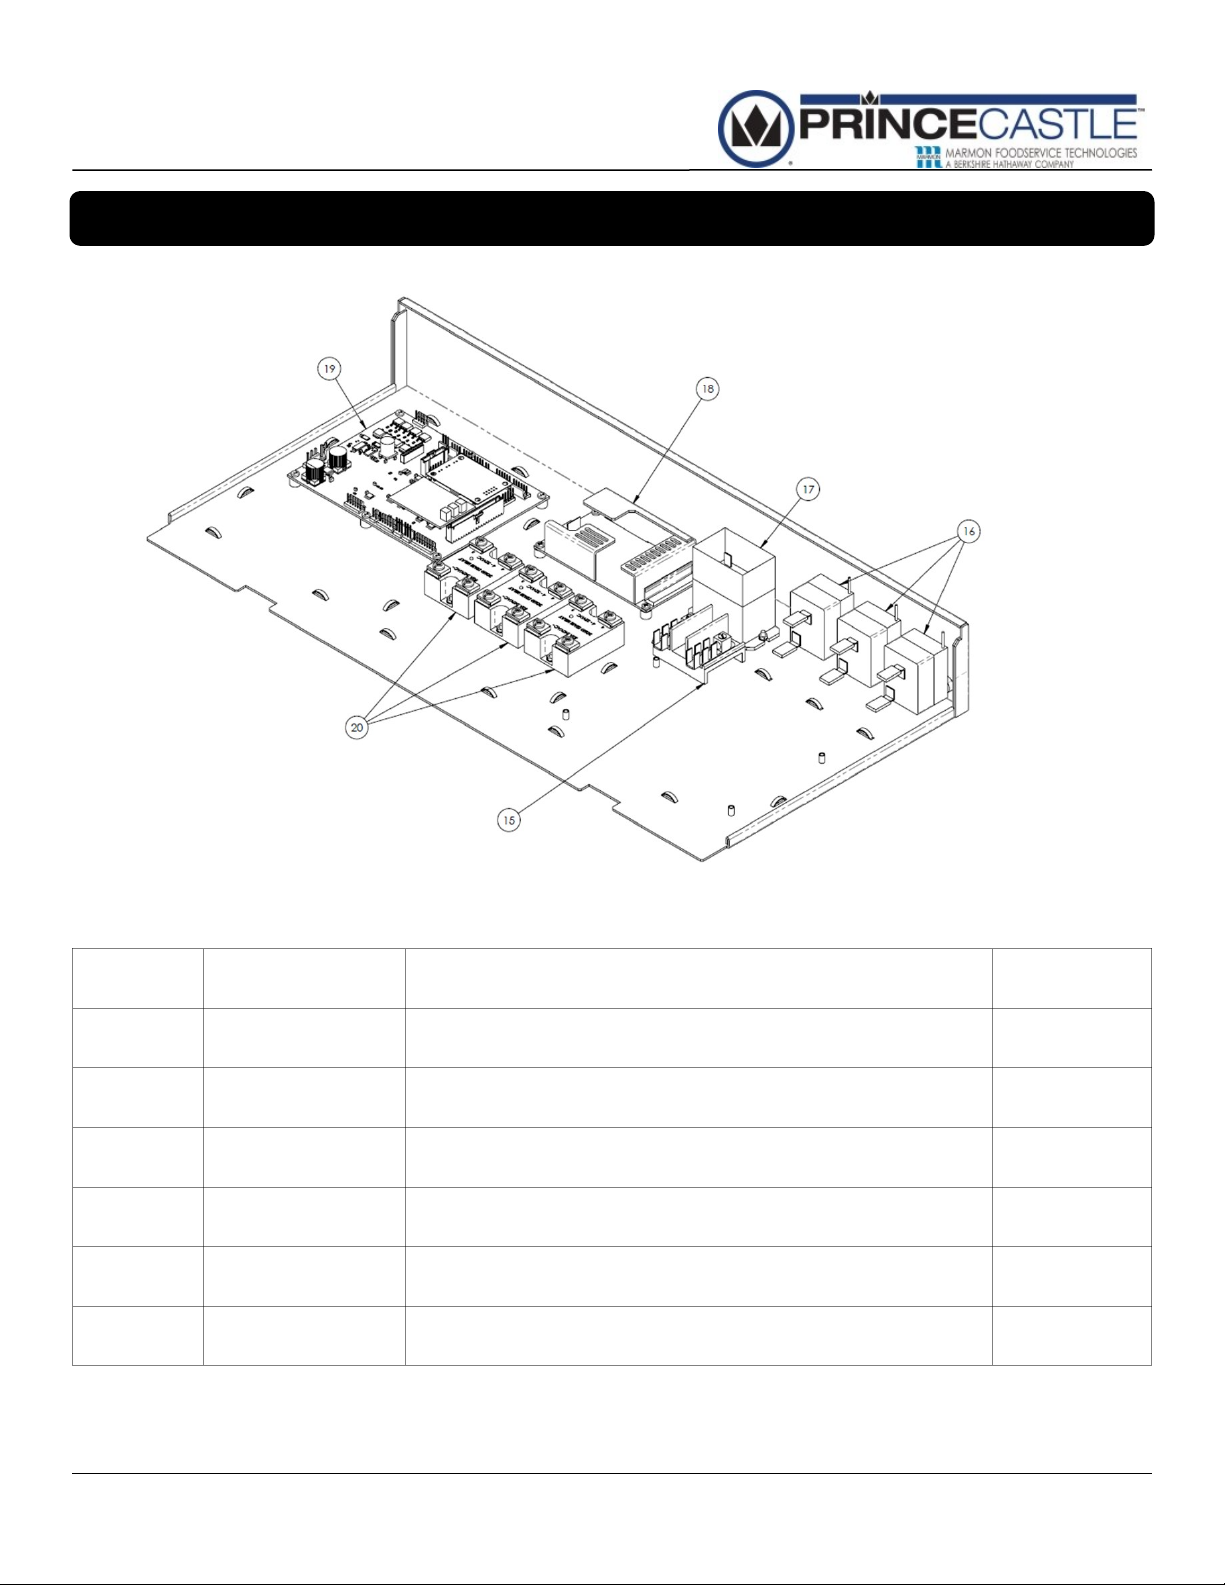
Exploded View and Parts List (Connued)
Item # Part # Description Qty
15 77-093S
16
17 65-067S
18
19
20
CBT-SB-NA-1PS 13 Printed in USA 11/15
526-281S TSTAT, HI-LIMIT BULB & CAP, 700F
85-144-24S PWER SUPPLY, 24VDC 100W
353-262CS PCB, MAIN CONTROLLER
65-058S RELAY, SS,50A,280VAC,3-32VDC
TERMINAL BLOCK 12POS 2ROW INSULATED
RELAY, DPST, 30A, 200/240, 50/60
1
3
1
1
1
3
Page 14

Horizontal Core Bun Toaster
CBT-SB-NA-1PS
Exploded View and Parts List (Connued)
Item # Part # Description Qty
21 353-208S
CBT-SB-NA-1PS 14 Printed in USA 11/15
HEATER PLATEN
1
Page 15

Horizontal Core Bun Toaster
CBT-SB-NA-1PS
Exploded View and Parts List (Connued)
Item # Part # Description Qty
22 527-370S
23
CBT-SB-NA-1PS 15 Printed in USA 11/15
37814S MOTOR FAN 230V UF12A23
ASSY, MEMBRANE SWITCH & OVERLAY
1
1
Page 16

Horizontal Core Bun Toaster
CBT-SB-NA-1PS
Exploded View and Parts List (Connued)
Item # Part # Description Qty
9
12 353-343S PULLEY, 3MM PITCH .44 GROOVE 2
24 353-357S BELT 3MM 80 TEETH 1
25 527-819S GEAR, SPUR,56,TEETH,24.P,2.33P.D..25 2
26 353-233S CLUB ASSY BOTTOM 1
27 353-231S CLUB ASSY TOP 1
NOT SHOWN 527-822S CLUB PROBE TOP 1
NOT SHOWN 527-636S CLUB PROBE BOTTOM 1
353-242S STEPPER MOTOR 2
CBT-SB-NA-1PS 16 Printed in USA 11/15
Page 17

Horizontal Core Bun Toaster
CBT-SB-NA-1PS
Display Menu Opons
CBT-SB-NA-1PS 17 Printed in USA 11/15
Page 18

Horizontal Core Bun Toaster
CBT-SB-NA-1PS
Display Menu Opons (Connued…)
CBT-SB-NA-1PS 18 Printed in USA 11/15
Page 19

Horizontal Core Bun Toaster
CBT-SB-NA-1PS
Management Programming
1
To Enter Programming screens
Press and hold the MENU
button for 6 seconds. The
PROGRAMMING VERSION
screen will appear in the LCD
display.
From the PROGRAMMING
VERSION screen, you may:
Press RIGHT scroll
button to advance to the
next menu item
2
3
To Adjust PLATEN
TEMPERATURE from the
SELECT LANUGAGE Screen,
press the RIGHT scroll button.
Press the OK button to enter the
programming screen.
A. From the PLATEN
TEMPERATURE screen that
that appears adjust the temperature using the RIGHT
and LEFT scroll buttons.
Accept the new Temperature by
pressing OK.
NOTE : To cancel without
accepting the new setting,
press the MENU logo button to
return to the previous screen
4
To Change the LANGUAGE
from the PROGRAMMING
VERSION
Screen, PRESS the left scroll
button.
From the SELECT
LANGUAGE Screen,
Press OK button
A. From the
LANGUAGE screen
that appears, use
the RIGHT and
LEFT scroll buttons.
TO select different
Language
B. Accept the new
language by pressing
OK button to return to
the SELECT
LANGUAGE screen
To adjust SELECT F/C
From The PLATEN
TEMPERATURE screen,
press the RIGHT scroll
button.
From the SELECT F/C screen
that appears, press the OK
button.
A. From the SET F/C
Screen that appears,
Use the LEFT and
RIGHT scroll buttons to
Select TEMP = F
( Fahrenheit ) or
C (Celsius )
B. Accept the new scale
By pressing the OK
Button to return to
The SELECT F/C
screen
CBT-SB-NA-1PS 19 Printed in USA 11/15
Page 20

Horizontal Core Bun Toaster
CBT-SB-NA-1PS
Management Programming (Connued)
5
To adjust set TOAST TIME
from the SELECT F/C
screen, press the RIGHT
scroll button
From the SELECT
TOAST TIME Screen,
Press OK button
A. From the SELECT TOAST
TIME that appears, Adjust
the set point Time Using the
RIGHT and LEFT
Scroll buttons. Accept
The new toast time by
Pressing OK.
NOTE : To cancel with\out
accepting the new setting,
press the MENU logo button to
return to the previous screen
6
To adjust CLUB TOAST
TIME from the SELECT
TOAST TIME screen, press
the RIGHT scroll button
From the SELECT CLUB
TOAST TIME Screen,
Press OK button
A. From the SELECT CLUB
TOAST TIME that appears,
Adjust the set point Time
Using the RIGHT and LEFT
Scroll buttons. Accept
The new toast time by
Pressing OK.
7
To enter LON SERVICE CALL
from CLUB TOAST TIME screen,
press the RIGHT scroll button.
From the LON SERVICE CALL
Screen, Press OK button
From the LON SERVICE CALL screen
that appears, the following options are
available
YES = LEFT scroll button
NO = RIGHT scroll button
OK = Cancel / Go Back
8
To enter MFY STORE from LON
SERVICE CALL screen, press
the RIGHT scroll button.
From the MFY STORE Screen, Press
OK button
From the MFY STORE screen that
appears, the following options are
available
YES = LEFT scroll button
NO = RIGHT scroll button
OK = Cancel / Go Back
NOTE : To cancel with\out
accepting the new setting,
press the MENU logo button to
return to the previous screen
CBT-SB-NA-1PS 20 Printed in USA 11/15
Page 21

Horizontal Core Bun Toaster
CBT-SB-NA-1PS
Management Programming (Connued)
9
To view Service Codes, From
the MFY Store screen, press the
RIGHT scroll button once.
From the Service
Codes screen,
A. Select OK to check
the service codes
B. Refer to Service
codes page to understand the operation of
the unit.
10
Exit Programming
Press the MENU button from
any screen to exit programming
mode.
CBT-SB-NA-1PS 21 Printed in USA 11/15
Page 22

Horizontal Core Bun Toaster
CBT-SB-NA-1PS
Unplug the unit
1
WARNING
Failure to disconnect power
from the unit before servicing
could result in severe bodily
injury or death. The ON/OFF
Switch does not disconnect
incoming power to the unit.
Remove the bun landing zone from the unit
2
Remove/Replace PCB
# 5
Loosen the boom screw to access the electronics
3
tray. Reference the Red Arrow.
Pull on the screw to slide the electronics tray open
4
Remove the (10) connectors from master control
5
board. Reference the Black Arrows.
Remove (4) screws to unsecure the master control
6
board. Reference the Blue Arrows.
Remove the Board
7
# 5
#
5
#
5
# 5
#
#
5
CBT-SB-NA-1PS 22 Printed in USA 11/15
Page 23

Horizontal Core Bun Toaster
CBT-SB-NA-1PS
Install the new board
8
Using the (4) screws removed in step 6, secure the
9
board onto the electronics tray
Reconnect (10) connecons onto board that were
10
removed in step 5.
Slide the electronics tray back into unit.
11
Remove/Replace PCB
Tighten the screw to secure the electronics tray.
12
Re-install the bun landing zone to the unit
13
Plug in Unit, ensure the unit is fully funconal.
14
CBT-SB-NA-1PS 23 Printed in USA 11/15
Page 24

Horizontal Core Bun Toaster
CBT-SB-NA-1PS
Unplug the unit
1
WARNING
Failure to disconnect power
from the unit before servicing
could result in severe bodily
injury or death. The ON/OFF
Switch does not disconnect
incoming power to the unit.
Remove the bun landing zone from the unit
2
Remove/Replace Relay
#
6
#
9
#
6
Loosen the boom screw to access the electronics
3
tray. Refer to the Yellow Arrow
Pull on the screw to slide the electronics tray open
4
Remove (4) connectors from relay (Note the posion
5
of each connector). Refer to the Blue Arrows
Remove (2)- 3mm nuts to release the relay from the
6
electronics tray. Refer to the Red Arrows
RELAYS
# 3
CBT-SB-NA-1PS 24 Printed in USA 11/15
Page 25

Horizontal Core Bun Toaster
CBT-SB-NA-1PS
Install the relay using the (2)- 3mm nuts removed in
7
Step 6
Install the (4) connectors that were removed in step 5
8
back onto the relay.
Install the relay using the (2)- 3mm nuts removed in
9
Step 6
Slide the electronics tray back into unit.
10
Remove/Replace Relay
Tighten the screw to secure the electronics tray.
11
Re-install the bun landing zone to the unit
12
Plug in Unit, ensure the unit is fully funconal.
13
CBT-SB-NA-1PS 25 Printed in USA 11/15
Page 26

Horizontal Core Bun Toaster
CBT-SB-NA-1PS
Remove/Replace Conveyor Belt
Unplug the unit
1
WARNING
Failure to disconnect power
from the unit before servicing
could result in severe bodily
injury or death. The ON/OFF
Switch does not disconnect
incoming power to the unit.
Remove the In-Feed Rack
2
#
3
#
4
#
3
#
4
Release tension on the conveyor belt by removing (2)
3
screws on rear side of unit. Refer to the Blue Arrows
Remove the front cover by removing the (4) screws.
4
Refer to the Red Arrows
Push in the release knob, then pull the conveyor as-
5
sembly out
Find the master link on belt. Refer to the Yellow Arrow
6
Un-crimp the master linkage on both sides. Use pliers
7
to remove. Refer to the Green Arrows.
#
4
#
4
# 6
# 7 # 7
CBT-SB-NA-1PS 26 Printed in USA 11/15
Page 27

Horizontal Core Bun Toaster
CBT-SB-NA-1PS
Remove/Replace Conveyor Belt (Cont..)
Slide master links out from each side. Refer to the
8
Black Arrows
Pull conveyor belt out.
9
# 8 # 8
#
9
CBT-SB-NA-1PS 27 Printed in USA 11/15
Page 28

Horizontal Core Bun Toaster
CBT-SB-NA-1PS
Remove/Replace Conveyor Belt (Cont..)
Feed in New Belt
10
Insert (2) linkages that were removed in step 8. (1 on
11
each side of belt)
Use pliers to hook linkages onto belt
12
Slightly crimp the master link onto the belt
13
Aer ensuring the belt is secure, slide the conveyor
14
assembly back into unit
Secure the front cover by installing the (4) screws pre-
15
viously removed in step 4.
Secure (2) belt tensioner bolts on rear side of unit,
16
Re-install the in-feed rack
previously loosened in step 3.
17
Plug in Unit, ensure the unit is fully funconal.
18
CBT-SB-NA-1PS 28 Printed in USA 11/15
Page 29

Horizontal Core Bun Toaster
CBT-SB-NA-1PS
Remove/Replace Teon Bars
Unplug the unit
1
WARNING
Failure to disconnect power
from the unit before servicing
could result in severe bodily
injury or death. The ON/OFF
Switch does not disconnect
incoming power to the unit.
Remove the In-Feed Rack
2
#
3
#
4
#
3
#
4
Release tension on the conveyor belt by loosening (2)
3
screws on rear side of unit. Refer to the Blue Arrows
Remove the front cover by removing the (4) screws.
4
Refer to the Red Arrows
Push in the release knob, then pull the conveyor as-
5
sembly out
Find the master link on belt. Refer to the Yellow Arrow
6
Un-crimp the master linkage on both sides. Use pliers
7
to remove. Refer to the Green Arrows.
#
4
#
4
# 6
# 7 # 7
CBT-SB-NA-1PS 29 Printed in USA 11/15
Page 30

Horizontal Core Bun Toaster
CBT-SB-NA-1PS
Remove/Replace Teon Bars (Cont..)
Slide master links out from each side. Refer to the
8
Black Arrows
Pull conveyor belt out. Refer to the Orange Arrow.
9
Remove (4) screws to release all (4) Teon bars. Refer
10
to the Green Arrows
# 9
# 8
# 8
#
10
CBT-SB-NA-1PS 30 Printed in USA 11/15
#
10
#
10
#
10
Page 31

Horizontal Core Bun Toaster
CBT-SB-NA-1PS
Remove/Replace Teon Bars (Cont..)
Install (4) screws to secure (4) Teon bars. Ensure the
11
Teon bars are properly aligned.
Feed in the Conveyor Belt
12
Insert (2) linkages that were removed in step 8. (1 on
13
each side of belt)
Use pliers to hook linkages onto belt
14
Slightly crimp the master link onto the belt
15
Aer ensuring the belt is secure, slide the conveyor
16
assembly back into unit
Secure the front cover by installing the (4) screws pre-
17
viously removed in step 4.
Secure (2) belt tensioner bolts on rear side of unit,
18
previously loosened in step 3.
Re-install the in-feed rack
19
Plug in Unit, ensure the unit is fully funconal.
20
CBT-SB-NA-1PS 31 Printed in USA 11/15
Page 32

Horizontal Core Bun Toaster
CBT-SB-NA-1PS
Remove/Replace Motor and Belt Assembly
Unplug the unit
1
WARNING
Failure to disconnect power
from the unit before servicing
could result in severe bodily
injury or death. The ON/OFF
Switch does not disconnect
incoming power to the unit.
Remove the In-Feed Rack
2
Remove the front cover by removing the (4) screws
3
Push in the release knob, then pull the conveyor as-
4
sembly out
On the le side of the conveyor assembly, remove the
5
belt cover.
#
3
#
3
#
3
#
3
On the underside of the conveyor assembly, remove
6
the motor cover by unhooking the 4 tabs.
Remove (4) 8mm nuts to remove motor, and release
7
tension from belt.
CBT-SB-NA-1PS 32 Printed in USA 11/15
Page 33

Horizontal Core Bun Toaster
CBT-SB-NA-1PS
Remove/Replace Motor and Belt Assembly (Cont...)
Reinstall Belt and Motor by securing the (4) 8mm nuts
8
and (4) screws.
Reinstall the motor cover on the underside of the con-
9
veyor assembly
Reinstall the belt cover on the le side of the conveyor
10
assembly
Slide electronics tray back into the unit.
11
Secure the front cover by installing the (4) screws pre-
12
viously removed in step 3.
Secure (2) belt tensioner bolts on rear side of unit.
13
Re-install the in-feed rack
14
Plug in Unit, ensure the unit is fully funconal.
15
CBT-SB-NA-1PS 33 Printed in USA 11/15
Page 34

Horizontal Core Bun Toaster
CBT-SB-NA-1PS
Remove/Replace Display Assembly
Unplug the unit
1
WARNING
Failure to disconnect power
from the unit before servicing
could result in severe bodily
injury or death. The ON/OFF
Switch does not disconnect
incoming power to the unit.
Remove the (2) Phillips screws to release the le side
2
panel. Refer to the Green Arrows.
Unplug the Display Harness. Refer to the Red Arrow.
3
Remove the (4) M3 nuts. Li the display assembly o
4
the control side panel. Refer to the Blue Arrows.
Reinstall the display assembly by installing the (4) M3
5
nuts. Previously removed in step 4.
Plug in the display harness. Previously removed in step
6
3.
Secure the le side panel using the (2) Phillips screws,
7
previously removed in step 2.
Plug in Unit, ensure the unit is fully funconal.
8
# 2 # 2
# 4 # 4
# 3
# 4
CBT-SB-NA-1PS 34 Printed in USA 11/15
# 4
Page 35

Horizontal Core Bun Toaster
CBT-SB-NA-1PS
Remove/Replace Club Belt
Unplug the unit.
1
WARNING
Failure to disconnect power
from the unit before servicing
could result in severe bodily
injury or death. The ON/OFF
Switch does not disconnect
incoming power to the unit.
Refer to Page to remove club assembly.
2
Loosen (4) motor bolts to lessen tension from belt.
3
Refer to the Blue Arrows.
Slide belt o gear assembly. Refer to the Red Arrow.
4
Replace Belt.
5
Tighten (4) motor bolts to apply tension to belt
6
Refer to Page to replace club assembly.
7
Plug in Unit, ensure the unit is fully funconal.
8
# 4
CBT-SB-NA-1PS 35 Printed in USA 11/15
Page 36

Horizontal Core Bun Toaster
CBT-SB-NA-1PS
Remove/Replace Club Probe
Unplug the unit.
1
WARNING
Failure to disconnect power
from the unit before servicing
could result in severe bodily
injury or death. The ON/OFF
Switch does not disconnect
incoming power to the unit.
Refer to Page to remove club assembly and belt.
2
Remove (2) gears from club assembly. Refer to the Red
3
Arrows.
Remove (3) Screws. Refer to the Yellow Arrows.
4
Remove (2) Wires by removing (2) Phillips screws. Re-
5
fer to the Orange Arrows.
# 7
# 3
# 3
# 7
Pull out platen assembly.
6
Remove (4) side screws to remove platen from assem-
7
bly. Note the length and posion of screws. Refer to
Blue Arrows.
Li platen o assembly.
# 7
# 7
8
Remove Screw to remove probe from platen. Refer to
9
the Green Arrow.
Replace Faulty Probe. Reuse sleeve for new probe.
# 9
10
CBT-SB-NA-1PS 36 Printed in USA 11/15
Page 37

Horizontal Core Bun Toaster
CBT-SB-NA-1PS
Remove/Replace Club Probe
Aer replacing the probe, reinstall screw to secure the
11
probe to platen. Previously removed in Step 9.
Place platen back onto assembly. Previously removed
12
in Step 8.
Replace (4) screws to secure platen to assembly. Previ-
13
ously removed in Step 7.
Feed probe wire through slot in assembly
14
Reinstall the conveyor platen assembly onto club as-
15
sembly. Previously removed in Step 6.
Replace (2) wires, Previously removed in Step 5.
16
Replace (3) screws, Previously removed in Step 4.
17
Replace (2) gears, Previously removed in Step 3.
18
Tighten (4) motor bolts to apply tension to belt
19
Refer to Page to reassemble club assembly and belt.
20
CBT-SB-NA-1PS 37 Printed in USA 11/15
Page 38

Horizontal Core Bun Toaster
CBT-SB-NA-1PS
Remove/Replace Club Assembly
Unplug the unit.
1
WARNING
Failure to disconnect power
from the unit before servicing
could result in severe bodily
injury or death. The ON/OFF
Switch does not disconnect
incoming power to the unit.
Push in from each side right side panel to remove pan-
2
el from unit. Refer to the Blue Arrows
Remove (2) screws to release the boom cover. Re-
3
move the boom cover. Refer to the Green Arrows.
Remove (2) screws to release the club assembly. Refer
4
to the Red Arrows
Slide the club assembly upwards, and out to remove
5
the enre club assembly. Be cauous of any wiring.
Using a sloed screwdriver, remove the (4) screws to
release all connecons from the club assembly. Refer
6
to the Yellow Arrows.
# 3
# 6
# 6
# 3
# 4 # 4
# 6
# 6
CBT-SB-NA-1PS 38 Printed in USA 11/15
Page 39

Horizontal Core Bun Toaster
CBT-SB-NA-1PS
Remove/Replace Club Assembly
Using a sloed screwdriver, aach (4) wires to club
7
assembly. Previously removed in step 6.
Slide club assembly back into unit. Make sure all tabs
on the upper club assembly are aligned. Ensure all
8
wiring is routed properly. Previously removed in step 5.
Install 2 screws to secure club assembly. Previously
9
removed in step 4.
Re-install the cover, and (2) screws. Previously re-
10
moved in step 3.
Re-install right side cover. Previously removed in step
11
2.
Plug in Unit, ensure the unit is fully funconal.
12
CBT-SB-NA-1PS 39 Printed in USA 11/15
Page 40

Horizontal Core Bun Toaster
CBT-SB-NA-1PS
Remove/Replace Platen High Limit Switch
Unplug the unit.
1
WARNING
Failure to disconnect power
from the unit before servicing
could result in severe bodily
injury or death. The ON/OFF
Switch does not disconnect
incoming power to the unit.
Push in from each side right side panel to remove pan-
2
el from unit. Refer to the Blue Arrows
# 3
# 3
Remove (2) screws to release the boom cover. Re-
3
move the boom cover. Refer to the Green Arrows.
Remove (4) screws to release the club assembly and
4
top cover. Refer to the Red Arrows
Slide the club assembly upwards, and out to remove
5
the enre club assembly. Be cauous of any wiring.
Using a sloed screwdriver, remove the (4) screws to
release all connecons from the club assembly. Refer
6
to the Yellow Arrows.
# 4
# 4
# 6
# 6
# 4
# 4
# 6
# 6
CBT-SB-NA-1PS 40 Printed in USA 11/15
Page 41

Horizontal Core Bun Toaster
CBT-SB-NA-1PS
Remove/Replace Platen High Limit Switch (Connued)
Open the Le Side panel by loosening the (2) Phillips
7
screws. Refer to the Blue Arrows.
Remove the (2) screws to release the top cover. Refer
8
to the Green Arrows.
Li top cover o the unit.
9
Remove (2) screws to remove High Limit Switch bracket
and release the high limit switch. Refer to the Orange
10
Arrows.
Loosen the boom screw to access the electronics
11
tray. Reference the Red Arrow.
Remove (2) nuts to remove High Limit Switch and pull
the high limit switch out of the unit. Refer to the Black
12
Arrow.
# 7 # 7
# 8
# 10
# 8
# 10
#
12
# 11
CBT-SB-NA-1PS 41 Printed in USA 11/15
Page 42

Horizontal Core Bun Toaster
CBT-SB-NA-1PS
Remove/Replace Platen High Limit Switch
Reinstall the high limit switch. Previously removed in
13
Step 12. Rewire high limit switch accordingly.
Close the electronics tray. Previously opened in Step
14
11.
Re-install the high limit switch bracket. Previously re-
15
moved in Step 10.
Re-install top cover onto unit. Previously removed in
16
Step 9.
Install the (2) Phillips screws on Le side of unit. Previ-
17
ously removed in Step 8.
Close the le side panel by ghtening the (2) Phillips
18
screws. Previously removed in Step 7.
Plug in Unit, ensure the unit is fully funconal.
24
Using a sloed screwdriver, reconnect all (4) connec-
19
ons on club assembly. Previously removed in Step 6.
Re-install the club assembly, previously removed in
20
Step 5.
Re-install (4) Phillips screws to secure top cover and
21
club assembly to unit. Previously removed in Step 4.
Re-install lower club cover. Previously removed in Step
22
3.
Re-install the right side panel. Previously removed in
23
step 2.
CBT-SB-NA-1PS 42 Printed in USA 11/15
Page 43

Horizontal Core Bun Toaster
CBT-SB-NA-1PS
Procedure Part Number Max Labor Hours
Remove/Replace PCB 353-262CS 0.5 Hours
Remove/Replace Relay 65-058S 0.5 Hours
Remove/Replace Conveyor Belt 353-300S 0.5 Hours
Remove/Replace Teon Bars 353-442S 0.5 Hours
Remove/Replace Motor and Belt Assembly 353-241S & 353-357S 0.5 Hours
Remove/Replace Display Assembly 526-370S 0.5 Hours
Allowable Labor Limits
Allowable Labor Limits
Remove/Replace Club Belt 353-357S 1.0 Hours
Remove/Replace Club Probe 527-468S OR 527-467S 1.0 Hours
Remove/Replace Club Assembly (Top or Boom) 353-231S OR 353-233S 1.0 Hours
Remove/Replace Main Platen High Limit Switch 526-281S 0.5 Hours
CBT-SB-NA-1PS 43 Printed in USA 11/15
 Loading...