

Page 1
PRIMARE APP
User Guide – iOS
Page 2

Primare App User Guide2
Page 3

CONTENTS
USING THE PRIMARE APP 4
Installing the Primare app 4
Connecting to the MM30, NP30, or PRE60 4
Selecting a source 4
Browsing tracks 5
Using the Playqueue 5
Play screen 6
Info screen 6
SELECTING A SOURCE 7
Playing music from internet radio 7
Playing music from a network shared music source 7
Playing music from a USB drive 7
Playing music from an iPod 8
Playing music from a digital or analogue input 8
Playing music from a PC/Mac 8
CONFIGURING SETTINGS 9
Settings screen 9
Application Settings 9
Device Settings 9
Network 10
IP Configuration 10
WiFi Configuration 10
INDEX 11
Primare App User Guide 3
Page 4
USING THE PRIMARE APP
INSTALLING THE PRIMARE APP
The Primare app is available for free download from the App Store on your
Android Phone or Tablet.
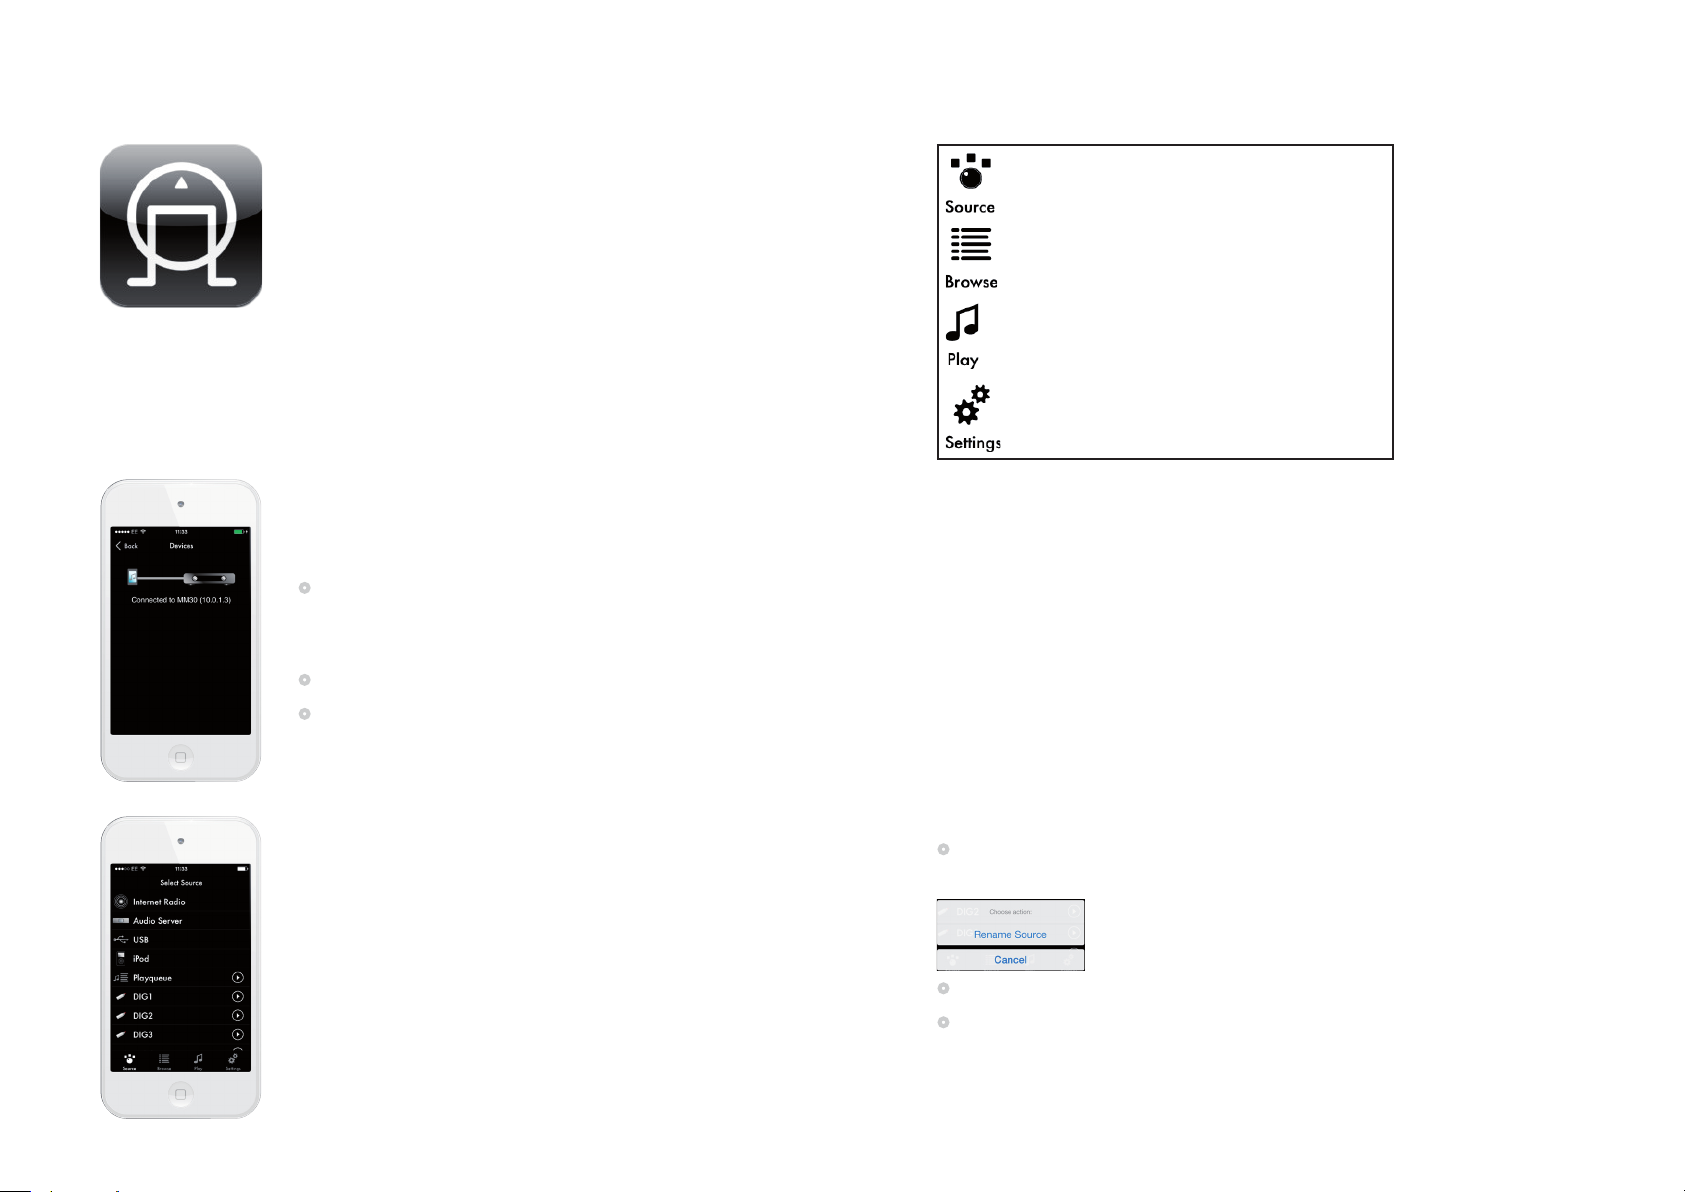
The Primare app provides the following screens which you can select by
touching one of the icons at the top of every screen:
CONNECTING TO THE MM30, NP30, OR PRE60
When you first launch the Primare App it will automatically search for UPnP
devices on the network, and display a list.
Touch the device you want to connect to.
•
It will subsequently connect to this device automatically.
To connect to a different device on the network
Touch the Settings icon, then touch Discover Devices.
•
Touch the device you want to connect to.
•
Displays the Select Source screen to allow
you to select a source
Displays the Browse screen to allow you to
browse for media on the selected source.
Displays the Play screen to allow you to
control playback of the music in the queue.
Displays the Settings screen to allow you
to see or change the Primare App settings.
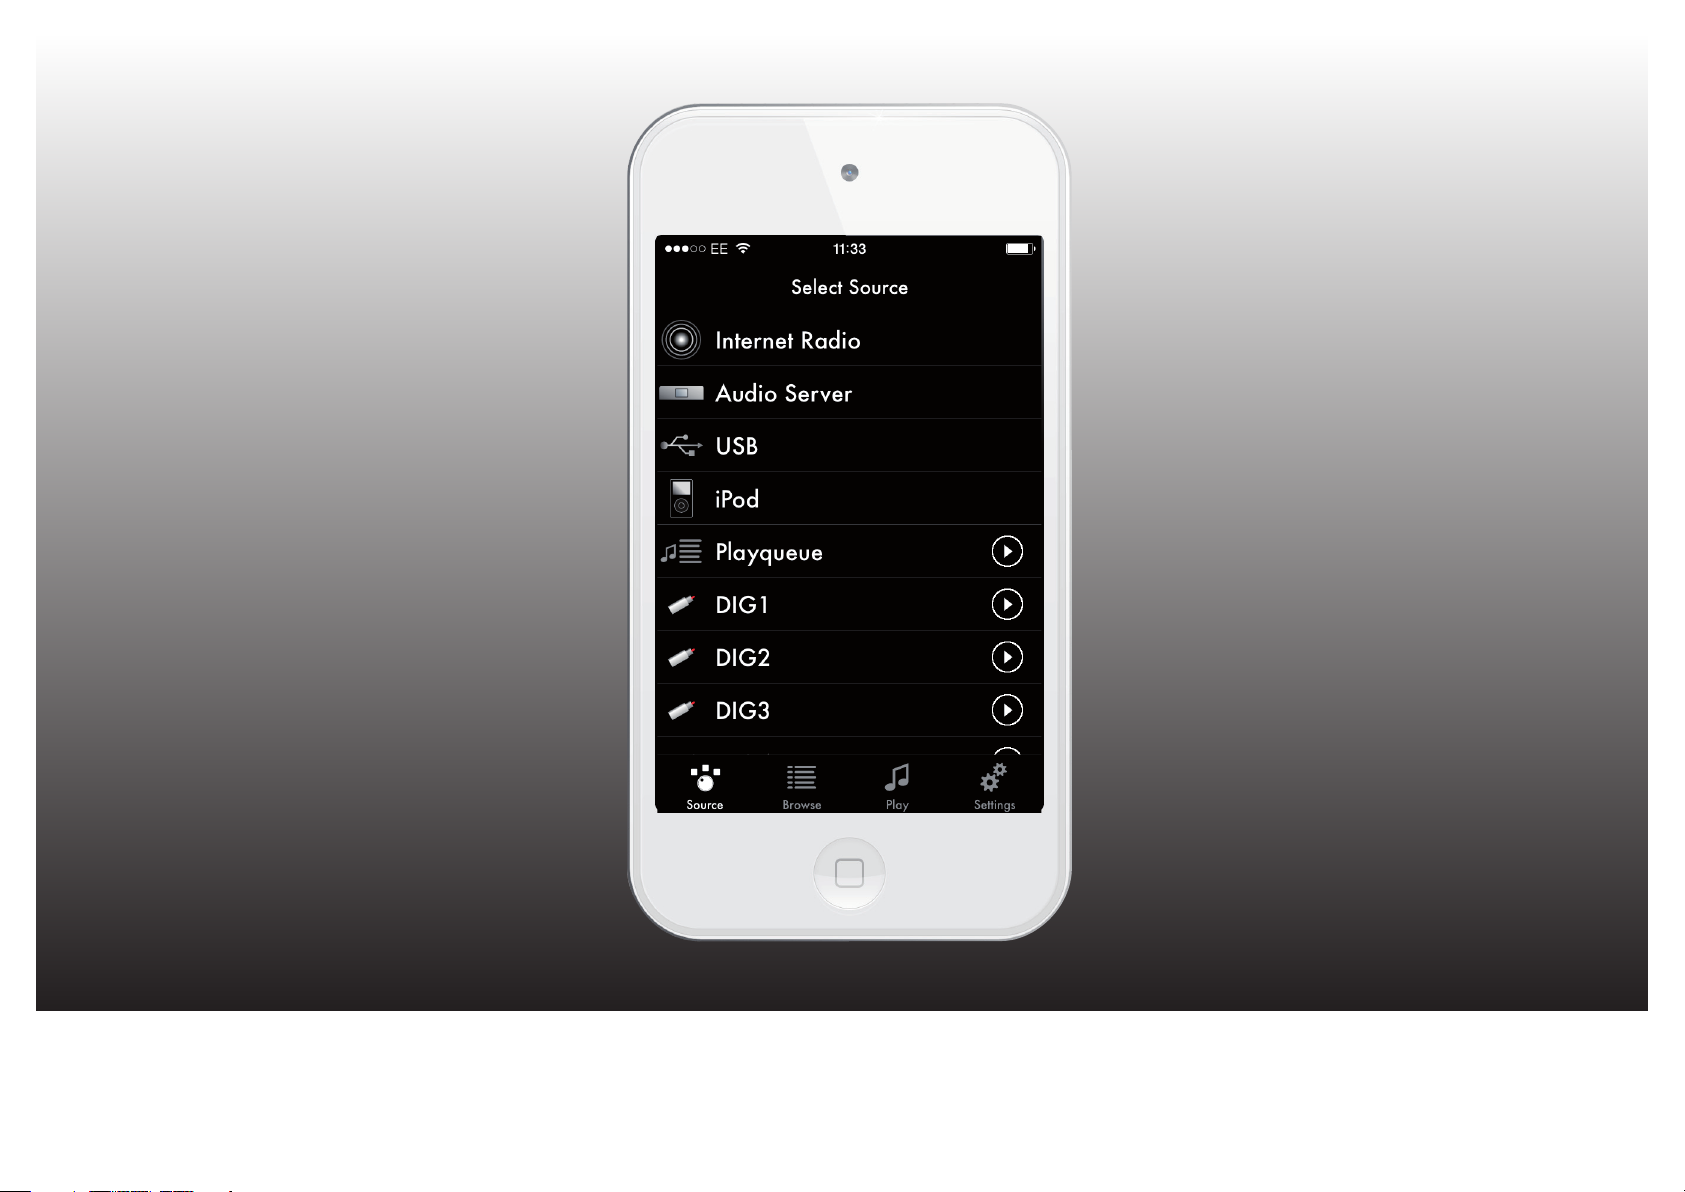
SELECTING A SOURCE
The Select Source screen allows you to select the music source:
Internet Radio Selects internet radio.
Audio Server Shows any network shared music sources.
USB Plays music from a USB drive attached to the USB-A input.
iPod Plays music from an iPod connected to the USB-A input.
Playqueue
DIG1 etc Selects a digital input. These can be renamed.
PC
IN1 etc Selects an analogue input. These can be renamed.
My Files Plays music from your device over Wi-Fi.
Displays the Playqueue.
Plays music from a PC/Mac connected to the USB-B input.
To rename a digital or analogue source, or PC
Touch the > icon to the right of the source you want to rename.
•
The following dialog box is displayed:
Touch Rename Source.
•
Enter the new name and touch return.
•
Primare App User Guide4
Page 5

BROWSING TRACKS
The Browse screen shows the folders and tracks on the selected device.
Note that you cannot browse on the Digital or Analogue inputs, or the PC
source, since no track information is available.
To play tracks
Touch a track to play it immediately.
•
To queue tracks
Touch the > icon to the right of the track, to display the Choose Action
•
dialog box to allow you to choose what to do:
To navigate back to the previous folder
Touch < Back at top left of the screen.
•
To search for tracks
Touch the Search icon:
•
Enter the text you want to search for.
•
Touch Search.
•
A list of matching tracks will be displayed.
Clear queue Clears the Playqueue.
Add now Adds the track in place of the currently playing track.
Add end Adds the track to the end of the Playqueue.
Add all now Adds all the tracks in place of the currently playing track.
Add all end Adds all the tracks to the end of the Playqueue.
USING THE PLAYQUEUE
Touch Playqueue on the Select Source screen.
•
The Playqueue screen displays the list of tracks queued to play, and allows
you to edit them. The currently playing track is indicated by a > icon.
To edit the Playqueue
Touch the Edit Queue icon:
•
Drag a track by the Reorder icon to move it in the Playqueue:
•
Touch the Delete icon to delete a track from the Playqueue:
•
Primare App User Guide 5
Touch the Edit Queue icon again to finish.
•
To clear or save the queue
Touch the > icon to the right of Playqueue on the Select Source screen.
•
Touch Clear Queue to clear the queue, or Save Queue as to save it.
•
Page 6

PLAY SCREEN
The Play screen allows you to control playback of the music in the queue.
Touch the Play icon:
•
Touch ¯ or ˘ for the previous or next track. Press and hold for fast
•
backwards or forwards.
INFO SCREEN
The Info screen displays detailed information about the currently playing
track.
To display the Info screen
Click the Info icon on the Play screen:
•
To change the volume
Drag the volume slider at the bottom of the Play Screen.
•
Tap the loudspeaker icons for small volume steps.
•
Primare App User Guide6
Page 7

SELECTING A SOURCE
PLAYING MUSIC FROM INTERNET RADIO
Touch Internet Radio on the Select Source screen.
•
You can now browse a directory of stations, organised by location, genre, and
popularity.
To create a list of favourites
On the Internet Radio screen touch Get access code, and note down the
•
code.
Connect to:
•
http://primare.vtuner.com/setupapp/primare/asp/authlogin/RegForm.
asp?ngy=eng
PLAYING MUSIC FROM A NETWORK SHARED
MUSIC SOURCE
Touch Audio Server on the Select Source screen.
•
Each network shared music source will be displayed as a folder, and you can
browse for the music you want to play.
See Browsing tracks, page 5, for information about browsing and searching
for music on a network shared music source.
Follow the instructions to activate your account.
•
Select your own Favorites.
•
Your favourites will appear in a folder on the Internet Radio screen called
*My Favorites*.
To add a station that is not on the list
Enter the following information:
Station name
Station URL, for example, http://62.168.116:8000/dsp1
Location, for example Germany.
Genre, for example Classical
Type, for example MP3
PLAYING MUSIC FROM A USB DRIVE
Touch USB on the Select Source screen.
•
The music on the USB drive will be displayed as a list of folders, and you can
browse for the music you want to play.
See Browsing tracks, page 5, for information about browsing and searching
for music on a USB drive.
Primare App User Guide 7
Page 8

PLAYING MUSIC FROM AN IPOD
Connect the iPod, iPhone, or iPad to the USB-A input on the MM30,
•
NP30, or PRE60, using an iPod USB lead.
You can then browse through the music on the iPod and select what you
want to play.
See Browsing tracks, page 5, for information about browsing and searching
for music on an iPod.
My Files on the Select Source screen will show the music on your device
and allow you to play it over Wi-Fi.
PLAYING MUSIC FROM A DIGITAL OR ANALOGUE
INPUT
Connect the source to the appropriate digital or analogue input on your
•
preamplifier.
Touch the entry corresponding to the input on the Select Source screen.
•
You can now play music from the chosen input.
PLAYING MUSIC FROM A PC/MAC
On a PC:
Install the Primare PC audio driver from the support section on:
•
www.primare.net
No driver is needed on a Mac.
Connect the PC/Mac USB connector to the USB-B input on the MM30,
•
NP30, or PRE60, using a USB-A to USB-B lead.
Select XMOS USB Audio 2.0 in the Sound Output Control Panel or
•
System Preferences panel.
Touch PC on the Select Source screen.
•
You can now pay music from your PC/Mac, using the MM30, NP30, or PRE60
as the soundcard of your PC/Mac.
Primare App User Guide8
Page 9

CONFIGURING SETTINGS
SETTINGS SCREEN
The Settings screen allows you to see or change settings.
Touch the Settings icon:
•
Discover Devices Searches for UPnP devices on the network.
Application Settings Specifies settings for the Primare app; see below.
Device Settings Allows you to configure the MM30, NP30, or PRE60;
see below.
About Displays the Primare app version information.
APPLICATION SETTINGS
The Application Settings screen provides the following Primare App
settings:
Autoconnect Specifies whether to connect automatically to the
last device.
Show Album Art Specifies when to show album art for tracks.
Play My Files Shows the My Files folder.
Purge Clears the stored album art files.
DEVICE SETTINGS
The Device Settings screen provides the following MM30, NP30, or PRE60
settings:
Network Allows you to configure the Wi-Fi and Ethernet
settings.
Audio Allows you to specify the maximum and default
volume.
Control Allows you to specify the IR Input location.
Firmware Displays the firmware information, and allows you
to check for and install updates.
To choose when album art is displayed
Touch Show Album Art on the Application Settings screen.
•
The following dialog box will be displayed:
Touch Always to show album art for tracks on all devices, Directories
•
and Internet Radio to show album art for the Internet Radio and Audio
Server options only, and Never to disable album art.
Primare App User Guide 9
Page 10

NETWORK
The Network screen displays a summary of the current network settings,
and provides the following MM30, NP30, or PRE60 settings:
Configure WiFi Displays the WiFi Configuration screen to allow you
to configure the Wi-Fi settings; see below.
Configure LAN Displays the IP Configuration screen to allow you to
configure the Ethernet settings; see below.
Device Name Allows you to assign a name to your Primare device.
Touch Restart to restart the MM30, NP30, or PRE60 following a change
•
to the network settings.
IP CONFIGURATION
The IP Configuration screen provides the following MM30, NP30, or PRE60
settings:
DHCP Enables or disables DHCP for the device. If DHCP
is enabled, the other settings will be managed
automatically by the network protocol.
IP Address The IP address of the MM30, NP30, or PRE60.
Subnet Mask The IP Subnet Mask.
Gateway The static default gateway address.
Primary Server The static primary Domain Name Server.
Secondary Server The static secondary Domain Name Server.
WIFI CONFIGURATION
The WiFi Configuration screen provides the following MM30, NP30, or
PRE60 settings:
SSID The name of your wireless network.
Security The type of wireless encryption used by the system. The
options are: None, WEP, WPA, or WPA2.
Cipher The type of WPA encryption that is used. The options are
TKIP, AES, or TKIP/AES.
Password The WiFi password.
Primare App User Guide10
Page 11

INDEX
A
Album art, showing 9
Analogue input 8
Application Settings 9
Audio Server 7
Audio settings 9
Autoconnect 9
B
Browsing tracks 5
C
Cipher 10
Clearing the Playqueue 5
Connecting 4
Control 9
D
Default volume 9
Device Settings 9
DHCP 10
Digital input 8
DNS servers 10
F
Favourites, creating 7
Firmware 9
G
Gateway 10
I
Info screen 6
Inputs, playing music from 8
Installing 4
Internet Radio 7
IP Address 10
IP Configuration 10
iPod 8
M
Maximum volume 9
My Files 4, 8
N
Network 10
Network shared music source 7
P
Password 10
PC/Mac, playing music from 8
Play My Files 9
Playqueue
Adding tracks 5
Clearing 5
Editing 5
Saving 5
Play screen 6
Purge 9
Q
Queuing tracks 5
R
Renaming a source 4
S
Saving the Playqueue 5
Searching for tracks 5
Security 10
Selecting a source 4
Settings screen 9
Show Album Art 9
Sources
Renaming 4
SSID 10
Station, adding 7
Subnet mask 10
T
Tracks
Browsing 5
Information 6
Queuing 5
Searching 5
U
USB drive 7
V
Volume, changing 6
W
WiFi Configuration 10
Primare App User Guide 11
Page 12

P R I M A R E A B
L I M S T E N S G A TA N 7
S E - 2 1 6 1 6 L I M H A M N
S W E D E N
P R I M A R E . N E T
 Loading...