

Page 1
Page 2

FCC Notice
This equipment has been tested and found to comply with the limits f or a Class A digital
device, pursuant to Part 15 of the FCC rules. These limits are designed to provide
reasonable protection against harmful interference when the equipment is operated in a
commercial environment. This equipment generates, uses, and can radiate radio frequency and energy and, if not installed and used in accordance with the instruction
manual, may cause harmful interference to radio communications. Operation of this
equipment in a residential area is likely to cause harmful interference in which case the
user will be required to correct the interference at his own expense.
Third Edition, September 2000
©2000 Pitney Bowes Inc.
All rights reserved. This book may not be reproduced in whole or in part in any fashion
or stored in a retrieval system of any type or transmitted by any means, electronically or
mechanically, without the express, written permission of Pitney Bowes.
We have made every reasonable effort to ensure the accuracy and usefulness of this
manual; however, we cannot assume responsibility for errors or omissions or liability for
the misuse of misapplication of our products.
Due to our continuing program of product improvement, equipment and material
specifications as well as performance, features are subject to change without notice.
Integra is a trademark of Pitney Bowes Inc.
SV60418 Rev. C 9/00
Page 3

Contents
CHAPTER PAGE
1 INTRODUCTION
About Your Integra
Sleep Mode ...........................................................................................................................2
Safety Precautions .............................................................................................2
Scale & Keypad Identification ......................................................................... 3
Connecting Wires, Cables, & Meter..................................................................4
Specifications..................................................................................................... 5
Getting Help ........................................................................................................5
2 USING YOUR INTEGRA™ 5 SCALE
Navigating the Menus................................................................................................... 8
Entering Alphabetic Information................................................................................ 8
Tailoring Setup Options ................................................................................................9
Changing User Options .................................................................................................... 9
Entering the Supervisor Password.............................................................................. 10
Calculating Postage....................................................................................................... 11
Examples:
First Class........................................................................................................................... 11
Adding Unlisted Service Fees ............................................................................... 12
Cancelling an Unlisted Service Fee ...................................................................... 12
Applying Postage to a Specific Acount ............................................................. 13
International ...................................................................................................................... 13
Standard Class.................................................................................................................13
Entering ZIP/Zone Codes ........................................................................................ 14
UPS .......................................................................................................................................14
Using Special Features................................................................................................ 15
Converting to Metric Weight ......................................................................................... 15
Generating Multiple Tapes ............................................................................................. 15
Recalling a Fee ...................................................................................................................16
Entering Weight Manually ..............................................................................................16
Using the Scale to Count Like Parts ...........................................................................17
Accessing Meter Functions........................................................................................ 19
Funds....................................................................................................................................19
Account Status ............................................................................................................... 19
Inscriptions ........................................................................................................................ 19
Refill ......................................................................................................................................19
™ 5 Scale ............................................................................2
i
Page 4

Contents
3 TROUBLESHOOTING
Clearing Error Messages............................................................................................ 22
Diagnosing Problems................................................................................................... 22
4 MAINTAINING YOUR INTEGRA™ 5 SCALE
Cleaning ......................................................................................................................... 26
Changing the Rate Card ............................................................................................. 26
INDEX .......................................................................................................................27
ii
Page 5

Integra™ 5 User Guide
CHAPTER 1
INTRODUCTION
About Your Integra™ 5 Scale ............................................ 2
Sleep Mode ......................................................................................2
Safety Precautions ............................................................. 2
Scale & Keypad Identification .......................................... 3
Connecting Wires, Cables, and Meter.............................. 4
Specifications...................................................................... 5
Getting Help......................................................................... 5
1
Page 6

CHAPTER 1: INTRODUCTION
ABOUT YOUR
INTEGRA™ 5
CALE
S
Sleep Mode
SAFETY
PRECAUTIONS
The Integra™ 5 is a five-pound capacity scale with keypad and display.
It determines the weight of a mailpiece placed on the platter and
calculates rates and fees based on selections you make from the keypad.
The scale can also interface with and display a variety of information
about your Pitney Bowes electronic postage meter.
The scale enters sleep mode if it remains inactive at zero weight for
more than five minutes. In this state, the display clears and all
information retained from the previous transaction clears.
Follow the normal safety precautions for all office equipment when
using this scale.
❒ Use only the AC adaptor/power supply included with this scale.
❒ To protect against electric shock, plug the AC adaptor into a
properly grounded wall outlet only.
❒ The wall outlet should be near the scale and easily accessible.
❒ Avoid using wall outlets controlled by wall switches or shared
with other equipment.
❒ Do not route the AC adaptor cable over sharp edges or trap it
between furniture.
❒ Do not remove covers; if the scale has been dropped or has
otherwise had the enclosure stressed in any way, call Pitney Bowes
at 1-800-537-2488.
❒ Do not place lighted candles, cigarettes, cigars, etc., on the scale.
❒ Use the equipment only for its intended purpose.
2
Page 7
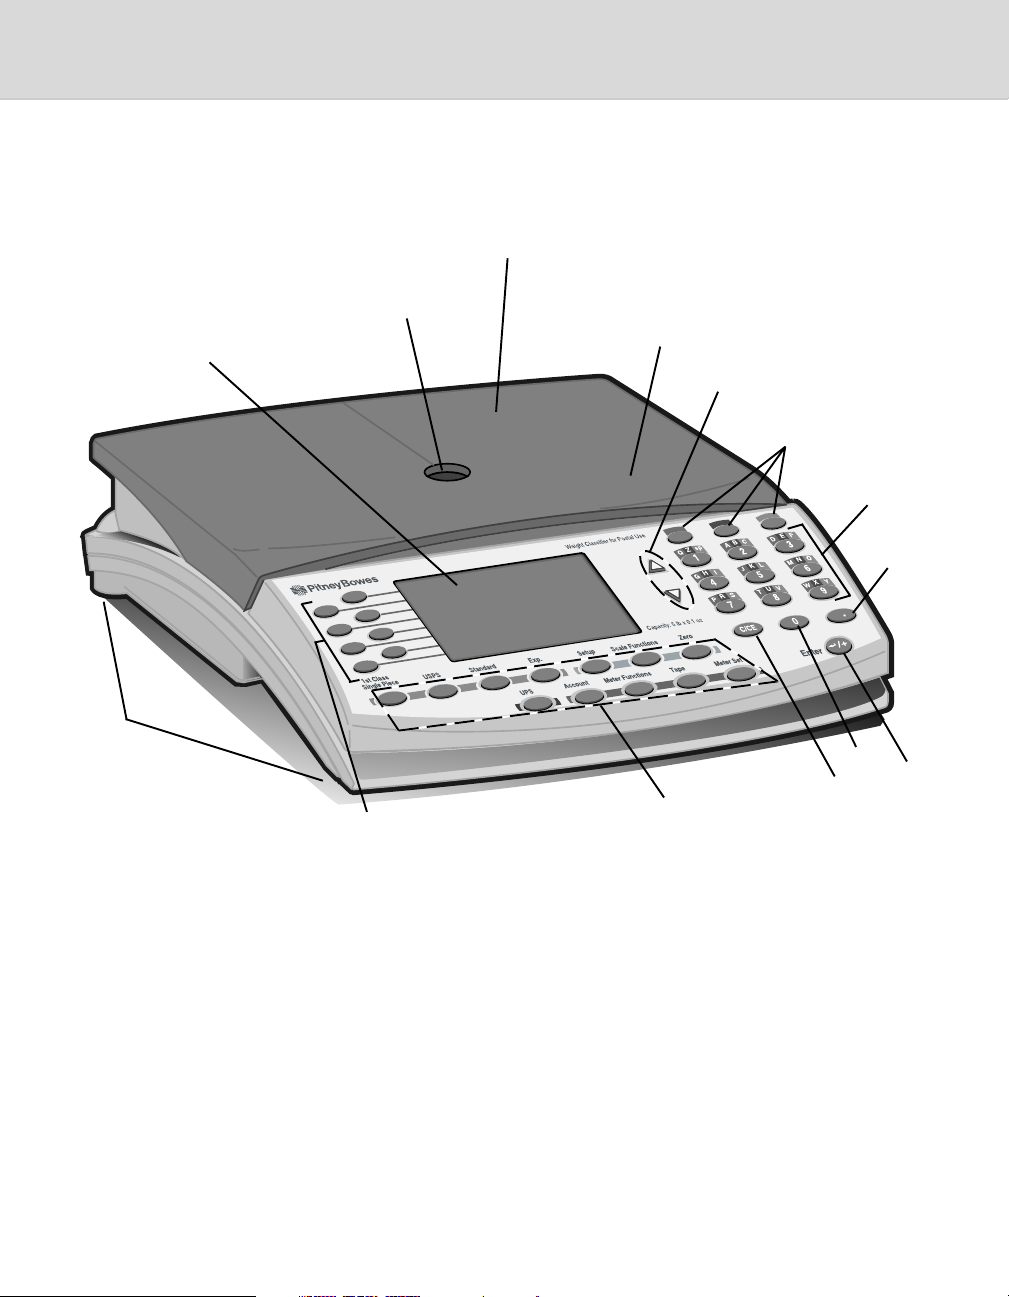
SCALE & KEYPAD
Integra™ 5 User Guide
IDENTIFICATION
Display
Adjustable
Feet (4)
Platter
(Weighing Platform)
Level
Indicator
Menu Selection Keys
Rate Card
(Under Platter)
Scroll Keys
Color Control Keys
Carrier, Scale, & Meter
Control Keys
Alphanumeric Keys
Decimal
Point
Zero
CE/C
Enter
3
Page 8
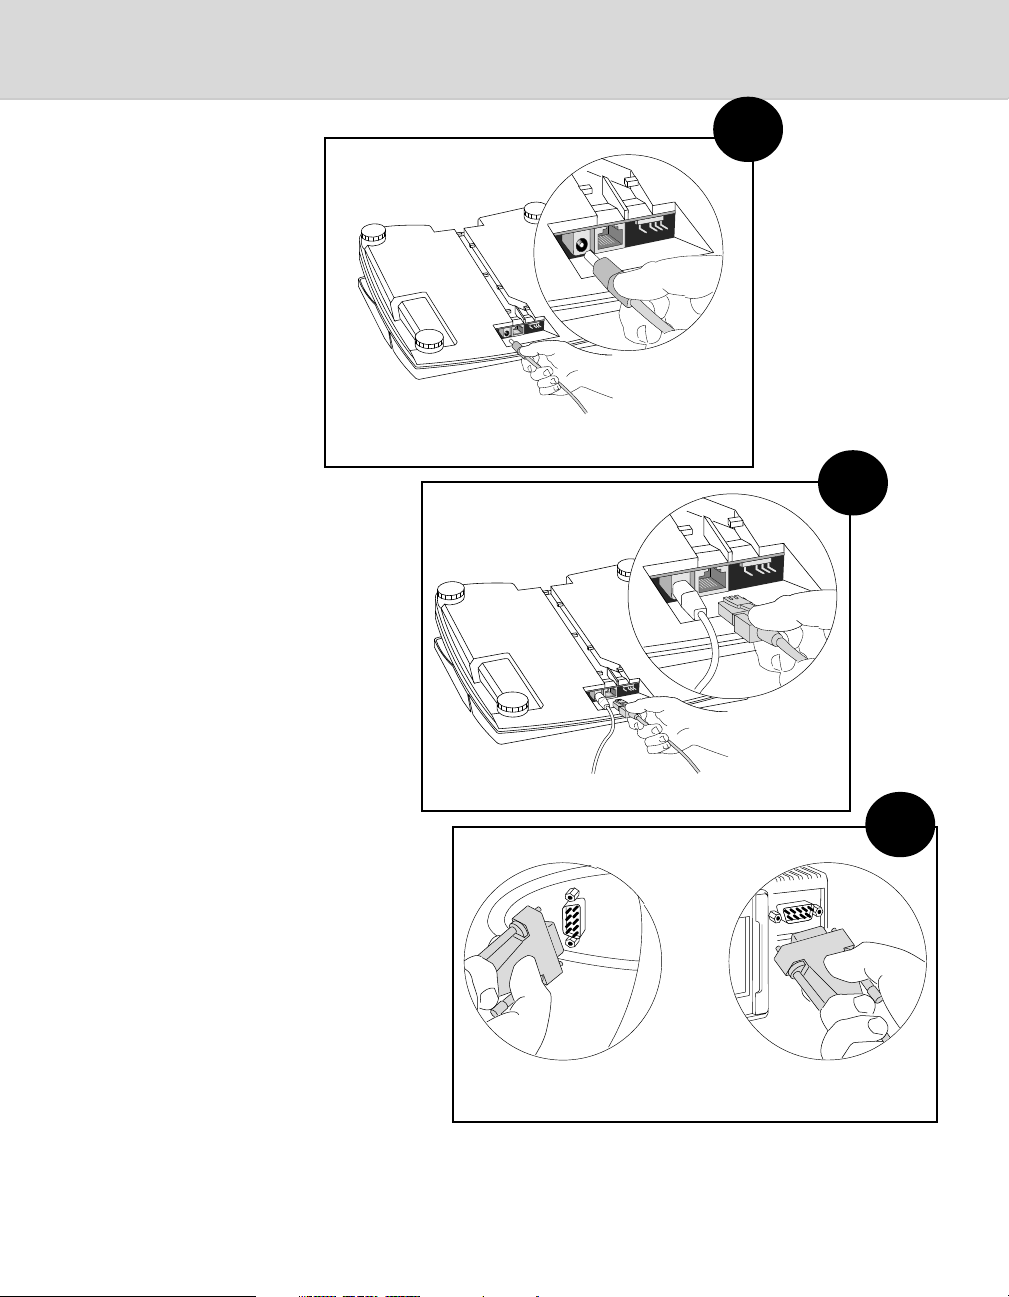
CHAPTER 1: INTRODUCTION
CONNECTING
WIRES, CABLES, &
METER
1
Connect power cord to scale.
2
Connect meter cable to scale.
3
Connect meter cable to meter.
4
Page 9
Integra™ 5 User Guide
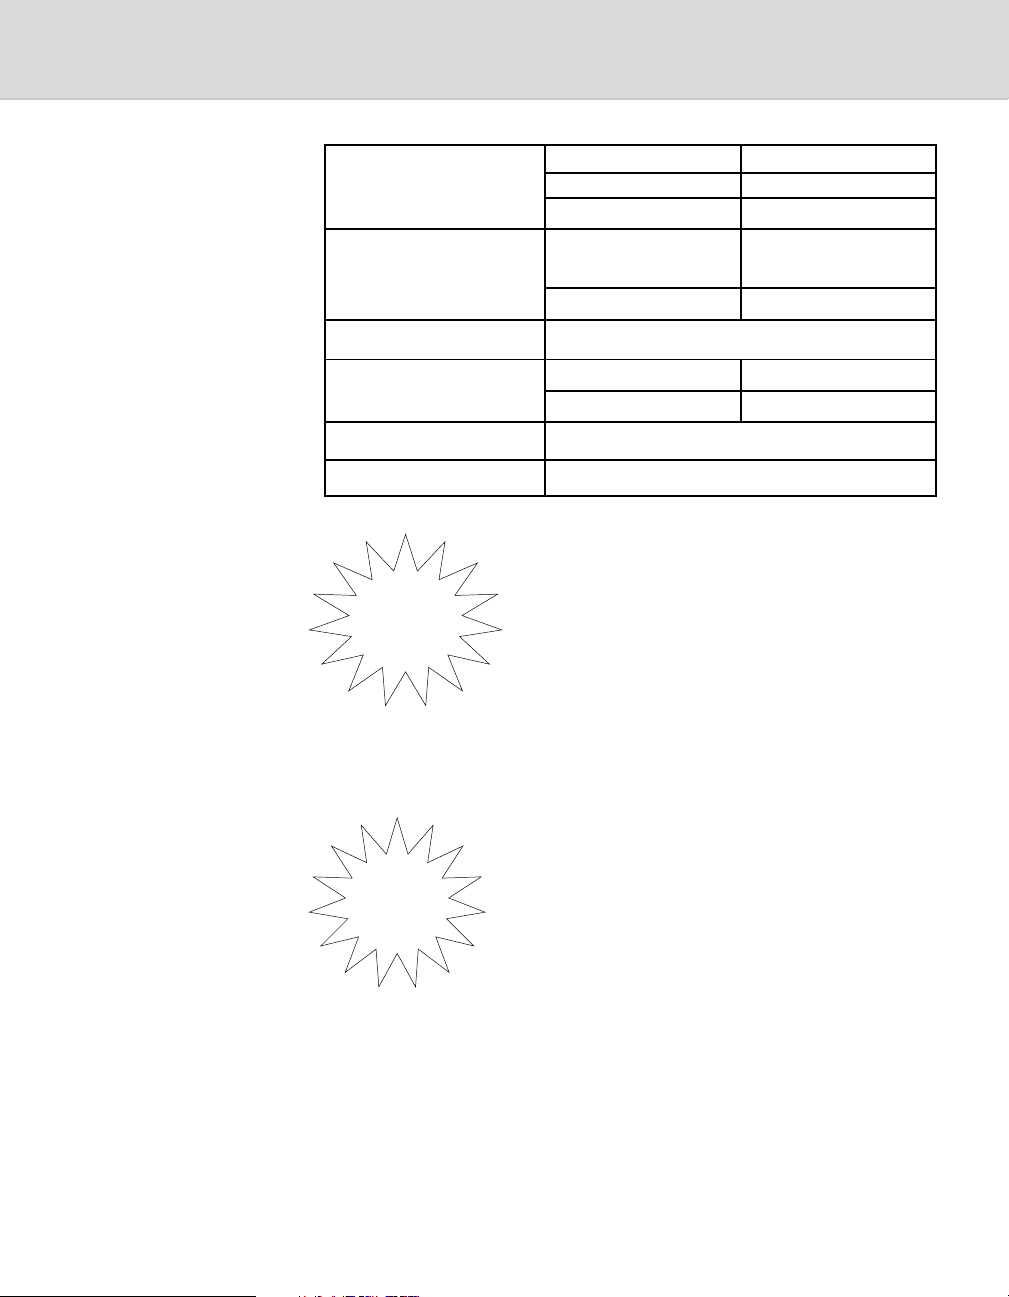
SPECIFICATIONS
GETTING HELP
Power supply: Input: 120 VAC, 60 ±1Hz
Output: 9 VDC/500 MA
Compliance: UL, CUL
Physical dimensions: LxWxH: 10.7 x 9.3 x 3 in.
(271 x 237 x 75mm)
Weight: 5 lb. (2.2kg)
Operating temp. range: +10C to +40°C
Weighing specifications: Max. wgt. displayed: 5.0 lb.
Increment: 0.1 oz.
Compliance: UL, CSA
Weights & Measures: NIST
Direct questions and requests for service to the
Pitney Bowes Diagnostic Center at
B
Y
P
HONE
1-800-537-2488.
Please be near your scale when you call.
Representatives are available Monday through
Friday between 8:00 a.m. and 8:00 p.m. Eastern time.
Visit our website for the latest updates and
THE
N
O
NTERNET
I
frequently asked questions about Integra.
The Pitney Bowes Corporate page is at:
http://www.pb.com.
When connected:
1. Click on Mailing Systems.
2. Click Product Support in the left-hand list.
3. Click on the down triangle ▼ in the dialog box to reveal the
dropdown menu.
4. Click on Integra Scales.
5. Click Go.
5
Page 10

CHAPTER 1: INTRODUCTION
6
Page 11

Integra™ 5 User Guide
CHAPTER 2
USING YOUR SCALE
Navigating the Menus ........................................................8
Entering Alphabetic Information .....................................8
Tailoring Setup Options .....................................................9
Changing User Options ............................................................... 9
Entering the Supervisor Password.........................................10
Calculating Postage ............................................................11
Examples:
First Class...................................................................................... 11
Adding Unlisted Service Fees .......................................... 12
Cancelling an Unlisted Service Fee ................................. 12
Applying Postage to a Specific Account ...................... 13
International ................................................................................. 13
Standard Class ...........................................................................13
Entering ZIP/Zone Codes................................................... 14
UPS.................................................................................................. 14
Using Special Features .....................................................15
Converting to Metric Weight.................................................... 15
Generating Multiple Tapes ....................................................... 15
Recalling a Fee ..............................................................................16
Entering Weight Manually .........................................................16
Using the Scale to Count Like Parts ..................................... 17
Using the Weight Hold Feature ............................................... 17
Accessing Meter Functions.............................................19
Funds ..............................................................................................19
Account Status ..........................................................................19
Inscriptions ...................................................................................19
7
Page 12

CHAPTER 2: USING YOUR INTEGRA™ 5 SCALE
NAVIGATING THE
MENUS
Note: Pressing the
CE/C key once, while
in a transaction,
reverts to the
previous screen. The
second press of
CE/C clears the
transaction and
returns you to the
ready mode.
ENTERING
ALPHABETIC
INFORMATION
Note: England is
listed under U as
the United Kingdom.
The scale's easy-to-follow menu system guides you through each
transaction and applies the information and features you select. Arrows
appearing on the right-hand side of the screen indicate the presence of
more choices. Press the up or down scroll keys at the right of the
display to view next or previous choices.
When you select an item from the menu, the display registers your
selection, displays the postage amount, and advances to the next menu
screen if appropriate. Press the CE/C key once to return to the previous
screen.
When entering alphabetic information, such as names of countries or
passwords, you must use a combination of alphanumeric keys, located
on the righthand side of the scale, and the color-coded keys above
them.
For example, when sending mail to Spain, at the Enter Country
prompt:
First, press and release the blue key
Next, press and release the S key
The scale displays the countries that begin with S.
Remember to press the color key before each press of an alpha key.
8
Page 13

Integra™ 5 User Guide
TAILORING SETUP
OPTIONS
After installing your scale and
becoming familiar with the location of
the keys, press the Setup key and
review the list of user default setup
options (shown at right).
Service Setup is accessible only by Pitney
User Setup
-Exit
-ON Autoclear Class
-ON ClrZoneNewClass
-OFF Auto Weigh Hold
-Supervisor Setup
-Service Setup
Bowes Customer Service Representatives.
User Options are set to either on or off. They concern information you
can retain from mailpiece to mailpiece. The options are defined below.
Option Function
Autoclear Class When on, class information clears when you
remove a mailpiece from the scale.
Autoclear Zone When on, zone information clears when you
(Displays only when remove a mailpiece from the scale.
Autoclear Class is off.)
Clear Zone New Class When on, the zone clears when you select a
new class.
Auto Weight Hold When on, retains the weight of an item for a
brief time after the item is removed from
the scale.
Changing User
Options
1. Press the Setup key.
2. Press the menu selection key next to the option you want to
change. The screen indicates your change.
3. Select Exit to escape this menu.
4. Select Save or Cancel to save or cancel your changes.
After exiting setup mode, the scale reinitializes and returns to ready
mode.
9
Page 14

CHAPTER 2: USING YOUR INTEGRA™ 5 SCALE
Entering the Supervisor
Password
Note: Pressing Exit
while in a supervisor
option returns you
to the previous
screen.
Certain options are password-protected for supervisory control. They
are: Configure Scale and BMC Intra ZIP. You can access these options
by pressing the Setup key and selecting Supervisor Setup.
After selecting Supervisor Setup, at the Enter Password prompt:
1. Enter the supervisor password, M G R, on the color-coded and
alphanumeric keys from left to right as shown.
Green
→
Green Red
→→→→
2. Press Enter. Menu options Exit, Configure Scale, and BMC Intra
ZIP display. See the chart below for definitions of Configure Scale
and BMC Intra ZIP. Pressing Exit returns you to the User Setup
screen.
Supervisor Setup Option Description
Configure Scale
Install Scale Used to enter a ZIP Code during the
installation process to establish the scale's
geographic location.
Other Language When on, prompts display in Spanish.
Inscriptions When on, allows you to include an inscription
in the meter imprint.
Accounting When on, communicates with connected mail
data system about account data. When off,
communicates with connected meter about
account data.
Vibration Filter Turn on this option only in areas of excessive
vibration to aid the display of stable weight.
BMC Intra ZIP
Create Intra ZIP Used to enter ranges of ZIP Code locations
within a bulk mailing center.
10
3. Select the desired options and respond to the prompts.
4. When finished, select Exit twice to exit the supervisor and user
setup menus.
5. Select Save or Cancel to save or cancel your changes and return to
the ready screen.
Page 15

Integra™ 5 User Guide
CALCULATING
POSTAGE
Note: If your scale
is connected to a
meter, the active
meter account also
appears at the
bottom of the
screen. See pg. 13,
Applying Postage to
a Specific Account.
Examples:
— First Class
Note: When you
select a listed fee,
the dash alongside it changes to
a check mark and
your selection
appears above the
remaining
unselected fees.
Cancel a checked
fee by pressing the
fee key a second
time.
The following assumes you have completed the installation instructions
included with your scale. If not, please do so now.
When the scale is ready to
weigh a mailpiece, the display
is in ready mode as shown here.
Refer to the examples below for
processing different classes of
mail.
1. Place an item on the scale. The weight displays.
2. Press the USPS key and
the menu at right appears.
(The arrow indicates
more options. Press the ∇
key to display additional
menu options.)
3. Select 1st Cl/Priority.
The postage amount
displays and the fees
menu appears.
4. Either select a fee or ignore these choices. If you select a fee, its
cost is added to the postage amount and the new total displays. (If
your scale is connected to a meter that supports electronic delivery
confirmation, you have the option of selecting this service from
the scale for certain classes of mail. When you press the Tape or
Meter Set keys on the scale, the meter prompts for any additional
delivery confirmation information required to complete the
delivery confirmation transaction. Enter this information at the
meter.)
0lb 0.0oz
Select Rate
Xlb 1.0oz
Select Class
-1st Cl/Priority
-Priority
-Standard
-International
-Express
-Postcard ↓
5. Press the Meter Set key to transfer postage to the meter,
OR
press the Tape key to generate a meter tape.
Tip: Use the 1st Class Single Piece key to shorten the
mailing process for single pieces.
11
Page 16

CHAPTER 2: USING YOUR INTEGRA™ 5 SCALE
Adding Unlisted
Service Fees
Note: The scale
does not retain
Dollar Add values
for the next item.
You may manually enter a monetary amount (called the "Dollar Add"
amount) up to six digits for fees not listed on the scale. The amount
you enter is added to the total.
For example, to add an unlisted fee:
With an item on the scale,
1. Calculate postage as explained in the previous section.
2. Manually enter the service fee using the numeric keys. Always enter
the decimal point for amounts greater than $0.99.
For example, if you enter 3 (with no decimal point), the scale
interprets the amount as $0.03.
0lb 0.9oz $ 0.32
Press and release
then press and
release
1st Cl/Priority
Dollar Add:
$3.
Cancelling an
Unlisted Service Fee
12
for $3.00. The amount displays at the bottom right of the screen.
3. Press Enter. The scale shows the total postage amount and displays
the "Dollar Add" amount in the fee list.
4. Press the Meter Set key to transfer postage to the meter,
OR
press the Tape key to generate a meter tape.
To cancel the Dollar Add amount:
Press the softkey next to the Dollar Add selection. The fee is deducted
from the postage value.
Page 17

Integra™ 5 User Guide
Applying Postage
to a Specific
— International
Account
The Accounting feature allows you to assign postage to the accounts set
up in your meter. When you designate an account, the postage and
piece information are updated and are reflected in Account Status
accessed with the Meter Functions key.
At any point in calculating postage and with the meter on:
1. Press the Account key. A list of account numbers appear.
2. Select an account. The account number you select appears at the
bottom of the display.
2. Complete your transaction.
3. Press Meter Set or Tape to transfer postage to the meter.
4. Feed the mailpiece through the meter.
To send an international letter by air:
With the scale in ready mode and weight on the scale,,
1. Press the USPS key and select International.
2. Select Air.
3. Select letters. Enter Country: appears.
— Standard Class
4. See Entering Alphabetic Information, page 8, to enter the name of
the country. A list of countries starting with the letter you entered
appears. (Enter the second letter of the country in the same way to
reduce the number of choices that appear. )
With the scale in ready mode and weight on the scale,
1. Press the Standard key.
2. Select a menu choice. Depending on your selection, fee options or
other menus appear.
3. Respond appropriately to the prompts.
When you finish making menu choices, note the total postage amount.
You may either transfer the amount to a meter or end the transaction
by removing the mailpiece.
13
Page 18

CHAPTER 2: USING YOUR INTEGRA™ 5 SCALE
Note: To change an
incorrectly entered
ZIP Code or zone,
press CE/C once to
clear the number
field. Then enter
the new number
and proceed as
usual.
— UPS
Entering ZIP/
Zone Codes
For parcel post mail, the Select ZIP/Select Zone prompt displays.
Choose one option.
For ZIP: Enter the first three digits of the destination ZIP Code;
press Enter.
For Zone: If you know the destination zone, enter the zone number
and press Enter.
The ZIP Code or zone number, postage amount, and options for more
services display.
With the scale in ready mode,
1. Press the UPS key. A list of selections displays.
2. Make your selection. The screen prompts you to Select ZIP/Select
Zone.
14
3. Select one and make other selections as needed. When you have
finished making selections, the postage field shows the total
shipping charge.
Page 19

Integra™ 5 User Guide
USING SPECIAL
FEATURES
Converting to
Metric Weight
The scale has a number of special
features that help you process mail
quickly and efficiently. These
features are explained below and
accessed by pressing the Scale
Functions key and selecting from the
menu list.
With an item on the scale:
1. Select a class.
2. Add fees.
3. Press the Scale Functions key.
4. Select Metric Weight. The scale converts and displays the weight
of the item to metric (kg). The message “For Export Forms” also
displays.
5. Press CE/C once to return to scale functions.
0lb 0.0oz
Scale Functions
-Metric Weight
-Fee Recall
-Weight Hold
-Manual Weight Entry
-Parts Count
Generating Multiple
Tapes
(Not in menu list)
6. Press CE/C again to return to the class display.
With weight on the scale:
1. Select a class and apply fees if desired.
2. Type the number of tapes you want to print. Do not press enter. If
you do, the scale interprets the number you typed as additional
postage.
3. Press the Tape key. The meter sets and the mailing machine begins
printing tapes.
15
Page 20

CHAPTER 2: USING YOUR INTEGRA™ 5 SCALE
Recalling a Fee
Entering Weight
Manually
The Fee Recall option allows you to review the fees included in the
total postage amount. It also displays the item value for verification.
For example, to recall insurance value or Dollar Add amount:
With the total postage amount displayed:
1. Press the Scale Functions key.
2. Select Fee Recall. The value of the item and the fees that were
applied to the postage amount display.
3. Select Exit to return to the transaction menu.
This function allows you to enter the known weight of an item without
putting the item on the scale. You can then generate a tape on the
meter and apply it to the mailpiece.
1. Press Scale Functions key.
2. Select Manual Weight Entry.
3. When prompted, enter the weight. The numbers display from
right to left as on a calculator. For example:
16
For 4 lbs. 2 oz. enter 4 0 2 0; press Enter.
For 3 lbs. 2.5 oz., enter 3 0 2 5; press Enter.
The scale returns to the ready mode.
4. Select a class. The postage amount displays.
5. Add fees as necessary.
6. Transfer postage to the meter.
7. Generate a tape or print a tape strip.
8. Press the Zero key to exit manual weight mode.
Page 21

Integra™ 5 User Guide
Using the Scale to
Count Like Parts
Note: All like Items
must be the same
individual weight.
With the Parts Count function, you can obtain a count of like items
based on the weight of a known quantity of those items. Depending on
the shape and quantity of the parts you are weighing, you may need to
place them in a container. You can deduct the weight of the container,
and count and weigh the parts at the same time. If you are not using a
container, start with Step 2 below.
1. Place an empty container on the scale. (The container must weigh
no more than 2 lbs.)
2. Press the Scale Functions key and select Parts Count from the
menu. The scale re-zeros and prompts you to place a counted
sample on the scale.
3. Place a known
quantity of like parts
on the scale (or in
the container). Add
parts until the scale
prompts you to
enter the number of
parts in the sample.
4. Enter the quantity
via the numeric
keypad; press Enter.
The display shows the total number of parts, their combined
weight, and their average individual weight. If you add or remove
items, parts and weight fields adjust accordingly.
Using the Weight
Hold Feature
To exit Parts Count, remove parts from scale and press CE/C. If you
used a container, remove it from the scale and press the Zero key.
The weight hold feature is useful when weighing large envelopes that
block the display. This feature retains the weight reading for a brief
time after you remove an item from the scale. It allows you to continue
selecting class and fees even though the item is no longer on the scale.
Pressing any key (for example, to select a class or fee) other than zero
extends the weight hold time for that transaction.
You may activate weight hold mode in two ways: manually with the
Scale Functions key or automatically through setup.
17
Page 22

CHAPTER 2: USING YOUR INTEGRA™ 5 SCALE
Using the Weight
Hold Feature (cont.)
To use the weight hold feature for one transaction:
1. With no weight on the scale, press the Scale Functions key.
2. Select Weight Hold from the list of features.
W
Result:
displays to the right of the weight field.
H
3. Place a mailpiece on the scale and wait two seconds to make sure
the weight registers before removing it.
Result: The weight reading is retained for a brief period.
4. Select the class and any desired fees. (Any key press other than zero
extends the weight hold time for that transaction.)
5. When finished with your selections, transfer postage to the meter in
the usual way.
To exit manual weight hold, wait a few seconds until the hold feature
times out or press Zero or, to cancel the entire transaction, press CE/C.
To enable automatic weight hold feature for every transaction:
1. Press the Setup key.
2. Select Auto Weigh Hold to turn the feature on.
18
3. Select Exit.
4. Select Save changes (or to exit without saving, select Cancel all
changes).
Result: The scale reinitializes and returns to ready mode. No
indication of the weight hold feature displays. Thereafter, whenever
you place an item on the scale, its weight will be retained briefly
when you remove it from the platter.
To disable weight hold, repeat the above steps, noting that selecting
Auto Weigh Hold in Step 2 results in Off displaying next to the feature.
Page 23

Integra™ 5 User Guide
ACCESSING
METER
FUNCTIONS
Note: Your meter
must be on to
access these
functions.
— Funds
— Account Status
The Integra 5 scale interfaces with postage meter models 6500, 6900,
6909, A900, B700, and B900. Depending on the functions available
with your meter, you can initiate and display the following meter
functions via the scale by pressing the Meter Functions key.
Select Funds to read the amount of funds available/used and the total
number of mailpieces processed. Press CE/C to return to the Meter
Functions screen.
Account Status allows you to view the status of the account to which
the meter is set. It displays the account number, the amount of money
in the account, and the number of pieces processed against that
account.
— Inscriptions
Note: Your meter's
operating guide
provides more
details on these
options.
Choose Select Account to pick from a list of other available account
numbers.
Choose Clear Account to clear value and pieces information at the end
of a reporting period.
Press CE/C twice to return to the ready screen.
(Must be turned on in Supervisor Setup.) Select Inscriptions to display
a list of inscriptions installed in your meter. The one you choose
appears on the mailpiece. Select None to clear an inscription.
19
Page 24

CHAPTER 2: USING YOUR SCALE
20
Page 25

Integra™ 5 User Guide
CHAPTER 3
TROUBLESHOOTING
Clearing Error Messages .................................................22
Diagnosing Problems ........................................................ 22
21
Page 26

CHAPTER 3: TROUBLESHOOTING
CLEARING ERROR
MESSAGES
DIAGNOSING
PROBLEMS
Occasionally, error messages display on the screen. Sometimes they
identify an incorrect entry and indicate corrective action. To clear most
errors:
1. Press CE/C to return to previous menu.
2. Press CE/C a second time to return to the beginning of the
transaction.
If the error does not clear, call the Pitney Bowes Diagnostic Center
at 1-800-537-2488.
You may be able to diagnose and correct problems yourself by referring
to the symptoms vs. recommendations chart on the next page. If
performing the suggested action is not successful, call the Pitney Bowes
Diagnostic Center.
22
Page 27

Integra™ 5 User Guide
Probable
Symptom Cause Recommendation
Blank screen. A. Sleep mode. Touch the weight platform.
B. Scale power supply Check power supply is firmly connected
unplugged. at each end. Remove plug from wall
outlet, wait 10 seconds; reconnect.
C. Rate card not firmly Disconnect power, remove card, rub a
in slot. pencil eraser over the gold contacts to
clean them, insert card as directed on
pg. 26, reconnect power.
Scale does not Interference with Press Zero key.
return to zero. scale platter.
Scale displays Out of calibration or Check for foreign matter under scale
zero wgt only. mechanical inter- platform. Call the Diagnostic Center.
ference.
Scale display does Platform incorrectly Ensure platform correctly seated. Check
for not reach five seated or mechanical foreign matter under platform.
pounds. interference.
Inconsistent A. Air currents moving Move scale to another location.
weights. across platform.
B. Platform or item Clear area around scale.
being weighed touching
another object.
C. Vibrations affecting Turn on vibration filter.
scale.
Decimal point on Low funds in meter. Refill meter.
postage amount is
blinking.
23
Page 28

CHAPTER 3: TROUBLESHOOTING
24
Page 29

 Loading...