

Page 1

MapMarker USA
Version 25
USER GUIDE
Page 2

Information in this document is subject to change without notice and does not represent a commitment on the part of the vendor or its representatives. No part
of this document may be reproduced or transmitted in any form or by any means, electronic or mechanical, including photocopying, without the written
permission of Pitney Bowes Software, One Global View, Troy, New York 12180-8399.
©2012 Pitney Bowes Software All rights reserved. MapInfo, Group 1 Software, Centrus, and MapMarker are trademarks of Pitney Bowes Software All other
marks and trademarks are property of their respective holders.
United States:
Phone: 518.285.6000
Fax: 518.285.6070
Sales: 800.327.8627
Government Sales: 800.619.2333
Technical Support: 518.285.7283
Technical Support Fax: 518.285.6080
pbinsight.com
Canada:
Phone: 416.594.5200
Fax: 416.594.5201
Sales: 800.268.3282
Technical Support:.518.285.7283
Technical Support Fax: 518.285.6080
pbinsight.ca
Europe/United Kingdom:
Phone: +44.1753.848.200
Fax: +44.1753.621.140
Technical Support: +44.1753.848.229
pbinsight.co.uk
Asia Pacific/Australia:
Phone: +61.2.9437.6255
Fax: +61.2.9439.1773
Technical Support: 1.800.648.899
pbinsight.com.au
Contact information for all Pitney Bowes Software offices is located at: http://www.pbinsight.com/about/contact-us.
Java and all Java-based trademarks and logos are trademarks or registered trademarks of Sun Microsystems, Inc. in the United States and other countries.
Link
The following trademarks are owned by the United States Postal Service: LACS
P.O. Box USPS, U.S. Postal Service and United States Postal Service.
Pitney Bowes Software is a non-exclusive DPV and LACS
Link
Licensee of the United States Postal Service®AD#1.08
Link
, Suite
, DPV, ZIP + 4, ZIP Code, ZIP, CASS, CASS Certified, Post Office,
Portions © 2012 TomTom Inc.
Shapefile C Library v. 1.2.10 is licensed under the MIT Style License. The license can be downloaded from: http://shapelib.maptools.org/license.html.
© 1998 Frank Warmerdam. The source code for this library is available from http://shapelib.maptools.org/dl.
April 2012
Page 3

Table of Contents
Chapter 1: Introduction. . . . . . . . . . . . . . . . . . . . . . . . . . . . . . . . . . . . . . . . . . . . . . 13
What Is MapMarker? . . . . . . . . . . . . . . . . . . . . . . . . . . . . . . . . . . . . . . . . . . . . . . . . . . . . . 14
MapMarker Features . . . . . . . . . . . . . . . . . . . . . . . . . . . . . . . . . . . . . . . . . . . . . . . . . . . . . 15
MapMarker Installer . . . . . . . . . . . . . . . . . . . . . . . . . . . . . . . . . . . . . . . . . . . . . . . . . . . . 15
Intersection Geocoding . . . . . . . . . . . . . . . . . . . . . . . . . . . . . . . . . . . . . . . . . . . . . . . . . 16
PlaceName Geocoding . . . . . . . . . . . . . . . . . . . . . . . . . . . . . . . . . . . . . . . . . . . . . . . . .16
Unformatted (Single-line) Address Input . . . . . . . . . . . . . . . . . . . . . . . . . . . . . . . . . . . .16
Address Cleansing . . . . . . . . . . . . . . . . . . . . . . . . . . . . . . . . . . . . . . . . . . . . . . . . . . . . .16
Postcode Geocoding . . . . . . . . . . . . . . . . . . . . . . . . . . . . . . . . . . . . . . . . . . . . . . . . . . . 16
Geographic Geocoding . . . . . . . . . . . . . . . . . . . . . . . . . . . . . . . . . . . . . . . . . . . . . . . . . 17
Reverse Geocoding . . . . . . . . . . . . . . . . . . . . . . . . . . . . . . . . . . . . . . . . . . . . . . . . . . . . 17
Address Dictionaries . . . . . . . . . . . . . . . . . . . . . . . . . . . . . . . . . . . . . . . . . . . . . . . . . . .17
Multiple File Formats as Input Data . . . . . . . . . . . . . . . . . . . . . . . . . . . . . . . . . . . . . . . .17
User Dictionaries . . . . . . . . . . . . . . . . . . . . . . . . . . . . . . . . . . . . . . . . . . . . . . . . . . . . . . 18
User Dictionary Utility. . . . . . . . . . . . . . . . . . . . . . . . . . . . . . . . . . . . . . . . . . . . . . . . . . .18
Attribution . . . . . . . . . . . . . . . . . . . . . . . . . . . . . . . . . . . . . . . . . . . . . . . . . . . . . . . . . . . .18
Automatic and Interactive Geocoding . . . . . . . . . . . . . . . . . . . . . . . . . . . . . . . . . . . . . .18
Batch Geocoding . . . . . . . . . . . . . . . . . . . . . . . . . . . . . . . . . . . . . . . . . . . . . . . . . . . . . .18
Saving and Using Project Files . . . . . . . . . . . . . . . . . . . . . . . . . . . . . . . . . . . . . . . . . . . 19
Display Geocoded Points on Map . . . . . . . . . . . . . . . . . . . . . . . . . . . . . . . . . . . . . . . . .19
Quick Find and Browsing . . . . . . . . . . . . . . . . . . . . . . . . . . . . . . . . . . . . . . . . . . . . . . . . 19
Result Codes . . . . . . . . . . . . . . . . . . . . . . . . . . . . . . . . . . . . . . . . . . . . . . . . . . . . . . . . .19
Match Codes and Location Codes . . . . . . . . . . . . . . . . . . . . . . . . . . . . . . . . . . . . . . . . .19
Segment IDs . . . . . . . . . . . . . . . . . . . . . . . . . . . . . . . . . . . . . . . . . . . . . . . . . . . . . . . . .20
Wide Search. . . . . . . . . . . . . . . . . . . . . . . . . . . . . . . . . . . . . . . . . . . . . . . . . . . . . . . . . .20
Centerline Offset for Point Candidates. . . . . . . . . . . . . . . . . . . . . . . . . . . . . . . . . . . . . .20
Expanded Search. . . . . . . . . . . . . . . . . . . . . . . . . . . . . . . . . . . . . . . . . . . . . . . . . . . . . .20
Search Level Constraints for Finance Area and City . . . . . . . . . . . . . . . . . . . . . . . . . . .21
MapMarker Desktop Application . . . . . . . . . . . . . . . . . . . . . . . . . . . . . . . . . . . . . . . . . .21
MapMarker Server . . . . . . . . . . . . . . . . . . . . . . . . . . . . . . . . . . . . . . . . . . . . . . . . . . . . . 21
Developer Tools . . . . . . . . . . . . . . . . . . . . . . . . . . . . . . . . . . . . . . . . . . . . . . . . . . . . . . .22
Integration with MapInfo Professional . . . . . . . . . . . . . . . . . . . . . . . . . . . . . . . . . . . . . . 22
MapMarker Documentation Set . . . . . . . . . . . . . . . . . . . . . . . . . . . . . . . . . . . . . . . . . . . .22
MapMarker User Guide . . . . . . . . . . . . . . . . . . . . . . . . . . . . . . . . . . . . . . . . . . . . . . . . . 22
Online Help . . . . . . . . . . . . . . . . . . . . . . . . . . . . . . . . . . . . . . . . . . . . . . . . . . . . . . . . . .23
MapMarker USA Developer Guide. . . . . . . . . . . . . . . . . . . . . . . . . . . . . . . . . . . . . . . . .23
MapMarker Release Notes . . . . . . . . . . . . . . . . . . . . . . . . . . . . . . . . . . . . . . . . . . . . . .23
Publications on the Web . . . . . . . . . . . . . . . . . . . . . . . . . . . . . . . . . . . . . . . . . . . . . . . . 23
MapMarker USA 25 3 User Guide
Page 4

MapMarker Streets . . . . . . . . . . . . . . . . . . . . . . . . . . . . . . . . . . . . . . . . . . . . . . . . . . . . . .23
Getting Technical Support . . . . . . . . . . . . . . . . . . . . . . . . . . . . . . . . . . . . . . . . . . . . . . . .24
Chapter 2: Installing MapMarker . . . . . . . . . . . . . . . . . . . . . . . . . . . . . . . . . . . . . . 26
Shared Install . . . . . . . . . . . . . . . . . . . . . . . . . . . . . . . . . . . . . . . . . . . . . . . . . . . . . . . . .27
About the Address Dictionary. . . . . . . . . . . . . . . . . . . . . . . . . . . . . . . . . . . . . . . . . . . . .28
License Management. . . . . . . . . . . . . . . . . . . . . . . . . . . . . . . . . . . . . . . . . . . . . . . . . . .28
Operating Requirements and Performance Recommendations. . . . . . . . . . . . . . . . . .28
Operating Requirements . . . . . . . . . . . . . . . . . . . . . . . . . . . . . . . . . . . . . . . . . . . . . . . .28
Optimizing Performance. . . . . . . . . . . . . . . . . . . . . . . . . . . . . . . . . . . . . . . . . . . . . . . . .30
Installing MapMarker. . . . . . . . . . . . . . . . . . . . . . . . . . . . . . . . . . . . . . . . . . . . . . . . . . . . .30
Using the Software License . . . . . . . . . . . . . . . . . . . . . . . . . . . . . . . . . . . . . . . . . . . . . .30
Install Using the Graphical Interface . . . . . . . . . . . . . . . . . . . . . . . . . . . . . . . . . . . . . . .33
Installing Silently . . . . . . . . . . . . . . . . . . . . . . . . . . . . . . . . . . . . . . . . . . . . . . . . . . . . . .39
Installing SuiteLink Data. . . . . . . . . . . . . . . . . . . . . . . . . . . . . . . . . . . . . . . . . . . . . . . . .39
Modifying the MapMarker Installation. . . . . . . . . . . . . . . . . . . . . . . . . . . . . . . . . . . . . . .40
Modify Using the Graphical Interface . . . . . . . . . . . . . . . . . . . . . . . . . . . . . . . . . . . . . . .40
Modify Silently . . . . . . . . . . . . . . . . . . . . . . . . . . . . . . . . . . . . . . . . . . . . . . . . . . . . . . . .41
Upgrading the MapMarker Installation . . . . . . . . . . . . . . . . . . . . . . . . . . . . . . . . . . . . . .41
Upgrade Using the Graphical Interface . . . . . . . . . . . . . . . . . . . . . . . . . . . . . . . . . . . . .42
Upgrade Silently. . . . . . . . . . . . . . . . . . . . . . . . . . . . . . . . . . . . . . . . . . . . . . . . . . . . . . . 43
Uninstalling MapMarker . . . . . . . . . . . . . . . . . . . . . . . . . . . . . . . . . . . . . . . . . . . . . . . . . . 44
Uninstall Using the Graphical Interface . . . . . . . . . . . . . . . . . . . . . . . . . . . . . . . . . . . . .44
Uninstall Silently. . . . . . . . . . . . . . . . . . . . . . . . . . . . . . . . . . . . . . . . . . . . . . . . . . . . . . . 44
Client Workstation Install . . . . . . . . . . . . . . . . . . . . . . . . . . . . . . . . . . . . . . . . . . . . . . . . . 45
Running the Client Install . . . . . . . . . . . . . . . . . . . . . . . . . . . . . . . . . . . . . . . . . . . . . . . . 45
Instructions for Enterprise License Holders . . . . . . . . . . . . . . . . . . . . . . . . . . . . . . . . . . 47
Starting MapMarker. . . . . . . . . . . . . . . . . . . . . . . . . . . . . . . . . . . . . . . . . . . . . . . . . . . . . . 47
Starting the Desktop Application . . . . . . . . . . . . . . . . . . . . . . . . . . . . . . . . . . . . . . . . . . 47
Starting the MapMarker Server . . . . . . . . . . . . . . . . . . . . . . . . . . . . . . . . . . . . . . . . . . .48
Chapter 3: Geocoding with MapMarker. . . . . . . . . . . . . . . . . . . . . . . . . . . . . . . . . 49
Geocoding Terminology . . . . . . . . . . . . . . . . . . . . . . . . . . . . . . . . . . . . . . . . . . . . . . . . . .50
Understanding the Geocoding Process . . . . . . . . . . . . . . . . . . . . . . . . . . . . . . . . . . . . .53
Supported File Formats . . . . . . . . . . . . . . . . . . . . . . . . . . . . . . . . . . . . . . . . . . . . . . . . .54
Geocoding Flexibility and Trade-offs . . . . . . . . . . . . . . . . . . . . . . . . . . . . . . . . . . . . . . .54
General Guidelines for Optimizing Geocoding. . . . . . . . . . . . . . . . . . . . . . . . . . . . . . . .55
Specify Input Address Columns . . . . . . . . . . . . . . . . . . . . . . . . . . . . . . . . . . . . . . . . . . .56
Specify Output Address Columns . . . . . . . . . . . . . . . . . . . . . . . . . . . . . . . . . . . . . . . . .56
Interpreting Census Block IDs . . . . . . . . . . . . . . . . . . . . . . . . . . . . . . . . . . . . . . . . . . . .59
Output Field Size and Column Names. . . . . . . . . . . . . . . . . . . . . . . . . . . . . . . . . . . . . .62
Mixed Case Street Output . . . . . . . . . . . . . . . . . . . . . . . . . . . . . . . . . . . . . . . . . . . . . . . 62
MapMarker USA 25 4 User Guide
Page 5

Setting Startup Preferences . . . . . . . . . . . . . . . . . . . . . . . . . . . . . . . . . . . . . . . . . . . . . .64
Running MapMarker – Overview . . . . . . . . . . . . . . . . . . . . . . . . . . . . . . . . . . . . . . . . . . .65
Opening and Running a Project. . . . . . . . . . . . . . . . . . . . . . . . . . . . . . . . . . . . . . . . . . . .65
Running a Project from a Batch File . . . . . . . . . . . . . . . . . . . . . . . . . . . . . . . . . . . . . . .66
Opening a Table or Text File . . . . . . . . . . . . . . . . . . . . . . . . . . . . . . . . . . . . . . . . . . . . . . 66
Defining Properties of Delimited Text Files . . . . . . . . . . . . . . . . . . . . . . . . . . . . . . . . . . 67
Exporting to Shapefiles . . . . . . . . . . . . . . . . . . . . . . . . . . . . . . . . . . . . . . . . . . . . . . . . . . 71
Selecting Input and Output Address Columns. . . . . . . . . . . . . . . . . . . . . . . . . . . . . . . .73
Selecting Input Columns . . . . . . . . . . . . . . . . . . . . . . . . . . . . . . . . . . . . . . . . . . . . . . . . 74
Selecting Output Columns . . . . . . . . . . . . . . . . . . . . . . . . . . . . . . . . . . . . . . . . . . . . . . .75
Geocoding Your Table Automatically . . . . . . . . . . . . . . . . . . . . . . . . . . . . . . . . . . . . . . .78
Geocoding Your Table Interactively . . . . . . . . . . . . . . . . . . . . . . . . . . . . . . . . . . . . . . . . 79
Making the Most of Interactive Geocoding. . . . . . . . . . . . . . . . . . . . . . . . . . . . . . . . . . .82
Intersection Geocoding . . . . . . . . . . . . . . . . . . . . . . . . . . . . . . . . . . . . . . . . . . . . . . . . . . 83
Using Single Line Addresses in Geocoding. . . . . . . . . . . . . . . . . . . . . . . . . . . . . . . . . .84
Single Line Geocoding Capabilities and Guidelines . . . . . . . . . . . . . . . . . . . . . . . . . . .85
Examples of Single Line Addresses. . . . . . . . . . . . . . . . . . . . . . . . . . . . . . . . . . . . . . . . 86
Using Address Range Geocoding . . . . . . . . . . . . . . . . . . . . . . . . . . . . . . . . . . . . . . . . . .87
Address Range Geocoding Capabilities and Guidelines . . . . . . . . . . . . . . . . . . . . . . . .87
Examples of Address Ranges . . . . . . . . . . . . . . . . . . . . . . . . . . . . . . . . . . . . . . . . . . . .88
Postal Geocoding . . . . . . . . . . . . . . . . . . . . . . . . . . . . . . . . . . . . . . . . . . . . . . . . . . . . . . . 88
Geographic Geocoding. . . . . . . . . . . . . . . . . . . . . . . . . . . . . . . . . . . . . . . . . . . . . . . . . . .89
Displaying Geocoded Records in MapInfo Professional. . . . . . . . . . . . . . . . . . . . . . . .91
Re-Geocoding a Table . . . . . . . . . . . . . . . . . . . . . . . . . . . . . . . . . . . . . . . . . . . . . . . . . . . 92
Using Geocoding Options . . . . . . . . . . . . . . . . . . . . . . . . . . . . . . . . . . . . . . . . . . . . . . . .92
Geocode Dialog . . . . . . . . . . . . . . . . . . . . . . . . . . . . . . . . . . . . . . . . . . . . . . . . . . . . . . . 93
Log File Dialog . . . . . . . . . . . . . . . . . . . . . . . . . . . . . . . . . . . . . . . . . . . . . . . . . . . . . . . .95
Match Settings Dialog . . . . . . . . . . . . . . . . . . . . . . . . . . . . . . . . . . . . . . . . . . . . . . . . . .96
Fallback Dialog. . . . . . . . . . . . . . . . . . . . . . . . . . . . . . . . . . . . . . . . . . . . . . . . . . . . . . .105
Multiple Match Dialog. . . . . . . . . . . . . . . . . . . . . . . . . . . . . . . . . . . . . . . . . . . . . . . . . . 106
Saving TAB Files . . . . . . . . . . . . . . . . . . . . . . . . . . . . . . . . . . . . . . . . . . . . . . . . . . . . . . .107
Creating and Saving a Project . . . . . . . . . . . . . . . . . . . . . . . . . . . . . . . . . . . . . . . . . . . .107
Creating a Project-Based Batch File . . . . . . . . . . . . . . . . . . . . . . . . . . . . . . . . . . . . . . 109
Multiple Pass Batch Geocoding Strategy. . . . . . . . . . . . . . . . . . . . . . . . . . . . . . . . . . .110
Chapter 4: MapMarker System Preferences . . . . . . . . . . . . . . . . . . . . . . . . . . . . 111
Startup Preferences . . . . . . . . . . . . . . . . . . . . . . . . . . . . . . . . . . . . . . . . . . . . . . . . . . . . 112
Dictionary Preferences . . . . . . . . . . . . . . . . . . . . . . . . . . . . . . . . . . . . . . . . . . . . . . . . . . 113
Offset System Preferences. . . . . . . . . . . . . . . . . . . . . . . . . . . . . . . . . . . . . . . . . . . . . . .114
Maps System Preferences . . . . . . . . . . . . . . . . . . . . . . . . . . . . . . . . . . . . . . . . . . . . . . . 116
MapMarker USA 25 5 User Guide
Page 6

Chapter 5: Match Settings and Strategies. . . . . . . . . . . . . . . . . . . . . . . . . . . . . . 117
Choosing Match Strategies . . . . . . . . . . . . . . . . . . . . . . . . . . . . . . . . . . . . . . . . . . . . . .118
Maximizing the Match Rate . . . . . . . . . . . . . . . . . . . . . . . . . . . . . . . . . . . . . . . . . . . . .118
Maximizing Geographic Accuracy . . . . . . . . . . . . . . . . . . . . . . . . . . . . . . . . . . . . . . . .119
Balancing Match Rate and False Positives . . . . . . . . . . . . . . . . . . . . . . . . . . . . . . . . .119
Using a Multiple Pass Strategy . . . . . . . . . . . . . . . . . . . . . . . . . . . . . . . . . . . . . . . . . . .120
First Pass . . . . . . . . . . . . . . . . . . . . . . . . . . . . . . . . . . . . . . . . . . . . . . . . . . . . . . . . . . .120
Second Pass . . . . . . . . . . . . . . . . . . . . . . . . . . . . . . . . . . . . . . . . . . . . . . . . . . . . . . . .120
Third Pass . . . . . . . . . . . . . . . . . . . . . . . . . . . . . . . . . . . . . . . . . . . . . . . . . . . . . . . . . .121
One Pass Settings . . . . . . . . . . . . . . . . . . . . . . . . . . . . . . . . . . . . . . . . . . . . . . . . . . . . 121
Specifying Match Settings . . . . . . . . . . . . . . . . . . . . . . . . . . . . . . . . . . . . . . . . . . . . . . .121
ZIP Code Matching . . . . . . . . . . . . . . . . . . . . . . . . . . . . . . . . . . . . . . . . . . . . . . . . . . . 121
City Name Matching. . . . . . . . . . . . . . . . . . . . . . . . . . . . . . . . . . . . . . . . . . . . . . . . . . . 121
Street Name Matching . . . . . . . . . . . . . . . . . . . . . . . . . . . . . . . . . . . . . . . . . . . . . . . . .122
House Number Matching . . . . . . . . . . . . . . . . . . . . . . . . . . . . . . . . . . . . . . . . . . . . . . .122
Matching to Street Intersections. . . . . . . . . . . . . . . . . . . . . . . . . . . . . . . . . . . . . . . . . .122
Geocoding to ZIP Centroids versus Falling Back to ZIP Centroid . . . . . . . . . . . . . . . .122
Preferring User Dictionary Matches . . . . . . . . . . . . . . . . . . . . . . . . . . . . . . . . . . . . . . .122
Viewing Match Candidates on a Map . . . . . . . . . . . . . . . . . . . . . . . . . . . . . . . . . . . . . .123
Setting the Street Data Path . . . . . . . . . . . . . . . . . . . . . . . . . . . . . . . . . . . . . . . . . . . . 123
Viewing Match Candidates With Interactive Geocoding . . . . . . . . . . . . . . . . . . . . . . . 123
A Closer Look at Multiple Matches . . . . . . . . . . . . . . . . . . . . . . . . . . . . . . . . . . . . . . . .124
Chapter 6: Result Codes. . . . . . . . . . . . . . . . . . . . . . . . . . . . . . . . . . . . . . . . . . . . 126
Single Match (S category) . . . . . . . . . . . . . . . . . . . . . . . . . . . . . . . . . . . . . . . . . . . . . . .128
Interpreting Complete S and M Result Codes . . . . . . . . . . . . . . . . . . . . . . . . . . . . . . .129
Interpreting S8 Result Codes . . . . . . . . . . . . . . . . . . . . . . . . . . . . . . . . . . . . . . . . . . . . 129
Interpreting S7 Result Codes . . . . . . . . . . . . . . . . . . . . . . . . . . . . . . . . . . . . . . . . . . . . 130
Interpreting S6 Result Codes . . . . . . . . . . . . . . . . . . . . . . . . . . . . . . . . . . . . . . . . . . . . 130
Interpreting S5 Result Codes . . . . . . . . . . . . . . . . . . . . . . . . . . . . . . . . . . . . . . . . . . . . 130
S and Z Result Codes: What is the Difference?. . . . . . . . . . . . . . . . . . . . . . . . . . . . . . 131
Best Match From Multiple Candidates (M category) . . . . . . . . . . . . . . . . . . . . . . . . . .131
Postal Centroid Matches (Z category). . . . . . . . . . . . . . . . . . . . . . . . . . . . . . . . . . . . . .132
Geographic Matches (G category). . . . . . . . . . . . . . . . . . . . . . . . . . . . . . . . . . . . . . . . .132
Reverse Geocoded Matches (R category) . . . . . . . . . . . . . . . . . . . . . . . . . . . . . . . . . .132
Non-match Codes (N category) . . . . . . . . . . . . . . . . . . . . . . . . . . . . . . . . . . . . . . . . . . . 133
Using the Georesult Dialog . . . . . . . . . . . . . . . . . . . . . . . . . . . . . . . . . . . . . . . . . . . . . . 133
Displaying Result Codes and Matching Details . . . . . . . . . . . . . . . . . . . . . . . . . . . . . .133
Displaying Match Code Details . . . . . . . . . . . . . . . . . . . . . . . . . . . . . . . . . . . . . . . . . .134
Displaying Location Code Details . . . . . . . . . . . . . . . . . . . . . . . . . . . . . . . . . . . . . . . .135
MapMarker USA 25 6 User Guide
Page 7

Chapter 7: Specialized Geocoding Features. . . . . . . . . . . . . . . . . . . . . . . . . . . . 137
CASS Report Required Fields . . . . . . . . . . . . . . . . . . . . . . . . . . . . . . . . . . . . . . . . . . . 139
CASS Report Optional Fields. . . . . . . . . . . . . . . . . . . . . . . . . . . . . . . . . . . . . . . . . . . .140
Geocoding in CASS Mode . . . . . . . . . . . . . . . . . . . . . . . . . . . . . . . . . . . . . . . . . . . . . .140
Link
LACS
DPV . . . . . . . . . . . . . . . . . . . . . . . . . . . . . . . . . . . . . . . . . . . . . . . . . . . . . . . . . . . . . . . . . .144
DPV and LACS
Suite
Returning Abbreviated Addresses . . . . . . . . . . . . . . . . . . . . . . . . . . . . . . . . . . . . . . . .153
Returning Abbreviated City Names . . . . . . . . . . . . . . . . . . . . . . . . . . . . . . . . . . . . . . . .154
Geocoding Dual Addresses . . . . . . . . . . . . . . . . . . . . . . . . . . . . . . . . . . . . . . . . . . . . . .155
Geocoding Remote Tables . . . . . . . . . . . . . . . . . . . . . . . . . . . . . . . . . . . . . . . . . . . . . . .156
Geocoding dBASE Files . . . . . . . . . . . . . . . . . . . . . . . . . . . . . . . . . . . . . . . . . . . . . . . . . 157
Geocoding Delimited, CSV, and SHP Files . . . . . . . . . . . . . . . . . . . . . . . . . . . . . . . . . . 157
Using Quick Geocode . . . . . . . . . . . . . . . . . . . . . . . . . . . . . . . . . . . . . . . . . . . . . . . . . . .158
Finding Address with Quick Find . . . . . . . . . . . . . . . . . . . . . . . . . . . . . . . . . . . . . . . . .158
Finding Airports with Locate Airport. . . . . . . . . . . . . . . . . . . . . . . . . . . . . . . . . . . . . . .168
Finding Highway Exits with Locate Highway Exit . . . . . . . . . . . . . . . . . . . . . . . . . . . .170
Batch Geocoding. . . . . . . . . . . . . . . . . . . . . . . . . . . . . . . . . . . . . . . . . . . . . . . . . . . . . . .170
Table Attribution with MapMarker . . . . . . . . . . . . . . . . . . . . . . . . . . . . . . . . . . . . . . . . .175
. . . . . . . . . . . . . . . . . . . . . . . . . . . . . . . . . . . . . . . . . . . . . . . . . . . . . . . . . . . . . .141
Using LACS
LACS
Link. . . . . . . . . . . . . . . . . . . . . . . . . . . . . . . . . . . . . . . . . . . . . . . . . . . . . . . . . . . . . . . . . . . . . 141
Link
Output Columns . . . . . . . . . . . . . . . . . . . . . . . . . . . . . . . . . . . . . . . . . . . . . .142
Using DPV . . . . . . . . . . . . . . . . . . . . . . . . . . . . . . . . . . . . . . . . . . . . . . . . . . . . . . . . . .144
Street Directionals with DPV . . . . . . . . . . . . . . . . . . . . . . . . . . . . . . . . . . . . . . . . . . . .145
Enhanced ZIP + 4 and DPV Requirement . . . . . . . . . . . . . . . . . . . . . . . . . . . . . . . . . .146
DPV Data and CASS . . . . . . . . . . . . . . . . . . . . . . . . . . . . . . . . . . . . . . . . . . . . . . . . . 146
DPV Output Columns. . . . . . . . . . . . . . . . . . . . . . . . . . . . . . . . . . . . . . . . . . . . . . . . . . 146
Link
Usage Guidelines and Requirements . . . . . . . . . . . . . . . . . . . . . . 150
Creating the False Positive Report for DPV or LACSLink . . . . . . . . . . . . . . . . . . . . . .150
Submitting a False Positive Report and Obtaining New Security Key . . . . . . . . . . . . .152
Link . . . . . . . . . . . . . . . . . . . . . . . . . . . . . . . . . . . . . . . . . . . . . . . . . . . . . . . . . . . . . . . . . . . . . . . . . . . . . . 152
Using Suite
Link . . . . . . . . . . . . . . . . . . . . . . . . . . . . . . . . . . . . . . . . . . . . . . . . . . . . . . . . . . . . . . . . . . . . .152
Finding Candidates Using Quick Find . . . . . . . . . . . . . . . . . . . . . . . . . . . . . . . . . . . . .158
Browsing Candidates Using Quick Find. . . . . . . . . . . . . . . . . . . . . . . . . . . . . . . . . . . .164
Quick Find Settings . . . . . . . . . . . . . . . . . . . . . . . . . . . . . . . . . . . . . . . . . . . . . . . . . . .165
Creating a Batch Geocoding File from a TAB File . . . . . . . . . . . . . . . . . . . . . . . . . . . . 171
Manually Creating a Batch File from a TAB File . . . . . . . . . . . . . . . . . . . . . . . . . . . . . 172
Batch Geocoding Considerations. . . . . . . . . . . . . . . . . . . . . . . . . . . . . . . . . . . . . . . . . 174
Opening the Table for Attribution . . . . . . . . . . . . . . . . . . . . . . . . . . . . . . . . . . . . . . . . .176
Selecting an Attribution Table . . . . . . . . . . . . . . . . . . . . . . . . . . . . . . . . . . . . . . . . . . .176
Creating a Column to Receive Attribution Data . . . . . . . . . . . . . . . . . . . . . . . . . . . . . .178
Binding Attributes – Output Point Attribution . . . . . . . . . . . . . . . . . . . . . . . . . . . . . . . .180
Binding Attributes – Column Value Attribution . . . . . . . . . . . . . . . . . . . . . . . . . . . . . . . 181
MapMarker USA 25 7 User Guide
Page 8

Adding Attributes to Your Table . . . . . . . . . . . . . . . . . . . . . . . . . . . . . . . . . . . . . . . . . . 183
Adding Attributes By Geocoding . . . . . . . . . . . . . . . . . . . . . . . . . . . . . . . . . . . . . . . . .183
Adding Attributes Using Batch Process . . . . . . . . . . . . . . . . . . . . . . . . . . . . . . . . . . . .183
Stopping Attribution . . . . . . . . . . . . . . . . . . . . . . . . . . . . . . . . . . . . . . . . . . . . . . . . . . .184
Clearing Attribute File Selections . . . . . . . . . . . . . . . . . . . . . . . . . . . . . . . . . . . . . . . . . 184
Tips for Using Attributions . . . . . . . . . . . . . . . . . . . . . . . . . . . . . . . . . . . . . . . . . . . . . .184
Chapter 8: Geocoding Remote Tables. . . . . . . . . . . . . . . . . . . . . . . . . . . . . . . . . 186
Remote Tables and Spatial Objects . . . . . . . . . . . . . . . . . . . . . . . . . . . . . . . . . . . . . . .187
Mappable Tables and the MapInfo Map Catalog . . . . . . . . . . . . . . . . . . . . . . . . . . . . .187
Supported Spatial Index Types . . . . . . . . . . . . . . . . . . . . . . . . . . . . . . . . . . . . . . . . . .187
Preparing to Geocode Remote Databases . . . . . . . . . . . . . . . . . . . . . . . . . . . . . . . . . .188
Creating a Data Source . . . . . . . . . . . . . . . . . . . . . . . . . . . . . . . . . . . . . . . . . . . . . . . .188
Preparing the Remote Table . . . . . . . . . . . . . . . . . . . . . . . . . . . . . . . . . . . . . . . . . . . .188
Creating a Map Catalog . . . . . . . . . . . . . . . . . . . . . . . . . . . . . . . . . . . . . . . . . . . . . . . . 189
Making a Remote Table Mappable . . . . . . . . . . . . . . . . . . . . . . . . . . . . . . . . . . . . . . .189
Accessing a Remote Table for Geocoding . . . . . . . . . . . . . . . . . . . . . . . . . . . . . . . . . .189
Editing Records Interactively . . . . . . . . . . . . . . . . . . . . . . . . . . . . . . . . . . . . . . . . . . . .190
Writing Geocoding Output to Another Table . . . . . . . . . . . . . . . . . . . . . . . . . . . . . . . .191
Relationship Between Source and Results Tables . . . . . . . . . . . . . . . . . . . . . . . . . . .192
Setting Up for Related Table Geocoding . . . . . . . . . . . . . . . . . . . . . . . . . . . . . . . . . . .192
Remote Table-to-Table Geocoding . . . . . . . . . . . . . . . . . . . . . . . . . . . . . . . . . . . . . . .192
Optimizing MapMarker for Related Table Geocoding . . . . . . . . . . . . . . . . . . . . . . . . .195
Remote Database Views . . . . . . . . . . . . . . . . . . . . . . . . . . . . . . . . . . . . . . . . . . . . . . .195
Related Table Considerations . . . . . . . . . . . . . . . . . . . . . . . . . . . . . . . . . . . . . . . . . . .195
Additional Considerations for Remote Table Geocoding . . . . . . . . . . . . . . . . . . . . . .196
Sort by ZIP Code™ for Faster Geocoding . . . . . . . . . . . . . . . . . . . . . . . . . . . . . . . . . . 196
Geocoding Unmatched Records . . . . . . . . . . . . . . . . . . . . . . . . . . . . . . . . . . . . . . . . .196
Transaction Control with ODBC Tables . . . . . . . . . . . . . . . . . . . . . . . . . . . . . . . . . . . .196
Remote Database Views . . . . . . . . . . . . . . . . . . . . . . . . . . . . . . . . . . . . . . . . . . . . . . .197
Rollback Segment Limit . . . . . . . . . . . . . . . . . . . . . . . . . . . . . . . . . . . . . . . . . . . . . . . .197
Supported Unique Index and Primary Key Data Types by Database . . . . . . . . . . . . .197
Chapter 9: Custom User Dictionaries . . . . . . . . . . . . . . . . . . . . . . . . . . . . . . . . . 198
User Dictionary Capabilities and Requirements . . . . . . . . . . . . . . . . . . . . . . . . . . . . . 199
Source Data Requirements . . . . . . . . . . . . . . . . . . . . . . . . . . . . . . . . . . . . . . . . . . . . .199
Required Input Columns . . . . . . . . . . . . . . . . . . . . . . . . . . . . . . . . . . . . . . . . . . . . . . .200
Optional (Recommended) Input Columns . . . . . . . . . . . . . . . . . . . . . . . . . . . . . . . . . .200
User Dictionary File Names and Formats . . . . . . . . . . . . . . . . . . . . . . . . . . . . . . . . . . .201
Additional User Dictionary Considerations . . . . . . . . . . . . . . . . . . . . . . . . . . . . . . . . . 202
Creating a Point User Dictionary . . . . . . . . . . . . . . . . . . . . . . . . . . . . . . . . . . . . . . . . .202
Data Access License . . . . . . . . . . . . . . . . . . . . . . . . . . . . . . . . . . . . . . . . . . . . . . . . . .203
MapMarker USA 25 8 User Guide
Page 9

CASS Standards . . . . . . . . . . . . . . . . . . . . . . . . . . . . . . . . . . . . . . . . . . . . . . . . . . . . .203
Address Range Order . . . . . . . . . . . . . . . . . . . . . . . . . . . . . . . . . . . . . . . . . . . . . . . . . 203
Street Intersections and Customized User Dictionaries. . . . . . . . . . . . . . . . . . . . . . . .204
Creating a Custom User Dictionary. . . . . . . . . . . . . . . . . . . . . . . . . . . . . . . . . . . . . . . .204
Using the MapMarker User Dictionary Wizard . . . . . . . . . . . . . . . . . . . . . . . . . . . . . . .204
Adding the User Dictionary to the Desktop Application . . . . . . . . . . . . . . . . . . . . . . . .207
Preferring User Dictionary Matches . . . . . . . . . . . . . . . . . . . . . . . . . . . . . . . . . . . . . . .209
Appendix A: MapMarker User Interface Reference . . . . . . . . . . . . . . . . . . . . . . 210
About MapMarker command . . . . . . . . . . . . . . . . . . . . . . . . . . . . . . . . . . . . . . . . . . . .212
Arrange Icons command . . . . . . . . . . . . . . . . . . . . . . . . . . . . . . . . . . . . . . . . . . . . . . .212
Batch Add Attributes command . . . . . . . . . . . . . . . . . . . . . . . . . . . . . . . . . . . . . . . . . .212
Cascade command . . . . . . . . . . . . . . . . . . . . . . . . . . . . . . . . . . . . . . . . . . . . . . . . . . . 212
Choose Font command . . . . . . . . . . . . . . . . . . . . . . . . . . . . . . . . . . . . . . . . . . . . . . . .212
Clear File Selections command . . . . . . . . . . . . . . . . . . . . . . . . . . . . . . . . . . . . . . . . . .213
Close command . . . . . . . . . . . . . . . . . . . . . . . . . . . . . . . . . . . . . . . . . . . . . . . . . . . . . . 213
Close Project command . . . . . . . . . . . . . . . . . . . . . . . . . . . . . . . . . . . . . . . . . . . . . . . .213
Create Batch File command. . . . . . . . . . . . . . . . . . . . . . . . . . . . . . . . . . . . . . . . . . . . .213
Create Project-based Batch File . . . . . . . . . . . . . . . . . . . . . . . . . . . . . . . . . . . . . . . . .213
Create/Save Project command . . . . . . . . . . . . . . . . . . . . . . . . . . . . . . . . . . . . . . . . . .214
Create User Dictionary command . . . . . . . . . . . . . . . . . . . . . . . . . . . . . . . . . . . . . . . .214
Exit command . . . . . . . . . . . . . . . . . . . . . . . . . . . . . . . . . . . . . . . . . . . . . . . . . . . . . . . 214
Export to ESRI Shapefile . . . . . . . . . . . . . . . . . . . . . . . . . . . . . . . . . . . . . . . . . . . . . . .214
Geocode command . . . . . . . . . . . . . . . . . . . . . . . . . . . . . . . . . . . . . . . . . . . . . . . . . . .215
Help Topics command . . . . . . . . . . . . . . . . . . . . . . . . . . . . . . . . . . . . . . . . . . . . . . . . . 215
Locate Airport command . . . . . . . . . . . . . . . . . . . . . . . . . . . . . . . . . . . . . . . . . . . . . . .215
Locate Highway Exit command . . . . . . . . . . . . . . . . . . . . . . . . . . . . . . . . . . . . . . . . . .215
Logfile command . . . . . . . . . . . . . . . . . . . . . . . . . . . . . . . . . . . . . . . . . . . . . . . . . . . . .215
MapMarker on the World Wide Web command . . . . . . . . . . . . . . . . . . . . . . . . . . . . . . 216
Open Browser List command. . . . . . . . . . . . . . . . . . . . . . . . . . . . . . . . . . . . . . . . . . . .216
Open ODBC Table command . . . . . . . . . . . . . . . . . . . . . . . . . . . . . . . . . . . . . . . . . . .216
Open Project command . . . . . . . . . . . . . . . . . . . . . . . . . . . . . . . . . . . . . . . . . . . . . . . . 216
Open Table command . . . . . . . . . . . . . . . . . . . . . . . . . . . . . . . . . . . . . . . . . . . . . . . . .217
Quick Find command . . . . . . . . . . . . . . . . . . . . . . . . . . . . . . . . . . . . . . . . . . . . . . . . . . 217
Quick Geocode command . . . . . . . . . . . . . . . . . . . . . . . . . . . . . . . . . . . . . . . . . . . . . .217
Recent File List command . . . . . . . . . . . . . . . . . . . . . . . . . . . . . . . . . . . . . . . . . . . . . .218
Select Attribute Files command . . . . . . . . . . . . . . . . . . . . . . . . . . . . . . . . . . . . . . . . . .218
Select Columns command . . . . . . . . . . . . . . . . . . . . . . . . . . . . . . . . . . . . . . . . . . . . . . 218
Status Bar command . . . . . . . . . . . . . . . . . . . . . . . . . . . . . . . . . . . . . . . . . . . . . . . . . .218
Stop Attribution command . . . . . . . . . . . . . . . . . . . . . . . . . . . . . . . . . . . . . . . . . . . . . .218
Submit Problem Report to Technical Support command . . . . . . . . . . . . . . . . . . . . . . .219
Summary command . . . . . . . . . . . . . . . . . . . . . . . . . . . . . . . . . . . . . . . . . . . . . . . . . . .219
MapMarker USA 25 9 User Guide
Page 10

System Preferences command . . . . . . . . . . . . . . . . . . . . . . . . . . . . . . . . . . . . . . . . . .219
Table Summary command . . . . . . . . . . . . . . . . . . . . . . . . . . . . . . . . . . . . . . . . . . . . . .219
Tile command. . . . . . . . . . . . . . . . . . . . . . . . . . . . . . . . . . . . . . . . . . . . . . . . . . . . . . . .220
Toolbar command . . . . . . . . . . . . . . . . . . . . . . . . . . . . . . . . . . . . . . . . . . . . . . . . . . . . 220
MapMarker Dialogs . . . . . . . . . . . . . . . . . . . . . . . . . . . . . . . . . . . . . . . . . . . . . . . . . . . . .220
About MapMarker dialog . . . . . . . . . . . . . . . . . . . . . . . . . . . . . . . . . . . . . . . . . . . . . . .221
Add Columns dialog . . . . . . . . . . . . . . . . . . . . . . . . . . . . . . . . . . . . . . . . . . . . . . . . . . .222
Automatic Geocode dialog . . . . . . . . . . . . . . . . . . . . . . . . . . . . . . . . . . . . . . . . . . . . . .223
Bind Attribute Table Columns to Output Columns dialog. . . . . . . . . . . . . . . . . . . . . . . 224
Candidate Map dialog . . . . . . . . . . . . . . . . . . . . . . . . . . . . . . . . . . . . . . . . . . . . . . . . . 225
Describe Table Relationships dialog . . . . . . . . . . . . . . . . . . . . . . . . . . . . . . . . . . . . . .228
Dictionary Preferences dialog . . . . . . . . . . . . . . . . . . . . . . . . . . . . . . . . . . . . . . . . . . .229
Export to dialog . . . . . . . . . . . . . . . . . . . . . . . . . . . . . . . . . . . . . . . . . . . . . . . . . . . . . .230
Export to ESRI Shapefile dialog. . . . . . . . . . . . . . . . . . . . . . . . . . . . . . . . . . . . . . . . . .231
Fallback dialog . . . . . . . . . . . . . . . . . . . . . . . . . . . . . . . . . . . . . . . . . . . . . . . . . . . . . . .232
Filter Tables dialog. . . . . . . . . . . . . . . . . . . . . . . . . . . . . . . . . . . . . . . . . . . . . . . . . . . . 233
Font dialog . . . . . . . . . . . . . . . . . . . . . . . . . . . . . . . . . . . . . . . . . . . . . . . . . . . . . . . . . . 234
Geocode dialog . . . . . . . . . . . . . . . . . . . . . . . . . . . . . . . . . . . . . . . . . . . . . . . . . . . . . .235
Geocoding Summary dialog. . . . . . . . . . . . . . . . . . . . . . . . . . . . . . . . . . . . . . . . . . . . .237
GeoResult Code dialog . . . . . . . . . . . . . . . . . . . . . . . . . . . . . . . . . . . . . . . . . . . . . . . .238
Interactive Geocode dialog . . . . . . . . . . . . . . . . . . . . . . . . . . . . . . . . . . . . . . . . . . . . .239
Locate Airport dialog . . . . . . . . . . . . . . . . . . . . . . . . . . . . . . . . . . . . . . . . . . . . . . . . . . 242
Locate Highway Exit dialog . . . . . . . . . . . . . . . . . . . . . . . . . . . . . . . . . . . . . . . . . . . . .243
Location Code dialog . . . . . . . . . . . . . . . . . . . . . . . . . . . . . . . . . . . . . . . . . . . . . . . . . .245
Log File dialog . . . . . . . . . . . . . . . . . . . . . . . . . . . . . . . . . . . . . . . . . . . . . . . . . . . . . . . 246
Maps Preferences dialog . . . . . . . . . . . . . . . . . . . . . . . . . . . . . . . . . . . . . . . . . . . . . . .247
Match Code Dialog. . . . . . . . . . . . . . . . . . . . . . . . . . . . . . . . . . . . . . . . . . . . . . . . . . . .248
Match Settings dialog. . . . . . . . . . . . . . . . . . . . . . . . . . . . . . . . . . . . . . . . . . . . . . . . . . 249
Modify Table Structure dialog . . . . . . . . . . . . . . . . . . . . . . . . . . . . . . . . . . . . . . . . . . .253
Multiple Match dialog . . . . . . . . . . . . . . . . . . . . . . . . . . . . . . . . . . . . . . . . . . . . . . . . . .254
Offset Preferences dialog. . . . . . . . . . . . . . . . . . . . . . . . . . . . . . . . . . . . . . . . . . . . . . .255
Open Project dialog . . . . . . . . . . . . . . . . . . . . . . . . . . . . . . . . . . . . . . . . . . . . . . . . . . .256
Open Table dialog . . . . . . . . . . . . . . . . . . . . . . . . . . . . . . . . . . . . . . . . . . . . . . . . . . . . 257
Quick Find dialog . . . . . . . . . . . . . . . . . . . . . . . . . . . . . . . . . . . . . . . . . . . . . . . . . . . . . 259
Quick Find Settings dialog . . . . . . . . . . . . . . . . . . . . . . . . . . . . . . . . . . . . . . . . . . . . . .261
Related Table dialog . . . . . . . . . . . . . . . . . . . . . . . . . . . . . . . . . . . . . . . . . . . . . . . . . . 264
Save As dialog . . . . . . . . . . . . . . . . . . . . . . . . . . . . . . . . . . . . . . . . . . . . . . . . . . . . . . .265
Save Batch File . . . . . . . . . . . . . . . . . . . . . . . . . . . . . . . . . . . . . . . . . . . . . . . . . . . . . .265
Save Project File . . . . . . . . . . . . . . . . . . . . . . . . . . . . . . . . . . . . . . . . . . . . . . . . . . . . .266
Export to Shapefile. . . . . . . . . . . . . . . . . . . . . . . . . . . . . . . . . . . . . . . . . . . . . . . . . . . . 266
Save Table Summary As dialog. . . . . . . . . . . . . . . . . . . . . . . . . . . . . . . . . . . . . . . . . .267
MapMarker USA 25 10 User Guide
Page 11

Select Attribute Tables dialog . . . . . . . . . . . . . . . . . . . . . . . . . . . . . . . . . . . . . . . . . . .267
Select Data Source . . . . . . . . . . . . . . . . . . . . . . . . . . . . . . . . . . . . . . . . . . . . . . . . . . . 268
Select input columns from your table dialog . . . . . . . . . . . . . . . . . . . . . . . . . . . . . . . .269
Select output columns from your table dialog . . . . . . . . . . . . . . . . . . . . . . . . . . . . . . . 271
Select Project Files dialog . . . . . . . . . . . . . . . . . . . . . . . . . . . . . . . . . . . . . . . . . . . . . .273
Select Table dialog. . . . . . . . . . . . . . . . . . . . . . . . . . . . . . . . . . . . . . . . . . . . . . . . . . . .274
Select Table Type dialog . . . . . . . . . . . . . . . . . . . . . . . . . . . . . . . . . . . . . . . . . . . . . . .274
Startup Preferences dialog. . . . . . . . . . . . . . . . . . . . . . . . . . . . . . . . . . . . . . . . . . . . . .275
Table Georesult Summary dialog. . . . . . . . . . . . . . . . . . . . . . . . . . . . . . . . . . . . . . . . . 276
Text File Wizard (Step 1 of 3) . . . . . . . . . . . . . . . . . . . . . . . . . . . . . . . . . . . . . . . . . . . 277
Text File Wizard (Step 2 of 3) . . . . . . . . . . . . . . . . . . . . . . . . . . . . . . . . . . . . . . . . . . . 278
Text File Wizard (Step 3 of 3) . . . . . . . . . . . . . . . . . . . . . . . . . . . . . . . . . . . . . . . . . . . 279
User Dictionary Wizard (Step 1 of 3) . . . . . . . . . . . . . . . . . . . . . . . . . . . . . . . . . . . . . .280
User Dictionary Wizard (Step 2 of 3) dialog . . . . . . . . . . . . . . . . . . . . . . . . . . . . . . . . .281
User Dictionary Wizard (Step 3 of 3) dialog . . . . . . . . . . . . . . . . . . . . . . . . . . . . . . . . .283
Appendix B: Creating a Map Catalog Manually . . . . . . . . . . . . . . . . . . . . . . . . . 285
Adding Rows to the MapInfo_MapCatalog . . . . . . . . . . . . . . . . . . . . . . . . . . . . . . . . . .287
Spatial Index Types for SPATIALTYPE . . . . . . . . . . . . . . . . . . . . . . . . . . . . . . . . . . . . 290
Per-Record Styles . . . . . . . . . . . . . . . . . . . . . . . . . . . . . . . . . . . . . . . . . . . . . . . . . . . .290
Symbol, Pen, Brush Clause Syntax . . . . . . . . . . . . . . . . . . . . . . . . . . . . . . . . . . . . . . .290
Appendix C: Frequently Asked Questions . . . . . . . . . . . . . . . . . . . . . . . . . . . . . 292
Q: I have a table that I cannot geocode because I get the error “Unable to update row.”
What does this mean and how can I fix it?. . . . . . . . . . . . . . . . . . . . . . . . . . . . . . . . . . 293
Q: I open a table in MapInfo Professional and I am able to open that same table in
MapMarker. Is this safe? . . . . . . . . . . . . . . . . . . . . . . . . . . . . . . . . . . . . . . . . . . . . . . .293
Q: How can I improve MapMarker performance? . . . . . . . . . . . . . . . . . . . . . . . . . . . . 293
Q: What determines if a row is unmatched? . . . . . . . . . . . . . . . . . . . . . . . . . . . . . . . .293
Q: After geocoding, some of my records have a result code of “ND.” What does this
mean? . . . . . . . . . . . . . . . . . . . . . . . . . . . . . . . . . . . . . . . . . . . . . . . . . . . . . . . . . . . . .294
Q: What is the significance of result codes, match codes, and location codes? . . . . .294
Q: What is the format of the Census Block code? . . . . . . . . . . . . . . . . . . . . . . . . . . . .294
Q: When geocoding, how can I prevent firm names from matching to street names?.295
Q: What is the difference between the Desktop product and the Developer Product? 295
Appendix D: MapMarker Utility Programs. . . . . . . . . . . . . . . . . . . . . . . . . . . . . . 296
Running FindAddress. . . . . . . . . . . . . . . . . . . . . . . . . . . . . . . . . . . . . . . . . . . . . . . . . .297
Append . . . . . . . . . . . . . . . . . . . . . . . . . . . . . . . . . . . . . . . . . . . . . . . . . . . . . . . . . . . . . . .298
Running Append . . . . . . . . . . . . . . . . . . . . . . . . . . . . . . . . . . . . . . . . . . . . . . . . . . . . . 298
Considerations when Running Append . . . . . . . . . . . . . . . . . . . . . . . . . . . . . . . . . . . .300
MapMarker USA 25 11 User Guide
Page 12

Appendix E: U.S. ZIP Code Ranges . . . . . . . . . . . . . . . . . . . . . . . . . . . . . . . . . . . 301
Appendix F: Match Codes and Location Codes . . . . . . . . . . . . . . . . . . . . . . . . . 305
Match Codes . . . . . . . . . . . . . . . . . . . . . . . . . . . . . . . . . . . . . . . . . . . . . . . . . . . . . . . . . .306
Match Code Values . . . . . . . . . . . . . . . . . . . . . . . . . . . . . . . . . . . . . . . . . . . . . . . . . . . 306
Hex Digits Associated with Match Codes. . . . . . . . . . . . . . . . . . . . . . . . . . . . . . . . . . .307
Corrected Lastline Match Codes . . . . . . . . . . . . . . . . . . . . . . . . . . . . . . . . . . . . . . . . . 308
Error and No Match Codes . . . . . . . . . . . . . . . . . . . . . . . . . . . . . . . . . . . . . . . . . . . . .311
Location Codes . . . . . . . . . . . . . . . . . . . . . . . . . . . . . . . . . . . . . . . . . . . . . . . . . . . . . . . . 312
Address Location Codes . . . . . . . . . . . . . . . . . . . . . . . . . . . . . . . . . . . . . . . . . . . . . . .313
Street Centroid Location Codes . . . . . . . . . . . . . . . . . . . . . . . . . . . . . . . . . . . . . . . . . . 318
ZIP +4 Code Location Codes . . . . . . . . . . . . . . . . . . . . . . . . . . . . . . . . . . . . . . . . . . . . 319
Geographic Location Codes. . . . . . . . . . . . . . . . . . . . . . . . . . . . . . . . . . . . . . . . . . . . .323
Location Code Not Available . . . . . . . . . . . . . . . . . . . . . . . . . . . . . . . . . . . . . . . . . . . .323
Using Status Codes . . . . . . . . . . . . . . . . . . . . . . . . . . . . . . . . . . . . . . . . . . . . . . . . . . . .323
Evaluating Candidate Match Quality . . . . . . . . . . . . . . . . . . . . . . . . . . . . . . . . . . . . . .324
Index . . . . . . . . . . . . . . . . . . . . . . . . . . . . . . . . . . . . . . . . . . . . . . . . . . . . . . . . . . . . 327
MapMarker USA 25 12 User Guide
Page 13

Introduction
Welcome to MapMarker USA, one of the premier address matching and
geocoding offerings from Pitney Bowes Software. MapMarker USA enables you
to assign geographic coordinates to large tables of American address records in
a single session.
In this chapter:
What Is Geocoding?. . . . . . . . . . . . . . . . . . . . . . . . . . . . . . . . . . . . . .14
What Is MapMarker? . . . . . . . . . . . . . . . . . . . . . . . . . . . . . . . . . . . . .14
MapMarker Features . . . . . . . . . . . . . . . . . . . . . . . . . . . . . . . . . . . . .15
MapMarker Documentation Set . . . . . . . . . . . . . . . . . . . . . . . . . . . . .22
MapMarker Streets . . . . . . . . . . . . . . . . . . . . . . . . . . . . . . . . . . . . . . .23
Getting Technical Support . . . . . . . . . . . . . . . . . . . . . . . . . . . . . . . . .24
1
Page 14

What Is Geocoding?
What Is Geocoding?
Geocoding is the process of assigning geographic coordinates to data that contain addresses. The
coordinates assigned to each address turn each record into a geographic object that can be
displayed on a map using MapInfo Professional or MapXtreme.
Geocoding turns ordinary data records containing address information into geographic objects that
can be displayed on a map. A list of customers, stores, or anything with a street address or postal
code may be matched using the comprehensive street and postal code files provided in the Address
Dictionary. The result of geocoding is an xy coordinate linked to a specific address. When displayed,
this enables you to better visualize the relationships in your data.
You can display coordinates by creating maps in MapInfo Professional or via MapXtreme and add to
other map objects to give your data a geographic reference. You can then perform a wide variety of
functions to analyze your data in geographic terms. Data that once was only readable in column and
row format can be now viewed with a whole new perspective, thereby disclosing patterns and
clusters you never knew existed.
Visualizing your records on a map can make the relationships among your data clearer. You can
display your geocoded records against a street map, a postal centroid map, a local map, or
whatever is most appropriate to your needs. You can then use the wide variety of functions available
in MapInfo mapping software to perform querying, create thematic maps, create territories, and
perform many other types of geographic analysis.
Beyond visualizing data on a map, location data can be leveraged in many ways. See Location
Intelligence Products and related parts of the Pitney Bowes Software web site for details on how
your organization can use location information to make better decisions.
What Is MapMarker?
MapMarker is a powerful geocoding tool produced by Pitney Bowes Software MapMarker enables
you to assign geographic coordinates to large tables of U.S.-based address records in a single
session. This is a key step toward mapping and analyzing your business data. MapMarker adds
geographic coordinates to every record in your database that it matches against its comprehensive
Address Dictionary, a database of USPS
centroids.
MapMarker assigns coordinates to an address based on how well it matched in the Address
Dictionary. The precision of the match can vary. For each address you geocode, you may get back a
single perfect, street-level match, a list of street-level match candidates from which you choose the
best match. You may get a less precise match, for example a ZIP Code centroid match if you
provided a ZIP Code or a city-level centroid match.
To identify the match precision, MapMarker also returns a result code for each address that it
geocodes. The precision that you require for your geocoded records depends on how you plan to
use your data.
MapMarker USA 25 14 User Guide
®
street addresses, street geometry and the latest ZIP + 4®
Page 15

In addition to being a powerful geocoder, MapMarker is also a suite of tools that allows you to
standardize your U.S. addresses, add spatial information and create points for your records, develop
standalone or client/server custom geocoding applications, and embed MapMarker functionality in
existing applications.
The MapMarker Desktop application, MapMarker server, and MapMarker developer tools have
geocoding capabilities that allow you to add geocoding functionality to your own desktop or Web
application.
MapMarker Features
MapMarker USA allows a great deal of flexibility in geocoding. This section briefly describes the
major features of MapMarker USA. This does not completely summarize all the MapMarker features
and capabilities.
See the MapMarker USA Release Notes for new features, Address Dictionary updates, and
behavioral changes that you may notice with MapMarker. The Release Notes also describe fixes to
customer-reported issues and known issues that customers must be aware of. The MapMarker USA
Release Notes are located at the Pitney Bowes Software Product Documentation site.
Chapter 1:
MapMarker Features
MapMarker Installer
The MapMarker USA 25 installer is designed to simplify the installation and provide more feedback
during installation. The installer accommodates:
• Typical and custom installs
• Upgrading software and data or upgrading data only
• Silent installation and modification
• Selecting and installing the JVM
• Installing the sample application (for Server installation)
• Selecting default and custom locations for installing software and data
• Choosing shortcut locations
• Uninstalling MapMarker
L Note You must have administrator rights to install MapMarker software. This is true for all
operating systems.
If you select the street level geocoding operation, MapMarker will match your full address record
against its Address Dictionary and/or User Dictionary (If you have created and selected a User
Dictionary.). This process will correct misspelled street addresses and city/town names. It can also
correct postal code information, or add postcodes if your data does not already include them. After
MapMarker completes the address cleaning step, it will geocode your records in accordance with
the other preferences you have set.
Addresses that are geocoded to a street level return an S or M result code. See Result Codes for a
description of these and other result codes.
MapMarker USA 25 15 User Guide
Page 16

MapMarker Features
Intersection Geocoding
MapMarker USA can geocode to street intersections. Using any of several ways to designate a
street intersection, MapMarker can find the position of the intersection of two street segments within
a given postal code or city. See Intersection Geocoding.
Addresses that are geocoded to an intersection return an SX result code. See Result Codes for a
description of all result codes.
PlaceName Geocoding
PlaceNames are included in the data and can be geocoded by MapMarker USA. PlaceNames can
include business names, building names, government offices, or other companies and organizations
that are included in the data source of the MapMarker USA Address Dictionary.
PlaceName geocoding is also supported by User Dictionaries. You can create and implement User
Dictionaries based on your own data or third-party data sources. Your custom data may include
place names, intersections, airports, business or organization names, building names, or any other
POI (Point of Interest) that you want to use for geocoding purposes.
Unformatted (Single-line) Address Input
MapMarker can geocode single line addresses, in which all address components appear on a single
line rather than in separate fields.
Address Cleansing
MapMarker USA can successfully geocode many addresses even if the addressing is less than
perfect. For example, the USPS
single postal code (especially in urban areas). MapMarker USA can interpret addresses that refer to
official (gazetted) or unofficial locality names, but will return the official locality name in the address
cleansing process.
®
may identify several official and unofficial locality names for a
Postcode Geocoding
If you choose Postcode Geocoding, MapMarker will geocode your records based on their postal
code in accordance with the other preferences you have set. You can also fallback to Postcode
geocoding if a street level match was not possible.
A postal code represents an area (polygon). A postal code can be related to one locality, or to
multiple localities in metropolitan areas. In some regions (such as Northern Territory) this may not be
true.
®
USPS
may identify several official and unofficial locality names for a single postal code (especially
in urban areas). MapMarker USA can interpret addresses that refer to official (gazetted) or unofficial
locality names, but will always return the official locality name in the address cleansing process.
Addresses that are geocoded to a postal code return a Z result code. See Postal Centroid Matches
(Z category) for a description of Z result codes.
MapMarker USA 25 16 User Guide
Page 17

MapMarker Features
Geographic Geocoding
If the input address consists of a valid combination of city and state, but no further address
information, you can still geocode to the city centroid. You can also fallback to Geographic
geocoding if a street level match was not possible.
MapMarker USA can interpret addresses that refer to official (gazetted) or unofficial locality names,
but will always return the official locality name in the address cleansing process.
Addresses that are geocoded to a geography return a G result code. See Geographic Matches (G
category) for a description of G result codes.
Reverse Geocoding
With reverse geocoding, you can provide X/Y (Longitude/Latitude) coordinates and MapMarker USA
25 returns the closest address for that location.
L Reverse geocoding is available with the Developer (Server) edition only (not with the
Desktop application). See the Developer Guide for relevant information on reverse
geocoding.
You can perform reverse geocoding using street segment or point address dictionaries or a user
dictionary.
Chapter 1:
Addresses that are reverse geocoded return an RS result code. See Chapter 6 Result Codes for a
description of all result codes.
Address Dictionaries
The default Address Dictionary is based on TomTom® Street data and USPS sources. This includes
millions of American street addresses and placenames with corresponding address range, street
geometry and postal code data and is used for matching addresses and assigning coordinates
during the geocoding process. This Address Dictionary can be purchased and licensed for all of
USA or for individual regions.
A number of other street range and point-based Address Dictionaries are available. See the
MapMarker USA Release Notes provided with your product. These Release Notes and other
documentation are also located at the Pitney Bowes Software Product Documentation site for
information on the available Address Dictionaries and data vintages for your version of MapMarker
USA.
Multiple File Formats as Input Data
MapMarker USA reads any MapInfo table (TAB format), CSV, delimited text files (TXT), fixed-width
text files, or any dBASE (DBF) format table. MapMarker supports multiple character sets for dBASE
files.
MapMarker USA 25 17 User Guide
Page 18

MapMarker Features
In addition, MapMarker, via Open Database Connectivity (ODBC) can geocode data stored in
remote databases, including Microsoft Access, Microsoft SQL Server, and Oracle using the X and Y
data type.
User Dictionaries
A User Dictionary is similar to the provided Address Dictionary, but it is created by the user from their
own source data. User-defined dictionaries can contain a variety of customized address-related data
that may provide improved address matching rates and add value to the address validation and
geocoding process. User Dictionaries can also be based on parcel/point data, which can provide an
even higher level of geocoding accuracy.
You can create any number of custom dictionaries. User Dictionaries can be used in combination
with or in preference to the Address Dictionary.
See Custom User Dictionaries.
User Dictionary Utility
The User Dictionary Utility simplifies the steps for creating User Dictionaries. This graphic utility can
be installed with the MapMarker USA Server product. Alternatively, this utility is available for
download from the MapInfo Geocoding web site.
Attribution
You can add attribute values from other tables as part of a geocoding pass, or as a separate
process. For example, MapMarker can attach information (such as lifestyle codes), stored in a
boundary or point file to a record in your database when it makes a match. All that is necessary is a
common link between the two tables.
Automatic and Interactive Geocoding
MapMarker USA runs in both automatic and interactive mode. You can use either automatic or
interactive geocoding or you can combine these techniques in multiple geocoding passes to
optimize your results.
Batch Geocoding
MapMarker USA supports batch geocoding for processing one or more tables without user
interaction. This feature is useful for overnight processing of large databases or when a table is
updated regularly.
See Creating a Project-Based Batch File.
MapMarker USA 25 18 User Guide
Page 19

MapMarker Features
Saving and Using Project Files
You can create MapMarker projects to preserve all current geocoding settings, matching and
fallback preferences, table attributes settings, and system preferences. Project files also provide a
way to do batch geocoding on delimited text files and fixed-width text files.
See Creating and Saving a Project for information on opening a project and creating a project.
Display Geocoded Points on Map
MapMarker can create point objects for geocoded records automatically. You can display the points
using MapInfo mapping software (such as MapInfo Professional.). Optionally, MapMarker can write
the X and Y coordinates directly to your table. Points created with MapMarker will overwrite any
points already existing in the table.
See the Viewing Match Candidates on a Map for information on viewing candidates on a map.
Quick Find and Browsing
The Quick Find Feature in the Desktop application enables you to quickly geocode a single address
or business name without using the Geocode dialog. The Quick Find dialog is located under the
Search menu of the Desktop application. Enter the address information in the Quick Find dialog and
click Search. MapMarker returns geocoding results based on the currently set geocoding
preferences.
Chapter 1:
You can also use the Quick Find dialog to browse the Address Dictionary for the correct spelling of a
street name or business. Provide the postal code and at least the first letter of the street or business
and click Browse. The city/town and state fields are optional. MapMarker returns a list of streets or
businesses that meet your criteria. Browsing does not geocode the record, but you can use the
browse results to confirm and correct your address and then geocode based on this information.
See the Finding Address with Quick Find for information on the Quick Find feature.
Result Codes
MapMarker USA returns a result code for each record it attempts to match. This enables you to see
whether a match was made, which dictionary was the source of the match, and how precisely each
address component matched. The result codes are stored in your table. When the records display in
a Map window, each result code is represented by a color-coded symbol. This allows you to visually
recognize the precision level and distribution of the matches.
See Result Codes.
Match Codes and Location Codes
MapMarker USA returns match codes that indicate the parts of the address were matched (or what
address parts were changed to achieve the match). MapMarker also returns location codes that
indicate the locational accuracy of the assigned geocode.
See Match Codes and Location Codes.
MapMarker USA 25 19 User Guide
Page 20

MapMarker Features
Segment IDs
Segment IDs are numeric codes that uniquely identify each point or street centroid candidate. The
MapMarker USA 25 geocoder returns the Segment ID for each S8, S7, S6, S5 and S4 candidate
(providing that the segment ID information is available in the Address dictionary.
L Segment IDs are available with the Developer (Server) product only (not with the Desktop
application).
Wide Search
You can increase the probability of a match by using Relaxed mode in combination with wide search.
Wide search considers all streets that begin with the first letter of the input street name, and
therefore can identify more potential candidates.
Wide search is supported at both the API level and in the Desktop application. You can set wide
search in the Match Settings dialog on page 249 and the Quick Find Settings dialog on
page 261.
See Using Wide Search with Multiple Pass Strategy on page 103 for an explanation of using this
feature.
Centerline Offset for Point Candidates
If a point candidate is returned from a point dictionary, you can return the coordinates at a specified
offset from the associated street segment (rather than at the original point). This feature is available
if you are using a point-based Address Dictionary (such as Centrus Points or TomTom Points). See
Address Dictionaries for an overview of the available Address Dictionaries.
Centerline offset can be specified in feet, miles, meters, kilometers, and other supported units. The
default setting is 25 feet for USA and 7 meters for other countries. A centerline offset candidate has
an SC result code rather than an S8 (for example: SCHPNTSCZA). The C indicates that the point
has been moved a specified distance along the centerline.
The centerline offset capability is disabled by default, but you can enable and control it through the
Offset Preferences dialog. See Offset System Preferences.
Expanded Search
MapMarker USA implements expanded search, which allows MapMarker to search for an address
within a given radius of the input address. Expanded search helps to find a match when the input
address contains limited or inaccurate city or ZIP Code information.
Expanded search is not implemented by default, but is supported at both the API level and in the
Desktop application. You can set expanded search in the Match Settings dialog on page 249 and
the Quick Find Settings dialog on page 261.
See Using Expanded Search on page 102 for an explanation of using this feature.
MapMarker USA 25 20 User Guide
Page 21

MapMarker Features
Search Level Constraints for Finance Area and City
You can specify if you want the search area based on a Finance Area or on an area defined by the
city, state, and ZIP Code.
These constraints are supported at both the API level and in the Desktop application. You can set
these search level constraints in the Match Settings dialog on page 249 and the Quick Find
Settings dialog on page 261.
CASS Mode automatically uses the Finance Area constraint by default. All other match modes use
City search level by defaults.
MapMarker Desktop Application
The MapMarker Desktop application can be installed on a single machine, or on a network to be
shared by other users. The Desktop application gives you a great deal of control over the geocoding
process.
Following is a partial list of MapMarker Desktop application features:
• Supports a number of different file formats, including MapInfo TAB files, DBF files, CSV,
delimited text files (TXT), and ESRI Shapefiles (SHP). See Supported File Formats.
• Geocode interactively (you make the final decision if it is a match) to maximize the number of
matches and to control error rate.
• Geocode a portion of your table using the Quick Geocode feature.
• Geocode a large database of addresses in batch mode.
• Geocode a portion of your table using the Quick Geocode feature.
• Geocode to street address ZIP Code centroids or to street intersections.
• Identify result codes quickly tell how the address match was made and how precise the match is.
• Standardize addresses to meet USPS CASS™. See CASS Geocoding for a description of
Coding Accuracy Support System requirements using MapMarker Address Dictionary.
®
• Use DPV
with CASS to verify whether an address is a valid USPS delivery point.
• Geocode remote tables via ODBC.
. See Using DPV for a description of using Delivery Point Validation in conjunction
Chapter 1:
L CASS and DPV functionality are available with MapMarker.
MapMarker Server
MapMarker Server is a server-based engine that is designed to be integrated into business
processes. The Server product enables multiple simultaneous geocoding requests to be served from
a single MapMarker engine.
MapMarker USA 25 21 User Guide
Page 22

MapMarker Documentation Set
Developer Tools
The MapMarker Server product includes developer tools provides a Java API and an XML (.NET
Framework) API. Developers can use these tools to build and deploy client/server or standalone
geocoding applications.
Integration with MapInfo Professional
MapInfo Professional users can run MapMarker USA or Envinsa 4.3.1 or later as a geocoding
service from within MapInfo Professional 8.5 or later. This direct connection enables users to take
advantage of MapMarker address validation and geocoding capabilities within the powerful MapInfo
Professional mapping and analysis environment.
MapMarker Documentation Set
The documentation set for MapMarker includes PDF and online resources to help you make the
most of the product. The set includes:
• MapMarker User Guide in PDF format.
• Online Help for the MapMarker Desktop application.
• MapMarker Developer Guide in PDF format.
• Release Notes that provide updated information on new features, behavioral changes in the
software, fixes for customer-reported issues, and known issues. To see these Release Notes
and other MapMarker documentation, go to the Product Documentation page on the Pitney
Bowes Business Insight web site.
MapMarker User Guide
This guide is designed to help you use MapMarker to the fullest. It introduces you to the product, and
explains how to use the MapMarker Desktop application. Coverage includes:
• Installing MapMarker
• Geocoding in MapMarker
• Using system preferences
• Configuring settings for optimum geocoding results
• Explaining result codes
• Geocoding remote tables
• Creating a customized user dictionary
The User Guide also contains a chapter on more specialized features, including CASS™ geocoding
and DPV
attribution.
This guide also includes appendixes that provide reference information for MapMarker.
• User Interface Reference – Illustrates and explains the dialogs, buttons, and menu commands in
• Creating a Map Catalog – Describes how to create a Map Catalog manually so that you can
MapMarker USA 25 22 User Guide
®
; finding airports, highway exits, single address geocoding, batch geocoding, and table
the MapMarker user interface.
make remote tables mappable.
Page 23

MapMarker Streets
• MapMarker Utility Programs – Explains the FindAddress and Append utilities.
• Frequently Asked Questions – A list of frequently asked questions.
• MapMarker Program Files – A list of the files that are installed with MapMarker.
• U.S. ZIP Code Ranges – A list of the ZIP Code ranges in the United States.
Online Help
In addition to the User Guide, MapMarker includes online help for the Desktop application. Online
help is instantly available while you are running MapMarker or the installation wizard. To access
help, either select the Help menu, press the F1 key, or click Help for help about a dialog.
MapMarker USA Developer Guide
This explains the server and API components of the developer product. This also describes and
illustrates the sample application, a Java client that illustrates how to geocode American addresses.
MapMarker Release Notes
The MapMarker Release Notes are posted to THE Pitney Bowes Software Product
Documentation web site, and contain a brief summary of the following:
Chapter 1:
• New features
• Operating requirements
• Bug fixes
• Known issues
Publications on the Web
The MapMarker documentation and Release Notes are available from the Product Documentation
page on the Pitney Bowes Business Insight web site.
Documentation on the web site may be updated if corrections are necessary or if new information
becomes available.
MapMarker Streets
Once you have geocoded your table you can display geocoded points in the MapMarker Desktop
application through Candidate Visualization. You may want to add other layers of information to your
map to give your records a geographic reference. MapMarker Streets is a U.S. network of fast
displaying streets, highways, municipal boundaries, water features, and points of interest to
complement your MapMarker geocoded data.
MapMarker Streets is provided on separate media with your MapMarker product.
MapMarker USA 25 23 User Guide
Page 24

Getting Technical Support
Getting Technical Support
Pitney Bowes Software offers a free support period on all new software purchases and upgrades, so
you can be productive from the start. Remember to provide your serial number, partner number, or
customer agreement number when contacting Technical Support.
Contact the technical support personnel for your area:
The Americas
Support: 800 552 2511
Fax: 518.285.6080
E-mail: pbbi.support@pb.com
Hours: Monday - Friday from 8:00am - 7:00pm EST, excluding company holidays.
Europe/Middle East/Africa:
Support: +44 1634.880.141
Fax: +44 1634.880.383
E-mail: pbbi.support@pb.com
Hours: Monday - Friday from 9am to 5pm GMT, excluding company holidays.
Asia-Pacific Headquarters
Support: 1800 648 899
Hours: Monday–Friday from 8:00am and 6:00pm (EST) Australian Eastern Standard Time,
excluding company holidays.
Fax: 61.2.9439.1773
Main Office Phone (Sydney): 61. 2.9437.6255
E-mail: pbbi.support@pb.com
Before You Call
Have the following information ready when contacting us for assistance on MapMarker:
1. Serial Number. You must have a registered serial number to receive Technical Support.
2. Your name and organization. The person calling must be the contact person listed on the support
agreement.
3. Version of the product you are calling about.
4. The operating system name and version.
5. A brief explanation of the problem. Some details that can be helpful in this context are:
• Error messages
• Context in which the problem occurs
• Consistency – is the problem occurring consistently or erratically?
MapMarker USA 25 24 User Guide
Page 25

Chapter 1:
Getting Technical Support
The Support Tracking System
The Support Tracking System is used internally by the Technical Support department to manage and
track customer issues. The system also has the ability to track calls with accountability. This system
helps Tech Support respond to all customer issues quickly and effectively.
Expected Response Time
Most issues can be resolved during the customer’s initial call. If quick resolution is not possible, a
response is issued before the end of the business day. A Technical Support representative will
provide you with the status each business day until the issue is resolved.
Support requests submitted by e-mail are handled using the same guidelines as telephone support
requests. However, there is an unavoidable delay of up to several hours for message transmission
and recognition.
Exchanging Information
Occasionally a Technical Support representative will ask you to provide sample data in order to
duplicate your scenario. In the case of our developer tools, a small subset of sample code may be
requested to help duplicate the issue.
The preferred method of exchanging information is either via e-mail or our FTP site. Use the
following e-mail address:
• Globally – pbbi.support@pb.com
Accessing the Pitney Bowes Software FTP site
For information regarding our FTP site, contact Technical Support. If information cannot be provided
electronically, Pitney Bowes Software also accepts information in the following media formats:
•CD
•DVD
Software Defects
If the issue is recognized as a defect in the software, the Technical Support representative will log
the issue in our incident database and assign an incident number that can be used for tracking
purposes.
MapMarker USA 25 25 User Guide
Page 26

Installing MapMarker
This chapter contains instructions for installing MapMarker. Refer to this chapter
for step-by-step instructions and other issues related to installation.
In this chapter:
Installation Overview . . . . . . . . . . . . . . . . . . . . . . . . . . . . . . . . . . . . .27
Operating Requirements and Performance Recommendations. . . . .28
Installing MapMarker . . . . . . . . . . . . . . . . . . . . . . . . . . . . . . . . . . . . .30
Modifying the MapMarker Installation. . . . . . . . . . . . . . . . . . . . . . . . .40
Upgrading the MapMarker Installation . . . . . . . . . . . . . . . . . . . . . . . .41
Uninstalling MapMarker . . . . . . . . . . . . . . . . . . . . . . . . . . . . . . . . . . .44
Client Workstation Install . . . . . . . . . . . . . . . . . . . . . . . . . . . . . . . . . .45
Starting MapMarker . . . . . . . . . . . . . . . . . . . . . . . . . . . . . . . . . . . . . .47
2
Page 27

Installation Overview
MapMarker is available as Desktop and Developer (Server) editions. The features available during
installation are as follows:
MapMarker Desktop Edition The Desktop edition includes the Desktop Application, which
includes the graphical user interface for geocoding addresses and the MapMarker Address
Dictionary. You can purchase data for all 50 states (plus D.C. and Puerto Rico), regional state
bundles, or individual state data.
The Desktop Application runs on Microsoft Windows only.
MapMarker Developer Edition The Developer (Server) edition enables multiple simultaneous
geocoding requests to be served from a single MapMarker engine. It also includes the tools
necessary for developing MapMarker solutions using the Java API or XML API. These tools include
the MapMarker SDK, native code libraries, and examples. A preconfigured Apache Tomcat servlet is
provided to run MapMarker as a geocoding server.
The Developer edition also includes one license for the MapMarker Desktop Application.
MapMarker is delivered on one DVD, which includes both the software and the data. An installer is
provided to install and configure MapMarker in one easy procedure.
The MapMarker installer program can be used for the following purposes:
Chapter 2:
Installation Overview
• New installation. See Installing MapMarker on page 30.
• Modifying existing installation to add or remove features. For example, you could add new data
or add a feature to an existing installation. See Modifying the MapMarker Installation on
page 40.
• Upgrading existing installation. For example, when a point release version of MapMarker is
available, you could upgrade from version 25.0 to 25.1 with the same set of features that are
already installed. See Upgrading the MapMarker Installation on page 41
• Uninstalling. See Uninstalling MapMarker on page 44.
L After you complete the installation, contact Pitney Bowes Software Customer Service and
provide your e-mail address. This will be necessary to receive future license file updates.
Contact Customer Service at 800 552 2511. This and other contact information also appears
in the Quick Reference Card enclosed in the product box.
Shared Install
The MapMarker data can be shared among a group of users who wish to run the MapMarker Desktop
Application. To do so, the system administrator must do a shared installation of MapMarker. This means
that during installation the administrator must select the Desktop Application and Data features (see
step 6
) and also select "This installation will be shared by others on a network" (see
installation, the data folder (for example, <SERVER-MACHINE>\MapMarker_USA_v25\
MapMarker_USA_v25_Data) must be shared on the network.
step 8
). After
MapMarker USA 25 27 User Guide
Page 28

Operating Requirements and Performance Recommendations
After the system administrator has made the shared data folder available across the network, client
users can browse to that location and run the Desktop Application installer (ClientSetup.exe) from
\\SERVER-MACHINE\MapMarker_USA_v25_Data\DesktopInstaller\ to install the MapMarker
Desktop Application on their workstations.
Note that with MapMarker USA v25, each machine must be licensed to run the software. See the
License Management topic.
For instructions on installing the client Desktop Application for use with a shared installation, see
Client Workstation Install on page 45.
About the Address Dictionary
The MapMarker Address Dictionary is installed during the installation of the MapMarker software. All
of the data is installed in the same dictionary (not separated by state). You will not see indication of
different states, but you will only be able to geocode those states for which you are licensed. You can
choose to install DPV
datasets.
The Address Dictionary must be stored on a local hard drive or a network drive.
®
, LACS
Link
™, and Suite
Link
™ data, assuming that you are licensed for those
License Management
Whether you are installing the MapMarker USA v25 Desktop or Server, single workstation or shared
installation, or using the graphical interface or silent installation, you must obtain a valid license file in
order to install the product.
Operating Requirements and Performance Recommendations
Note the following recommendations in order to maximize the performance of your MapMarker
installation.
Operating Requirements
Optimizing Performance
Operating Requirements
This section describes the basic software and hardware requirements for MapMarker. See your
version-specific Release Notes for more detailed descriptions and additional information on
supported software and hardware.
Hardware and Memory Requirements
Supported Operating Systems
JVM Requirements
Database Requirements
Web Server Requirements (Developer Edition Only)
MapMarker USA 25 28 User Guide
Page 29

Chapter 2:
Operating Requirements and Performance Recommendations
Hardware and Memory Requirements
The minimum system requirements for MapMarker USA v25 are:
®
• 1 Ghz Pentium
• 1 GB RAM
• 5 GB available disk space (including 1 GB for Address Dictionary)
For optimal performance we recommend:
• Dual core processor or better
•2GB RAM
• 10 GB available disk space.
processor or equivalent
Supported Operating Systems
MapMarker runs on:
• Microsoft Windows
•Solaris
•HP-UX
• Red Hat Linux
• SUSE Linux
See the product Release Notes for detailed information on supported operating systems for your
specific version of MapMarker.
JVM Requirements
MapMarker requires a Java Virtual Machine (JVM) to run. MapMarker USA v25 ships with JVM 1.6.
See the product Release Notes for detailed JVM support information for your specific version of
MapMarker.
During the installation, you will have the option of installing the JVM that ships with MapMarker or
using one that you already have installed on your computer. See the product Release Notes for
detailed JVM support information for your specific version of MapMarker.
MapMarker USA 25 29 User Guide
Page 30

Installing MapMarker
Database Requirements
MapMarker USA 25 supports selected ODBC databases and drivers for SQL Server, Microsoft
Access and Oracle.
See the product Release Notes for updated database support information for your specific version of
MapMarker.
Web Server Requirements (Developer Edition Only)
The MapMarker server allows you to develop geocoding applications on any Java Platform,
Enterprise Edition (Java EE) application server that supports JDK 1.5 or JDK 1.6.
MapMarker USA ships with:
• Apache Tomcat 6.0. This is installed if the Web Application feature is selected during the
Developer Product installation.
Your product Release Notes may contain additional information on web server support information
for your specific version of MapMarker.
Optimizing Performance
To get the greatest benefit from the MapMarker geocoding capabilities, you can follow some
optimization and performance guidelines. See General Guidelines for Optimizing Geocoding.
Installing MapMarker
This section describes the typical MapMarker installation procedures for Microsoft Windows users
and for UNIX/Linux users. The graphical installer interface guides you through the procedure. You
can also install silently, without user interaction.
L You must have administrative privilege on your machine to install MapMarker USA 25.
Using the Software License
Install Using the Graphical Interface on page 33
Installing Silently on page 39
Using the Software License
Regardless of your installation strategy or platform, you must have a software license to install
MapMarker USA v25. You should have received software license files from your Sales
Representative before you install the software.
License management is explained in your MapMarker USA v25 Release Notes. Your Sales
Representative and Pitney Bowes Software Customer Service can also provide information.
MapMarker USA 25 30 User Guide
Page 31

Chapter 2:
Installing MapMarker
If you do need to generate a new license file, you can run the license manager. This file is named
LicAsssist.exe on Windows platforms and licassist for UNIX platforms. Instructions for running the
license manager are included in the licassist.txt file. Both LicAssist.exe and licassist.txt are located
on your software media under the licassist/platform folder, where platform is either windows or your
specific UNIX platform.
L You cannot use an existing MapMarker USA v24 license file. Only a new v25 license file can
be used to run MapMarker USA v25.
Your MapMarker USA v25 licence file will be named as follows, depending on whether it is a Server
or Desktop installation:
• mmusa_<MYMACHINE-NAME>.lic
• mmusad_<MYMACHINE-NAME>.lic (the d in the filename indicates Desktop)
Troubleshooting License File Errors
If you are missing a software license, or have an expired or invalid license, you may receive one of
the following messages. Follow the suggested actions.
Software License Error Messages
Error Message Description and Corrective Action
Invalid License Password or Invalid License file. The license file is created with a default
password. If it was created with a non-default
password, this password can be specified in
the USA_DataManagerSettings.properties
file. If the license file does not use the default
password or the correct password is not
specified in the properties file, you can
receive this error. This is a very uncommon
situation for end users.
License does not match the current machine. You may have used a v24 license file. Or you
may be using a v25 license with the wrong
machine. Licenses are machine-specific. You
must obtain a v25 license file from Customer
Service.
MapMarker USA 25 31 User Guide
Page 32

Installing MapMarker
License specified does not exist. The license could not be found. Either there
Software license has expired. This was a valid license file but it has expired.
Additional Licensing Scenarios
Following are some common scenarios that you may encounter with MapMarker USA v25 license
management. Consider these solutions before you contact Pitney Bowes Software Customer
Service for assistance.
Installing with the wrong machine .lic file. If you install with wrong machine .lic file, you will be
able to install MapMarker USA v25 but not run it. After you obtain the correct license file for your
machine, you can replace the .lic file in your Data folder with the correct license file. However, the
LICENSE_FILE entry of the USA_DataManagerSettings.properties files will be populated with the
.lic file name that you originally installed. You must then edit USA_DataManagerSettings.properties
in the following locations to resolve this.
Software License Error Messages (continued)
Error Message Description and Corrective Action
is no license or the license file (.lic) is not
located in the expected area.
You will get an expired message only once.
After that, the license is considered invalid
and you will get the Invalid License error
message. You must obtain a new v25 license
file from Customer Service.
For Desktop installation:
C:\Program Files (x86)\MapInfo\MapMarker_USA_v25\desktop
For a Windows platform Server installation, edit the following two instances of the properties file:
C:\Program Files (x86)\MapInfo\MapMarker_USA_v25\sdk\tomcat\
webapps\mapmarker40\WEB-INF\classes
C:\Program Files (x86)\MapInfo\MapMarker_USA_v25\sdk\engine\lib\client
For non-Windows platforms:
/opt/MapInfo/MapMarker_USA_v25/sdk/tomcat/webapps/mapmarker40/
WEB-INF/classes
/opt/MapInfo/MapMarker_USA_v25/sdk/engine/lib/client/
For example, for a Server installation copy the correct machine-specific .lic file into your Data folder
and edit the required properties files at the above mentioned locations as follows:
LICENSE_FILE=C:/Program Files(x86)/MapInfo/MapMarker_USA_v25/
MapMarker_USA_v25_Data/mmusa_<
where MYMACHINE-NAME represents your unique machine name. Note that forward slashes must
be used in properties files. For a Desktop installation, the .lic file is named mmusad_<MYMACHINENAME.lic.
MapMarker USA 25 32 User Guide
MYMACHINE-NAME
>.lic
Page 33

Installing MapMarker
Attempting to use a renamed v24 license. If you renamed your existing v24 license file as a v25
license file you will receive an error message. You cannot use an older license file with
MapMarker USA v25. Contact your Sales Representative if you did not receive your new license file.
Install Using the Graphical Interface
After you have obtained a license file, copy the license file to your local hard drive. You will need to
know the path to the license file in step 5 of the installation procedure.
After you have obtained your license file, copy it to your local machine (such as to the Desktop folder
or the C:/ directory) and follow these steps for typical installation using the graphical installer
program:
1. Begin the installation procedure as follows, depending on whether you are installing on Windows
or on UNIX/Linux:
• On Microsoft Windows, place the MapMarker DVD into your DVD drive. The installation
starts automatically. Click Install Product in the list of options. In the Install Product dialog,
click Install MapMarker USA. Proceed to step 2.
If the installation does not automatically run, from the Windows 2003/XP Start menu, select
Run. From the Run dialog, type D:\SETUP.EXE in the Open command box (where D is the
drive letter of your DVD-ROM).
• On Solaris, Linux, or HP-UX, run the shell script from the root of the DVD-ROM using the
command:
sh startinstall.sh
Proceed to step 2.
To bypass the startinstall.sh script, go to the /instdata folder of the DVD-ROM, and run the
executable appropriate for your operating system. For example, on a Linux operating system:
sh linux/install.bin
2. In the Introduction dialog, click Next to display the What’s New dialog. This has a brief summary
of new features for MapMarker USA 25 and has data vintage information.
Chapter 2:
3. From the What’s New dialog, click Next to display the License Agreement dialog.
4. After reading the License Agreement, click I accept the terms of the License Agreement and
then click Next to display the Licensing dialog.
5. In the Licensing dialog, enter the location of your license file (.lic file), which you recorded before
starting the installation.
MapMarker USA 25 33 User Guide
Page 34

Installing MapMarker
After entering the path to the license file, click Next to continue.
If you entered valid license file path, you see the Choose Install Set dialog. If you did not point to
a valid license file, you receive an error message and can to re-enter the license file.
L During standard Desktop installation, the license file is copied into the MapMarker Data
folder. The license file remains in that folder after an uninstall. If you are doing a shared
Client Desktop installation, see Client Workstation Install on page 45.
MapMarker USA 25 34 User Guide
Page 35
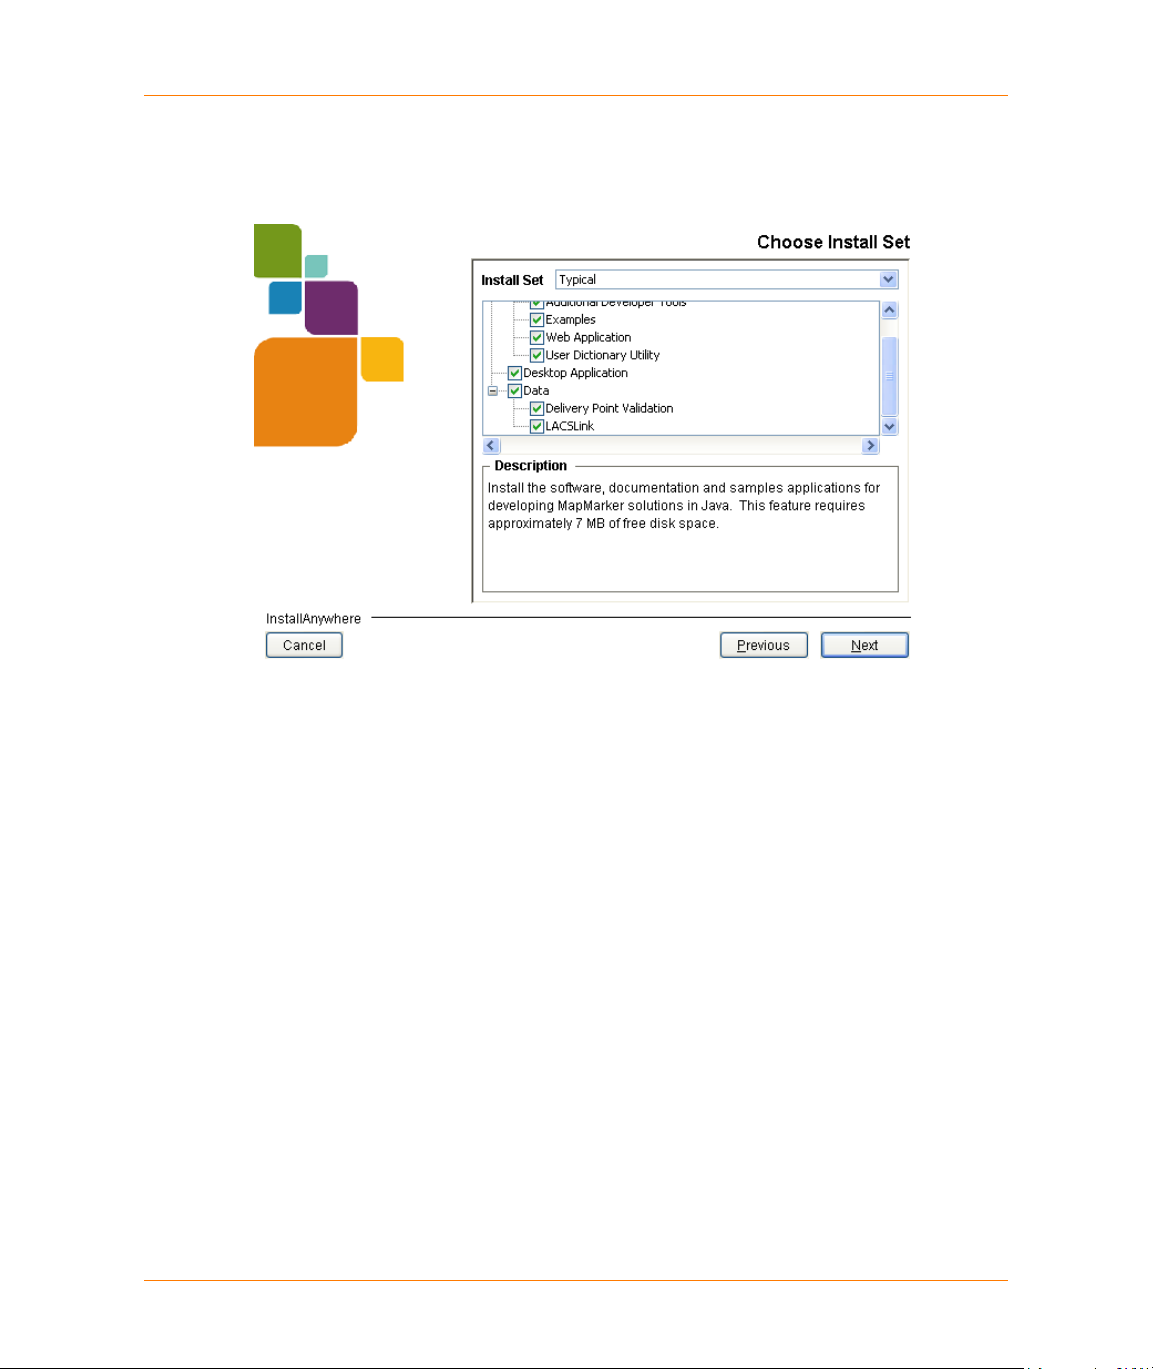
Chapter 2:
Installing MapMarker
6. In the Choose Install Set dialog, the default Typical Install Set shows all the software and data
available. To see a description of each feature, click on the feature to highlight it. A description of
the selected feature appears in the Description box.
Check the boxes for the features that you want to install and clear the check boxes of the
features that you do not want to install. Product documentation is always installed.
After choosing the features to install, click Next to display the Choose Install Folders dialog
MapMarker USA 25 35 User Guide
Page 36

Installing MapMarker
7. In the Choose Install Folder dialog, select the locations to install MapMarker software and data.
You can use the default locations, or click Choose to display the Browse for Folder dialog. From
the Browse folder you can navigate to the desired location. Click OK in the Browse for Folder
dialog when you are finished.
If you decide after selecting an alternative location that you would prefer the default location,
click Restore Default Folder in the Choose Install Folder dialog.
When you have selected the software and data install folders, click Next.
8. If you selected the Desktop Application feature in the Choose Install Set dialog (in step 6), the
Desktop Application Settings dialog appears. If you are not installing the Desktop Application,
skip to step 11.
In the dialog, choose whether the installation is for this workstation only or whether the
installation is shared by others on the network.
MapMarker USA 25 36 User Guide
Page 37

Chapter 2:
Installing MapMarker
Select The installation is for this workstation only if you want a local installation of
MapMarker software and data. This is not shared with other users.
Select The installation will be shared by others on the network if this workstation of
MapMarker serves as a host that provides a group of users on the same network a common
location for the software and data. Users who wish to access the shared software and data that
resides on the host workstation must do a separate client installation. See Client Workstation
Install on page 45 for more information.
After choosing a workstation only or shared installation, click Next to continue.
9. If you chose a shared installation (step 8), the dialog asks if you want to install the MapMarker
Desktop Application on this workstation (the host workstation). If you specified that the
installation would be for this workstation only, proceed to step 11.
If you plan to use the MapMarker application on this workstation (the one on which you are doing
the Shared installation), check Install the Desktop Application on this workstation. If you are
installing the software only for other users to access, do not check this box.
Click Next to continue.
10. The Desktop Application Settings dialog now shows the path to the shared data folder. Confirm
or correct the path to the shared data folder. Universal Naming Convention (UNC) paths are
used (for example: \\<mycomputer>\Program Files\MapInfo\
MapMarker_USA_v25\MapMarker_USA_v25_Data). This ensures that users running
MapMarker on other machines are able to access the shared data. If the network share name or
MapMarker USA 25 37 User Guide
Page 38

Installing MapMarker
shared folder does not already exist, it must be created before you can use the MapMarker
application.
L The install program does not ensure that the data folder is shared to others on the
network or is visible on the network. The person doing the installation is responsible for
entering a valid path to the data folder and making this data folder accessible.
After you have confirmed the shared data folder location, click Next to continue.
11. In the Choose Java Virtual machine dialog, do one of the following:
•Select Install a Java VM specifically for this application to install the Java virtual machine
that comes with MapMarker.
•Select Choose a Java VM already installed on this system to select a Java virtual
machine that you already have installed on the computer. Then select Search for Others to
search your computer for an installed JVM. After the search is completed, the dialog is
populated with a list of the JVMs that were found on your workstation. Select the JVM that
you want to use.
L See your MapMarker version-specific Release Notes for complete information on
operating requirements and recommendations, including information on the supported
and recommended JVMs.
After selecting the JVM, Click Next to display the Choose Shortcut Folder dialog. If you select a
JVM that is already installed on your system, and that JVM is invalid or cannot be found, you
receive an error message.
12. In the Choose Shortcut Folder dialog, choose where you want to create the product icons. You
can create a new Program Group, place the icons in an existing Program Group, or make other
choices. After making your selection, click Next to continue.
13. In the Pre-Installation Summary dialog, review the product features that you have chosen to
install, disk space requirements and other details. To edit any selections, click Previous to go
back to the earlier dialogs.
14. When you are satisfied with your installation choices, click Install. A progress dialog reports
progress as the software and data is installing.
An installation of MapMarker and the entire Address Dictionary may be time-consuming. The
amount of time required to install depends on how much data you are installing and machine
processing power. Do not cancel the install process if there is hard drive or DVD drive activity. To
verify that the installation is progressing, check the directory where the data is targeted to reside.
New files are added as the process continues.
15. When the installation is finished, the Install Complete message appears. Click Done to exit the
installer.
MapMarker USA 25 38 User Guide
Page 39

Installing MapMarker
Installing Silently
You can install MapMarker USA 25 without using a graphical interface and without user interaction.
This allows you to install MapMarker in environments that do not provide a graphical user interface.
To do a silent install, use the properties file located in the root folder on the DVD. The file is named:
silentinstall.properties
This file defines the values for the installer to use when installing in silent mode.
You must edit the file to suit your particular needs. This file includes extensive comments to assist
you in this process. After editing this file, you can then launch the silent install and pass this
properties file to the installer program.
To edit the silentinstall.properties file:
1. Copy the silentinstall.properties template file to a location on the target machine and open the file
in a text editor.
2. In the properties file, specify information for the install properties and set the software and data
features that you want to install. The file contains instructions for changing each of the values.
You must specify the following:
•Licence File (LICENSE_FILE=)
• Install location of the application files and data
• Java Virtual Machine
• Shortcuts/links location
• Features to install
• Web Application configuration
• Desktop Application configuration
Chapter 2:
3. To launch the silent install, use the following command line arguments:
On Unix/Linux (where /media is the location of the installation media and /tmp is the location of
the silentinstall.properties file).
/
media
/startinstall.sh -f /
On Windows operating systems (where D: is the drive location of the installation media and
C:\tmp is the location of the silentinstall.properties file).
start /w D:\instdata\windows\install.exe -f C:\tmp\silentinstall.properties
tmp
/silentinsall.properties
L You must use an absolute path for the properties file.
Installing SuiteLink Data
Beginning with Cycle N (MapMarker USA 24), Suite
reporting.
We are continuing to provide Suite
Representative. This dataset is provided on a separate Centrus SuiteLink media.
MapMarker USA 25 39 User Guide
Link
free of charge, but you must request this data from your Sales
Link
™ is required by the USPS for CASS
Page 40

Modifying the MapMarker Installation
Note that you can still use CASS Mode with or without Suite
subject to the Suite
To add Suite
1. Insert the media into your drive.
2. Open the ASCII folder and copy the file in that folder into the Data directory (typically
<install>/MapMarker_USA_v25_Data). Copy the file only, not the folder.
Link
USPS requirement.
Link
files to your MapMarker USA installation, do the following:
Modifying the MapMarker Installation
After you have installed MapMarker, you can run the Install program to modify the MapMarker
installation. For example, you may want to add tools that you are licensed for but did not previously
install. Or you may want to remove features that you had previously installed. These changes are
characterized as modifications.
L To modify your installation, you must use the same installer program that was originally used
to install MapMarker. If you use a different installer program (for a different version of
MapMarker) you will not be able to modify the installation.
A modification is distinct from an upgrade. With an upgrade, currently installed software and/or data
components are updated to their latest version. A modification adds features to or removes features
from the currently installed version.
Link
. Only the CASS reporting feature is
L Some things cannot be modified, such as the paths for software and data.
Since MapMarker is already installed on your system, the install program opens to the Introduction
dialog. This bypasses the Licensing dialog, since you have already accepted the License
Agreement. You can then proceed to modify your installation.
Modify Using the Graphical Interface on page 40
Modify Silently on page 41
Modify Using the Graphical Interface
To modify your MapMarker installation, do the following:
1. Start the installer as described in step 1 of Install Using the Graphical Interface on page 33.
2. At the Introduction dialog, click Next.
3. In the Licensing dialog, enter the location of your license file, then click Next. For a modification,
this information is already populated in the dialog.
4. The Choose Install Set dialog appears and shows a checked box for every MapMarker feature
that is installed. This is where you can install licensed features that you previously chose not to
install, or uninstall selected features. Do the following:
MapMarker USA 25 40 User Guide
Page 41

Upgrading the MapMarker Installation
a. Uncheck any feature that you want to remove. For example, you can uncheck and remove
Examples (sample application) that you previously installed. Click Next.
b. Check features that you want to install. You see only features that are licensed to you. Click
Next.
5. The Pre-installation Summary dialog shows a list of product features to be installed. If you chose
to install new features, they are listed. If you chose to uninstall any features, those features are
absent from the list of product features.
6. After verifying the product features, click Install.
7. The Install Complete dialog confirms your actions. Click Done.
Modify Silently
You can modify MapMarker USA without using a graphical interface and without user interaction. To
do a silent modify, edit the silentinstall.properties file to suit your needs. See Installing Silently on
page 39 for information on the location and use of the properties file.
The FEATURE_LIST variable of the silentinstall.properties file must include all the MapMarker
features that you want to install. For example, if you already had the User Dictionary utility (udgui)
installed and wanted to remove it, simply remove udgui from the FEATURE_LIST before launching
the silent install.
Chapter 2:
You cannot use the silent modify procedure to change any of the following settings:
• Program paths
•JVM
• Shortcuts and links
You cannot use the silent modify procedure to change the configuration of a previously installed Web
Application (for Developer Edition). Similarly, you cannot change the shared/unshared configuration
of the previously installed Desktop Application. If you want to make any of these changes in your
installation, you must uninstall then reinstall MapMarker.
Upgrading the MapMarker Installation
Major releases can be upgraded when point releases become available. Similarly, one point release
can be upgraded to the next point release. When doing an upgrade, all currently installed software
and/or data components are updated to their latest version. All settings and configurations remain
unchanged.
MapMarker USA 25 41 User Guide
Page 42

Upgrading the MapMarker Installation
If you want to add or remove features or change settings, you must first upgrade and then run the
installer again to modify your installation (see Modifying the MapMarker Installation on page 40).
Alternatively, you may uninstall and then re-install MapMarker if you have changes that cannot be
done using the Modify option.
L You cannot upgrade from one major release to another. For example, you cannot upgrade
from MapMarker 24 to Version 25. You must do a new installation of MapMarker 25. You can
then upgrade from version 25 to a 25.x point release, when that becomes available.
You can have different major releases on the same workstation (such as MapMarker USA
Version 24 and Version 25), but you cannot have different point releases installed on the same
workstation (For example, version 25.0 and version 25.1 cannot be on the same workstation.)
Upgrade Using the Graphical Interface on page 42
Upgrade Silently on page 43
Upgrade Using the Graphical Interface
To upgrade from MapMarker USA v25 to a point software release, do the following:
1. Start the installer as described in step 1 of Install Using the Graphical Interface on page 33.
2. In the Introduction dialog, click Next to display the What’s New dialog.
3. In the What’s New dialog, click Next to display the Licensing Agreement dialog.
4. After reading the License Agreement, click I accept the terms of the License Agreement and
then click Next to display the Choose Upgrade Type dialog.
5. The Choose Upgrade Type dialog presents the opportunity to upgrade data only, or software
plus data. For example:
MapMarker USA 25 42 User Guide
Page 43
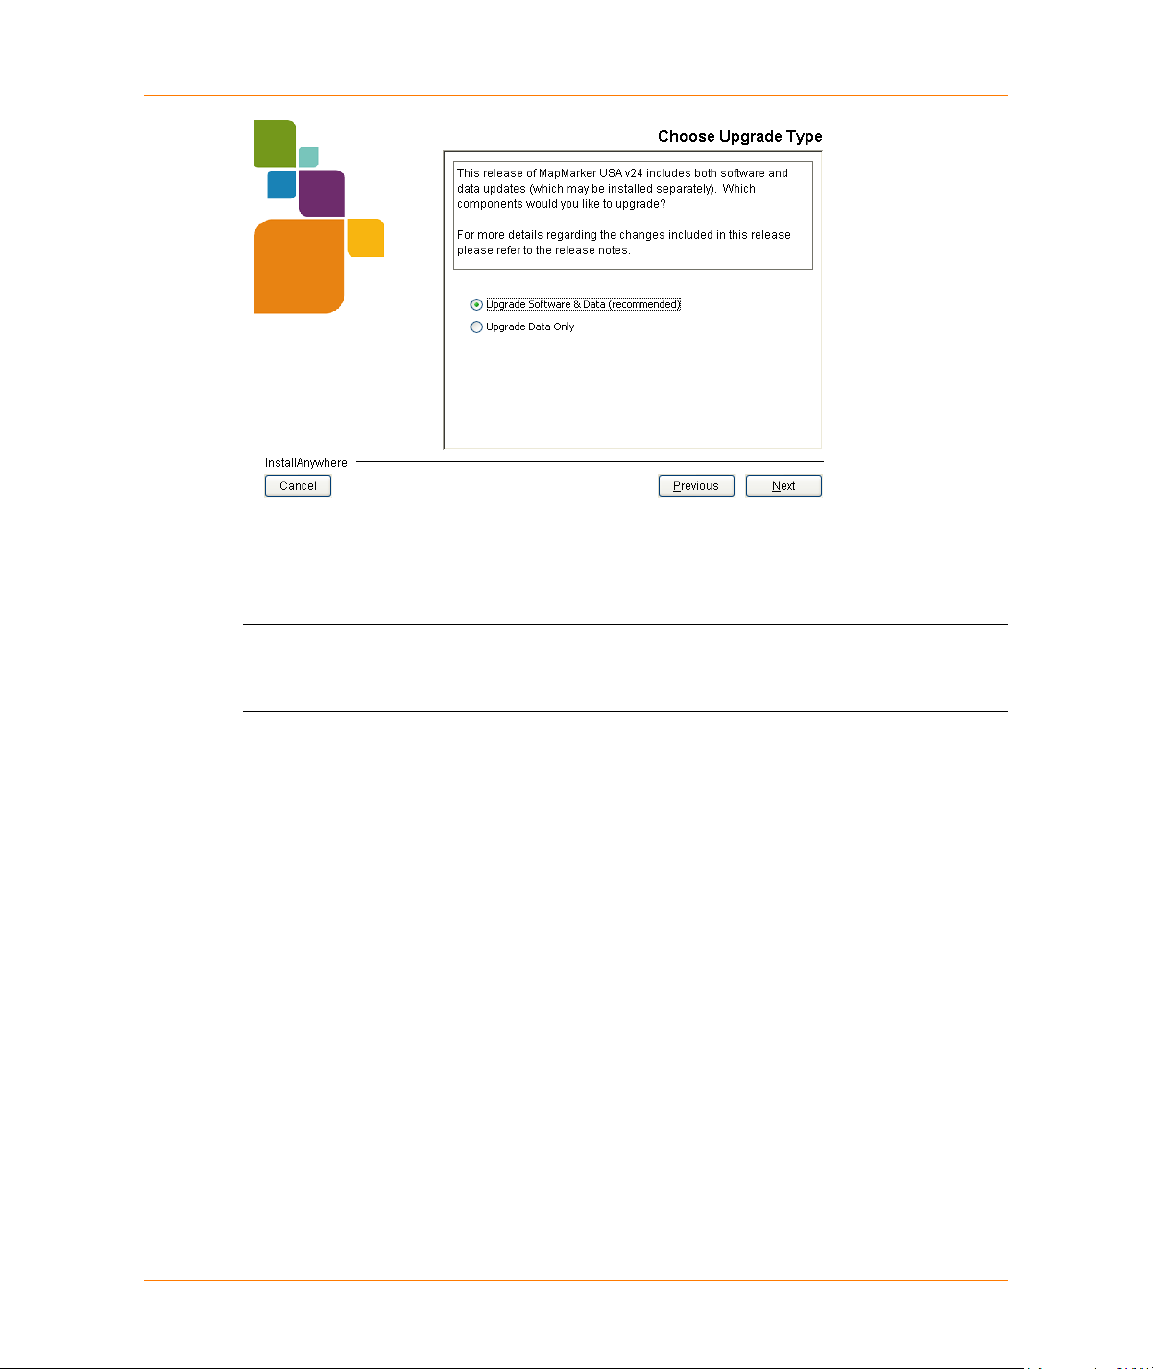
Chapter 2:
Upgrading the MapMarker Installation
Make one of the upgrade selection (upgrading both software and data is generally
recommended). The software option is included only if there has been a software upgrade;
otherwise Upgrade Data Only is the only option.
L Some releases may present more restrictive options. For example, if a new data
component requires updated software, then the Confirm Upgrade dialog explains that
both software and data must be updated.
Because this is an upgrade, you will not be prompted to select installation features, folders, or
application settings. Nor will you be asked for a license file. All of this information is gathered
from the original installation, and cannot be changed during an upgrade. If you want to change
the installation feature set, you must modify (rather than upgrade) the installation. See Modify
Using the Graphical Interface on page 40.
6. If you are prompted to confirm the upgrade, select the confirmation button and click Next to
continue
7. In the Pre-Installation Summary dialog, verify the information, including the data folders. Click
Install to begin the upgrade.
8. When the Upgrade Complete dialog appears, click Done.
Upgrade Silently
You can upgrade MapMarker v25 to a point release without using a graphical interface and without
user interaction. Start the silent installer as described in Installing Silently on page 39. Any
changes to the installation reflected in the properties file are ignored by the silent upgrade.
MapMarker USA 25 43 User Guide
Page 44

Uninstalling MapMarker
Uninstalling MapMarker
When uninstalling MapMarker, you have two options: a complete uninstallation, or a removal of
certain features only. A complete uninstall removes the MapMarker program directories, groups, and
icons. Files and folders created after the installation are not removed or affected in any way.
You can uninstall specific features (rather than a complete uninstall) if you use the graphical
interface uninstall. The silent uninstall always does a complete uninstall.
Uninstall must be done using the same mode (graphical interface or silent) as the previous
installation, modify, or upgrade. So if your previous install, modify, or upgrade was done using the
graphical interface, then the uninstall is run using the graphical interface.
Uninstall Using the Graphical Interface on page 44
Uninstall Silently on page 44
Uninstall Using the Graphical Interface
If MapMarker was installed as a shared installation, the uninstaller removes the MapMarker Desktop
Application if it was previously installed on that workstation. Each user who accesses the shared
application must use Add/Remove Programs on their own workstation to remove the MapMarker
Desktop Application.
1. Begin the uninstall procedure as follows, depending on whether you are uninstalling on Windows
or on UNIX/Linux:
• On Microsoft Windows, from the Control Panel Add or Remove Programs utility select
MapMarker USA v25 and click Change/Remove. Proceed to step 2.
• On Solaris, Linux, or HP-UX Run the shell script from the root of the DVD-ROM using the
command:
sh
/opt/MMv25/Uninstall_MapMarker_USA_v25/Uninstall_MapMarker_USA_v25
where /opt/MMv25 is the directory into which MapMarker 25 was installed.
2. In the Uninstall MapMarker USA dialog, click Next.
3. Select Complete Uninstall or Uninstall Specific Features, then click Next.
4. If you selected Complete Uninstall in step 3, the uninstall program runs immediately and
MapMarker 25 is completely uninstalled.
If you selected Uninstall Selected Features in step 3, uncheck the product features that you
want to uninstall, then click Uninstall to uninstall those features only.
5. When the uninstall completes, click Done.
Uninstall Silently
If your previous installation, modify, or upgrade of MapMarker was done silently, the uninstall runs
silently as well. Launch the uninstall by running the command appropriate for your operating system
shown in step 1 of Uninstall Using the Graphical Interface. Remember, a silent uninstall always
does a complete uninstall of MapMarker.
MapMarker USA 25 44 User Guide
Page 45

Client Workstation Install
If the system administrator has done a Shared installation of MapMarker and shared the data folder
across the network, users on the network can run client installations on their local workstations.
For instructions on doing a Shared installation on the server, see Shared Install on page 27.
If you are doing a shared Desktop application installation (Windows platform only), each client
machine that uses MapMarker USA v25 must have a MapMarker machine-specific license file. You
should have received this license file from your Sales Representative. See License Management
on page 28.
L Exception: If you have an enterprise license, you will not need a separate software license
for your client machine. Enterprise license holders can point to the enterprise license file on
the server. This is described in Instructions for Enterprise License Holders on page 47.
To perform this client installation, access the DesktopInstaller directory in the shared data folder on
the server machine (\\SERVER-MACHINE \MapMarker_USA_v25_Data\DesktopInstaller\) and
locate the following files:
• ClientSetup.exe – client Desktop application installer
• setup.ini – INI file that specifies the data path.
For a shared install, the setup.ini file specifies the shared data path as with a UNC path. For
example:
Chapter 2:
Client Workstation Install
MI_DATAPATH=\\
This datapath entry specifies where the client Desktop application can find the shared data for
MapMarker USA v25. There should be no need to modify this INI file entry.
SERVER-MACHINE
\MapMarker_USA_v25_Data
Running the Client Install
To install your client Desktop application, you will run the ClientSetup.exe from the shared
DesktopInstaller folder on the server. The system administrator should have made the shared Data
and DesktopInstaller folders available across the network. Remember, you must have a
machine-specific license file in order to proceed.
Follow these steps:
1. Browse to the location of the shared installation of MapMarker on the network server. You may
need to check with the System Administrator for the location and to verify that the folder has
been shared.
2. From the shared machine, run the setup program (ClientSetup.exe) from
\\SERVER-MACHINE\MapMarker_USA_v25_Data\DesktopInstaller\.
The \\SERVER-MACHINE represents the UNC path of the of the host machine where
MapMarker USA v25 server is installed. The Welcome dialog appears.
3. In the Welcome dialog, click Next to display the Destination Folder dialog.
MapMarker USA 25 45 User Guide
Page 46

Client Workstation Install
4. You can click Next to accept the default destination folder or click Change to display the Change
Current Destination Folder dialog and navigate to another location. Click OK in the Change
Current Destination Folder dialog when you have specified the new location, then click Next to
continue.
5. In the Licensing dialog, enter the location of your license file (.lic file), which you recorded before
starting the installation. You should have received this license file from your Sales
Representative and copied it to your local machine.
In this example, the mmusa_CLIENT-MACHINE.lic file is selected.
L If you have an enterprise license, you can use the Setup.INI file to point to the .lic file. In
that case, you will skip over the Licensing dialog. See Instructions for Enterprise
License Holders.
6. If you have entered a valid license file, you will see the Ready to Install the Program dialog. Click
Install. If you did not enter a valid license file, you will receive an error message. See
Troubleshooting License File Errors on page 31 for information on interpreting license file
errors messages.
7. When the installation wizard completes, click Finish.
All the components necessary to run the MapMarker Desktop Application using the shared Address
Dictionary are installed.
L During a shared Client Desktop installation, the specified license file is copied into the
MapMarker <Install> folder. The license file remains in that folder after an uninstall.
To uninstall the client application, from the Control Panel select the Add or Remove Programs
utility. Select MapMarker 25 Desktop and click Change/Remove.
MapMarker USA 25 46 User Guide
Page 47

Starting MapMarker
Instructions for Enterprise License Holders
A small number of MapMarker USA customers have an enterprise license. An enterprise license can
be shared among clients, and therefore it is not necessary for each client to have their own .lic file.
Enterprise license holders can use a LICENSE_FILE entry to their Setup.INI file. This will specify the
network location of the enterprise license file. This file will be used directly and will not be copied
during the client install.
Clients must still perform the client installation (ClientSetup.exe), but will not see the Licensing
dialog. Instead, you can manually add a LICENSE_FILE file entry with the UNC path to the shared
.lic file. For example, you could add the following to the Setup.INI file that resides on the server Data
folder:
Chapter 2:
LICENSE_FILE=\\<
MapMarker_USA_v25_Data)\mmusa_enterprise.lic
Alternatively, the administrator could provide a copy of the enterprise .lic file to each client. When the
client runs the ClientSetup program, the Licensing dialog will prompt for the location of the .lic file as
described in step 5 of Running the Client Install.
SERVER-MACHINE
Starting MapMarker
After successfully installing MapMarker 25, you can start the Desktop Application, if you installed
that feature on your workstation, or start the MapMarker Server if you installed the Web Application.
Starting the Desktop Application on page 47
Starting the MapMarker Server on page 48
Starting the Desktop Application
If you installed the Desktop Application feature of MapMarker, you can start the MapMarker Desktop
as follows:
• From the Start Menu or the program group where you installed the MapMarker icons, click the
icon named MapMarker Desktop. The Desktop Application starts.
If you chose not to install icons, open the directory where you installed MapMarker, and in the
subdirectory named
Application starts.
desktop double-click on the file mapmarkr.exe. The Desktop
>\MapMarker_USA_v25\
MapMarker USA 25 47 User Guide
Page 48

Starting MapMarker
Starting the MapMarker Server
If you installed MapMarker 25 Web Application feature (available with the Developer Edition), you
can start the MapMarker server as follows, depending on whether you are installing on Windows or
on UNIX/Linux:
• On Microsoft Windows, from the Start Menu or the program group where you installed the
MapMarker icons, click the icon named Start MapMarker USA v25 Server. The
MapMarker Server starts.
If you chose not to install icons, open the directory where you installed MapMarker, and in the
subdirectory named
MapMarker Server starts.
• On Solaris, Linux, or HP-UX, from the directory where you installed the MapMarker icons, run:
sh Start_MapMarker_USA_v25_Server
If you chose not to install icons, run the following command from the installation directory:
sh sdk/tomcat/bin/startup.sh
sdk\tomcat\bin double-click on the file startup.bat. The
L On all operating systems, Administrator privilege is required to start the MapMarker Server.
MapMarker USA 25 48 User Guide
Page 49

Geocoding with MapMarker
After you have prepared your address data, you are ready to geocode your
table. This chapter describes how to run MapMarker and how to start geocoding
your records. This chapter also describes the basic geocoding workflow and
illustrates the major MapMarker geocoding features.
In this chapter:
Geocoding Terminology . . . . . . . . . . . . . . . . . . . . . . . . . . . . . . . . . . .50
Understanding the Geocoding Process . . . . . . . . . . . . . . . . . . . . . . .53
Running MapMarker – Overview . . . . . . . . . . . . . . . . . . . . . . . . . . . .65
Opening and Running a Project . . . . . . . . . . . . . . . . . . . . . . . . . . . . .65
Opening a Table or Text File. . . . . . . . . . . . . . . . . . . . . . . . . . . . . . . .66
Selecting Input and Output Address Columns . . . . . . . . . . . . . . . . . .73
Geocoding Your Table Automatically . . . . . . . . . . . . . . . . . . . . . . . . .78
Geocoding Your Table Interactively . . . . . . . . . . . . . . . . . . . . . . . . . .79
Making the Most of Interactive Geocoding. . . . . . . . . . . . . . . . . . . . .82
Intersection Geocoding . . . . . . . . . . . . . . . . . . . . . . . . . . . . . . . . . . .83
Using Single Line Addresses in Geocoding . . . . . . . . . . . . . . . . . . . .84
Using Address Range Geocoding . . . . . . . . . . . . . . . . . . . . . . . . . . .87
Postal Geocoding. . . . . . . . . . . . . . . . . . . . . . . . . . . . . . . . . . . . . . . .88
Geographic Geocoding . . . . . . . . . . . . . . . . . . . . . . . . . . . . . . . . . . .89
Displaying Geocoded Records in MapInfo Professional . . . . . . . . . .91
Re-Geocoding a Table . . . . . . . . . . . . . . . . . . . . . . . . . . . . . . . . . . . .92
Using Geocoding Options . . . . . . . . . . . . . . . . . . . . . . . . . . . . . . . . .92
Saving TAB Files . . . . . . . . . . . . . . . . . . . . . . . . . . . . . . . . . . . . . . .107
3
Page 50

Geocoding Terminology
MapMarker products use a common set of geocoding terms. We use these terms consistently in the
MapMarker documentation, and describe the terms more fully where appropriate.
Term Definition
address Information that identifies the location of a site, for example, a
address dictionary The search dictionary used for matching addresses during
address interpolation A mathematical means of estimating an address location based on
candidate An address record that is a potential match to the input address
Geocoding Terminology
home or business.
geocoding.
a street segment and the address ranges associated with that
segment. This method of interpolation assigns coordinates to
address records in relation to the position of address point
candidates in the data, providing greater positional accuracy to the
geocoded points.
information.
A candidate is returned by the geocoding process. See also
geocoding.
CASS™ Coding Accuracy Support System. This is a process by which
mailing addresses are standardized to meet U.S. Postal Service
requirements for bulk mailing discounts. When CASS mode is
enabled, MapMarker will perform this address standardization
under strict matching conditions set by the USPS
CASS mode matches records to the exact house number, street
name, and ZIP Code™. Other geocoding preferences are
overridden.
centroid A point at the calculated center of a polygon, often used to attach
attribute information to an area. The centroid is used for labeling
and geocoding.
For an irregularly shaped area, region, or polygon, the centroid is
derived mathematically and is weighted to locate the point at the
approximate "center of gravity."
close match If an input address corresponds closely to one or more known
records in the address dictionary, then the returned candidates are
considered close matches. The specified matching criteria may
include house number, street name, city name, locality, or postal
code.
MapMarker USA 25 50 User Guide
®
. Geocoding in
®
Page 51

Geocoding Terminology (continued)
Term Definition
CMRA Commercial Mail Receiving Agencies
Chapter 3:
DPV
®
Delivery Point Validation. DPV is technology available from the U.S.
Postal Service®. Used in conjunction with CASS mode geocoding,
DPV enables you to verify whether an address is a deliverable
®
USPS
address.
EWS Early Warning System. The EWS file contains addresses that did
not make it into the current USPS
®
update, and therefore do not
match. Records that have no match because they are in the EWS
file can be flagged in the EWS output column. EWS usage is not
required for CASS discounts.
The EWS file is shipped as a file named ews.niu (not in use) and
installed in the Data folder. If you want to use EWS processing,
rename this file as ews.txt. Otherwise EWS will not be used.
geocoding The process determining the X and Y coordinates of a location by
its address.
geographic geocoding Candidate coordinates are based on state, county, or city centroids.
This not very precise, but may be suitable for certain applications.
LACS
Link®
Locatable Address Conversion System. LACS
Link
allows business
mailers to electronically update their rural-style addresses with
locatable street-style addresses resulting from 911 emergency
response address conversions.
For example, and address like RR 1 Box 32 might be converted to
a street-style address like 141 Morrison Ave.
location code The geocoding engine returns location code for each record it
matches or attempts to match. Location codes indicate the
accuracy of the assigned geocode. Location codes begin with an
A (Address location), S (street centroid) Z (ZIP + 4
®
centroid), or
G (geographic centroid). See Match Codes and Location Codes
on page 305.
match code The geocoding engine returns a match code for each record it
matches or attempts to match. Match codes allow you to determine
the quality of the address match and indicate what type of match
was made, as well as the address elements that were changed to
match the input address to the returned output address. See Match
Codes on page 306.
MapMarker USA 25 51 User Guide
Page 52

Geocoding Terminology (continued)
Term Definition
match strategy An approach to geocoding a table that achieves the desired
geocoding results. For example, if geocoding hit rate is more
important than accuracy, then less restrictive match criteria, such
as Relaxed mode, would ensure that more records in the table are
geocoded. However this strategy may produce false positive
results.
If you required greater accuracy, you could use stricter geocoding
criteria, such as an exact match on street name and house number.
must match Must Match options are used for deciding whether returned
candidates are close matches. A Must Match option does not
eliminate non-close matches.
PMB Private Mailbox
postal geocoding Candidate coordinates are based on postal codes. This is faster but
not as accurate as street level geocoding. Also, postal geocoding of
rural areas is generally less accurate than that of urban areas. For
P.O. Box and rural route addresses, MapMarker automatically
geocodes to a ZIP Code™ centroid, as required by CASS
standards.
postcode A unique identifier for postal mailing zones.
For the U.S.A. this is the ZIP Code system. See ZIP Code™ on
page 53.
post-directional The letters following a street name that give a direction to the
address, for example 18th Street N. This shows that the location is
on the north side of 18th street.
Not every address has a post-directional component.
post-type Street type that follows the street name. These are also known as
street suffixes. For example, Main St. See Publication 28, Postal
Addressing Standards Appendix C for a complete list of street
suffix abbreviations recognized by the USPS
®
and MapMarker.
Not every address has a post-type component.
pre-directional The letters preceding a street name that give a direction to the
address, for example W 18th Street. This shows that the location is
on the west side of 18th street.
Not every address has a pre-directional component.
MapMarker USA 25 52 User Guide
Page 53

Chapter 3:
Understanding the Geocoding Process
Geocoding Terminology (continued)
Term Definition
result code MapMarker returns a result code (georesult) for each record it
attempts to match. These codes allow you to determine the
success and precision of the geocoding match. Result codes begin
with either an S (street level geocode), Z (postal level geocode) or
G (geographic level geocode. Result codes are described in more
detail in Result Codes.
street level geocoding Candidate coordinates are interpolated along a street segment.
This is a highly accurate level of geocoding.
Link®
Suite
user dictionary A customized search dictionary of addresses and coordinates that
ZIP Code™ The system of numeric codes that identifies the individual post
Link®
Suite
suite numbers for businesses located in high-rise buildings. This
allows delivery sequencing where it would not otherwise be
available.
can be used in place of, or in addition to, the application’s address
dictionary.
office or metropolitan area delivery station associated with an
address.
is the USPS® business name database that provides
Understanding the Geocoding Process
MapMarker is based on a model of relative matching that is governed by a set of weights that scores
each portion of the address against candidate records (possible matches) in the Address Dictionary.
The resulting scores are summed and the candidate’s total score is used to determine the best
match or matches. An exact match is made when a candidate scores well above other candidates. If
there is no clear best match, several (non-close) candidates may be returned.
If a record is not geocoded, you can still attempt to match that record during interactive geocoding
where you can pick what you consider the best match from a list of candidates.
The basic MapMarker workflow is to open your MapInfo Table or other input file, specify which
columns contain address information, and then geocode your records. MapMarker automatically
matches your records to those in its Address Dictionary, determines if there is a match, and assigns
the geographic coordinates.
The following topics provide an overview of the supported file formats, basic steps, input, and
expected output.
Subsequent topics in this chapter provide more detail.
• Supported File Formats on page 54
• Geocoding Flexibility and Trade-offs on page 54
MapMarker USA 25 53 User Guide
Page 54

Understanding the Geocoding Process
• General Guidelines for Optimizing Geocoding on page 55
• Specify Input Address Columns on page 56
• Specify Output Address Columns on page 56
• Interpreting Census Block IDs on page 59
• Output Field Size and Column Names on page 62
• Mixed Case Street Output on page 62
• Setting Startup Preferences on page 64
Supported File Formats
MapMarker supports (opens and writes) files in the following data formats:
• TAB – MapInfo TAB files
• DBF – dBASE format
• CSV – comma-delimited text files (Desktop only)
• TXT – other delimited text file (Desktop only)
Delimited text files can use various delimiters (comma, semicolon, tab, slash, or other). If you open a
CSV file, a comma delimiter is assumed.
L MapMarker USA 25 can export TAB, DBF, CSV, and TXT files to ESRI Shapefile (SHP)
format. Shapefile export is described in Exporting to Shapefiles on page 71.
See Opening a Table or Text File on page 66 for instructions on opening an input file in
MapMarker. See Defining Properties of Delimited Text Files on page 67 for information on
managing delimited text files.
See the following topics:
Geocoding Flexibility and Trade-offs
General Guidelines for Optimizing Geocoding
Specify Input Address Columns
Specify Output Address Columns
Output Column Type/Width Requirements
Interpreting Census Block IDs
Output Field Size and Column Names
Mixed Case Street Output
Setting Startup Preferences
Geocoding Flexibility and Trade-offs
MapMarker uses a relative matching system that gives you a great deal of control over geocoding
accuracy and scope.
The optimal level of geocoding depends on your application and goals. You may require highly
accurate address matching, or possibly a close positional matching is suitable for your purposes. Or
you may want to retrieve as many records as possible in an area (postal code) without concern for
exact address matching.
MapMarker USA 25 54 User Guide
Page 55

Chapter 3:
Understanding the Geocoding Process
There are trade-offs that you must consider with respect to how you intend to use the geocoded
data. When setting up a geocoding session, consider questions such as the following:
• What level of matching accuracy are you looking for: a unique address match or close match?
• What level of geographic accuracy do you need for your geocoded points: street-level centroid or
postal code centroid?
• Is your goal to geocode as many records as possible?
The answers to these questions are driven by how you intend to use the geocoded records. When
determining the location of a new retail store, you need to know the distribution of current and
potential customers. In this case, you would need to geocode as much of the customer base as
possible but you might not need an exact street address match for each customer. Geocoding to
postal code centroid would be suitable for this analysis.
Street level geocoding with strict matching preferences would be useful for cases in which it is
necessary to know exactly where your customers are. For example, if you are a utility service
coordinator and need to know exactly where your customers are in relation to neighborhood gas
lines, the positional accuracy of each customer is of critical importance to you.
In addition, the matching routine uses the geocoding preferences that are set for the table to
determine whether certain matching conditions are required or not. For example, the MapMarker
default preferences do not require a match on street name and ZIP Code, but require an exact
match on the house number. This generally gives the best combination of hit rate with the fewest
erroneous matches (false positives) and the best performance.
For an overview of geocoding match strategies, see Choosing Match Strategies.
General Guidelines for Optimizing Geocoding
MapMarker USA 25 has been optimized for high performance. Follow these guidelines to achieve
even faster performance.
In general, you will achieve faster and more accurate geocoding if you standardize and format your
data. By reducing the ambiguity in the input data, MapMarker USA 25 will be able to find appropriate
candidates faster. For complete information on addressing practices and conventions and ZIP
Codes, see the ZIP Code Lookup page on the USPS web site.
Also consider the following guidelines to optimize your results and performance.
• Use the fastest processor available to you. Pitney Bowes Software recommends 2.5 Ghz dual
processor or better.
• Have enough memory so that the operating system can allocate some memory to your disk
cache. Pitney Bowes Software recommends 2 GB RAM or better.
• Have at least 10 GB available disk space.
• Store the Address Dictionary on a local hard drive.
• Sort your table by postal code before geocoding.
• Use Must Match (exact match) criteria for the most precise geocoding results. However, note
that this strategy requires more processing and may reduce performance.
• Do not create points automatically.
• Remove indexes on any table output columns before geocoding.
MapMarker USA 25 55 User Guide
Page 56

Understanding the Geocoding Process
Specify Input Address Columns
MapMarker reads the addresses stored in your table and matches it against address records in the
Address Dictionary. MapMarker then assigns geographic coordinates (geocodes) each address that
it can process.
You must specify the columns that contain your addresses. The Select Input Columns dialog is the
first area where you specify that information. For street level geocoding, you must have at least one
street address column plus one column each for city and state or ZIP Code. For ZIP Code centroid
matching, you do not need to specify a street address or city and state.
MapMarker can also geocode single line addresses, where all address components appear on a
single line rather than in separate fields. That strategy is described in Using Single Line
Addresses in Geocoding on page 84.
For instructions on selecting input columns, see Selecting Input Columns on page 74.
See also the following topics:
Supported File Formats
Geocoding Flexibility and Trade-offs
General Guidelines for Optimizing Geocoding
Specify Output Address Columns
Output Column Type/Width Requirements
Interpreting Census Block IDs
Output Field Size and Column Names
Mixed Case Street Output
Setting Startup Preferences
Specify Output Address Columns
MapMarker can store longitude/latitude coordinates and geocoding result codes in your table. For
supported output file formats, you can either prepare the table ahead of time by adding columns to
store this information, or specify that MapMarker automatically creates the columns for you. For
ODBC (remote) tables, you or your database administrator must add the columns before you run
MapMarker.
L The longitude/latitude columns are required if you do not want MapMarker to create points
automatically. A result code column is optional, but it is recommended.
If you want MapMarker to return the matching address for you to compare with your input address,
you must provide columns for that information. For supported file formats, you can either prepare
your table ahead of time, or create the columns by clicking Modify Columns on the Select input
columns from your table or Select output columns from your table dialogs. For remote tables, add
the columns before opening the file in MapMarker. If you store your input addresses in two fields,
note that MapMarker only returns the matching address to a single field. ZIP Code and ZIP + 4
returned to two fields.
MapMarker can also return attributes (such as demographic data) from other tables during
geocoding, so you must first prepare columns from the Select Input Columns dialog as described in
Specify Input Address Columns on page 56.
MapMarker USA 25 56 User Guide
®
are
Page 57

Chapter 3:
Understanding the Geocoding Process
For instructions on selecting output columns, see Selecting Output Columns on page 75.
See the following topics:
Supported File Formats
Geocoding Flexibility and Trade-offs
General Guidelines for Optimizing Geocoding
Specify Input Address Columns
Output Column Type/Width Requirements
Interpreting Census Block IDs
Output Field Size and Column Names
Mixed Case Street Output
Setting Startup Preferences
Output Column Type/Width Requirements
The Output Column Width Requirements table lists the type and width requirements for output
columns.
The asterisked columns always optional. All other columns are required for generating a CASS™
report (not required for geocoding to CASS standards, but for generating the report.)
For more information on LACS
LACSLink Output Columns on page 142
Link®
and DPV® output requirements, see the following topics.
DPV Output Columns on page 146
Output Column Width Requirements
Output Column Type (Width)
Result Code char(13)
Match Code char(4)
Location Code char(4)
Long (X) Decimal (11,6) or Float
Lat (Y) Decimal (10,6) or Float
Firm char(30)
Address char(64)
Address2 char(64)
*
City
*
State
Output County char (40)
char(30)
char(2)
MapMarker USA 25 57 User Guide
Page 58

Understanding the Geocoding Process
Output Column Width Requirements (continued)
Output Column Type (Width)
ZIP Code char(5)
ZIP + 4 char(4)
Urb char(30)
Census * char(15)
Delivery Pt char(2)
Check Dig char(1)
LACS char(1)
Carrier Route char(4)
DefaultFlag char(1)
PMB char(4)
PMB range char(8)
EWS flag char(1)
RecordType char(1)
County * char(40)
DataSource Type * char(2) or small int
DPV ConfCode char(1)
DPV Cmra char(1)
DPV falsePos char(1)
DPV FtNote1 char(2)
DPV FtNote2 char(2)
DPV FtNote3 char(2)
DPV Vacant char(1)
DPV NoStat char(1)
LACSLink Indicator * char(1)
LACSLink Code char(2)
SuiteLink Code char(1)
MapMarker USA 25 58 User Guide
Page 59

Understanding the Geocoding Process
See the following topics:
Supported File Formats
Geocoding Flexibility and Trade-offs
General Guidelines for Optimizing Geocoding
Specify Input Address Columns
Specify Output Address Columns
Interpreting Census Block IDs
Output Field Size and Column Names
Mixed Case Street Output
Setting Startup Preferences
Interpreting Census Block IDs
MapMarker can return Census Block IDs as output, or partial Census information, depending on the
quality of the match.
The complete Census Block ID is a 15-character code and is made up of the following:
SSCCCTTTTTTGBB(B)
where S=State FIPS (Federal Information Processing Standard) code (two characters)
C=County FIPS code (three characters)
T=Census Tract (six characters)
G=Census Block Group (one character)
B=Census Block (typically two characters, sometimes three)
MapMarker can return the full 15-character Census Block ID for geocoded records with S2, S3, S5,
S7, or S8 geocoding result codes The S4 result code can return a 15-character Census Block ID if
the block groups on each side of the street are the same.
Chapter 3:
L Result codes are very important in evaluating the accuracy of your geocoded results. For a
more complete discussion of this topic, see Result Codes.
Some S codes and Z codes may return partial census information if ZIP + 4® information is supplied.
Others may not return any census information because certain information is missing.
MapMarker USA 25 59 User Guide
Page 60

Understanding the Geocoding Process
The following table shows what census information is returned, if any, for specific geocoding result
codes.
Geocoding Result Codes Related to Census Block Information
Result Code Census Block ID Output
S8 S8 results are matched to either the single point associated with an
address point candidate, or to an address point candidate that shares
the same house number.
An S8 result is possible only if you are using a point/parcel dictionary.
The S8 indicates that the address candidate corresponds to an exact
point. No interpolation is required.
S8 results can return complete 15-character Census Block ID.
S7 S7 results are matched to an interpolated point along a street
segment. An S7 result is possible only if you are using a point/parcel
dictionary in addition to a street segment dictionary. Since the S7
interpolation is based on known point addresses, the interpolation is
more accurate than interpolation based on a segment dictionary alone
(which would produce an S5 result).
S7 results can return a complete 15-character Census Block ID. You
must enable address point interpolation to generate S7 result codes.
See Dictionary Preferences and check the Use Address Point
Interpolation check box to enable address point interpolation during
geocoding.
S6 S6 results are matched to a point ZIP centroid. A point ZIP is a 5-digit
ZIP Code™ that represents a unique ZIP such as a single site,
building, or organization.
S6 is the same level of geocoding accuracy as a Z6 result.
S5 S5 results are matched to an interpolated point along a street
segment. An S5 result is based on a street segment dictionary only.
This interpolation is not a accurate as an S7 result.
When using the Address Dictionary, this can return a complete
15-character Census Block ID.
S4 S4 results are matched to a street centroid point.
S4 results can return complete 15-character Census Block ID, but
only if the block groups on each side of the street are the same. A
house number is also required for Census Block IDs.
MapMarker USA 25 60 User Guide
Page 61

Understanding the Geocoding Process
Geocoding Result Codes Related to Census Block Information
Result Code Census Block ID Output
Chapter 3:
S3
S3 results are matched to ZIP + 4® locations. S3 is the same level of
geocoding accuracy as a Z3 result.
S3 results can return complete 15-character Census Block ID if the
ZIP + 4 location is contained in one Census Block. However a ZIP + 4
location may cover more than one Census Block, in which case S3
may return a 12-character Census Block Group number.
S2 S2 results are matched to ZIP + 2 locations. This may return partial
census information if ZIP + 4 is supplied.
S2 is the same level of geocoding accuracy as a Z2 result.
S1 S1 results are matched to ZIP centroid locations. This may return
partial census information if ZIP + 4 is supplied.
S1 is the same level of geocoding accuracy as a Z1 result.
SX SX results are matched to a point located at street intersection.
SC SC results represent a match where the original point has been
moved a specified distance (usually along a perpendicular line)
toward or away from the associated street segment. An SC result is
possible only when both a point/parcel dictionary and a street
segment dictionary are available and when you are using the
centerline offset feature.
Z6 Z6 results are matched to a point ZIP centroid. Point ZIPs are 5-digit
The Z6 code indicates that these special ZIPs are actual point
locations, not an area. Point ZIPs include unique single sites,
buildings, or organizations.
Z3 May return partial census information if ZIP + 4 is supplied. Z3 results
are matched to ZIP + 4 locations.
Z2 May return partial census information if ZIP + 4 is supplied. Z2 results
are matched to ZIP + 2 locations.
Z1 May return partial census information if ZIP + 4 is supplied. Z1 results
are matched to ZIP centroid locations.
For more information on result codes, see Result Codes.
See the following topics:
Supported File Formats
Geocoding Flexibility and Trade-offs
General Guidelines for Optimizing Geocoding
MapMarker USA 25 61 User Guide
Page 62

Understanding the Geocoding Process
Specify Input Address Columns
Specify Output Address Columns
Output Column Type/Width Requirements
Output Field Size and Column Names
Mixed Case Street Output
Setting Startup Preferences
Output Field Size and Column Names
MapMarker can return output information (such as firm names, apartment numbers, and suites) that
exceeds the recommended width of the output fields for Street and Firm. When this happens,
MapMarker truncates the information in the respective output field.
In the Input Column and Output Column dialogs, if a field name is too long to be seen in its entirety
in the list box, hold the cursor over the field name to display a popup box with the full name of the
field.
See the following topics:
Supported File Formats
Geocoding Flexibility and Trade-offs
General Guidelines for Optimizing Geocoding
Specify Input Address Columns
Specify Output Address Columns
Output Column Type/Width Requirements
Interpreting Census Block IDs
Mixed Case Street Output
Setting Startup Preferences
Mixed Case Street Output
This optional feature adds the ability for output street addresses to have mixed case. The capability
is supplied in the MapMarker Desktop Application only. This geocoding preference located on the
Geocode tab of the Geocode dialog. When the Mixed Letter Case check box is selected, the output
street is in mixed case for a match. The input street column remains unchanged.
MapMarker USA 25 62 User Guide
Page 63

Chapter 3:
Understanding the Geocoding Process
See Geocoding Your Table Automatically on page 78 for a description of the Geocode dialog.
An output address without a house number remains in uppercase. This is to accommodate cases
such as PO BOX 233. Streets such as McFly are handled so that the letter following Mc is
capitalized. However, a word like MacIntosh is not handled because it cannot be differentiated from
a word like Macoun.
See the following topics:
Supported File Formats
Geocoding Flexibility and Trade-offs
General Guidelines for Optimizing Geocoding
Specify Input Address Columns
Specify Output Address Columns
Output Column Type/Width Requirements
Interpreting Census Block IDs
Output Field Size and Column Names
Setting Startup Preferences
MapMarker USA 25 63 User Guide
Page 64
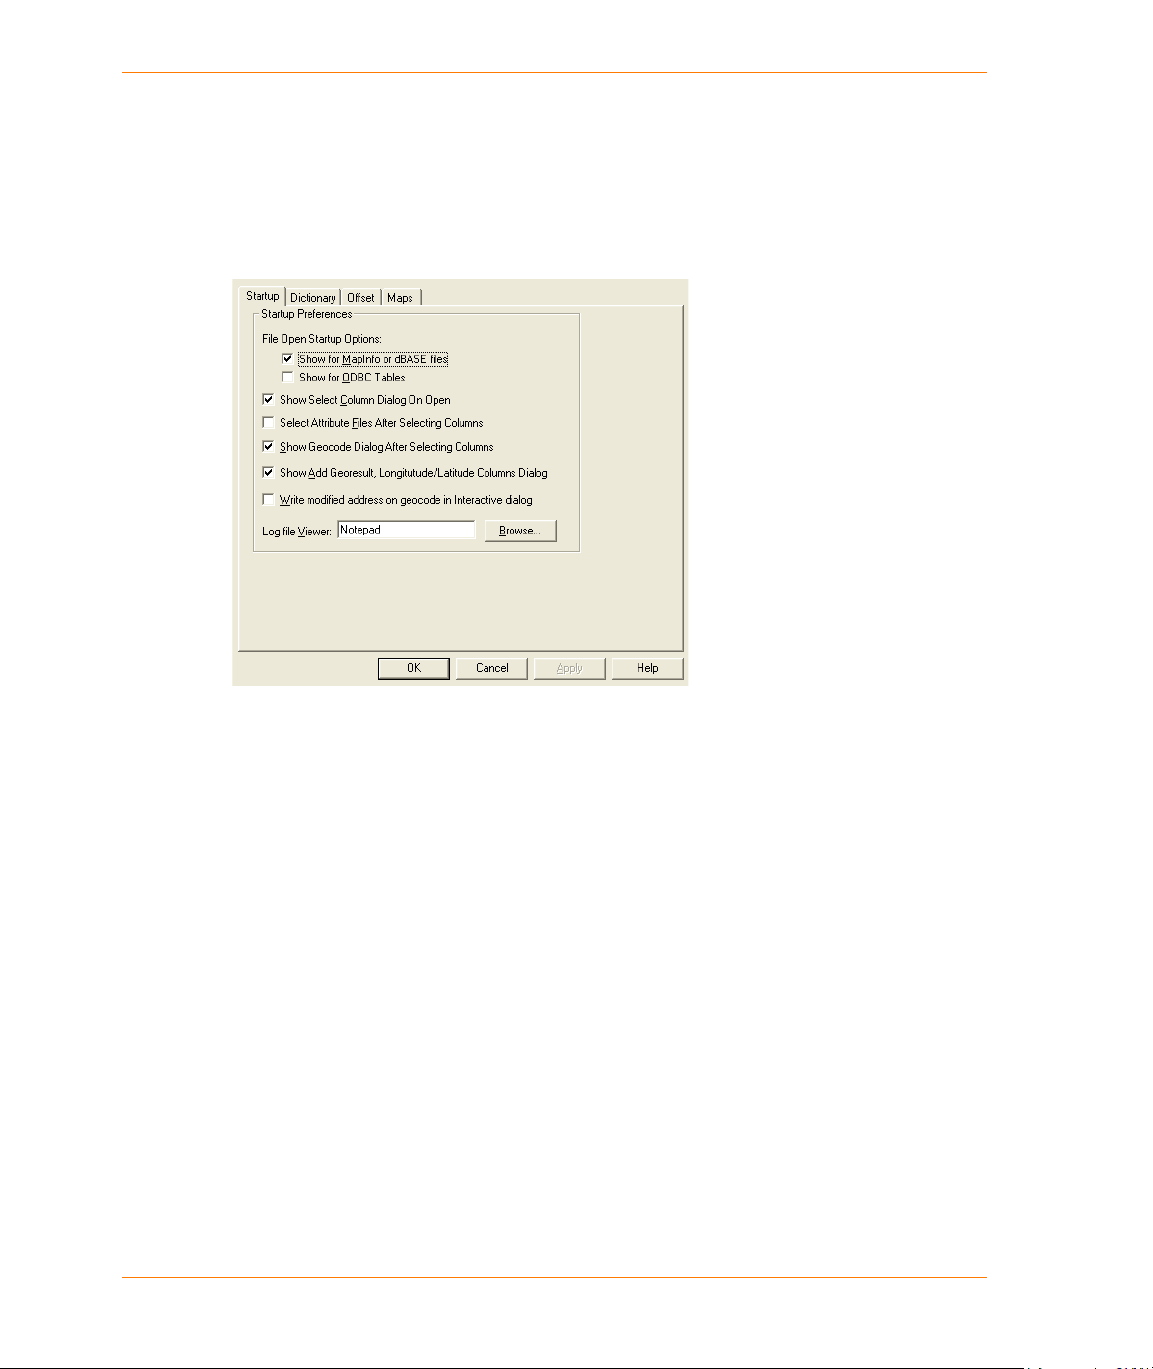
Understanding the Geocoding Process
Setting Startup Preferences
MapMarker has Startup preferences that apply to all of your geocoding sessions. This allows you to
start MapMarker with a consistent appearance and behavior. These Startup preferences are
available on the System Preferences dialog.
To display the System Preferences dialog, click System Preferences on the Options menu, and
then click the Startup tab.
You can use any and all preferences available in this dialog. For the file open choices, if you select
either Show for MapInfo or dBASE files or Show for ODBC tables, the Open dialog appears
automatically when you start MapMarker. If you have both options selected, MapMarker prompts
you with another dialog at startup to choose which type of table you want to open.
You may also control which of the setup dialogs, if any, display on startup. Choose from:
• Show Select Column Dialog On Open (selected by default)
• Select Attribute Files After Selecting Columns
• Show Geocode Dialog After Selecting Columns (selected by default)
By selecting all three options, when you start MapMarker, it walks you through the geocode and
attribution setup phase. The settings are saved to the table as metadata and used as new defaults
when you open the table again.
Other system preferences are discussed in Setting System Preferences on page 112.
See the following topics:
Supported File Formats
Geocoding Flexibility and Trade-offs
General Guidelines for Optimizing Geocoding
Specify Input Address Columns
Specify Output Address Columns
Output Column Type/Width Requirements
Interpreting Census Block IDs
MapMarker USA 25 64 User Guide
Page 65

Output Field Size and Column Names
Mixed Case Street Output
Setting Startup Preferences
Running MapMarker – Overview
MapMarker geocodes your records to street level, ZIP Code™, or geographic centroid either
automatically (making a match without user interaction) or interactively (allowing you to decide the
match from a list of suggestions). You can use a number of strategies to geocode your records. A
basic scenario is to run MapMarker and follow these steps:
1. Open the table to be geocoded and identify the columns that contain specific address
components (see Selecting Input and Output Address Columns on page 73.
2. Geocode your records automatically to match as many records as possible. See Geocoding
Your Table Automatically on page 78.
3. Geocode remaining unmatched records interactively by choosing from a list of candidates. See
Geocoding Your Table Interactively on page 79.
4. Display geocoded records in Pitney Bowes Software Inc. mapping software. See Displaying
Geocoded Records in MapInfo Professional on page 91.
Chapter 3:
Running MapMarker – Overview
5. Analyze the result codes. See Result Codes.
After opening an input table, you must identify the input columns that contain address information to
use for matching purposes.
Opening and Running a Project
A project preserves settings preferences and restores these settings the next time the project is
opened. A project file overrides any existing metadata settings associated with a TAB file.
To create or save a project, see Creating and Saving a Project on page 107. That topic also
describes the specific items that are saved with a project.
To open an existing project:
1. From the MapMarker menu, select File > Projects > Open Project.
2. Navigate to the folder that contains the project, select the project name (with a PROJ file
extension), and click Open.
MapMarker USA 25 65 User Guide
Page 66
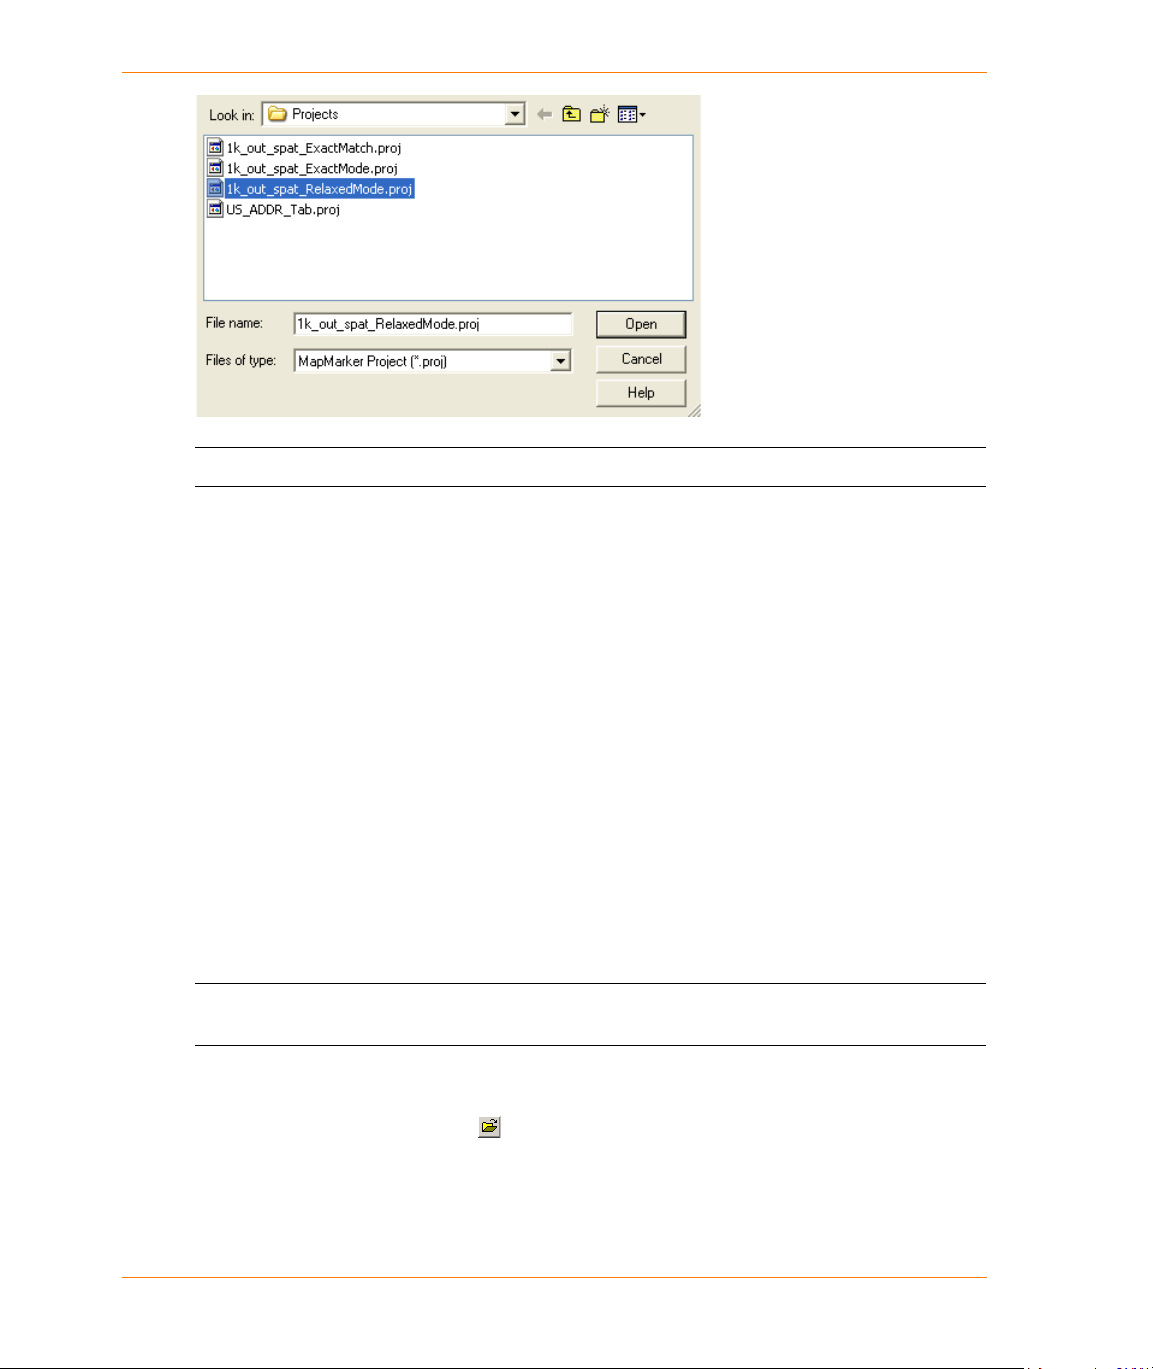
Opening a Table or Text File
L You can open only one project at a time.
After opening the project you can geocode using the column mappings and geocoding preferences
that were saved with the project. Or you can you make changes before proceeding with geocoding.
If you are using an old project, you may get an initialization error when you try to run the project in
MapMarker USA 25. This is because your project is pointing to an older Address Dictionary. You can
ignore this error message, and the project will then use the MapMarker USA 25 Address Dictionary.
To eliminate this error message, see the Note on page 108 with Creating and Saving a Project.
Running a Project from a Batch File
You can run a project from a command line batch file. For this syntax see Creating a Project-Based
Batch File on page 109.
Opening a Table or Text File
The following steps describe how to select and open your input file. See Supported File Formats
on page 54.
L This procedure applies to opening local files. For instructions on opening remote tables, see
Geocoding Remote Tables.
1. Start MapMarker from the Windows Start menu or Shortcut menu.
2. Select File > Open Table, click or click the right mouse button to display a shortcut menu.
The Open Table dialog appears. Select the folder that contains your tables and click Open.
MapMarker USA 25 66 User Guide
Page 67
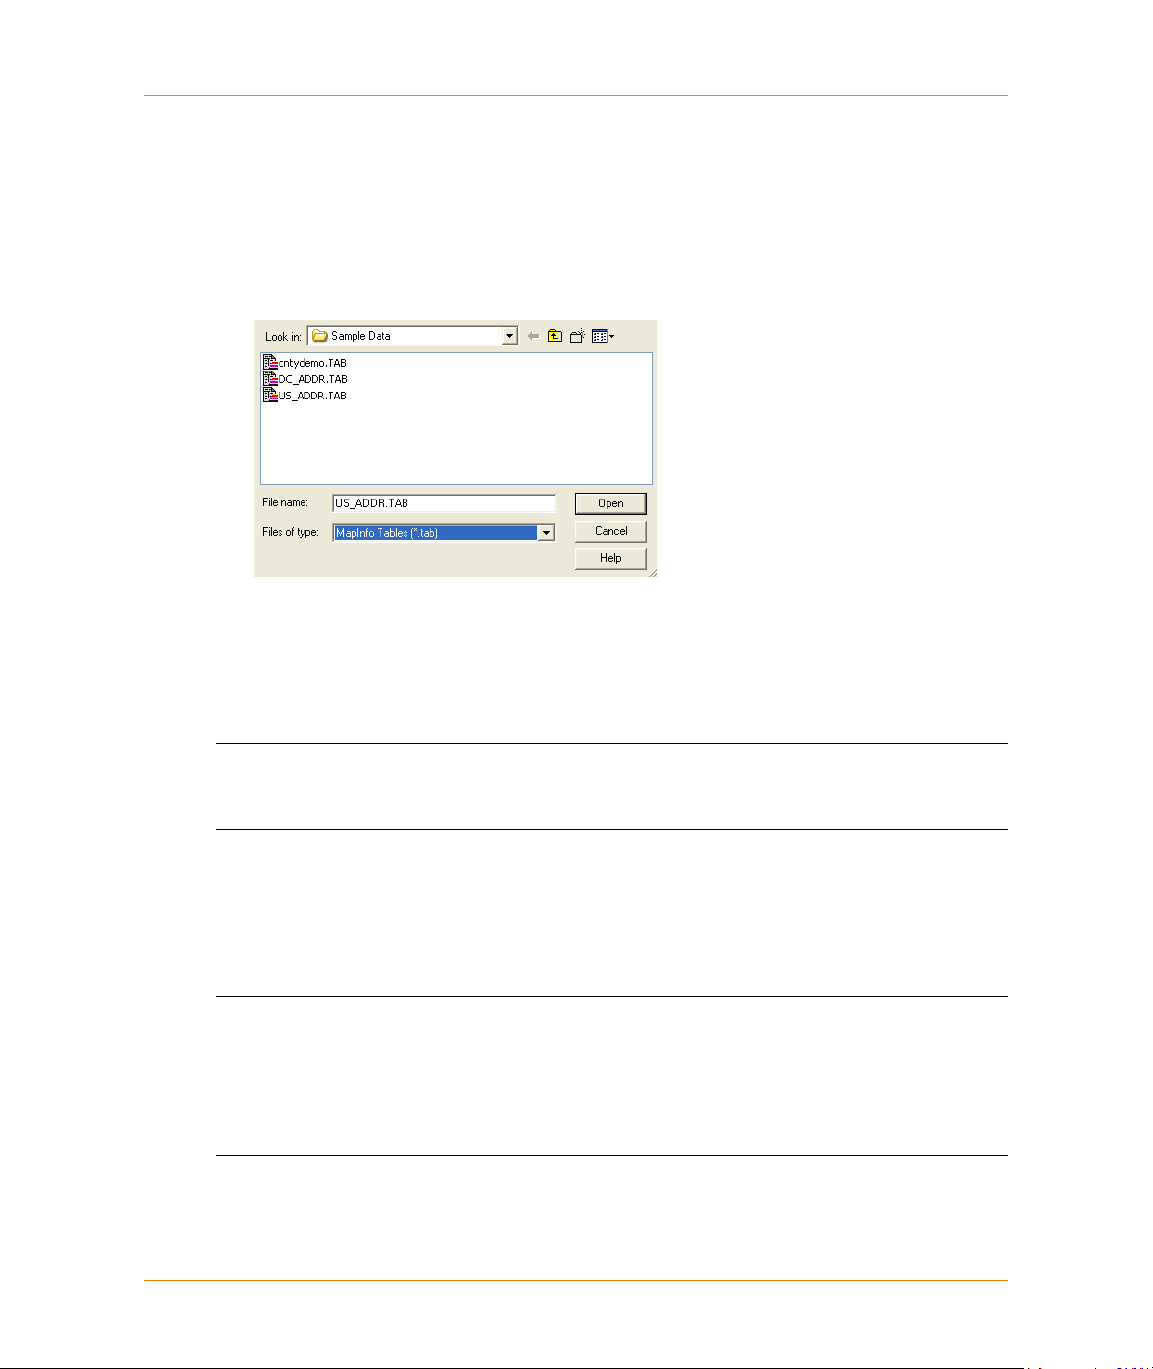
Chapter 3:
Opening a Table or Text File
3. From the Files of type drop-down list, select one of the following file types:
• MapInfo Tables (*.TAB)
• DBF Files (*.DBF)
• Comma-delimited text (*.CSV)
• Other delimited files
All files associated with the selected file type will appear. See Supported File Formats on
page 54 for a description of MapMarker supported input file formats.
4. Select the file that you want and click Open. If you open a MapInfo TAB file, you will now identify
address input and output columns. Continue with Selecting Input and Output Address
Columns on page 73
If you open a text file (CSV, TXT, or possibly other file extension), the Text File Wizard appears.
Continue with Defining Properties of Delimited Text Files
L After you open a TAB file, you can right-click anywhere in the workspace to see a context
menu. This gives you an alternative way to perform the same actions that are available from
menu selections.
Defining Properties of Delimited Text Files
After you open any CSV or TXT input file, the Text File Wizard appears. This wizard allows you to
define the properties of the input file.
L The wizard creates or modifies format files that govern the properties of its associated input
and output text file. The format files are created in the same folder that contains the input file.
If this folder is not writable, the format files are created in My Documents\MapMarker USA\
folder. Format file are given the same name as the associated text file, but with an FMT file
extension. In most cases you will not have to examine or maintain the format files in any way,
but you can examine then using any text editor.
MapMarker USA 25 67 User Guide
Page 68

Opening a Table or Text File
The following steps follow one likely scenario and show how to use the Text File Wizard for a
comma-delimited text file This example assumes that you are opening the file for the first time and
the first row of the table is used for column titles (rather than data).
First, open the text file as described in Opening a Table or Text File on page 66. Select TXT file
extension from the Files of type drop-down.
1. Step 1 of the Text File Wizard displays the Input Table dialog with the name of the file that was
previously opened. The list box area of the dialog will display up to the first 20 records of the
opened file.
Text File Type: If the text file is a delimited file, the appropriate button will be selected in the wizard.
Delimiter Type: If the delimiter is recognized it will be selected and the other choices are disabled.
For example, with a CSV file a comma delimiter is recognized and the other group selections are
disabled. Semicolon, tab, or slash can also be used as delimiters. If one of these standard
delimiters is not recognized in your text file, you can select Other and type the delimiter
character. For example, your text file might use a pipe symbol (|) as a delimiter. Not all
characters and symbols can be used as delimiters. You will receive an appropriate message if
you try to specify a disallowed character.
MapMarker USA 25 68 User Guide
Page 69

Chapter 3:
Opening a Table or Text File
First Line Used for Column Titles: You can use the first line of the text file as column titles or as
data.
To use the first line as column titles, check the First Line Used for Column Titles check box.
This will replace the generic FIELD_1, FIELD_2... labels and use the first row of the text file to
name the columns.
If First Line Used for Column Titles is not checked, the first line will be used as data just as any
other line in your text file. In this example, we will assume that the first line of the text file is used
for column titles.
When you have finished with step 1of the wizard, click Next to go to step 2 of the wizard.
2. Step 2 of the text file wizard allows you to examine the fields (columns) in the input table and
change the field name.
Click a field name to see all the relevant information for that field. You can also change the name
of fields. Some fields cannot be changed, depending on they type of file that you opened.
For example, you could change the name of a field from City to Municipality.
Click Next to update your changes to go to step 3 of the wizard.
3. Step 3 of the text file wizard allows you to select the output file. This file contains the output
columns in which MapMarker will store the address components, result codes, and coordinate
information for each matched record after you geocode.
Typically, the output file uses the same base name as the input file with _out appended to the file
name. This prevents you from accidentally overwriting the data in the original input file. Click OK.
MapMarker USA 25 69 User Guide
Page 70

Opening a Table or Text File
By default, the output file is created the same folder that contains the input file. If this folder is not
writable, the output file is created in the My Documents\MapMarker USA\ folder. If the output file
already exists, you can choose to overwrite or change the file name.
4. Click OK.
5. Select the input columns from your table. See Selecting Input Columns on page 74.
6. Select output columns. Standard address column names will be named with the OUT_ prefix (for
example, OUT_STATE and OUT_ZIPCODE) and these column names will be pre-populated in
output column selections. See Selecting Output Columns on page 75.
Delimited File Guidelines
The Text File Wizard helps you manage how delimited files are interpreted and used in MapMarker.
The following guidelines may help you when using the Text File Wizard.
• If you want to ignore the first row in the text file (that is, not use it for either column title or data),
you should remove the row from the data file. When you geocode, you can specify which rows to
geocode, so you can select or skip row 1. See step 3 of Geocoding Your Table Automatically
for an example of selecting a range of rows to geocode.
• Delimited text files can be geocoded automatically or interactively. See Geocoding Your Table
Automatically on page 78 and Geocoding Your Table Interactively on page 79.
MapMarker USA 25 70 User Guide
Page 71

Exporting to Shapefiles
MapMarker USA 25 can export TAB, DBF, CSV, and TXT files to ESRI Shapefile (SHP) format.
For example, a MapMarker USA 25 can open any of the following file types for Shapefile export:
• MapInfo Table (TAB)
• Delimited text (CSV, TXT)
•DBF
L There are some limitations on how attributes of the original files are preserved and exported
to SHP files:
• For DBF files, binary, memo, and OLE data types are not supported and are not exported to
the SHP file.
• For CSV files, numbers are exported as strings.
• For TAB files, date and time fields are exported as strings, and decimal numbers are
truncated to six places of precision.
The following steps describe how to select, open, and export your input file.
1. Start MapMarker from the Windows Start menu or Shortcut menu.
Chapter 3:
Exporting to Shapefiles
2. Open a Table or text file. Follow the steps in Opening a Table or Text File on page 66.
3. From the Table menu, select Export to ESRI Shapefile.
4. In the Export To dialog, select a file name for export. The SHP file extension is automatically
selected for ESRI Shapefiles.
MapMarker USA 25 71 User Guide
Page 72

Exporting to Shapefiles
MapMarker checks for write permission on the directory that you are exporting the Shapefile to. If
write permission is verified, the process continues. You will receive a message if you do not
select a valid file name, or if the directory does not have write permission, or the Shapefile
already exists.
MapMarker also checks whether the opened file is a DBF file. If the input is a DBF file, the export
file name will be named with a _out suffix. For example, if the input file was Customer.dbf the
export file name will be Customer_out.shp.
After specifying the SHP file name, click Save.
5. In the Export to ESRI Shapefile dialog, do one of the following:
a. If the table in not mappable or does not contain points, Use X/Y Columns will be selected.
For TAB files, Long (X) and Lat (Y) are initially populated with the appropriate column names
as determined from table metadata. If the TAB file metadata does not contain this
information, MapMarker will look for typical names for coordinate columns and populate
those column names into the Long (X) and Lat (Y) fields. If no typical names are found (or if
you want to change the Long (X) and Lat (Y) column names), you can select columns from
the drop-down lists.
CSV, TXT, or DBF files do not contain metadata.
MapMarker USA 25 72 User Guide
Page 73
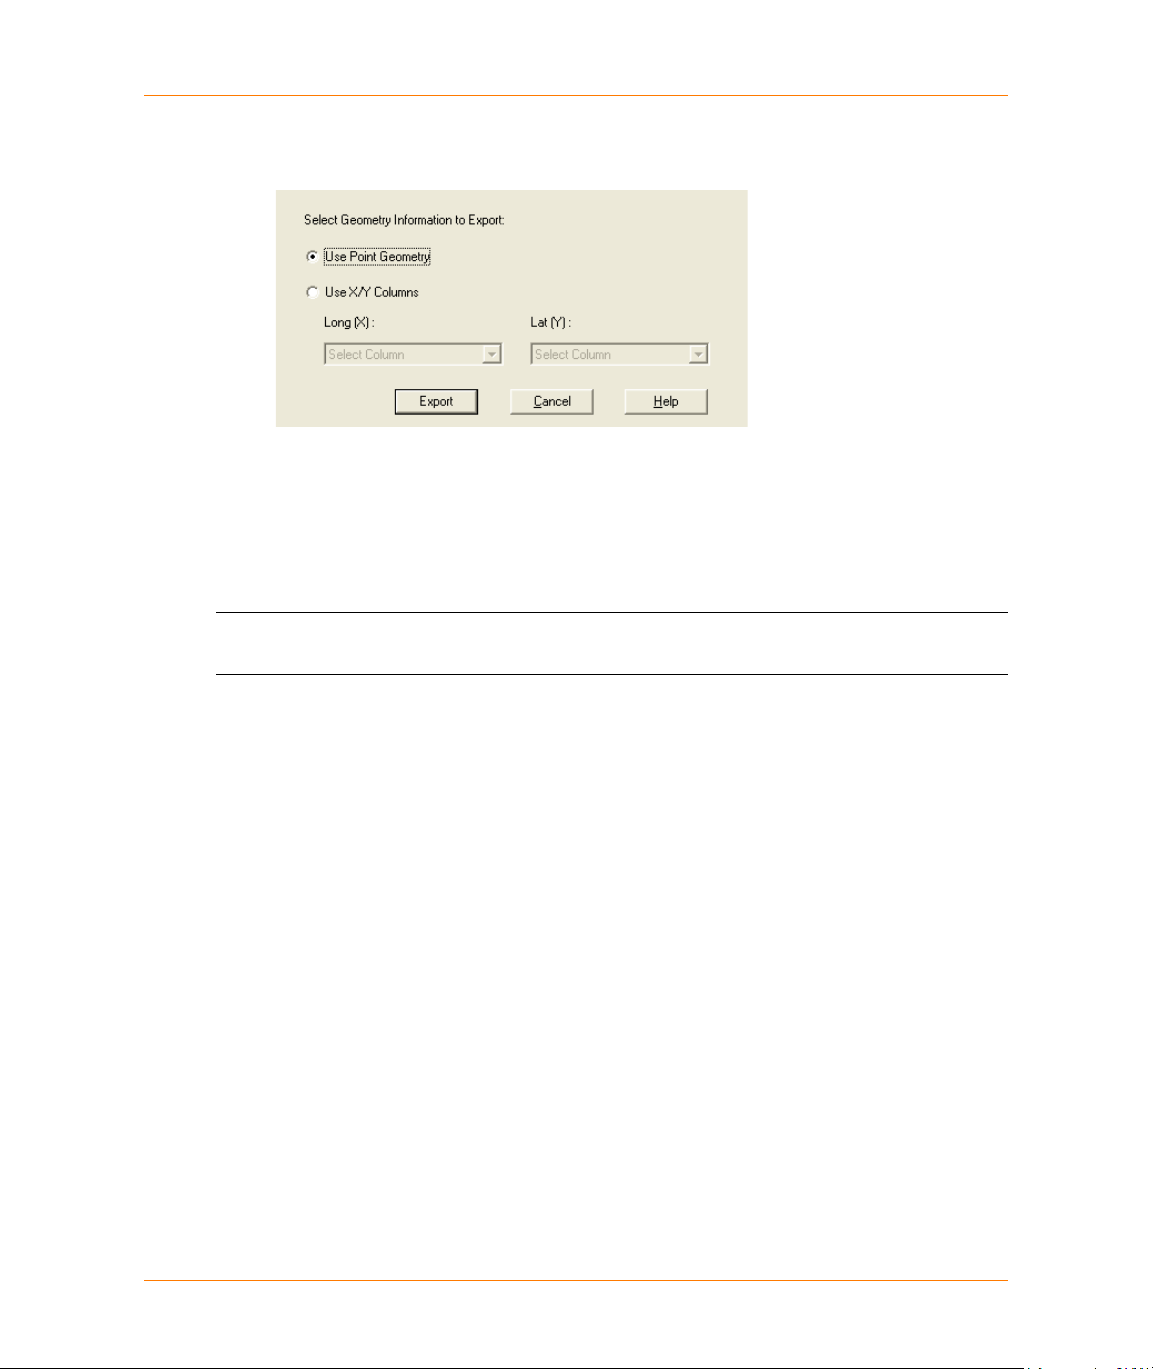
Chapter 3:
Selecting Input and Output Address Columns
b. Alternatively, if the table is mappable and there are points in the table the Use Point
Geometry will be initially checked. If the table is not mappable, the Use Point Geometry
choice will be disabled (grayed out).
6. Click Export. If you selected Use X/Y Columns, MapMarker verifies the type of the selected
Long/Lat columns. The acceptable types are decimal, float, and string.
If the opened table is a DBF file, or the user doesn’t have write permission, the Export To dialog
re-appears. This dialog is described in step 4.
7. A progress bar appears and a confirmation message indicates the success of the Export.
L See the Note at the beginning of this section to understand limitations on date/time and other
data that is exported to SHP files.
Selecting Input and Output Address Columns
After opening your input file, you are ready to identify the address input address columns and output
address columns. These are the columns that contain address information to use for the purposes of
geocoding matching.
See the following topics:
Selecting Input Columns on page 74
Selecting Output Columns on page 75
MapMarker USA 25 73 User Guide
Page 74

Selecting Input and Output Address Columns
Selecting Input Columns
For MapMarker USA, the key input address columns are:
MapMarker U.S.A. Input Address Columns
Input Address Example
Firm Pitney Bowes Software
Address One Global View
Address2
(optional secondary address line)
City Troy
State NY
ZIP Code™ 12180
®
ZIP + 4
Urb
(Urbanization)
The following steps describe how to identify the address input columns in your input file. After
identifying the input columns, you can begin geocoding, either interactively or automatically.
1. Choose the table you wish to geocode. Click Open.
2. Click OK. A progress bar appears as your table is being updated. Then a browser window
appears, displaying the Table. You will see a dialog box titled: Select input columns from your
table.
Suite 175
8337
Parc Sabana (used for Puerto Rico addresses
only).
MapMarker USA 25 74 User Guide
Page 75

Chapter 3:
Selecting Input and Output Address Columns
3. Select the input columns that contain the appropriate address components. If your table has
separate columns for ZIP Code™ and ZIP + 4
ZIP Code and ZIP + 4 boxes.
MapMarker attempts to choose the address columns for you. It can make some determinations
for fields, but if this is the first time this table has been opened in MapMarker, be sure to verify
these columns. Once you have geocoded the table, the column settings are saved to the table as
metadata and used for future geocoding sessions.
Single line address
input is recognized in the Address field. See Using Single Line Addresses in Geocoding on
page 84 for details on geocoding single line addresses.
County Level Geocoding
Use the County input field only if you want to explicitly geocode to the county centroid. You may
need to add the County column to your input table. (Click Modify/Add Columns and see
Adding a Column on page 77. For county centroid geocoding, you should also use the State
input field because identically named counties are found in several states.
®
information, identify each column in the
4. When you are finished selecting input columns, click Next. You are now ready to select output
columns. See Selecting Output Columns.
Selecting Output Columns
After you have selected input columns, you will see a dialog box titled: Select output columns from
your table.
1. Select columns in your output table where you want MapMarker to store the address
components, result codes, and coordinate information for each matched record. From the list of
at the left, drag column names to the appropriate output address column. Use <Clear> selection
to clear a column selection.
MapMarker USA 25 75 User Guide
Page 76

Selecting Input and Output Address Columns
To avoid overwriting your input data, use output columns that have different names than the
corresponding input columns. If your output columns and input columns have the same name,
you receive a Warning message when you click Finish in step 3. If you click Yes, you will
overwrite your input data. Click No to change your output column selections.
2. In the Select output columns from your table dialog box, continue with the following steps, as
necessary.
a. If you do not want MapMarker to create points for your table, clear the check box marked
Create points in MapInfo table. In that case, you must select longitude and latitude columns
to proceed with geocoding. (Create points is not available if you are geocoding a text file
rather than a TAB file.)
b. If you are using CASS™ and want to generate a CASS report, all output fields with the
exception of asterisked fields are required. Note that this is not required for geocoding with
CASS, but only for generating a CASS report.
c. Identify a Census output column if you want MapMarker to return the Census Block code for
the matched address. MapMarker returns the code that represents the state and county FIPS
code, census tract, and tabulation block, depending on the match type.
d. You can optionally identify a County output column if you want MapMarker to return the name
of the county. You may need to add the County column to your output table.
e. If you are using DPV, LACS
Link
, or Suite
Link
, select Show DPV, LACSLink, SuiteLink
Columns. Note that the these columns are required for generating the CASS report (but not
required for CASS address matching).
MapMarker USA 25 76 User Guide
Page 77

Chapter 3:
Selecting Input and Output Address Columns
3. Once you have provided all the information in the Select output columns from your table, click
Finish. You are then returned to the Geocode dialog box.
If your output columns and input columns have the same name, you will receive a Warning
message when you click Finish. To avoid overwriting your input data, click No at the Warning
message, and specify output columns that have different names than the corresponding input
columns. If you need to add a uniquely named output column, click Modify /Add and follow the
instructions in Adding a Column on page 77.
After selecting the input and output columns, you can begin geocoding, either interactively or
automatically.
See the following topics:
Geocoding Your Table Automatically on page 78
Geocoding Your Table Interactively on page 79
Adding a Column
1. You may need to add a column to either your input or output table. For example, you may want to
add a uniquely named column to an output table so that you do not overwrite your input data
during geocoding.
2. Click Modify/Add Columns to access the Modify Table Structure dialog.
3. Click Add Column to add a new column to the table. The Columns list box displays a new
default 10-character column named Field# (where # is the column number in the table).
4. In the Column Information group, define the Name, Type, and Width of the new column
containing the new attributes. If you are adding a new output column, this column should have a
unique name but have the same type and width as the corresponding input column. For
example, if the input table Firm column is defined as type Character with a width of 10, you could
define and Output_Firm column with the same type and width parameters.
MapMarker USA 25 77 User Guide
Page 78

Geocoding Your Table Automatically
5. Click OK when done editing the new column information.
6. A message appears telling you that the table must be closed and re-opened for update. Click
Yes to continue.
Geocoding Your Table Automatically
To geocode automatically:
1. If the Geocode dialog is not automatically displayed upon leaving the Select Output dialog, do
one of the following:
•Select Table > Geocode from the MapMarker menu.
• Click .
• Click the right mouse button, and select Geocode from the pop-up menu.
2. In the Geocode Precision group, select Street Level and select Automatic from the Method
drop-down list.
Alternatively, you could geocode to ZIP Centroid or Geographic Centroid.
3. Select the Range to Geocode and Row Numbers to geocode. By default, MapMarker
automatically geocodes the unmatched rows. For previously geocoded tables, you may be able
to improve matching by re-geocoding records that had a georesult below a specified level.
4. Set additional geocoding preferences by selecting the appropriate tabs and check boxes. For an
explanation of these preferences, see Using Geocoding Options on page 92. In particular, see
Match Settings Dialog on page 96 to apply a range of highly restrictive or less restrictive match
criteria, and Fallback Dialog on page 105 to permit a less precise geocoding match if the
original criteria do not produce a match.
MapMarker USA 25 78 User Guide
Page 79

Chapter 3:
Geocoding Your Table Interactively
5. Click Geocode to begin geocoding. The Automatic Geocode dialog appears showing a progress
bar that updates the match count every 25 records.
6. At the completion of the geocoding run, click Done to leave the Automatic Geocode summary
dialog. MapMarker opens the log file if you selected Automatically open log file after
geocoding in the Log File dialog.
The log file contains a history of the geocoding pass, including the number of matched,
unmatched and previously matched records, and the number of matched records by result code.
Information from subsequent passes is appended to the top of the log file. The log file size limit is
1 MB.
7. To create a summary of the geocoding results for a table, select Table > Table Summary.
Specify the column containing the georesult and save the information as a text file.
L The summary is for the active table (the frontmost browser). If you run multiple tables in a
single session, you will have addresses open for each table. To obtain the geocoding
summary information for the desired table, select the appropriate table to make it active
and select View > Summary.
To view information about previous geocoding passes, view the log file by selecting View > Log file.
See the following topics:
Automatic Geocode dialog on page 223
Making the Most of Interactive Geocoding on page 82
Interactive Geocode dialog on page 239
Quick Geocode command on page 217
Geocoding Your Table Interactively
MapMarker allows you to geocode records interactively by choosing from a list of candidates. Using
interactive geocoding, you can expand the search for a match, map potential matches, move back
up the table to an earlier record, and correct your records directly from the MapMarker dialog.
L Interactive geocoding is not completely interactive. MapMarker attempts to geocode the row
first. Only when it fails to find a single close match is the record displayed in the Interactive
dialog.
1. Do one of the following:
•Select Table > Geocode from the MapMarker menu.
• Click .
• Click the right mouse button, and select Geocode from the pop-up menu.
2. In the Geocode Precision group, select Street Level and select Interactive from the Method
drop-down list.
MapMarker USA 25 79 User Guide
Page 80

Geocoding Your Table Interactively
3. Select the range and type of rows to geocode.
4. Click Geocode. The Interactive Geocode dialog appears and shows the first unmatched record
and a list of suggested matches.
The candidate list displays each potential match including a result code, Match Codes and
Location codes, street address, LastLine of address, and other information. A green check mark
in the Cand Num column indicates a close match. Use the horizontal scroll bar to see additional
columns, including the coordinates and the DataSource Name (the name of address or user
dictionary that returned the candidate.)
You can also right-click a candidate to a candidate and select Show Status Code Details. This
displays the Status Codes dialog with tabs for GeoResult Code, Match Code, and Locational
Code.
L The candidate list columns are the same as you will see in the Quick Find dialog. See
Match Candidate List on page 159 for a more detailed description of these columns.
5. Select Geocode if you agree that the highlighted suggested match is the correct match.
MapMarker assigns coordinates from that row and moves on to display the next unmatched
record. To choose a different candidate in the list, move the highlight with your cursor to your
choice and select Geocode.
MapMarker USA 25 80 User Guide
Page 81

Chapter 3:
Geocoding Your Table Interactively
6. Select Next if MapMarker offers no match suggestions or if you do not agree with the choices in
the match list.
When you click Next, a dialog is displayed asking if you want to mark the record as
“Non-geocodable.” This means that you do not want MapMarker to attempt to match this record
during future geocoding passes. This is useful when you know the record does not geocode and
you do not want it to display again in future geocoding passes. You have several choices in this
dialog:
• Click Yes to have MapMarker mark the record with the result code NG (non-geocodable).
This dialog is displayed each time you click Next.
• Click Yes to All if you want to mark all future “Ignore” records in this geocoding session as
NG. The dialog is not displayed again during the session.
• Click No if you do not wish to mark the record as NG. The dialog is displayed each time you
click Next on a record.
• Click No to All if you do not want to mark any “Ignore” records as NG. The dialog is not
displayed again during the session.
7. To expand the search area, check Expand Search and specify a radius up to 99 miles. Select
the check box labelled Limit to current state if desired. This feature helps to find a match when
the input address contains limited or inaccurate city or ZIP Code information.
8. To change the interactive matching conditions, click Options. The tabs, Match Settings,
Fallback, and Multiple Match appear. Make the necessary changes to increase the potential for
a match.
For more information on controlling these geocoding match settings and preferences, see:
Match Settings Dialog on page 96
Fallback Dialog on page 105
Multiple Match Dialog on page 106
9. Click Search to search the Address Dictionary using the new matching conditions.
10. Edit the record by entering new text that may increase the likelihood of a match. Click Search to
bring up a new list of suggestions that may better match the edited record.
Add the edits into your table by selecting the Write selected address below to database on
Geocode check box. Choose the match from the list and click Geocode. MapMarker geocodes
the record and updates your table with your edits.
11. To see an expanded list of ranges, including apartment numbers, office suites, etc., select
Ranges. A detailed list of address ranges for the highlighted street appears. Click Ranges again
to close the list of ranges.
12. Click Back to move backward in the table to re-display a record.
13. Click Map to view the match candidates in a map window. The match candidates are displayed
with color-coded symbols that indicate their match potential to the input address. See
Displaying Geocoded Records in MapInfo Professional on page 91 for a description of the
symbols.
The map feature is available if you have set the location for street data in the Maps tab in the
System Preferences dialog, as described in Maps System Preferences. Also see Viewing
Match Candidates on a Map, for related information.
MapMarker USA 25 81 User Guide
Page 82
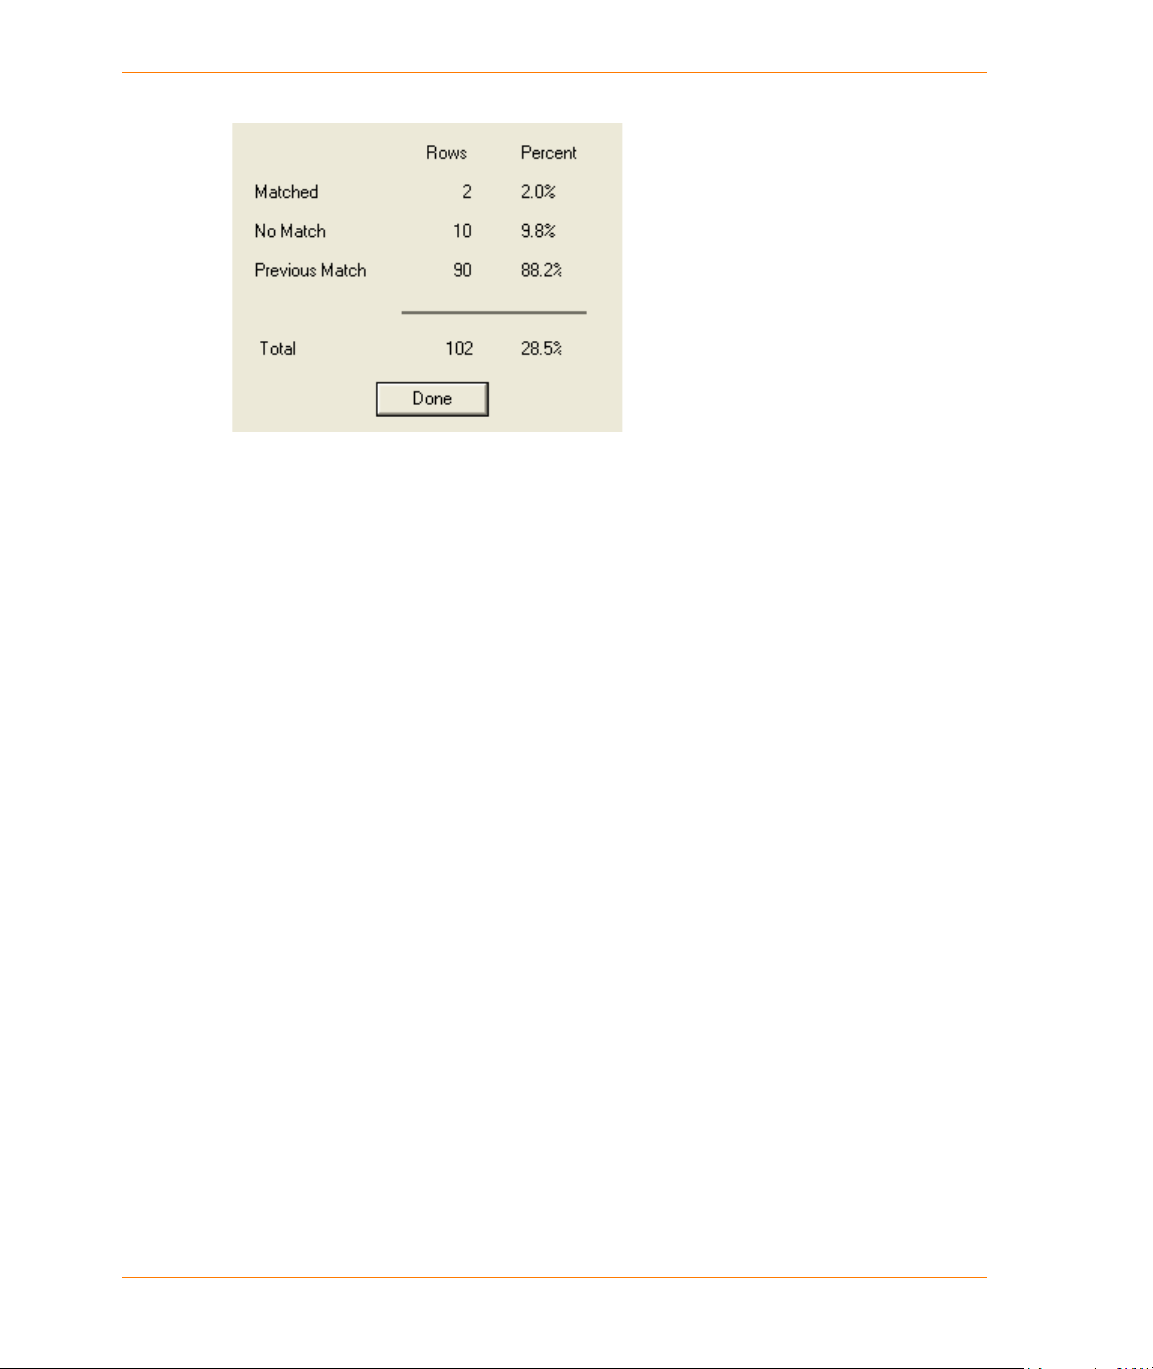
Geocoding Your Table Interactively
Click Close. A Geocoding Summary is displayed showing the results of the session
14. Click Done. To view the summary again, select View > Summary.
15. To create a summary of the geocoding results for a table, select Table > Table Summary.
Specify the column containing the georesult and save the information as a text file.
See the following topics:
Automatic Geocode dialog
Geocoding Your Table Automatically
Interactive Geocode dialog
Quick Geocode command)
Making the Most of Interactive Geocoding
Interactive geocoding allows you to control the matching process because you can accept or ignore
a potential match from the list of suggestions that MapMarker generates for the record.
See the following topics:
Change Matching Conditions on page 82
Map the Match Candidates on page 83
Edit Your Records on page 83
Change Matching Conditions
MapMarker follows the settings in the Geocode dialog or responds to your changed settings as you
progress through the interactive pass. To increase the list of suggested matches, you can use less
restrictive matching criteria. You can do this at the beginning of an interactive pass or change the
settings for each record by clicking Options on the Interactive Geocode dialog.
You can also return to a previous record in the table by selecting Back and changing settings as
needed. This feature can help you maximize the potential for a match.
MapMarker USA 25 82 User Guide
Page 83

Chapter 3:
Intersection Geocoding
Map the Match Candidates
To help you choose the best match for your record, display the candidates on a map via Map in the
Interactive dialog. This requires that you have street data on your system and you specify its location
in the System Preferences > Maps tab.
See Viewing Match Candidates on a Map for a complete discussion of visualizing match
candidates.
Edit Your Records
Interactive geocoding also allows you to correct your record to improve the possibility of a match. If
you choose, your table can be updated to reflect the newly edited record, all from within the
Interactive Geocode dialog.
By manually correcting the fields to put the firm, street, city, and state into their proper locations, the
record is more logical and MapMarker can make better suggestions on possible matches. After
editing the record, click Search to display a new list of match candidates.
To write these changes to the base table, select the Write modified address above to Input Fields
on Geocode check box and click Geocode to confirm the match.
L Your edits overwrite the address data in the respective fields, so be sure not to alter the fields
containing the correct address data.
Remote Tables
Note that when you geocode remote tables interactively, MapMarker cannot overwrite the Input
Address fields of the source table. That is why the check box Write modified address above to
Input Fields on Geocode is unavailable in the Interactive Geocode dialog.
Intersection Geocoding
MapMarker enables you to geocode to street intersections in two ways. The method that you choose
depends on how you prefer to store the street and cross street information in your table.
Intersection addresses stored in one column. With this method of intersection geocoding,
MapMarker reads input street addresses that contain intersection tokens (such as “&&”) between the
street and the cross street. If you do not have the information in your table, you must create a
column that contains the street and the cross street.
Street 1 and Street 2 names can be separated by one of the following intersection tokens: “and”,
“at”, “&”, “&&”.
MapMarker USA 25 83 User Guide
Page 84

Using Single Line Addresses in Geocoding
For example, to specify the intersection of Main Street and Washington Avenue, the column input
address could look like:
Main Street && Washington Avenue
Main St & Washington Ave.
Main St at Washington Ave
Main St and Washington Ave
You can omit spaces between the token and the street name, but the space is required for the ”and”
separator.
To use this single-column method to geocode to street intersections, do the following:
1. Open the table you want to geocode.
2. In the Select input columns from your table dialog, specify the columns that have the
appropriate address components. Map the column that contains the intersection information to
the Address box.
3. Click Next. In the Select output columns from your table dialog, select the columns in which you
want to store the output
4. Click Finish.
5. If the Geocode dialog does not display automatically, select Table > Geocode.
6. Click Geocode.
Intersection addresses stored in separate columns. In this method of intersection geocoding,
the street and cross street are stored in separate columns. An option in the Select input columns
from your table dialog enables you to specify which column to use as the cross street. To use this
method to geocode to street intersections, do the following:
1. Open the table you want to geocode.
2. In the Select input columns from your table dialog, specify the columns from your table that
have the appropriate address components. Map the columns that have the street and cross
street information to the Address and Address2 boxes.
3. Select the Use Address2 Column as Intersection Cross Street check box.
4. Click Next. In the Select output columns from your table dialog, select the columns to store
the output.
5. Click Finish.
6. If the Geocode dialog does not display automatically select Table > Geocode.
7. Click Geocode.
For an example of intersection geocoding see Intersection Geocoding on page 83:
Using Single Line Addresses in Geocoding
MapMarker can geocode single line addresses, in which all address components appear on a single
line rather than in separate fields.
MapMarker USA 25 84 User Guide
Page 85

Chapter 3:
Using Single Line Addresses in Geocoding
Each line of your single line input data must appear in the order:
<street address> <city> <state> <ZIP> <country>.
Not all of these address components are required. If you omit the ZIP Code™ and country,
MapMarker still geocodes the address based on street address, city, and state.
If you use delimiters (comma, semicolon, or colon) between each component of the address,
MapMarker parses the address accordingly. For example, if your input was:
One Global View, Troy, NY, 12180
The delimiters are recognized and the address is parsed as:
Main Address One Global View
City Troy
State NY
ZIP Code 12180
Country U,S.A. (default for MapMarker U,S.A.)
If delimiters are missing in the input address, MapMarker recognizes spaces as separators and uses
internal parsing rules to identify address components. In the example above, MapMarker would still
successfully geocode the address even if some or all of the delimiters were missing in the input.
However, non-delimited or partially delimited addresses may take longer to geocode.
Punctuation (such as quotation marks) are ignored for geocoding purposes.
See the following topics:
Single Line Geocoding Capabilities and Guidelines on page 85
Examples of Single Line Addresses on page 86
Single Line Geocoding Capabilities and Guidelines
MapMarker can recognize single line addresses that have the following characteristics:
• P.O. boxes
• Address units such as apartment or suite numbers
• Addresses with Private Mailbox (PMB) information
• Dual addresses (such as addresses containing both a P.O. Box and street)
• U.S military addresses
Single line address geocoding works within the following guidelines:
• The country is not required for U.S.A.
• You must include either (City plus State) or ZIP Code™ as the last address element. For
example, either Phoenix AZ or 85068-3049 (an Arizona ZIP Code) would be sufficient. However,
the City or State alone would not be sufficient.
MapMarker USA 25 85 User Guide
Page 86

Using Single Line Addresses in Geocoding
• Specific delimiters (comma, semicolon, or colon) between each address component improve
geocoding results. MapMarker can geocode space-delimited addresses, but it takes longer and
may not be as accurate. Partially delimited addresses are acceptable.
• Your input table can have formatted addresses, single line addresses, or a combination of both.
MapMarker recognizes the input formats and geocodes accordingly. Single line addresses are
recognized in the Address field of the Select input columns table. See step 2 of Selecting Input
Columns for a description of that dialog.
• You can still specify output columns. See step 1 of Selecting Output Columns for a description
of that dialog.
• Single line input is supported in Quick Find geocoding. See Finding Address with Quick Find.
Whether you identify address input columns in your input file, or use single line style input
addresses, you can geocode your data automatically or interactively.
• Geocoding Your Table Automatically on page 78
• Geocoding Your Table Interactively on page 79
Examples of Single Line Addresses
Following are examples of single line addresses that can be geocoded with a close match.
• 2901 GRANT ST UNIT 140 # 8351 Mobile AL 36606-4743 (unit type and number, no delimiters)
• 2901 GRANT ST UNIT 140 # 8351, Mobile, AL, 36606-4743 (unit type and number, comma
delimiters)
• 2901 GRANT ST UNIT 140 # 8351; Mobile; AL; 36606-4743 (unit type and number, semicolon
delimiters)
• P.O.Box 33049 Phoenix Arizona 85068-3049 (P.O. Box, no delimiters)
• P.O.Box 33049, Phoenix, Arizona, 85068-3049 (P.O. Box, comma delimiter)
• 1 Global St Troy New York 12180-8399 (street type corrected from St. to Vw, no delimiters)
• 2901 GRANT ST UNIT 140 # 8351 Mobile AL (unit type and number, no delimiters, no ZIP Code)
• 2901 GRANT ST UNIT 140 # 8351, Mobile, AL (unit type and number, comma delimiters, no
ZIP Code)
• P.O.Box 33049 Phoenix 85068-3049 (P.O. Box, no delimiters, no State)
• P.O.Box 33049, Phoenix, 85068-3049 (P.O. Box, comma delimiters no State)
• 2901 GRANT ST UNIT 140 # 8351, Mobile AL (unit type and number, no delimiters, no
ZIP Code)
• 2901 GRANT ST UNIT 140 # 8351 Mobile, AL (unit type and number, partially delimited, no
ZIP Code)
• 16736 Hwy 8 W P.O. Box 1070 Grenada MS 38901 (dual address: both P.O. Box and street)
• UNIT 2134 APO AP 96214 (military address)
MapMarker USA 25 86 User Guide
Page 87

Using Address Range Geocoding
Some business locations are identified by address ranges. For example, a shopping plaza could be
addressed as 10-12 Front St. This is how business mail would typically be addressed to such a
business location. These address ranges can be geocoded to the interpolated mid-point of the
range.
L Address ranges are different than hyphenated (dashed) addresses that occur in some
metropolitan areas. For example, a hyphenated address in Queens County (New York City)
could be 243-20 147 Ave. This represents a single residence (rather than an address range)
and is geocoded as a single address. If a hyphenated address similar to this example is
returned as a close match candidate, address range geocoding will not be attempted.
Chapter 3:
Using Address Range Geocoding
Address ranges cannot be geocoded in CASS™ mode, since the range is not an actual USPS
address. Also, the following fields are not returned by address range geocoding:
•ZIP+4® (in multiple segment cases)
• Delivery Point
• Check Digit
• Carrier Route
• Record Type
•Multi-Unit
• Default flag
See the following topics:
Address Range Geocoding Capabilities and Guidelines on page 87
Examples of Address Ranges on page 88
Address Range Geocoding Capabilities and Guidelines
Address Range geocoding works within the following guidelines:
• There must be two numbers separated by a hyphen.
• The first number must be lower than the second number.
• Both numbers must be of the same parity (odd or even) unless the address segment itself has
mixed odd and even addresses.
• Numbers can be on the same street segment or can be on two different segments. The
segments do not have to be contiguous.
• If both numbers are on the same street segment, the geocoded point is interpolated to the
approximate mid-point of the range.
• If the numbers are on two different segments, the geocoded point is based on the last valid
house number of the first segment. The ZIP Code™ and FIPS Code are based on the first
segment.
• In all cases, odd/even parity is evaluated to place the point on the correct side of the street.
Address range geocoding will not be attempted in the following cases:
®
MapMarker USA 25 87 User Guide
Page 88

Postal Geocoding
• If a valid hyphenated address is recognized as a close match (similar to the Queens, NY address
described in the preceding Note.)
• If removing the hyphen produces a close match. For example: an address like 1-5 Hoosick St,
Troy, NY produces a valid address of 15 Hoosick St if the hyphen is removed. So 15 Hoosick St.
is returned as a close match and address geocoding is not attempted.
Examples of Address Ranges
Following are examples of address ranges that can be successfully geocoded:
• 212-216 Red Apple Court, Central Valley, NY
• 212-266 Red Apple Court, Central Valley, NY – can geocode even though 212 and 266 are
located on different segments.
• 2702-2730 Pine Hills Road, Orlando, FL
The following addresses would not be geocoded to address range for the given reasons:
• 212-215 Red Apple Court, Central Valley, NY – invalid address range because 212 and 215
have different parity numbers (even and odd) and the segment does not allow this.
• 10-212 Red Apple Court, Central Valley, NY – invalid address range because 10 does not exist
• 2730-2702 Pine Hills Road, Orlando, FL – invalid address range because the first number is
greater than the second number.
• 10-14 Columbia Avenue, Lancaster, PA – address range geocoding is not attempted because
removing the hyphen produces a close match on 1014 Columbia Avenue.
Postal Geocoding
As an alternative to street-level geocoding, you can specify for MapMarker to geocode your records
to the appropriate ZIP Code™ centroid. This is called Postal geocoding. This is a fast method of
geocoding because it eliminates the need to match based on street address. This method matches
the ZIP Code in your table with the ZIP Code in the Address Dictionary. MapMarker geocodes to the
most precise ZIP Code level contained in your table.
Use ZIP Code centroid matching when you have a large database that you want to geocode quickly
and you are less concerned with spotting the points to street level.
To geocode to ZIP Code™ centroids:
1. In the Geocode dialog, select To ZIP Centroid under Geocode Precision.
2. Choose the range and type of rows you want to geocode.
3. Click Geocode. MapMarker updates the Automatic Geocode dialog every 25 records.
MapMarker USA 25 88 User Guide
Page 89

Geographic Geocoding
4. When through, click Done to view the log file or return to the MapMarker menu.
Chapter 3:
Geographic Geocoding
Geocoding to geographic centroids provides another fast alternative to street-level geocoding that
you can use when you do not need an exact match on the street address. Geographic geocoding is
less precise than street or postal geocoding, but may be suitable for certain applications. You can
also use geographic geocoding as a fallback option (see Fallback Dialog on page 105) if
MapMarker cannot match a record to the level or precision you originally requested (such as street
level).
For geographic geocoding, MapMarker returns the most precise geographic centroid that it can,
based on the user input.
To geocode to geographic centroids:
1. At the Geocode dialog in the Geocode Precision group, choose To Geographic Centroid.
2. Choose the range and type of rows you want to geocode.
3. Click Geocode.
MapMarker USA 25 89 User Guide
Page 90
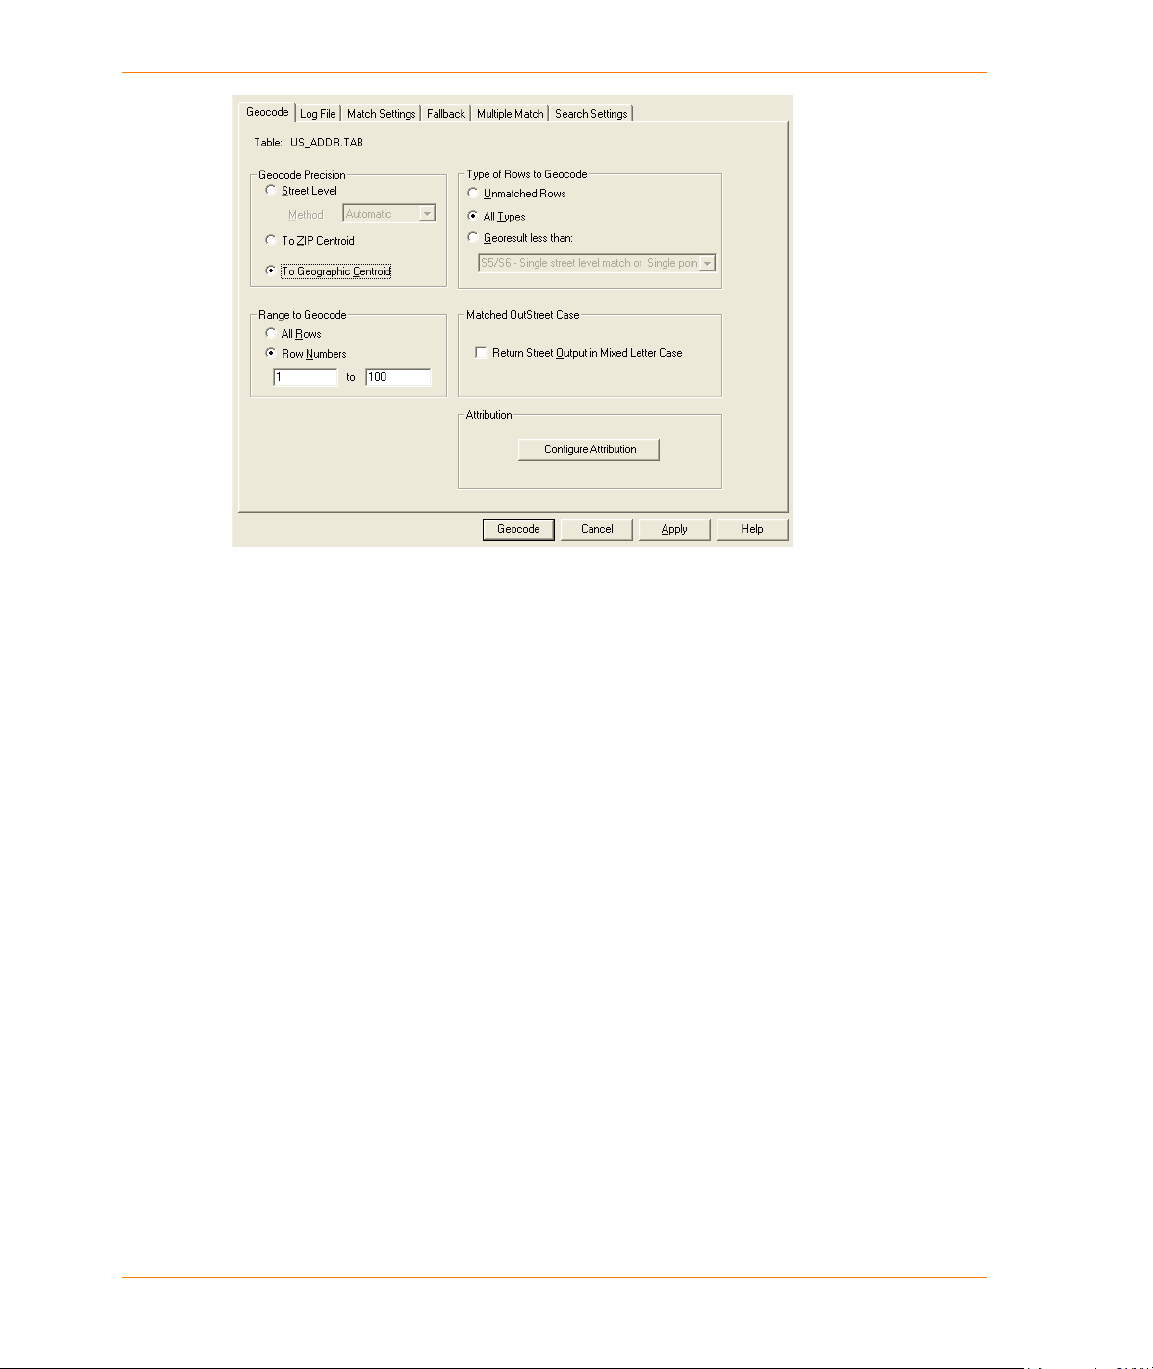
Geographic Geocoding
MapMarker USA 25 90 User Guide
Page 91

Displaying Geocoded Records in MapInfo Professional
Displaying Geocoded Records in MapInfo Professional
After MapMarker geocodes your records, you can display them in MapInfo Professional or MapX to
analyze them geographically.
1. Close your table in MapMarker and open it in MapInfo Professional or add it to your MapX
geoset.
The points are displayed with color-coded symbols that represent the level of geocoding
precision for the record, as described below.
• Magenta stars: all records matched to a single address point. No interpolation is required
(S8 result code)
• Orange stars: all records geocoded an interpolated point along the candidate’s street
segment (S7 result code)
• Purple stars: all records geocoded to point ZIP
• Maroon stars: records offset a specified distance along the perpendicular between the
original parcel/point to the associated street segment. (SC result code).
• Green stars: all records geocoded to a street address (S5 and M5 result codes)
• Blue stars: all records geocoded to a shape path centroid (S4, M4 result codes)
• Yellow stars: all records geocoded to a ZIP + 4
• Cyan stars: all records geocoded to a ZIP + 2 centroid (S2, M2 and Z2 result codes)
• Red stars: all records geocoded to a ZIP Code™ centroid, including highway exits (S1, M1
and Z1 result codes)
• Black stars: all records geocoded to intersections (Mx and Sx result codes)
• Black circles: all records geocoded to a state geographic centroid (G1 result code)
• Red circles: all records geocoded to a county geographic centroid (G2 result code)
• Blue circles: all records geocoded to a city/town geographic centroid (G3 result code)
See Result Codes for an explanation of the types of result codes.
2. Add other map layers such as MapMarker Streets or ZIP Code boundaries to give your points a
geographic reference.
You are now ready to analyze your data geographically. using Pitney Bowes Software Inc.
mapping software.
®
locations (S6, M6 and Z6 result codes)
®
centroid (S3, M3 and Z3 result codes)
Chapter 3:
When displaying your geocoded points over street data, use MapMarker Streets, StreetInfo, or
StreetPro display (products that use TIGER 2000 street geometry). When geocoding with
MapMarker, be sure to display over enhanced TIGER 2000 street geometry, such as MapMarker
Streets or StreetPro Enhanced or Display. This preserves the positional accuracy of the points with
respect to the street geometry.
MapMarker USA 25 91 User Guide
Page 92

Re-Geocoding a Table
Re-Geocoding a Table
After you have geocoded a table, existing records may be updated or new records may be added, so
you may need to geocode again. New or previously ungeocoded records (records that do not have
result codes) can simply be re-geocoded. By default. MapMarker automatically geocodes only
unmatched records. This means that for a large database, previously matched records are not rematched, thus saving time.
Records that already contain coordinates, but are incorrect (due to a change in address for
example), should be identified and the result codes should be deleted. MapMarker treats any record
without a result code as an unmatched record and attempts to find a match. MapMarker also
re-geocodes records with “N” or “ND” codes.
Your records may already include geometry objects (such as points) that were added from another
source (such as from MapInfo Professional). MapMarker can replace the points for matched
geocoded records (if you specify that action in the Geocode dialog). MapMarker deletes existing
points for records that it cannot match.
Using Geocoding Options
This section discusses geocoding options that affect the conditions under which MapMarker
attempts to match a record. This includes automatic or interactive geocoding, match settings,
fallback options, how to handle multiple matches, log files, table attribution, CASS settings, and
many other choices.
Geocoding options and preferences give you a great deal of control over the accuracy and precision
of your geocoding operation. Among the capabilities are:
• Specify the level of geocoding precision, automatic or interactive geocoding, and the range of
records to geocode.
• Specify criteria that must be matched (match settings) to return a candidate.
• Use search level settings to implement expanded search or to limit results to finance area or city.
• Prefer ZIP Code™ match over city name match
• Provide fallback options to broaden the possible candidate list in case a close match is not
initially identified.
• Determine how to choose candidates when multiple candidates are identified as close matches.
Changing match settings can affect the hit rate of successfully geocoded records. It can also affect
the time it takes for MapMarker to geocode a table, as well as the precision with which the geocoded
record is displayed on a map. It is important to keep in mind your intended use of geocoded data
when setting these conditions. These settings are set for individual tables and the information is
stored in the table’s metadata.
Accept or change any of the matching criteria to fit your needs. For example, by deselecting Exact
Match requirements, MapMarker can potentially match more records, but may return some false
positives.
MapMarker USA 25 92 User Guide
Page 93

Using Geocoding Options
To set geocoding preferences for a table:
1. On the Table menu, click Geocode. The Geocode dialog appears.
2. Choose the settings you want from any of the geocoding preferences tabs: Geocode, Log File,
Match Settings, Fallback, or Multiple Match.
3. Click Apply to set the changes or Geocode to geocode immediately.
For information on each of the tabs, see:
Geocode Dialog on page 93
Log File Dialog on page 95
Match Settings Dialog on page 96
Fallback Dialog on page 105
Multiple Match Dialog on page 106
Geocode Dialog
The Geocode dialog allows you to select a variety of preferences that control the method, precision,
range, and levels of geocoding.
Chapter 3:
Geocode Precision
Geocoding precision is a measure of how close a match is to the true location of the record you want
to geocode. MapMarker has Street Level, ZIP
MapMarker USA 25 93 User Guide
®
centroid, and Geographic precision.
Page 94

Using Geocoding Options
Street Level precision means that MapMarker attempts to geocode all records to street address, but
some matches may end up at a less precise location such as a ZIP centroid (ZIP + 4
ZIP Code™) or shape path.
ZIP Centroid precision means that MapMarker attempts to match a record to the most precise ZIP
Code it finds. Keep in mind that a match to a ZIP + 4 centroid is nearly as precise as a match to a
street address. The added bonus of ZIP Centroid matching is the speed of the operation;
MapMarker processes records faster if it only has to match on the ZIP Code.
The disadvantage of ZIP Code matching is that MapMarker only examines the ZIP Code field. If your
records only contain 5-digit ZIP Codes, MapMarker can do no better than match to 5-digit ZIP Code
centroids. If you use street level precision, MapMarker looks at both the street name and ZIP Code
fields and attempts to return street level coordinates and falls back to ZIP Code coordinates,
optionally to ZIP + 4 centroid.
Geographic precision is to the city, county, or state geographic centroid. See Geographic
Geocoding on page 89 for details.
®
, ZIP + 2, or
Street Level Geocoding Method Preference
The geocoding Method list allows you to select the geocoding method for Street Level geocoding.
MapMarker processes records automatically or interactively.
For automatic geocoding, the operation continues until all records are processed or the operation is
cancelled. For interactive geocoding, MapMarker geocodes records automatically, but stops on each
record for which it cannot make a single match. You can then choose the best match from a list of
candidates.
Type of Rows to Geocode
The Unmatched Rows selection means that MapMarker attempts to geocode addresses in your
input table only if those addresses have not previously been matched (rows for which the GeoResult
field: blank or N). Addresses that already have been geocoded are not re-geocoded. Unmatched
Rows is the default selection.
You can click All Types to geocode all rows, regardless of whether they have been previously
geocoded. You can also click Georesult less than and select a level of geocoding from the
drop-down list. This re-geocodes addresses that were originally matched below the given level of
precision. Use Georesult less than only with a table that has already been geocoded. If you use
this option with a table that has not been geocoded, MapMarker geocodes all of the rows regardless
of this selection.
Range to Geocode
The All Rows selection means that MapMarker attempts to geocode all rows in your input table. You
can also select Row Numbers and select a range of row numbers for geocoding.
Matched Case Preference
Use Return Street Output in Mixed Letter Case to write matched output street addresses in
mixed-case (for example, 12 Front St). The input street column remains unchanged.
MapMarker USA 25 94 User Guide
Page 95

Chapter 3:
Using Geocoding Options
An output address without a house number remains in uppercase. This is to accommodate cases
such as PO BOX 233.
In mixed case output, streets such as McFly are handled so that the letter following Mc is capitalized.
However, words like MacIntosh are not handled because it cannot be differentiated from cases like
Macoun.
Attribution Bindings
MapMarker has the ability to add information from one table to another, either before, during, or after
the geocoding process. This ability is called attribution binding.
To begin the process of attribution binding (or simply to display or modify existing attribute bindings),
click Configure Attribution. This displays the Bind Attribute Table Columns to Output Columns
dialog.
Table attribution described fully in the topic Table Attribution with MapMarker.
For related information, see:
Using Geocoding Options on page 92
Log File Dialog on page 95
Match Settings Dialog on page 96
Fallback Dialog on page 105
Multiple Match Dialog on page 106
Log File Dialog
The log file is a text file that MapMarker generates during geocoding that contains setup and
processing information about the geocoding session. If you do not specify another name, the log file
is named mapmarkr.log and contains the results of the session, including number of matches,
non-matches, previously matched records, and the number of matched records by result code.
MapMarker appends new information to the top of the log file after each geocoding pass.
By default, the log file is written to the My Documents\MapMarker USA folder. CASS reports and
MapMarker batch files are also written to this area by default.
The maximum file size for the log file is 1 MB.
L By default, the error files IgnoredErrors.txt and ODBCErr.log are created in:
Documents and Settings\All Users\Application
Data\MapInfo\MapMarker\USA\25.0
MapMarker USA 25 95 User Guide
Page 96

Using Geocoding Options
Select the Log File tab to control log file options.
To specify a different log file name, select the Specify Log File Name check box in the Log File tab
of the Geocode dialog. You may enter a path as well as a name for the log file (for example,
c:\temp\Us_addr.log). If the path specified is invalid, MapMarker creates MapMarker.log in the My
Documents\MapMarker USA folder.
In Windows 2003/XP, you must close the log file from a previous session before you can open the
table it refers to in MapMarker. If you do not, a message that the table may not have read/write
access is displayed. Close the table in the text editor to proceed.
In addition to creating a log file with the results of the geocoding operation, you can generate a table
summary that shows the results of the geocoding. To do so, select Table > Table Summary and
specify the column in your table that contains the georesults of the active table. The Save As dialog
appears allowing you to save this information as a text file.
For related information, see:
Using Geocoding Options on page 92
Geocode Dialog on page 93)
Match Settings Dialog on page 96)
Fallback Dialog on page 105
Multiple Match Dialog on page 106)
Match Settings Dialog
The Match Settings tab lets you specify how precisely MapMarker matches input addresses against
the Address Dictionary. By adjusting match settings, you can control whether MapMarker requires a
very precise match, a less restrictive match, or an intermediate level of matching. The best choice
for you depends on the nature of your data and the requirements of your application.
MapMarker USA 25 96 User Guide
Page 97

Chapter 3:
Using Geocoding Options
Match Modes
You can select one of the match modes to control the variance allowed between an input address
and the matched address. Less variance ensures the highest quality matches. More variance can
provide high quality matches on badly formatted or incomplete input addresses, but requires
additional processing time.
The Standard, Tight, and Relaxed Match Modes use internal algorithms to achieve matching
results. CASS Mode allows you to produce a CASS report (assuming that CASS data is available).
You can also select Custom (Exact Match On) to achieve more precise control over your matching
results.
MapMarker USA 25 97 User Guide
Page 98

Using Geocoding Options
.
Match Mode Description
Standard This is the default mode, and generally provides the best balance of
Tight This uses the most strict matching rules and requires an exact street
Relaxed This provides less strict matching rules. In general, Relaxed mode
Match Modes
accurate geocoding, few false matches, and high performance. This
requires a close (not necessarily exact) street name match.
name match. In general, this returns the fewest number of candidates in
the fastest processing time. There will be fewer non-close matches than
are returned in Standard or Relaxed mode.
Tight mode is most suitable when your input addresses are complete, well
standardized, and free of spelling errors.
L Tight mode is not equivalent to selecting Custom matching with all
Exact Match criteria checked.
increases your chances of getting a close match but performance
(geocoding speed) may not be as good.
Relaxed mode:
• allows the most variation in street name spelling, and therefore may
return desirable candidates that are not returned in other modes.
• is most suitable when your input addresses are not well standardized,
incomplete, or may contain spelling errors.
• is the only mode that does not respect street parity.
• is more likely to return false positive candidates.
• may (but does not always) return more candidates than other modes.
• generally will perform more slowly than other modes.
• is best used as a second or third geocoding pass. See Using Wide
Search with Multiple Pass Strategy on page 103 and Using a
Multiple Pass Strategy on page 120. strategies of optimizing match
rates using multiple geocoding passes.
• is best used if you examine the Match codes and Location codes to
verify how the address was matched, what address elements were
changed to achieve the match, and the locational accuracy of the
geocode. See Match Codes and Location Codes on page 305.
L Relaxed mode is not equivalent to selecting Custom matching with
all Exact Match criteria unchecked.
MapMarker USA 25 98 User Guide
Page 99

Match Modes (continued)
Match Mode Description
Chapter 3:
Using Geocoding Options
CASS
Custom (Exact Match
On)
This provides strict conformity to USPS
software. Use CASS mode to standardize your input for mailing. If you
select CASS Mode, several other options are disabled and their values
are overwritten by CASS rules.
CASS mode requires a close name match. Unlike other modes, CASS
does not match intersection addresses, building name, or street aliases.
CASS also does not match based on a user dictionary or any data source
that does not have USPS equivalent records.
In other modes, a close match candidate may by identified very quickly
and this candidate is returned without further processing. However, in
CASS mode, the first identified close match may not be the best USPS
candidate (for example it could be a building name while the preferred
USPS candidate is a business name). A CASS mode search must
continue to ensure that the best USPS candidate is returned. For this
reason, CASS mode can return more records than in other modes.
See CASS related Selections on page 100.
Custom allows you to select any combination of Exact Match constraints
rather than relying on any of the match mode algorithms. This gives you
very precise control over the matching.
See Exact Match On for a description of all the Exact Match settings.
®
CASS™ regulations for CASS
Exact Match On
Use the Require Exact Match On criteria to fine-tune your control over geocoding matching
preferences. You can specify precise matching criteria based on house number, street name, city
name, and ZIP Code. If all specified criteria are not met, then the geocoded candidate is not
considered a close match.
Exact Match Settings
Exact Match Description
House number When the House Number box is checked, candidate house numbers
must be exactly matched to return a close match. When the House
Number box is unchecked, MapMarker can make a close match even if
the house number match is not exact.
MapMarker USA 25 99 User Guide
Page 100

Using Geocoding Options
Street name When the Street Name box is checked, candidate street names but be
City Name When the City Name box is checked, MapMarker requires a city name
ZIP Code When ZIP Code™ is checked, ZIP Code must be exactly matched to get
Exact Match Settings (continued)
exactly matched to get a geocoding match. When the street name box is
unchecked, MapMarker will accept similar street names as a match.
This requires an exact match on all elements of the street name. Also,
blank input values for these elements will not match non-blank values in
the candidate records.
L Street name exact match also requires an exact match on street
type. That is, 147 Rd. must be matched exactly; 147 Ave does
not match.
match. When this box in unchecked, the city name does not have to
match.
a geocoding match. When ZIP Code is unchecked, surrounding
ZIP Codes are considered for matching purposes and records with
missing ZIP Codes are also considered.
CASS related Selections
If you selected CASS mode, you can also produce a CASS report (Form 3553).
Because the address standardization requirements for CASS are very rigid, you cannot control the
geocoding settings you normally have when geocoding with the MapMarker Desktop application.
For example, you cannot geocode to a user dictionary when you are CASS geocoding.
The CASS related options are:
CASS Related Options
CASS Options Description
Produce a CASS Report If you wish to qualify your table for CASS, you must print
a report USPS Form 3553. If you choose to Produce a
CASS Report, the Use DPV and Use LACSLink check
boxes are automatically checked. DPV validation is
required for CASS reports. See DPV.
Use DPV
Check this box to specify DPV
must be installed and unlocked in order to access this
feature. If you choose to Produce a CASS Report, the
Use DPV mode check box is automatically checked. This
is because DPV validation is required for CASS™
reports.
®
geocoding. The DPV files
MapMarker USA 25 100 User Guide
 Loading...