

Page 1
Page 2

MAIL MATERIALS REFERENCE GUIDE
Page 3

SV60822 Rev. A
First Edition, October 2000
©2000 Pitney Bowes Inc.
All Rights Reserved.
This book may not be reproduced in whole or in part in any fashion or stored in
a retrieval system of any type or transmitted by any means, electronically or
mechanically, without the express written permission of Pitney Bowes Inc.
We have made every reasonable effort to ensure the accuracy and usefulness
of this publication; however, we assume no liability for any errors or omissions,
or for the misuse or misapplication of our publications or products.
Due to our continuing program of product improvement, equipment and material
specifications as well as performance features are subject to change without
notice.
DocuMatch is a trademark of Pitney Bowes Inc. Lexmark and Optra S are
trademarks or registered trademarks of Lexmark International Inc. Canon is a
trademark or registered trademark of Canon Inc. Dow Window Film and Trycite
are trademarks or registered trademarks of The Dow Chemical Company.
Page 4

Contents
1 - Introduction
Purpose of This Guide...............................................1-2
Who Should Read This Guide....................................1-2
2 - General Material Specifications and Storage
Handling and Storage Tips........................................2-2
Definition of Mail Materials...................................2-2
Handling................................................................2-2
Storage..................................................................2-2
Rotation.................................................................2-3
Locally-Manufactured Materials...........................2-3
Mail Materials Reference Table..................................2-4
Collation Total Thickness Limits................................2-6
Materials Not Suited for DocuMatch™.......................2-7
3 - Paper for Document Printer
Recycled Paper...........................................................3-2
Paper Weights............................................................3-2
Grain............................................................................3-3
Methods for Determining Grain...........................3-3
Paper for DocuMatch™ Document Printer..................3-5
Document Printer Materials Reference Table.......3-5
Storage Tips.........................................................3-6
Loading Tips.........................................................3-6
Perforated Stock Specifications For
DocuMatch™ .........................................................3-8
Page 5

Contents
4 - Envelopes
Overview of Envelopes...............................................4-2
Envelope Quality...................................................4-2
Envelope Size.......................................................4-2
Envelope Type.......................................................4-2
Die-Cut............................................................4-2
Web-Fed..........................................................4-3
Envelope Style......................................................4-4
Envelope Curl........................................................4-4
Window Envelopes...............................................4-6
Standard Window Dimensions.......................4-7
Envelope Seal Flap and Gum...............................4-8
Storage..................................................................4-8
Loading Tips.........................................................4-9
Envelope Guidelines for DocuMatch™ ......................4-10
Envelope Style and Type......................................4-10
Envelope Size and Weight...................................4-10
#10 Envelope Specifications................................4-11
Envelope Materials Reference Table....................4-12
5 - Cut Sheet Feeder Material
Cut Sheets for DocuMatch
Grain Orientation...................................................5-2
Glossy Materials...................................................5-2
Static Charge........................................................5-2
Loading Tips.........................................................5-3
What to Watch For................................................5-3
Cut Sheet Feeder Materials Reference Table.......5-4
ii
™
.....................................5-2
Page 6

Contents
6 - Insert Feeder Material
Inserts and Business Reply Envelopes......................6-2
Loading Tips.........................................................6-2
Insert Feeder Materials Reference Table..............6-3
7 - Document Printer Preventive Maintenance
and Toner Usage
Scheduled Printer Preventive Maintenance...............7-2
Toner Yield..................................................................7-2
Setting the Printer Resolution to 300 DPI.............7-3
Setting the Print Darkness to Lighter or Lightest..7-3
Turning Toner Saver On........................................7-4
Page Coverage.....................................................7-4
Replica of Sample Page Showing
5% Print Coverage...............................................7-6
8 - General Machine Preventive Maintenance
System Preventive Maintenance................................8-2
General..................................................................8-2
Maintenance Log..................................................8-2
Pre-Service System Check with Remote
Diagnostics............................................................8-3
System Preventive Maintenance Schedule..........8-4
iii
Page 7

Contents
Appendices
A - Introduction to Paper
How Paper Is Made...................................................A-2
Paper Characteristics.................................................A-4
Moisture................................................................A-4
Wire and Felt Sides (of a Sheet of Paper)............A-5
Surface Coating or Finish....................................A-5
Body or Strength or Material................................A-5
Understanding Paper Ream Labels...........................A-6
B -Collation Total Thickness Limits
Total Thickness Limits................................................B-2
Total Thickness Worksheet........................................B-2
Index
iv
Page 8

Contents
List of Illustrations and Tables
Figure Description Page
3-1 Grain Long and Grain Short Direction...............3-3
3-2 Checking Grain Direction..................................3-4
3-3 Aerating Paper Before Loading.........................3-6
3-4 Flexing Paper Before Loading...........................3-7
3-5 Perforated Stock Specifications for
DocuMatch™.......................................................3-8
4-1 Envelope Curling Can Cause Problems............4-5
4-2 Window Envelope Standard for DocuMatch™...4-7
4-3 DocuMatch™ Specifications for #10
Envelope Dimensions........................................4-11
7-1 Reduced Replica of 8-1/2 x 11" Sample
Page With 5% Page Coverage..........................7-6
A-1 How Paper Is Made..........................................A-2
A-2 Two Sides of a Sheet of Paper...........................A-3
A-3 Understanding Paper Ream Labels..................A-6
Table Description Page
™
2-1A DocuMatch
2-1B DocuMatch™ Mail Materials Reference.............2-5
2-1C DocuMatch™ Mail Materials Reference.............2-6
3-1 Document Printer Materials Reference.............3-5
3-2 Letterhead Paper Loading Guidelines for
C-Fold and Z-Fold.............................................3-7
4-1 Envelope Trade Numbers and Sizes.................4-3
4-2 Envelope Materials Reference...........................4-12
5-1 Cut Sheet Feeder Materials Reference.............5-4
6-1 Insert Feeder Materials Reference....................6-3
7-1 Estimated Toner Yield........................................7-5
8-1 System Preventive Maintenance Schedule.......8-4
Mail Materials Reference.............2-4
v
Page 9

vi
Page 10

Chapter 1
Introduction
In this chapter:
Purpose of This Guide.....................................................1-2
Who Should Read This Guide..........................................1-2
1-1
Page 11

1 • Introduction
Purpose of This Guide
We have designed the DocuMatch™ Mail Materials Reference
Guide as a handy reference tool to provide you with useful
information about mailpiece materials. This guide will help you
to identify the proper materials to use and to determine
whether certain materials are within specifications. We have
also included some preventive maintenance
recommendations.
The ultimate goal of this guide is to help you to make your
DocuMatch system and your DocuMatch mail jobs run at
optimum efficiency.
Who Should Read This Guide
Our Pitney Bowes customers, Customer Service Field
Representatives, Sales Representatives, and visitors to our
Pitney Bowes internet/intranet web sites are encouraged to
refer to this guide frequently for quick access to information
about mailpiece materials.
This booklet is small enough to carry with you as needed for
visits to the post office, office supplies vendors, or your other
office locations.
1-2
DocuMatch™ Mail Materials Reference Guide
Page 12

Chapter 2
General Material Specifications and Storage
In this chapter:
Handling and Storage Tips..............................................2-2
Definition of Mail Materials............................................2-2
Handling.........................................................................2-2
Storage...........................................................................2-2
Rotation..........................................................................2-3
Locally-Manufactured Materials....................................2-3
Mail Materials Reference Table........................................2-4
Collation Total Thickness Limits.......................................2-6
Materials Not Suitable for DocuMatch™...........................2-7
2-1
Page 13

2 • General Material Specifications and Storage
Handling and Storage Tips
Definition of Mailing Materials
For the purposes of this guide, when we refer to mail materials, we mean:
• paper;
• envelopes;
• cut sheets;
• inserts.
Handling
Whenever you transport material, handle it with care. Careful
handling will extend the usable life of the material and maintain machine productivity.
Avoid exposing cartons of materials to the elements. Prolonged exposure to intense sunlight, high humidity, and so on,
can compromise the performance of material.
Storage
Store materials in a controlled environment. These cautions
apply:
• Store materials away from moisture if possible. A nominal
temperature range of 68-75 degrees F (21-24 degrees C),
50% humidity, is recommended. Since envelope formulations vary, it may be helpful to experiment with temperature and humidity limits above and below the specified
nominal figure. This will help determine the values for
achieving best productivity with material. It is best to
accumulate data over a period of several weeks for each
value of temperature and humidity.
2-2
DocuMatch™ Mail Materials Reference Guide
Page 14

General Material Specifications and Storage • 2
• Store cartons of materials at least six inches away from
masonry walls to prevent absorption of moisture. Keep
cartons on skids or shelves, but never directly on floors.
Remember that a very dry environment produces static,
which causes material to cling together. Humid conditions
may make paper limp and difficult to handle and may
cause curl.
• Do not stack cartons more than five feet high; any higher,
and you can deform the bottom cartons and damage the
envelopes. Stack cartons so that all envelopes stand on
edge. The lid of the box should be uppermost when
stacked. Boxes should remain closed until envelopes are
required.
Rotation
Rotate the stock, noting the following points:
• Control the inventory. Rotate the stock, using the oldest
stock first (first in, first out).
• If your storage area is compatible with our storage envi-
ronment guidelines (see previous section) and your work
area is not, transfer cartons from the storage area to the
work area no more than several hours before use.
• If your work area is compatible with our storage environ-
ment guidelines (see previous section) and your storage
area is not, transfer cartons from the storage area to the
work area at least 24 hours before use.
• Do not remove envelope or enclosure boxes from their
cartons until you are ready to load them on the work table.
Locally-Manufactured Materials
If you live in an extreme climate, we recommend that you buy
mailing materials manufactured locally. By doing this, you may
avoid significant changes in environmental conditions that
may cause performance problems.
DocuMatch™ Mail Materials Reference Guide
2-3
Page 15
2 • General Material Specifications and Storage
Table 2-1A
DocuMatch™ Mail Materials Reference
Source Minimum Requirements Performance Tips
Doc.
Printer
(Laser
Printer)
Insert
Feeder
• 8-1/2 x 11"
• Xerographic copy
paper, 20-24 lb. bond
• 24 lb. paper may be
microperfed (see page
3-8 for details).
• Grain long
Pre-folded Inserts (C-fold,
1/3 size):
• 3 x 5" to 3-7/8 x
8-7/8"
• 20 lb. bond
• 24 lb. bond
• 50-80 lb. coated offset
• 50-70 lb. uncoated
offset
• 80 lb. uncoated offset,
smooth
BREs:
• #9 standard envelope
(3-7/8 x 8-7/8")
• Check size
(3-5/8 x 8-5/8")
• Some preprinted
letterhead paper or
previously copied
paper may cause
feeder problems and
should be tested first.
• Avoid recycled
materials.
Pre-folded Inserts (C-fold,
1/3 size):
• Do not use Z-fold
material.
• Material that is highly
varnished will
contaminate the feed
belts.
• Do not use light-weight
inserts less than 16 lb.
• Do not use any inserts
with significant curl.
BREs:
• Closed flap with or
without window
• You may also use
#8-5/8 and #7 BREs.
2-4
• 20-24 lb. bond, all
types, smooth, glossy,
or flat
Postcards:
• As above (includes
7-point reply)
Postcards:
• Thickness range:
0.007" to 0.0095"
DocuMatch™ Mail Materials Reference Guide
Page 16
General Material Specifications and Storage • 2
Table 2-1B
DocuMatch™ Mail Materials Reference
Source Minimum Requirements Performance Tips
Cut
Sheet
Feeder
(Flat
Sheets)
• 8-1/2 x 11"
• Xerographic copy
paper 20-32 lb. bond
• 60-80 lb. offset
• Grain long
• 3/8" curl maximum
• Dimensional tolerance
is ± 1/32"
• Glossy materials may
be used but must not
be statically charged.
• Materials that are
varnished on both
sides and are very
slick must be tested
first.
• Avoid recycled
materials.
• Heavier materials may
not perform as well.
Test them first.
• The fourth sheet of a
four-page document
cannot be a 50 lb. or
60 lb. cut sheet.
• Do not use laser-
printed paper.
DocuMatch™ Mail Materials Reference Guide
2-5
Page 17
2 • General Material Specifications and Storage
Table 2-1C
DocuMatch™ Mail Materials Reference
Source Minimum Requirements Performance Tips
Envelope
Printer
• Use only #10 size
(4-1/8 x 9-1/2").
• Dimensions from
envelope to envelope
should not vary more
than ± 1/16".
• 24-28 lb. bond basis
weight
• Guidelines for curl:
» 1/4" curl maximum
on any one corner
» 3/8" combined curl
maximum for entire
envelope
» 1/8" curl maximum
on flap
• Guidelines for
window:
» 1-1/8" high
» 4-1/2" wide
» 7/8" from left edge
of envelope
» 5/8" from bottom
edge of envelope
• Avoid weights less
than 24 lb. bond.
• Web-fed preferred
over die-cut.
• Side seam better than
diagonal seam.
• Side seam preferred
over executive or
commercial.
• Avoid recycled
materials.
• Window envelopes
may be used, but any
window material must
be secured with no
loose edges.
• Do not use open-
faced window
envelopes.
Collation Total Thickness Limits
For reliable inserting, the total thickness of the entire collation
to be inserted into the envelope must be limited to 0.060 in.
You can estimate the thickness using the table in Appendix B.
2-6
DocuMatch™ Mail Materials Reference Guide
Page 18

General Material Specifications and Storage • 2
Materials Not Suitable for DocuMatch
The materials listed below are not suitable for use with the
DocuMatch system:
Blueprint and Brownprint
Book covering materials
Book papers—coated
Book papers—uncoated
Bristol
Carbon paper
Carbonless paper
Cut-size duplicating
Groundwood
Labels—dry gummed
Labels—heat sealed
Labels—pressure sensitive
Ledger
Lightweight
Manifold
Newsprint
Non-paper substrates
Paperboard
Pressure-sensitive paper,
films and foils
Publication paper—coated
Publication paper—uncoated
Recycled paper
Supercalendered paper
Ta g
Text and cover
Tyvek
DocuMatch™ Mail Materials Reference Guide
2-7
Page 19

Page 20

Chapter 3
Paper for Document Printer
In this chapter:
Recycled Paper.................................................................3-2
Paper Weights..................................................................3-2
Grain..................................................................................3-3
Methods for Determining Grain..................................3-3
Paper for DocuMatch™ Document Printer.......................3-5
Document Printer Materials Reference Table.............3-5
Storage Tips...............................................................3-6
Loading Tips...............................................................3-6
™
Perforated Stock Specifications For DocuMatch
....3-8
3-1
Page 21

3 • Paper for Document Printer
Recycled Paper
In the past few years recycled paper has grown in popularity.
Constant testing of recycled paper for feeding on DocuMatch
systems is ongoing. Sometimes recycled paper lacks body,
which can cause problems in paper feeding. Use of recycled
paper may also cause problems with the opening of envelope
flaps and the insertion of mailpieces into envelopes. Consequently, it is important to submit all samples of materials for
any application to your Pitney Bowes specialist for approval.
Paper Weights
An important specification to consider is paper weight. The
DocuMatch system has specific minimum and maximum
paper weights that can be processed. Staying within these
specifications will maximize the system's overall performance.
In the U.S., the weight is given in pounds for one ream (500
sheets) of a specific size of paper. For bond or copier paper
this specific size is 17 x 22 in. Since 8-1/2 x 11 in. paper is
one-fourth the size of 17 x 22, a ream of 20-pound bond
paper will weigh one-fourth of 20, or five pounds.
™
Other types of paper have different reference sizes. Offset or
book paper, often used for cut sheets in the DocuMatch, has
a reference size of 25 x 38 inches. Thus, 20-pound bond
paper corresponds to 50-pound offset paper.
Outside the U.S., paper weight is measured in grams per
square meter (gsm or g/m2). Twenty-pound bond paper
corresponds to 75 grams per square meter.
3-2
DocuMatch™ Mail Materials Reference Guide
Page 22
Paper for Document Printer • 3
Grain
Since it is easier to fold along the length of the fibers rather
than across them, consider the grain direction when folding
papers that are close to the machine's maximum weight
specifications. The bulk of the fibers will give resistance to
folding. Consideration must also be given to grain direction
when folding multiple sheets.
At times it may be necessary to determine paper grain direction. Often, the package of paper will have the grain direction
indicated, but if this is not the case, you can use one of the
following three methods to determine paper grain.
Methods for Determining Grain
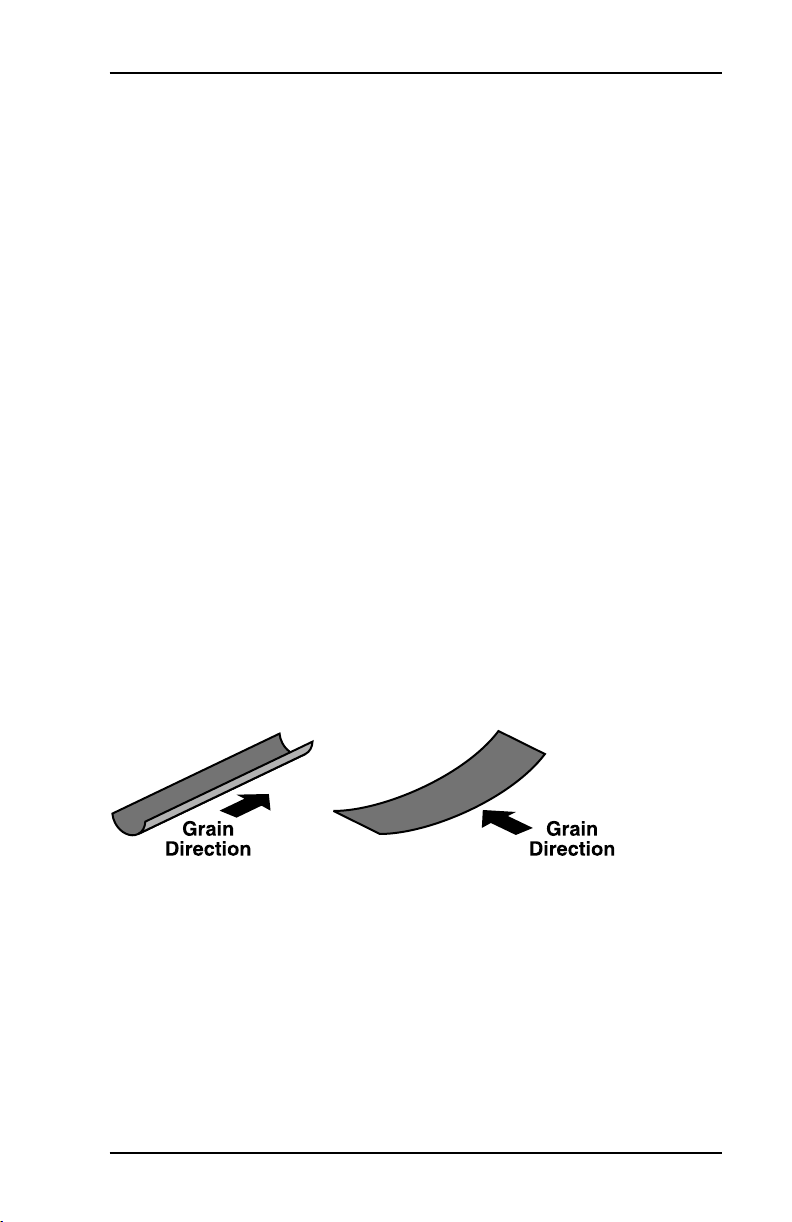
Method 1 (Figure 3-1)
From a sheet of paper, cut a strip approximately 1 inch
(25mm) wide. Moisten one side of the strip. This will cause the
paper to curl according to its grain direction as illustrated in
Figure 3-1. The fibers will not curl and therefore the paper
curls in such a way that it stays flat in the direction of the
grain.
Figure 3-1
Grain long direction (left) and grain short direction (right).
DocuMatch™ Mail Materials Reference Guide
3-3
Page 23
3 • Paper for Document Printer
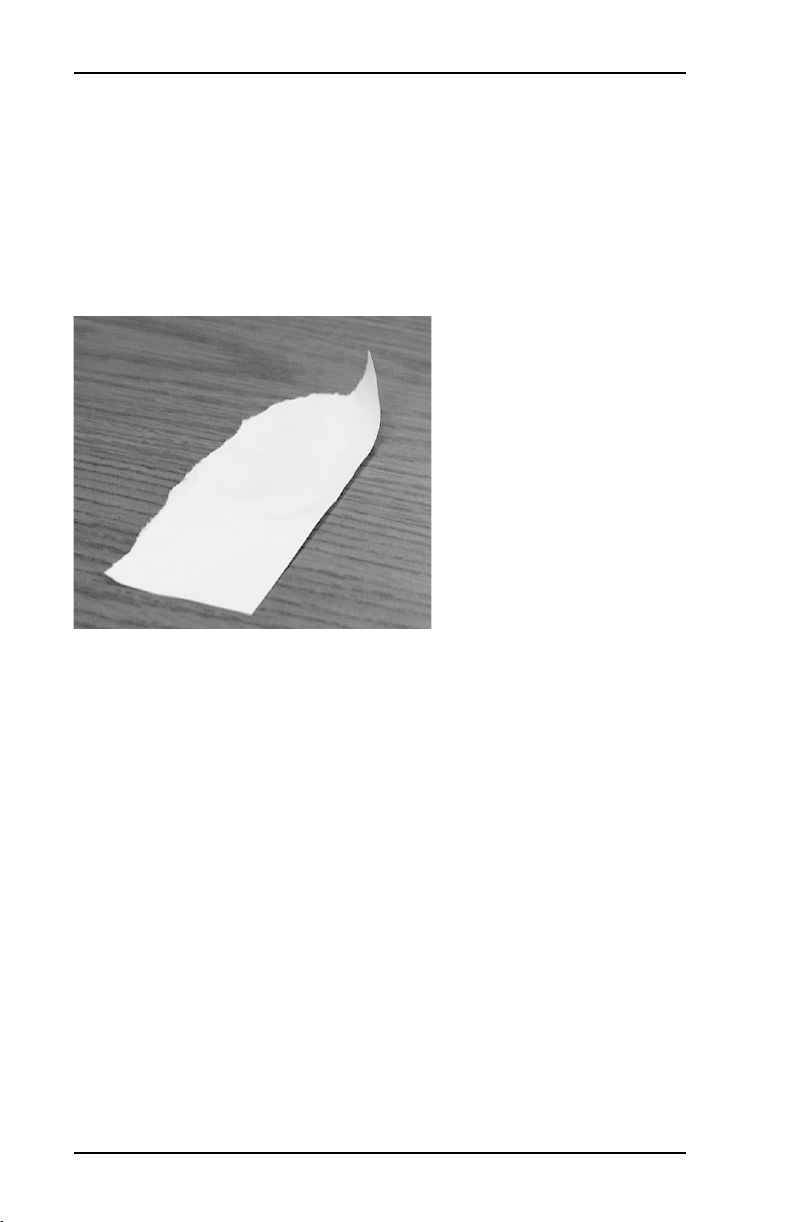
Method 2 (Figure 3-2)
Tear off (as opposed to cutting) a piece of paper. A strip torn
with the grain will tend to have a much smoother edge than
one torn across the grain.
Some experience with paper is necessary to identify whether
the edge is smooth or rough when using this method. If in
doubt, use one of the other methods mentioned here.
When using Method 2 to
determine grain direction, the
paper will tear more evenly
along the grain and should
show a distinct curl in the
direction of the grain, when
moistened.
Figure 3-2
Checking grain direction.
Method 3
Again, take a piece of paper, but this time fold it in half along
its length, open it, and then fold along its width. When you
open it again and look at the folded edges, you will see one
edge that is very fine where you have folded in the direction of
the grain, while the other edge is ragged where you have had
to bend the fibers across the grain.
3-4
DocuMatch™ Mail Materials Reference Guide
Page 24

Paper for Document Printer • 3
Paper for DocuMatch Document Printer
Table 3-1
Document Printer Materials Reference
Source Minimum Requirements Performance Tips
Doc.
Printer
(Laser
Printer)
• 8-1/2 x 11"
• Xerographic copy
paper, 20-24 lb. bond
• 24 lb. paper may be
microperfed (see pg.
3-6 for details).
• Grain long
• Some preprinted
letterhead paper or
previously copied
paper may cause
feeder problems and
should be tested first.
• Avoid recycled
materials.
The document printer works best with 20-pound Xerographic
paper made for use in laser printers or Xerographic copiers.
For mail generation, the printer accepts 8-1/2 x 11 in. paper
only. If you're using the printer in stand-alone mode, it accepts a wide range of sizes.
Avoid using offset printer paper, which looks like copier paper
but is made differently and tends to be very dusty.
Finally, document printer paper should always be “grain long.”
Paper made for laser printers is almost always grain long; but
if you have any doubts, check the wrapper or use the tear test
described in the previous section.
DocuMatch™ Mail Materials Reference Guide
3-5
Page 25

3 • Paper for Document Printer
Storage Tips
Here are some helpful storage tips.
• Always store paper in its moisture-proof wrapper until
you're ready to use it.
• Store preprinted forms and letterhead stock in moistureproof wrappers until needed.
• If the wrapper indicates a side to be imaged first (usually
this means the arrow on the wrapper points up) and you
are using a DocuMatch
system equipped with a Canon
printer, always load the paper with that side up.
• If the wrapper indicates a side to be imaged first (usually
this means the arrow on the wrapper points up) and you
are using a DocuMatch system equipped with a Lexmark
printer, always load that side down if you are printing one
side only (simplex), up if you are printing both sides
(duplex).
Loading Tips
• To reduce the chance of sheets sticking together, aerate
(fan) and flex the paper back and forth before loading. Do
NOT fold or crease the paper. Straighten the edges of the
pack by tapping it on a level surface. (See Figures 3-3 and
3-4).
™
™
3-6
Figure 3-3
Aerating paper before loading
DocuMatch™ Mail Materials Reference Guide
Page 26

Paper for Document Printer • 3
Figure 3-4
Flexing paper before loading
• CAUTION: Don't use torn, wrinkled, or creased paper, or
paper with a curled, bent, or wavy edge.
• Load the paper on the bottom of the paper trays about an
inch at a time. Line it up against the left side of the tray.
• Don't overfill the trays.
• If you're adding paper to a tray, put the new paper on the
bottom so that unused paper won't stay in the tray longer
than necessary.
Table 3-2 provides the proper guidelines for loading letterhead
paper which you intend to have either C-folded or Z-folded.
Table 3-2
Letterhead Paper Loading Guidlines for C-Fold and
Z-fold
Document
Printer
Lexmark
(Single-Sided)
Lexmark
(Duplex)
Canon
(Single-Sided)
DocuMatch™ Mail Materials Reference Guide
C-Fold Z-Fold
Load paper face
down, bottom edge
leading
Load paper face up,
top edge leading
Load paper face
down, top edge
leading
Load paper face up,
bottom edge
leading
Load paper face up,
top edge leading
Load paper face up,
bottom edge
leading
3-7
Page 27

3 • Paper for Document Printer
Perforated Stock Specifications for DocuMatch
Perforated paper can cause problems if you don't select it
carefully. For your perforated stock to work well with
DocuMatch, we suggest you follow the specifications listed
below when discussing your future perforated stock orders
with your business forms supplier.
• 24 lb. bond only
• Microperf should be 66 holes per inch (66 TPI) and have a
0.008 in. tie.
• Your business forms supplier may locate the perf at any
location on the page, but locating perfs on fold lines may
be difficult due to tolerances. For best performance, you
should located the perf within the bottom folded third of
the page (at the bottom end of the page). Since fold lines
are approximately 3-5/8 in. from either end of the page,
your supplier should avoid putting perfs in the range of
3-1/2 to 3-3/4 in. from the top or bottom edge of the page
to assure clean-tearing perfs.
• Another way to convey the required specifications to your
business forms suppliers is to simply show them the
illustration in Figure 3-5:
3-8
Figure 3-5
Graphic representation of perforated stock
specifications for DocuMatch
DocuMatch™ Mail Materials Reference Guide
Page 28

Paper for Document Printer • 3
If you have an application requiring the use of perforated
stock, please consult your local Pitney Bowes Customer
Service Representative. He or she will evaluate your application and recommend the best approach before you order
stock from your business forms supplier.
Important:
Do not use grain short paper, recycled paper, or paper coated
with lacquer. These materials can cause severe performance
problems with your DocuMatch mail jobs. Using out-of-spec
material will cause jams in the laser printer and the accumulator.
DocuMatch™ Mail Materials Reference Guide
3-9
Page 29

Page 30

Chapter 4
Envelopes
In this chapter:
Overview of Envelopes.....................................................4-2
Envelope Quality.........................................................4-2
Envelope Size.............................................................4-2
Envelope Type.............................................................4-2
Die-Cut..................................................................4-2
Web-Fed................................................................4-3
Envelope Style............................................................4-4
Envelope Curl.............................................................4-4
Window Envelopes.....................................................4-6
Standard Window Dimensions.............................4-7
Envelope Seal Flap and Gum.....................................4-8
Storage........................................................................4-8
Loading Tips...............................................................4-9
Envelope Guidelines for DocuMatch™.............................4-10
Envelope Style and Type...........................................4-10
Envelope Size and Weight.........................................4-10
#10 Envelope Specifications......................................4-11
Envelope Materials Reference Table..........................4-12
4-1
Page 31

4 • Envelopes
Overview of Envelopes
Envelope Quality
We cannot over-emphasize the importance of using good
envelopes. To maximize the productivity of the DocuMatch
system you should use high quality envelopes that are the
correct size and texture to accept materials consistently and
accurately.
To ensure the highest level of productivity, all envelopes
should conform to the guidelines discussed in this guide. You
may want to discuss these guidelines with your envelope
supplier. If you have any questions that are not covered here,
please contact your Pitney Bowes DocuMatch specialist for
additional technical assistance.
Envelope Size
One way we classify envelopes is by size. The envelope
manufacturing industry has assigned trade numbers for
various sizes of envelopes. Table 4-1 on the next page lists
these designated trade numbers with their respective envelope sizes.
™
Note that the envelope trade number is slightly larger than the
envelope width. For example, a #10 envelope is actually
9-1/2 inches wide.
Envelope Type
We also classify envelopes by type, that is, by the type of
manufacturing process that created them — die-cut or webfed. Each envelope type has unique characteristics as a result
of its manufacturing process, the main differences being in
flap and seam construction.
Die-Cut Envelopes
When die cut envelopes are manufactured, a die is placed
upon a ream of paper. The die is pressed down under pressure by machinery or by hand. It is then removed, emptied,
and the paper is moved to printing, gluing, and folding machines.
4-2
DocuMatch™ Mail Materials Reference Guide
Page 32

Table 4-1
Envelope Trade Numbers and Sizes
Trade Number Name Envelope Size (inches)
6 1/4 3-1/2 x 6
6 3/4 3-5/8 x 6-1/2
7 3-3/4 x 6-3/4
Monarch 3-7/8 x 7-1/2
Data Card 3-5/8 x 7-3/4
Check Size 3-5/8 x 8-5/8
9 3-7/8 x 8-7/8
10 4-1/8 x 9-1/2
11 4-1/2 x 10-3/8
12 4-3/4 x 11
14 5 x 11-1/2
Envelopes • 4
The die-cutting process is generally used for short runs and
specialty envelopes. Because of the height of the paper stack,
the dimensions for die cut envelopes tend to vary.
Web-Fed Envelopes
When web-fed envelopes are manufactured, a large roll of
paper called a web is fed into a machine where it is cut,
printed, glued, folded, and in some cases, a panel is cut out
and a window patch is added.
This process is generally used for large volume runs of envelopes. The quality of web-fed envelopes tends to be more
consistent compared to die-cut envelopes and is the preferred type.
DocuMatch™ Mail Materials Reference Guide
4-3
Page 33

4 • Envelopes
Envelope Style
Within the two basic envelope types (die-cut or web-fed) there
are several different envelope styles: commercial, side seam,
and executive. The commercial style envelope is by far the
most popular, followed by executive, then by side seam. For
DocuMatch use, side seam envelopes work best (see pages
4-10 and 4-12).
Envelope Curl
Envelope curl or twist (caused by improper storage or
handling) should not exceed 1/4 in. at any one corner
when the envelope is placed on a flat surface. Total com-
bined envelope curl (at the corners or in the body of the
envelope) should not exceed 3/8 in.
The flap must not exceed 1/8 in. curl.
Envelopes that have a curl at more than one location can
cause poor envelope feeding. Refer to Figure 4-1 on page
4-5.
Folds, especially along the bottom edge of the envelope,
should be crisp and uniform.
Executive and commercial envelopes are more susceptible
to curl because the grain direction is diagonal. That is why
side seam envelopes are preferable.
4-4
DocuMatch™ Mail Materials Reference Guide
Page 34

Curled Flap
Curling should not exceed 1/4" (6.4 mm) at any location.
Figure 4-1
Envelope curling can cause problems
Envelopes • 4
DocuMatch™ Mail Materials Reference Guide
4-5
Page 35

4 • Envelopes
Window Envelopes
Window envelopes come in different types and raise different
issues. The types used are open-face, glassine, DWF (Dow
Window Film
An envelope may have a window or be open-face (without a
patch). A patch is a transparent covering that is placed over
the window from the inside. Three different patch materials
are available for window envelopes.
Glassine This patch material is the most opaque and has
™
) and Trycite™.
rarely been used over the past 10 years. When
the glassine window (a paper product) is glued
to the envelope, both surfaces become wet.
They do not dry at the same rate. This results in
wrinkling and puckering of the patch. Since
glassine is a paper product, it is recyclable.
DWF Dow Window Film
(DWF) is by far the most
popular window patch. It will allow for scanning
readability while providing a measure of
security. By security, we mean if someone tries
to examine the contents of the envelope
through the window, the patch material will
cloud their vision. Readability is excellent only
when material is held against the patch
material. DWF is a petroleum, not paper-based
product, and does not wrinkle or pucker during
the drying process. Because it is petroleumbased, it is not recyclable like paper. DWF is
sometimes referred to as “Poly-Klear.”
Trycite This type of patch material is usually on
expensive, high grade envelopes. Readability
by post office scanning equipment is poor due
to the reflectiveness or glare of this patch
material. Trycite is also called cellophane or
“Krystal-Klear.”
4-6
DocuMatch™ Mail Materials Reference Guide
Page 36

Envelopes • 4
When using window envelopes, be sure they are made for
machine insertion. The patch has to be securely glued onto
the inside body of the envelope 1/8 in. over the edges of the
window opening. This helps the collated set to be inserted
cleanly without the edges of the material being caught by a
poorly glued window patch. An open-face envelope (no
patch) cannot be used on the DocuMatch
of a standard window envelope is shown below.
Standard Window Dimensions
Here is the industry standard for window dimensions (Figure
4-2).
• 1-1/8 in. high
• 4-1/2 in. wide
• 7/8 in. from left edge
• 1/2 in. from bottom edge (must be 5/8 in. for DocuMatch)
system. A figure
5/8"
Figure 4-2
The standard for window envelopes to be used with DocuMatch
DocuMatch™ Mail Materials Reference Guide
4-7
Page 37

4 • Envelopes
Envelope Seal Flap and Gum
Mechanical sealing requires seal flap gum that is uniform and
adheres quickly and firmly when moistened. To prevent the
inserting operation from pulling the envelope apart, the seams
must also be securely glued.
Any inserting machine will jam if there is even the slightest tendency for the seal flap to adhere to the envelope's
back. On many styles of envelopes, the seal flap gum is the
first adhesive applied, and it is dried before the envelope goes
through the folding and seam gumming process. During the
manufacturing of die-cut envelopes, for instance, the envelope does not go through another drying process. This translates to the seam gum being damp when the envelopes are
packed into boxes. The compression of the envelopes in the
boxes may cause the damp seam gum to remoisten the seal
flap gum, which in turn, may cause the flap to tack. This chain
of events can cause problems during the insertion process.
When you are ordering envelopes from your business forms
vendor or supplier, you should make it clear that you require
envelopes designed for automatic insertion. A knowledgeable
vendor should be able to review the DocuMatch
requirements in this chapter and supply you with the kinds of
envelopes that will optimize your DocuMatch mail jobs.
envelope
Storage
Because of the glue used in their construction, proper storage
is especially important for envelopes. If they become too dry,
some envelopes will develop curled flaps, which can cause
flap opening problems. Too much moisture can cause envelopes to warp or curl excessively, which can cause feeding
problems. Always store envelopes in closed boxes until ready
for use. It is best to remove the envelopes from the
DocuMatch™ hopper and return them to a box if you know the
system will be idle for several hours or overnight.
4-8
DocuMatch™ Mail Materials Reference Guide
Page 38

Envelopes • 4
Loading Tips
Always follow the envelope loading instructions on the envelope printer carefully. When you load envelopes correctly, the
back of the stack in the hopper will be smooth, with a smooth
curve near the bottom of the hopper directed toward the
printer, and no sudden offsets in the stack.
DocuMatch™ Mail Materials Reference Guide
4-9
Page 39

4 • Envelopes
Envelope Guidelines for DocuMatch
Envelope Style and Type for DocuMatch
For optimum DocuMatch performance, we recommend you
use high quality, web-fed, side seam envelopes designed for
automatic insertion. You may also use commercial style or
executive style, but side seam is preferable.
Make sure the flap and throat dimensions comply with our
published specifications (see Figure 4-3 on page 4-11).
For optimum DocuMatch performance, printed (non-window)
envelopes work best. If you are using window envelopes,
make sure they comply with our DocuMatch window envelope
requirements (see Figure 4-2 on page 4-7 and Table 4-2 on
page 4-12).
Envelope Size and Weight for DocuMatch
The envelope printer handles only #10 size envelopes
(9-1/2 x 4-1/8 in. ± 1/16 in.). Envelopes with a basis weight of
24 pounds work best, but you can use 28-pound envelopes
also. Lighter weight envelopes tend to cause problems in the
envelope transport.
Refer to Figure 4-3 on the following page for an illustration of
the DocuMatch specifications for #10 envelope dimensions.
4-10
DocuMatch™ Mail Materials Reference Guide
Page 40

Envelopes • 4
#10 Envelope Specifications for DocuMatch
Figure 4-3
DocuMatch specifications for #10 envelope dimensions
DocuMatch™ Mail Materials Reference Guide
4-11
Page 41

4 • Envelopes
Table 4-2
Envelope Materials Reference
Source Minimum Requirements Performance Tips
Envelope
Printer
• Use only #10 size
(4-1/8 x 9-1/2").
• Dimensions from
envelope to envelope
should not vary more
than ± 1/16".
• 24-28 lb. bond basis
weight
• Guidelines for curl:
» 1/4" curl maximum
on any one corner
» 3/8" combined curl
maximum for entire
envelope
» 1/8" curl maximum
on flap
• Guidelines for
window:
» 1-1/8" high
» 4-1/2" wide
» 7/8" from left edge
of envelope
» 5/8" from bottom
edge of envelope
• Avoid weights less
than 24 lb. bond.
• Web-fed preferred
over die-cut.
• Side seam better than
diagonal seam.
• Side seam preferred
over executive or
commercial.
• Avoid recycled
materials.
• Window envelopes
may be used, but any
window material must
be secured with no
loose edges.
• Do not use open-
faced window
envelopes.
4-12
DocuMatch™ Mail Materials Reference Guide
Page 42

Chapter 5
Cut Sheet Feeder Material
In this chapter:
Cut Sheets for DocuMatch™............................................5-2
Grain Orientation.........................................................5-2
Glossy Materials.........................................................5-2
Static Charge..............................................................5-2
Loading Tips...............................................................5-3
What to Watch For.....................................................5-3
Cut Sheet Feeder Materials Reference Table.............5-4
..
5-1
Page 43

5 • Cut Sheet Feeder Material
Cut Sheets for DocuMatch
The DocuMatch cut sheet feeders are designed to work
reliably with a wide range of materials, including 20- or 24pound Xerographic bond paper and 50- to 80-pound coated
and uncoated offset paper, with a variety of finishes. There
are, however, some materials and storage conditions that can
cause problems.
™
Grain Orientation
When you order offset printed materials for use in the DocuMatch, be sure to specify grain long orientation for the printed
sheets. Grain long paper feeds better because it's stiffer in the
direction of the feed. If you have feeding problems, check the
grain direction as described in Chapter 3, pages 3-3 through
3-4.
Glossy Materials
Spot varnished materials generally work well, but glossy stock
with varnish covering the whole sheet is sometimes so slippery that it causes problems in the folder.
Static Charge
Materials with a high static charge can cause feeding problems. This usually occurs when humidity is very low. If you
find that sheets tend to stick to each other and you can’t
correct the problem by aerating the paper stack, the static
charge is probably too high for reliable feeding. You may have
to operate the DocuMatch in a controlled environment. Sometimes the addition of a release agent (such as talc) in the
manufacturing process of the cut sheets helps to reduce
static problems.
5-2
DocuMatch™ Mail Materials Reference Guide
Page 44

Cut Sheet Feeder Material • 5
Loading Tips
• When loading the cut sheet feeders, start by pushing any
materials already in the feeder square against the feeder’s
left stop.
• Fan the new materials and load them so that the whole
stack is square against the left stop. Make sure you load
the newer materials under the older materials.
• Do not fill the feeders above the indicated line.
• Do not mix materials within a tray.
What to Watch For
• Highly-charged (static) materials
• Curled or dog-eared materials
• Damaged materials
• Very high or very low humidity conditions
• Photocopied material
NOTE: The most difficult applications seem to be photocopied material, due to residual static charge and curl.
Allowing photocopied materials to “rest” for several hours
and then carefully fanning the materials often helps.
• Do not use paper run through a laser printer. Such sheets
will have a tendency to curl due to the nature of the print
generated by the laser printer.
DocuMatch™ Mail Materials Reference Guide
5 -3
Page 45

5 • Cut Sheet Feeder Material
Table 5-1
Cut Sheet Feeder Materials Reference
Source Minimum Requirements Performance Tips
Cut
Sheet
Feeder
(Flat
Sheets)
• 8-1/2 x 11"
• Xerographic copy
paper 20-32 lb. bond
• 60-80 lb. offset
• Grain long
• 3/8" curl maximum
• Dimensional tolerance
is ± 1/32"
• Glossy materials may
be used but must not
be statically charged.
• Materials that are
varnished on both
sides and are very
slick must be tested
first.
• Avoid recycled
materials.
• Heavier materials may
not perform as well.
Test them first.
• The fourth sheet of a
four-page document
cannot be a 50 lb. or
60 lb. cut sheet.
• Do not use laser-
printed paper.
5-4
DocuMatch™ Mail Materials Reference Guide
Page 46

Chapter 6
Insert Feeder Material
In this chapter:
Inserts and Business Reply Envelopes............................6-2
Loading Tips...............................................................6-2
Insert Feeder Materials Reference Table....................6-3
6-1
Page 47

6 • Insert Feeder Material
Inserts and Business Reply Envelopes
The insert feeder accepts materials ranging from 3 x 5 in.
(a minimum-size postcard) to #9 envelopes (3-7/8 x 8-7/8
in. ± 1/16 in.). You can also use C-folded 8-1/2 x 11 in.
sheets that have the same material characteristics as
those specified for the cut sheet feeders. Cards can range
in thickness from 0.007 to 0.0095 in. Envelopes can be
24- to 28-pound bond and should be loaded with the flaps
up and to the left.
Loading Tips
To load the insert feeder:
1. Push the paddle to the left and place the materials
vertically in the feeder.
2. Make sure all the materials are to the left of the tabs at
the bottom right-hand end of the feeder.
3. Adjust the side guides so that they rest gently on the
sides of the materials, leaving a gap of about 1/16 in.
(about the thickness of a dime).
4. If the tray is not full, slide the paddle to the right to
support the materials. Be careful not to overfill the tray
or push the paddle too hard against the stack. If the
materials are packed in too tightly, the first several
pieces won't feed reliably.
6-2
DocuMatch™ Mail Materials Reference Guide
Page 48

Insert Feeder Material • 6
Table 6-1
Insert Feeder Materials Reference
Source Minimum Requirements Performance Tips
Insert
Feeder
Pre-folded Inserts (C-fold,
1/3 size):
• 3 x 5" to 3-7/8 x
8-7/8"
• 20 lb. bond
• 24 lb. bond
• 50-80 lb. coated offset
• 50-70 lb. uncoated
offset
• 80 lb. uncoated offset,
smooth
BREs:
• #9 standard envelopes
(3-7/8 x 8-7/8")
• Check size
(3-5/8 x 8-5/8")
• 24-28 lb. bond, all
types, smooth, glossy,
or flat
Pre-folded Inserts (C-fold,
1/3 size):
• Do not use Z-fold
material.
• Material that is highly
varnished will
contaminate the feed
belts.
• Do not use light-weight
inserts less than 16 lb.
• Do not use any inserts
with significant curl.
BREs:
• Closed flap with or
without window
• You may also use
#8-5/8 and #7 BREs.
Postcards:
Postcards:
• As above (includes
7-point reply)
• Thickness range:
(0.007" to 0.0095")
DocuMatch™ Mail Materials Reference Guide
6-3
Page 49

Page 50

Chapter 7
Document Printer Preventive Maintenance and Toner Usage
In this chapter:
Scheduled Printer Preventive Maintenance.....................7-2
Toner Yield........................................................................7-2
Setting the Print Resolution to 300 DPI......................7-3
Setting the Print Darkness to Lighter or Lightest........7-3
Turning Toner Saver On..............................................7-4
Page Coverage...........................................................7-4
Replica of Sample Page Showing 5%
Print Coverage............................................................7-6
..
7-1
Page 51

7 • Document Printer Preventative Maint & Toner Usage
Scheduled Printer Preventive Maintenance
For a DocuMatch
™
equipped with a Lexmark
printer’s operator panel displays the message 80 Scheduled
Maintenance at each 250,000 page count interval. When this
occurs, call Pitney Bowes to perform preventive maintenance
on your printer.
For a DocuMatch equipped with a Canon™ printer, at each
200,000 page interval you must contact Pitney Bowes to have
a Customer Service Representative perform preventive
maintenance on your printer.
™
printer, the
Toner Yield
If you have the Lexmark printer version of DocuMatch, you
can achieve maximum toner yield by:
• setting the DocuMatch print resolution to 300 DPI;
• setting the print darkness to Lighter or Lightest;
• turning toner saver ON.
Refer to the steps listed on pages 7-3 and 7-4 to learn how to
make these adjustments.
7-2
DocuMatch™ Mail Materials Reference Guide
Page 52

Document Printer Preventative Maint & Toner Usage • 7
Setting Print Resolution to 300 DPI for a DocuMatch with Lexmark Printer
1. Check that the Lexmark printer operator panel displays
Ready.
2. Press the right Menu button until QUALITY MENU
appears.
3. Press the Select button.
4. Press the right Menu button until QUALITY MENU Print
Resolution appears.
5. Press the Select button.
6. Press the right or left Menu button to lower Print
Resolution to 300 dpi.
7. Press the Select button. The operator panel briefly
displays Print Resolution SAVED, then displays QUALITY
MENU Print Resolution.
8. Press the Return button twice to return to Ready.
Setting Print Darkness to Lighter or Lightest for a DocuMatch with Lexmark Printer
1. Check that the Lexmark printer operator panel displays
Ready.
2. Press the right Menu button until QUALITY MENU
appears.
3. Press the Select button.
4. Press the right Menu button until QUALITY MENU Print
Darkness appears.
5. Press the Select button.
6. Press the right or left Menu button to lower Print Darkness
as you wish: Darkest, Darker, Normal, Lighter, Lightest.
7. Press the Select button. The operator panel briefly
displays Print Darkness SAVED, then displays your new
default Print Darkness setting, for example, PRINT
DARKNESS=Lighter.
8. Press the Return button twice to return to Ready.
DocuMatch™ Mail Materials Reference Guide
7-3
Page 53

7 • Document Printer Preventative Maint & Toner Usage
Turning Toner Saver ON for a DocuMatch with Lexmark Printer
1. Check that the Lexmark printer operator panel displays
Ready.
2. Press the right Menu button until QUALITY MENU
appears.
3. Press the Select button.
4. Press the right Menu button until QUALITY MENU Toner
Saver appears.
5. Press the Select button.
6. If the operator panel displays Toner Saver=On, press the
Return button twice to return to Ready. Disregard the
remaining steps.
7. If the operator panel displays Toner Saver=Off, press the
right Menu button until Toner Saver=On appears.
8. Press the Select button. The operator panel briefly
displays Toner Saver SAVED, then QUALITY MENU Toner
Saver.
9. Press the Return button twice to return to Ready.
Page Coverage
Toner yield for the document printer is greatly affected by the
amount of page coverage on a particular document. In the
Lexmark version of DocuMatch, the 17,600-page yield is
based on 5% coverage. There are many other variables
(including the type of image on the page) that cause this yield
to vary by as much as ± 20%.
As of now, there is no commonly accepted industry standard
by which to measure cartridge yield. Manufacturers are
working to create a standard in the near future.
Table 7-1 lists estimated toner yield ranges in relation to page
coverage for a DocuMatch with Lexmark printer model
Optra S™.
7-4
DocuMatch™ Mail Materials Reference Guide
Page 54

Document Printer Preventative Maint & Toner Usage • 7
Table 7-1
Estimated Toner Yield
Coverage Nominal Min Max
5.0% 17,600 14,960 20,240
5.5% 16,000 13,600 18,400
6.0% 14,667 12,467 16,867
6.5% 13,538 11,508 15,569
7.0% 12,571 10,686 14,457
7.5% 11,733 9,973 13,493
8.0% 11,000 9,350 12,650
8.5% 10,353 8,800 11,906
9.0% 9,778 8,311 11,244
9.5% 9,263 7,874 10,653
10.0% 8,800 7,480 10,120
Estimated toner yield in relation to page coverage for a DocuMatch with
Lexmark printer model Optra S.
Note:
• A cartridge is considered to have reached end-of-life after
it has been removed, shaken, and reinstalled at Toner Low
notification 3 times.
• The estimates in Table 7-1 are for text-only documents.
Graphics will lower the yields by as much as 10%.
• Switching to Toner Saver mode can increase yield by as
much as 20%.
• Remember the yield is number of prints! If a mailpiece has
two pages, the yield for mailpieces is half. If you use the
duplex function, the number of mailpieces is half.
Figure 7-1 on the following page shows a reduced replica of
an 8-1/2 x 11 in. sample printed page with 5% coverage.
DocuMatch™ Mail Materials Reference Guide
7-5
Page 55

7 • Document Printer Preventative Maint & Toner Usage
INTEROFFICE MEMORANDUM
TO: Cathy Jones
FROM: Michael Smith
SUBJECT: The Typical Printed Page
DATE: 10/11/2000
What does the typical printed document look
like? Well, across the diverse business community it
would be impossible to capture all aspects of printing
style within a single page document. However, if
attention is focused on the majority of printing volume,
text and simple business graphics would stand out
as the most prevalent output from laser printers. This
sample memo represents a reasonable example of
the typical business document.
This memo covers approximately 5% of a letter or A4-sized piece of paper. This
number (5%) has historically been called the “average” page coverage by laser printer
manufacturers. It may seem to the naked eye that there is much more than 5%, but in fact,
alphanumeric characters rely on a large portion of white space for their composition.
There are many factors that can influence the actual page coverage of a document
as well as the page-yield of a toner cartridge. Testing parameters such as font size and
style, internal printer settings, print environment, paper stock, sample size, job length and
criteria for determining “end-of-life”, can all influence how long a toner cartridge will last.
The best competitive analysis of printer page yield should occur under similar conditions
using industry standards for the variables listed above.
Figure 7-1
Reduced replica of an 8-1/2 x 11" sample page with 5% page coverage
7-6
DocuMatch™ Mail Materials Reference Guide
Page 56

Chapter 8
General Machine Preventive Maintenance
In this chapter:
System Preventive Maintenance......................................8-2
General........................................................................8-2
Maintenance Log........................................................8-2
Pre-Service System Check with Remote
Diagnostics..................................................................8-3
System Preventive Maintenance Schedule................8-4
8-1
Page 57

8 • General Machine Preventive Maintenance
System Preventive Maintenance
General
To ensure smooth, trouble-free operation of your
DocuMatch™, we recommend you review the information
outlined in this chapter and familiarize yourself with the System Preventive Maintenance Schedule (Table 8-1, page 8-4).
This schedule lists procedures performed at various intervals
by your Pitney Bowes Customer Service Representative.
Periodically monitor your DocuMatch cycle count. To determine your current cycle count:
1. Press the following options on the control panel:
System Options/More/System Counters/Display Counter.
2. Press Next or Previous to navigate to the desired cycle
count: Machine Cycles, Insert Fdr Cycles, Top Cut Sheet
Cycles, Bot Cut Sheet Cycles, Env Ptr Cycles.
Following the guidelines in the System Preventive Maintenance Schedule, contact your Pitney Bowes Customer Service Representative at the appropriate intervals to request the
necessary scheduled maintenance. You can also contact
Pitney Bowes if your system is operating at a reduced efficiency.
The amount of preventive maintenance for your DocuMatch
system will vary significantly depending on the types of paper
you use.
Maintenance Log
The maintenance log is located inside the right-hand door of
the DocuMatch. It is maintained by your Pitney Bowes Customer Service Representative, who records all actions by date
and cycle count.
8-2
DocuMatch™ Mail Materials Reference Guide
Page 58

General Machine Preventive Maintenance • 8
Pre-Service System Check with Remote Diagnostics
All DocuMatch systems are equipped with remote diagnostic
capabilities. Through Remote Diagnostics, Pitney Bowes can
quickly diagnose obscure problems and provide you with
fixes you can download. To use this feature, you need to have
an analog phone line connected to your DocuMatch (we
recommend a dedicated line). This feature is provided to you
at no cost except for the phone line.
To request a remote diagnosis of your DocuMatch:
1. Make sure that all the system feeders are loaded.
2. Generate a test piece using the DocuMatch control panel
(System Options/Print Demo Piece), or run a 10-piece job
from your host computer using all the feeders.
3. Note the system serial number.
4. Call the Pitney Bowes Technical Operations Center at
1-800-253-6565* and ask for a “Remote Diagnostic
Analysis” of your DocuMatch system.
The Technical Operations representative will call into the
analog phone line connected to your DocuMatch system to
obtain system data and other specific information. This data
will be used to analyze the configuration of the system and to
check for obvious system problems.
When Remote Diagnostics is complete, the Technical Operations representative will give you the results and provide
additional instructions and trouble-shooting assistance, or
may dispatch a Pitney Bowes Customer Service Representative if necessary.
*(Monday through Friday, 8AM-8PM, ET)
DocuMatch™ Mail Materials Reference Guide
8-3
Page 59

8 • General Machine Preventive Maintenance
Table 8-1
System Preventive Maintenance Schedule
Subsystem or Area
Pre-Service System
Check
Document Printer
(Lexmark™)
Document Printer
(Canon™)
Envelope Feeder/
Printer Rollers
Cut Sheet Feeders
Insert Feeder Belts
and Rollers
Main Drawer
Assembly
Cycles Between
Variable
250,000
200,000
50,000/300,000
When dusty
When worn or very
dusty
When very dusty
Remarks
Run as required to
verify system.
Install PM kit for
Lexmark.
Install PM kit for
Canon.
Turn/replace retard
rollers.
Remove paper dust.
Clean or replace
staging belts and
rollers (water only).
Clean dust, paper
fragments. Check all
main drawer
functions.
Main Drawer
Assembly
8-4
200,000 or when
skewing, jamming,
or improper folding
of paper is determined to be caused
by worn urge roller
tires
Replace urge roller
tires.
DocuMatch™ Mail Materials Reference Guide
Page 60

Appendix A
Introduction to Paper
In this appendix :
How Paper Is Made.........................................................A-2
Paper Characteristics.......................................................A-4
Moisture......................................................................A-4
Wire and Felt Sides (of a Sheet of Paper)...................A-5
Surface Coating or Finish..........................................A-5
Body or Strength of Material......................................A-5
Understanding Paper Ream Labels.................................A-6
A-1
Page 61

A • Introduction to Paper
How Paper Is Made
Both the letter to be folded (material or inserts), and the
envelope into which it is inserted, are generally made of
paper. Most paper is made from wood pulp. However, other
sources of cellulose fiber such as certain grasses, cotton,
hemp, and jute are also used for manufacturing paper. In
addition, recycled paper is increasingly being used in bond
paper and envelopes (but recycled materials are not recommended for use with DocuMatch
overall quality of paper in the folding/inserting process, since
paper characteristics can affect the production process.
The ingredients that make up paper are ground up, bleached,
cooked, strained, and mixed with water and other chemicals
to form a syrup-like mixture. This mixture is poured onto a
conveyer belt consisting of a fine wire cloth. Some of the
water drains through the wire cloth by gravity or is pulled
through by vacuum. The conveyer then passes under a set of
felt rollers that press more moisture through the wire cloth as
though it were a sieve (Figure A-1).
™
). What is important is the
Figure A-1
How paper is made
A-2
DocuMatch™ Mail Materials Reference Guide
Page 62

Introduction to Paper • A
Left on the wire cloth is a thin sheet of fibers that, when dried
and given a finish, becomes paper. The fibers in the sheet are
crisscrossed in all directions. Because of the motion of the
conveyer, however, most of the fibers align themselves along
the direction of the sheet motion. This alignment of fibers
gives paper its grain.
There are two sides to a sheet of paper – the wire side and the
felt side (Figure A-2). The wire side is the side next to the wire
cloth. Generally more fibers are found on the wire side of a
sheet of paper. Because the fibers tend to hang through the
mesh, the wire side tends to have a rougher finish than the felt
side. The felt side, as you might expect, is the side next to the
felt rollers. It is the smoother side of a sheet of paper and is
the side printed on (and the first side printed on when in
duplex mode). You can determine which is the felt side and
which is the wire side by examining both sides of a sheet of
letterhead paper closely.
Figure A-2
The two sides of a sheet of paper
DocuMatch™ Mail Materials Reference Guide
F400_024
A-3
Page 63

A • Introduction to Paper
Paper Characteristics
There are several paper characteristics that can prevent your
application from being an accurate and productive process.
The paper characteristics listed below have a direct affect on
the folding/inserting process.
• Moisture
• Wire and felt sides (of the paper)
• Surface coating or finish
• Body or strength of material
Moisture
As paper is rolled, it has a moisture content of about 92-94%
pulp and 6-8% water. Moisture content can change due to
local atmospheric conditions. On rainy days, paper will tend
to absorb more moisture, while on dry days it will tend to lose
moisture. This process causes the paper to swell or shrink
depending on the condition. Consequently, two identical
reams of paper stored under different conditions of humidity
can be two different sizes when the time comes for folding
and inserting.
Laser-printed material can also affect reliability because laser
printing tends to dry paper out excessively. Dry paper is more
prone to curl and accumulates static charges more readily.
Laser printing also hardens the paper due to pressure. Both
the dryness and hardening of paper will change its folding and
feeding characteristics.
A-4
DocuMatch™ Mail Materials Reference Guide
Page 64

Introduction to Paper • A
Wire and Felt Sides
Having felt and wire sides, combined with its ability to hold
moisture, can make paper very susceptible to curl. The wire
side has more fibers exposed than the felt side. This causes
the wire side to absorb and lose moisture at a faster rate than
the felt side. As it loses moisture, it shrinks faster and curls
toward the wire side.
As an example, on a normal day, the paper may lay flat on a
table. The next day may be very dry and the paper would take
an upward curl. The day after, wet weather would cause the
paper to take a downward curl. All of these characteristics
could have an adverse affect in feeding paper.
Surface Coating or Finish
The amount of sizing and finish applied to paper must be
given consideration. Glossy finish paper is usually more
difficult to separate by the rubber covered rollers than flat
finish paper. If you will be using glossy paper in your application, give samples to your Pitney Bowes specialist for testing
just to be sure it is suitable for the machine (in most cases it
will not be a problem if a release agent was used in the manufacturing process).
Body or Strength of Material
The body of the paper can also affect the folding operation.
Paper that is loose, openly-fibered, and contains no sizing
(such as news print, chemically treated, or onion skinned
paper), could burst when gripped by the rollers within the
folding module. Close-fibered and treated paper, such as
writing paper, has more strength, thereby making the bursting
point much higher. Lack of body may cause misfolds and
stalls in the folder.
Other Characteristics
Refer to Chapter 3 for information on recycled paper, paper
weights, and paper graIn.
DocuMatch™ Mail Materials Reference Guide
A-5
Page 65

A • Introduction to Paper
Understanding Paper Ream Labels
In a ream (500 sheets) of paper, an arrow on the label usually
indicates the felt side, while the bottom side is the wire side
(paper reams are normally shipped felt side up). Information
generally marked on the outside wrapper of a ream includes:
• type (bond, offset, bristol, ledger, tissue, etc.);
• size (dimensions);
• weight;
• color and finish;
• long grain (aligned along the longest dimension) or short
grain (aligned along the shortest dimension). The dimension (length or width) which is underlined on the ream
label indicates the direction of the grain. In Figure A-3
below, note the length (11 in.) is underlined, thereby
indicating the paper is grain long.
Underlined Length
Felt Side
Indicates Grain Long
Wire Side
Figure A-3
Understanding paper ream labels
A-6
DocuMatch™ Mail Materials Reference Guide
GRAIN LONG
FIRST
Page 66

Appendix B
Collation Total Thickness Limits
In this appendix :
Total Thickness Limits..............................................B-2
Total Thickness Worksheet......................................B-2
B-1
Page 67

B • Collation Total Thickness Limits
Total Thickness Limits
For reliable inserting, the total thickness of the collation to be
inserted into the envelope must be limited to 0.060 in. You
can estimate the thickness using the worksheet in Table B-1.
Table B-1
Collation Total Thickness Worksheet
Material thickness factors (shown in gray shaded areas):
Document printer paper: 20# 24#
bond paper 12 14
Cut sheet feeders
bond paper same as doc. printer paper above
offset book paper 50# 60# 70# 80#
Coated Gloss 8* 9* 11 12
Coated Dull 10 11 12 14
Uncoated 12 14 16 18
* not recommended
Insert feeder 20# 24# 28#
Business Reply Envelope 12 14 16
Tri-folded insert Use cut sheet value
Business Reply Card 10
Folded brochure Use thickness in 0.001 in.
Envelope Content Thickness Evaluation:
Folded portion (4 sheets max.) Pages x Factor = Total
Laser printed sheets _____ _____ _____
1st Cut Sheet (0 or 1) _____ _____ _____
2nd Cut Sheet (0 or 1) _____ _____ _____
Insert _____
Total thickness (must be less than or equal to 60) _____
B-2
DocuMatch™ Mail Materials Reference Guide
Page 68

Index
I-1
Page 69

Index
Index
A
Aerating Paper Before
Loading 3-6
B
Body or Strength of Paper
Material A-5
Business Reply Envelopes
(BREs)
Minimum Requirements
2-5, 2-6, 6-3
Performance Tips 2-5,
2-6, 6-3
C
C-Fold
and Loading Sheets in
Insert Feeder 6-2
Cards
in Insert Feeder 6-2
Cellophane Window
Envelopes. See
Envelope: Window
Envelopes: Trycite™
Climate
Extreme Climate and Mail
Materials 2-3
Collation
Total Thickness Limits
2-6, B-2
Total Thickness Worksheet
B-2
Commercial Envelopes 4-4
Curl
High Curl in Cut Sheets
5-3
Paper Curl A-4, A-5
Cut Sheet Feeder
Materials
Minimum Requirements
5-4
Performance Tips 5-4
Minimum Requirements
2-4
Performance Tips 2-4
Cut Sheet Folder
Problems Caused by
Glossy Materials 5-2
Cut Sheets 5-2
Feeding Problems
Static Charge 5-2
Glossy Materials
Spot Varnished Materials
5-2
Varnish Covering Whole
Sheet 5-2
Grain Orientation
Grain Long 5-2
High Curl 5-3
Loading 5-3
Photocopied Materials 5-3
What to Watch Out for 5-3
D
Die-Cut Envelopes 4-2
Document Printer (Laser
Printer)
Paper. See Paper: for
Document Printer
I-2
DocuMatch™ Mail Materials Reference Guide
Page 70

Index
Scheduled Preventive
Maintenance 7-2, 8-4
Dry Environment
and Storage of Mailing
Materials 2-3
Duplex Function (Lexmark™
Printer) 3-6, 3-7
E
Envelope
Flap 4-8
Flap Gum 4-8
Grain Direction
Diagonal 4-4
in Insert Feeder 6-2
Loading 4-9
Materials Reference Table
4-12
Open-Face (Open-Window)
4-7
Quality 4-2
Seam 4-8
Size
General 4-10
Trade Numbers with
Dimensions 4-3
Specifications
#10 Envelope for
DocuMatch 4-11
Storage 4-8
Style
Commercial 4-4
Executive 4-4
Side Seam 4-4
Type
Die-Cut 4-2
Web-Fed 4-3
Weight 4-10
Window Envelopes
Dow Window Film™ 4-6
Glassine 4-6
Standard Window
Envelope 4-7
Trycite™ 4-6
Envelope Printer
Minimum Requirements
2-4
Performance Tips 2-4
Environmental Conditions
and Mail Materials 2-3
Executive Envelopes 4-4
F
Fanning Paper Before
Loading 3-6
Felt Side of Sheet of Paper
A-3, A-5, A-6
Finish or Surface Coating of
Paper A-5
Flap
Curl Limits 4-4
Seal Flap 4-8
Seal Flap Gum 4-8
Flat Sheets. See Cut Sheet
Feeder
Flexing Paper Before Loading
3-7
Folder
Cut Sheet Folder
Problems Caused by
Glossy Materials 5-2
G
General Machine Preventive
Maintenance 8-2
Glossy Finish Paper A-5
DocuMatch™ Mail Materials Reference Guide
I-3
Page 71

Index
Grain
Grain Direction
Caused by Alignment of
Fibers A-3
Grain Long 3-3, 3-5
Grain Short 3-3, 3-9
Methods for Determining
3-3
Overview 3-3
Gum
Seal Flap Gum 4-8
Seam Gum 4-8
H
Hardening of Paper A-4
Humidity
and Storage of Mailing
Materials 2-2
I
Insert Feeder
Belt and Rollers
and Dust Problems 8-4
Loading 6-2
Materials 6-2
Minimum Requirements
6-3
Performance Tips 6-3
Materials Reference Table
6-3
Minimum Requirements
2-5, 2-6
Performance Tips 2-5, 2-6
Preventive Maintenance
8-4
Inserts
Business Reply Envelopes
(BREs)
Minimum Requirements
2-5, 2-6, 6-3
Performance Tips
2-5, 2-6, 6-3
Postcards
Minimum Requirements
2-5, 2-6, 6-3
Performance Tips
2-5, 2-6, 6-3
Pre-Folded
Minimum Requirements
2-5, 2-6, 6-3
Performance Tips
2-5, 2-6, 6-3
K
Krystal-Klear Window
Envelopes. See
Envelope: Window
Envelopes: Trycite™
L
Lacquer Coated Paper 3-9
Laser Printer. See Document
Printer
Loading
Envelopes 4-9
Paper for Document Printer
Aerating (Fanning) 3-6
Caution 3-7
Flexing 3-6
M
Mail Materials
Definition 2-2
DocuMatch™ Mail
Materials Reference Table
2-4, 2-5, 2-6
I-4
DocuMatch™ Mail Materials Reference Guide
Page 72

Index
Cut Sheet Feeder (Flat
Sheets) 2-4
Envelope Printer 2-4
Insert Feeder 2-5, 2-6
Laser Printer 2-4
Handling 2-2
Locally-Manufactured
Materials 2-3
Not Suitable for
DocuMatch 2-7
Rotation of Stock 2-3
Storage 2-2
Dry Environment 2-3
Humidity 2-2
Masonry Walls 2-3
Moisture 2-2, 2-3
Stacking Boxes and
Cartons 2-3
Static Accumulation 2-3
Temperature 2-2
Main Drawer Assembly
Dust Problems 8-4
Preventive Maintenance
8-4
Skewing, Jamming, or
Improper Fold 8-4
Maintenance Log 8-2
Masonry Walls
and Storage of Mailing
Materials 2-3
Microperf
Document Printer Paper
2-4, 3-8
Moisture
and Storage of Mailing
Materials 2-2, 2-3
Moisture-proof Wrappers
and Paper for Document
Printer (Laser Printer) 3-6
O
Offset Printer Paper 3-5
Onion Skinned Paper A-5
Open-Face Envelope 4-7
Operator Panel
Messages
80 Scheduled
Maintenance 7-2
P
Page Coverage
Sample Page with 5%
Page Coverage 7-6
Toner Yield 7-4
Paper
Characteristics
Body or Strength of
Material A-5
Moisture A-4
Surface Coating or Finish
A-5
Wire and Felt Sides A-5
Curl A-4, A-5
Document Printer (Laser
Printer)
Grain Long 3-3, 3-5
Grain Short 3-3, 3-9
Lacquer Coated 3-9
Loading Tips 3-6
Methods for Determining
Grain 3-3
Microperf 3-8
Minimum Requirements
3-5
Offset Printer Paper 3-5
Overview 3-3
Perforated 3-8
Perforated Stock
DocuMatch™ Mail Materials Reference Guide
I-5
Page 73

Index
Specifications 3-8
Performance Tips 3-5
Recycled 3-2, 3-9
Storage Tips 3-6
Weights of Paper 3-2
Xerographic Paper 3-5
Finish or Surface Coating
A-5
Glossy Finish A-5
Hardening A-4
Onion Skinned A-5
Ream of Paper 3-2, A-6
Understanding Paper
Ream Labels A-6
Surface Coating or Finish
A-5
Two Sides of a Sheet
Felt Side A-3
Wire Side A-3
Patch
In Window Envelopes
4-6, 4-7
Perforated Stock
Specifications 3-8
Photocopied Material
and Cut Sheet Feeders 5-3
Pitney Bowes Technical
Operations Center 8-3
Poly-Klear Window
Envelopes. See
Envelope: Window
Envelopes: Dow Window
Film™ (DWF)
Postcards
in Insert Feeder 6-2
Minimum Requirements
2-5, 2-6, 6-3
Performance Tips 2-5,
2-6, 6-3
Pre-Folded Inserts
Minimum Requirements
2-5, 2-6
Performance Tips 2-5, 2-6
Pre-Service System Check
with Remote Diagnostics
8-3
Preventative Maintenance
Document Printer 7-2
System
General 8-2
Maintenance Log 8-2
Pre-Service System
Check 8-3
Remote Diagnostics 8-3
Test Piece 8-3
Print
Darkness
Adjusting Lexmark™
Printer 7-3
Resolution
Adjusting Lexmark™
Printer 7-3
R
Ream of Paper 3-2, A-6
Understanding Paper Ream
Labels A-6
Recycled Paper
Paper for Document Printer
3-2, 3-9
Submitting Samples for
Approval 3-2
Release Agent
to Reduce Static Charge in
Cut Sheet Feeders 5-2
Remote Diagnostics 8-3
Rotation of Mailing Materials
Stock 2-3
I-6
DocuMatch™ Mail Materials Reference Guide
Page 74

Index
S
Seal Flap 4-8
Seal Flap Gum 4-8
Seam
Envelope Seam 4-8
Seam Gum 4-8
Side Seam Envelopes 4-4
Simplex Function (Lexmark™
Printer) 3-6, 3-7
Specifications
Perforated Stock Paper
3-8
Standard Window Envelope
4-7
Static Accumulation
and Storage of Materials
2-3
Static Charge
Cut Sheet Feeders
Feeding Problems 5-2
Reduction with Release
Agent 5-2
Storage
of Envelopes 4-8
of Materials
and Static Accumulation
2-3
of Paper for Document
Printer 3-6
Sunlight
and Handling of Mailing
Materials 2-2
Surface Coating or Finish of
Paper A-5
T
Technical Operations Center
8-3
Temperature
and Storage of Mailing
Materials 2-2
Test Piece 8-3
Thickness Limits of a
Collation 2-6, B-2
Worksheet B-2
Toner Cartridge
End-of-Life 7-5
Toner Saver
Turning On Toner Saver
7-4
Toner Yield
Lexmark™ Printer
Estimated Ranges in
Relation to Page
Coverage 7-4
Maximizing Yield by
Lightening Print Darkness
7-3
Maximizing Yield by
Lowering Print Resolution
7-3
Maximizing Yield by
Turning Toner Saver On
7-4
Page Coverage 7-4
Sample of 5% Page
Coverage 7-6
W
Web-Fed Envelopes 4-3
Weight
Envelope Weight 4-10
Weights of Paper 3-2
Window Envelopes. See
Envelope: Window
Envelopes
DocuMatch™ Mail Materials Reference Guide
I-7
Page 75

Index
Wire Cloth A-3
Wire Side of Sheet of Paper
A-3, A-5, A-6
X
Xerographic Paper 2-4,
2-5, 3-5, 5-2, 5-4
I-8
DocuMatch™ Mail Materials Reference Guide
Page 76

 Loading...