

Page 1
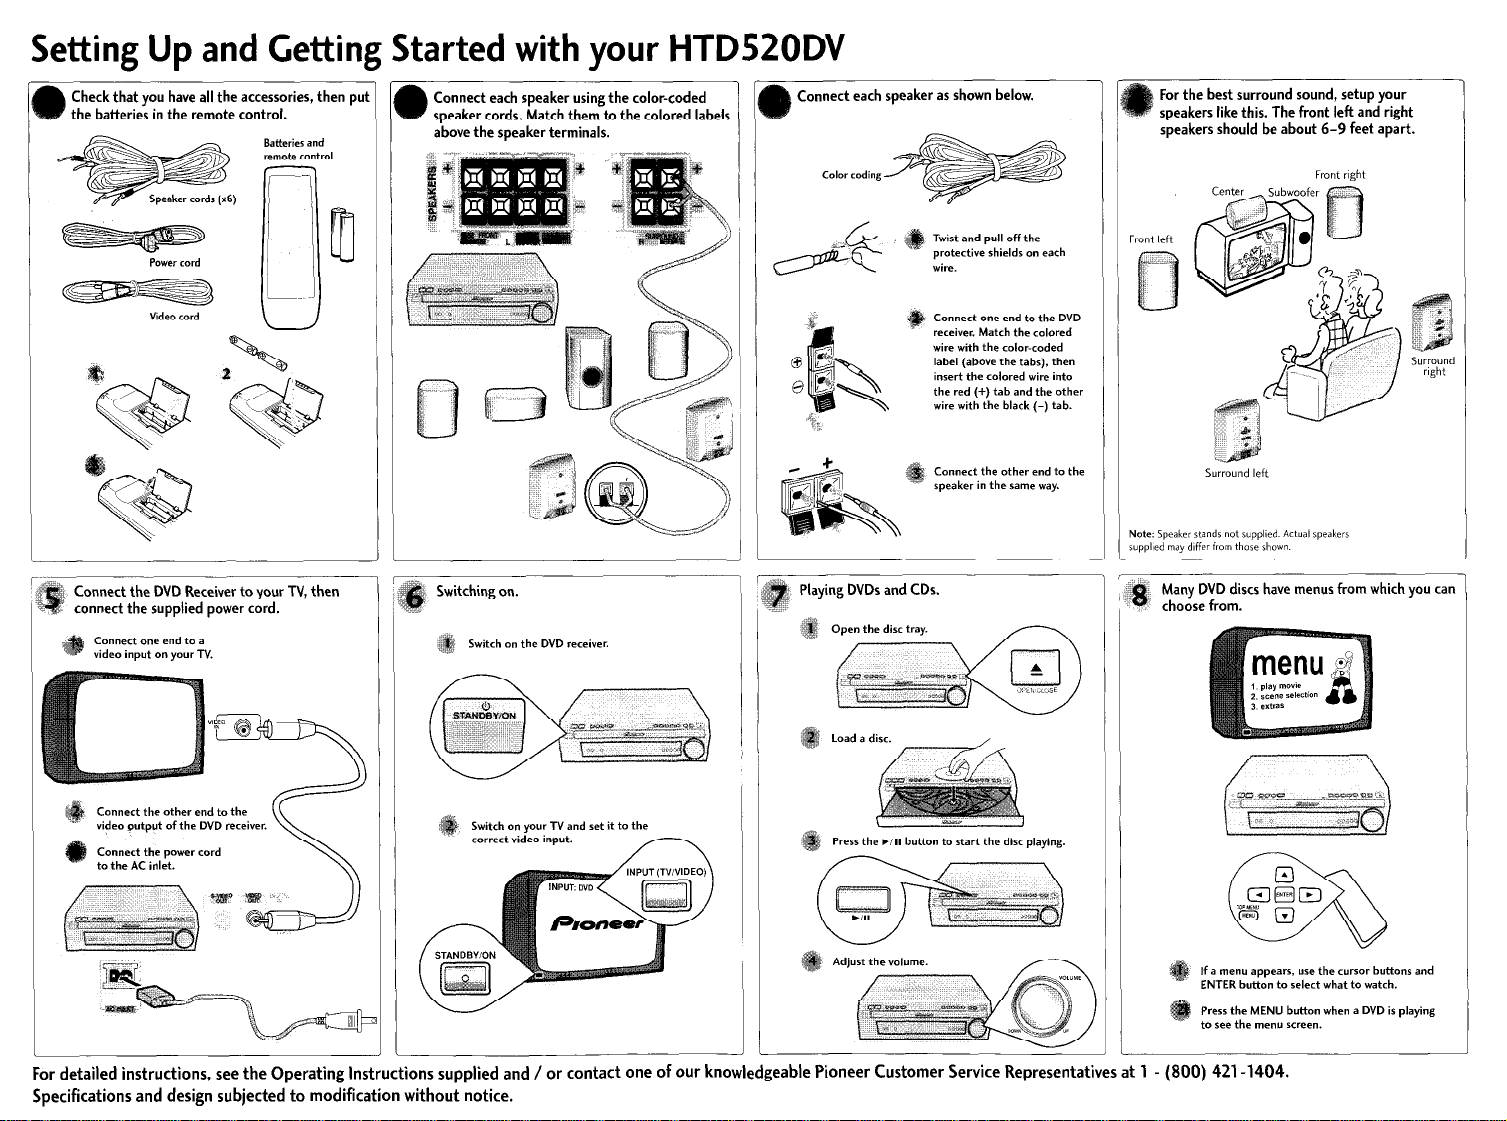
Setting Up and Getting Started with your HTD52ODV
Check that you have all the accessories, then put
the batteries in the remote control.
Connect the DVD Receiver to your TV, then
connect the supplied power cord.
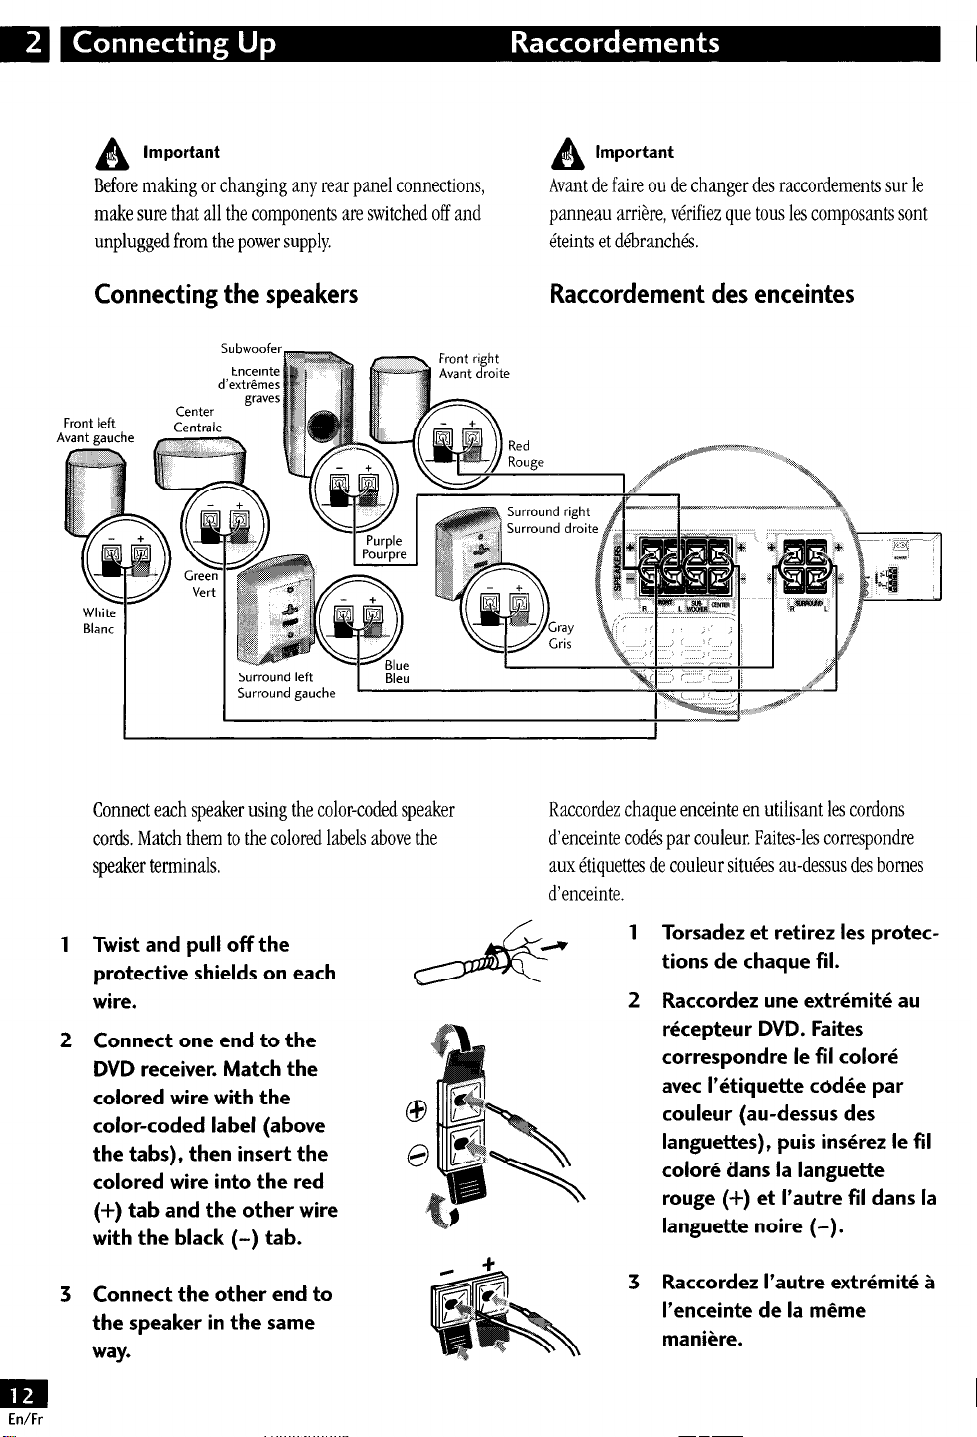
Connect each speaker as shown below.
Twist and pull off the
Connect one end to the DVD
receiver. Match the colored
wire with the color-coded
label (above the tabs), then
insert the colored wire into
the red (+) tab and the other
wire with the black (-) tab.
Playing DVDs and CDs.
.%.
For the best surround sound, setup your
speakers like this. The front left and right
speakers should be about 6-9 feet apart.
Front right
Many DVD discs have menus from which you can
choose from.
Connect the other end to the
video wtput of the DVD receiver.
Connect the power cord
to the AC inlet.
Switch on your TV and set it to
correct video input.
For detailed instructions, see the Operating Instructions supplied and / or contact one of our knowledgeable Pioneer Customer Service Representatives at 1 - (800) 421-1404.
Specifications and design subjected to modification without notice.
Page 2
P1oncmsr soum! vis~of7.soul
DVD/CD RECEIVER
RECEPTEUR DVD/CD
XV-HTD520
SPEAKER SYSTEM
ENCEINTES ACOUSTIQUES
SHTD520
Operating Instructions
Mode d’emploi
Page 3
WARNING:
PREVENT FIRE OR SHOCK HAZARD, DO NOT EXPOSE THIS
APPLIANCE TO RAIN OR MOISTURE AND DO NOT PUT ANY
WATER SOURCE NEAR THIS APPARATUS, SUCH AS VASE,
FLOWER POT, COSMETICS CONTAINER AND MEDICINE BOTTLE
ETC.
THE APPARATUS IS NOT WATERPROOFS, TO
“CmAE”
IMPORTANT
AA
The lightning flash with arrowhead symbol, wIthIn an
equilateral triangle, 1s Wended to alert the user to the
pre$e”ce of untnsulated ‘dangerous voltage’w~th~n the
product’s enclosure that may be of sufflaent magnitude
to constitute a risk of electric shock to persons
CAUTIONI
TO PREVENT THE RISK OF ELECTRIC SHOCK, DO NOT
REMOVE COVER (OR BACK) NO USER-SERVICEABLE
PARTS INSIDE REFER SERVICING TO QUALIFIED
SERVICE PERSONNEL
IMPORTANT
A
Cesynbolede l’6cla1r, pl&dans”” tr~angle6qwlatW
8 pour but d’attirer l’attention de l’util6ateur sur la
pr~sence,~l’int~rieurducoffretdel’appare~l, de”tenwns
dangerewes non ~sol&s d’une grandeur suffisante
pourrepr~sentarunr,~q”~d’~lectrocutlon po”rles&res
hurrwns.
AlTENTlOM
POUR EVITER TOUT RISQUE D’ELECTROCUTION, NE
PAS ENLEVER LE COUVERCLE (Nl LE PANNEAU
ARRIEREI. AUCUNE PIECE REPARABLE PAR
VUTILISATEUR NESETROUVEALINTERIEUR CONFIER
TOUT ENTRETIEN A UN PERSONNEL QUALIFIE
UNIQUEMENT
ATTENTION:
AFIN DE PREVENIRTOUTRISQUE DE CHOC ELECTRIQUE OU DE
DEBUT D’ENCENDIE, NE PAS EXPOSER CET APPAREIL A
L’HUMIDITE OU A LA PLUIE ET NE PLACER AUPRES DE LUI
AUCUNE SOURCE D’EAU, TELS QUE VASES, POTS DE FLEUR,
COSMETIQUES, FLACONS DE MEDICAMENTS, ETC.
CET APPAREIL N’EST PAS IMPERMEABLE,
WmAF”
[For U.S. model1
IMPORTANT NOTICE
Theserial numberforthis equipment is located in the
rear panel. Please write this serial number on your
enclosed warranty card and keep it in a secure area.
This is for your security.
[For U.S. model1
ENERGY STAR@ and the E~RG~
STAR certification mark are registered
US marks. KOO1A.E”
HCKXAE”
[For Canadian model]
CAUTlON:TO
USE THIS (POLARIZED) PLUG WITH AN EXTENSION
CORD, RECEPTACLE OR OTHER OUTLET UNLESS THE
BLADES CAN BE FULLY INSERTED TO PREVENT BLADE
EXPOSURE.
ATTENTION:
ELECTRIQUES NE PAS UTILISER CE-ITE FICHE POLARISEE
AVEC UN PROLONGATEUR UNE PRISE DECOURANTOU
UNE AUTRE SORTIE DE COURANT, SAUF Sl LES LAMES
PEUVENT ETRE INSEREES A FOND SANS EN LAISSER
AUCUNE PARTIE A DECOUVERT. “oo,AaL
PREVENT ELECTRIC SHOCK, DO NOT
POUR PREVENIR LES CHOCS
This Class B digital apparatus complies with Canadian ICES-003.
[Pour le modhle Canadienl
Cet appareil num&ique de la classe B
NOTE:
This equipment has been tested and found to comply with the limits for a Class B digital device, pursuant to Part 15 of
the FCC Rules. These limits are designed to provide reasonable protection against harmful interference in a residential
installation. This equipment generates, uses, and can radiate radio frequency energy and, if not installed and used in
accordancewith the instructions, may cause harmful interference to radio communications. However, there is no guarantee that
interference will not occur in a particular installation. If this equipment does cause harmful interference to radio or television
reception, which can be determined by turning the equipment off and on, the user is encouraged to try to correct the interference
by one or more of the following measures:
est
conforme a la norme NMB-003 du Canada.
-Reorient or relocate the receiving antenna.
-Increase the separation between the equipment and receiver.
-Connect the equipment into an outlet on a circuit different from that to which the receiver is connected.
-Consult the dealer or an experienced radio/TV technician for help.
Page 4
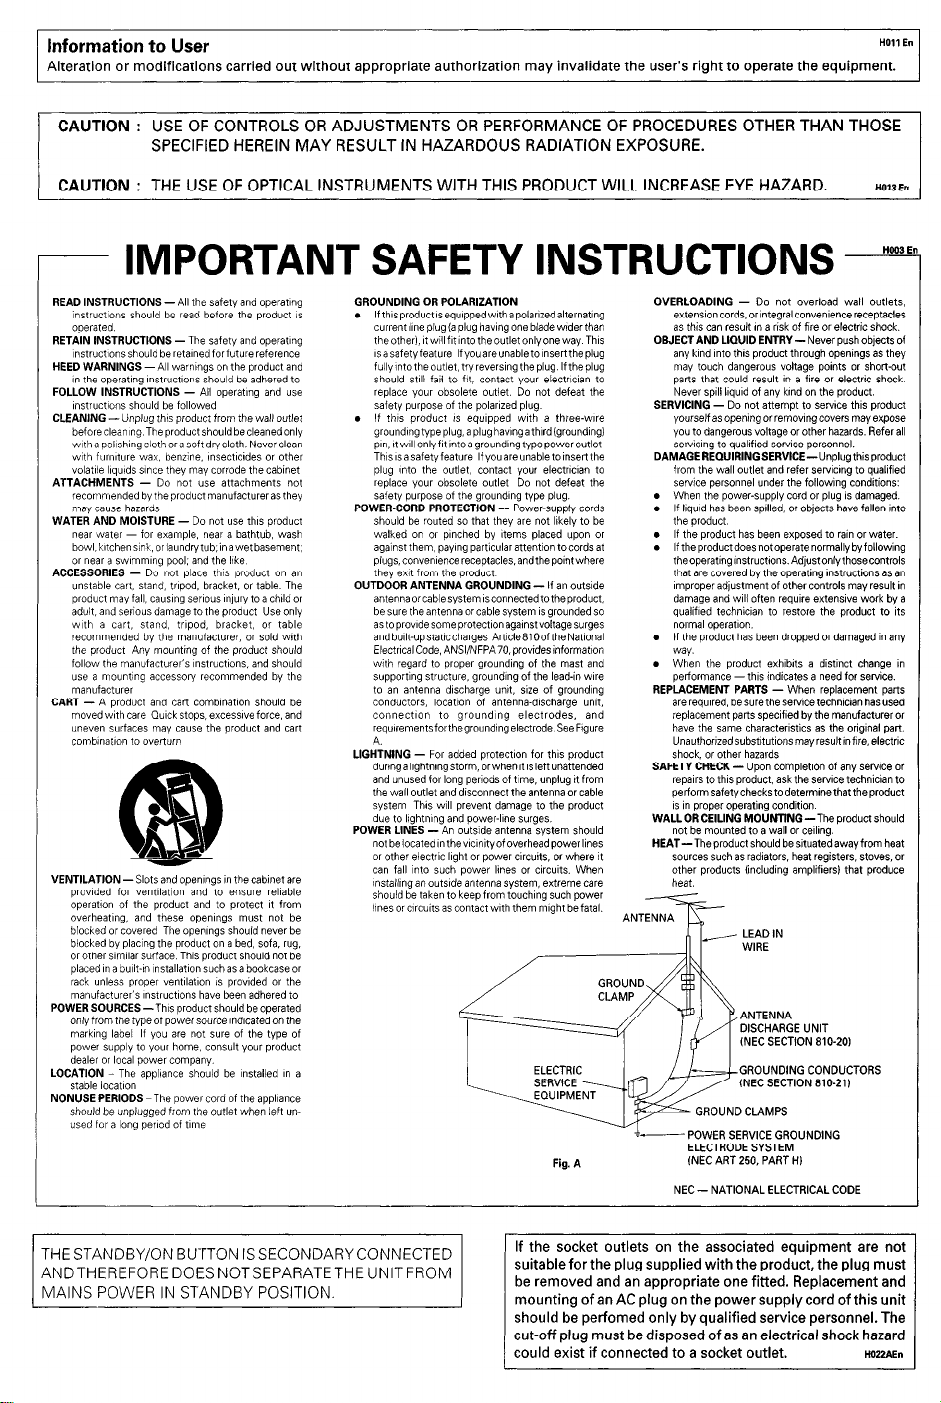
Information to User
1
Alteration or modifications carried out without appropriate authorization mav invalidate the user’s right to operate the equipment.
CAUTION : USE OF CONTROLS OR ADJUSTMENTS OR PERFORMANCE OF PROCEDURES OTHER THAN THOSE
SPECIFIED HEREIN MAY RESULT IN HAZARDOUS RADIATION EXPOSURE.
CAUTION : THE USE OF OPTICAL INSTRUMENTS WITH THIS PRODUCT WILL INCREASE EYE HAZARD. “OWE”
~ IMPORTANT SAFETY INSTRUCTIONS -
READ INSTRUCTIONS-All the safety and operating
~“struct~ons should be read before the product 1s
ooerated
RETAIN INSTRUCTIONS-The safety and operating
,“str”ct!o”sshould b~retalnedforfuturereference
HEED WARNINGS-AI warwngs on the product and
1” the operatrng ,“struct,o”s should be adhered to
FDLLOW INSTRUCTIONS - All operatrng and use
~“struct~ons should be followed
CLEANING-Unplug ISIS product from the wall outlet
beforeclea”,“q TheDroductshouldbecleanedonlv
vatha p~l,~h,“~cloth~r~softd~cloth. Never&an
with funvture wax, benzjne, rnsecwrdes or other
volatile lrqufds stnce they may corrode the cabinet
ATTACHMENTS - Do not we attachments not
recommended by the product manufacturer as they
may cause hazards
WATER AND MOISTURE - Do “ot use thrs product
“ear water - for example, “ear 8 bathtub, wash
b~~,,k,t~h~“~,“k,orlaund~tub,inawetbasement,
or near a sw~rnrmng pool, and the IIke
ACCESSDRIES - Do not place thts product or, a”
unstable cart, stand, tripod, bracket, or table The
product “w, fall, causrng ser,o”s ~“,ury to a chrld or
adult, ad sewus damage to the product Use only
with a cart, stand, trrpod, bracket, or table
recommended by the manufacturer, or sold wth
the product Anv rnountrnq of the product should
follow the manufacturer’s &uctro”s, and should
use a r”ou”t!“g eccessorv recommended by the
CART - A product and cart combinatro” should be
moved with care Qurck stops, excesswe force, and
VENTILATION-Slots and openrngs I” the cabrnet are
prwded for ventllatlon and to e”sure reINable
operatro” of the product and to protect I, from
overheatIng, and these openrngs “tat not be
blocked or covered The operxngs should “ever be
blocked by pIacIng the product on a bed, sofa, wg,
or other slmllar surface Thus product should not be
placedrna burlt-1” ~nstallat~onsuchasa bookcaseor
rack unless proper ve”t,lat,o” ,s prwded or the
manufacturer’s ~“structrons have been adhered to
POWERSDURCES-Thrsproduct should beoperated
onlvfrom the twxof powrswrce (“drcatedo” the
markrng label If you are not sure of the type of
power supply to your home, consult your product
dealer or local power company
LOCATION - The appliance should be wstalled I” a
stable locatIon
NONUSE PERIDDS -The nowe, cord of the a~&“ce
should be unplugged from the outlet wh& ieft unused for a long period of t~“,e
GROUNDING OR POLARIZATION
. lfth~sproduct~sequ~ppedwrthapolarrzedalternatrng
currer,t lhe plug (a plug havrng ow blade wider than
theotherl, ~twtllf~t~“totheoutletonlYonewav Thrs
lsasafetyfeature lfvouareunabletornserttheplug
full~~ntotheoutlet,t~r~“~r~,“g theplug lftheplug
should still fari to f& co”txt your electnc~a” to
replace your obsolete outlet Do not defeat the
safety purpose of the p&wed plug
. If thbs product ,s equrpped wth a three-wrre
groundrngtypeplug,a plughavrngathrrdlgroundrngl
PI”, ,tw~llonlYf~t,“t~~groundrngtvp~poweroutlet
Thwsasafetyfeatwe lf~ou~r~u”ablet~r”*~~the
plug (“to the outlet, contact vow electrician to
replace your obsolete outlet Do not defeat the
safety purpose of the growdIng type plug.
POWERXORD PROTECTIDN - Power-supply cords
should be routed so that they are not lrkely to be
walked on or pInched by (terns placed “po” or
agal”$t them, payrng pamcularattention tocords at
p~ugs,~~““~“~~“~~receptacles,a”dthepo~ntwhere
they exat from the product
DUTDOOR ANTENNA GROUNDING - If a” outsrde
andb”,lt-“p*t~t,~~~~rg~~ A~r~~ElO~fth~N~t,~“~l
ElectrrcalCode, ANSllNFPA7O,providesinformat1on
wth regard to proper groundrng of the mast and
supportIng structure, groundrng of the lead-in wire
to an antema drscharge ““it, s,ze of groundrng
co”d”ctors, locatro” of antenna-discharge unrt,
co”“ect~on to groundlng electrodes, and
requ,rementsforthegroundlngelectrode SeeFIgure
A.
LIGHTNING - For added protect~o” for this product
durrnqalrqhtnrnq~t~r~, orwhenrtr~leftunattended
and unused for iong perrods of tome, unplug rt from
the ,+,a,, outle, and d,sco”“ect the a”te”“a or cable
system Thus will prevent damage to the product
due to l\ghtrv”g and power-lone surges.
PDWER LINES -An outsIde antenna system should
“~tbelocated,“thev~c~nr~ofoverheadp~~~rl~nes
or other electric lrghi or power wc”rts, or where !t
can fall ,“to such power lknes or crrcurts. When
mtallmg 8” outsrde a”te”“a systerr, extrwrw care
should be take” to keep from touching such power
l~nes~r~,r~urt*~~contactwlth them might befatal.
Fig. A
OVERLOADING - Do “ot overload wall outlets,
~~t~“~,~“cards,~rrntegral~~““~“,~”~~receptacles
as this can result I” a risk of fire or electric shock.
DSJECTAND LIQUID ENTRY - Never push objects of
any krnd rnto thus product through openings as they
r”aY touch dangerous voltage points or shortat
parts ihat could result in 8 fire or electric shock
Never sp~lf llquld of any krnd o” the product.
SERVICING - Do “o, attempt to serv,ce thrs product
yourself as opening or re”lo”,“g cwers ma” expose
You to dangerous voltage or other hazards. Refer all
servwng to qualrfied serwce personnel.
DAMAGEREOUIRINGSERVICE-Unplugthisproduct
from the wall outlet and refer swwrng to qualrfied
swvrce personnel under the followrng conditions:
l
When the power-supply cord or plug 13 damaged.
. If lrqurd has been sprlled, or objects have fallen ,“to
the product
. If the product has been exposed to rar” or water.
l
If theproductdoesnotoperatenormallybYfollowing
the~p~r~t~ng,“~tru~t,~“~.Ad~ustonl~thosecontrols
that are covered by the operating rnstructions as a”
improper adjustment of other controls maY result in
damage and wrll often requrre exterwve work bY a
qualified technicran to restore the product to its
normal opemtI0”.
l
If the product has been dropped or damaged I” any
vvay.
l
When the product exhrbrts a distrnct change r”
periormance - thus rndicates a need for service.
REPLACEMENT PARTS - When
are rewred, besuretheserwe teihnicia” hasused
replacement parts specrfled by the manufacturer or
have the same characterrstics as the oriqrnal wt.
Unauthorrzedsubstrtutrons~~vresultinfrr~, electrrc
shock, or other hazards
SAFETY CHECK - UDO” completron of any service or
reparrs to thus p&X, ask the s?wce t&hnicia” to
pe~ormsafetvcheckstodetermrnethattheproduct
1s 1” proper operating condition
WALLORCEILING MOUNTING-The product should
not be mounted to a wall or ceiling.
HEAT-Theproductshould besrtuated.waYfrom heat
sources such 8s radrators, heat registers, stoves, or
other products (including amplifiers1 that produce
heat.
ANT;?%
ELECTRODE SYSTEM
fNEC ART 250, PART HI
NEC - NATIONAL ELECTRICAL CODE
replacement
“‘a, E”
i”
parts
THE STANDBY/ON BUrTON IS SECONDARY CONNECTED
ANDTHEREFOREDOESNOTSEPARATETHEUNITFROM
MAINS POWER IN STANDBY POSITION.
If the socket outlets on the associated equipment are not
suitable for the plug supplied with the product, the plug must
be removed and an appropriate one fitted. Replacement and
mounting of an AC plug on the power supply cord of this unit
should be perfomed only by qualified service personnel. The
cut-off plug must be disposed of as an electrical shock hazard
could exist if connected to a socket outlet. WzAEn
Page 5
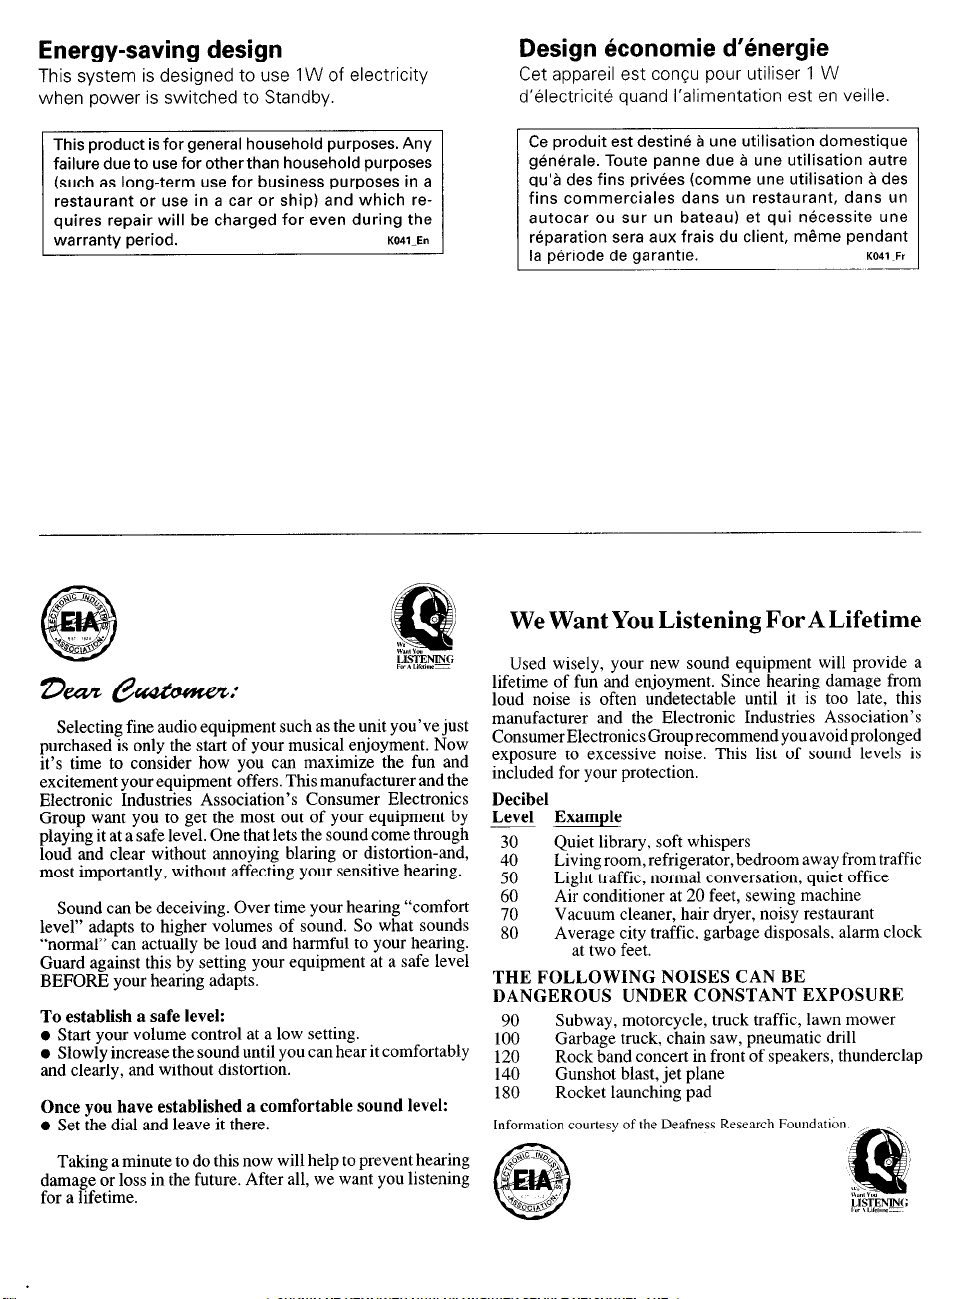
Energy-saving design
This system is designed to use 1 W of electricity
when power is switched to Standby.
Design hconomie d’hergie
Cet appareil est conGu pour utiliser 1 W
d’&lectricitk quand l’alimentation est en veille.
This product is for general household purposes. Any
failure due to use for otherthan household purposes
(such as long-term use for business purposes in a
restaurant or use in a car or ship) and which requires repair will be charged for even during the
warranty period.
KO4ldEn
Selecting fine audio equipment such as the unit you’ve just
purchased is only the start of your musical enjoyment. Now
it’s time to consider how you can maximize the fun and
excitement your equipment offers. This manufacturer and the
Electronic Industries Association’s Consumer Electronics
Group want you to get the most out of your equipment by
playing it at a safe level. One that lets the sound come through
loud and clear without annoying blaring or distortion-and,
most importantly, without affecting your sensitive hearing.
Sound can be deceiving. Over time your hearing “comfort
level” adapts to higher volumes of sound. So what sounds
“normal” can actually be loud and harmful to your hearing.
Guard against this by setting your equipment at a safe level
BEFORE your hearing adapts.
To establish a safe level:
0 Start your volume control at a low setting.
l
Slowly increase the sound until you can hear it comfortably
and clearly, and without distortion.
Once you have established a comfortable sound level:
l
Set the dial and leave it there.
Ce produit est destine a une utilisation domestique
g&&-ale. Toute panne due a une utilisation autre
qu’a des fins privees (comme une utilisation a des
fins commerciales dans un restaurant, dans un
autocar ou sur un bateau) et qui necessite une
reparation sera aux frais du client, meme pendant
la periode de garantie.
KO4, ~Fr
We Want You Listening For ALifetime
Used wisely, your new sound equipment will provide a
lifetime of fun and enjoyment. Since hearing damage from
loud noise is often undetectable until it is too late, this
manufacturer and the Electronic Industries Association’s
Consumer Electronics Group recommend you avoid prolonged
exposure to excessive noise. This list of sound levels is
included for your protection.
Decibel
Level Example
Quiet library, soft whispers
30
Living room, refrigerator, bedroom away from traffic
40
Light traffic, normal conversation, quiet office
Air conditioner at 20 feet, sewing machine
2:
Vacuum cleaner, hair dryer, noisy restaurant
70
Average city traffic, garbage disposals, alarm clock
80
THE FOLLOWING NOISES CAN BE
DANGEROUS UNDER CONSTANT EXPOSURE
90
100
120
140
180
at two feet.
Subway, motorcycle, truck traffic, lawn mower
Garbage truck, chain saw, pneumatic drill
Rock band concert in front of speakers, thunderclap
Gunshot blast, jet plane
Rocket launching pad
Taking a minute to do this now will help to prevent hearing
damage or loss in the future. After all, we want you listening
for a lifetime.
Page 6
Thank you for buying this Pioneer product.
Please read through these operating instructions so you will know how to operate your model properly After you have finished
reading the instructions, put them away in a safe place for future reference.
In some countries or regions, the shape of the power plug and power outlet may sometimes differ from that shown in the explanatory
drawings, However the method of connecting and operating the unit is the same,
Contents
1 Before You Start
Features
What’s in the box
Using this manual
Putting the batteries in
the remote control
Using the remote control
Hints on installation
Avoiding problems with
condensation
Moving the system
DVD Video regions
Discs compatible with this system
10
10
10
2 Connecting Up
Connecting the speakers
Placing the speakers
Wall mounting the center and
surround speaker system
Connecting to your TV
Connecting the supplied antennas 16
AM loop antenna
FM wire antenna
Connecting external antennas
External AM antenna
External FM antenna
Connecting other components
Connecting the power
12
13
14
15
16
17
17
17
17
18
18
3 Controls & Displays
Front panel
Remote control
Display
19
20
22
4 Setting Up
Switching on and setting the clock 23
Setting up for surround sound
Setting the speaker distances
Balancing the surround sound
Using the Setup Navigator
24
24
25
27
5 Getting Started
Playing DVDs, CDs and Video CDs 29
Basic playback controls
Navigating DVD disc menus
Navigating Video CD PBC menus 32
Exchanging discs
Listening to the radio
30
31
32
33
Improving FM stereo sound
7
Saving station presets
8
Listening to station presets
8
Listening to other components
8
6 Using Surround Sound
9
9
Adjusting the bass and treble
Using PBass
Using sound modes
Listening to surround-sound
11
sources
Listening to other sources with
room effects
Adjusting the effect level
Listening at low volume
Direct recording
7 Playing Discs
Introduction
Finding what you want on a disc
Switching camera angles
Switching subtitles
Switching audio language
Switching audio channel
Making a program list
More programming options
Using random play
Using repeat play
Looping a section of a disc
Playing CDs only (CD Mode)
Bookmarking a place in a disc
Memorizing disc settings
Displaying disc information
8 Using the Timer
Using the wake up timer
Activating/deactivating the
wake up timer
Checking the timer settings
Using the sleep timer
9 Advanced Sound Setup
Advanced sound settings
LFE attenuator
Dynamic Range Control
Dual-mono setting
Adjusting channel volume levels
10 DVD Setup Menu
34
Using the DVD Setup menu
34
Video settings
35
TV Screen
35
Picture Quality
S-Video Out
Still Picture
On Screen Display
36
Angle Indicator
36
Language settings
37
OSD language
Audio Language
37
Subtitle Language
Auto Language
38
DVD Language
39
Subtitle Display
40
Subtitle Off
40
General settings
Setup Menu Mode
Parental Lock
41
Changing the parental lock level
41
Changing your password
42
Screen Saver
42
Background Color
42
43
11 Additional Information
43
Switching the AM frequency
4.5
interval
45
Setting the display brightness
46
Switching the time format
47
Taking care of your system
47
Disc lens cleaner
48
Taking care of your discs
49
Storing discs
50
Discs to avoid
Glossary
Language code list
51
Screen sizes and disc formats
Troubleshooting
52
Resetting the system
52
Switching the demo mode on/off
53
Specifications
54
54
54
5.5
56
57
57
57
58
58
59
59
59
60
60
60
61
62
62
63
64
64
64
65
66
66
67
67
68
68
68
69
69
69
70
70
70
72
73
74
75
75
78
En
Page 7
Features
l
Superlative audio performance with
Dolby Digital* and DTS** software
The XV-HTD520 delivers breathtaking sound quality
with Dolby Digital and DTS discs.
l
Graphical Setup Navigator
Setting up your home theater is easy using the
graphical Setup Navigator. Answer the questions that
appear on-screen and the Setup Navigator makes the
necessary video and language settings for you.
l
This product incorporates copyright protection
technology that is protected by method claims of
certain U. S. patents and other intellectual property
rights owned by Macrovision Corporation and
other rights owners. Use of this copyright protection technology must be authorized by Macrovision
Corporation, and is intended for home and other
limited viewing uses only unless otherwise
authorized by Macrovision Comoration. Reverse
engineering or disassembly is prohibited.
* Manufactured under license from Dolby
Laboratories. “Dolby”, “Pro Logic” and the
double-D symbol are trademarks of Dolby
Laboratories.
** “DTS” and “DTS Digital Surround” are
registered trademarks of Digital Theater Systems,
Inc.
Caractkristiques
l
Performance audio supkieure avec Dolby
Digital* et logiciel DTS**
Le XWHTD520 fournit une extraordinaire qualite
sonore avec les disques Dolby Digital et DTS.
Setup Navigator (navigateur de contigu-
l
ration) graphique
11 est facile de regler votre “home theater” en utilisant
le Setup Navigator. Repondez aux questions qui
apparaissent a l’ecran et le Setup Navigator fera les
reglages audio, video et de langue pour vous.
l
Ce produit integre une technologie de protection des droits d’auteur elle-mEme protegee par
certains brevets nord-americains et d’autres droits
sur la propriete intellectuelle qui appartiennent a
la societe Macrovision Corporation et a d’autres
detentems, Lillustration de cette technologie de
protection des droits d’auteur doit 8tre autorisee
par ladite societe Macrovision Corporation et est
exclusivement destinee a une exploitation a
domicile et a d’autres usages limit&, sauf
autorisation differente. La recherche technique par
inversion ou le d&assemblage est interdit.
* Fabrique sous licence de Dolby Laboratories.
“Dolby”, “Pro Logic” et le symbole double-D sont
des marques de Dolby Laboratories.
** “DTS” et “DTS Digital Surround” sont des
.
marques commerciales de Digital Theater Systems,
Inc.
En/Fr
Page 8
What’s in the box
Confirm that the following accessories are in the box
when you open it.
l
Remote control
l
AA/R6P dry cell batteries x2
. AM loop antenna
l
FM antenna
l
Video cord (yellow)
l
Power cord
l
These operating instructions
l
Warranty card
l
Speaker cords 5m
speakets)
l
Speaker cord 5m (16 ft. 5 in) xl (for center speaker)
l
Speaker cords 1Om (32 ft. 10 in.) x2 (for surround L-
R speakers)
l
Speaker cord 5m (16 ft. 5 in.) xl (for subwoofer)
l
Non-slip pads x20
(16
ft. 5 in) x2 (for front L-R
Contenu de la boite
Verifiez que les accessoires suivants se trouvent dans la
bofte a son ouverture.
l
Telecommande
l
2 piles seches AA/R~P
l
Antenne cadre AM
* Antenne FM
l
Cordon video (jaune)
. Cordon d’ahmentation
l
Ce mode d’emploi
l
Fiche de garantie
l
2 Cordons d’enceinte de 5m (16 pieds 5 pouces)
(pour les enceintes avant L-R)
l
1 cordon d’enceinte de 5m (16 pieds 5 pouces) (pour
l’enceinte centrale)
l
2 cordons d’enceinte de 1Om (32 pieds 10 pouces)
(pour les enceintes surround L-R)
l
1 cordon d’enceinte de 5m (16 pieds 5 pouces) (pour
le Enceinte d’extremes graves)
l
20 Coussinets anti-derapage
Using this manual
This manual is for the XV-HTD520 DVD Receiver. It is
divided into several sections: system basics and
connecting up (chapters 1 and 2); an explanation of
the controls and displays (chapter 3); setting up for
surround sound and other preferences (chapter 4);
getting started (chapter 5); advanced features (chapters
6-9); system settings and preferences (chapter 10).
Chapter 11 provides additional information, including a
glossary of terms used in this manual, and a troubleshooting section.
Putting the batteries in the
remote control
Open the battery compartment
1
cover on the back of the remote
control.
Insert two AA/R6P batteries into
2
the battery compartment following
the indications (@, @) inside the
compartment.
Close the cover.
3
Utilisation de ce manuel
Ce manuel est consacre au recepteur DVD XKHTD520.
II est divise en plusieurs sections : bases et raccordement
de l’appareil (chapitres 1 et 2) : une explication des
commandes et des affichages (chapitre 3) ;
configuration pour son surround et autres priorites
(chapitre 4) ; mise en service (chapitre 5) ; caracteristiques avancees (chapitres 6-9) ; reglages de l’appareil
et priori& (chapitre 10). Le chapitre 11 fournit des
informations additionnelles, y compris un glossaire de
termes utihses dans ce manuel, et une section guide de
depannage.
Placer les piles dans la
tGcommande
1 Soulevez le couvercle du
compartiment a piles qui se trouve
au dos de la telecommande.
2 lnserez deux piles AA/R6P dans le
compartiment a piles en suivant les
indications (@, @) a l’interieur du
compartiment.
3 Refermez le couvercleO
:
m
EdFr
Page 9
Caution
t!B
l
Remove the batteries if the remote is not going to be
used for a month or more.
l
Remove dead batteries promptly-they can leak and
damage the unit.
l
When disposing of used batteries, please comply with
governmental regulations or environmental public
institution’s rules that apply in your country or area.
Attention
e!B
l
Enlevez les piles si vous n’utilisez pas la
tt%commande pendant un mois ou plus.
. Enlevez immddiatement les piles usGes+lles
peuvent p&enter une fuite et endommager l’unitk.
l
Lorsque vous aver des piles usagees, veuillez
respecter les rkglementations gourvernementales ou
environnementales en vigueur dans votre pays ou dans
votre region.
Using the remote control
Keep in mind the following when using the remote
control:
l
Make sure that there are no obstacles between the
remote control and the remote sensor on the unit.
* Use within 7 meters
(21
feet) of the remote sensor
and at an angle of less than 30’.
* Remote operation may become unreliable if strong
sunlight or fluorescent light is shining on the unit’s
remote sensor.
l
Remote controllen for different devices can interfere
with each other Avoid using remotes for other equipment located nearby this unit.
l
Replace the batteries when you notice the operating
range of the remote starts to decrease.
Hints on installation
We want you to enjoy using this unit for years to come,
so please bear in mind the following points when
choosing a suitable location for it:
Do...
J Use in a well-ventilated room.
J Place on a solid, flat, level surface, such as a table,
shelf or stereo rack.
Don’t...
8 Use in a place exposed to high temperatures or
humidity, including near radiates and other heatgenerating appliances.
8 Place on a window sill or other place where the
system will be exposed to direct sunlight.
Utilisation de la tkkommande
N’oubliez pas les remarques suivantes lofsque vous
utilisez la t&commande:
l
V6rifiez qu’il n’y a aucun obstacle entre la
t&Scommande et le t&?capteur de l’unit6.
l
Utilisez-la ?I 7
(21
pieds) mhtres du t&capteur et
dans un angle inf&ieur & 30’.
l
La commande 5 distance peut 2tre affect& par un
rayonnement solaire impottant ou si une lum2re
fluorescente 6claire le t&capteur de l’uniti.
l
Plusieun t616commandes peuvent faire interf&ence.
l?vitez d’utiliser les t&&ommandes destint% & d’autres
appareils & proximitd de l’unitt!.
l
Changez les piles d2s que vous remarquez une baisse
de la plage d’utilisation de la t&commande.
Suggestions pour l’installation
Nous souhaitons que vous puissiez profiter de cet
appareil pendant les ann6es 2 venir, veuillez done
garder en mkmoire les points suivants au moment de
choisir un endroit convenable pour son installation :
A faire...
J Utilisez-le dans une pi&e bien at%e.
d Placez-le sur une surface solide, plate, nivel&, telle
qu’une table, une &ag&e ou &ag&re pour chaine st&6o~
A ne pas faire...
8 Ne l’utilisez pas dans un endroit exposi i de hautes
tempkratures ou &de l’humiditb, y compris p& de
radiateurs et d’autres appareils g&?rateurs de chaleur.
J Ne le placez pas sur le rebord d’une fenetre ou autre
endroit exposi directement aux rayons du soleil.
Page 10
J Use in an excessively dusty or damp environment.
8 Place directly on top of an amplifier, or other
component in your stereo system that becomes hot in
use.
8 Use near a television or monitor as you may
experience interference+-especially if the television
uses an indoor antenna.
8 Use in a kitchen or other room where the system
may be exposed to smoke or steam.
8 Use on a thick rug or carpet, or cover with cloththis may prevent proper cooling of the unit.
8 Place on an unstable surface, or one that is not large
enough to support all four of the unit’s feet.
Avoiding problems with condensation
Condensation may form inside the system if it is
brought into a warm room from outside, or if the
temperature. of the room rises quickly. Although the
condensation won’t damage the system, it may
temporarily impair its performance. For this mason you
should leave it to adjust to the warmer temperature for
about an hour before switching on and using.
Moving the system
If you need to move the system, first switch it off and
unplug from the wall outlet. Never lift or move the unit
during playback-discs rotate at a high speed and may
be damaged.
8 Ne l’utilisez pas dans un environnement
excessivement poussiereux ou humide.
3 Ne le place2 pas directement au-dessus de
l’amplificateur, ou d’un autre composant de votre
cha?ne stereo qui se rechauffe a l’utilisation
8 Ne l’utilisez pas pres d’un televiseur ou dun
moniteur puisque vous pouvez experimenter des
interferences-specialement si le televiseur emploie une
antenne interieure.
8 Ne l’utilisez pas dans une cuisine ou autre piece ou
l’appareil peut etre expose a de la fumee ou de la
vapeur.
8 N’utilisez pas de couverture, ni de tapis epais, ou un
linge pour le recouvrir-ceci peut empecher le
refroidissement correct de l’appareil.
8 Ne le placez pas sur une surface instable, ou pas
assez grande pour supporter les quatre pieds de
l’appareil.
Comment &iter les probkmes de
condensation
De la condensation peut se former a l’interieur du
lecteur si celui-ci est deplace de i’exterieur a une piece
chaude, ou si la temperature de la piece s’eleve
rapidement. Quoique la condensation n’endommagera
pas le lecteur, elle peut diminuer temporairement son
fonctionnement normal. Dans ce cas vous devriez le
laisser tel quel pendant environ une heure afin qu’il
s’adapte a la plus chaude temperature avant de
l’allumer et de l’utihser.
DVD Video regions
All DVD Video discs carry a region mark on the case
somewhere that indicates which region(s) of the world
the disc is compatible with. Your DVD system also has a
region mark, which you can find on the rear panel.
Discs from incompatible regions will not play in this
system. Discs marked
All
will play in any player.
Dkplacer l’appareil
Si vous aver besoin de deplacer l’appareil, eteignez-le
d’abord et debranchez-le de la prise. Ne soulevez ni
deplacez jamais l’appareil pendant la lecture-les
disques tournent a une haute vitesse et ils pourraient
s’endommager.
R$ions des DVD vid6o
Tous les disques DVD video portent une marque de la
region sur l’etui pour indiquer avec quelles regions du
monde le disque est compatible. Votre cha?ne DVD a
egalement une marque que vous pouvez trouver sur le
panneau arriere. Les disques provenant de regions
incompatibles ne seront pas lus sur cet appareil. Les
disques marques avec
lecteur.
ALL
seront lus sur qu’importe quel
Page 11
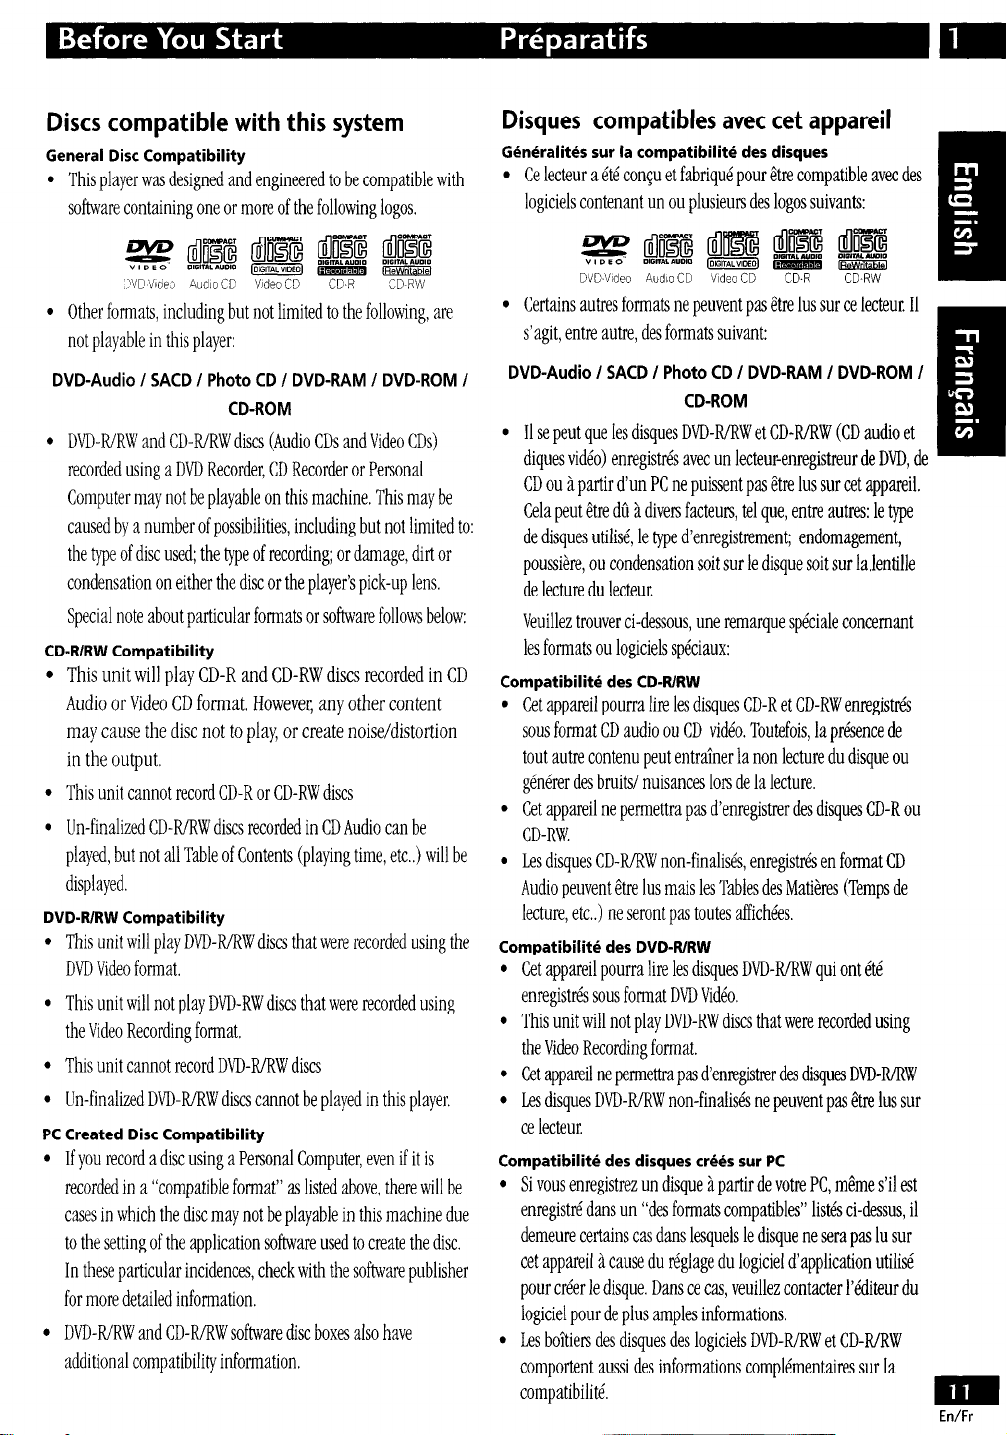
Discs compatible with this system
General Disc Compatibility
l
This player was designed and engineered to be compatible with
software containing one or more of the following logos
>VD Lhoe~ Audlc Cc ‘hdeo CD CD.R
l
Other formats including but not limited to the following, are
not playable in this player:
DVD-Audio I SACD I Photo CD I DVD-RAM / DVD-ROM I
CD-ROM
l
DVD-R/RW and CD-WRW discs (Audio CDs and Video CDs)
recorded using a DVD Recorder, CD Recorder or Personal
Computer may not be playable on this machine. This may be
caused by a number of possibilities, including but not limited to:
the type of disc used; the type of recording; or damage, dirt or
condensation on either the disc or the player’s pick-up lens.
Special note about particular formats or software follows below:
CD-RIRW Compatibility
This unit will play CD-R and CD-RW discs recorded in CD
Audio or Video CD format. However, any other content
may cause the disc not to play, or create noise/distortion
in the output.
This unit cannot record CD-R or CD-RW discs
Un-finalized CD-R/RW discs recorded in CD Audio can be
played, but not all Table of Contents (playing time, etc.,) will be
displayed.
DVD-R/RW Compatibility
This unit will play DVD-R/RW discs that were recorded using the
l
DVD Video format,
This unit will not play DVD-RW discs that were recorded using
l
the Video Recording format,
This unit cannot record DVD-R/RW discs
l
Un-finalized DVDR/RW discs cannot be played in this player,
l
PC Created Disc Compatibility
If you record a disc using a Personal Computer, even if it is
recorded in a “compatible format” as listed above, there will be
cases in which the disc may not be playable in this machine due
to the setting of the application sofhvare used to create the disc.
In these particular incidences, check with the sofhvare publisher
for more detailed information.
DVD-R/RW and CD-R/RW software disc boxes also have
additional compatibility information.
CD RW
Disques compatibles avec cet appareil
Gh5ralit6s sur la compatibilitk des disques
l
Ce lecteur a et6 con$u et fabrique pour &re compatible avec des
logiciels contenant un ou plusieurs des logos suivants:
gg @@ pEiJ
DVD.Vsdeo Audc CD
l
Certains autres formats ne peuvent pas &re lus sur ce lecteur. II
s’agit, entre autre, des formats suivant:
DVD-Audio I SACD I Photo CD I DVD-RAM I DVD-ROM I
l
II se peut que ies disques DVD-R/RW et CD-R/RW (CD audio et
diques video) enregistres avec un lecteur-enregistreur de DVD, de
CD ou a partir dun PC ne puissent pas 2tre lus sur cet appareil,
Cela peut &re dti a divers facteurs, tel que, entre autres: le type
de disques utilise, le type d’enregistrement; endomagement,
poussiere, ou condensation soit sur le disque soit sur la,lentille
de lecture du lecteur~
Veuillez trouver ci-dessous, une remarque speciale concemant
les formats ou logiciels speciaux:
CompatibilittS des CD-R/RW
Get appareil pourra lire les disques CD-R et CD-RW enregistres
sous format CD audio ou CD video. Toutefois, la presence de
tout autre contenu peut entrainer la non lecture du disque ou
generer des bruits/ nuisances lors de la lecture.
Cet appareil ne permettra pas d’enregistrer des disques CD-R ou
CD-RW.
Les disques CD-R/RW non-finalises, enregistres en format CD
Audio peuvent &re lus mais les Tables des Matieres (Temps de
lecture, etc.) ne seront pas toutes affichees
Compatibilit6 des DVD-R/RW
l
Cet appareil pourra lire les disques DVD-R/RW qui ont et6
enregistres sous format DVD Video.
l
This unit will not play DVD-RW discs that were recorded using
the Video Recording format.
l
Cet appareii ne permettra pas d’emegistier des disques DVD-R/RW
l
Les disques DVD-R/RW non-finalises ne peuvent pas &re lus sur
ce lecteur.
Compatibilit6 des disques c&s sur PC
Si vous enregistrez un disque a partir de votre PC, m&me s’il est
enregistre dans un “des formats compatibles” list& ci-dessus, il
demeure cenains cas dans lesquels le disque ne sera pas lu sur
cet appareil a cause du reglage du logiciel d’apphcation utilise
pour creer le disque. Dans ce cas veuillez contacter l’editeur du
logiciel pour de plus amples informations.
Les boftieis des disques des logiciels DVD-R/RW et CD-R/RW
comportent aussi des informations complementaires sur la
compatibihte.
Video CD CD.R CD.RW
CD-ROM
Page 12
important
A
Before making or changing any rear panel connections,
make sure that all the components are switched off and
unplugged from the power supply.
Important
A
Avant de faire ou de changer des raccordements sur le
panneau arriere, verifiez que tous les composants sont
eteints et debranches.
Connecting the speakers
A
Connect each speaker using the color-coded speaker
cords. Match them to the colored labels above the
speaker terminals.
Raccordement des enceintes
Raccordez chaque enceinte en utilisant les cordons
d’enceinte codes par couleur. Faites-les correspondre
aux etiquettes de couleur situees au-dessus des bornes
d’enceinte.
1 Twist and pull off the
protective shields on each
wire.
2 Connect one end to the
DVD receiver. Match the
colored wire with the
color-coded label (above
the tabs), then insert the
colored wire into the red
(+) tab and the other wire
with the black (-) tab.
3 Connect the other end to
the speaker in the same
way.
En/Fr
1 Torsadez et retirez les protec-
tions de chaque fil.
2 Raccordez une extremite au
recepteur DVD. Faites
correspondre le fil color-4
avec l’etiquette codee par
couleur (au-dessus des
languettes), puis inserez le fil
color6 clans la languette
rouge (+) et l’autre fil dans la
languette noire (-).
3 Raccordez l’autre extremite a
l’enceinte de la meme
maniere.
Page 13
Note
e3
Remove the supplied non-slip pads from the paper, and
stick four onto the base of each satellite speaker. Actual
speakers supplied may differ from those shown.
Caution
t!!B
Do not connect any of the supplied speakets to any other amplifier.
This may result in malfunction or fire.
This DVD receiver has been designed for best performance when
connected to the supplied speakers. We do not, therefore) recommend
that you connect and use other speakers with this system.
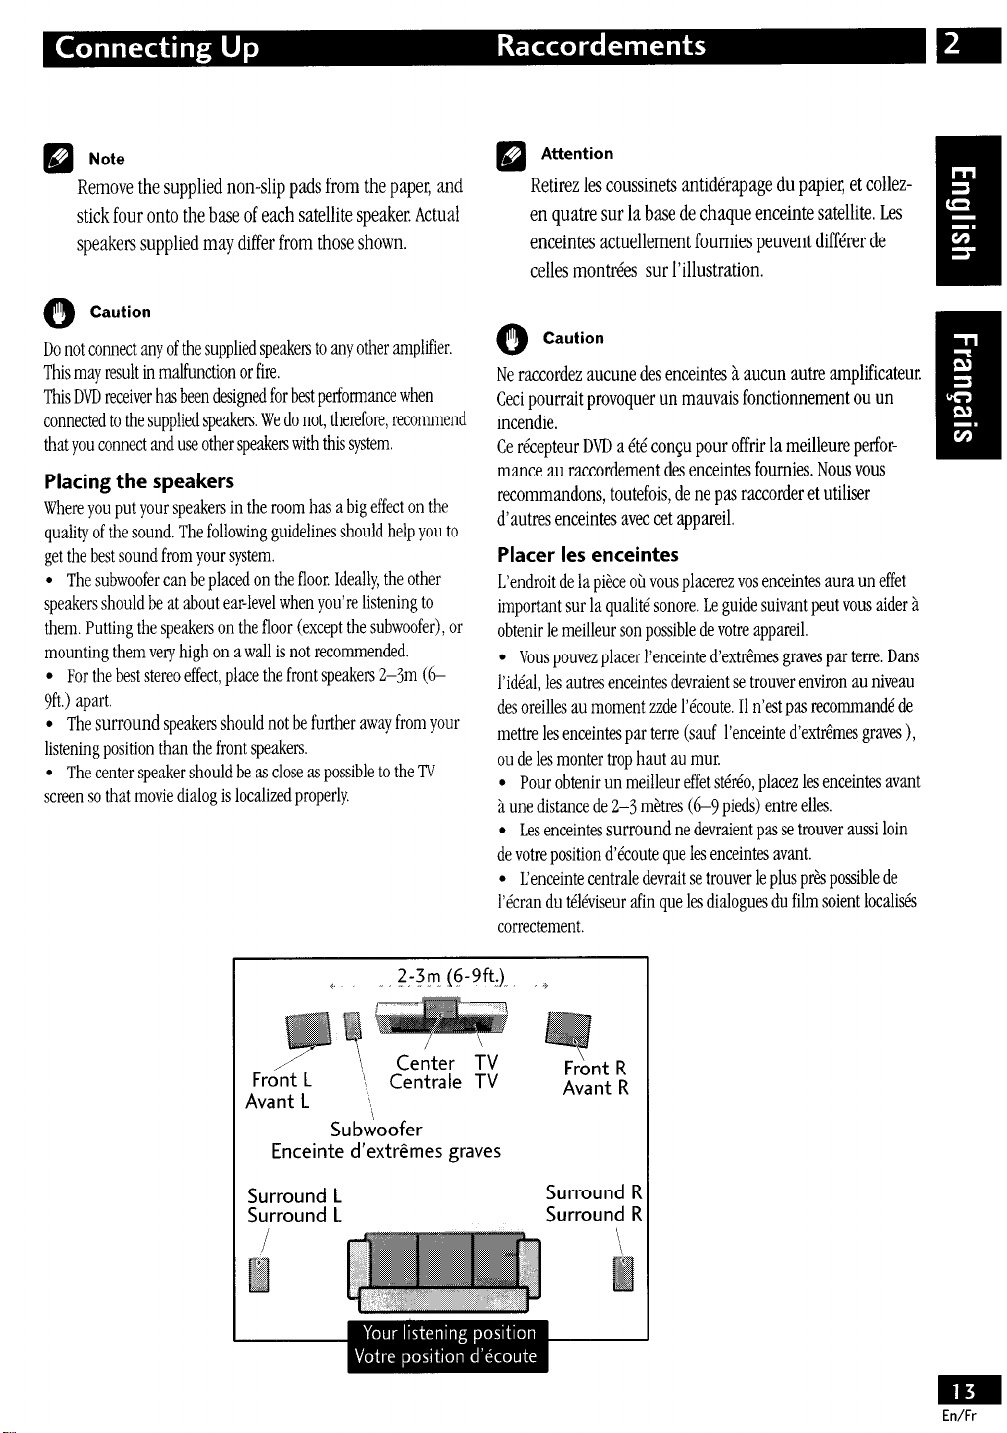
Placing the speakers
Where you put your speakers in the room has a big effect on the
quality of the sound, The following guidelines should help you to
0
Ne raccordez aucune des enceintes a aucun autre amplificateur.
Ceci pourrait provoquer un mauvais fonctionnement ou un
incendie.
Ce recepteur DVD a et& con$u pour offrir la meilleure performance au raccordement des enceintes fournies. Nous vous
d’autres enceintes avec cet appareil.
get the best sound from your system.
l
The subwoofer can be placed on the floor. Ideally, the other
speakers should be at about ear-level when you’re listening to
them. Putting the speakers on the floor (except the subwoofer), or
mounting them very high on a wall is not recommended.
l
For the best stereo effect, place the front speakers 2%3m (6Yft.) apart.
l
The surround speaken should not be further away from your
listening position than the front speakers.
l
The center speaker should be as close as possible to the TV
des oreilles au moment zzde l’ecoute. 11 n’est pas recommande de
mettre les enceintes par terre (sauf l’enceinte d’extremes graves ),
screen so that movie dialog is localized properly.
de votre position d’ecoute que les enceintes avant.
Attention
Retire2 les coussinets antiderapage
du
papier, et collezen quatre sur la base de chaque enceinte satellite. Les
enceintes actuellement fournies peuvent differer de
celles montrees sur l’illustration.
Caution
recommandons, toutefois, de ne pas raccorder et utiliser
Placer les enceintes
L’endroit de la piece on vous placerez vos enceintes aura un effet
important sur la qualite sonore. Le guide suivant peut vous aider a
obtenir le meilleur son possible de votre appareil.
l
Vous pouvez placer l’enceinte d’extremes graves par terre. Dans
f’ideal, les autres enceintes devraient se trouver environ au niveau
ou de les monter trop haut au mur.
l
Pour obtenir un meilleur effet stereo, placez les enceintes avant
a une distance de
l
hes encemtes surround ne devraient pas se trouver aussi loin
l
L’enceinte centrale devrait se trouver le plus p&s possible de
2-3
metres (CL9 pieds) entre elles.
l’ecran du televiseur afin que les dialogues du film soient localis&
correctement
Front R
Avant L 5x,
Su bdoofer
Enceinte d’extremes graves
Surround L
Surround L Surround R
Avant R
Surround R
En/Fr
Page 14
Note
Eli
If you install the center speaker on top of your n, be
sure to secure it with tape or by some other suitable
means. An unsecured speaker may fall from the TV due
to external shocks such as earthquakes, endangering
those nearby or damaging the speaker.
Important
A
The front and center speakers supplied with this system
are magnetically shielded. However, placing them
extremely close to a television may result in color
distortion on the screen. If this happens, move the
speaken a little further away and switch off the
television for 15-30 minutes.
The subwoofer and surround speakers are not
magnetically shielded, so they should not be placed
near a TV or monitor.
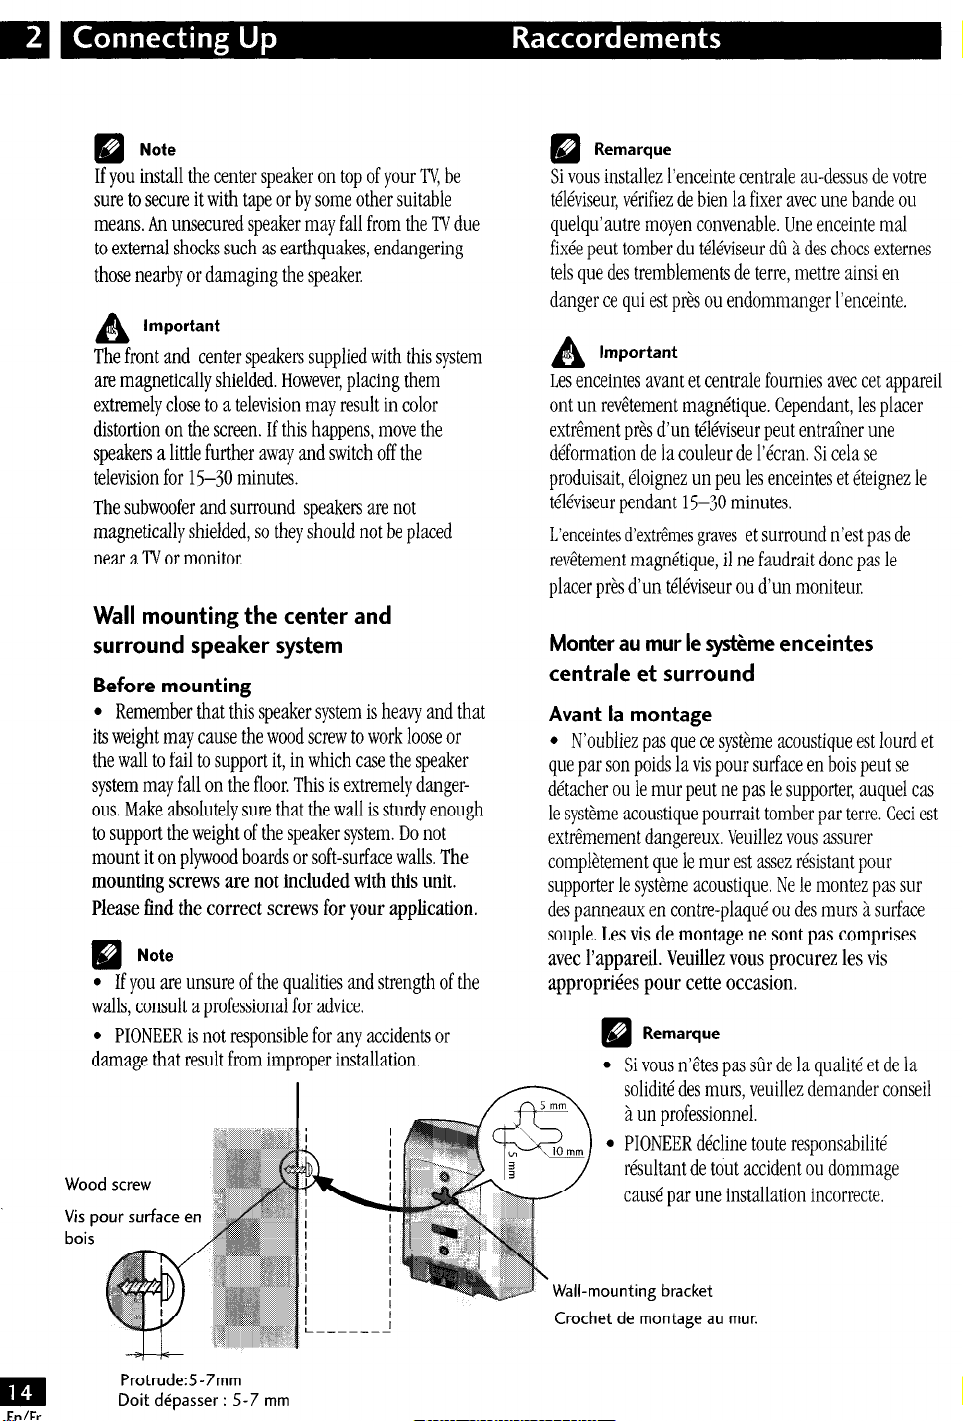
Wall mounting the center and
surround speaker system
Before mounting
l
Remember that this speaker system is heavy and that
its weight may cause the wood screw to work loose or
the wall to fail to support it, in which case the speaker
system may fall on the floor. This is extremely dangerous. Make absolutely sure that the wall is sturdy enough
to support the weight of the speaker system. Do not
mount it on plywood boards or soft-surface walls.
The
mounting screws are not included with this unit.
Please find the correct screws for your application.
Note
6l
l
If you are unsure of the qualities and strength of the
walls, consult a professional for advice.
l
PIONEER is not responsible for any accidents or
damage that result from improper installation.
Wood screw
Vis pour sutface en
bois
Remarque
El
Si vous installer l’enceinte centrale au-dessus de votre
t&viseur, virifiez de bien la fixer avec une bande ou
quelqu’autre moyen convenable. Une enceinte ma1
fix6e peut tomber du t&viseur dij 2 des chocs externes
tels que des tremblements de terre, mettre ainsi en
danger ce qui est pr2s ou endommanger l’enceinte.
Important
A
Les enceintes avant et centrale fournies avec cet appareil
ont un revetement magnktique. Cependant, les placer
extrement pr&s d’un t&viseur peut entra7ner une
dgformation de la couleur de l’kcran. Si cela se
produisait, kloignez un peu les enceintes et iteignez le
t&viseur pendant 15-30 minutes.
L’enceintes d’extr6mes graves et surround n’est pas de
rev6tement magn&ique, il ne faudrait done pas le
placer p&s d’un t@viseur ou d’un moniteur,
Monter au mur le systkme enceintes
centrale et surround
Avant la montage
l
N’oubliez pas que ce systgme acoustique est lourd et
que par son poids la vis pour surface en bois peut se
d&acher ou le mur peut ne pas le supporter, auquel cas
le systhme acoustique pourrait tomber par terre. Ceci est
extr6mement dangereux. Veuillez vous assurer
compl&ement que le mur est asset risistant pour
supporter le syst2me acoustique. Ne le montez pas sur
des panneaux en contre-plaqu6 ou des murs 2 surface
souple.
Les vis de
montage
ne sent pas comprises
avec l’appareil. Veuillez vous procurez les vis
appropriies pour cette occasion.
l
Si vous n’ztes pas stir de la qualit et de la
solidit des murs, veuillez demander conseil
A un professionnel.
l
PIONEER d&line toute responsabiliti
risultant de tout accident ou dommage
caus6 par une installation incorrecte,
ProtrudeS-7mm
Doit d6passer : S-7 mm
Wall-mounting bracket
Crochet de montage au mur.
Page 15
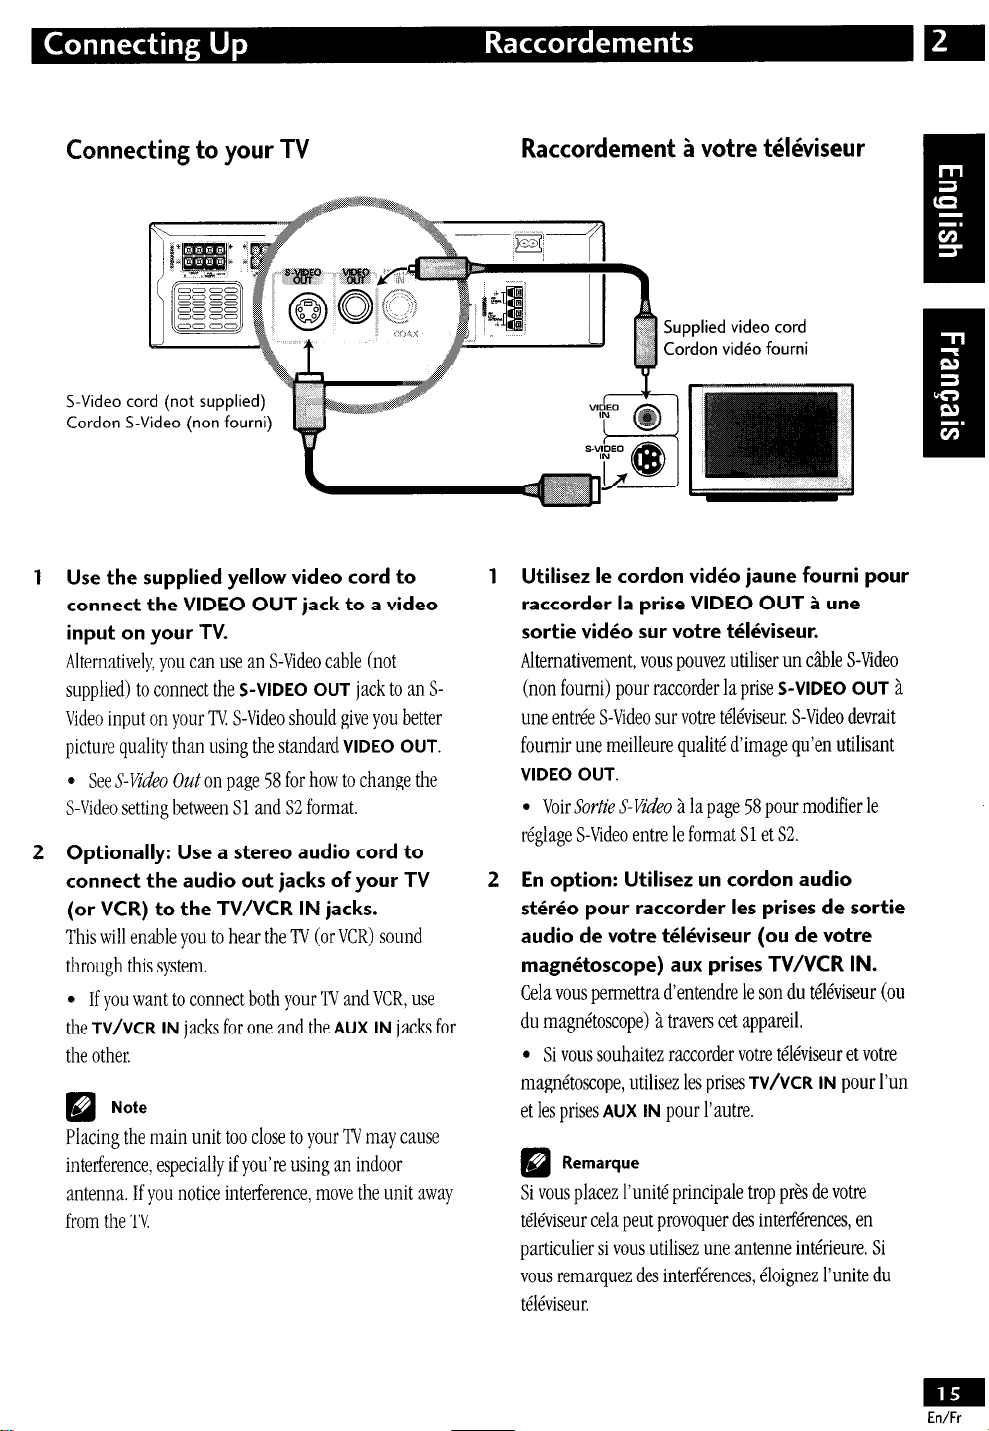
Connecting to your TV Raccordement A votre t6kiseur
Supplied video cord
Cordon vidko fourni
S-Video cord (not supplied)
Cordon S-Video (non fourni)
1 Use the supplied yellow video cord to
connect the VIDEO OUT jack to a video
input on your TV.
Alternatively you can use an S-Video cable (not
supplied) to connect the
S-VIDEO OUT
jack to an SVideo input on your TV S-Video should give you better
picture quality than using the standard
VIDEO OUT.
* See S-Video OUT on page 58 for how to change the
S-Video setting between Sl and S2 format.
2 Optionally: Use a stereo audio cord to
connect the audio out jacks of your TV
(or VCR) to the TV/VCR IN jacks.
This will enable you to hear the TV (or VCR) sound
through this system.
l
If you want to connect both your TV and VCR, use
the
TV/VCR IN
jacks for one and the
AUX IN
jacks for
the other.
Note
El
Placing the main unit too close to your TV may cause
interference, especially if you’re using an indoor
antenna. If you notice interference, move the unit away
from the TV
1 Utilisez le cordon video jaune fourni pour
raccorder la prise VIDEO OUT a une
sortie video sur votre televiseur.
Uernativement, vous pouvez utiliser un c&ble S-Video
(non fourni) pour raccorder la prise
S-VIDEO OUT i
une entree S-Video sur votre televiseur. S-Video devrait
fournir une meilleure qualite d’image qu’en utilisant
VIDEO OUT.
l
Voir Sortie S-Video a la page 58 pour modifier le
reglage S-Video entre le format Sl et S2.
En option: Utilisez un cordon audio
2
stereo pour raccorder les prises de sortie
audio de votre televiseur (ou de votre
magnetoscope) aux prises TV/VCR IN.
Cela vous permettra d’entendre le son du t&%iseur (ou
du magnetoscope) a travets cet appareil.
l
Si vous souhaitez raccorder votre televiseur et votre
magnetoscope, utilisez les prises
et les prises
Eii
AUX IN
Remarque
pour
l'wtre.
TV/VCR IN
pour l’un
Si vous place2 l’unite principale trop p&s de votre
televiseur cela peut provoquer des interferences, en
particulier si vous utilisez une antenne interieure. Si
vous remarquez des interferences, eloignez l’unite du
televiseur.
En/Fr
Page 16

Connecting the supplied antennas
Raccordement des antennes
fournies
FM wire antenna
Fil d’antenne FM
AM loop antenna
Antenne cadre AM
The supplied antennas provide a simple way to listen to
AM and FM radio. If you find that reception quality is
poor, an outdoor antenna should give you better sound
quality-see Connecting extwnal antenrus below for
more on how to do this.
AM
loop antenna
Pull off the protective shields of both AM
antenna wires.
Press the antenna terminal tabs to open
and insert one wire into each terminal.
Release the tabs to secure the AM an-
tenna wires.
Bend the stand in the direction indicated
by the arrow (see fig. A below).
Clip the loop onto the stand (fig. B).
Place the AM antenna on a flat surface
and point in the direction giving the best
reception.
Avoid placing near computers, television sets or other
electrical appliances and do not let it come into contact
with metal objects.
Les antennes fournies fournissent un moyen simple
d’ecouter la radio AM et FM. Si vous trouvez que la
qualite de la reception est pauvre, une antenne
exterieure rne devrait offrir une meilleure qualite
sonore-voir Raccordement d’antennes externes cidessous pour plus de details.
Antenne cadre AM
Retire2 les protections des deux fils de
l’antenne AM.
Pressez les languettes des bornes
d’antenne pour ouvrir et inserez un fil
dans chaque borne.
Rekhez les languettes pour fixer les fils
de l’antenne AM.
Courbez le support dans le sens indique
par la fleche (voir fig. A ci-dessous).
Accrochez le cadre au support (fig. B).
Placez l’antenne AM sur une surface plate
et pointez-la dans la direction offrant la
meilleure reception.
6vitez de la placer p&s d’ordinateurs, de pastes de
t&%ision ou d’autres appareils electriques et ne la
laissez pas entrer en contact avec des objets metalliques
.
mm
ErdFr
fig. A
fig. B
fig. c
Page 17
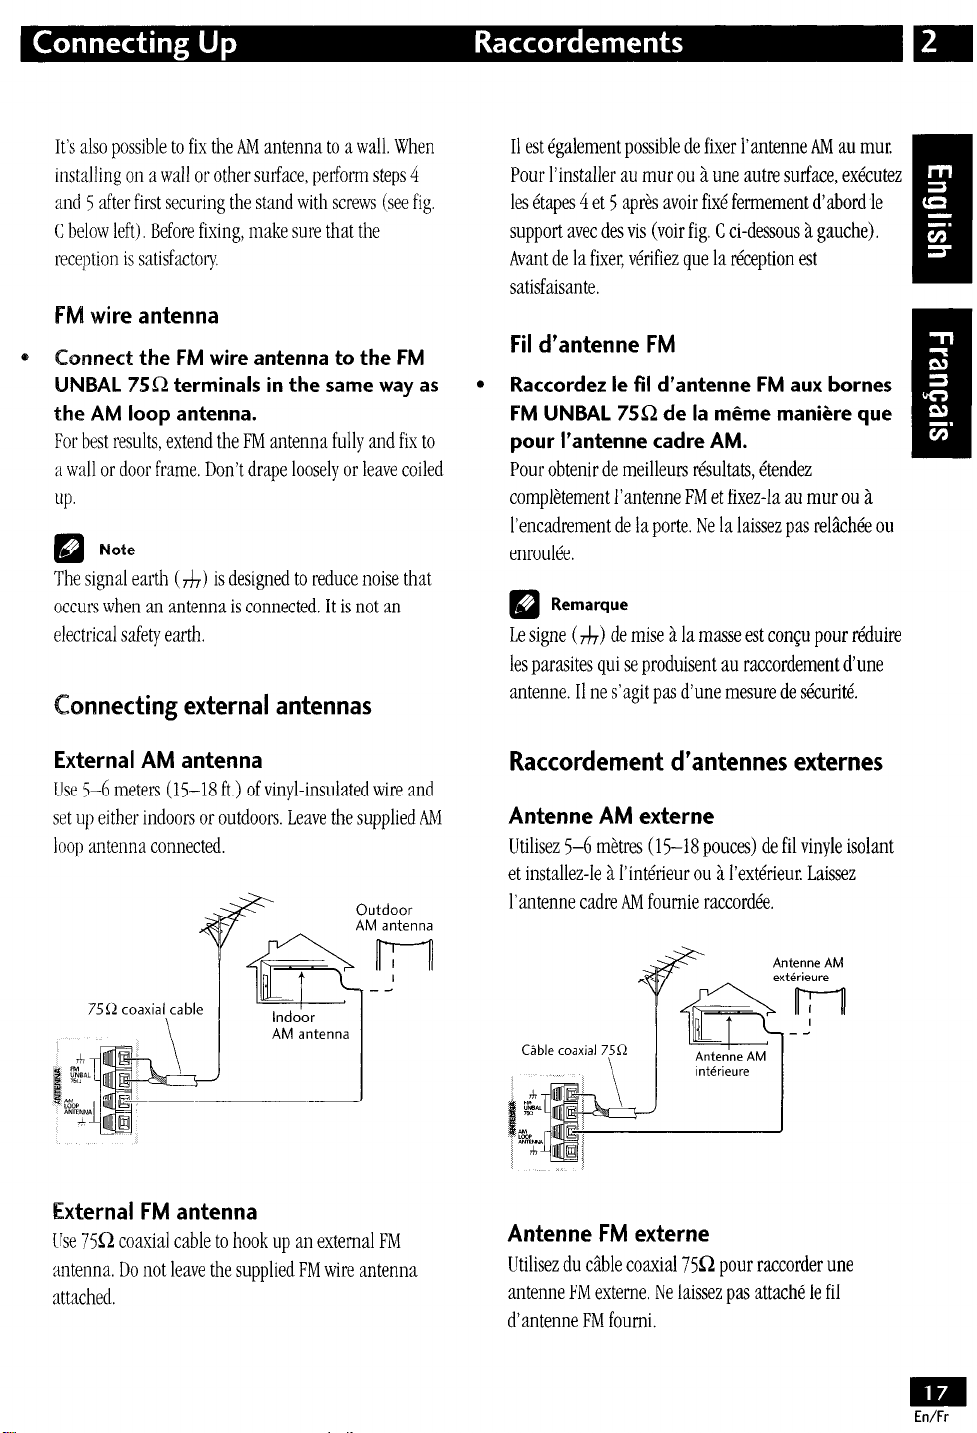
It’s also possible to fix the AM antenna to a wall. When
installing on a wall or other surface, perform steps 4
and 5 after first securing the stand with screws (see fig.
C below left). Before fixing, make sure that the
reception is satisfactory.
FM wire antenna
a
ormect the FM wire antenna to the FM
UNBAL 75Q terminals in the same way as
the AM loop antenna.
For best results, extend the FM antenna fully and fix to
a wall or door frame. Don’t drape loosely or leave coiled
UP,
Note
m
The signal earth (J,) is designed to reduce noise that
occurs when an antenna is connected. It is not an
electrical safety earth.
onnecting external antennas
11 est egalement possible de fixer l’antenne AM au mur.
Pour l’installer au mur ou a une autre surface, execute2
les &tapes 4 et 5 apres avoir fix6 fermement d’abord le
support avec des vis (voir fig. C ci-dessous 21 gauche).
Avant de la fixer, verifiez clue la reception est
satisfaisante.
Fil d’antenne FM
Raccordez ie fil d’antenne FM aux bornes
l
FM UNBAL 75!2 de la m&me manike que
pour l’antenne cadre AM.
Pour obtenir de meilleurs resultats, etendez
completement l’antenne FM et fixez-la au mur ou 2
l’encadrement de la Porte. Ne la laissez pas relgchee ou
enroulee.
Remarque
El
Le signe (J,-) de mise a la masse est con$u pour reduire
les parasites qui se produisent au raccordement d’une
antenne. 11 ne s’agit pas d’une mesure de securite.
-
Ii
External AM antenna
Use
5-6
meters (15-H ft.) of vinyl-insulated wire and
set up either indoors or outdoors. Leave the supplied AM
loop antenna connected.
Outdoor
75Q
coaxial cable
AM antenna
External FM antenna
tIse 75Q coaxial cable to hook up an external FM
antenna. Do not leave the supplied FM wire antenna
attached.
Raccordement d’antennes externes
Antenne AM externe
Utilisez
5-6
metres (15-18 pouces) de fil vinyle isolant
et installez-le a l’interieur ou a l’exterieur. Laissez
l’antenne cadre AM fournie raccordee.
Antenne AM
ext&ieure
Cable coaxial 7
Antenne FM externe
Utilisez du cable coaxial 75&2 pour raccorder une
antenne FM externe, Ne laissez pas attache le fil
d’antenne FM fourni.
En/Fr
Page 18
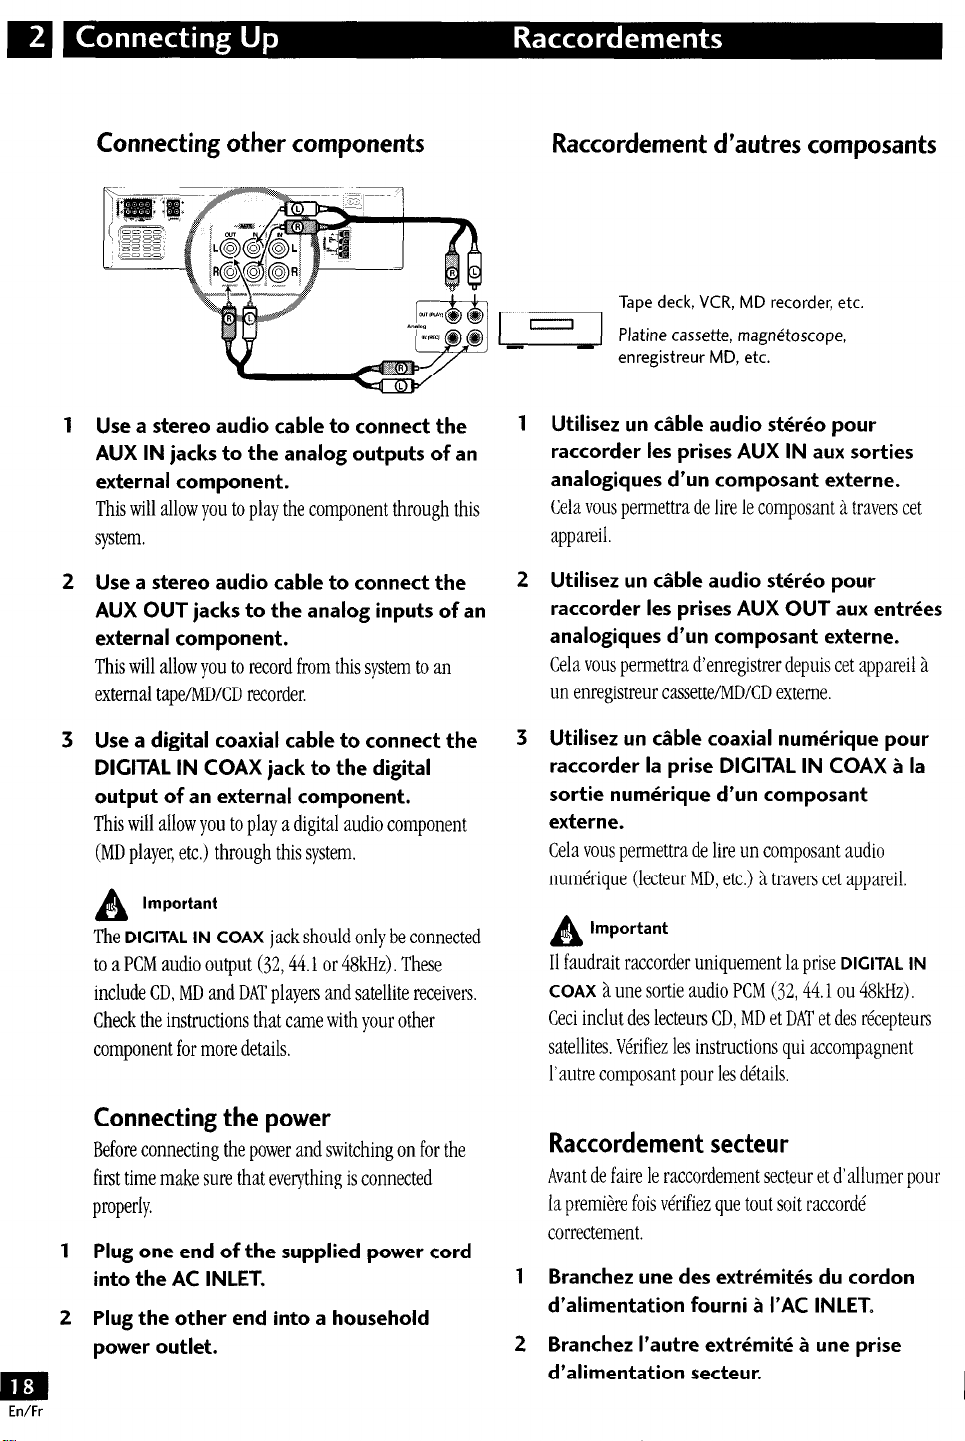
Connecting other components
Raccordement d’autres composants
1
Use a stereo audio cable to connect the
AUX IN jacks to the analog outputs of an
external component.
This will allow you to play the component through this
system.
2
Use a stereo audio cable to connect the
AUX OUT jacks to the analog inputs of an
external component.
This will allow you to record from this system to an
external tape/MD/CD recorder.
3
Use a digital coaxial cable to connect the
DIGITAL IN COAX jack to the digital
output of an external component.
This will allow you to play a digital audio component
(MD player, etc.) through this system.
Important
A
The DIGITAL IN COAX
jack should only be connected
to a PCM audio output (32,44.1 or 48kHz). These
include CD, MD and DAT playets and satellite receivers.
Check the instructions that came with your other
component for more details.
Tape deck, VCR,
Platine cassette,
-
enregistreur MD, etc.
Utilisez un cable audio stereo pour
raccorder les prises AUX IN aux sorties
analogiques d’un composant externe.
MD recorder, etc.
magn&oscope,
Cela vous permettra de lire le composant a travers cet
appareil.
Utilisez un cable audio stereo pour
raccorder les prises AUX OUT aux entrees
analogiques d’un composant externe.
Cela vous permettra d’enregistrer depuis cet appareil a
un enregistreur cassette/MD/CD externe.
Utilisez un cable coaxial numerique pour
raccorder la prise DIGITAL IN COAX a la
sortie numerique d’un composant
externe.
Cela vous permettra de lire un composant audio
numerique (lecteur MD, etc.) a travers cet appareil,
Important
A
11 faudrait raccorder uniquement la prise
COAX
a une sortie audio PCM (J&44.1
DIGITAL IN
ou
48kHz).
Ceci inclut des lecteurs CD, MD et DAT et des recepteuts
satellites. Verifiez les instructions qui accompagnent
l’autre composant pour les details
Connecting the power
Before connecting the power and switching on for the
first time make sure that everything is connected
properly.
1
Plug one end of the supplied power cord
into the AC INLET.
2
Plug the other end into a household
power outlet.
Raccordement secteur
Avant de faire le raccordement secteur et d’allumer pour
la premiere fois verifiez que tout soit raccorde
correctement.
Branches une des extremites du cordon
d’alimentation fourni a I’AC INLET-
Branches l’autre extremite a une prise
d’alimentation secteur.
Page 19
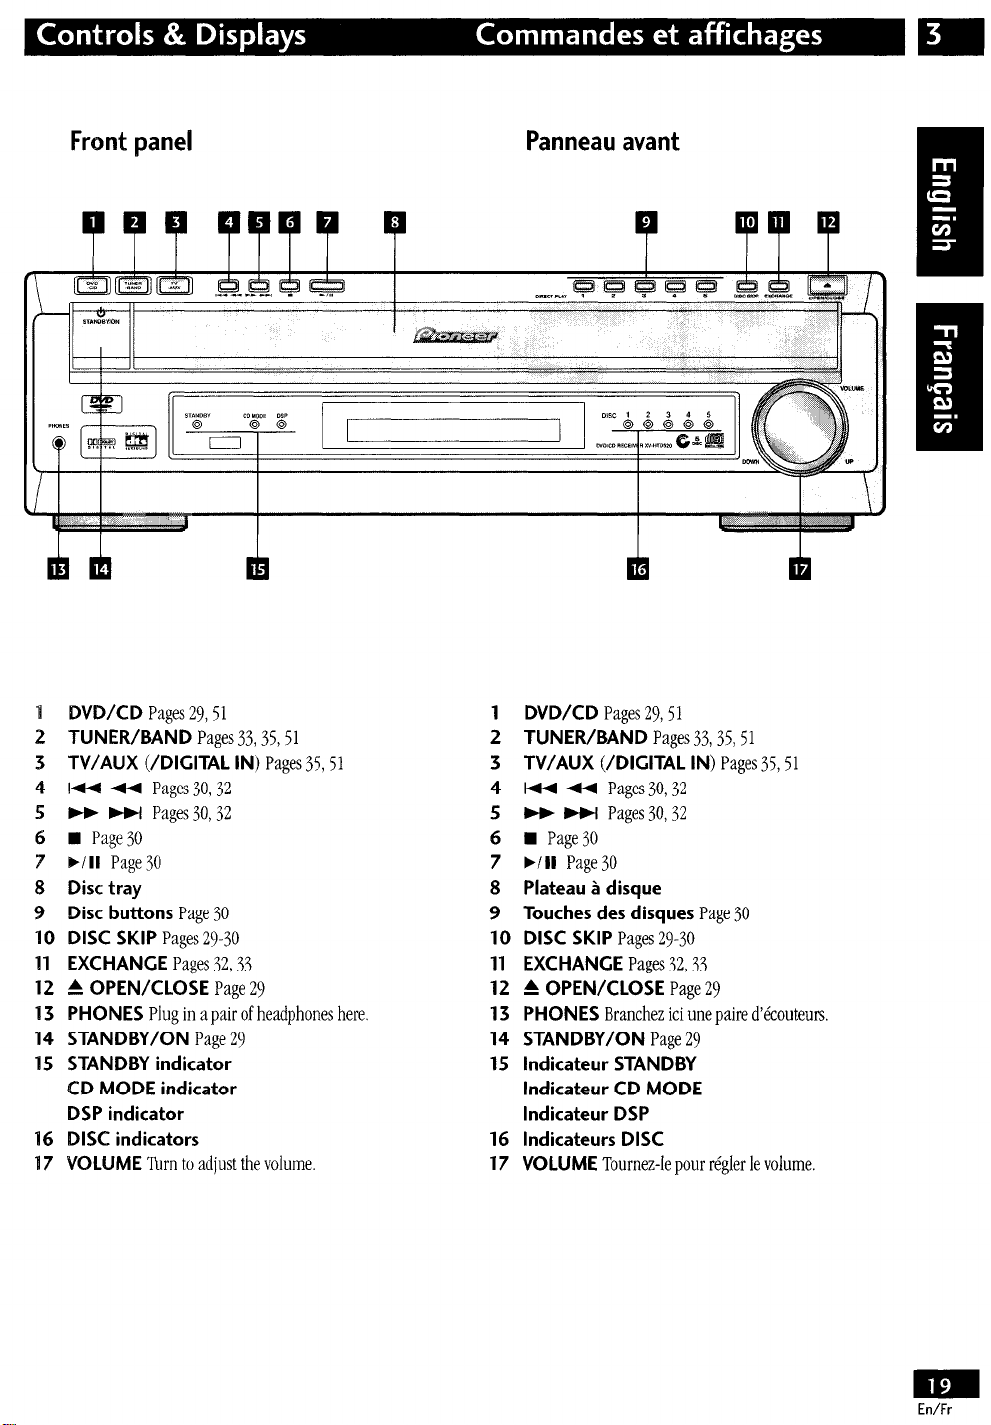
Front panel Panneau avant
1 DVD/CD
Pages 29,51
2 TUNER/BAND Pages 33,35,51
3 TV/AUX (/DIGITAL IN) Pages 35,51
4
lu u Pages 30,32
S bb b+l Pages30,32
6 n
Page 30
7 b/U Page30
8 Disc tray
9 Disc buttons Page 30
IO DISC SKIP Pages
29-30
11 EXCHANGE Pages 32,33
12 k OPEN/CLOSE Page
29
13 PHONES Plug in a pair of headphones here.
14 STANDBY/ON Page ‘29
15 STANDBY indicator
CD MODE indicator
DSP indicator
16 DISC indicators
17 VOLUME ‘Ibrn to adjust the volume.
1 DVD/CD Pages 29,51
2 TUNER/BAND Pages 33,35,51
3 TV/AUX (/DIGITAL IN) Pages 35,51
4
I44 44 Pages30,32
5 bb FWl Pages 30,32
6 n
Page 30
7
b/II Page30
8 Plateau a disque
9 Touches des disques Page 30
10 DISC SKIP Pages 29-30
11 EXCHANGE Pages 32,33
12 = OPEN/CLOSE Page 29
13 PHONES Branchez ici une paire d’kouteun
14 STANDBY/ON Page ‘29
1S lndicateur STANDBY
lndicateur CD MODE
lndicateur DSP
16 lndicateurs DISC
17 VOLUME Tournez-le pour rigler le volume.
EdFr
Page 20
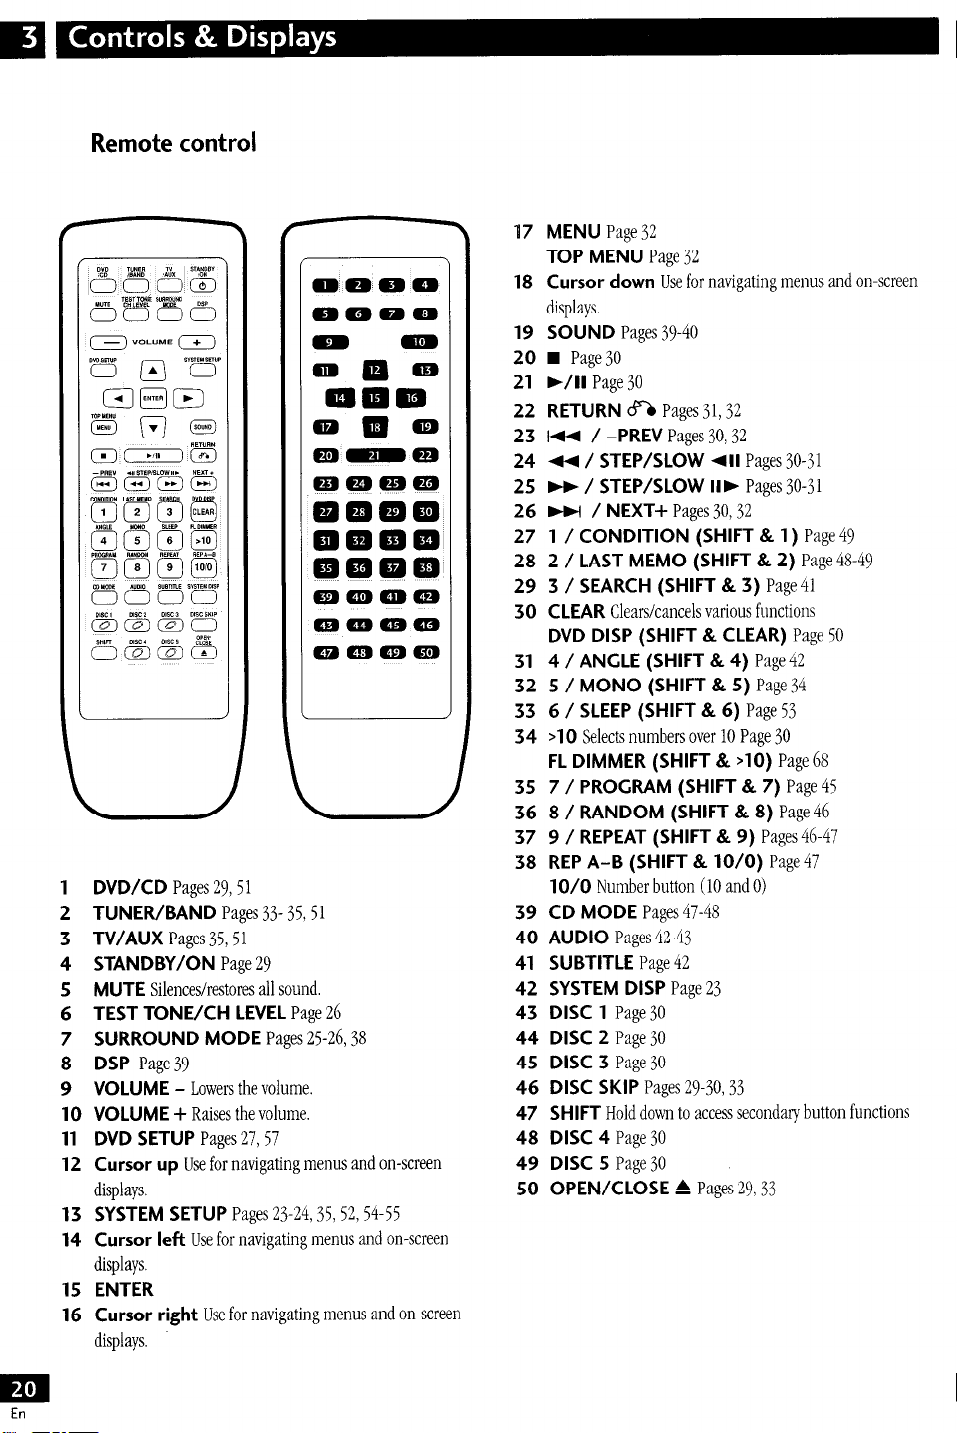
Remote control
.
1 DVD/CD Pages 2951
2 TUNER/BAND Pages 33- 35,51
3 TV/AUX Pages 35,51
4 STANDBY/ON Page 29
5 MUTE Silences/restores all sound.
6 TEST TONE/CH LEVEL Page 26
7 SURROUND MODE Pages 25-26, $3
8 DSP Page39
9 VOLUME - Lowers the volume.
10 VOLUME + Raises the volume.
11 DVD SETUP Pages 27,57
12 Cursor up IJse for navigating menus and on-screen
displays.
13 SYSTEM SETUP Pages 2324,35,52,54-55
14 Cursor left use for navigating menus and on-screen
displays.
15 ENTER
16 Cursor right Use for navigating menus and on-screen
displays.
17 MENU Page 32
TOP MENU Page 32
18 Cursor down Use for navigating menus and onscreen
displays.
19 SOUND Pages 39-40
20 n Page 30
21 b/II Page 30
22 RETURN cf% Pages 31,32
23 Ia / -PREV Pages 30,32
24 U / STEP/SLOW 411 Pages 30-31
25 bb / STEP/SLOW
llb
Pages 30-31
26 bbl / NEXT+ Pages 30,32
27 1 / CONDITION (SHIFT & 1) Page49
28 2 / LAST MEMO (SHIFT & 2) Page 48-49
29 3 / SEARCH (SHIFT & 3) Page41
30 CLEAR Clears/cancels various functions
DVD DISP (SHIFT & CLEAR) Page 50
31 4 / ANGLE (SHIFT & 4) Page42
32 5 / MONO (SHIFT & 5) Page 34
33 6 / SLEEP (SHIFT & 6) Page 53
34 >lO Selects numbers over 10 Page 30
FL DIMMER (SHIFT & >lO) Page 68
35 7 / PROGRAM (SHIFT & 7) Page 45
36 8 / RANDOM (SHIFT & 8) Page 46
37 9 / REPEAT (SHIFT & 9) Pages 46-47
38 REP A-B (SHIFT & 10/O) Page 47
1 O/O Number button (10 and 0)
39 CD MODE Pages 47-48
40 AUDIO Pages 42-43
41 SUBTITLE Page 42
42 SYSTEM DISP Page 23
43 DISC 1 Page30
44 DISC 2 Page 30
45 DISC 3 Page 30
46 DISC SKIP Pages 2930,33
47 SHIFT Hold down to access secondary button functions
48 DISC 4 Page 30
49 DISC 5 Page 30
SO OPEN/CLOSE = Pages 2933
Page 21
l3kommande
1 DVD/CD Pages 2951
2 TUNER/BAND Pages
3 TV/AUX Pages 35,51
4 STANDBY/ON Page 29
5 MUTE Coupe/retablit tous les sons.
6 TEST TONE/CH LEVEL Page
7
SURROUND MODE Pages &26,38
8 DSP Page39
9 VOLUME - Baisse le volume.
10 VOLUME + Augmente le volume.
11 DVD SETUP Pages 27,57
12 Curseur vers le haut Sert a naviguer parmi les menus
et les affichages a l’ecran.
13 SYSTEM SETUP Pages Z-24,35,52,54-55
14 Curseur vers la gauche Sert a naviguer parmi fes
menus et fes affichages a l’ecran.
1S ENTER
16 Curseur vers la droite Sert a naviguer parmi les
menus et les affichages a l’ecran.
33.35,51
26
17 MENU Page 32
TOP MENU Page 32
18 Curseur vers le bas Sert a naviguer parmi les menus et
les affichages a l’ecran
19 SOUND Pages 39-40
20
1 Page 30
21 b/II Page 30
22 RETURN cf% Pages 31,32
23 m / -PREV Pages 30,32
24 U / STEP/SLOW 411 Pages 30-31
25 w / STEP/SLOW
26
bbi / NEXT+ Pages 30,32
lib
Pages 30-31
27 1 / CONDITION (SHIFT & 1) Page49
28 2 / LAST MEMO (SHIFT & 2) Page 48-49
29 3 / SEARCH (SHIFT & 3) Page 41
30 CLEAR Supprime/annule plusieurs fonctions
DVD DISP (SHIFT & CLEAR) Page 50
31 4 / ANGLE (SHIFT & 4) Page 42
32 5 / MONO (SHIFT i% 5) Page 34
33 6 / SLEEP (SHIFT & 6) Page 53
34 >lO Selectionne les numeros superieurs a 10 Page 30
FL DIMMER (SHIFT & >lO) Page 68
35 7 / PROGRAM (SHIFT & 7) Page 45
36 8 / RANDOM (SHIFT & 8) Page 46
37 9 / REPEAT (SHIFT & 9) Pages 46-47
38 REP A-B (SHIFT & 10/O) Page 47
1 O/O Touche numerotee (IO et 0)
39 CD MODE Pages 47-48
40 AUDIO Pages 42-43
41 SUBTITLE Page 42
42 SYSTEM DISP Page 23
43
DISC 1 Page30
44
DISC 2 Page 30
45
DISC 3 Page 30
46 DISC SKIP Pages 29.30,33
47 SHIFT Maintenez press6 pour acceder aux fonctions
secondaires de la touche
48
DISC 4 Page 30
49 DISC 5 Page 30
SO OPEN/CLOSE = Pages 2933
Fr
Page 22
Display Afficheur
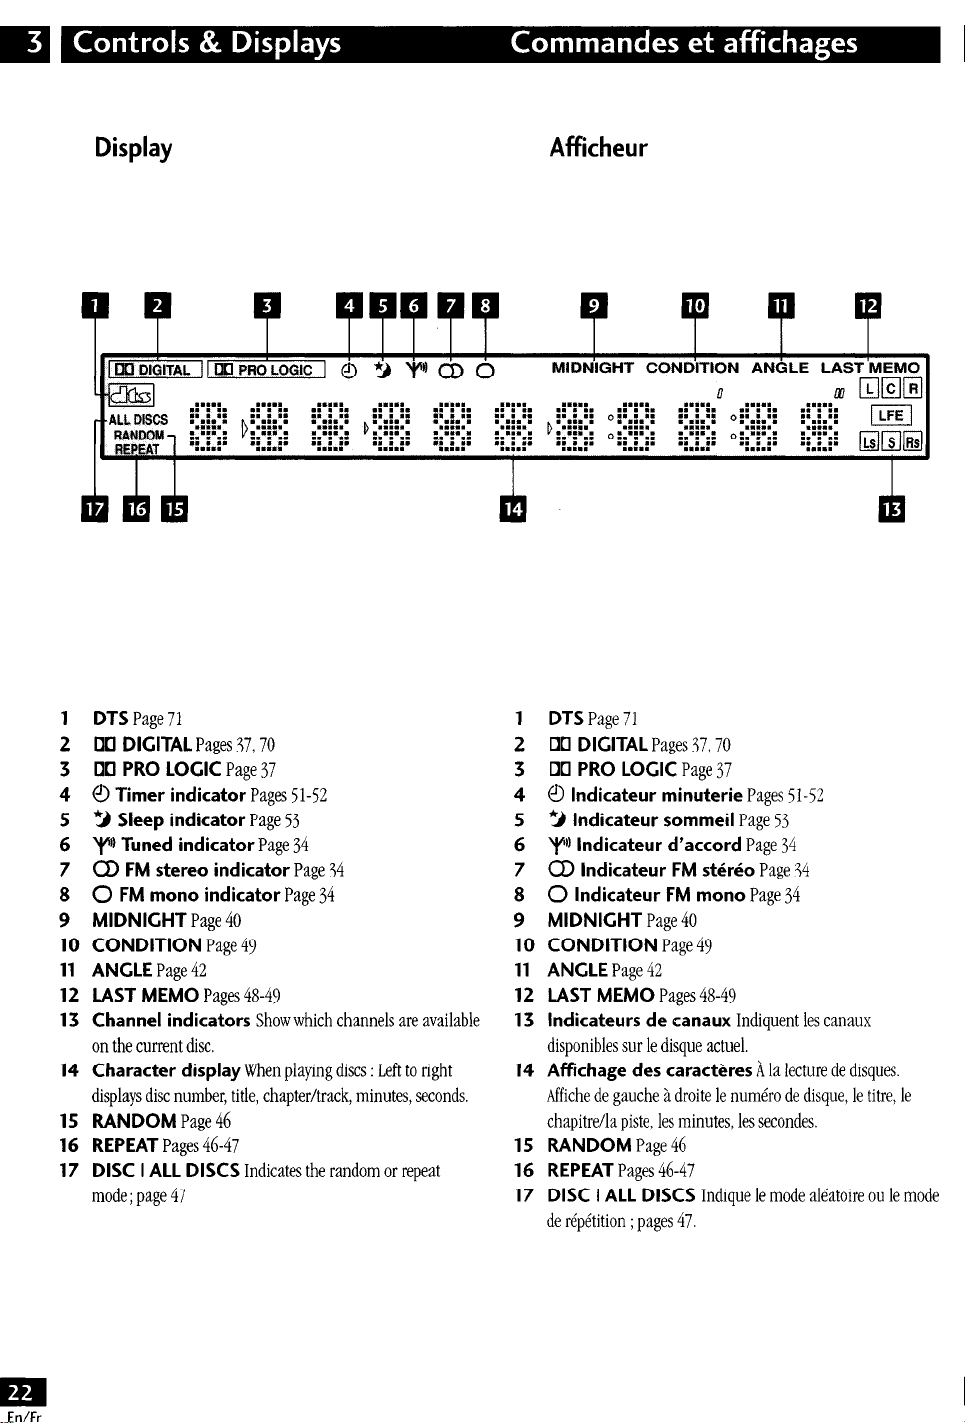
MIDNIGHT CONDITION ANGLE LAST MEMO
A’?!- 2-e=!-
11 R/,Nn@,,T :y::: !+3:;
-~.~.~- . . . . . . . . . . ..,.. ..a.. . . . . . . . . . . ,.... .,.*.
g,.:.,;
::::: ::::: u::: ::::: 0::::: ::::: *::::: :::::
. . . . . =s:. ..:::.-
. . . . . . . . . . . . . . .
b;;‘;;;
:; : :; . . . . . . . . . . o:.‘:‘.:
..,.. . . . . . .,... -:.:.r
b:.#ti.: ‘.:::.’ ‘,:::,’ ‘.:::.’ :,r:;.:
*:.:.:= l :.:.:* l :.:.:*
n Lz7 lIri.kJM
!:.y;$ o:.‘:‘.:
::g: liqilliiq
m
1 DTS
2 DCI DIGITAL
3
4
5 3 Sleep indicator
6 yjj Tuned indicator
7 a FM stereo indicator
8 0 FM mono indicator
9 MIDNIGHT
10 CONDITION
11 ANGLE
12 LAST MEMO
13 Channel indicators
Page 71
Pages 37,70
00 PRO LOGIC
@ Timer indicator
Page 40
Page 49
Page 42
Pages 48-49
Page 37
Pages 51-52
Page 53
Page 34
Page 34
Page 34
Show which channels are available
on the current disc.
14 Character display
When playing discs : Left to right
displays disc number, title, chapter/track, minutes, seconds.
15 RANDOM
16 REPEAT
17 DISC I ALL DISCS
Page 46
Pages 46-47
Indicates the random or repeat
mode ; page 47
1 DTS
2 IIKI DIGITAL
3
4 a lndicateur minuterie
5 3 lndicateur sommeil
6 ‘+Q lndicateur d’accord
7 a lndicateur FM stereo
8 0 lndicateur FM mono
9 MIDNIGHT
10 CONDITION
11 ANGLE
12 LAST MEMO
13 lndicateurs de canaux
Page 71
Pages 37,70
El PRO LOGIC
Page 40
Page 42
Pages 48-49
Page 37
Pages 51-52
Page 53
Page 34
Page 34
Page 34
Page 49
Indiquent les canaux
disponibles sur le disque actuel.
14 Afkhage des caracteres
A la lecture de disques.
Affiche de gauche a droite le numero de disque, le titre, le
chapitre/la piste, les minutes, les secondes.
1S RANDOM
16 REPEAT
17 DISC I ALL DISCS
Page 46
Pages 46-47
Indique le mode aleatoire ou le mode
de repetition ; pages 47.
m
EdFr
Page 23
Switching on and setting
the clock
This system has a built-in clock, which
needs to be set to be able to use the
timer features.
Mise sous tension et
@age de l’horloge
Cet appareil a une horfoge integree qui
doit 6tre reglee pour pouvoir utiliser les
caracteristiques de la minuterie.
Press & to switch on.
Press SYSTEM SETUR
Press the 4 or F button until
you see TIMER in the display.
Press ENTER.
Press 4 or k until you see
CLOCK ADJ in the display.
Press ENTER.
The display shows a clock, with the
hour blinking.
Use the A and v buttons to set
the hour, then press ENTER.
Use the A and v buttons to set
the minute, then press ENTER.
The display blinks to indicate that the
time has been set.
Tip
4%
l
Press
SYSTEM DISP
anytime to see
the clock when the system is on or in
standby.
Appuyez sur (!I pour mettre
l’appareil sous tension.
Appuyez sur SYSTEM SETUR
Appuyez sur la touche 4 ou F
jusqu’a ce que vous voyiez
TIMER sur l’affichage.
Appuyez sur ENTER.
Appuyez sur 4 ou b jusqu’a ce
que vous voyiez CLOCK ADJ sur
l’affkhage.
Appuyez sur ENTER.
L’afficheur montre une horloge avec
les heures qui clignotent.
Utilisez les touches A et v pour
regler les heures, puis appuyez
sur ENTER.
Utilisez les touches A et v pour
regler les minutes, puis appuyez
sur ENTER.
L’afficheur clignote pour indiquer que
l’heure a et6 reglee.
Astute
43
l
Appuyez sur
SYSTEM DISP
a tout
moment pour voir l’horloge quand
l’appareil est sous tension ou en veille.
m
En/Fr
Page 24
Setting up for surround
sound
You can use this system right out of the
box for surround sound with just the
default settings. However, for really
great surround sound, we recommend
that you spend a few minutes making
some settings that match this system to
your listening room. Unless you
change the layout of your speakets or
main listening position, you only need
to make most of these settings once.
Setting the speaker
distances
1 Press SYSTEM SETUP.
2 Press the 4 or b button until
you see FRT. SP in the display.
3 Use the A and v buttons to set
the distance from your main
listening position to the front
speakers.
Ideally, your listening position should
be equidistant from the two front
speakers.
The default setting is 3m. You can
adjust the range from 03m to 9.Om in
steps of 03m.
4
Press w to move on to the
CENTER speaker setting.
5 Use the A and v buttons to set
the distance from your main
listening position to the center
speaker.
The default setting is 3m. You can
adjust the range from 0.3m to 9,Om in
steps of 03m.
6
Press b to move on to the
SURROUND speakers setting.
Configuration du son
surround
Vous pouvez utihser cet appareil
directement tel qu’il est fourni dans
l’emballage pour obtenir une qualite
du son surround en utilisant
simplement le reglage par defaut.
Cependant, pour obtenir un son
surround meilleur, nous
recommandons de prendre quelques
minutes a faire quelques reglages pour
accorder l’appareil a votre Salle
d’ecoute. A moins que vous changiez la
disposition de vos enceintes ou la
position d’ecoute principale, vous
n’avez besoin de faire ces reglages
qu’une seule fois.
Rkglage de la distance des
enceintes
1 Appuyez sur SYSTEM SETUP.
2 Appuyez sur la touche 4 ou b
jusqu’a ce que vous voyiez
FRT.SP sur l’afficheur.
3 Utiiisez les touches A et v pour
regler la distance a partir de
votre position principale
d’ecoute jusqu’aux enceintes
avant.
La position d’ecoute ideale devrait etre
equidistante a partir des deux enceintes
avant.
Le reglage par defaut est 3m. Vous
pouvez regler la portee entre 0,3m et
9,Om par pas de 0,3m.
4 Appuyez sur la touche B- pour
aller jusqu’au reglage d’enceinte
CENTER.
S Utilisez les touches A et V pour
regler la distance a partir de
votre position principale
d’ecoute jusqu’a l’enceinte
centrale.
Le reglage par defaut est 3m Vous
pouvez regler la port&e entre OS3m et
9,Om par pas de 0,3m.
6 Appuyez sur b pour aller
jusqu’au reglage des enceintes
SURROUND.
En/Fr
Page 25

Use the A and v buttons to set the distance
from your main listening position to the
surround speakers.
Ideally, your listening position should be equidistant
from the surround speakers.
The default setting is 3m. You can adjust the range
from 031 to 9.Om in steps of OJrn.
Utilisez les touches A et v pour r6gler la
distance h partir de votre position principale
d’kcoute jusqu’aux enceintes surround.
La position d’bcoute idiale devrait ctre kquidistante &
partir des deux enceintes surround.
Le rkglage par d6faut est 3m. Vous pouvez r6gler la
portbe entre 0,3m et 9,Om par pas de O,jrn.
Ill
Press ENTER to exit.
* The setting mode is automatically exited if no
operation is performed within 20 seconds.
e There are several other settings that you can make
from the System Setup menu to further tailor your
surround sound. See chapter 9 for more on this.
e The speaker distance settings have no effect when the
surround mode is set to
VlR.SURR.1
or
VlR.SURR.2.
See page 37 for more on surround modes.
Note
Ed
You can’t make these settings with the Record mode on.
See page 40 for how to switch the Record mode on/off,
Balancing the surround sound
You can further improve surround sound performance
by balancing the levels from the subwoofer, center and
surround speakers relative to the front left/right
speaken. To help you judge the sound level of each
speaker a test tone is played through each speaker in
turn (make sure that there are no headphones
connected). Adjust the levels until they all sound equal.
The levels you set here will apply to all surround modes.
However, you can set levels independently for each DSP
mode.
Note
a
@ It may not be possible to accurately adjust the
subwoofer level using this method. You may prefer to
leave it on its default setting and adjust it to your liking
later when playing surround-sound sources,
Q You cannot change the DSP mode when Record
mode is active (see Direct recording on page 40).
Appuyez sur ENTER pour quitter le mode.
l
Le mode de rkglage est automatiquement quitt6 si
aucune opiration ne s’effectue dans les 20 secondes.
l
11 existe plusieurs autres rkglages que vous pouvez
effectuer & partir du menu System Setup (menu de
configuration) pour mieux adapter votre son surround.
Voir chapitre 9 pour plus de d&ails.
l
Les rkglages de la distance des enceintes sont sans
effet quand le mode surround est r6gl6
ou VlR.SURR.2.
Voir page 37 pour plus de details sur
& VIR.SURR.I
les modes surround.
Remarque
El
Vous ne pouvez pas faire ces reglages avec le mode
d’enregistrement active. Voir page 40 pour comment
activer/d&activer le mode d’enregistrement.
Comment kquilibrer le son surround
Vous pouvez amiliorer la performance du son surround
en 6quilibrant les niveaux depuis les enceintes
d’extremes graves, centrale et surround relatives aux
enceintes avant droite/gauche. Pour vous aider 2 juger
du niveau du son de chaque enceinte, un test de tonalit
est lu 2 travers chaque enceinte simultaniment (vt!rifiez
que des icouteurs ne sont pas raccord&). Rdglez les
niveaux jusqu’& obtenir un son 6quilibr6.
Les niveaux que vous r6glez ici s’appliqueront & tous les
modes surround. Cependant, vous pouvez r6gler les
niveaux indkpendamment pour chaque mode DSP
Remarque
Eii
l
11 se peut qu’il ne soit pas possible de r6gler
correctement le niveau d’enceinte d’extremes graves en
utilisant cette m&hode. Vous pouvez le laisser au
rkglage par dkfaut et le rigler plus tard selon votre
pr6f6rence 2 la lecture de sources sonores surround.
l
Vous ne pouvez pas changer le mode DSP si le mode
d’enregistrement est actif, (voir Bz~eg&-e~& directe
on page 40).
Page 26

1 Press SURROUND MODE.
The surround mode can be set to
anything except
AUTO,
SURROUND
OFF
(No test tone is output in these
modes.)
2 Set the volume to a moderate
level.
3 Press TEST TONE (SHIFT & CH
LEVEL) to start the test tone
then adjust the volume to a
suitable level.
The test tone plays through each
speaker in turn:
l
Front left
l
Center
l
Front right
l
Surround right
l
Surround left
l
Subwoofer
4 Use the A and v buttons to
adjust the level of a speaker as
the test tone plays.
For best results, sit in your main
listening position when doing this. You
can adjust each speaker in the range of
+/-1OdB.
5 When you’re done, press TEST
TONE (SHIFT & CH LEVEL) to
turn off the test tone.
1 Appuyez sur SURROUND
MODE.
or
Vous pouvez faire tous les reglages du
mode surround sauf
OFF ou AUTO.
SURROUND
(11 n’y aura pas de test
de tonahte dans ces modes.)
2 Reglez le volume a un niveau
mod&&
3 Appuyez sur TEST TONE (SHIFT
& CH LEVEL) pour demarrer le
test de tonalite puis reglez le
volume principal au niveau
approprie.
Le test de tonalite lit a travers chaque
enceinte simultanement:
l
Avant gauche
l
Centrale
l
Avant droite
l
Surround droite
l
Surround gauche
l
Enceinte d’extremes graves
4 Utilisez les touches A et v pour
regler le niveau d’une enceinte
tel que le lit le test de tonalite.
Pour obtenir de meilleuts resultats
occupez votre position d’ecoute
pendant ce temps Vous pouvez regler
chaque enceinte dans une gamme de
+/-1OdB.
5 Apres quoi, appuyez sur TEST
TONE (SHIFT & CH LEVEL)
pour desactiver le test de
tonalite.
Page 27

Using the Setup
Navigator
Before playing any discs, we strongly
recommend using the Setup Navigator.
This makes all the basic DVD system
settings for you.
1 Make sure that the system is
switched on.
Also turn on your TV and make sure
that it is set to the correct video input.
l
If a disc that’s already loaded starts
to play, press n to stop it.
2 Press DVD SETUF!
The Setup Navigator on-screen display
(OSD) appears:
Utilisation du Setup
Navigator
Avant la lecture de disques, nous conseillons vivement &utiliser le Setup
Navigator. Celui-ci effectue i votre
place tous les riglages de base de la
cha?ne DVD.
1 V&ifiez que l’appareil est sous
tension.
Mettez kgalement sous tension votre
t&?viseur et vkrifiez qu’il est r6gl6 &
Pentree vid6o correcte.
l
Si la lecture d’un disque d&j&
charg6 dkmarre, appuyez sur H pour
l’arr&er,
2 Appuyez sur DVD SETUP
L’affichage i P&ran (OSD) de Setup
Navigator apparalt:
Iill
a setup “sl”g ,tle setup rhgator
L’ VMove ~Select ~ExI, ~
Navigate all of the following OSDs
using these controls:
A, V - cursor up/down
ENTER
- select the highlighted menu
option
4 - go back to the previous question
The control possibilities for the current
OSD are shown at the bottom of each
screen.
3 Select START.
l
If you decide not to use the Setup
Navigator, select
Auto Start Off
here instead.
Naviguez sur tous les OSD en utilisant
ces commandes:
A, V - curseur en haut/en bas
ENTER
- sklectionne l’option en
surbrillance du menu
4 - retournei la question antirieure
Les possibilit& de commande pour
1’OSD actuel sont montries sur la
partie inferieure de chaque &ran.
3 Wectionnez START.
l
Si vous dkcidez de ne pas utiliser le
Setup Navigator, st!lectionnez ici
Start
Off & sa place.
Auto
Page 28

4 Choose an OSD menu language.
5 Select the type of TV you have.
l
See Aspect ratio in the glossary on
page 70 if you’re unsure of the
difference between widescreen and
standard TVs.
6 Select ‘Save Changes’ to make
the settings.
4 Choisissez une langue pour le
menu OSD.
S Selectionnez le type de
televiseur que vous utilisez.
l
Voirmect ratio (rapport de
jirma(,l dans le glossaire de la page 70
si vous n’etes pas stir de la difference
entre un televiseur a &ran large et un
televiseur a &ran standard.
6 Selectionnez “Save Changes”
(Memoriser les changements)
pour confirmer les reglages.
M
En/b
.
.
7 Press DVD SETUP to exit.
Congratulations, set up is complete!
If you want to use the Setup Navigator
again at any time, it is available from
the
General
menu. Also, each
individual setting can be changed
using the appropriate menu option chapter 10 explains all menu options
in detail.
7 Appuyez sur DVD SETUP pour
quitter le mode.
Felicitations, vous aver regle votre
appareil!
Si vous souhaitez utiiiser a nouveau le
Setup Navigator a n’importe quel
moment, il est disponible depuis le
menu
General
(general). Aussi,
chaque reglage individuel peut etre
modifie en utilisant l’option correcte
du menu - le chapitre 10 explique
toutes les options du menu en details
Page 29

Playing DVDs, CDs and
Video CDs
The basic controls for playing discs are
covered here. Further functions are
detailed in chapter 7.
1
Press STANDBY/ON 6 to turn
on the player.
Press DVDKD.
2
Press OPEN/CLOSE = to open
3
the disc tray.
4 Load a disc.
lecture de DVD, de CD
et de Video CD
Les commandes de base pour la lecture
de disques sont ici d&rites. Des
fonctions plus completes sont detaillees
dans le chapitre 7.
1 Appuyez sur STANDBY/ON 6
pour mettre le lecteur sous
tension.
2 Appuyez sur DVDKD.
3 Appuyez sur OPEN/CLOSE =
pour ouvrir le plateau 5 disque.
4 Chargez un disque.
Load a disc with the label side facing
up, using the disc tray guide to align
the disc (if you’re loading a doublesided DVD disc, load it with the side
you want to play face down).
If you want to load more discs, press
DISC SKIP
to rotate the disc tray. You
can load up to five discs at once.
l
Do not place discs in the two
partially accessible disc spaces, as it’s
easy to misalign them. Use only the
front-most space.
l
When using the
DISC SKIP
button,
wait until the disc tray has come to a
complete stop before loading a disc; the
player may malfunction if a disc is
caught in the disc tray mechanism.
Charge2 un disque avec l’etiquette
toumee vets le haut, en utilisant le
guide du plateau a disque pour aligner
le disque (si vous chargez un disque
DVD a double face, chargez-le avec la
face que vous souhaitez lire tournee
vers le has) .
Si vous souhaitez charger plus de
disques, appuyez sur
DISC SKIP
pour
faire tourner le plateau a disque. Vous
pouvez charger un maximum de cinq
disques a la fois.
l
Ne placez pas les disques dans les
deux espaces partiellement accessibles,
puisqu’il est facile de les desaligner
Utilisez uniquement l’espace se
trouvant le plus en avant.
l
Si vous utilisez la touche
SKIP,
avant de charger un disque
DISC
attendez jusqu’a ce que le plateau a
disque s’arr&e completement, le
lecteur risque de ne pas fonctionner
correctement si un disque est attrape
dans le mecanisme du plateau a
disque.
En/Fr
Page 30

l
Do not rotate the disc tray by hand. Always use the
DISC SKIP
s Press ~/II to start playback of the disc just
loaded.
l
If you’re playing a DVD or Video CD, a menu may
button.
appear. See page 32 for how to navigate these.
l
Ne tournez pas le plateau A disque avec la main.
Utilisez toujours la touche
5 Appuyez sur F/II pour d6marrer la lecture du
dernier disque char&
l
h la lecture d’un DVD ou d’un Video CD, un menu
DISC SKIP.
devrait apparaitre. Voir la page 32 pour la manike d’y
naviguer.
Basic playback controls
Starts playback or pauses a disc that’s
playing (press again to restart playback).
DVD and Video CD only: Resumes playback
of a stopped disc.
n
44
w
I44
w
Numbers
>lO
DISC
1-S
Stops playback. DVD and Video CD only:
Display shows RESUME (press Ml to start
playback again from the last place
stopped).
Press & hold for fast reverse scanning.
(After 5 seconds, scanning continues even
after releasing the button: press
resume normal playback.)
On the front panel use: W 4
Press & hold for fast forward scanning.
(After 5 seconds, scanning continues even
after releasing the button: press b/II to
resume normal playback.)
On the front panel use: W M
Skips to the start of the current track or
chapter, then to previous tracks/chapters.
On the front panel use: W *
Skips to the next track or chapter.
On the front panel use: W W
If the disc is stopped, playback starts from
the selected track or title number. If the
disc is playing, playback jumps to the start
of the selected track or chapter number.
Selects tracks/titles/chapters 11 and over.
(For example, for 24, press
Starts playing the selected disc.
(On the front panel use:
b/II
>lO , 2,4.)
1-S).
to
Commandes de base de lecture
b/II
44
bb
I44
bw
Numkos
>lO
Demarre la lecture ou met sur pause un
disque en tours de lecture (appuyez de
nouveau pour redemarrer la lecture).
Uniquement DVD et Video CD : Reprend la
lecture d’un disque a l’arret.
Arrete la lecture. Uniquement DVD et Video
CD : Laffrcheur montre
sur b/II pour demarrer de nouveau la
lecture a partir du dernier arret).
Appuyez et maintenez-la enfoncee pour
parcourir rapidement en arriere. (Apres 5
secondes, le parcours continue meme apres
avoir relache la touche : appuyez sur b/II
pour reprendre la lecture normale.)
Utilisez : H4 44 sur le panneau avant.
Appuyez et maintenez-la enfoncee pour
parcourir rapidement en avant. (Apres 5
secondes, le parcours continue meme apres
avoir relache la touche : appuyez sur
pour reprendre la lecture normale.)
Utilisez : W FM sur le panneau avant.
Revient au debut de la piste ou du chapitre
actuel, puis aux pistes suivantes/chapitres
suivants. Utilisez : I44 W sur le panneau
avant.
Passe a la piste ou au chapitre suivant.
Utilisez : W FFI sur le panneau avant.
Si le disque est arrete, la lecture demarre a
partir du numero de piste ou de chapitre
selectionne Si le disque est en tours de
lecture, la lecture saute jusqu’au debut du
numero de piste ou de chapitre selectionne
Selectionne les pistes/titres/chapitres
allant de 11 a plus. (Par exemple, pour 24,
appuyez sur >lO ,2,4.)
RESUME
(appuyez
b/II
m
I
En/Fr
DISC 1-S
Demarre la lecture du disque selectionne
(Utilisez: 1-S sur le panneau avant).
Page 31

During playback, press and hold to start
Ill
slow-motion forward scanning. Change the
speed using the 41 and
During playback, press once to pause:
advance a single frame with each subsequent press.
Ilk
buttons.
Pendant la lecture, appuyez et maintenez-la
enfoncee pour demarrer le scannage avance
en ralenti. Modifiez la vitesse en utilisant les
touches
4lletllb.
Pendant la lecture, appuyez une fois pour
mettre sur pause ; chaque pression
consecutive fait avancer une seule image.
II
411
(SHIFT 44) During playback, press and hold to start
slow-motion reverse scanning.
During playback, press once to pause;
reverse a single frame with each subsequent
press.
Important
A
While using the DVD playback controls, you may see the
mark displayed on-screen.
means that the operation is not allowed by the
system.
means that the operation is not allowed by the disc,
Navigating DVD disc menus
Some DVD discs contain menus. Sometimes these are
displayed automatically when you start playback others
only appear when you press
TOP MENU
(SHlPf MENU) this varies with the disc.
MENU
RETURN
4bAT
Displays the ‘top menu’ of a DVD disc-
Displays a DVD disc menu-this varies with
the disc and may be the same as the ‘top
menu’.
cj~ Returns to the previously displayed menu
screen.
Moves the cursor around the screen
MENU
or
TOP MENU,
41
(SHl!T+) Pendant la lecture, appuyez et maintenez-la
enfoncee pour demarrer le scannage recul
en ralenti. Pendant la lecture, appuyez une
fois pour me’dre sur pause; chaque pression
consecutive fait reculer une seule image.
Important
A
Pendant l’utilisation des commandes de lecture DVD,
vous pouvez voir le marques
affichees a
l’ecran.
signifie que loperation nest pas autorisee par
pareil
signifie que loperation n’est pas autorisee par le
disque.
Comment naviguer sur ies menus de
disques DVD
Certains disques DVD contiennent des menus. 11s
s’affichent parfois automatiquement quand vous
demarrez la lecture; d’autres apparaissent seulement si
vous appuyez sur
TOP MENU
(SHIT MENU)
MENU
MENU ou TOP MENU.
Affiche le ‘top menu’ d’un disque DVDcelui-ci varie en fonction du disque.
Affiche le menu d’un disque DVD-celui-ci
varie en fonction du disque et peut etre le
meme que le ‘top menu:
.
.
ENTER
Numbers
Selects the current menu option
Selects a numbered menu option (some
discs only)
RETURN
4FAV
ENTER
Numciros
,j~ Retourne a l’ecran du menu anterieurement
affiche.
Deplace le curseur sur l’ecran
Selectionne l’option du menu actuel
Sefectionne une option numerotee du menu
(certains disques uniquement)
EdFr
Page 32

Navigating Video CD PBC menus
Some Video CDs have menus from which you can
choose what you want to watch. These are called PBC
(Playback control) menus, and are displayed
automatically when you start playback.
You can switch PBC off by starting playback using a
number button to select a track, rather than the F/II
button.
RETURN
Displays the PBC menu.
Comment naviguer sur les menus PBC
de Video CD
Certains Video CD ont des menus 2I partir desquels vous
pouvez choisir ce que vous souhaitez voir. Ceux-ci
s’appellent menus PBC (PlayBack Control) (commande
de lecture), et s’affichent automatiquement quand vous
dkmarrez la lecture.
Vous pouvez disactiver PBC en dkmarrant la lecture en
utilisant une touche num6rot6e pour silectionner une
piste, au lieu de la touche F/ II.
Numbers
I44
bbl
Selects a numbered menu option.
Displays the previous menu page (if there is
one).
Displays the next menu page (if there is
one).
Press to select an item from a PBC menu.
Exchanging discs
You can change any of the discs not in the play position
using the
EXCHANGE
button. Because the disc in the
play position is unaffected, you can use this button to
change discs even during playback.
1 Press EXCHANGE to open the disc tray
without interrupting playback.
2 load a disc.
RETURN
Numkros
n4
bw
Aftiche le menu PBC.
Mectionne une option num&o@e du
menu.
Aftkhe la page prMdente du menu (s’il y
en a une).
Affiche la page suivante du menu (s’il yen a
une).
Appuyez pour Glectionner un item du menu
PBC.
Changement des disques
Vous pouvez changer tout disque n’&ant pas en
position de lecture en utilisant la touche
EXCHANGE.
Puisque le disque en position de lecture est sans effet,
vous pouvez utihser cette touche pour changer des
disques m$mes pendant la lecture.
1 Appuyez sur EXCHANGE pour ouvrir ie
plateau 5 disque saris interrompre la lecture.
2 Charge2 un disque.
En/Fr
Page 33

You can load two discs at a time in the
two fully accessible disc spaces. Do not
try and load discs into any of the other
spaces; they may not load correctly and
cause the unit to malfunction.
If you want to load more discs,
press DISC SKIP to rotate the
disc tray.
Press A OPEN/CLOSE or
EXCHANGE to close the disc
tray.
l
Do not push the disc tray shut by
hand after exchanging discs.
Vous pouvez charger deux disques en
meme temps dans les deux espaces a
disque completement accessibles.
N’essayez pas de charger des disques
dans aucun des autres espaces ; ils
peuvent etre charges incorrectement et
provoquer un mauvais fonctionnement
de Iunite.
3 Si vous souhaitez charger plus
de disques, appuyez sur DISC
SKIP pour faire tourner le
plateau a disque.
4 Appuyez sur = OPEN/CLOSE
ou EXCHANGE pour refermer le
plateau 5 disque.
l
Ne refermez pas a la main le plateau
a disque apres les avoir changes.
n
Listening to the radio
The following steps show you how to
tune in to FM and AM radio broadcasts
using the automatic (search) and
manual (step) tuning functions. Once
you are tuned to a station you can
memorize the frequency for recall
later-see Saving station pvwets on
page 34 for more on how to do this.
1 Press TUNER/BAND to select
the tuner.
On the remote, press repeatedly to
switch between FM and AM bands. On
the front panel, the
button switches between FM, AM and
preset station mode. For now, choose
either FM or AM.
TUNER/BAND
koute de la radio
Les operations suivantes vous montrent
comment accorder des emissions de
radio FM et AM en utilisant les
fonctions d’accord automatique
(recherche) et d’accord manuel (par
pas). Une fois qu’une station est
accordee vous pouvez memoriser la
frequence pour la faire revenir plus
tard-voir Mhnorhation de stations
pr&bglbespresets a la page 34 pour
plus de details sur la maniere de faire.
1 Appuyez sur TUNER/BAND
pour selectionner le tuner.
Sur la telecommande, appuyez
plusieurs fois pour commuter entre les
bandes FM et AM. Sur le panneau
avant, la touche
commute entre FM, AM et le mode
prereglage de station. Pour
maintenant, choisissez soit FM ou AM.
TUNER/BAND
m
En/Fr
Page 34

2 Tune to a station.
There are three ways to do this:
l
Automatic tuning
To search for stations in the currently selected band,
press and hold either the 44 or w button for about
a second. The system will start searching for the next
station, stopping when it has found one. Repeat this step
to search for other stations. Every time searching stops
on a station, the Y1 (tuned) indicator lights in the
display.
l
Manual tuning
To change the frequency one step at a time, press the
++ / m buttons. When you locate a station signal,
the y’ (tuned) indicator lights in the display.
l
High-speed tuning
Press and hold the * or w button for high speed
tuning, releasing the button once you reach the
frequency you want. When you stop on a station signal,
the yfl (tuned) indicator lights in the display.
Improving FM stereo sound
If you’re listening to a stereo FM broadcast, but find that
there is a lot of noise because of a weak signal, try
switching to mono.
l
Press MONO (SHIFTU) to switch between
mono and stereo.
When listening in mono, the 0 indicator lights in the
display.
Saving station presets
If you often listen to a particular radio station, it’s
convenient to have the receiver store the frequency for
easy recall whenever you want to listen to that station.
This saves the effort of manually tuning in each time.
This system can save up to 30 station presets. When
saving FM frequencies, the receiver also saves the mono
setting (see Improving FM stereo sound above).
1 Tune to a station you want to memorize.
See .hhtening to the radio on page 53 for more on how
to do this.
Accordez une station.
2
11 y a trois manihre de le faire :
l
Accord automatique
Pour rechercher des stations sur la bande actuellement
sdlectionn&e, appuyez et maintenez enfoncbe la touche
4+ ou w pendant une seconde. L’appareil
dimarrera la recherche de la station suivante, en
s’arr&ant quand il en aura trouv4 une. R&p&ez cette
op&ation pour rechercher d’autres stations. Chaque fois
que la recherche s’arrete sur une station, l’indicateur
Y”’ (accord@ s’allume sur l’affichage.
l
Accord manuel
Pour modifier la frkquence un pas i la fois, appuyez sur
les touches ++ / w. @and vous localisez un signal
de station, l’indicateur Y” (accord&) s’allume sur
l’dficheur.
* Accord haute vitesse
Appuyez et maintenez enfoncke la touche 44 ou w
pour accorder h haute vitesse) en rel2chant la touche
une fois que vous aver atteint la frkquence souhait6e.
En vous arr&ant sur un signal de station, l’indicateur
‘t”O (accord&) s’allume sur l’affichage.
Am&borer ie son FM st&bo
Si vous 6coutez une 6mission FM St&r&o, mais vous
trouvez qu’il y a beaucoup de parasites i cause du
signal qui est faible, essayez de passer en mono.
l
Appuyez sur MONO (SHIFT&S) pour commuter entre mono et st&Go.
Si vous 6coutez en mono, l’indicateur 0 s’allume sur
l’affichage.
Mbmorisation de stations pr&kglbes
Si vous 6coutez souvent une station de radio en
particulier, il est commode de mkmoriser la friquence
pour la rappeler plus facilement toutes les fois que vous
souhaitez &outer cette station. Ceci vous &ite de fidire
l’accord manuellement i chaque fois. Cet appareil peut
mkmoriser un maximum de 30 stations prt?%gl&es. En
mbmorisant les frkquences FM, le rkcepteur mimorise
bgalement le rbglage mono (voir.4&io?*w le $0~ FM
&Wo ci-dessus)
1 Accordez une station que vous souhaitez
mbmoriser.
Voir ,&o&e de La radio & la page 33 pour plus de
d6tails sur la mani?re de faire.
Page 35

Press SYSTEM SETUP
Press 4 or F until you see ST. MEMORY
appear in the display.
Press ENTER.
Press 4 or b to select a station preset
number.
Alternatively, use the number buttons (use the
button for numbers over
10).
>lO
If you use the number buttons you can skip step 6.
Press ENTER again to save the station preset.
Repeat these steps to save up to 30 station presets.
Listening to station presets
Having saved up to 30 station presets, you can be
listening to a station with a couple of button presses.
Press TUNER/BAND to switch to the tuner.
If you’re using the front panel controls, press
BAND
repeatedly to select the preset station mode.
Use 144 or w to select the station preset
you want to listen to.
Alternatively, use the number buttons (use the
TUNER/
al 0
button for numbers over 10).
* If the system is left disconnected from the AC power
outlet for a lengthy period, the station presets will be lost
and will have to be reprogrammed.
Listening to other components
You may have connected your TV VCR, or other
components to play through this system. Use the
MJX button to select your external equipment as the
sousce.
Press TV/AUX.
Press repeatedly to switch between:
e TV inputs
@
DIGITAL
input
e NIX analog inputs
$tart playing the source component.
TV/
Appuyez sur SYSTEM SETUP.
Appuyez sur 4 ou k jusqu’a ce que vous
voyiez apparaitre ST.MEMORY sur l’afkheur.
Appuyez sur ENTER.
Appuyez sur 4 ou k pour selectionner un
numero de station prereglee.
Alternativement, utilisez les touches numerotees
(utilisez la touche
>lO
pour les numeros superieuts a
10).
Si vous utilisez les touches numerotees, vous pouvez
sauter l’operation 6.
Appuyez de nouveau sur ENTER pour
6
memoriser la station prereglee.
Repetez ces operations pour memoriser un maximum
de 30 stations prereglees.
koute de stations pr&x+es
En ayant memorise un maximum de 30 stations
prereglees, vous pouvez &outer une station en appuyant
sur une paire de touches.
Appuyez sur TUNER/BAND pour passer au
1
tuner.
si vous utilisez les commandes du panneau avant,
appuyez plusieurs fois sur
TUNER/BAND
pour
selectionner le mode prereglage de station.
Utilisez I* ou W pour selectionner la
2
station prereglee que vous souhaitez &outer.
Alternativement, utilisez les touches numerotees
(utilisez la touche
>lO
pour les numeros superieuts a
10).
l
Si vous laissez l’appareil debranch de la prise
d’alimentation secteur pendant une longue periode de
temps les stations prereglees seront perdues et devront
etre programmees de nouveau.
koute d’autres composants
11 vous faut raccorder votre televiseur, votre
magnetoscope ou d’autres composants pour lire a
travers cet appareil. Utilisez la touche
selectionner votre appareil externe comme source.
Appuyez sur TV/AUX.
1
Appuyez plusieurs fois pour commuter entre:
l
Entrees
TV
l
Entrees
DIGITAL
l
Entrees analogiques
2
Demarrez la lecture du composant de source.
AUX
TV/AUX
pour
m
En/Fr
Page 36

Adjusting the bass and treble
Enregzktrement
graves
The simplest way to shape the sound is by adjusting the
amount of bass and treble.
Note
El
l
The bass and treble controls have no effect when
using the DSP modes, or when the surround mode is set
to anything other than
SURR. OFF
(surround off).
STANDARD, AUTO
or
Rkglage des graves et des aigus
La man&e la plus simple de configurer le son est de
regler la quantite de graves et d’aigus.
l
Les commandes de graves et d’aigus sont sans effet si
vous utilisez les modes DSP, ou si le reglage du mode
surround est autre que
SURR. OFF
(surround d&active).
STANDARD, AUTO ou
. You cannot adjust the bass or treble when Record
Mode is active (see Direct recording on page 40).
1 Press SOUND.
2 Use the 4 or F buttons to select BASS or
TREBLE.
3 Use the A and v buttons to adjust the sound.
You can see the current level in the display.
4 Press ENTER.
Using EBass
In addition to the standard controls for adjusting bass
and treble, this system has a l?Bass feature. Switch this
on to further extend the bass.
Note
6i
l
PBass has no effect when listening through
headphones.
l
You cannot adjust l?Bass when Record Mode is active
(see Direct recording on page 40).
1 Press SOUND.
2 Use the 4 or F buttons to select RBASS.
3 Use the A and v buttons to switch on or off.
4 Press ENTER.
l
Vous ne pouvez pas regler les graves et les aigus si le
mode d’enregistrament est active (voir
direct 21 la page
Appuyez sur SOUND.
Utilisez les touches 4 ou F pour selectionner
BASS ou TREBLE.
Utilisez les touches A et v pour regler le son.
40).
Vous pouvez voir le niveau actuel sur l’afficheur.
Appuyez sur ENTER.
Utilisation de t?Bass
En plus des commandes standards pour regler les
et les aigus, cet appareil est dote d’une caracteristique
PBass. Activez-la pour prolonger les graves.
Remarque
El
l
PBass est sans effet pendant l’ecoute a n-avers des
ecouteuts.
l
Vous ne pouvez pas regler PBass si le mode
d’enregistrament est active (voir Enregktremerzt direct
iI la page
Appuyez sur SOUND.
Utilisez les touches 4 ou b pour selectionner
RBASS.
40).
Utilisez les touches A et v pour activer ou
desactiver.
Appuyez sur ENTER.
Page 37

Using sound modes
The sound modes allow you to add various surround
and room-type sound effects to your DVDs, CDs and
other sources. These effects process the sound in various
ways to simulate different spaces such as a theater, or
concert hall.
For Dolby Surround, Dolby Digital or DTS surround
sources, such as DVDs, use the Advanced Theater effects
to add room ambience to the sounk for stereo-only
sources, such as audio CDs, use the DSP modes.
For each effect you can also adjust how strong the effect
sounds. Often, a more subtle effect level enhances the
sound better than turning it right up. Experiment to see
what works best for you.
Listening to surround-sound sources
When you play DVD discs with Dolby Digital or DTS
sound> choose from the following sound settings.
e
Auto
-For digital sources, decoding is automatically selected according to the source: Dolby Digital,
DTS, Dolby Pro Logic, 2-channel stereo, etc. No extra
effects are added to the source. Analog sources are
played in the same way as the Surround Off setting.
* Standard
(analog or digital) sources are processed using Dolby
Pro Logic for surround-sound effects.
The following six settings are Advanced Theater effects.
l
Musical
* Drama
l
Action
* Virtual Surround 1 (VlR.SURR.1) -
Virtual surround sound from just the main front stereo
speaken and a subwoofer. Use this mode if you can’t use
the surround speaken.
* Virtual Surround 2 (VlR.SURR.2) -
Virtual surround sound if you have connected the
surround speakers, but are using them in front of the
listening position.
e Rear Wide
soundstage.
-As Auto, except that 2-channel
-Concert hall sound.
- Classic, mid-size movie theater sound.
- Large, modern movie theater sound.
-Widens the rear channel
Utilisation des modes de son
Les modes de son vous permettent d’ajouter des effets
spatiaux de son vari& & vos DVD, CD et autres sources. Ces effets font un traitement du son de mani&e varit5e
pour simuler des espaces diffdrents tels qu’une Salle de
th&tre ou de concert.
Pour les sources Dolby Surround, Dolby Digital ou DTS
surround, telles que les DVD, utilisez les effets Advanced
Theater pour ajouter des effets spatiaux au son ; pour a
des sources St&o uniquement, telles que des CD audio,
utilisez les modes DSP
Pour chaque effet vous pouvez igalement r6gler la
puissance de l’effet sonore. Souvent, un niveau d’effet
plus subtil rehausse mieux le son qu’en 1’6levant. Faites
l’experience pour voir lequel fonctionne le mieux selon
vous.
koute de sources sonores surround
A la lecture de disques DVD avec son Dolby Digital ou
DTS, choisissez parmi les riglages sonores suivants.
l
Auto
- Pour les sources num&-iques, le d6codage
est automatiquement sIectionn6 en fonction de la
source : Dolby Digital, DTS, Dolby Pro Logic, & 2
canaux st&?o, etc. Aucun effet suppl6mentaiE n’est
ajoutk 2 cette source. Les sources analogiques sont lues
de la mZme man&e que le r6glage Surround Off
(surround d6sactiv6).
l
Standard
- Comme Auto, sauf que les sources & 2
canaux (analogiques ou numdriques) sont traitt!es en
utilisant Dolby Pro Logic pour les effets sonores
surround.
Les six r6glages suivants sont des effets Advanced
Theater
l
Musical
l
Drama
l
Action
l
Virtual Surround 1 (VlR.SURR.1) -
- Son Salle de concert.
- Son Salle de th&re moyenne, classique.
- Son Salle de th&re moderne.
surround virtue1 provenant principalement des
enceintes avant St&o et d’un enceinte d’extremes
graves. Utilisez ce mode si vous ne pouvez pas utiliser
les enceintes surround.
l
Virtual Surround 2 (VlR.SURR.2) -Son
surround virtue1 si vous aver raccordk les enceintes
surround, mais si vous &res en train de les utiliser en
face de la position
l
Rear Wide
d’koute.
- Amplifie le degr6 de son du canal
arri&re.
Son
1
Ill
m
En/Fr
.
Page 38

l
Surround Off (SUR.OFF) -All
played through only the front left and right speaken,
and the subwoofer. No effects are added.
Note
la
l
The surround modes cannot be used in combination
with DSP effects or with 96k~~ digital sources.
l
You cannot change the surround mode when Record
Mode is active (see Direct recording on page 40).
l
The surround modes should not be used with stereo
sources.
1 Press SURROUND MODE.
Each press changes the surround mode as follows:
l
AUTO
l
STANDARD
Theater)
l
MUSICAL
l
DRAMA
. ACTION
l
VlR.SURR.1
l
VlR.SURR.2
l
REAR WIDE
l
SUR.OFF
Listening to other sources with room
effects
You can add room effects to audio CDs and other stereo
sources using the DSP modes. Different effects work
better with different kinds of music, so don’t be afraid to
experiment a little.
There are seven DSP effects to choose from:
Hall 1
Hall 2
Jazz
Dance
Theater 1
- Large, wood-paneled concert hall sound.
- Large, stone-walled concert hall sound.
-Live jazz club sound.
- Nightclub sound.
sound.
l
Theater 2
l
Simulated Stereo
sources.
:
m
EdFr
sources are
(surround on, with no Advanced
(surround off)
- Classic, mid-size movie theater
- Large, modem movie theater sound.
-Virtual stereo for mono
l
Surround Off (SUR.OFF)
-‘routes les
sources sont lues uniquement & travers des enceintes
avant droite et gauche, et d’enceinte d’extremes graves.
Aucun effet n’est ajoutk.
l
Les modes surround ne peuvent pa s’utiliser en
combinaison avec des effe& DSP ou des sources
numiriques 96k~~.
l
Vous ne pouvez pas modifier le mode surround si
mode d’enregistrement activk (voir Enregistrement
direct 2 la page 40).
l
Les modes surround sont pas compatible avec les
sources st&+o.
1 Appuyez sur SURROUND MODE.
,& chaque pression le mode surround change dans
l’ordre suivant:
* AUTO
l
STANDARD
(surround activk saris effets
Advanced Theater)
. MUSICAL
. DRAMA
. ACTION
l
VlR.SURR.1
. VlR.SURR.2
l
REAR WIDE
l
SUR.OFF
(surround d&activb)
koute d’autres sources avec des effets
spatiaux
Vous pouvez ajouter des effets spatiaux aux CD audio et
i d’autres sources stf%o en utilisant les modes DSI?
Diffkrents effets fonctionnent mieux avec diffdrents types
de musique, n’ayez done aucune crainte i en faire
l’expkrience.
11 y a sept effets DSP & choisir:
l
Hall 1
- Son Salle de concert ample, d&co&e en
bois
l
Hall 2
- Son Salle de concert ample avec mur en
Pierre.
l
Jazz
- Son direct de club de jazz.
l
Dance
l
Theater 1
- Son bo?te de nuit.
- Son Salle de th&tre moyenne,
classique.
l
Theater 2
l
Simulated Stereo
- Son Salle de thGtre moderne ample.
-St&&o virtue1 pour des
sources mono.
le
Page 39

m
l
Note
a
@ The DSP effects cannot be used in combination with
the surround modes or with 96k~~ digital sources.
@ When playing stereo sources with DSP effects
switched off, there is no sound from the surround and
center speakers.
e You camlot change the DSP mode when Record
Mode is active (see Direct yecording on page 40).
Press DSP to select a sound mode.
Each press changes the mode as follows:
ts HALL 1
@ HALL 2
* JAZZ
ta DANCE
c+ THEATER 1
as THEATER 2
es SIMULATED STEREO
e
DSP OFF
(no effects added)
Adjusting the effect level
You can adjust the effect level when using one of the
DSP effects or Advanced Theater effects. It is not possible
to change the effect level of the
AUTO
or
STANDARD
surround mode (or when DSP or Surround modes are
off).
Note
Ed
e You cannot change the effect level when Record
Mode is active (see Dkect yecording on page 40).
1
ess SOUND.
2 se the 4 or fi buttons to select EFFECT.
3 Use the A and v buttons to adjust the effect
IeveL
You can adjust the effect level in the range of
4 Press ENTER.
10
to 90.
Remarque
RI
l
Les effets DSP ne peuvent pas s’utiliser en
combinaison avec des modes surround ou avec des
sources numkriquesde 96k~~.
l
A la lecture de sources st&+o avec les effets DSP
d&activ&, aucun son ne sort des enceintes surround et
centrale.
l
Vous ne pouvez pas modifier le mode DSP si le mode
d’enregistrament est active (voir EnregrMwmnt direct
i la page 40).
1 Appuyez sur DSP pour Giectionner un mode
de son.
Chaque pression modifie le mode dans l’ordre suivant:
l
HALL 1
l
HALL2
l
JAZZ
l
DANCE
l
THEATER 1
l
THEATER 2
l
SIMULATED STEREO
l
DSP OFF
(saris effet en plus)
Rbglage du niveau de i’effet
Vous pouvez rkgler le niveau de l’effet & l’utilisation de
l’un des effets DSP ou des effets Advanced Theater. 11
n’est pas possible de modifier le niveau de l’effet des
modes surround
AUTO ou STANDARD (ou
si les
modes DSP et Surround sont d&activ&).
l
Vous ne pouvez pas modifier le niveau de l’effet si le
mode d’enregistrament est activi (voir Enregistrement
direct 2 la page 40).
l Appuyez sur SOUND.
2 Utilisez les touches 4 ou k pour klectionner
EFFECT.
3 Utilisez les touches A et v pour rkgler le
niveau de l’effet.
Vous pouvez rdgler le niveau de l’effet dans une portde
de IO & 90.
Ill
.
.
l!l
4 Appuyez sur ENTER.
WFr
Page 40

Listening at low volume
When the volume is low, surround effects
become less than satisfactory Turn the Midnight
listening mode on to enjoy quality surround sound even
at low volumes.
1 Press SOUND.
2 Use the 4 or b buttons to select MNIGHT.
3 Use the A and V buttons to turn ON or OFF.
4 Press ENTER.
Note
El
l
You cannot change the Midnight mode when Record
mode is active (see Direct ~ecodhzg below).
tend
to
Direct recording
This feature lets you record directly to an external
recorder, without worrying about the various sound
settings. The bass, treble, surround, DSP and Midnight
settings are all bypassed so that the recording is directfrom-source.
Note
Ii
l
When the Record mode is on you cannot change or
adjust the bass, treble, surround and DSP mode settings
or the Midnight setting.
l
Once the power is switched off or the function is
changed, the Record mode automatically reverts to off.
l
The LFE channel is not recorded.
1 Press SOUND.
2 Use the 4 or b buttons to select RECORD
MODE.
3 Press ENTER.
The display shows
4 Press ENTER again.
The Record mode is now active.
l
To switch off the Record mode, repeat the same
proceedure, In step 3 above the display shows
RECMODE OFF.
RECMODE ON.
koute 21 bas volume
Quand le volume est ba, les effets surround ont
tendance 2 devenir moins satisfaisants. Active2 le mode
d’koute Midnight pour profiter d’un son surround de
qualit meme & bas volume.
Appuyez sur SOUND.
Utiiisez les touches 4 ou b pour sklectionner
M.NlGHT.
Utilisez les touches A et v pour activer (ON)
ou dhsactiver (OFF) .
Appuyez sur ENTER.
Remarque
El
0 Vous ne pouvez pas modifier le mode Midnight si le
mode d’enregistrament est activi (voir Enregist~ement
ukect 2 la page ci-dessous).
Enregistrement direct
Cette caractkristique vous laisse enregistrer directement
5 un enregistreur externe, sans vous saucier des
diffkents reglages sonores. Les reglages des graves) des
aigus, du surround, du DSP et du Midnight sont tous
amen& afin que l’enregistrement provienne
directement de la source.
Remarque
Ea
* Si le mode d’enregistrament est activi vous ne
pouvez pas modifier ou rkgler les r6glages des graves,
des aigus, des modes surround et DSP ou le rkglage
Midnight.
l
Une fois que l’alimentation est coupie ou que la
fonction est changbe, le mode d’enregistrement est
automatiquement dksactivk.
l
Le canal LFE n’est pas enregistrk
Appuyez sur SOUND.
Utilisez les touches 4 ou b pour sklectionner
RECORD MODE.
Appuyez sur ENTER.
L’afficheur montre
Appuyez de nouveau sur ENTER-
Le mode d’enregistrament est maintenant activk
* Pour dksactiver le mode d’enregistrament, &p&ez le
meme prockdk. Dans l’opkration 3 ci-dessus l’afficheur
montre
RECMODE OFF.
RECMODE ON.
En/Fr
Page 41

Introduction
m
A
e Most of the functions covered in this chapter apply to
DVD discs, Video CDs and CDs, although the exact
operation of some varies slightly with the kind of disc
loaded.
e When playing DVD discs, if the icon
appears on-screen when you try and use a particular
function, either the player or the disc doesn’t allow the
use of that function.
* When playing Video CDs, some of the functions are
not available in PBC mode. You can switch PBC off by
starting playback using a number button to select a
track, rather than the b/II button.
Finding what you want on a disc
(T)(iGiii+)(T)
You can directly access any point on a disc using one of
the search modes. Use these search modes while a disc is
playing, or when it’s stopped-playback immediately
starts from the point specified,
1 Press SEARCH (SHIFT & 3) (remote only) to
choose between:
e Title search (DVD only)
0 Chapter/Track search
0 Time search (DVD and Video CD only)
es Off
2 Enter the title/chapter/track number or time
(minutes & seconds).
For example, for title 4, press 4.
For chapter/track
For
45
minutes into the disc, press 4, 5, 0) 0.
3 Press ~/II to start/restart playback.
12,
press
1 , 2.
Introduction
l
La plupart des fonctions d&rites dans ce chapitre
font reference aux disques DVD, Video CD et CD, bien
que l’operation exacte de certains varie un peu avec le
type de disque charge.
l
A la lecture de disques DVD, si l’i&ne
apparait a l’ecran quand vous essayer d’utiliser une
fonction en particulier, soit le lecteur soit le disque ne
permet pas l’utilisation de cette fonction.
l
A la lecture de Video CD, certaines fonctions ne sont
pas valables dans le mode PBC. Vous pouvez desactiver
PBC en demarrant la lecture en utilisant une touche
numerotee pour selectionner une piste, au lieu de la
touche b/II.
Comment trouver ce que vous
souhaitez sur un disque
(r)(m)(T)
Vous pouvez acceder directement a n’importe quel
emplacement sur le disque en utilisant un des modes de
recherche. Utilisez ces modes de recherche pendant la
lecture d’un disque, ou pendant son art&-la lecture
demarre immediatement a partir de l’emplacement
specific.
Appuyez sur SEARCH (SHIFT & 3) (seulement
telecommande) pour choisir entre :
l
Recherche de titre (seulement DVD)
l
Recherche de chapitre/piste
l
Recherche de temps (seulement DVD et Video CD)
l
Off (d&active)
Entree le numero de titre/chapitre/piste ou le
temps (minutes et secondes).
Par exemple, pour le titre
Pour le chapitre/la piste 12, appuyez sur
4,
appuyez sur 4.
1,2.
Pour 45 minutes du disque, appuyez sur, 4,5,0,0.
Appuyez sur b/II pour demarrer/redemarrer
la lecture.
En/Fr
Page 42

Switching camera angles CEQ
Some DVD discs feature scenes shot from hvo or more
anglesdheck the disc box for details: it should be
marked with a icon if it contains multi-angle scenes.
When these scenes are playing, a camera icon (E?u)
appears on-screen.
l
To switch the camera angle, press ANGLE
(SHIFT & 4).
l
To hide the TV angle indicator, choose Angle
Indicator
> Off from the
Video
menu (see page
59-60).
Switching subtitles m
Many DVD discs have subtitles in one or more
languages-the disc box will usually tell you which
subtitle languages are available. You can switch subtitle
language anytime during playback.
l
To display/switch the subtitle language, press
SUBTITLE repeatedly.
l
To switch off subtitles, press SUBTITLE then
CLEAR.
l
To set subtitle preferences, see page 61.
Changement des angles de cam&a
(Yiic)
Certains disques DVD prhsentent des s&es enregistrges
sous deux ou plusieurs angles-v6rifiez 1’6tui pour les
d&ails ; un i&e devrait &re marqu6 s’il contient des
schnes i angles multiples. A la lecture de ces sc+nes, un
i&e de cam&a appara?t & l’&ran (E&I,
.
Pour changer l’angle de cam&-a, appuyez sur
ANGLE (SHIFT & 4)e
l
Pour cacher l’indicateur d’angle du t&viseur,
choisissez
Video
Angle Indicator
(voir page 59-60).
> Off & partir du menu
Changement des sous-titres (III?@3
Beaucoup de disques DVD ont des sous-titres dans une
ou plusieurs langues-en g&&al l’&ui vous indiquera
les langues disponibles. Vous pouvez changer la langue
du sous-titre n’importe quand pendant la lecture.
l
Pour afficher/changer la langue des soustitres, appuyez plusieurs fois sur SUBTITLE0
e
Pour dksactiver les sous-titres, appuyez SW
SUBTITLE puis sur CLEAR.
l
Pour rigler les sous-titres, voir page 61.
Switching audio language @E3
When playing a DVD disc recorded with dialog in two or
more languages, you can switch audio language
anytime during playback.
l
To display the current audio language, press
AUDIO.
l
To switch the audio language, press AUDIO
repeatedly.
l
To set audio language preferences, see page 60.
Changement de la langue audio
(T)
A la lecture d’un disque DVD enregistri avec des
dialogues dans deux langues ou plus, vous pouvez
changer la langue audio n’importe quand pendant la
lecture.
.
Pour afficher la langue audio actuelle,
appuyez sur AUDIO.
l
Pour changer la langue audio? appuyez
plusieurs fois sur AUDIO.
e Pour rt!gler les langues audio, voir page 60.
Page 43

Switching audio channel
(m)(T)
When playing a CD or Video CD, you can switch between
the stereo soundtrack, just the left channel, or lust the
right.
Changement du canal audio
(iGiia(T)
A la lecture d’un CD ou d’un Video CD, vous pouvez
commuter entre la bande sonore stereo, juste le canal
de gauche ou juste le canal de droite.
C, To switch the audio channel, press AUDIO
repeatedly.
Making a program list
piGq(i?Gzig(T)
Making a program list means telling the player which
tracks and in what order, you want played. You can
program a sequence of up to 24 tracks/chapters to play
from any of the discs loaded in the disc changer. The
discs can be any combination of DVD, Video CD and
audio CD. Chapters/tracks can appear more than once
in the playlist, or can be left out entirely.
1 Press PROGRAM (SHIFT & 7).
~QfiPaQe
~ mMove m Play ~ExI, ~
The program screen appears showing the first six steps
in the playlist. Navigate around this screen using the
cursor buttons. Jump to the next six steps using the
WI button; to the previous six steps using the I*
button
2 Enter a disc number (1 to S).
You can use either the
number buttons.
* If this is the fit% step you’re programming, the
number of the disc that is currently in the play position
will appear automatically.
* If the unit has already read the contents of the disc
you want to program, the disc details appear in the box
on the right of the screen (type of disc, number of titles/
chapters/tracks, etc.). If the unit hasn’t yet read the disc
then ‘? ? ?’ appears in the box for disc type.
DISC1
-5 buttons, or the
Pour changer le canal audio, appuyez
plusieurs fois sur AUDIO.
Comment faire une liste de
programme CT) (a)(T)
Faire une liste de programme signifie indiquer au
lecteur quelles pistes, et dans quel ordre vous souhaitez
leur lecture. Vous pouvez programmer une siquence
d’un maximum de 24 pistes/chapitres pour lire depuis
n’importe quel disque charge dans le changeur de
disque, Les disques peuvent &re une combinaison
quelconque de DVD, de Video CD et de CD audio. Les
chapitres/pistes peuvent apparaitre plus d’une fois dans
le repertoire, ou etre entierement exclus.
1 Appuyez sur PROGRAM (SHIFT & 7).
L&ran du programme appara7t en montrant les six
premieres operations dans le repertoire. Naviguez
autour de cet &ran en utilisant les touches curseur.
Saute2 jusqu’aux six operations suivantes en utilisant la
touche H ; jusqu’aux six operations anterieures en
utilisant la touche I++.
2 Entrez un num&o de disque (1 3 S ).
Vous pouvez utiliser soit les touches
touches numerotees.
l
Si c’est la premiere operation que vous programmez,
le numero du disque actuellement en position de
lecture s’affichera automatiquement.
l
Si l’unite a deja lu les contenus du disque que vous
souhaitez programmer, les details du disque
apparaissent dans la bolte a droite de l&ran (type de
disque, numero des titres/chapitres/pistes, etc.). Si
l’unite n’a pas encore lu le disque ‘? ? ?’ apparait dans
la bo?te pour le type de disque.
DISCS -5,
soit les
EdFr
Page 44

l
If you want to put the whole disc into the program
list, jump to step 5 below.
3 Move the cursor to the TITLE/TRACK field
and enter a title or track number.
For DVDs, this number will be a disc title; for Video CDs
and audio CDs, a track number.
For example, to enter title/track 6, press 6. To enter
title/track 14, press
l
To clear an entry, press
l
DVD only: If you want to put the whole title into the
1 , 4.
CLEAR.
program list, jump to step 5 below.
4 If the current disc is a DVD, move the cursor
to the CHAPTER held and enter a chapter
number.
* Si VOLE souhaitez mettre l’ensemble du disque dans
la liste de programme, sautez jusqu’a loperation 5
ci-dessous
3 Deplacez le curseur jusqu’au champ TITLE/
TRACK et entree un numero de titre ou de
piste.
Pour les DVD, ce numero sera un titre de disque ; pour
les Video CD et les CD audio, un numero de piste.
Par exemple, pour entrer titre/piste 6, appuyez sur 6
Pour entrer titre/piste 14, appuyez sur
l
Pour effacer une entree, appuyez sur
l
Seulement DVD : Si vous souhaitez mettre
1 , 4.
CLEAR
l’ensemble dun titre dans la liste de programme> sautez
jusqu’a loperation 5 ci-dessous
4 Si le disque actuel est un DVD, deplacez le
curseur jusqu’au champ CHAPTER et entrez
un numero de chapitre.
5 Press ENTER.
The cursor moves down to the disc number field in the
next step.
6 Repeat steps 2-S to add more items to the
program list.
7 Press F/M to start the program list playing.
lip
43
l
To edit any item in the program list, position the
cursor on the item you want to change, then enter a
new value using the number buttons.
l
To delete a whole step, position the cursor anywhere
on the step you want to delete and press
CLEAR.
5 Appuyez sur ENTER.
Le curseur se d&place vers le has jusqu’au champ du
numero de disque dans loperation suivante.
6 Repetez les operations 2-S pour ajouter plus
d’items a la liste de programme.
7 Appuyez sur ~/II pour demarrer la lecture de
la liste de programme.
Astute
43
l
Pour monter tout item dans la liste de programme,
placez le curseur sur l’item que vous souhaitez modifier,
puis entrez une nouvelle valeur en utilisant les touches
numerotees
* Pour supprimer toute une operation, place2 le
curseur n’importe ou sur loperation que vous souhaitez
supprimer et appuyez sur
CLEAR.
Page 45

Note
El
e The playlist remains active even if you open the disc
tray and change discs. If a step in the program list
cannot be played (because the track number is too
high, for example), that step is automatically skipped.
* To delete the playlist, stop playback, then press
CLEAR,
e You may see an asterisk (*) appear on-screen when
program play of some DVD discs starts. The asterisk
means that the part of the disc being played is not in the
playlist, but has to be played whenever the disc is first
loaded in to the play position. The asterisk will
disappear once the programmed chapters start playing.
More programming options
There are several other options available when making
using program lists.
To view the playlist, press PROGRAM (SHIFT
8L 7).
To delete an entry from the playlist, position
the cursor on the title/chapter/track number
and press CLEAR.
To add an entry to the end of the playlist,
press PROGRAM (SHIFT & 7), enter the title/
chapter/track number, then press PROGRAM
again.
To delete the playlist, exit the program list
screen, stop playback, then press CLEAR.
Using random play
Use the random play function to play titles/chapters/
tracks in a random order.
How random play works depends on the disc currently
in the play position, If the ‘current’ disc is a DVD, you
can play either the titles or chapters on that disc at
random. If the ‘current’ disc is an audio or Video CD,
you can play either the tracks on that disc, or all the
tracks on all the CDs and Video CDs loaded at random
(DVD discs loaded will be ignored).
Remarque
Iii
l
Le repertoire reste actif meme si vous ouvrez le
plateau a disque et vous change2 les disques. Si une
opt!ration de la liste de programme ne peut pas &re lue
(a cause du numero de piste qui est trop elevt!, par
exemple), cette operation est automatiquement sautee,
l
Pour supprimer le repertoire, arretez la lecture puis
appuyez sur
l
11 se peut que vous voyiez appara?tre a l&ran un
CLEAR.
asterisque (*) quand la lecture de certains DVD
demarre. L’asterisque signifie que la partie du disque en
tours de lecture ne fait pas partie du repertoire, mais
doit &re lue chaque fois que le disque est charge pour la
premiere fois en position de lecture. Last&isque
disparaitra une fois que la lecture des chapitres
programmes demarrera.
Options de programmation
suppkmentaires
11 y a plusieurs autres options disponibles 2 la
programmationAitilisation des listes de programme.
Pour voir le repertoire, appuyez sur
PROGRAM (SHIFT & 7).
Pour supprimer une entree du repertoire,
place2 le curseur sur le numero de titre/
chapitre/piste et appuyez sur CLEAR.
Pour ajouter une entree a la tin du repertoire,
appuyez sur PROGRAM (SHIFT & 7), entree le
numero de titre/chapitre/piste, puis appuyez
de nouveau sur PROGRAM.
Pour supprimer le repertoire, quitter F&ran
de la liste de programme, arrgtez la lecture,
puis appuyez sur CLEAR.
Utilisation de la lecture alhatoire
Utilisez la fonction de lecture aleatoire pour lire des
titres/chapitres/pistes dans un ordre aleatoire.
Le fonctionnement de la lecture aleatoire depend du
disque actuellement en position de lecture. Si le disque
‘actuel’ est un DVD, vous pouvez lire soit les titres soit
les chapitres de ce disque aleatoirement. Si le disque
‘actuel’ est un CD audio ou un Video CD, vous pouvez
lire aleatoirement soit les pistes de ce disque, soit toutes
les pistes de tous les CD et les Video CD qui sont charges
(les disques DVD charges seront ignores),
En/Fr
Page 46

1 Press RANDOM (SHIFT & 8) repeatedly to
select a random play mode.
The mode is displayed on-screen and in the front panel
display:
(X)
l
Random Chapter
(from within the current
title)
l
Random Title
(m)(T)
l
Random 1 Disc
l
Random All Discs
2 Press ENTER or ~/II to start random play.
l
To stop the disc and cancel random playback,
press n .
l
To cancel random playback without stopping
playback, press
43
lip
CLEAR.
The rest of the disc plays out.
During random play, the I44 and H buttons
function a little differently to normal: I++ returns to
the beginning of the current track/chapter. You can’t go
back further than this. H selects another track/
chapter at random from those remaining.
Using repeat play
You can set the player to repeat individual tracks on CDs
or Video-CDs, chapters or titles on DVD discs, a whole
disc, or all the discs loaded in the player. It’s also
possible to loop a section of a disc.
You can use the repeat together with the programming
mode to repeat the tracks/chapters in the playlist (see
page
43
for how to program a playlist).
1 Press REPEAT (SHIFT & 9) during playback to
select a repeat mode.
Each press switches the repeat mode:
(-iii-)
l
Chapter Repeat
l
Title Repeat
l
Repeat Off
EdFr
1 Appuyez plusieurs fois sur RANDOM (SHIFT &
8) pour Glectionner un mode de lecture
alkatoire.
I,e mode s’affiche ?J l’hcran et dam l’afficheur du panneau
avant:
(--iiF)
l
Random Chapter
(lecture alkatoire de chapitres)
(2 partir du titre actuel)
l
Random Title
(lecture alkatoire de titres)
(izzi)(T)
* Random 1 Disc
l
Random All Discs
(lecture aliatoire d’un disque)
(lecture alkatoire de tous les
disques)
Appuyez sur ENTER ou b/II pour d6marrer !a
2
lecture alkatoire.
* Pour arr&er le disque et annuler la lecture alkatoire,
appuyez sur W.
@ Pour arrtter la lecture aliatoire saris arr&er la lecture,
appuyez sur
43
CLEAR.
Astute
Le reste du disque sera lu.
Pendant la lecture aikatoire, le fonctionnement des touches
H et M est un peu diffkrent du fonctionnement
normal : 14 retourne au debut de la piste/du chapitre
actuel. Vous ne pouvez pas retourner au dell de cela. M
s&lectionne la lecture aliatoire d’une/un autre piste/
chapitre depuis celles/ceux qui restent,
Utilisation de la lecture rkphtbe
Vous pouvez rkgler le lecteur pour rip&ter des pistes
individuelles de CD ou de Video CD, des chapites ou des
titres de disques DVD, tout un disque, ou tous les disques
charg& dans le lecture. 11 est bgalement possible de ripbter
en continu une partie d’un disque (looping),
Vous pouvez utiliser le mode de r&p&ition avec le mode de
programmation pour ript!ter les pistes/chapitres du
ripertoire (voir page
un rt!pertoiie).
1 Appuyez sur REPEAT (SHIFT & 9) pendant la
lecture pour s6lectionner un mode de r6p&ition0
A chaque pression le mode de r&p&ition change dans
l’ordre suivant :
0 Chapter Repeat
e Titie Repeat
e Repeat Off
43
pour la mani?re de programmer
(ripitition de chapitres)
(rt!p&ition de titres)
(rip&ition d&activ&eJ
Page 47

cjzG$ (-Tr-)
e Track Repeat
l
1 Disc Repeat
@ All Discs Repea.t
e Repeat off
e
The
Repeat All
function repeats all tracks on all
audio and Video CDs loaded. If, during repeat play, the
unit encounters a DVD disc, it will start playing, but the
repeat mode will be canceled.
2 To resume normal playback, press CLEAR.
Tip
43
You can use repeat play with program play and random
play, During program/random play, press
(SHIFT &
Looping a section
e Press REP A-B (SHIFT & 10/O) once at the
start of the section you want to repeat, then
again at the end.
9).
of a disc
REPEAT
Playback immediately jumps back to the start point and
plays the loop repeatedly.
e On a DVD disc, the start and end points of the loop
must be in the same title.
* To resume normal playback, press
* To repeat a section of a disc just once, press
REP A-B (SHIFT & 10/O) at the start of the
section, then ~/II at the end.
CLEAR.
Playback lumps back to the start point.
Playing CDs only (CD Mode) m
Using this feature you can play only the CDs loaded in
the disc tray-automatically skipping over any DVDs or
Video CDs loaded. This may be useful if you have a
mixture of discs loaded but only want to play music:
you dent have to keep track of what kind of disc is
where in the disc tray.
l
Track Repeat
l
1 Disc Repeat
l
All Discs Repeat
l
Repeat
l
La fonction
(repetition de pistes)
(repetition d’un disque)
(repetition de tous les disques)
off (repetition desactivee)
Repeat All
repete toutes les pistes de
tous les CD audio et les Video CD. Si pendant la lecture
repetee, l’unite rencontre un disque DVD, la lecture
demarrera, mais le mode de repetition sera annul6
2 Pour reprendre la lecture normale, appuyez
sur CLEAR.
Astute
43
Vous pouvez utiliser la lecture rep&e avec la lecture
programmee et la lecture aleatoire. Pendant la lecture
programmee/aleatoire, appuyez sur
&
9).
“Looping” (rbp&ition
REPEAT (SHIFT
saris fin) d’une
partie d’un disque
l
Appuyez une fois sur REP A-B (SHIFT & 10/O)
au demarrage de la partie que vous souhaitez
repeter, puis a la fin.
La lecture saute immediatement avant le point du debut
et lit de faGon rep&&e le “looping”.
l
Sur un disque DVD, les points du debut et de la fin
du “loop” doivent se trouver dans le m6me titre.
l
Pour reprendre la lecture normale, appuyez sur
CLEAR,
l
Pour &peter une section d’un disque une seule
fois, appuyez sur REP A-B (SHlFf & 10/O) au
debut de la section, puis sur ~/II a la fin.
La lecture saute en arriere jusqu’au point de depart.
Lecture de CD seulement (Mode
CD) -
En utilisant cette caracteristique vous pouvez hre
seulement les CD charges dans le plateau 3 disque-en
sautant automatiquement tout DVD ou Video CD
charge. Ceci peut &re plus pratique si vous avez charge
des disques melanges mais ne souhaitez que la lecture
musicale : il n’est pas necessaire de garder la piste du
type de disque qui se trouve dans le plateau a disque.
En/Fr
Page 48

1 Press CD MODE.
The CD Mode indicator lights.
l
To switch off, press
2
Press b/II.
CD MODE
again.
The player automatically starts playing the fit% CD
loaded. Once all the CDs loaded have played, the player
automatically stops.
1 Appuyez sur CD MODE.
L’indicateur du mode CD s’allume.
e Pour &eindre, appuyez de nouveau sur
2 Appuyez sur b/II.
CD MODE.
Le lecteur dkmarre automatiquement la lecture du
premier CD charg6. Une fois que tous les CD sont lus, le
lecteur s’arr&e automatiquement.
En/Fr
Tip
42
l
In CD Mode, use the
DISC SKIP
button to rotate the
disc tray to the next CD loaded (if there is one).
l
You can use repeat and random play in CD mode
(see pages 45-47).
Note
El
l
You can’t switch on CD mode while playing a DVD or
Video CD. Stop playback first.
l
Program play is not possible in CD Mode. However, it
is possible to program a playlist. When you start
program play, CD Mode is canceled (see page 43).
Bookmarking a place in a disc
(-Tiiq(rn)
If you watch only part of a DVD disc with the intention
of picking up later where you left off, you can bookmark
the place then resume playback at a later date without
having to manually search for the right place.
You can use this feature for up to five discs (after that
the oldest bookmark is deleted to make space for a new
one).
l
At the point from which you want to resume
playback next time, press LAST MEMO (SHIFT
& 2).
Press n if you want to stop playback here.
l
To resume playback, load the disc and press
LAST MEMO (SHIFT 8‘ 2).
If the disc starts auto playback, stop it first.
l
To clear the bookmark for the disc loaded, press
LAST MEMO (SHlFr
Memory is displayed on-screen.
& 2) then
CLEAR
while Last
Astute
43
l
Dans le mode CD, utilisez la touche
DISC SKIP
pour faire tourner le plateau 3 disque jusqu’au CD
charg6 suivant (s’il yen a un),
l
Vous pouvez utiliser la lecture rf!p&&e et la lecture
aliatoire dans le mode de CD (voir pages 45-47).
@ Vous ne pouvez pas activer le mode CD pendant la
lecture d’un DVD ou d’un Video CD, Arri?tez d’abord la
lecture.
* La lecture programmke n’est pas possible dans le
mode CD. Cependant, il est possible de programmer un
ripertoire. Si vous dkmarrez la lecture programmbe, le
mode CD s’annule (voir la page 43).
hdexation d’un endroit du disque
(r)(m)
Si vous ne regardez qu’une partie du disque DVD dans
l’intention de le reprendre plus tard & l’endroit oti vous
l’avez laiss6, vous pouvez indexer l’endroit puis
reprendre la lecture un autre jour saris devoir
rechercher manuellement le bon endroit.
Vous pouvez utiliser cette caractkristique pour un
maximum de cinq disques (aprks quoi l’ancienne
indexation est effacke pour laisser de l’espace pour la
nouvelle).
l
Au point oil vous souhaitez reprendre la
lecture la prochaine fois, appuyez sur LAST
MEMO (SHIFT & 2).
Appuyez sur q si vous souhaitez arreter ici la lecture.
l
Pour reprendre la lecture, chargez le disque et
appuyez sur LAST MEMO (SHIFT & 2)0
Si le disque dimarre automatiquement la lecture8
arr&ez-la d’abord.
Page 49

Note
Km
m
* Bookmarking also works with Video CD, but for one
disc only, and you must leave the disc in the player-
opening the disc tray erases the memory. Last Memory
may not work reliably with some PBC Video CDs.
Memorizing disc settings
(TiGr)
If you have a particular set of preferences for a disc, you
can memorize them using the Condition Memory
function. Once memorized, your settings will be recalled
automatically whenever you load that disc. The player
can store settings for 15 discs; after this, memorizing
another replaces the oldest one stored.
The settings memorized are:
* OSD Position
* Subtitle Language
e Audio Language
e Angle Indicator
e Parental Lock level
To memorize settings for the current disc,
press CONDITION (SHIFT & 1) during
playback.
To recall memorized settings, just load the
disc
The display shows
Memory
appears on-screen.
e To clear memorized settings, load the disc and press
CLEAR
while
screen.
(page60)
(page
(page
60)
(page 59)
(page 65)
CONDITION
Condition Memory
61)
and
Condition
is displayed on-
l
Pour supprimer l’indexation du disque charge,
appuyez sur
CLEAR
a
l
Lindexation fonctionne egalement avec les
LAST MEMO (SHlfl
& 2) puis sur
alors que Last Memory est affiche a p&ran. -
Remarque
Video CD, mais seulement pour un disque, et vous devez
laisser le disque dans le lecteur-l’ouverture du plateau
a disque efface la memoire. 11 se peut que Last Memory
ne fonctionne pas fidelement avec certains Video CD
avec PBC.
Mhmorisation des rbglages d’un
disque (-YE--)
Si vous avez des preferences de reglage pour un disque,
vous pouvez le memoriser en utilisant la fonction
Condition Memory (memoire selon condition). Une fois
memorises, vos reglages seront automatiquement
rappel& toutes les fois que vous chargerez un disque. Le
lecteur peut memoriser des reglages pour 15 disques ;
apres quoi une autre memorisation remplacera la plus
ancienne.
Les reglages memorises sont :
OSD Position (Placent OSD)
Subtitle Language (Langue sous-titres)
(page
60)
(page 60
Audio Language (Langue audio)
Angle Indicator (lndicateur d’angle)
(page
60)
(page 591
Parental Lock level (Verrouillage
parental)
(page 65)
Ill
.
Pour memoriser des reglages pour le disque
actuel, appuyez sur
pendant la lecture.
.
Pour rappeler des reglages memorises,
chargez simplement le disque.
L’afficheur montre
Memory
l
appara?t a l’ecran
Pour supprimer des reglages memorises, chargez le
disque et appuyez sur
Memory
est affiche a l’ecran.
CONDITION (SHIFT & 1)
CONDITION et Condition
CLEAR
afors que
Condition
. l
EdFr
Page 50

Displaying disc information
(-iiF)
Various track, chapter and title information, as well as
the video transmission rate for DVD discs, can be
displayed on-screen while a disc is playing, or while it’s
stopped.
l
To show/switch the information displayed,
press DVD DISP (SHlFr & CLEAR).
l
When a disc is playing, the information appears at
the top of the screen. Keep pressing
& CLEAR)
DVD data transmission rate display
l
When a disc is stopped, all title/chapter, or track
to change the displayed information.
information for the disc loaded appears on-screen. Press
DVD DISP(SHI~ & CLEAR)
lnfomlation: mm 1
Title Chapter Title Chapter
01 l-30 06 1- 10
02 I-21 07 I- 13
03 l-46 08 I-S
04 I-12 09 l-4
05 l-6
l/l
DVD-Video
=Exit
DVD DISP (SHlFr
again to exit the screen.
Affichage de l’information du disque
(T)(m)(T)
Differentes informations sur la piste, le chapitre et le
titre, ainsi que la limitation de transmission video pour
les disques DVD, peuvent s’afficher a l’ecran pendant la
lecture dun disque, ou pendant son arret.
.
Pour montrer/changer Information affichke,
appuyez sur DVD DISP (SHIFT & CLEAR).
l
A la lecture d’un disque, l’information appara?t sur
la partie superieure de l’ecran. Maintenez enfoncee
DVD DISP (SHlFr & CLEAR)
l’information affichee,
Affichage de la limitation de transmission du DVD
l
A l’arret d’un disque, toute l’information sur le titre/
chapitre ou la piste du disque charge apparajt a l’ecran
Appuyez de nouveau sur
pour quitter Y&ran.
Title Chapter Title Chapter
~ Ii; I-30 l-21 07 06 I- 1- 10 13
03 l-46 08 l-5
04 l-12 09 l-4
05 l-8
Ill
DVD-Video
mExit
pour modifier
DVD DlSP(SHlFT & CLEAR)
EdFr
l/l
-Exit
CD/video CD
l
To display the time remaining on a DVD disc, press
and hold
DVD DISP (SHIP & CLEAR).
The display shows the disc time remaining for as long
as you hold the button. Release the button to revert to
the previous display.
l”tomlatlo”: cmllpact DISC ,
Total Time 6.30
Track Time i
01 3.32
02 2.50
l/l
I
CD/Video CD
* Pour afficher le temps restant sur un disque DVD,
appuyez et maintenez enfoncee
CLEAR).
DVD DISP (SHIFT &
L’afficheur montre le temps restant du disque aussi
longtemps que vous maintenez enfoncee la touche,
Relachez la touche pour retourner a l’affichage
anterieur.
Page 51

Using the wake up timer
l!l
m
You can use the timer as an alarm clock to wake up to
the sound of a disc loaded or the radio. If you have an
external component operated by a separate timer, you
can also set it as the source function.
Once the timer is active, it will switch the system on
everyday at the set time.
Unlike an ordinary alarm clock, you need to set a
system switch off time, as well as a switch on time.
Select the source that you’d like to wake up
to.
For a disc, press
BAND;
Load a disc or tune to a radio station, then
set the volume.
If you selected an external component, make the
appropriate timer settings for it.
Press SYSTEM SETUP.
Press 4 or F until you see TIMER in the
display.
Press ENTER.
Press 4 or b until you see WAKE UP SET in
the display.
Press ENTER.
The display shows a switch on time with the hour
blinking.
Set the switch on time.
Use A and v to set the hour then press
minute in the same way, pressing
* If you make a mistake, press
start again from step 3.
Set the switch off time.
Set in the same way as the switch on time, pressing
ENTER
l
If you make a mistake, press
start again from step 3.
DVD/CD;
for an external component, press
for the radio press
TV/AUX.
ENTER.
ENTER
SYSTEM SETUP
to finish.
SYSTEM SETUP
TUNER/
Set the
to finish.
and
and
Utilisation de la minuterie de r&eil
Vous pouvez utiliser la minuterie comme un reveil pour
vous reveiller au son dun disque charge ou de la radio.
Si vous disposez dun composant externe command6
par une minuterie separee, vous pouvez egalement
regler la source a cette fonction
Une fois que la minuterie est activee, celle-ci allumera
l’appareil tous les jours a l’heure reglee.
Contrairement a un r&veil courant, il faut regler une
heure d’art& de l’appareil ainsi qu’une heure de mise
enmarche.
Selectionnez la source qui vous plairait pour
vous reveiller.
Pour un disque, appuyez sur
appuyez sur
TUNER/BAND ;
externe, appuyez sur
Charge2 un disque ou accordez une station de
radio, puis reglez le volume.
Si vous selectionnez un composant externe, effectuez les
reglages appropries de la minuterie.
Appuyez sur SYSTEM SETUf?
Appuyez sur 4 ou b jusqu’a ce que vous
voyiez TIMER sur I’afRcheur.
Appuyez sur ENTER.
Appuyez sur 4 ou b jusqu’a ce que vous
voyiez WAKE UP SET sur l’afficheur.
Appuyez sur ENTER.
L’afficheur montre une heure de mise en marche avec
les heures qui clignotent.
Reglez l’heure de mise en marche.
Utilisez A et v pour regler les heures puis appuyez sur
ENTER.
appuyant sur
l
SETUP
Reglez les minutes de la m?me man&e, en
ENTER
Si vous commettez une erreur, appuyez sur
et demarrez de nouveau a partir de l’operation
3.
Reglez l’heure d’art-et.
Reglez de la meme man&e, en appuyant sur
pour finir.
l
Si vous commettez une erreur, appuyez sur
SETUP
et demarrez de nouveau a partir de Poperation
2J
~
DVD/CD
TV/AUX.
pour finir.
pour un
; pour la radio
COmpOSant
SYSTEM
ENTER
SYSTEM
.
.
En/Fr
Page 52

En/Fr
Check the settings you just made.
10
The display should indicate that you have set the wake
up timer, then show the on time, the off time, the
function (DVD, etc.), and the volume. The display
shows
CHECK END
l
There is no direct way to edit the timer settings. If
after all the settings.
you see that some timer setting is not what you’d
intended, you’ll need to start the process again from the
top.
11
Switch the system into standby.
The timer will not work if the system is left on!
The timer indicator ( C!) ) lights when the timer is on
Activating/deactivating the wake
timer
To activate the wake up timer, set the timer to
deactivate it, set the timer to
1
Press SYSTEM SETUt?
Press 4 or b until you see TIMER in the
2
display.
Press ENTER.
3
Press the 4 or b button until you see TIMER
4
ON or TIMER OFF in the display.
Press ENTER.
5
OFF.
The timer indicator ( C!) ) lights when the timer is on.
Checking the timer settings
If you’ve set the wake-up timer, you can check the
settings anytime.
Press SYSTEM SETUR
1
2
Press 4 or b until you see TIMER in the
display.
Press ENTER.
3
4
Press the 4 or b button until you see TIMER
CHECK in the display.
Press ENTER.
s
The display shows the timer settings:
l
On time
l
Off time
l
Function (DVD, etc.)
l
Volume
up
ON.
To
Verifiez les reglages que vous venez de faire.
10
L’afficheur devrait vous indiquer que vous avez regle la
minuterie de r&veil, puis devrait montrer l’heure de
mise en marche, la fonction (DVD, etc.), et le volume.
L’afficheur montre
l
11 n’y a pas de moyen direct pour monter les reglages
CHECK END
apres tous les reglages
de la minuterie. Si vous voyez que certains reglages de
la minuterie ne correspondent pas a ce que vous
vouliez, il faudra demarrer de nouveau le processus a
partir du haut.
11
Mettez l’appareil en veille.
La minuterie ne fonctionnera pas si l’appareil reste
allume !
L’indicateur de la minuterie ( C!) ) s’allume quand la
minuterie est activee.
Activation/d&activation de la
minuterie de rbveil
Pour activer la minuterie de reveil, reglez la minuterie a
ON.
Pour la desactiver, reglez la minuterie a
Appuyez sur SYSTEM SETUP
Appuyez sur 4 ou b jusqu’a ce que vous
voyiez TIMER sur l’afficheur.
Appuyez sur ENTER.
Appuyez sur la touche 4 ou b jusqu’a ce que
vous voyiez TIMER ON ou TIMER OFF sur
l’afficheur.
Appuyez sur ENTER.
OFF.
Lindicateur de la minuterie ( @ ) s’allume quand la
minuterie est activee.
V&ification des rkglages de la minuterie
Si vous avez regle la minuterie de r&veil, vous pouvez
verifier les reglages a n’importe quel moment.
Appuyez sur SYSTEM SETUP
Appuyez sur 4 ou W jusqu’a ce que vous
voyiez TIMER sur l’affrcheur.
Appuyez sur ENTER.
Appuyez sur la touche 4 ou b jusqu’a ce que
vous voyiez TIMER CHECK sur l’afficheur.
Appuyez sur ENTER.
L’afficheur montre les reglages de la minuterie :
l
On time (active)
* Off time (d&active)
l
Function (fonction) (DVD, etc.)
l
Volume (volume)
Page 53

Using the sleep timer
The sleep timer switches the system into standby after a
specified amount of time so that you can fall asleep
without worrying about the stereo being left on all
night. If you’ve also set the wake up timer this is
important since the wake up timer will only work if the
system is in standby.
1 Press SLEEP (SHIFT & 6) to set the time until
the system goes into standby.
Press repeatedly to switch between:
0 SLEEP AUTO
the system is playing a CD*
. SLEEP 90
l
SLEEP 60
l
SLEEP 30
0 SLEEP OFF
The sleep timer indicator (3) lights and the display
dims when the sleep timer is active.
* This is not available when a Video CD is in PBC mode,
or if you’re playing a CD or Video CD in repeat mode. If
you set a disc playing in repeat mode after setting the
sleep timer to
to the 90 minute setting.
* Once the sleep timer is set, you can check the time
left by pressing
l
To cancel the sleep timer, switch the system into
standby, or select
* If you switch to a different source when
AUTO
is set, the system will automatically go into
standby a minute later.
- this setting is only available when
(minutes)
(minutes)
(minutes)
(cancels the sleep timer)
SLEEP AUTO,
SLEEP (SHlFr &
SLEEP OFF
it automatically switches
6).
(as described above).
SLEEP
Utilisation de la minuterie de
sommeil
La minuterie de sommeil met l’appareil en veille apt+&
une heure specifiee afin que vous vous endormiez saris
vous saucier de si l’appareil est rest6 allume toute la
nuit. Si vous aver egalement regle la minuterie de reveil
ceci est important puisque la minuterie de reveil ne
fonctionnera pas si l’appareil est en veille.
1 Appuyez sur SLEEP (SHIFT & 6) pour rhgler
l’heure de mise en veille de l’appareil.
Appuyez plusieurs fois pour passer parmi :
l
SLEEP AUTO
pour la lecture dun CD*
l
SLEEP 90
l
SLEEP 60
l
SLEEP 30
l
SLEEP OFF
Lindicateur de la minuterie de sommeil (3) s’allume
et l’afficheur s’obscurcit quand la minuterie de
sommeil est active.
* Ceci n’est pas valable quand un Video CD est en mode
PBC, ou si vous lisez un CD ou un Video CD en mode de
repetition. Si vous reglez la lecture dun disque en mode
de repetition apres le reglage de la minuterie de
sommeil
?i SLEEP AUTO,
automatiquement au reglage de 90 minutes.
l
Une fois que la minuterie de sommeil est reglee,
vous pouvez verifier l’heure laissee en appuyant sur
SLEEP (SHIFT &
l
Pour annuler la minuterie de sommeil, mettez
l’appareil en veille, ou selectionnez
(comme decrit ci-dessus).
l
Si vous change2 de source quand
regle, l’appareil se mettra automatiquement en veille
dans la minute qui suit.
- ce reglage est seulement valable
(minutes)
(minutes)
(minutes)
(annule la minuterie de sommeil)
celui-ci passera
6).
SLEEP OFF
SLEEP AUTO
est
WFr
Page 54

Advanced sound settings
This chapter covers advanced settings to further
optimize the sound of your system.
Rbglages du son avancbs
Ce chapitre decrit des reglages avances pour obtenir une
optimisation plus poussee du son de votre appareil.
LFE attenuator
The LFE (low frequency effects) channel carries ultra
low bass sound to add weight to effects in Dolby Digital
and DTS soundtracks. This channel can overload the
subwoofer resulting in distortion. Use the LFE
attenuator setting to reduce the signal fed to the
subwoofer.
Note
a
l
The LFE attenuator only works with sources that
contain an LFE channel. It is not a general level control
for the subwoofer.
l
You can’t change this setting if the Record mode is
on (see page 40).
1 Press SYSTEM SETUF?
2 Press the 4 or b button until you see LFE in
the display.
3 Use the A and v buttons to set the amount
of signal reduction.
There are three settings:
l
LFE AlT o
l
LFE ATT 10
- default setting (no signal reduction)
-the LFE channel signal level is
reduced to avoid distortion
l
LFE OFF
- the LFE channel is switched off
completely. This may be useful late at night, for
example.
4 Press ENTER.
Atthuateur LFE
Le canal LFE (effets basses frequences) transporte un
son grave ultra bas pour ajouter du poids aux effets des
bandes-son Dolby Digital et DTS. Ce canal peut
surcharger l’enceinte d’extremes graves provoquant
ainsi une deformation du son, Utilisez le reglage de
l’attenuateur LFE pour reduire le signal aliment6 au
l’enceinte d’extremes graves.
l
L’attenuateur LFE fonctionne settlement avec des
sources qui contiennent un canal LFE. Ce n’est pas une
commande de niveau general pour l’enceinte
d’extremes graves.
l
Vous ne pouvez pas changer ce reglage si le mode
d’enregistrement est active (voir page 40).
1 Appuyez sur SYSTEM SETUP
2 Appuyez sur 4 ou b jusqu’h ce que vous
voyiez LFE sur l’afficheur.
3 Appuyez sur la touche A et v pour rkgler la
quantit6 de kduction du signal.
11 y a trois reglages :
l
LFE Al7 o
- reglage par defaut (sans reduction du
signal)
. LFE ATT 10
- le niveau de signal du canal LFE est
reduit pour eviter toute deformation
l
LFE OFF
- le canal LFE est completement d&active,
Cela peut etre habitue1 tard dans la nuit, par exemple.
4 Appuyez sur ENTER.
Dynamic Range Control
The dynamic range of a source is the difference between
the quietest and the loudest sounds. The dynamic range
of Dolby Digital soundtracks can be very great, This
makes them exciting, but it also means that when you.
turn the volume down you can easily lose quiet dialog.
Switch on Dynamic Range Control to even out the
soundtrack volume.
l
You can’t change this setting if the Record mode is
on (see page 40).
Commande Dynamic Range (Gamme
dynamique)
La gamme dynamique dune source est la difference
qu’il y a entre fes sons les plus legers et les plus forts. La
gamme dynamique des bandes-son Dolby Digital peut
etre t&s vaste. C’est ce qui les rend plus excitantes, mais
cela signifie egalement que lorsque vous baissez le
volume vous pouvez facilement perdre des dialogues
pauses. Active2 la commande de la gamme dynamique
pour uniformiser le volume de la bande-son.
0 Vous ne pouvez pas changer ce reglage si le mode
d’enregistrement est active (voir page 40).
Page 55

I Press SYSTEM SETUR
2 Press the 4 or F button until you see D.R.C.
in the display.
3 Use the A and v buttons to select a dynamic
range setting.
*
D.R.C. OFF
- default setting (no change to the
dynamics)
*
D.R.C. LOW
- the dynamic range is reduced by a
small amount.
e
D.R.C. MID
*
D.R.C. HIGH
- mid setting
-the dynamic range is reduced by a
large amount (good for listening at very low volume).
4 Press ENTER.
hal-mono setting
The dual-mono setting applies only to Dolby Digital
discs that feature dual-mono material-see the disc
box for details.
Dual-mono discs are recorded with two independent
channels that may be played together or separately
depending on the situation. For example, a guitar
tuition disc might have the guitar recorded on one
channel and all the other instruments on the other. Use
the dual-mono setting to play just the guitar part on its
own; just the backing, or everything together (through
separate speakers, or mixed).
e
YOLI
can’t change this setting if the Record mode is
on (see page 40).
1 Press SYSTEM SETUR
2 Press the 4 or b button until you see
CH or MIX in the display.
3 Use the A and v buttons to select a dual-
mono setting.
e L-CHl R-CH2
-default setting (Chl is played
through the left speaker; Ch2 through the right)
e
CHl
- Chl is played through the center speaker
(or through the left and right speakers if
Surround
0ff is selected); Ch2 is muted.
e
CH2
- Ch2 is played through the center speaker
(or through the left and right speakers if
Surround
0ff is selected); Chl is muted.
1 Appuyez sur SYSTEM SETUP.
2 Appuyez sur la touche 4 ou k jusqu’a ce que
vous voyiez D.R.C. sur l’aftkheur.
3 Utilisez les touches A et v pour selectionner
un reglage de gamme dynamique.
l
D.R.C. OFF
- reglage par defaut (saris
changement de dynamique)
l
D.R.C. LOW
- la gamme dynamique est reduite a
une petite quantite.
l
D.R.C. MID - &jage
l
D.R.C. HIGH
- la gamme dynamique est reduite a
moyen
une grande quantite (bonne pour &outer a un tres has
volume).
4 Appuyez sur ENTER.
Rhglage dual-mono
Le reglage dual-mono s’applique seulement aux
disques en Dolby Digital qui offrent un materiel
dual-mono-voir l’etui du disque pour plus de details.
Les disques dual-mono sont enregistres avec deux
canaux independants qui peuvent etre lus ensemble ou
separement en fonction de la situation. Par exemple,
sur un disque de touts de guitare, la guitare doit Stre
enregistree sur un canal et les autres instruments sur
l’autre, IJtilisez le rkglage dual-mono pour lire juste la
partie de la guitare ; juste le fond, ou tout ensemble (a
travets des enceintes separees, ou melangees).
l
Vous ne pouvez pas changer ce reglage si le mode
d’enregistrement est active (voir page 40).
1 Appuyez sur SYSTEM SETUR
2 Appuyez sur la touche 4 ou F jusqu’a ce que
vous voyiez CH ou MIX sur l’afticheur.
3 Utilisez les touches A et v pour selectionner
un reglage dual-mono.
l
L-CHl R-CH2
- reglage par defaut (Chl est lu
par l’enceinte gauche ; Ch2 par l’enceinte droite)
l
CHl
- est lu par l’enceinte centrale (ou par les
enceintes gauche et droite si
Surround Off
est
selectionne) ; Ch2 est coupe.
l
CH2
- Ch2 est lu par l’enceinte centrale (ou par
les enceintes gauche et droite si
Surround Off
est
selectionne) ; Chl est coupe.
En/Fr
Page 56

l
stereo.
affecteront
MIX - Chl and Ch2 are mixed together and played
through the center speaker (or through both left and
right speakets
if Surround
Off is selected).
l
MIX
- Chl et Ch2 sont melanges ensemble et lisent
par l’enceinte centrale (ou par les deux enceintes
gauche et droite si
Surround
Off est selectionne).
Press ENTER.
Adjusting channel volume levels
Depending on your room and where you’re sitting, you
may want to adjust the relative volumes of one or more
speakers for a more balanced sound. You can do this in
any mode, including the surround, DSP, and stereo
modes. Settings that you make in any sound mode are
completely independent and don’t affect any other
mode.
Note
El
l
Each DSP effect has its own set of channel level
settings.
l
The channel levels you set for the Surround mode
apply to Standard and all Advanced Theater effects.
l
The headphone level is not affected by the channel
level settings.
Press CH LEVEL.
Adjustments to the channel volume levels will affect
only the current sound mode.
Use the 4 and b buttons to select a channel
to adjust.
The display shows the channel and its current setting.
l
Remember that not all channels are available in all
sound modes.
Use the A and v buttons to adjust the
volume of the current channel.
For best results, sit in your main listening position when
doing this. You can adjust each speaker in the range of
+/-1OdB.
When you’re done, press ENTER.
Appuyez sur ENTER.
Rbglage des niveaux de volume du
canal
Selon la piece et l’endroit ou vous vous asseyez, il se
peut que vous souhaitiez regler les volumes
correspondants a une ou plusieurs enceintes pour
obtenir un son plus equilibre, Vous pouvez le faire dans
tout mode, y compris les modes surround, DSP et
Les reglages que vous effectuez dans un mode de son
quelconque sont completement independants et son
sans effet sur tout autre mode.
l
Chaque effet DSP dispose de son propre groupe de
regiages du niveau du canal.
l
Les niveaux du canal que vous avez regles pour le
mode surround s’appliquent a Standard et a tous les
effets Advanced Theater.
l
Les reglages du niveau du canal sont sans effet sur
le niveau des ecouteurs
Appuyez sur CH LEVEL.
Les reglages des niveaux de volume du canal
seulement le mode de son actuel.
Utilisez les touches 4 et b pour selectionner
un canal 23 regler.
L’afficheur montre le canal et son reglage actuel.
* Rappelez-vous que tous les canaux ne sont pas
disponibles dans tous les modes de son.
Utilisez les touches A et v pour regler le
volume du canal actuel.
Pour obtenir de meilleuts resultats, asseyez-vous a votre
position principale d’ecoute pendant le reglage. Vous
pouvez regler chaque enceinte dans une portee de
+/-1OdB.
.
m
En/b
Apres quo4 appuyez sur ENTER.
Page 57

Using the DVD Setup
menu
Utilisation du menu
Setup du DVD
The DVD Setup menu gives you access
to all the system’s DVD settings. Press
DVD SETUP
to display/leave the
menu and the cursor (4Avb) and
ENTER
buttons on the remote to
navigate and select options. In some
screens you can press
RETURN
to
leave the screen without making any
changes, The controls for each menu
are shown at the bottom of the screen.
If an option is greyed out it means that
it cannot be changed at the current
time. This is usually because a disc is
,
playing. Stop the disc, then change the
setting.
The current setting for any option is
marked with a colored box. The color
of the box indicates what kind of disc
the setting is applicable to: blue for
DVD only; yellow for DVD and Video
CD; green for any type of disc.
Le menu Setup (de configuration) du
DVD vous donne acces a tous les
reglages DVD de l’appareil. Appuyez sur I
DVD SETUP
pour afficher/laisser le
menu et les touches du curseur
(4AVb)
et
ENTER
sur la
telecommande pour naviguer et
selectionner les options. Dans certains
ecrans vous pouvez appuyez sur
RETURN
ou laisser l’ecran sans faire
de modification. Les commandes pour
chaque menu sont indiquees sur la
partie inferieure de l’ecran
Si une option est en dehors du gris cela
signifie qu’elle ne peut pas etre
modifiee a ce moment-la. Ceci est
habitue1 quand il y a une lecture de
disque en tours. Ar&ez le disque, puis
modifiez le reglage.
Le reglage actuel pour toute option est
marque par une case de couleur. La
couleur de la case indique a quel type
de disque le reglage est applicable :
Video settings
bleue pour les DVD seulement ; jaune
pour les DVD et les Video CD ; verte
TV
Screen
l
Set in Setup Navigator (Default:
16:9 (Wide))
pour tout autre type de disque.
Rhglages vidbo
If you have a widescreen TV select the
16:9 (Wide)
setting-widescreen
DVD software is then shown using the
full screen area. When playing software
recorded in conventional
(4:3)
format,
the settings on your TV will determine
TV
Screen @ran du
t&viseur)
l
Regle au Setup Navigator
(par defaut
a Select your dfsplay preference
~~~hVblwe =Exit 1
: 16:9 (Wide))
Si vous disposez d’un t&viseur a
grand &ran, selectionnez le reglage
16:9 (Wide)-le
logiciel du DVD
m
En/Fr
Page 58

how the material is presented-see the manual that
came with your TV for details on what options are
available.
If you have a conventional TV choose either 4:3
(Letter Box)
or
4:3 (Pan & Scan).
In Letter
Box mode, widescreen software is shown with black bars
at the top and bottom of the screen. Pan & Scan chops
the sides off widescreen material to make it fit the 4:3
screen (so even though the picture looks larger on the
screen, you’re actually seeing less of the movie). See
page 73 for more information.
Picture Quality
l
Default setting:
Standard
grand &ran est alors montre en prenant tout l’espace de
l’ecran. ,& la lecture dun logiciel enregistre en format
conventionnel (4:3), les reglages sur votre televiseur
determineront la faGon dont est presente ie materielvoir le manuel qui accompagne votre televiseur pour les
details sur les options disponibles,
Si vous aver un televiseur conventionnel, choisissez soit
4:3 (Letter Box) ou 4:3 (Pan & Scan).
Dans
le mode Letter Box (bo?te aux lettres), le logiciel grand
&ran est montre avec des franges noires sur les parties
superieure et inferieure de l’ecran. Pan & Scan
(panoramique et scannage) reduit les cot& du materiel
pour l’adapter a l’ecran 4:s (bien que l’image semble
plus large sur l’ecran, vous &es en train de voir du film
en mains), Voir page 73 pour plus d’information
Picture Quality (Qualitk de l’image)
l
Reglage par defaut
: Standard
There are three preset picture quality settings that suit
various program types.
Cinema
Animation
Standard
- Sharp, high contrast picture.
-Bright, vibrant colors.
-Neutral picture.
S-Video Out W
l
Default setting: S2
You can switch the type of S-Video signal output, If you
connected your ‘IV with an S-Video cord in some rare
cases the TV picture may appear stretched. If you find
this switch the S-Video output from S2 to
Sl.
11 y a trois reglages preregles pour la qualite de l’image
qui s’adaptent a differems types de programmes.
Cinema
Animation
Standard
- Image hautement contrastee, nette.
- Coulems vibrantes, brillantes
- Image neutre.
S-Video Out (Sortie S-Video)
l
Reglage par defaut : S2
Vous pouvez changer le type de sortie du signal S-Video.
Si vous avez raccorde votre televiseur avec un cordon
S-Video il est rare que l’image du televiseur apparaisse
etiree. Dans ce cas faites passer la sortie S-Video de S2 a
Sl.
En/Fr
Page 59

Still Picture BE3
Ill
l
Default setting:
Auto
Still Picture (Image fig6e) CEE3
l
Reglage par defaut
: Auto
1
.
The player uses one of two processes when displaying a
still frame from a DVD disc. The default Auto setting lets
the system decide which to use.
Field
-produces a stable, generally shake-free image.
Frame
shake than field stills.
On Screen Display @@B
* Default setting:
When watching DVD discs recorded in
(‘regular’ TV size) on a widescreen n, it can be difficult
to see the operation displays
etc.) at the top of the screen. If you find them hard to
read, select
If you prefer not to have the operation displays shown
on-screen, change the setting to Off.
Angle Indicator @G!ECI
* Default setting:
-produces a sharper image, but more prone to
Position - Normal
4:3
format
(Play, Stop, Resume,
Position - Wide.
On
Video 1
TV Screen -16:9(Wide)
Picture Quality -Standard
S-Video Out -5~2
Still Picture -Auto
I
I
Le lecteur utihse un des deux processus 2 l’affichage
d’une image figee dun disque DVD. Le reglage par
defaut Auto laisse l’appareil decider lequel utiliser.
Field
- produit une image stable, generalement libre
de vibration.
Frame
propice a vibrer que les champs fig&.
On Screen Display (Affichage h
l’bcran) @GE0
l
Si vous visionnez des disques DVD enregistres dans un
format
televiseur a grand &an, il est possible que les
affichages d’operation
soient difficiles a voir sur la partie superieure de l’ecran
Si vous trouvez qu’ils sont difficiles a lire, reglez
Position - Wide.
Si vous preferez que les affichages des operations ne
soient pas montres a l’ecran, modifiez le reglage a Off.
Angle Indicator (lndicateur d’angle)
(Tiq-)
l
- produit une image plus nette, mais plus
Reglage par defaut
4:3
(format du televiseur ‘normal’) sur un
Reglage par defaut :
: Position - Normal
(Play, Stop, Resume, etc.)
On
.
EdFr
Page 60
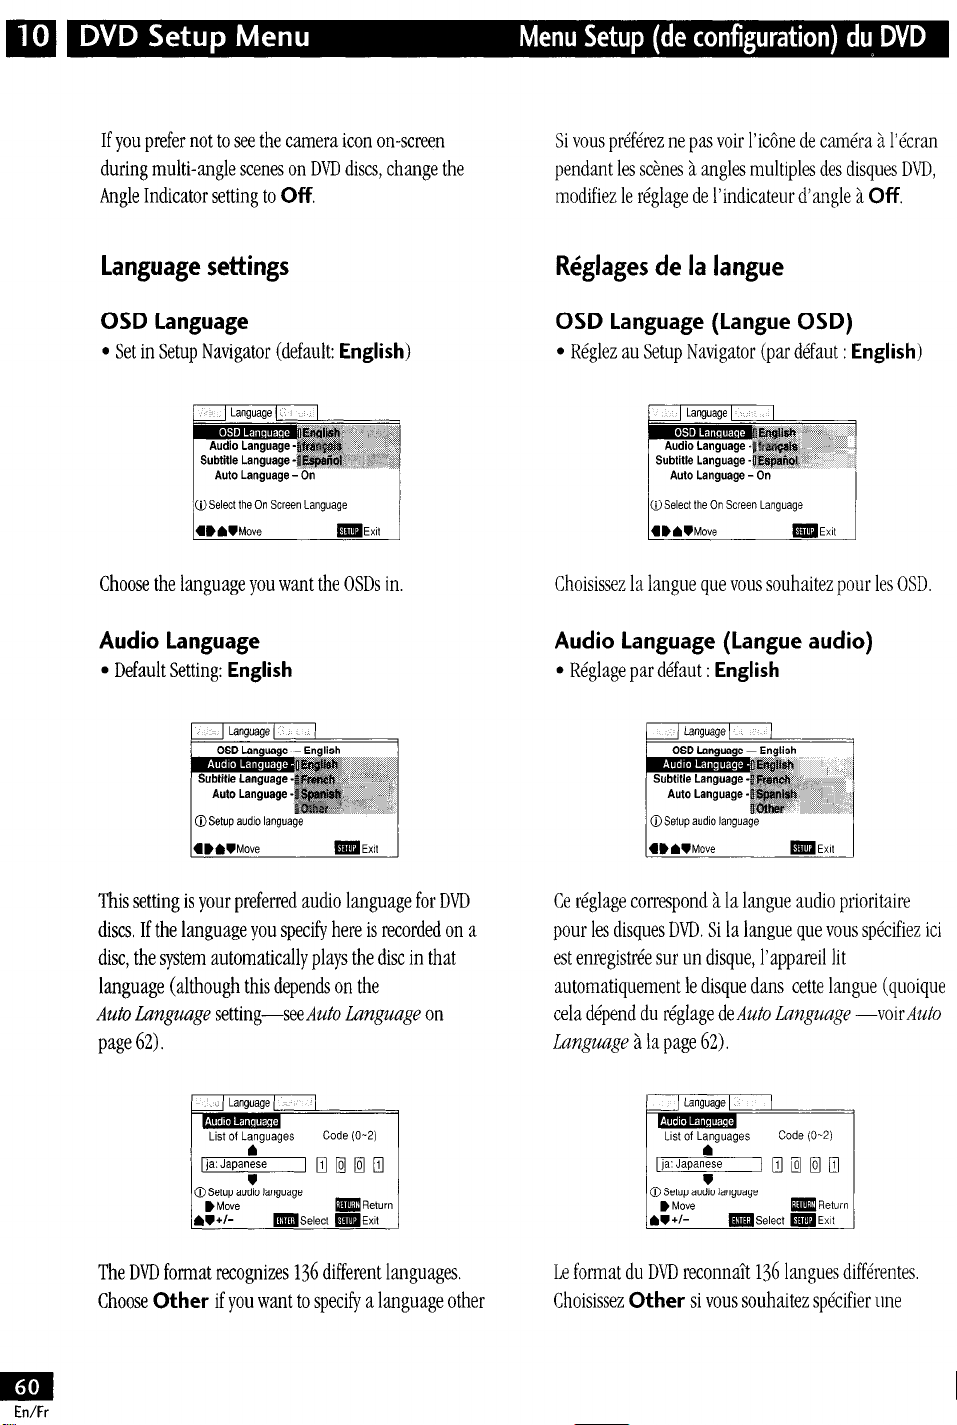
If you prefer not to see the camera icon on-screen Si vous preferez ne pas voir l’ic6ne de camera a l’ecran
(quoique
during multi-angle scenes on DVD discs, change the
pendant les scenes a angles multiples des disques DVD,
Angle Indicator setting to Off. modifiez le reglage de l’indicateur d’angle a Off,
Language settings
OSD
language
l
Set in Setup Navigator (default:
Choose the language you want the OSDs in.
Audio language
l
Default Setting:
English
@Setup audio langua
English)
Rhglages de la langue
OSD Language (Langue OSD)
l
Reglez au Setup Navigator (par defaut
@Select the On Screen Language
~....Move =Ex~t 1
Choisissez la langue que vous souhaitez pour les OSD.
Audio Language (Langue audio)
l
Reglage par defaut
: English
aSetup audio langua
: English)
En/h
This setting is your preferred audio language for DVD
discs, If the language you specify here is recorded on a
disc, the system automatically plays the disc in that
language (although this depends on the
AZ&O knguuge setting-see&lo
L4mguage
on
page 62).
List 01 Languages
b
1 ja: Japanese
v
Code (O-2)
lIDElm
The DVD format recognizes 136 different languages.
Choose
Other
if you want to specify a language other
Ce reglage correspond a la langue audio prioritaire
pour les disques DVD. Si la langue que vous specifiez ici
est enregistree sur un disque, l’appareil lit
automatiquement le disque dans cette langue
cela depend du reglage deA&o baguage -voir.&fo
hzguage A la page 62).
Code (0-Z)
Le format du DVD reconnalt 136 langues differentes
Choisissez
Other
si vous souhaitez srkcifier une
Page 61

than those listed, then follow the on-screen display to
select a language, You may also want to refer to the
Lunguuge code list on page 72.
Remember
Q
You can switch betweenthe languages recorded on a
DVD disc any time during playback using the
button. (This does not affect this setting.)
Subtitle Language
l
Default Setting:
This setting is your preferred subtitle language for DVD
discs. If the language you specify here is recorded on a
disc, the system automatically plays the disc with those
subtitles (although this depends on theAto Language
setting-see&to Language on page 62).
English
@Setup d!sc’s subMe language
AUDIO
langue autre que celles de la liste, suivez ensuite
l’affichage a P&ran pour selectionner une langue. Vous
pouvez egalement consulter la&te & codes de
lungws ii la page 12.
Rappel
42
Vous pouvez passer parmi les langues enregistrees sur
un disque DVD a n’importe quel moment de la lecture
en utihsant la touche
reglage.)
Subtitle Language (Langue des sous-
titres)
l
Reglage par defaut
Ce reglage correspond a la langue prioritaire des
sous-titres pour les disques DVD, Si la langue que vous
specifiez ici est enregistree sur un disque, l’appareil lit
automatiquement le disque avec ces sous-titres
(quoique cela depend du reglage
voiehto Language h la page 62).
AUDIO.
: English
(Ceci est sans effet sur le
dehto
Mzguage-
-
Ill
aSetup dls& subtitle language
The DVD format recognizes 136 different languages.
Ciloose Other
than those listed, then follow the on-screen display to
select a language, You may also want to refer to the
Lungufage code l&t on page 12.
Remember
Q
You can change or switch off the subtitles on a DVD disc
any time during playback using the
(This does not affect this setting.)
if you want to specify a language other
SUBTITLE
button.
Larlguage 1
List of Languages
Le format du DVD reconnait 136 langues differentes.
Choisissez
langue autre que celles de la liste, suivez ensuite
l’affichage a l’ecran pour selectionner une langue. Vous
pouvez egalement consulter lakde des co& de
langues Si la page J2.
Q
Vous pouvez modifier ou desactiver les sous-titres sur un
disque DVD a n’importe quel moment de la lecture en
utihsant la touche
reglage.)
Other
Rappel
si vous souhaitez specifier une
SUBTITLE,
I
Code (0-Z)
(Ceci est sans effet sur le
.
m
WFr
Page 62

Auto language
l
Default Setting:
On
@Play dialog, etc. in original language
Subtitle ON with loreign audio
1d.A Move =Exit ~
Auto Language (Langue automatique)
l
Rbglage par difaut :
On
When set to
On,
the system always selects the default
audio language on a DVD disc (French dialog for a
French movie, for example), and displays subtitles in
your preferred subtitle language only if that is set to
something different. In other words, movies in your
native language won’t have any subtitles, while foreign
language movies will be shown with subtitles.
Set to Off to have the system play discs strictly
according to your Audio Language and Subtitle
Lunguage settings.
For Auto Language to work, the Audio Language and
Subtitle Lunguage settings must be the same-see
pages 60-61 and this page.
Tip
a
You can still switch audio and subtitle languages on
playback using the
AUDIO
and
SUBTITLE
buttons
DVD language @if3
l
Default Setting:
w/Subtitle Language
@and le riglage est
On,
l’appareil silectionne
toujours la langue audio par ddfaut du disque DVD
(dialogues en fran$ais pour un film franGais, par
exemple) et affiche les sous-titres dans votre langue
prkf&$e de sous-titres uniquement si le rdglage est
diffkrent. Dans d’autres termes, les films dans votre
langue maternelle ne seront pas sous-tit&, tandis que
les films de langue &rang&e seront sous-tit&s.
Rkglez 3 Off pour que l’appareil lise des disques
strictement en fonction de vos r&glagesAudio
Language et Subtitle Language.
Pour que Auto Language fonctionne, les riglages Audio
Language et Subtitle Language doivent 3re les
memes-voir les pages 60-61 et cette page.
Astute
a
Vous pouvez encore changer les langues audio et des
sous-titres lors de la lecture en utilisant les touches
AUDIO
et
SUBTITLE.
DVD Language (Langue du DVD)
(-&x)
l
Rt?glage par dbfaut
: w/Subtitle Language
ErdFr
Some multi-lingual discs have disc menus in several
languages. This setting specifies in which language the
disc menus should appear. Leave on the default setting
for menus to appear in the same language as your
Subtitle Lunguage-see page 61.
Certains disques 2 langues multiples ont des menus de
disque en plusieun langues. Ce riglage spicifie la
langue dans laquelle les menus de disque doivent
appara?tre. Gardez le rkglage par dkfaut pour que les
menus apparaissent dans la meme langue que votre
Subtitle Language-voir la page 61.
Page 63

List 01 Languages
code (O-2)
The DVD format recognizes 136 different languages.
Choose
Other
if you want to specify a language other
than those listed, then follow the on-screen display to
select a language. You may also want to refer to the
Language code list on page 72.
Subtitle Display EEB
l
Default Setting:
Set to
On,
On
Audio La&a& - En&h
Subtitle Language - English
the player displays subtitles according to the
Subtitle Language and Auto Language settings above.
Set to Off to switch subtitles off altogether (although
see Subtitle 0) on page 64 for special cases). Set to
Assist Subtitle
to have the player display the extra
assistive subtitles recorded on to some DVD discs.
Le format du DVD reconnaft 136 langues differentes.
Choisissez
Other
si vous souhaitez sptkifier une
langue autre que celles de la liste, suivez ensuite
l’affichage a P&ran pour stqectionner une langue. Vous
pouvez egalement consulter la Lkte des coda ah
langue3 a la page 12.
Subtitle Display (Affichage des soustitres) @@3
l
Reglage par defaut :
Regle a
On,
le lecteur affiche des sous-titres en
On
OSD Lanawe - English
Audio Lan&a& - En&h
Subtitle Language-English
fonction des reglages Subtitle Lmguuge etAuto
Lmguage ci-dessus. Reglez a Off pour desactiver
compktement les sous-titres (cependant voir Subtitle
Of a la page 64 pour des cas speciaux). Reglez a
Assist Subtitle
pour que le lecteur affiche les soustitres d’assistance supplementaires enregistr& sur
certains disques DVD.
L
EdFr
Page 64

Subtitle Off @EQ
l
Default Setting:
Selected Subtitle
Some discs display subtitles even if the Subtitle Dkplay
setting (on page 63) is set to off. In this case, you can
either have the subtitles displayed in the same language
as your preferred audio language
in your preferred subtitle language
Subtitle).
If the Aa% Language and Subtitle
(With Audio),
(Selected
or
hnguage settings are the same then both of these
choices will give the same result.
General settings
Setup Menu Mode
l
Default setting:
Basic
Subtitle Off (D&activation
des
sous-titres) GE@
l
Reglage par defaut
: Selected Subtitle
Language 1
OSD Language-English
Audio Language- English
Subtitle Language - English
Auto Lanouaw - On
Certains disques affichent des sous-titres meme si le
reglage Subtitle D&play (page 63) est d&active. Dans
ce cas vous pouvez soit avoir les sous-titres affiches
dans la meme langue que votre langue audio preferee
(With Audio),
les sous-titres
soit dans votre langue preferee pour
(Selected Subtitle),
Si les reglages
Audio Latiguage et Subtitle La?zgtiage sont les memes
alors les deux choix donneront le m&ne resultat.
Rbglages g&kraux
Setup Menu Mode (Mode menu de
configuration)
l
Reglage par defaut
: Basic
ErdFr
The
Basic
setup menu gives you access to the more
commonly used settings, It also features an information
bar which tells you more about what the currently
highlighted option means.
Set to
Expert
for access to all settings.
a Change menu mode
Le menu de configuration
Basic
vous offre l’acces aux
reglages les plus couramment utilises. 11 presente
egalement une barre d’information qui vous en dit plus
sur ce que signifie l’option actuellement en
surbrillance.
Reglez
2 Expert
pour acceder a tous les reglages.
Page 65

Parental lock
l
Default level: 8
e Default password: no?ze
Parental Lock (Verrouillage parental)
l
Niveau par defaut : 8
l
Mot de passe par defaut : QWW
You can restrict access to certain discs using this feature.
Once set, the player will ask for a four-digit password if a
restricted disc is loaded, giving you a degree of control
over what your children watch,
The player can be set to one of eight levels. Setting the
level at 1 means that any disc with any level of
restriction will need the password in order to watch it,
while setting it at level 8 gives unlimited access.
DVD discs are also rated from 1 to 8. Discs rated 1 (or
with no rating) generally contain little or no offensive
material; discs rated 2, may contain material that some
parents may feel is unsuitable for children. Discs rated 8
will almost certainly be unsuitable for children.
Since a disc’s rating is up to the manufacturer, it is not
possible to give a definitive guide to each level&check
the disc box for parental lock details.
Note
Eil
Not all discs that you may consider inappropriate for
your children are rated. Unrated discs will always play
without requiring the password first.
Vous pouvez restreindre l’acces a certains disques en
utilisant cette caracteristique. Une fois rig16 vous
pourrez demander un mot de passe de quatre chiffres si
un disque restreint est charge, vous offrant ainsi un
degre de contmle sur ce que regardent vos enfants
Vous pouvez regler le lecteur a un des huit niveaux. Le
reglage au niveau 1 signifie que tout disque ayant un
niveau de restriction quelconque requiert un mot de
passe pour Ctre vision&, tandis que le reglage au
niveau 8 offre un acces illimite.
Les disques DVD sont egalement classifies de 1 a 8. Les
disques avec l’estimation 1 (ou sans limitation)
contiennent en general du materiel peu ou pas du tout
offensif ; les disques avec l’estimation 2 peuvent
contenir du materiel que certains parents ne
considerent pas approprie pour des enfants. Les disques
estimes a 8 seront t&s certainement peu convenables
pour les enfants
Puisque la limitation d’un disque provient du fabricant,
il nest pas possible de fournir un guide definitif pour
chaque niveau-v6rifie.z l’etui du disque pour les
details sur le verrouillage parental.
Les disques que vous pouvez considerer inapropries pour
vos enfants ne sont pas tous classif comme tels. Les
disques non classifies pourront &re toujours lus sans
demander d’abord le mot de passe.
En/i?
Page 66

Changing the parental lock level
1 Select level Change.
2 Use number buttons to register a new
password or confirm your existing password,
then press ENTER.
@Enter 4-Digit Code
The first time you set the parental lock level, you have
to register a password. Anything you input becomes your
password.
3 Select a new level.
Modifier le niveau de verrouillage
parental
1 Selectionnez “level Change’!
2 Utilisez les touches numerotees pour
consigner un nouveau mot de passe ou
confirmer le mot de passe existant deja, puis
appuyez sur ENTER.
La premiere fois que vous reglez le niveau de
verrouillage parental, vous devez consigner un mot de
passe. Quoi que vous entriez deviendra votre mot de
passe.
3 Selectionnez un nouveau niveau.
Move leftward to lock more levels (more discs will
require the password); rightward to unlock levels. You
can’t lock level 1.
4 Press ENTER to set the new level.
Changing your password
1 Select Password Change.
2 Input your existing password, then press
ENTER.
lm?a~lm~lEhiifl
Level 1 2
aSet Parental Lock
3 4 m 6 7 a
Deplacez-vous vers la gauche pour verrouiller plusieurs
niveaux (beaucoup de disques requeriront le mot de
passe) ; ven la droite pour deverrouiller les niveaux.
Vous ne pouvez pas verrouiller le niveau 1.
4 Appuyez sur ENTER pour regler le nouveau
niveau.
Modifier votre mot de passe
1 Selectionnez “Password Change’!
2 Entree votre mot de passe existant, pub
appuyez sur ENTER.
En/Fr
Page 67

3 Input a new password, then press ENTER.
(3 Enter 4-DIgit Code
3 Entree un nouveau mot de passe, puis
appuyez sur ENTER.
@Enter 4-DIgit Code
If you forget your password, resetting the player will
clear the password. See page 74 for more on this.
Screen Saver @G3
* Default setting: Off
If a constant image is displayed on a conventional CRT-type
n, it can “bum in” leaving a ghost image on the screen,
When On, the screen saver makes sure that a constant
image is not displayed for a dangerously long time.
Background Color CEG@ * Default setting:
Blue
Si vous oubliez votre mot de passe, le lecteur
supprimera le mot de passe en le reinitialisant. Voir la
page 76 pour plus de details.
Screen Saver (&onomiseur d’bcran)
(W)
l
Reglage par defaut : Off
4D4WlOV~
=EXlt
Si une image constante est affichee sur un televiseur CRT
de type ordinaire, celle-ci peut se desintegrer en la&ant
une image vague sur l’ecran. 1
On,
l’economiseur
d’ecran garantit qu’une image constame ne soit pas
affichee pendant une longue periode de temps dangereuse.
Background Color (Couleur de
l’arrihre-plan) (33
l
Reglage par defaut : Blue
This specifies the color of the screen when the player is
stopped (or playing an audio disc).
Select Other if you want to make your own
background color. Follow the on-screen display to create
a color from the red, green and blue bars.
11 specific la couleur de l’ecran quand le lecteur est
arr&e (ou a la lecture d’un CD audio).
Selectionnez Other si vous souhaitez composer votre
propre couleur d’arriere-plan. Suivez l’affichage a
l’ecran pour creer une couleur a partir des barres rouge,
verte et bleue.
En/h
Page 68

Switching the AM frequency interval
As its default setting, the tuner jumps in steps of IOkHz
when tuning in AM stations. If you find that this is
unsuitable in your area (if you can’t tune into stations
successfully), you can change the tuning interval to
9kHz
for AM. Here’s how to switch the setting.
1 Switch the system into standby.
2 Press SYSTEM SETUR
3 Press the 4 or b button until you see AM
STEP in the display.
4 Use the A and V buttons to select 9kHz
or 1OkHz.
l
When set to WIz, the FM tuning interval becomes
5okHz.
5 Press ENTER.
Changement de l’intervalle de
frbquence AM
En temps que reglage par defaut, le tuner saute par pas
de
1OkHz
en accordant des stations AM. Si vous trouvez
que ce reglage n’est pas approprie pour votre region (si
vous ne pouvez pas accorder des stations avec succes),
vous pouvez changer l’intervalle d’accord a !&Hz pour
AM. Voici comment changer le reglage.
1 Mettez l’appareil en veille.
2 Appuyez sur SYSTEM SETUP
3 Appuyez sur la touche 4 ou b jusqu’a ce
que vous voyiez AM STEP sur l’afficheur.
4 Utilisez les touches A et V pour
selectionner 9kHz ou 1OkHz.
l
Au reglage a qkH2, l’intervalle d’accord FM devient
5okHz.
Setting the display brightness
You can adjust the brightness of the display to suit the
lighting conditions of the room.
l
Press FL DIMMER (SHIFT & >lO).
Press repeatedly to set the display brightness. There are
five levels.
Switching the time format
You can display the clock in either 12 or 24-hour
format.
1 Switch the system into standby.
2 Press SYSTEM SETUR
3 Press the 4 or w button until you see
CLOCK 12 HR or CLOCK 24 HR in the
display.
4 Use the A and V buttons to select 12 or
24.
5 Press ENTER.
5 Appuyez sur ENTER.
Rkglage de l’kclairage de l’afficheur
Vous pouvez regler l’eclairage de l’afficheur pour
l’adapter aux conditions lumineuses de l’entourage.
l
Appuyez sur FL DIMMER (SHIFT & >lO).
Appuyez plusieurs fois pour regler l’eclairage de
l’afficheur II y a cinq niveaux.
Changement du format de l’heure
Vous pouvez afficher l’horloge soit
heures ou le format 24 heures
1 Mettez l’appareil en veille.
2 Appuyez sur SYSTEM SETUP
3 Appuyez sur la touche 4 ou b jusqu’a
ce que vous voyiez CLOCK 12 HR ou
CLOCK 24 HR sur l’affrcheur.
4 Utilisez les touches A et V pour
selectionner 12 ou 24.
dans
le format
12
5 Appuyez sur ENTER.
Page 69

Taking care of your system
To clean this unit, wipe with a soft, dry cloth. For
stubborn dirt, wet a soft cloth with a mild detergent
solution made by diluting one part detergent to 5 or
6
parts water, wring well, then wipe off the dirt. Use a dry
cloth to wipe the surface dry. Do not use volatile liquids
such as benzene and thinner which may damage the
surfaces.
Comment prendre soin de votre appareil
Pour nettoyer cette unite, essuyez-la avec un chiffon doux et
sec. Pour eliminer la salete plus resistante, impmgnez un
chiffon doux dune solution detergente deuce obtenue en
diluant une dose de detergent dans 5 ou 6 doses d’eau ; essorez
le chiffon et essuyez la salete. Sechez la surface avec un
chiffon sec. N’utilisez pas de produits tels que le benzene et un
diluant qui pourraient endommager la surface.
Disc lens
cleaner
The disc pickup lens should not become dirty in normal
use, but if for some reason it should malfunction due to
dirt or dust, consult your nearest Pioneer authorized
service center. Although lens cleaners for CD players are
commercially available, we do not recommend using
them since some may damage the lens.
Taking care of your discs
When holding discs, take care not to leave fingerprints,
dirt or scratches on the disc surface. Hold the disc by its
edge or by the center hole and edge. Damaged or dirty
discs can affect playback performance. Take care also
not to scratch the label side of the disc. Although not as
fragile as the recorded side, scratches can still result in a
disc becoming unusable.
Should a disc become marked with fingerprints, dust,
etc., clean using a soft, dry cloth, wiping the disc lightly
from the center to the outside edge as shown on the next
page. If necessary, use a cloth soaked in alcohol, or a
commercially available CD or DVD cleaning kit to clean
a disc more thoroughly Never use benzine, thinner or
other cleaning agents, including products designed for
cleaning vinyl records.
l
Wipe lightly from the center of the disc using
straight strokes.
Produits nettoyants pour lentille de disque
Si l’unite est utilisee normalement, la lentille du capteur du
lecteur CD ne devrait pas se salir, mais si un probleme de
fonctionnement se produit a cause de la saleti ou de la
poussiere, contactez votre centre Pioneer autorise le plus
proche, Bien que des produits nettoyants pour lentille CD
soient actuellement commercialist%, nous deconseillons leur
utilisation car certains produits pourraient endommager la
lentille.
Comment prendre soin de vos disques
En manipulant les CD, prenez soin de ne pas laisser de traces
de doigts, de ne pas salir ou ne pas rayer la surface du disque.
Saisissez le disque par le bord ou par l’orifice central et le
bard. Les disques endommages ou sales risquent d’affecter la
lecture. Prenez soin egalement de ne pas rayer le ci% de
l’etiquette du disque. Meme si cette face nest pas aussi fragile
que la face enregistree, un disque ray6 peut devenir
inutilisable.
Au cas ou un disque a des traces de doigts, de la poussiere, etc.,
nettoyez-le en utilisant un chiffon doux et humecte, en
essuyant le disque du centre vers la peripherie comme indique
a la page suivante. Le cas echeant, utilisez un chiffon imbibe
d’alcool, ou un kit de nettoyage pour CD et DVD disponible
dans le commerce pour nettoyer le disque avec efficacite.
N’utilisez jamais de benzene, de diluant ou d’autres agents
nettoyants, y compris les produits conGus pour le nenoyage de
disques en vinyle.
l
Don’t wipe the disc surface using circular strokes.
l
Essuyez legerement le disque a partir de son centre d’un
mouvement vertical.
l
N’essuyez pas la surface du disque en faisant des cercles.
.m
Page 70

Storing discs
Although CDs and DVDs are more durable than vinyl
records, you should still take care to handle and store
discs correctly. When you’re not using a disc, return it to
its case and store upright. Avoid leaving discs in
excessively cold, humid, or hot environments
(including under direct sunlight).
Don’t glue paper or put sticken on discs, or write on
them using a pencil, ball-point pen or other
sharp-tipped writing instrument.
Rangement des disques
Bien que les CD et les DVD soient plus resistants que les
disques en vinyle, vous devez les manipuler et les ranger
avec le plus grand soin Des que vous avez termine
d’ecouter un disque, remettez-le dans son etui et
rangez-le en position verticale. Ne rangez pas les
disques dans des endroits tres froids, humides ou chauds
(y compris en plein soleil).
Ne collez aucun papier ou etiquette sur le disque, et
n’inscrivez rien sur la surface du disque avec un crayon,
un sty10 a bille ou autre instrument d’ecriture pointu
Discs to avoid
Discs spin at high speed during playback. If you can see
that a disc is cracked, chipped, warped, or otherwise
damaged, don’t risk using it-you could end up
damaging the system.
This system is designed for use with conventional, fully
circular discs only. Use of shaped discs is not
recommended. Pioneer disclaims all liability arising in
connection with the use of shaped CDs and DVDs.
Glossary
Aspect ratio
The width of a TV screen relative to its height.
Conventional TVs are
almost square); widescreen models are
is almost twice as wide as it is high).
Chapter
Just as a book is split up into several chapters, a title on
a DVD disc is usually divided into chaptets. See also
Title.
Dolby Digital
A surround sound system developed by Dolby
Laboratories containing up to six channels of digital
audio (front left and right, surround left and right,
center and low-frequency channels). See also DTS
4:3
(in other words, the screen is
1619
(the screen
Disque 21 bviter
Pendant la lecture, les disques tournent a grande vitesse
dans le lecteur. Si vous remarquez qu’un disque est f&Z,
ebreche, voile, ou autrement endommage, ne l’utilisez
pas-vous pourriez endommager l’appareil
Cet appareil est con$u pour etre utilise avec des CD
ordinaires, entierement circulaires. 11 est deconseille
d’utiliser des disques ayant une forme irreguliere.
Pioneer decline toute responsabilie lice a l’utilisation de
CD et de DVD ayant une forme irreguliere.
Glossaire
Aspect ratio (rapport de format)
C’est la largeur de l’ecran dun televiseur par rapport a
sa hauteur. Les televiseuts ordinaires mesurent
(dans d’autres termes, l’ecran est presque carre) ; les
modeles grand &ran mesurent
1619
(l&ran est presque
deux fois sa hauteur).
Chapter (chapitre)
Tout comme un livre est compose de plusieurs
chapitres, un titre sur un disque DVD est habituellement
divise en chapitres Voir egalement Title (titre).
Dolby Digital
C’est un systeme de son surround developpe par Dolby
Laboratories comprenant jusqu’a six canaux d’audio
numerique (canaux avant gauche et droite, canaux
surround gauche et droite, canal central et canal de
basses frequences). Voir egalement DTS
4:3
En/Fr
Page 71

DTS
A surround sound system developed by Digital Theater
Systems as an alternative to Dolby Digital. DTS discs
contain up to eight channels of digital audio. See also
Dolby Digital.
DTS
C’est un systeme de son surround developpe par Digital
Theater Systems comme alternative au Dolby Digital.
Les disques DTS contiennent jusqu’a huit canaux
d’audio numerique. Voir egalement Dolby Digital.
MPEC video
The video format used for Video CDs and DVDs. Video
CD uses the older MPEG-1 standard, while DVD uses the
newer and much better quality MPEG-2 standard.
PBC (PlayBack Control) (Video CD only)
A system of navigating a Video CD through on-screen
menus recorded onto the disc. Especially good for discs
that you would normally not watch from beginning to
end all at once-karaoke discs, for example.
Regions (DVD only)
These associate discs and players with particular areas
of the world. This unit will only play discs that have
compatible region codes. You can find the region code
of your unit by looking on the rear panel. Some discs
are compatible with more than one region (or all
regions).
Title (DVD only)
A collection of chapters on a DVD disc. See also Chapter.
MPEG video (MPEG vidko)
C’est le format video utilise pour les Video CD et les DVD.
Le Video CD utilise le format standard MPEG-1 le plus
ancien, tandis que le DVD utilise le format MPEG-2 plus
actuel et de meilleure qualite.
PBC (Commande de lecture) (Video CD
seulement)
C’est un systeme de navigation sur Video CD a travers les
menus a l’ecran enregistres sur le disque.
Particulierement bon pour les disques que vous ne
regardez pas habituellement du debut a la fin en une
seule fois-les disques karaoke, par exemple.
Regions (r@ons) (DVD seulement)
Pour associer les disques et les lecteurs ayant une zone
geographique paritculiere. Cette unite lira seulement
des disques ayant des codes de region compatibles. Vous
pouvez trouver le code de region de votre unite en
regardant le panneau arriere. Certains disques sont
compatibles avec plus d’une region (ou avec toutes les
regions).
Title (titre) (DVD seulement)
C’est une collection de chapitres sur un disque DVD.
Voir egalement Chapter (chapitre).
En/Fr
Page 72

Language code list Liste des codes de langues
Quechua ( qu )
Engiish/angiais ( en )
French ( fr) 0618
German ( de ) cl405
Italian ( it )
Spanish (es )
Outch ( nl ) 1412
Russian ( ru )
Chinese ( zh )
Korean ( ko )
Greek ( el )
Afar ( aa )
Abkhazian ( ab )
Afrikaans ( af )
Amharic ( am )
Arabic ( ar )
Assamese ( as )
4fnam t a~ 1
Azerbaijani ( az )
Bashkir ( ba )
Byeiorussian ( be )
Bulgarian ( bg ) Bulgarian ( bg )
Bihari ( bh ) Bihari ( bh )
Bislama ( bi ) Bislama ( bi )
Bengali ( bn ) Bengali ( bn )
Tibetan ( bo ) Tibetan ( bo )
Breton ( br 1 Breton ( br )
Catalan ( ca ) Catalan ( ca )
Corsican ( co 1 Corsican ( co )
Czech ( cs ) Czech ( cs )
Welsh ( cv 1 Welsh ( cy )
Danish ( da ) Danish ( da )
Bhutani f dz 1 Bhutani ( dz )
Esperanto ( eo ) Esperanto ( eo )
Estonian f et 1 Estonian ( et )
Basque ( eu ) Basque ( eu )
Persian ( fa ) Persian ( fa )
Finnish ( ti )
Fiji ( tj )
Faroese ( fo )
Frisian ( fy )
Irish ( ga )
Scats-Gaelic ( gd )
Galician ( gl )
Guarani ( gn )
Gujarati ( gu )
0514
UP20
a.519
1821
2608
‘OTO6
O?l3
#I%
t3119
aI25
oz%
Q201
$XOS
0207
a207
a208 a2a8
a2a9 a2a9
0214 0214
a235 a235
0218 0218
0307 0307
0315 0315
#319 #319
Q32S Q32S
0401 0401
0426
Q426
05lS 05lS
fxi2a w2a
0521 0521
06Ql 06Ql
0609
Ml0
0615
U625
wai
o7a4
0712
a714
a72T
Hindi ( hi )
Croatian (hr )
Hungarian ( hu )
Armenian ( hy )
interlingua ( ia )
lnteriingue ( ie )
lnuoiak ( ik )
Indonesian ( in )
Icelandic ( is )
Hebrew ( iw )
Yiddish ( ji )
javanese ( jw ) TO23
Georgian ( ka ) 1101
Kazakh ( kk) 1111
Greenlandic ( kl ) 1112
Cambodian ( km ) 1113
Kannada ( kn ) 1114
Kashmiri ( ks ) $119
Kurdish ( ku )
Kirghiz ( ky )
Latin ( la )
Lingala (In )
Laothian ( lo )
Lithuanian ( It ) T22U
Latvian ( Iv ) 1222
Malagasy ( mg )
Maori ( mi )
Macedonian ( mk ) 1311
Malayalam ( ml ) 1312
Mongolian ( mn ) 1314
Moldavian ( mo )
Marathi ( mr )
Malay ( ms )
Maltese ( mt ) 1320
Burmese ( my )
Nauru ( na )
Nepali ( ne )
Norwegian ( no )
Occitan ( oc )
Oromo ( om ) 1513
Oriya ( or )
Panjabi ( pa ) l6Ql
.Polish ( pl ) 1612
Pashto, Pushto ( ps ) 1619
Portuguese ( pt ) 1620
oNI9
0818
0821
0825
a901
OPOS
0911
a914
as9
0923
3aa9
1121
112s
T201
1214
1215
130?
1309
131.5
1318
1319
1325
1401
14OS
14lS
Isas
1518
Rhaeto-Romance ( rm )
Kirundi ( rn )
Romanian ( ro ) 181.5
Kinyarwanda ( rw ) 1823
Sanskrit ( sa )
Sindhi ( sd )
Sangho ( sg )
Serbo-Croatian ( sh )
Singhalese ( si )
Slovak ( sk ) 1911
Slovenian ( sl )
Samoan ( sm )
Shona ( sn )
Somali ( so )
Albanian ( sq )
Serbian ( sr ) 1918
Siswati ( ss )
Sesotho ( st )
Sundanese ( su ) 1921
-Swedish ( sv )
Swahili ( sw )
Tamii ( ta )
Telugu ( te )
Tajik ( tg ) 2007
Thai ( th )
Tigrinya ( ti )
Turkmen ( tk ) 2011
Tagalog ( tl )
Setswana ( tn )
Tonga ( to ) 2OlS
Turkish ( tr ) 2al8
Tsonga ( ts ) 2019
Tatar ( tt )
Twi ( tw 1
Ukrainian ( uk ) 2111
Urdu ( ur )
Uzbek ( uz )
Vietnamese ( vi )
Volapuk ( vo )
Wolof ( wo )
Xhosa ( xh )
Yoruba ( vo )
Zulu ( zu )
1814
1901
1904
1907
lPiI8
1909
1912
1913
1914
1915
1917
1919
i92a
1922
1923
2001
2aos
2008
2009
2012
2ai4
2a20
2023
2118
2126
2209
2215
2621
En/Fr
Page 73

Screen sizes and disc formats
The table below shows the effect of various TV Screen
settings on the different kinds of disc available.
Tailles d’bcran et formats du disque
La table ci-dessous montre l’effet de divers rt!glages de
TV Screen sur diffkents tvoes de disaues disDonibles.
Setting and
Setting and appearance Screen format of disc
appearance
16:9 (Wide)
16:9 (Wide\
*Screen format
Widescreen (movies, etc.)
Note that some extra-wide
formats (such as CinemaScope)
will appear with black bars at the
top and bottom of the screen.
Standard (TV programs, etc.)
Your TV will determine how the
picture is presentedcheck the
manual that came with the TV
for details. Typical options are
black bars either side, some
form of stretched or zoomed
presentation.
Standard (TV programs, etc)
The program is presented
correctly, regardless of the
setting.
of disc
16:9 (Wide) (Large)
16:9 (Wide) (Large)
R#giage et apparence
Grand &ran (films, etc.)
Remarquez que certains formats
extra larges (tel que
CinGmaScope) apparaitront avec
des franges noires en haut et en
bas de l’&ran.
Standard (Programmes de
t&vision, etc.)
Votre t&viseur determinera la
presentation de l’image-v&ifiez
le manuel qui accompagne le
t&viseur pour les details. Les
ODtions tvDiaues sont des
. . ,
franges noires de chaque c&6,
tme forme de prgsentation
rallongee ou zoomhe.
Format d%cran du disc&
Standard (programmes de
t&vision, etc)
Le programme est pr&.ent6
correctement, indkpendamment
du r6glage.
Any setting
4:3 (Letter Box)
:I -
4:3 (Pan & Scan)
16:9 (Wide)
Widescreen (movies, etc.)
The program is shown in
widescreen with black bars at
the top and bottom of the
screen.
Widescreen (movies, etc.)
The sides of the program are
cropped so that the picture fills
the whole screen.
Widescreen (movies, etc.)
The program appears squashed:
set to either 4:3 (Letter Box) or
4:3 (Pan & Scan).
Un r&lage auelconaue
4:3 (Letter box)
[Boite aux lettres)
4:3 (Pan & Scan)
(Panoramique et Scannage)
16:9 (Wide) (Large)
Grand &ran (films, etc.)
Le programme est montr6 en
grand &ran avec des franges
noires en haut et en bas de
l’&ran.
Grand &ran (films, etc.)
- !
: Le programme est montr6 en
: grand &ran avec des franges
1 noires en haut et en bas de
’ l’6cran.
m -1
Grand &ran (films, etc.)
Le programme apparait tasz.6 :
r6glez soit ?I 4 :3 (Letter Box) OLI
4 :3 (Pan &Scan).
En/Fr
Page 74

Troubleshooting
Incorrect operation is often mistaken for trouble or malfunction. If you think that there is something wrong with this
component, check the points below. Sometimes the trouble may lie in another component. Inspect the other components
and electrical appliances being used. If the trouble cannot be rectified after checking the items below, ask your nearest
Pioneer authorized service center or your dealer to carry out repair work.
The disc is ejected automatitally after loading.
Playback is not possible.
mark appears on screen.
mark appears on screen.
When making changes in the
DVD Setup menu, B is
displayed.
Picture playback stops and
the operation buttons cannot
be used.
New settings made in the DVD
Setup menu while a disc is
playing are ineffective.
Settings are canceled.
l Check that the disc is clean and undamaged (page
l Make sure that the disc is seated properly in the disc guide.
l Check that the disc has a compatible region number (page 10).
l There may be condensation inside the unit. Allow time for condensation to evaporate.
69-70).
Avoid using the player near an air-conditioning unit.
l Check that the disc is loaded correctly (label side face up).
l The operation is prohibited by the system.
l The selected function does not operate for that disc.
l There is a CD or Video CD loaded and the setting that was changed applies only to
DVD discs. The settings will take effect next time a DVD is loaded.
l Switch the power off once, then on again using the front panel standby/on switch.
l Some settings can be changed while a disc is playing, but are not effective until the
disc is stopped then restarted. This is not a malfunction. Note that making settings in the
Setup screen menus may cancel the resume function.
l If the power was cut due to power failure or by unplugging the power cord, settings
will be canceled.
m
En
No picture/No color.
Screen is stretched or aspect
l Check that the video connections are correct and that plugs are inserted fully.
l Check that the TV/monitor settings are correct.
l Make sure that the TV Screen option in the Setup menu matches the TV/monitor
does not change. you’re using.
Picture disturbance during
playback or screen is dark.
l This player is compatible with Macro-Vision System copy guard. Some discs include a
copy prevention signal, and when this type of disc is played back, stripes etc., may appear
on some sections of the picture depending on the TV. This is not a malfunction.
l Problems with some discs may result in the screen becoming black for a brief instant
or shaking slightly when certain functions are executed.
l Due to copy protection, connection of this system through a VCR or an AV selector
may prevent recording or cause picture problems. This is not a malfunction.
Noticeable difference in DVD
l DVDs and CDs use different recording methods. This is not a malfunction.
and CD volume.
A
Page 75

Noisy radio reception
l Check that the frequency is correct.
l Check that the antennas are connected properly. For FM, make sure that the antenna
is fully extended and positioned to give the best reception.
For AM, make sure that the loop antenna is pointing in the best direction.
l If the radio signal is weak, an outdoor antenna will usually give better results than the
supplied indoor types.
l Other electrical equipment, such as TVs, fluorescent lamps and motors can cause
interference. Try switching off or moving the equipment, or moving the antenna(s).
l The tuning interval may be incorrect for your country or region. Try switching the
tuning interval (page 68).
Auto tuning does not pick up
some stations.
General
The remote control doesn’t
seem to work.
No audio, or audio is distorted.
Can’t adjust sound mode
settings (bass, treble, etc.)
AMP FAN ERR or PT FAN ERR
shows in the display and the
system switches off.
Note
ml
l Auto tuning will only detect radio stations with a good signal. For more sensitive
tuning, connect an outdoor antenna.
l Make sure that you’re using the remote within its operating range and that there are
no obstacles between the remote and the sensor on the main unit.
l Check that the batteries are not exhausted.
l Check that the correct function is selected (DVDKD, etc.), the volume turned up.
l Check that the MUTE function is not on and that the disc is not paused.
l Check that the disc is clean and undamaged (page 69-70).
l Check that all rear panel connections are correct.
* If you find dirty or oxidized plugs/terminals, clean them.
0 The Record Mode is switched on. Switch off then adjust as desired (see page 40).
l The cooling fan is not functioning properly and could be broken. Unplug the unit
from the wall outlet and take it to your nearest Pioneer authorized service center or your
dealer to carry out repair work.
Static electricity or other external influences may cause
malfunctioning of this unit. In this case, unplug the
power cord and then plug back in. This will usually
reset the unit for proper operation. If this does not
correct the problem, please consult your nearest Pioneer
service center.
Switching the demo mode on/off
When you first plug in this system the display shows a
demo sequence. The demo will also start if the system is
on in the DVD function but idle for more than 5
minutes. The demo will stop if you press any button
except
EXCHANGE
on the main unit.
Resetting the system
Resetting the system returns all menu, picture and
password settings to their factory defaults.
1 Switch the system into standby using the
front panel standby/on switch.
2 Hold down the front panel n button and
switch back on.
To switch the demo mode off completely,
l
press and hold EXCHANGE on the main
unit for about 3 seconds while the demo
is in progress.
To switch the demo mode on, press and
l
hold EXCHANGE on the main unit for
about 3 seconds while the system is in
standby.
Page 76

Specifications
Amplifier Section
Continuous power output (RMS)
Front . . . . . . . . . . . . . . . . . . . . . . . . . . . . . . . . . . . . . . . . . . . . . . . . 115 W, per channel
(1 kHz, 10 % T.H.D., 8 Q)
Surround . . . . . . . . . . . . . . . . . . . . . . . . . . . . . . . . . . . . . . . . . . 52 W, per channel
(1 kHz, 10 % T.H.D., 6 Q)
Center . . . . . . . . . . . . . . . . . . . . . . . . . . . . . . . . . . . . . . . . . . . . . . . 52 W, per channel
(1 kHz, 10 % TH.D., 6 Q)
Subwoofer . . . . . . . . . . . . . . . . . . 114W (1OOHz 10% T.H.D., 8Q)
DVD Player (Audio)Section
S/N ratio . . . . . . . . . . . . . . . . . . . . . . . . . . . . . . . . . . . . . . . . . . . . . . . . . . . . . . . . . . . . 95 d6 (EIAJ)
Dynamic range . . . . . . . . . . . . . . . . . . . . . . . . . . . . . . . . . . . . . . . . . . . . . . . . . . . 95 d6 (EIAJ)
Distortion . . . . . . . . . . . . . . . . . . . . . . . . . . . . . . . . . . . . . . . . . . . . . . . . . . . . . . . . . . . . . . . . . 0.004%
Frequency response
48 kHz sampling . . . . . . . . . . . . . . . . . . . . . . . . . . . . . . . . . . 4 Hz to 22 kHz
96 kHz sampling . . . . . . . . . . . . . . . . . . . . . . . . . . . . . . . . . . 4 Hz to 44 kHz
Wow & flutter . . . . . . . . . . . . . . . . . . . . . . . . . . . . . . . . . Below measurable levels
(kO.001 % W.PEAK)
DVD Player (Video) Section
Output level . . . . . . . . . . . . . . . . . . . . . . . . . . . . . . . . . . . . . . . . . . . . . . . . . . . 1 Vp-p (75 0)
Video Y output level . . . . . . . . . . . . . . . . . . . . . . . . . . . . . . . . . . . . . . 1 Vp-p (75 0)
Video C output level . . . . . . . . . . . . . . . . . . . . . . . . . . . . . . . 286 mVp-p (75 Q)
Max. input .................................................................... 115 W
Dimensions ...................... 145 (W) x 235 (H) x 204 (D) mm
Weight .................................................... 2.0 kg (4 lbs. 7 oz.)
5 “/x (W) x 9 ‘/d (H) x 8 ‘/x (D) in.
Surround speaker
Enclosure .................................... Closed-box bookshelf type
System ............................... 8.7 cm (3 ‘/16 in.) 1 -way system
Speaker ................................ 8.7 cm (3 ‘/IG in.) (cone type)
Nominal impedance ........................................................ 6 Q
Frequency range ...................................... 150 to 20,000 Hz
Max. input ..................................................................... 52 W
Dimensions ......................... 110 (W) x 155 (H) x 76 (D) mm
Weight .................................................. 0.8 kg (1 lbs. 12 oz.)
4 */x (W) x 6 ‘/E (H) x 3 (D) in.
Center speaker
Enclosure .................................... Closed-box bookshelf type
System ............................... 8.7 cm (3 ‘/16 in.) 1 -way system
Speaker ................................
Nominal impedance ........................................................ 6 Q
Frequency range ........................................ 70 to 20,000 Hz
Max. input
Dimensions ......................... 310 (W) x 110 (H) x 76 (D) mm
Weight .................................................... 1 .O kg (2 lbs. 3 oz.)
.....................................................................
(magnetically shielded j-)
8.7 cm (3 ‘/x in.) (cone type)
52 W
12 3/~6 (W) x 4 s/16 (H) x 3 (D) in.
En
DVD (Other jacks) Section
Digital coaxial input (PCM/LXl/DTS) . . . . . . Coaxial connector
Tuner Section
FM tuner
Frequency range . . . . . . . . . . . . . . . . . . . . 87.5 MHz to 108.0 MHz
Antenna . . . . . . . . . . . . . . . . . . . . . . . . . . . . . . . . . . . . . . . . . . . . . 75 Q unbalanced
AM tuner
Frequency range 530 kHz to 1,700 kHz (10 kHz step)
Antenna . . . . . . . . . . . . . . . . . . . . . . . . . . . . . . . . . loop antenna (supplied)
Power Supply Section
Power requirements . . . . . . . . . . . . . . . . . . . . . . . . . . . . . . . . . . . . AC 120 V, 60 Hz
Power consumption . . . . . . . . . . . . . . . . . . . . . . . . . . . . . . . . . . . . . . . . . . . . . . . . . . . . . 186 W
Power consumption in standby mode . . . . . . . . . . . . . . . . . . . . . . 0.88 W
Miscellaneous
DVD Receiver
Dimensions . . . . . . . . . . . . . 420 (W) x 455 (D) x 125 (H) mm
Weight . . . . . . . . . . . . . . . . . . . . . . . . . . . . . . . . . . . . . . . . . . . . . 9.0 kg (19.84 lbs)
(16 9/~h (W) x 17 ‘s/16 (D) x 4 ‘s/16 (H) in.)
Speaker system (S-HTDS20)
(Front Speaker x 2, Surround Speaker x 2, Center Speaker
x 1, Subwoofer x 1)
Front speaker
Enclosure . . . . . . . . . . . . . . . . . . . . . . . . . . . . . . . . . . . . Closed-box bookshelf type
System . . . . . . . . . . . . . . . . . . . . . . . . . . . . . . . . . . . . . . . . 10 cm (4 in.) 2-way system
Speaker
Woofer . . . . . . . . . . . . . . . . . . . . . . . . . . . . . . . . . . . . . 10 cm (4 in.) cone type
. . . . . . . . . . . . . . . . . . . . . . . . . . . . . . . . . . . 5.2 cm (2 in.) cone type
Tweeter
Nominal impedance . . . . . . . . . . . . . . . . . . . . . . . . . . . . . . . . . . . . . . . . . . . . . . . . . . . . . . . . 8 Cl
Frequency range . . . . . . . . . . . . . . . . . . . . . . . . . . . . . . . . . . . . . . . . 50 to 20,000 Hz
(magnetically shielded t)
Subwoofer
Enclosure .............................................. Bass reflex floor type
System ................................. 16 cm (6 s/~~ in.) 1 -way system
Speaker .................................. 16 cm (6 s/~~ in.) (cone type)
Nominal impedance ........................................................ 8 Q
Frequency range ...................................... 30 Hz to 2000 Hz
Max. input .................................................................... 115 W
Dimensions ..................... 190 (W) x 360 (H) x 327 (D) mm
Weight .................................................. 4.8 kg (10 lbs. 9 oz.)
7
‘/z (IV) x
14
‘/x (H) x 12 ‘/a (D) in.
t Antimagnetic design (EIAJ) speaker system conforms
to the basic EIAJ standards.
Supplied Items
Remote control .................................................................... 1
AA/R6P dry cell batteries ................................................... 2
AM loop antenna ................................................................. 1
FM antenna .......................................................................... 1
Video cord (yellow) ............................................................. 1
Power cord ........................................................................... 1
Speaker cords
5m (16 ft. 5 in.) (for front L-R speakers) .................. 2
5m (16 ft. 5 in.) (for center speaker) ....................... 1
1Om (32 ft. 10 in.)(for Surround L-R speakers) ....... 2
5m (16 ft. 5 in.) (for subwoofer). ............................. 1
Operating instructions ........................................................ 1
Warranty card ...................................................................... 1
Non skid pad ...................................................................... 20
A'Ok
e Specz$cations and de&n subject to possible modz$cation
&bout notice, due improvements
PublIshed by Pioneer Corpomon
CopyrIght @ 2002 Pioneer Corporamn
All rights reserved
Page 77

-------mm------------------------
Should this product require service in the U.SA and you wish to locate the nearest Pioneer Authorized
Independent Service Company, or if you wish to purchase replacement parts, operating instructions, servrce
manuals, or accessories, please call the number shown below.
800-421-1404
1 Please do not ship your product to Pioneer without first calling the Customer Service Department at the above 1
1 listed number for assistance.
I
I
I
I
I
I
Pioneer Electronics (USA) Inc.
Customer Service Department
P.O. BOX 1760, Long Beach,
CA 90801-1760, U.S.A.
I
1 For warranty information please see the Limited Warranty sheet included with your product.
I
Should this product require service in Canada, please contact a Proneer Canadian Authorized Dealer to locate the
I
nearest Pioneer Authorized Service Company in Canada.
1 Alternatively, please contact the Customer Satisfaction Department at the following address:
I
I
I
1 For warranty information please see the Limited Warranty sheet included with your product.
I
SI ce produit doit etre repare au Canada, veuillez vous adresser a un distributeur autorise Pioneer du Canada
1 pour obtenir le nom du Centre de Service Autorise Pioneer le plus pres de chez-vous. Vous pouvez aussi
contacter le Service a la clientele de Pioneer:
I
I
I
I
I
I
Pour obtenir des renseignements sur la garantie, veuillez vous reporter au feuillet sur la garantie restreinte qui
I
accompagne L le produit.
D-w------------------------------
Pioneer Electronics of Canada, Inc.
Customer Satisfaction Department
300 Allstate Parkway, Markham, Ontario L3R OP2
(905)479-4411
1(877)283-5901
Pioneer Electroniques du Canada, Inc.
Service a la clientele
300, Allstate Parkway, Markham, Ontano L3R OP2
(905)479-441
1(877)283-5901
I
SOl8%2L
I
I
I
I
I
I
I
I
I
J
PIONEER CORPORATION
PIONEER ELECTRONICS (USA) INC.
PIONEER ELECTRONICS OF CANADA, INC.
PIONEER EUROPE NV
PIONEER ELECTRONICS AUSTRALIA PTY. LTD.
PIONEER ELECTRONICS DE MEXICO S.A. DE C.V.
<TSWZW/OlCOOOOl>
Haven 1087, Keetberglaan I, B-91 20 Melsele, Belgium TEL. 03/570 05.11
eguro l-Chome, Meguro-ku, Tokyo 153-8654,
4-1, M
P 0. BOX 1540, Long Beach, California 90801-I 540, U S.A
300 Allstate Parkway, Markham, Ontarlo L3Fi OP2, Canada
PublIshed by Pioneer Corpomon
CopyrIght 0 2002 Pioneer Corporation
All rights reserved
Japan
178-184 Boundary Road, Braeslde, Victoria 3195, Australia, TEL I031 9586.6300
San Lorenzo 1009 3er PISO Desp. 302 Cal. Del Valle Mexico D.F C P 03100
TEL, 55-5688-52-90
PrInted in Singapore
<XRE3062-A>
Page 78

PIONEER ELECTRONICS (USA) INC. PIONEER ELECTRONICS OF CANADA, INC.
I
LIMITEDWARRANTY
WARRANTY VALID ONLY IN COUNTRY OF PRODUCT PURCHASE
WARRANTY
Pioneer Electronics (USA) Inc. (PUSA), and Pioneer Electronics Of Canada, Inc. (POC), warrant that products distributed by PUSA in the USA., and by POC in Canada that fail to function
properlyundernormal useduetoamanufacturingdefectwhen installedand operatedaccording to theownersmanualenclosed with theunitwill be repairedorreplacedwithaunitofcomparabie
value, at the option of PUSA or POC, without charge to you for parts or actual repair work. Parts supplied under this warranty may be new or rebuilt at the option of PUSA or POC.
THlSLlMlTEDWARRANTYAPPLlESTOTHEORlGlNALORANYSUBSEQUENTOWNEROFTHlSPlONEERPRODUCTDURlNGTHEWARRANTYPERlODPROVlDEDTHE
PRODUCT WAS PURCHASED FROM AN AUTHORIZED PIONEER DISTRIBUTOR/DEALER IN THE U.S.A. OR CANADA. YOU WILL BE REQUIRED TO PROVIDE A SALES
RECEIPT OR OTHER VALID PROOF OF PURCHASE SHOWING THE DATE OF ORIGINAL PURCHASE OR, IF RENTED, YOUR RENTAL CONTRACT SHOWING THE PLACE
ANDDATEOFFIRSTRENTAL. lNTHEEVENTSERVlCElSREQUlRED,THEPRODUCTMUSTBEDELlVEREDWlTHlNTHEWARRAN~PERlOD,TRANSPORTATlONPREPAlD,
ONLY FROM WITHIN THE COUNTRY OF PURCHASE AS EXPLAINED IN THIS DOCUMENT. YOU WILL BE RESPONSIBLE FOR REMOVAL AND INSTALLATION OF THE
PRODUCT. PUSA OR POC, AS APPROPRIATE, WILL PAY TO RETURN THE REPAIRED OR REPLACEMENT PRODUCTTO YOU WITHIN THE COUNTRY OF PURCHASE.
PRODUCT WARRANTY PERIOD
Home Audio and Video . . . . . . . . . . . . . . . . . . . . . . . . . . . . . . . . . . . . . . . . . . . . . . . . . . . . . . . . . . . . . . . . . . . . . . . . . . . . . . . . . . . . . . . . . . . . . . . . . . . . . . . . . . . . . . . . . . . . . . . . ...............................
Microphones, Headphones, Phono Cartridges and Styluses
Shorter limited warranty periods apply to some models. Please refer to the limited warranty document enclosed with the product for a definitive statement of the warranty period.
The warranty period for retail customers who rent the product commences upon the date product is first put into use (a) during the rental period or (b) retail sale, whichever occurs first.
. . . . . . . . . . . . . . . . . . . . 90 Days 90 Days
pa!& L&.&r
1 Year 1 Year
WHAT IS NOT COVERED
IFTHIS PRODUCT WAS PURCHASED FROM AN UNAUTHORIZED DISTRIBUTOR, THERE ARE NO WARRANllES, EXPRESS OR IMPLIED, INCLUDING THE IMPLIED WARRANN
OF MERCHANTABlLlTY AND THE IMPLIED WARRANN OF FlTNESS FOR A PARTICULAR PURPOSE AND THIS PRODUCT IS SOLD STRICTLY “AS IS” AND “WITH ALL FAULTS”.
PIONEER SHALL NOT BE LIABLE FOR ANY CONSEQUENTlAL AND/OR INCIDENTAL DAMAGES.
PIONEER DOES NOT WARRANT ANY PRODUCT LISTED ABOVE WHEN lT IS USED IN A TRADE OR BUSINESS OR IN ANY INDUSTRIAL OR COMMERCIAL APPLICATION.
THIS WARRANN DOES NOT APPLY IF THE PRODUCT HAS BEEN SUBJECTED TO POWER IN EXCESS OF lTS PUBLISHED POWER RATlNG.
THIS WARRANN DOES NOT COVER TELEVISION OR DISPLAY SCREENS DAMAGED BY STATIC, NON-MOVING, IMAGES APPLIED FOR LENGTHY PERIODS (BURN-IN).
THlSWARRANN~ESNOTCOVERTHECABlN~ORANYAPP~RANCElTEM,USERA~ACHEDA~ENNA,ANYDAMAGETORECORDSORRECORDlNGTAPESORDlSCS,ANY
DAMAGE TOTHE PRODUCT RESULTING FROM ALTERATlONS, MODlFlCATlONS NOT AUTHORIZED IN WRlTlNG BY PIONEER, ACCIDENT, MISUSE OR ABUSE, DAMAGE DUE TO
Lffi~lffiORTOPOWERSURGES,SUBSEQUE~DAMAGEFROML~KlNG,DAMAGEFROMlNOPERA~VEBA~ERlES,OR~EUSEOFBA~ERlESNOTCONFORMlNGTO~OSE
SPEClFlED IN THE OWNER’S MANUAL.
~lSWAR~~~ESNOTCOVERTHECOSTOFPARTSOR~BORWHlCHWOULDBEOTHERWlSEPROVlDEDW~OUTCHARGEUNDERTHlSWARRANNOBTAlNEDFROM
ANY~URCEO~ER~ANAPlONEERA~HORlZEDSER~CECOMPANYORO~ERDESlGNA~DLOCA~ON.THlSWAR~~DOESNOTCOVERDEFE~ORDAMAGECAUSED
BY THE USE OF UNAUTHORlZED PARTS OR LABOR OR FROM IMPROPER MAINTENANCE.
ALTERED, DEFACED, OR REMOVED SERIAL NUMBERS VOID THIS ENTIRE WARRANN
h’C OTHER WARRANTIES
IN THE U.S.A. - PIONEER LIMITS ITS OBLIGATIONS UNDER ANY IMPLIED WARRANTIES INCLUDING, BUT NOT LIMITED TO, THE IMPLIED WARRANTIES OF
MERCHANTABlLlNANDFlTNESSFORAPARTlCULARPURPOSE,TOAPERlODNOTTOEXCEEDTHEWARRANTYPERlOD. NOWARRANTIESSHALLAPPLYAFTERTHE
WARRANNPERIOD. SOMESTATESDONOTALLOWLlMlTATlONSONHOWLONGANlMPLlEDWARRANNLASTSANDSOMESTATESDONOTALLOWTHEEXCLUSlONS
OR LIMITATIONS OF INCIDENTAL OR CONSEQUENTIAL DAMAGES, SO THE ABOVE LIMITATIONS OR EXCLUSIONS MAY NOT APPLY TO YOU. THIS WARRANTY GIVES
YOU SPECIFIC LEGAL RIGHTS AND YOU MAY HAVE OTHER RIGHTS WHICH MAY VARY FROM STATE TO STATE.
lNCANADA-EXCEPTASEXPRESSLYPROVlDEDHERElN,THEREARENOREPRESENTATlONS,WARRANTlES,OBLlGATlONSORCONDlTlONS,lMPLlED,STATUTORY
OR OTHERWISE, APPLICABLE TO THIS PRODUCT.
TO OBTAIN SERVICE
PUSA and POC have appointed a number of Authorized Service Companies throughout the USA. and Canada should your product require service. To receive warranty service
you need to present your sales receipt or, if rented, your rental contract showing place and date of original owner’s transaction. If shipping the unit you will need to package
it carefully and send it, transportation prepaid by a traceable, insured method, to an Authorized Service Company. Package the product using adequate padding material to
prevent damage in transit. The original container is ideal for this purpose. Include your name, address and telephone number where you can be reached during business hours.
On all complaints and concerns in the U.S.A. call Customer Support at 1-800-421-1404, or, in Canada, call Customer Satisfaction at (905) 479-441 I.
For hook-up and operation of your unit or to locate an
1NTHEU.S.A.
Authorized Service Company, please call or write:
CUSTOMERSUPPORTDIVISION
PIONEER ELECTRONICS (USA) INC.
P.O. BOX 1760
LONG BEACH, CALIFORNIA 90801
1-800-421-1404
http://www.pioneerelectronicscom
For additional information on this warranty,
CUSTOMERSATISFACTION GROUP
PlONEERELECTRONlCSOFCANADA,lNC
http://www.pioneerelectronics.com
IN CANADA
please call or write:
300 ALLSTATE PARKWAY
MARKHAM, ON L3R OP2
l905\ 479-441 I
\~ ~-,
I-877-283-5901
DISPUTE RESOLUTION
IN THE U.S.A.
Resolution Program to resolve the dispute, The Complaint Resolution Program is available to you without charge. You are required to use the Complaint Resolution Program
before you exercise any rights under, or seek any remedies, created by Title I of the Magnuson-Moss Warranty-Federal Trade Commission Improvement Act, 15 U.S.C. 2301 erseq.
To use the Complaint Resolution Program call l-800-421-1404 and explain to the customer service representative the problem you are experiencing, steps you have taken
to have the product repaired during the warranty period and the name of the authorized Distributor/Dealer from whom the Pioneer product was purchased. After the complaint
has been explained to the representative, a resolution number will be issued, Within 40 days of receiving your complaint, Pioneer will investigate the dispute and will either:
(I) respond to your complaint in writing informing you what action Pioneer will take, and in what time period, to resolve the dispute: or (2) respond to your complaint in writing
informing you why it will not take any action.
IN CANADA - Call the Customer Satisfaction Manaaer at I-877-283-5901 to discuss vour complaint and to obtain a prompt resolution.
Model No.
Purchased From
- Following our response to any initial request to Customer Support, should a dispute arise between you and Pioneer, Pioneer makes available its Complaint
RECORDTHEPLACEANDDATEOFPURCHASEFORFUTUREREFERENCE
Serial No.
KEEP THIS INFORMATION AND YOUR SALES RECEIPT IN A SAFE PLACE
Purchase Date
<ARY7045-B>
PrInted In Smgapore
 Loading...