

Page 1

X-HM32V
DVD Receiver System | Micro chaîne DVD | DVD-Receiversystem |
Sistema DVD con amplificatore | DVD Receiver System |
Sistema receptor de DVD
Discover the benefits of registering your product online at
http://www.pioneer.co.uk
Découvrez les nombreux avantages offerts en enregistrant
votre produit en ligne maintenant sur
http://www.pioneer.fr
Bitte nutzen Sie die Möglichkeit zur Registrierung Ihres
Produktes unter
http://www.pioneer.eu)
Registra il tuo prodotto su
http://www.pioneer.eu) e scopri subito quali vantaggi puoi
ottenere!
Ontdek nu de voordelen van online registratie! Registreer uw
Pioneer product via
http://www.pioneer.be
Registre su producto en
http://www.pioneer.eu) Descubra los beneficios de
registrarse on-line:
http://www.pioneer.de
http://www.pioneer.nl -
-K/-S
(or http://www.pioneer.eu).
(ou http://www.pioneer.eu).
(oder
http://www.pioneer.it
(of http://www.pioneer.eu)
http://www.pioneer.es
(o
(o en
Operating Instructions
Mode d’emploi
Bedienungsanleitung
Istruzioni per l’uso
Handleiding
Manual de instrucciones
Page 2
CAUTION
TO PREVENT THE RISK OF ELECTRIC SHOCK, DO NOT
REMOVE COVER (OR BACK). NO USER-SERVICEABLE
PARTS INSIDE. REFER SERVICING TO QUALIFIED
SERVICE PERSONNEL.
D3-4-2-1-1_B1_En
WARNING
This equipment is not waterproof. To prevent a fire or
shock hazard, do not place any container filled with
liquid near this equipment (such as a vase or flower
pot) or expose it to dripping, splashing, rain or
moisture.
D3-4-2-1-3_A1_En
WARNING
To prevent a fire hazard, do not place any naked flame
sources (such as a lighted candle) on the equipment.
D3-4-2-1-7a_A1_En
VENTILATION CAUTION
When installing this unit, make sure to leave space
around the unit for ventilation to improve heat radiation
(at least 25 cm at top, 10 cm at rear, and 5 cm at each
side).
WARNING
Slots and openings in the cabinet are provided for
ventilation to ensure reliable operation of the product,
and to protect it from overheating. To prevent fire
hazard, the openings should never be blocked or
covered with items (such as newspapers, table-cloths,
curtains) or by operating the equipment on thick carpet
or a bed.
D3-4-2-1-7b*_A1_En
WARNING
Store small parts out of the reach of children and
infants. If accidentally swallowed, contact a doctor
immediately.
D41-6-4_A1_En
This product is for general household purposes. Any
failure due to use for other than household purposes
(such as long-term use for business purposes in a
restaurant or use in a car or ship) and which requires
repair will be charged for even during the warranty
period.
K041_A1_En
CAUTION
The STANDBY/ON switch on this unit will not
completely shut off all power from the AC outlet.
Since the power cord serves as the main disconnect
device for the unit, you will need to unplug it from the
AC outlet to shut down all power. Therefore, make
sure the unit has been installed so that the power
plug can be easily unplugged from the AC outlet in
case of an accident. To avoid fire hazard, the power
cord should also be unplugged from the AC outlet
when left unused for a long period of time (for
example, when on vacation).
D3-4-2-2-2a*_A1_En
POWER-CORD CAUTION
Handle the power cord by the plug. Do not pull out the
plug by tugging the cord and never touch the power
cord when your hands are wet as this could cause a
short circuit or electric shock. Do not place the unit, a
piece of furniture, etc., on the power cord, or pinch the
cord. Never make a knot in the cord or tie it with other
cords. The power cords should be routed such that they
are not likely to be stepped on. A damaged power cord
can cause a fire or give you an electrical shock. Check
the power cord once in a while. When you find it
damaged, ask your nearest PIONEER authorized service
center or your dealer for a replacement.
S002*_A1_En
Do not install your speakers overhead on the ceiling or
wall. The grill is designed to be detachable, and as such
it may fall and cause damage or personal injury if
installed overhead.
SGK004_A1_En
CAUTION
This product is a class 1 laser product classified
under the Safety of laser products, IEC 60825-1:2007.
CLASS 1 LASER PRODUCT
D58-5-2-2a_A1_En
Operating Environment
Operating environment temperature and humidity:
+5 °C to +35 °C (+41 °F to +95 °F); less than 85 %RH
(cooling vents not blocked)
Do not install this unit in a poorly ventilated area, or in
locations exposed to high humidity or direct sunlight
(or strong artificial light).
D3-4-2-1-7c*_A2_En
Page 3
Information for users on collection and disposal of old equipment and used batteries
These symbols on the products, packaging, and/or accompanying documents mean
that used electrical and electronic products and batteries should not be mixed with
general household waste.
For proper treatment, recovery and recycling of old products and used batteries,
please take them to applicable collection points in accordance with your national
legislation.
By disposing of these products and batteries correctly, you will help to save valuable
resources and prevent any potential negative effects on human health and the
environment which could otherwise arise from inappropriate waste handling.
For more information about collection and recycling of old products and batteries,
please contact your local municipality, your waste disposal service or the point of sale
where you purchased the items.
These symbols are only valid in the European Union.
For countries outside the European Union:
If you wish to discard these items, please contact your local authorities or dealer and
ask for the correct method of disposal.
K058a_A1_En
Symbol examples
for batteries
Symbol for
equipment
Pb
Radio wave caution
This unit uses a 2.4 GHz radio wave frequency, which is
a band used by other wireless systems (Microwave
ovens and Cordless phones, etc.). In this event noise
appears in your television image, there is the possibility
this unit (including products supported by this unit) is
causing signal interference with the antenna input
connector of your television, video, satellite tuner, etc. In
this event, increase the distance between the antenna
input connector and this unit (including products
supported by this unit).
• Pioneer is not responsible for any malfunction of the
compatible Pioneer product due to communication
error/malfunctions associated with your network
connection and/or your connected equipment.
Please contact your Internet service provider or
network device manufacturer.
• A separate contract with/payment to an Internet
service provider is required to use the Internet.
D3-11-15-5-2_A1_En
For Norway customers
Utstyr som er koplet til beskyttelsesjord via nettplugg
og/eller via annet jordtilkoplet utstyr – og er tilkoplet
et kabel-TV nett, kan forårsake brannfare. For å unngå
dette skal det ved tilkopling av utstyret til kabel-TV
nettet installeres en galvanisk isolator mellom
utstyret og kabel-TV nettet.
For Sweden customers
Utrustning som är kopplad till skyddsjord via jordat
vägguttag och/eller via annan utrustning och
samtidigt är kopplad till kabel-TV nät kan i vissa fall
medföra risk för brand.
För att undvika detta skall vid anslutning av
utrustningen till kabel-TV nät galvanisk isolator finnas
mellan utrustningen och kabel-TV nätet.
Page 4

Thank you for buying this Pioneer product.
Please read through these operating instructions so that you will know how to operate your model properly. After you
have finished reading the instructions, put them in a safe place for future reference.
Contents
01 Before you start
What’s in the box . . . . . . . . . . . . . . . . . . . . . . . . . . . . . . . 6
Loading the batteries in the remote control . . . . . . . . . 6
Using the remote control . . . . . . . . . . . . . . . . . . . . . . . . . 6
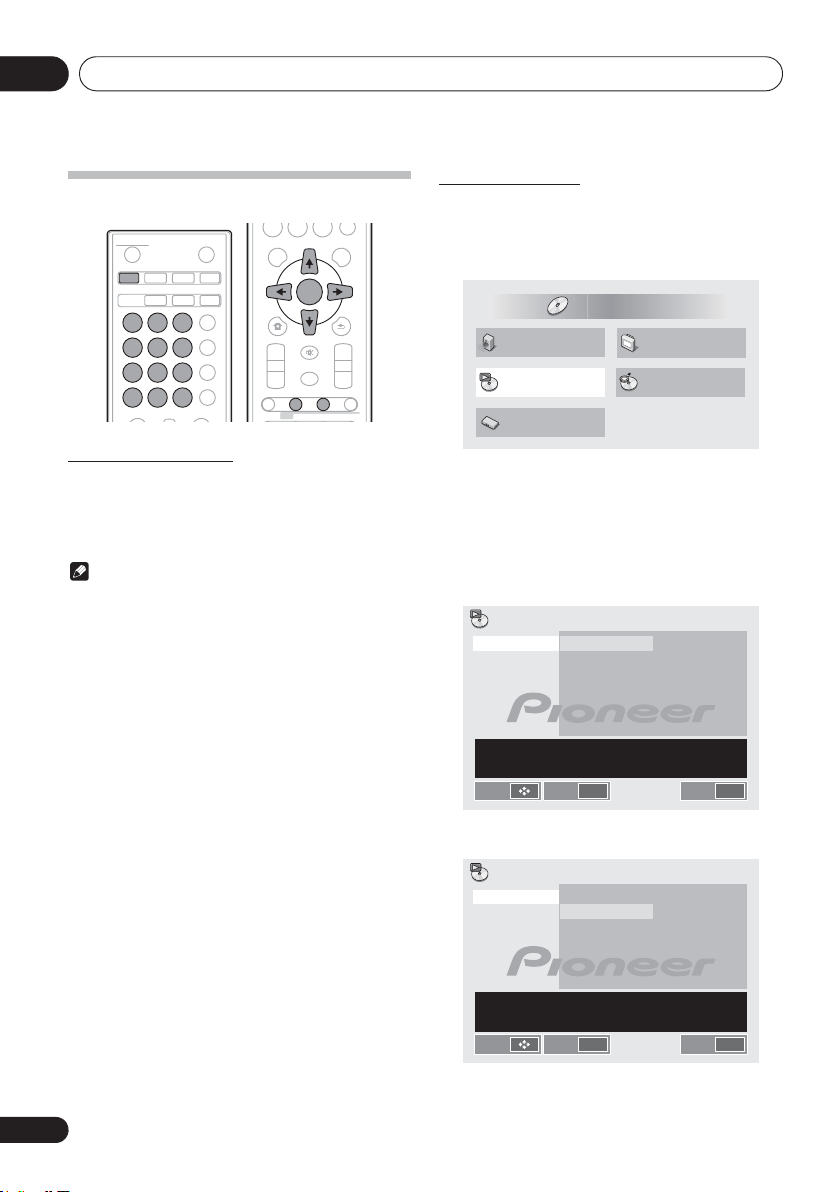
02 Part names and functions
Remote control . . . . . . . . . . . . . . . . . . . . . . . . . . . . . . . . 7
Detatching and replacing the front grille . . . . . . . . . . . 9
Front panel . . . . . . . . . . . . . . . . . . . . . . . . . . . . . . . . . . . 10
Display . . . . . . . . . . . . . . . . . . . . . . . . . . . . . . . . . . . . . . 11
03 Connections
Speaker connection . . . . . . . . . . . . . . . . . . . . . . . . . . . 12
Connecting using an HDMI cable . . . . . . . . . . . . . . . . . 13
Audio signals that can be output from this unit’s HDMI
OUT terminal . . . . . . . . . . . . . . . . . . . . . . . . . . . . . . . . . . 14
Connecting the FM antenna . . . . . . . . . . . . . . . . . . . . . 14
Using external antennas . . . . . . . . . . . . . . . . . . . . . . . . . 15
Plugging in . . . . . . . . . . . . . . . . . . . . . . . . . . . . . . . . . . . 15
04 Getting started
To turn the power on . . . . . . . . . . . . . . . . . . . . . . . . . . . 16
Setting the clock . . . . . . . . . . . . . . . . . . . . . . . . . . . . . . 16
General control . . . . . . . . . . . . . . . . . . . . . . . . . . . . . . . 16
Input function. . . . . . . . . . . . . . . . . . . . . . . . . . . . . . . . . . 16
Display brightness control . . . . . . . . . . . . . . . . . . . . . . . 16
Volume auto set-in. . . . . . . . . . . . . . . . . . . . . . . . . . . . . . 16
Volume control. . . . . . . . . . . . . . . . . . . . . . . . . . . . . . . . . 16
Muting. . . . . . . . . . . . . . . . . . . . . . . . . . . . . . . . . . . . . . . . 16
Sound controls . . . . . . . . . . . . . . . . . . . . . . . . . . . . . . . 17
Equalizer. . . . . . . . . . . . . . . . . . . . . . . . . . . . . . . . . . . . . . 17
P.BASS control . . . . . . . . . . . . . . . . . . . . . . . . . . . . . . . . 17
Bass/treble control . . . . . . . . . . . . . . . . . . . . . . . . . . . . . 17
Setting the wake-up timer . . . . . . . . . . . . . . . . . . . . . . . 17
Calling the wake-up timer . . . . . . . . . . . . . . . . . . . . . . . . 18
Cancelling the wake-up timer. . . . . . . . . . . . . . . . . . . . . 18
Using the wake-up timer. . . . . . . . . . . . . . . . . . . . . . . . . 18
Using the sleep timer . . . . . . . . . . . . . . . . . . . . . . . . . . 18
Using Headphones . . . . . . . . . . . . . . . . . . . . . . . . . . . . 18
05 iPod/iPhone/iPad playback
Confirming what iPod/iPhone/iPad models are
supported . . . . . . . . . . . . . . . . . . . . . . . . . . . . . . . . . . . . 19
Connecting your iPod/iPhone/iPad . . . . . . . . . . . . . . . 19
Connecting iPod/iPhone/iPad using supplied stand . . 19
Playing iPod/iPhone/iPad . . . . . . . . . . . . . . . . . . . . . . . 20
06 Disc playback
Playing discs or files . . . . . . . . . . . . . . . . . . . . . . . . . . . 21
Advanced DVD, CD disc playback . . . . . . . . . . . . . . . . 22
Direct track search . . . . . . . . . . . . . . . . . . . . . . . . . . . . . 22
A-B Repeat play . . . . . . . . . . . . . . . . . . . . . . . . . . . . . . . . 22
Repeat play. . . . . . . . . . . . . . . . . . . . . . . . . . . . . . . . . . . . 23
Random play . . . . . . . . . . . . . . . . . . . . . . . . . . . . . . . . . . 23
Programmed play . . . . . . . . . . . . . . . . . . . . . . . . . . . . . . 24
Search mode . . . . . . . . . . . . . . . . . . . . . . . . . . . . . . . . . . 25
About downloading MP3/WMA . . . . . . . . . . . . . . . . . . . 25
About playback order . . . . . . . . . . . . . . . . . . . . . . . . . . . 25
Procedure to playback DivX or MP3/WMA/JPEG file. . 26
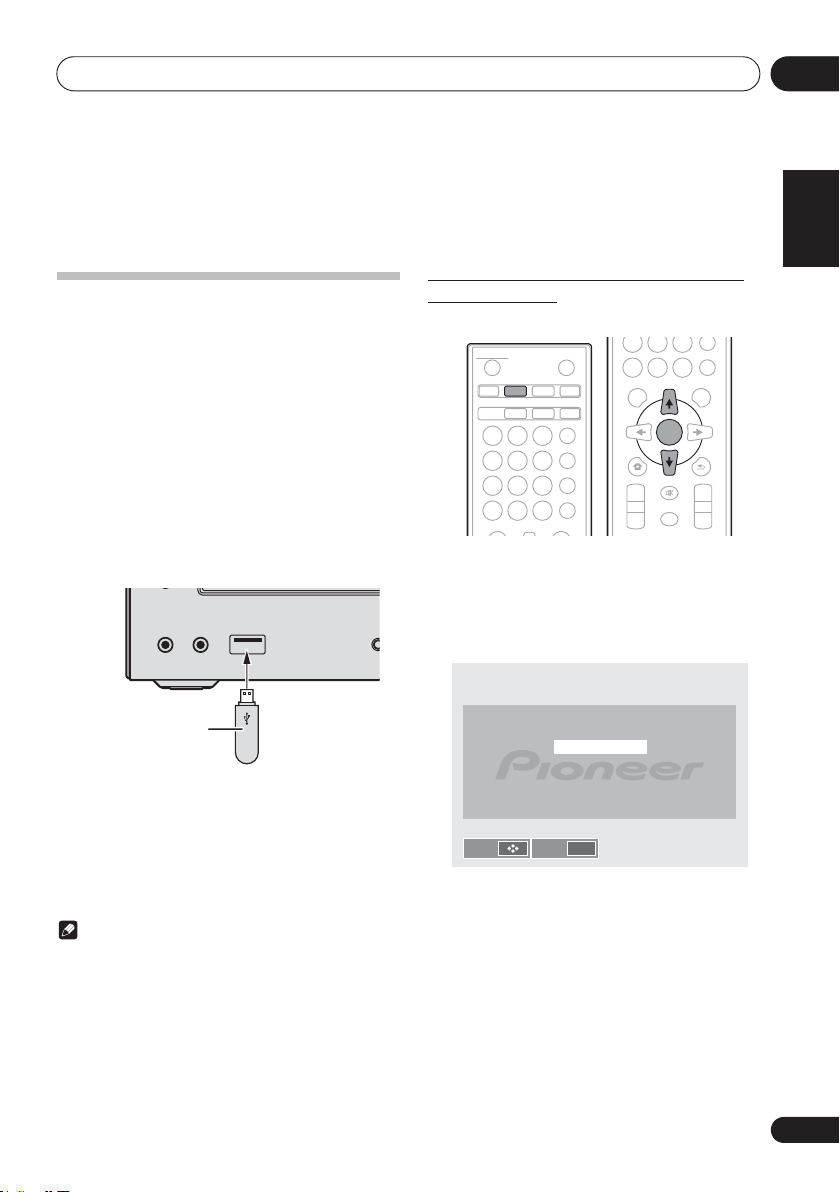
07 USB playback
Playing USB storage devices . . . . . . . . . . . . . . . . . . . . 27
Procedure to playback DivX or MP3/WMA/JPEG file. . 27
Playing in the desired order (Programmed Play) . . . . 28
08 Using the tuner
Listening to the radio broadcasts . . . . . . . . . . . . . . . . 29
Tuning. . . . . . . . . . . . . . . . . . . . . . . . . . . . . . . . . . . . . . . . 29
Saving station presets. . . . . . . . . . . . . . . . . . . . . . . . . . . 29
To recall a memorised station . . . . . . . . . . . . . . . . . . . . 30
To scan the preset stations. . . . . . . . . . . . . . . . . . . . . . . 30
To erase entire preset memory. . . . . . . . . . . . . . . . . . . . 30
Using the Radio Data System (RDS) . . . . . . . . . . . . . . 30
An introduction to RDS. . . . . . . . . . . . . . . . . . . . . . . . . . 30
Searching for RDS programs. . . . . . . . . . . . . . . . . . . . . 30
Information provided by RDS . . . . . . . . . . . . . . . . . . . . . 31
Using the Auto Station Program Memory (ASPM). . . . 31
Notes for RDS operation. . . . . . . . . . . . . . . . . . . . . . . . . 31
09 Other connections
Connecting auxiliary components . . . . . . . . . . . . . . . . 32
10
Bluetooth
Music playback using Bluetooth wireless
technology . . . . . . . . . . . . . . . . . . . . . . . . . . . . . . . . . . . 33
Remote control operation . . . . . . . . . . . . . . . . . . . . . . . 33
Pairing with the unit (Initial registration) . . . . . . . . . . 33
Listen to music on the unit from a Bluetooth
capable device . . . . . . . . . . . . . . . . . . . . . . . . . . . . . . . . 34
BT STANDBY . . . . . . . . . . . . . . . . . . . . . . . . . . . . . . . . . . 34
Radio wave caution . . . . . . . . . . . . . . . . . . . . . . . . . . . . 34
Scope of operation . . . . . . . . . . . . . . . . . . . . . . . . . . . . . 35
Radio wave reflections . . . . . . . . . . . . . . . . . . . . . . . . . . 35
Precautions regarding connections to products
supported by this unit . . . . . . . . . . . . . . . . . . . . . . . . . . . 35
® Audio playback
4
En
Page 5

11 Changing the settings
Settings for DVD/CD and USB playback . . . . . . . . . . .36
Audio Settings parameters. . . . . . . . . . . . . . . . . . . . . . . 36
Video Adjust parameters . . . . . . . . . . . . . . . . . . . . . . . . 36
Initial Settings parameters. . . . . . . . . . . . . . . . . . . . . . . 36
Setting the HDMI Resolution settings back to their
defaults. . . . . . . . . . . . . . . . . . . . . . . . . . . . . . . . . . . . . . . 37
12 Additional information
Troubleshooting . . . . . . . . . . . . . . . . . . . . . . . . . . . . . . .38
Language Code Table and Country/Area Code Table .41
Language Code Table . . . . . . . . . . . . . . . . . . . . . . . . . . . 41
Country/Area Code Table . . . . . . . . . . . . . . . . . . . . . . . . 41
Playable discs and formats . . . . . . . . . . . . . . . . . . . . . . 42
Discs that cannot be played. . . . . . . . . . . . . . . . . . . . . . 42
About region numbers . . . . . . . . . . . . . . . . . . . . . . . . . . 42
Regarding copy protected CDs . . . . . . . . . . . . . . . . . . . 42
About playing DualDiscs . . . . . . . . . . . . . . . . . . . . . . . . 42
Playing discs created on computers or BD/DVD
recorders . . . . . . . . . . . . . . . . . . . . . . . . . . . . . . . . . . . . . 43
Playable files . . . . . . . . . . . . . . . . . . . . . . . . . . . . . . . . . .43
Supported video file formats . . . . . . . . . . . . . . . . . . . . . 43
Displaying external subtitle files . . . . . . . . . . . . . . . . . . 43
Supported image file formats . . . . . . . . . . . . . . . . . . . . 43
Supported audio file formats . . . . . . . . . . . . . . . . . . . . . 43
Cautions on use . . . . . . . . . . . . . . . . . . . . . . . . . . . . . . .44
When moving this unit . . . . . . . . . . . . . . . . . . . . . . . . . . 44
Place of installation. . . . . . . . . . . . . . . . . . . . . . . . . . . . . 44
Do not place objects on this unit. . . . . . . . . . . . . . . . . . 44
About condensation . . . . . . . . . . . . . . . . . . . . . . . . . . . . 44
Cleaning the product . . . . . . . . . . . . . . . . . . . . . . . . . . . 44
Cleaning the lens . . . . . . . . . . . . . . . . . . . . . . . . . . . . . . 44
Handling discs . . . . . . . . . . . . . . . . . . . . . . . . . . . . . . . .45
Storing . . . . . . . . . . . . . . . . . . . . . . . . . . . . . . . . . . . . . . . 45
Cleaning discs. . . . . . . . . . . . . . . . . . . . . . . . . . . . . . . . . 45
About specially shaped discs. . . . . . . . . . . . . . . . . . . . . 45
About iPod/iPhone/iPad . . . . . . . . . . . . . . . . . . . . . . . .45
Auto power off setting . . . . . . . . . . . . . . . . . . . . . . . . . .45
Restoring all the settings to the defaults . . . . . . . . . . .45
Specifications . . . . . . . . . . . . . . . . . . . . . . . . . . . . . . . . .46
En
5
Page 6
Before you start01
INP
UT
Chapter 1:
Before you start
What’s in the box
Please confirm that the following accessories are in the box
when you open it.
•Remote control
•Power cord
• Video cable (1.5 m)
• FM wire antenna
• AAA batteries (R03) x 2
• Speaker wire x 2
• iPhone/iPad stand
• Warranty card
• Operating instructions (this document)
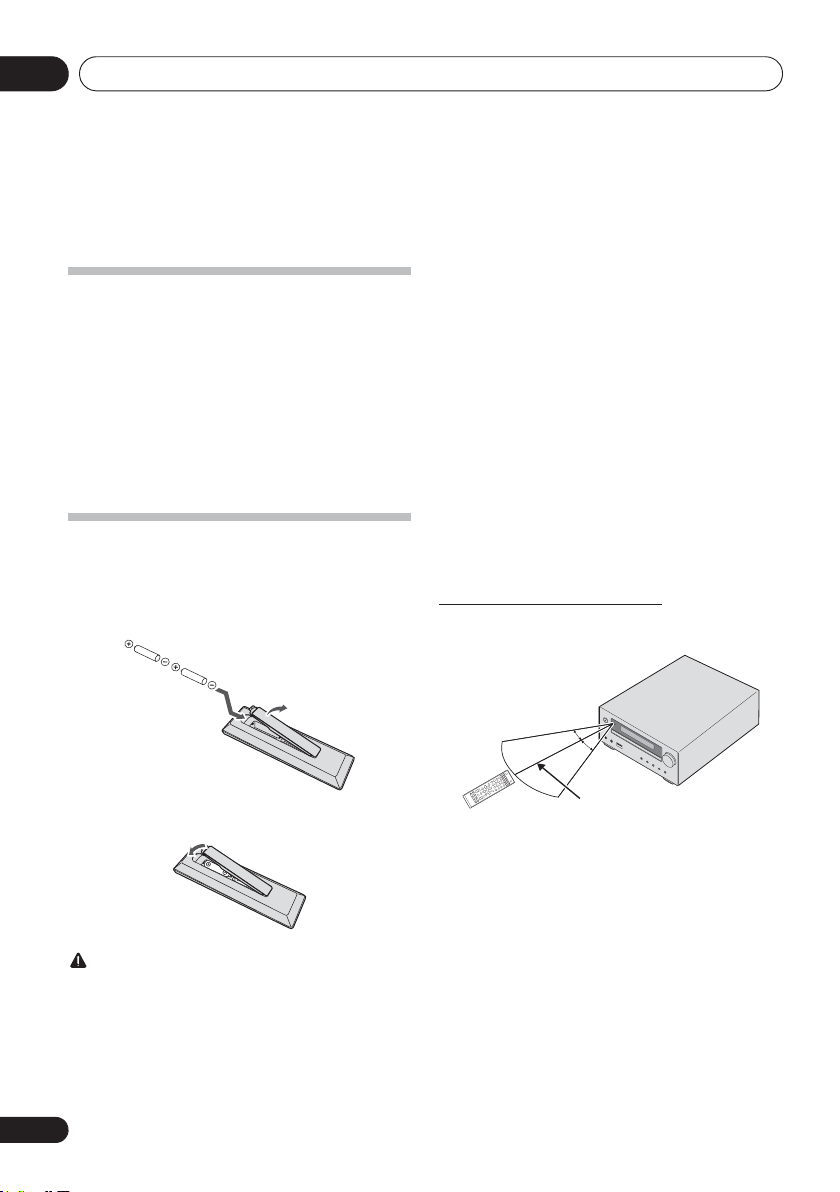
Loading the batteries in the
remote control
1 Open the rear lid and load the batteries as
illustrated below.
• Do not heat batteries, disassemble them, or throw them
into flames or water.
• Batteries may have different voltages, even if they are the
same size and shape. Do not use different types of
batteries together.
• To prevent leakage of battery fluid, remove the batteries
if you do not plan to use the remote control for a long
period of time (1 month or more). If the fluid should leak,
wipe it carefully off the inside of the case, then insert new
batteries. If a battery should leak and the fluid should get
on your skin, flush it off with large quantities of water.
• When disposing of used batteries, please comply with
governmental regulations or environmental public
institution’s rules that apply in your country/area.
• WARNING
Do not use or store batteries in direct sunlight or other
excessively hot place, such as inside a car or near a
heater. This can cause batteries to leak, overheat,
explode or catch fire. It can also reduce the life or
performance of batteries.
Using the remote control
The remote has a range of about 7 m at an angle of about 30º
from the remote sensor.
2 Close the rear lid.
CAUTION
• When inserting the batteries, make sure not to damage
the springs on the battery’s terminals. This can cause
batteries to leak or over heat.
• Do not use any batteries other than the ones specified.
Also, do not use a new battery together with an old one.
• When loading the batteries into the remote control, set
them in the proper direction, as indicated by the polarity
marks ( and ).
6
En
30°
30°
7 m
Keep in mind the following when using the remote control:
• Make sure that there are no obstacles between the
remote and the remote sensor on the unit.
• Remote operation may become unreliable if strong
sunlight or fluorescent light is shining on the unit’s
remote sensor.
• Remote controllers for different devices can interfere
with each other. Avoid using remotes for other
equipment located close to this unit.
• Replace the batteries when you notice a fall off in the
operating range of the remote.
Page 7
Part names and functions 02
English
Chapter 2:
Part names and functions
1 1 STANDBY/ON
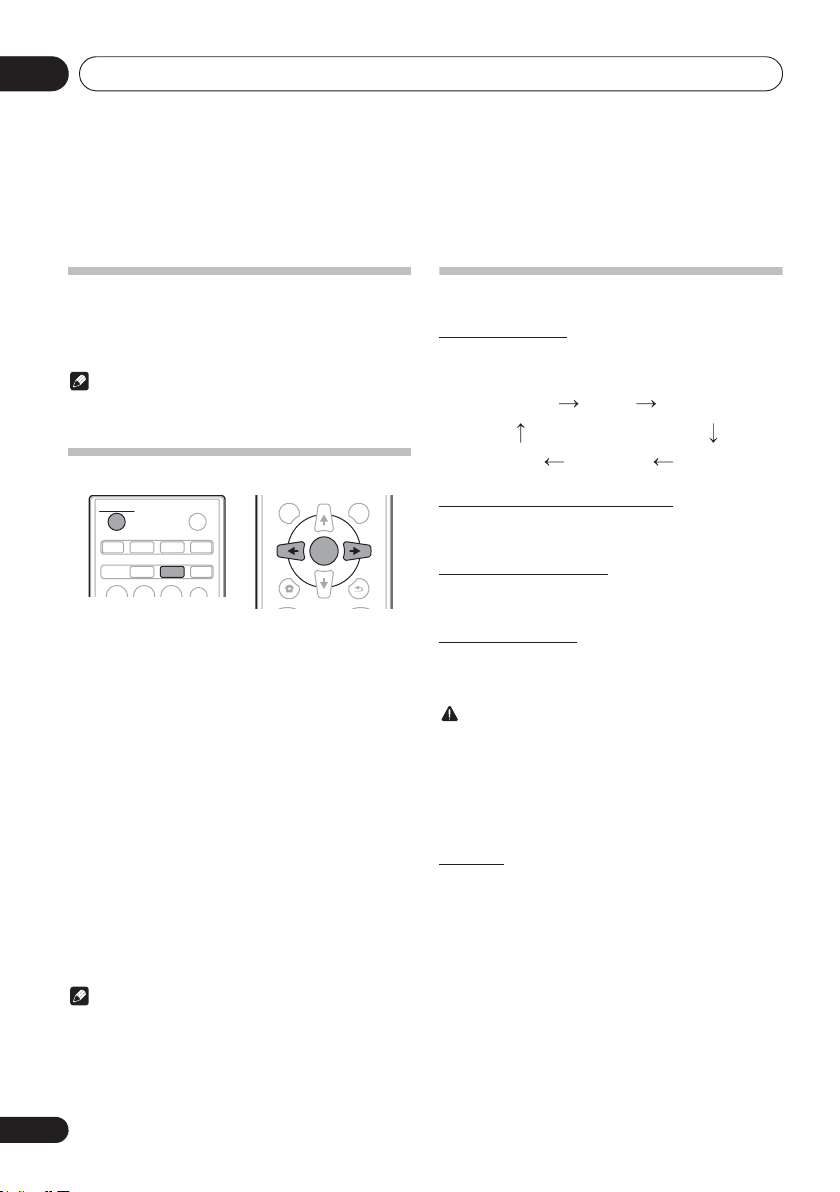
Remote control
1
2
3
4
5
6
7
8
9
10
STANDBY/ON
DVD/CD USB TUNER
BT AUDIO
AUDIO SUBTITLE ANGLE
OPEN/CLOSE
AUDIO IN/LINE
CLOCK/TIMER
EQUALIZER
SLEEP
123
ZOOM MEMORY PROGRAM
P.B A S S
456
ST/MONO VIDEO MODE A-B
BASS/TREBLE
789
CLEAR RPT/RDM
DISPLAY
0
TOP MENU MENU/PBC
HOME MENU
SHIFT
TUNE+
ENTER
RETURN
PRESET VOLUME
TUNE–
+
MUTE
–
DIMMER
RDS
ASPM PTY DISPLAY
+
–
OPTION
11
12
13
14
15
16
17
18
Switches the receiver between standby and on (page 16).
2 Input function buttons
Use to select the input source to this receiver (pages 20, 21,
27, 29, 32 and 33).
BT AUDIO
Use to set up or play the audio file using the Bluetooth
network (pages 33).
3 Numeric buttons (0 to 9)
Use to enter the number (page 22).
AUDIO*
For discs or files including multiple audio streams/
channels, the audio stream/channel can be switched
during playback. For files stored in iPod/iPhone/iPad,
this button is not available.
SUBTITLE*
On DVD-Video or DivX discs containing subtitles in
multiple languages, the subtitle can be switched during
playback. For files stored in iPod/iPhone/iPad, this
button is not available.
ANGLE*
On DVD-Video discs containing multiple angles, the
angle can be switched during playback.
ZOOM*
Zooming on the image. For images stored in iPod/
iPhone/iPad, this button is not available.
MEMORY*
Use to memory the radio station (page 29).
PROGRAM*
Use to program the DVD-Video, MP3/WMA disc or USB
mass storage device (page 24).
ST/MONO*
Use to switch the sound mode between stereo and
monaural (page 29).
VIDEO MODE*
Use to change the output resolution (HDMI only)
(page 37).
A-B*
The specified section within a single title or track is
played repeatedly.
4
CLEAR
Press to clear the selected item.
Use this for example if you use to clear the programmed play
(page 24).
En
7
Page 8
Part names and functions02
5 DVD Receiver control buttons
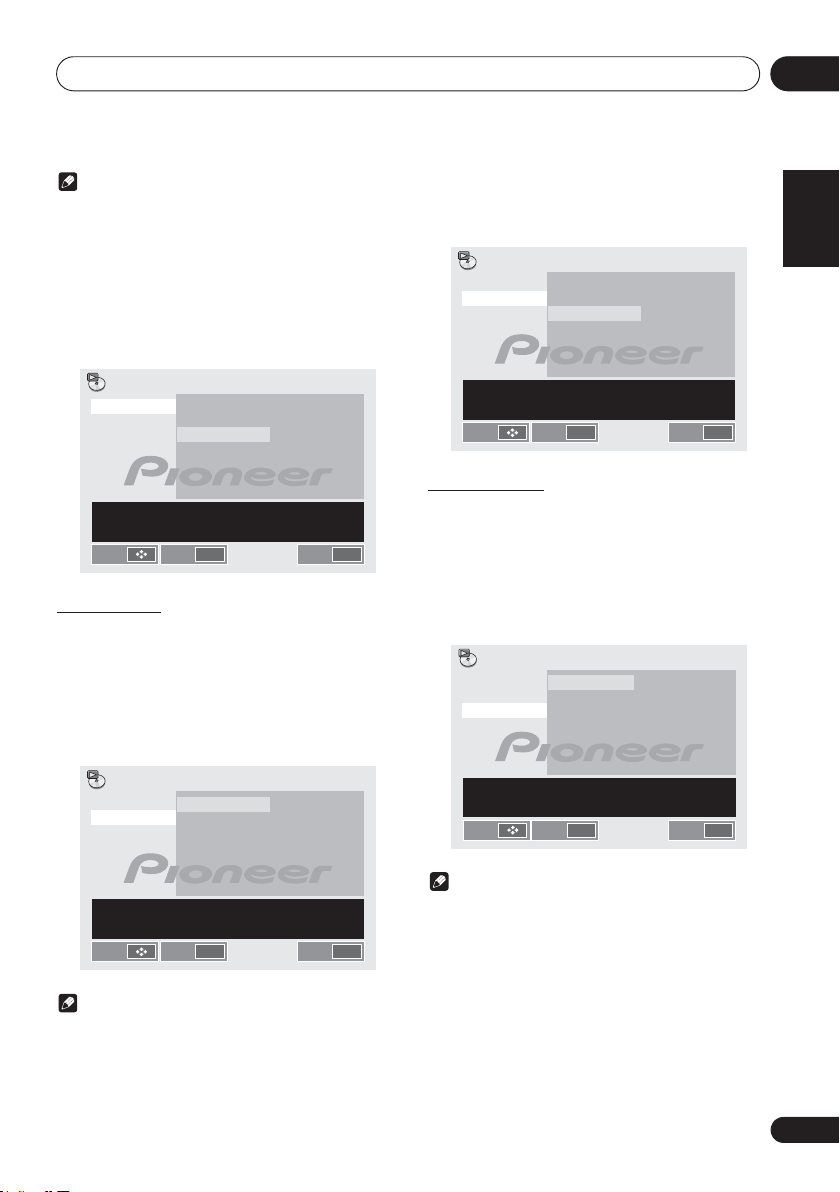
TOP MENU
Press to display the top menu of the DVD-Video.
MENU/PBC
Use to access the DVD menu or VCD PBC menu.
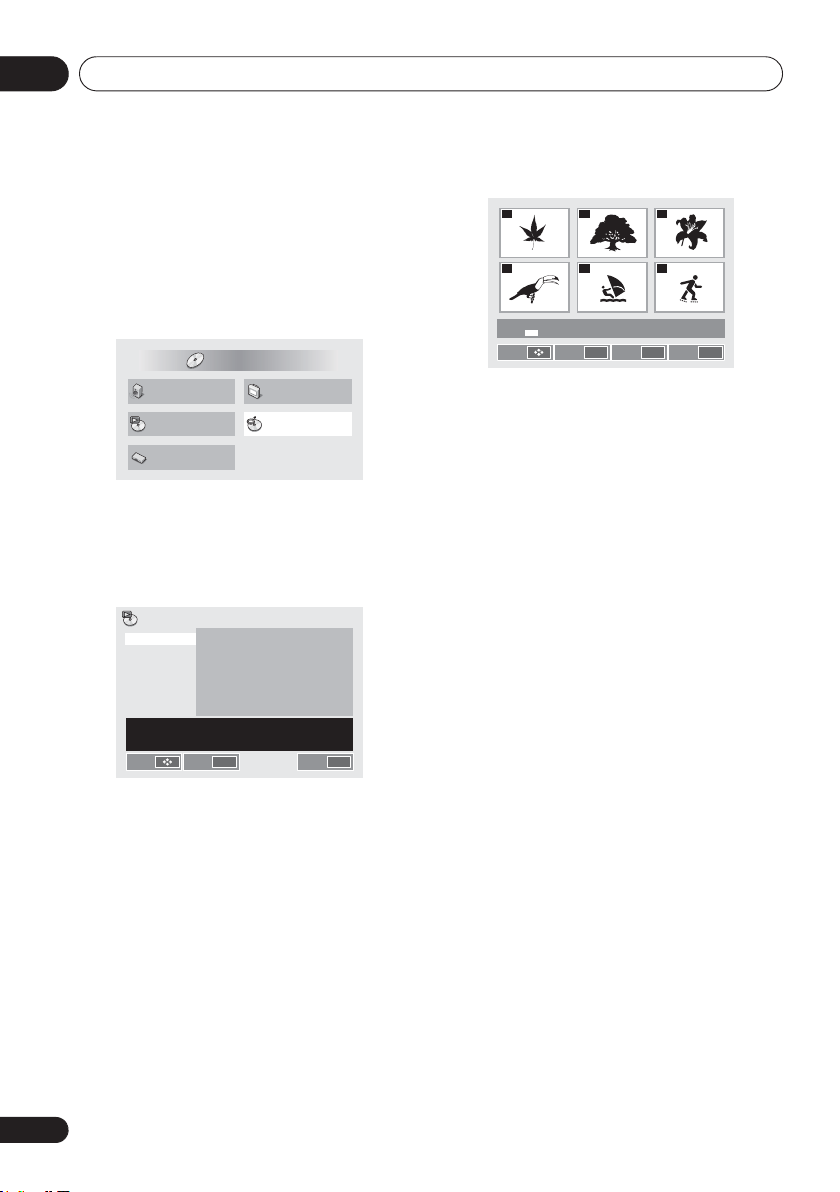
HOME MENU
Press to display the menu screen.
Use this to change initial settings of the unit (page 36).
HOME MENU
DVD
Audio Settings
Play Mode
Initial Settings
• Audio Settings (page 36)
• Video Adjust (page 36)
• Play Mode
The Play Mode function may not work for some discs or
files. For files stored on iPod/iPhone/iPad, this function
is not available.
Play Mode
A-B Repeat
Repeat
Random
Program
Search Mode
Setup playback functions such as Program. Random and
Repeat play
Move Select
A-B Repeat (page 22)
The specified section within a single title or track is
played repeatedly.
Repeat (page 23)
Plays titles, chapters, tracks or files repeatedly.
Random (page 23)
Plays titles, chapters or tracks in random order.
Program (page 24)
Plays titles, chapters, tracks or files in the order in which
you program them.
Search Mode (page 25)
Plays the specified number or time within the title,
chapter, track or file.
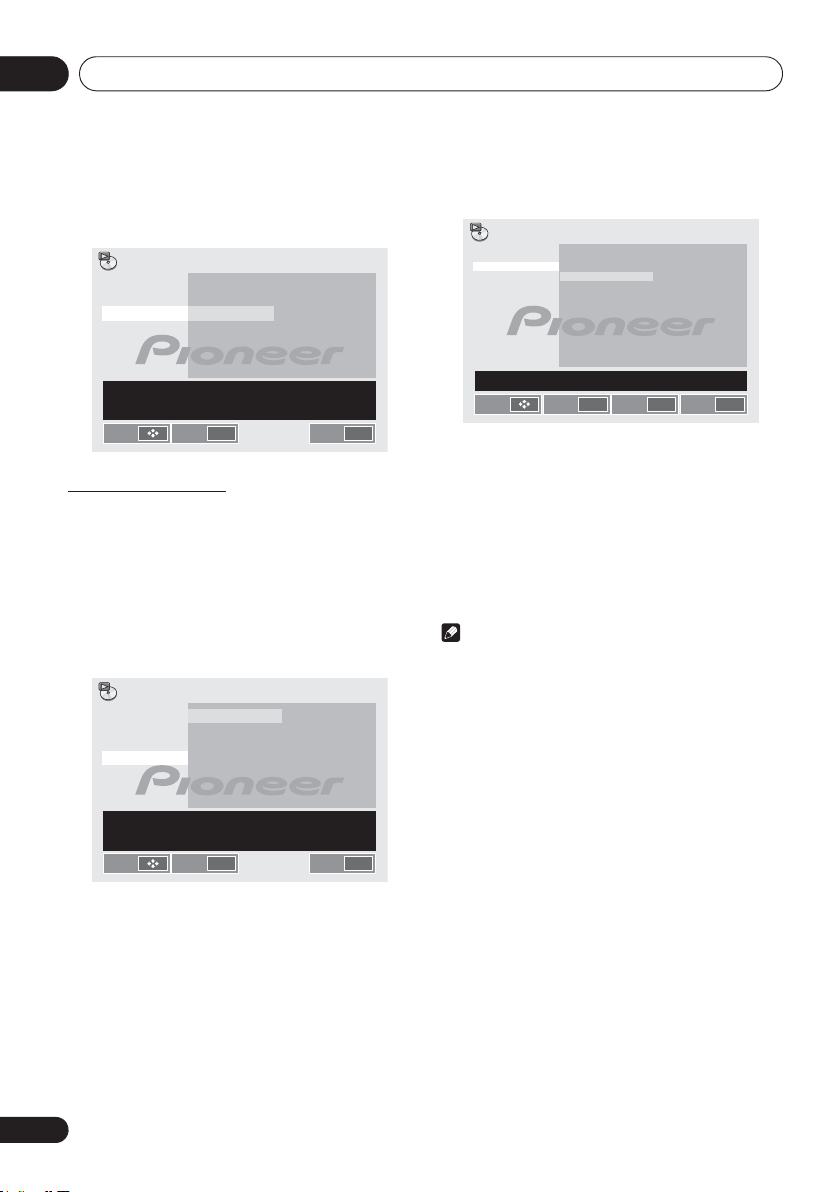
• Disc Navigator
Select and plays title, chapter, track or file from the Disc
Navigator.
A(Start Point)
B(End Point)
Off
ENTER
Video Adjust
Disc Navigator
Exit
HOME MENU
Ex.: DVD-Video Disc Navigator
01
04
Disc Navigator: Title
01- 49: – –
Move
02 03
05 06
Select
ENTER
Prev. Next
• Initial Settings (page 36)
RETURN
Press to return to the previous screen. Also, use to
cancel the clock setting or the sound setting.
6
FGHI
Use to select/switch system settings and modes, and to
confirm actions.
Use TUNE +/–
(page 29).
7
PRESET +/–
Use to select preset radio stations (page 30).
8
MUTE
Mutes/unmutes the sound (page 16).
9 Playback control buttons
Use to control each function after you have selected it using
the input function buttons (page 21).
!
Press to start playback.
#
Press to stop playback.
+)/-
• Press to return to the beginning of the currently playing
track or file. Press twice to move back to the beginning
of the previous track or file.
• Press and hold during playback to fast-reverse.
• Press in the pause mode to move backward frame-byframe. (DVD-Video only)
• Press and hold in the pause mode for slow play in the
reverse direction. (DVD-Video only)
,*0.
• Press during playback to skip ahead to the beginning of
the next track or file.
• Press and hold during playback to fast-forward.
• Press in the pause mode to move forward frame-byframe. (DVD-Video, Video CD or DivX files only)
• Press and hold in the pause mode for slow play in the
forward direction. (DVD-Video, Video CD or DivX files
only)
(TUNE +/–), ENTER
can be used to find radio frequencies
8
En
Page 9
Part names and functions 02
English
Play
Playback status
Time display
Subtitle Language
Audio Language
Audio format
DVD-Video
Current / Total
1 Chinese - - 1
Audio Dolby Digital 2 / 0 CH Subtitle Angle
1/4Title
Elapsed Remain Total
5:34 35:56 41:30
Play
PAUSE
Slow Backward
Slow Forward
Fast B ackward
Fast Forward
10
SHIFT
Press to access the ‘blue’ commands (above the
buttons) on the remote. These buttons are marked with
an asterisk (*) in this section.
11 OPEN/CLOSE
Use to open or close the disc tray (page 21).
12 DVD Receiver control buttons
CLOCK/TIMER
Use for setting the clock, as well as for setting and
checking the timers (page 16).
SLEEP
See Using the sleep timer on page 18.
13 Sound control buttons
Adjust the sound quality (page 17).
14
DISPLAY
Press to change the display for DVD-Video, Video CD, CD or
MP3.
Ex.: DVD-Video DISPLAY
Detatching and replacing the front
grille
The front grille of this speaker system is removable. Proceed
as follows:
1 Grab the bottom of the grille, and gently
pull it toward you to remove the bottom
portion.
2 Next, grab the top part of the grille and
gently pull it toward you to remove the top
portion.
3 To install the grille, align the projections on
the speaker with the receptacles on the top and
at the base of the grille and push them into
place.
15
RPT/RDM
Press to change the repeat play or randomize order play
setting from a DVD-Video, Video CD, CD or iPod (page 22).
16 Volume control buttons
Use to set the listening volume (page 16).
17
DIMMER
Dims or brightens the display. The brightness can be
controlled in four steps (page 16).
18
Tuner
control buttons
RDS ASPM
Use to search for RDS Auto station program memory
(page 30).
RDS PTY
Use to search for RDS program types (page 30).
RDS DISPLAY
Press to change the RDS display for information mode
(page 30).
9
En
Page 10
Part names and functions02
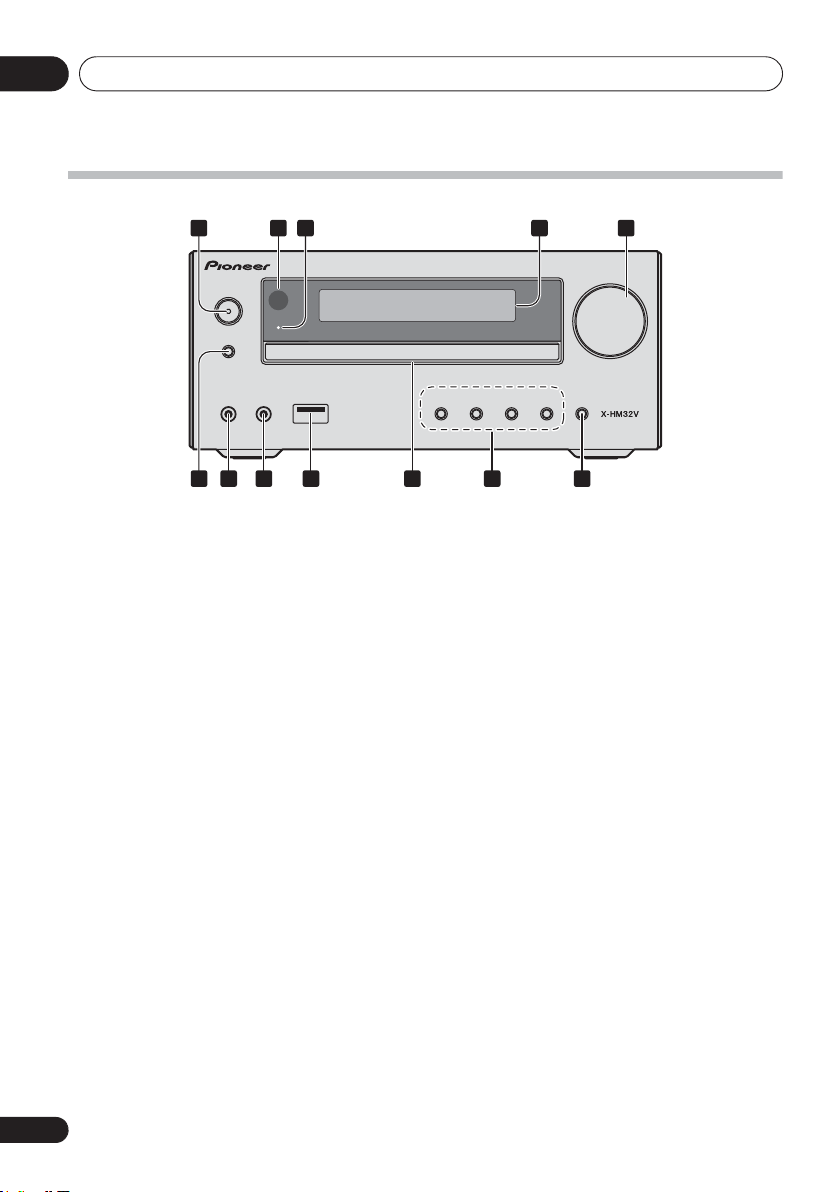
Front panel
2 51 3 4
STANDBY/ON
TIMER
INPUT
PHONES AUDIO IN
7 86 9 11 1210
1 1 STANDBY/ON button
Switches the receiver between standby and on (page 16).
2 Remote sensor
Receives the signals from the remote control.
3TIMER
Lights when the unit power is off but when the timer setting is
activated.
indicator
4 Character display
See Display on page 11.
5 Volume control
Use to set the listening volume (page 16).
6 INPUT button
Selects the input source.
Long press to change to BT STANDBY mode.
7 Headphone socket
Use to connect headphones. When the headphones are
connected, there is no sound output from the speakers
(page 18).
VOLUME
8 AUDIO IN socket
Use to connect an auxiliary component using a stereo
minijack cable (page 32).
9 USB terminal
Use to connect your USB mass storage device or Apple iPod/
iPhone/iPad as an audio source (pages 20 and 27).
10 Disc tray
Place the disc, label side up (page 21).
11 Playback control buttons
Select the desired track or file to be played back. Stop current
playback. Stop playback or resume playback from the point
where it was paused.
12 Disc tray open/close button
Use to open or close the disc tray (page 21).
10
En
Page 11
Part names and functions 02
English
1 32 4
5
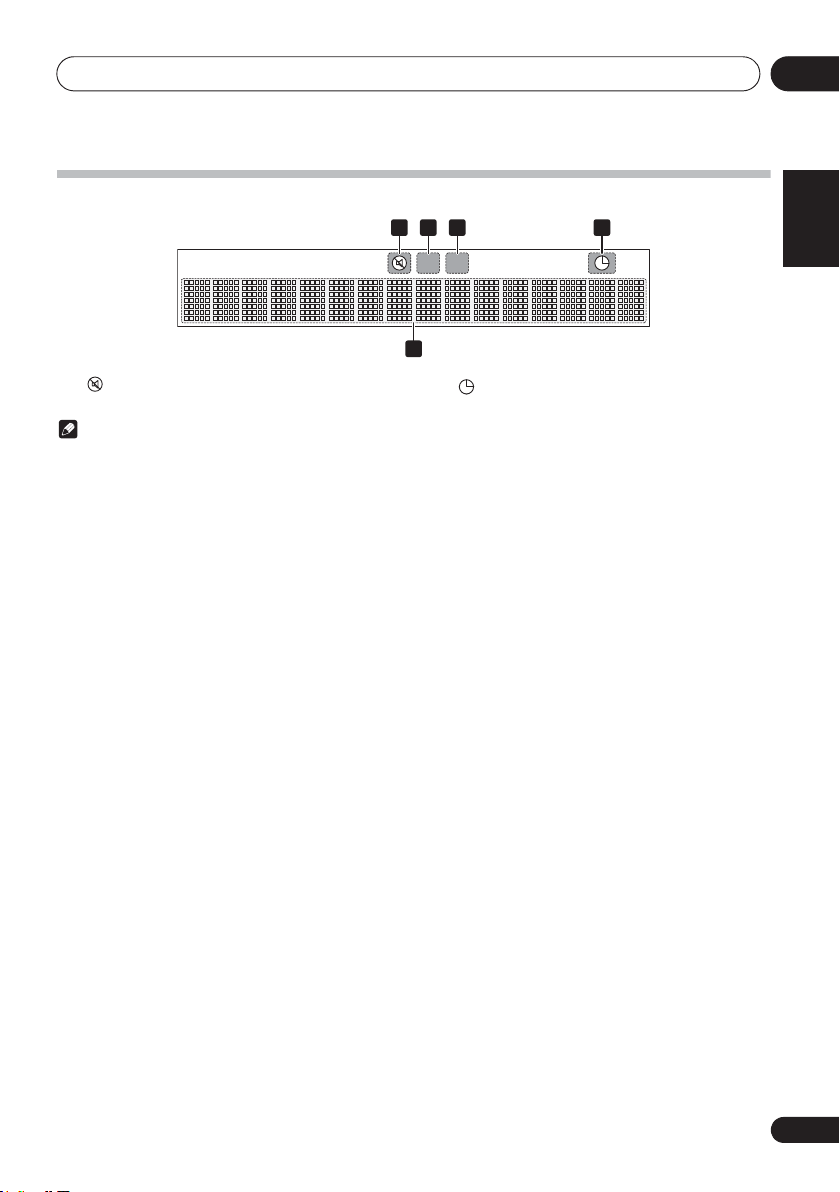
Display
1
Lights when the sound is muted.
Note
• The mute icon will be displayed in red.
2
Start playback.
3 !
Pause playback.
4
Timer function is set.
5 Character display
Displays various system information.
11
En
Page 12
Connections03
Y
Chapter 3:
Connections
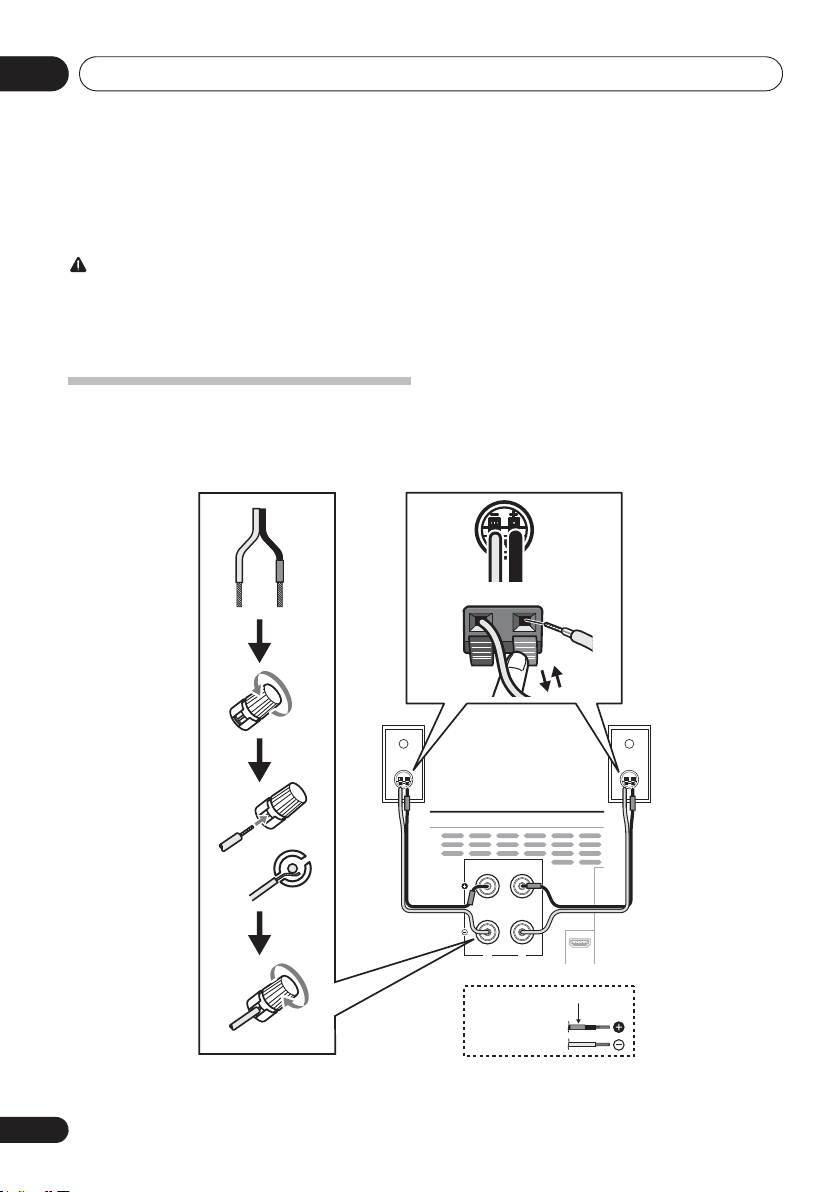
CAUTION
• Be sure to turn off the power and unplug the power cord
from the power outlet whenever making or changing
connections.
• Connect the power cord after all the connections
between devices have been completed.
Speaker connection
• The provided speaker wire with the red tube is for the (+)
terminal. Connect the wire with red tube the (+)
terminal, and other wire to the (–) terminal.
+
12
En
Left speakerRight speaker
SPEAKERS
P
RL
This unit’s rear panel
Supplied
speaker wire
P
OU
Red tube
Page 13
Connections 03
English
ANTENNA
VIDEO
OUT
OUT
COMPONENT
VIDEO
OUT
IN
LINE
PB
PR
Y
L
R
FM
UNBAL 75 Ω
HDMI
RS
L
CAUTION
• These speaker terminals carry HAZARDOUS LIVE
voltage. To prevent the risk of electric shock when
connecting or disconnecting the speaker cables,
disconnect the power cord before touching any
uninsulated parts.
• Do not connect any speakers other than those supplied
to this system.
• Do not connect the supplied speakers to any amplifier
other than the one supplied with this system.
Connection to any other amplifier may result in
malfunction or fire.
• Do not attach these speakers to the wall or ceiling. They
may fall off and cause injury.
• These speakers are magnetically shielded. However,
depending on the installation location, color distortion
may occur if the speaker system is installed extremely
close to the screen of a television set. If this happens,
turn off the television set, and then turn it on after 15 to
30 minutes. If the problem persists, move the speaker
system away from the television set.
• Make sure that the speaker cable cores do not become
exposed and make contact with other cable cores. This
may cause malfunction of the product.
• Do not allow the speaker cable core to come into contact
with the receiver body.
- If the speaker cable core comes into contact with any
metal portion of the receiver’s body, it may damage the
speakers and cause smoke and fire.
Insert speaker cables securely into the terminals and
check that the cable does not come out of easily.
Note
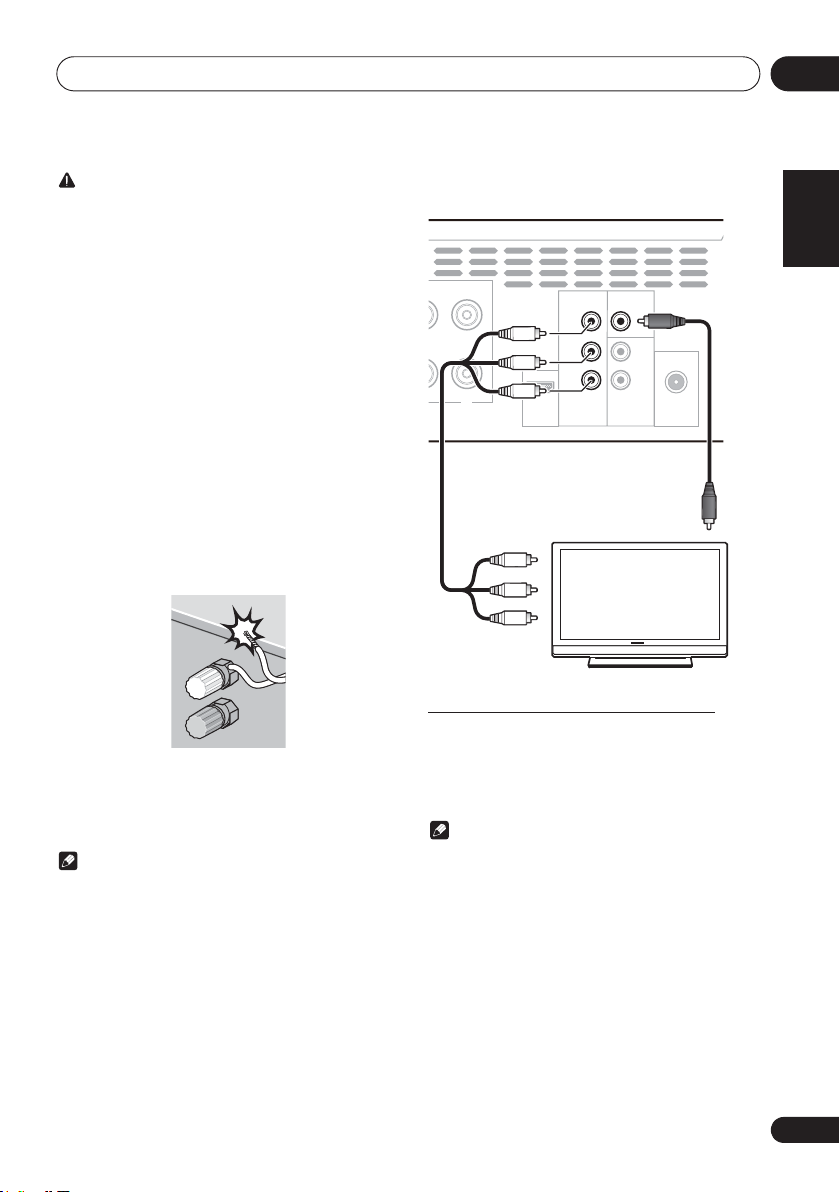
• There is no difference between L and R speakers.
This unit’s rear panel
terminal
Video cable
(supplied)
Yellow
Component video cable
(commercially available)
To video input
TV
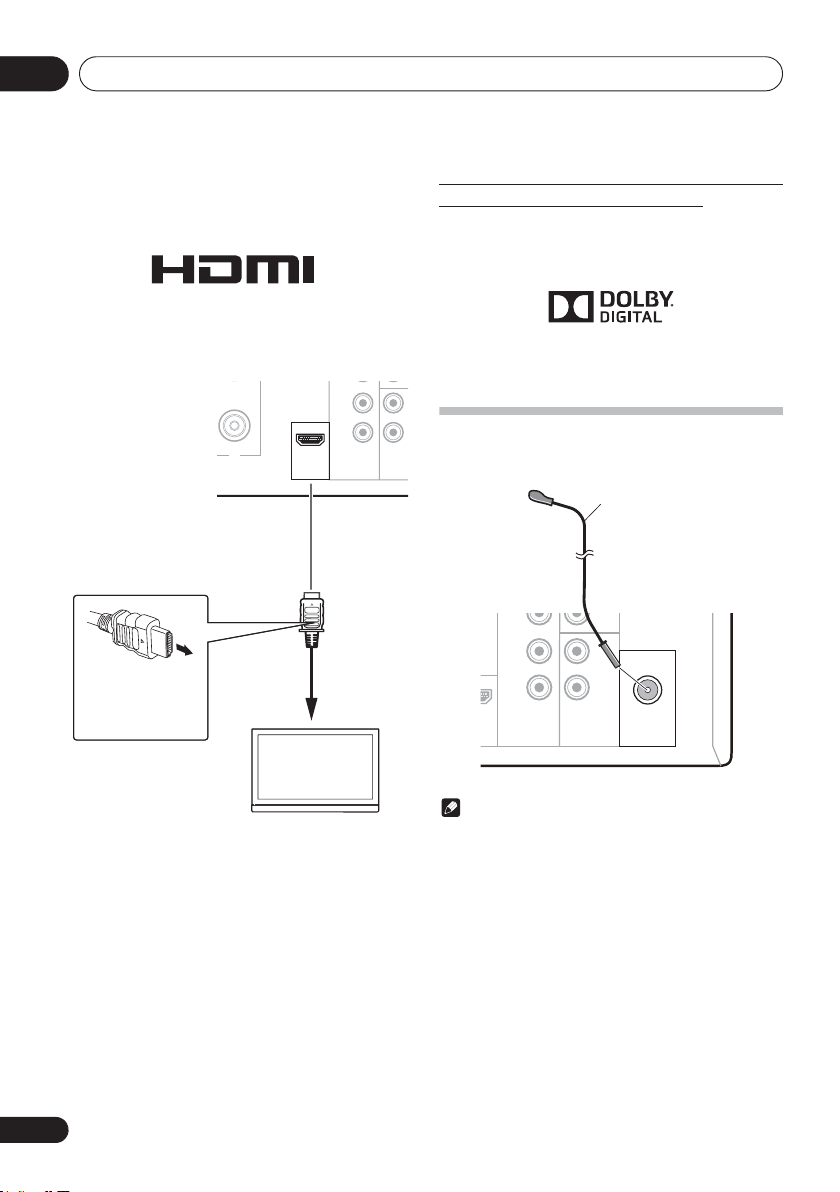
Connecting using an HDMI cable
By using an HDMI cable, digital signals can be transferred to
an HDMI-compatible TV on a single cable with no loss of
picture or sound quality. After connecting, make this unit's
resolution and HDMI color settings according to the HDMIcompatible TV. Also refer to the operating instructions with
the HDMI-compatible TV.
Note
• When playing a disc or USB storage device content, this
unit can transfer digital signals by the HDMI OUT
terminal. Use the video cable for playing other content.
• This unit’s interface is designed based on the HighDefinition Multimedia Interface specification.
• When an HDMI-compatible device is connected, the
resolution is displayed on the front panel display.
• The resolution of the video signals output from this unit’s
HDMI OUT terminal is changed manually. Change the
HDMI Resolution setting (page 37).
13
En
Page 14
Connections03
OUT
COMPONENT
VIDEO
OUT
I
L
PB
PR R
HDMI
L
Match the direction of
the plug to the
terminal and insert
straight.
To HDMI input
terminal
HDMI cable
(commercially
available)
TV
This unit’s rear panel
Y
This unit’s rear panel
FM wire antenna
(supplied)
• This unit is designed for connection to HDMI-compatible
devices. It may not operate properly if connected to DVI
devices.
The term HDMI and High-Definition Multimedia Interface, and
the HDMI Logo are trademarks or registered trademarks of
HDMI Licensing, LLC in the United States and other countries.
Audio signals that can be output from
this unit’s HDMI OUT terminal
• 44.1 kHz to 96 kHz, 16-bit/ 20-bit/ 24-bit 2-channel linear
PCM audio (including 2-channel downmixing)
• Dolby Digital 5.1-channel audio
•MPEG audio
• Manufactured under license from Dolby Laboratories.
Dolby and the double-D symbol are trademarks of Dolby
Laboratories.
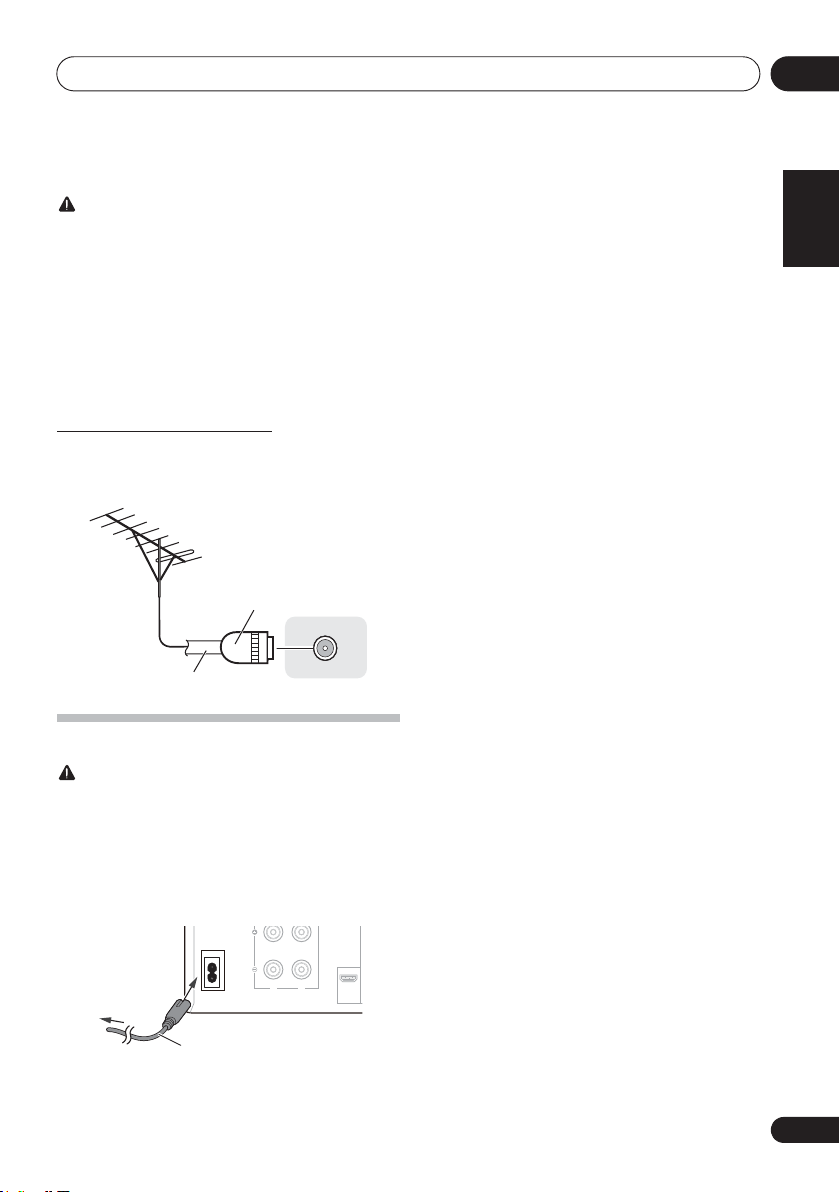
Connecting the FM antenna
Connect the FM antenna plug onto the center pin of the FM
antenna socket.
PR
PB
OUT
COMPONENT
VIDEO
R
L
IN
LINE
ANTENNA
FM
UNBAL 75 Ω
14
En
Note
• To ensure optimum reception, make sure the FM
antenna is fully extended and not coiled or hanging at
the rear of the unit.
Page 15
Connections 03
English
ANTENNA
FM
UNBAL 75 Ω
OUT
C
V
O
HDMI
AC IN
RL
To AC outlet
This unit’s rear panel
Power cord
To customers in Norway and Sweden
CAUTION
• “Apparater som er koplet til beskyttelsesjord via
nettplugg og/eller via annet jordtilkoplet utstyr - og er
tilkoplet et koaksialbasert kabel-TV nett, kan forårsake
brannfare. For å unngå dette skal det ved tilkopling av
apparater til kabel-TV nett installeres en galvanisk
isolator mellom apparatet og kabel-TV nettet.”
• “Apparater som är kopplade till skyddsjord via jordat
vägguttag och/eller via annan utrustning och samtidigt
är kopplad till kabel-TV nät kan i vissa fall medföra risk för
brand. För att undvika detta skall vid anslutning av
apparaten till kabel-TV nät galvanisk isolator finnas
mellan apparaten och kabel-TV nätet.
Using external antennas
To improve FM reception
Use a PAL connector (not supplied) to connect an external FM
antenna.
One-touch
PAL connector
75 :coaxial cable
Plugging in
CAUTION
• Do not use any power cord other than the one supplied
with this unit.
• Do not use the supplied power cord for any purpose
other than that described below.
Before making or changing the connections, switch off the
power and disconnect the power cord from the AC outlet.
After you’ve finished making all connections, plug the unit
into an AC outlet.
15
En
Page 16
Getting started04
TOP MENU MENU/PBC
HOME MENU
PRESET VOLUME
TUNE–
TUNE+
RETURN
ENTER
DVD/CD
FM
AUDIO IN
LINE
USB/iPod
BT AUDIO
Chapter 4:
Getting started
To turn the power on
Press the 1 STANDBY/ON to turn the power on.
After use:
Press the 1 STANDBY/ON to enter the power stand-by mode.
Note
• In standby mode, if iPod/iPhone/iPad is connected, the
unit turns charge mode.
Setting the clock
STANDBY/ON
DVD/CD USB TUNER
AUDIO SUBTITLE ANGLE
1 Press
2 Press
“CLOCK” is shown on the main display.
3 Press
4 Press
ENTER
.
5 Press
ENTER
.
6 Press
ENTER
to confirm.
7 Press
To confirm the time display:
Press the CLOCK/TIMER. The time display will appear for
about 10 seconds.
To readjust the clock:
Perform “Setting the clock” from step 1.
Note
• When power supply is restored after unit is plugged in
again or after a power failure, reset the clock.
OPEN/CLOSE
AUDIO IN/LINE
BT AUDIO
CLOCK/TIMER
SLEEP
EQUALIZER
1 STANDBY/ON
CLOCK/TIMER
ENTER
.
HI
to set the day, then press
HI
to set the hour, then press
HI
to set the minute, then press
to turn the power on.
on the remote control.
ENTER
General control
Input function
When the INPUT on main unit is pressed, the current function
will change to different mode. Press the INPUT repeatedly to
select desired function.
Display brightness control
Press DIMMER to dims the display brightness. The
brightness can be controlled in four steps.
Volume auto set-in
If you turn off and on the main unit with the volume set to 31
or higher, the volume starts at 30.
Volume control
Turn the volume knob towards VOLUME (on main unit) or
press VOLUME +/– (on remote control) to increase or
decrease the volume.
CAUTION
• The sound level at a given volume setting depends on
speaker efficiency, location, and various other factors. It
is advisable to avoid exposure to high volume levels. Do
not turn the volume on to full at switch on. Listen to
music at moderate levels. Excessive sound pressure
from earphones and headphones can cause hearing
loss.
Muting
The volume is muted temporarily when pressing the MUTE on
the remote control. Press again to restore the volume.
16
En
Page 17

Getting started 04
English
NIGHT
FLAT A flat and basic sound.
ACTIVE
DIALOGUE
A sound that can be enjoyed
at night even with lower volume.
A powerful sound that
emphasizes low and high tones.
A sound that allows the radio or
vocals to be heard more easily.
Sound controls
Equalizer
When the EQUALIZER is pressed, the current mode setting
will be displayed. To change to a different mode, press the
EQUALIZER repeatedly until the desired sound mode
appears.
P.BASS control
Each time the P.BASS button on the remote control is
pressed, the bass frequency mode will change.
Note
• P.BASS control is initially set to ON.
Bass/treble control
Press the BASS/TREBLE, then press FG/HI to adjust the
bass or treble.
Note
•The EQUALIZER and P.BASS cannot operate
simultaneously. The most recently selected of these two
functions will be the one used.
• BASS/TREBLE can operate alongside either the
EQUALIZER or P.BASS.
When one of the above two functions is
selected, the function that is not selected
will be displayed as follows.
1When
• EQUALIZER : FLAT
2When
• P.BASS : OFF
P.BASS
setting (ON/
EQUALIZER
OFF
) is changed
setting is changed
Setting the wake-up timer
Used to change the existing timer setting, or to set a new
timer.
1 Press
2 Press and hold
3 Press
then press
4 Press
press
5 Press
source, then press
6 Press
press
7 Press
ENTER
8 Press
ENTER
9 Adjust the volume press
press
10 Press
standby mode.
1 STANDBY/ON
HI
to select “ONCE“ or “DAILY“,
ENTER
ONCE – Works once only at a preset time.
DAILY – Works at the preset time on a preset day.
ENTER
• DVD/CD, FM, USB/iPod, BT AUIDIO, AUDIO IN and
LINE can be selected as the playback source.
ENTER
.
HI
to select “
.
HI
to select the timer playback
HI
to select the timer day, then
.
HI
to set the hour, then press
to turn the power on.
CLOCK/TIMER
TIMER
ENTER
.
.
SET“, then
.
HI
to set the minute, then press
.
• Set the time to finish as in steps 7 and 8 above.
ENTER
.
1 STANDBY/ON
•The TIMER indicator lights up.
VOLUME +/–
to enter the power
, then
17
En
Page 18
Getting started04
Calling the wake-up timer
An existing timer setting can be reused.
1 Follow steps 1 to 3 in “Setting the wake-up
timer”.
2 Press
press
HI
ENTER
to select “
.
TIMER ON
“, then
Cancelling the wake-up timer
Turn off the timer setting.
1 Follow steps 1 to 3 in “Setting the wake-up
timer”.
2 Press
press
HI
ENTER
to select “
.
TIMER OFF
“, then
Using the wake-up timer
1 Press
off.
2 At the wake-up time, this unit will turn on
automatically and play the selected input
function.
1 STANDBY/ON
Note
• If at the wake-up time iPod/iPhone/iPad is not
connected to this unit or a disc is not inserted, this unit
will be turned to on and not play back the track.
• Some discs may not be played automatically at the wakeup time.
• When setting the timer set at least one minute between
the start and end time.
to turn the power
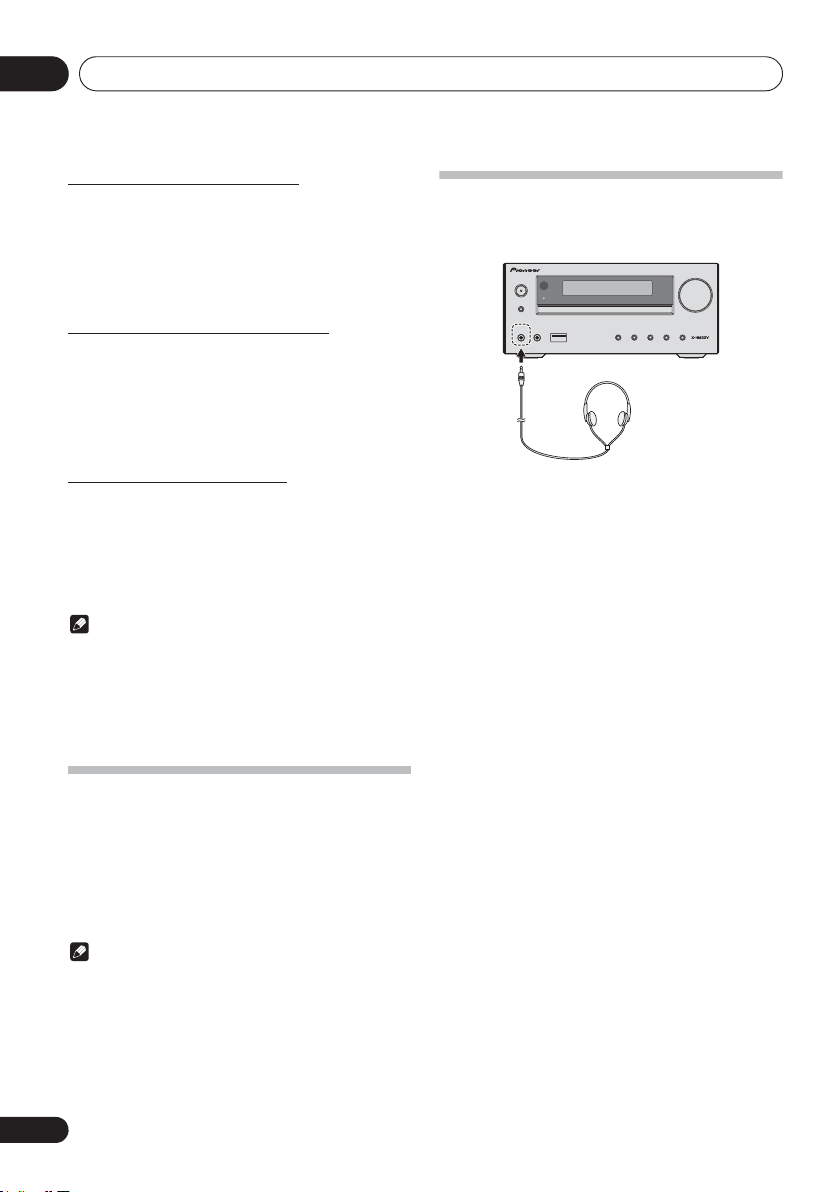
Using Headphones
Connect the headphones plug to the PHONES terminal.
When the headphones are connected, there is no sound
output from the speakers.
STANDBY/ON
TIMER
INPUT
PHONES AUDIO IN
• Do not turn the volume on to full at switch on and listen
to music at moderate levels. Excessive sound pressure
from earphones and headphones can cause hearing
loss.
• Before plugging in or unplugging the headphone,
reduce the volume.
• Be sure your headphone has a 3.5 mm diameter plug
and impedance between 16
recommended impedance is 32
• Audio from the iPod/iPhone/iPad cannot be heard via
the headphones connected to the unit. “HP MUTE” will
be displayed if you connect the headphones when the
iPod/iPhone/iPad function is selected.
: and 50 :. The
VOLUME
:.
Using the sleep timer
The sleep timer switches off the unit after a specified time so
you can fall asleep without worrying about it.
1 Press
time.
Choose between 10 min, 20 min, 30 min, 60 min, 90 min, 120
min, 150 min, 180 min or OFF. The newly set value displays for
5 seconds, and then the setting is completed.
18
En
SLEEP
repeatedly to select a switch off
Note
• The sleep timer can be set by pressing SLEEP while the
remaining time is displayed.
Page 19
iPod/iPhone/iPad playback 05
English
Chapter 5:
iPod/iPhone/iPad playback
Merely by connecting your iPod/iPhone/iPad to this unit, you
can enjoy high-quality sound from your iPod/iPhone/iPad.
This unit can not transfer music, movies and images from an
iPod/iPhone/iPad via the HDMI OUT and COMPONENT
VIDEO terminal. Playback setting for iPod/iPhone/iPad music
and images can be performed from this unit or the iPod/
iPhone/iPad itself.
Confirming what iPod/iPhone/iPad
models are supported
The iPod/iPhone/iPad playable on this unit are shown below.
iPod/iPhone/iPad USB Terminal (Audio only)
iPod nano (3/4/5/6/7G)
iPod touch (1/2/3/4/5G)
iPhone 5
iPhone 5s
iPhone 5c
iPhone 4s
iPhone 4
iPhone 3GS
iPhone 3G
iPhone
iPad mini
iPad mini with Retina display
iPad Air
iPad (3/4G)
iPad/iPad 2
• For detailed instructions on using the iPod/iPhone/iPad,
please refer to the manual supplied with the iPod/
iPhone/iPad.
• This system has been developed and tested for the
software version of iPod/iPhone/iPad indicated on the
website of Pioneer (http://pioneer.jp/homeav/support/
ios/eu/).
• Installing software versions other than indicated on the
website of Pioneer to your iPod/iPhone/iPad may result
in incompatibility with this system.
• This unit cannot be used to record CD, tuner or other
content on an iPod/iPhone/iPad.
Connecting your iPod/iPhone/iPad
CAUTION
• When connecting iPod/iPhone/iPad devices, use the
iPod/iPhone/iPad cable provided with iPod/iPhone/iPad
devices, or a commercially available iPod/iPhone/iPad
cable designed to support iPod/iPhone/iPad.
• An iPod/iPhone/iPad cable is not supplied with this unit.
Important
• If you are mounting the protective cover of a
commercially available iPod/iPhone/iPad, you may not
be able to connect iPod/iPhone/iPad to this unit.
Connecting iPod/iPhone/iPad using
supplied stand
1 Connect the unit to an iPod/iPhone/iPad
with a iPod/iPhone/iPad cable.
Note
• Pioneer does not guarantee that this unit plays iPod/
iPhone/iPad models other than the ones specified.
• Some functions may be restricted depending on the
model or software version.
• iPod/iPhone/iPad is licensed for reproduction of noncopyrighted materials or materials the user is legally
permitted to reproduce.
• Features such as the equalizer cannot be controlled
using this system, and we recommend switching the
equalizer off before connecting.
• Pioneer cannot under any circumstances accept
responsibility for any direct or indirect loss arising from
any inconvenience or loss of recorded material resulting
from iPod/iPhone/iPad failure.
iPod/iPhone/iPad cable
19
En
Page 20

iPod/iPhone/iPad playback05
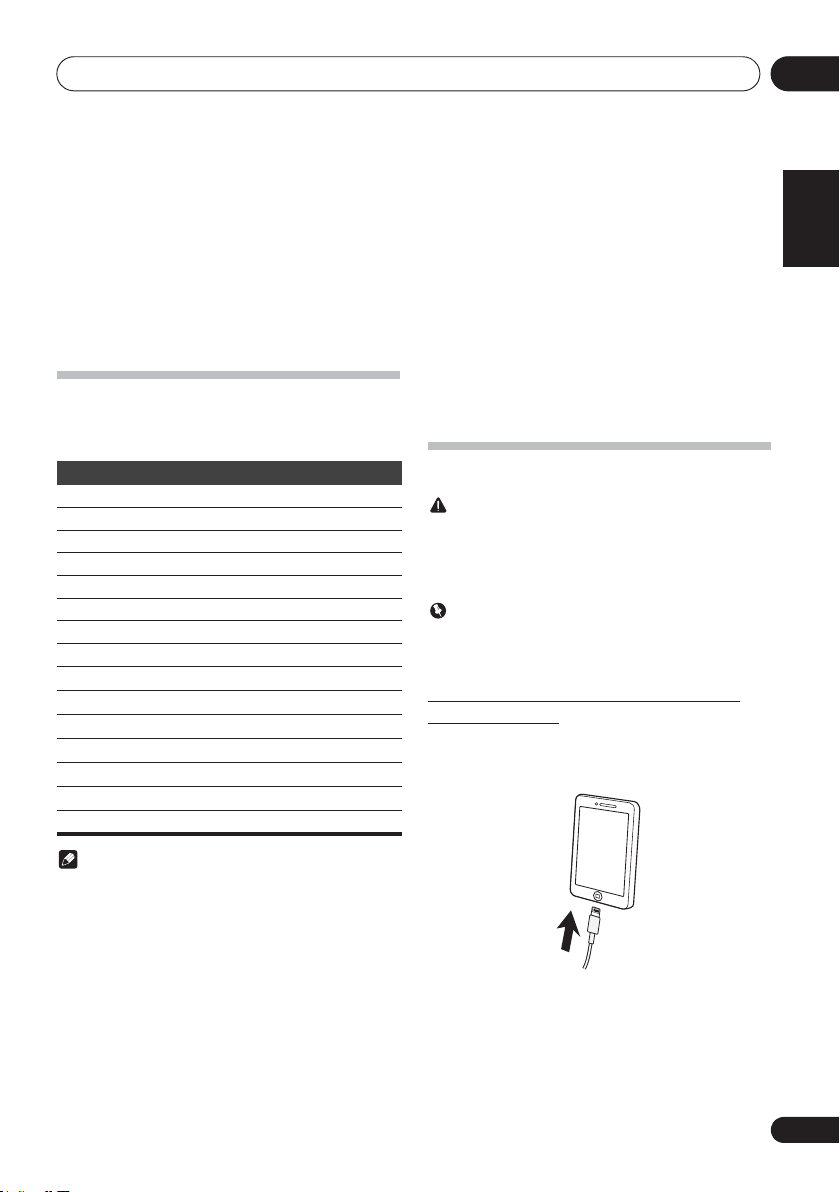
2 Set up to stand the iPod/iPhone/iPad.
When using an iPod/iPhone
Make sure the iPod/iPhone cable is aligned along the groove
for it on the back of the stand that comes with the unit.
Back of stand
iPod/iPhone
cable
When using an iPad
Make sure to place the iPad in a horizontal direction on the
stand.
Playing iPod/iPhone/iPad
1 Connect your iPod/iPhone/iPad.
• If an iPod/iPhone/iPad is connected while the unit is
turned on, playback of the iPod/iPhone/iPad will not
begin.
2Press
“USB/iPod” is shown on the main display.
3 When the recognition is completed, will
begin playing automatically.
If this unit cannot play your iPod/iPhone/iPad, perform the
following troubleshooting checks:
If the iPod/iPhone/iPad cannot be operated, check the
following items:
USB
as the input source.
• The available iPod/iPhone/iPad playback control from
the unit are !, + ), *,.
CAUTION
• When your iPod/iPhone/iPad is connected to this unit
and you wish to operate the iPod/iPhone/iPad directly,
be sure to steady the iPod/iPhone/iPad with the other
hand to prevent malfunctions due to faulty contacts.
Note
• For detailed instructions on using the iPod/iPhone/iPad,
please refer to the manual supplied with the iPod/
iPhone/iPad.
• iPod/iPhone/iPad recharging occurs whenever an iPod/
iPhone/iPad is connected to this unit. (This function is
supported in standby mode as well.)
• When input is switched from USB/iPod to another
function, iPod/iPhone/iPad playback is temporarily
stopped.
• When iPod/iPhone/iPad is not playing and no operations
have been performed for more than 20 minutes, the unit
will automatically power off. In this case it is required
that the Auto power off is switched to
• Auto power off can be switched to
Important
• Check whether the iPod/iPhone/iPad is supported by
this unit.
• Reconnect the iPod/iPhone/iPad to the unit. If this
doesn’t seem to work, try resetting your iPod/iPhone/
iPad.
• Check the iPod/iPhone/iPad software is supported by
this unit.
• Is the iPod/iPhone/iPad connected correctly?
Reconnect the iPod/iPhone/iPad to the unit.
• Is the iPod/iPhone/iPad experiencing a hangup? Try
resetting the iPod/iPhone/iPad, and reconnect it to the
unit.
ON.
ON/OFF (page 45).
20
En
Page 21
Disc playback 06
English
Chapter 6:
Disc playback
Playing discs or files
1 Press
The selected input is displayed on the front panel display.
2 Press
INPUT
DVD/CD
Please wait until you see the “NO DISC“.
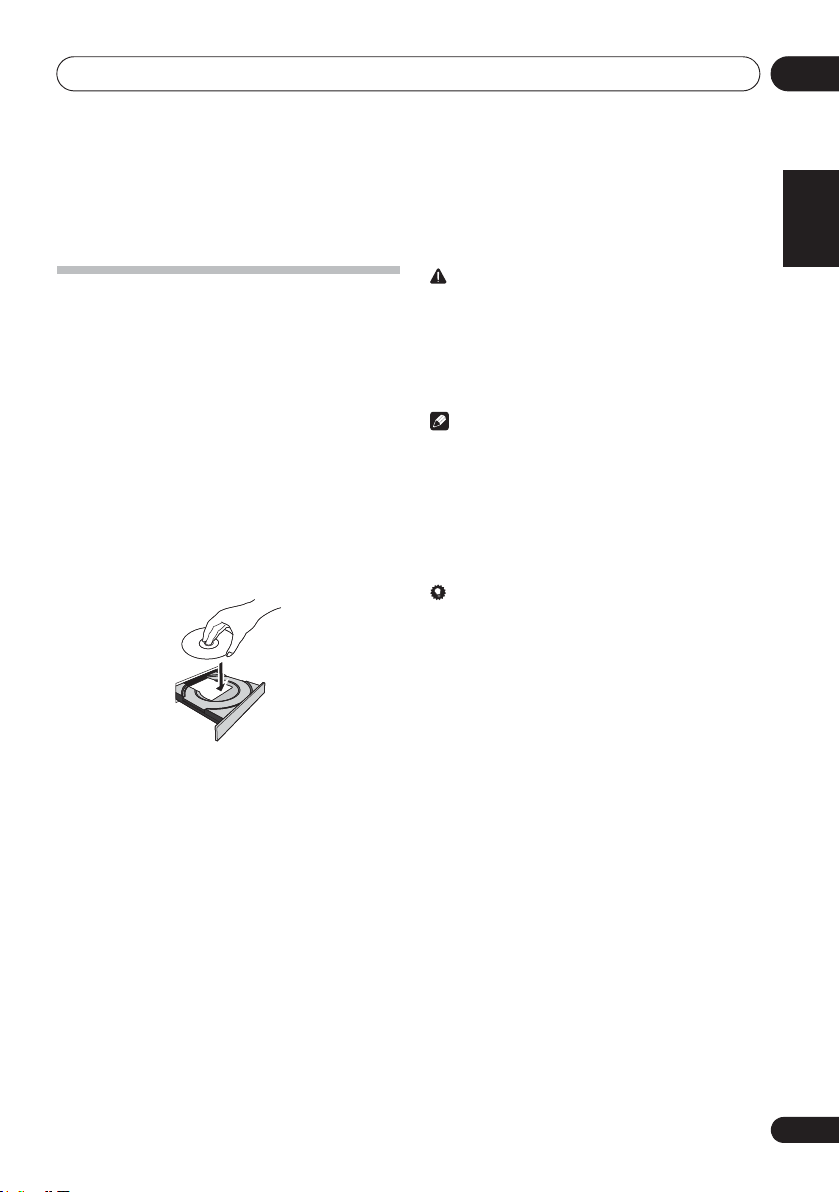
When a disc is already on the disc tray, press $ OPEN/CLOSE
to eject the disc.
3 Press
4 Place the disc on the disc tray, label side up.
5 Press
6 Press
1 STANDBY/ON
• When playing discs or files, turn the TV on and switch TV
input before starting.
• You can change the screen display language of the unit
(Display settings on page 37).
DVD/CD
to turn the power on.
on the remote control or
repeatedly on the main unit to select
input.
$ OPEN/CLOSE
$ OPEN/CLOSE
!
to start playback.
to open the disc tray.
to close the disc tray.
CAUTION
• Do not place two discs in one disc tray.
• Do not play discs of special shapes (heart, octagon, etc).
It may cause malfunctions.
• Do not push the disc tray whilst it is moving.
• If the power fails whilst the tray is open, wait until the
power is restored.
• Be sure to place 8 cm disc in the middle of the disc tray.
Note
• Due to the structure of the disc information, it takes longer
to read the disc has written by many files than a normal CD
(approximately 20 to 90 seconds).
• When the beginning of the first tr ack is reached during fast
reverse, the unit will enter the playback mode.
• Rewritable multi-session discs with unfinished writing, can
still be played.
• If TV or radio interference occurs during DVD/CD
operation, move the unit away from the TV or radio.
Tip
• When no operation has done in DVD/CD mode and the
audio file is not played for more than 20 minutes, the
power will automatically turn off. In this case it is
required that the Auto power off is switched to ON.
• Auto power off can be switched to ON/OFF (page 45).
21
En
Page 22
Disc playback06
Move Select ENTER Exit
HOME MENU
Play Mode
Setup playback functions such as Program. Random and
Repeat play
A(Start Point)
B(End Point)
Off
A-B Repeat
Repeat
Random
Program
Search Mode
Move Select ENTER Exit
HOME MENU
Play Mode
Setup playback functions such as Program. Random and
Repeat play
A(Start Point)
B(End Point)
Off
A-B Repeat
Repeat
Random
Program
Search Mode
Advanced DVD, CD disc playback
STANDBY/ON
DVD/CD USB TUNER
AUDIO SUBTITLE ANGLE
123
ZOOM MEMORY PROGRAM
456
ST/MONO VIDEO MODE A-B
789
CLEAR RPT/RDM
TOP MENU MENU/PBC
BT AUDIO
0
TUNE+
OPEN/CLOSE
CLOCK/TIMER
BASS/TREBLE
AUDIO IN/LINE
SLEEP
EQUALIZER
P.B AS S
DISPLAY
Direct track search
By using the number buttons (0 to 9), you can specify and play
the title, chapter, track or file you want to view/listen to.
Use the numeric buttons on the remote control to
select the desired title, chapter, track or file whilst
playing the selected disc.
Note
• The title, chapter, track or file number higher than the
number of titles, chapters, tracks or files on the disc
cannot be selected.
• During random play, direct track search is not possible.
To stop playback:
Press #.
0
TOP MENU MENU/PBC
TUNE+
ENTER
HOME MENU
PRESET VOLUME
+
–
RDS
SHIFT
RETURN
TUNE–
+
MUTE
–
DIMMER
ASPM PTY DISPLAY
A-B Repeat play
The specified section within a single title or track is played
repeatedly.
1Press
The HOME MENU is displayed.
2Use FG to select
ENTER.
The Play Mode screen is displayed.
3Use FG to select
ENTER or
4Use
HOME MENU
Audio Settings
Play Mode
Initial Settings
.
HOME MENU
DVD
Video Adjust
Disc Navigator
Play Mode
A-B Repeat
I
.
FG
to select the A(Start Point).
, then press
, then press
22
En
5Use
FG
to select the B(End Point).
Page 23
Disc playback 06
English
Move Select ENTER Exit
HOME MENU
Play Mode
Setup playback functions such as Program. Random and
Repeat play
A(Start Point)
B(End Point)
Off
A-B Repeat
Repeat
Random
Program
Search Mode
Move Select ENTER Exit
HOME MENU
Play Mode
Setup playback functions such as Program. Random and
Repeat play
Title Repeat
Chapter Repeat
Repeat Off
A-B Repeat
Repeat
Random
Program
Search Mode
Note
• When A-B repeat playback starts, “A-B repeat” will be
displayed on the screen.
• A-B repeat play is disabled on some discs.
• A-B repeat play for DVD is possible only within a title.
• A-B repeat play for CD is possible only within a track.
• Some scenes on DVD may not allow A-B repeat play.
To cancel
1Use FG to select the
A-B
repeat play:
Off
.
Repeat play
Plays titles, chapters, tracks or files repeatedly.
1 Follow steps 1 to 2 in “A-B Repeat play”.
FG
2Use
I
or
3Use
“REPEAT TITLE” is displayed on the main display.
to select
.
FG
to select the Title Repeat.
Repeat
, then press ENTER
To cancel repeat play:
1 Use FG to select the
“REPEAT OFF” is displayed on the main display.
Play Mode
A-B Repeat
Repeat
Random
Program
Search Mode
Setup playback functions such as Program. Random and
Repeat play
Move Select ENTER Exit
Title Repeat
Chapter Repeat
Repeat Off
Repeat Off
.
HOME MENU
Random play
Plays titles, chapters or tracks in random order.
1 Follow steps 1 to 2 in “A-B Repeat play”.
FG
2 Use
ENTER or
3 Use
“RANDOM TITLE” is displayed on the main display.
to select
I
.
FG
to select the Random Title.
Play Mode
A-B Repeat
Repeat
Random
Program
Search Mode
Random
Random Title
Random Chapter
Random Off
, then press
Note
• The display shown is when DVD is played.
• After performing repeat play, be sure to press #.
Otherwise, the disc will play continuously.
• During repeat play, random play is not possible.
Setup playback functions such as Program. Random and
Repeat play
Move Select ENTER Exit
HOME MENU
Note
• The display shown is when DVD is played.
• If you press the , during random play, you can move
to the track selected next by the random operation. On
the other hand, the + does not allow you to move to
the previous track. The beginning of the track being
played will be located.
• In random play, the unit will select and play tracks
automatically. (You cannot select the order of the
tracks.)
• During random play, repeat play is not possible.
23
En
Page 24
Disc playback06
Move Select ENTER Exit
HOME MENU
Play Mode
Setup playback functions such as Program. Random and
Repeat play
Random Title
Random Chapter
Random Off
A-B Repeat
Repeat
Random
Program
Search Mode
Move Select ENTER Exit
HOME MENU
Play Mode
Setup playback functions such as Program. Random and
Repeat play
Create/Edit
Playback Start
Playback Stop
Program Delete
A-B Repeat
Repeat
Random
Program
Search Mode
To cancel random play:
1Use FG to select the
“RANDOM OFF” is displayed on the main display.
Random Off
.
Programmed play
You can choose up to 24 selections for playback in the order
you like.
1 Follow steps 1 to 2 in “A-B Repeat play”.
FG
.
I
FG
to select
.
to select
2Use
ENTER or
3Use
ENTER
The Create/Edit screen differs according to the disc or file.
Program
, then press
Create/Edit
, then press
4Use F
track or file, then press
• To add to a program, first select the place in the program
•Press RETURN to return to the previous screen. If you
GHI
Program
Program Step
01.
02.
03.
04.
05.
06.
07.
08.
Move Select ENTER Exit
(the program step), next select the title, chapter or track,
then press ENTER (files are added at the end of
program).
return to the previous screen when inputting it, the
settings you have programmed are cleared.
to select the title, chapter,
ENTER
.
Play
Chapter 1 - 004
Chapter 001
Chapter 002
Chapter 003
Chapter 004
Title 1 - 05
Title 01
Title 02
Title 03
Title 04
Title 05
Chapter : 001Current Title : 01
HOME MENU
• To delete a step, highlight it and press CLEAR.
5Press .
Playback will start.
Note
• To play a program that has already been set, select
Playback Start from the program screen, then press
ENTER.
• To resume normal playback, select Playback Stop from
the program screen, then press ENTER. The program
remains in memory.
• To cancel the entire program, select Program Delete
from the program screen, then press ENTER.
• Programs can be played repeatedly. Select Program
Repeat from Repeat on the Play Mode screen during
programmed playback.
• Programs cannot be played in random order (random
play is not possible during programmed play).
24
En
Page 25

Disc playback 06
English
Move Select ENTER Exit
HOME MENU
Play Mode
Setup playback functions such as Program. Random and
Repeat play
Title Search
Chapter Search
Time Search
A-B Repeat
Repeat
Random
Program
Search Mode
Move Select ENTER Exit
HOME MENU
Input Title
Play Mode
Setup playback functions such as Program. Random and
Repeat play
Title Search
Chapter Search
Time Search
A-B Repeat
Repeat
Random
Program
Search Mode
0
1
ROOT
(FOLDER 1)
FOLDER A
(FOLDER 2)
FOLDER B
(FOLDER 3)
FILE 9
FILE 10
FILE 3
FILE 4
FILE 5
FILE 6
FILE 7
FILE 8
FOLDER E
(FOLDER 6)
FOLDER C
(FOLDER 4)
FOLDER D
(FOLDER 5)
FILE 1
FILE 2
Search mode
Plays the specified number or time within the title, chapter,
track or file.
1 Follow steps 1 to 2 in “A-B Repeat play”.
FG
2Use
to select
ENTER.
FG
3Use
ENTER or
to select
I
.
4 Use the numeric buttons to select
Title
.
Search Mode
Title search
, then press
, then press
Input
About downloading MP3/WMA
There are many music sites on the internet that you can
download MP3/WMA music files. Follow the instructions
from the website on how to download the music files. You can
then play back these downloaded music files by burning them
to a CD/DVD disc.
• Your downloaded song/files are for personal use only.
Any other usage of the song without owner’s
permission, is against the law.
About playback order
Will be played in order from the file that is stored in the upper
folder.
Ex.
The file will be played in order listed above.
25
En
Page 26
Disc playback06
STANDBY/ON
DVD/CD USB TUNER
AUDIO IN/LINE
TOP MENU MENU/PBC
TUNE+
123
456
789
0
BT AUDIO
CLOCK/TIMER
SLEEP
EQUALIZER
AUDIO SUBTITLE ANGLE
P.B AS S
ZOOM MEMORY PROGRAM
BASS/TREBLE
ST/MONO VIDEO MODE A-B
DISPLAY
CLEAR RPT/RDM
OPEN/CLOSE
TOP MENU MENU/PBC
HOME MENU
PRESET VOLUME
+
MUTE
TUNE–
TUNE+
DIMMER
–
+
–
RETURN
789
0
DISPLAY
CLEAR RPT/RDM
ENTER
Move Select ENTER
MP3 / WMA / JPEG
DivX
Procedure to playback DivX or MP3/
WMA/JPEG file
To play by specifying a file.
1 Press
2 Press
JPEG.
If DivX, MP3, WMA or JPEG files are mixed in the disc.
DVD/CD
FG
.
to select DivX or MP3/WMA/
3 Press FGto select desired playback the
file.
00:00 / 00:00
320kbps
/ TEST / WMA /
_ _ _ _
WMA
_ _ _ _
WMA
_ _ _ _
26
En
4 Press ENTER.
Playback will start.
Page 27
USB playback 07
English
PHONES AUDIO IN
USB storage device
(commercially available)
STANDBY/ON
DVD/CD USB TUNER
AUDIO IN/LINE
TOP MENU MENU/PBC
TUNE+
123
456
789
0
BT AUDIO
CLOCK/TIMER
SLEEP
EQUALIZER
AUDIO SUBTITLE ANGLE
P.B AS S
ZOOM MEMORY PROGRAM
BASS/TREBLE
ST/MONO VIDEO MODE A-B
DISPLAY
CLEAR RPT/RDM
OPEN/CLOSE
TOP MENU MENU/PBC
HOME MENU
PRESET VOLUME
+
MUTE
TUNE–
TUNE+
DIMMER
–
+
–
RETURN
789
0
DISPLAY
CLEAR RPT/RDM
ENTER
Chapter 7:
USB playback
Procedure to playback DivX or MP3/
Playing USB storage devices
It is possible to listen to two-channel audio using the USB
interface on the front of this receiver.
• Pioneer does not guarantee that any file recorded on a
USB storage device will play or that power will be
supplied to a USB storage device. Also note that Pioneer
will accept no responsibility whatsoever for loss of files
on USB storage devices caused by connection to this
unit.
1 Press
“USB/iPod” is shown on the main display.
2 Connect the USB storage device.
“GUI” appear on the main display automatically.
USB
as the input source.
• This receiver does not support a USB hub.
• If an iPod/iPhone/iPad is connected to the unit, the unit
will automatically begin charging it.
WMA/JPEG file
To play by specifying a file.
1 Press
2 Press
JPEG.
If DivX, MP3, WMA or JPEG files are mixed in the USB storage
device.
USB
.
FG
to select DivX or MP3/WMA/
3 When the recognition is completed, press
!
to start playback.
• When changing to a different input source, stop the USB
memory playback first before changing.
4 Disconnect USB storage device from the USB
terminal.
Turn the power off before removing the USB storage device.
Note
• USB flash drive that supports USB 2.0 can be used.
• This unit may not recognize a USB storage device, play
files or supply power to a USB storage device. For
details, see When a USB storage device is connected on
page 39.
• When a USB storage device is not playing and no
operations have been performed for more than 20
minutes, the unit will automatically power off. In this case
it is required that the Auto power off is switched to
• Auto power off can be switched to ON/OFF (page 45).
ON
DivX
MP3 / WMA / JPEG
Move Select ENTER
.
27
En
Page 28

USB playback07
3 Press FGto select desired playback file.
00:00 / 00:00
320kbps
/ TEST / MP3 /
_ _ _ _
MP3
_ _ _ _
MP3
_ _ _ _
4 Press ENTER.
Playback will start.
Playing in the desired order
(Programmed Play)
This unit can play repeatedly folders stored in the USB
storage device. For details, see Programmed play on page 24.
28
En
Page 29
Using the tuner 08
English
STANDBY/ON
DVD/CD USB TUNER
AUDIO IN/LINE
TOP MENU MENU/PBC
TUNE+
123
456
789
0
BT AUDIO
CLOCK/TIMER
SLEEP
EQUALIZER
AUDIO SUBTITLE ANGLE
P.B AS S
ZOOM MEMORY PROGRAM
BASS/TREBLE
ST/MONO VIDEO MODE A-B
DISPLAY
CLEAR RPT/RDM
OPEN/CLOSE
ASPM PTY DISPLAY
RDS
TOP MENU MENU/PBC
HOME MENU
PRESET VOLUME
SHIFT
+
MUTE
TUNE–
TUNE+
DIMMER
–
+
–
RETURN
0
ENTER
Chapter 8:
Using the tuner
Listening to the radio broadcasts
The following steps show you how to tune in to FM radio
broadcasts using the automatic (search) and manual (step)
tuning functions. Once you are tuned to a station you can
memorize the frequency for recall later. See Saving station
presets below for more on how to do this.
Tuning
1 Press the
on.
2 Press
3 Press
tune in to the desired station.
Automatic tuning:
Press and hold TUNE +/–, scanning will start automatically
and the tuner will stop at the first receivable broadcast
station.
Manual tuning:
Press the TUNE +/– repeatedly to tune in to the desired
station.
Note
• When radio interference occurs, automatic tuning may
stop automatically at that point.
• Automatic tuning will skip weak signal stations.
• To stop the automatic tuning, press #.
• When an RDS (Radio Data System) station is tuned in,
the frequency will be displayed first. Finally, the station
name will appear.
• Full auto tuning can be achieved for RDS stations using
Auto Station Program Memory (ASPM) mode, see
page 31.
TUNER
TUNE +/–
1 STANDBY/ON
to turn the power
.
on the remote control to
To receive an FM stereo transmission:
• Press ST/MONO to select stereo mode and “AUTO” will
be displayed.
Improving poor FM reception:
1 Press ST/MONO repeatedly to select MONO.
This will change the tuner from stereo to mono and usually
improve the reception.
Saving station presets
If you often listen to a particular radio station, it’s convenient
to have the receiver store the frequency for easy recall
whenever you want to listen to that station (Preset tuning).
This saves the effort of manually tuning in each time. This unit
can memorize up to 40 stations.
0
TOP MENU MENU/PBC
TUNE+
ENTER
HOME MENU
PRESET VOL UME
+
–
TUNE–
MUTE
RETURN
+
–
1 Tune to a station you want to memorize.
See Tuning above for more on this.
2 Press
The preset number will flash.
3 Press
MEMORY
PRESET +/–
.
to select the preset
channel number.
4 Press
memory.
If the preset number has changed from flashing to lighting,
before the station is memorised, repeat the operation from
step 2.
MEMORY
• Repeat steps 1 - 4 to set other stations, or to change a
preset station. When a new station is stored in the
memory, the station previously memorised for that
preset channel number will be erased.
to store that station in
Note
• The backup function protects the memorised stations for
a few hours should there be a power failure or the AC
power cord become disconnected.
BT AUDIO
CLOCK/TIMER
0
SLEEP
EQUALIZER
P.B AS S
BASS/TREBLE
DISPLAY
TUNE+
AUDIO SUBTITLE ANGLE
123
ZOOM MEMORY PROGRAM
4 5 6
ST/MONO VIDEO MODE A-B
789
CLEAR RPT/RDM
TOP MENU MENU/PBC
29
En
Page 30

Using the tuner08
To recall a memorised station
1 Press
station.
PRESET +/–
to select the desired
To scan the preset stations
The stations saved in the memory can be scanned
automatically. (Preset memory scan)
1 Press and hold
The preset number will appear and the programmed stations
will be tuned in sequentially, for 5 seconds each.
2 Press
PRESET +/–
PRESET +/–
.
again when the desired
station is located.
To erase entire preset memory
1 Press
2 Press
appears.
TUNER
on the remote control.
CLEAR
until “MEMORY CLEAR”
Note
• All stations will be erased.
Using the Radio Data System (RDS)
An introduction to RDS
Radio Data System (RDS) is a system used by most FM radio
stations to provide listeners with various kinds of
information—the name of the station and the kind of show
they’re broadcasting, for example.
One feature of RDS is that you can search by type of program.
For example, you can search for a station that’s broadcasting
a show with the program type, JAZZ.
You can search the following program types:
News – News
Current Affairs – Current
Affairs
Information – General
Information
Sport – Sport
Education – Educational
Drama – Radio plays, etc.
Cultures – National or regional
culture, theater, etc.
Science – Science and
technology
Varied Speech – Usually talkbased material, such as quiz
shows or interviews.
Pop Music – Pop music
Rock Music – Rock music
Easy Listening – Easy
listening
Light Classics M – ‘Light’
classical music
Serious Classics – ‘Serious’
classical music
Other Music – Music not
fitting above categories
Weather & Metr – Weather
reports
Finance – Stock market
reports, commerce, trading,
etc.
Children’s Progs – Programs
for children
Social Affairs – Social affairs
Religion – Programs
concerning religion
Phone In – Public expressing
their views by Phone
Travel & Touring – Holidaytype travel rather than traffic
announcements
Leisure & Hobby – Leisure
interests and hobbies
Jazz Music – Jazz
Country Music – Country
music
National Music – Popular
music in a language other than
English
Oldies Music – Popular music
from the ‘50s and’ 60s
Folk Music – Folk music
Documentary – Documentary
Alarm Test – Broadcasting
when testing emergency
broadcast equipment or
receivers.
Alarm – Alarm!
Searching for RDS programs
You can search a program type listed above.
1Press
2 Press RDS
“SELECT” will appear for about 6 seconds.
3Press
want to hear.
Each time the button is pressed, the program type will appear.
If the button is held down, the program type will appear
continuously.
4 Whilst the selected program type is
displayed (within 6 seconds), Press RDS
again.
After the selected program type has been lit for 2 seconds,
“SEARCH” will appear, and the search operation will start.
TUNER
on the remote control.
PTY
on the remote control.
HI
to select the program type you
PTY
Note
• If the display has stopped flashing, start again from step
2. If the unit finds a desired program type, the
corresponding channel number will be lit for about 8
seconds, and then the station name will be displayed.
• If you want to listen to the same program type of another
station, press the RDS PTY whilst the channel number or
station name is flashing. The unit will look for the next
station.
30
En
Page 31

Using the tuner 08
English
STANDBY/ON
DVD/CD USB TUNER
AUDIO IN/LINE
TOP MENU MENU/PBC
TUNE+
123
456
789
0
BT AUDIO
CLOCK/TIMER
SLEEP
EQUALIZER
AUDIO SUBTITLE ANGLE
P.B AS S
ZOOM MEMORY PROGRAM
BASS/TREBLE
ST/MONO VIDEO MODE A-B
DISPLAY
CLEAR RPT/RDM
OPEN/CLOSE
ASPM PTY DISPLAY
RDS
TOP MENU MENU/PBC
HOME MENU
PRESET VOLUME
SHIFT
+
MUTE
TUNE–
TUNE+
DIMMER
–
+
–
RETURN
ENTER
Station name (PS) Programme type (PTY)
Frequency Radio text (RT)
No RDS
FM 98.80 MHz
• If no station can be found, “NOT FOUND” will appear for
4 seconds.
Information provided by RDS
Each time the
as follows:
When tuning in to a station other than an RDS station or to an
RDS station which sends weak signal, the display will change
in the following order:
RDS
DISPLAY is pressed, the display will switch
Using the Auto Station Program
Memory (ASPM)
Whilst in the ASPM operation mode, the tuner will
automatically search for new RDS stations. Up to 40 stations
can be stored.
If you have already stored some stations in memory, the
number of new stations you can store will be less.
1 Press
2 Press and hold down RDS ASPM on the
remote control.
After “ASPM” has flashed for about 4 seconds, scanning will
start (87.5 MHz to 108 MHz).
After scanning, the number of stations stored in memory will
be displayed for 4 seconds, and then “END” will appear for 4
seconds.
TUNER
on the remote control.
To stop the ASPM operation before it is
complete:
Press # whilst it is scanning for stations. The stations which
are already stored in memory will be kept there.
Note
• If the same station is broadcasting on different
frequencies, the strongest frequency will be stored in
memory.
• Any station which has the same frequency as the one
stored in memory will not be stored.
• If 40 stations have already been stored in memory, the
scan will be aborted. If you want to redo the ASPM
operation, erase the preset memory.
• If no station have been stored in memory, “NOT FOUND”
will appear for about 4 seconds.
• If the RDS signals are very weak, station names may not
be stored in memory.
• The same station name can be stored in different
channels.
• In a certain area or during certain time periods, the
station names may temporarily be different.
Notes for RDS operation
If any of the following events occur, it does
not mean that the unit is faulty:
• “PS”, “NO PS” and a station name appear alternately,
and properly.
• If a particular station is not broadcasting properly or a
station is conducting tests, the RDS reception function
may not work properly.
• When you receive an RDS station whose signal is too
weak, information like the station name may not be
displayed.
• “NO PS”, “NO PTY” or “NO RT” will flash for about 5
seconds, and then the frequency will be displayed.
Notes for radio text:
• The first 16 characters of the radio text will appear and
then they will scroll across the display.
• If you tune in to an RDS station which is not
broadcasting any radio text, “NO RT” will be displayed
when you switch to the radio text position.
• Whilst radio text data is received or when the text
contents change, “RT” will be displayed.
31
En
Page 32

Other connections09
STANDBY/ON
INPUT
VOLUME
PHONES AUDIO IN
TIMER
VIDEO
OUT
OUT
COMPONENT
VIDEO
OUT
IN
LINE
PB
PR
Y
L
R
HDMI
Chapter 9:
Other connections
CAUTION
• Before making or changing the connections, switch off
the power and disconnect the power cord from the AC
outlet.
Connect the rear panel LINE IN audio jacks to your auxiliary
playback component.
This unit’s rear panel
Connecting auxiliary components
Connect the front panel AUDIO IN mini-plug jack to your
auxiliary playback component.
• This method can be used to play music on this unit from
iPods/iPhones/iPads that do not support use of the USB
terminal.
PHONES AUDIO IN
Stereo mini-plug
cable (commercially
available)
1 Press
When AUDIO IN is selected, “AUDIO IN” will be displayed on
the main display.
AUDIO IN/LINE
Note
•If the AUDIO IN mini-plug jack is connected to auxiliary
phones jack, the volume of the unit will be adjusted by
the volume on the playback component. If the sound is
distorted after you lower the volume of the unit, try
lowering the volume on the auxiliary playback
component.
Portable audio player, etc.
as the input source.
TV
Audio cable
(commercially available)
1Press
AUDIO IN/LINE
twice as the input
source.
When LINE is selected, “LINE” will be displayed on the main
display.
32
En
Page 33

Bluetooth
® Audio playback
10
Chapter 10:
Bluetooth® Audio playback
Music playback using
technology
Bluetooth wireless technology
Bluetooth wireless technology
Device not equipped with Bluetooth
Bluetooth
Music data
The unit is capable of playing back music stored on Bluetooth
capable devices (cell phones, digital music players etc.)
wirelessly. You can also use a Bluetooth audio transmitter
(sold separately) to enjoy music from devices that do not have
Bluetooth functionality. Please refer to the user’s manual for
your Bluetooth capable device for more details.
Note
•The Bluetooth
trademarks owned by Bluetooth SIG, Inc. and any use of
such marks by PIONEER CORPORATION is under
license. Other trademarks and trade names are those of
their respective owners.
•The Bluetooth wireless technology enabled device must
support A2DP profiles.
• Pioneer does not guarantee proper connection and
operation of this unit with all Bluetooth wireless
technology enabled devices.
®
word mark and logos are registered
Bluetooth
enabled device:
Cell phone
enabled device:
Digital music player
wireless technology:
Digital music player
+
®
audio transmitter
(commercially available)
wireless
Remote control operation
The remote control supplied with this unit allows you to play
and stop media, and perform other operations.
Note
•The Bluetooth wireless technology enabled device must
support AVRCP profiles.
• Remote control operations cannot be guaranteed for all
Bluetooth wireless technology enabled devices.
Pairing with the unit (Initial registration)
In order for the unit to playback music stored on a Bluetooth
capable device, pairing must first be performed. Pairing
should be performed when first using the unit with the
Bluetooth capable device, or when the pairing data on the
device has been erased for any reason.
Pairing is a step required to allow communication using
Bluetooth wireless technology to be carried out.
• Pairing is only performed the first time that you use the
unit and the Bluetooth capable device together.
• In order to allow communication using Bluetooth
wireless technology to take place, pairing must be
performed on both the unit and the Bluetooth capable
device.
• After pressing the BT AUDIO and switching to BT
AUDIO input, perform the pairing procedure on the
Bluetooth capable device. If pairing has been performed
correctly, you will not need to perform the pairing
procedures for the unit as shown below.
Please refer to the user’s manual for your Bluetooth capable
device for more details.
1
Press the 1STANDBY/ON and turn the
power to the unit on.
2 Press the
The unit switches to BT AUDIO and PAIRING will be
displayed.
3 Turn on the power to the Bluetooth capable
device that you wish to pair with, and perform
pairing procedure on it.
Note
• This unit will be displayed as “X-HM32V” on all Bluetooth
capable devices that you have.
Pairing will start.
•Place the Bluetooth capable device close to the unit.
BT AUDIO
English Français Español
.
33
En
Page 34

10
Bluetooth
® Audio playback
• Please refer to the user’s manual for your Bluetooth
capable device for details on when pairing can be
performed and the procedures required for pairing.
• When PIN code entry is requested, enter “0000.” (This
unit does not accept any PIN code setting other than
“0000.”)
4 Confirm on the Bluetooth capable device
that pairing has been completed.
If pairing with the Bluetooth capable device has been
completed correctly, the name of the Bluetooth capable
device will be displayed on the front panel of the unit. (Only
single-byte alphanumeric characters can be displayed. Any
character that cannot be displayed will be indicated by a “*”.)
Listen to music on the unit from a
Bluetooth
1 Press the
The unit will switch to BT AUDIO input.
2A Bluetooth connection will be created
between the Bluetooth capable device and the
unit.
Procedures for connecting to the unit should be performed
from the Bluetooth capable device.
• Please refer to the user’s manual for your Bluetooth
3 Playback music from the Bluetooth capable
device.
Note
• When Bluetooth capable devise is not playing and no
• Auto power off can be switched to ON/OFF (page 45).
BT STANDBY
• The following can be done when the unit is on standby
• By selecting a Bluetooth capable device that already has
BT STANDBY settings
•Switch ON/OFF by long pressing the INPUT button
• When the power is ON, long press the INPUT button.
• The setting operation can only be performed by using the
capable device
BT AUDIO
capable device for details of the connection procedures.
operations have been performed for more than 20
minutes, the unit will automatically power off. In this
case it is required that the Auto power off is switched to
ON.
with the BT STANDBY switched ON.
a connection history (pairing has already been
conducted) with this unit, this unit will automatically
turn on with the BT AUDIO function.
located on the top of the unit for 3 seconds.
This cannot be operated if the power is not on.
INPUT button on the unit. The setting cannot be
performed using the remote control.
.
Note
• When the BT STANDBY is ON, “BT STANDBY ON” is
displayed on the main display.
• When the BT STANDBY is OFF, “BT STANDBY OFF” is
displayed on the main display.
• If the power cable has been removed and inserted again,
the function will become effective after the power is
turned ON for the unit.
Connection while in BT STANDBY mode with
Bluetooth capable device
When connection history (pairing has already been
conducted) with a Bluetooth capable device exists for the unit
during BT STANDBY, the unit can receive a connection
request directly from the connection history.
The unit will start using the BT AUDIO function, and connect
with a Bluetooth capable device.
Even devices that have already been paired with this unit will
not connect during BT STANDBY in the following cases.
In such cases, delete pairing history from the Bluetooth
wireless technology device and perform pairing again.
• Up to 8 pairing history can be recorded with this unit. If
connecting to a Bluetooth wireless technology device
over 8 units, the oldest pairing history will be deleted.
• If the settings are reset to the factory setting, all pairing
history will be deleted.
Radio wave caution
This unit uses a 2.4 GHz radio wave frequency, which is a
band used by other wireless systems (see list below). To
prevent noise or interrupted communication, do not use this
unit nearby such devices, or make sure these devices are
switched off during use.
• Cordless phones
• Cordless facsimiles
• Microwave ovens
• Wireless LAN devices (IEEE802.11b/g)
• Wireless AV equipment
• Wireless controllers for game systems
• Microwave-based health aids
• Some baby monitors
Other, less common, equipment that may operate on the
same frequency:
• Anti-theft systems
• Amateur radio stations (HAM)
• Warehouse logistic management systems
• Discrimination systems for train or emergency vehicles
Note
• In the event noise appears in your television image, there
is the possibility that a Bluetooth wireless technology
enabled device or this unit (including products
supported by this unit) are causing signal interference
with the antenna input connector of your television,
34
En
Page 35

Bluetooth
® Audio playback
10
video, satellite tuner, etc. In this event, increase the
distance between the antenna input connector and the
Bluetooth wireless technology enabled device or this
unit (including products supported by this unit).
• If there is something obstructing the path between this
unit (including devices supported by this unit) and the
device equipped with Bluetooth wireless technology
(such as a metal door, concrete wall, or insulation
containing tinfoil), you may need to change the location
of your system to prevent signal noise and interruptions.
Scope of operation
Use of this unit is limited to home use. (Transmission
distances may be reduced depending on communication
environment).
In the following locations, poor condition or inability to receive
radio waves may cause the audio to be interrupted or stopped:
• In reinforced concrete buildings or steel framed or ironframed buildings.
• Near large metallic furniture.
• In a crowd of people or near a building or obstacle.
• In a location exposed to the magnetic field, static
electricity or radio wave interference from radio
communication equipment using the same frequency
band (2.4 GHz) as this unit, such as a 2.4 GHz wireless
LAN device (IEEE802.11b/g) or microwave oven.
• If you live in a heavily populated residential area
(apartment, townhouse, etc.) and if your neighbor’s
microwave is placed near your system, you may
experience radio wave interference. If this occurs, move
your unit to a different place. When the microwave is not
in use, there will be no radio wave interference.
Radio wave reflections
The radio waves received by this unit include the radio wave
coming directly from the device equipped with Bluetooth
wireless technology (direct wave) and waves coming from
various directions due to reflections by walls, furniture and
building (reflected waves). The reflected waves (due to
obstacles and reflecting objects) further produce a variety of
reflected waves as well as variation in reception condition
depending on locations. If the audio cannot be received
properly due to this phenomenon, try moving the location of
the device equipped with Bluetooth wireless technology a
little. Also note that audio may be interrupted due to the
reflected waves when a person crosses or approaches the
space between this unit and the device equipped with
Bluetooth wireless technology.
• When disconnecting this unit, confirm that you have
sufficient working space in the surrounding area.
• When changing connections of audio or other cables for
products supported by this unit, confirm that you have
sufficient working space in the surrounding area.
English Français Español
Precautions regarding connections to
products supported by this unit
• Complete connections for all devices supported by this
unit, including all audio cords and power cables before
connecting them to this unit.
• After completing connections to this unit, check the
audio and power cables to confirm that they not twisted
together.
35
En
Page 36

Changing the settings11
Chapter 11:
Changing the settings
Settings for DVD/CD and USB playback
1 Press
HOME MENU screen appears.
2Use
3Use
The factory default settings are indicated in
Audio Settings parameters
Settings What it does
Audio DRC
(High/Medium/Low/Off)
HOME MENU
FGHI
FGHI
•Closing the HOME MENU screen.
Press HOME MENU.
Important
• The following settings are available for a disc or USB storage device content. They are not available for iPod/iPhone/iPad,
tuner, external input (AUDIO IN/LINE) and BT AUDIO.
• In the USB mode, you can only change the Play Mode and Audio Settings on the HOME MENU screen.
.
to select the item, then press
to change the setting, then press
italic.
• This makes loud sounds weaker and weak sounds louder. Change the setting for example when
watching movies late at night.
• This setting only affects Dolby Digital sound.
• The effect depends on the volume of the connected TV, AV receiver or amplifier, speakers, etc. Try
different settings, and choose the one providing the strongest effect.
ENTER
ENTER
.
.
Video Adjust parameters
Settings What it does
Sharpness
(Fine/Standard/Soft)
Brightness
(-20 to +20)
Contrast
(-16 to +16)
Gamma
(-3 to +3)
Hue
(green 9 to red 9)
Chroma Level
(-9 to +9)
Brightness, Contrast, Gamma, Hue and Chroma Level are set to 0 upon purchase.
Adjusts the picture’s sharpness.
Adjusts the picture’s brightness.
Adjusts the ratio of the brightness of the brightest and darkest portions of the picture.
Adjusts the look of the dark portions of the picture.
Adjusts the balance between green and red.
Adjusts the density of the colors. This setting is effective for sources with many colors, such as cartoons.
Initial Settings parameters
• Use these settings to make detailed unit settings.
• Initial Settings cannot be selected during playback. Stop the disc first.
36
En
Page 37

Changing the settings 11
English
Digital Audio Out settings
Settings What it does
HDMI Out
Video Output settings
Settings What it does
TV Screen
HDMI Resolution
HDMI Color
Language settings
Settings What it does
Audio Language
Subtitle Language
DVD Menu Lang.
Subtitle Display
• If the above setting is used to select
page 41.
Display settings
Settings What it does
OSD Language
Angle Indicator
On Screen Display
Options settings
Settings What it does
Parental Lock
DivX(R) VOD
Select the audio signals to be output from the
to the connected HDMI-compatible device.
Change the picture display format (
(Compressed)
Change the resolution of the video signals output from the
1280x720p/1920x1080i/1920x1080p
setting, return the setting to “
defaults
Change the video signals output from the
Change the language when listening to the sound of DVD-Video discs (
Other Language
Change the language of the subtitles displayed for DVD-Video discs (
Other Language
Change the language used for the menu displays of DVD-Video discs
(
w/ Subtitle Lang./available languages/Other Language
Select whether to display subtitles (On) or not (
Change the language of the operation messages (
available languages
Select whether to display the angle mark on the TV screen (On) or not (
Select whether to display operation messages (
Restrict DVD-Video viewing (
page 41 in order to set the “Country Code.”
Display the registration code required for playing DivX(R) VOD files (
), according to the connected TV.
below.
“
Other Language,
720x576p
).
).
).
Password/Level Change/Country Code
”
perform operations while referring to Language Code Table on
HDMI OUT
4:3 (Letter Box)/4:3 (Pan & Scan)/16:9 (Wide)/16:9
). If the image does not appear correctly after changing the
.” Refer to
HDMI OUT
terminal (
LPCM (2CH)/Auto/Off
HDMI OUT
Setting the HDMI Resolution settings back to their
terminal (
Full range RGB/RGB/Component
).
Off
).
Play, Stop
, etc.) displayed on the TV screen (
Play, Stop
, etc.) on the TV screen (On) or not (
Activate/Deactivate
) according
terminals (
720x576i/720x576p
English/available languages
English/available languages
Off
).
Off
). See
Language Code Table
).
).
/
/
English
).
on
/
/
Setting the HDMI Resolution settings back to their defaults
1 Press and hold
VIDEO
MODE.
37
En
Page 38

Additional information12
Chapter 12:
Additional information
Troubleshooting
Incorrect operations are often mistaken for trouble and malfunctions. If you think that there is something wrong with this
component, check the points below. Sometimes the trouble may lie in another component. Investigate the other components
and electrical appliances being used. If the trouble cannot be rectified even after exercising the checks listed below, ask your
nearest Pioneer authorized service center or your dealer to carry out repair work.
• If the unit does not operate normally due to external effects such as static electricity disconnect the power plug from the
outlet and insert again to return to normal operating conditions.
General problem
Problem Check Remedy
Settings you have made have
been cleared.
Difference in volume
between DVDs, CDs, MP3,
WMA, iPod/iPhone/iPad,
Tuner, BT AUDIO, AUDIO IN
and LINE.
This unit cannot be operated
with the remote control.
Disc cannot be played or disc
is ejected automatically.
DVD VR cannot be played. Is the disc supported CPRM? This unit does not support CPRM. You can play only DVD VR of a
Picture is stretched, or
aspect ratio cannot be
switched.
During playback, picture is
disturbed or dark.
Sound and video are
intermittent during disc
playback.
Was the power cord unplugged? When power cord is unplugged, the settings you have made is
This is not a problem with this unit. The volume may sound differently depending on the input source
Are you operating from far away? Operate within 7 m,
Is the remote control sensor exposed
to direct sunlight or strong artificial
light from a fluorescent bulb, etc.?
Are the batteries dead? Replace the batteries (page 6).
Is the disc scratched? Scratched discs may not play.
Is the disc dirty? Wipe the dirt off the disc (page 45).
Is this unit placed in a humid
location?
Is the aspect ratio properly set on the
connected TV?
Is
TV Screen
properly set? Set
This is not a problem with this unit. This unit supports Rovi copy protection. With some TVs, the picture
Are this unit and TV connected via a
video deck?
Sound volume may be too high. Sound and video may be unsteady if sound volume is set too high;
cleared. Please set the clock again. If you do not want to clear the
settings, do not unplug the power cord.
and recording format.
30º
(page 6).
The remote control signals may not be received properly if the
remote control sensor is exposed to direct sunlight or strong
artificial light from a fluorescent bulb, etc.
There could be condensation inside. Wait a while for the
condensation to evaporate. Do not place this unit near an airconditioner, etc. (page 44).
non CPRM.
Refer to the TV’s operating instructions and set the TV’s aspect ratio
properly.
TV Screen
or USB storage device content. For movies and images stored in
iPod/iPhone/iPad, operate your iPod/iPhone/iPad.
may not display properly when playing discs including copy
prevention signals. This is not a malfunction.
When this unit and TV are connected via a video deck, this unit’s
analog copy protect function may cause the picture being played
on the video deck not to display properly. Connect this unit and TV
directly.
in this case, lower the sound volume.
of the remote sensor on the front panel
properly (page 36). This setting is available for a disc
38
En
Page 39

Additional information 12
English
Problem Check Remedy
Folder or file names are not
recognized. (DivX, WMA,
MP3 and JPEG)
Time is req uired to play JPEG
files.
Black bars are displayed
when playing JPEG files.
The unit turns off
automatically.
When a USB storage device is connected
Problem Check Remedy
USB storage device is not
recognized.
File cannot be played. Is the file copyright-protected (by
Folder or file names are not
displayed or are not properly
displayed.
Folder or file names are not
displayed in alphabetical
order.
Much time is required to
recognize the USB storage
device.
Power is not supplied to the
USB storage device.
Have you exceeded the maximum
number of folder or file names this
unit can recognize?
Are you playing large files? Some time may be required to display large files.
Are you playing files with different
aspect ratios?
Is the USB storage device properly
connected?
Is the USB storage device connected
via a USB hub?
Is the USB storage device supported
by this unit?
This is not a problem with this unit. Turn the power off then back on.
DRM)?
This is not a problem with this unit. Files stored on a computer cannot be played.
Do the folder of file names contain
more than 30 characters?
This is not a problem with this unit. The order of the folder and file names displayed
What is the USB storage devices
capacity?
Is
AUTH ERROR
front panel display? No power is
supplied if the power consumption is
too high.
displayed on the
Up to 255 folders can be recognized on one disc. Up to 648 files can
be recognized within one folder. Depending on the folder structure,
however, this unit may not be able to recognize certain folders or
files.
Black bars may be displayed along the top and bottom or sides
when JPEG files with different aspect ratios are played.
If no play back and no operation has done for 20 minutes or more,
the unit turns off automatically. In this case it is required that the
Auto power off is switched to
Auto power off can be switched to
Connect the device securely (all the way in).
This unit does not support USB hubs. Connect the USB storage
device directly.
This unit only supports USB mass storage class devices.
This unit supports portable flash memory and digital audio
playback devices.
Only the FAT16 and FAT32 file systems are supported. Other file
systems (exFAT, NTFS, HFS etc.) are not supported.
USB flash drive that supports USB 2.0 can be used.
This device does not support the use of external hard disc drives.
Some USB storage devices may not be recognized properly.
Copyright-protected files cannot be played.
It may not be possible to play some files.
The maximum number of characters displayable for the folder and
file names is 30.
depends on the order in which the folders or files were recorded on
the USB storage device.
Some time may be required to load the data when large capacity
USB storage devices are connected (this could take several
minutes).
Turn the power off then back on.
Turn the power off, then disconnect and reconnect the USB storage
device.
Press
INPUT
USB/iPod
to switch to the other input, then switch again to the
input.
ON
.
ON/OFF
(page 45).
Disc Navigator
39
En
Page 40

Additional information12
When connected to an HDMI-compatible device
Problem Check Remedy
Picture is not displayed. Is the resolution properly set? Set
Is the HDMI cable properly
connected?
Sound is not produced or is
distorted.
Multichannel audio signals
are not output.
Colors are not properly
displayed on TV screen.
Is
HDMI Out
Is
HDMI Out
Is
HDMI Color
properly set? Set
properly set? Set
properly set? Change the
When an iPod/iPhone/iPad is connected
Problem Remedy
Can’t operate the iPod/iPhone/iPad by the remote control. Make sure the iPod/iPhone/iPad is connected correctly (refer to
Can’t operate the iPod/iPhone/iPad. Make sure the iPod/iPhone/iPad is connected correctly (refer to
HDMI Resolution
Restor e
HDMI Resolution
(page 37).
Connect the cable securely (all the way in).
With some cables, 1080p video signals will not be output.
HDMI Out to LPCM (2CH)
HDMI Out
Connecting your iPod/iPhone/iPad
Connecting your iPod/iPhone/iPad
If the iPod/iPhone/iPad is experiencing a hangup, try resetting the
iPod/iPhone/iPad, and reconnect it to the unit.
properly for the connected device (page 37).
to the default setting (
or
Auto
(page 37).
to
Auto
(page 37).
HDMI Color
setting (page 37).
on page 19).
on page 19).
720x576p
)
When the
Bluetooth
wireless technology device is connected or operated
Problem Remedy
The
Bluetooth
operated.
Sound from the
or the sound is interrupted.
wireless technology device cannot be connected or
Bluetooth
wireless technology device is not emitted
40
En
Check that no object that emits electromagnetic waves in the 2.4
GHz band (microwave oven, wireless LAN device or
wireless technology apparatus) is near the unit. If such an object is
near the unit, set the unit far from it. Or, stop using the object
emitting the electromagnetic waves.
Check that the
from the unit and that obstructions are not set between the
Bluetooth
Bluetooth
distance between them is less than about 10 m* and no
obstructions exist between them.
* The distance given is to be used as a rough guide. The actual
allowable distance between devices may vary depending on
conditions in the surrounding environment.
The
communication mode supporting the
technology. Check the setting of the
device.
Bluetooth
wireless technology device is not too far
wireless technology device and the unit. Set the
wireless technology device and the unit so that the
Bluetooth
wireless technology device may not be set to the
Bluetooth
Bluetooth
Bluetooth
wireless
wireless technology
Page 41

Additional information 12
English
Language Code Table and Country/
Area Code Table
Language Code Table
Language names (codes) and input codes:
Japanese (ja),
English (en),
French (fr),
German (de),
Italian (it),
Spanish (es),
Chinese (zh),
Dutch (nl),
Portuguese (pt),
Swedish (sv),
Russian (ru),
Korean (ko),
Greek (el),
Afar (aa),
Abkhazian (ab),
Afrikaans (af),
Amharic (am),
Arabic (ar),
Assamese (as),
Aymara (ay),
Azerbaijani (az),
Bashkir (ba),
Byelorussian (be),
Bulgarian (bg),
Bihari (bh),
Bislama (bi),
Bengali (bn),
Tibetan (bo),
Breton (br),
Catalan (ca),
Corsican (co),
Czech (cs),
Welsh (cy),
Danish (da),
Bhutani (dz),
Esperanto (eo),
Estonian (et),
Basque (eu),
Persian (fa),
Finnish (fi),
Fiji (fj),
Faroese (fo),
0610
0618
0920
1412
0512
0101
0118
0208
0319
0325
0609
0514
0405
0519
2608
1922
1821
1115
0125
0201
0209
0214
0215
0218
0301
0401
0426
0520
0521
0601
0615
1001
0102
0106
0113
0119
0126
0207
0315
0515
1620
0205
Frisian (fy),
Irish (ga),
0701
Scots-Gaelic (gd),
Galician (gl),
Guarani (gn),
Gujarati (gu),
Hausa (ha),
Hindi (hi),
0809
Croatian (hr),
Hungarian (hu),
Armenian (hy),
Interlingua (ia),
Interlingue (ie),
Inupiak (ik),
Indonesian (in),
Icelandic (is),
Hebrew (iw),
Yiddish (ji),
Javanese (jw),
Georgian (ka),
Kazakh (kk),
Greenlandic (kl),
Cambodian ( km),
Kannada (kn),
Kashmiri (ks),
Kurdish (ku),
Kirghiz (ky),
Latin (la),
1201
Lingala (ln),
Laothian (lo),
Lithuanian (lt),
Latvian (lv),
Malagasy (mg),
Maori (mi),
Macedoni an (mk),
Malayalam (ml),
Mongolian (mn),
Moldavian (mo),
Marathi (mr),
Malay (ms),
Maltese (mt),
Burmese (my),
0625
0712
0714
0721
0801
0818
0911
0919
0923
1009
1111
1121
1125
1214
1215
1222
1309
1318
1319
1320
0821
0825
0901
0905
0914
1023
1101
1114
1119
1220
1307
1325
0704
1112
1113
1312
1314
1315
1311
Nauru (na),
Nepali (ne),
Norwegian (no),
Occitan (oc),
Oromo (om),
Oriya (or),
Panjabi (pa),
Polish (pl),
Pashto, Pushto (ps),
Quechua (qu),
Rhaeto-Romance (rm),
Kirundi (rn),
Romanian (ro),
Kinyarwanda (rw),
Sanskrit (sa),
Sindhi (sd),
Sangho (sg),
Serbo-Croatian (sh),
Sinhalese (si),
Slovak (sk),
Slovenian (sl),
Samoan (sm),
Shona (sn),
Somali (so),
Albanian (sq),
Serbian (sr),
1401
1405
1518
1612
1814
1904
1911
1914
1915
1503
1513
1601
1721
1901
1907
1909
1912
1913
1917
1918
1415
1815
1619
1823
1908
1813
Siswati (ss),
Sesotho (st),
Sundanese (su),
Swahili (sw),
Tamil (ta),
Telugu (te),
Tajik (tg),
Thai (th),
Tigrinya (ti),
Turkmen (tk),
Tagalog (tl),
Setswana (tn),
Tonga (to),
Turkish (tr),
Tsonga (ts),
Tatar (tt),
Twi (tw),
Ukrainian (uk),
Urdu (ur),
Uzbek (uz),
Vietnamese (vi),
Volapük (vo),
Wolof (wo),
Xhosa (xh),
Yoruba (yo),
Zulu (zu),
1919
1920
1923
2001
2005
2007
2008
2009
2011
2012
2015
2018
2019
2020
2023
2118
2126
2215
2315
2408
2515
2621
1921
2014
2111
2209
Country/Area Code Table
Country/Area name, Input codes and Country/
Area code
United States,
Argentina,
United Kingdom,
Italy,
India,
Indonesia,
Australia,
Austria,
Netherlands,
Canada,
Korea, Republic of,
Singapore,
Switzerland,
Sweden,
Spain,
Thailand,
Taiwan,
China,
2119
, us Chile,
0118
, ar Denmark,
0702
0920
, it Japan,
0914
, in New Zealand,
0904
0121
0120
0301
1905
0519
2008
2023
0314
, gb Germany,
, id Norway,
, au Pakistan,
, at Philippines,
1412
, nl Finland,
, ca Mexico,
1118
1907
0308
, kr Russian Federation,
, sg Brazil,
, ch France,
, se Belgium,
, es Portugal,
, th Hong Kong,
, tw Malaysia,
, cn
0312
1016
1324
0218
0618
0411
0405
1415
1611
0609
0205
1620
1325
, cl
, br
, jp
1608
, mx
, fr
0811
1426
, no
, pk
, fi
, be
, pt
, my
, dk
, de
, ph
, hk
, nz
1821
, ru
41
En
Page 42

Additional information12
Playable discs and formats
DVD-Video
DVD VR
Super Video CD Super Video CDs
Video CD Video CDs
Audio CD
JPEG JPEG Files recorded on DVD-R/ -RW/ -R DL discs, CD-R/ -RW/ -ROM discs or USB storage devices
DivX
WMA WMA files recorded on DVD-R/ -RW/ -R DL discs, CD-R/ -RW/ -ROM discs or USB storage devices
MP3 MP3 files recorded on DVD-R/ -RW/ -R DL discs, CD-R/ -RW/ -ROM discs or USB storage devices
• Commercially available DVD-Video discs
• DVD-R/ -RW/ -R DL and DVD+R/ +RW/ +R DL discs recorded in the Video mode
DVD-R/ -RW/ -R DL discs recorded in the VR mode
This unit does not support CPRM
• Commercially available audio CDs
• CD-R/ -RW/ -ROM discs containing music recorded in the CD-DA format
®
DivX video files recorded on DVD-R/ -RW/ -R DL discs, CD-R/ -RW/ -ROM discs or USB storage devices
• Only the discs that have been finalized can be played.
• Discs recorded in packet write mode (UDF format) are
not compatible with this unit.
• Corporation and product names mentioned herein are
trademarks or registered trademarks of the respective
corporations.
• Only discs recorded in ISO9660 Level 1, Level 2 and Joliet
can be played.
• is a trademark of DVD Format/ Logo Licensing
Corporation.
Note
• This unit does not support multisession discs or
multiborder recording.
• Multisession/multiborder recording is a method in
which data is recorded on a single disc in two or more
sessions/borders. A “session” or “border” is one
recording unit, consisting of a complete set of data from
lead-in to lead-out.
Discs that cannot be played
• Blu-ray discs
• HD DVDs
•AVCHD
• AVCREC
• DVD-Audio discs
• DVD-RAM discs
•SACDs
•CD-G
About region numbers
DVD player and DVD-Video discs are assigned region
numbers according to the region in which they are sold. This
player’s region number(s) is (are) as shown below.
• DVD-Video: 2
Discs not including these numbers cannot be played. Discs
playable on this player are as shown below.
• DVDs: 2 (including 2) and ALL
Regarding copy protected CDs
This unit is designed to conform to the specifications of the
audio CD format. This unit does not support the playback or
function of discs that do not conform to these specifications.
• Files other than the ones below (WMV, MPEG4-AAC,
etc.) are not guaranteed to play.
About playing DualDiscs
A DualDisc is a new two-sided disc, one side of which
contains DVD content - video, audio, etc. - while the other side
contains non-DVD content such as digital audio material.
• The DVD side of a DualDisc can be played on this unit
(excluding any DVD-Audio content).
• The non-DVD, audio side of the disc is not compatible
with this unit.
• It is possible that when loading or ejecting a DualDisc,
the opposite side to that being played will be scratched.
Scratched discs may not be playable.
• For more detailed information on DualDisc
specifications, please refer to the disc manufacturer or
disc retailer.
42
En
Page 43

Additional information 12
English
Playing discs created on computers or
BD/DVD recorders
• It may not be possible to play discs recorded using a
computer due to the application settings or computer’s
environment settings. Record discs in a format playable
on this unit. For details, contact the dealer.
• It may not be possible to play discs recorded using a
computer or a BD/DVD recorder, if burn quality is not
good due to characteristics of the disc, scratches, dirt on
the disc, dirt on the recorder’s lens, etc.
Playable files
• Files protected by DRM (Digital Rights Management)
cannot be played.
• Files other than the ones below (WMV, MPEG4-AAC,
etc.) are not guaranteed to play.
Supported video file formats
DivX
• DivX is a media technology created by DivX, Inc. DivX
media files contain image data.
• DivX files may also include such advanced playback
functions as menu screens and selection of multiple
subtitle languages/ audio tracks.
• DivX Certified
content.
• DivX
trademarks of Rovi Corporation or its subsidiaries and
are used under license.
• This item incorporates copyright protection technology
that is protected by U.S. patents and other intellectual
pr ope rty r igh ts o f Ro vi C orpor ation. Reverse engineering
and disassembly are prohibited.
File extensions: .avi and .divx (these must be used for this unit
to recognize DivX video files). Note that all files with the .avi
extension are recognized as MPEG4, but not all of these are
necessarily DivX video files and therefore may not be playable
on this unit.
• Files not containing DivX video signals cannot be played,
even if they have the extension “.avi”.
ABOUT DIVX VIDEO: DivX
DivX, LLC, a subsidiary of Rovi Corporation. This is an official
DivX Certified
more information and software tools to convert your files into
DivX videos.
ABOUT DIVX VIDEO-ON-DEMAND: This DivX Certified
device must be registered in order to play purchased DivX
Video-on-Demand (VOD) movies. To obtain your registration
code, locate the DivX VOD section in your device setup menu.
Go to vod.divx.com for more information on how to complete
your registration.
®
to play DivX® video, including premium
®
, DivX Certified® and associated logos are
®
is a digital video format created by
®
device that plays DivX video. Visit divx.com for
Displaying external subtitle files
• The font sets listed below are available for external
subtitle files. You can see the proper font set on-screen
by setting the Subtitle Language on page 37 to match
the subtitle file.
• This unit supports the following language groups:
Group 1
Group 2
Group 3
Group 4
Group 5
• Some external subtitle files may be displayed incorrectly
• For external subtitle files the following subtitle format
• The filename of the movie file has to be repeated at the
• The number of external subtitle files which can be
Afrikaans (af), Basque (eu), Catalan (ca), Danish
(da), Dutch (nl), English (en), Faroese (fo), Finnish
(fi), French (fr), German (de), Icelandic (is), Irish
(ga), Italian (it), Norwegian (no), Portuguese (pt),
Rhaeto-Romanic (rm), Scottish (gd), Spanish (es),
Swedish (sv)
Albanian (sq), Croatian (hr), Czech (cs), Hungarian
(hu), Polish (pl), Romanian (ro), Slovak (sk),
Slovenian (sl)
Bulgarian (bg), Byelorussian (be), Macedonian
(mk), Russian (ru), Serbian (sr), Ukrainian (uk)
Hebrew (iw), Yiddish (ji)
Turkish (tr)
or not at all.
filename extensions are supported (please note that
these files are not shown within the disc navigation
menu): .srt, .sub, .ssa, .smi
beginning of the filename for the external subtitle file.
switched for the same movie file is limited to a maximum
of 10.
Supported image file formats
JPEG
Resolution: Up to 3072 x 2048 pixels
File extensions: .jpg and .JPG (must be used for this unit to
recognize JPEG files
• This unit supports baseline JPEG.
• This unit supports Exif Ver.2.2.
• This unit does not support progressive JPEG.
-
do not use for other file types)
Supported audio file formats
• This unit does not support lossless encoding.
MP3:
MP3 is a form of compression. It is an acronym which stands
for MPEG Audio Layer 3. MP3 is a type of audio code which is
processed by significant compression from the original audio
®
source with very little loss in sound quality.
• This system supports MPEG-1/2 Audio Layer 3 (Sampling
rates: 8 kHz to 48 kHz; Bit rates: 64 kbps to 384 kbps).
• During VBR file playback, time counter in the display
may differ from its actual playback time.
43
En
Page 44

Additional information12
WMA:
WMA files are Advanced System Format files that include
audio files which are compressed with Windows Media Audio
codec. WMA is developed by Microsoft as an audio format file
for Windows Media Player.
• This system supports WMA (Sampling rates: 32 kHz/44.1
kHz/48 kHz; Bit rates: 64 kbps to 320 kbps).
• During VBR file playback, time counter in the display
may differ from its actual playback time.
Cautions on use
When moving this unit
When moving this unit, be sure to first check that there is no
disc loaded and disconnect the iPod/iPhone/iPad. Then press
1STANDBY/ON, wait for “STAND BY” disappears on main
display to turn off, then unplug the power cord. Damage may
occur if the unit is transported or moved with a disc inserted,
or when another device is connected to the USB terminal, or
AUDIO IN mini-plug jack.
Place of installation
• Choose a stable place near the TV or stereo system being
used with this unit.
• Do not place this unit on top of a TV or color monitor. Also
install it away from cassette decks and other devices
easily affected by magnetic forces.
Avoid the following locations:
• Places exposed to direct sunlight
• Humid or poorly ventilated places
•Extremely hot places
• Places exposed to vibrations
• Places in which there is much dust or cigarette smoke
• Places exposed to soot, steam or heat (kitchens, etc.)
About condensation
If this unit is moved suddenly from a cold place into a warm
room (in winter, for example) or if the temperature in the room
in which this unit is installed rises suddenly due to heater
operation, etc., water droplets (condensation) may form
inside (on operating parts and the lens). When condensation
is present, this unit will not operate properly and playback is
not possible. Let this unit stand at room temperature for 1 or
2 hours with the power turned on (the time depends on the
extent of condensation). The water droplets will dissipate and
playback will become possible. Condensation can also occur
in the summer if this unit is directly exposed to the air flow
from an air-conditioner. If this happens, move this unit to a
different place.
Cleaning the product
• Unplug the power cord from the power outlet when
cleaning this unit.
• Clean this unit using a soft cloth. For tough dirt, apply
some neutral detergent diluted in 5 to 6 parts water to a
soft cloth, wring out thoroughly, wipe off the dirt, then
wipe again with a soft, dry cloth.
• Alcohol, thinner, benzene, insecticides, etc., could cause
the print or paint to peel off. Also, leaving rubber or vinyl
products in contact with this unit for long periods of time
could mar the cabinet.
• When using chemical-impregnated wipes, etc., read the
cautions included with the wipes carefully.
Cleaning the lens
• This unit’s lens should not become dirty in normal use,
but if for some reason it should malfunction due to dust
or dirt, consult your nearest Pioneer authorized service
center. Although lens cleaners for players are
commercially available, we advise against using them
since some may damage the lens.
Do not place objects on this unit
Do not place any objects on top of this unit.
Do not obstruct the ventilation holes.
Do not use this unit on shaggy rugs, beds, sofas, etc., or
wrapped in cloth, etc. Doing so will prevent the heat from
dispersing, leading to damage.
Do not expose to heat.
Do not place this unit on top of an amplifier or other
component that generates heat. When rack mounting it, to
avoid the heat given off by the amplifier or other audio
component, place it on a shelf below the amplifier.
• Turn off the unit’s power when not using it.
• Depending on signal conditions, striped patterns may
appear on a TV screen and noise may enter the sound of
radio broadcasts when the unit’s power is on. If this
happens, turn the unit’s power off.
44
En
Page 45

Additional information 12
English
Handling discs
Storing
• Always place discs in their cases and store them
vertically, avoiding hot, humid places, places exposed to
direct sunlight and extremely cold places.
• Be sure to read the cautions included with the disc.
Cleaning discs
• Discs may not play if there are fingerprints or dust on
them. In this case, use a cleaning cloth, etc., to gently
wipe the disc from the inside towards the outside. Do not
use dirty cleaning cloths.
• Do not use benzene, thinner or other volatile chemicals.
Also do not use record spray or antistatic agents.
• For tough dirt, apply some water to a soft cloth, wring out
thoroughly, wipe off the dirt, then wipe off the moisture
with a dry cloth.
• Do not use damaged (cracked or warped) discs.
• Do not let the signal surface of discs get scratched or
dirty.
• Do not attach pieces of paper or stickers to discs. Doing
so could warp discs, making it impossible to play them.
Also note that rental discs often have labels attached to
them, and the label’s glue may have oozed out. Check
that there is no glue around the edges of such labels
before using rented discs.
About specially shaped discs
Specially shaped discs (heart-shaped, hexagonal, etc.)
cannot be played on this unit. Do not attempt to play such
discs, as they could damage this unit.
About iPod/iPhone/iPad
“Made for iPod,” and “Made for iPhone,” and “Made for iPad”
mean that an electronic accessory has been designed to
connect specifically to iPod, iPhone, or iPad, respectively, and
has been certified by the developer to meet Apple
performance standards. Apple is not responsible for the
operation of this device or its compliance with safety and
regulatory standards. Please note that the use of this
accessory with iPod, iPhone, or iPad may affect wireless
performance.
iPad, iPhone, iPod, iPod nano and iPod touch are trademarks of
Apple Inc., registered in the U.S. and other countries.
Auto power off setting
Long press the # on the unit for 3 seconds to switch auto
power off setting ON/OFF.
The operation can be conducted using only the # on the unit.
No need to set this using the remote control.
Initial setting is set to ON.
Note
• When the auto power off is set to ON, “APD ON” will be
displayed on the main display.
• When the auto power off is set to OFF, “APD OFF” will be
displayed on the main display.
Restoring all the settings to the
defaults
Use the steps below to restore the all settings to their defaults.
1 Press
2 Press
INPUT
DVD/CD
3 Press
4 Press
seconds while pressing
1STANDBY/ON
DVD/CD
to turn the power on.
on the remote control or
on the main unit repeatedly to select
input.
$ OPEN/CLOSE
1STANDBY/ON
• “DEFAULT” is displayed while the settings are being
restored. Power is turned off.
• No need to set this using the remote control.
to open the disc tray.
on the unit for 3
#.
45
En
Page 46

Additional information12
Specifications
• Amplifier section
RMS Power Output: . . . . . . . . . . . . . . . . . . . . . . . 30 W + 30 W
• Tuner section
Frequency Range (FM) . . . . . . . . . . . . . . 87.5 MHz to 108 MHz
Antenna Input (FM). . . . . . . . . . . . . . . . . . . . .75 : unbalanced
• Bluetooth
Version. . . . . . . . . . . . . . . . . . . Bluetooth Specification Ver. 3.0
Output . . . . . . . . . . . . . . . . . . . Bluetooth Specification Class 2
Estimated line-of-sight transmission distance*
. . . . . . . . . . . . . . . . . . . . . . . . . . . . . . . . . . . . . . . . . About 10 m
Frequency range . . . . . . . . . . . . . . . . . . . . . . . . . . . . . . .2.4 GHz
Modulation
. . . . . . . . . . . . FH-SS (Frequency Hopping Spread Spectrum)
Supported Bluetooth profiles . . . . . . . . . . . . . . . A2DP, AVRCP
Supported Codec . . . . . . . . . . . . . . . . . SBC (Subband Codec)
Supported contents protection . . . . . . . . . . . . . . . . . . SCMS-T
* The line-of-sight transmission distance is an estimate.
Actual transmission distances supported may differ
depending on surrounding conditions.
• Miscellaneous
USB terminal. . . . . . . . . . . . . . . . . . . . . . . . . . . . . . . . 5 V, 2.1 A
Power source. . . . . . . . . . . . . . AC 220 V to 240 V, 50 Hz/60 Hz
Power consumption
Power on . . . . . . . . . . . . . . . . . . . . . . . . . . . . . . . . . . . . .35 W
Power stand-by . . . . . . . . . . . . . . . . . . . . . . . . . 0.5 W or less
Power stand-by (BT STANDBY ON). . . . . . . . . 0.5 W or less
Dimensions . . . . . . . .215 mm (W) x 95 mm (H) x 325 mm (D)
Weight (without package) . . . . . . . . . . . . . . . . . . . . . . . . 2.0 kg
• Speaker
Magnetically shielded speaker system
Type
2-way type speaker system
5 cm Tweeter
10 cm Woofer
Maximum input power . . . . . . . . . . . . . . . . . . . . . . . . . . . .30 W
Impedance. . . . . . . . . . . . . . . . . . . . . . . . . . . . . . . . . . . . . . . 4 :
Dimensions . . . . . 130 mm (W) x 211.5 mm (H) x 240 mm (D)
Weight . . . . . . . . . . . . . . . . . . . . . . . . . . . . . . . . . . . 2.0 kg/each
• Accessories
Remote control . . . . . . . . . . . . . . . . . . . . . . . . . . . . . . . . . . . . . 1
Video cable (1.5 m) . . . . . . . . . . . . . . . . . . . . . . . . . . . . . . . . . . 1
FM wire antenna . . . . . . . . . . . . . . . . . . . . . . . . . . . . . . . . . . . . 1
AAA batteries (R03) . . . . . . . . . . . . . . . . . . . . . . . . . . . . . . . . . 2
Speaker wire . . . . . . . . . . . . . . . . . . . . . . . . . . . . . . . . . . . . . . . 2
iPhone/iPad stand . . . . . . . . . . . . . . . . . . . . . . . . . . . . . . . . . . 1
Power cord
Warranty card
Operating instructions (This document)
(1 kHz, 10 %, T.H.D., 4 :)
Note
• The specifications are applicable when the power supply
is 230 V.
• Specifications and the design are subject to possible
modifications without notice, due to improvements.
© 2014 PIONEER HOME ELECTRONICS CORPORATION.
All rights reserved.
46
En
Page 47

Additional information 12
English
47
En
Page 48

N’installez pas les enceintes en hauteur sur un mur ou
au plafond. La grille est conçue pour être démontable, et
pour cette raison elle peut tomber et causer des
dommages ou des blessures si les enceintes sont
suspendues en hauteur.
SGK004_A1_Fr
NOTE IMPORTANTE SUR LE CABLE
D’ALIMENTATION
Tenir le câble d’alimentation par la fiche. Ne pas
débrancher la prise en tirant sur le câble et ne pas
toucher le câble avec les mains mouillées. Cela risque
de provoquer un court-circuit ou un choc électrique. Ne
pas poser l’appareil ou un meuble sur le câble. Ne pas
pincer le câble. Ne pas faire de noeud avec le câble ou
l’attacher à d’autres câbles. Les câbles d’alimentation
doivent être posés de façon à ne pas être écrasés. Un
câble abîmé peut provoquer un risque d’incendie ou un
choc électrique. Vérifier le câble d’alimentation de
temps en temps. Contacter le service après-vente
PIONEER le plus proche ou le revendeur pour un
remplacement.
S002*_A1_Fr
Ce produit est destiné à une utilisation domestique
générale. Toute panne due à une utilisation autre qu'à
des fins privées (comme une utilisation à des fins
commerciales dans un restaurant, dans un autocar
ou sur un bateau) et qui nécessite une réparation sera
aux frais du client, même pendant la période de
garantie.
K041_A1_Fr
ATTENTION
Cet appareil est un produit laser de Classe 1, classé
selon l’article IEC 60825-1:2007 relatif à la Sécurité
des produits laser.
APPAREIL À LASER DE CLASSE 1
D58-5-2-2a_A2_Fr
AVERTISSEMENT
Gardez les pièces de petite taille hors de la portée des
bébés et des enfants. En cas d’ingestion accidentelle,
veuillez contacter immédiatement un médecin.
D41-6-4_A1_Fr
ATTENTION
L’interrupteur STANDBY/ON de cet appareil ne
coupe pas complètement celui-ci de sa prise secteur.
Comme le cordon d’alimentation fait office de
dispositif de déconnexion du secteur, il devra être
débranché au niveau de la prise secteur pour que
l’appareil soit complètement hors tension. Par
conséquent, veillez à installer l’appareil de telle
manière que son cordon d’alimentation puisse être
facilement débranché de la prise secteur en cas
d’accident. Pour éviter tout risque d’incendie, le
cordon d’alimentation sera débranché au niveau de la
prise secteur si vous prévoyez une période prolongée
de non utilisation (par exemple avant un départ en
vacances).
D3-4-2-2-2a*_A1_Fr
Milieu de fonctionnement
Température et humidité du milieu de fonctionnement :
De +5 °C à +35 °C (de +41 °F à +95 °F) ; Humidité
relative inférieure à 85 % (orifices de ventilation non
obstrués)
N’installez pas l’appareil dans un endroit mal ventilé ou
un lieu soumis à une forte humidité ou en plein soleil
(ou à une forte lumière artificielle).
D3-4-2-1-7c*_A1_Fr
PRÉCAUTION DE VENTILATION
Lors de l’installation de l’appareil, veillez à laisser un
espace suffisant autour de ses parois de manière à
améliorer la dissipation de chaleur (au moins 25 cm sur
le dessus, 10 cm à l’arrière et 5 cm de chaque côté).
AVERTISSEMENT
Les fentes et ouvertures du coffret sont prévues pour la
ventilation, pour assurer un fonctionnement stable de
l’appareil et pour éviter sa surchauffe. Pour éviter les
risques d’incendie, ne bouchez jamais les ouvertures et
ne les recouvrez pas d’objets, tels que journaux, nappes
ou rideaux, et n’utilisez pas l’appareil posé sur un tapis
épais ou un lit.
D3-4-2-1-7b*_A1_Fr
AVERTISSEMENT
Pour éviter les risques d’incendie, ne placez aucune
flamme nue (telle qu’une bougie allumée) sur
l’appareil.
D3-4-2-1-7a_A1_Fr
AVERTISSEMENT
Cet appareil n’est pas étanche. Pour éviter les risques
d’incendie et de décharge électrique, ne placez près de
lui un récipient rempli d’eau, tel qu’un vase ou un pot
de fleurs, et ne l’exposez pas à des gouttes d’eau, des
éclaboussures, de la pluie ou de l’humidité.
D3-4-2-1-3_A1_Fr
ATTENTION
POUR ÉVITER TOUT RISQUE D’ÉLECTROCUTION, NE
PAS ENLEVER LE COUVERCLE (NI LE PANNEAU
ARRIÈRE). AUCUNE PIÈCE RÉPARABLE PAR
L’UTILISATEUR NE SE TROUVE À L’INTÉRIEUR.
CONFIER TOUT ENTRETIEN À UN PERSONNEL
QUALIFIÉ UNIQUEMENT.
D3-4-2-1-1_B1_Fr
Page 49

K058a_A1_Fr
Pb
Information à destination des utilisateurs sur la collecte et l’élimination des
équipements et batteries usagés
Ces symboles qui figurent sur les produits, les emballages et/ou les documents
d’accompagnement signifient que les équipements électriques et électroniques et
batteries usagés ne doivent pas être jetés avec les déchets ménagers et font l’objet
d’une collecte sélective.
Pour assurer l’enlèvement et le traitement appropriés des produits et batteries
usagés, merci de les retourner dans les points de collecte sélective habilités
conformément à la législation locale en vigueur.
En respectant les circuits de collecte sélective mis en place pour ces produits, vous
contribuerez à économiser des ressources précieuses et à prévenir les impacts
négatifs éventuels sur la santé humaine et l’environnement qui pourraient résulter
d’une mauvaise gestion des déchets.
Pour plus d’information sur la collecte et le traitement des produits et batteries
usagés, veuillez contacter votre municipalité, votre service de gestion des déchets
ou le point de vente chez qui vous avez acheté ces produits.
Ces symboles ne sont valables que dans les pays de l’Union Européenne.
Pour les pays n’appartenant pas à l’Union Européenne :
Si vous souhaitez jeter ces articles, veuillez contacter les autorités ou revendeurs
locaux pour connaître les méthodes d’élimination appropriées.
Exemples de marquage
pour les batteries
Marquage pour les
équipements
Précaution concernant les ondes radio
Cet appareil utilise comme onde radio une fréquence de
2,4 GHz, c’est-à-dire une bande utilisée par d’autres
systèmes sans fil (Fours à micro-ondes, téléphones sans
fil, etc.).
Si des parasites apparaissent sur les images télévisées,
il est possible que cet appareil (y compris ceux qu’il
prend en charge) provoquent des interférences sur le
connecteur d’entrée de votre téléviseur, les images
vidéo, le tuner satellite, etc.
Dans ce cas, augmentez la distance entre la prise
d’entrée d’antenne et cet appareil (y compris les
produits pris en charge par cet appareil).
• Pioneer n’est pas responsable d’un mauvais
fonctionnement du produit Pioneer compatible due à
une erreur/défaillance de la connexion réseau et/ou
de l’appareil raccordé. Veuillez contacter votre
fournisseur de service Internet ou le fabricant du
périphérique du réseau.
• Un abonnement payant auprès d’un fournisseur
d’accès Internet est nécessaire pour utiliser Internet.
Page 50

Nous vous remercions d’avoir acheté ce produit Pioneer.
Veuillez lire attentivement ce mode d’emploi de manière à pouvoir utiliser votre modèle correctement. Lorsque vous
avez terminé, rangez ces instructions en lieu sûr afin de pouvoir vous y référer à l’avenir.
Table des matières
01 Préparatifs
Contenu de l’emballage . . . . . . . . . . . . . . . . . . . . . . . . . 6
Mise en place des piles dans la télécommande . . . . . . 6
Utilisation de la télécommande . . . . . . . . . . . . . . . . . . . . 6
02 Les organes et leurs fonctions
Télécommande . . . . . . . . . . . . . . . . . . . . . . . . . . . . . . . . 7
Démontage et remontage de la grille de protection
avant . . . . . . . . . . . . . . . . . . . . . . . . . . . . . . . . . . . . . . . . . 9
Panneau avant . . . . . . . . . . . . . . . . . . . . . . . . . . . . . . . . 10
Afficheur . . . . . . . . . . . . . . . . . . . . . . . . . . . . . . . . . . . . . 11
03 Connexions
Raccordement des enceintes . . . . . . . . . . . . . . . . . . . . 12
Raccordement avec un câble HDMI . . . . . . . . . . . . . . . 13
Signaux audio pouvant être restitués par la prise HDMI
OUT de cet appareil. . . . . . . . . . . . . . . . . . . . . . . . . . . . . 14
Connexion de l’antenne FM . . . . . . . . . . . . . . . . . . . . . 14
Utilisation des antennes externes . . . . . . . . . . . . . . . . . 15
Branchement . . . . . . . . . . . . . . . . . . . . . . . . . . . . . . . . . 15
04 Pour commencer
Pour allumer l’appareil . . . . . . . . . . . . . . . . . . . . . . . . . 16
Réglage de l’horloge . . . . . . . . . . . . . . . . . . . . . . . . . . . 16
Commandes générales . . . . . . . . . . . . . . . . . . . . . . . . . 16
Fonction d’entrée. . . . . . . . . . . . . . . . . . . . . . . . . . . . . . . 16
Contrôle de la luminosité de l’affichage . . . . . . . . . . . . 16
Réglage automatique du volume initial. . . . . . . . . . . . . 16
Commande de volume . . . . . . . . . . . . . . . . . . . . . . . . . . 16
Sourdine . . . . . . . . . . . . . . . . . . . . . . . . . . . . . . . . . . . . . . 16
Commandes de son . . . . . . . . . . . . . . . . . . . . . . . . . . . 17
Equalizer. . . . . . . . . . . . . . . . . . . . . . . . . . . . . . . . . . . . . . 17
Touche P.BASS . . . . . . . . . . . . . . . . . . . . . . . . . . . . . . . . 17
Touche de réglage grave/aigu . . . . . . . . . . . . . . . . . . . . 17
Réglage de l’alarme de réveil . . . . . . . . . . . . . . . . . . . . 17
Rappel de l’alarme de réveil . . . . . . . . . . . . . . . . . . . . . . 18
Annulation de l’alarme de réveil. . . . . . . . . . . . . . . . . . . 18
Utilisation du réveil . . . . . . . . . . . . . . . . . . . . . . . . . . . . . 18
Utilisation du minuteur de mise en veille . . . . . . . . . . 18
Utilisation avec un casque . . . . . . . . . . . . . . . . . . . . . . 18
05 Lecture d’une source iPod/iPhone/iPad
Vérification des modèles d’iPod/iPhone/iPad pris en
charge . . . . . . . . . . . . . . . . . . . . . . . . . . . . . . . . . . . . . . . 19
Connexion de votre iPod/iPhone/iPad . . . . . . . . . . . . . 19
Connexion d’un iPod/iPhone/iPad à l’aide du support
fourni. . . . . . . . . . . . . . . . . . . . . . . . . . . . . . . . . . . . . . . . . 19
Lecture à partir d’un iPod/iPhone/iPad . . . . . . . . . . . . 20
06 Lecture de disque
Lecture de disques ou de fichiers . . . . . . . . . . . . . . . . 21
Lecture avancée de disque DVD ou CD . . . . . . . . . . . 22
Recherche directe de morceaux . . . . . . . . . . . . . . . . . . 22
Lecture répétée (A-B Repeat). . . . . . . . . . . . . . . . . . . . . 22
Lecture répétée . . . . . . . . . . . . . . . . . . . . . . . . . . . . . . . . 23
Lecture aléatoire . . . . . . . . . . . . . . . . . . . . . . . . . . . . . . . 24
Lecture des morceaux programmés . . . . . . . . . . . . . . . 24
Mode recherche. . . . . . . . . . . . . . . . . . . . . . . . . . . . . . . . 25
À propos du téléchargement de fichiers
MP3/WMA . . . . . . . . . . . . . . . . . . . . . . . . . . . . . . . . . . . . 26
À propos de l’ordre de lecture . . . . . . . . . . . . . . . . . . . . 26
Lecture d’un fichier DivX ou MP3/WMA/JPEG. . . . . . . 26
07 Lecture USB
Lecture à partir de contenu stocké sur un
périphérique USB . . . . . . . . . . . . . . . . . . . . . . . . . . . . . 27
Lecture d’un fichier DivX ou MP3/WMA/JPEG. . . . . . . 27
Lecture dans l’ordre souhaité
(Lecture programmée) . . . . . . . . . . . . . . . . . . . . . . . . . 28
08 Utilisation du tuner
Écoute d’émissions de radio . . . . . . . . . . . . . . . . . . . . 29
Accord . . . . . . . . . . . . . . . . . . . . . . . . . . . . . . . . . . . . . . . 29
Mémorisation des stations. . . . . . . . . . . . . . . . . . . . . . . 29
Rappel d’une station mémorisée. . . . . . . . . . . . . . . . . . 30
Pour balayer les stations préréglées . . . . . . . . . . . . . . . 30
Pour effacer toute la mémoire . . . . . . . . . . . . . . . . . . . . 30
Utilisation du système RDS (Radio Data System) . . . 30
Présentation du système RDS . . . . . . . . . . . . . . . . . . . . 30
Recherche de programmes RDS. . . . . . . . . . . . . . . . . . 30
Informations données par RDS . . . . . . . . . . . . . . . . . . . 31
Utilisation de la fonction de mémorisation
automatique des stations de radio (ASPM) . . . . . . . . . 31
Remarques au sujet du fonctionnement RDS . . . . . . . 31
09 Autres raccordements
Connexion de composants auxiliaires . . . . . . . . . . . . . 32
10 Lecture audio
Lecture de musique par la technologie sans fil
Bluetooth . . . . . . . . . . . . . . . . . . . . . . . . . . . . . . . . . . . . 33
Fonctionnement par télécommande . . . . . . . . . . . . . . 33
Association avec l’appareil
(enregistrement initial) . . . . . . . . . . . . . . . . . . . . . . . . . 33
Écouter de la musique sur l’appareil à partir d’un
périphérique sans fil Bluetooth . . . . . . . . . . . . . . . . . . 34
BT STANDBY . . . . . . . . . . . . . . . . . . . . . . . . . . . . . . . . . . 34
Précaution concernant les ondes radio . . . . . . . . . . . 35
Limite de fonctionnement. . . . . . . . . . . . . . . . . . . . . . . . 35
Réflexions des ondes radio. . . . . . . . . . . . . . . . . . . . . . . 35
Précautions relatives aux connexions à des produits
pris en compte par cet appareil. . . . . . . . . . . . . . . . . . . 35
Bluetooth
®
4
Fr
Page 51

11 Changement des réglages
Paramètres pour la lecture d’une source DVD/CD ou
USB . . . . . . . . . . . . . . . . . . . . . . . . . . . . . . . . . . . . . . . . .36
Paramètres Audio Settings . . . . . . . . . . . . . . . . . . . . . . 36
Paramètres Video Adjust . . . . . . . . . . . . . . . . . . . . . . . . 36
Paramètres Initial Settings. . . . . . . . . . . . . . . . . . . . . . . 36
Rétablissement des paramètres HDMI Resolution aux
valeurs par défaut . . . . . . . . . . . . . . . . . . . . . . . . . . . . . . 37
12 Informations supplémentaires
Guide de dépannage . . . . . . . . . . . . . . . . . . . . . . . . . . .38
Tableau des codes de langues et Tableau des codes
de pays et régions . . . . . . . . . . . . . . . . . . . . . . . . . . . . . .41
Tableau des codes de langues. . . . . . . . . . . . . . . . . . . . 41
Tableau des codes de pays et régions. . . . . . . . . . . . . . 41
Types de disque et formats de fichier lisibles . . . . . . .42
Disques non lisibles par l’appareil . . . . . . . . . . . . . . . . 42
À propos des codes régionaux. . . . . . . . . . . . . . . . . . . . 42
À propos des CD protégés contre la copie. . . . . . . . . . 42
À propos de la lecture des DualDisc. . . . . . . . . . . . . . . 42
Lecture de disques créés sur un ordinateur ou un
enregistreur BD/DVD . . . . . . . . . . . . . . . . . . . . . . . . . . . 43
Fichiers lisibles . . . . . . . . . . . . . . . . . . . . . . . . . . . . . . . .43
Formats de fichiers vidéo pris en charge . . . . . . . . . . . 43
Affichage de sous-titres externes . . . . . . . . . . . . . . . . . 43
Formats de fichiers d’images pris en charge . . . . . . . . 43
Formats de fichiers audio pris en charge. . . . . . . . . . . 44
Précautions dutilisation . . . . . . . . . . . . . . . . . . . . . . . . .44
Lors d’un déplacement de l’appareil. . . . . . . . . . . . . . . 44
Emplacement d’installation . . . . . . . . . . . . . . . . . . . . . . 44
Ne posez pas d’objets sur cet appareil . . . . . . . . . . . . . 44
À propos de la condensation . . . . . . . . . . . . . . . . . . . . . 44
Nettoyage de l’appareil. . . . . . . . . . . . . . . . . . . . . . . . . . 44
Nettoyage de la lentille . . . . . . . . . . . . . . . . . . . . . . . . . . 45
Manipulation d’un disque . . . . . . . . . . . . . . . . . . . . . . .45
Rangement . . . . . . . . . . . . . . . . . . . . . . . . . . . . . . . . . . . 45
Nettoyage des disques . . . . . . . . . . . . . . . . . . . . . . . . . . 45
À propos des disques de forme particulière. . . . . . . . . 45
À propos de l’iPod/iPhone/iPad . . . . . . . . . . . . . . . . . .45
Configuration de la fonction de mise hors tension
automatique . . . . . . . . . . . . . . . . . . . . . . . . . . . . . . . . . .45
Rétablissement de tous les réglages à leur valeur par
défaut . . . . . . . . . . . . . . . . . . . . . . . . . . . . . . . . . . . . . . . .46
Spécifications . . . . . . . . . . . . . . . . . . . . . . . . . . . . . . . . .46
5
Fr
Page 52

Préparatifs01
I
NP
U
T
Chapitre 1 :
Préparatifs
Contenu de l’emballage
Veuillez vérifier que les accessoires suivants sont présents
dans la boîte quand vous l’ouvrez.
• Télécommande
• Cordon d’alimentation
• Câble vidéo (1,5 m)
• Antenne FM à fil
• Piles « AAA (R03) » x 2
• Câble d’enceinte x 2
• Support pour iPhone/iPad
• Carte de garantie
• Mode d’emploi (ce document)
Mise en place des piles dans la
télécommande
1 Ouvrez le couvercle arrière et insérez les
piles comme sur l’illustration ci-dessous.
• Ne chauffez pas les piles, ne les ouvrez pas et ne les jetez
pas au feu ou dans l’eau.
• Les piles peuvent avoir des tensions différentes, même si
elles ont une taille et une forme identiques. N’utilisez
pas ensemble différents types de piles.
• Pour éviter toute fuite d’électrolyte, retirez les piles si
vous prévoyez de ne pas utiliser la télécommande
pendant un certain temps (1 mois ou plus). Si une pile
devait suinter, essuyez soigneusement l’intérieur du
logement, puis insérez de nouvelles piles. Si l’électrolyte
d’une pile devait couler et se répandre sur votre peau,
nettoyez le liquide avec une grande quantité d’eau.
• Lorsque vous éliminez des piles/batteries usées, veuillez
vous conformer aux normes gouvernementales ou aux
règles des institutions publiques environnementales en
vigueur dans votre pays ou région.
• AVERTISSEMENT
N’utilisez ni ne conservez les piles sous la lumière
directe du soleil ou dans un endroit excessivement
chaud, comme une voiture ou à proximité d’un appareil
de chauffage. Les piles risqueraient de fuir, de
surchauffer, d’exploser ou de s’enflammer. Leur durée
de vie et/ou leur performance pourrait également être
réduite.
Utilisation de la télécommande
La télécommande a une portée d’environ 7 mètres avec un
angle de 30° par rapport au capteur de télécommande.
2 Refermez le couvercle arrière.
ATTENTION
• Lors de l’insertion des piles, veillez à ne pas
endommager les ressorts des bornes de chaque pile.
Les piles risqueraient de fuir ou de surchauffer.
• N’utilisez que les piles spécifiées à l’exclusion de toute
autre. N’utilisez pas non plus une pile neuve avec une
pile usée.
• Lorsque vous insérez les piles dans la télécommande,
orientez-les correctement, comme indiqué par les
symboles de polarité ( et ).
6
Fr
30°
30°
7 m
Gardez à l’esprit ce qui suit lorsque vous utilisez la
télécommande :
• Assurez-vous de l’absence d’obstacles entre la
télécommande et le capteur de l’appareil.
• La télécommande risque de ne pas fonctionner
correctement si la lumière du soleil ou une lampe
fluorescente puissante éclaire le capteur de l’appareil.
• Les télécommandes d’autres appareils peuvent
interférer les unes sur les autres. Évitez d’utiliser des
télécommandes, contrôlant d’autres équipements
placés à proximité de cet appareil.
• Remplacez les piles lorsque vous constatez une
diminution de la portée de fonctionnement de la
télécommande.
Page 53

Les organes et leurs fonctions 02
English Français Deutsch
Nederlands
Italiano Español
Pyccкий
Chapitre 2 :
Les organes et leurs fonctions
2 Touches de fonction d’entrée
Télécommande
STANDBY/ON
1
2
DVD/CD USB TUNER
BT AUDIO
AUDIO SUBTITLE ANGLE
123
ZOOM MEMORY PROGRAM
456
3
ST/MONO VIDEO MODE A-B
789
CLEAR RPT/RDM
4
TOP MENU MENU/PBC
5
6
HOME MENU
PRESET VOLUME
+
7
–
RDS
SHIFT
8
9
10
1 1 STANDBY/ON
Cette touche permet d’allumer le récepteur et de le mettre en
veille (page 16).
OPEN/CLOSE
AUDIO IN/LINE
CLOCK/TIMER
SLEEP
EQUALIZER
P.B A S S
BASS/TREBLE
DISPLAY
0
TUNE+
ENTER
RETURN
TUNE–
+
MUTE
–
DIMMER
ASPM PTY DISPLAY
OPTION
11
12
13
14
15
16
17
18
Pour sélectionner la source d’entrée de ce récepteur
(pages 20, 21, 27, 29, 32 et 33).
BT AUDIO
Pour configurer ou lire le fichier audio via le réseau
Bluetooth (pages 33).
3 Touches numériques (0 à 9)
Ces touches permettent d’entrer des numéros (page 22).
AUDIO*
Le flux ou le canal audio peut être changé pendant la
lecture si le disque ou le fichier comprend plusieurs flux
ou canaux audio. Pour des fichiers mémorisés sur iPod/
iPhone/iPad, cette touche n’est pas disponible.
SUBTITLE*
La langue des sous-titres des disques DVD-Vidéo ou
DivX peut être changée pendant la lecture pourvu que
ces disques contiennent des sous-titres en plusieurs
langues. Pour des fichiers mémorisés sur iPod/iPhone/
iPad, cette touche n’est pas disponible.
ANGLE*
L’angle de prise de vue peut être changé pendant la
lecture si le DVD-Vidéo lu contient des scènes prises
sous plusieurs angles.
ZOOM*
Zoom avant sur l’image. Pour des images mémorisées
sur iPod/iPhone/iPad, cette touche n’est pas disponible.
MEMORY*
Pour mémoriser les stations de radio (page 29).
PROGRAM*
Pour programmer les médias DVD-Video, les disques
MP3/WMA ou les périphériques de stockage USB
(page 22).
ST/MONO*
Pour permuter entre le mode audio stéréo et le mode
mono (page 29).
VIDEO MODE*
Pour changer la résolution de sortie
(HDMI uniquement) (page 37).
A-B*
Le passage spécifié d’un titre ou d’une plage est lu de
façon répétée.
4
CLEAR
Appuyez pour supprimer l’élément sélectionné.
Pour effacer la programmation de lecture, par exemple
(page 24).
7
Fr
Page 54

Les organes et leurs fonctions02
5 Touches de commande du récepteur DVD
TOP MENU
Appuyez pour afficher la première page du menu du
DVD-Vidéo.
MENU/PBC
Cette touche permet d’accéder au menu DVD ou au
menu VCD PBC.
HOME MENU
Appuyez sur cette touche pour afficher l’écran de menu.
A utiliser pour changer les paramètres de l’appareil
(page 36).
HOME MENU
DVD
Audio Settings
Play Mode Disc Navigator
Initial Settings
• Audio Settings (page 36)
• Video Adjust (page 36)
• Play Mode
La fonction Play Mode peut ne pas agir pour certains
disques ou fichiers. Pour des fichiers mémorisés sur
iPod/iPhone/iPad, cette fonction n’est pas disponible.
Play Mode
A-B Repeat
Repeat
Random
Program
Search Mode
Setup playback functions such as Program. Random and
Repeat play
Move Select
A-B Repeat (page 22)
Le passage spécifié d’un titre ou d’une plage est lu de
façon répétée.
Repeat (page 23)
Les titres, chapitres, plages ou fichiers sont lus de façon
répétée.
Random (page 24)
Pour lire les titres, chapitres ou plages dans un ordre
aléatoire.
Program (page 24)
Les titres, chapitres, plages ou fichiers sont lus dans
l’ordre programmé.
Search Mode (page 25)
Restitute le numéro ou le temps spécifié à l’intérieur
d’un titre, d’un chapitre, d’une plage ou d’un fichier.
A(Start Point)
B(End Point)
Off
ENTER
Video Adjust
Exit
HOME MENU
• Disc Navigator
Sélectionnez et lisez le titre, le chapitre, la piste ou le
fichier à partir du Disc Navigator.
Ex. : DVD-Video Disc Navigator
01
04
Disc Navigator: Title
01- 49: – –
Move
02 03
05 06
Select
ENTER
Prev. Next
• Initial Settings (page 36)
RETURN
Appuyez pour revenir à la page précédente. A utiliser
également pour annuler le réglage de l’horloge ou le
réglage du son.
6
FGHI (TUNE +/–
Utilisez ces touches pour sélectionner les paramètres du
système, basculer entre les modes et confirmer les actions.
La touche TUNE +/– permet de rechercher/parcourir les
fréquences de station de radio (page 29).
7
PRESET +/–
Ces touches permettent de sélectionner des stations de radio
préréglées (page 30).
8
MUTE
Permet de couper/restaurer le son (page 16).
),
ENTER
9 Touches de commande de la fonction de
lecture
Ces touches permettent de contrôler chacune des fonctions
après avoir sélectionné la fonction désirée à l’aide des
touches de fonctions d’entrée (page 21).
!
Lance la lecture.
#
Appuyez pour arrêter la lecture.
+)/-
• Permet de revenir au début de la plage ou du fichier en
cours de lecture. Appuyez deux fois pour revenir au
début de la plage ou du fichier précédent.
• Appuyez sans relâcher pendant la lecture pour passer
en retour rapide.
• Permet de revoir les images une à une pendant la pause.
(DVD-Video uniquement)
• Maintenir un instant la pression pendant la pause
permet de ralentir la lecture vers l’arrière. (DVD-Video
uniquement)
,*0.
• Pendant la lecture, appuyez pour sauter au début de la
plage ou du fichier suivant.
8
Fr
Page 55

Les organes et leurs fonctions 02
English Français Deutsch
Nederlands
Italiano Español
Pyccкий
Play
Playback status
Time display
Subtitle Language
Audio Language
Audio format
DVD-Video
Current / Total
1 Chinese - - 1
Audio Dolby Digital 2 / 0 CH Subtitle Angle
1/4Title
Elapsed Remain Total
5:34 35:56 41:30
Play
PAUSE
Slow Backward
Slow Forward
Fast B ackward
Fast Forward
• Appuyez sans relâcher pendant la lecture pour passer
en avance rapide.
• Permet de faire défiler les images une à une pendant la
pause. (DVD-Video, Video CD ou fichiers DivX
uniquement)
• Maintenir un instant la pression pendant la pause
permet de ralentir la lecture vers l’avant. (DVD-Video,
Video CD ou fichiers DivX uniquement)
10
SHIFT
Appuyez sur cette touche pour accéder aux commandes
« bleues » (situées au-dessus des touches) de la
télécommande. Ces touches sont marquées d’un
astérisque (*) dans ce chapitre.
11 OPEN/CLOSE
Permet d’ouvrir ou de refermer le tiroir disque (page 21).
12 Touches de commande du récepteur DVD
CLOCK/TIMER
Pour le réglage de l’horloge, ainsi que pour la
programmation et la vérification des minuteries
(page 16).
SLEEP
Voir la section Utilisation du minuteur de mise en veille à
la page 18.
13 Touches de contrôle du son
Pour ajuster la qualité du son (page 17).
14
DISPLAY
Utilisez cette touche pour changer l’affichage entre DVDVideo, Video CD, CD et MP3.
Ex. : DVD-Video DISPLAY
15
RPT/RDM
Cette touche permet de changer les paramètres de lecture
répétée et de lecture aléatoire pour la lecture d’un DVD-Video,
d’un Video CD, d’un ou l’CD iPod (page 22).
16 Touches de commande de préréglage
Volume
Pour ajuster le volume d’écoute (page 16).
17
DIMMER
Permet d’obscurcir ou d’éclaircir l’affichage. Quatre étapes
sont nécessaires pour commander la luminosité (page 16).
18 Touches de commande de préréglage
Tuner
RDS ASPM
Pour effectuer une recherche automatique des stations
de radio RDS (page 30).
RDS PTY
Permet de rechercher des programmes de type RDS
(page 30).
RDS DISPLAY
Pour changer le mode d’affichage des informations RDS
(page 30).
Démontage et remontage de la
grille de protection avant
La grille de protection avant de chaque enceinte est amovible.
Procédez comme suit :
1 Saisissez la grille par le bas et tirez-la
doucement vers vous pour dégager la partie
inférieure.
2 Ensuite, saisissez la grille par le haut et tirezla doucement vers vous pour dégager la partie
supérieure.
3 Pour installer la grille, alignez les parties
saillantes sur l’enceinte avec les parties en creux
en haut et en bas de la grille et poussez sur la
grille pour la fixer en place sur l’enceinte.
9
Fr
Page 56

Les organes et leurs fonctions02
Panneau avant
2 51 3 4
STANDBY/ON
TIMER
INPUT
PHONES AUDIO IN
7 86 9 11 1210
1Touche 1 STANDBY/ON
Cette touche permet d’allumer le récepteur et de le mettre en
veille (page 16).
2 Capteur de télécommande
Reçoit les signaux provenant de la télécommande.
3 Témoin
S’allume lorsque la fonction de réveille-matin est activée,
même si l’appareil est à l’arrêt.
TIMER
4 Afficheur alphanumérique
Voir la section Afficheur à la page 11.
5 Commande de volume
Pour ajuster le volume d’écoute (page 16).
6 Touche INPUT
Permet de sélectionner la source d’entrée.
Une pression longue permet de passer en mode BT
STANDBY.
7 Prise casque/écouteurs
Permet de raccorder un casque. Lorsque le casque est
branché, les enceintes ne fournissent aucun son (page 18).
VOLUME
8 Prise AUDIO IN
Pour raccorder un équipement auxiliaire à l’aide d’un câble
stéréo mini-jack (page 32).
9 Prise USB
Permet de raccorder votre périphérique de stockage de
masse USB ou votre iPod/iPhone/iPad Apple pour l’utiliser
comme source audio (pages 20 et 27).
10 Tiroir d’insertion du disque
Placez le disque côté étiquette vers le haut (page 21).
11 Touches de commande de la fonction de
lecture
Ces touches permettent de sélectionner la piste ou le fichier
à lire. Pour arrêter la lecture en cours. Pour arrêter la lecture
ou reprendre la lecture à partir de l’endroit où elle a été mise
en pause.
12 Touche d’ouverture/fermeture du tiroir
disque
Permet d’ouvrir ou de refermer le tiroir disque (page 21).
10
Fr
Page 57

Les organes et leurs fonctions 02
English Français Deutsch
Nederlands
Italiano Español
Pyccкий
1 32 4
5
Afficheur
1
S’allume lorsque le son est coupé.
Remarque
• L’icône de silence est affichée en rouge.
2
Permet de lancer la lecture.
3 !
Pour mettre la lecture en pause.
4
La fonction réveille-matin est activée.
5 Afficheur alphanumérique
Affiche diverses informations sur le système.
11
Fr
Page 58

Connexions03
Y
Chapitre 3 :
Connexions
ATTENTION
• Veillez à mettre l’appareil hors tension et à débrancher le
cordon d’alimentation de la prise secteur à chaque fois
que vous effectuez ou que vous modifiez des
connexions.
• Branchez le cordon d’alimentation une fois que toutes
les connexions entre les différents équipements ont été
effectuées.
Raccordement des enceintes
• Le fil d’enceinte fourni portant le repère en tube rouge
doit être raccordé à la borne plus (+). Raccordez le fil
portant le repère en tube rouge à la borne plus (+) et
l’autre fil à la borne moins (–).
+
12
Fr
Enceinte gaucheEnceinte droite
SPEAKERS
P
RL
Panneau arrière de cet appareil
Câble d’enceinte
fourni
P
OU
Tube rouge
Page 59

Connexions 03
English Français Deutsch
Nederlands
Italiano Español
Pyccкий
ANTENNA
VIDEO
OUT
OUT
COMPONENT
VIDEO
OUT
IN
LINE
PB
PR
Y
L
R
FM
UNBAL 75 Ω
HDMI
RS
L
Panneau arrière de cet appareil
Câble vidéo en
composantes
(disponible dans le
commerce)
Câble vidéo
(fourni)
Vers la prise
d’entrée vidéo
Jaune
Téléviseur
ATTENTION
• Les bornes des haut-parleurs sont sous une tension
ACTIVE DANGEREUSE. Pour éviter tout risque de
décharge électrique lors du branchement et du
débranchement des câbles de haut-parleur, débranchez
le cordon d’alimentation avant de toucher des parties
non isolées.
• Ne raccordez à ce système aucun haut-parleur autre que
ceux qui sont fournis.
• Ne raccordez pas les haut-parleurs fournis à un
amplificateur autre que celui fourni avec ce système.
Une telle connexion pourrait provoquer une défaillance,
voire un incendie.
• Ne fixez pas ces enceintes sur un mur ou au plafond. Ils
pourraient causer des blessures en tombant.
• Ces enceintes sont protégées contre les interférences
électromagnétiques. Toutefois, selon l’emplacement
d’installation, un phénomène de distorsion des couleurs
peut se produire dans le cas où les enceintes sont
installées à proximité immédiate de l’écran du
téléviseur. Dans ce cas, mettez le téléviseur hors tension
puis remettez-le sous tension après 15 à 30 minutes. Si
le problème persiste, éloignez les enceintes du
téléviseur.
• Vérifiez que les âmes des câbles d’enceintes ne soient
pas exposées et qu’elles ne viennent pas en contact avec
les âmes des autres câbles. Ceci pourrait causer un
dysfonctionnement de l’appareil.
• Ne laissez pas l’âme des câbles d’enceintes venir en
contact avec le boîtier du récepteur.
• Il n’y a aucune différence entre les enceintes gauche (L)
- Si l’âme des câbles d’enceintes entraient en contact
avec une partie métallique du boîtier du récepteur, cela
créerait un court-circuit qui pourrait endommager les
enceintes et provoquer un départ de feu.
Insérez correctement les câbles d’enceintes dans les
bornes et vérifiez que les câbles ne peuvent pas se
détacher facilement.
Remarque
et droite (R).
Raccordement avec un câble HDMI
Lorsqu’un câble HDMI est utilisé, les signaux numériques
peuvent être transférés sur un téléviseur compatible HDMI
par un seul câble, sans perte de qualité de l’image et du son.
Après avoir raccordé le câble, réglez la résolution et la
couleur HDMI de cet appareil en fonction du téléviseur
compatible HDMI utilisé. Reportez-vous aussi au mode
d’emploi fourni avec le téléviseur compatible HDMI.
Remarque
• A la lecture du contenu d’un disque ou d’une clé de
mémoire USB, cet appareil peut transférer les signaux
numériques via la borne HDMI OUT. Utilisez le câble
vidéo pour la lecture d’autres contenus.
• L’interface de ce lecteur est conforme aux spécifications
High-Definition Multimedia Interface (HDMI).
• Lorsqu’un appareil compatible HDMI est raccordé, la
résolution apparaît sur l’afficheur de la face avant.
• La résolution des signaux vidéo restitués par la borne
HDMI OUT de cet appareil se change manuellement.
Changez le réglage HDMI Resolution (page 37).
13
Fr
Page 60

Connexions03
OUT
COMPONENT
VIDEO
OUT
I
L
PB
PR R
HDMI
L
Faites correspondre le
sens de la fiche et de la
borne et insérez tout
droit.
A la borne
d’entrée HDMI
Câble HDMI
(disponible
dans le
commerce)
Téléviseur
Panneau arrière de
cet appareil
Y
Panneau arrière de
cet appareil
Antenne FM à fil
(fournie)
• Cet appareil peut être raccordé à des appareils
compatibles HDMI. Il se peut qu’il ne fonctionne pas
correctement s’il est raccordé à un appareil DVI.
Les termes HDMI et HDMI High-Definition Multimedia
Interface ainsi que le logo HDMI sont des marques
commerciales ou des marques déposées de HDMI Licensing,
LLC aux États-Unis et dans d’autres pays.
Signaux audio pouvant être restitués
par la prise HDMI OUT de cet appareil
• Son PCM linéaire à 2 canaux de 44,1 kHz à 96 kHz,
16 bits/20 bits/24 bits (remixage en 2 canaux compris)
• Son Dolby Digital 5.1 canaux
•Son MPEG
• Fabriqué sous licence de Dolby Laboratories. Dolby et le
symbole double-D sont des marques déposées de Dolby
Laboratories.
Connexion de l’antenne FM
Branchez la fiche de l’antenne FM sur la broche centrale de
la prise d’antenne FM.
PR
PB
OUT
COMPONENT
VIDEO
R
L
IN
LINE
ANTENNA
FM
UNBAL 75 Ω
14
Fr
Remarque
• Pour bénéficier d’une réception optimale, assurez-vous
que l’antenne FM est complètement déployée et qu’elle
ne reste pas enroulée ou pendante à l’arrière de
l’appareil.
Page 61

Connexions 03
English Français Deutsch
Nederlands
Italiano Español
Pyccкий
ANTENNA
FM
UNBAL 75 Ω
OUT
C
V
O
HDMI
AC IN
RL
À la prise
secteur
Panneau arrière de cet appareil
Cordon d’alimentation
Utilisation des antennes externes
Pour améliorer la réception FM
Utilisez un connecteur de type PAL (non fourni) pour
raccorder une antenne FM externe.
Connecteur
rapide PAL
Câble coaxial 75 :
Branchement
ATTENTION
• N’utilisez aucun autre cordon d’alimentation que celui
fourni avec cet appareil.
• N’utilisez pas le cordon d’alimentation fourni à d’autres
fins que celles décrites ci-dessous.
Avant d’effectuer ou de modifier les raccordements, mettez
l’appareil hors tension et débranchez le cordon
d’alimentation au niveau de la prise secteur.
Après avoir effectué toutes les connexions, branchez
l’appareil sur une prise secteur.
15
Fr
Page 62

Pour commencer04
TOP MENU MENU/PBC
HOME MENU
PRESET VOLUME
TUNE–
TUNE+
RETURN
ENTER
DVD/CD
FM
AUDIO IN
LINE
USB/iPod
BT AUDIO
Chapitre 4 :
Pour commencer
Pour allumer l’appareil
Appuyez sur la touche 1 STANDBY/ON pour mettre
l’appareil sous tension.
Après utilisation :
Appuyez sur 1 STANDBY/ON pour passer en mode veille.
Remarque
• En mode veille, si un iPod/iPhone/iPad est connecté,
l’appareil se met en mode de recharge.
Réglage de l’horloge
STANDBY/ON
DVD/CD USB TUNER
AUDIO SUBTITLE ANGLE
1 Appuyez sur
sous tension.
2 Appuyez sur la touche
télécommande.
« CLOCK » apparaît sur l’afficheur principal.
3 Appuyez sur la touche
4 Utilisez les touches
puis appuyez sur
5 Utilisez les touches
l’heure, puis appuyez sur
6 Utilisez les touches
minutes, puis appuyez sur
confirmer.
7 Appuyez sur la touche
Pour vérifier l’heure :
Appuyez sur CLOCK/TIMER. L’afficheur indiquera l’heure
pour 10 secondes environ.
Pour remettre l’horloge à l’heure :
Suivez la procédure de “Réglage de l’horloge” à partir de
l’étape 1.
BT AUDIO
OPEN/CLOSE
AUDIO IN/LINE
CLOCK/TIMER
SLEEP
EQUALIZER
1 STANDBY/ON
ENTER
pour la mise
CLOCK/TIMER
ENTER
.
HI
pour régler le jour,
.
HI
pour régler
ENTER
.
HI
pour régler les
ENTER
pour
ENTER
.
de la
Remarque
• Remettre l’horloge à l’heure lorsque l’alimentation est
rétablie après que l’appareil ait été rebranché ou après
une panne d’électricité.
Commandes générales
Fonction d’entrée
La touche INPUT située sur le panneau supérieur de
l’appareil permet de permuter la source d’entrée. Appuyez sur
la touche INPUT à plusieurs reprises pour sélectionner la
source souhaitée.
Contrôle de la luminosité de
l’affichage
Appuyez sur la touche DIMMER pour atténuer la luminosité
de l’affichage. Quatre étapes sont nécessaires pour
commander la luminosité.
Réglage automatique du volume initial
Si vous mettez en marche ou si vous arrêtez l’appareil avec le
volume réglé au niveau 31 ou supérieur, le volume se règle
automatiquement sur 30.
Commande de volume
Tourner le bouton du volume vers VOLUME (sur l’appareil
principal) ou appuyer sur VOLUME +/– (sur la
télécommande) pour augmenter ou baisser le volume.
ATTENTION
• Le niveau sonore émis à un réglage donné du volume
dépend, entre autres facteurs, du rendement des
enceintes et du lieu d’utilisation. Il est conseillé d’éviter
l’exposition à des niveaux de volume élevés. Éviter de
trop élever le volume. Écoutez de la musique à des
niveaux modérés. Un volume sonore excessif émis par
les écouteurs et le casque peut endommager l’ouïe.
Sourdine
Pour couper le son temporairement, maintenez enfoncé la
touche MUTE de la télécommande. Appuyer de nouveau pour
restaurer le volume.
16
Fr
Page 63

Pour commencer 04
English Français Deutsch
Nederlands
Italiano Español
Pyccкий
NIGHT
FLAT Son de base à caractéristique plate
ACTIVE
DIALOGUE
Son permettant une meilleure écoute
à bas volume, par exemple la nuit
Son puissant avec accentuation
des registres grave et aigu
Son permettant une meilleure
écoute de la radio et de la parole
Commandes de son
Equalizer
Lorsque vous appuyez sur la touche EQUALIZER, le mode en
cours est affiché. Pour changer de mode, appuyez à plusieurs
reprises sur la touche EQUALIZER jusqu’à ce que le mode
audio souhaité s’affiche.
Touche P.BASS
Le mode de fréquences graves change à chaque pression sur
la touche P.BASS de la télécommande.
Remarque
•La fonction P.BASS est activée par défaut (ON).
Touche de réglage grave/aigu
Appuyez sur la touche BASS/TREBLE puis utilisez les touches
FG/HI pour régler les graves ou les aigus.
Remarque
•Les fonctions EQUALIZER et P.BASS ne peuvent pas être
utilisées simultanément. La dernière fonction à avoir été
utilisée sera utilisée la prochaine fois.
•La fonction BASS/TREBLE peut être utilisée
simultanément avec les fonctions EQUALIZER ou
P.BASS.
Lorsqu’une des deux fonctions ci-dessus
est sélectionnée, la fonction qui n’est pas
sélectionnée est affichée comme suit.
1 Lorsque le réglage de la fonction
(
ON/OFF
) est changé.
• EQUALIZER : FLAT
2 Lorsque le réglage de la fonction
EQUALIZER
• P.BASS : OFF
est changé.
P.BASS
Réglage de l’alarme de réveil
Vous pouvez modifier les réglages de l’alarme de réveillematin en cours ou définir une nouvelle alarme.
1 Appuyez sur
sous tension.
2 Appuyez sans relâcher sur la touche
TIMER
.
3 Utilisez les touches
« ONCE » (une fois) ou « DAILY » (tous les jours),
puis appuyez sur
ONCE – Le réveille-matin se déclenchera une seule fois
à l’heure choisie.
DAILY – Le réveille-matin se déclenchera à l’heure
choisie pour le jour choisi.
4 Utilisez les touches
l’option «
touche
ENTER
5 Utilisez les touches
la source de lecture utilisée par le réveil, puis
appuyez sur la touche
• Les sources d’entrée DVD/CD, FM, USB/iPod, BT
AUIDIO, AUDIO IN et LINE peuvent être sélectionnées
comme source de lecture.
6 Utilisez les touches
le jour de l’alarme, puis appuyez sur la touche
ENTER
.
7 Utilisez les touches
l’heure, puis appuyez sur
8 Utilisez les touches
minutes, puis appuyez sur
• Programmer l’heure d’arrêt comme décrit dans les
étapes 7 et 8.
9 Réglez le volume à l’aide de la touche
VOLUME +/–
10 Appuyez sur
en mode veille.
• Le voyant TIMER s’allume.
1 STANDBY/ON
HI
ENTER
.
HI
TIMER
SET », puis appuyez sur la
.
HI
ENTER
HI
HI
ENTER
HI
ENTER
, puis appuyez sur
1 STANDBY/ON
pour sélectionner
pour sélectionner
pour sélectionner
.
pour sélectionner
pour régler
pour définir les
pour la mise
CLOCK/
.
.
ENTER
.
pour passer
17
Fr
Page 64

Pour commencer04
Rappel de l’alarme de réveil
Un réglage de réveille-matin peut être réutilisé.
1 Suivez les étapes 1 à 3 décrite dans la section
« Setting the wake-up timer ».
2 Appuyez sur
«
TIMER ON
HI
pour sélectionner
», puis appuyez sur
ENTER
.
Annulation de l’alarme de réveil
Pour désactiver la fonction réveille-matin.
1 Suivez les étapes 1 à 3 décrite dans la section
« Setting the wake-up timer ».
2 Appuyez sur
«
TIMER OFF
HI
pour sélectionner
», puis appuyez sur
ENTER
.
Utilisation du réveil
1 Appuyez sur
l’alimentation.
2 Au moment du réveil, cet appareil sera
automatiquement mis sous tension et il fera
entendre la source d’entrée sélectionnée.
Remarque
• Si un iPod/iPhone/iPad n’est pas branché sur cet
appareil ou si un disque n’est pas inséré, l’appareil ne
sera pas activé et aucune plage ne sera reproduite.
• Certains disques ne conviennent pas à une lecture
automatique au moment du réveil.
• Lors du réglage de la fonction réveille-matin, définissez
une plage de lecture d’au moins une minute entre le
début et la fin.
1 STANDBY/ON
pour couper
Utilisation avec un casque
Branchez le connecteur du casque à la prise PHONES.
Lorsque le casque est branché, les enceintes ne fournissent
aucun son.
STANDBY/ON
TIMER
INPUT
PHONES AUDIO IN
• Ne pas tourner le volume à fond à la mise en route et
écouter la musique à des niveaux modérés. Un volume
sonore excessif émis par les écouteurs et le casque peut
endommager l’ouïe.
• Avant de brancher ou de débrancher le casque, réduire
le niveau sonore.
• Utiliser un casque muni d’une fiche de 3,5 mm de
diamètre et ayant une impédance de 16 à 50 ohms.
L’impédance préconisée est de 32 ohms.
• Le son d’un iPod/iPhone/iPad connecté à l’appareil ne
peut pas être écouté au moyen d’un casque ou
d’écouteurs branché(s) sur la prise casque de l’appareil.
L’indication « HP MUTE » s’affiche si vous connectez un
casque ou des écouteurs lorsque la fonction iPod/
iPhone/iPad est sélectionnée.
VOLUME
Utilisation du minuteur de mise en
veille
Le minuteur de mise en veille met l’appareil hors tension
après le délai spécifié pour que vous puissiez vous endormir
l’esprit tranquille.
1 Appuyez de façon répétée sur
sélectionner la durée avant la mise à l’arrêt.
Choisissez enter 10 min, 20 min, 30 min, 60 min, 90 min,
120 min, 150 min, 180 min ou Hors service. La nouvelle valeur
programmée s’affiche pendant 5 secondes et le réglage est
ainsi terminé.
Remarque
• Le minuteur de mise en veille peut être réglé en
appuyant sur SLEEP pendant que la durée restante est
affichée.
18
Fr
SLEEP
pour
Page 65

Lecture d’une source iPod/iPhone/iPad 05
English Français Deutsch
Nederlands
Italiano Español
Pyccкий
Chapitre 5 :
Lecture d’une source iPod/iPhone/iPad
En raccordant simplement votre iPod/iPhone/iPad à cet
appareil, vous pouvez profiter d’un son de grande qualité
directement à partir de votre iPod/iPhone/iPad. Cet appareil
ne peut pas transférer de la musique, des films ou des images
à partir d’un iPod/iPhone/iPad via les prises HDMI OUT et
COMPONENT VIDEO. Les commandes de lecture de
musique et d’affichage des images peuvent être contrôlées à
partir de cet appareil ou directement sur l’iPod/iPhone/iPad.
Vérification des modèles d’iPod/
iPhone/iPad pris en charge
Les iPod/iPhone/iPad utilisables sur cet appareil sont
indiqués ci-après.
iPod/iPhone/iPad
iPod nano (3/4/5/6/7G)
iPod touch (1/2/3/4/5G)
iPhone 5
iPhone 5s
iPhone 5c
iPhone 4s
iPhone 4
iPhone 3GS
iPhone 3G
iPhone
iPad mini
iPad mini avec écran Retina
iPad Air
iPad (3/4G)
iPad/iPad 2
Remarque
• Pioneer ne garantit pas que cet appareil convienne à des
iPod/iPhone/iPad, autres que ceux qui sont spécifiés.
• Certaines fonctions peuvent ne pas être accessibles en
fonction du modèle et de la version du logiciel.
• L’emploi de l’iPod/iPhone/iPad est autorisé pour la
reproduction de contenus non protégés ou de contenus
que l’utilisateur est autorisé à reproduire légalement.
• Les fonctions telles que l’égaliseur ne peuvent pas être
commandées en utilisant ce système et nous
recommandons de désactiver l’égaliseur avant la
connexion.
Prise USB (audio
uniquement)
• Pioneer ne peut en aucun cas être tenu responsable
pour toute perte directe ou indirecte, liée à un problème
ou une perte des données enregistrées à la suite d’une
défaillance de l’iPod/iPhone/iPad.
• Pour des instructions détaillées sur l’utilisation de
l’iPod/iPhone/iPad, veuillez vous reporter au mode
d’emploi qui accompagne votre iPod/iPhone/iPad.
• Ce système a été développé et testé pour la version du
logiciel iPod/iPhone/iPad indiquée sur le site Web de
Pioneer (http://pioneer.jp/homeav/support/ios/eu/).
• L’installation sur votre iPod/iPhone/iPad de versions de
logiciel autres que celles indiquées sur le site Web de
Pioneer peut provoquer des problèmes d’incompatibilité
avec ce système.
• Cette unité ne peut pas servir pour enregistrer un CD,
une émission d’un tuner ou le contenu d’un iPod/
iPhone/iPad.
Connexion de votre iPod/iPhone/
iPad
ATTENTION
• Pour connecter un iPod/iPhone/iPad, utilisez le câble
iPod/iPhone/iPad fourni avec votre iPod/iPhone/iPad,
ou bien un câble disponible dans le commerce
spécifiquement conçu pour iPod/iPhone/iPad.
• Cet appareil n’est pas fourni avec un câble iPod/iPhone/
iPad.
Important
• Si vous avez installé un rabat de protection pour iPod/
iPhone/iPad (accessoire disponible dans le commerce),
il est possible que cela empêche de connecter l’iPod/
iPhone/iPad à l’appareil.
Connexion d’un iPod/iPhone/iPad à
l’aide du support fourni
1 Connectez l’iPod/iPhone/iPad à l’appareil à
l’aide du câble iPod/iPhone/iPad.
Câble iPod/iPhone/iPad
19
Fr
Page 66

Lecture d’une source iPod/iPhone/iPad05
2 Placez l’iPod/iPhone/iPad sur le support.
Utilisation du support avec un iPod/iPhone
Veillez à ce que le câble iPod/iPhone passe bien dans la
rainure prévue à cet effet à l’arrière du support fourni avec
l’appareil.
Arrière du support
Câble iPod/
iPhone
Utilisation du support avec un iPad
Veillez à placez l’iPad horizontalement sur le support.
Lecture à partir d’un iPod/iPhone/
iPad
1 Connectez votre iPod/iPhone/iPad.
• Si un iPod/iPhone/iPad est connecté alors que l’appareil
est déjà en marche, la lecture à partir de l’iPod/iPhone/
iPad ne commence pas.
2 Sélectionnez
« USB/iPod » apparaît sur l’afficheur principal.
3 Une fois l’équipement connecté reconnu, la
lecture commence automatiquement.
• Les commandes de l’appareil disponibles pour la lecture
à partir d’un iPod/iPhone/iPad sont !, + ), *
,.
ATTENTION
• Quand votre iPod/iPhone/iPad est connecté à cet
appareil et que vous souhaitez le faire fonctionner en le
touchant directement, assurez-vous de tenir l’iPod/
iPhone/iPad avec l’autre main pour éviter un mauvais
fonctionnement causé par un contact défectueux.
Remarque
• Pour des instructions détaillées sur l’utilisation de
l’iPod/iPhone/iPad, veuillez vous reporter au mode
d’emploi qui accompagne votre iPod/iPhone/iPad.
• L’iPod/iPhone/iPad se charge chaque fois qu’il est
connecté à cet appareil. (Cela vaut également lorsque
l’appareil est en mode veille.)
• Lorsque la source d’entrée de l’appareil est changée
depuis USB/iPod vers une autre source, la lecture à
partir de l’iPod/iPhone/iPad est arrêtée temporairement.
• Lorsqu’un iPod/iPhone/iPad n’est pas en cours de
lecture et qu’aucune opération n’a été effectuée depuis
20 minutes, l’appareil se met automatiquement à l’arrêt.
Pour cela, il est nécessaire d’activer (ON) la fonction
d’arrêt automatique la fonction de mise hors tension
automatique.
• La fonction de mise hors tension automatique peut être
activée/désactivée (ON/OFF) (page 45).
Important
Si cet appareil ne peut assurer la lecture de votre iPod/
iPhone/iPad, effectuez les vérifications suivantes :
• Vérifiez si l’iPod/iPhone/iPad est pris en charge par cet
appareil.
• Reconnectez l’iPod/iPhone/iPad à l’appareil. Si cela ne
permet pas de résoudre le problème, essayez de
réinitialiser votre iPod/iPhone/iPad.
• Vérifiez si l’iPod/iPhone/iPad est pris en charge par cet
appareil.
Si l’iPod/iPhone/iPad ne peut pas être utilisé, vérifiez les
points suivants :
• L’iPod/iPhone/iPad est-il raccordé correctement ?
Reconnectez l’iPod/iPhone/iPad à l’appareil.
• L’iPod/iPhone/iPad est-il figé ? Essayez de réinitialiser
l’iPod/iPhone/iPad et de le reconnecter à l’appareil.
USB
comme source d’entrée.
20
Fr
Page 67

Lecture de disque 06
English Français Deutsch
Nederlands
Italiano Español
Pyccкий
Chapitre 6 :
Lecture de disque
Lecture de disques ou de fichiers
1 Appuyez sur
sous tension.
La source sélectionnée est affichée sur le panneau avant de
l’appareil.
• Lors de la lecture de disques ou de fichiers, mettez le
téléviseur en marche et permutez l’entrée TV avant de
commencer.
• Vous pouvez changer la langue d’affichage sur l’écran
(Pramètres Display (affichage) à la page 37).
2 Appuyez sur la touche
télécommande ou appuyez à plusieurs reprises
sur la touche
sélectionner la source d’entrée
Patientez jusqu’à ce que l’indication « NO DISC » s’affiche.
Si un disque est déjà inséré dans le tiroir disque, appuyez sur
$ OPEN/CLOSE pour éjecter le disque.
3 Appuyez sur la touche
ouvrir le tiroir disque.
4 Placez le disque sur le tiroir disque, côté
étiquette vers le haut.
1 STANDBY/ON
INPUT
de l’appareil pour
DVD/CD
DVD/CD
$ OPEN/CLOSE
pour la mise
de la
.
pour
ATTENTION
• Ne placez pas deux disques dans un seul tiroir de
disque.
• Ne pas utiliser de disques de formes spéciales (cœur,
octogone, etc.). Ceci risque de provoquer des
dysfonctionnements.
• Ne pas pousser le tiroir en cours de mouvement.
• S’il se produit une panne de courant alors que le tiroir
est ouvert, attendre le rétablissement du courant.
• Penser à placer le disque de 8 cm au centre du tiroir de
disque.
Remarque
• En raison de la structure des informations sur le disque, la
lecture d’un disque contenant de nombreux fichiers prend
plus de temps que la lecture d’un CD normal (de 20 à
90 secondes environ).
• Lorsque le début de la première piste est atteint en cours
de retour rapide, l’appareil passe en mode lecture.
• Les disques multisessions réinscriptibles non finalisés
peuvent être lus.
• En cas d’interférences TV ou radio pendant la lecture d’un
DVD/CD, éloignez l’appareil du téléviseur ou du poste de
radio.
Astuce
• Si aucune opération n’a été effectuée en mode DVD/CD
ou si le fichier audio n’a pas été lu depuis plus de
20 minutes, l’appareil se met automatiquement hors
tension. Pour cela, il est nécessaire d’activer (ON) la
fonction d’arrêt automatique la fonction de mise hors
tension automatique.
• La fonction de mise hors tension automatique peut être
activée/désactivée (ON/OFF) (page 45).
5 Appuyez sur la touche
refermer le tiroir disque.
6 Appuyez sur
disque.
$ OPEN/CLOSE
!
pour lancer la lecture du
pour
21
Fr
Page 68

Lecture de disque06
Move Select ENTER Exit
HOME MENU
Play Mode
Setup playback functions such as Program. Random and
Repeat play
A(Start Point)
B(End Point)
Off
A-B Repeat
Repeat
Random
Program
Search Mode
Lecture avancée de disque DVD ou
CD
STANDBY/ON
DVD/CD USB TUNER
AUDIO SUBTITLE ANGLE
123
ZOOM MEMORY PROGRAM
456
ST/MONO VIDEO MODE A-B
789
CLEAR RPT/RDM
TOP MENU MENU/PBC
BT AUDIO
0
TUNE+
OPEN/CLOSE
CLOCK/TIMER
BASS/TREBLE
AUDIO IN/LINE
SLEEP
EQUALIZER
P.B AS S
DISPLAY
Recherche directe de morceaux
Par les touches numériques (de 0 à 9), vous pouvez spécifier
et lire le titre, le chapitre, la plage ou le fichier que vous
souhaitez voir ou écouter.
Utilisez les touches numérotées de la
télécommande pour sélectionner le titre, le
chapitre, la piste ou le fichier souhaité pendant que
l’appareil est en train de lire le disque.
Remarque
• Il n’est pas possible de sélectionner des numéros de
titre, de chapitre, de piste ou de fichier plus élevés que le
nombre de titres, de chapitres, de pistes ou de fichiers
sur le disque.
• La recherche directe d’une piste n’est pas possible en
mode de lecture aléatoire.
Arrêt de la lecture :
Appuyez sur la touche #.
0
TOP MENU MENU/PBC
TUNE+
ENTER
HOME MENU
PRESET VOLUME
+
–
RDS
SHIFT
RETURN
TUNE–
+
MUTE
–
DIMMER
ASPM PTY DISPLAY
Lecture répétée (A-B Repeat)
Le passage spécifié d’un titre ou d’une plage est lu de façon
répétée.
1 Appuyez sur la touche
La page HOME MENU est affichée.
Audio Settings
Play Mode
Initial Settings
2 Utilisez les touches
Play Mode
Lécran Play Mode saffiche.
, puis appuyez sur ENTER.
3 Utilisez les touches
A-B Repeat
, puis appuyez sur ENTER ou sur I.
4 Utilisez les touches
le début A(Start Point) de la boucle.
HOME MENU
HOME MENU
DVD
FG
FG
FG
.
Video Adjust
Disc Navigator
pour sélectionner
pour sélectionner
pour sélectionner
22
Fr
Page 69

Lecture de disque 06
English Français Deutsch
Nederlands
Italiano Español
Pyccкий
Move Select ENTER Exit
HOME MENU
Play Mode
Setup playback functions such as Program. Random and
Repeat play
A(Start Point)
B(End Point)
Off
A-B Repeat
Repeat
Random
Program
Search Mode
Move Select ENTER Exit
HOME MENU
Play Mode
Setup playback functions such as Program. Random and
Repeat play
Title Repeat
Chapter Repeat
Repeat Off
A-B Repeat
Repeat
Random
Program
Search Mode
5 Utilisez les touches
FG
pour sélectionner
la fin B(End Point) de la boucle.
Remarque
• Lorsque la lecture répétée commence, l’indication « A-B
repeat » s’affiche sur l’écran.
• Sur certains disques, la fonction de lecture répétée A-B
est désactivée.
• Pour les DVD, la lecture répétée A-B est possible
uniquement à l’intérieur d’un même titre.
• Pour les disques CD, la lecture répétée A-B est possible
uniquement à l’intérieur d’une même piste.
• Certaines scènes d’un DVD peuvent ne pas permettre la
répétition A-B.
Pour annuler la lecture répétée A-B :
1 Utilisez
FG
pour sélectionner
Play Mode
A-B Repeat
Repeat
Random
Program
Search Mode
Setup playback functions such as Program. Random and
Repeat play
Move Select ENTER Exit
A(Start Point)
B(End Point)
Off
Off
.
HOME MENU
Lecture répétée
Les titres, chapitres, plages ou fichiers sont lus de façon
répétée.
1 Suivez les étapes 1 et 2 de la section
« Lecture répétée (A-B Repeat) ».
2 Utilisez les touches
Repeat
, puis appuyez sur ENTER ou sur I.
3 Utilisez les touches
le titre à répéter.
L’indication « REPEAT TITLE » apparaît sur l’affichage
principal.
Play Mode
A-B Repeat
Repeat
Random
Program
Search Mode
Setup playback functions such as Program. Random and
Repeat play
Move Select ENTER Exit
Remarque
• L’illustration montre l’affichage lors de la lecture d’un
DVD.
• Après avoir utilisé la lecture répétée, n’oubliez pas
d’appuyer sur la touche #. Sinon, le disque sera lu
continuellement.
• Pendant la lecture répétée, la lecture aléatoire n’est pas
disponible.
Pour annuler la répétition :
1 Utilisez
L’indication « REPEAT OFF » apparaît sur l’affichage
principal.
FG
FG
pour sélectionner
FG
pour sélectionner
Title Repeat
Chapter Repeat
Repeat Off
pour sélectionner
HOME MENU
Repeat Off
.
23
Fr
Page 70

Lecture de disque06
Move Select ENTER Exit
HOME MENU
Play Mode
Setup playback functions such as Program. Random and
Repeat play
Random Title
Random Chapter
Random Off
A-B Repeat
Repeat
Random
Program
Search Mode
Lecture aléatoire
Pour lire les titres, chapitres ou plages dans un ordre
aléatoire.
1 Suivez les étapes 1 et 2 de la section
« Lecture répétée (A-B Repeat) ».
2 Utilisez les touches
Random
3 Utilisez
L’indication « RANDOM TITLE » apparaît sur l’affichage
principal.
, puis appuyez sur ENTER ou sur I.
FG
Remarque
• L’illustration montre l’affichage lors de la lecture d’un
DVD.
• Si vous appuyez sur la touche , pendant la lecture en
mode aléatoire, vous pouvez accéder à la piste suivante
sélectionnée par la fonction de lecture aléatoire. Mais la
touche + ne permet pas de revenir à la piste
précédente. Le début de la plage courante sera repéré.
• Lors de la lecture au hasard, l’appareil reproduit des
morceaux dans un ordre aléatoire. (Vous ne pouvez pas
choisir l’ordre de lecture des pistes.)
• Pendant la lecture aléatoire, la lecture répétée n’est pas
disponible.
FG
pour sélectionner
pour sélectionner Random Title
Pour annuler la lecture aléatoire :
1 Utilisez
Off
L’indication « RANDOM OFF » apparaît sur l’affichage
principal.
FG
pour sélectionner
.
Play Mode
A-B Repeat
Repeat
Random
Program
Search Mode
Setup playback functions such as Program. Random and
Repeat play
Move Select ENTER Exit
Random Title
Random Chapter
Random Off
Random
HOME MENU
Lecture des morceaux programmés
On peut sélectionner 24 morceaux (maxi) pour la lecture dans
un ordre souhaité.
1 Suivez les étapes 1 et 2 de la section
« Lecture répétée (A-B Repeat) ».
2 Utilisez les touches
Program
3 Utilisez
puis appuyez sur
La page Create/Edit varie selon le disque ou le fichier.
, puis appuyez sur ENTER ou sur I.
FG
Play Mode
A-B Repeat
Repeat
Random
Program
Search Mode
FG
pour sélectionner
pour sélectionner
ENTER
.
Create/Edit
Playback Start
Playback Stop
Program Delete
Create/Edit
,
24
Fr
Setup playback functions such as Program. Random and
Repeat play
Move Select ENTER Exit
HOME MENU
Page 71

Lecture de disque 06
English Français Deutsch
Nederlands
Italiano Español
Pyccкий
Move Select ENTER Exit
HOME MENU
Program
Title 1 - 05
Title 01
Title 02
Title 03
Title 04
Title 05
Chapter 1 - 004
Chapter 001
Chapter 002
Chapter 003
Chapter 004
Chapter : 001Current Title : 01
Program Step
01.
02.
03.
04.
05.
06.
07.
08.
Play
4 Utilisez les touches
FGHI
sélectionner le titre, le chapitre, la piste ou le
fichier, puis appuyez sur
ENTER
• Pour ajouter un programme, sélectionnez d’abord sa
place dans la programmation (étape de programme),
puis le titre, le chapitre ou la plage et appuyez sur ENTER
(les fichiers sont ajoutés à la fin du programme).
•Appuyez sur RETURN pour revenir à l’écran précédent.
Si vous revenez à la page précédente pendant la
programmation, le réglages effectués seront effacés.
• Pour effacer une étape, mettez-la en valeur puis appuyez
sur CLEAR.
5 Appuyez sur .
La lecture commence.
Remarque
• Pour lire un programme existant, sélectionnez Playback
Start sur la page du programme, puis appuyez sur
ENTER.
• Pour revenir à la lecture normale, sélectionnez Playback
Stop sur l’écran du programme, puis appuyez sur
ENTER. Le programme reste en mémoire.
• Pour annuler tout le programme, sélectionnez Program
Delete sur l’écran du programme, puis appuyez sur
ENTER.
• Les programmes peuvent être lus de façon répétée.
Pendant la lecture programmée, sélectionnez Program
Repeat à partir de Repeat sur l’afficheur du mode de
lecture (Play Mode).
• Les programmes ne peuvent pas être lus dans un ordre
aléatoire (la lecture aléatoire n’est pas possible pendant
la lecture programmée).
.
pour
Mode recherche
Restitute le numéro ou le temps spécifié à l’intérieur d’un
titre, d’un chapitre, d’une plage ou d’un fichier.
1 Suivez les étapes 1 et 2 de la section
« Lecture répétée (A-B Repeat) ».
2 Utilisez les touches
Search Mode
, puis appuyez sur ENTER.
3 Utilisez les touches
Title search
, puis appuyez sur ENTER ou sur I.
Play Mode
A-B Repeat
Repeat
Random
Program
Search Mode
Setup playback functions such as Program. Random and
Repeat play
Move Select ENTER Exit
4 Utilisez les touches numérotées pour
sélectionner
Input Title
Play Mode
A-B Repeat
Repeat
Random
Program
Search Mode
Setup playback functions such as Program. Random and
Repeat play
Move Select ENTER Exit
FG
FG
Title Search
Chapter Search
Time Search
.
Title Search
Chapter Search
Time Search
pour sélectionner
pour sélectionner
HOME MENU
Input Title
1
0
HOME MENU
25
Fr
Page 72

Lecture de disque06
RACINE
(DOSSIER 1)
DOSSIER A
(DOSSIER 2)
DOSSIER B
(DOSSIER 3)
FICHIER 9
FICHIER 10
FICHIER 3
FICHIER 4
FICHIER 5
FICHIER 6
FICHIER 7
FICHIER 8
DOSSIER E
(DOSSIER 6)
DOSSIER C
(DOSSIER 4)
DOSSIER D
(DOSSIER 5)
FICHIER 1
FICHIER 2
00:00 / 00:00
/ TEST / WMA /
320kbps
WMA
_ _ _ _
_ _ _ _
WMA
_ _ _ _
À propos du téléchargement de
fichiers MP3/WMA
Il y a de nombreux sites de musique sur l’Internet d’où on peut
télécharger des fichiers musicaux MP3/WMA. Suivre les
instructions de ces sites pour télécharger ce type de fichiers.
Il est alors possible de lire ces fichiers musicaux téléchargés
en les gravant sur un disque CD/DVD.
• Les chansons/fichiers téléchargés sont pour usage
personnel seulement. Toute autre utilisation d’une
chanson sans la permission du propriétaire est illégale.
À propos de l’ordre de lecture
La lecture s’effectue dans l’ordre à partir du fichier stocké
dans le dossier de niveau supérieur.
Ex.
Les fichiers sont lus dans l’ordre indiqué ci-dessus
(FICHIER 1, FICHIER 2, FICHIER 3, etc.)
Lecture d’un fichier DivX ou MP3/WMA/
JPEG
Pour lire par type de fichier spécifique.
STANDBY/ON
DVD/CD USB TUNER
AUDIO SUBTITLE ANGLE
123
ZOOM MEMORY PROGRAM
456
ST/MONO VIDEO MODE A-B
789
CLEAR RPT/RDM
TOP MENU MENU/PBC
1 Appuyez sur
BT AUDIO
0
TUNE+
OPEN/CLOSE
AUDIO IN/LINE
CLOCK/TIMER
EQUALIZER
BASS/TREBLE
DISPLAY
DVD/CD
SLEEP
P.B AS S
2 Utilisez les touches
DivX ou MP3/WMA/JPEG.
Dans le cas où des fichiers DivX, MP3, WMA ou JPEG sont
mélangés dans le disque.
DivX
MP3 / WMA / JPEG
Move Select ENTER
789
CLEAR RPT/RDM
0
TOP MENU MENU/PBC
TUNE+
ENTER
HOME MENU
PRESET VOLUME
TUNE–
+
MUTE
–
DIMMER
.
FG
pour sélectionner
DISPLAY
RETURN
+
–
26
Fr
3 Utilisez les touches
le fichier à lire.
4 Appuyez sur ENTER.
La lecture commence.
FG
pour sélectionner
Page 73

Lecture USB 07
English Français Deutsch
Nederlands
Italiano Español
Pyccкий
PHONES AUDIO IN
STANDBY/ON
DVD/CD USB TUNER
AUDIO IN/LINE
TOP MENU MENU/PBC
TUNE+
123
456
789
0
BT AUDIO
CLOCK/TIMER
SLEEP
EQUALIZER
AUDIO SUBTITLE ANGLE
P.B AS S
ZOOM MEMORY PROGRAM
BASS/TREBLE
ST/MONO VIDEO MODE A-B
DISPLAY
CLEAR RPT/RDM
OPEN/CLOSE
TOP MENU MENU/PBC
HOME MENU
PRESET VOLUME
+
MUTE
TUNE–
TUNE+
DIMMER
–
+
–
RETURN
789
0
DISPLAY
CLEAR RPT/RDM
ENTER
Chapitre 7 :
Lecture USB
Lecture à partir de contenu stocké
sur un périphérique USB
Il est possible d’obtenir un son à deux canaux en utilisant
l’interface USB située à l’avant de ce récepteur.
• Pioneer ne garantit pas que tout fichier enregistré sur un
périphérique de stockage USB puisse être lu par
l’appareil, ni que ce dernier puisse fournir l’alimentation
nécessaire au périphérique de stockage USB. Notez
aussi que Pioneer décline toute responsabilité en cas de
perte de fichiers d’une clé USB, résultant de la
connexion à cet appareil.
1 Sélectionnez
USB
comme source d’entrée.
« USB/iPod » apparaît sur l’afficheur principal.
2 Connectez le périphérique de stockage USB.
L’indication « GUI » apparaît automatiquement sur l’affichage
principal.
• Cet appareil ne prend pas en charge les concentrateurs
USB.
• Lorsqu’un iPod/iPhone/iPad est connecté à l’appareil, il
commence à se recharger automatiquement depuis
l’appareil.
Remarque
• Une clé mémoire flash USB prenant en charge la norme
USB 2.0 peut être utilisée.
• Il se peut que cet appareil ne reconnaisse pas certaines
clés USB et qu’il ne puisse pas lire les fichiers ou fournir
le courant à une clé mémoire USB. Pour plus de détails,
voir la section Lorsqu’un périphérique de stockage USB
est connecté à la page 39.
• Lorsqu’un périphérique de stockage USB n’est pas en
cours de lecture et qu’aucune opé ration n’a été effectuée
depuis 20 minutes, l’appareil se met automatiquement à
l’arrêt. Pour cela, il est nécessaire d’activer (
fonction d’arrêt automatique la fonction de mise hors
tension automatique.
• La fonction de mise hors tension automatique peut être
activée/désactivée (ON/OFF) (page 45).
ON
) la
Lecture d’un fichier DivX ou MP3/WMA/
JPEG
Pour lire par type de fichier spécifique.
Périphérique de
stockage USB
(disponible dans le
commerce)
3 Une fois la reconnaissance terminée,
appuyez sur la touche
lecture.
• Si vous souhaitez changer de source d’entrée, arrêtez
d’abord la lecture de la musique stockée sur le
périphérique USB, avant de changer de source.
4 Déconnectez le périphérique de stockage
USB de la prise USB.
Mettez l’appareil hors tension avant de débrancher le
périphérique de stockage USB.
!
pour lancer la
27
Fr
Page 74

Lecture USB07
Move Select ENTER
MP3 / WMA / JPEG
DivX
1 Appuyez sur la touche
2 Utilisez les touches
DivX ou MP3/WMA/JPEG.
Dans le cas où des fichiers DivX, MP3, WMA ou JPEG sont
mélangés dans le périphérique de stockage USB.
3 Utilisez les touches
USB
.
FG
pour sélectionner
FG
pour sélectionner
le fichier à lire.
00:00 / 00:00
320kbps
/ TEST / MP3 /
_ _ _ _
MP3
_ _ _ _
MP3
_ _ _ _
Lecture dans l’ordre souhaité
(Lecture programmée)
Les dossiers stockés sur le périphérique de stockage USB
peuvent être lus par l’appareil en mode de lecture répétée.
Pour plus de détails, voir la section Lecture des morceaux
programmés à la page 24.
4 Appuyez sur ENTER.
La lecture commence.
28
Fr
Page 75

Utilisation du tuner 08
English Français Deutsch
Nederlands
Italiano Español
Pyccкий
STANDBY/ON
DVD/CD USB TUNER
AUDIO IN/LINE
TOP MENU MENU/PBC
TUNE+
123
456
789
0
BT AUDIO
CLOCK/TIMER
SLEEP
EQUALIZER
AUDIO SUBTITLE ANGLE
P.B AS S
ZOOM MEMORY PROGRAM
BASS/TREBLE
ST/MONO VIDEO MODE A-B
DISPLAY
CLEAR RPT/RDM
OPEN/CLOSE
ASPM PTY DISPLAY
RDS
TOP MENU MENU/PBC
HOME MENU
PRESET VOLUME
SHIFT
+
MUTE
TUNE–
TUNE+
DIMMER
–
+
–
RETURN
0
ENTER
TOP MENU MENU/PBC
HOME MENU
PRESET VOL UME
+
MUTE
TUNE–
TUNE+
–
+
–
RETURN
0
ENTER
TOP MENU MENU/PBC
TUNE+
123
4 5 6
789
0
BT AUDIO
CLOCK/TIMER
SLEEP
EQUALIZER
AUDIO SUBTITLE ANGLE
P.B AS S
ZOOM MEMORY PROGRAM
BASS/TREBLE
ST/MONO VIDEO MODE A-B
DISPLAY
CLEAR RPT/RDM
Chapitre 8 :
Utilisation du tuner
Écoute d’émissions de radio
Les étapes suivantes décrivent la façon de régler les bandes
FM à l’aide de la recherche automatique et des fonctions de
réglage manuel. Une fois que le tuner est réglé sur une
station, vous pouvez mémoriser sa fréquence pour accéder
facilement à cette station plus tard. Voir la section
Mémorisation des stations ci-dessous pour en savoir plus sur
la façon de procéder.
Accord
1 Appuyez sur la touche
pour mettre l’appareil sous tension.
2 Appuyez sur la touche
3 Appuyez sur la touche
télécommande pour rechercher la station
souhaitée.
Réglage automatique :
Appuyez sans relâcher sur la touche TUNE +/– ; le balayage
des fréquences commence automatiquement et la recherche
s’arrête à la première station de radio pouvant être captée.
Accord manuel :
Appuyez à plusieurs reprises sur la touche TUNE +/– de la
télécommande pour rechercher la station souhaitée.
Remarque
• En cas d’interférence/parasites radio, la recherche
automatique peut s’arrêter automatiquement.
• La recherche automatique ignore les stations de radio
dont le signal est faible.
• Pour arrêter la recherche automatique, appuyez sur #.
• Lorsqu’une station de radio RDS (Radio Data System)
est trouvée, sa fréquence s’affiche en premier. Le nom
de la station apparaît ensuite.
1 STANDBY/ON
TUNER
.
TUNE +/–
de la
• La recherche automatique complète des stations peut
être effectuée pour les stations RDS en utilisant le mode
ASPM de mémorisation automatique des stations de
radio (voir page 31).
Pour recevoir une émission FM stéréo :
• Appuyez sur la touche ST/MONO pour sélectionner le
mode audio stéréo et l’indication « AUTO » apparaît à
l’affichage.
Amélioration dune réception FM de mauvaise
qualité :
1 Appuyez à plusieurs reprises sur la touche
ST/MONO pour sélectionner MONO.
Le tuner passe du mode stéréo au mode mono, ce qui permet
d’améliorer la qualité de réception en cas de mauvaise
réception.
Mémorisation des stations
Si vous écoutez souvent une station de radio, il peut être
pratique d’enregistrer sa fréquence dans le récepteur afin de
pouvoir y accéder facilement lorsque vous le souhaitez
(Stations préréglées). Ceci vous évite d’avoir à rechercher la
fréquence chaque fois que vous désirez écouter cette station.
Cet appareil peut mémoriser jusqu’à 40 stations.
1 Réglez une station que vous souhaitez
mémoriser.
Pour plus d’information à ce sujet, voir la section Accord audessus.
2 Appuyez sur la touche
L’affichage du numéro de préréglage clignote.
3 Appuyez sur la touche
choisir le numéro que vous souhaitez affecter à
la station sélectionnée.
MEMORY
PRESET +/–
.
pour
29
Fr
Page 76

Utilisation du tuner08
4 Appuyez sur la touche
enregistrer la station dans la mémoire.
Si l’affichage du numéro de préréglage passe du mode
clignotant au mode fixe avant que la station ne soit mise en
mémoire, reprenez la procédure à partir de l’étape 2.
• Renouveler les étapes 1 - 4 pour mémoriser d’autres
stations ou remplacer une station mise en mémoire.
Lorsqu’une nouvelle station est mémorisée, la station
mémorisée auparavant sur le même numéro de chaîne
sera effacée.
Remarque
• La fonction de sauvegarde conserve les réglages
mémorisés pendant quelques heures en cas de panne
de courant ou lorsque le cordon d’alimentation secteur
est débranché.
MEMORY
pour
Rappel d’une station mémorisée
1 Utiliser la touche
sélectionner la station souhaitée.
PRESET +/–
pour
Pour balayer les stations préréglées
On peut balayer les stations mises en mémoire
automatiquement. (Balayage dans la mémoire de
présélection)
1 Appuyez sans relâcher sur la touche
+/–
.
Le numéro de préréglage s’affiche et le tuner fait défiler les
stations mémorisées en s’arrêtant 5 secondes sur chacune.
2 Appuyez de nouveau sur
PRESET +/–
PRESET
lorsque le tuner passe sur la station souhaitée.
Pour effacer toute la mémoire
1 Appuyez sur la touche
télécommande.
2 Appuyez sur la touche
l’indication « MEMORY CLEAR » apparaisse.
Remarque
• Toutes les stations seront effacées.
TUNER
CLEAR
de la
jusqu’à ce que
Utilisation du système RDS (Radio
Data System)
Présentation du système RDS
Le système RDS (système de radiocommunication de
données) est utilisé par la plupart des stations de radio FM
pour fournir aux auditeurs différents types d’informations—
notamment le nom de la station et le type d’émissions
diffusées.
L’une des fonctions du système RDS permet d’effectuer une
recherche par type de programme. Par exemple, vous pouvez
rechercher une station qui diffuse une émission ayant pour
type de programme JAZZ.
Vous pouvez rechercher les types de programmes suivants :
News – Informations
Current Affairs – Analyse de
l’actualité
Information – Informations
d’ordre général
Sport – Sport
Education – Éducation
Drama – Pièces
radiophoniques, etc.
Cultures – Culture nationale
ou régionale, théâtre, etc.
Science – Science et
technologie
Varied Speech –
Habituellement programmes
de discussion, quiz ou
entretiens.
Pop Music – Musique pop
Rock Music – Musique rock
Easy Listening – Écoute aisée
Light Classics M – Musique
classique « légère »
Serious Classics – Musique
classique « sérieuse »
Other Music – Musique ne
correspondant à aucune des
catégories ci-dessus
Weather & Metr – Bulletins
météorologiques
Finance – Rapports de bourse,
commerce, ventes, etc.
Children’s Progs –
Programmes pour enfants
Social Affairs – Affaires
sociales
Religion – Programmes
religieux
Phone In – Opinion publique
par téléphone
Travel & Touring – Voyages et
vacances, plutôt qu’annonces
de circulation routière
Leisure & Hobby – Loisirs et
hobbies
Jazz Music – Jazz
Country Music – Musique
country
National Music – Musique
populaire dans une autre
langue que l’anglais
Oldies Music – Musique
populaire des années 50 et 60
Folk Music – Musique folk
Documentary –
Documentaires
Alarm Test – Programme
spécialement prévu pour tester
les équipements ou les
récepteurs radio d’urgence.
Alarm – Alarmes !
Recherche de programmes RDS
Vous pouvez rechercher un type de programme parmi ceux
énumérés ci-dessus.
1 Appuyez sur la touche
télécommande.
2 Appuyez sur la touche RDS
télécommande.
L’indication « SELECT » s’affiche pendant environ
6 secondes.
3 Appuyez sur
de programme à écouter.
Le type de programme affiché change à chaque pression sur
la touche. Si vous maintenez la touche enfoncée, l’affichage
des types de programme défile en continu.
HI
4 Alors que le type de programme sélectionné
est affiché (pendant 6 secondes), appuyez de
nouveau sur la touche RDS
Le type de programme sélectionné s’affiche pendant
2 secondes, puis l’indication « SEARCH » apparaît et la
recherche commence.
TUNER
de la
PTY
de la
pour sélectionner le type
PTY
.
30
Fr
Page 77

Utilisation du tuner 08
English Français Deutsch
Nederlands
Italiano Español
Pyccкий
STANDBY/ON
DVD/CD USB TUNER
AUDIO IN/LINE
TOP MENU MENU/PBC
TUNE+
123
456
789
0
BT AUDIO
CLOCK/TIMER
SLEEP
EQUALIZER
AUDIO SUBTITLE ANGLE
P.B AS S
ZOOM MEMORY PROGRAM
BASS/TREBLE
ST/MONO VIDEO MODE A-B
DISPLAY
CLEAR RPT/RDM
OPEN/CLOSE
ASPM PTY DISPLAY
RDS
TOP MENU MENU/PBC
HOME MENU
PRESET VOLUME
SHIFT
+
MUTE
TUNE–
TUNE+
DIMMER
–
+
–
RETURN
ENTER
Station name (PS) Programme type (PTY)
Frequency Radio text (RT)
No RDS
FM 98.80 MHz
Remarque
• Si l’affichage arrête de clignoter, renouveler l’opération
depuis l’étape 2. Si l’appareil trouve une émission
correspondant au type de programme sélectionné, le
numéro de la station apparaît pendant environ
8 secondes puis le nom de la station est affiché.
• Si vous souhaitez écouter le même type de programme
sur une autre station radio, appuyez sur la touche RDY
PTY pendant que le numéro ou le nom de la station
clignote à l’affichage. L’appareil recherche alors une
autre station.
• Si aucune station n’est trouvée, « NOT FOUND »
apparaît pendant 4 secondes.
Informations données par RDS
À chaque pression sur la touche RDY DISPLAY, l’affichage
change comme suit :
Lorsqu’il s’agit d’une station non-RDS ou d’une station RDS
portant de faibles signaux, l’affichage change comme suit :
Utilisation de la fonction de
mémorisation automatique des
stations de radio (ASPM)
En mode ASPM, le tuner recherche automatiquement de
nouvelles stations RDS. Jusqu’à 40 stations programmables.
S’il y a des stations déjà mises en mémoire, le nombre de
stations mémorisables est réduit d’autant.
1 Appuyez sur la touche
TUNER
de la
télécommande.
2 Appuyez sans relâcher sur la touche RDS
ASPM de la télécommande.
Le voyant « ASPM » clignote pendant environ 4 secondes, et
le balayage démarre (87,5 MHz à 108 MHz).
Une fois le balayage terminé, le nombre de stations
mémorisées s’affiche pendant 4 secondes, puis « END »
apparaît pendant 4 secondes.
Pour interrompre l’opération ASPM en cours :
Appuyez sur la touche # pendant que le tuner est en train de
rechercher des stations. Les stations préalablement mises en
mémoire restent inchangées.
Remarque
• Si une station diffuse sur deux fréquences différentes, la
plus forte sera mise en mémoire.
• L’appareil ignore une station utilisant la même
fréquence que celle de la station déjà mise en mémoire.
• S’il y a 40 stations déjà stockées en mémoire, la
recherche sera annulée. Pour refaire l’opération ASPM,
effacer des stations.
• Si aucune stations n’est mise en mémoire, l’appareil
affiche « NOT FOUND » pendant 4 secondes environ.
• Si des signaux RDS sont faibles, le nom de station peut
ne pas être mémorisé.
• Il est possible de stocker une station dans deux canaux
différents.
• Selon la région ou l’époque de l’année, les noms de
stations peuvent changer.
Remarques au sujet du
fonctionnement RDS
Il ne s’agit pas d’un mauvais fonctionnement
même si l’un des cas suivants se présente :
• L’indication « PS », « NO PS » et un nom de station
s’affichent tour à tour et de manière correcte.
• Lorsqu’il s’agit d’une station ne diffusant pas
correctement ou d’une station en cours d’essai, la
fonction RDS ne fonctionne pas de façon souhaitée.
• S’il s’agit d’une station RDS portant de faibles signaux,
l’appareil n’arrive pas à afficher le nom de la station.
• « NO PS », « NO PTY » ou « NO RT » clignote environ
5 secondes et la fréquence s’affiche.
Remarques au sujet du texte radio :
• Les 16 premiers caractères des données texte de la
station radio s’affichent, puis le reste du texte défile à
l’affichage.
• Si on capte une station RDS n’émettant pas de texte
ra di o, l’ app ar ei l a ffi ch e « NO RT » au pa ss ag e e n po si ti on
de texte radio.
• L’appareil affiche « RT » pendant la réception de texte
radio ou chaque fois que le texte change.
31
Fr
Page 78

Autres raccordements09
STANDBY/ON
INPUT
VOLUME
PHONES AUDIO IN
TIMER
VIDEO
OUT
OUT
COMPONENT
VIDEO
OUT
IN
LINE
PB
PR
Y
L
R
HDMI
Chapitre 9 :
Autres raccordements
ATTENTION
• Avant d’effectuer ou de modifier les raccordements,
mettez l’appareil hors tension et débranchez le cordon
d’alimentation au niveau de la prise secteur.
Connectez l’équipement de lecture auxiliaire aux prises LINE
IN situées sur le panneau arrière de l’appareil.
Panneau arrière de cet appareil
Connexion de composants
auxiliaires
Connectez l’équipementde lecture auxiliaire à la prise minijack AUDIO IN située sur le panneau avant de l’appareil.
• Cette méthode permet de lire de la musique sur cet
appareil à partir des iPod/iPhone/iPad qui ne prennent
pas en charge la connexion via la prise USB.
PHONES AUDIO IN
Lecteur audio
portable, etc.
Câble stéréo minijack (disponible
dans le commerce)
1 Sélectionnez
d’entrée.
Lorsque la source d’entrée AUDIO IN est sélectionnée,
l’indication « AUDIO IN » apparaît à l’affichage.
Remarque
• Si le jack à mini-fiche AUDIO IN est branché sur la prise
auxiliaire de casque, le volume de l’appareil sera ajusté
par la commande de volume du composant de lecture.
Si la qualité du son est affectée lorsque vous baissez le
volume sur l’appareil, essayez de baisser le volume sur
l’équipement de lecture externe.
AUDIO IN/LINE
comme source
Téléviseur
Câble audio (disponible
dans le commerce)
1 Appuyez deux fois sur la touche
LINE
pour sélectionner la source d’entrée LINE.
Lorsque la source d’entrée LINE est sélectionnée, l’indication
« LINE » apparaît à l’affichage.
AUDIO IN
/
32
Fr
Page 79

Lecture audio
English Français Deutsch
Nederlands
Italiano Español
Pyccкий
Chapitre 10 :
Bluetooth
®
10
Lecture audio
Lecture de musique par la technologie
sans fil
L’appareil peut lire de la musique stockée sur des
périphériques équipés de la fonction sans fil Bluetooth
(téléphones portables, lecteurs de musique numériques,
etc.). Vous pouvez aussi utiliser un transmetteur audio
Bluetooth (vendu séparément) pour lire de la musique à partir
d’équipements non dotés de la fonction sans fil Bluetooth.
Pour plus d’informations, veuillez consulter le Guide
d’utilisation de votre équipement Bluetooth.
Bluetooth
Périphérique optimisé pour la
technologie sans fil Bluetooth :
Téléphone portable
Périphérique optimisé pour la
technologie sans fil Bluetooth : Lecteur
de musique numérique
Périphérique non équipé de la
technologie sans fil Bluetooth : Lecteur
de musique numérique + émetteur
audio Bluetooth
Données musicales
Remarque
• La marque et les logos Bluetooth
déposées appartenant à Bluetooth SIG, Inc. et PIONEER
CORPORATION utilise ces marques sous licence. Les
autres marques commerciales et noms commerciaux
appartiennent à leurs propriétaires respectifs.
• L’équipement sans fil Bluetooth doit prendre en charge
les profils A2DP.
• Pioneer ne garantit pas que cet appareil se connecte et
fonctionne correctement avec tous les périphériques
dotés de la technologie sans fil Bluetooth.
®
(disponible dans le
commerce)
®
sont des marques
Bluetooth
®
Fonctionnement par télécommande
La télécommande fournie permet de lire et d’arrêter la lecture
de contenus sur l’appareil, ainsi que d’effectuer d’autres
opérations.
Remarque
• L’équipement sans fil Bluetooth doit prendre en charge
les profils AVRCP.
• Le fonctionnement de la télécommande n’est pas
garanti avec tous les périphériques dotés de la
technologie sans fil Bluetooth.
Association avec l’appareil
(enregistrement initial)
Pour pouvoir lire de la musique stockée sur un périphérique
sans fil Bluetooth, il est tout d’abord nécessaire d’associer les
deux équipements. L’association doit être effectuée lors de la
première utilisation de l’appareil avec un périphérique sans fil
Bluetooth, ou lorsque les données d’association ont été
effacées pour une raison quelconque.
L’association est une procédure nécessaire pour permettre
les communications à l’aide de la technologie sans fil
Bluetooth.
• L’association est effectuée seulement lorsque vous
utilisez l’appareil et le périphérique sans fil Bluetooth
ensemble pour la première fois.
• Afin d’autoriser les communications à l’aide de la
technologie sans fil Bluetooth, l’association doit être
effectuée à la fois sur l’appareil et sur le périphérique
sans fil Bluetooth.
• Après avoir appuyé sur la touche BT AUDIO et être
passé sur l’entrée BT AUDIO, effectuez la procédure
d’association sur le périphérique sans fil Bluetooth. Si
cette procédure d’association s’est déroulée
correctement, vous n’avez pas besoin d’effectuer la
procédure d’association ci-dessous sur l’appareil.
Pour plus d’informations, veuillez consulter le Guide
d’utilisation de votre équipement Bluetooth.
1 Appuyez sur la touche
pour mettre l’appareil sous tension.
2 Appuyez sur
L’appareil passe sur BT AUDIO et l’indication PAIRING
s’affiche.
BT AUDIO
1STANDBY/ON
.
33
Fr
Page 80

10
Lecture audio
Bluetooth
®
3 Mettez le périphérique sans fil Bluetooth
que vous souhaitez associer sous tension et
effectuez la procédure d’association sur le
périphérique.
Remarque
• Cet appareil apparaîtra sous le nom « X-HM32V » sur
tous les périphériques sans fil Bluetooth que vous
possédez.
La procédure d’association commence.
• Placez le périphérique sans fil Bluetooth près de
l’appareil.
• Pour plus d’informations sur la procédure d’association
de votre périphérique sans fil Bluetooth, veuillez
consulter le Guide d’utilisation de votre périphérique.
• Lorsque le code PIN est demandé, entrez « 0000 ». (Cet
appareil ne prend pas en charge d’autre code PIN que
« 0000 ».)
4 Vérifiez que l’association a bien été
effectuée sur le périphérique sans fil Bluetooth.
Si l’association avec le périphérique sans fil Bluetooth a été
réalisée correctement, le nom du périphérique s’affiche sur le
panneau avant de l’appareil. (Seuls les caractères
alphanumériques d’un seul octet peuvent être affichés. Les
caractères qui ne peuvent pas être affichés normalement
sont remplacés par le symbole « * ».)
Écouter de la musique sur
l’appareil à partir d’un
périphérique sans fil
1 Appuyez sur
L’appareil passe sur l’entrée BT AUDIO.
2 Une connexion Bluetooth est créée entre le
périphérique sans fil Bluetooth et l’appareil.
La procédure de connexion vers l’appareil doit être effectuée
sur le périphérique sans fil Bluetooth.
• Pour plus d’informations sur la procédure de connexion,
veuillez consulter le Guide d’utilisation de votre
périphérique sans fil Bluetooth.
3 Lecture de musique à partir du périphérique
sans fil Bluetooth.
Remarque
• Lorsqu’un périphérique Bluetooth n’est pas en cours de
lecture et qu’aucune opération n’a été effectuée depuis
20 minutes, l’appareil se met automatiquement à l’arrêt.
Pour cela, il est nécessaire d’activer (ON) la fonction
d’arrêt automatique la fonction de mise hors tension
automatique.
• La fonction de mise hors tension automatique peut être
activée/désactivée (ON/OFF) (page 45).
BT AUDIO
Bluetooth
.
BT STANDBY
• Les opérations suivantes peuvent être effectuées
lorsque l’appareil est en veille avec la fonction BT
STANDBY activée (ON).
• En sélectionnant un périphérique sans fil Bluetooth pour
lequel un historique de connexion avec cet appareil
existe déjà (l’association a déjà été effectuée), l’appareil
se met automatiquement en marche avec la fonction BT
AUDIO activée.
Configuration de la fonction BT STANBY
• Pour activer/désactiver (ON/OFF) la fonction INPUT,
appuyez pendant 3 secondes sur le bouton BT AUDIO
situé sur le dessus de l’appareil.
• Lorsque l’appareil est sous tension (ON), appuyez
longuement sur le bouton INPUT. Cette opération ne
fonctionne pas si l’appareil est hors tension.
• L’opération de configuration peut uniquement être
effectuée en utilisant le bouton INPUT situé sur
l’appareil. Cette opération ne peut pas être effectuée à
l’aide de la touche BT AUDIO de la télécommande.
Remarque
• Lorsque la fonction BT STANDBY est activée (ON),
l’indication « BT STANDBY ON » apparaît sur l’affichage
principal.
• Lorsque la fonction BT STANDBY est désactivée (OFF),
l’indication « BT STANDBY OFF » apparaît sur l’affichage
principal.
• Si le cordon d'alimentation a été débranché puis
rebranché, la fonction sera de nouveau effective lorsque
l'appareil aura été remis en marche (ON).
Connexion avec un périphérique sans fil Bluetooth
lorsque l’appareil est en mode BT STANDBY
Lorsqu’un historique de connexion avec un périphérique sans
fil Bluetooth existe déjà sur cet appareil (l’association a déjà
été effectuée), l’appareil peut recevoir une requête de
connexion lorsqu’il est un mode BT STANDBY.
L’appareil se met en marche avec la fonction BT AUDIO et se
connecte directement au périphérique sans fil Bluetooth.
Même les équipements déjà associés avec cet appareil ne se
connecteront pas en mode BT STANDBY dans les cas
suivants.
Si cela se produit, effacez l’historique d’association au niveau
du périphérique sans fil Bluetooth et exécutez de nouveau la
procédure d’association.
• Jusqu’à 8 historiques d’association peuvent être
conservés sur cet appareil. En cas de connexion au-delà
de huit périphériques sans fil Bluetooth, le plus ancien
historique d’association est supprimé.
• Tous les historiques d’association sont supprimés en
cas de réinitialisation des paramètres à leur valeur
initiale d’usine.
34
Fr
Page 81

Lecture audio
English Français Deutsch
Nederlands
Italiano Español
Pyccкий
Bluetooth
Précaution concernant les ondes radio
Cet appareil utilise une fréquence d’ondes radio de 2,4 GHz,
cette bande étant également utilisée par d’autres systèmes
sans fil (consultez la liste ci-dessous). Pour éviter le brouillage
ou les interruptions de communication, n’utilisez pas cet
appareil à proximité de dispositifs fonctionnant sur la même
bande, ou veillez à éteindre ces dispositifs lorsque vous
utilisez l’adaptateur.
• Téléphones sans fil
• Télécopieurs filaires
• Fours à micro-ondes
• Périphériques réseau sans fil (IEEE802.11b/g)
• Appareil AV sans fil
• Télécommandes sans fil pour jeux vidéo
• Appareils paramédicaux à micro-ondes
• Certains écrans de surveillance des bébés
D’autres appareils, moins courants, peuvent fonctionner sur
la même fréquence :
• Systèmes antivol
• Stations radio amateur (HAM)
• Systèmes logistiques des grands magasins
• Systèmes discriminatoires des véhicules ferroviaires ou
de secours
Remarque
• Si des parasites apparaissent sur l’image du téléviseur,
il se peut que le périphérique sans fil Bluetooth ou cet
appareil (y compris des produits pris en charge par cet
appareil) crée des interférences avec le connecteur
d’antenne de votre téléviseur, ou avec votre équipement
vidéo, radio satellite, etc. Dans ce cas, éloignez le
connecteur d’entrée d’antenne par rapport au
périphérique sans fil Bluetooth ou à cet appareil (y
compris des éléments pris en charge par cet appareil).
• Dans le cas où un obstacle (tel qu’une porte métallique,
un mur en béton ou un dispositif d’isolation contenant
un film d’aluminium) se trouve entre cet cet appareil (et
des périphériques pris en charge par cet appareil) et le
périphérique sans fil Bluetooth, vous devrez peut-être
changer l’emplacement de l’appareil afin d’éviter le
brouillage du signal et les interruptions de
communication.
Limite de fonctionnement
L’utilisation de cet équipement est limitée à un usage privé.
(Selon l’environnement, les distances de transmission
peuvent être réduites.)
Dans les situations suivantes, le son peut être coupé ou arrêté
pour cause de mauvaise réception ou de non réception des
ondes radio :
• Dans des immeubles en béton armé ou à structure
métallique.
• Près d’un grand meuble métallique.
• Dans la foule ou près d’un bâtiment ou d’un obstacle.
®
• Dans un emplacement exposé au champ magnétique, à
de l’électricité statique ou des parasites provenant
d’équipements de communication radio, utilisant la
même bande de fréquence (2,4 GHz) que cet appareil, tel
qu’un périphérique LAN sans fil de 2,4 GHz
(IEEE802.11b/g) ou un four à micro-ondes.
• Si vous vivez dans une zone résidentielle très peuplée
(appartement, maison en ville, etc.) et si le four à microondes de votre voisin se trouve à proximité de votre
système, des interférences peuvent se produire. Si tel
est le cas, installez votre appareil à un autre endroit.
Lorsque le four à micro-ondes n’est pas utilisé, les
interférences disparaissent.
Réflexions des ondes radio
Les ondes radio reçues par cet appareil comprennent celles
qui proviennent directement du périphérique sans fil
Bluetooth (onde directe) et les ondes provenant de différentes
directions en raison de leur réflexion sur les murs, le mobilier
et le bâtiment (ondes réfléchies). Les ondes réfléchies (dues
aux obstacles et objets réfléchissants) produisent à leur tour
un certain nombre d’ondes réfléchies et modifient les
conditions de réception selon l’endroit. Si le son ne peut pas
être reçu convenablement à cause de ce phénomène,
essayez de déplacer légèrement le dispositif sans fil
Bluetooth. Notez également que les ondes réfléchies peuvent
interrompre la réception audio lorsqu’une personne traverse
ou s’approche de l’espace entre cet appareil et le
périphérique sans fil Bluetooth.
Précautions relatives aux connexions à
des produits pris en compte par cet
appareil
• Achevez les connexions pour tous les périphériques pris
en compte par cet appareil, y compris tous les cordons
audio et les câbles d’alimentation, avant de les brancher
sur cet appareil.
• Après avoir achevé les connexions sur cet appareil,
vérifiez les câbles audio et d’alimentation pour vous
assurer qu’ils ne sont pas emmêlés.
• Avant de déconnecter cet appareil, vérifiez que vous
disposez d’assez d’espace libre autour de celui-ci.
• Lorsque vous rebranchez les cordons audio et d’autres
câble des produits pris en charge par cet appareil,
assurez-vous que l’espace environnant est suffisant
pour le faire.
10
35
Fr
Page 82

Changement des réglages11
Chapitre 11 :
Changement des réglages
Paramètres pour la lecture d’une source DVD/CD ou USB
1 Appuyez sur la touche
L’écran du menu d’accueil HOME MENU s’affiche.
2 Utilisez
3 Utilisez les touches de navigation
• Fermeture de l’écran d’accueil HOME MENU.
Les réglages par défaut sont indiqués en
Important
• Les réglages suivants sont disponibles pour le contenu d’un disque ou d’une clé de mémoire USB. Ils ne conviennent pas
• En mode USB, vous pouvez changer uniquement Play Mode, Audio Settings sur l’écran HOME MENU.
FGHI
Appuyez sur la touche HOME MENU.
pour un iPod/iPhone/iPad, un tuner ou une entrée externe (AUDIO IN/LINE) et BT AUDIO.
Paramètres Audio Settings
Réglages Fonction
Audio DRC
(High/Medium/Low/Off)
HOME MENU
pour sélectionner le paramètre, puis appuyez sur
• Rend les sons forts plus faibles et les sons faibles plus forts. Changez ce réglage, par exemple,
lorsque vous regardez des films tard le soit.
• Ce réglage n’agit que sur le son Dolby Digital.
• L’effet dépend du volume du téléviseur, du récepteur ou l’amplificateur AV, des enceintes, etc.
raccordés. Essayez différents réglages et choisissez celui qui procure le meilleur effet.
italique.
.
FGHI
ENTER
.
pour ajuster le paramètre, puis appuyez sur
ENTER
.
Paramètres Video Adjust
Réglages Fonction
Sharpness
(Fine/Standard/Soft)
Brightness
(-20 à +20)
Contrast
(-16 à +16)
Gamma
(-3 à +3)
Hue
(green 9 à red 9)
Chroma Level
(-9 à +9)
A la livraison, les paramètres Brightness, Contrast, Gamma, Hue et Chroma Level sont réglés sur 0.
Ajuste la netteté de l’image.
Ajuste la luminosité de l’image.
Ajuste le rapport de luminosité entre les parties les plus claires et les plus sombres de l’image.
Ajuste l’aspect des parties sombres de l’image.
Ajuste la balance entre le vert et le rouge.
Ajuste la densité des couleurs. Ce réglage agit efficacement sur les sources très colorées, comme les
dessins animées.
Paramètres Initial Settings
• Utilisez ces paramètres pour effectuer des réglages détaillés sur l’appareil.
• Initial Settings ne peut pas être sélectionné pendant la lecture. Arrêtez d’abord le disque.
36
Fr
Page 83

Changement des réglages 11
English Français Deutsch
Nederlands
Italiano Español
Pyccкий
Paramètres Digital Audio Out
Réglages Fonction
HDMI Out
Paramètres Video Output (sortie vidéo)
Réglages Fonction
TV Screen
HDMI Resolution
HDMI Color
Paramètres Language
Réglages Fonction
Audio Language
Subtitle Language
DVD Menu Lang.
Subtitle Display
Sélectionnez les signaux audio à fournir par la borne
du périphérique compatible HDMI qui a été raccordé.
Changez le format d’affichage de l’image (
(Compressed)
Changez la résolution des signaux vidéo restitués par les prises
1280x720p/1920x1080i/1920x1080p
paramètre, rétablissez le réglage à «
HDMI Resolution aux valeurs par défaut
Changez les signaux vidéo restitués par la prise
Il change la langue des dialogues des disques DVD-Vidéo (
Language
Il change la langue des sous-titres des disques DVD-Vidéo (
Language
Il change la langue utilisée pour les affichages de menu des disques DVD-Vidéo (
langues disponibles/
Pour choisir si les sous-titres seront affichés (On) ou non (
) selon le téléviseur raccordé.
).
).
Other Language
HDMI OUT (LPCM (2CH)/Auto/Off
4:3 (Letter Box)/4:3 (Pan & Scan)/16:9 (Wide)/16:9
). Si l’image n’apparaît pas correctement après avoir changé le
720x576p
». Reportez-vous à
ci-dessous.
HDMI OUT (Full range RGB/RGB/Component
).
HDMI OUT (720x576i/720x576p
Rétablissement des paramètres
English
/langues disponibles/
English
/langues disponibles/
Off
).
) en fonction
Other
Other
w/ Subtitle Lang.
/
).
/
• Si le réglage ci-dessus est utilisé pour choisir « Other Language », effectuez les opérations en vous reportant au Tableau
des codes de langues à la page 41.
Pramètres Display (affichage)
Réglages Fonction
OSD Language
Angle Indicator
On Screen Display
Paramètres Options (options)
Réglages Fonction
Parental Lock
DivX (R) VOD
Il change la langue des messages fonctionnels (
(
English
/langues disponibles).
Pour choisir si le voyant d’angle de prise de vue doit être affichée (On) ou non (
téléviseur.
Précisez si les messages fonctionnels (
l’écran du téléviseur.
Il limite le visionnage des DVD-Vidéo (
Tableau des codes de langues
Pour afficher le code d’immatriculation requis pour la lecture de fichiers VOD DivX(R) (
Deactivate
).
à la page 41 pour définir le « Country Code » (code de pays).
Play, Stop
, etc.), apparaissant sur l’écran du téléviseur
Play, Stop
, etc.) doivent être affichés (On) ou non (
Password/Level Change/Country Code
Off
Rétablissement des paramètres HDMI Resolution aux valeurs par défaut
1 Appuyez sans relâcher sur la touche
VIDEO
MODE.
) sur l’écran du
Off
) sur
). Reportez-vous à
Activate
/
37
Fr
Page 84

Informations supplémentaires12
Chapitre 12 :
Informations supplémentaires
Guide de dépannage
Souvent, les opérations incorrectes sont interprétées comme des problèmes ou des dysfonctionnements. Si vous estimez que
cet appareil ne fonctionne pas correctement, vérifiez les points ci-dessous. Parfois, le problème peut provenir d’un autre
composant. Examinez les autres composants et les appareils électriques utilisés. Si le problème ne peut pas être résolu en dépit
des vérifications ci-dessous, consultez le service après-vente Pioneer le plus proche pour faire réparer l’appareil.
• Si l’appareil ne fonctionne pas normalement en raison d’effets extérieurs comme l’électricité statique, débranchez la fiche
d’alimentation de la prise de courant et rebranchez-la pour revenir aux conditions normales de fonctionnement.
Problèmes d’ordre général
Problème éventuel Vérification Solution
Les paramètres que vous
avez réglés sont effacés.
Différence de volume entre
les sources/formats DVD,
CD, MP3, WMA, iPod/
iPhone/iPad, Tuner,BT
AUDIO, AUDIO IN et LINE.
La commande de cet appareil
à l’aide de la télécommande
n’est pas possible.
Le disque ne peut pas être lu
ou le disque est éjecté
automatiquement.
Le disque DVD VR ne peut
pas être lu.
L’image est étirée ou le
format ne peut pas être
changé.
Pendant la lecture l’image
est perturbée ou sombre.
Le cordon d’alimentation a-t-il été
débranché ?
Ce problème ne provient pas de cet
appareil.
Essayez-vous d’utiliser la
télécommande en étant placé loin de
l’appareil ?
Le capteur de la télécommande est-il
exposé directement à la lumière du
soleil ou à un puissant éclairage
artificiel, tel qu’un tube fluorescent ?
Les piles sont mortes ? Remplacez les piles (page 6).
Le disque est-il rayé ? Les disques rayés risquent de ne pas pouvoir être lus.
Le disque est-il sale ? Nettoyez le disque (page 45).
Cet appareil se trouve-t-il dans un
endroit humide ?
Le disque utilise-t-il la technologie de
protection des données CPRM ?
Le format est-il réglé correctement
sur le téléviseur raccordé ?
TV Screen
est-il correctement réglé ? Réglez
Ce problème ne provient pas de cet
appareil.
Cet appareil et le téléviseur sont-ils
raccordés via un magnétoscope ?
Lorsque le cordon d’alimentation est débranché, les réglages que
vous avez effectués sont effacés. Réglez l’horloge à nouveau. Si
vous ne voulez pas perdre les réglages, ne débranchez pas le
cordon d’alimentation.
Le volume peut varier selon les sources d’entrée et selon les
formats de contenus audio.
Utilisez à moins de 7 m, 30º du capteur de télécommande du
panneau avant (page 6).
Les signaux de la télécommande peuvent ne pas être reçus
correctement si la télécommande est exposée directement à la
lumière du soleil ou à un puissant éclairage artificiel, tel qu’un tube
fluorescent, etc.
De la condensation a pu se former à l’intérieur. Attendez que la
condensation s’évapore. N’installez pas cet appareil près d’un
climatiseur, etc. (page 44).
Cet appareil ne prend pas en charge la technologie CPRM. Vous
pouvez lire uniquement des DVD VR qui ne sont pas enregistrés
avec la technologie CPRM.
Reportez-vous au mode d’emploi du téléviseur et réglez
correctement le format sur le téléviseur.
TV Screen
disponible pour le contenu d’un disque ou d’une clé de mémoire
USB. Pour les films et images mémorisés sur l’iPod/iPhone/iPad,
faites fonctionner celui-ci.
Cet appareil intègre un système anticopie Rovi. L’image peut ne
pas s’afficher correctement sur certains téléviseurs lorsque les
disques lus contiennent des signaux anticopie. Il ne s’agit pas d’un
dysfonctionnement.
Lorsque cet appareil et le téléviseur sont raccordés via un
magnétoscope, la fonction anticopie analogique du lecteur peut
empêcher l’image de s’afficher correctement sur le magnétoscope.
Raccordez directement cet appareil et le téléviseur.
correctement (page 36). Ce réglage est
38
Fr
Page 85

Informations supplémentaires 12
English Français Deutsch
Nederlands
Italiano Español
Pyccкий
Problème éventuel Vérification Solution
Le son et l’image vidéo se
coupent de façon
intermittente pendant la
lecture d’un disque.
Les noms de dossiers ou de
fichiers ne sont pas
reconnus. (DivX, WMA, MP3
et JPEG)
Il faut un certain temps pour
lire des fichiers JPEG.
Des barres noires
apparaissent à la lecture de
fichiers JPEG.
L’appareil se met
automatiquement hors
tension.
Lorsqu’un périphérique de stockage USB est connecté
Problème éventuel Vérification Solution
Le périphérique de stockage
USB n’est pas reconnu.
Le fichier ne peut pas être lu. Le fichier est-il protégé contre la
Les noms de dossiers ou de
fichiers ne sont pas affichés,
ou bien ils sont mal affichés.
Les noms de dossiers ou de
fichiers ne sont pas affichés
dans l’ordre alphabétique.
Le volume est peut-être réglé trop
haut.
Avez-vous dépassé le nombre
maximal de noms de dossiers ou de
fichiers pouvant être reconnus par
cet appareil ?
Êtes-vous en train de lire de gros
fichiers ?
Lisez-vous des fichiers dont les
images ont différents rapports
d’aspect ?
Le périphérique de stockage USB
est-il connecté correctement ?
Le périphérique de stockage USB
est-il connecté via un concentrateur
USB ?
Le périphérique de stockage USB
est-il pris en charge par cet appareil ?
Ce problème ne provient pas de cet
appareil.
copie (par DRM) ?
Ce problème ne provient pas de cet
appareil.
Les noms de dossiers ou de fichiers
contiennent-ils plus de
30 caractères ?
Ce problème ne provient pas de cet
appareil.
Les sons et l’image vidéo peuvent devenir instables lorsque le
volume est réglé trop haut ; dans ce cas, baissez le volume.
Un maximum de 255 dossiers peuvent être reconnus sur un disque.
Un maximum de 648 fichiers peuvent être reconnus à l’intérieur
d’un dossier. Toutefois, selon la structure du dossier, cet appareil
peut ne pas être capable de reconnaître certains dossiers ou
fichiers.
L’affichage de gros fichiers peut requérir un certain temps.
Des barres noires peuvent s’afficher au haut et au bas, ou encore
sur les côtés de l’image, lorsque des fichiers JPEG d’un autre
rapport d’aspect sont affichés.
Si aucune opération n’est effectuée pendant 20 minutes, l’appareil
se met automatiquement hors tension. Pour cela, il est nécessaire
d’activer (
ON
hors tension automatique.
La fonction de mise hors tension automatique peut être activée/
désactivée (
Connectez le périphérique correctement (en l’engageant à fond).
L’appareil ne prend pas en charge les concentrateurs USB.
Connectez directement le périphérique de stockage USB à
l’appareil.
Cet appareil prend en charge seulement les clés de mémoire
auxiliaire USB.
Cet appareil prend en charge les clés à mémoire flash et audio
numériques portables.
Seuls les systèmes de fichiers FAT16 et FAT32 sont pris en charge.
Les autres systèmes de fichiers (exFAT, NTFS, HFS etc.) ne sont pas
pris en charge.
Une clé mémoire flash USB prenant en charge la norme USB 2.0
peut être utilisée.
Cet appareil ne prend pas en charge l’utilisation de disques durs
externes.
Mettez l’appareil hors tension puis remettez-le sous tension.
Certains périphériques de stockage USB peuvent ne pas être
reconnus correctement.
Les fichiers protégés contre la copie ne peuvent pas être lus.
Les fichiers stockés sur un ordinateur ne peuvent pas être lus.
Il se peut que l’appareil ne lise pas certains fichiers.
Le nombre maximum de caractères affichables pour les noms de
dossier et de fichier est de 30.
L’ordre d’affichage des noms de dossier et de fichier dans l’écran
Disc Navigator
fichiers ont été enregistrés sur le périphérique de stockage USB.
) la fonction d’arrêt automatique la fonction de mise
ON/OFF
) (page 45).
dépend de l’ordre dans lequel les dossiers et les
39
Fr
Page 86

Informations supplémentaires12
Problème éventuel Vérification Solution
Le lecteur prend beaucoup
de temps à reconnaître le
périphérique de stockage
USB.
Le périphérique de stockage
USB n’est pas alimenté.
Lors d’un branchement à un appareil compatible HDMI
Problème éventuel Vérification Solution
Aucune image ne s’affiche. La résolution est-elle réglée
Aucun son n’est produit ou le
son est déformé.
Les signaux audio
multicanaux ne sont pas
restitués.
Les couleurs ne s’affichent
pas correctement sur l’écran
du téléviseur.
Lorsqu’un iPod/iPhone/iPad est connecté
Problème éventuel Solution
Impossible d’actionner l’iPod/iPhone/iPad par la télécommande. Assurez-vous que l’iPod/iPhone/iPad est correctement connecté
Je n’arrive pas à faire fonctionner l’iPod/iPhone/iPad. Assurez-vous que l’iPod/iPhone/iPad est correctement connecté
Lorsqu’un périphérique sans fil
Problème éventuel Solution
Le périphérique sans fil
utilisé.
Aucun son ne provient du périphérique sans fil
est interrompu.
Quelle est la capacité du
périphérique de stockage USB ?
Le message
affiché sur le panneau avant ?
Lorsque la consommation électrique
du périphérique est trop importante,
l’alimentation est coupée.
correctement ?
Le câble HDMI est-il correctement
raccordé ?
HDMI Out
réglé ?
HDMI Out
réglé ?
HDMI Color
réglé ?
AUTH ERROR
est-il correctement
est-il correctement
est-il correctement
Bluetooth
Bluetooth
ne peut pas être connecté ou
Bluetooth
Un certain temps est nécessaire pour charger les données
lorsqu’un périphérique de stockage USB de grande capacité est
connecté (cela peut prendre plusieurs minutes).
est-il
Mettez l’appareil hors tension puis remettez-le sous tension.
Mettez l’appareil hors tension, puis débranchez et rebranchez le
périphérique de stockage USB.
Appuyez sur
l’entrée
Réglez
périphérique raccordé (page 37).
Ramenez
(
720x576p
Raccordez le câble correctement (à fond dans la prise).
Avec certains câbles, les signaux vidéo 1080p ne sont pas restitués.
Réglez
Réglez
Changez le réglage
(voir
(voir
Si l’iPod/iPhone/iPad a subi une immobilisation, essayez de le
réinitialiser et rebranchez-le ensuite sur cet appareil.
INPUT
USB/iPod
.
HDMI Resolution
HDMI Resolution
) (page 37).
HDMI Out
sur
HDMI Out
sur
Connexion de votre iPod/iPhone/iPad
Connexion de votre iPod/iPhone/iPad
est connecté ou utilisé :
Vérifiez qu’aucun produit émettant des ondes électromagnétiques
ou le son
dans la bande 2,4 GHz (four à micro-ondes, périphérique LAN sans
fil ou équipement sans fil
l’appareil. Le cas échéant, éloignez-le de cet appareil. Ou bien,
n’utilisez pas l’objet émettant les ondes électromagnétiques.
Vérifiez que le périphérique
l’appareil et qu’il n’y ait pas d’obstacle entre le périphérique
Bluetooth
et l’appareil. Placez le périphérique sans fil
l’appareil de manière à ce qu’ils ne soient pas éloignés de plus de
10 m* qu’il n’y ait pas d’obstacle entre eux.
* Cette distance est indicative. La portée réelle peut varier selon les
conditions propres à l’environnement d’utilisation.
Il se peut que le périphérique
mode de communication prenant en charge la technologie sans fil
Bluetooth
. Vérifiez la configuration du périphérique
pour passer à l’autre entrée, puis revenez à
correctement en fonction du
à son paramètre par défaut
LPCM (2CH)
Auto
HDMI Color
ou
Auto
(page 37).
(page 37).
à la page 19).
à la page 19).
Bluetooth
) ne se trouve à proximité de
Bluetooth
n’est pas trop éloigné de
Bluetooth
ne soit pas configuré sur le
(page 37).
Bluetooth
Bluetooth
et
.
40
Fr
Page 87

Informations supplémentaires 12
English Français Deutsch
Nederlands
Italiano Español
Pyccкий
Tableau des codes de langues et
Tableau des codes de pays et
régions
Tableau des codes de langues
Noms (codes) de langues et codes numériques:
Japanese (ja), 1001 Frisian (fy), 0625
English (en), 0514 Irish (ga), 0701
French (fr), 0618 Scots-Gaelic (gd), 0704
German (de), 0405 Galician (gl), 0712
Italian (it), 0920 Guarani (gn), 0714
Spanish (es), 0519 Gujarati (gu), 0721
Chinese (zh), 2608 Hausa (ha), 0801
Dutch (nl), 1412 Hindi (hi), 0809
Portuguese (pt), 1620 Croatian (hr), 0818
Swedish (sv), 1922 Hungarian (hu), 0821
Russian (ru), 1821 Armenian (hy), 0825
Korean (ko), 1115 Interlingua (ia), 0901
Greek (el), 0512 Interlingue (ie), 0905
Afar (aa), 0101 Inupiak (ik), 0911
Abkhazian (ab), 0102 Indonesian (in), 0914
Afrikaans (af), 0106 Icelandic (is), 0919
Amharic (am), 0113 Hebrew (iw), 0923
Arabic (ar), 0118 Yiddish (ji), 1009
Assamese (as), 0119 Javanese (jw), 1023
Aymara (ay), 0125 Georgian (ka), 1101
Azerbaijani (az), 0126 Kazakh (kk), 1111
Bashkir (ba), 0201 Greenlandic (kl), 1112
Byelorussian (be), 0205 Cambodian (km), 1113
Bulgarian (bg), 0207 Kannada (kn), 1114
Bihari (bh), 0208 Kashmiri (ks), 1119
Bislama (bi),
Bengali (bn), 0214 Kirghiz (ky), 1125
Tibetan (bo), 0215 Latin (la), 1201
Breton (br), 0218 Lingala (ln), 1214
Catalan (ca), 0301 Laothian (lo), 1215
Corsican (co), 0315 Lithuanian (lt), 1220
Czech (cs), 0319 Latvian (lv), 1222
Welsh (cy), 0325 Malagasy (mg), 1307
Danish (da), 0401 Maori (mi), 1309
Bhutani (dz), 0426 Macedonian (mk), 1311
Esperanto (eo), 0515 Malayalam (ml), 1312
Estonian (et), 0520 Mongolian (mn), 1314
Basque (eu), 0521 Moldavian (mo), 1315
Persian (fa), 0601 Marathi (mr), 1318
Finnish (fi), 0609 Malay (ms), 1319
Fiji (fj), 0610 Maltese (mt), 1320
0209 Kurdish (ku), 1121
Faroese (fo), 0615 Burmese (my), 1325
Nauru (na), 1401 Siswati (ss), 1919
Nepali (ne), 1405 Sesotho (st), 1920
Norwegian (no), 1415 Sundanese (su), 1921
Occitan (oc), 1503 Swahili (sw), 1923
Oromo (om), 1513 Tamil (ta), 2001
Oriya (or), 1518 Telugu (te), 2005
Panjabi (pa), 1601 Tajik (tg), 2007
Polish (pl), 1612 Thai (th), 2008
Pashto, Pushto (ps), 1619
Quechua (qu), 1721 Turkmen (tk), 2011
Rhaeto-Romance (rm), 1813 Tagalog (tl), 2012
Kirundi (rn), 1814 Setswana (tn), 2014
Romanian (ro), 1815 Tonga (to), 2015
Kinyarwanda (rw), 1823 Turkish (tr), 2018
Sanskrit (sa), 1901 Tsonga (ts), 2019
Sindhi (sd), 1904 Tatar (tt), 2020
Sangho (sg), 1907 Twi (tw), 2023
Serbo-Croatian (sh), 1908 Ukrainian (uk), 2111
Sinhalese (si), 1909 Urdu (ur), 2118
Slovak (sk), 1911 Uzbek (uz), 2126
Slovenian (sl), 1912 Vietnamese (vi), 2209
Samoan (sm), 1913 Volapük (vo), 2215
Shona (sn), 1914 Wolof (wo), 2315
Somali (so), 1915 Xhosa (xh), 2408
Albanian (sq), 1917 Yoruba (yo), 2515
Serbian (sr), 1918 Zulu (zu), 2621
Tigrinya (ti), 2009
Tableau des codes de pays et régions
Noms de pays et régions, Codes numériques et
Codes de pays et régions
Etats-Unis, 2119, us Chili, 0312, cl
Argentine,
Royaume-uni,
Italie,
Inde,
Indonésie,
Australie,
Autriche,
Pays-Bas,
Canada,
Corée, République de,
Singapour,
Suisse,
Suède,
Espagne,
Thaïlande,
Taiwan,
Chine,
0118, ar Danemark, 0411, dk
0702, gb Allemagne, 0405, de
0920, it Japon, 1016, jp
0914, in Nouvelle-Zélande, 1426, nz
0904, id Norvège, 1415, no
0121, au Pakistan, 1611, pk
0120, at Philippines, 1608, ph
1412, nl Finlande, 0609, fi
0301, ca Mexique, 1324, mx
0308, ch France, 0618, fr
1905, se Belgique, 0205, be
0519, es Portugal, 1620, pt
2023, tw Malaisie, 1325, my
0314, cn
1118
, kr
1907, sg Brésil, 0218, br
2008, th Hong Kong, 0811, hk
Fédération russe, 1821, ru
41
Fr
Page 88

Informations supplémentaires12
Types de disque et formats de fichier lisibles
DVD-Vidéo
DVD VR
Cd Super Vidéo
Vidéo CD
CD audio
JPEG
DivX
WMA
MP3
• Disques DVD-Vidéo en vente dans le commerce
• Disques DVD-R/-RW/-R DL et DVD+R/+RW/+R DL enregistrés en mode Vidéo
Disques DVD-R/-RW/-R DL enregistrés en mode VR
Cet appareil ne prend pas en charge la technologie CPRM
Super Video CD
CD-Vidéo
• CD Audio en vente dans le commerce
• Disques CD-R/-RW/-ROM contenant de la musique enregistrée en format CD-DA
Fichiers JPEG enregistrés sur des disques DVD-R/-RW/-R DL, ou des disques CD-R/-RW/-ROM, ou des
périphériques de stockage USB
Fichiers vidéo DivX enregistrés sur des disques DVD-R/-RW/-R DL, CD-R/-RW/-ROM ou des clés de mémoire USB
®
Fichiers WMA enregistrés sur des disques DVD-R/-RW/-R DL, CD-R/-RW/-ROM ou des clés de mémoire USB
Fichiers MP3 enregistrés sur des disques DVD-R/-RW/-R DL, CD-R/-RW/-ROM ou des clés de mémoire USB
• Seuls les disques qui ont été finalisés peuvent être
reproduits.
• Les disques enregistrés en mode d’écriture par paquet
(format UDF) ne sont pas compatibles avec cet appareil.
• Les noms de sociétés et de produits mentionnés dans le
présent mode d’emploi sont des marques commerciales
ou des marques déposées des sociétés respectives.
• Seuls les disques enregistrés en format ISO9660 Niveau
1, Niveau 2 et Joliet peuvent être lus.
• est une marque de commerce de DVD Format/
Logo Licensing Corporation.
Remarque
• Cet appareil ne prend pas en charge les disques
multisession ni l’enregistrement multiborder.
• L’enregistrement multisession/multiborder est une
technique permettant d’enregistrer un disque en
plusieurs sessions/bords. Une « session » ou « bord » est
une unité d’enregistrement, consistant en un jeu
complet de données de la zone d’entrée à la zone de
sortie.
Disques non lisibles par l’appareil
•Disques Blu-ray
•HD DVD
•AVCHD
•AVCREC
•Disques DVD-Audio
•Disques DVD-RAM
•SACD
•CD-G
À propos des codes régionaux
Des codes régionaux sont attribués aux lecteurs de DVD et
aux disques DVD-Vidéo selon la région où ils sont
commercialisés. Le(s) code(s) régional(aux) de ce lecteur est
(sont) indiqué(s) ci-dessous.
• DVD-Vidéo : 2
Les disques ne contenant pas ces codes ne peuvent pas être
lus. Les disques suivants peuvent être lus sur ce lecteur.
• DVD : 2 (comprenant 2) et ALL
À propos des CD protégés contre la
copie
Ce lecteur se conforme aux spécifications du format CD
Audio. Il ne prend pas en charge la lecture ou les fonctions
des disques non conformes à ces spécifications.
• La lecture des fichiers qui ne sont pas mentionnés ci-
dessous (WMV, MPEG4-AAC, etc.) n’est pas garantie.
À propos de la lecture des DualDisc
DualDisc est un nouveau type de disque à deux faces dont la
structure est la suivante : le contenu DVD vidéo, audio, etc.
est gravé sur une face, tandis que l’autre face contient des
données non-DVD, comme par exemple des fichiers audio
numériques classiques.
• La face DVD d’un DualDisc peut être lue sur ce lecteur
(mais pas le contenu DVD-Audio).
• La face audio, non DVD du disque n’est pas compatible
avec ce lecteur.
• Il est possible que, lors du chargement et de l’éjection
d’un DualDisc, la face opposée à celle en cours de
lecture soit rayée. La lecture d’un disque rayé n’est plus
possible.
• Pour de plus amples informations au sujet des
spécifications DualDisc, consultez le fabricant ou le
revendeur de ce type de disque.
42
Fr
Page 89

Informations supplémentaires 12
English Français Deutsch
Nederlands
Italiano Español
Pyccкий
Lecture de disques créés sur un
ordinateur ou un enregistreur BD/DVD
• Les réglages de l’application utilisée ou de
l’environnement de l’ordinateur peuvent empêcher la
lecture de disques enregistrés sur un ordinateur.
Enregistrez vos disques selon un format lisible sur ce
lecteur. Pour des détails, contactez votre revendeur.
• Il se peut qu’un disque enregistré sur un ordinateur ou
un enregistreur BD/DVD ne puisse pas être lu parce que
les caractéristiques de ce disque, des rayures, de la
saleté sur le disque, ou de la saleté sur la lentille de
l’enregistreur, etc. n’ont pas permis d’effectuer une
gravure de qualité.
Fichiers lisibles
• Les fichiers protégés par le DRM (Gestion des droits
numériques) ne peuvent pas être lus.
• La lecture des fichiers qui ne sont pas mentionnés cidessous (WMV, MPEG4-AAC, etc.) n’est pas garantie.
Formats de fichiers vidéo pris en
charge
DivX
• DivX est une technologie multiméd ia créée par DivX, Inc.
Les fichiers multimédia DivX incluent les données
d’images.
• Les fichiers DivX peuvent aussi inclure des fonctions de
lecture plus sophistiquées, comme l’affi chage de menus
et la sélection de diverses langues pour les sous-titres et
la sélection de pistes audio.
• DivX Certified
du contenu spécifique.
•DivX
marques commerciales de Rovi Corporation ou de ses
filiales et sont utilisés sous licence.
• Ce produit est équipé d’une technologie de protection
des droits d’auteur protégée par des brevets américains
et par d’autres droits de propriété intellectuelle de Rovi
Corporation. La rétrotechnique et le désassemblage sont
proscrits.
Extensions de nom de fichier : .avi et .divx (à utiliser pour que
l’appareil reconnaisse les fichiers vidéo DivX). Sachez que
tous les fichiers ayant l’extension .avi sont reconnus comme
MPEG4 mais qu’ils ne sont pas tous nécessairement des
fichiers vidéo DivX et peuvent donc être illisibles sur ce
lecteur.
• Les fichiers ne contenant pas de la vidéo DivX ne pe uvent
pas être lus, même s’ils ont l’extension “.avi”.
®
po ur l a le ctu re d e vi déo s Di vX®, y compris
®
, DivX Certified® et les logos associés sont des
À PROPOS DE LA VIDÉO DIVX : DivX® est un format vidéo
numérique créé par DivX, LLC, qui est une filiale de Rovi
Corporation. Ceci est un appareil DivX Certified
lit la vidéo DivX. Visitez le site divx.com pour plus
d’informations sur les outils logiciels permettant de convertir
vos fichiers en vidéos DivX.
À PROPOS DE LA VIDÉO DIVX À LA DEMANDE : Cet appareil
certifié DivX
vidéos DivX à la demande (VOD). Pour obtenir le code
d’enregistrement, accédez à l’option DivX VOD dans le menu
de configuration de l’appareil. Allez sur le site vod.divx.com
pour savoir comment terminer votre enregistrement.
®
doit être enregistré afin de pouvoir lire des
®
officiel qui
Affichage de sous-titres externes
• Les polices suivantes sont disponibles pour les soustitres externes. Vous pouvez afficher le jeu de polices
adéquat à partir de l’écran en réglant Subtitle Language
à la page 37 afin qu’il corresponde au fichier de soustitrage.
• Ce lecteur prend en charge les groupes de langues
suivants:
Groupe 1 Afrikaans (af), Basque (eu), Catalan (ca), Danois
Groupe 2 Albanien (sq), Croate (hr), Tchèque (cs), Hongrois
Groupe 3 Bulgare (bg), Béèlorusse (be), Macédonien (mk),
Groupe 4 Hébreu (iw), Yiddish (ji)
Groupe 5
• Certains fichiers de sous-titrage externes peuvent
• Pour les fichiers de sous-titrage externes, les extensions
• Le nom de fichier du fichier du film doit être répété au
• Le nombre de fichiers de sous-titrage externes pouvant
(da), Néerlandais (nl), Anglais (en), Féringien (fo),
Finnois (fi), Français (fr), Islandais (is), Irlandais
(ga), Italien (it), Norvégien (no), Portugais (pt),
Rhéto-Roman (rm), Écossais-Gaélique (gd),
Espagnol (es), Suédois (sv)
(hu), Polonais (pl), Roumain (ro), Slovaque (sk),
Slovène (sl)
Russe (ru), Serbe (sr), Ukrainien (uk)
Turc (tr)
s’afficher de façon incorrecte ou pas du tout.
de nom de fichier de sous-titrage suivantes sont prises
en cha rge ( not ez q ue c es fi chi ers ne f igu rent pas dan s le
menu de navigation du disque) : .srt, .sub, .ssa, .smi
début du nom de fichier pour le fichier de sous-titrage
externe.
être modifiés pour le même fichier de film est limité à un
maximum de 10.
Formats de fichiers d’images pris en
charge
JPEG
Résolution : Jusqu’à 3072 x 2048 pixels
Extensions de nom de fichier : .jpg et .JPG (Doit être utilisé
pour permettre à l’appareil de reconnaître les fichiers JPEG Ne pas utiliser pour d’autres types de fichiers)
• Cet appareil prend en charge JPEG Baseline.
• Cet appareil prend en charge le format Exif Ver.2.2.
• Cet appareil ne prend pas en charge JPEG progressif.
43
Fr
Page 90

Informations supplémentaires12
Formats de fichiers audio pris en
charge
• Cet appareil ne prend pas en charge le codage sans
perte.
MP3 :
MP3 est un format de compression. Il s’agit de l’acronyme de
MPEG Audio Layer 3. MP3 est un code audio qui permet de
compresser des données audio de façon significative sans
altérer la qualité sonore.
• Ce système prend en charge les fichiers de type MPEG1/2 Audio Layer 3 (Taux d’échantillonnage : 8 kHz à
48 kHz; Débit binaire : 64 kbps à 384 kbps).
• Pendant la lecture d’un fichier VBR, le compteur sur
l’afficher peut différer du temps de lecture en cours.
WMA :
Les fichiers WMA sont des fichiers Advanced System format
qui comprennent des fichiers audio compressés à l’aide du
codec Windows Media Audio. Le format WMA est le format de
fichier audio développé par Microsoft pour le lecteur
Windows Media.
• Ce système prend en charge les fichiers de type WMA
(Taux d’échantillonnage : 32 kHz/44,1 kHz/48 kHz; Débit
binaire : 64 kbps à 320 kbps).
• Pendant la lecture d’un fichier VBR, le compteur sur
l’afficher peut différer du temps de lecture en cours.
Précautions dutilisation
Lors d’un déplacement de l’appareil
Avant de déplacer l’appareil, assurez-vous qu’il ne contient
pas de disque et débranchez l’iPod/iPhone/iPad. Puis
appuyez sur la touche 1STANDBY/ON, attendez que
l’indication « STAND BY » disparaisse de l’affichage sur
l’appareil et débranchez le cordon d’alimentation. Le fait de
déplacer ou de transporter l’appareil avec un disque chargé à
l’intérieur ou avec un équipement raccordé à la prise USB, ou
à la prise mini-jack AUDIO IN, peut causer des dommages.
Emplacement d’installation
• Choisissez un endroit stable près du téléviseur ou de la
chaîne stéréo, utilisés avec cet appareil.
• N’installez pas cet appareil sur un téléviseur ou un
moniteur couleur. En outre, installez-le à l’écart des
platines à cassettes et autres équipements pouvant être
facilement affectés par les champs magnétiques.
Évitez d’installer l’appareil dans les endroits
suivants :
• Endroits exposés à la lumière directe du soleil
• Endroits humides ou insuffisamment aérés
• Endroits extrêmement chauds
• Endroits exposés aux vibrations
• Endroits dans lesquels il y a beaucoup de poussière ou
de fumée de cigarette
• Endroits exposés à la suie, à la vapeur ou à la chaleur
(cuisines, etc.)
Ne posez pas d’objets sur cet appareil
Ne posez pas d’objets sur le dessus de cet appareil.
N’obstruez pas les orifices de ventilation.
N’utilisez pas cet appareil sur une couverture, un lit, un sofa,
etc. pelucheux, et ne l’enveloppez pas dans un tissu, etc. La
chaleur ne pourra pas se dégager et causera des dommages.
N’exposez pas l’appareil à la chaleur.
N’installez pas cet appareil sur un amplificateur ou un autre
appareil produisant de la chaleur. En cas d’installation sur un
rack, pour éviter que l’appareil ne soit exposé à la chaleur
dégagée par l’amplificateur ou d’autres équipements audio,
placez-le sur un rayon en-dessous de l’amplificateur, etc.
• Mettez l’appareil hors tension lorsque vous ne l’utilisez
pas.
• Des rayures peuvent apparaître sur l’écran de télévision
et du bruit peut parasiter le son des émissions de radio,
selon l’état des signaux, lorsque l’appareil est en service.
Dans ce cas, mettez l’appareil hors tension.
À propos de la condensation
Si vous transportez l’appareil sans transition d’un endroit
froid vers une pièce chaude (par exemple, en hiver), ou si la
température de la pièce où se trouve cet appareil augmente
rapidement, des gouttelettes d’eau (condensation) peuvent
se former à l’intérieur (sur des pièces et la lentille). En cas de
condensation, cet appareil ne fonctionne pas correctement et
la lecture n’est pas possible. Laissez l’appareil sous tension
pendant 1 ou 2 heures à la température ambiante (pour que
l’humidité ait le temps de s’évaporer). Les gouttelettes d’eau
se dissiperont et la lecture sera de nouveau possible. De la
condensation peut aussi se former en été si l’appareil est
exposé à l’air d’un climatiseur. Si tel est le cas, déplacez votre
appareil.
Nettoyage de l’appareil
• Débranchez le cordon d’alimentation de la prise secteur
avant de nettoyer cet appareil.
• Nettoyez l’appareil avec un chiffon doux. En cas de
salissure importante, mouillez un chiffon doux dans une
solution de détergent neutre dilué dans 5 à 6 volumes
d’eau, essorez le chiffon complètement, nettoyez la
saleté, puis essuyez l’appareil à l’aide d’un chiffon doux
et sec.
• L’utilisation d’alcool, de diluent, de benzène, de produits
insecticides, etc. risque d’effacer les inscriptions et
d’abimer la peinture. Évitez aussi de laisser des produits
en caoutchouc ou en vinyle très longtemps au contact de
cet appareil pour ne pas endommager le coffret.
• En cas d’utilisation de chiffons/lingettes imprégnés avec
des produits chimiques, etc., lisez les précautions
d’emploi fournies par le fabricant.
44
Fr
Page 91

Informations supplémentaires 12
English Français Deutsch
Nederlands
Italiano Español
Pyccкий
Nettoyage de la lentille
• La lentille de cet appareil ne devrait pas se salir lors d’une
utilisation normale, mais si, pour une raison quelconque,
des poussières ou saletés perturbent son
fonctionnement, consultez un centre d’entretien agréé
par Pioneer. Bien que divers produits de nettoyage pour
lentille de lecteur soient en vente dans le commerce,
nous déconseillons leur utilisation, car certains d’entre
eux risquent, en fait, d’endommager la lentille.
Manipulation d’un disque
Rangement
• Remettez toujours les disques dans leur boît ier et rangezles verticalement, en évitant les endroits chauds,
humides, exposés directement à la lumière du soleil ou
extrêmement froids.
• Veuillez lire les recommandations fournies avec le
disque.
Nettoyage des disques
• Des empreintes de doigts ou de la poussière sur un
disque peuvent empêcher sa lecture. Dans ce cas,
utilisez un chiffon de nettoyage, etc. pour essuyer
délicatement le disque en allant du centre vers
l’extérieur. N’utilisez pas un tissu de nettoyage sale.
• N’utilisez pas de benzène, de di luant ou d’autres produits
chimiques volatils. En outre, n’utilisez pas de
vaporisateur de produits de nettoyage ni d’agents
antistatiques.
• En cas de salissure importante, mouillez un chiffon doux,
essorez-le chiffon, nettoyez la saleté, puis essuyez
l’appareil à l’aide d’un chiffon sec.
• N’utilisez pas de disques endommagés (fissurés ou
déformés).
• Ne laissez pas la face des disques sur laquelle sont
gravées les informations devenir rayée ou sale.
• N’attachez pas de morceaux de papier ou d’autocollants
sur les disques. Cela pourrait déformer les disques et les
rendre illisibles. Notez aussi que souvent, une étiquette
est collée sur les disques de location, et que la colle de
l’étiquette peut avoir débordé. Vérifiez que la colle n’a pas
débordé des bords de l’étiquette avant d’utiliser un
disque de location.
À propos des disques de forme
particulière
Les disques à formes spéciales (en cœur, hexagonaux, etc.)
ne peuvent pas être lus sur cet appareil. N’essayez pas de lire
de tels disques car ils pourraient endommager cet appareil.
À propos de l’iPod/iPhone/iPad
Les accessoires électroniques portant la mention « Made for
iPod », « Made for iPhone » et « Made for iPad » ont été
conçus pour fonctionner respectivement avec un iPod, un
iPhone ou un iPad et sont certifiés conformes aux exigences
d’Apple par le fabricant. Apple n’est pas responsable pour le
fonctionnement de cet appareil ou de sa compatibilité avec
les normes réglementaires et de sécurité. Veuillez noter que
l’emploi de cet accessoire avec un iPod, iPhone ou iPad peut
affecter les performances sans fil.
iPad, iPhone, iPod, iPod nano et iPod touch sont des marques
commerciales d’Apple Inc., déposées aux États-Unis et dans
d’autres pays.
Configuration de la fonction de
mise hors tension automatique
Appuyez sur le bouton # de l’appareil pendant 3 secondes
pour activer/désactiver la fonction de mise hors tension
automatique.
Cette fonction peut être configurée uniquement à l’aide du #
de l’appareil.
Il n’est pas possible de la configurer à l’aide de la
télécommande.
Le réglage par défaut est ON (activé).
Remarque
• Lorsque la fonction de mise hors tension automatique
est activée (ON), l’indication « APD ON » apparaît sur
l’affichage principal.
45
Fr
Page 92

Informations supplémentaires12
• Lorsque la fonction de mise hors tension automatique
est désactivée (OFF), l’indication « APD OFF » apparaît
sur l’affichage principal.
Rétablissement de tous les
réglages à leur valeur par défaut
Suivez les étapes ci-dessous pour restaurer tous les
paramètres de l’appareil à leur valeur d’origine par défaut.
1 Appuyez sur
1STANDBY/ON
pour la mise
sous tension.
2 Appuyez sur la touche
DVD/CD
de la
télécommande ou appuyez à plusieurs reprises
sur la touche
sélectionner la source d’entrée
3 Appuyez sur la touche
INPUT
de l’appareil pour
DVD/CD
.
$ OPEN/CLOSE
pour
ouvrir le tiroir disque.
4 Appuyez sur le bouton
1STANDBY/ON
de
l’appareil pendant 3 secondes tout en appuyant
sur le bouton
• « DEFAULT » apparaît pendant que les paramètres sont
rétablis aux valeurs par défaut. L’appareil est mis hors
tension.
• Il n’est pas possible de la configurer à l’aide de la
télécommande.
#
.
Spécifications
• Section Amplificateur
Puissance de sortie RMS : . . . . . . . . . . . . . . . . 30 W + 30 W
• Section tuner
Gamme de fréquences (FM) . . . . . . . . . 87,5 MHz à 108 MHz
Entrée antenne (FM). . . . . . . . . . . . . . . . . . .75 : asymétrique
• Bluetooth
Version. . . . . . . . . . . . . . . . . Bluetooth Spécifications Ver. 3.0
Sortie . . . . . . . . . . . . . . . . . Bluetooth Spécifications Classe 2
Distance estimée de transmission en visibilité directe*
. . . . . . . . . . . . . . . . . . . . . . . . . . . . . . . . . . . . . . . .Environ 10 m
Gamme de fréquences . . . . . . . . . . . . . . . . . . . . . . . . . 2,4 GHz
Modulation . . . . . FH-SS (Étalement de spectre par évasion)
Profils Bluetooth pris en charge . . . . . . . . . . . .A2DP, AVRCP
Codec prise en charge . . . . . . . . SBC (Codec de sous-bande)
Protection de contenus pris en charge. . . . . . . . . . . . SCMS-T
* La distance de transmission en visibilité directe est une
estimation. La distance de transmission dans la pratique peut
être différente selon l’environnement.
•Divers
Prise USB . . . . . . . . . . . . . . . . . . . . . . . . . . . . . . . . . . 5 V, 2,1 A
Alimentation . . . . . . . . . . . . CA de 220 V à 240 V, 50 Hz/60 Hz
Consommation
(1 kHz, 10 %, T.H.D., 4 :)
En marche. . . . . . . . . . . . . . . . . . . . . . . . . . . . . . . . . . . .35 W
En veille . . . . . . . . . . . . . . . . . . . . . . . . . . . . . . . . 0,5 W max.
Veille (fonction BT STANDBY activée) . . . . . . . 0,5 W max.
Dimensions externes
. . . . . . . . . . . . . . . . . . .215 mm (L) x 95 mm (H) x 325 mm (P)
Poids (sans emballage) . . . . . . . . . . . . . . . . . . . . . . . . . . 2,0 kg
• Enceintes
Enceintes protégées contre les interférences
électromagnétiques
Type
Enceinte à 2 voies
Haut-parleur d’aigus : 5 cm
Haut-parleur de graves : 10 cm
Puissance d’entrée max. . . . . . . . . . . . . . . . . . . . . . . . . . .30 W
Impédance . . . . . . . . . . . . . . . . . . . . . . . . . . . . . . . . . . . . . .4 :
Dimensions externes
. . . . . . . . . . . . . . . . 130 mm (L) x 211,5 mm (H) x 240 mm (P)
Poids . . . . . . . . . . . . . . . . . . . . . . . . . . . . . . . .2,0 kg (chacune)
• Accessoires
Télécommande . . . . . . . . . . . . . . . . . . . . . . . . . . . . . . . . . . . . . 1
Câble vidéo (1,5 m). . . . . . . . . . . . . . . . . . . . . . . . . . . . . . . . . .1
Antenne FM à fil . . . . . . . . . . . . . . . . . . . . . . . . . . . . . . . . . . . . 1
Piles AAA (R03). . . . . . . . . . . . . . . . . . . . . . . . . . . . . . . . . . . . . 2
Câble d’enceinte. . . . . . . . . . . . . . . . . . . . . . . . . . . . . . . . . . . .2
Support pour iPhone/iPad. . . . . . . . . . . . . . . . . . . . . . . . . . . . 1
Cordon d’alimentation
Carte de garantie
Mode d’emploi (ce document)
Remarque
• Les spécifications sont valables pour une alimentation
de 230 V.
• Les spécifications et la conception sont susceptibles
d’être modifiées sans préavis, en raison d’améliorations
apportées à l’appareil.
© 2014 PIONEER HOME ELECTRONICS CORPORATION.
Tous droits de reproduction et de traduction réservés.
46
Fr
Page 93

English Français Deutsch
Nederlands
Italiano Español
Pyccкий
Informations supplémentaires 12
47
Fr
Page 94

Installieren Sie Ihre Lautsprecher nicht über Kopf an der
Decke oder an der Wand. Der Grill ist abnehmbar
gestaltet, und deshalb ist es möglich, dass er, wenn er
über Kopf installiert ist, herunterfallen und auf diese
Weise Schaden oder Verletzungen hervorrufen kann.
SGK004_A1_De
VORSICHT MIT DEM NETZKABEL
Fassen Sie das Netzkabel immer am Stecker. Ziehen Sie
nicht am Kabel selbst, und fassen Sie das Netzkabel
niemals mit nassen Händen an, da dies einen
Kurzschluss oder elektrischen Schlag verursachen
kann. Stellen Sie nicht das Gerät, Möbelstücke o.ä. auf
das Netzkabel; sehen Sie auch zu, dass es nicht
eingeklemmt wird. Machen Sie niemals einen Knoten in
das Netzkabel, und binden Sie es nicht mit anderen
Kabeln. Das Netzkabel sollte so gelegt werden, dass
niemand darauf tritt. Ein beschädigtes Netzkabel kann
einen Brand oder elektrischen Schlag verursachen.
Prüfen Sie das Netzkabel von Zeit zu Zeit. Sollte es
beschädigt sein, wenden Sie sich an Ihre nächste
autorisierte PIONEER-Kundendienststelle oder Ihren
Händler, um es zu ersetzen.
S002*_A1_De
Dieses Gerät ist für den Heimgebrauch vorgesehen.
Falls bei Einsatz zu einem anderem Zweck (z.B.
Langzeitgebrauch zu gewerblichen Zwecken in einem
Restaurant oder Betrieb in einem Fahrzeug bzw.
Schiff) eine Funktionsstörung auftritt, die eine
Reparatur des Gerätes erforderlich macht, werden die
Reparaturkosten dem Kunden selbst dann in
Rechnung gestellt, wenn die Garantiefrist noch nicht
abgelaufen ist.
K041_A1_De
ACHTUNG
Bei diesem Gerät handelt es sich zwar um ein
Laserprodukt der Klasse 1, das entsprechend dem
Standard Sicherheit für Laserprodukte IEC
60825-1:2007 klassifiziert ist.
LASER KLASSE 1
D58-5-2-2a_A1_De
WARNUNG
Kleine Teile außerhalb der Reichweite von Kleinkindern
und Kindern aufbewahren. Bei unbeabsichtigtem
Verschlucken ist unverzüglich ein Arzt aufzusuchen.
D41-6-4_A1_De
ACHTUNG
Der STANDBY/ON-Schalter dieses Gerätes trennt
das Gerät nicht vollständig vom Stromnetz. Um das
Gerät vollständig vom Netz zu trennen, muss der
Netzstecker aus der Netzsteckdose gezogen werden.
Daher sollte das Gerät so aufgestellt werden, dass
stets ein unbehinderter Zugang zur Netzsteckdose
gewährleistet ist, damit der Netzstecker in einer
Notsituation sofort abgezogen werden kann. Um
Brandgefahr auszuschließen, sollte der Netzstecker
vor einem längeren Nichtgebrauch des Gerätes,
beispielsweise während des Urlaubs, grundsätzlich
von der Netzsteckdose getrennt werden.
D3-4-2-2-2a*_A1_De
Betriebsumgebung
Betriebstemperatur und Betriebsluftfeuchtigkeit:
+5 °C bis +35 °C, 85 % rel. Feuchte max.
(Ventilationsschlitze nicht blockiert)
Eine Aufstellung dieses Gerät an einem unzureichend
belüfteten, sehr feuchten oder heißen Ort ist zu
vermeiden, und das Gerät darf weder direkter
Sonneneinstrahlung noch starken Kunstlichtquellen
ausgesetzt werden.
D3-4-2-1-7c*_A1_De
VORSICHTSHINWEIS ZUR BELÜFTUNG
Bei der Aufstellung dieses Gerätes muss für einen
ausreichenden Freiraum gesorgt werden, um eine
einwandfreie Wärmeabfuhr zu gewährleisten
(mindestens 25 cm oberhalb des Gerätes, 10 cm hinter
dem Gerät und jeweils 5 cm an der Seite des Gerätes).
WARNUNG
Im Gerätegehäuse sind Ventilationsschlitze und andere
Öffnungen vorgesehen, die dazu dienen, eine
Überhitzung des Gerätes zu verhindern und einen
zuverlässigen Betrieb zu gewährleisten. Um
Brandgefahr auszuschließen, dürfen diese Öffnungen
auf keinen Fall blockiert oder mit Gegenständen (z.B.
Zeitungen, Tischdecken und Gardinen) abgedeckt
werden, und das Gerät darf beim Betrieb nicht auf
einem dicken Teppich oder Bett aufgestellt sein.
D3-4-2-1-7b*_A1_De
WARNUNG
Keine Quellen offener Flammen (z.B. eine brennende
Kerze) auf dieses Gerät stellen.
D3-4-2-1-7a_A1_De
WARNUNG
Dieses Gerät ist nicht wasserdicht. Zur Vermeidung der
Gefahr von Brand und Stromschlag keine Behälter mit
Flüssigkeiten (z.B. Blumenvasen und -töpfe) in die
Nähe des Gerätes bringen und dieses vor Tropfwasser,
Spritzwasser, Regen und Nässe schützen.
D3-4-2-1-3_A1_De
ACHTUNG
UM SICH NICHT DER GEFAHR EINES ELEKTRISCHEN
SCHLAGES AUSZUSETZEN, DÜRFEN SIE NICHT DEN
DECKEL (ODER DIE RÜCKSEITE) ENTFERNEN. IM
GERÄTEINNEREN BEFINDEN SICH KEINE VOM
BENUTZER REPARIERBAREN TEILE. ÜBERLASSEN
SIE REPARATUREN DEM QUALIFIZIERTEN
KUNDENDIENST.
D3-4-2-1-1_B1_De
Page 95

K058a_A1_De
Pb
Informationen für Anwender zur Sammlung und Entsorgung von Altgeräten und
gebrauchten Batterien
Diese Symbole auf den Produkten, der Verpackung und/oder Begleitdokumenten
bedeuten, dass gebrauchte elektrische und elektronische Produkte und Batterien
nicht über den Haushaltsmüll entsorgt werden dürfen.
Zur richtigen Handhabung, Rückgewinnung und Wiederverwertung von Altprodukten
und gebrauchten Batterien bringen Sie diese bitte zu den gemäß der nationalen
Gesetzgebung dafür zuständigen Sammelstellen.
Mit der korrekten Entsorgung dieser Produkte und Batterien helfen Sie dabei,
wertvolle Ressourcen zu schonen und vermeiden mögliche negative Auswirkungen
auf die Gesundheit und die Umwelt, die durch eine unsachgemäße Behandlung des
Abfalls entstehen könnten.
Weitere Informationen zur Sammlung und Wiederverwertung von Altprodukten und
Batterien erhalten Sie von Ihrer örtlichen Gemeindeverwaltung, Ihrem Müllentsorger
oder dem Verkaufsort, an dem Sie die Waren erworben haben.
Diese Symbole gelten ausschließlich in der Europäischen Union.
Für Länder außerhalb der Europäischen Union:
Wenn Sie diese Gegenstände entsorgen wollen, wenden Sie sich bitte an Ihre
lokalen Behörden oder Händler und fragen Sie dort nach der korrekten
Entsorungsweise.
Symbolbeispiele
für Batterien
Symbol für
Geräte
Vorsicht bei Radiowellen
Diese Einheit verwendet eine Radiowellenfrequenz von
2,4 GHz, ein Freqeunzband, das auch von anderen
drahtlosen Systemen (z. B. Mikrowellengeräten und
drahtlosen Telefonen) verwendet wird. Wenn es auf
Ihrem Fernsehbild zu Störungen kommt, kann es sein,
dass diese Einheit (einschließlich von Produkten, die
durch diese Einheit unterstützt werden) eine
Signalüberlagerung mit den
Antennen-Eingangsanschluss Ihres Fernsehers,
Videogeräts, Stelliten-Tuners usw. verursacht.
Vergrößern Sie, wenn das der Fall ist, den Abstand
zwischen dem Antennen-Eingangsanschluss und
dieser Einheit (einschließlich von Produkten, die durch
diese Einheit unterstützt werden).
• Pioneer ist nicht verantwortlich für irgendeine
Störung eines kompatiblen Pioneer-Produkts
aufgrund von
Kommunikationsfehlern/Fehlfunktionen, die in
Zusammenhang mit Ihrer Netzwerkverbindung
und/oder Ihren angeschlossenen Geräten stehen.
Wenden Sie sich bitte an Ihren Internetanbieter oder
Ihren Netzwerkgeräte-Hersteller.
• Um das Internet zu benutzen, müssen Sie einen
gesonderten Vertrag mit einem Internet-anbieter
abschließen oder eine Zahlung an einen
Internetanbieter leisten.
Page 96

Wir danken Ihnen dafür, dass Sie sich für dieses Produkt von Pioneer entschieden
haben.
Bitte lesen Sie diese Bedienungsanleitung vor der Inbetriebnahme aufmerksam durch, damit Sie Ihr neues Gerät
richtig bedienen und stets seine optimale Leistung erzielen können. Bitte bewahren Sie diese Anleitung anschließend
für spätere Bezugnahme griffbereit auf.
Inhaltsverzeichnis
01 Vor der Inbetriebnahme
Lieferumfang . . . . . . . . . . . . . . . . . . . . . . . . . . . . . . . . . . 6
Einlegen der Batterien in die Fernbedienung . . . . . . . . 6
Verwendung der Fernbedienung . . . . . . . . . . . . . . . . . . . 6
02 Bezeichnungen und Funktionen der
Teile
Fernbedienung . . . . . . . . . . . . . . . . . . . . . . . . . . . . . . . . . 7
Entfernen und Wiederanbringen des Frontgrills . . . . . 9
Vorderes Bedienfeld . . . . . . . . . . . . . . . . . . . . . . . . . . . 10
Display . . . . . . . . . . . . . . . . . . . . . . . . . . . . . . . . . . . . . . 11
03 Anschlüsse
Anschluß der Lautsprecher . . . . . . . . . . . . . . . . . . . . . 12
Anschluss über ein HDMI-Kabel . . . . . . . . . . . . . . . . . . 13
Audiosignale, die von der HDMI OUT-Buchse dieses
Gerätes ausgegeben werden können . . . . . . . . . . . . . . 14
Anschließen der UKW-Antenne . . . . . . . . . . . . . . . . . . 14
Verwendung externer Antennen. . . . . . . . . . . . . . . . . . . 15
Einstecken des Steckers . . . . . . . . . . . . . . . . . . . . . . . . 15
04 Die ersten Schritte
Einschalten der Stromversorgung . . . . . . . . . . . . . . . . 16
Einstellen der Uhr . . . . . . . . . . . . . . . . . . . . . . . . . . . . . 16
Generelle Bedienung . . . . . . . . . . . . . . . . . . . . . . . . . . 16
Eingangsfunktion. . . . . . . . . . . . . . . . . . . . . . . . . . . . . . . 16
Display-Helligkeitsregler . . . . . . . . . . . . . . . . . . . . . . . . . 16
Automatische Einstellung der Lautstärke . . . . . . . . . . . 16
Lautstärkeregelung . . . . . . . . . . . . . . . . . . . . . . . . . . . . . 16
Muting. . . . . . . . . . . . . . . . . . . . . . . . . . . . . . . . . . . . . . . . 16
Lautstärkeregler . . . . . . . . . . . . . . . . . . . . . . . . . . . . . . . 17
Equalizer. . . . . . . . . . . . . . . . . . . . . . . . . . . . . . . . . . . . . . 17
P.BASS-Regelung . . . . . . . . . . . . . . . . . . . . . . . . . . . . . . 17
Bass/Hochtöner-Regelung . . . . . . . . . . . . . . . . . . . . . . . 17
Einstellen des Weck-Timers . . . . . . . . . . . . . . . . . . . . . 17
Anwählen des Weck-Timers . . . . . . . . . . . . . . . . . . . . . . 18
Abbrechen des Weck-Timers . . . . . . . . . . . . . . . . . . . . . 18
Verwendung der Weck-Zeitschaltuhr. . . . . . . . . . . . . . . 18
Verwendung des Sleep-Timers . . . . . . . . . . . . . . . . . . . 18
Verwenden von Kopfhörern . . . . . . . . . . . . . . . . . . . . . 18
05 iPod/iPhone/iPad-Wiedergabe
Bestätigen, was für iPod/iPhone/iPad-Modelle
unterstützt werden . . . . . . . . . . . . . . . . . . . . . . . . . . . . 19
Anschließen Ihres iPod/iPhone/iPad . . . . . . . . . . . . . . 19
Anschließen des iPod/iPhone/iPad unter Verwendung
des mitgelieferten Ständers . . . . . . . . . . . . . . . . . . . . . . 19
Abspielen des iPod/iPhone/iPad . . . . . . . . . . . . . . . . . 20
06 Disc-Wiedergabe
Abspielen von Discs oder Dateien . . . . . . . . . . . . . . . . 21
Erweiterte DVD-/CD-Disc-Wiedergabe . . . . . . . . . . . . 22
Direkter Titel-Suchlauf . . . . . . . . . . . . . . . . . . . . . . . . . . 22
Wiedergabe der Wiederholung A-B. . . . . . . . . . . . . . . . 22
Wiederholte Wiedergabe . . . . . . . . . . . . . . . . . . . . . . . . 23
Zufallswiedergabe . . . . . . . . . . . . . . . . . . . . . . . . . . . . . . 23
Programmierte Wiedergabe. . . . . . . . . . . . . . . . . . . . . . 24
Suchmodus . . . . . . . . . . . . . . . . . . . . . . . . . . . . . . . . . . . 25
Herunterladen von MP3/WMA. . . . . . . . . . . . . . . . . . . . 25
Reihenfolge der Wiedergabe . . . . . . . . . . . . . . . . . . . . . 25
Vorgehensweise bei der Wiedergabe einer DivX- oder
MP3/WMA/JPEG-Datei . . . . . . . . . . . . . . . . . . . . . . . . . . 26
07 USB-Wiedergabe
Wiedergeben von USB-Speichern (USB-Geräten) . . . 27
Vorgehensweise bei der Wiedergabe einer DivX- oder
MP3/WMA/JPEG-Datei . . . . . . . . . . . . . . . . . . . . . . . . . . 27
Wiedergabe in einer gewünschten Reihenfolge
(Programmwiedergabe) . . . . . . . . . . . . . . . . . . . . . . . . 28
08 Verwendung des Tuners
Anhören von Radiosendungen . . . . . . . . . . . . . . . . . . 29
Abstimmung . . . . . . . . . . . . . . . . . . . . . . . . . . . . . . . . . . 29
Speichern voreingestellter Sender. . . . . . . . . . . . . . . . . 29
Abrufen eines gespeicherten Senders . . . . . . . . . . . . . 30
Festsender-Suchlauf . . . . . . . . . . . . . . . . . . . . . . . . . . . . 30
Löschen aller gespeicherten Sender . . . . . . . . . . . . . . . 30
Benutzen des Radio-Daten-Systems (RDS) . . . . . . . . 30
Einführung in das RDS-System . . . . . . . . . . . . . . . . . . . 30
Suche nach RDS-Sendungen . . . . . . . . . . . . . . . . . . . . 30
RDS-INFORMATIONEN. . . . . . . . . . . . . . . . . . . . . . . . . . 31
Verwendung des Auto Station Program Memory (ASPM)
(automatischer Senderprogramm-Speicher) . . . . . . . . 31
Hinweise zum RDS-Betrieb . . . . . . . . . . . . . . . . . . . . . . 31
09 Andere Anschlüsse
Anschluss zusätzlicher Komponenten . . . . . . . . . . . . 32
10
Bluetooth
Musikwiedergabe unter Einsatz von Bluetooth
drahtloser Technologie . . . . . . . . . . . . . . . . . . . . . . . . . 33
Betrieb per Fernbedienung . . . . . . . . . . . . . . . . . . . . . 33
Pairing (Paarung) mit der Einheit
(Erstregistrierung) . . . . . . . . . . . . . . . . . . . . . . . . . . . . . 33
Musik auf der Einheit von einem Bluetooth-fähigen
Gerät anhören . . . . . . . . . . . . . . . . . . . . . . . . . . . . . . . . 34
BT STANDBY . . . . . . . . . . . . . . . . . . . . . . . . . . . . . . . . . . 34
Warnhinweis Funkwellen . . . . . . . . . . . . . . . . . . . . . . . 35
Einsatzbereich . . . . . . . . . . . . . . . . . . . . . . . . . . . . . . . . . 35
Funkwellenreflektionen. . . . . . . . . . . . . . . . . . . . . . . . . . 35
Vorsichtshinweise zum Anschließen von Produkten,
die von dieser Anlage unterstützt werden. . . . . . . . . . . 35
® Audio-Wiedergabe
4
De
Page 97

11 Ändern der Einstellungen
Einstellungen für DVD/CD- und USB-Wiedergabe . . .36
Audio Settings-Parameter . . . . . . . . . . . . . . . . . . . . . . . 36
Video Adjust-Parameter . . . . . . . . . . . . . . . . . . . . . . . . . 36
Initial Settings-Parameter. . . . . . . . . . . . . . . . . . . . . . . . 36
Rückstellen der Einstellung des Eintrags HDMI
Resolution auf den Standardwert . . . . . . . . . . . . . . . . . 37
12 Zusätzliche Informationen
Fehlersuche . . . . . . . . . . . . . . . . . . . . . . . . . . . . . . . . . . .38
Sprachcode-Tabelle und Länder-/
Gebietscode-Tabelle . . . . . . . . . . . . . . . . . . . . . . . . . . . .41
Sprachencode-Tabelle . . . . . . . . . . . . . . . . . . . . . . . . . . 41
Länder-/Gebietscode-Tabelle . . . . . . . . . . . . . . . . . . . . . 41
Abspielbare Discs und Formate . . . . . . . . . . . . . . . . . .42
Nicht abspielbare Discs . . . . . . . . . . . . . . . . . . . . . . . . . 42
Hinweise zu Regionalcodes . . . . . . . . . . . . . . . . . . . . . . 42
Hinweise zu CDs, die mit Kopierschutz versehen
sind. . . . . . . . . . . . . . . . . . . . . . . . . . . . . . . . . . . . . . . . . . 42
Hinweise zur Wiedergabe von DualDiscs. . . . . . . . . . . 42
Abspielen von Discs, die auf einem PC oder BD/DVD-
Recorder erstellt wurden . . . . . . . . . . . . . . . . . . . . . . . . 43
Abspielbare Dateien . . . . . . . . . . . . . . . . . . . . . . . . . . . .43
Unterstützte Videodateiformate . . . . . . . . . . . . . . . . . . . 43
Anzeigen von externen Untertiteldateien . . . . . . . . . . . 43
Unterstützte Bilddateiformate . . . . . . . . . . . . . . . . . . . . 44
Unterstützte Audiodateiformate . . . . . . . . . . . . . . . . . . 44
Vorsichtsmaßregeln bei der Verwendung . . . . . . . . . .44
Transport dieses Gerätes . . . . . . . . . . . . . . . . . . . . . . . . 44
Installationsort. . . . . . . . . . . . . . . . . . . . . . . . . . . . . . . . . 44
Stellen Sie keine Gegenstände auf dieses Gerät . . . . . 44
Hinweise zu Kondensatbildung. . . . . . . . . . . . . . . . . . . 44
Reinigen des Produkts . . . . . . . . . . . . . . . . . . . . . . . . . . 45
Reinigen der Abtasterlinse. . . . . . . . . . . . . . . . . . . . . . . 45
Handhabung von Discs . . . . . . . . . . . . . . . . . . . . . . . . .45
Aufbewahren . . . . . . . . . . . . . . . . . . . . . . . . . . . . . . . . . . 45
Reinigen der Discs . . . . . . . . . . . . . . . . . . . . . . . . . . . . . 45
Speziell geformte Discs . . . . . . . . . . . . . . . . . . . . . . . . . 45
Über iPod/iPhone/iPad . . . . . . . . . . . . . . . . . . . . . . . . .45
Einstellen der automatischen Stromabschaltung . . . .46
Wiederherstellen aller Standardeinstellungen . . . . . . 46
Technische Daten . . . . . . . . . . . . . . . . . . . . . . . . . . . . . . 46
De
5
Page 98

Vor der Inbetriebnahme01
IN
PU
T
Kapitel 1:
Vor der Inbetriebnahme
• Batterien dürfen nicht erhitzt, zerlegt oder in ein Feuer
Lieferumfang
Bitte überzeugen Sie sich, dass sich das folgende Zubehör in
der Box befindet, wenn Sie sie öffnen.
• Fernbedienung
• Netzkabel
• Video-Kabel (1,5 m)
• UKW-Drahtantenne
• Mikrozelle (R03, Größe „AAA“) x 2
• Lautsprecher-Draht x 2
• iPhone/iPod-Ständer
• Garantiekarte
• Bedienungsanleitung (vorliegendes Dokument)
Einlegen der Batterien in die
Fernbedienung
1 Öffnen Sie den Batteriefachdeckel an der
Rückseite, und legen Sie die Batterien wie in der
nachstehenden Abbildung gezeigt in das
Batteriefach ein.
oder in Wasser geworfen werden.
• Batterien können unterschiedliche Spannungen
besitzen, selbst wenn sie die gleiche Größe und Form
aufweisen. Verwenden Sie keine Batterien
unterschiedlicher Sorten gemeinsam.
• Um ein Auslaufen von Batterieelektrolyt zu vermeiden,
entfernen Sie die Batterien aus dem Batteriefach, wenn
die Fernbedienung längere Zeit (mindestens einen
Monat) nicht verwendet werden soll. Falls
Batterieelektrolyt ausgelaufen ist, reinigen Sie das
Innere des Batteriefachs gründlich, und legen Sie dann
neue Batterien ein. Falls ausgelaufener
Batterieelektrolyt mit der Haut in Kontakt gekommen ist,
spülen Sie die betroffenen Stellen unter laufendem
Wasser ab.
• Bitte beachten Sie bei der Entsorgung von gebrauchten
Batterien die geltenden staatlichen Regelungen oder die
in Ihrem Land/Gebiet geltenden Umweltvorschriften der
Umweltbehörden.
• WARNUNG
Verwenden oder lagern Sie Batterien nicht bei direkter
Sonneneinstrahlung oder in übermäßig warmen
Umgebungen wie zum Beispiel in Fahrzeugen oder in
der Nähe von Heizungen. Dies kann zu Leckage,
Überhitzung, Explosion oder Brand der Batterien führen.
Außerdem kann sich die Lebensdauer der Batterien
verringern.
Verwendung der Fernbedienung
Die Reichweite der Fernbedienung beträgt ca. 7 m innerhalb
eines Winkels von ca. 30º vor dem FernbedienungssignalSensor am Gerät.
2 Schließen Sie den Batteriefachdeckel
wieder.
ACHTUNG
• Achten Sie beim Einlegen der Batterien sorgfältig
darauf, die Federn der negativen () Pole nicht zu
beschädigen. Dies kann dazu führen, dass Batterien
auslaufen oder überhitzt werden.
• Verwenden Sie keine anderen als die vorgeschriebenen
Batterien. Verwenden Sie außerdem niemals eine neue
Batterie gemeinsam mit einer alten.
• Legen Sie die Batterien unter Bezugnahme auf die
Polaritätsmarkierungen ( und ) im Inneren des
Batteriefachs polaritätsgerecht ein.
6
De
30°
30°
7 m
Bitte beachten Sie bei der Verwendung der Fernbedienung
Folgendes.
• Sorgen Sie dafür, dass sich keine Hindernisse zwischen
der Fernbedienung und dem FernbedienungssignalSensor am Gerät befinden.
• Wenn der Fernbedienungssignal-Sensor am Gerät
starker Sonneneinstrahlung oder dem Licht einer
Leuchtstofflampe ausgesetzt ist, arbeitet die
Fernbedienung möglicherweise nicht zuverlässig.
• Die Fernbedienungen verschiedener Geräte können eine
gegenseitige Beeinflussung verursachen. Vermeiden
Sie den Gebrauch anderer Fernbedienungen in der Nähe
dieses Gerätes.
• Wechseln Sie die Batterien aus, sobald die Reichweite
der Fernbedienung merklich nachgelassen hat.
Page 99

Bezeichnungen und Funktionen der Teile 02
English Français Deutsch
Nederlands
Italiano Español
Pyccкий
Kapitel 2:
Bezeichnungen und Funktionen der Teile
2 Eingangsfunktion-Tasten
Fernbedienung
STANDBY/ON
1
2
DVD/CD USB TUNER
BT AUDIO
CLOCK/TIMER
AUDIO SUBTITLE ANGLE
123
ZOOM MEMORY PROGRAM
456
3
4
5
6
7
8
9
10
1 1 STANDBY/ON
Schaltet den Receiver zwischen Eingeschaltet und
Bereitschaftsmodus um (Seite 16).
ST/MONO VIDEO MODE A-B
789
CLEAR RPT/RDM
0
TOP MENU MENU/PBC
HOME MENU
TUNE+
ENTER
PRESET VOLUME
TUNE–
+
MUTE
–
SHIFT
DIMMER
RDS
ASPM PTY DISPLAY
OPTION
OPEN/CLOSE
AUDIO IN/LINE
SLEEP
EQUALIZER
P.B A S S
BASS/TREBLE
DISPLAY
RETURN
+
–
11
12
13
14
15
16
17
18
Wird zur Wahl der Eingangsquelle für diesen Receiver
verwendet (Seiten 20, 21, 27, 29, 32 und 33).
BT AUDIO
Verwendung zur Einstellung der Audio-Datei unter
Verwendung des Bluetooth-Network (Seiten 33).
3 Zifferntasten (0 bis 9)
Verwendung zur Eingabe der Zahl (Seite 22).
AUDIO*
Bei Discs oder Dateien, die mehrere Audiostreams/
Kanäle enthalten, können Sie während der Wiedergabe
zwischen den verschiedenen Audiostreams/Kanälen
umschalten. Bei der Wiedergabe von Dateien, die auf
einem iPod/iPhone/iPad abgespeichert sind, ist diese
Taste ohne Funktion.
SUBTITLE*
Bei DVD-Video- oder DivX-Discs, die Untertitel in
mehreren Sprachen enthalten, können Sie während der
Wiedergabe zwischen den verschiedenen
Untertitelsprachen umschalten. Bei der Wiedergabe von
Dateien, die auf einem iPod/iPhone/iPad abgespeichert
sind, ist diese Taste ohne Funktion.
ANGLE*
Bei DVD-Video-Discs, die Szenen mit mehreren
Betrachtungswinkeln enthalten, können Sie während
der Wiedergabe zwischen den verschiedenen
Kamerawinkeln umschalten.
ZOOM*
Diese Taste dient zum Heranzoomen des Bilds. Bei der
Wiedergabe von Bildern, die auf einem iPod/iPhone/
iPad abgespeichert sind, ist diese Taste ohne Funktion.
MEMORY*
Verwendung zur Speicherung des Radiosenders
(Seite 29).
PROGRAM*
Verwendung zur Programmierung von DVD-VideoDiscs, MP3/WMA-Discs oder USB-Massenspeichern
(Seite 22).
ST/MONO*
Verwendung zum Umschalten des Klangs zwischen
Stereo und Mono (Seite 29).
VIDEO MODE*
Verwendung zur Änderung der Ausgabe-Auflösung (nur
HDMI) (Seite 37).
A-B*
Der innerhalb eines einzelnen Video- oder Musiktitels
festgelegte Abschnitt wird wiederholt abgespielt.
7
De
Page 100

Bezeichnungen und Funktionen der Teile02
4
CLEAR
Drücken Sie diese Taste, um die Auswahl eines Eintrags zu
stornieren.
Verwenden Sie dies zum Beispiel, um die programmierte
Wiedergabe zu löschen (Seite 24).
5 Bedientasten für den DVD-Receiver
TOP MENU
Drücken Sie diese Taste, um das Hauptmenü einer DVDVideo-Disc aufzurufen.
MENU/PBC
Verwendung zum Zugriff auf das DVD-Menü oder das
VCD-PBC-Menü.
HOME MENU
Drücken zur Anzeige des Menü-Bildschirms.
Diese Taste dient zum Ändern der ursprünglichen
Einstellungen dieses Gerätes (Seite 36).
HOME MENU
DVD
Audio Settings
Play Mode
Initial Settings
• Audio-Einstellungen (Seite 36)
• Video Adjust (Seite 36)
• Play Mode
Bei bestimmten Discs oder Dateien arbeitet die Play
Mode-Funktion möglicherweise nicht. Bei der
Wiedergabe von Dateien, die auf einem iPod/iPhone/
iPad abgespeichert sind, steht diese Funktion nicht zur
Verfügung.
Play Mode
A-B Repeat
Repeat
Random
Program
Search Mode
Setup playback functions such as Program. Random and
Repeat play
Move Select
A-B Repeat (Seite 22)
Der innerhalb eines einzelnen Video- oder Musiktitels
festgelegte Abschnitt wird wiederholt abgespielt.
Repeat (Seite 23)
Dieser Modus dient zur wiederholten Wiedergabe von
Videotiteln, Kapiteln, Musiktiteln oder Dateien.
Random (Seite 23)
Dieser Modus dient zur Wiedergabe von Videotiteln,
Kapiteln oder Musiktiteln in einer zufallsbestimmten
Reihenfolge.
A(Start Point)
B(End Point)
Off
ENTER
Video Adjust
Disc Navigator
Exit
HOME MENU
Program (Seite 24)
Dieser Modus dient zur Programmierung von
Videotiteln, Kapiteln, Musiktiteln oder Dateien für
Wiedergabe in einer gewünschten Reihenfolge.
Search Mode (Seite 25)
Dieser Modus dient zum Starten der Wiedergabe ab
einer vorgegebenen Indexnummer oder Zeitposition
innerhalb des betreffenden Videotitels, Kapitels,
Musiktitels bzw. der Datei.
• Disc Navigator
Wählt und gibt Titel, Kapitel, Tracks oder Dateien vom
Disc Navigator wieder.
Beispiel: DVD-Video Disc Navigator
01
04
Disc Navigator: Title
01- 49: – –
Move
02 03
05 06
Select
ENTER
Prev. Next
• Initial Settings (Seite 36)
RETURN
Drücken Sie die Taste, um auf den vorigen Bildschirm
zurückzukehren. Außerdem dient diese Taste zum
Abbrechen der Uhr- oder Klangeinstellung.
6
FGHI (TUNE +/–
Verwendung zur Auswahl/Umschaltung der
Systemeinstellungen und -modi sowie zur Bestätigung von
Aktionen.
Die Verwendung von TUNE +/– kann dem Finden von
Radiofrequenzen dienen (Seite 29).
7
PRESET +/–
Zum Wählen voreingestellter Radiosender (Seite 30).
8
MUTE
Schaltet den Ton stumm/Stellt den Ton wieder her (Seite 16).
9 Wiedergabe-Steuertasten
Verwendung zur Steuerung jeder Funktion, nachdem Sie sie
unter Verwendung der Eingabefunktionstasten gewählt
haben (Seite 21).
!
Drücken Sie diese Taste, um die Wiedergabe zu starten.
#
Drücken Sie diese Taste, um die Wiedergabe zu stoppen.
+)/-
• Drücken Sie diese Taste während der Wiedergabe, um
einen Sprung an den Anfang des laufenden Titels bzw.
der laufenden Datei auszuführen. Drücken Sie die Taste
zweimal, um einen Sprung an den Anfang des vorigen
Titels bzw. der vorigen Datei auszuführen.
• Während der Wiedergabe zum schnellen Rücklauf
drücken und gedrückt halten.
),
ENTER
8
De
 Loading...