

Page 1

Operation Manual
Smartphone Receiver
SPH-DA120
Notice to all users:
This software requires that the product is properly
connected to your vehicle’s parking brake and
depending on your vehicle, additional installation may
be required. For more information, please contact your
Authorized Pioneer Electronics retailer or call us at
(800) 421-1404.
Be sure to read Important Information for the User
first!
Important Information for the User includes the
important information that you must understand before
using this product.
English
Page 2

Contents
Thank you for buying this Pioneer product.
Please read through these instructions so you will know how to operate your model
properly. After you have finished reading the instructions, keep this document in a
safe place for future reference.
Important
The screens shown in the examples may differ
from actual screens, which may be changed
without notice for performance and function
improvements.
Introduction
Manual overview 7
– How to use this manual 7
– Conventions used in this manual 7
– Terms used in this manual 7
Notes on internal memory 7
– Before removing the vehicle battery 7
– Data subject to erasure 7
Basic operation
Checking part names and functions 8
Connecting media 8
– Connecting and disconnecting an
iPod 8
– Plugging and unplugging a USB
storage device 8
Startup and termination 9
On first-time startup 9
Regular startup 9
Turning off the display 9
– When the application screen is
available 9
– When the application screen is not
available 9
How to use the screens 10
– Switching screens using the touch
panel keys 10
– Switching screens using the
buttons 11
Supported AV source 11
Displaying the AV operation screen 12
– Selecting a front source on the AV
source selection screen 12
– Selecting a front source on the source
list 12
– Selecting a rear source 13
Turning off the AV source 13
Changing the display order of source
icons 13
Changing the display order of source
keys 13
Using the touch panel 14
– Using the common touch panel
keys 14
– Operating list screens 14
– Operating the time bar 14
– Operating the on-screen keyboard 15
Registering and connecting a Bluetooth
device
Preparing communication devices 16
Registering your Bluetooth devices 16
– Searching for nearby Bluetooth
devices 16
– Pairing from your Bluetooth
devices 17
– Connecting to a Bluetooth device
automatically 18
– Deleting a registered device 18
Connecting a registered Bluetooth device
manually 19
Switching visibility 19
Entering the PIN code for Bluetooth wireless
connection 19
Displaying the Bluetooth device address 19
Clearing the Bluetooth memory 20
Updating Bluetooth software 20
Displaying the Bluetooth software
version 20
2
En
Page 3

Contents
Using hands-free phoning
Displaying the phone menu 21
– Touch panel keys 21
– Reading the screen 21
Making a phone call 21
– Direct dialing 22
– Calling a number in the phone
book 22
– Dialing from the history 23
– Using the preset dial lists 23
Receiving a phone call 24
– Answering an incoming call 24
Minimizing the dial confirmation screen 25
Changing the phone settings 25
– Answering a call automatically 25
– Switching the ring tone 25
– Inverting names in the phone book 25
– Setting the private mode 26
– Adjusting the other party’s listening
volume 26
Using the voice recognition function (for
iPhone) 26
Notes for hands-free phoning 26
iPod / iPhone or smartphone setup
operation
The basic flow of iPod / iPhone or
smartphone setup 28
Setting the device connection method 28
iPod compatibility 28
™
Android
Apple CarPlay compatibility 29
MirrorLink device compatibility 29
Information on the connections and
Using the radio
Using the touch panel keys 32
Reading the screen 32
Starting procedure 33
device compatibility 29
functions for each device 30
Selecting a band 33
Manual tuning 33
Seek tuning 33
Selecting a preset channel from the preset
channel list 34
Storing broadcast frequencies 34
Storing the strongest broadcast
frequencies 34
Tuning into strong frequencies 34
Storing song information to an iPod (iTunes
Tagging) 35
Operating with the buttons 35
Playing compressed audio files
Using the touch panel keys 36
Reading the screen 37
Starting procedure 37
Switching the browse mode 38
Selecting files from the file name list 38
Selecting a file from the list related to the
song currently playing (link search) 38
Displaying the album list 39
Playing files in random order 39
Setting a repeat play range 39
Switching the media file type 39
Operating with the buttons 40
Playing compressed video files
Using the touch panel keys 41
Reading the screen 41
Starting procedure 42
Selecting files from the file name list 42
Setting a repeat play range 42
Slow motion playback 42
Switching the media file type 43
Operating with the buttons 43
Playing compressed still image files
Using the touch panel keys 44
Reading the screen 44
En
3
Page 4

Contents
Starting procedure 45
Selecting files from the file name list 45
Playing files in random order 45
Setting a repeat play range 45
Switching the media file type 45
Setting the slideshow interval 46
Operating with the buttons 46
Using an iPod
Using the touch panel keys (for audio) 47
Using the touch panel keys (for video) 47
Reading the screen (for audio) 48
Reading the screen (for video) 48
Starting procedure 49
Setting the shuffle play 50
Setting a repeat play range 50
Selecting song or video sources from the
playlist screen 50
Using this product’s iPod function from your
iPod 51
Changing the speed of audiobook
playback 52
Displaying lists related to the song currently
playing (link search) 52
Operating with the buttons 52
Playing back music from a music app other
than iPod music, as the iPod source 52
– Using the touch panel keys 52
– Reading the screen 53
Using your iPhone or smartphone
applications
Using AppRadio Mode 54
– Using the touch panel keys (App
control side bar) 54
– Starting procedure 55
– Using the keyboard 56
– Adjusting the image size (For
smartphone users) 57
– Displaying the image of your
application (iPhone with 30-pin
connector) 57
– Displaying the image of your
application (iPhone with Lightning
connector) 58
– Displaying the image of your
application (smartphone) 58
Using Apple CarPlay 59
– Using the touch panel keys 59
– Starting procedure 60
– Setting the driving position 60
– Adjusting the volume 60
Using MirrorLink 61
– Using the touch panel keys (App
control side bar) 61
– Starting procedure 61
Using the audio mix function 61
Streaming Pandora
Pandora operations 63
Using the touch panel keys 63
Reading the screen 64
Starting procedure 64
– For iPhone with a 30-pin connector
users 64
– For iPhone with a Lightning connector
users 65
– For smartphone users 65
Selecting a Pandora station from the list 65
Add station 66
Operating with the buttons 66
Using a Bluetooth audio player
Using the touch panel keys 67
Reading the screen 68
Starting procedure 68
Selecting files from the file name list 69
Playing files in random order 69
Setting a repeat play range 69
®
4
En
Page 5
Contents
Operating with the buttons 69
Using an HDMI source
Using the touch panel keys 70
Reading the screen 70
Starting procedure 70
Using an AUX source
Using the touch panel keys 71
Reading the screen 71
Starting procedure 71
Setting the video signal 72
Switching the operation screen 72
Using AV input
Using the touch panel keys 73
Reading the screen 73
Starting procedure 73
Setting the video signal 74
Using MIXTRAX
Touch panel keys 75
Selecting an item to play songs 75
Selecting songs not to be played 75
Specifying the playback portion 76
Setting the flash pattern 76
System settings
Activating the Bluetooth audio source 77
Setting the ever scroll 77
Setting AV input 77
Setting the rear view camera 77
– Setting rear view camera
activation 78
– Setting the polarity of the rear view
camera 78
Setting the camera for Camera View
mode 79
Displaying the parking assist guidelines 79
Setting guidelines on the rear view
image 79
Turning off the demo screen 80
Selecting the system language 80
Setting the keyboard language with the
application for iPhone 81
Setting the beep sound 81
Adjusting the picture 81
Displaying the firmware version 83
Updating firmware 83
Checking the connections of leads 83
Audio adjustments
Using fader/balance adjustment 85
Using balance adjustment 85
Switching sound muting/attenuation 86
Adjusting source levels 86
Adjusting the filter 88
– Adjusting the front and rear speaker
output 88
– Using the subwoofer output 88
Selecting the listening position 89
Adjusting the speaker output levels
finely 89
Adjusting the time alignment 90
Using the equalizer 92
– Recalling equalizer curves 92
– Customizing the equalizer curves 92
– Using the auto-adjusted equalizer 93
Adjusting the equalizer curve automatically
(Auto EQ) 93
– Before operating the Auto EQ
function 93
– Performing Auto EQ 94
Theme menu
Selecting the background display 96
– Changing to the background display
image stored on the USB storage
device 96
Setting the illumination color 97
En
5
Page 6

Contents
– Selecting the color from the preset
colors 97
– Creating a user-defined color 97
Selecting the theme color 98
Selecting the clock image 98
Changing the preinstalled splash screen 98
– Changing to the splash screen stored
on the USB storage device 98
Setting up the video player
Displaying your DivX VOD registration
code 100
Displaying your DivX VOD deregistration
code 100
Setting the video signal for the rear view
camera 100
Favorite menu
Creating a shortcut 102
Selecting a shortcut 102
Removing a shortcut 102
Common operations
Setting the time and date 103
Storing song information to an iPod (iTunes
Tagging) 103
Setting the “Sound Retriever” function 104
Changing the wide screen mode 104
Appendix
Troubleshooting 109
Error messages 110
Positioning technology 115
– Positioning by GPS 115
Handling large errors 115
– When positioning by GPS is
impossible 115
– Conditions likely to cause noticeable
positioning errors 115
Detailed information for playable media 117
– Compatibility 117
– Media compatibility chart 120
Display information 125
– Phone menu 125
– System menu 125
– Theme menu 126
– Audio menu 127
– Video Setup menu 127
– Bluetooth menu 128
Other functions
Selecting the video for the rear display 106
Setting the anti-theft function 106
– Setting the password 106
– Entering the password 107
– Deleting the password 107
– Forgotten password 108
Restoring this product to the default
settings 108
– Restoring the default settings 108
6
En
Page 7
Introduction
Chapter
01
Manual overview
Before using this product, be sure to read Important Information for the User (a separate
manual) which contains warnings, cautions,
and other important information that you
should note.
How to use this manual
Finding the operation procedure for
what you want to do
When you have decided what you want to do,
you can find the page you need from the Con-
tents.
Finding the operation procedure from
a menu name
If you want to check the meaning of an item
displayed on screen, you will find the necessary page from the Display information at the
end of this manual.
Conventions used in this manual
Before moving on, take a few minutes to read
the following information about the conventions used in this manual. Familiarity with
these conventions will help you greatly as you
learn how to use your new equipment.
! Buttons on this product are described in
ALL CAPITALS, BOLD lettering:
e.g.)
HOME button, MODE button.
! Menu items, screen titles, and functional
components are described in bold with
double quotation marks “”:
e.g.)
“System” screen or “Audio” screen
! Touch panel keys that are available on the
screen are described in bold in brackets [ ]:
e.g.)
[Radio], [AV Source Settings].
! Extra information, alternatives and other
notes are presented in the following format:
e.g.)
p If the home location has not been stored
yet, set the location first.
! Functions of other keys on the same screen
are indicated with # at the beginning of the
description:
e.g.)
# If you touch [OK], the entry is deleted.
! References are indicated like this:
e.g.)
= For details of the operations, refer to
How to use the screens on page 10.
Terms used in this manual
“Front display” and “Rear display”
In this manual, the screen that is attached to
the body of this product will be referred to as
the “Front display”. Any additional screen that
is commercially available and can be connected to this product will be referred to as the
“Rear display”.
“Video image”
“Video image” in this manual indicates moving images of DivX
that is connected to this system with an RCA
cable, such as general-purpose AV equipment.
®
, iPod, and any equipment
“iPod”
In this manual, iPod and iPhone will be referred to as “iPod”.
Notes on internal memory
Before removing the vehicle
battery
If the battery is disconnected or discharged,
the memory will be erased and must be reprogrammed.
p Some of the settings and recorded con-
tents will not be reset.
Data subject to erasure
The information is erased by disconnecting
the yellow lead from the battery (or removing
the battery itself).
p Some of the settings and recorded con-
tents will not be reset.
Introduction
En
7
Page 8

2
Chapter
02
Basic operation
Checking part names and
functions
This chapter gives information about the names
of the parts and the main features using the buttons.
1
2
3
4
5
1 LCD screen
2 VOL (+/–) button
Touch to adjust the AV (Audio and Video)
source volume.
3 HOME button
! Touch to display the Top menu screen.
= For details of the operations, refer to
How to use the screens on page 10.
! Touch and hold to activate the voice re-
cognition function.
= For details, refer to Using the voice re-
cognition function (for iPhone) on
page 26 and Using the touch panel
keys on page 59.
5 TRK button
! Touch to perform manual seek tuning,
fast for ward, reverse and track search
controls.
Connecting media
Connecting and disconnecting
an iPod
Connecting your iPod
= For details of the connections, refer to the
Installation Manual.
Disconnecting your iPod
% Pull out the cables after confirming
that no data is being accessed.
Plugging and unplugging a USB
storage device
p This product may not achieve optimum per-
formance with some USB storage devices.
p Connection via a USB hub is not possible.
p A USB cable is required for connection.
Plugging in a USB storage device
% Plug a USB storage device into the USB
cable.
4 MODE button
! Touch to switch between the Application
screen and the AV operation screen.
p If the display cannot switch from the
AV operation screen to the Application screen when the MODE button is
touched, the display will turn off.
= For details of the operations, refer to
How to use the screens on page 10.
! Touch and hold to turn the display off.
= For details, refer to Turning off the dis-
play on page 9.
8
En
1
1 USB cable
2 USB storage device
Page 9
Basic operation
Chapter
02
Unplugging a USB storage device
% Pull out the USB storage device after
checking that no data is being accessed.
Startup and termination
1 Start the engine to boot up the system.
After a short pause, the splash screen comes
on for a few seconds.
2 Turn off the vehicle engine to terminate the system.
This product is also turned off.
On first-time startup
When you use this product for the first time,
select the language that you want to use.
1 Start the engine to boot up the system.
After a short pause, the splash screen comes
on for a few seconds.
The “Select Program Language” screen appears.
2 Touch the language that you want to
use on screen.
3 Touch the following key.
Regular startup
% Start the engine to boot up the system.
After a short pause, the splash screen comes
on for a few seconds.
p The screen shown will differ depending on
the previous conditions.
p If the anti-theft function is activated, you
must enter your password.
Turning off the display
You can turn off the display at night or when
the screen is too bright.
When the application screen is
available
% Touch and hold the MODE button.
The display turns off.
When the application screen is
not available
% Touch the MODE button.
The display turns off.
p If you touch the screen when the display is
off, it reverts to the original screen.
Basic operation
Displays the “Smartphone Setup”
screen.
4 Touch the item you want to set.
= For details, refer to Information on the con-
nections and functions for each device on
page 30.
5 Touch the following key.
Displays the Top menu screen.
# If you touch , the display returns to the pre-
vious screen.
En
9
Page 10
Chapter
02
Basic operation
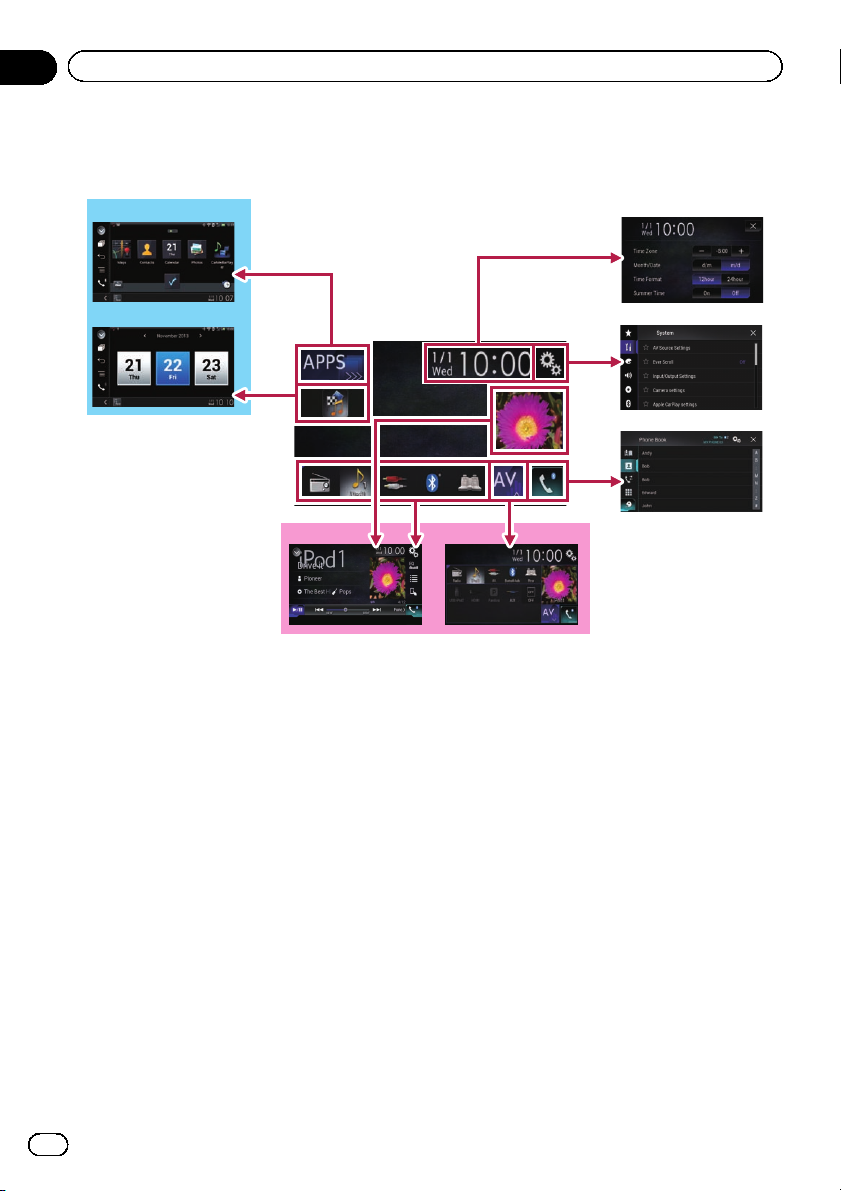
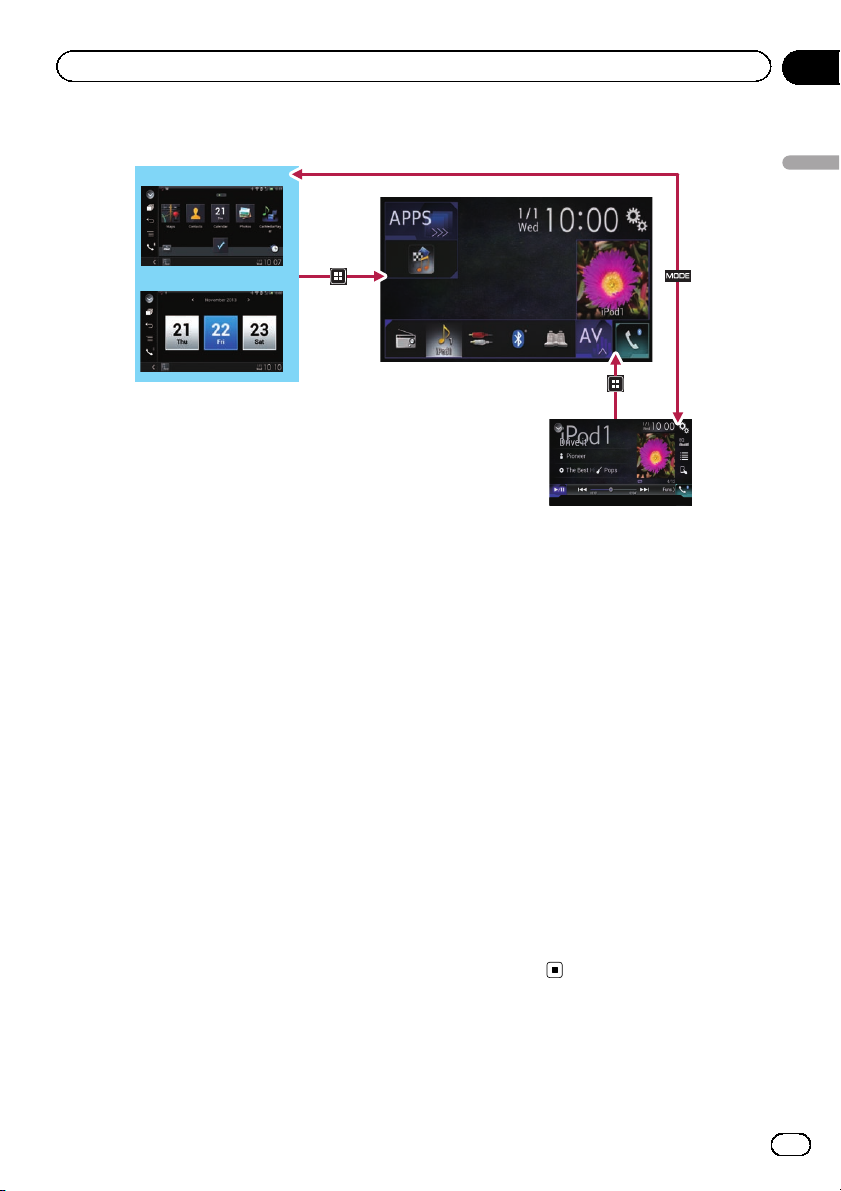
How to use the screens
Switching screens using the touch panel keys
9
2
8
1
6
7
5
3
4
10
En
Page 11
Basic operation
Switching screens using the buttons
Chapter
02
9
8
1 Top menu screen
This is the starting menu to access the desired screens and operate the various functions.
p If you touch the HOME button, the Top
menu screen is displayed.
p [APPS] is displayed when AppRadio
Mode or MirrorLink is on.
p [Apple CarPlay] is displayed when
Apple CarPlay is on.
2 Time and date setting screen
You can set the time and date settings.
3 Setting menu screen
You can customize the system and audio
settings, etc.
4 Phone menu screen
You can access the screen that is related to
hands-free phoning.
5 AV source selection screen
You can select the AV source.
1
7
= For details of the operation, refer to
Changing the display order of source
icons on page 13.
7 AV operation screen
You can customize the settings for each
source.
8 Application operation screen
You can control the iPhone or smartphone
applications directly on this product.
p If applications are not available, the Ap-
plication operation screen will not be displayed.
9 Application menu screen
This product can switch to the application
menu, on which you can display and operate the application for an iPhone or a smartphone on the screen.
p If application menus are not available,
the Application menu screen will not be
displayed.
Basic operation
6 Favorite source icons
You can display the icons of frequently used
sources by dragging the icons to the display
area.
Supported AV source
You can play or use the following sources with
this product.
En
11
Page 12
Chapter
02
Basic operation
! Radio (FM, AM)
The following sources can be played back or
used by connecting an auxiliary device.
! USB
! iPod
! Pandora
! Bluetooth audio
! AV input (AV)
! AUX
! HDMI
®
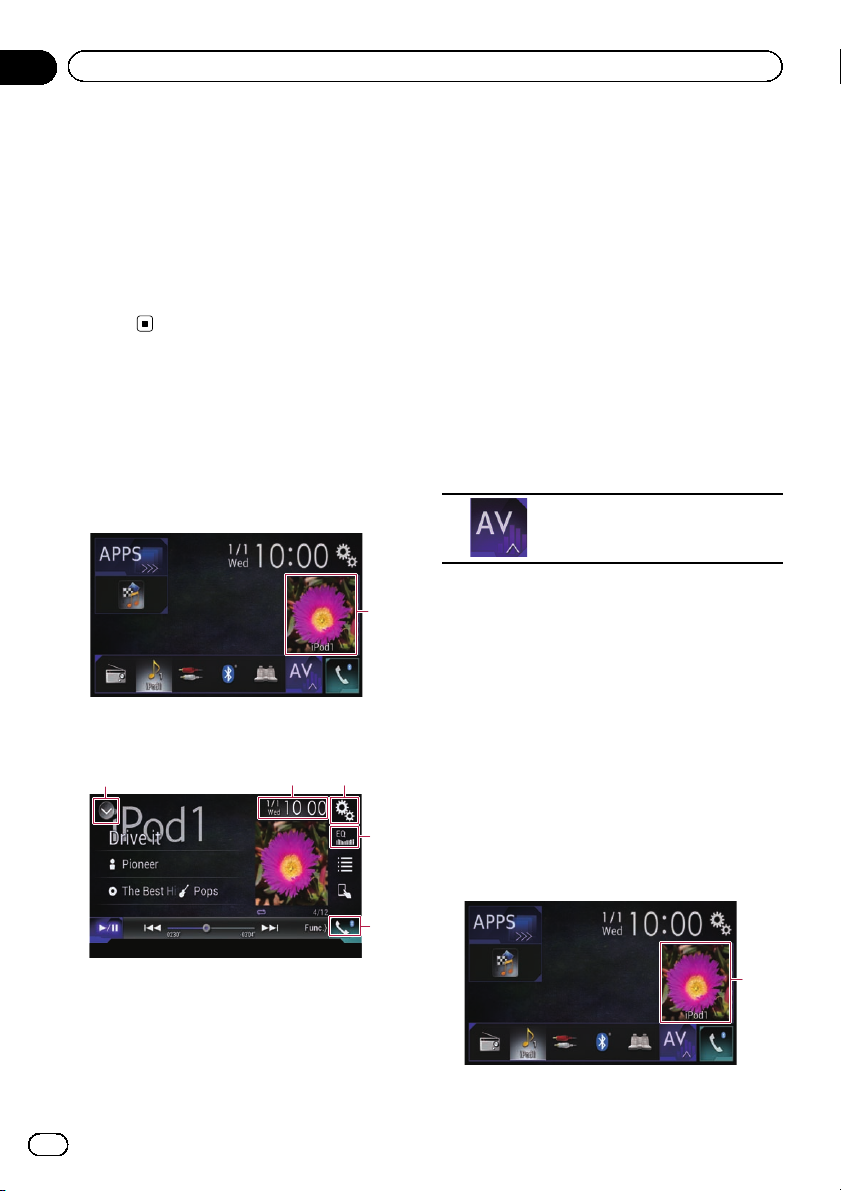
Displaying the AV
operation screen
1 Touch the HOME button to display the
Top menu screen.
2 Touch the AV operation key.
1
1 AV operation key
The AV operation screen appears.
132
= For details, refer to Setting the time and
date on page 103.
3 Displays the Setting menu screen.
4 Recalls equalizer curves.
= For details, refer to Using the equalizer
on page 92.
5 Displays the Phone menu screen.
= For details, refer to Displaying the phone
menu on page 21.
Selecting a front source on the
AV source selection screen
1 Touch the HOME button to display the
Top menu screen.
2 Touch the following key.
Displays the AV source selection
screen.
3 Touch the source icon you want to select.
The AV operation screen of the selected
source appears.
Selecting a front source on the
source list
p This function is not available during a call
in Apple CarPlay.
1 Displays the source list.
= For details, refer to Selecting a front
source on the source list on page 12.
2 Displays the Time and date setting
screen.
12
En
4
5
1 Touch the HOME button to display the
Top menu screen.
2 Touch the AV operation key.
1
1 AV operation key
Page 13

Basic operation
Chapter
02
The AV operation screen appears.
3 Touch the following key.
Displays the source list.
4 Touch the source key you want to select.
The AV operation screen of the selected
source appears.
Selecting a rear source
You can select a source output to the rear display.
= For details of the operations, refer to Select-
ing the video for the rear display on page
106.
Turning off the AV source
Turn off the AV source to stop playing or receiving the AV source.
1 Touch the HOME button to display the
Top menu screen.
2 Touch the following key.
1 Touch the HOME button to display the
Top menu screen.
2 Touch the following key.
Displays the AV source selection
screen.
3 Touch and hold a source icon, and drag
the icon to the desired position.
p If the source icon is moved, the order of the
source list is also changed.
Changing the display order
of source keys
You can change the display order of source
keys on the source list.
p This function is available only when you
stop your vehicle in a safe place and apply
the parking brake.
p This function is not available during a call
in Apple CarPlay.
1 Touch the HOME button to display the
Top menu screen.
2 Touch the AV operation key.
Basic operation
Displays the AV source selection
screen.
3 Touch [OFF].
The AV source is turned off.
Changing the display order
of source icons
You can change the display order of source
icons on the AV source selection screen.
p This function is available only when you
stop your vehicle in a safe place and apply
the parking brake.
1 AV operation key
The AV operation screen appears.
3 Touch the following key.
Displays the source list.
1
13
En
Page 14
Chapter
02
Basic operation
4 Touch the following key.
The source keys can be moved.
5 Drag the source key to the desired position.
6 Touch the following key.
Returns to the previous screen.
p If the source key is moved, the source icons
displayed on the Top menu screen and the
AV source screen are also moved.
Using the touch panel
You can operate this product by touching the
marks and items (touch panel keys) displayed
on the screen directly with your fingers.
p To protect the LCD screen from damage, be
sure to touch the touch panel keys only
with your finger and do so gently.
Using the common touch panel
keys
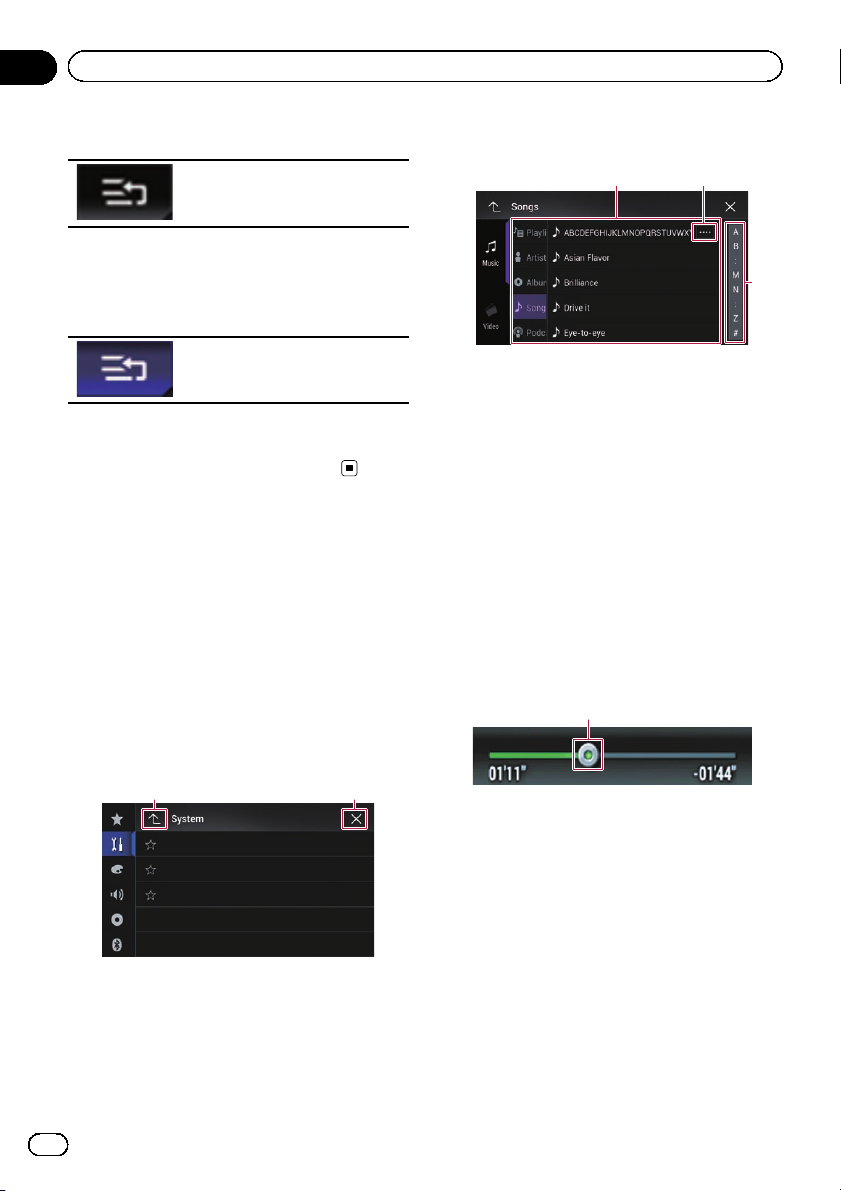
Operating list screens
1
1 Touching an item on the list allows you to nar-
row down the options and proceed to the next
operation.
2 Appears when all characters are not displayed
on the display area.
If you touch the key, the rest of the characters
are scrolled for display.
3 Appears when items cannot be displayed on a
single page only.
Drag the scrubber bar to view any hidden
items.
Also, you can drag the list to view any hidden
items.
2
3
Operating the time bar
1
1 2
1 Returns to the previous screen.
2 Closes the screen.
14
En
1 You can change the playback point by drag-
ging the key.
p Playback time corresponding to the po-
sition of the key is displayed while dragging the key.
p This function is not available when
using iPod function with an iPhone 5s,
iPhone 5c, iPhone 5, or iPod touch (5th
generation).
p This function is not available while play-
ing iTunes Radio.
Page 15
Basic operation
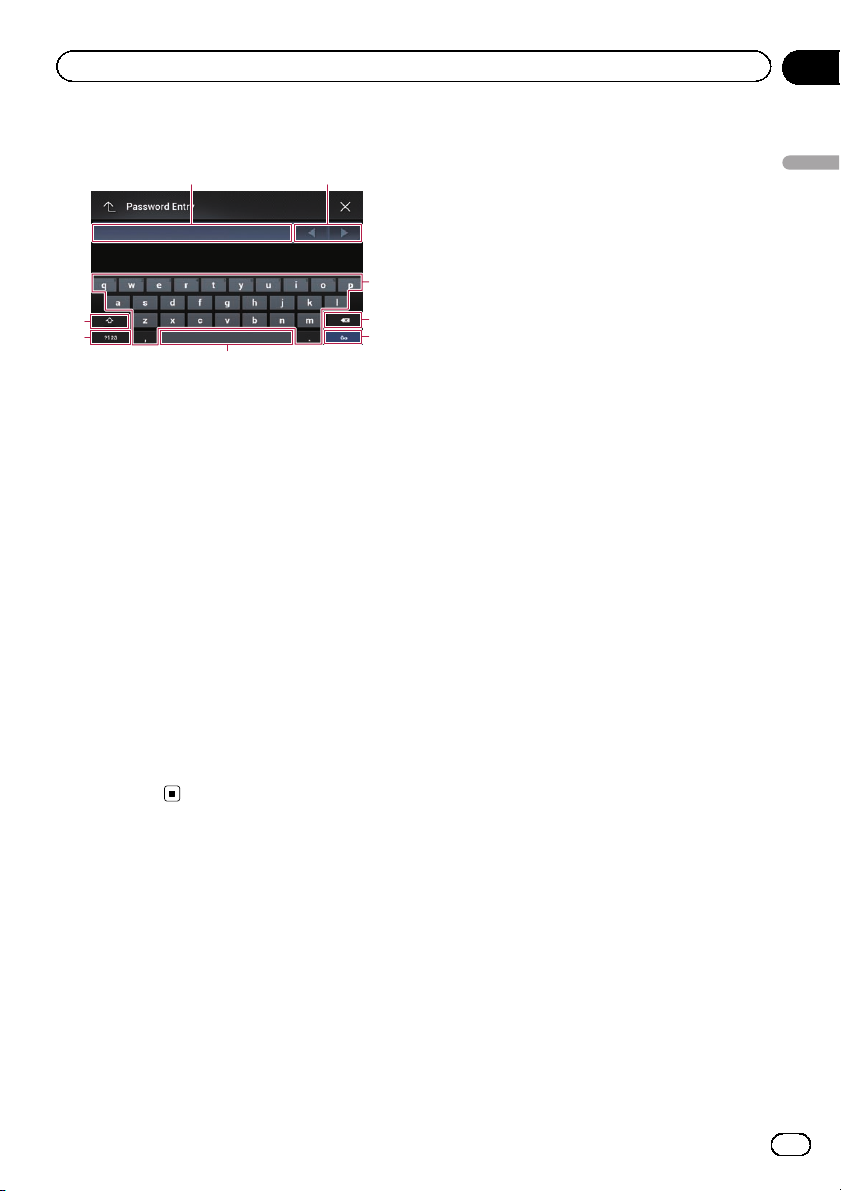
Operating the on-screen keyboard
21
Chapter
02
Basic operation
3
8
7
6
1 Displays the characters that are entered. If
there is no text in the box, an informative
guide with text appears.
2 Allows you to move the cursor to the right or
left for a number of characters equivalent to
the number of touches.
3 Touching the keys enters the characters in the
text box.
4 Deletes the input text one letter at a time, be-
ginning at the end of the text. Continuing to
touch the key deletes all of the text.
5 Confirms the entry and allows you to proceed
to the next step.
6 You can leave spaces.
A space equivalent to the number of touches
is inserted.
7 Switches between alphabet and numbers/
symbols.
8 You can switch between capital and lower
case letters.
4
5
En
15
Page 16
Chapter
03
Registering and connecting a Bluetooth device
If your devices feature Bluetooth®technology,
this product can be connected to your devices
wirelessly. This section describes how to set
up a Bluetooth connection.
For details about connectivity with the devices
featuring Bluetooth wireless technology, refer
to the information on our website.
p The “Bluetooth” menu is available only
when you stop your vehicle in a safe place
and apply the parking brake.
Preparing communication
devices
This product has a built-in function that enables to use devices featuring Bluetooth wireless technology.
= For details, refer to Notes for hands-free
phoning on page 26.
You can register and use devices that feature
the following profiles with this product.
! HFP (Hands-Free Profile)
! A2DP (Advanced Audio Distribution Pro-
file)
! SPP (Serial Port Profile)
p When this product is turned off, the
Bluetooth connection is also disconnected.
When the system restarts, the system auto-
matically attempts to reconnect the pre-
viously-connected device. Even when the
connection is severed for some reason, the
system automatically reconnects the speci-
fied device (except when the connection is
severed due to device operation).
p The Bluetooth connection will be termi-
nated if Apple CarPlay is turned on.
nect it to this product for the first time. A total
of three devices can be registered. Two registration methods are available:
! Searching for nearby Bluetooth devices
! Pairing from your Bluetooth devices
p If three devices are already paired, “Mem-
ory Full” is displayed and pairing cannot
be performed. In such cases, delete a
paired device first.
= For details, refer to Deleting a registered
device on page 18.
Searching for nearby Bluetooth
devices
The system searches for available Bluetooth
devices near this product, displays them in a
list, and registers them for connection.
p When the device is already connected, this
function is inactive.
1 Activate the Bluetooth wireless technology on your devices.
p For some Bluetooth devices, no specific ac-
tion is necessary to activate Bluetooth wireless technology. For details, refer to the
instruction manual of your devices.
2 Touch the HOME button to display the
Top menu screen.
3 Touch the following keys in the following order.
The “Bluetooth” screen appears.
4 Touch [Connection].
5 Touch the following key.
Registering your Bluetooth
devices
You need to register your devices featuring
Bluetooth wireless technology when you con-
16
En
Starts searching.
Page 17
Registering and connecting a Bluetooth device
Chapter
03
The system searches for Bluetooth devices
waiting for a connection and displays them in
the list if a device is found.
p Up to 30 devices will be listed in the order
that the devices are found.
6 Wait until your Bluetooth device appears in the list.
p If you cannot find the Bluetooth device that
you want to connect, check that the device
is waiting for a Bluetooth wireless technology connection.
7 Touch the Bluetooth device name you
want to register.
While connecting, “Pairing… Please wait.” is
displayed. If the connection is established,
“Paired.” is displayed.
p If your device supports SSP (Secure Simple
Pairing), a six-digit number appears on the
display of this product. Touch [Ye s ] to pairing the device.
p If the connection fails, “Error” is displayed.
In such cases, try again from the beginning.
p The PIN code is set to “0000” as the default,
but can be changed.
= For details, refer to Entering the PIN code
for Bluetooth wireless connection on
page 19.
p Once the connection is established, the de-
vice name is displayed. Touch the device
name to disconnect.
After the device is successfully registered, a
Bluetooth connection is established from the
system.
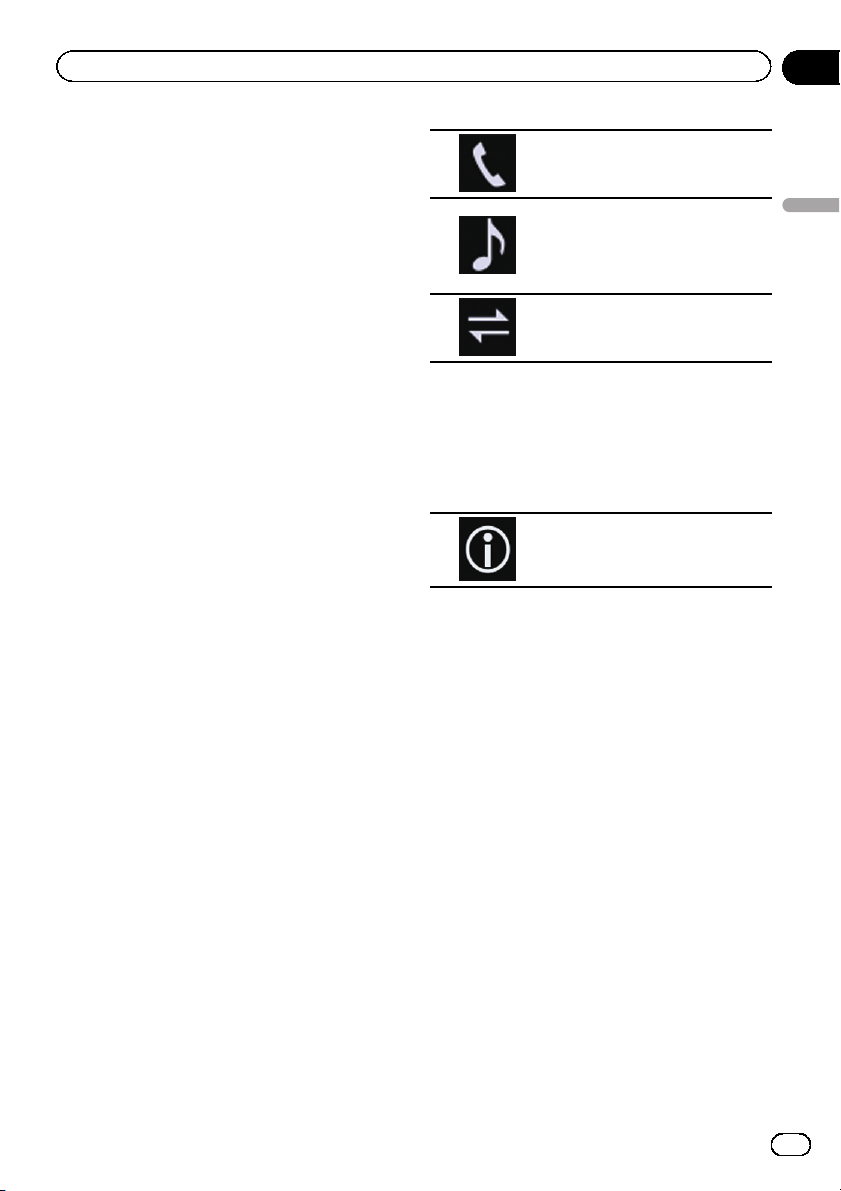
The profile icons in the registered device list
screen are displayed and illuminated as follows.
Illuminates when your mobile device is successfully connected with
the HFP (Hands-Free Profile).
Illuminates when your audio device is successfully connected with
the A2DP (Advanced Audio Distribution Profile)/AVRCP (Audio/
Video Remote Control Profile).
Illuminates when the Bluetooth
connection is established with the
SPP (Serial Port Profile).
p After pairing, the phone book registered in
the device may be automatically trans-
mitted to this product.
# If you touch the following key, you can switch
the display between the device names and
Bluetooth device addresses.
Switches between the device
names and Bluetooth device addresses.
Pairing from your Bluetooth
devices
You can register a Bluetooth device by setting
this product to standby mode and requesting
a connection from the Bluetooth device.
p Before registration, make sure that “Visibi-
lity” in the “Bluetooth” menu is set to
“On”.
= For details, refer to Switching visibility on
page 19.
1 Activate the Bluetooth wireless technology on your devices.
p For some Bluetooth devices, no specific ac-
tion is necessary to activate Bluetooth wire-
less technology. For details, refer to the
instruction manual of your devices.
Registering and connecting a Bluetooth device
2 Use the Bluetooth setting in the device
to pair this product with the device.
p If a PIN code input is required, enter a PIN
code. (The default PIN code is “0000”.)
En
17
Page 18
Chapter
03
Registering and connecting a Bluetooth device
When the device is successfully registered,
the connection settings are made from the
device.
p If registration fails, repeat the procedure
from the beginning.
Connecting to a Bluetooth
device automatically
If this function is set to on, a connection between your Bluetooth device and this product
will take place automatically as soon as the
two devices are less than a few meters apart.
p If this function is set to on, a connection
with the last connected Bluetooth device
will be established automatically when the
ignition switch is turned on.
1 Touch the HOME button to display the
Top menu screen.
2 Touch the following keys in the following order.
The “Bluetooth” screen appears.
3 Touch [Auto Connect] repeatedly until
the desired setting appears.
! On (default):
Turns the automatic connection on.
! Off:
Turns the automatic connection off.
If your Bluetooth device is ready for a
Bluetooth wireless connection, a connection
to this product will automatically be established.
If connection fails, “Auto connection failed.
Retry?” appears.
Touch [Ye s ] to reconnect.
# To turn automatic connection off, touch [Auto
Connect] again.
p Once the connection is established for the
first time, the connection with the device
will be established automatically when the
ignition switch is turned on from the next
time.
Deleting a registered device
When you have already registered three
Bluetooth devices and you want to add another one, you must first delete one of the registered devices.
p If a registered phone is deleted, all the
phone book entries and call history lists
that correspond to the phone will be also
cleared.
CAUTION
Never turn this product off while the paired
Bluetooth device is being deleted.
1 Touch the HOME button to display the
Top menu screen.
2 Touch the following keys in the following order.
The “Bluetooth” screen appears.
3 Touch [Connection].
4 Touch the following key.
Deletes a paired device.
A message prompting you to delete a registered device appears.
5 Touch [Yes].
The device is deleted.
18
En
Page 19
Registering and connecting a Bluetooth device
Chapter
03
Connecting a registered
Bluetooth device manually
Connect the Bluetooth device manually in the
following cases:
! Two or more Bluetooth devices are regis-
tered, and you want to manually select the
device to be used.
! You want to reconnect a disconnected
Bluetooth device.
! Connection cannot be established automa-
tically for some reason.
If you wish to start the connection manually,
carry out the following procedure.
1 Activate the Bluetooth wireless technology on your devices.
p For some Bluetooth devices, no specific ac-
tion is necessary to activate Bluetooth wireless technology. For details, refer to the
instruction manual of your devices.
2 Touch the HOME button to display the
Top menu screen.
3 Touch the following keys in the following order.
The “Bluetooth” screen appears.
4 Touch [Connection].
5 Touch the name of the device that you
want to connect.
Switching visibility
This function sets whether or not to make this
product visible to the other device.
1 Touch the HOME button to display the
Top menu screen.
2 Touch the following keys in the following order.
3 Touch [Visibility] repeatedly until the
desired setting appears.
! On (default):
Turns the visibility on.
! Off:
Turns the visibility off.
Entering the PIN code for
Bluetooth wireless connection
To connect your Bluetooth device to this product via Bluetooth wireless technology, you
need to enter a PIN code on your Bluetooth
device to verify the connection.
The default code is “0000”, but you can change
it with this function.
1 Touch the HOME button to display the
Top menu screen.
2 Touch the following keys in the following order.
The “Bluetooth” screen appears.
3 Touch [PIN Code Input].
The “PIN Code” screen appears.
4 Touch [0] to [9] to input pin code (up to
8 digits).
5 Touch the following key.
Stores the PIN code in this product.
Displaying the Bluetooth
device address
This product can display its Bluetooth device
address.
1 Touch the HOME button to display the
Top menu screen.
Registering and connecting a Bluetooth device
The “Bluetooth” screen appears.
En
19
Page 20
Chapter
03
Registering and connecting a Bluetooth device
2 Touch the following keys in the following order.
The “Bluetooth” screen appears.
3 Touch [Device Information].
The Bluetooth device address is displayed.
Clearing the Bluetooth
memory
CAUTION
Never turn this product off while the Bluetooth
memory is being cleared.
1 Touch the HOME button to display the
Top menu screen.
2 Touch the following keys in the following order.
The “Bluetooth” screen appears.
3 Touch [Bluetooth Memory Clear].
4 Touch [Clear].
The confirmation screen appears.
5 Touch [OK].
The Bluetooth memory is cleared.
# If you do not want to clear the memory, touch
[Cancel].
CAUTION
Never turn this product off and never disconnect
the phone while the software is being updated.
1 Touch the HOME button to display the
Top menu screen.
2 Touch the following keys in the following order.
The “Bluetooth” screen appears.
3 Touch [BT Software Update].
4 Touch [Start].
The data transfer screen is displayed.
p Follow the on-screen instructions to finish
updating the Bluetooth software.
Displaying the Bluetooth
software version
If this product fails to operate properly, you
may need to consult your dealer for repair.
In such cases, you may be asked to specify the
software version. Perform the following procedure to check the version on this unit.
1 Touch the HOME button to display the
Top menu screen.
2 Touch the following keys in the following order.
Updating Bluetooth software
This function is used to update this product
with the latest Bluetooth software. For details
on Bluetooth software and updating, refer to
our website.
p The source is turned off and the Bluetooth
connection is disconnected before the process starts.
20
En
The “Bluetooth” screen appears.
3 Touch [Bluetooth Version Information].
The version of this product’s Bluetooth module appears.
Page 21
Using hands-free phoning
Chapter
04
CAUTION
For your safety, avoid talking on the phone as
much as possible while driving.
If your cellular phone features Bluetooth technology, this product can be connected to your
cellular phone wirelessly. Using this handsfree function, you can operate this product to
make or receive phone calls. This section describes how to set up a Bluetooth connection
and how to operate a cellular phone featuring
Bluetooth technology on this product.
p Hands-free phoning via Bluetooth wireless
technology is not available when Apple
CarPlay is on.
For details about connectivity with the devices
featuring Bluetooth wireless technology, refer
to the information on our website.
Displaying the phone menu
Use the Phone icon if you wish to connect a
cellular phone to this product for utilization.
= For details, refer to Chapter 3.
p The Phone icon is displayed on the follow-
ing screens.
— Top menu screen
— AV operation screen
— On the App control side bar on the
AppRadio Mode and MirrorLink
screens
% Touch the following key.
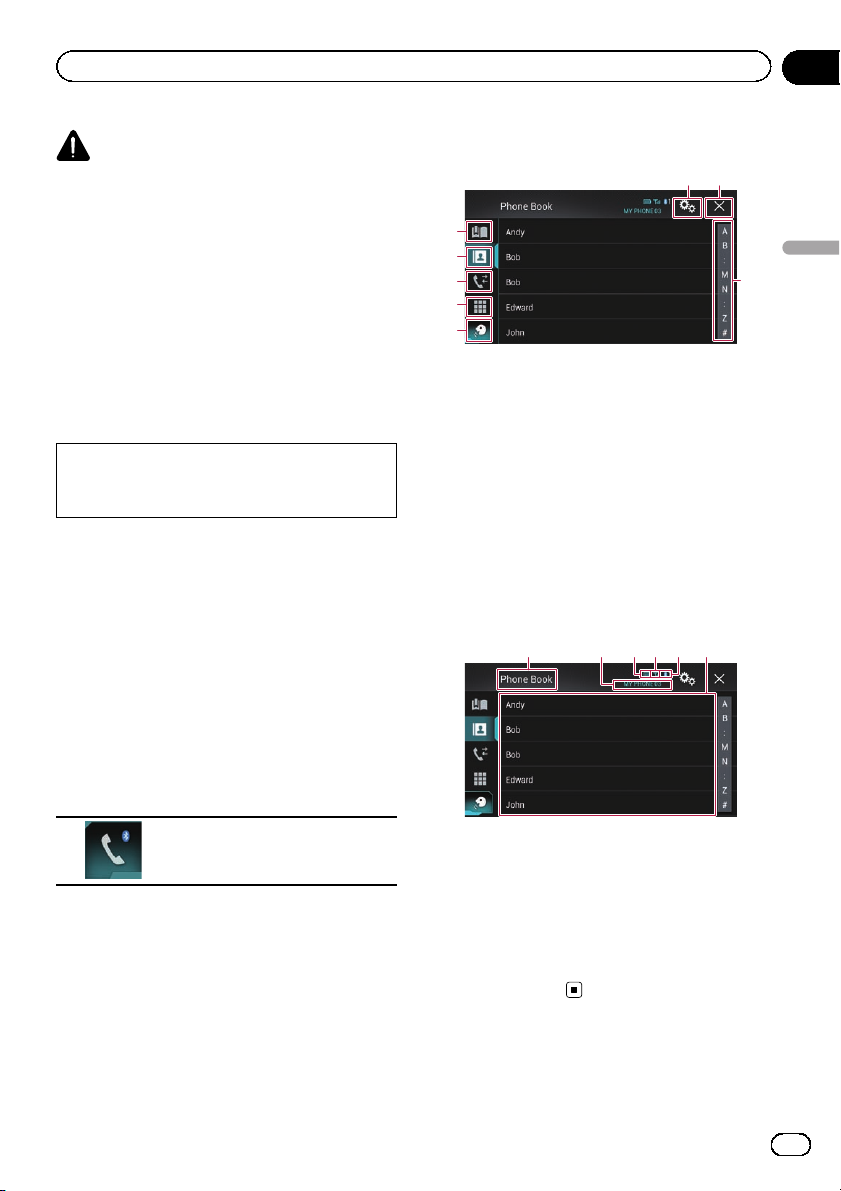
Touch panel keys
6 7
1
2
3
4
5
1 Displays the preset dial screen.
2 Switches to the phone book list.
3 Switches to the missed, received and dialed
call lists.
4 Switches the mode to enter the phone num-
ber directly.
5 Switches to the voice recognition function (for
iPhone).
6 Displays the Setting menu screen.
7 Closes the screen.
8 Displays the alphabet search screen.
8
Reading the screen
1 32456
Using hands-free phoning
Displays the Phone menu screen.
p The “Phone Book” screen appears when
using this function for the first time. The
screen of the last-used function appears
from the next time.
p The Bluetooth icon on the key is not dis-
played when Apple CarPlay is on. If touching the key when Apple CarPlay is on, the
phone screen for Apple CarPlay will be displayed.
For details of Apple CarPlay, refer to Using
Apple CarPlay on page 59.
1 Menu title
2 Name of the connected cellular phone
3 Battery status of the cellular phone
4 Reception status of the cellular phone
5 Indicates that a Bluetooth telephone is con-
nected.
The device number of the connected device is
displayed.
6 List display area
Making a phone call
You can make a phone call in many different
ways.
En
21
Page 22
Chapter
04
Using hands-free phoning
Direct dialing
p This function is available only when you
stop your vehicle in a safe place and apply
the parking brake.
1 Touch the HOME button to display the
Top menu screen.
2 Touch the following keys in the following order.
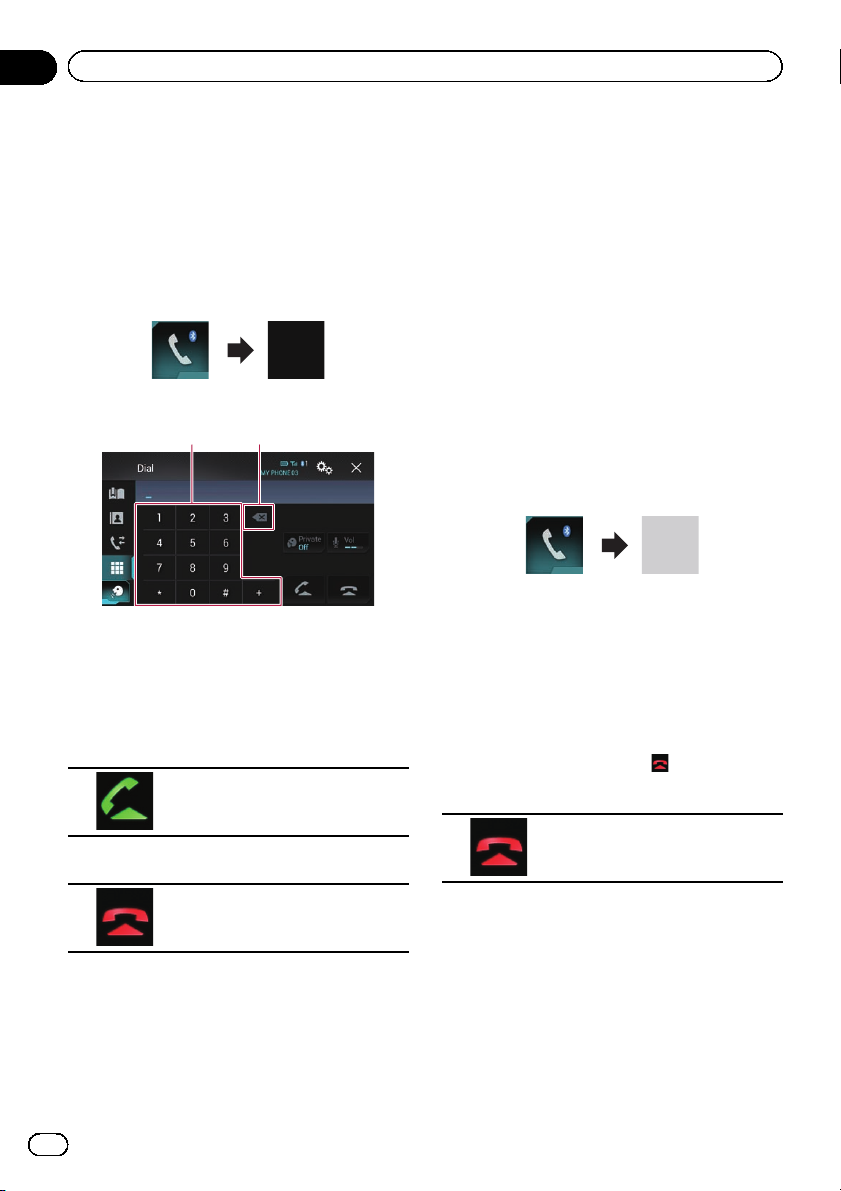
The “Dial” screen appears.
1 2
1 Dial pad
2 Deletes one digit. Touch and hold to delete
all digits.
3 Touch the number keys to enter the
phone number.
4 Touch the following key.
Makes a call.
Calling a number in the phone
book
After finding the number you want to call in
the phone book, you can select the entry and
make the call.
p The contacts on your phone will normally
be transferred to this product automatically
when the phone is connected.
If it is not, use your phone menu to transfer
the contacts.
The visibility of this product should be on
when you use the “Bluetooth” menu.
= For details, refer to Switching visibility
on page 19.
1 Touch the HOME button to display the
Top menu screen.
2 Touch the following keys in the following order.
The “Phone Book” screen appears.
3 Touch the desired name on the list.
The details screen of the phone book appears.
4 Touch the phone number you want to
dial.
The dial screen appears.
5 Dialing starts.
p To cancel the call, touch .
6 Touch the following key.
5 Touch the following key.
Ends the call.
The call ends.
p You may hear a noise when you hang up
the phone.
22
En
Ends the call.
The call ends.
Selecting a number by alphabet
search mode
If a lot of numbers are registered in the phone
book, you can search for the phone number by
alphabet search mode.
1 Touch the HOME button to display the
Top menu screen.
Page 23
Using hands-free phoning
Chapter
04
2 Touch the following keys in the following order.
The “Phone Book” screen appears.
3 Touch the Initial Search Bar to display
the alphabet search screen.
4 Touch the first letter of the entry you
are looking for.
The “Phone Book” entries starting with that
letter (e.g. “Ben”, “Brian” and “Burt” when “B”
is selected) will be displayed.
5 Touch the list to display the phone
number list of the selected entry.
The details screen of the phone book appears.
# If several phone numbers are included in an
entry, select one by touching the list.
6 Touch the phone number you want to
dial.
The dial screen appears.
7 Dialing starts.
p To cancel the call, touch .
8 Touch the following key.
Ends the call.
The call ends.
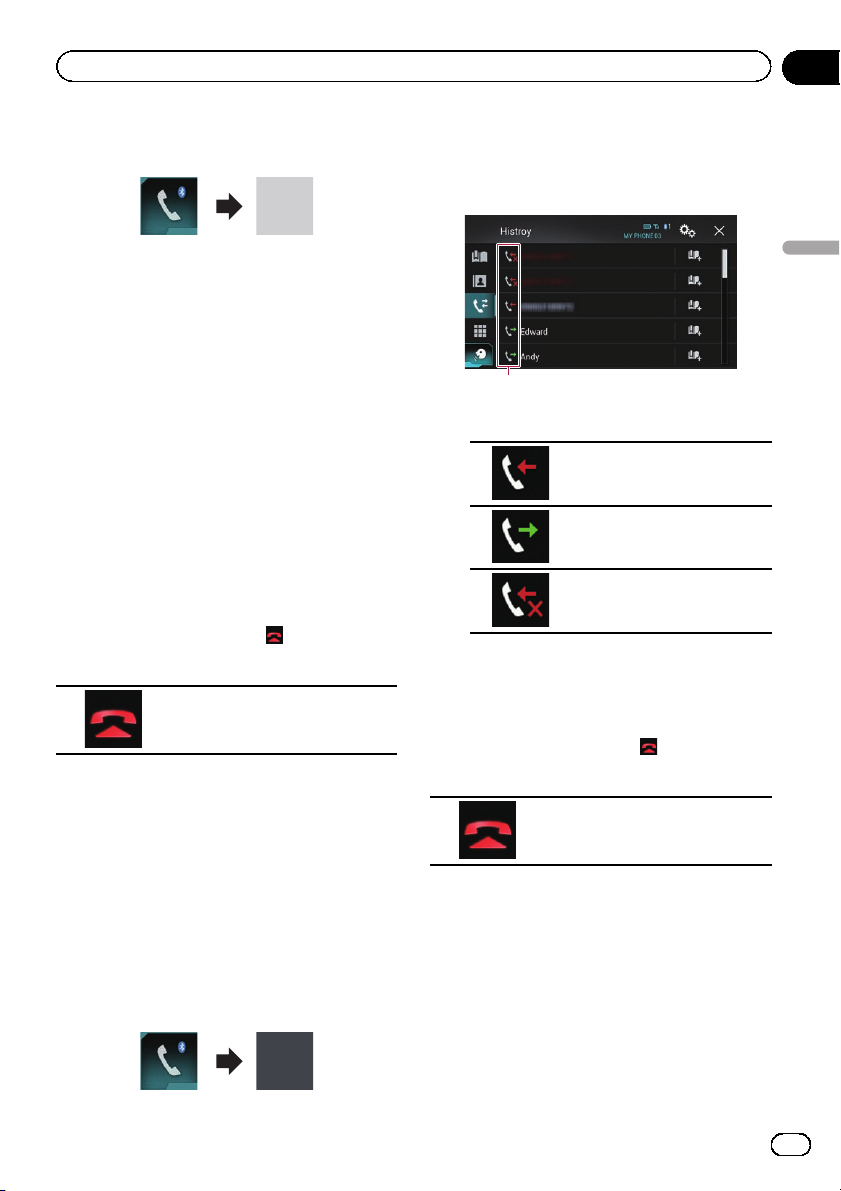
The “History” screen appears.
p Depending on the type of cellular phone,
some calls may not be displayed in the call
history.
Using hands-free phoning
1
1 Type of call history
Received calls.
Dialed calls.
Missed calls.
3 Touch the desired entry on the list to
make a call.
The dial screen appears.
4 Dialing starts.
p To cancel the call, touch .
5 Touch the following key.
Dialing from the history
The most recent calls made (dialed, received
and missed) are stored in the call history list.
You can browse the call history list and call
numbers from it.
1 Touch the HOME button to display the
Top menu screen.
2 Touch the following keys in the following order.
Ends the call.
The call ends.
Using the preset dial lists
You can dial a number from the preset dial
list.
Registering a phone number
You can easily store up to six phone numbers
per device as presets.
En
23
Page 24
Chapter
04
Using hands-free phoning
1 Touch the HOME button to display the
Top menu screen.
2 Touch the following keys in the following order.
The “Phone Book” or “History” screen appears.
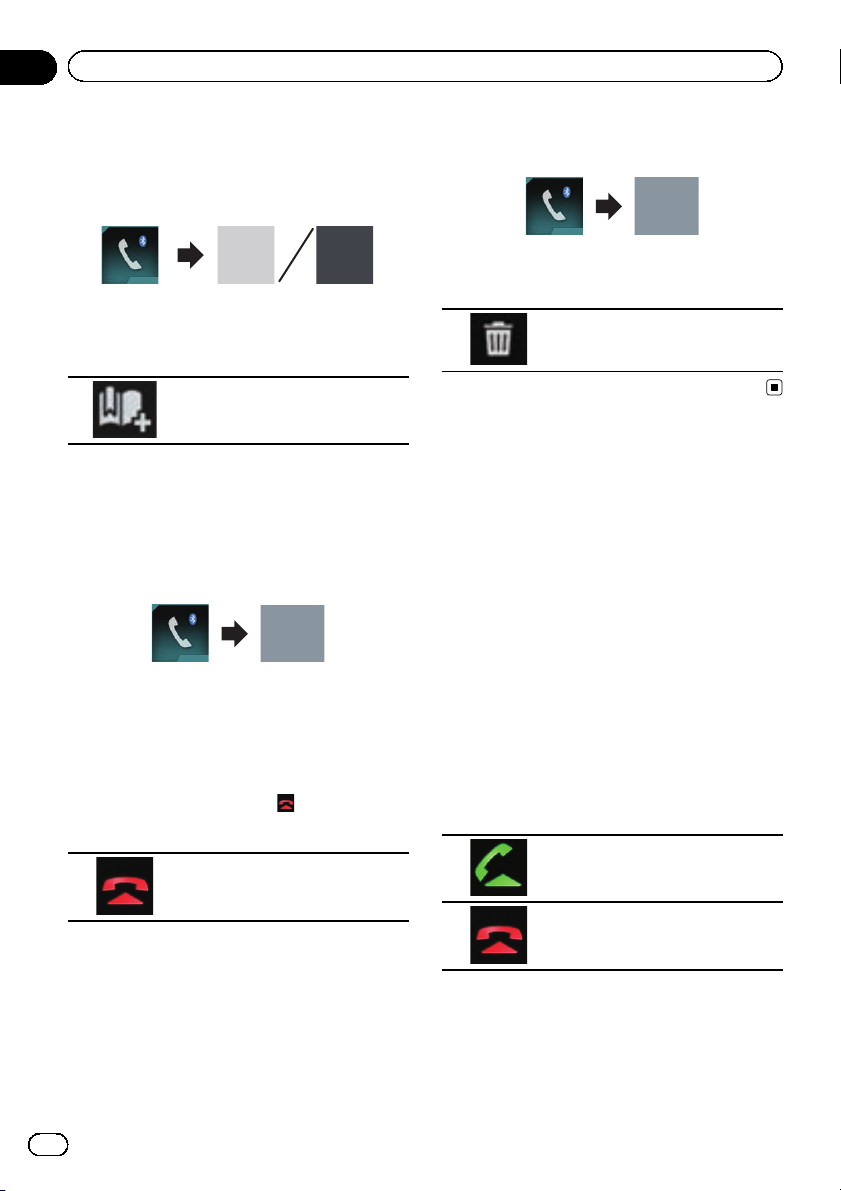
3 Touch the following key.
Registers the phone number to the
“Preset Dial” list.
Dialling from the preset dial list
1 Touch the HOME button to display the
Top menu screen.
2 Touch the following keys in the following order.
The “Preset Dial” screen appears.
3 Touch the desired entry on the list to
make a call.
The dial screen appears.
4 Dialing starts.
p To cancel the call, touch .
5 Touch the following key.
2 Touch the following keys in the following order.
The “Preset Dial” screen appears.
3 Touch the following key.
Deletes the phone number.
Receiving a phone call
You can perform hands-free answering by
using this product.
Answering an incoming call
This product informs you that it is receiving a
call by displaying a message and producing a
ring sound.
p You can set the system to automatically an-
swer incoming calls. If this product is not
set to automatically answer incoming calls,
you will have to answer the calls manually.
= For details, refer to Answering a call
automatically on page 25.
p The registered name appears if the phone
number of the received call is already registered in “Phone Book”.
1 Touch the following key.
Ends the call.
The call ends.
Deleting a phone number
1 Touch the HOME button to display the
Top menu screen.
24
En
Answers an incoming call.
Rejects an incoming call.
The rejected call is recorded in the missed call
history list.
= For details, refer to Dialing from the history
on page 23.
Page 25
Using hands-free phoning
Chapter
04
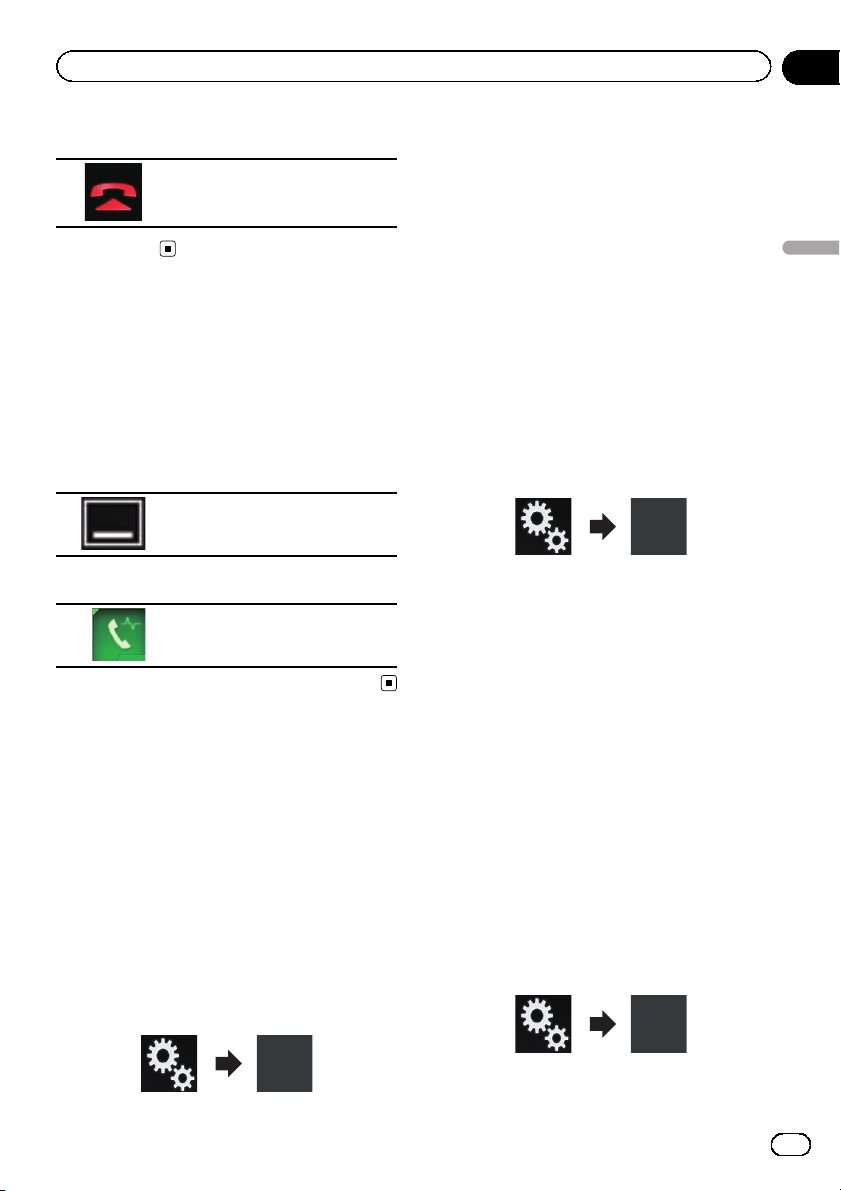
2 Touch the following key.
Ends the call.
The call ends.
Minimizing the dial
confirmation screen
p The dial confirmation screen cannot be
minimized on the AV operation screen.
p AV sources cannot be selected even if the
dial confirm screen is minimized while talk-
ing on the phone.
1 Touch the following key.
The dial confirmation screen is
minimized.
2 Touch the following key.
Displays the dial confirmation
screen again.
The “Bluetooth” screen appears.
3 Touch [Auto Answer] repeatedly until
the desired setting appears.
! Off (default):
Turns the automatic answering off.
! On:
Turns the automatic answering on.
Switching the ring tone
You can select whether or not to use this product’s ring tone. If this function is set to on,
the ring tone for this product will sound.
1 Touch the HOME button to display the
Top menu screen.
2 Touch the following keys in the following order.
The “Bluetooth” screen appears.
3 Touch [Ring Tone] repeatedly until the
desired setting appears.
! On (default):
Turns the ring tone on.
! Off:
Turns the ring tone off.
Using hands-free phoning
Changing the phone settings
Answering a call automatically
This product automatically answers incoming
calls to the connected cellular phone, so you
can answer calls while driving without taking
your hands off the steering wheel.
When “Auto Answer” is set to “On”, an incoming call will be automatically answered in
5 seconds.
1 Touch the HOME button to display the
Top menu screen.
2 Touch the following keys in the following order.
Inverting names in the phone book
When your device is connected to this product, the first and last names of your contacts
may be registered to the phone book in reverse
order.
You can use this function to change the order
back. (Inverting the names in the phone book)
1 Touch the HOME button to display the
Top menu screen.
2 Touch the following keys in the following order.
The “Bluetooth” screen appears.
En
25
Page 26
Chapter
04
Using hands-free phoning
3 Touch [Invert Name].
The confirmation screen appears.
4 Touch [Yes].
p If the inversion fails, “Invert Name Error”
appears. In such cases, try again from the
beginning.
p Inverting the names of your contacts from
this product does not affect the data on
your Bluetooth device.
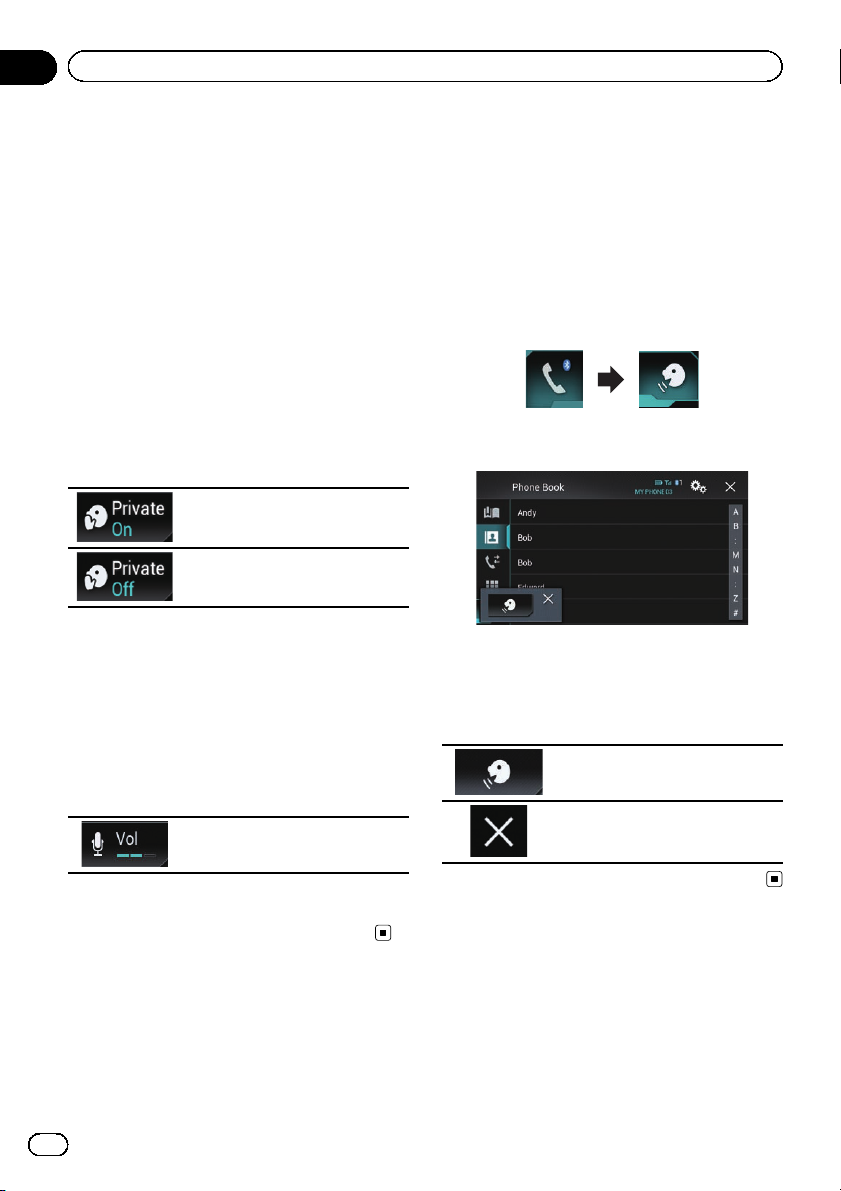
Setting the private mode
During a conversation, you can switch to private mode (talk directly on your cellular
phone).
% Touch the following keys to turn private mode on or off.
Talk directly on your mobile device
Hands-free phoning
Adjusting the other party’s
listening volume
To maintain good sound quality, this product
can adjust the other party’s listening volume.
If the volume is not loud enough for the other
party, use this function.
% Touch the following key.
Switches between the three volume levels.
p When an iPhone running iOS 6.1 or higher
is used, Siri Eyes Free Mode is available
with this product.
p For using the voice recognition function in
Apple CarPlay, refer to Using Apple CarPlay
on page 59.
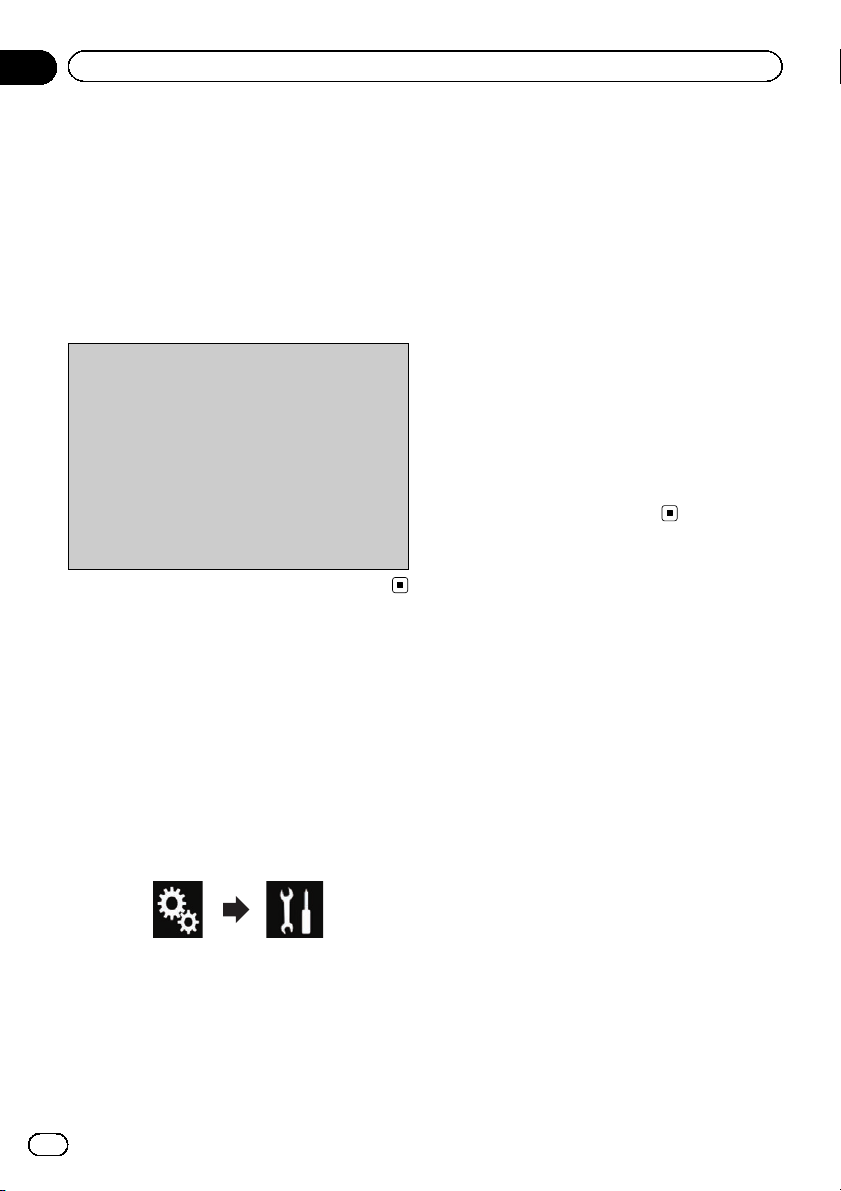
1 Touch the HOME button to display the
Top menu screen.
2 Touch the following keys to start voice
control.
The voice recognition function launches and
the voice control screen appears.
You can use the voice recognition function in
the same way as using it on the iPhone.
p You can also launch the voice recognition
function by touching and holding the
HOME button.
Indicates that this product is on
standby for your voice commands.
Cancels the voice recognition
function.
p This function can be performed even while
talking on the phone.
p Settings can be stored for each device.
Using the voice recognition
function (for iPhone)
You can use the voice recognition function of
iPhone.
26
En
Notes for hands-free phoning
General notes
! Connection to all cellular phones featuring
Bluetooth wireless technology is not guaranteed.
Page 27

Using hands-free phoning
Chapter
04
! The line-of-sight distance between this pro-
duct and your cellular phone must be
10 meters or less when sending and receiv-
ing voice and data via Bluetooth technol-
ogy. However, the actual transmission
distance may be shorter than the estimated
distance, depending on the usage environ-
ment.
! With some cellular phones, the ring sound
may not be output from the speakers.
! If private mode is selected on the cellular
phone, hands-free phoning may be dis-
abled.
Registration and connection
! Cellular phone operations vary depending
on the type of cellular phone. Refer to the
instruction manual that came with your cel-
lular phone for detailed instructions.
! With cellular phones, phone book transfer
may not work even though your phone is
paired with this product. In that case, dis-
connect your phone, and then perform
pairing again from your phone to this pro-
duct.
! The Bluetooth connection will be termi-
nated if Apple CarPlay is turned on.
! If Apple CarPlay is turned on during a call
on a cellular phone other than the iPhone
connected to use Apple CarPlay, the
Bluetooth connection will be terminated
after the call ends.
Making and receiving calls
! You may hear a noise in the following situa-
tions:
— When you answer the phone using the
button on the phone.
— When the person on the other end of
the line hangs up the phone.
! If the person on the other end of the line
cannot hear the conversation due to an
echo, decrease the volume level for hands-
free phoning. This may reduce the echo.
! With some cellular phones, even if you
press the accept button on the cellular
phone when a call comes in, hands-free
phoning may not be performed.
! The registered name appears if the phone
number of the received call is already regis-
tered in the phone book. When one phone
number is registered under different
names, only the phone number is displayed.
! If the phone number of the received call is
not registered in the phone book, the
phone number of the received call appears.
The received call and the dialed
number histories
! You cannot make a call to the entry of an
unknown user (no phone number) in the received call history.
! If calls are made by operating your cellular
phone, no history data will be recorded in
this product.
Phone book transfers
! If there are more than 800 phone book en-
tries on your cellular phone, not all entries
may download completely.
! With some cellular phones, it may not be
possible to transfer all items in the phone
book at one time. In this case, transfer
items one by one from your cellular phone.
! Depending on the cellular phone, this pro-
duct may not display the phone book correctly. (Some characters may be garbled, or
the order of first and last names may be reversed.)
! If the phone book in the cellular phone con-
tains image data, the phone book may not
be transferred correctly. (Image data cannot be transferred from the cellular phone.)
! Depending on the cellular phone, phone
book transfer may not be available.
Using hands-free phoning
En
27
Page 28
Chapter
05
iPod / iPhone or smartphone setup operation
When using an iPod / iPhone or a smartphone
with this product, configure the settings of
this product according to the device to be connected.
This section describes the settings required
for each device.
The basic flow of iPod /
iPhone or smartphone setup
1 Select the method for connecting your de-
vice.
= For details, refer to Setting the device
connection method on page 28.
2 Connect your device to this product.
= For details of the connections, refer to
the Installation Manual.
3 If necessary, connect your device to this
product via Bluetooth connection.
= For details of the Bluetooth connection,
refer to Chapter 3.
Setting the device
connection method
If you want to use the application for iPhone
or smartphone on this product, you must select the method for connecting your device.
Settings are required according to the connected device.
1 Touch the HOME button to display the
Top menu screen.
2 Touch the following keys in the following order.
The “System” screen appears.
3 Touch [Input/Output Settings].
4 Touch [Smartphone Setup].
The “Smartphone Setup” screen appears.
5 Touch the following settings.
! Device: Select the device to be connected.
! Connection: Select the connection meth-
od.
! Apple CarPlay: Set to “On” to use Apple
CarPlay.
p Configure the settings correctly according
to the device to be connected and the connection method to be used.
= For details, refer to Information on the
connections and functions for each device on page 30.
p If you change the setting, the confirmation
screen appears.
Touch [OK].
The setting will change after the following
processes are automatically executed.
— The source is turned off.
— AppRadio Mode and MirrorLink mode
are exited.
— The smartphone connection (USB and
Bluetooth) is disconnected.
To cancel, touch [Cancel].
iPod compatibility
This product supports only the following iPod
models and iPod software versions. Others
may not work correctly.
Made for
! iPhone 5s: iOS 7.0.3
! iPhone 5c: iOS 7.0.3
! iPhone 5: iOS 7.0.3
! iPhone 4s: iOS 7.0.3
! iPhone 4: iOS 7.0.3
! iPhone 3GS: iOS 6.0.1
! iPod touch (5th generation): iOS 6.0.1
! iPod touch (4th generation): iOS 6.0.1
! iPod touch (3rd generation): iOS 5.1.1
! iPod touch (2nd generation): iOS 4.2.1
! iPod classic 160GB (2009): Ver. 2.0.4
! iPod classic 160GB (2008): Ver. 2.0.1
! iPod classic 80GB: Ver. 1.1.2
! iPod nano (7th generation)
! iPod nano (6th generation): Ver. 1.2
! iPod nano (5th generation): Ver. 1.0.2
! iPod nano (4th generation): Ver. 1.0.4
! iPod nano (3rd generation): Ver. 1.1.3
p You can connect and control an iPod com-
patible with this product by using separately sold connector cables.
28
En
Page 29

iPod / iPhone or smartphone setup operation
Chapter
05
p Operation methods may vary depending on
the iPod model and the software version of
the iPod.
p Depending on the software version of the
iPod, it may not be compatible with this
product.
For details about iPod compatibility with
this product, refer to the information on our
website.
This manual applies to the following iPod
models.
iPod with 30-pin connector
! iPhone 4s
! iPhone 4
! iPhone 3GS
! iPod touch 4th generation
! iPod touch 3rd generation
! iPod touch 2nd generation
! iPod classic 160GB
! iPod classic 80GB
! iPod nano 6th generation
! iPod nano 5th generation
! iPod nano 4th generation
! iPod nano 3rd generation
iPod with Lightning connector
! iPhone 5s
! iPhone 5c
! iPhone 5
! iPod touch 5th generation
! iPod nano 7th generation
! iPhone 5c: iOS 7.1 or later
! iPhone 5: iOS 7.1 or later
MirrorLink device
compatibility
p This product is compatible with MirrorLink
version 1.1.
p Compatibility with all MirrorLink devices is
not guaranteed.
For details about MirrorLink device compatibility with this product, refer to the information on our website.
iPod / iPhone or smartphone setup operation
Android™device compatibility
p Operation methods may vary depending on
the Android device and the software ver-
sion of the Android OS.
p Depending on the version of the Android
OS, it may not be compatible with this pro-
duct.
p Compatibility with all Android devices is
not guaranteed.
For details about Android device compatibility
with this product, refer to the information on
our website.
Apple CarPlay compatibility
Apple CarPlay is available for the following
iPhone models.
! iPhone 5s: iOS 7.1 or later
En
29
Page 30
Chapter
05
iPod / iPhone or smartphone setup operation
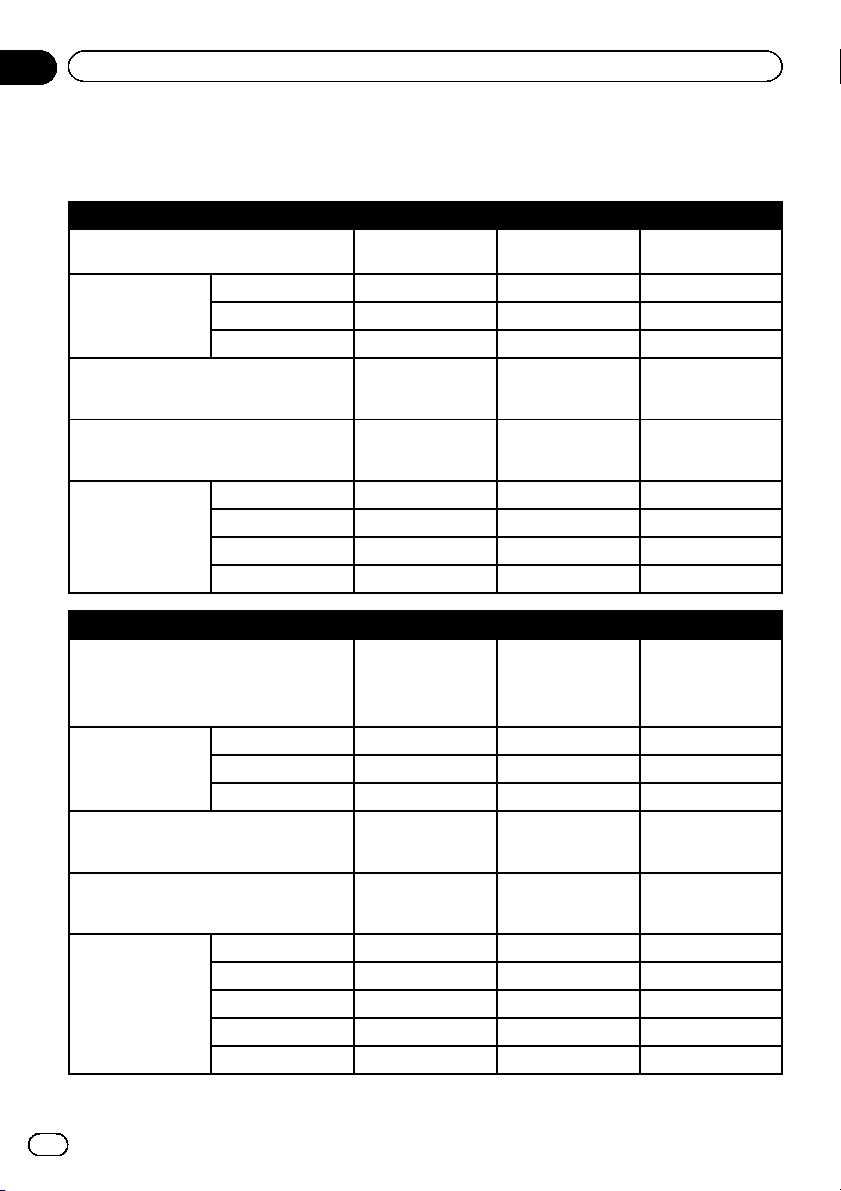
Information on the connections and functions for each device
The settings and cables required for connecting each device, and the available sources are as follows.
iPod / iPhone with a 30-pin connector
Required cable (sold separately)
Device iPhone/iPod iPhone/iPod iPhone/iPod
Smartphone Setup
Bluetooth connection
Connection requirement —
Available source
Connection Wireless via BT USB USB
Apple CarPlay — On/Off On/Off
iPod (audio) — 11
iPod (video) — 11
Pandora 111
AppRadio Mode ——1
Cable connection is
not required.
Bluetooth connection is required for
using Pandora.
CD-IU201V CD-IU201S
——
Connect to USB
port 1 for using
Pandora.
Connect to USB
port 1 for using
AppRadio Mode.
iPod / iPhone with a Lightnin g connector
Required cable (sold separately)
Device iPhone/iPod iPhone/iPod iPhone/iPod
Smartphone Setup
Bluetooth connection
Connection requirement —
Available source
30
En
Connection Wireless via BT USB Digital AV adapter
Apple CarPlay — On/Off —
iPod (audio) — 1 —
iPod (video) ———
Pandora 11(*1) 1
AppRadio Mode ——1
Apple CarPlay — 1 (*2) —
Cable connection is
not required.
Bluetooth connection is required for
using Pandora.
CD-IU52
Bluetooth connection is required for
using Pandora.
Connect to USB
port 1 for using
Apple CarPlay.
! CD-IH202
! CD-IU52
! Lightning Digital
AV Adapter
Bluetooth connection is required.
Connect to USB
port 1 for using
AppRadio Mode.
Page 31

iPod / iPhone or smartphone setup operation
iPod / iPhone with a Lightnin g connector
Remarks —
(*1) Not available when Apple CarPlay is on.
(*2) Available only when an Apple CarPlay-compatible device is connected.
(*3) Install the CarMediaPlayer app on your iPod or iPhone.
= For details about the CarMediaPlayer, refer to the information on our website.
= Refer to the CarMediaPlayer manual for more information.
Android, MirrorLink device
Required cable (sold separately)
Smartphone Setup
Bluetooth connection
Connection requirement —
Available source
Device Others Others Others
Connection Wireless via BT USB HDMI
Pandora 111
AppRadio Mode ——1
MirrorLink — 1 —
Cable connection is
not required.
Bluetooth connection is required for
using Pandora.
Set “Apple CarPlay”
to “On” for using
Apple CarPlay.
CD-MU200 CD-AH200
Bluetooth connection is required for
using Pandora.
Connect to USB
port 2.
Chapter
05
iPod is not available.
Please use the Car-
MediaPlayer to play
music or videos in
AppRadio Mode.
(*3)
iPod / iPhone or smartphone setup operation
Bluetooth connection is required.
Connect to USB
port 2.
En
31
Page 32

Chapter
06
Using the radio
You can listen to the radio using this product.
This section describes operations for the
radio.
Using the touch panel keys
12 43
a
9
1 Displays the source list.
= For details, refer to Selecting a front
source on the source list on page 12.
2 Selects a band.
= For details, refer to Selecting a band on
page 33.
3 Displays the Time and date setting
screen.
= For details, refer to Setting the time and
date on page 103.
4 Displays the Setting menu screen.
5 Recalls equalizer curves.
= For details, refer to Using the equalizer
on page 92.
6 Stores song information to an iPod.
= For details, refer to Storing song informa-
tion to an iPod (iTunes Tagging) on page
103.
7 Displays the Phone menu screen.
= For details, refer to Displaying the phone
menu on page 21.
8 Performs manual tuning or seek tuning.
= For details, refer to Manual tuning on
page 33.
= For details, refer to Seek tuning on page
33.
9 Displays the preset channels.
8
= For details, refer to Selecting a pr eset
channel from the preset channel list on
page 34.
a Recalls the preset channel stored to a key
from memory with a single touch of the
key.
Stores the current broadcast frequency to
a key for later recall by continuing to
touch the key.
= For details, refer to Storing broadcast fre-
5
6
7
quencies on page 34.
Reading the screen
1
8
1 Band indicator
Shows the tuned band: FM1, FM2, FM3 or AM.
2 Current time and date
3 Program service name indicator
Shows the program service name (station
name) of the current station.
4 Song title
Shows the title of the current song (when
available).
5 Artist name
Shows the artist name for the current song
(when available).
®
6 iTunes
Shows the status of the song information
stored in this product.
tagging song status indicator
p The icon is displayed on all operation
screens of AV sources.
2
3
4
5
76
32
En
Page 33

Using the radio
Chapter
06
Indicator Meaning
Appears when the song information
tag is stored in this product.
Appears when the song information
tag is being transferred to an iPod.
7 iTunes®tagging indicator
Indicates songs that are capable of iTunes tag-
ging.
p The icon is displayed on all operation
screens of AV sources.
Indicator Meaning
Appears when this product receives
an iTunes song tag that can be
stored and then downloaded to an
iPod for later purchase.
Flashes when this product is storing
song tag information.
8 Preset number indicator
Highlights the selected preset item.
Starting procedure
1 Display the AV source selection screen.
= For details of the operations, refer to Dis-
playing the AV operation screen on page 12.
2 Touch [Radio] on the AV source selection screen.
The “Radio” screen appears.
3 Use the touch panel keys on the screen
to control the radio.
= For details, refer to Using the touch panel
keys on page 32.
Selecting a band
% Touch the following key repeatedly
until the desired band appears.
Switches between the following FM
bands: FM1, FM2 and FM3.
Switches to AM band.
p This function is convenient for preparing
different preset lists for each band.
Manual tuning
% Touch the following keys to tune manually.
Moves down one step at a time.
Moves up one step at a time.
p This function is convenient for preparing
different preset lists for each band.
Seek tuning
% Touch and hold one of the following
keys for about one second and then release.
Scans frequencies until it finds a broadcast strong enough for good reception.
You can cancel seek tuning by touching
either key briefly.
If you keep holding either key, you can
skip broadcasting frequencies. Seek
tuning will start when you release the
key.
Using the radio
En
33
Page 34

Chapter
06
Using the radio
Selecting a preset channel
from the preset channel list
Once you have stored broadcast channels,
you can easily recall preset channels from
memory with a single touch of a key.
= For details, refer to Storing broadcast fre-
quencies on page 34.
1 Touch the preset channel list display
key.
1
1 Preset channel list display key
2 Touch the item on the list (“1” to “6”)to
switch to a channel registered as a preset
channel.
p If you touch the preset channel list display
key while the preset channel list is displayed, the list disappears and the preset
tuning keys are displayed.
Storing broadcast frequencies
With a touch of any of the preset tuning keys
(“1” to “6”), you can easily store up to six
broadcast channels for later recall (also with
the touch of a key).
1 Select a frequency that you want to
store in memory.
2 Touch and hold a preset tuning key [1]
to [6].
The selected radio station is stored in memory.
The next time you touch the same preset tuning key “1” to “6”, the ser vice component is recalled from memory.
p Up to 18 FM stations, six for each of the
three FM bands, as well as six AM stations,
can be stored in memory.
Storing the strongest
broadcast frequencies
BSM (best stations memory) function automatically stores the six strongest broadcast frequencies under the preset tuning keys “1” to
“6” and, once stored there, you can tune into
them with the touch of a key.
p Storing broadcast frequencies with BSM
may replace broadcast frequencies you
have already saved.
p Previously stored broadcast frequencies
may remain stored if the number of strong
broadcast frequencies stored has not
reached the limit.
1 Touch the preset channel list display
key.
The preset channel list appears.
2 Touch [BSM] to begin a search.
A message appears. While the message is displayed, the six strongest broadcast frequencies will be stored under the preset tuning
keys “1” to “6” in order of their signal strength.
When this is complete, the message disappears.
# If you touch [Cancel], the storage process is
canceled.
Tuning into strong frequencies
p This setting is available only when “Radio”
is selected as the source.
Local seek tuning allows you to only tune into
those radio stations with sufficiently strong
signals for good reception.
1 Touch the HOME button to display the
Top menu screen.
34
En
Page 35

Using the radio
Chapter
06
2 Touch the following keys in the following order.
The “System” screen appears.
3 Touch [AV Source Settings].
4 Touch [Radio Settings].
5 Touch [Local].
The pop-up menu appears.
6 Touch the item you want to set.
FM
! Off (default):
Turns the seek tuning setting off.
! Level1:
Sets the level of sensitivity for FM to level 1.
! Level2:
Sets the level of sensitivity for FM to level 2.
! Level3:
Sets the level of sensitivity for FM to level 3.
! Level4:
Sets the level of sensitivity for FM to level 4.
AM
! Off (default):
Turns the seek tuning setting off.
! Level1:
Sets the level of sensitivity for AM to level 1.
! Level2:
Sets the level of sensitivity for AM to level 2.
p The FM “Level4” (AM “Level2”) setting al-
lows reception of only stations with the
strongest signals, while lower settings
allow reception of those with weaker signals.
Operating with the buttons
Touch the TRK button
You can move the preset channels up or down.
Touch and hold the TRK button
You can perform seek tuning.
Using the radio
Storing song information
to an iPod (iTunes Tagging)
p For details, refer to Storing song information
to an iPod (iTunes Tagging) on page 103.
En
35
Page 36

Chapter
07
Playing compressed audio files
You can play compressed audio files stored in
a USB storage device.
= For details, refer to Media compatibility
chart on page 120.
Using the touch panel keys
Playback screen (page 1)
1243
5
6
7
8
d c aba
Playback screen (page 2)
j
1 Displays the source list.
= For details, refer to Selecting a front
source on the source list on page 12.
2 Displays the MIXTRAX screen.
= For details, refer to Chapter 17.
3 Displays the Time and date setting
screen.
= For details, refer to Setting the time and
date on page 103.
4 Displays the Setting menu screen.
5 Recalls equalizer curves.
= For details, refer to Using the equalizer
on page 92.
6 Selects a file from the list.
9
e
9fghi
= For details, refer to Selecting files from
the file name list on page 38.
Displays a list related to the song cur-
rently playing (link search).
= For details, refer to Selecting a file from
the list related to the song currently playing (link search) on page 38.
7 Switches the text display between tag in-
formation and file/folder information.
= For details, refer to Reading the screen
on page 37.
= For details, refer to Switching the browse
mode on page 38.
8 Displays the Phone menu screen.
= For details, refer to Displaying the phone
menu on page 21.
9 Switches to the next or previous page of
touch panel keys.
a Skips files forward or backward.
b Changes the playback point by dragging
the key.
= For details, refer to Operating the time
bar on page 14.
c Switches the media file type.
= For details, refer to Switching the media
file type on page 39.
d Switches between playback and pause.
e Displays the album list.
= For details, refer to Displaying the album
list on page 39.
f Uses “Sound Retriever” function.
= For details, refer to Setting the “Sound
Retriever” function on page 104.
g Plays files in random order.
= For details, refer to Playing files in ran-
dom order on page 39.
h Sets a repeat play range.
= For details, refer to Setting a repeat play
range on page 39.
i Selects the previous folder or the next
folder.
j Displays the category list including the
selected item.
36
En
Page 37

Playing compressed audio files
Chapter
07
Reading the screen
1
5
1 Current file information
Music Browse mode
! Song title/File name
Shows the title of the song currently
playing (when available). If the title of a
song is not available, the file name appears.
!
: Artist name
Shows the artist name for the song currently playing (when available). “No
Name” is displayed if there is no corre-
sponding information.
!
: Album title/Folder name
Shows the title of the album of the current file (when available). If the title of
the album is not available, the folder
name appears.
!
: Genre
Shows the genre of the current file
(when available). “No Genre” is displayed if there is no corresponding information.
p Nothing is displayed if the song cur-
rently playing is in a format which does
not support these functions.
Folder Browse mode
! : File name
Shows the name of the file currently
playing.
!
: Folder name
Shows the name of the folder containing the file currently playing.
2 Current time and date
2
3 Album artwork
Album art of the current song is displayed if it
is available.
4 Playback condition indicator
Indicates the current playback condition.
3
4
Playing files in random order
Indicator Meaning
Does not play files in random order.
Plays all files within the repeat range
in random order.
Playing compressed audio files
Setting a repeat play range (for Music
Browse mode)
Indicator Meaning
Repeats just the current file.
Repeats all compressed audio files.
Setting a repeat play range (for Folder
Browse mode)
Indicator Meaning
Repeats just the current file.
Repeats just the current folder.
Repeats all compressed audio files.
5 Play time indicator
Shows the elapsed playing time within the
current file.
Starting procedure
1 Display the AV source selection screen.
= For details of the operations, refer to Dis-
playing the AV operation screen on page 12.
En
37
Page 38

Chapter
07
Playing compressed audio files
2 Plug the USB storage device into the
USB connector.
= For details, refer to Plugging in a USB sto-
rage device on page 8.
3 Touch [USB] on the AV source selection
screen.
The image is displayed on the screen.
4 Use the touch panel keys on the screen
to control the USB storage device.
= For details, refer to Using the touch panel
keys on page 36.
p Playback is performed in order of folder
numbers. Folders are skipped if they contain no playable files. If there are no playable files in folder 01 (root folder), playback
starts from folder 02.
Switching the browse mode
This product supports two types of browse
modes: Folder Browse mode and Music
Browse mode.
Music Browse mode
Displays a song title, artist name, album name
and genre in the current file information display area on the AV operation screen. Select
when you want to play music files narrowed
down by a category of song title, artist name,
album name or genre.
If connecting a USB storage device, this product accesses the database of music files with
tag information and switches to the Music
Browse mode automatically.
Folder Browse mode
Displays a folder name and file name in the
current file information display area on the AV
operation screen. Select when you want to
search for music files in the list screen or
folders on the list screen.
p You can switch between the browse modes
for file search by touching the tabs on the
list screen.
% Touch the following key repeatedly
until the desired setting appears.
Switches the display between
Music Browse mode and Folder
Browse mode.
Selecting files from the file
name list
You can find files or folders to play back using
the file name or folder name list which is a list
of the files or folders stored in the USB storage
device.
1 Touch the following key.
Displays the list of the files or
folders stored in the USB storage
device.
2 Touch a file on the list to play back.
p Files are played back in file number order.
p Touching a folder on the list shows its con-
tents. You can play a file on the list by
touching it.
Selecting a file from the list
related to the song currently
playing (link search)
You can select files to play back using the file
list which is a list of the files recorded in the
USB storage device.
1 Display the Music Browse mode.
= For details, refer to Switching the browse
mode on page 38.
2 Touch the following key.
Displays the list of the files or
folders stored in the USB storage
device.
38
En
Page 39

Playing compressed audio files
3 Touch the desired category to display
the file list.
The list screen appears.
4 Touch the item that you want to refine.
Refine the item until the desired song title or
file name is displayed on the list.
p Touching [All] on the list includes all op-
tions in the current list. For example, if you
touch [All] after touching [Artists], you can
proceed to the next screen with all artists in
the list selected.
p After you select “Artists”, “Albums” or
“Genres”, go on to touch one of the lists to
start playing the first song in the selected
list and display the next options.
5 Touch the desired song title or file
name to play back.
!
:
Plays all audio files in the current repeat
play range in random order.
p If you turn random play on when the re-
peat play range is set to the current file,
the repeat play range changes to the
whole of the USB storage device automatically.
Setting a repeat play range
The repeat play range can be changed by only
touching a single key.
% Touch the following key repeatedly
until the desired setting appears.
Changes the repeat play range.
Chapter
07
Playing compressed audio files
Displaying the album list
1 Touch the artwork to open a list of the
albums stored on the USB storage device.
2 Touch the desired album.
3 Touch the name of the song you want
to play to start playing that song.
p If part of the recorded information is not
displayed, a scroll key appears on the right
side of list. Touch the scroll key to scroll.
Playing files in random order
All files in the USB storage device can be
played at random by only touching a single
key.
% Touch the following key repeatedly
until the desired setting appears.
Turns random play on or off.
! (default):
Does not play files in random order.
Music Browse mode
! (default):
Repeats all files.
:
!
Repeats just the current file.
Folder Browse mode
! (default):
Repeats all files.
:
!
Repeats the current folder.
:
!
Repeats just the current file.
Switching the media file type
When playing a digital media containing a
mixture of various media file types you can
switch between media file types to play.
1 Touch the following key.
Displays the pop-up menu for selecting
a media file type to play in the USB storage device.
En
39
Page 40

Chapter
07
Playing compressed audio files
2 Touch the item you want to set.
! Music:
Switches the media file type to music (compressed audio).
! Video:
Switches the media file type to video.
! Photo:
Switches the media file type to still image
(JPEG data).
Operating with the buttons
Touch the TRK button
You can skip files forward or backward.
Touch and hold the TRK button
You can perform fast reverse or fast forward.
40
En
Page 41

2
Playing compressed video files
Chapter
08
You can play compressed video files stored in
a USB storage device.
= For details, refer to Media compatibility
chart on page 120.
CAUTION
For safety reasons, video images cannot be
viewed while your vehicle is in motion. To view
video images, you must stop in a safe place and
apply the parking brake.
Using the touch panel keys
132
h
g
f
a bda
1 Displays the source list.
= For details, refer to Selecting a front
source on the source list on page 12.
2 Displays the Time and date setting
screen.
= For details, refer to Setting the time and
date on page 103.
3 Displays the Setting menu screen.
4 Recalls equalizer curves.
= For details, refer to Using the equalizer
on page 92.
5 Selects a file from the list.
= For details, refer to Selecting files from
the file name list on page 42.
6 Hides the touch panel keys.
Touching this area hides the touch panel keys.
p Touch anywhere on the LCD screen to
display the touch panel keys again.
7 Sets a repeat play range.
= For details, refer to Setting a repeat play
range on page 42.
ce
8 Switches the subtitle language.
With DivX featuring multi-subtitle recordings,
you can switch between subtitle languages
during playback.
9 Displays the Phone menu screen.
= For details, refer to Displaying the phone
menu on page 21.
a Skips files forward or backward.
b Switches the audio language.
With DivX files that provide audio playback in
different languages and different audio systems (Dolby Digital, DTS, etc.), you can switch
between languages or audio systems during
playback.
c Changes the playback point by dragging
the key.
= For details, refer to Operating the time
4
5
6
7
8
9
bar on page 14.
d Slows down playback speed (slow-mo-
tion playback).
= For details, refer to Slow motion playback
on page 42.
e Switches the media file type.
= For details, refer to Switching the media
file type on page 43.
f Switches between playback and pause.
g Changes the wide screen mode.
= For details, refer to Changing the wide
screen mode on page 104.
h Stops playback.
Reading the screen
3
1 Current time and date
Playing compressed video files
1
41
En
Page 42

Chapter
08
Playing compressed video files
2 Play time indicator
Shows the elapsed playing time within the
current file.
3 Current file information
! : File name
Shows the name of the file currently
playing.
!
: Folder name
Shows the name of the folder containing the file currently playing.
Starting procedure
1 Display the AV source selection screen.
= For details of the operations, refer to Dis-
playing the AV operation screen on page 12.
2 Plug the USB storage device into the
USB connector.
= For details, refer to Plugging in a USB sto-
rage device on page 8.
3 Touch [USB] on the AV source selection
screen.
The image is displayed on the screen.
4 Use the touch panel keys on the screen
to control the USB storage device.
= For details, refer to Using the touch panel
keys on page 41.
p Playback is performed in order of folder
numbers. Folders are skipped if they contain no playable files. If there are no playable files in folder 01 (root folder), playback
starts from folder 02.
1 Touch the following key.
Displays the list of the files or
folders stored in the USB storage
device.
2 Touch a file on the list to play back.
p Files are played back in file number order
and folders are skipped if they contain no
files. (If folder 01 (root folder) contains no
files, playback commences with folder 02.)
p Touching a folder on the list shows its con-
tents. You can play a file on the list by
touching it.
# Touch the playback sign of the thumbnail to
preview the file.
Setting a repeat play range
The repeat play range can be changed by only
touching a single key.
% Touch the following key repeatedly
until the desired setting appears.
Changes the repeat play range.
! (default):
Repeats all files.
:
!
Repeats just the current folder.
:
!
Repeats just the current file.
Selecting files from the file
name list
You can select files to view using the file name
list which is a list of the files stored in the USB
storage device.
42
En
Slow motion playback
This lets you slow down the playback speed.
1 Touch and hold [r] until an arrow icon
is displayed during playback.
The arrow icon is displayed, and forward slow
motion playback begins.
p To return to normal playback, touch [d/e].
Page 43

Playing compressed video files
2 Touch [r] to adjust playback speed
during slow motion playback.
p There is no sound during slow motion play-
back.
p With some USB storage devices, images
may be unclear during slow motion playback.
p Reversed slow motion playback is not possi-
ble.
Switching the media file type
When playing a digital media containing a
mixture of various media file types you can
switch between media file types to play.
1 Touch the following key.
Displays the pop-up menu for selecting
a media file type to play in the USB storage device.
2 Touch the item you want to set.
! Music:
Switches the media file type to music (compressed audio).
! Video:
Switches the media file type to video.
! Photo:
Switches the media file type to still image
(JPEG data).
Chapter
08
Playing compressed video files
Operating with the buttons
Touch the TRK button
You can skip files forward or backward.
Touch and hold the TRK button
You can perform fast reverse or fast forward.
En
43
Page 44

abcd
9 9
Chapter
09
Playing compressed still image files
You can view still images stored in a USB device.
= For details, refer to Media compatibility
chart on page 120.
CAUTION
For safety reasons, still images cannot be viewed
while your vehicle is in motion. To view still
images, you must stop in a safe place and apply
the parking brake.
Using the touch panel keys
132
4
5
6
f
e
1 Displays the source list.
= For details, refer to Selecting a front
source on the source list on page 12.
2 Displays the Time and date setting
screen.
= For details, refer to Setting the time and
date on page 103.
3 Displays the Setting menu screen.
4 Recalls equalizer curves.
p This key is not available while you are
viewing still images stored in a USB storage device.
5 Selects a file from the list.
= For details, refer to Selecting files from
the file name list on page 45.
6 Hides the touch panel keys.
Touching this area hides the touch panel keys.
p Touch anywhere on the LCD screen to
display the touch panel keys again.
7 Plays files in random order.
7
8
= For details, refer to Playing files in ran-
dom order on page 45.
8 Displays the Phone menu screen.
= For details, refer to Displaying the phone
menu on page 21.
9 Skips files forward or backward.
a Sets a repeat play range.
= For details, refer to Setting a repeat play
range on page 45.
b Rotates the displayed picture 90° clock-
wise.
c Selects the previous folder or the next
folder.
d Switches the media file type.
= For details, refer to Switching the media
file type on page 45.
e Switches between playback and pause.
f Changes the wide screen mode.
= For details, refer to Changing the wide
screen mode on page 104.
Reading the screen
1
2
1 Current time and date
2 Current file information
! : File name
Shows the name of the file currently
playing.
!
: Folder name
Shows the name of the folder containing the file currently playing.
44
En
Page 45

Playing compressed still image files
Chapter
09
Starting procedure
1 Display the AV source selection screen.
= For details of the operations, refer to Dis-
playing the AV operation screen on page 12.
2 Plug the USB storage device into the
USB connector.
= For details, refer to Plugging in a USB sto-
rage device on page 8.
p Playback is performed in order of folder
numbers. Folders are skipped if they contain no playable files. If there are no playable files in folder 01 (root folder), playback
starts from folder 02.
3 Touch [USB] on the AV source selection
screen.
The image is displayed on the screen.
4 Use the touch panel keys on the screen
to control the USB storage device.
= For details, refer to Using the touch panel
keys on page 44.
Selecting files from the file
name list
You can select files to view using the file name
list which is a list of the files stored in the USB
storage device.
1 Touch the following key.
Playing files in random order
All files in the USB storage device can be
played at random by only touching a single
key.
% Touch the following key repeatedly
until the desired setting appears.
Turns random play on or off.
! (default):
Does not play files in random order.
:
!
Plays all files in the current repeat play
range in random order.
p If you turn random play on when the re-
peat play range is set to the current file,
the repeat play range changes to the
whole of the USB storage device automatically.
Setting a repeat play range
The repeat play range can be changed by only
touching a single key.
% Touch the following key repeatedly
until the desired setting appears.
Changes the repeat play range.
Playing compressed still image files
Displays the list of the files stored
in the USB storage device.
2 Touch a file on the list to play back.
p Files are played back in file number order
and folders are skipped if they contain no
files. (If folder 01 (root folder) contains no
files, playback commences with folder 02.)
p Touching a folder on the list shows its con-
tents. You can play a file on the list by
touching it.
! (default):
Repeats all files.
:
!
Repeats the current folder.
Switching the media file type
When playing a digital media containing a
mixture of various media file types you can
switch between media file types to play.
1 Touch the following key.
Displays the pop-up menu for selecting
a media file type to play in the USB storage device.
En
45
Page 46

Chapter
09
Playing compressed still image files
2 Touch the item you want to set.
! Music:
Switches the media file type to music (compressed audio).
! Video:
Switches the media file type to video.
! Photo:
Switches the media file type to still image
(JPEG data).
Setting the slideshow interval
JPEG files can be viewed as a slideshow on
this product. In this setting, the interval between each image can be set.
p This setting is available during playback of
the JPEG files.
1 Touch the HOME button to display the
Top menu screen.
2 Touch the following keys in the following order.
The “Video Setup” screen appears.
3 Touch [Time Per Photo Slide].
The pop-up menu appears.
4 Touch the item you want to set.
! 10sec (default):
JPEG images switch at intervals of 10 seconds.
! 5sec:
JPEG images switch at intervals of 5 seconds.
! 15sec:
JPEG images switch at intervals of 15 seconds.
! Manual:
JPEG images can be switched manually.
Touch and hold the TRK button
You can search 10 JPEG files at a time.
p If the number of files in the folder (from the
file currently being played to the first or last
file) is fewer than 10, the first or last file in
the folder is automatically played.
p If the file currently being played is the first
or last file in the folder, the search is not
performed.
Operating with the buttons
Touch the TRK button
You can skip files forward or backward.
46
En
Page 47

Using an iPod
Chapter
10
For iPod with a 30-pin connector users
p Depending on your iPod, there may not be
any output unless you use a USB interface
cable for iPod / iPhone (CD-IU201S/CDIU201V) (sold separately). Be sure to use a
USB interface cable for iPod / iPhone (CDIU201S/CD-IU201V) (sold separately) to
connect your iPod.
iPod audio and/or video sources are enabled if either of the cables is connected.
= For details of the connections, refer to
the Installation Manual.
For iPod / iPhone with a Lightning connector users
p To use iPod audio source, you must con-
nect your iPod to this product using a USB
interface cable for iPod / iPhone (CD-IU52)
(sold separately).
However, functions related to iPod video
files and AppRadio Mode are not available.
p iPod audio and/or video sources are not
available when an iPod with a Lightning
connector is connected to this product
with a interface cable (CD-IH202) (sold separately).
= For details of the connections, refer to
the Installation Manual.
When you want to play audio and/or video
files on your iPod with a Lightning connector, first install CarMediaPlayer on your
iPod with a Lightning connector and then
launch CarMediaPlayer while in
AppRadio Mode.
For details about the CarMediaPlayer,
refer to the information on our website.
CAUTION
For safety reasons, video images cannot be
viewed while your vehicle is in motion. To view
video images, you must stop in a safe place and
apply the parking brake.
Using the touch panel keys
(for audio)
Playback screen (page 1)
132
b 9a9
Playback screen (page 2)
h
8
c
8defg
Using the touch panel keys
(for video)
132
j
b
1 Displays the source list.
= For details, refer to Selecting a front
source on the source list on page 12.
i
9a
9
de
c
4
5
6
7
Using an iPod
4
5
6
7
En
47
Page 48

Chapter
10
Using an iPod
2 Displays the Time and date setting
screen.
= For details, refer to Setting the time and
date on page 103.
3 Displays the Setting menu screen.
4 Recalls equalizer curves.
= For details, refer to Using the equalizer
on page 92.
5 Selects a track from the list.
= For details, refer to Selecting song or
video sources from the playlist screen on
page 50.
6 Switches the control mode to “App
Mode”.
= For details, refer to Using this product’s
iPod function from your iPod on page 51.
7 Displays the Phone menu screen.
= For details, refer to Displaying the phone
menu on page 21.
8 Switches to the next or previous page of
touch panel keys.
9 Skips files forward or backward.
p Availability of the skip-forward function
while playing iTunes Radio depends on
the iPod.
p The skip-back key is not available while
playing iTunes Radio.
a Changes the playback point by dragging
the key.
= For details, refer to Operating the time
bar on page 14.
b Switches between playback and pause.
c Displays the song list of the album cur-
rently playing.
= For details, refer to Displaying lists re-
lated to the song currently playing (link
search) on page 52.
d Uses “Sound Retriever” function.
= For details, refer to Setting the “Sound
Retriever” function on page 104.
e Plays files in random order.
= For details, refer to Setting the shuffle
play on page 50.
f Sets a repeat play range.
= For details, refer to Setting a repeat play
range on page 50.
g Changes the audiobook speed.
= For details, refer to Changing the speed
of audiobook playback on page 52.
h Displays the category list including the
selected item.
i Hides the touch panel keys.
Touching this area hides the touch panel keys.
p Touch anywhere on the LCD screen to
display the touch panel keys again.
j Changes the wide screen mode.
= For details, refer to Changing the wide
screen mode on page 104.
Reading the screen (for audio)
1
5
2
3
4
Reading the screen (for video)
2
5
1 Current track information
! Song title
Shows the title of the song currently
playing (when available). “No Title” is
displayed if there is no corresponding
information.
!
: Artist name
48
En
Page 49

Using an iPod
Chapter
10
Shows the artist name for the song cur-
rently playing (when available). “No
Name” is displayed if there is no corre-
sponding information.
: Album title
!
Shows the title of the album of the cur-
rent file (when available). “No Title” is
displayed if there is no corresponding
information.
!
: Genre
Shows the genre of the current file
(when available). “No Genre” is dis-
played if there is no corresponding infor-
mation.
2 Current time and date
3 Album artwork
Album art of the current song is displayed if it
is available.
4 Playback condition indicator
Indicates the current playback condition.
Setting the shuffle play
Indicator Meaning
Plays back songs or videos in
random order within the selected list.
Selects an album randomly, and
then plays back all songs in that
album in order.
Setting a repeat play range
Indicator Meaning
Repeats all songs or videos in
the selected list.
Repeats just the current song or
video.
= For details, refer to Chapter 5.
1 Display the AV source selection screen.
= For details of the operations, refer to Dis-
playing the AV operation screen on page 12.
2 Connect your iPod.
p If the iPod is already connected, touch
[iPod] on the AV source selection screen.
p If connecting an iPhone or iPod touch, quit
applications before connecting.
p If an iPhone 5s, iPhone 5c, iPhone 5, or
iPod touch (5th generation) is connected,
the media library (song information) will be
imported from the connected device and
saved to this product. Wait until the process
completes.
The media library will not be imported if an
updated media library of the connected device has been imported or the memory of
this product is full.
3 Touch [iPod] on the AV source selection
screen.
4 Use the touch panel keys on the screen
to control your iPod.
= For details, refer to Using the touch panel
keys (for audio) on page 47.
= For details, refer to Using the touch panel
keys (for video) on page 47.
p The video image of the iPod may have noise
if the rear display outputs the video image.
When noise is produced in the video image
of the iPod, turn off the output setting of the
rear display.
= For details of the operations, refer to Se-
lecting the video for the rear display on
page 106.
Using an iPod
5 Play time indicator
Shows the elapsed playing time within the
current file.
Starting procedure
When connecting an iPod to this product, you
must select the method for connecting your
device. Settings are required according to the
connected device.
En
49
Page 50

Chapter
10
Using an iPod
Setting the shuffle play
This function shuffles songs, albums or videos
and plays them in random order.
p This function is not available while playing
iTunes Radio.
% Touch the following key repeatedly
until the desired setting appears.
Turns random play on or off.
! :
Plays back songs or videos in random order
within the selected list.
:
!
Selects an album randomly, and then plays
back all songs in that album in order.
p The icon does not change when using this
function with an iPhone 5s, iPhone 5c,
iPhone 5, or iPod touch (5th generation).
The setting changes when the icon is
touched even though the icon does not
change.
Setting a repeat play range
The repeat play range can be changed by only
touching a single key.
p This function is not available while playing
iTunes Radio.
touched even though the icon does not
change.
p The no-repeat setting is available only when
an iPhone 5s, iPhone 5c, iPhone 5, or iPod
touch (5th generation) is connected to this
product.
Selecting song or video
sources from the playlist
screen
You can search for the song or video you want
to play from the playlist screen.
1 Touch the following key.
Displays the list of the category.
The “ROOT” screen appears.
2 Touch the following keys to switch the
music or video category list.
Switches to the music categor y
list.
Switches to the video categor y list.
% Touch the following key repeatedly
until the desired setting appears.
Changes the repeat play range.
! :
Repeats all songs or videos in the selected
list.
:
!
Repeats just the current song or video.
p The icon does not change when using this
function with an iPhone 5s, iPhone 5c,
iPhone 5, or iPod touch (5th generation).
The setting changes when the icon is
50
En
3 Touch the category you want to search
for.
Category lists (for music):
! Radio (iTunes Radio)
! Playlists
! Artists
! Albums
! Songs
! Podcasts
! Genres
! Composers
! Audiobooks
Category lists (for video):
! Video Playlists
Page 51

Using an iPod
Chapter
10
! Movies
! Music Videos
! TV Shows
! Video Podcasts
p Category items that do not correspond to
the connected iPod are not displayed.
p “Radio” is displayed only if iTunes Radio is
available when using iPod function with an
iPhone 5s, iPhone 5c, iPhone 5, or iPod
touch (5th generation).
4 Touch the Initial Search Bar to display
the alphabet search screen.
p The Initial Search Bar is not displayed in
the top category list or the song list.
5 Touch the first letter of the title of the
song or video you are looking for.
While searching, touch panel key operation is
not available.
p To refine the search with a different letter,
touch [Cancel].
6 Touch the title of the list that you want
to play.
Repeat this operation until you find the desired song or video.
7 Start playback of the selected list.
p Depending on the generation or version of
the iPod, some functions may not be available.
p You can play playlists created with the
MusicSphere application. The application
is available on our website.
p Playlists that you created with the
MusicSphere application are displayed in
abbreviated form.
the music files and video files in the iPod can
be played back with this product.
p This function is not available when using
iPod function with an iPhone 5s, iPhone
5c, iPhone 5, or iPod touch (5th generation).
p While this function is in use, the iPod will
not turn off even if the ignition key is turned
off. Operate the iPod to turn off the power.
1 Touch the following key.
Switches the control mode.
p The control mode switches to “App Mode”.
The icon changes to
.
2 Operate the connected iPod to select a
video or song and play.
p The following functions are still accessible
from this product even if the control mode
is set to “App Mode”. However, the operation will depend on your applications.
— Playing/pausing
— Fast forwarding/reversing
— Tracking up/down
— Moving up/down to a chapter
3 Touch the following key.
Switches the control mode, to control iPod functions from this product.
Using an iPod
Using this product’s iPod
function from your iPod
You can control this product’s iPod function
from the connected iPod if the control mode is
set to “App Mode”. The application screen of
the iPod can be displayed on this product, and
En
51
Page 52

Chapter
10
Using an iPod
Changing the speed of
audiobook playback
The playback speed can be changed while
playing an audiobook.
% Touch the following key.
Changes the playback speed.
! (default):
Plays back in normal speed.
:
!
Plays back faster than normal speed.
:
!
Plays back slower than normal speed.
p The icon does not change when using this
function with an iPhone 5s, iPhone 5c,
iPhone 5, or iPod touch (5th generation).
The setting changes as follows when the
icon is touched, even though the icon does
not change.
Faster d Slower d Normal d Faster...
Displaying lists related to
the song currently playing
(link search)
p This function is not available while playing
iTunes Radio.
1 Touch the artwork to open a list of the
names of songs on the album currently
playing.
2 Touch the name of the song you want
to play to start playing that song.
p If part of the recorded information is not
displayed, a scroll key appears on the right
side of list. Touch the scroll key to scroll.
Operating with the buttons
Touch the TRK button
You can skip songs or videos forward or backward.
p The skip-back key is not available while
playing iTunes Radio.
When a song or video with chapters is played,
you can skip a chapter forward or backward.
Touch and hold the TRK button
You can perform fast reverse or fast forward.
Playing back music from a
music app other than iPod
music, as the iPod source
The app name and the song information are
also displayed.
Using the touch panel keys
132
4
5
6
7
9 8 8
1 Displays the source list.
= For details, refer to Selecting a front
source on the source list on page 12.
2 Displays the Time and date setting
screen.
= For details, refer to Setting the time and
date on page 103.
3 Displays the Setting menu screen.
4 Recalls equalizer curves.
= For details, refer to Using the equalizer
on page 92.
5 Selects a track from the list.
52
En
Page 53

Using an iPod
= For details, refer to Selecting song or
video sources from the playlist screen on
page 50.
6 Switches the control mode to “App
Mode”.
= For details, refer to Using this product’s
iPod function from your iPod on page 51.
7 Displays the Phone menu screen.
= For details, refer to Displaying the phone
menu on page 21.
8 Skips files forward or backward.
9 Switches between playback and pause.
Reading the screen
Chapter
10
1
2
3
45 6
1 App name
Shows the App name of the currently playing.
2 Song title
Shows the title of the song currently playing
(when available). “No Title” is displayed if
there is no corresponding information.
3 Artist name
Shows the artist name for the song currently
playing (when available). “No Name” is displayed if there is no corresponding information.
4 Album title
Shows the title of the album of the current file
(when available). “No Title” is displayed if
there is no corresponding information.
5 Pause indicator
6 Album artwork
Album art of the current song is displayed if it
is available.
Using an iPod
En
53
Page 54

Chapter
11
Using your iPhone or smartphone applications
WARNING
Certain uses of an iPhone or a smartphone
may not be legal while driving in your jurisdiction, so you must be aware of and obey
any such restrictions.
If in doubt as to a particular function, only
perform it while the car is parked.
No feature should be used unless it is safe to
do so under the driving conditions you are
experiencing.
CAUTION
For safety reasons, video images cannot be
viewed while your vehicle is in motion. To view
video images, you must stop in a safe place and
apply the parking brake.
Using AppRadio Mode
You can control applications for an iPhone or
a smartphone directly from the screen
(AppRadio Mode).
In AppRadio Mode, you can operate applications with finger gestures such as tapping,
dragging, scrolling or flicking on the screen of
this product.
p The compatible finger gestures vary de-
pending on the application for an iPhone
or a smartphone.
p When an application not compatible with
AppRadio Mode is started, depending on
the application, you can see an image of
the application on the screen of this product. However, you will not be able to operate the application.
http://www.pioneerelectronics.ca/
AppRadioMode
p Be sure to read Important Information for
the User (a separate manual) before you
perform this operation.
! Pioneer is not liable for any issues that may
arise from incorrect or flawed app-based
content.
! The content and functionality of the sup-
ported applications are the responsibility of
the App providers.
! In AppRadio Mode, functionality through
the product is limited while driving, with
available functions determined by the App
providers.
! Availability of AppRadio Mode functional-
ity is determined by the App provider, and
not determined by Pioneer.
! AppRadio Mode allows access to applica-
tions other than those listed (subject to limitations while driving), but the extent to
which content can be used is determined
by the App providers.
Using the touch panel keys
(App control side bar)
1
2
3
4
5
6
To use AppRadio Mode, install the AppRadio
app on the iPhone or smartphone beforehand
to enable launching of the application on this
product. For details about the AppRadio app,
visit the following site:
For U.S.A.
http://www.pioneerelectronics.com/
AppRadioMode
For Canada
54
En
1 Displays the source list.
= For details, refer to Selecting a front
source on the source list on page 12.
2 Displays the launcher application screen.
3 Displays the previous screen.
p When you use an iPhone, this key is not
available.
4 Displays the menu screen.
Page 55

Using your iPhone or smartphone applications
Chapter
11
p When you use an iPhone, this key is not
available.
5 Displays the Phone menu screen.
= For details, refer to Displaying the phone
menu on page 21.
6 Displays the current source.
p In AppRadio Mode, App control side bar
will appear.
p If you touch the HOME button twice, the
App control side bar will disappear. Touch
the HOME button twice again, and the App
control side bar will appear.
Starting procedure
When connecting an iPhone or smartphone to
this product, you must select the method for
connecting your device. Settings are required
according to the connected device.
= For details, refer to Chapter 5.
The procedure varies depending on the type of
device.
For iPhone with a 30-pin connector users
1 Connect your iPhone.
= For details of the connections, refer to the
Installation Manual.
2 Touch the HOME button to display the
Top menu screen.
p If you connect your device while an
AppRadio Mode-compatible application is
already running, the application operation
screen will appear on this product.
6 Touch the desired application icon.
The desired application is launched, and the
application operation screen appears.
7 Operate the application.
8 Touch the HOME button to return to
the Top menu screen.
For iPhone with a Lightning
connector users
1 Register your iPhone and connect it to
this product via Bluetooth wireless technology.
p The registered device must be selected as
the priority device.
= For details, refer to Registering your
Bluetooth devices on page 16.
2 Unlock your iPhone.
3 Connect your iPhone.
p The cable connection method varies de-
pending on your device.
= For details of the connections, refer to the
Installation Manual.
Using your iPhone or smartphone applications
3 Touch [APPS].
A message, which notifies you that your
iPhone can launch the application, appears
on the screen.
A message, which asks you whether you want
to launch your application, appears on your
iPhone.
4 Use your iPhone to launch the application.
The AppRadio app is launched.
5 Touch [OK] on the screen of this product.
The AppRadio Mode screen (Application
menu screen) appears.
4 Touch the HOME button to display the
Top menu screen.
5 Touch [APPS].
The AppRadio app is launched, and the
AppRadio Mode screen (Application menu
screen) appears.
p If you connect your device while an
AppRadio Mode-compatible application is
already running, the application operation
screen will appear on this product.
6 Touch the desired application icon.
The desired application is launched, and the
application operation screen appears.
En
55
Page 56

Chapter
11
Using your iPhone or smartphone applications
7 Operate the application.
8 Touch the HOME button to return to
the Top menu screen.
For smartphone users
1 Register your smartphone and connect
it to this product via Bluetooth wireless
technology.
p The registered device must be selected as
the priority device.
= For details, refer to Registering your
Bluetooth devices on page 16.
2 Unlock your smartphone.
3 Connect your smartphone to this product via the separately sold App Connectivity Kit (CD-AH200).
p The cable connection method varies de-
pending on your device.
= For details of the connections, refer to the
Installation Manual.
4 Touch the HOME button to display the
Top menu screen.
5 Touch [APPS].
The AppRadio app is launched, and the
AppRadio Mode screen (Application menu
screen) appears.
p If you connect your device while an
AppRadio Mode-compatible application is
already running, the application operation
screen will appear on this product.
Using the keyboard
CAUTION
For your safety, the keyboard functionality is only
available when the vehicle is stopped and the
parking brake is engaged.
p This function is only available in AppRadio
Mode on the iPhone.
When you tap the text input area of an application for iPhone, a keyboard will be displayed
on the screen. You can input the desired text
directly from this product.
p The language preference for the keyboard
of this product should be same as the setting on your iPhone.
If the settings for this product and the
iPhone are different, you may be unable to
enter characters properly.
1 Set the keyboard language.
= For details of the operations, refer to Setting
the keyboard language with the application
for iPhone on page 81.
2 Start up the AppRadio Mode.
= For details, refer to Starting procedure on
page 55.
3 Touch the text input area on the application operation screen.
A keyboard for entering text appears.
6 Touch the desired application icon.
The desired application is launched, and the
application operation screen appears.
7 Operate the application.
8 Touch the HOME button to return to
the Top menu screen.
56
En
7
3456
1 Enters the characters.
2 Deletes the entered text one letter at a time,
beginning at the end of the text.
3 Confirms the entry and allows you to pro-
ceed to the next step.
1
2
Page 57

Using your iPhone or smartphone applications
Chapter
11
4 Hides the keyboard and the text can now be
entered using the keyboard of the iPhone.
5 Changes the iPhone keyboard layout.
p The iPhone keyboard layouts that can be
selected by tapping
setting for Hardware Keyboard Layout
set on your iPhone.
6 Switches to a keyboard offering numeric
characters and symbols.
7 Converts the case of the keyboard charac-
ters.
depends on the
Adjusting the image size (For
smartphone users)
Black dots may appear on the screen when
using AppRadio Mode with an Android device connected to this product.
CAUTION
This setting is available only when you stop your
vehicle in a safe place and apply the parking
brake.
p This function can be set under the follow-
ing conditions:
— When an Android device is connected
to this product using the CD-AH200
(sold separately), and when AppRadio
Mode is available after a Bluetooth con-
nection using SPP (Serial Port Profile)
has been established.
p If this setting has not been set, the setting
screen automatically appears in the following cases:
— When entering AppRadio Mode after a
Bluetooth connection using SPP (Serial
Port Profile) has been established.
— When a Bluetooth connection using
SPP (Serial Port Profile) has been estab-
lished in AppRadio Mode.
1 Touch the HOME button to display the
Top menu screen.
2 Touch the following keys in the following order.
The “System” screen appears.
3 Touch [Input/Output Settings].
4 Touch [AppRadio Video Adjustment].
The confirmation screen appears.
5 Touch [OK].
6 Touch the following keys to adjust the
line to fit smartphone image size.
Moves the line to the left.
Moves the line to the right.
Moves the line upward.
Moves the line downward.
7 Touch [Preview].
p Confirm that the whole image fills the
screen.
8 Touch [OK].
p If you want to adjust the setting again from
the beginning, touch [RESET].
Displaying the image of your
application (iPhone with 30-pin
connector)
You can set an image of an application for
iPhone, which is not compatible with
AppRadio Mode, to be shown on the screen.
p Depending on the type of application, you
may not be able to see the image on the
screen.
Using your iPhone or smartphone applications
En
57
Page 58

Chapter
11
Using your iPhone or smartphone applications
p You can only control the application on the
connected device.
p When you touch the display in this func-
tion, “Don’t Touch” mark appears on the
upper right corner of the screen.
1 Connect your iPhone.
= For details of the connections, refer to the
Installation Manual.
2 Touch the HOME button to display the
Top menu screen.
3 Touch [APPS].
A message, which notifies you that your
iPhone can launch the application, appears
on the screen.
A message, which asks you whether you want
to launch your application, appears on your
iPhone.
4 Use your iPhone to refuse to launch the
application.
5 Touch [OK] on the screen of this product.
The black screen appears.
6 Launch an application on your iPhone.
An image of the application appears on the
screen.
7 Touch the HOME button to return to
the Top menu screen.
Displaying the image of your
application (iPhone with
Lightning connector)
You can set an image of an application for
smartphone, which is not compatible with
AppRadio Mode, to be shown on the screen.
p Depending on the type of application, you
may not be able to see the image on the
screen.
p When you use this function, do not connect
other devices via Bluetooth wireless technology. Be sure to disconnect your
Bluetooth device before using this function.
p You can only control the application on the
connected device.
p When you touch the display in this func-
tion, “Don’t Touch” mark appears on the
upper right corner of the screen.
1 Connect your iPhone.
p The cable connection method varies de-
pending on your device.
= For details of the connections, refer to the
Installation Manual.
2 Touch the HOME button to display the
Top menu screen.
3 Touch [APPS].
The image in your iPhone appears on the
screen.
4 Launch an application on your iPhone.
An image of the application appears on the
screen.
5 Touch the HOME button to return to
the Top menu screen.
Displaying the image of your
application (smartphone)
You can set an image of an application for
smartphone, which is not compatible with
AppRadio Mode, to be shown on the screen.
p Compatibility with all smartphones is not
guaranteed.
p When you use this function, do not connect
other devices via Bluetooth wireless technology. Be sure to disconnect your
Bluetooth device before using this function.
p You can only control the application on the
connected device.
p When you touch the display in this func-
tion, “Don’t Touch” mark appears on the
upper right corner of the screen.
58
En
Page 59

Using your iPhone or smartphone applications
Chapter
11
1 Connect your smartphone to this product via the separately sold App Connectivity Kit (CD-AH200).
p The cable connection method varies de-
pending on your device.
= For details of the connections, refer to the
Installation Manual.
2 Touch the HOME button to display the
Top menu screen.
3 Touch [APPS].
The image in your smartphone appears on the
screen.
4 Launch an application on your smartphone.
An image of the application appears on the
screen.
5 Touch the HOME button to return to
the Top menu screen.
Using Apple CarPlay
You can control applications for an iPhone directly from the screen (Apple CarPlay).
In Apple CarPlay, you can operate applications with finger gestures such as tapping,
dragging, scrolling or flicking on the screen of
this product.
p Apple CarPlay may not be available in your
country or region.
For details about Apple CarPlay, visit the
following site:
http://www.apple.com/
p In this chapter, the iPhone compatible with
Apple CarPlay is referred to as “iPhone”.
= For details of Apple CarPlay compatible
devices, refer to Using the touch panel
keys (for audio) on page 47.
p The compatible finger gestures vary de-
pending on the application for an iPhone
or a smartphone.
To use Apple CarPlay, set “Apple CarPlay” in
“Smartphone Setup” to “On” beforehand.
= For details, refer to Setting the device con-
nection method on page 28.
! Pioneer is not liable for any issues that may
arise from incorrect or flawed app-based
content.
! The content and functionality of the sup-
ported applications are the responsibility of
the App providers.
! In Apple CarPlay, functionality through the
product is limited while driving, with available functions determined by the App providers.
! Availability of Apple CarPlay functionality
is determined by the App provider, and not
determined by Pioneer.
! Apple CarPlay allows access to applica-
tions other than those listed (subject to limitations while driving), but the extent to
which content can be used is determined
by the App providers.
Using the touch panel keys
1 2
1 Displays the Application menu screen
with a single touch of the key.
Launches the voice recognition function if
touching and holding the key.
p You can also launch the voice recogni-
tion function by touching and holding
the HOME button.
2 Displays the Top menu screen of this pro-
duct.
p You can also display the Top menu
screen of this product by touching the
HOME button.
Using your iPhone or smartphone applications
En
59
Page 60

1 2 3
Chapter
11
Using your iPhone or smartphone applications
Starting procedure
1 Connect an iPhone to this product via
the separately sold USB interface cable for
iPod / iPhone (CD-IU52).
The Application menu screen appears.
p If an iPhone has been connected and an-
other screen is displayed, touch [Apple
CarPlay] on the Top menu screen to display
the Application menu screen.
= For details of the connections, refer to the
Installation Manual.
2 Touch the desired application icon.
The desired application is launched, and the
application operation screen appears.
3 Operate the application.
Setting the driving position
You can change the display position of the
side bar on the Application menu screen according to the driving position.
1 Touch the HOME button to display the
Top menu screen.
2 Touch the following keys in the following order.
The setting will be applied when the Apple
CarPlay-compatible device is connected to
this product next time.
Adjusting the volume
You can adjust the guidance volume/alert
sound volume separately from the main sound
volume.
% Touch the VOL (+/–) button.
Apple CarPlay
1 Touch to mute. Touch again to unmute.
2 Displays the main sound volume.
3 Adjusts the guidance volume/alert sound
volume.
Each touch of [+]or[–] increases or de-
creases the volume level.
p You cannot adjust the volume of the main
sound on the screen. Touch the VOL (+/–)
button to adjust the volume of the main
sound.
p The volume menu is displayed for four sec-
onds. If the screen disappears, touch the
VOL (+/–) button again. The screen reap-
pears.
The “System” screen appears.
3 Touch [Apple CarPlay settings].
4 Touch [Driving Position].
5 Touch the item you want to set.
! Left (default):
Select for a left-hand drive vehicle. The side
bar on the application menu is displayed on
the left-hand side of the screen.
! Right:
Select for a right-hand drive vehicle. The
side bar on the application menu is displayed on the right-hand side of the screen.
60
En
Page 61

Using your iPhone or smartphone applications
Chapter
11
Using MirrorLink
When you connect a MirrorLink device with
compatible applications installed, you can
control the applications for the mobile device
directly from this product (MirrorLink mode).
You can view and operate the compatible applications via the display with multi-touch gestures like tapping, dragging, scrolling, and
flicking.
p Multi-touch gestures may be disabled de-
pending on the MirrorLink device model
that is connected.
Using the touch panel keys
(App control side bar)
1
2
3
4
5
6
1 Displays the source list.
= For details, refer to Selecting a front
source on the source list on page 12.
2 Displays the launcher application screen.
3 Displays the previous screen.
p Depending on the type of MirrorLink
device, this key is not available.
4 Displays the menu screen.
p Depending on the type of MirrorLink
device, this key is not available.
5 Displays the Phone menu screen.
= For details, refer to Displaying the phone
menu on page 21.
6 Displays the current source.
p In MirrorLink mode, App control side bar
will appear.
p If you touch the HOME button twice, the
App control side bar will disappear. Touch
the HOME button twice again, and the App
control side bar will appear.
Starting procedure
When connecting a MirrorLink device to this
product, you must select the method for connecting your device. Settings are required according to the connected device.
= For details, refer to Chapter 5.
1 Unlock your MirrorLink device.
2 Connect your MirrorLink device to this
product via the separately sold USB interface cable for use with MirrorLink devices
(CD-MU200).
p The cable connection method varies de-
pending on your device.
= For details of the connections, refer to the
Installation Manual.
3 Touch the HOME button to display the
Top menu screen.
4 Touch [APPS].
If the launcher application is installed in the
MirrorLink device, the application launches.
If not, the Application menu screen will appear.
5 Touch the desired application icon.
The desired application is launched, and the
application operation screen appears.
p Some applications may not launch depend-
ing on the state of the connected device. If
it does not launch, launch the application
according to the application startup message.
6 Operate the application.
7 Touch the HOME button to return to
the Top menu screen.
Using the audio mix function
You can output audio mixing AV source and
an application for iPhone or smartphone
when the AppRadio Mode or MirrorLink
mode is used.
1 Start up the AppRadio Mode or
MirrorLink mode.
Using your iPhone or smartphone applications
En
61
Page 62

Chapter
11
Using your iPhone or smartphone applications
2 Touch the VOL (+/–) button.
The audio mix menu will be displayed on the
screen.
1 2 3
1 Touch to mute. Touch again to unmute.
2 Sets whether to switch the sound mix func-
tion on or off.
! Left tab: The audio mix function is en-
abled (mix on). The App volume is displayed. If you touch the App volume, the
volume keys will be displayed.
! Right tab: The audio mix function is dis-
abled (mix off).
3 Adjusts the application audio volume.
Each touch of [+]or[–] increases or de-
creases the volume level.
p The AV operation screen and the Applica-
tion screen can be switched by touching
the MODE button.
p You cannot adjust the volume of the main
sound on the screen. Touch the VOL (+/–)
button to adjust the volume of the main
sound.
p The audio mix menu is displayed for four
seconds. If the screen disappears, touch
the VOL (+/–) button again. The screen reappears.
62
En
Page 63

Streaming Pandora
Chapter
®
12
WARNING
Certain uses of an iPhone or a smartphone
may not be legal while driving in your jurisdiction, so you must be aware of and obey
any such restrictions.
If in doubt as to a particular function, only
perform it while the car is parked.
No feature should be used unless it is safe to
do so under the driving conditions you are
experiencing.
Pandora operations
You can enjoy Pandora by connecting an
iPhone or a smartphone that has the Pandora
application installed.
p This function is not available when Apple
CarPlay is on.
Important
! Requirements to access Pandora using
Pioneer car audio/video products:
= For details, refer to Chapter 5.
! Please update the firmware of the Pandora ap-
plication to the latest version before use.
! The latest version of the Pandora application
can be downloaded from the iTunes App Store
or Google Play.
! Create a free or a paid account online. You
can create the account in the Pandora application from your iPhone or from the website
(http://www.pandora.com/register).
! If the Data Plan for your iPhone does not pro-
vide for unlimited data usage, additional
charges from your carrier may apply for accessing the Pandora service via 3G, EDGE and/or
LTE (4G) networks.
! You need to connect to the Internet via 3G,
EDGE, LTE (4G) or Wi-Fi network to use the
Pandora service.
Limitations:
! Depending on the availability of the Internet,
you may not be able to receive the Pandora
service.
! The Pandora service is subject to change with-
out notice.
The service could be affected by any of the following: firmware version of the iPhone, firmware version of the Pandora application,
changes to the Pandora music service.
! Certain functions of the Pandora service are
not available when accessing the service
through Pioneer car audio/video products.
They include, but are not limited to the following: creating new stations, deleting stations,
sending information about current stations,
buying tracks from iTunes, viewing additional
text information, logging in to Pandora, adjusting Cell Network Audio Quality.
Notes
! Pandora internet radio is a music service not
affiliated with Pioneer. More information is
available at
http://www.pandora.com
! The Pandora mobile application is available
for most iPhone and smartphone, please visit
www.pandora.com/everywhere/mobile for the
latest compatibility information.
Using the touch panel keys
Playback screen (page 1)
132
4
5
6
a 8
9
7
Streaming Pandora
®
En
63
Page 64

Chapter
12
Streaming Pandora
®
Playback screen (page 2)
7
bcd
1 Displays the source list.
= For details, refer to Selecting a front
source on the source list on page 12.
2 Displays the Time and date setting
screen.
= For details, refer to Setting the time and
date on page 103.
3 Displays the Setting menu screen.
4 Recalls equalizer curves.
= For details, refer to Using the equalizer
on page 92.
5 Touching the key displays the list of your
Pandora stations so you can select one of
them to play.
6 Displays the Phone menu screen.
= For details, refer to Displaying the phone
menu on page 21.
7 Switches to the next or previous page of
touch panel keys.
8 Touching the key gives a “Thumbs Down”
to the track currently playing and skips to
the next track.
p This function is not available when
using a shared station.
9 Touching the key gives a “Thumbs Up” to
the track currently playing.
p This function is not available when
using a shared station.
a Switches between playback and pause.
b Uses “Sound Retriever” function.
= For details, refer to Setting the “Sound
Retriever” function on page 104.
c Adds information for the track currently
playing to bookmarks.
d Creates a new station.
= For details, refer to Add station on page
66.
Reading the screen
1
2
1 Current track information
! Shows the Pandora station name the
tuner is currently tuned in to.
!
: Track title
Shows the title of the current track.
!
: Artist name
Shows the artist name for the track currently playing.
!
: Album title
Shows the title of the album of the current track.
p “-------” is displayed if there is no corre-
sponding information.
2 Play time indicator
Shows the elapsed time, remaining time and
time bar of the current track.
Starting procedure
When connecting an iPhone or smartphone to
this product, you must select the method for
connecting your device. Settings are required
according to the connected device.
= For details, refer to Chapter 5.
For iPhone with a 30-pin
connector users
1 Unlock your iPhone.
2 Connect your iPhone.
p Connect via USB or Bluetooth.
64
En
Page 65

Streaming Pandora
Chapter
®
12
= For details of the Bluetooth connection,
refer to Registering your Bluetooth de-
vices on page 16.
3 Display the AV source selection screen.
= For details of the operations, refer to Dis-
playing the AV operation screen on page 12.
4 Touch [Pandora] on the AV source selection screen.
5 Use the touch panel keys on the screen
to control the Pandora application.
= For details, refer to Using the touch panel
keys on page 63.
For iPhone with a Lightning
connector users
1 Unlock your iPhone.
2 Connect your iPhone.
p Connect via USB, Bluetooth, or HDMI and
Bluetooth.
= For details of the Bluetooth connection,
refer to Registering your Bluetooth de-
vices on page 16.
p The cable connection method varies de-
pending on your device.
= For details of the connections, refer to
the Installation Manual.
3 Display the AV source selection screen.
= For details of the operations, refer to Dis-
playing the AV operation screen on page 12.
4 Touch [Pandora] on the AV source selection screen.
When you touch [Pandora], this product will
start establishing a Bluetooth connection.
After the connection is successfully established, the touch panel key on the “Pandora”
screen is activated.
5 Use the touch panel keys on the screen
to control the Pandora application.
= For details, refer to Using the touch panel
keys on page 63.
For smartphone users
1 Unlock your smartphone.
2 Connect your smartphone.
p Connect via USB, Bluetooth, or HDMI and
Bluetooth.
= For details of the Bluetooth connection,
refer to Registering your Bluetooth de-
vices on page 16.
p The cable connection method varies de-
pending on your device.
= For details of the connections, refer to
the Installation Manual.
3 Display the AV source selection screen.
= For details of the operations, refer to Dis-
playing the AV operation screen on page 12.
4 Touch [Pandora] on the AV source selection screen.
When you touch [Pandora], this product will
start establishing a Bluetooth connection.
After the connection is successfully established, the touch panel key on the “Pandora”
screen is activated.
5 Use the touch panel keys on the screen
to control the Pandora application.
= For details, refer to Using the touch panel
keys on page 63.
Selecting a Pandora station
from the list
% Touch the following key.
Displays the list of Pandora stations.
The following screen appears.
p Touch to switch to the station list.
p Touch
p Touching
particular musical characteristics, one at a
time, from several shuffled stations.
p Stations indicated by
tions.
to switch to the genre list.
plays only one track based on
are shared sta-
Streaming Pandora
®
En
65
Page 66

Chapter
12
Streaming Pandora
p When you touch [A-Z]or[Date], the list
items can be sorted.
A-Z: You can sort the items in the list alphabetically.
Date: You can sort the items in the list in
the order of the dates the items were created.
p If you touch
A message prompting you to delete the station appears.
Touch [Ye s ]. The station will be deleted.
To cancel, touch [No].
, the station will be deleted.
Add station
1 Touch the following key.
Displays the selection screen.
2 Touch [Track] (from track) or [Artist]
(from artist).
A new station is created.
# To cancel adding a new station, touch
[Cancel].
®
Operating with the buttons
Touch the TRK button
You can skip songs forward.
66
En
Page 67

Using a Bluetooth audio player
Chapter
13
You can control a Bluetooth audio player.
p Before using the Bluetooth audio player,
you must register and connect the device
to this product.
= For details, refer to Registering your
Bluetooth devices on page 16.
p Operations may vary depending on the
Bluetooth audio player.
p Depending on the Bluetooth audio player
connected to this product, the available operations with this product may be limited to
the following two levels:
— A2DP (Advanced Audio Distribution
Profile): Only playing back songs on
your audio player is possible.
— A2DP and AVRCP (Audio/Video Remote
Control Profile): Playing back, pausing,
selecting songs, etc., are possible.
p Since a number of Bluetooth audio players
are available on the market, operations
with your Bluetooth audio player using this
product vary considerably in range. Please
refer to the instruction manual that came
with your Bluetooth audio player as well as
this manual while operating your player on
this product.
p While you are listening to songs on your
Bluetooth audio player, please refrain from
operating your cellular phone as much as
possible. If you try operating your cellular
phone, the signal may cause noise for song
playback.
p Even if you switch to another source while
listening to a song on your Bluetooth audio
player, song playback may continues.
p Depending on the Bluetooth audio player
you connected to this product, operations
on this product to control the player may
differ from those explained in this manual.
p When you are talking on a cellular phone
connected to this product via Bluetooth
wireless technology, song playback from
your Bluetooth audio player connected to
this product may be paused.
p This function is not available when Apple
CarPlay is on.
Using the touch panel keys
Playback screen (page 1)
13
87
Playback screen (page 2)
1 Displays the source list.
2
79abc
Using a Bluetooth audio player
4
5
6
= For details, refer to Selecting a front
source on the source list on page 12.
2 Displays the Time and date setting
screen.
= For details, refer to Setting the time and
date on page 103.
3 Displays the Setting menu screen.
4 Recalls equalizer curves.
= For details, refer to Using the equalizer
on page 92.
5 Selects a file from the list.
= For details, refer to Selecting files from
the file name list on page 69.
6 Displays the Phone menu screen.
= For details, refer to Displaying the phone
menu on page 21.
7 Switches to the next or previous page of
touch panel keys.
8 Skips files forward or backward.
9 Uses “Sound Retriever” function.
= For details, refer to Setting the “Sound
Retriever” function on page 104.
En
67
Page 68

Chapter
13
Using a Bluetooth audio player
a Plays files in random order.
= For details, refer to Playing files in ran-
dom order on page 69.
b Sets a repeat play range.
= For details, refer to Setting a repeat play
range on page 69.
c Switches between playback and pause.
Reading the screen
1
4
23
1 Current time and date
2 File number indicator
Shows the file number currently playing
(when available).
3 Play time indicator
Shows the elapsed playing time within the
current file (when available).
4 Current file information
If the connected Bluetooth audio player features AVRCP 1.3, the following file information
will be displayed.
! Track title
Shows the title of the track currently
playing (when available).
!
: Artist name
Shows the name of the artist for the
track currently playing (when available).
!
: Album title
Shows the title of the album of the current file (when available).
!
: Genre
Shows the genre of the current file
(when available).
p In the following cases, file information
will only be displayed after a file starts
or resumes playing:
— You connect a Bluetooth audio player
compatible with AVRCP1.3, and operate the player to start playing.
— You select another file when play-
back is paused.
Starting procedure
1 Pull out the connecting cable for using
AppRadio Mode.
p You cannot use Bluetooth audio player
when the connecting cable for using
AppRadio Mode is connected.
p You cannot use Bluetooth audio player
when Apple CarPlay is on.
2 Touch the HOME button to display the
Top menu screen.
3 Touch the following keys in the following order.
The “System” screen appears.
4 Touch [AV Source Settings].
5 Confirm that “Bluetooth Audio” is
turned on.
p The default setting is “On”.
6 Display the AV source selection screen.
= For details of the operations, refer to Dis-
playing the AV operation screen on page 12.
7 Touch [Bluetooth Audio] on the AV
source selection screen.
The “Bluetooth Audio” screen appears.
8 Use the touch panel keys on the screen
to control the Bluetooth audio player.
= For details, refer to Using the touch panel
keys on page 67.
68
En
Page 69

Using a Bluetooth audio player
Chapter
13
Selecting files from the file
name list
The file name list lets you see the list of track
titles for the Bluetooth audio player and lets
you select one of them to play back.
p This function is only available when the
connected Bluetooth audio player supports
AVRCP 1.4.
1 Touch the following key.
Displays the file name list.
2 Touch a file on the list to play back.
p Touching a folder on the list shows its con-
tents. You can play a file on the list by
touching it.
Playing files in random order
All of the files within the repeat play range can
be played at random by only touching a single
key.
p This function is only available when the
connected Bluetooth audio player supports
AVRCP 1.3.
% Touch the following key repeatedly
until the desired setting appears.
Changes the repeat play range between the current file and all audio
files in the Bluetooth audio player.
Operating with the buttons
Touch the TRK button
You can skip files forward or backward.
Touch and hold the TRK button
You can perform fast reverse or fast forward.
Using a Bluetooth audio player
% Touch the following key repeatedly
until the desired setting appears.
Turns random play on or off.
Setting a repeat play range
The repeat play range can be changed by only
touching a single key.
p This function is only available when the
connected Bluetooth audio player supports
AVRCP 1.3.
En
69
Page 70

Chapter
14
Using an HDMI source
You can display the video image output by the
device connected to this product. This section
describes operations for an HDMI source.
p A High Speed HDMI
®
Cable (sold separately) is required for connection.
= For details of the connection method,
refer to the Installation Manual.
CAUTION
For safety reasons, video images cannot be
viewed while your vehicle is in motion. To view
video images, you must stop in a safe place and
apply the parking brake.
Using the touch panel keys
132
4
5
6
7
1 Displays the source list.
= For details, refer to Selecting a front
source on the source list on page 12.
2 Displays the Time and date setting
screen.
= For details, refer to Setting the time and
date on page 103.
3 Displays the Setting menu screen.
4 Recalls equalizer curves.
= For details, refer to Using the equalizer
on page 92.
5 Hides the touch panel keys.
Touching this area hides the touch panel keys.
p Touch anywhere on the LCD screen to
display the touch panel keys again.
6 Displays the Phone menu screen.
= For details, refer to Displaying the phone
menu on page 21.
7 Changes the wide screen mode.
= For details, refer to Changing the wide
screen mode on page 104.
Reading the screen
1
1 Current time and date
Starting procedure
1 Display the AV source selection screen.
= For details of the operations, refer to Dis-
playing the AV operation screen on page 12.
2 Touch [HDMI] on the AV source selection screen.
The image is displayed on the screen.
3 Use the touch panel keys on the screen
to control the external unit.
= For details, refer to Using the touch panel
keys on page 70.
70
En
Page 71

Using an AUX source
Chapter
15
You can display the video image output by the
device connected to this product. This section
describes operations for an AUX source.
p A Mini-jack AV cable (CD-RM10) (sold sepa-
rately) is required for connection.
= For details of the connection method,
refer to the Installation Manual.
CAUTION
For safety reasons, video images cannot be
viewed while your vehicle is in motion. To view
video images, you must stop in a safe place and
apply the parking brake.
Using the touch panel keys
132
4
5
6
8
7
1 Displays the source list.
= For details, refer to Selecting a front
source on the source list on page 12.
2 Displays the Time and date setting
screen.
= For details, refer to Setting the time and
date on page 103.
3 Displays the Setting menu screen.
4 Recalls equalizer curves.
= For details, refer to Using the equalizer
on page 92.
5 Hides the touch panel keys.
Touching this area hides the touch panel keys.
p Touch anywhere on the LCD screen to
display the touch panel keys again.
6 Displays the Phone menu screen.
= For details, refer to Displaying the phone
menu on page 21.
7 Switches the operation screen.
= For details, refer to Switching the opera-
tion screen on page 72.
8 Changes the wide screen mode.
= For details, refer to Changing the wide
screen mode on page 104.
Reading the screen
1
1 Current time and date
Starting procedure
1 Touch the HOME button to display the
Top menu screen.
2 Touch the following keys in the following order.
The “System” screen appears.
3 Touch [Input/Output Settings].
4 Confirm that “AUX Input” is turned on.
p The default setting is “On”.
5 Display the AV source selection screen.
= For details of the operations, refer to Dis-
playing the AV operation screen on page 12.
6 Touch [AUX] on the AV source selection
screen.
The image is displayed on the screen.
Using an AUX source
En
71
Page 72

Chapter
15
Using an AUX source
7 Use the touch panel keys on the screen
to control the external unit.
= For details, refer to Using the touch panel
keys on page 71.
Setting the video signal
When you connect this product to an AUX
equipment, select the suitable video signal
setting.
p You can operate this function only for the
video signal input into the AUX input.
1 Touch the HOME button to display the
Top menu screen.
2 Touch the following keys in the following order.
The “Video Setup” screen appears.
3 Touch [Video Signal Setting].
4 Touch [AUX].
The pop-up menu appears.
Switching the operation
screen
You can switch between the screen to operate
music files and that to operate video files.
p This touch panel key is only available when
there are both audio and video files on the
auxiliary equipment.
% Touch the following key.
Switches between the screen to
operate video files and that to operate music files.
5 Touch the item you want to set.
! Auto (default):
Adjusts the video signal setting automatically.
! PAL:
Sets the video signal to PAL.
! NTSC:
Sets the video signal to NTSC.
! PAL-M:
Sets the video signal to PAL-M.
! PAL-N:
Sets the video signal to PAL-N.
! SECAM:
Sets the video signal to SECAM.
72
En
Page 73

Using AV input
Chapter
16
You can display the video image output by the
device connected to this product.
= For details of the connection method, refer
to the Installation Manual.
CAUTION
For safety reasons, video images cannot be
viewed while your vehicle is in motion. To view
video images, you must stop in a safe place and
apply the parking brake.
Using the touch panel keys
132
4
5
6
7
1 Displays the source list.
= For details, refer to Selecting a front
source on the source list on page 12.
2 Displays the Time and date setting
screen.
= For details, refer to Setting the time and
date on page 103.
3 Displays the Setting menu screen.
4 Recalls equalizer curves.
= For details, refer to Using the equalizer
on page 92.
5 Hides the touch panel keys.
Touching this area hides the touch panel keys.
p Touch anywhere on the LCD screen to
display the touch panel keys again.
6 Displays the Phone menu screen.
= For details, refer to Displaying the phone
menu on page 21.
7 Changes the wide screen mode.
= For details, refer to Changing the wide
screen mode on page 104.
Reading the screen
1
Using AV input
1 Current time and date
Starting procedure
1 Touch the HOME button to display the
Top menu screen.
2 Touch the following keys in the following order.
The “System” screen appears.
3 Touch [Input/Output Settings].
4 Touch [AV Input].
The pop-up menu appears.
5 Touch [On].
The video image output by the connected external device can be displayed.
6 Display the AV source selection screen.
= For details of the operations, refer to Dis-
playing the AV operation screen on page 12.
7 Touch [AV] on the AV source selection
screen.
The image is displayed on the screen.
8 Use the touch panel keys on the screen
to control the external unit.
= For details, refer to Using the touch panel
keys on page 73.
En
73
Page 74

Chapter
16
Using AV input
Setting the video signal
When you connect this product to an AV
equipment, select the suitable video signal
setting.
p You can operate this function only for the
video signal input into the AV input.
1 Touch the HOME button to display the
Top menu screen.
2 Touch the following keys in the following order.
The “Video Setup” screen appears.
3 Touch [Video Signal Setting].
4 Touch [AV].
The pop-up menu appears.
5 Touch the item you want to set.
! Auto (default):
Adjusts the video signal setting automatically.
! PAL:
Sets the video signal to PAL.
! NTSC:
Sets the video signal to NTSC.
! PAL-M:
Sets the video signal to PAL-M.
! PAL-N:
Sets the video signal to PAL-N.
! SECAM:
Sets the video signal to SECAM.
74
En
Page 75

Using MIXTRAX
Chapter
17
MIXTRAX is original technology for creating
non-stop mixes of selections from your audio
library, complete with DJ effects that make
them sound as if a DJ is right there with you
playing the music.
p You can turn MIXTRAX on by touching
[MIXTRAX] on the playback screen of compressed audio files.
= For details, refer to Using the touch
panel keys on page 36.
Touch panel keys
1
b
9
a8 8
1 Exits the MIXTRAX screen.
2 Displays the LinkGate screen.
Touch the desired item. Songs related to the
selected item are played.
3 Specifies the BPM.
The original BPM is not displayed during playback.
4 Displays the item selection screen.
= For details of the operations, refer to Se-
lecting an item to play songs on page 75.
5 Displays the playback list screen.
= For details of the operations, refer to Se-
lecting songs not to be played on page
75.
6 Sets to the original BPM (Beats Per Minute).
7 Specifies the playback portion.
= For details of the operations, refer to
Specifying the playback portion on page
76.
8 Touch to select a track.
Touch and hold to fast forward or rewind.
2
7
9 Turns on or off the MIXTRAX original visual
display.
a Pauses and starts playback.
b Displays the item selected on the LinkGate
screen or item selection screen.
Selecting an item to play
songs
You can specify an item to play songs related
to it.
1 Touch the following key.
Displays the item selection screen.
3
4
2 Touch the following keys to select the
5
item.
6
Displays the MIX pattern list.
Displays the tag list.
Displays the file list.
3 Select an item in the list.
Songs related to the selected item are
played.
Selecting songs not to be
played
You can select items or songs not to be
played.
Using MIXTRAX
En
75
Page 76

Chapter
17
Using MIXTRAX
1 Touch the following key.
Displays the playback list screen.
2 Touch the following key.
Displays the “Playback not allowed” screen.
3 Touch [Songs], [Artists] or [Albums].
4 Touch the box on the left of the item or
song that you do not want to play.
An icon is displayed. Items displayed with the
icon will not be played.
# If you touch [Unselect All], all the selections
are canceled.
# If you touch [Select All], all the items are
selected.
Specifying the playback
portion
You can specify the playback portion.
% Touch the following key repeatedly
until the desired setting appears.
Changes the playback portion.
! (default):
Plays back a middle portion.
:
!
Plays back a long portion.
:
!
Plays back a short portion.
p The most suitable sound effect is automati-
cally applied when switching to the next
song.
Setting the flash pattern
The flashing color changes with the changes
in the sound and bass levels.
1 Touch the HOME button to display the
Top menu screen.
2 Touch the following keys in the following order.
The “System” screen appears.
3 Touch [AV Source Settings].
4 Touch [MIXTRAX Settings].
5 Touch [Flash Pattern].
The pop-up menu appears.
6 Touch the item you want to set.
! Sound1 (default) to Sound6:
The flash pattern changes according to the
sound level. Select a desired mode.
! L-Pass1 to L-Pass6:
The flash pattern changes according to the
bass level. Select a desired mode.
! Random1:
The flash pattern changes randomly according to the sound level mode and low
pass mode.
! Random2:
The flash pattern changes randomly according to the sound level mode.
! Random3:
The flash pattern changes randomly according to the low pass mode.
! Off:
The flash pattern does not flash.
76
En
Page 77

System settings
Chapter
18
Activating the Bluetooth
audio source
You need to activate the Bluetooth audio
source in order to use a Bluetooth audio
player.
1 Touch the HOME button to display the
Top menu screen.
2 Touch the following keys in the following order.
The “System” screen appears.
3 Touch [AV Source Settings].
4 Touch [Bluetooth Audio] repeatedly
until the desired setting appears.
! On (default):
Activates the Bluetooth audio source.
! Off:
Deactivates the Bluetooth audio source.
Setting the ever scroll
When “Ever Scroll” is set to “On”, recorded
text information scrolls continuously in the
display. Set to “Off” if you prefer the information to scroll just once.
1 Touch the HOME button to display the
Top menu screen.
2 Touch the following keys in the following order.
The “System” screen appears.
3 Touch [Ever Scroll] repeatedly until the
desired setting appears.
! Off (default):
Turns the ever scroll setting off.
! On:
Turns the ever scroll setting on.
Setting AV input
You can use external video equipment such as
portable players connected to this product
with this setting.
1 Touch the HOME button to display the
Top menu screen.
2 Touch the following keys in the following order.
The “System” screen appears.
3 Touch [Input/Output Settings].
4 Touch [AV Input].
The pop-up menu appears.
! Off (default):
Deactivates the AV source.
! On:
Displays the video image output by the connected external device.
Setting the rear view camera
The following two functions are available. A separately sold rear view camera (e.g. ND-BC6)
is required for utilizing the rear view camera
function. (For details, consult your dealer.)
Rear view camera
This product features a function that automatically switches to the full-screen image of the
rear view camera installed on your vehicle.
When the shift lever is in the REVERSE (R) position, the screen automatically switches to
full-screen rear view camera image.
System settings
En
77
Page 78

Chapter
18
System settings
p If the shift lever is aligned to the REVERSE
(R) position immediately after the system of
this product is started up, only the camera
image will be displayed and the parking assist guidelines and the message, “The
video may appear reversed” will not be
displayed. The parking assist guidelines
and the message will be displayed on the
camera image after a little while. Be sure to
check the conditions around the vehicle
even before the guidelines and the message are displayed.
Camera for Camera View mode
Camera View can be displayed at all times
(e.g. when monitoring an attached trailer,
etc.). Please note that with this setting, the
camera image is not resized to fit, and that a
portion of what is seen by the camera is not
viewable.
CAUTION
Pioneer recommends the use of a camera which
outputs mirror reversed images, otherwise the
screen image may appear reversed.
p Immediately verify whether the display
changes to a rear view camera image when
the shift lever is moved to REVERSE (R)
from another position.
p When the screen changes to full-screen
rear view camera image during normal
driving, switch to the opposite setting in
“Camera Polarity”.
Setting rear view camera
activation
1 Touch the HOME button to display the
Top menu screen.
2 Touch the following keys in the following order.
The “System” screen appears.
3 Touch [Camera settings].
4 Touch [Back Camera Input] repeatedly
until the desired setting appears.
! Off (default):
Turns the back camera input setting off.
! On:
Turns the back camera input setting on.
Setting the polarity of the rear
view camera
p This function is available when “Back Cam-
era Input” is “On”.
= For details, refer to Setting rear view camera
activation on page 78.
1 Touch the HOME button to display the
Top menu screen.
2 Touch the following keys in the following order.
The “System” screen appears.
3 Touch [Camera settings].
4 Touch [Camera Polarity] repeatedly
until the desired setting appears.
! Battery (default):
When the polarity of the connected lead is
positive while the shift lever is in the REVERSE (R) position.
! Ground:
When the polarity of the connected lead is
negative while the shift lever is in the REVERSE (R) position.
When the shift lever is moved to the REVERSE
(R) position after setting the rear view camera,
the rear view image appears.
78
En
Page 79

System settings
Chapter
18
Setting the camera for
Camera View mode
To display Camera View at all times, “Camera
View” needs to be set to “On”.
p To set the rear view camera for Camera
View mode, “Back Camera Input” needs
to be set to “On”.
= For details, refer to Setting rear view camera
activation on page 78.
1 Touch the HOME button to display the
Top menu screen.
2 Touch the following keys in the following order.
The “System” screen appears.
3 Touch [Camera settings].
4 Touch [Camera View] repeatedly until
the desired setting appears.
! Off (default):
Turns the camera view setting off.
! On:
Turns the camera view setting on.
If no operations are performed for seven seconds after the AV operation screen is displayed, the camera view will appear
automatically.
p If you touch the screen while the camera
view is displayed, the displayed image will
turn off temporarily.
Displaying the parking
assist guidelines
1 Touch the HOME button to display the
Top menu screen.
2 Touch the following keys in the following order.
The “System” screen appears.
3 Touch [Camera settings].
4 Touch [Parking Assist Guide] repeatedly
until the desired setting appears.
! Off (default):
Hides the guidelines.
! On:
Displays the guidelines.
When the shift lever is moved to the REVERSE
(R) position after setting the rear view camera,
the rear view image appears.
Setting guidelines on the
rear view image
CAUTION
! When adjusting the guidelines, be sure to
park the vehicle in a safe place and apply the
parking brake.
! Before getting out of the car to place the
markings, be sure to turn the ignition switch
off (ACC OFF).
! The range projected by the rear view camera
is limited. Also, the vehicle width and distance
guidelines displayed on the rear view camera
image may differ from the actual vehicle
width and distance. (The guidelines are
straight lines.)
! The image quality may deteriorate depending
on the usage environment, such as at night or
in dark surroundings.
1 Park your vehicle in a safe place and
apply the parking brake.
System settings
En
79
Page 80

Chapter
18
System settings
2 Using packing tape or similar, place
markings approximately 25 cm from each
side of the vehicle, and approximately
50 cm and 2m from the rear bumper.
2 m (6 ft. 7 in.)
50 cm (1 ft. 8 in.)
25 cm
Markings
Markings
Rear bumper
(9-7/8 in.)
25 cm
(9-7/8 in.)
3 Touch the HOME button to display the
Top menu screen.
4 Touch the following keys in the following order.
The “System” screen appears.
5 Touch [Camera settings].
6 Touch [Parking Assist Guide Adjust].
Extends the line to the left and right
from the current center point of the distance guideline. The adjustment points
on the lateral coordinates at both ends
will also move.
Shortens the line from the left and right
to the current center point of the distance guideline. The adjustment points
on the lateral coordinates at both ends
will also move.
Default
Resets the settings of the distance and
vehicle width guidelines and adjustment points to the default.
p When a point is moved, the distance from
the initial value is displayed at the bottom
of the screen.
Turning off the demo screen
If the demo screen appears, perform the following procedure to turn off the demo screen.
1 Touch the HOME button to display the
Top menu screen.
2 Touch the following keys in the following order.
7 Set the guidelines by dragging the four
points.
8 Touch the following keys to adjust the
position of the point if necessary.
Moves the point to the left.
Moves the point to the right.
Moves the point upward.
Moves the point downward.
80
En
The “System” screen appears.
3 Touch [Demo Mode] repeatedly until
the desired setting appears.
! On (default):
Displays the demo screen.
! Off:
Hides the demo screen.
Selecting the system language
The system language can be selected.
! The language can be changed for the fol-
lowing:
— The “Audio” screen
Page 81

System settings
Chapter
18
— The “System” screen
— The “Video Setup” screen
— The “Bluetooth” screen
— Language for messages
Some operations on this product are
prohibited from use while driving or require careful attention when operated.
In such cases, a caution message will
appear on the display. You can change
the language for caution messages with
this setting.
! If the embedded language and the selected
language setting are not the same, text information may not display properly.
! Some characters may not be displayed
properly.
1 Touch the HOME button to display the
Top menu screen.
2 Touch the following keys in the following order.
The “System” screen appears.
3 Touch [System Language].
The pop-up menu appears.
4 Touch the desired language.
After the language is selected, the previous
screen returns.
2 Touch the following keys in the following order.
The “System” screen appears.
3 Touch [Keyboard].
The pop-up menu appears.
4 Touch the desired language.
After the language is selected, the previous
screen returns.
Setting the beep sound
1 Touch the HOME button to display the
Top menu screen.
2 Touch the following keys in the following order.
The “System” screen appears.
3 Touch [Beep Tone] repeatedly until the
desired setting appears.
! On (default):
Sounds a beep.
! Off:
Does not sound a beep.
System settings
Setting the keyboard
language with the
application for iPhone
You can use the keyboard in AppRadio Mode
by setting the language of the keyboard for
iPhone.
p This function is only available in AppRadio
Mode on the iPhone.
1 Touch the HOME button to display the
Top menu screen.
Adjusting the picture
You can adjust the picture for each source and
rear view camera.
En
81
Page 82

Chapter
18
System settings
CAUTION
For safety reasons, you cannot use some of these
functions while your vehicle is in motion. To enable these functions, you must stop in a safe
place and apply the parking brake. Refer to Important Information for the User (a separate manual).
1 Display the screen you wish to adjust.
2 Touch the HOME button to display the
Top menu screen.
3 Touch the following keys in the following order.
The “System” screen appears.
4 Touch [Picture Adjustment].
5 Touch any of the following keys to select the function to be adjusted.
Picture adjustment items are displayed.
! Brightness:
Adjusts the black intensity.
! Contrast:
Adjusts the contrast.
! Color:
Adjusts the color saturation.
! Hue:
Adjusts the tone of color (which color is emphasized, red or green).
! Dimmer:
Adjusts the brightness of the display.
! Temperature:
Adjusts the color temperature, resulting in
a better white balance.
p You can adjust Hue only when the color
system is set to NTSC.
# If you touch [Rear View], the mode changes
to the rear view camera mode. By touching
[Source]or[Apps], you can return to the selected
mode.
6 Touch the following keys to adjust the
selected item.
Decreases the level of the selected
item.
Increases the level of the selected item.
Selects the adjustable previous item.
Selects the adjustable next item.
Each time you touch the key, the level of the
selected item increases or decreases.
p “Brightness”, “Contrast”, “Color” and
“Hue” can be adjusted from “-24” to “+24”.
p “Dimmer” can be adjusted from “+1” to
“+48”.
p “Temperature” can be adjusted from “+3”
to “-3”.
p The adjustments of “Brightness” and “Con-
trast” are stored separately when your vehi-
cle’s headlights are off (daytime) and when
your vehicle’s headlights are on (nighttime).
These are switched automatically depending on whether the vehicle’s headlights are
on or off.
p The adjustment of “Dimmer” is stored se-
parately when your vehicle’s headlights are
off (daytime) and when your vehicle’s headlights are on (nighttime). “Dimmer” is
switched automatically only when the value
of nighttime is lower than that of daytime.
p The picture adjustment may not be avail-
able with some rear view cameras.
p The setting contents can be memorized se-
parately for the following screens and video
images.
— AV and external camera
— USB (Video), USB (JPEG) and
MirrorLink
— HDMI and AppRadio Mode (HDMI)
— MIXTRAX, images output from the exter-
nal device
82
En
Page 83

System settings
Chapter
18
Displaying the firmware
version
1 Touch the HOME button to display the
Top menu screen.
2 Touch the following keys in the following order.
The “System” screen appears.
3 Touch [System Information].
4 Touch [Firmware Information].
The “Firmware Information” screen appears.
Updating firmware
CAUTION
! The only USB port that supports the firmware
update is USB port 1.
! Never turn this product off or disconnect the
USB storage device while the firmware is
being updated.
! You can only update the firmware when the ve-
hicle is stopped and the parking brake is engaged.
1 Download the firmware update files.
2 Connect a USB storage device to your
computer, and then locate the correct update file and copy it onto the USB storage
device.
5 Touch the following keys in the following order.
The “System” screen appears.
6 Touch [System Information].
7 Touch [Firmware Update].
The “Firmware Update” screen appears.
8 Touch [Continue] to display the data
transfer mode.
p Follow the on-screen instructions to finish
updating the firmware.
p This product will reset automatically after
the firmware update is completed if the update is successful.
p When the firmware update starts, the
source is turned off and the Bluetooth connection is disconnected.
p If an error message appears on the screen,
touch [Continue] to proceed and start the
recovery sequence.
Checking the connections
of leads
Check that the leads are properly connected
between this product and vehicle.
1 Touch the HOME button to display the
Top menu screen.
2 Touch the following keys in the following order.
System settings
3 Turn the source off.
= For details, refer to Turning off the AV source
on page 13.
4 Touch the HOME button to display the
Top menu screen.
The “System” screen appears.
3 Touch [System Information].
4 Touch [Connection Status].
The “Connection Status” screen appears.
En
83
Page 84

Chapter
18
System settings
! GPS Antenna
Indicates the connection status of the GPS
antenna, the reception sensitivity, and from
how many satellites the signal is received.
Color
Orange Yes Yes
Yellow Yes No
Signal communication
Used in positioning
p When the GPS antenna is connected to
this product, “OK” is displayed. When
the GPS antenna is not connected to
this product, “NOK” is displayed.
p If reception is poor, please change the
installation position of the GPS antenna.
! Positioning Status
Displays the positioning status (3D positioning, 2D positioning, or no positioning),
the number of satellites used for positioning (orange), and the number of satellites
whose signal has been received (yellow). If
signals from more than three satellites are
received, the current location can be measured.
= For details, refer to Positioning technol-
ogy on page 115.
! Illumination
When the headlights or small lamps of the
vehicle are on, “ON” is displayed. When the
small lamps of the vehicle are off, “OFF” is
displayed. (If the orange/white lead is not
connected, “OFF” appears.)
! Back Signal
When the shift lever is shifted to “R”, the
signal switches to “High” or “Low”. (One of
these is displayed depending on the
vehicle.)
84
En
Page 85

Audio adjustments
Chapter
19
Using fader/balance
adjustment
You can select a fader/balance setting that
provides an ideal listening environment in all
occupied seats.
p This function is available when “Rear
Speaker” is set to “On”.
1 Touch the HOME button to display the
Top menu screen.
2 Touch the following keys in the following order.
The “Audio” screen appears.
3 Touch [Fader/Balance].
The “Fader/Balance” screen appears.
4 Touch the following keys to adjust the
front/rear speaker balance.
Moves towards the front.
Moves towards the rear.
Each time you touch the keys, the front/rear
speaker balance moves towards the front or
rear.
p “Front25” to “Rear25” is displayed as the
front/rear speaker balance moves from the
front to rear.
p The default setting is “F/R 0 L/R 0”.
p Set “Front” and “Rear” to “0” when using a
dual speaker system.
5 Touch the following keys to adjust the
left/right speaker balance.
Moves towards the left.
Moves towards the right.
Each time you touch the keys, the left/right
speaker balance moves towards the left or
right.
p “Left25” to “Right25” is displayed as the
left/right speaker balance moves from the
left to right.
p The default setting is “L/R 0”.
p You can also set the fader/balance by drag-
ging the point on the displayed table.
Using balance adjustment
You can adjust the balance between right/left
sound output.
p This function is available when “Rear
Speaker” is set to “Off”.
1 Touch the HOME button to display the
Top menu screen.
2 Touch the following keys in the following order.
The “Audio” screen appears.
3 Touch [Balance].
The “Fader/Balance” screen appears.
4 Touch the following keys to adjust the
left/right speaker balance.
Audio adjustments
Moves towards the left.
Moves towards the right.
En
85
Page 86

Chapter
19
Audio adjustments
Each time you touch the keys, the left/right
speaker balance moves towards the left or
right.
p “Left25” to “Right25” is displayed as the
left/right speaker balance moves from the
left to right.
p The default setting is “L/R 0”.
p You can also set the fader/balance by drag-
ging the point on the displayed table.
Switching sound muting/
attenuation
The AV source volume and the iPhone application volume can be automatically muted or attenuated when guidance voice is output from
the connected external device.
1 Touch the HOME button to display the
Top menu screen.
2 Touch the following keys in the following order.
The “Audio” screen appears.
3 Touch [Mute Level].
The pop-up menu appears.
4 Touch the item you want to set.
! ATT (default):
The volume becomes 1/10.
! Mute:
The volume becomes 0.
! Off:
The volume does not change.
p Settings are based on the FM tuner volume
level, which remains unchanged.
p This function is not available when the FM
tuner is selected as the AV source.
1 Compare the FM tuner volume level
with the level of the source you want to
adjust.
2 Touch the HOME button to display the
Top menu screen.
3 Touch the following keys in the following order.
The “Audio” screen appears.
4 Touch [Source Level Adjuster].
The “Source Level Adjuster” screen appears.
5 Touch the following keys to adjust the
source volume.
Increases the source volume.
Decreases the source volume.
p If you directly touch the area where the cur-
sor can be moved, the SLA setting will be
changed to the value of the touched point.
p “+4” to “–4” is displayed as the source vo-
lume is increased or decreased.
p The default setting is “0”.
Adjusting source levels
The SLA (source level adjustment) function adjusts the volume level of each source to prevent radical changes in volume when
switching between sources.
86
En
Page 87

Audio adjustments
The following AV sources are set to the same source level adjustment volume automatically.
Chapter
19
Required cable
(sold sepa-
rately)
CD-IU201V iPhone/iPod USB —
iPod / iPhone
with a 30-pin
connector
iPod / iPhone
with a Lightning
connector
Android device CD-AH200 Others HDMI —
(*1) Excludes the phone volume.
CD-IU201S iPhone/iPod USB —
! CD-IH202
! CD-IU52
! Lightning Di-
gital AV
Adapter
CD-IU52 iPhone/iPod USB On
Device Connection Apple CarPlay
iPhone/iPod
p When a USB storage device is connected to
USB port 1 or USB port 2, the source level
adjustment volume is automatically set to
the same level as the USB port to which the
Smartphone Setup
Digital AV
adapter
p When a MirrorLink device is connected to
USB port 2, the source level adjustment volume is automatically set to the same level
as USB port 2.
device is connected. The source level adjustment volume that is automatically set
varies depending on whether the device is
connected to USB port 1 or USB port 2.
p When an iPod / iPhone with a Lightning
connector is connected to USB port 1 or
USB port 2 using a USB interface cable for
iPod / iPhone (CD-IU52) (sold separately),
the source level adjustment volume is automatically set to the same level as the USB
port to which the iPod / iPhone with a Lightning connector is connected. The source
level adjustment volume that is automatically set varies depending on whether the
iPod / iPhone with a Lightning connector is
connected to USB port 1 or USB port 2.
AV sources
USB1
iPod1
Pandora
USB1
Pandora
iPod1
AppRadio
Mode
AppRadio
—
Mode
HDMI
Pandora
iPod1
Apple CarPlay
(*1)
AppRadio
Mode
HDMI
Pandora
Audio adjustments
En
87
Page 88

34
Chapter
19
Audio adjustments
Adjusting the filter
The following adjustments can be made during filter adjustments. Make the appropriate
adjustments for the reproduced frequency
band and characteristics of the connected
speaker unit.
1
Level (dB)
0
5
20 1 k
100
1 Reproduced frequency band
2 Slope adjustment
3 Cut-off frequency of the LPF
4 Cut-off frequency of the HPF
5 Level adjustment
Adjusting the front and rear
speaker output
You can set the frequency range for the sound
output from the front and rear speakers.
1 Touch the HOME button to display the
Top menu screen.
2 Touch the following keys in the following order.
2
10 k
Frequency (Hz)
5 Touch the following keys to select
“Front” or “Rear”.
Selects the adjustable previous speaker.
Selects the adjustable next speaker.
6 Touch [HPF] to turn on.
7 Drag the line graph horizontally to adjust the range of cut-off frequency from
“50” Hz to “200” Hz.
p The default setting is “100” Hz.
8 Drag the tip of the slope to adjust the
range of level between “–6” dB/oct and “
–18” dB/oct.
p The default setting is “–12” dB/oct.
Using the subwoofer output
This product is equipped with a subwoofer output mechanism, which can be turned on or
off.
1 Touch the HOME button to display the
Top menu screen.
2 Touch the following keys in the following order.
The “Audio” screen appears.
3 Confirm that “Rear Speaker” is set to
“On”.
p The default setting is “On”.
4 Touch [Crossover].
The “Cutoff” screen appears.
88
En
The “Audio” screen appears.
3 Touch [Subwoofer] to set the subwoofer output “On”.
p The default setting is “Off”.
4 Touch [Subwoofer Settings].
The “Cutoff” screen appears.
Page 89

Audio adjustments
Chapter
19
5 Touch the following keys to select
“Subwoofer”.
Selects the adjustable previous speaker.
Selects the adjustable next speaker.
6 Touch [LPF] to turn on.
7 Touch the following keys to select the
phase of subwoofer output.
Sets the phase of subwoofer output to
normal.
Sets the phase of subwoofer output to
reverse.
8 Drag the line graph horizontally to adjust the range of cut-off frequency from
“50” Hz to “200” Hz.
p The default setting is “100” Hz.
9 Drag the tip of the slope to adjust the
range of level between “–6” dB/oct and “
–18” dB/oct.
p The default setting is “–18” dB/oct.
Selecting the listening
position
You can select a listening position that you
want to make as the center of sound effects.
1 Touch the HOME button to display the
Top menu screen.
2 Touch the following keys in the following order.
3 Touch [Listening Position].
The “Listening Position” screen appears.
4 Touch the desired position.
! Off (default):
Changes the listening position setting to
off.
! Front:
Changes the listening position setting to
front.
! Front-L:
Changes the listening position setting to
front left.
! Front-R:
Changes the listening position setting to
front right.
! All:
Changes the listening position setting to
all.
Adjusting the speaker
output levels finely
Fine adjustments of the speaker output level
can be made by listening to audio output.
p This function is available when “Rear
Speaker” is set to “On”.
= For details, refer to Adjusting the front
and rear speaker output on page 88.
p This function is available when “Subwoo-
fer” is set to “On”.
= For details, refer to Using the subwoofer
output on page 88.
1 Touch the HOME button to display the
Top menu screen.
2 Touch the following keys in the following order.
Audio adjustments
The “Audio” screen appears.
The “Audio” screen appears.
3 Touch [Speaker Level].
The “Speaker Level” screen appears.
En
89
Page 90

Chapter
19
Audio adjustments
4 Touch the following keys to select the
listening position if necessary.
Selects the listening position.
! Off:
Changes the listening position setting to
off.
! Front Left:
Changes the listening position setting to
front left.
! Front Right:
Changes the listening position setting to
front right.
! Front:
Changes the listening position setting to
front.
! All:
Changes the listening position setting to
all.
p If you change the listening position setting,
the output levels of all the speakers will
change in conjunction with the setting.
5 Touch the following keys to adjust the
speaker output level.
Decreases the speaker level.
Increases the speaker level.
Changes the speaker level of the front right
speaker.
! Rear Left:
Changes the speaker level of the rear left
speaker.
! Rear Right:
Changes the speaker level of the rear right
speaker.
! Subwoofer:
Changes the speaker level of the subwoofer
speaker.
# If you touch [Apply Auto EQ], the result of
“A-EQ&TA Measurement” will be applied to the
speaker level setting.
p To use this function, the vehicle’s acoustics
must be measured in advance.
Adjusting the time alignment
By adjusting the distance from each speaker
to the listening position, time alignment is
able to correct the time required for sound to
reach the listening position.
p This function is available when “Rear
Speaker” is set to “On”.
= For details, refer to Adjusting the front
and rear speaker output on page 88.
p This function is available when “Subwoo-
fer” is set to “On”.
= For details, refer to Using the subwoofer
output on page 88.
p This function is available only when the lis-
tening position setting is set to “Front Left”
or “Front Right”.
= For details, refer to Selecting the listen-
ing position on page 89.
p “–24” dB to “10” dB is displayed as the dis-
tance to be corrected is increased or decreased.
! Front Left:
Changes the speaker level of the front left
speaker.
! Front Right:
90
En
1 Measure the distance between the
head of the listener and each speaker unit.
2 Touch the HOME button to display the
Top menu screen.
Page 91

Audio adjustments
Chapter
19
3 Touch the following keys in the following order.
The “Audio” screen appears.
4 Touch [Time Alignment].
The “Time Alignment” screen appears.
5 Touch the following keys to select the
listening position if necessary.
Selects the listening position.
! Off:
Changes the listening position setting to
off.
! Front Left:
Changes the listening position setting to
front left.
! Front Right:
Changes the listening position setting to
front right.
! Front:
Changes the listening position setting to
front.
! All:
Changes the listening position setting to
all.
p If you change the listening position setting,
the output levels of all the speakers will
change in conjunction with the setting.
6 Touch the following keys to input the
distance between the selected speaker and
the listening position.
Decreases the distance between the selected speaker and the selected listening position.
Increases the distance between the selected speaker and the selected listening position.
p “0.0” inch to “200.0” inch is displayed as
the distance to be corrected is increased or
decreased.
! Front Left:
Changes the distance between the front left
speaker and the selected listening position.
! Front Right:
Changes the distance between the front
right speaker and the selected listening po-
sition.
! Rear Left:
Changes the distance between the rear left
speaker and the selected listening position.
! Rear Right:
Changes the distance between the rear
right speaker and the selected listening po-
sition.
! Subwoofer:
Changes the distance between the subwoo-
fer speaker and the selected listening posi-
tion.
# If you touch [TA On], the time alignment is
turned off.
p This function is available only when the lis-
tening position setting is set to “Front Left”
or “Front Right”.
# If you touch [Apply Auto EQ], the result of
“A-EQ&TA Measurement” will be applied to the
time alignment setting.
p To use this function, the vehicle’s acoustics
must be measured in advance.
Audio adjustments
En
91
Page 92

Chapter
19
Audio adjustments
Using the equalizer
The equalizer lets you adjust equalization to
match the vehicle interior acoustic characteristics as desired.
Recalling equalizer curves
There are seven stored equalizer curves that
you can easily recall at any time. Here is a list
of the equalizer curves:
Equalizer curve
S.Bass is a cur ve in which only low-pitched sound is
boosted.
Powerful is a curve in which low- and high-pitched
sounds are boosted.
Natural is a curve in which low- and high-pitched
sounds are slightly boosted.
Vocal is a curve in which the midrange, which is the
human vocal range, is boosted.
Flat is a flat curve in which nothing is boosted.
Custom1 is an adjusted equalizer curve that you cre-
ate. If you select this curve, the effect is applied to all
AV sources.
Custom2 is an adjusted equalizer curve that you create. If you select this curve, the effect is applied to all
AV sources.
3 Touch [Graphic EQ].
The “Graphic EQ” screen appears.
4 Touch the equalizer you want.
Customizing the equalizer curves
You can adjust the currently selected equalizer
curve setting as desired. Adjustments can be
made with a 13-band graphic equalizer.
p If you make adjustments when a curve “S.
Bass”, “Powerful”, “Natural”, “Vocal”,or
“Flat” is selected, the equalizer curve settings will be changed to “Custom1” mandatorily.
p If you make adjustments when the “Cus-
tom2” curve is selected for example, the
“Custom2” curve will be updated.
p “Custom1” and “Custom2” curves can be
created common to all sources.
1 Touch the HOME button to display the
Top menu screen.
2 Touch the following keys in the following order.
p The default setting is “Powerful”.
p When “Flat” is selected, no supplement or
correction is made to the sound. This is
useful to check the effect of the equalizer
curves by switching alternatively between
“Flat” and a set equalizer curve.
1 Touch the HOME button to display the
Top menu screen.
2 Touch the following keys in the following order.
The “Audio” screen appears.
92
En
The “Audio” screen appears.
3 Touch [Graphic EQ].
The “Graphic EQ” screen appears.
4 Touch one of the keys to select a curve
that you want to use as the basis of customizing.
5 Touch the frequency for which you
want to adjust the level.
p If you trail a finger across the bars of multi-
ple equalizer bands, the equalizer curve settings will be set to the value of the touched
point on each bar.
Page 93

Audio adjustments
Chapter
19
Using the auto-adjusted equalizer
You can set the auto-adjusted equalizer to suit
the vehicle’s acoustics. To use this function,
the vehicle’s acoustics must be measured in
advance.
= For details of the operations, refer to Adjust-
ing the equalizer curve automatically (Auto
EQ) on page 93.
p To manually adjust the equalizer curve, set
“Auto EQ&TA” to “Off”.
1 Touch the HOME button to display the
Top menu screen.
2 Touch the following keys in the following order.
The “Audio” screen appears.
3 Touch [Auto EQ&TA] repeatedly until
the desired setting appears.
! Off (default):
Turns the Auto EQ&TA setting off.
! On:
Turns the Auto EQ&TA setting on.
Adjusting the equalizer curve
automatically (Auto EQ)
By measuring the vehicle’s acoustics, the
equalizer curve can be adjusted automatically
to suit the vehicle interior.
WARNING
A loud tone (noise) may be emitted from the
speakers when measuring the vehicle’s acoustics. Never perform Auto EQ measurement while
driving.
maged if this is performed under the following
conditions:
— When the speakers are incorrectly con-
nected. (For example, when a rear speaker
is connected as a subwoofer output.)
— When a speaker is connected to a power
amp delivering output higher than the
speaker’s maximum input power capability.
! If a microphone for acoustical measurement
(sold separately) is not placed in an appropriate location, the measurement tone may become loud and measurement may take a long
time, resulting in battery drainage. Be sure to
place the microphone in the specified location.
Before operating the Auto EQ
function
! Perform Auto EQ in as quiet a place as pos-
sible, with the vehicle engine and air conditioning switched off. Also, cut power to car
phones or cellular phones in the vehicle, or
remove them from the vehicle before performing Auto EQ. Sounds other than the
measurement tone (surrounding sounds,
engine sound, telephones ringing, etc.)
may prevent correct measurement of the
vehicle’s acoustics.
! Be sure to perform Auto EQ using the mi-
crophone for acoustical measurement
(sold separately). Using another microphone may prevent measurement, or result
in incorrect measurement of the vehicle’s
acoustics.
! To perform Auto EQ, the front speakers
must be connected.
! When this product is connected to a power
amp with input level control, Auto EQ may
be impossible if the power amp’s input
level is set below the standard level.
Audio adjustments
CAUTION
! Thoroughly check the conditions before per-
forming Auto EQ, as the speakers may be da-
En
93
Page 94

Chapter
19
Audio adjustments
! When this product is connected to a power
amp with an LPF (low pass filter), turn the
LPF off before performing Auto EQ. Also,
set the cut-off frequency for the built-in LPF
of an active subwoofer to the highest frequency.
! The distance has been calculated by a
computer to provide optimum delay to ensure accurate results. Do not change this
value.
— The reflected sound within the vehicle is
strong and delays occur.
— The LPF on active subwoofers or exter-
nal amps delay the lower sounds.
! If an error occurs during measurement, a
message appears and measurement is
canceled. Check the following before measuring the vehicle’s acoustics.
— Front speakers (left/right)
— Rear speakers (left/right)
— Noise
— Microphone for acoustical measure-
ment (sold separately)
— Low battery
Performing Auto EQ
p Auto EQ changes the audio settings as fol-
lows:
—“Auto EQ&TA” is set to “On”.
= For details, refer to Using the auto-ad-
justed equalizer on page 93.
— The fader/balance settings return to the
center position.
= For details, refer to Using balance ad-
justment on page 85.
— The equalizer curve switches to “Flat”.
= For details, refer to Using the equali-
zer on page 92.
— The front and rear speakers will automa-
tically be adjusted to a high pass filter
setting.
p Previous settings for Auto EQ will be over-
written.
CAUTION
Do not turn off the engine while the measurement is in progress.
1 Stop the vehicle in a quiet place, close
all the doors, windows and sun roof, and
then turn the engine off.
If the engine is left running, engine noise may
prevent correct Auto EQ.
p If driving restrictions are detected during
measurement, measurement is canceled.
2 Fix the microphone for acoustical measurement (sold separately) in the center of
the headrest of the driver’s seat, facing forward.
The Auto EQ may differ depending on where
you place the microphone. If desired, place
the microphone on the front passenger seat
and perform Auto EQ.
3 Disconnect the iPhone or smartphone
device.
4 Turn on the ignition switch (ACC ON).
If the vehicle’s air conditioner or heater is
turned on, turn it off. Noise from the fan in the
air conditioner or heater may prevent correct
Auto EQ.
5 Switch the AV source to “OFF”.
= For details of the operations, refer to Dis-
playing the AV operation screen on page 12.
6 Touch the HOME button to display the
Top menu screen.
94
En
Page 95

12
Audio adjustments
Chapter
19
7 Touch the following keys in the following order.
The “Audio” screen appears.
8 Touch [A-EQ&TA Measurement].
The “A-EQ&TA Measurement” screen appears.
9 Connect the microphone for acoustical
measurement (sold separately) with this
product.
Connect the microphone with the mini-jack extension cable, and then plug it into the auxiliary input jack on this product.
= For details of the operations, refer to the In-
stallation Manual.
12 Exit the vehicle and keep the doors
closed until the countdown finishes.
When the countdown finishes, a measurement tone (noise) is emitted from the speakers
and the Auto EQ measurement begins.
13 Wait until the measurement is completed.
When Auto EQ is completed, a message is displayed indicating that the measurement is
completed.
p If the vehicle’s acoustics cannot be mea-
sured correctly, an error message will be
displayed.
p The measurement time varies depending
on the type of vehicle.
p To stop the measurement, touch [Stop].
14 Store the microphone carefully in the
glove compartment or another safe place.
If the microphone is subjected to direct sunlight for an extended period, high temperatures may cause distortion, color change or
malfunction.
Audio adjustments
1 Mini-jack extension cable
2 Microphone for acoustical measurement
(sold separately)
10 Touch [Front Left] or [Front Right] to select the current listening position.
11 Touch [Start].
A 10-second countdown starts.
p The Bluetooth connection is disconnected
before the process starts.
En
95
Page 96

Chapter
20
Theme menu
Selecting the background
display
The background display can be selected from
8 different preset displays for the AV operation
screen and 5 different preset displays for the
Top menu screen. Furthermore, you can
change the background display to other
images imported from an external device.
1 Touch the HOME button to display the
Top menu screen.
2 Touch the following keys in the following order.
The “Theme” screen appears.
3 Touch [Background].
p You can also change the screen for settings
by touching [Illumination], [Theme]or
[Clock] on this screen.
4 Touch [Home] or [AV] to switch the
screen displays.
p The setting contents can be memorized se-
parately for the AV operation screen and the
Top menu screen.
5 Touch the item you want to set.
! Preset displays:
Selects the desired preset background display.
(custom):
!
Displays the background display image imported from the external device.
= For details, refer to Changing to the back-
ground display image stored on the USB
storage device on page 96.
(off):
!
Hides the background display.
Changing to the background
display image stored on the
USB storage device
You can change the background display
image to an image imported from the USB storage device.
p Background display image must be used
within the following formats.
— JPEG image files (.jpg or .jpeg)
— Allowable data size is 10MB or smaller
— Allowable image size is 4000 ×
4 000 pixel or smaller
CAUTION
Do not turn off the engine while importing an
image from the USB storage device.
1 Touch the HOME button to display the
Top menu screen.
2 Touch the following keys in the following order.
The “Theme” screen appears.
3 Touch [Background].
p You can also change the screen for settings
by touching [Illumination], [Theme]or
[Clock] on this screen.
4 Touch the following key.
Displays the list of the background display images stored on the USB storage
device.
5 Touch the desired external device.
6 Touch the image to use as the background display from the list.
The image is set as the background display.
96
En
Page 97

Theme menu
Chapter
20
p You can delete the imported image and re-
store the setting for the background display
to the default by touching and holding the
custom key.
Setting the illumination color
The illumination color can be selected from 5
different colors. Furthermore, the illumination
can be switched between these 5 colors in
order.
Selecting the color from the
preset colors
You can select an illumination color from the
color list.
1 Touch the HOME button to display the
Top menu screen.
2 Touch the following keys in the following order.
The “Theme” screen appears.
3 Touch [Illumination].
p You can also change the screen for settings
by touching [Theme], [Background]or
[Clock] on this screen.
p You can preview the Top menu screen or
the AV operation screen by touching
[Home]or[AV] respectively.
Creating a user-defined color
You can create a user-defined color. The created color is stored, and you can select the
color when setting the illumination color the
next time.
1 Touch the HOME button to display the
Top menu screen.
2 Touch the following keys in the following order.
The “Theme” screen appears.
3 Touch [Illumination].
p You can also change the screen for settings
by touching [Theme], [Background]or
[Clock] on this screen.
4 Touch the following key.
Displays the screen to create a user-defined color and store it to memory.
5 Touch the following keys.
Theme menu
4 Touch the color you want.
! Colored keys:
Selects the desired preset color.
(custom):
!
Displays the screen to customize the illumination color.
= For details, refer to Creating a user-de-
fined color on page 97.
(rainbow):
!
Shifts gradually between the five default
colors in sequence.
Adjusts the brightness and the level of
red, green and blue to create a favorite
color.
p You can also adjust the color tone by drag-
ging the color bar.
6 Touch and hold [Memo] to store the
customized color in the memory.
The customized color is stored in the memory.
The set color will be recalled from the memory
the next time you touch the same key.
En
97
Page 98

Chapter
20
Theme menu
Selecting the theme color
A theme color can be selected from 5 different
colors.
1 Touch the HOME button to display the
Top menu screen.
2 Touch the following keys in the following order.
The “Theme” screen appears.
3 Touch [Theme].
p You can also change the screen for settings
by touching [Illumination], [Background]
or [Clock] on this screen.
4 Touch the color you want.
p You can preview the Top menu screen or
the AV operation screen by touching
[Home]or[AV] respectively.
Selecting the clock image
The clock on the AV operation screen and the
Top menu screen can be selected from 3 different images.
1 Touch the HOME button to display the
Top menu screen.
2 Touch the following keys in the following order.
4 Touch the item you want to set.
! Preset images:
Selects the desired preset clock image.
(off):
!
Hides the clock display.
p You can preview the Top menu screen or
the AV operation screen by touching
[Home]or[AV] respectively.
Changing the preinstalled
splash screen
You can change the splash screen to other
images preinstalled in this product.
1 Touch the HOME button to display the
Top menu screen.
2 Touch the following keys in the following order.
The “Theme” screen appears.
3 Touch [Splash Screen].
4 Touch the item you want to set.
! Preset images:
Selects the desired preset splash screen
image.
(custom):
!
Displays the splash screen image imported
from the external device.
= For details, refer to Changing to the splash
screen stored on the USB storage device on
page 98.
The “Theme” screen appears.
3 Touch [Clock].
p You can also change the screen for settings
by touching [Illumination], [Theme]or
[Background] on this screen.
98
En
Changing to the splash screen
stored on the USB storage device
You can change the splash screen to other
images imported from the USB storage device.
Page 99

Theme menu
CAUTION
Do not turn off the engine while importing an
image from the USB storage device.
1 Touch the HOME button to display the
Top menu screen.
2 Touch the following keys in the following order.
The “Theme” screen appears.
3 Touch [Splash Screen].
4 Touch the following key.
Displays the list of the splash screens
stored on the USB storage device.
5 Touch the desired external device.
Chapter
20
Theme menu
6 Touch the image to use as the splash
screen from the list.
The image is set as the splash screen.
p You can delete the imported image and re-
store the setting on the splash screen to the
default by touching and holding the custom
key.
En
99
Page 100

Chapter
21
Setting up the video player
Displaying your DivX VOD
registration code
If you want to play DivX VOD (video on demand) content on this product, you must first
register this product with your DivX VOD content provider. You do this by generating a DivX
VOD registration code, which you submit to
your provider.
p Keep a record of the code as you will need
it when you register this product to the
DivX VOD provider.
1 Touch the HOME button to display the
Top menu screen.
2 Touch the following keys in the following order.
The “Video Setup” screen appears.
3 Touch [DivX Setup].
4 Touch [DivX® VOD].
The “DivX® VOD” screen appears.
p If a registration code has already been acti-
vated, it cannot be displayed.
5 Touch [Registration Code].
Your 10-digit registration code is displayed.
p Make a note of the code as you will need it
when you register with a DivX VOD
provider.
2 Touch the following keys in the following order.
The “Video Setup” screen appears.
3 Touch [DivX Setup].
4 Touch [DivX® VOD].
The “DivX® VOD” screen appears.
5 Touch [Deregistration Code].
Your eight-digit deregistration code is displayed.
p Make a note of the code as you will need it
when you deregister from a DivX VOD
provider.
Setting the video signal for
the rear view camera
When you connect a rear view camera to this
product, select the suitable video signal setting.
p You can operate this function only for the
video signal input into the AV input.
1 Touch the HOME button to display the
Top menu screen.
2 Touch the following keys in the following order.
Displaying your DivX VOD
deregistration code
A registration code registered with a deregistration code can be deleted.
1 Touch the HOME button to display the
Top menu screen.
100
En
The “Video Setup” screen appears.
3 Touch [Video Signal Setting].
4 Touch [Camera].
The pop-up menu appears.
5 Touch the item you want to set.
! Auto (default):
 Loading...