


壁掛けユニット
Wall mount unit Support mural Wandmontage-einheit Wandmontage-element
B-PDSP-W
|
|
|
|
|
|
Operating Instructions Mode d’emploi Bedienungsanleitung Gebruiksaanwijzing
取扱説明書および製品に記されている注意事項には、損害の レベルや内容を示す絵表示が付けられていることがあります。 それら絵表示の意味は以下のとおりです。
警告
ます。


■ 
PDSP-1
PDSP-1
2
禁止
経年変化で強度が不足することがあります。5
2
Ja
■
x1
x2
M8 x15mm x6
M5 x 40mm x2
x1
x1
x1
■
取り付けは、次の1 7
1
ターの合計質量は約58kg
2
(
|
|
|
3
6
3
Ja

4
M5×40mm 2mm 3mm
M5 x 40mm
5
6 |
|
4 |
|
M8×15mm 1 3 6
1
M8×15mm 3
2
PDSP-1
7 |
|
M5×40mm |
2 |
4
Ja
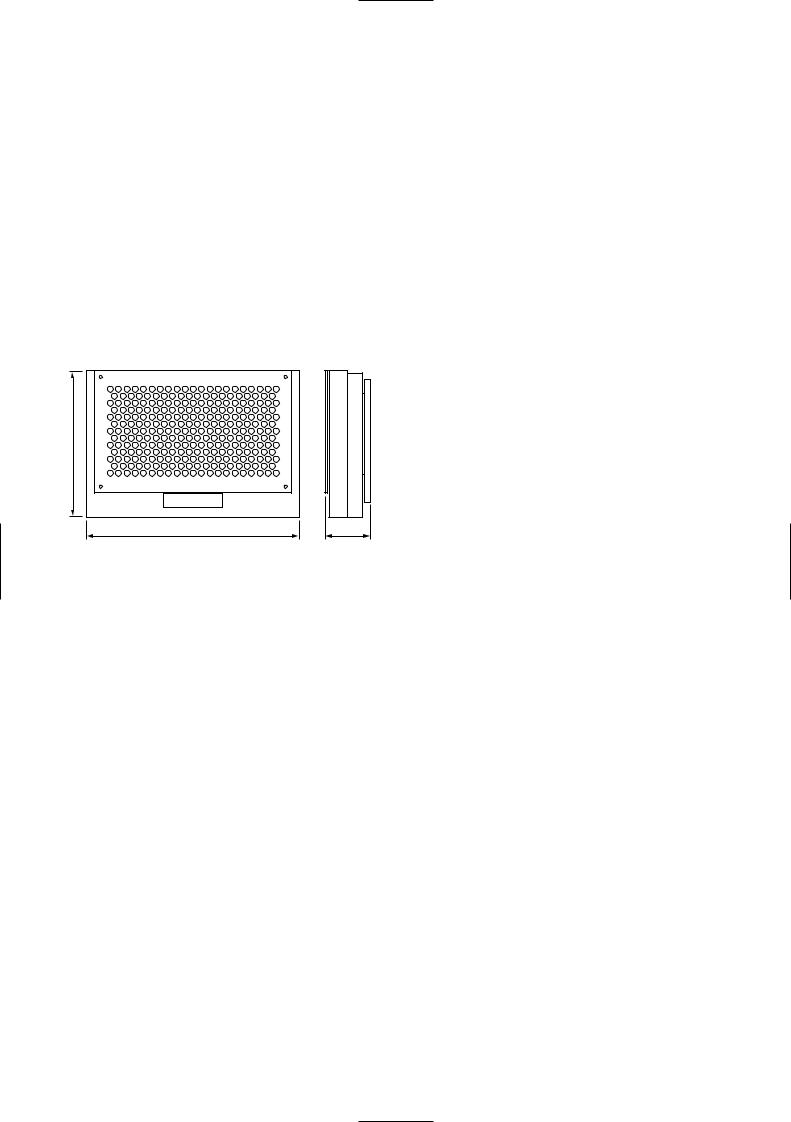
■
630 x 550 x 33 mm8.0kg
■
mm
640
963 |
178 |
2003
5
Ja

Thank you for buying Pioneer’s product. Please read through the Operating Instructions to learn how to operate your model safely and properly. Please be advised to keep the Operating Instructions in your place for future reference.
[Item to Be Handled by Professional Installation
Workers]
Pioneer is not liable for any damages resulting from improper assembling, installation, or use other than specified in the instructions, or accidental damages due to modification or natural disasters.
Installation Work
÷This product is sold on the premise that it will be installed by a professional with sufficient technique and skills. Make sure to request installation and mounting from a professional construction company or your sales agent.
÷Pioneer shall not be liable in any way for any accidents or damage resulting from improper installation or mounting, incorrect usage, remodeling, natural disasters or the like.
7 Cautions
This Wall Mount Unit is exclusively designed for the Digital Sound Projector PDSP-1.
Do not install or modify the product other than specified. Do not use this product for any other purpose.
Installation Location
•Do not neglect to verify the structure’s suitability and safety of the installation location before starting the installation work.
•Please be advised to consult with professional installation workers in the case the wall is not sufficiently strong to support the unit and the main projector, or in the case any supplemental material should be needed to support the unit.
•Make sure to install this Wall Mount Unit in a location that can sufficiently support the combined weight of the product to be attached and Wall Mount Unit.
•Do not install the Wall Mount Unit in a location where any person may easily hang on to or lean over the Stand, or where the Wall Mount Unit may be affected by vibration or shock.
•Do not install this unit outdoors, at a hot spring, or near the beach.
•Install this unit away from direct sunlight or extremely high temperatures.
Assembling and Installation
•Before assembling and installation, make sure the main power switch on the main body of PDSP-1 is turned off, and remove the power plug from the wall outlet.
•Please be advised that two persons or more should be in charge of the work for safety purposes.
•Tighten the screws firmly in accordance with the installation steps to prevent damages and accidents such as a violent fall after installation.
•Do not forget to make sure the screws on each part are tightened before installation. If they are too loose, an accident may occur such as the falling of the unit.
How to Use the Wall Mount Unit
•Do not ride or hang on to the Wall Mount Unit. Be careful to prevent children from doing such activities with the Wall Mount Unit. If the Wall Mount Unit falls down or breaks, it can be dangerous and may cause injury.
Please be advised to immediately contact a professional installation worker when any abnormality is found or any part is out of order.
This unit may become unable to support the main projector due to aging, depending on the installation environment, after being used for a long time. Ask a professional installation worker to check the unit about every five years, making sure the unit can be used without problems.
6
En

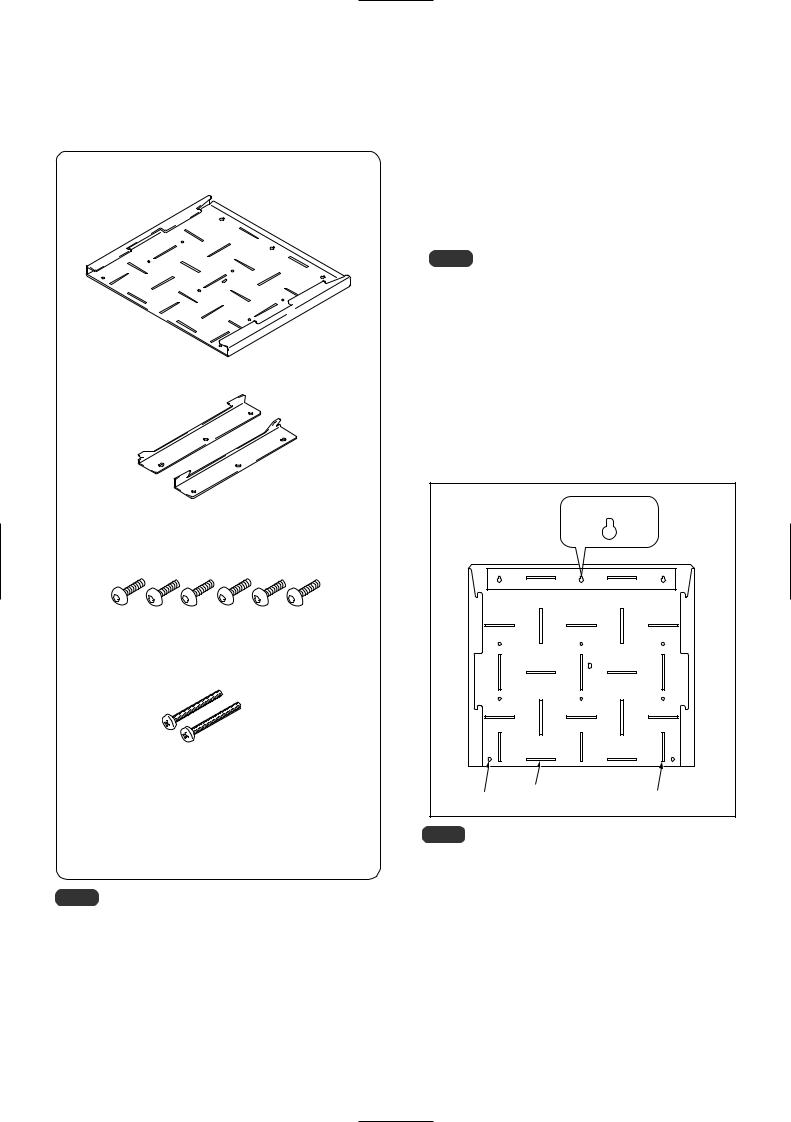
7 Verify That You Have All
the Parts
Verify you have the enclosed parts for the Wall Mount Unit before installation.
Wall mount metal fitting x 1
Installation metal fitting x 2
Hexagon socket head cap bolt (M8 x 15mm) x 6
Phillips binder screw (M5 x 40mm) x 2
Hexagonal wrench x 1
Wall mount metal fitting (actual size) pattern x 1 Operating Instructions (this manual) x 1
Caution
This product does not include screws to fix the wall mount metal fitting onto the wall.
7 Installation Steps
Follow procedures 1-7 to install the Wall Mount Unit and to attach the Digital Sound Projector.
1 Determining the installation location on the wall.
Make sure the foundation around the screw positions under the wall mount metal fitting has sufficient strength, using the actual size of the pattern, to determine the installation location of the Unit.
Caution
The combined weight of the Wall Mount Unit and the Digital Sound Projector to be attached is about 58 kg. Before installation, do not forget to make sure that the installation location on the wall has sufficient strength. If the wall’s foundation is not strong enough, change the installation location, or reinforce the installation location.
2 Hook the wall mount metal fitting onto the wall.
Insert a screw into the tentative screw hole, and tighten it so the wall mount metal fitting is level, then hook the wall mount metal fitting onto the screw.
(Hook the wall mount metal fitting onto the screw in the center so you can easily make sure it is level.)
Tentative screw hole
Round hole |
Horizontal slit |
Vertical slit |
Caution
This product does not include screws to fix the wall mount metal fitting onto the wall. Use screws suitable for the strength and material of the wall.
3 Attach the wall mount metal fitting onto the wall.
Tighten six or more screws at the positions of the vertical slits, horizontal slits, or round holes to stabilize the installation of the unit. Screws must be tightened symmetrically on both sides and evenly onto the entire surface.
7
En
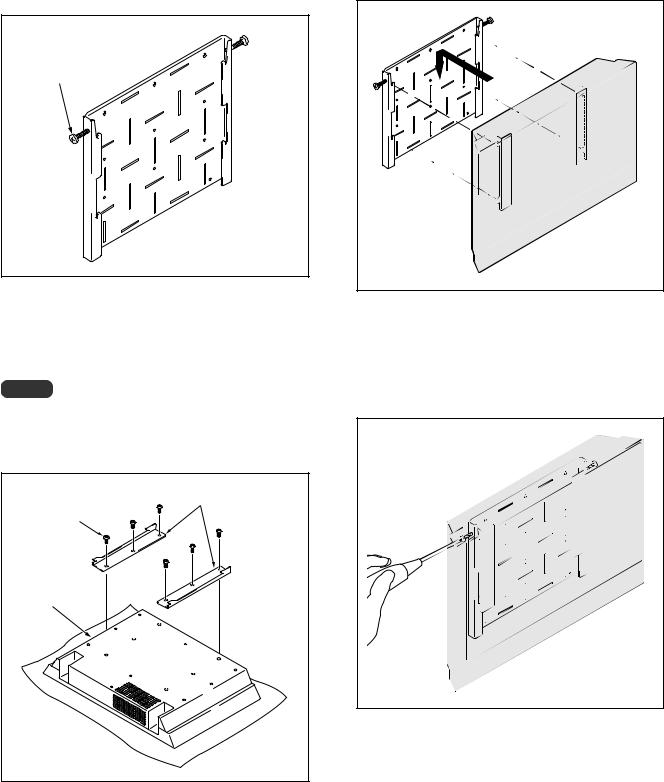
4 Tentatively screw the wall mount metal fitting.
Using the Phillips binder screws (M5 x 40 mm), tentatively attach the wall mount metal fitting by screwing in at least 2 mm – 3 mm, as the product is screwed onto the wall mount metal fitting.
6 Attach the Digital Sound Projector to the metal fitting fixed to the wall.
Make sure to firmly insert the installation metal fittings into the four slots on the wall mount metal fitting, to hang the hooks of the installation metal fittings.
Phillips binder screw (M5 x 40 mm)
5 Attaching the installation metal fittings to the Digital Sound Projector.
Tighten the six places 1 – 3 in order, using the bolts (M8 x 15 mm).
Caution
The main body of the product, especially the speaker section, is a very delicate sound device. Be careful not to damage or impair the main body; for example, put a sheet under the main body for safety.
1 |
Metal fittings |
Bolt
(M8 x 15 mm) |
3 |
|
|
|
2 |
PDSP-1
8
7Screwing the Digital Sound Projector to the wall mount metal fitting so the
Projector will not be moved.
Using a Phillips screwdriver, tighten the Phillips binder screws (M5 x 40 mm) on the two places of the Projector.
En
 Loading...